

Page 1

Version: V1.00.000
Revised Date: 2017-11-01
Product Model: HTT
Product Name: Vehicle VIN Checking Terminal
Company Name: LAUNCH TECH. CO., LTD.
Company Address: LAUNCH TECH. CO., LTD. Launch Industrial Park,
North of Wuhe Avenue, Banxuegang, Bantian, Longgang, Shenzhen,
China
Page 2

Vehicle VIN Checking Terminal
Copyright Information
Copyright © 2017 LAUNCH TECH. CO., LTD. All rights reserved. No
part of this publication may be reproduced, stored in a retrieval system,
or transmitted in any form or by any means, electronic, mechanical,
photocopying, recording or otherwise, without the prior written permission
of LAUNCH. The information contained herein is designed only for the use
of this unit. LAUNCH is not responsible for any use of this information as
applied to other units.
Neither LAUNCH nor its affiliates shall be liable to the purchaser of this
unit or third parties for damages, losses, costs, or expenses incurred by
purchaser or third parties as a result of: Accident, misuse, or abuse of
this unit, or unauthorized modications, repairs, or alterations to this unit,
or failure to strictly comply with LAUNCH operating and maintenance
instructions. LAUNCH shall not be liable for any damages or problems
arising from the use of any options or any consumable products other than
those designated as Original LAUNCH Products or LAUNCH Approved
Products by LAUNCH.
Trademark Information
LAUNCH is a registered trademark of LAUNCH TECH CO., LTD. (LAUNCH)
in China and other countries. All other LAUNCH trademarks, service marks,
domain names, logos, and company names referred to in this manual are
either trademarks, registered trademarks, service marks, domain names,
logos, company names of or are otherwise the property of LAUNCH or its
afliates. In countries where any of the LAUNCH trademarks, service marks,
domain names, logos and company names are not registered, LAUNCH
claims other rights associated with unregistered trademarks, service marks,
domain names, logos, and company names. Other products or company
names referred to in this manual may be trademarks of their respective
owners. You may not use any trademark, service mark, domain name, logo,
or company name of LAUNCH or any third party without permission from
the owner of the applicable trademark, service mark, domain name, logo, or
company name. You may contact LAUNCH by visiting the website at www.
cnlaunch.com, or writing to LAUNCH TECH. CO., LTD., Launch Industrial
Park, North of Wuhe Avenue, Banxuegang, Bantian, Longgang, Shenzhen,
Guangdong, P.R.China, to request written permission to use Materials on
this manual for purposes or for all other questions relating to this manual.
II
Page 3

Vehicle VIN Checking Terminal
Precuations on using e-VIN
To avoid personal injury, property damage, or accidental damage to the
product, read all of the information in this section before using the product.
• Never collide, throw, or puncture e-VIN, and avoid falling, extruding and
bending it.
• Do not use e-VIN in exceptionally cold or hot, dusty, damp or dry
environments.
• Do not insert foreign objects into or place heavy objects on your device.
Sensitive components inside might cause damage.
• If the battery remains unused for a long period of time or the battery is
completely discharged, it is normal that the tool will not power on while
being charged. Please charge it for a period of 5 minutes and then turn it
on.
• DANGER: Do not attempt to replace the internal rechargeable lithium
battery. Contact the dealer for factory replacement.
• CAUTION: Please use the included power adaptor to charge your e-VIN.
No responsibility can be assumed for any damage or loss caused as a
result of using power adaptors other than the one supplied.
• Please make sure the ignition key is Off while plugging/unplugging the
diagnostic cable into/from the vehicle’s DLC.
• While the e-VIN keeps unused, please set the handset in standby or OFF
mode to conserve the battery power.
• After inspection, remember to disconnect the diagnostic cable from the
vehicle.
III
Page 4

Vehicle VIN Checking Terminal
Table of Contents
1 Foreword ................................................................................................... 1
1.1 Introduction ............................................................................................. 1
1.2 Knowledge of e-VIN................................................................................ 1
1.3 Technical Parameters ............................................................................. 5
2 Wi-Fi Setting .............................................................................................. 6
2.1 Connect to a Wi-Fi network .................................................................... 6
2.2 Disconnect from a Wi-Fi network............................................................ 6
3 Preparation & Connection ......................................................................... 7
3.1 Preparation ............................................................................................. 7
3.2 Connections............................................................................................ 7
4 Initial Use ................................................................................................. 10
4.1 Startup & Login ..................................................................................... 10
4.2 Job Menu .............................................................................................. 13
4.3 Update .................................................................................................. 13
5 Start VIN Inspection................................................................................. 15
5.1 Auto Detect ........................................................................................... 16
5.2 Manually Detect .................................................................................... 18
6 Check Data .............................................................................................. 20
7 Settings.................................................................................................... 21
7.1 My Information ...................................................................................... 21
7.2 Change Password ................................................................................ 21
7.3 Activate Device ..................................................................................... 22
7.4 My Device ............................................................................................. 22
7.5 Firmware Fix ......................................................................................... 22
7.6 Print Information ................................................................................... 22
7.7 Launch Printer Connection ................................................................... 23
7.8 About .................................................................................................... 24
7.9 Exit from the current account/Login ...................................................... 24
8 Wi-Fi Printer (Optinal) .............................................................................. 25
8.1 Introduction ........................................................................................... 25
8.2 Thermal paper loading .......................................................................... 26
8.3 Using the rechargeable battery ............................................................ 28
8.4 Wi-Fi Connections ................................................................................ 29
8.5 Print Test Result ................................................................................... 30
IV
Page 5
Vehicle VIN Checking Terminal
1 Foreword
1.1 Introduction
e-VIN Vehicle VIN Inspection Terminal is a professional law enforcement
equipment, which has been developed and designed by LAUNCH for
Police/ forensic research institute to perform VIN enquiries. e-VIN can
read all the electronically embedded Vehicle Identication Numbers (VINs)
from all the parts in modern vehicles. The results can be checked and
compared, to see whether or not the VIN codes are registered as stolen.
The e-VIN will contribute to the investigation of stolen and cloned vehicles,
and minimize the trade in stolen parts.
1.2 Knowledge of e-VIN
1
Page 6

Vehicle VIN Checking Terminal
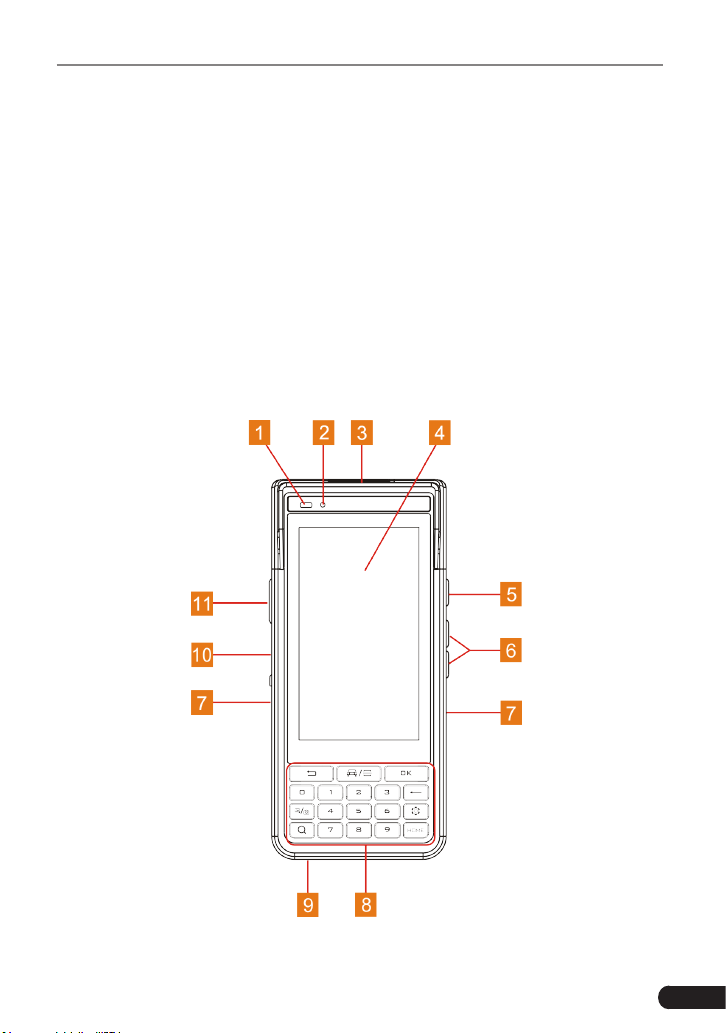
Fig. 1-1 Front View
No. Name Description
1 Ambient light sensor
2 Charging LED
Sockt for diagnostic
3
cable
Read means Charging, and Green means
Fully Charged.
For connecting the DB15 female terminal
of the diagnostic cable.
4 Screen For indicating the test results.
• In Off mode, press and hold it for 3
seconds to turn the handset on.
• In On mode:
• Press it to activate the LCD if the
LCD is off.
Power/Screen lock
5
button
• Press it to turn off the LCD if the
LCD lights up.
• Press and hold it for 3 seconds
and choose "Shut down" from the
pulldown list to turn it off.
• Press and hold it for 10 seconds to
perform forced shutdown.
• To adjust the volume.
6 Volume +/- buttons
• Press and hold the [Power] and
[Volume -] buttons at the same time to
take a screenshot.
7 Wrist strap
2
Page 7
Vehicle VIN Checking Terminal
Keypad
8
9 Microphone
To execute the command and input the
characters.
To return to the previous screen.
A quick dial to start the VIN Inspection
APK.
To conrm an action/operation.
• Delete one character before the cursor
with short press.
• Delete all characters within one line
with long press.
Quick access to the system setting.
• To navigate to Android’s Home screen
with short press.
• To open the application list manager
with long press.
• To capture the current screen with
short press.
• To launch camera with long press.
To retrieve it in search engine.
10 USB port
PTT(Push-To-Talk)
11
Key
To connect the included power adaptor for
charging the handset or connect to the PC
for data transmission.
Also known as press-to-transmit, is a
method of having conversations or talking
on half-duplex communication lines.It is
currently disabled and reserved for future
use.
3
Page 8

Vehicle VIN Checking Terminal
Fig. 1-3 Rear View
No. Name Description
It is used to quickly scan the VIN (Vehicle
12 Laser scanner
Identification Number) of the tested vehicle.
It is currently disabled and reserved for future
use.
13 Camera Flash
14 Camera
15 Battery
4
Page 9

Vehicle VIN Checking Terminal
NFC(Near Field
16
Communication)
module
As an optional module, it is currently disabled
and reserved for future use.
1.3 Technical Parameters
Operating System Android 7.0
CPU 8-Core processor
ROM 16GB
RAM 2GB
Screen 5 inch capacitive touch screen with a resolution
of 1280*720 pixels
Battery 4680mAh fast recharging supported
Camera Rear-facing 13 MP camera
Scan Laser Supported (It is currently disabled and reserved
for future use.)
NFC Supported (It is currently disabled and reserved
for future use.)
Wi-Fi 802.11a/b/g/n/ac
Rated Voltage 3.8V
Working Temp. -10℃ ~ 50
Storage Temp. -10℃ ~ 45
℃
℃
5
Page 10

Vehicle VIN Checking Terminal
2 Wi-Fi Setting
Note: Once WLAN is set as ON, e-VIN will consume more power. While
WLAN keeps unused, please turn it off to conserve battery power.
e-VIN has built-in Wi-Fi that can be used to get online. Once you’re online,
you can register your e-VIN, update the diagnostic APK, browse the Internet,
get apps and send email on your network.
2.1 Connect to a Wi-Fi network
1. On the home screen, tap Settings -> WLAN.
2. Tap or slide the Wi-Fi switch to ON, e-VIN starts searching for all
available wireless LANs.
3. Choose the desired Wi-Fi access point / network:
• If the network you chose is open, you can connect directly.
• If the selected network is encrypted, you have to enter the right
security key (network password).
Once it is connected successfully, tap the Wi-Fi network from the list to view
its name, link speed, security type, IP address etc.
When this tool is in range, it will connect to the previously linked network
automatically.
2.2 Disconnect from a Wi-Fi network
1. On the home screen, tap Settings -> WLAN.
2. Tap the network with a Connected status, then tap “Disconnect”.
6
Page 11
Vehicle VIN Checking Terminal
3 Preparation & Connection
3.1 Preparation
1. Turn the ignition key on.
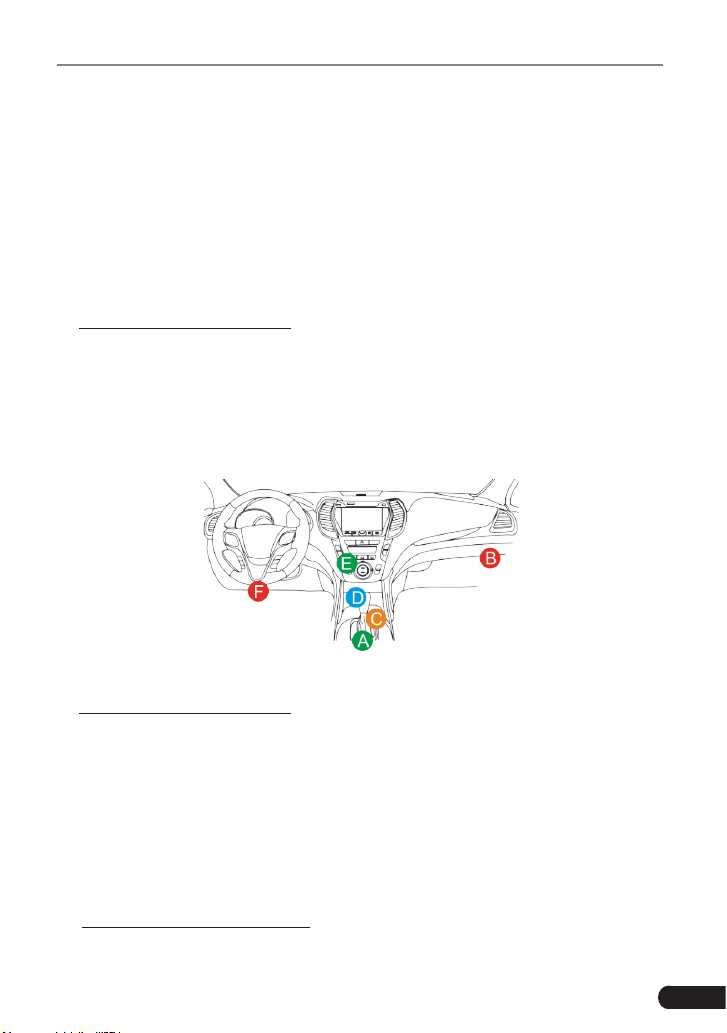
2. Locate the vehicle’s DLC socket: The DLC (Data Link Connector) is
typically a standard 16-pin connector where diagnostic code readers
interface with the vehicle’s on-board computer.
A. For Passenger Vehicles,
The DLC is usually located 12 inches from the center of the instrument
panel (dash), under or around the driver’s side (See Fig. 3-1 for DLC
location). If Data Link Connector is not located under dashboard, a label
should be there telling location. For some Asian and European vehicles,
the DLC is located behind the ashtray and the ashtray must be removed
to access the connector.
Fig. 3-1
B. For Passenger Vehicles,
The DLC is usually located in driver’s cab.
If the DLC cannot be found, refer to the vehicle’s service manual for the
location.
3.2 Connections
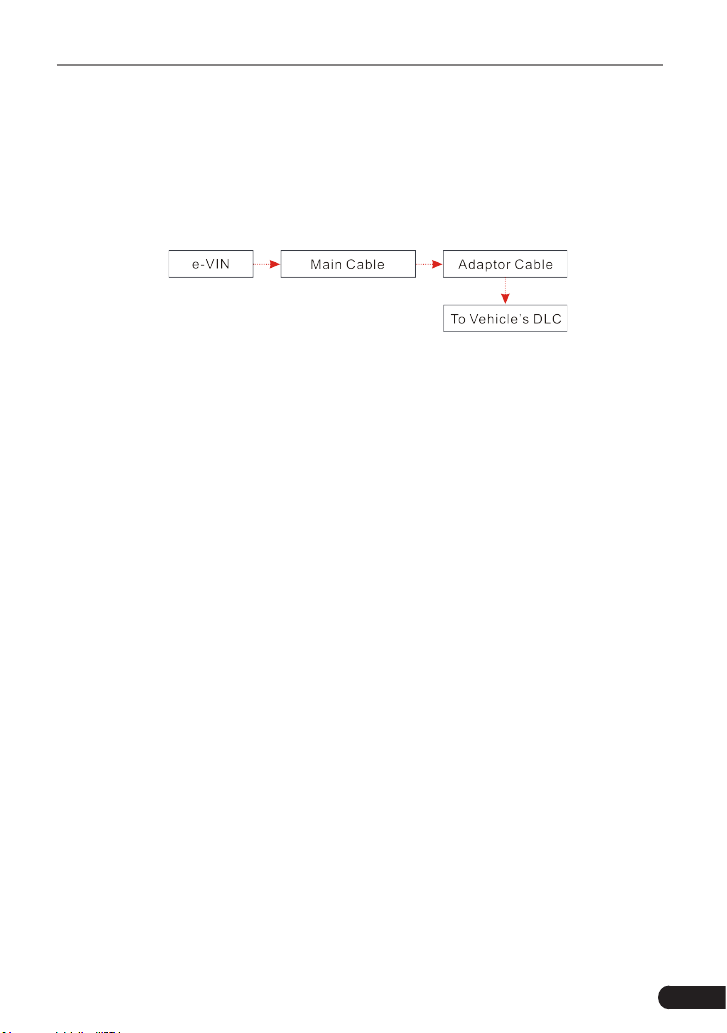
The method used to connect the main cable to a vehicle’s DLC depends on
the vehicle’s conguration as follows:
A. OBD II Vehicle Connection: Plug one end of the main cable into the
vehicle’s DLC, and the other end into the diagnostic socket of the e-VIN,
7
Page 12
Vehicle VIN Checking Terminal
and then tighten the captive screws.
B. Non-OBD II Vehicle Connection: For vehicles with non-OBD II diagnostic
socket, a non-16pin adaptor cable is required.
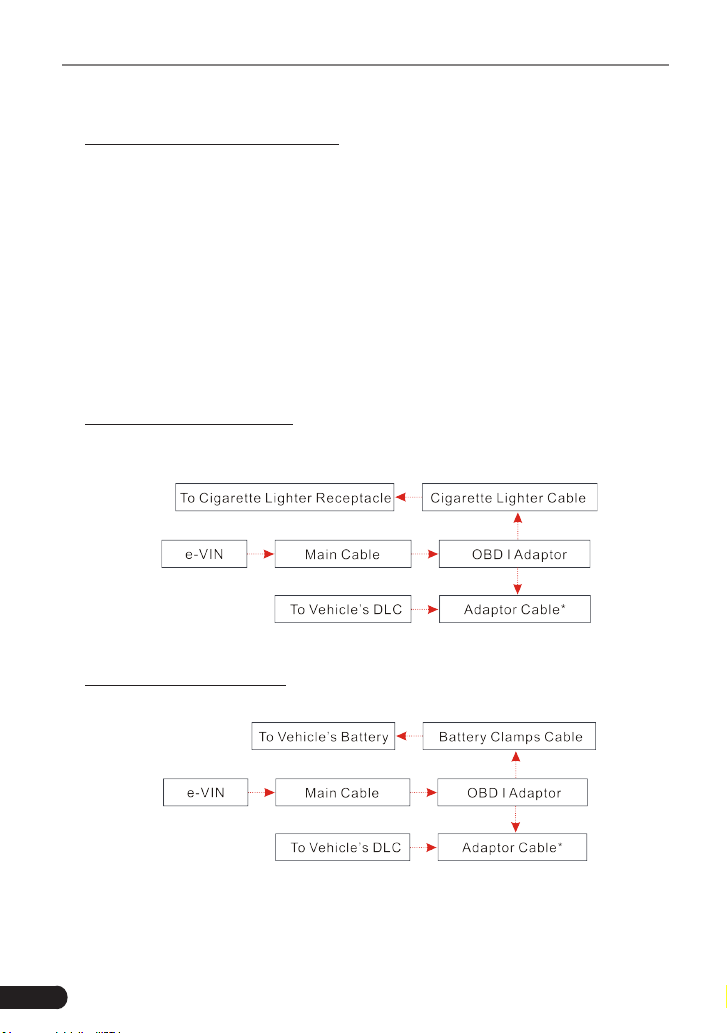
a). For non-OBDII Passenger Vehicle, proceed as follows:
1. Select the non-16pin adaptor cable corresponding to the tested
vehicle.
2. Plug one end of the main cable into the diagnostic socket of the e-VIN,
and the other end to into the OBD I adaptor.
3. Plug the non-16pin end of the adaptor cable into the DLC socket,
and the other end to the OBD I adaptor, and then tighten the captive
screws.
4. To supply power to OBD I adaptor from:
A. Cigarette Lighter Cable: Connect one end of the cigarette lighter cable
to vehicle’s cigarette lighter receptacle, and the other end to the power
jack of OBD I adaptor.
Fig. 3-2
B. Battery Clamps Cable: Connect one end of the battery clamps cable
to vehicle’s battery, and the other end to the power jack of OBD I adaptor.
Fig. 3-3
b). For non-OBDII Commercial Vehicles, proceed as follows:
8
Page 13
Vehicle VIN Checking Terminal
1. Select the non-16pin adaptor cable corresponding to the tested
vehicle.
2. Plug the non-16pin end of the adaptor cable into the DLC socket, and
the other end to the main cable.
3. Connect the other end of the main cable to the DB15 diagnostic
socket of the e-VIN, and then tighten the captive screws.
Fig. 3-4
9
Page 14

Vehicle VIN Checking Terminal
4 Initial Use
Notes:
• Before starting inspecting vehicle VIN, you have to experience a online
product registration and activation, which requires a stable network
connection.
• Currently e-VIN is not allowed to have multiple accounts. Account
swtiching will be available soon in the coming version.
4.1 Startup & Login
1. Press [Power] button to turn your e-VIN on.
2. On the home screen, tap "e-VIN" to run it, a screen similar to the
following appears:
(If you are a new user, follow A to proceed.)
(If you have registered to be a member, go to B to login the system directly.)
(In case you forgot password, refer to C to reset a new password.)
A. If you are a new user, proceed as follows:
10
Fig. 4-1
Page 15

Vehicle VIN Checking Terminal
1. Create App Account: Tap “Register” to enter registration page. See Fig.
4-2.
Fig. 4-2
In Fig. 4-2, ll in the information in each eld (Items with ! must be lled).
After inputting, tap “Next” to go to the next step.
2. Activate Device: In Fig. 4-3, input the Product Serial Number and
Activation Code, and then tap “Activate” to activate it.
Fig. 4-3
Note: The Product Serial Number and Activation Code can be found in the included
password envelope.
11
Page 16

Vehicle VIN Checking Terminal
Product S/N
Activation Code
Fig. 4-4
3
. Update software: After the device has been activated, the system will
automatically navigate to the update center once newer software are
detected. Tap “Update” to start downloading and installing it.
Notes:
• All software is updated from time to time. To enjoy more better service and
functions, you are strongly suggested to keep synchronized with the latest
version on regular basis.
• When downloading the diagnostic software or checking for updates it is
important to make sure the handset has a strong Wi-Fi connection.
B. If you have registered to be a member, input your name and password,
and then tap the “Login” button in Fig. 4-1 to enter the Job Menu directly.
Note: e-VIN has an auto-save function. Once the username and password are
correctly entered, the system will automatically store it. Next time you login the
system, you will not be asked to input the account manually.
C. If you forgot the password, tap “Retrieve password” in Fig. 4-1 and then
follow on-screen instructions to set a new password.
4. After logging in, the system will enter the Job Menu.
12
Page 17

Vehicle VIN Checking Terminal
Fig. 4-6
4.2 Job Menu
It mainly includes the following options.
Use the installed vehicle inspection software to decode the
Check VIN
Check Data To review and manage the inspection data.
current VIN and original VIN by automatically detecting or
manually selecting the vehicle model.
Update
Settings
To update the APK and all available vehicle inspection
software.
To manage personal information, change password,
activate device and congure Wi-Fi printer.
4.3 Update
Once some newer software is found, you may use this option to download it
and keep it synchronized with the latest version.
By default, all diagnostic software is selected. To deselect certain software,
tap “Unselect”, and then check the box next to vehicle model.
Tap “Update” to start downloading. It may take several minutes to nish it,
13
Page 18

Vehicle VIN Checking Terminal
please be patient to wait. To pause downloading, tap “Stop”. To resume it,
tap “Continue”. If network connection failure occurs, tap “Retry” to try again.
Once download is finished, the software packages will be installed
automatically.
14
Page 19

Vehicle VIN Checking Terminal
5 Start VIN Inspection
Notes:
• Before inspection, please make sure the e-VIN has a stable network
signal (Refer to Chapter 2 for details on how to make network setup).
• Carefully check the e-VIN is properly connected to the vehicle's DLC (For
details, see Chapter 3.2).
1. On the home screen, tap “e-VIN” to run the application.
2. Input the username and password, and then tap "Login" to navigate to
the Job menu.
3. Tap "Check VIN", a screen similar to the following appears:
Fig. 5-1
(
To perform a smart detection, tap "YES" and follow Chapter 5.1 to proceed.
Otherwise, tap "NO" to abort. In this case, proceed following Chapter 5.2.
)
15
Page 20

Vehicle VIN Checking Terminal
5.1 Auto Detect
Here we take "Focus" for example to demonstarte how to inspect a vehicle
VIN.
Note: Different vehicle models have different options and operation steps.
Tap "YES" in Fig. 5-1, a prompt message appears:
Fig. 5-2
Tap "OK" to switch the ignition key to ON, and the system starts accessing
the vehicle data.
Fig. 5-3
Tap "OK" to conrm and the screen displays as below:
16
Page 21

Vehicle VIN Checking Terminal
Fig. 5-4
Tap the desired manufature year of the vehicle to start decoding the vehicle
VIN.
a). Once decoding is complete and the current VIN is consistent with the
original one, the screen displays as follows:
Fig. 5-5
Tap "Complete" to end the inspection session.
To print the test result, tap "Print" (Befor printing, you need to congure
the Wi-Fi printer. For details, refer to Chapter 8.4).
17
Page 22
Vehicle VIN Checking Terminal
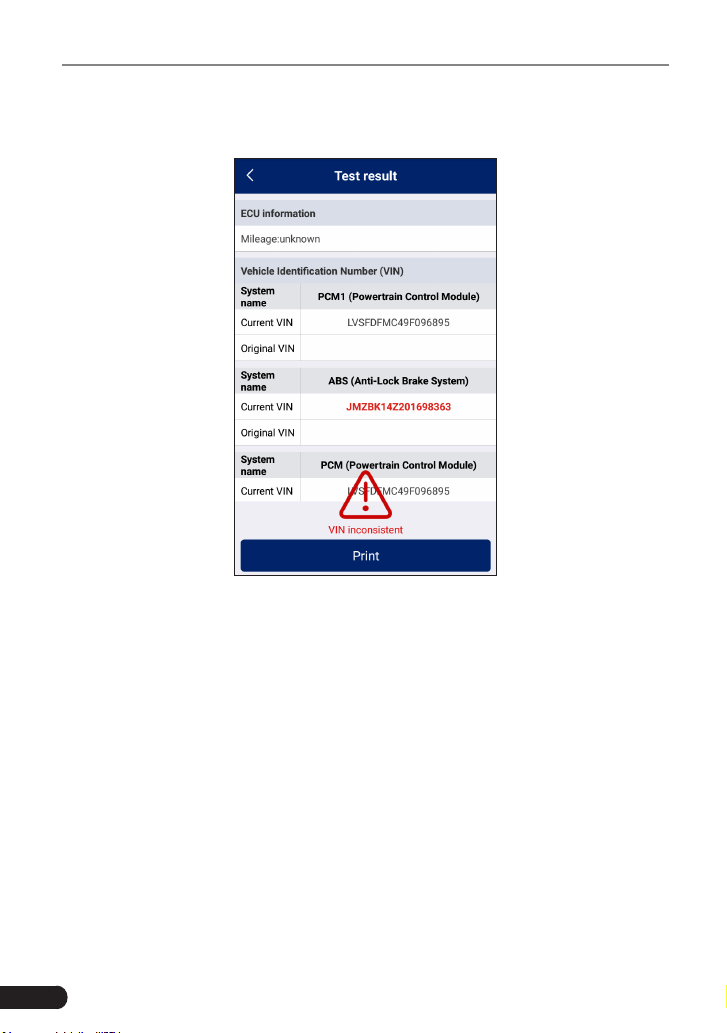
b). If the currently identified VIN is inconsistent with the original one, the
screen displays as follows:
Fig. 5-6
Tap "<" to return to the previous screen.
To print the test result, tap "Print" (Befor printing, you need to congure
the Wi-Fi printer. For details, refer to Chapter 8.4).
5.2 Manually Detect
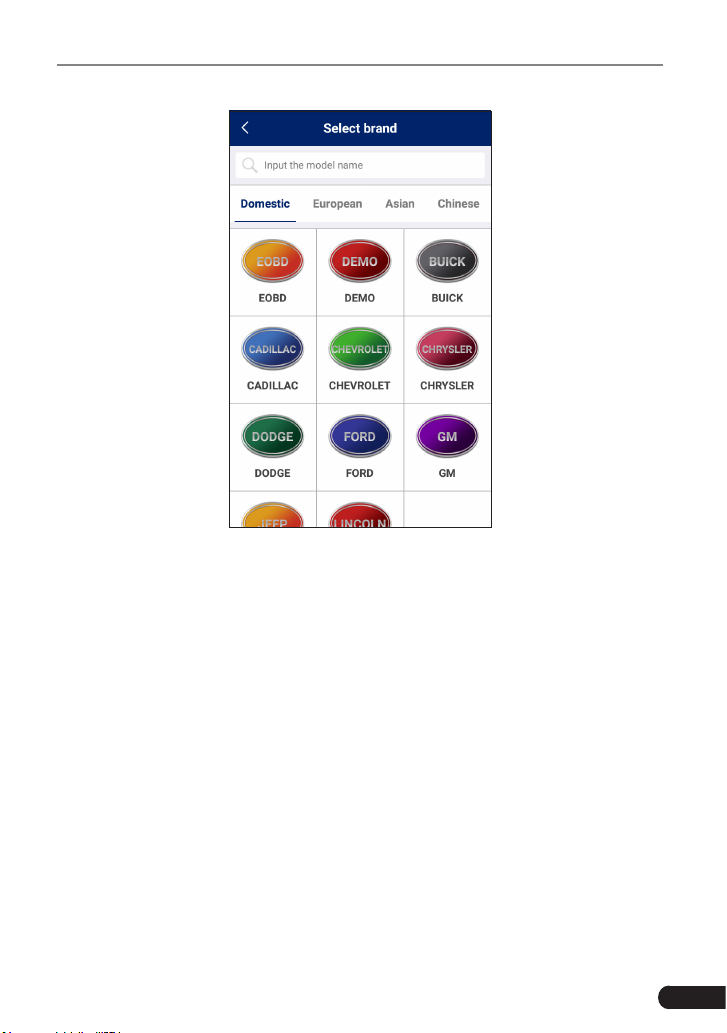
Tap "YES" in Fig. 5-1, the system navigates to the vehicle selection page.
See Fig. 5-7.
18
Page 23
Vehicle VIN Checking Terminal
Fig. 5-7
Tap different tabs to switch to corresponding vehicles.
Swipe the screen from the bottom to select the vehicle model.
Alternatively, you can also tap the search bar, and then use the virtual
keyboard to quickly locate the vehicle model. Input the desired vehicle
model to start searching.
After selecting the vehicle model, follow the on-screen instructions to start a
new inspection session.
19
Page 24
Vehicle VIN Checking Terminal
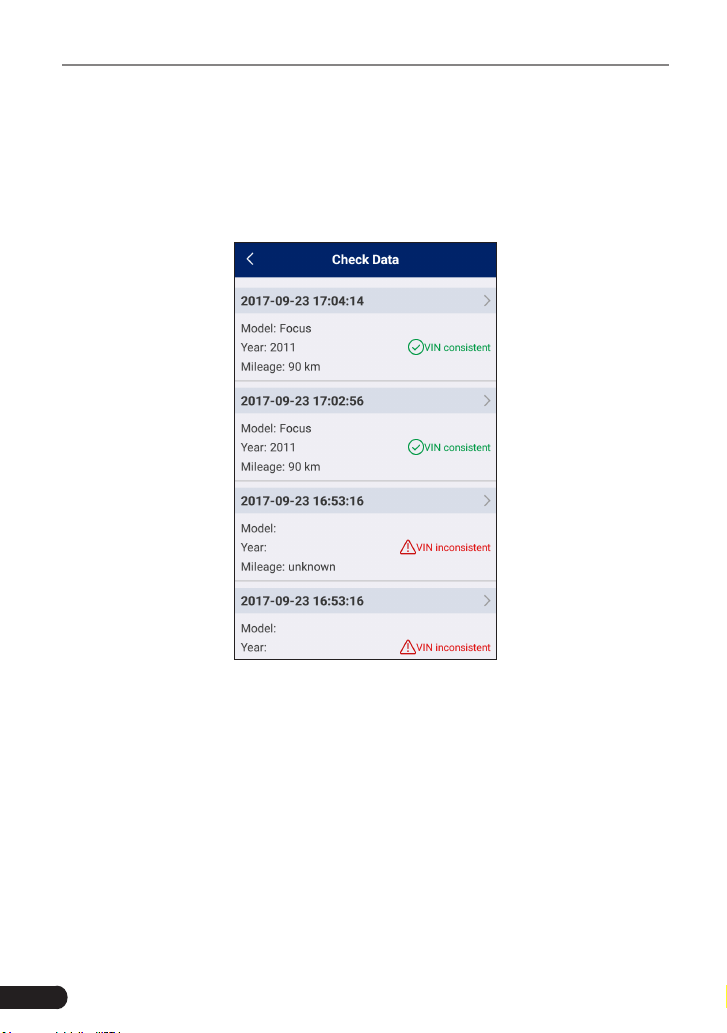
6 Check Data
This optin is designed to review and manage the inspection data.
Tap "Check Data", a screen similar to the following appears:
Fig. 6-1
All inspection data are listed in date sequence. Tap ">" on the right edge of
the screen to view the details.
20
Page 25

Vehicle VIN Checking Terminal
7 Settings
This option lets you manage personal information, change password,
activate device and congure Wi-Fi printer.
Fig. 7-1
7.1 My Information
This item enables you to view and modify personal information.
7.2 Change Password
This item allows you to modify your login password.
21
Page 26

Vehicle VIN Checking Terminal
7.3 Activate Device
This item lets you to activate the device.
Fig. 7-2
Input the Serial Number and Activation Code, and then tap “Activate” to activate
the device.
7.4 My Device
This option allows you to view the relevant information about the device.
7.5 Firmware Fix
Use this item to upgrade and x diagnostic rmware. During xing, please
do not cut power or switch to other interfaces.
7.6 Print Information
This option lets you dene your print information.
22
Page 27

Vehicle VIN Checking Terminal
Fig. 7-3
After inputting the print information, tap “Save” to save it.
Once a piece of print information is generated, the screen displays as following:
Fig. 7-4
• Tap “Edit” to modify the current print information.
• Tap “Delete” to clear the current print information
• Tap “+” to create a new print information. Once the information is
complete, tap the “Default print” to set it as the default print information.
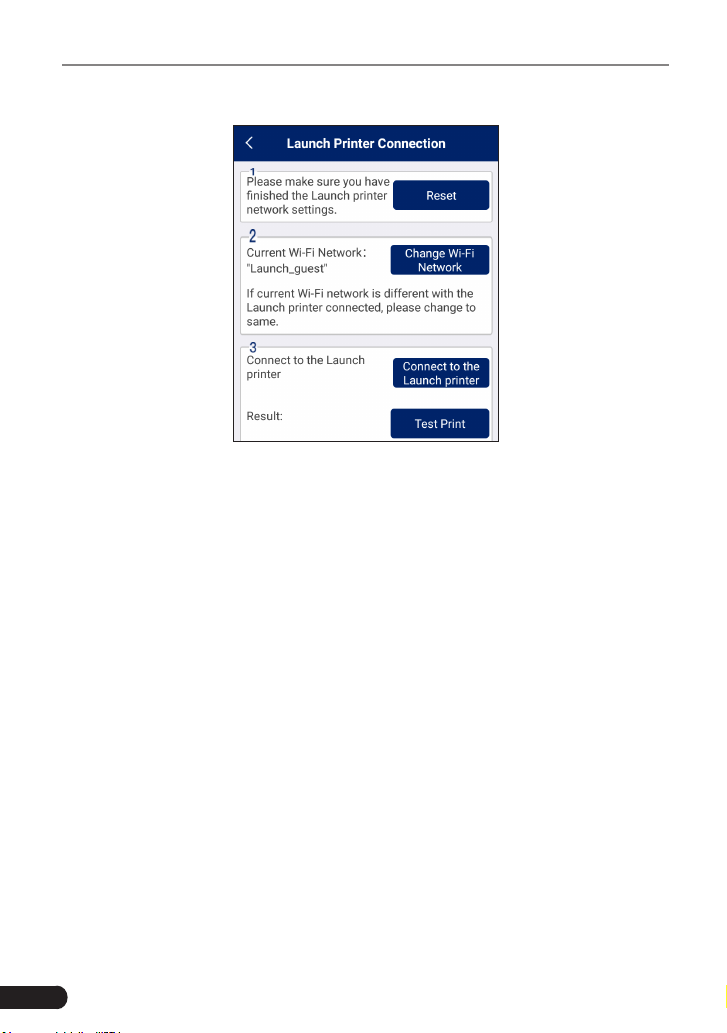
7.7 Launch Printer Connection
This option is designed to establish a wireless connection between e-VIN
and the Wi-Fi printer (sold separately) while performing printing operations.
23
Page 28
Vehicle VIN Checking Terminal
Fig. 7-5
Follow Chapter 8.4 to learn to how to congure Wi-Fi printer.
7.8 About
The software version information and disclaimer are included.
7.9 Exit from the current account/Login
To logout the current user ID, tap “Exit from current account”.
To login the system again, tap “Login”.
24
Page 29

Vehicle VIN Checking Terminal
8 Wi-Fi Printer (Optinal)
8
8.1 Introduction
This Wi-Fi printer is an optional accessory of a series of LAUNCH’s diagnostic
devices. The built-in Wi-Fi module enables you to easily print the real time test
results without connecting any USB cable.
Compared to conventional printers, it is smaller and easier to carry. Meanwhile,
being free of paper spindle, it is also simple and fast to load printing paper.
In addition to the included DC power adaptor, it can be powered alternatively
by the built-in rechargeable battery, which enables you to use it anytime and
anywhere.
Furthermore, this printer has auto-hibernate and auto power-off features. While
it does not perform printing operation, it will enter auto sleeping mode to save
power. If no activities are made within 30 minutes, it will power off automatically.
To start printing, users need to power it on again.
1
2
3
4
5
Fig. 8-1
6
7
25
Page 30

Vehicle VIN Checking Terminal
1) Side lock notch
2) Paper outlet
3) POWER button: Press and hold it for 2 seconds to turn it on/off.
4) MODE (ready) button: Press it to get the printer ready or switch it to
manual feed mode.
5) FEED (paper test) button: Press it to test whether thermal paper is
properly installed while the MODE indicator goes out.
6) CHARGE indicator
[Green]: Indicates the battery is fully charged.
[Red]: Indicates it is charging.
7) DC 9V adaptor jack
attempt to insert the cable into it.)
8) Rechargeable battery
(Note: The USB port next to it is disabled. Do not
8.2 Thermal paper loading
This Wi-Fi printer applies thermal paper roll with size of Φ30×57mm. Follow
the steps described as below to load it.
1. Hold the side notches on the front of the printer and lift it up to open the
cover.
2. Place the unpacked thermal paper into the compartment with its starting
end approaching to the paper outlet (refer to the gure shown as below).
Reversing paper direction will result in that no results will be printed
out.
Fig. 8-2
3. Pull out some printing paper and introduce it along the slot until it comes
26
Page 31

Vehicle VIN Checking Terminal
out of the paper outlet shown as below. Otherwise, paper can not be
fed.
Fig. 8-3
4. Close the paper cover and press it down until you hear a click.
Fig. 8-4
Notes:
A. After loading the paper, users need to check whether the paper can be fed
normally. For details, please refer to “How to print test results”.
B. If the printer keeps printing for a long time, the thermal matrixes (shown as
below) will overheat. To avoid a risk of burning injury, please do NOT touch the
matrixes.
27
Page 32

Vehicle VIN Checking Terminal
Fig. 8-5
Note: The printer applies the thermal paper, which should be prevented from being
heated before printing, otherwise, the paper would be no longer effective or printing
results disappear.
8.3 Using the rechargeable battery
The included rechargeable battery must be installed to ensure that the
printer can print the test result normally. This printer utilizes a 7.2V,
1200mAh rechargeable Lithium battery. Do the following steps to install and
charge it:
1. Align the latches on the bottom of the battery with the holes (shown as
right) on the battery compartment.
Fig. 8-6
2. Press the battery down until it is rmly tted.
28
Page 33

Vehicle VIN Checking Terminal
3. Press the [POWER] button for 2 seconds to turn it on. If the battery is
low, the [POWER] indicator blinks. In this case plug the included adaptor
into an outlet to charge it in time. While charging, the charge indicator
turns red. After charging is complete, the indicator will turn green. The
normal charging time is 2 hours.
Notes:
A. Please use the included DC adaptor and rechargeable battery only. We assume
no responsibilities for any personal injury or loss resulting from using other
adaptorsorrechargeablebatteriesnotspeciedinthisusermanual.
B. If the printer keeps unattended for a long period, please remove the rechargeable
battery.
8.4 Wi-Fi Connections
A. While used as a Wi-Fi peer-to-peer (P2P) printer, follow the steps
described below to make Wi-Fi connection:
Note:This mode congures theprinterasan auxiliary equipment andonlyworks
with Android diagnostic devices manufactured by LAUNCH.
1. Tap “Settings” on the home screen of e-VIN.
2. Tap “Wi-Fi” and slide its switch to ON.
3. Locate and tap the X-431PRINTER-XXX (XXX stands for 3 numbers).
Fig. 8-7
4. Input the identity password (default factory value is 12345678) and tap
“Connect”. “Connected” will appear on the screen once it is successful.
B. If used as a Wi-Fi hotspot printer, do the following to make Wi-Fi
connection and settings.
Note: This mode only applies to Wi-Fi LAN environment and works with e-VIN.
29
Page 34

Vehicle VIN Checking Terminal
OtherAndroid-baseddevicesequippedwiththisapponlycanperformthefunctions
of printer setting and printing test.
A. If it is the rst time you have operated this printer, please proceed the
following:
1. For initial use, you are suggested to reset the printer: Press and hold
[MODE] & [FEED] for 8 seconds, the following resetting command will be
printed out:
at + default = 1
ok
at + reboot = 1
rebooting...
2. Tap “Setting the Wi-Fi Printer now” to congure Wi-Fi printer.
Step 1: Connect the printer: Tap “Scan” to select the desired printer
hotspot named with X-431PRINTER-XXXX (XXXX stands for 4
characters), and then tap “Connect” to enter Step 2.
Step 2: Connect the Wi-Fi printer to LAN: Tap “Scan” to select the desired
local Wi-Fi network from the list, and type in the security password (If it is
an open network, password is not required), and then tap “Conrm”.
3. Once the Wi-Fi network of the printer is connected and the printer is
found, tap “Printing test” to test the printing.
If the printer is not found, please reset the printer to default factory
settings (refer to Step 3 for details) and check whether the current device
and the printer are on the same LAN.
B. If you have configured the Wi-Fi printer to the LAN, Tap “Set, starting
printing”:
a). If the local network remains as it is, tap “Conrm” directly to test the
printing.
b). If the local network changes, you have to reboot and recongure the
Wi-Fi printer.
8.5 Print Test Result
There are three indicators on the printer:
* [POWER]: Power indicator
[Red]: Indicates that the printer is on.
30
Page 35

Vehicle VIN Checking Terminal
[Red & blink]: Indicates that the battery is low.
[Off]: Indicates the printer is off.
* [MODE]: Ready indicator
[Green]: Indicates that the printer is ready.
[Green & blink]: Indicates that no thermal paper is loaded or the printer
runs out of paper.
[Off]: Indicates that the printer is switched to manual feed mode.
* [FEED]: Paper test indicator
[Green]: Indicates that users can press the [FEED] button to check
whether the paper is fed normally.
[Off]: Indicates that manual mode is off.
Press the [POWER] button for 2 seconds to turn it on, the [MODE] indicator
blinks and then remains steady on. Every time you load or change the
paper, press the [MODE] button to turn the indicator off first, and then
press [FEED] to test whether paper can be fed properly. When the [MODE]
indicator is on, it shows that the printer is ready.
If “print” appears on the bottom of the screen, it means that printing
operation can be done. Tap it to start printing.
Notes:
A. Never expose the apparatus to sunshine, rain, or water.
B. Make sure that this apparatus operates in the following conditions:
o
• Working temperature: -10
• Working humidity: 5
C~50oC
o
C RH~90oC RH.
31
Page 36

Vehicle VIN Checking Terminal
Warranty
THIS WARRANTY IS EXPRESSLY LIMITED TO PERSONS WHO
PURCHASE LAUNCH PRODUCTS FOR PURPOSES OF RESALE OR
USE IN THE ORDINARY COURSE OF THE BUYER’S BUSINESS.
LAUNCH electronic product is warranted against defects in materials and
workmanship for one year from date of delivery to the user.
This warranty does not cover any part that has been abused, altered, used
for a purpose other than for which it was intended, or used in a manner
inconsistent with instructions regarding use. The exclusive remedy for
any automotive meter found to be defective is repair or replacement, and
LAUNCH shall not be liable for any consequential or incidental damages.
Final determination of defects shall be made by LAUNCH in accordance
with procedures established by LAUNCH. No agent, employee, or
representative of LAUNCH has any authority to bind LAUNCH to any
affirmation, representation, or warranty concerning LAUNCH automotive
meters, except as stated herein.
Disclaimer
The above warranty is in lieu of any other warranty, expressed or implied,
including any warranty of merchantability or tness for a particular purpose.
Purchase Order
Replaceable and optional parts can be ordered directly from your LAUNCH
authorized tool supplier. Your order should include the following information:
Order quantity
Part number
Part name
Customer Service
Any question during the operation, please call 86-755-89366558.
If your unit requires repair service, return it to the manufacturer with a
copy of the sales receipt and a note describing the problem. If the unit is
determined to be in warranty, it will be repaired or replaced at no charge. If
the unit is determined to be out of warranty, it will be repaired for a nominal
service charge plus return freight. Send the unit pre-paid to:
Attn: Customer Service Department
LAUNCH TECH. CO., LTD.
32
Page 37

Vehicle VIN Checking Terminal
Launch Industrial Park,
North of Wuhe Avenue,
Banxuegang, Bantian,
Longgang, Shenzhen, Guangdong
P.R.China, 518129
Launch website: http://www.cnlaunch.com
http://www.golo365.com
Statement:
All information, specifications, and illustrations in this manual are based
on the latest information available at the time of product release. Launch
reserves the right to make changes at any time without notice.
33
Page 38

FCC Warning:
The SAR limit of USA (FCC) is 1.6 W/kg averaged over one gram of tissue.
Device types has also been tested against this SAR limit. The Max SAR is
0.28W/kg.
This device complies with part 15 of the FCC Rules. Operation is subject to the
following two conditions: (1) This device may not cause harmful interference, and (2)
this device must accept any interference received, including interference that may
cause undesired operation.
Any Changes or modifications not expressly approved by the party responsible for
compliance could void the user's authority to operate the equipment.
This equipment has been tested and found to comply with the limits for a Class B
digital device, pursuant to part 15 of the FCC Rules. These limits are designed to
provide reasonable protection against harmful interference in a residential
installation. This equipment generates uses and can radiate radio frequency energy
and, if not installed and used in accordance with the instructions, may cause harmful
interference to radio communications. However, there is no guarantee that
interference will not occur in a particular installation. If this equipment does cause
harmful interference to radio or television reception, which can be determined by
turning the equipment off and on, the user is encouraged to try to correct the
interference by one or more of the following measures:
-Reorient or relocate the receiving antenna.
-Increase the separation between the equipment and receiver.
-Connect the equipment into an outlet on a circuit different from that to which the
receiver is connected.
-Consult the dealer or an experienced radio/TV technician for help.
The device has been evaluated to meet general RF exposure requirement.
To maintain compliance with FCC’s RF exposure guidelines, this equipment should
be installed and operated with a minimum distance of 20cm between the radiator and
your body.
For 5G frequency band, operations in the 5150-5250 and 5725-5850 band are
restricted to indoor usage only.
Any emission is maintained within the band of operation under all conditions of
normal operation. The max. frequency stability is less than 20ppm.
 Loading...