

Page 1

EasyDiag Quick Start Guide
LAUNCH TECH. CO., LTD.
Launch Industrial Park, North of Wuhe Avenue,
Banxuegang, Longgang district,
Shenzhen, Guangdong,
P.R.China, 518129
http://www.x431.com
Page 2
The main purpose of this manual is to help users to understand the operating
process, especially for the initial use of a new connector.
For more instructions about this product, please refer to the Users Manual
attached in EasyDiag app.
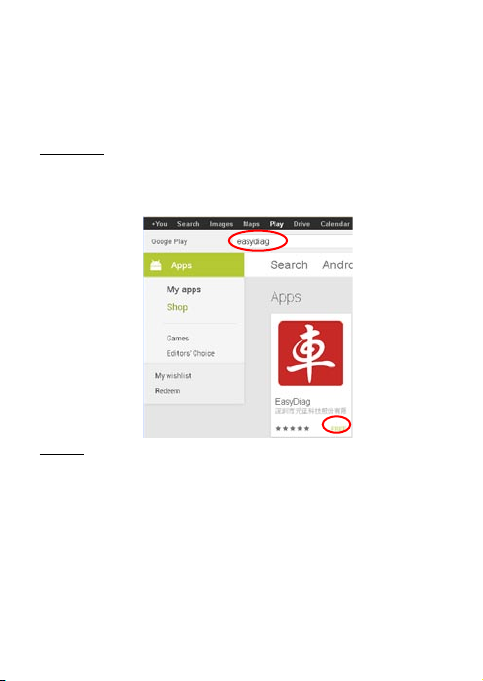
Step1. Download and Install EasyDiag app
»
For Android:
Go into Google Play(https://play.google.com/store) and search for "easydiag",
once found, download and install EasyDiag app follow the on-screen
instructions.
For iOS:
EasyDiag app is free to download in the Apple App Store
Step 1: Turn on your iOS device and go into App Store.
Step 2: Search for "easydiag" in the search eld.
Step 3: Once found, download it.
Step 4: When download is complete, you may click the home button then select
the new icon on your home screen called EasyDiag.
Step2: Register and Login
»
During the initial setup, you need to register a user account. A user account is a
unique login that allows you to register your EasyDiag on our server.
1
Page 3
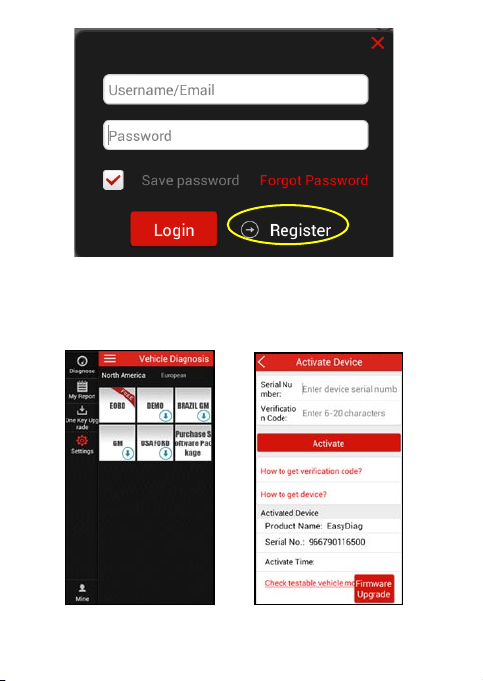
Step3: Register Connector
»
Step 1: Open the EasyDiag app and go into [Mine]-[Activate Device];
Step 2: Fill in the product Serial Number and Verication Code on the activation
interface;
The product SN and verication code will be found in the password envelope.
2
Page 4

Serial Number
4. Purchase and Download Diagnostic Software
»
Now you are ready to begin downloading software.
Step: 1 This icon
yet. If you want to diagnose a car made by a certain manufacturer, please click
on the manufacturer icon to begin downloading the diagnostic software.
Step 2: Go into [Settings], conrm the current serial number.
Step 3: Select the desired vehicle brand, here we take GM as an example.
means that no diagnostic software has been downloaded
Verification
Code
3
Page 5

Step 4: If only this software to be purchased, click on [Purchase Now] to go into
Order Conrm interface.
If you want to add others, click on [Add to Shopping Cart], then go back to the
previous screen to select others.
Or you can choose the software conguration package for preferential
purchase.
NOTE: Software conguration package only applies to individual
regions.
Step 5: Conrm the order and select points to pay.
4
Page 6

Step 6: Click on to go into payment interface.
5
Page 7

Step 7: Select payment type.
Step 8: After made the payment, please go back to the EasyDiag app and
select the manufacturer icon that you just purchased to download.
6
Page 8

Step 9: Click on [Download Software].
Step 10: Click on to download till completed.
Step 11: Click on to return to the diagnose interface.
You are now ready to diagnose the vehicle using the EasyDiag.
7
Page 9

5.Connected to Vehicle
»
NOTE: Do not keep EasyDiag Pin Connector plugged into your
vehicle overnight, be sure to always remove connector once
testing and/or diagnosis is complete. Failure to do so may result
in drained or weakened battery.
Step 1: Locate the vehicle’s DLC socket. It is usually located under the
dashboard, towards the driver’s left knee area.
Step 2: Plug the EasyDiag connector into DLC socket. The connector’s power
indicator will light up to signify communication.
NOTE: Please turn off the ignition switch before connecting and
then turn the key to the ON position after the EasyDiag has been
plugged in.
6. Start to Diagnose
»
Step 1: Open the EasyDiag app, then go into [Settings], select the proper Serial
Number.
Step 2: Select the desired car brand.
Step 3: Pair with the Bluetooth named by the selected serial number.
NOTE: For iOS device, Bluetooth pairing should be done in
the rst step.
Step 4: Select the car brand again and then select the software version.
Step 5: Refer to the on-screen instructions to diagnose.
Note:
1. An audible beep will be heared once the EasyDiag is ready to
be used.
2. For more details, please refer to the user's manual.
3. The illustrations herein are for reference only and are subject
to change based on the Smart Device you are using and/ or
software updates.
8
 Loading...