

Page 1
Quick Start Guide (EN)
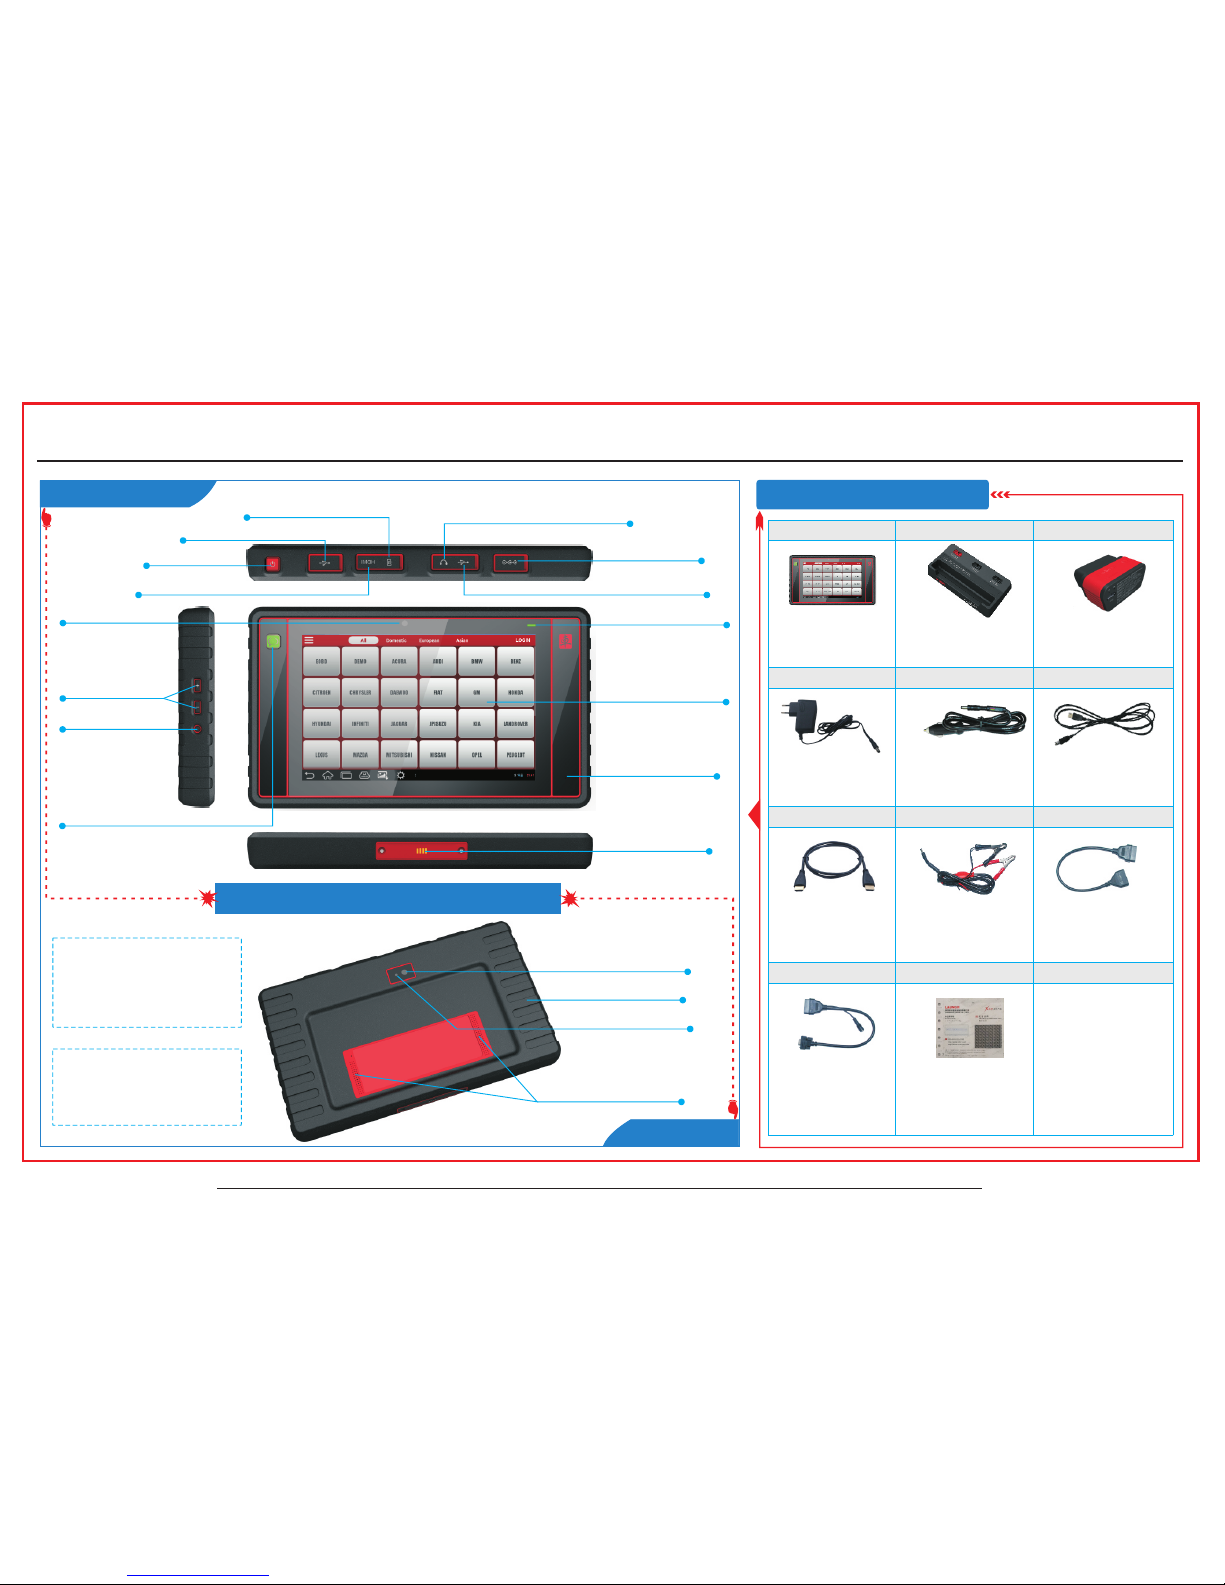
X-431 PADII
LAUNCH
Fron t & Side View
X-431 PADII Profes sional Tablet
Rear Vie w
Accessory Ch ecklist
*No te1:
USB P ort is re serve d for add -on
mod ules, a nd othe r USB dev ices us e
onl y.
Mic ro USB Po rt is res erved f or Micr o
USB c able on ly.
*No te2:
X-4 31 PADII tabl et i s charg ing.
Onc e charg in g is fi nishe d, it wil l
tur n green .
It il lumin ates re d while
X-4 31 PADII U ni t Do cki ng Stat ion Dia gnost ic Conn ector
OBD I Co nv er te r Pas sw or d En velop e Non -16pin Co nn ec to r
HDM I Cable B at te ry C la mps C ab le O BD II Exte ns io n Ca ble
Pow er Adaptor C ig ar et te Li gh te r US B Cable
(A tab let for s howin g
tes t resul ts.)
(To su pply po wer to
the t ablet .)
(To co nnect t o an
ext ernal p rojec tor or
mon itor wi th HDMI
int erfac e.)
(A con verti ng cabl e
for c onnec ting
non -16pi n conne ctor.)
(A pie ce of pap er b earin g
Pro duct S/ N and Reg ister
Pas sword , which i s
req uired f or your
reg istra tion. )
(To su pply po wer to th e
non -16pi n conne ctor vi a
veh icle’s c ig arett e
lig hter so cket. )
(To co nnect t he
dia gnost ic conn ector
and t he disp lay tab let.)
(To co nnect t he
dia gnost ic conn ector
for e xtens ion pur pose. )
(To pr ovide p ower to t he
non -16pi n conne ctor
thr ough co nnect ion to
the v ehicl e’s batt er y.)
(Se e Secti on “Doc king
Sta tion” o n Page 2. )
(A dev ice for
acc essin g vehic le data .)
(Op tiona l)
(Fo r detai led non -16pi n
con necto rs, ple ase che ck
the p ackag e)
Pictu re s il lu st ra te d he re a re for refe re nc e pu rp os e on ly a nd this Qui ck S ta rt G ui de i s su bj ect to chan ge w it ho ut n ot ic e.
Han dgrip
Cam era Fla sh
Rea r Camer a
Aud io Spea kers
Micro S D Ca rd S lo t
Mini HD MI P or t
Volume B ut to ns
Reset B ut to n
golo Bu tt on
(For
Messa gi ng a pp licatio n)
quick a cc es s to I nstant
DC Inpu t Po rt
1
USB Por t
Power B ut to n
1
Micro U SB P or t
Front C am er a
Charg in g In di ca tor
2
Micro ph on e
IPS Touch S cr ee n
Charg in g Sl ot
Headp ho ne J ac k
Page 2
Quick Start Guide (EN)
X-431 PADII
LAUNCH
Pictu re s il lu st ra te d he re a re for refe re nc e pu rp os e on ly a nd this Qui ck S ta rt G ui de i s su bj ect to chan ge w it ho ut n ot ic e.
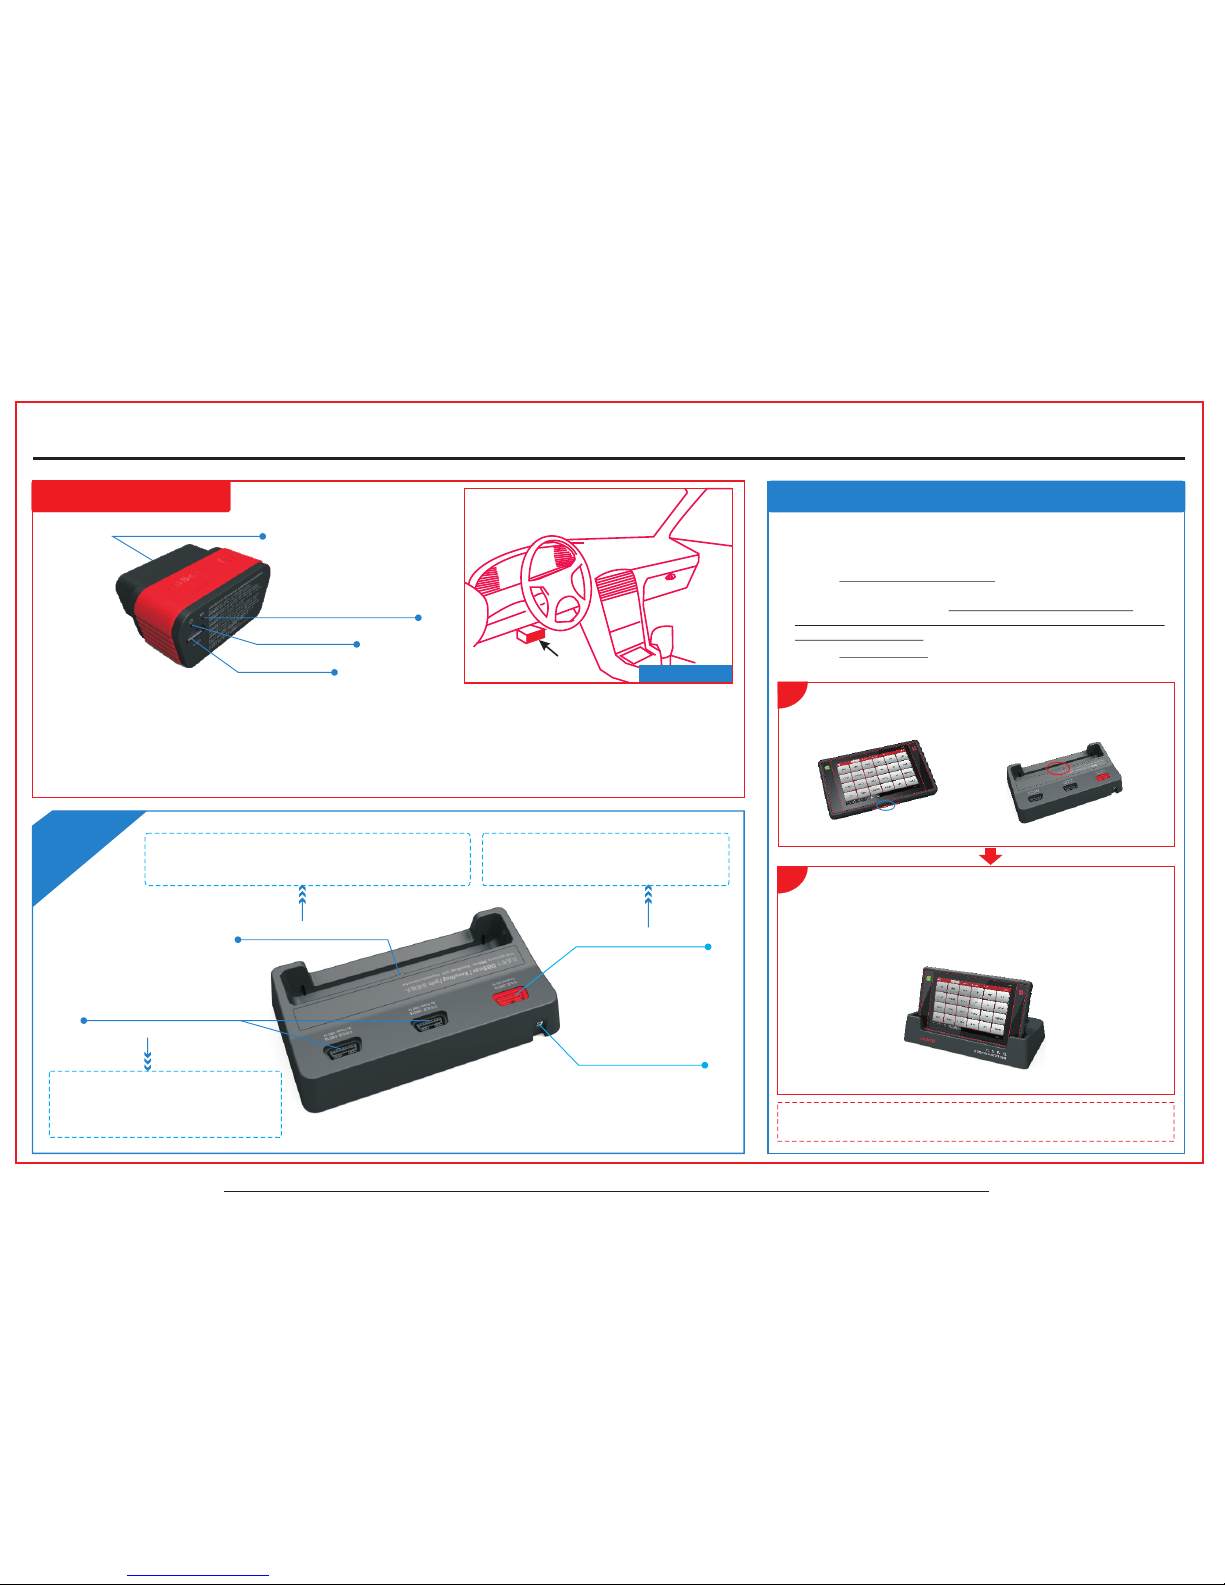
Diag nosti c Conne ct or
1. Lo cate ve hicle ’s DLC so ck et : It pr ovide s stand ard 16 pi ns and is g enera lly loc ated on d river ’s sid e, a bou t 12 i nc h aw ay
fro m th e ce nt er o f das hb oa rd . See Fig ur e DL C Lo cat io n. I f DL C is not eq ui pp ed u nder da sh bo ar d, a la be l in di catin g
its p os it io n wi ll be g iv en . In c ase no DL C is f ou nd , ple as e re fe r to Au tom ob il e Re pair Ma nu al ;
2. Pl ug the co nnect or i nt o th e ve hic le 's D LC (It is su gg es te d to us e th e OB D II e xtens io n ca bl e to conn ec t th e DL C and t he
con ne ct or ). F or ve hi cl es w ith non -1 6P IN D LC, p le as e ch oo se th e de si re d conne ct or. N or mal ly the po wer ind icato r of
dia gnost ic c on ne ct or wi ll l ig ht u p.
Not e: Reme mber to r emove t he
dia gnost ic conn ector f rom the D LC
if it k eeps un atten ded.
NEA R CENTE R
OF DA SH
DLC L ocati on
1. Cha rge X-4 31 PADII Tab let
Exc ep t th at p ow er ad ap to r su pp lies po we r to X -4 31 PAD II ,
PADI I ca n al so obta in p ow er f rom the L it hi um p olyme r ba tt er y.
Choos e an y of t he f ollow in gs t o ch arge X- 43 1 PADII ta bl et :
1. Us e th e in cl ud ed 5V pow er a da pt or: Con ne ct o ne e nd of the
power a da pt or t o DC IN por t of X -4 31 PAD II , th en c onnec t th e
oth er e nd t o th e AC ou tlet. W e as sume no r es po ns ibili ty f or
damag e or l os s re sulti ng f ro m us ing oth er s im il ar adap to rs o th er
tha n th e sp ec if ied one .
2. Us e th e do ck in g sta ti on : Fo ll ow th e st ep s de sc rib ed a s be lo w to
charg e yo ur X -4 31 PAD II t ab let:
X-4 31
Do
c
ki
ng
Sta
ti
o
n
Inst al l di agnosti c co nnector
Not e: If X-4 31 PADII tabl et k eeps id le o r unatt en ded for a l on g
per iod, pl ease lo ck the sc reen or t urn it of f to save p ower.
OBD II 16 P IN c on ne ctor
Commu ni ca ti on indi ca to r
Power i nd ic at or
Micro U SB p or t
Fig . a Fig . b
Loc ate the c hargi ng slot o n the bot to m of X -4 31 PAD II t ab le t and
the d ockin g stati on . Se e Fi g. a & F ig. b .
1
*No te3: It i s desig ned to ch arge th e di spl ay tabl et. For
det ails on h ow to cha rge, pl ea se re fer to Se ction “ Charg e
X-4 31 PADII Tab let ” on the ri ght.
*No te5:
the s ocket f or demo e xperi ence wh en the
sta tion is c onnec ted to th e AC ou tlet.
Plu g the dia gnost ic conn ector i nto
Pow er Inte rface
3
Cha rging S lot
OBD 1 6 Socke t witho ut
4
pow er outp ut
OBD 1 6 Socke t wi th
5
pow er outp ut
(Pr ovide s power t o
the d ockin g stati on)
*No te4: Th ese 2 soc kets ar e used to
sto re the ad ditio nal DBS car/E asyDi ag/
gol o diagn ostic c onnec tor (se parat ely
pur chase d).
Fig . c
2
Align t he c ha rg ing slo ts , an d th en dock t he t ab le t into th e st at io n
to en su re t ha t it f irm ly s it s on t he d ock in g st at io n. Re fe r to F ig . c.
Ins er t on e en d of p ower co rd o f th e do cki ng s ta ti on i nto t he p ow er
jack, t he n pl ug t he othe r en d in to t he AC outl et .
Page 3

2. Connectio ns
Non- OB D II Ve hicle C on ne ction
OBD II Ve hi cl e Conne ct io n
3. Power on, Wi- Fi co nnection, Register and Dow nlo ad so ftw are
1. Pow er o n
Pre ss t he [ PO WE R] bu tt on , th e sy ste m st ar ts i ni tia li zi ng a nd t hen e nt er s th e de skt op .
2. Wi-Fi c on ne ct ion
Tap [Se tt in gs ] on t he de sk to p an d th en [W i- Fi ] to c on fig ur e Wi -F i
setti ng . Re fe r to Fi gu re A .
Selec t th e de si red Wi- Fi c on ne cti on f ro m th e li st. ( Pa ss wo rd m ay be
requi re d fo r se cured n et wo rk s). Whe n “C on ne cted” a pp ea rs , tap
to re tu rn t o th e de skt op .
(To be c on ti nu ed .. .)
3. Regis te r (1 . Tap “Login” --> 2 . Re gi st er a n Account --> 3. Ac ti va te C on ne ct or - -> 4. Finish
Regist er )
1. Launch the applicati on o n th e de sk to p to e nt er. Tap on “LOGI N” o n th e ri gh t up pe r co rn er
of the scre en .
2. Tap on “New Regi st er ” in F ig ur e B, i np ut t he i nf or mation (items w it h * mu st b e fi ll ed ) an d th en t ap o n
“Register ”. R ef er t o Fi gu re C .
3. Input th e Pr od uc t S/ N an d Act iv at io n Co de ( ca n be obtained fro m th e pa ss wo rd e nv el op e, s ee F ig ure
F), and the n ta p on “ Ac ti va te ”. R ef er t o Fi gu re D.
4. Tap on “Go To Up da te C en te r” t o en te r diagnosti c so ft wa re d ow nl oa d sc re en . Re fe r to Figure E.
X-431 PADI I
A Via Cigare tt e Li gh te r
A Dir ec tl y plug the di ag no st ic c on ne ct or i nt o vehicle ’s
DLC
B Via B at te ry C la mp s Ca ble
B Using OBD I I ex te ns io n ca bl e
To Vehicle’s D LC
OBD II Exte ns io n
Cable
To diagnostic
connector
X-431 PADII
LAUNCH
Quick Start Guide (EN)
Login Int er fa ce
B
Create an Acc ount
C
A
Page 4

Act ivati on
Cod e
Passwor d En ve lo pe
For more detaile d op er at io ns , pl ea se r ef er t o Us er ’s M an ua l of X -4 31 PA DI I.
X-431 PADII
LAUNCH
3. Power on, Wi- Fi co nnection, Register and Dow nlo ad so ftw are ( Con t.)
4. Dow nl oa d & Up date So ft wa re
Tap to st ar t do wn lo adi ng .
Not e: B y de fa ul t, al l ve hi cl e so ftw ar e ar e se le cte d. To d ese le ct
certa in s of tw are , ju st u nc he ck th e bo x ne xt t o th e sof tw ar e
versi on .
Onc e do wn lo ad ing fin is he d, t he soft wa re p ac kages w il l be
insta ll ed a ut omati ca ll y.
4. How to Diagno se
Fol lo w th e fl ow chart i ll us tr ated as b el ow t o di agnos e a ve hi cl e.
Tap “Diagnostic”
Select vehicle
Select test systemSelect test function
Select diagnostic
software version
Tap “LOGIN” to
register
1
Activate
connector?
No
Tap “Update” to
update software
2
Yes
…… (Refer to
Section 3)
Register & Activate
OK
Not es:
* 1. To start d iagno sing a ve hicle , yo u ha ve to r egist er the di agnos tic
con necto r. For det ai ls , ple ase ref er to Sec tion 3 “P ower on , Wi-
Fi co nnect ion, Re giste r an d Do wnloa d So ft war e” i n thi s
Qui ck Star t Guide .
* 2. To perfo rm upda te, tap a nd sele ct “ Up dat e” from t he pull -
dow n list.
3. Reg is te r (C ont.)
Dia gn os in g Fl owc ha rt
Quick Start Guide (EN)
Activate Co nn ec to r
D
Finish Re gi st er
Where i s my acti vatio n code?
G
Tap her e to ente r
upd ate cen ter
E
F
 Loading...