

Page 1
X-431 EuroPro4
(c) Diagtools, Launch. Pernavas 43A, Riga, Latvia, LV1009, www.diagtools.lv, tel. +371 29416069, +371 67704152
Quick Start Guide
VCI (Vehicle Communicat ion In terf ace) 3. Register a nd Download Softwar e
LAUNC H
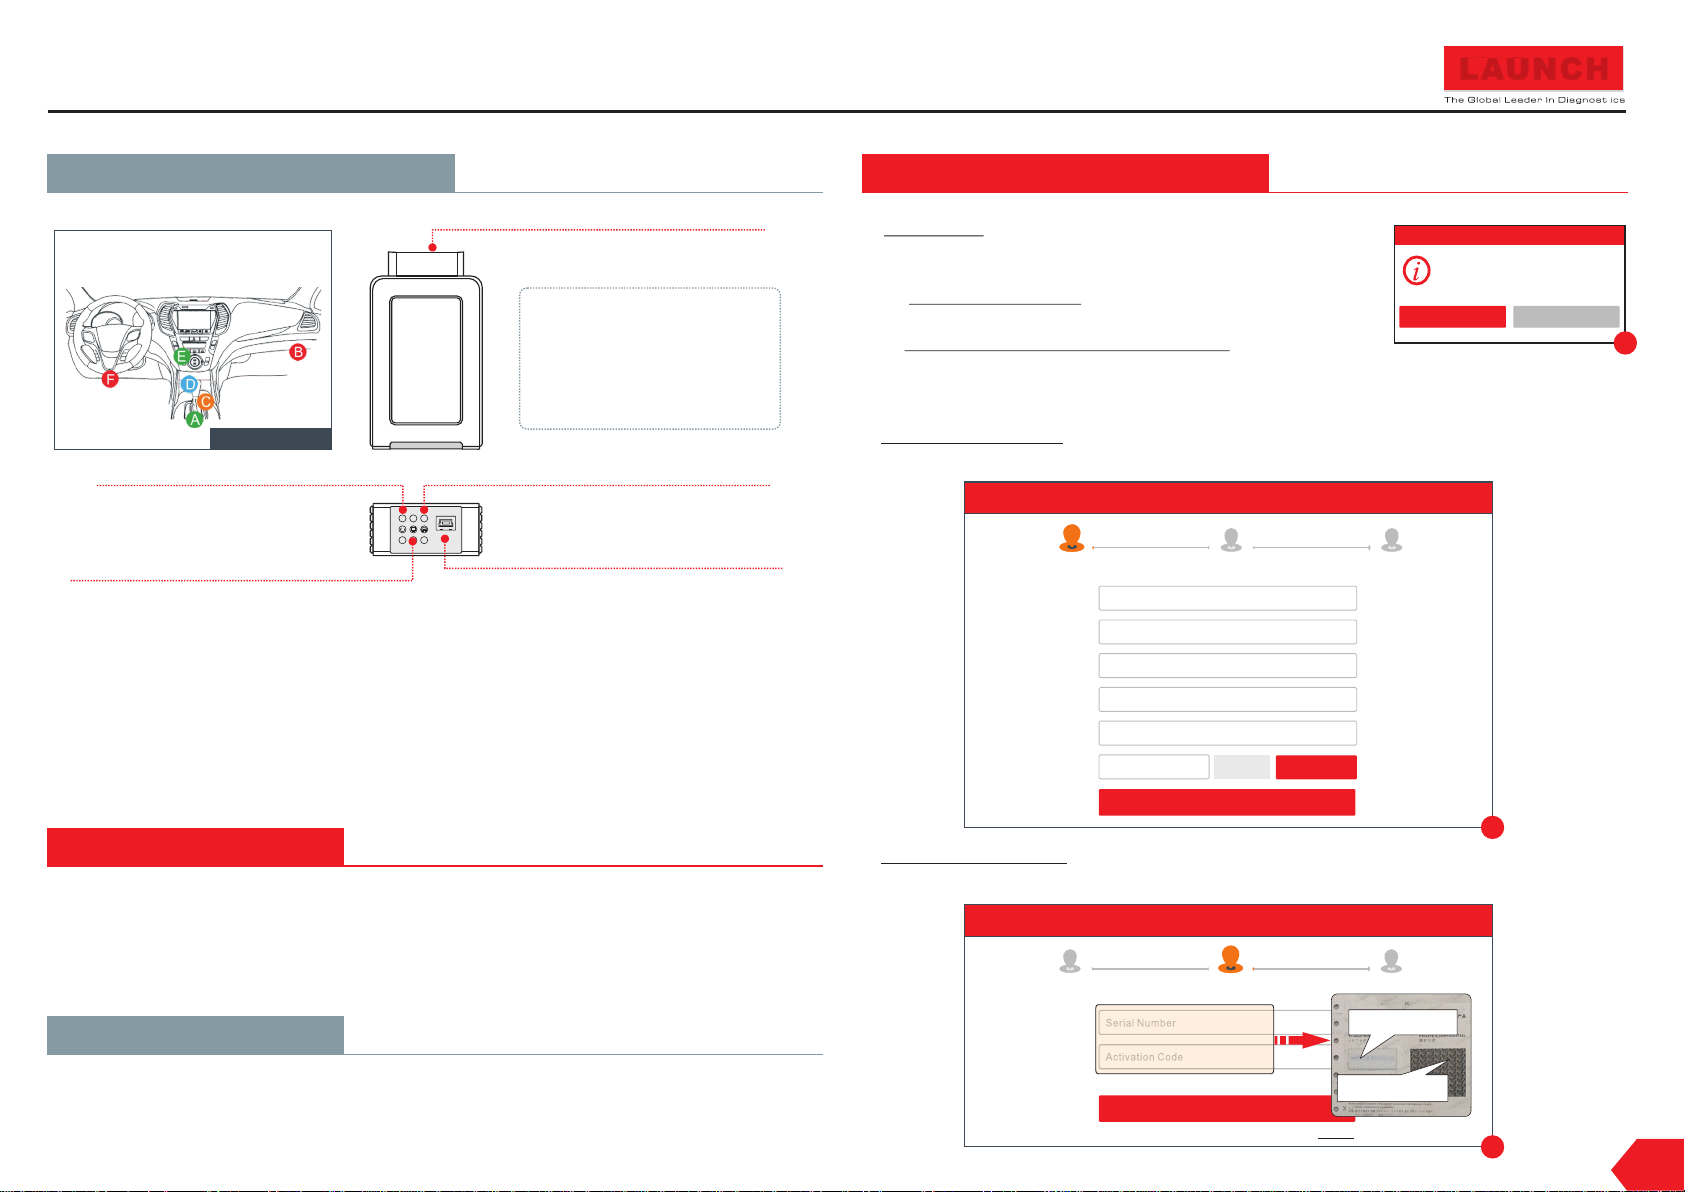
OBD- 16 co nnect or
Note: Remember t o re mo ve t he VCI
connector from t he v eh ic le ’s DL C if i t
keeps unused.
(To co nn ec t on vehicle's OBD II D LC .)
The VC I con necto r is used t o
acce ss th e vehic le data a nd
then s end i t to the ha ndset v ia
Blue too th, whi ch only w ork s
with t he ve hicle w ith 12V
batt ery v oltag e.
DLC Lo catio n
Powe r ind icato r
(It lights up wh il e th e VCI co nn ec to r
is plugged int o th e ve hi cl e' s DLC.)
Blue too th comm unica tio n indic ator
(By defaul t, i t is i n Bl ue to oth mode when the
connector is p ow er ed u p an d il luminates blue. )
ECU co mmu nicat ion ind ica tor
(It flashes wh en t he VCI con ne ct or i s
communicat in g wi th t he v eh icle.)
Mini U SB po rt
(Reserve d fo r su bs eq ue nt function exten si on .)
Inst all t he VCI co nnect or
1. Loc ate v ehicl e’s DLC s ocket :
diag nos tic cod e reade rs in terfa ce wi th the ve hicle 's on -boar d com puter.
The DL C(D ata Lin k Conne cto r) is typ ica lly a 16- pin con nec tor whe re
It is us ual ly loca ted on
driv er’s sid e, abou t 12 in ches aw ay fr om the ce nter of d ash board . See F igure D LC Loca tio n. In
case n o DLC i s found , pleas e ref er to Auto mob ile Rep air Man ual .
2. Plu g the V CI conn ector i nto t he vehi cle 's DLC( It is sug ges ted to us e the O BD II ext ensio n cab le to
conn ect t he DLC an d the VCI ). No rmall y the p ower in dicat or of t he VCI wi ll li ght up.
1. Charging & Turnin g On
1. Plu g one e nd of the i nclud ed po wer ada pto r into th e USB por t of th e hands et, a nd then o ther en d
into t he AC ou tlet.
2. Onc e the b atter y is full y cha rged, d isc onnec t the pow er ad aptor f rom t he AC outl et.
scre en .
hand set3. Pre ss t he [POW ER] but to n on the , the sy st em star ts init ia lizin g an d the n en ters th e ho me
1. Laun ch A pp: On t he hom e s cre en, tap the application icon
Reg ister /Logi n
to lau nch it, a d ial og box si mil ar to Fig . A will p op up on th e
screen.
Has t his uni t been re giste red?
A. If yo u a re a ne w u ser , t ap on “New Cu sto mer” i n F ig. A to
start your sig n-u p.
New C ustom er Exi sting C ustom er
B.If you have registered to be a member , tap o n “Exi sti ng
Customer” and then tap on “Logi n” to login the system
directly.
2. Cre ate a n App Accou nt: Tap on “N ew Re gistr ati on” in Fi gure A, i npu t the inf orm ation ( items w ith *
must b e fil led) an d then ta p on “R egist er” . Refer t o Figur e B.
Regi ster
1
Create an Account Activate VCI Finish Registration
Use rname
*
Pas sword
*
Con firm Pa sswor d
*
Ema il
*
Sel ect Cou ntry
*
CAP TCHA
*
2 3
CAP TCHA
Register
B
3. Act iva te VCI Co nnect or: I nput th e Pro duct S/ N and Acti vat ion Cod e (ca n be obta ined fr om th e
pass wor d envel ope), a nd th en tap on “ Act ivate ”. Refe r to Fi gure C.
Regi ster
1 3
Create an Account Finish Registration Activate VCI
2
A
2. Wi-Fi Setup
1. Tap [Se tting s] o n the des kt op and th en [WLA N] t o confi gu re Wi -F i setti ng .
2. Sel ec t the des ired Wi -F i conne ct ion f ro m the lis t. ( Passw ord may b e re quire d fo r sec ur ed netw or ks).
3. Whe n “C onnec ted” ap pe ars, it i ndica te s that it i s pr operl y conne ct ed to the n et wor k.
Ser ial Num ber
*
Act ivati on Code
*
Whe re is my ac tivat ion cod e?
Activate
>> Sk ip
Prod uc t S/ N
Acti va ti on c ode
C
EN
Page 2
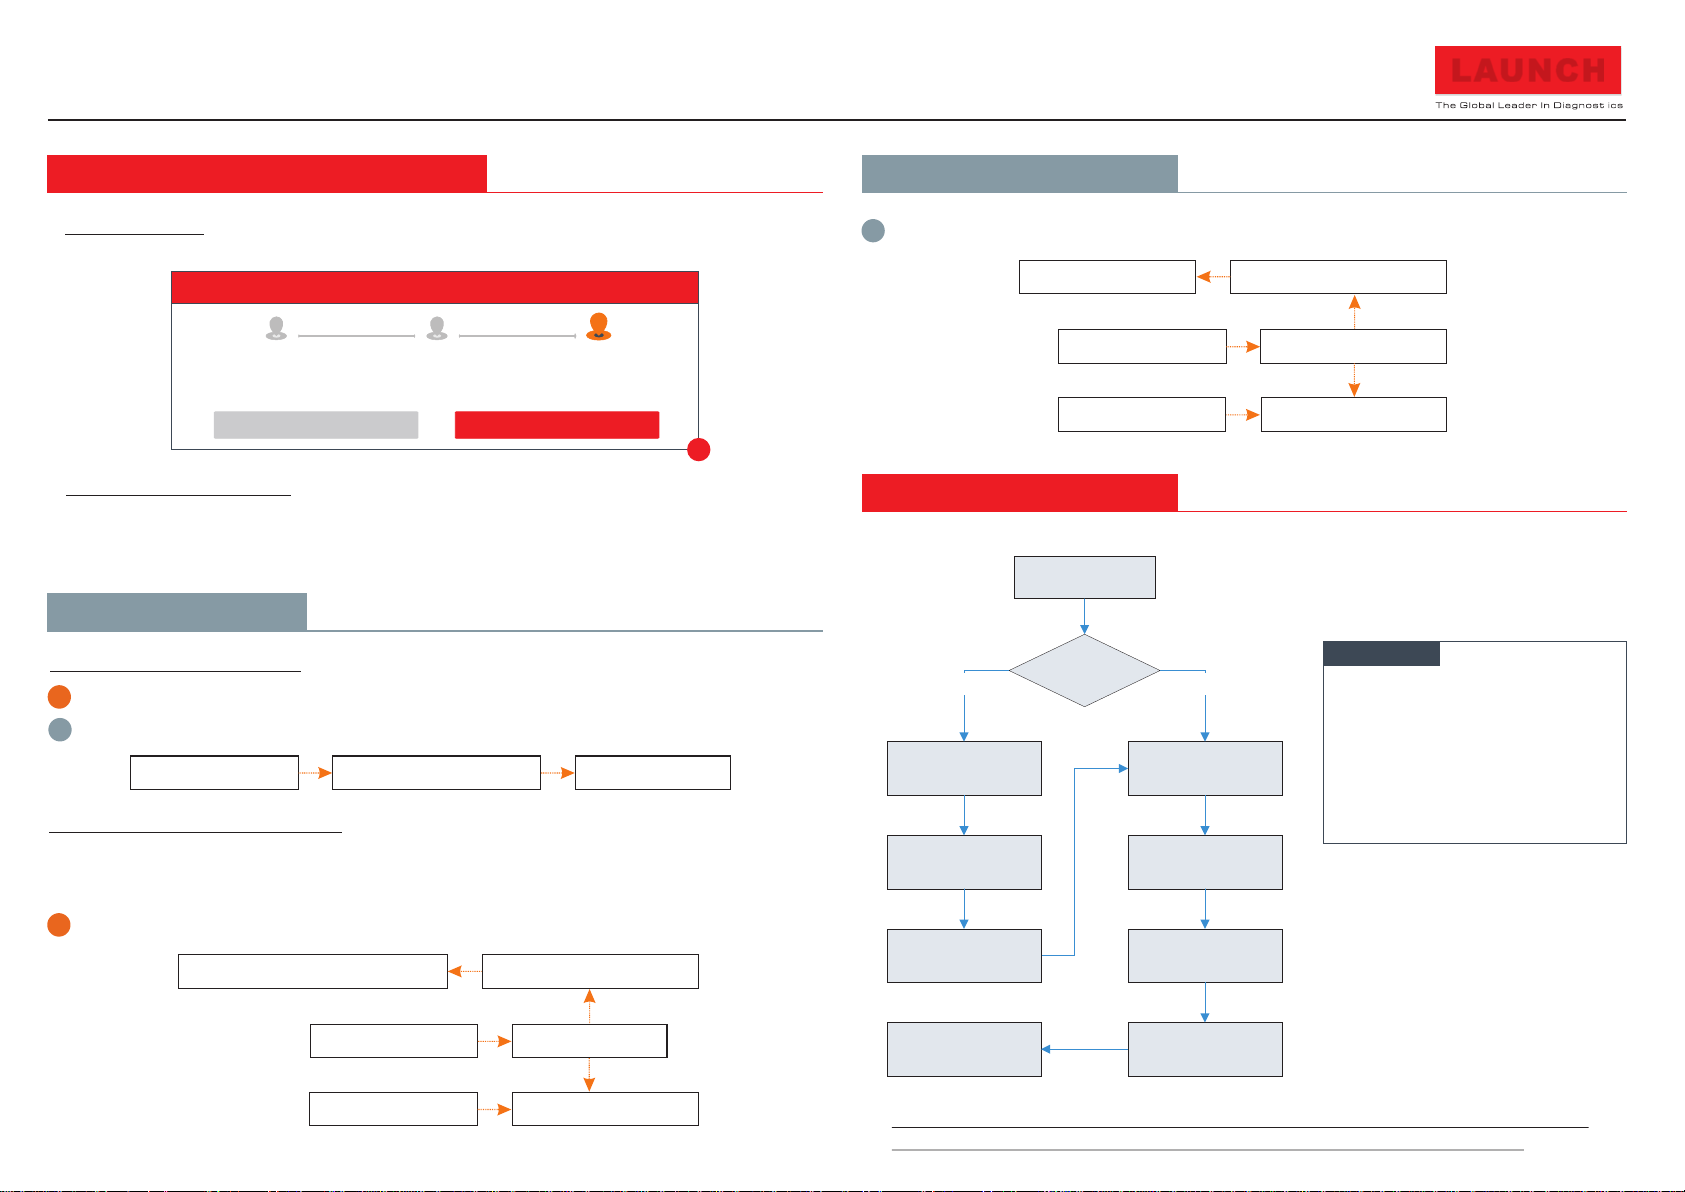
Tap “Diagnose”
Select vehicle
Select test system
Select test function
Select diagnostic
software version
Tap “New
Customer” to
register
Is the VCI
activated ?
No
Tap “Update” to
update software*1
Yes
…… (Refer to
Section 3)
Register & Activate
OK
X-431 EuroPro4
(c) Diagtools, Launch. Pernavas 43A, Riga, Latvia, LV1009, www.diagtools.lv, tel. +371 29416069, +371 67704152
Quick Start Guide
3. Register a nd Download Softwar e(Cont.) 4. Vehicle Connect ion( Cont .)
LAUN CH
4. Fin is h Reg is trati on : Tap on “Yes ” to en ter the v ehi cle sof tware d own load sc ree n. Refe r to Figu re D.
To downl oad i t later, t ap on “No ”.
Regi ster
1
Create an Account Activate VCI Finish Registration
Con gratu latio ns! You hav e succe ssful ly comp leted y our reg istra tion. D o you wan t to down load
the d iagno stic so ftwar e now?
2
3
YesNo
D
5. Dow nl oad D ia gnost ic S oftwa re: Tap “Up date” o n the u pdate p age to st art d ownlo adi ng. Onc e
down loa ding fi nishe d, th e softw are p ackag es will b e ins talle d aut omati cal ly.
No te : Wh en d ownload in g the diagn os tic softw ar e or checki ng f or update s it i s importa nt t o make sure t he
tool has a s tr ong Wi-Fi conn ec tion.
4. Vehicle Connect ion
1. OBD II Vehicle Connection
A Dir ect ly plug t he VCI in to ve hicle ’s DLC
B Usin g OBD I I exten sion ca ble
2. Non-OBD II Vehicle Connection
If the power supply on vehicle diag nostic sock et is insuffic ien t or the power pin i s d ama ged ,
you can get powe r in th e fol low ing w ays :
A Via Cig are tte Lig hter Cable
VCI Connecto r
OBD II Extensi on Ca ble To Vehicle’s D LC
VCI Connecto r
To Vehicle’s D LC
Cigarette Li ght er Ca bleTo Cigarette Lig hte r Rec ept acl e
OBD I Adaptor
Non-16pin Conne cto r
B Via Batt ery C lamps C able
Battery Clam ps Ca bleTo Vehicle's Bat ter y
VCI Connecto r
To Vehicle’s D LC
OBD I Adaptor
Non-16pin Conne cto r
5. Start Diagnost ics
For new users, p lea se fo llo w the o per ati on
chart shown on t he le ft to g et fa mil iar w ith a nd
start using th is to ol.
Prep ara tion
Befo re di agnos ing, pl eas e make
sure t he fo llowi ng:
s Swit ch th e ignit ion on.
s Vehic le ba ttery v oltag e ran ge
shou ld be 9 -14Vol ts.
s Thro ttl e shoul d be in a clo sed
posi tio n.
No te s:
To enjoy more s ervic e and fun ctions,
1.
you ar e suggest ed to che ck for
upda tes on a freq uent ba sis and k eep
sync hronize d with th e lates t available
soft ware.
2. If yo u choose “A utoDe tect” t o
diag nose a vehi cle, th is flow chart
shal l not apply.
Pict ures illu strat ed here a re for re ference p urpos e only an d this Qu ick Start G uide is s ubjec t to
chan ge withou t notic e. For mo re deta iled oper ation s, plea se refer to t he User M anual .
 Loading...