

Page 1

LAUNCH TLT 235SCA User’s Manual
U SER ’ S MANUAL
Copyright reserved! Without the written agreement of
Launch Shanghai Machinery Co., Ltd. (hereinafter called
“Launch”), no company or individual is allowed to copy and
backup this manual in any form (electronic, mechanical,
photocopy, recording or other forms). This manual is
specifically designed for the use of Launch product, and our
company doesn’t undertake any responsibility for various
consequences caused as a result of applying it to the
guidance of operating other equipment.
In case of the equipment damage or loss due to the
accident of the user himself or third party, abuse or misuse
of this equipment, unauthorized change and repair of this
equipment, or not conforming to the operation and
maintenance requirement of Launch, Launch and its
branches won’t undertake any responsibility for the
expenses and expenditures generated.
For the equipment damage or problem caused as a result of
using other optional accessories or consumables instead of
original Launch product or its recognized product, Launch
won’t undertake any responsibility.
Official statement: The purpose of other- product- names
mentioned in this manual is to describe how to use this
equipment. Their registered trademarks still belong to the
original companies.
This equipment is for the use of professional technical
personnel or maintenance personnel.
Registered Trademark
Launch has registered its trademark in China and several
foreign countries, with the symbol of LAUNCH. Other
trademarks, service symbol, domain name, icon, and
company name of Launch mentioned in this manual belong
to the property of Launch and its subsidiary companies. In
the countries where Launch’s trademark, service symbol,
domain name, icon and company name haven’t been
registered, Launch declares its ownership on such
unregistered trademark, service symbol, domain name, icon
and company name. The trademarks of other products and
company names mentioned in this manual still belong to the
originally registered companies. Without prior written
agreement of the owner, nobody can use the trademark,
service symbol, domain name, icon and company name of
Launch and other companies mentioned in this manual. If
you have any question, please visit website of Launch:
http://www.cnlaunch.com or write to Sales Dept. of Launch
Shanghai Machinery Co., Ltd. at No. 661 Baian Road,
International Automobile City Auxiliary Parts Park, Anting
Town, Jiading District, Shanghai City to contact Launch.
i
Insured by PICC
Page 2

LAUNCH TLT 235SCA User’s Manual
CAUTION
WARNING
This instruction manual is an essential integral part of
this product. Please read all instructions.
Properly keep this manual for use during the
maintenance.
Use only as described in this manual. Use only
manufacturer’s recommended adapters.
This equipment is only used for its clearly designed
purpose, and never use it for other purposes.
The manufacturer is not responsible for any damage
caused as a result of improper use or use it for other
purposes.
Always wear safety goggles.
IMPORTANT SAFETY
INSTRUCTIONS
When using your garage equipment, basic safety
precautions should always be followed, including the
following:
Only the qualified personnel having undergone special
training can operate this machine. Without the
permission of the manufacturer or not following the
requirement of the manual, any changes in the
machine part and in the usage scope may cause direct
or indirect damage to the machine.
Don’t keep the lift in the extreme temperature and
humidity environment. Avoid installation beside the
heating equipment, water tap, air humidifier or stove.
Prevent the lift from contacting large amount of dust,
ammonia, alcohol, thinner or spray adhesive, and
prevent it from rain shower.
Always disconnect equipment from electrical supply
when not in use. Never use the cord to pull the plug
from the outlet. Grasp plug and pull to disconnect.
To reduce the risk of electric shock, do not use on wet
surfaces or expose to rain.
To reduce the risk of fire, do not operate equipment in
the vicinity of open containers of flammable liquids
(gasoline).
During the machine operation, non-operators should
be kept away from the machine.
Do not operate equipment with a damaged cord or the
equipment has damaged or lost parts, until examined
by a qualified serviceman.
The lift can’t be overloaded. The rated load of the lift is
already marked on the nameplate.
Please don’t raise the lift when there are people in the
vehicle. During the operation, the customer and
spectators shouldn’t stand in the lifting area.
Keep the lifting area free from obstacle, grease,
machine oil, garbage and other impurities.
Position the swing arm of the lift, making it contact the
lifting point as recommended by the manufacturer.
Raise the carriage and confirm the lifting pad and
vehicle are closely contacted. Raise the carriage to the
appropriate working height.
For some vehicles, the parts dismantling (or
installation) will cause severe deviation of the center of
gravity, leading to unstable vehicle. The support is
needed to keep the balance of the vehicle.
Before moving the vehicle away from the lifting area,
please position the swing arm and lifting pad back
away to avoid blockage during the movement.
Use appropriate equipment and tools as well as safety
protection facilities, e.g. working uniform, safety boot,
etc.
Pay special attention to various safety marks attached
to the machine body.
Keep hair, loose clothing, fingers, and all parts of body
away form moving parts
Pay special attention not to dismantling the safety unit
of the machine or making it not functioning.
The hydraulic oil used for this lift is N32 or N46. Please
refer the safety data of grease and oil shown in the
manual.
Adequate ventilation should be provided when working
on internal combustion engines.
Launch Shanghai Machinery Co., Ltd. is dedicated
to continuously improving the product quality and
upgrading the technical spec. They are subject to
change without notice.
ii
Page 3
LAUNCH TLT 235SCA User’s Manual
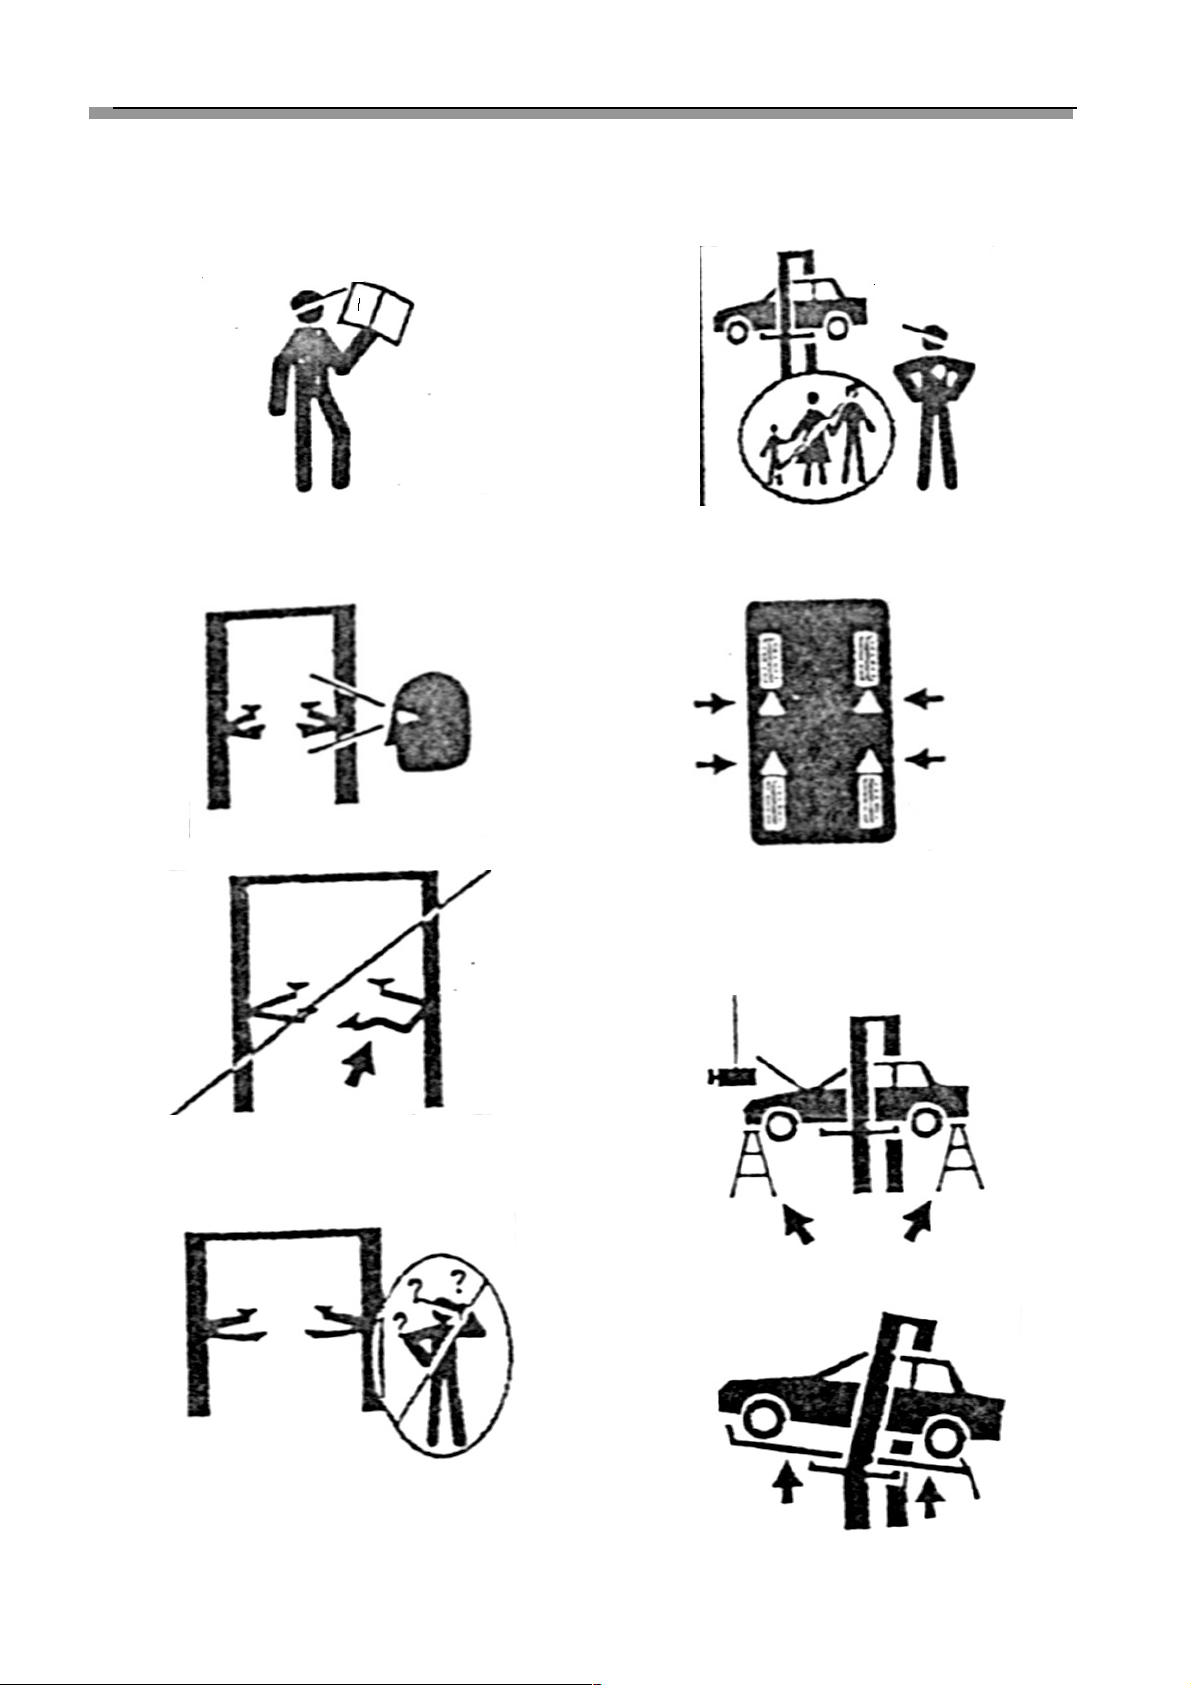
Caution labeling exemplify
(1)
Read operating and safety manual before using lift .
(2)
Proper maintenance and inspection is necessary for
safe operation.
(3)
Do not operating a damaged lift
!
(4)
Lift to be used by trained operator only!
(5)
Authorized personnel only in lift area.
(6)
Use vehicle manufacturer’s lift points.
(7)
Always use safety stands when removing or installing
heavy components.
(8)
Auxiliary adapters may reduce load capacity.
iii
Page 4
LAUNCH TLT 235SCA User’s Manual
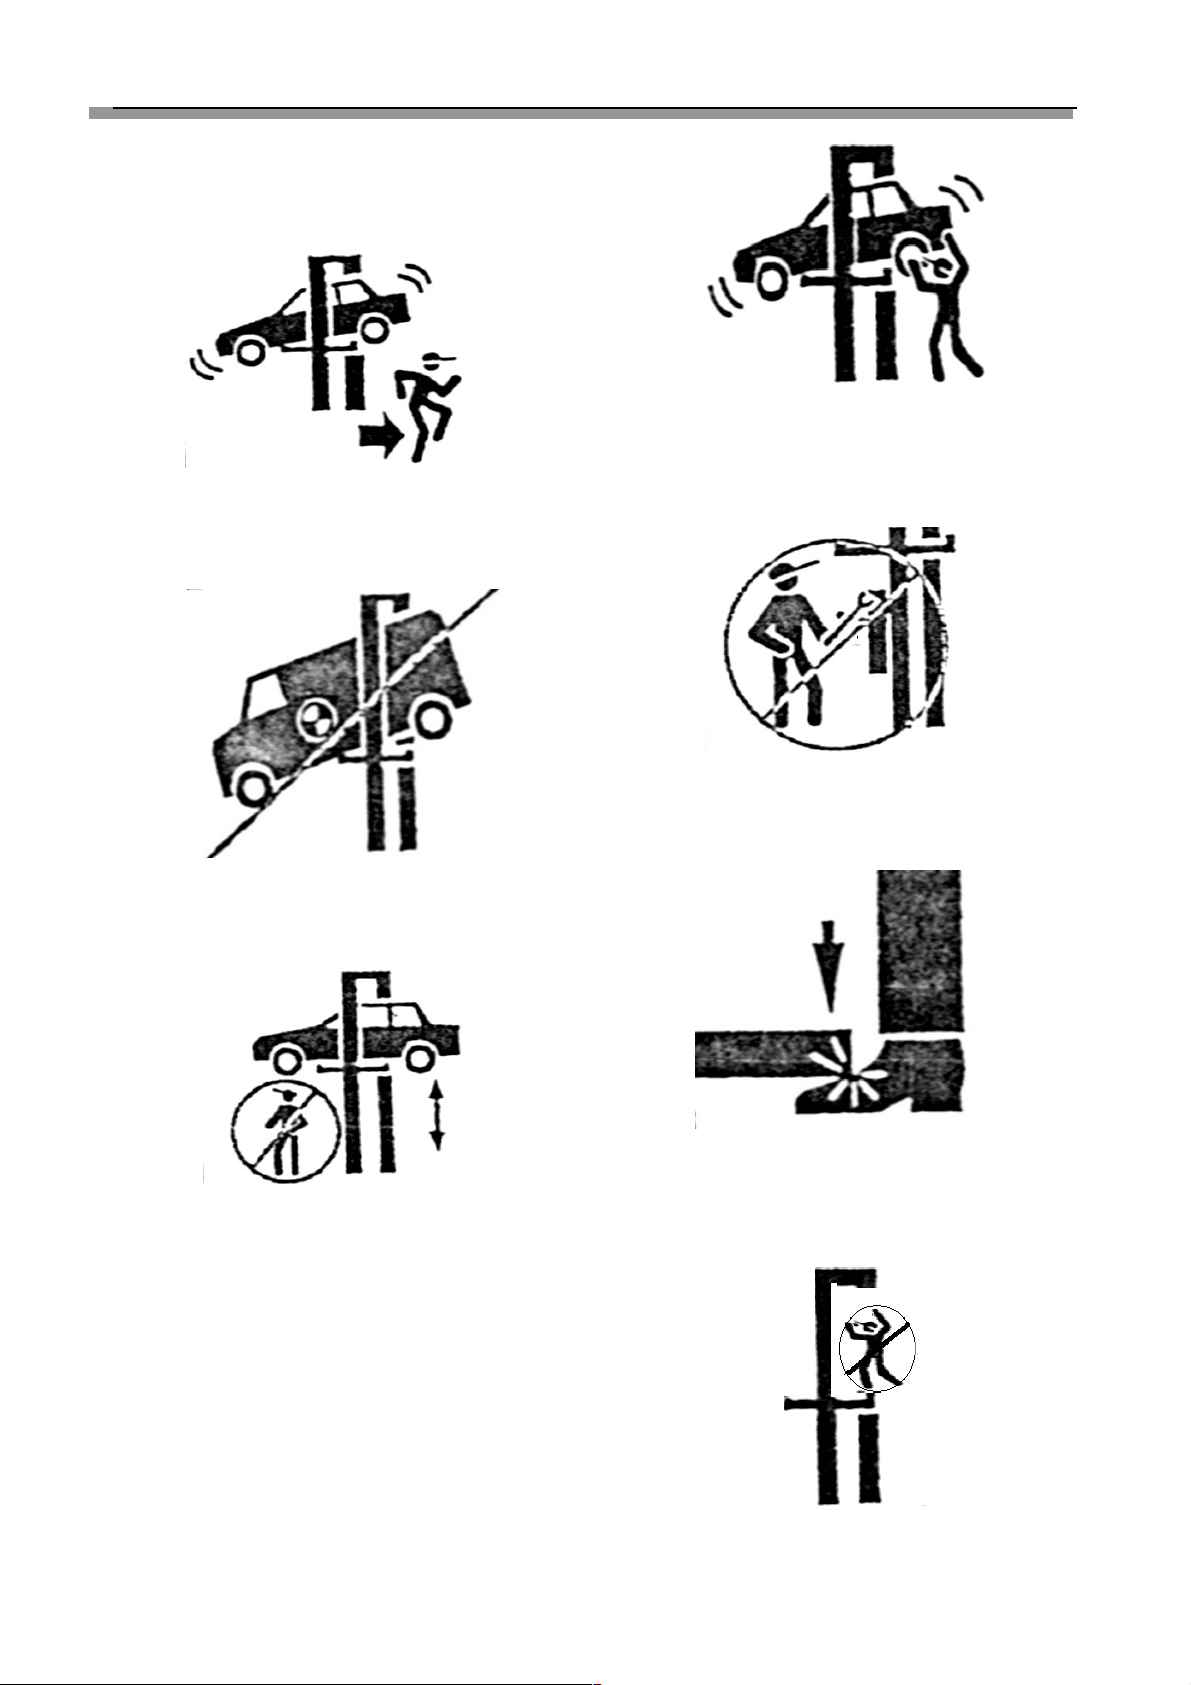
(9)
Clear area if vehicle is in danger of falling .
(10)
Position Vehicle with center of gravity midway between
adapters. .
(11)
Remain clear of lift when raising or lowering vehicle .
(12)
Avoid excessive rocking of vehicle while on lift .
(13)
Do not override self-closing lift controls.
(14)
Keep feet clear of lift while lowering
!
(15)
Do not stand on lift arm while rising or lowering .
(16) When operating the lift, please have earmuff on.
iv
Page 5

LAUNCH TLT 235SCA User’s Manual
Table of Contents
1 Outline………………………………………………………1
1.1 Model Description………………………………………….1
1.2 Purpose…………………………………………………...1
1.3 Functions and Features…………………………………1
1.4 Technical Specifications…………………………………...1
1.5 Environmental Requirement………………………………1
2 Lift Structure…………………………………………….2
3 Operation Description……………………………………...4
3.1 Precautions for Operation……………………………..4
3.2 Preparation before Operation………………………..4
3.3 Inspection before Operation………………………4
3.4 Lifting the Vehicle………………………………………..4
3.5 Lowering the Vehicle……………………………………4
4 Hydraulic and Electrical System of the Equipment..5
4.1 Hydraulic System of the Lift……………………………….5
4.2 Electrical System of the Lift……………………………….6
5 Solutions to FAQ…………………………………..7
6 Repair and Maintenance…………………………..……….9
7 Storage and Scrap………………………………………...9
7.1 Storage……………………………………………………9
7.2 Scrap……………………………………………………….9
Grease and hydraulic oil for lift….…..……………………10
Warranty……………………………………………………….11
v
Page 6

1 Outline
1.1Model Description
Model Description
TLT235SCA clear-floor 2-post lift 3.5T (7875 Lb) clear-floor 2-post lift (Symmetric and asymmetric
installation adjustable)
TLT240SCA Ⅱ clear-floor 2-post lift 4T (9000 Lb) clear-floor 2-post lift (Symmetric and asymmetric
installation adjustable)
Page 7

1.2 Purpose
This machine is applicable for the lifting of various small and
medium-sized vehicles with total weight below 3.5t/4t in
garage and workshop.
1.3 Functions and Features
The cable and oil pipe are fully concealed, with decent
and elegant appearance.
Designed based on the international standard, meeting
the demand of the garage and workshop.
Top limit switch, effectively protecting the vehicle from
overhead collision.
Dual hydraulic cylinders drive, stable lifting and lowering.
Electromagnetic full-scope safety lock.
Lowering electrically, safe and simple in operation.
Adopt two steel cables for equalization, force two
carriages to move synchronously, and effectively
prevent the vehicle from tilting.
Lowest height of lifting pad is 110mm, good for repairing
low chassis or low profile car.
1.4 Technical Specifications
Page 8

Basic parameters of the equipment:
Model Rated load
T (Lb)
Lifting
height
mm
(in)
Rising
time
Sec
Descending
time
Sec
Equipment
net weight
Passage
width
mm
(in)
Machine
width
mm
(in)
Machine
height
mm
(in)
TLT235SCA
(symmetric
installation)
3500 kg
7875 lb
1950 mm
76.8 in
50s 40s 670kg
1477 lb
2486
mm
97.9 in
3420 mm
134.6 in
3840
151.2 in
TLT235SCA
(asymmetric
installation)
2415
mm
95.1 in
3563mm
140.3 in
TLT240SCA
(symmetric
installation)
4000 kg
9000 lb
1950 mm
76.8 in
50s 40s 700kg
1543 lb
2486
mm
97.9 in
3420 mm
134.6 in
3840
151.2 in
TLT240SCA
(asymmetric
installation)
2415
mm
95.1 in
3563mm
140.3 in
Page 9

Noise:
Working noise: 80dB(A)
Power unit:
Working pressure: 16MPa
Electrical parameters of the machine:
Motor: (selected by client)
Single phase: 110V/60Hz 2.2kW; 220V/50Hz 2.2 kW
Single phase: 200V/60Hz 2.2 kW
Three phase: 380V/50Hz 2.2 kW
1.5 Environmental Requirement
Working temperature: -5C ~+40C
Transport/storage temperature: -5C ~+40C
Relative humidity: Temperature +30C, relative humidity
80%
Height above sea level: No more than 2000m
Page 10

2 Lift Structure
The structure is as shown in Fig. 1:
Fig. 1
3840mm(151.2in)
SWI NG ARM
mi n110 mm(4.3in)
LIFTING PAD
POWERSI DE COLUMN
EXTENSI ON COLUMN
TOP BEAM
2750mm(108.3in)
OFFSI DE COLUMN
POWER UNI T
CONTROL BOX
ELECTROMAGNET
CARRI AGE
Page 11

3420mm( 134. 6i n)
2566mm( 101i n)
8
0
0
m
m
(
3
1
.
5
i
n
)
986mm
( 38. 8i n)
186mm
( 7. 3i n)
2625mm( 103. 3i n)
1
2
0
0
m
m
(
4
7
.
2
i
n
)
225mm( 8. 9i n)
225mm( 8. 9i n)
passing width 2486mm( 97. 9i n)
Fig. 2
3563mm(140. 3i n)
8
0
0
m
m
(
3
1
.
5
i
n
)
1
2
0
0
m
m
(
4
7
.
2
i
n
)
passing width 2415mm( 95. 1i n)
Fig. 3
Page 12

3 Operation Description
3.1 Precautions for Operation
Different vehicles have different center of gravity
positions. First understand the position of center of
gravity, and when the vehicle enters into the lift, make its
center of gravity close to the plane formed by two
columns. Adjust the swing arm, and make the lifting pad
support onto the lifting point of the vehicle.
For the lifting with top beam lift, observe the vehicle top
position, and don’t get close to the top beam to avoid
causing the accident.
Carefully read the warming symbol.
The hydraulic valves have been adjusted before ex-
factory, and the user can’t make self-adjustment,
otherwise it will be responsible for all the consequences
generated.
Based on the production needs, some specifications in
the instruction manual are subjected to change without
notice.
3.2 Preparation before Operation
Lubricate contact surface of the carriage and corners of
the column with general-purpose lithium grease. All
sliding surface should be coated evenly from the top to
bottom.
Fill hydraulic oil N32 or N46 to the oil reservoir of the
power unit.
3.3 Inspection before operation
Check to see if the motor power is installed properly.
Check to see if all the connection bolts are fastened.
Press the UP button to start the motor, and the carriage
rises. Release the UP button, and carriage will stop. To
lower the carriage, first actuate the electromagnet by
press the UNLOCK button. If it can’t release the safeties,
press the UP button to go up a little. Press and hold the
UNLOCK button again, and then press the DOWN button,
the carriage will lower. Release the two buttons (DOWN
and UNLOCK), the carriage will stop lowering.
Note: Don’t operate the lift with damaged cables or
damaged and missing part, until it is inspected and
repaired by the professionals.
3.4 Lifting the Vehicle
Keep work area clean, don’t operate the lift in cluttered
work area.
Lower the carriage to the lowest position.
Reduce the swing arm to the minimum length.
Swing the arm along the route of the vehicle
Move the vehicle to the location between the two columns
Swing the arm and put the lifting pad below the
recommended lifting point, and adjust the height of lifting
pad to touch lifting point of vehicle
Press the UP button on the electric control box, slowly lift
the vehicle to ensure the load balance, and then raise the
lift to the required height.
Release the UP button and the carriage will stop.
Press the DOWN button to engage the safety lock of
carriage. At this time, the vehicle can be repaired.
Note:
When lifting the vehicle, all the swing arms
must be used.
Before lifting the vehicle, check all the hydraulic
hose and fittings for oil leakage. In case of leakage,
please don’t use the lift. Remove the fitting with
leakage and re-seal. Re-install the fitting and check if
oil leakage still exists.
After the vehicle is lifted, when adding or
removing any major heavy object, use jack stand to
maintain the balance of the vehicle.
3.5 Lowering the Vehicle
Clean the work area before lowering the vehicle.
First press the UP button to raise the vehicle a little, then
press and hold the UNLOCK button to disengage the
safety lock, and then press DOWN button to lower the
vehicle.
Lower the vehicle till the swing arm down to the bottom
and the lifting pads leave the vehicle chassis, and then
release the two buttons.
The swing arms under the vehicle must be fully shrunk
Note: When the lift doesn’t work, you must switch off
the power.
Page 13

4 Hydraulic and Electrical
System of the Equipment
4.1 Hydraulic System of the Lift
Diagram of the hydraulic system of clear-floor 2-post lift
(TLT235ACA)
11
2
3
1
4
10
5
7
6
8
9
8
9
1- Gear pump, 2- Motor, 3- Oil filter, 4- Check-valve, 5- Safety
valve, 6- Solenoid valve, 7- Servo flow-control valve, 8- Hose,
9- Hydraulic cylinder, 10- Level gauge, 11- Air filter
Fig. 4
The working principle of the hydraulic system is as
follows:
When the UP button is pressed, the motor is started, driving
the oil pump, sucking the hydraulic oil from the oil tank into the
oil cylinder 9, forcing the piston rod move. At this time, the
safety valve 5 is closed, and Max working the pressure is
already adjusted before ex-factory. The safety valve can
ensure the capacity of the rated load, but when the pressure in
the system exceeds the limit, automatically overflow will be
happened inside safety valve to protect the hydraulic system.
Release the UP button to stop the oil supply and the lifting will
stop. For lowering, press and hold the UNLOCK button, the
electromagnetic safety lock mechanism will be released,
meanwhile press the DOWN button, the solenoid valve 6 is
actuated, the hydraulic oil flows back from the hydraulic
cylinder into the oil tank through the solenoid valve 6 and flow-
control valve 7, and the lift starts the lowering.
Page 14

4.2 Electrical System of the Lift
Page 15

Diagram of the electrical system
KM
KM
U V W
M
3~
U21 V21 W21
QC
L1 L2 L3 PE
AC220V/380V-3PH
T
1-2:AC220V
1-3:AC380V
AC7V
SQ
DC24V
FU1
U11 V11 W11
C ontrol Unit 1
AC18V
AC24V
FU2/1A
FU3/10A
FU4/3A
XS
YV
YA1...YA4
SB4
DC24VAC24V
Control Unit 2
Vice-control
control box
Explaination:ONLY in the
type of two post electrical
control box
AP2
AP1
1
2
3
KM
U V
M
1~
U21 V21
QC
L1 L2 PE
AC220V 1PH
FU1
U11 V11
1
1
2
3
KM-Contactor; M-Motor; QC-Power switch; T-Transformer; SB1-UP button; SB4-STOP button; YA1、YA2、YA3、Y4-
Electromagnet YV-Solenoid valve; SQ-Limit switch; XS-Socket of light; FU-Fuse
Fig.4
Diagram of the line connection
XT
PE
U V W
KM
1 2 3 4 5 6
QC
L1 L2 L3
U21
V21W21
U21
V21
J1
1
2
3
4
1 2 3 4
J6
KM
1 2 3 4
J7
YV
YA1
5 6
SQ
J4
1
2
3
4
Control Unit 1
1
2
3
4
J8
red
AC380V
U11
V11W1 1
FU1
U21
V21 W21
AC7V
AC18V
AC24V
5
6
FU2
FU4
FU3
7
8
1
2
J2
SB5
SB4
XS
7 8 1 2 3 4
J5
1
2
J3
Control Unit 2
1 2 3 4
J8
Control Unit 2
1 2
J9
1
2
J10
Vice-control box
blue
yellow green
T
SQ YV
YA
J18 J19
YA2
YA3 YA4
YA1 YA2
YA3 YA4
7
L1 L 2 L3
PE
PE
M
3~
X
red
green
greenblue
yellow
red
blue
blue
red
Fig. 5
Page 16

NOTES
: This equipment needs NFB (non-fuse
breaker) upon installation. This equipment does not
include this part, bought and installed by users.The
NFB is 16A.
DOWNUPUNLOCK
1- 2-上升键 解锁键
3- 4-下降键 急停按钮
5- 6-工作灯插座 电源开关
5
6
1
2
3
4
1. UP button 2. Unlock button 3.DOWN button
4. ES button 5. Socket of light 6. Power switch
Electrical operation description:
After the electric wire is properly connected, switch on the
power switch.
During the lifting, after pressing the UP button, the oil
pump works, and the carriage rises. Release the UP
button to stop the rising. Press the DOWN button in short
time, and the carriage is locked.
To lower the carriage, first press the UP button to raise
the carriage a little, then press the DOWN button and the
UNLOCK button simultaneously, and the carriage will
lower.
If any button is found to have no response, check the
circuit breaker ]to see if opened.
Page 17

5 Solutions to FAQ
Symptom Reason Solution
Motor not operation
Check the circuit breaker or fuse
Check the voltage to the motor
Check all the wire connection
Limit switch is failed
Motor wire is burnt
Replace the burnt fuse or reset the
circuit breaker
Supply correct voltage for motor
Repair all the wires
Replace the limit switch
Replace the motor
Motor is running, but the
lift can’t be raised.
Motor rotation reversed
Solenoid valve body open.
Hydraulic pump sucks the air
Suction tube is separate from the hydraulic
pump
Low oil level
Change the motor rotating direction by
changing wire connection.
Repair or replace the solenoid valve
body
Fasten all the suction pipe fittings
Replace the suction tube
Add the oil into the oil tank
Motor is running, the lift
can be raised without load,
but the vehicle can’t be
raised
Motor is running under low voltage
Impurities inside the solenoid valve body
Regulation pressure of safety valve is
incorrect
Lift is overloaded
Supply correct voltage to the motor
Remove impurities from the solenoid
valve body.
Adjust the safety valve
Check the weight of the vehicle
The lift is lowering slowly
without pressing the down
button
Impurities on the solenoid valve body.
External oil leakage
Clean the solenoid valve body
Repair the external leakage
The lifting speed is slow or
oil flows out of the oil fill
cap
Air and oil are mixed
Air and oil suction are mixed
Oil return pipe is loosened
Replace the hydraulic oil
Fasten all the suction pipe fittings
Re-install the oil return pipe
The lift can’t rise
horizontally
Balance cable is not adjusted properly
The lift is installed on the slop floor
Adjust the balance cable to the proper
tension
Shimming the columns to level the lift,
If exceeding 12mm, pour new concrete
floor and make it leveled. Refer to
installation description.
Anchor bolt is not fastened
Hole is drilled too big
Concrete floor thickness or fastening force
is insufficient
Pour the fast curing concrete into the
big hole and reinstall the anchor bolt,
or use new drill to drill the hole for re-
positioning the lift
Cut open the old concrete and make
new concrete slab for the lift. Refer to
installation description.
Page 18

Page 19

6 Repair and Maintenance
Keep clean
This unit should be cleaned with dry cloth frequently to
keep it clean. Before cleaning, first switch off the power to
ensure the safety.
The working environment of this unit should be clean. In
case of dust in the working environment, it will speed up
the parts wearing and shorten the service life of the lift.
Every day:
Before the operation, carefully check the safety
mechanism of the lift to ensure the electromagnet suction
and release action is proper, and the safety plate is in
good condition. When finding any abnormal situation,
make adjustment, repair or replacement immediately.
Check to see if the connection between hydraulic cylinder
and carriage is proper, if the connecting nut between the
steel chain and carriage is loose or falling. Refer to Fig. 6.
Check to see if the steel cable connection is proper, and if
the tension is at the optimum status.
Fig. 6
Every month:
Retighten the anchor bolts.
Lubrication chains/cables.
Check all the chain connectors, bolts and pins to ensure
correct installation
Check all the hydraulic lines for wearing
Check to see if the carriage and the inner side of the
column are properly lubricated. Use high-quality heavy
lubrication grease (lithium based lubrication grease).
Note: All the anchor bolts should be tightened
completely. If any screw doesn’t function for some reason,
the lift can not be used until the bolt is replaced
Every six months
Check all the movable parts for possible wearing,
interference or damage.
Check the lubrication of all the pulleys. If the pulley has
dragging during the lifting and lowering, add appropriate
lubricant to the wheel axle.
When necessary, check and adjust the balancing tension
to ensure the horizontal lifting and lowering.
Check the verticality of the column.
Note: The inner corner of each column should be
lubricated with lubricant, to minimize the roller friction and
ensure the smooth and even lifting.
Maintenance of hydraulic system:
Clean and oil change
In the six months after initial use of this unit, clean the
hydraulic oil tank and replace the oil, later clean the
hydraulic system once a year, and replace the oil. See
Fig. 7.
Replace the seal
After this unit is put into operation for certain period, if
finding the oil leakage, carefully check it; if the leakage is
due to the wearing of sealing materials, immediately
replace the worn one based on the original spec. See Fig.
7 and Fig. 8.
P l a t e c h a i n
A d j u s t m e n t b o l t
C o n n e c t i n g n u t
H y d r a u l i c c y l i n d e r
C a r r i a g e
R o l l e r
S w i n g a r m
Page 20

Diagram of hydraulic line of clear-floor 2-post lift
Fig. 8
Wearing Parts
No. Name Model Spec Qty Remark
1 O rubber sealing ring GB3452.1-92 48.7×5.3 1
2 Dust proof ring J40 1
3 Shaft sealing ring USI53×63×6 1
4 Rubber pad 4 Self-made part
7 Storage and Scrap
7.1 Storage
When the equipment requires long-time storage:
Disconnect the power supply
Lubricate all the parts requiring lubrication: mobile contact
surface of the carriage, etc.
Empty all the oil/liquid storage units
Put the plastic cover over the equipment for dust
protection
7.2 Scrap
When the equipment service life is expired and can no longer
be used, disconnect the power supply, and properly dispose of
as per relevant local regulations.
Page 21

Grease and hydraulic oil for lift
2# lithium based lubrication grease
Item Quality Index
Conical degree (1/10mm) 278
Dripping point ℃ 185
Corrosion (T2 copper sheet, 100 ℃, 24h) No change for copper sheet
Copper mesh oil split(100℃,22h)% 4
Evaporation(100℃,22h)% 2
Oxidation stability(99℃,100 h
)
0.2
Anti-corrosion(52℃,48
)
Class 1
Impurity (microscope) /(pcs/cm³
)
Above 10µm no more than
Above 25µm no more than
Above 75µm no more than
Above 125µm no more than
5000
3000
500
0
Similar viscosity
(
-15℃
,
10s-1
)
,/(Pa·s)
no more than
800
Water spray loss(38℃,1h)(%)
no more than
8
N32 hydraulic oil (used for
low ambient temperature)
Item Quality Index
Kinematic viscosity 40℃ 28.8~35
Pour point /℃ no higher than -15
Flash point /℃ no lower than 175
N46 hydraulic oil (used for
high ambient temperature)
Item Quality Index
Kinematic viscosity 40℃ 41.4~50.6
Pour point /℃ no higher than -9
Flash point /℃ no lower than 185
Page 22

Warranty
This warranty clause is only applicable for the users and
distributors who purchase LAUNCH products through normal
sales procedure.
Within 12 months from the date of goods delivery, Launch will
make warranty on its mechanical and electrical components
due to material or process defects. This warranty does not
extend to defects or damage caused by ordinary wear, abuse,
unauthorized change, misuse, shipping damage, or lack of
required maintenance. The compensation for the automobile
damage caused by our equipment defect is only restricted to
repair, and Launch doesn’t undertake any indirect or incidental
loss. Launch will judge the equipment damage attribute based
on its stipulated inspection method. None of Launch’s
distributors, staffs or commercial representatives has the right
to make any confirmation, prompting or commitment related to
Launch’s products.
Disclaimer
The above warranty clause can replace any other forms of
warranty clauses.
Order notice
The parts and optional accessories that can be replaced can
be directly ordered with suppliers authorized by Launch. When
placing the order, please indicate:
Order quantity
Parts number
Parts name
Customer service
In case of any problems during the operation of the equipment,
please call: 86-21-69573179 or toll free number 8008206369.
The following is the address of the lift production base of
Launch Shanghai:
No. 661 Baian Road, International Automobile City Auxiliary
Parts Park, Anting Town, Jiading District, Shanghai City
Launch Shanghai Machinery Co., Ltd.
Postcode: 201805
 Loading...