

Page 1

Lathem Time Corporation
Page 2

This equipment has been tested and found to comply with the limits for a Class A
digital device, pursuant to Part 15 of FCC Rules. These limits are designed to
provide reasonable protection against harmful interference when the equipment
is operated in a commercial environment. This equipment generates, uses, and
can radiate radio frequency energy and, if not installed and used in accordance
with the instruction manual, may cause harmful interference to radio
communications. Operation of this equipment in a residential area is likely to
cause harmful interference in which case the user will be required to correct the
interference at his or her own expense.
Caution: Changes or modifications not expressly approved by the party
responsible for compliance could void the user's authority to operate the
equipment.
THIS DIGITAL APPARATUS DOES NOT EXCEED THE CLASS A LIMITS FOR RADIO NOISE EMISSIONS
FROM DIGITAL APPARATUS AS SET OUT IN THE RADIO INTERFERENCE REGULATIONS OF THE
CANADIAN DEPARTMENT OF COMMUNICATIONS.
LE PRÉSENT APPAREIL NUMÉRIQUE N'ÉMET PAS DE BRUITS RADIOÉLECTRIQUES DÉPASSANT LES
LIMITES APPLICABLES AUX APPAREILS NUMÉRIQUES DE CLASSE A PRESCRITES DANS LE
RÈGLEMENT SUR LE BROUILLAGE RADIOÉLECTRIQUE ÉDICTÉ PAR LE MINISTÈRE DES
COMMUNICATIONS DU CANADA.
The details of this User's Manual are subject to change even without previous notification.
This User's Manual has been prepared with the utmost care to cover all aspects of the time
clock's use.
Be sure to use your time clock after you have fully understood the hardware and software
specifications and limits.
No part of this publication may be reproduced, stored in a retrieval system, or transmitted,
in any form or by any means, mechanical, photocopying, recording or otherwise.
1.
2.
3.
4.
Lathem Time Corporation
www. lathem. com
(800) 241-4990
This User's Manual and its contents are copyrighted by
LATHEM TIME CORP. with all rights reserved.
WARNING
Page 3

FEATURES:
Quartz time clock
Dot matrix printer
Perpetual calender
Automatic daylight saving time
4-way print activation
Automatic
Manual
Semi-automatic
Combination
Adjustable print position
Prints in 8 languages
Prints numbers/date
Alphanumeric printing
Selectable 4-digit
year imprint
12 or 24-hour format
Regular minute, 1/10, 1/100 or
5/100 of an hour
Password for program protection
Digital LCD display (Date, Hour,
Minute, Day of the Week indication)
Rigid enclosure, wall or desk top
mount
Full power reserve (optional)
Main applications : Payroll/job cost recorder, time stamp or numbering
machine.
•
•
•
•
•
•
•
•
•
•
•
•
•
•
•
•
•
•
•
•
•
•
•
•
•
•
•
•
•
•
•
•
Thank you for purchasing our time clock.
For safe and proper operation, please carefully read the manual
before using the time clock and save it for reference.
Caution:
Avoid placing the unit in environments that are:
• humid or dusty.
• exposed to direct sunshine.
• subject to frequent or continuous vibrations.
• outside the temperature range between -5˚ and 45˚C
(+25˚and 113˚F)
• affected by chemicals or ozone.
Place the time clock close to the wall outlet so that it is easily
accessible to disconnect.
For questions about the operation of this time clock, or to order
supplies and accessories, please contact Lathem Time at
(800)241-4990.
1
Page 4
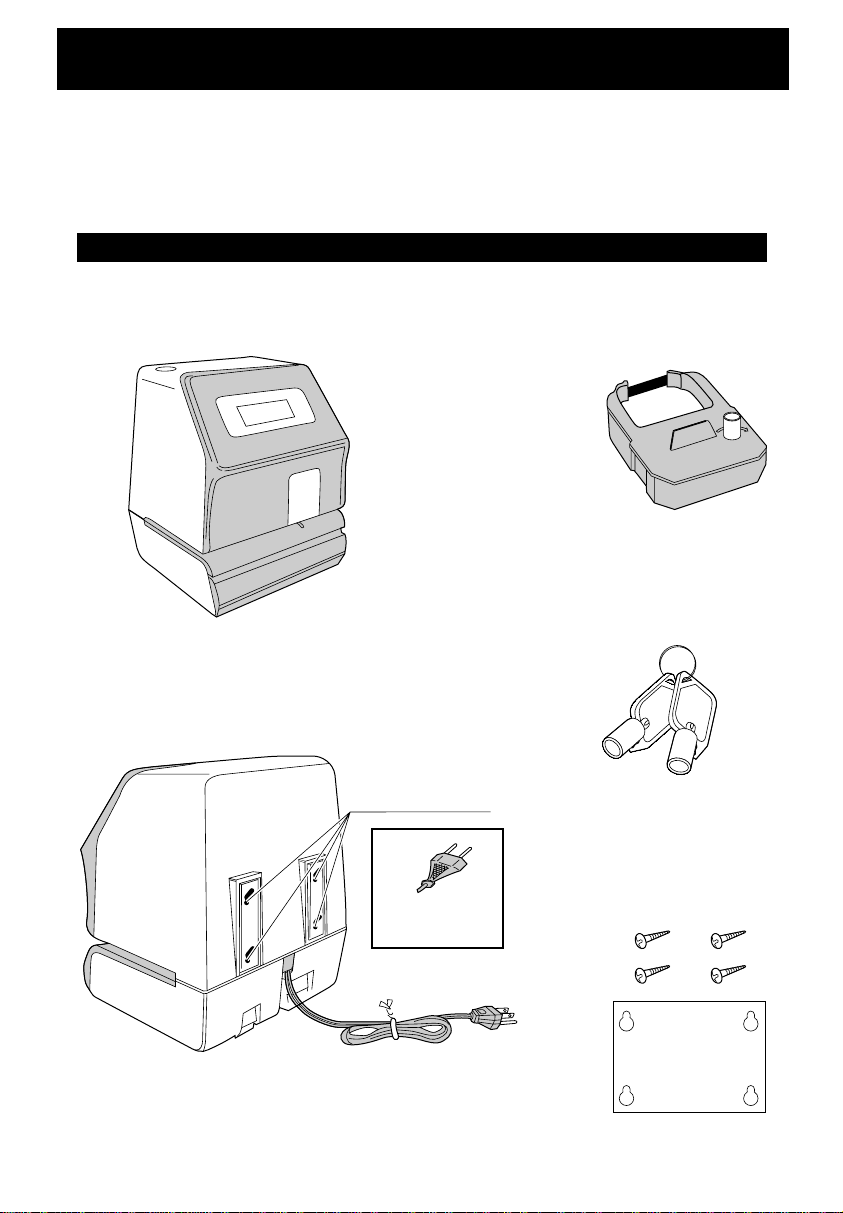
Package Contents
Unpack the time clock and check its contents to ensure that the time clock unit and all
accessories as shown below are included.
ATTACHED ACCESSORIES
Wall-mount holes
AC Power Plug
(230VAC model)
AC Power Plug
(120VAC model)
• Time clock • Ribbon cassette
• Keys ......................2 pcs.
• Wall-mount fitings
Screw
Template
.................4 pcs.
.........1 sheet.
...................1 ps.
•The ribbon casette is installed
at the factory.
BEFORE USING YOUR TIME CLOCK
2
Page 5

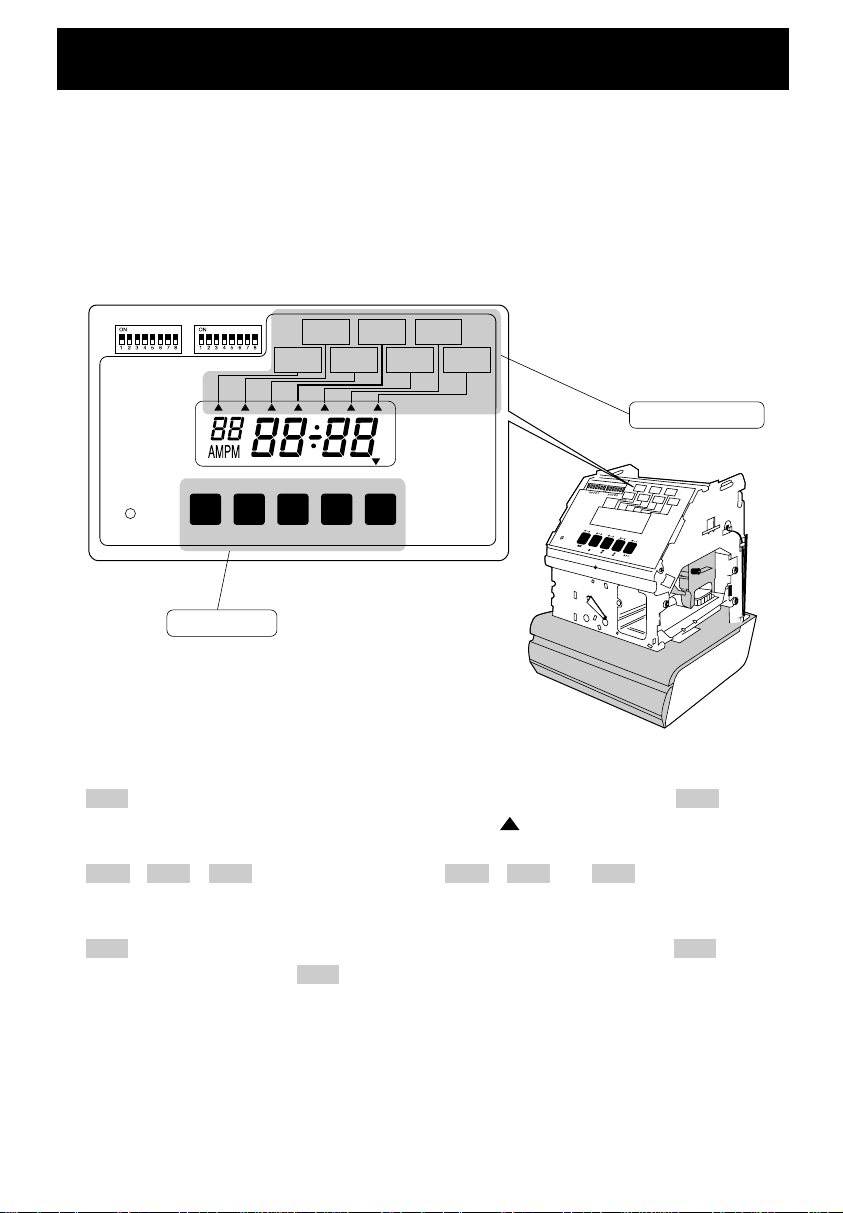
CONFIGURATION
It is important to become familiar with the time clock before setting it up and using
it.
The print position from the card edge is adjustable by
pressing and sliding the print position button located
on the right outside bottom of the recorder. Maxuim
distance from edge of form to print is approximately
1 3/16"(30mm).
JAN 31AM12:00
JAN 31AM12:00
JAN31A
15mm
30mm
Ribbon holder
Ribbon
Cassette
Control keys
LCD panel
DIP switch
RESET switch
Print head
Top caae
Key hole
Locating mark
Push bar
DIPSW1
DIPSW2
YEAR
MONTH
DAY
HOUR
MINUTE
START
DAYLIGHT
SAVING
INITIAL
NUMBER
SET
COMMENT
END
DAYLIGHT
SAVING
NUMBER
REPEAT
TIMES
MO TU WE FR SA SUTH
SW5
MODE SETHOUR
MONTH
MINUTE
DAYYEAR
SW4 SW3 SW2 SW1
RESET
Print position adjuster
The print position from
the card edge is adjustable
by pressing and sliding the
print position button on
outside bottom.
LOCATION OF NAME
PRINT POSITION ON TIME CARD
3
Page 6
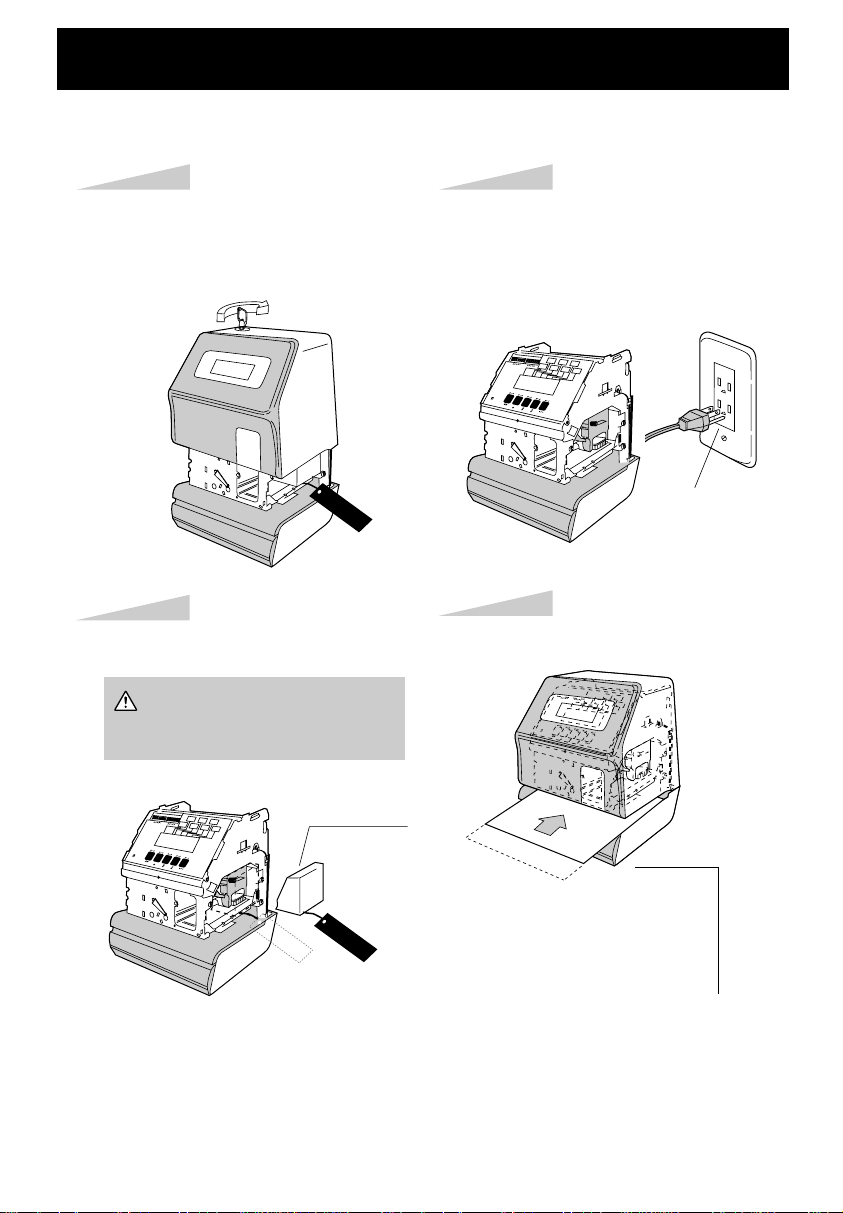
QUICK EASY SETUP
Step 1
Unlock the key and remove the
top case.
Step 2
Remove the PROTECTION PAD.
Remove the PROTECTION PAD
before you plug the AC cord into
the AC outlet.
Step 3
Plug the AC cord into the AC outlet.
When plugged in the LCD panel
indicates the current time. It is now
ready to be adjusted if necessary.
Step 4
Insert a card.
PROTECTION
PAD
AC Outlet
C
AU
TIO
N
CAUTION
CAUTION
PLEASE NOTE: If a time card is inserted and
removed too quickly, the print head will move,
but no imprinting will occur. This feature is
designed to protect and maintain the life of your
printer. Please hold the time card in the recorder
until the print head movement is complete.
Print example
JAN 31 AM12:00
4
Page 7
HOW TO PROGRAM THE CLOCK
To enter the program setting mode, you should plug the AC power cord into the
AC outlet and remove the cover. Thereafter press the 5 tactile switches, SW5 to
SW1.
< > indicates pressing a tactile switch. Pressing longer will realize faster
increments.
Function of 5 control keys
SW5 : You can select the desired program setting mode by pressing this SW5 key.
Selected program setting mode is indicated by the " " mark on the display.
SW4 , SW3 , SW2 : When you press the SW4 , SW3 and SW2 keys, you can
increment the set value.
SW1 : You can set the value selected on the display by pressing the SW1 key.
Thereafter you press this SW1 key again, you can return the clock to the normal
operation mode.
DIPSW1
DIPSW2
RESET
SW5
MODE SETHOUR
MONTH
MINUTE
DAYYEAR
SW4 SW3 SW2 SW1
YEAR
MONTH
DAY
HOUR
MINUTE
START
DAYLIGHT
SAVING
INITIAL
NUMBER
SET
COMMENT
END
DAYLIGHT
SAVING
NUMBER
REPEAT
TIMES
MO TU WE FR SA SUTH
Control keys
Program modes
5
Page 8

Step 1
Press the [SW5 : MODE] key once, the
"HOUR MINUTE" arrow flashes.
Press the [SW2: MINUTE / DAY] key
until the correct minute appears.
Keeping the SW2 pressed, advances the
minute automatically. Longer pressing
speeds advancement.
Step 3
SW5
MODE
SW2
MINUTE
DAY
TU WE TH FR SA SUMO
TU WE TH FR SA SUMO
HOUR
MINUTE
Press the [SW1: SET] key after checking
the desired time appears on the LCD.
The seconds are 00.
Press [SET] accordingly to a time signal.
The unit is now set to correct time.
Step 4
SW1
SET
TU WE TH FR SA SUMO
Press the [SW1:SET] key again.
Step 5
SW1
SET
TU WE TH FR SA SUMO
Step 2
Press the [SW3 : HOUR / MONTH] key
until the correct hour appears.
The seconds are automatically reset to 00.
Keeping the SW3 pressed, advances the
hour automatically.
Example :
Set to Morning 10:08 AM
SW3
HOUR
MONTH
TU WE TH FR SA SUMO
SETTING THE TIME
6
Page 9

SETTING THE DATE
Step 1
Press the [SW5 : MODE] key twice, the
"YEAR / MONTH / DAY" arrow flashes.
Press the [SW2: MINUTE / DAY] key
until the correct day appears.
Keeping the SW2 pressed, advances
the day automatically. Longer pressing
speeds advancement.
Step 4
SW5
MODE
SW2
MINUTE
DAY
TU WE TH FR SA SUMO
TU WE TH FR SA SUMO
YEAR
MONTH
DAY
Press the [SW1: SET] key after checking
the desired year, month and day on the
LCD.
Step 5
SW1
SET
TU WE TH FR SA SUMO
Press the [SW1:SET] key again.
Step 6
SW1
SET
TU WE TH FR SA SUMO
Step 2
Press the [SW4 : YEAR] key until the
correct year appears.
Keeping the SW4 pressed, advances the
year automatically. Longer pressing
speeds advancement.
Example : set to 21st Octobr, 2001
SW4
YEAR
TU WE TH FR SA SUMO
Press the [SW3 : HOUR / MONTH] key
until the correct month appears.
Step 3
SW3
HOUR
MONTH
TU WE TH FR SA SUMO
7
Page 10

SETTING THE STARTING DAYLIGHT SAVING TIME
Step 1
Press the [SW5:MODE] key three times,
the "START DAYLIGHT SAVING" arrow
flashes.
Example :
Starting from Second of April, 2001
Press the [SW2:MINUTE / DAY] key
untli the correct day appears.
Keeping the SW2 pressed,advances the
day automatically. Longer pressing
speeds advancement.
Step 4
SW5
MODE
SW2
MINUTE
DAY
TU WE TH FR SA SUMO
TU WE TH FR SA SUMO
START
DAYLIGHT
SAVING
Press the [SW1:SET] key after checking
the desired year, month and day on the
LCD.
Step 5
SW1
SET
TU WE TH FR SA SUMO
Press the [SW1: SET] key again.
Step 6
SW1
SET
TU WE TH FR SA SUMO
Step 2
Press the [SW4:YEAR] key until the
correct year appears.
Keeping the SW4 pressed,advances the
year automatically, Longer pressing
speeds advancement.
SW4
YEAR
TU WE TH FR SA SUMO
Step 3
Press the [SW3 : HOUR / MONTH] key
until the correct month appears.
SW3
HOUR
MONTH
TU WE TH FR SA SUMO
If you do not use the daylight
saving time function, set the
month value to 00.
When the daylight saving time is set, one hour will be automatically added to the day advance
time on the starting date and, similarly, one hour will be automatically subtracted on the ending
date of the daylight saving time.
8
Page 11

SETTING THE ENDING DAYLIGHT SAVING TIME
Step 1
Press the [SW5: MODE] key four times,
the "END DAYLIGHT SAVING" arrow
flashes.
Example:
End on 28th of October, 2001
Press the [SW2: MINUTE / DAY] key
until the correct day appears.
Keeping the SW2 pressed, advances
the day automatically. Longer pressing
speeds advancement.
Step 4
SW5
MODE
SW2
MINUTE
DAY
TU WE TH FR SA SUMO
TU WE TH FR SA SUMO
END
DAYLIGHT
SAVING
Press the [SW1: SET] key after
checking the desired year, month and
day on the LCD.
Step 5
SW1
SET
TU WE TH FR SA SUMO
Press the [SW1:SET] key again.
Step 6
SW1
SET
TU WE TH FR SA SUMO
Step 2
Press the [SW4: YEAR] key until the
correct year appers.
Keeping the SW4 pressed, advances
the year automatically. Longer pressing
speeds advancement.
SW4
YEAR
TU WE TH FR SA SUMO
Step 3
Press the [SW3 : HOUR / MONTH] key
until the correct month appears.
SW3
HOUR
MONTH
TU WE TH FR SA SUMO
9
Page 12

Step 1
Press the [SW5: MODE] key five times,
the "INITIAL NUMBER SET" arrow
flashes.
Example:
Setting initial number to 675829.
SW5
MODE
TU WE TH FR SA SUMO
INITIAL
NUMBER
SET
Step 2
Press the SW2, 3 or 4 key until the
correct number appears.
Longer pressing speeds advancement.
Press the [SW1: SET] key after checking
the desired number on the LCD.
TU WE TH FR SA SUMO
Step 3
Press the [SW1: SET] key again.
SW1
SET
TU WE TH FR SA SUMO
Step 3
Press the [SW1: SET] key again.
SW1
SET
TU WE TH FR SA SUMO
Step 1
Press the [SW5: MODE] key six times,
the "NUMBER REPEAT TIMES" arrow
flashes.
Example:
Setting 2 times repeat.
The repeat times can be set to 0 to 9.
SW5
MODE
TU WE TH FR SA SUMO
NUMBER
REPEAT
TIMES
SW1SW4 SW3 SW2
SET
YEAR
SW1SW2
SET
MINUTE
DAY
HOUR
MONTH
Step 2
Press the [SW2: MINUTE/DAY] key
until the correct number appears.
The repeat times can be selected 0 to 9.
Press the [SW1: SET] key after checking
the desired number on the LCD.
TU WE TH FR SA SUMO
MINUTE
DAY
SETTING THE NUMBER
INITIAL NUMBER SET
NUMBER REPEAT TIMES SET
10
Page 13

Step 1
Plug the AC cord out from the AC outlet.
Confirm the LCD disappeared.
If optional Ni-Cd battery is used, it
should be taken off.
At the time of chenging the date, the number is automatically reset to "0".
Press the [SW2: MINUTE/DAY] key
until the correct number on the LCD.
Press the [SW1: SET] key after checking
the desired number on the LCD.
Step 3
TU WE TH FR SA SUMO
Press the [SW1: SET] key again.
Step 4
SW1
SET
TU WE TH FR SA SUMO
Step 2
Plug the AC cord into the AC outlet
while pressing the [SW5: MODE] key.
Then " 0 " is mentioned on the LCD.
SW5
MODE
TU WE TH FR SA SUMO
Display Number reset
N / A
YES
and
OFF
ON
SW1SW2
SET
MINUTE
DAY
NUMBER RESET
11
Page 14

Step 1
Press the [SW5: MODE] key seven
times, the "COMMENT" arrow flashes.
Example:
Setting the comment to SENT.
SW5
MODE
SW2
MINUTE
DAY
SW1
SET
TU WE TH FR SA SUMO
COMMENT
Step 2
Press the SW2 key until the correct
number appears.
Press the [SW1:SET] key after checking
the desired number on the LCD.
• The comment will change according to country
selection by DIP switch 2-6, 7 and 8.
TU WE TH FR SA SUMO
Step 3
Press the [SW1: SET] key again.
SW1
SET
TU WE TH FR SA SUMO
No.
Comment
1234567
RCVD
SENT
IN OUT
CMFDFILE
D PAID
PREPROGRAMED COMMENTS SETTING
12
Page 15

SETTING THE PASSWORD
Step 1
SW3
HOUR
MONTH
Step 2
Press the [SW3: HOUR/MONTH] key
and assign the desired numbers to first
two digits.
TU WE TH FR SA SUMO
When the password is set, you are asked to enter it. If the password you entered does not
coincide with the setting, you can not change the setting values.
You may set a password by any 4-digit number from 0001 to 9998.
Note a number "00 00" and "99 99" can not be used as a password.
12345678 12345678
DIPSW1 DIPSW2
Set DIPSW 1-2, 4, 5, 8 and DIPSW 2-1,
3, 5, 7, 8 to ON. Then display shows
"00 00".
Example: Password "2878"
SW2
MINUTE
DAY
TU WE TH FR SA SUMO
Step 3
Press the [SW2: MINUTE/DAY] key
and assign the desired numbers to the
last two digits.
SW1
SET
TU WE TH FR SA SUMO
Step 4
Press the [SW1: SET] key. " " located
right-below on the LCD will disappear
that confirms password setting.
Step 5
TU WE TH FR SA SUMO
Set DIP SW1, and 2 as desired position.
DIPSW
1-2, 4, 5and
8: ON
DIPSW
2-1, 3, 5, 7
and 8: ON
REGISTERING THE PASSWORD
13
Page 16

Step 4
Select desired setting mode by pressing
the [SW5: MODE] key. Then make
settings as explained.
SW5
MODE
TU WE TH FR SA SUMO
Step 1
Press the [SW5: MODE] key.
Example: Password "2878"
TU WE TH FR SA SUMO
Step 2
Once password is set, you have to enter the password for changing any settings.
"99 99" will be displayed when you press the [SW5: MODE] key before entering
password.
Press the [SW3: HOUR/MONTH],
[SW2: MINUTE/DAY] key until the
correct number appears.
SW2SW3
MINUTE
DAY
HOUR
MONTH
Step 3
Press the [SW1: SET] key.
SW1
SET
TU WE TH FR SA SUMO
HOUR
MINUTE
HOW TO CHANGE SETTINGS WHEN PASSWORD IS SET
14
Page 17

Step 1
TU WE TH FR SA SUMO
Step 2
Press the [SW3: HOUR/MONTH],
[SW2: MINUTE/DAY] key until the
correct number appears.
TU WE TH FR SA SUMO
12345678 12345678
DIPSW1 DIPSW2
Set DIPSW 1-2, 4, 5, 8, and DIPSW 21, 3, 5, 7, 8, to ON. Then display
shows "99 99".
Example: Cancel Pasword "2878"
Step 4
Step 5
Press the [SW3: HOUR/MONTH],
[SW2: MINUTE/DAY] key until
"00 00" number appears.
Press the [SW1: SET] key.
" " located right-below on the LCD
will disappear that confirms password
cancelation.
SW1
SET
TU WE TH FR SA SUMO
Step 3
Press the [SW1: SET] key.
Step 6
Set DIPSW 1 and 2 as desired position.
SW2SW3
MINUTE
DAY
HOUR
MONTH
DIPSW
1-2, 4, 5and
8: ON
DIPSW
2-1, 3, 5, 7
and 8: ON
CANCELING THE PASSWORD
TU WE TH FR SA SUMO
SW2SW3
MINUTE
DAY
HOUR
MONTH
TU WE TH FR SA SUMO
SW1
SET
TU WE TH FR SA SUMO
15
The code "00 00" must be entered to cancel the password.
Page 18

PRINT METHOD SETTING
TU WE TH FR SA SUMO
TU WE TH FR SA SUMO
The DIPSW1-7 is used to select whether to
print flush right or flush left on the card.
Right
Left
Automatic print
Inserting the card automatically initiates
printing.
Semi-automatic print
Only with the card inserted, pressing the
push bar starts printing.
Manual print
Even with no card, pressing the push bar
starts printing.
Combination
Either inserting the card or pressing the
push bar starts printing.
DIP switch 1-7:ON DIP switch 1-7:OFF
JUN 13 18:08
DIP switch 2-5:ON
JUN 13 PM6:08
DIP switch 2-5:OFF
TU WE TH FR SA SUMO
JUN 13 AM08:08
JUN 13 AM8:08
Time can be displayed on a 12-hour (AM,
PM) or 24-hour basis. DIP switch 2-5 is
used for selection.
Print also changed accordingly.
Leading 0 for hours less than 10 may be
shown (enable) or suppressed (disable) on
print.
Minute is printed in a unit which is obtained
by dividing an hour by 60, 100, 20 or 10.
DIP switches 2-2 and 2-3 are used for
selection.
DIP switch 2-4:ON
DIP switch 2-4:OFF
Print Example
To divide an hour by 60 : 0,1,2...58,59,0,1,2....
To divide an hour by 100 : 0,1,2...98,99,0,1,2....
To divide an hour by 20 : 0,5,10...90,95,0,5,10...
To divide an hour by 10 : 0,1,2...8,9,0,1,2....
JAN 1 AM12:40
JAN 1 AM12.67
JAN 1 AM12.65
JAN 1 AM12.6
Print
Example
Print contents
DIPSW1-8:OFF
DIPSW2-1:OFF
DIPSW1-8:ON
DIPSW2-1:OFF
DIPSW1-8:OFF
DIPSW2-1:ON
DIPSW1-8:ON
DIPSW2-1:ON
JAN 31 AM 12:00
JAN 31 AM 12:00
TYPE OF AN HOURLEFT OR RIGHT PRINT
PRINT SWITCH
LEADING 0
TYPE OF MINUTES
16
Page 19

Year can be printed either 2 digits
or 4 digits. DIPSW 1-6 is used for
the selection.
DIPSW1-6: OFF
'01 OCT 21 AM10:08
DIPSW1-6: ON
2001 OCT 21 AM10:08
English
Spanish
German
French
Italian
Portuguese
Roman
Numeric
DEC 21
DIC 21
DEZ 21
DEC 21
DEC 21
DEZ 21
XII 21
12-21
AM10:08
AM10:08
AM10:08
AM10:08
AM10:08
AM10:08
AM10:08
AM10:08
ExampleLanguage
You can choose 8 differents
languages for printing month, day
of the week, and preprogrammed
comments.Use DIPSW 2-5 ~ 2-8
for setting.
NUMBER OF YEAR DIGITS
TYPE OF LANGUAGE
17
Page 20

1. Carefully slide the exposed ribbon under
the print head.
2. Push cassette with the projection into the
ribbon cassette holder until snapped into
place.
3. Turn the ribbon feed knob clockwise until
the ribbon is taut.
Ribbon cassette
holder
Projection
WALL MOUNTING
REPLACING RIBBON CASSETTE
Four screws
•Leave screw heads
about 1/8" from wall.
•Remove the top case
and hang on the wall.
•Put on the top case.
Step1
Step2
Step3
• Select wall area near AC outlet.
• Mount the Time Recorder on
wood or a surface which can
support weight (dry wall will
not support unit).
18
Page 21

Print example Meaning
JAN 31 AM12:00
31 JAN AM12:00
JAN 31 '00 AM12:00
31 JAN '00 AM12:00
'00 JAN 31 AM12:00
'00 JAN 31 AM12:00:00
'00 JAN 31
JAN 31
31 AM12:00
MO, 31 AM12:00
MO, 31 JAN '00
000000 JAN 31 '00
000000 31 JAN '00
000000 '00 JAN 31
JAN 31 '00 000000
31 JAN '00 000000
'00 JAN 31 000000
000000 31 AM12:00
000 JAN 31 AM12:00
0000 '00 JAN 31 AM12:00
00000 '00 JAN 31 0:00
000000
RCVD JAN 31 '00
RCVD 31 JAN '00
RCVD '00 JAN 31
JAN 31 '00 RCVD
31 JAN '00 RCVD
'00 JAN 31 RCVD
RCVD 31 AM12:00
ABC HOTEL
Mon, Day, Hour, Min
Day, Mon, Hour, Min
Mon, Day, Year, Hour, Min
Day, Mon, Year, Hour, Min
Year, Mon, Day, Hour, Min
Year, Mon, Day, Hour, Min, Sec
Year, Mon, Day
Mon, Day
Day, Hour, Min
DOW, Day, Hour, Min
DOW, Day, Mon, Year
Num, Mon, Day, Year
Num, Day, Mon, Year
Num, Year, Mon, Day
Mon, Day, Year, Num
Day, Mon, Year, Num
Year, Mon, Day, Num
Num, Day, Hour, Min
Num, Mon, Day, Hour, Min
Num, Year, Mon, Day, Hour, Min
Num, Year, Mon, Day, Hour, Min
Num
Com, Mon, Day, Year
Com, Day, Mon, Year
Com, Year, Mon, Day
Mon, Day, Year, Com
Day, Mon, Year, Com
Year, Mon, Day, Com
Com, Day, Hour, Min
Customized Comments
DIPSW1 DIPSW2
12345678 12345678
ON ON
: OFF : ON
DIP SWITCH SETTING
19
Page 22

Print example Meaning
'00 JAN 31 AM12:00
2000 JAN 31 AM12:00
JAN 31 AM12:00
JAN 31 AM12:40
JAN 31 AM12.67
JAN 31 AM12.65
JAN 31 AM12.6
JAN 1 PM3:00
JAN 01 PM03:00
JAN 31 PM3:00
JAN 31 15:00
JAN 31 AM12:00
ENE 31 AM12:00
JAN 31 AM12:00
JAN 31 AM12:00
GEN 31 AM12:00
JAN 31 AM12:00
31 AM12:00
1-31 AM12:00
Types of Year (2 digits)
Types of Year (4 digits)
Flush Left Print
Flush Right Print
Automatic
Manual
Combination
Semi-automatic
60 Min/Hour
100 Min/Hour
20 Min/Hour
10 Min/Hour
Zero Disabled
Zero Enabled
AM/PM
24 Hours
English
Spanish
German
French
Italian
Portuguese
Roman
Numeric
Password
DIPSW1 DIPSW2
12345678 12345678
ON ON
: OFF : ON
JAN 31 AM12:00
NUMBER OF YEAR DIGITS
LEFT OR RIGHT PRINT
PRINT SWITCH
TYPE OF MINUTES
LEADING 0
TYPE OF AN HOUR
TYPE OF LANGUAGE
20
Page 23

Calendar
Clock accuracy
Display
Daylight saving time
Preprogramed
comments
Customized
comments
DIP switch
Memory Backup
SPECIFICATIONS
MAIN FUNCTION
Print method
Print position/
direction
Hour & minute
format
Multiple copies
Ribbon cassette
Impact Dot Matrix - 9pins
4-way Card activated
automatic, manual, semiautomatic or combination
Adjustable trigger trip
Right/Left print by DIP
switch
12 or 24-hours format,
regular minute, 1/10, 1/100
or 5/100 of a hour
Original + 4
(Maximum thickness 3mm
or less)
Carry-on cassette type
fabric ink ribbon
PRINT FUNCTION
Year up to 2099
(Automatically adjusted to leap year)
Monthly accuracy ±15 seconds
(at ordinary temperatures)
Digital LCD with 7 segments
Date, Hour, Minute and day
of the week indication
Auto
Selectable 7 different kinds
Available up to 3 lines
16 poles
3 year memory backup by
lithium battery.
Power supply
Power consumption
110/120VAC..............
...............
...............
220-240/230VAC.......
..............
..............
Temperature
Humidity
Dimensions
Weight
OTHER SPECIFICATIONS
Ribbon cassette
Battery
VIS6002
VIS6001
Available of 200 prints or 72
hours during no electricity.
OPTION
110 VAC, 120 VAC
230 VAC, 220-240 VAC
20 VA max.while printing
4 VA while idling
0.2 A max.while printing
20 VA max.while printing
4 VA while idling
0.1 A max.while printing
Operating -5˚C – 45˚C
Operating 20% – 80% RH
(No condensation)
6 27/32" x 6 3/16" x 8 3/16"
(174mm(W) x157mm(D) x208mm(H))
Approximately 5.5lb.(2.5 Kg)
In case of power failure
Even if a power failure has occurred, the optional
built-in battery backs up to 72 hours (roughly three
days), provided that the battery cells are fully
charged.
No printing battery capacity
The display is flashing when detecting the low
battery capacity. Please stop printing until AC
power supply is resumed.
If you still keep printing, the time recorder will
hang up. When hung up, you have to press the
RESET switch on the control panel by using a pair
of tweezers. In this case, the calendar clock is
cleared.
1 21
Bescheinigung des Herstellers/Importeurs
Dies Gerät entspricht den Bedingungen der Niederspannungs-Vorschrift 73/23/EEC und
dem EMVG nach 89/336/EEC.
This unit complies with the Low Voltage Directive 73/23/EEC and the EMC Directive
89/336/EEC.
Maschinenlärminformationsverordnung 3. GSGV,18.01.1991:Der arbeitsplatzbezogene
Schalldruckpegel beträgt 70 dB(A) oder weniger gemäß ISO 7779.
Die zugeho¨rige Steckdose muß nahe beim Gerät angebracht und leicht zugänglich sein.
 Loading...