


ENGLISH
Lathem Time Corporation
WARNING
This equipment has been tested and found to comply with the limits for a Class A digital device, pursuant to Part 15 of FCC Rules. These limits are designed to provide reasonable protection against harmful interference when the equipment is operated in a commercial environment. This equipment generates, uses, and can radiate radio frequency energy and, if not installed and used in accordance with the instruction manual, may cause harmful interference to radio communications. Operation of this equipment in a residential area is likely to cause harmful interference in which case the user will be required to correct the interference at his or her own expense.
Caution: Changes or modifications not expressly approved by the party responsible for compliance could void the user's authority to operate the equipment.
THIS DIGITAL APPARATUS DOES NOT EXCEED THE CLASS A LIMITS FOR RADIO NOISE EMISSIONS FROM DIGITAL APPARATUS AS SET OUT IN THE RADIO INTERFERENCE REGULATIONS OF THE CANADIAN DEPARTMENT OF COMMUNICATIONS.
LE PRÉSENT APPAREIL NUMÉRIQUE N'ÉMET PAS DE BRUITS RADIOÉLECTRIQUES DÉPASSANT LES LIMITES APPLICABLES AUX APPAREILS NUMÉRIQUES DE CLASSE A PRESCRITES DANS LE RÈGLEMENT SUR LE BROUILLAGE RADIOÉLECTRIQUE ÉDICTÉ PAR LE MINISTÈRE DES COMMUNICATIONS DU CANADA.
1.The details of this User's Manual are subject to change even without previous notification.
2.This User's Manual has been prepared with the utmost care to cover all aspects of the time clock's use.
3.Be sure to use your time clock after you have fully understood the hardware and software specifications and limits.
4.No part of this publication may be reproduced, stored in a retrieval system, or transmitted, in any form or by any means, mechanical, photocopying, recording or otherwise.
This User's Manual and its contents are copyrighted by LATHEM TIME CORP. with all rights reserved.
Lathem Time Corporation
www.lathem. com
(800)241-4990
(404)691-1065

TABLE OF CONTENTS
1. |
PRECAUTIONS |
|
|
|
|
|
1 |
||||
|
|
|
|
|
|||||||
2. |
FEATURES |
|
|
|
|
|
3 |
||||
|
|
|
|
|
|||||||
3. |
BEFORE USING TIME RECORDER |
|
4 |
||||||||
|
|||||||||||
|
Accessories |
|
|
|
|
|
4 |
||||
|
|
|
|
|
|
||||||
|
Features |
|
|
|
|
|
|
|
|
4 |
|
|
|
|
|
|
|
|
|
|
|||
|
Installing Ribbon Cassette |
|
5 |
||||||||
|
|
||||||||||
|
Mounting Unit on Wall |
|
|
7 |
|||||||
|
|
|
|||||||||
|
Environmental Conditions |
|
7 |
||||||||
|
|
||||||||||
4. |
DAILY OPERATIONS |
|
|
|
|
|
|
|
|
|
|
|
8 |
||||||||||||||||||||||
|
|
|
|
|
|
|
|
|
|
|
|||||||||||||||||||||||||
|
Functions for the buttons |
|
|
|
|
|
|
|
|
|
|
|
|
|
9 |
||||||||||||||||||||
|
|
|
|
|
|
|
|
|
|
|
|
|
|
||||||||||||||||||||||
|
Required / Optional / Disabled |
|
|
|
|
|
|
9 |
|||||||||||||||||||||||||||
|
|
|
|
|
|
|
|||||||||||||||||||||||||||||
|
Card reassign |
|
|
|
|
|
|
|
|
|
|
|
|
|
|
|
|
|
|
|
|
|
|
|
|
10 |
|||||||||
|
|
|
|
|
|
|
|
|
|
|
|
|
|
|
|
|
|
|
|
|
|
|
|
|
|||||||||||
|
All cards reset |
|
|
|
|
|
|
|
|
|
|
|
|
|
|
|
|
|
|
|
|
|
|
|
11 |
||||||||||
|
|
|
|
|
|
|
|
|
|
|
|
|
|
|
|
|
|
|
|
|
|
|
|||||||||||||
5. |
Card reset |
|
|
|
|
|
|
|
|
|
|
|
|
|
|
|
|
|
|
|
|
|
|
|
|
|
|
|
|
|
12 |
||||
|
|
|
|
|
|
|
|
|
|
|
|
|
|
|
|
|
|
|
|
|
|
|
|
|
|
|
|
|
|||||||
WHAT YOU CAN DO WITH THE 7000E |
|
|
|
14 |
|||||||||||||||||||||||||||||||
|
|
|
|||||||||||||||||||||||||||||||||
6. |
SETTING |
|
|
|
|
|
|
|
|
|
|
|
|
|
|
|
|
|
|
|
|
|
|
16 |
|||||||||||
|
|
|
|
|
|
|
|
|
|
|
|
|
|
|
|
|
|
|
|
|
|
||||||||||||||
|
Preparation for setting |
|
|
|
|
|
|
|
|
|
|
|
|
|
16 |
||||||||||||||||||||
|
|
|
|
|
|
|
|
|
|
|
|
|
|
||||||||||||||||||||||
|
Setting the Display Hours |
|
|
|
|
|
|
|
|
|
17 |
||||||||||||||||||||||||
|
|
|
|
|
|
|
|
|
|
||||||||||||||||||||||||||
|
Setting the Time |
|
|
|
|
|
|
|
|
|
|
|
|
|
|
|
|
|
18 |
||||||||||||||||
|
|
|
|
|
|
|
|
|
|
|
|
|
|
|
|
|
|
||||||||||||||||||
|
Setting the Date |
|
|
|
|
|
|
|
|
|
|
|
|
|
|
|
|
|
19 |
||||||||||||||||
|
|
|
|
|
|
|
|
|
|
|
|
|
|
|
|
|
|
||||||||||||||||||
|
Setting the Mode |
|
|
|
|
|
|
|
|
|
|
|
|
|
|
|
|
20 |
|||||||||||||||||
|
|
|
|
|
|
|
|
|
|
|
|
|
|
|
|
|
|||||||||||||||||||
|
Payroll Mode |
|
|
|
|
|
|
|
|
|
|
|
|
|
|
20 |
|||||||||||||||||||
|
|
|
|
|
|
|
|
|
|
|
|
|
|
|
|||||||||||||||||||||
|
Job Cost Mode |
|
|
|
|
|
|
|
|
|
|
|
|
|
23 |
||||||||||||||||||||
|
|
|
|
|
|
|
|
|
|
|
|
|
|||||||||||||||||||||||
|
Setting the Print Format |
|
|
|
|
|
|
|
|
|
24 |
||||||||||||||||||||||||
|
|
|
|
|
|
|
|
|
|
||||||||||||||||||||||||||
|
Setting the Rounding |
|
|
|
|
|
|
|
|
|
|
|
26 |
||||||||||||||||||||||
|
|
|
|
|
|
|
|
|
|
|
|||||||||||||||||||||||||
|
Setting the Auto Break Deduction |
|
|
|
27 |
||||||||||||||||||||||||||||||
|
|
|
|||||||||||||||||||||||||||||||||
|
Setting the Max In |
|
|
|
|
|
|
28 |
|||||||||||||||||||||||||||
|
|
|
|
|
|
||||||||||||||||||||||||||||||
|
Setting the Button Function |
|
|
|
29 |
||||||||||||||||||||||||||||||
|
|
|
|
||||||||||||||||||||||||||||||||
|
Setting the Daylight Saving Time |
|
|
|
|
|
30 |
||||||||||||||||||||||||||||
|
|
|
|
|
|
||||||||||||||||||||||||||||||
|
Deleting the daylight saving time settings |
|
|
33 |
|||||||||||||||||||||||||||||||
|
|
|
|||||||||||||||||||||||||||||||||
|
Setting the Print Language |
|
|
34 |
|||||||||||||||||||||||||||||||
|
|
|
|||||||||||||||||||||||||||||||||
7. |
Resetting |
|
|
|
|
|
|
|
|
|
|
|
|
|
|
|
|
|
|
|
|
|
|
|
|
|
|
|
|
|
|
|
35 |
||
|
|
|
|
|
|
|
|
|
|
|
|
|
|
|
|
|
|
|
|
|
|
|
|
|
|
|
|
|
|
|
|||||
PRINT EXAMPLE |
|
|
|
|
|
|
|
36 |
|||||||||||||||||||||||||||
|
|
|
|
|
|
|
|||||||||||||||||||||||||||||
8. |
INSTALLING Ni-Cd BATTERY (Optional) |
|
|
37 |
|||||||||||||||||||||||||||||||
|
|
||||||||||||||||||||||||||||||||||
9. |
TROUBLESHOOTING |
|
|
|
|
|
38 |
||||||||||||||||||||||||||||
|
|
|
|
|
|||||||||||||||||||||||||||||||
10. |
SPECIFICATIONS |
|
|
39 |
|||||||||||||||||||||||||||||||
|
|
||||||||||||||||||||||||||||||||||
1. PRECAUTIONS
This operation manual is prepared for safe and proper use of the unit. Please follow all the instructions to avoid possible danger to yourself or others and damage to the unit.
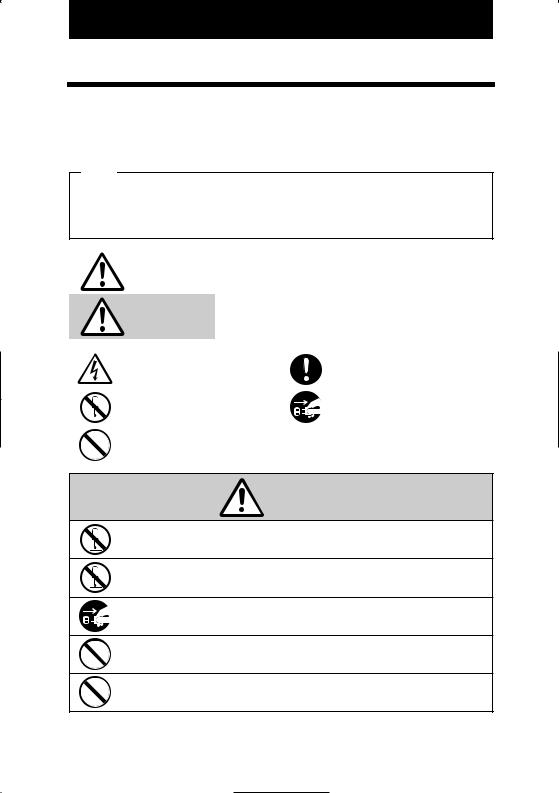
Signs
Various warnings and cautions are provided throughout this manual along with signs. Remember each sign and its explanation listed below for your safety and proper operation of the unit.
|
|
Warning |
Improper handling may cause bodily accidents including |
||
|
|
death and serious injury. |
|
||
|
|
|
|
|
|
|
|
Caution |
Improper handling may harm the human body or material. |
||
|
|
|
|
|
|
|
|
|
|
|
|
|
|
Improper handling may cause electric |
|
"Must-Do" sign. |
|
|
|
shock DANGER. |
|
|
|
|
|
|
|
|
|
|
|
|
|
|
|
|
|
DO NOT disassemble the unit. |
|
Be sure to remove the line cord plug |
|
|
|
|
from the outlet. |
||
|
|
|
|
|
|
|
|
|
|
|
|
|
|
"Don't" sign. |
|
|
|
|
|
|
|
|
|
Warning
Do not disassemble the unit. There is a high voltage present inside, possibly leading to an electric shock.
Do not modify the unit. Modifications may cause a fire and/or electric shock.
If any anomaly occurs, for example, heat or smoke is generated or an odor is emitted, unplug the unit immediately and contact your dealer for servicing. There is a danger that further use may cause a fire or electric shock.
Do not use any voltage of the power source other than designated.
Do not share a single outlet with another plug. These may lead to fire or shock hazards.
Do not damage, break, or modify the power cord. Do not put a heavy object on, pull, or forcefully bend the cord, either. These may damage the cord, possibly resulting in a fire or electric shock.
1
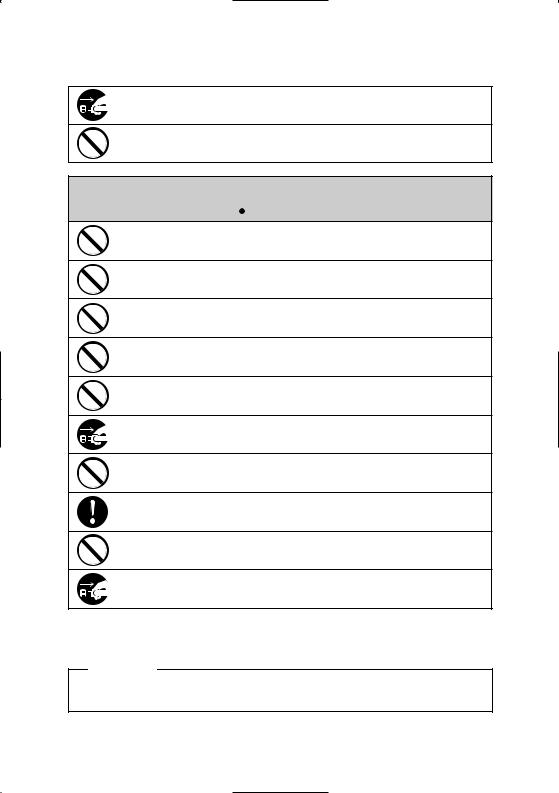
If foreign matter should get in the unit (including a piece of metal, water, or liquid), disconnect the plug from the outlet immediately and contact your dealer for servicing. There is a danger that further use may cause a fire or electric shock.
Do not plug or unplug the unit with a wet hand. You may get an electric shock.
 Caution
Do not place the unit on an uneven or tilted surface. This may result in injuries due to the unit dropping or falling off.
Do not put a water-filled container or a metal object on top of the unit. If water is spilled or the metallic object slips inside, a fire or shock hazard may occur.
Do not install the unit in a humid or dusty environment. It may cause a fire or electric shock.
Do not place the unit near kitchen counter or humidifier. Oil, smoke, or steam generating from them may cause fire or shock hazards.
Do not yank the power cord to disconnect from the outlet. Hold the plug with your hand to do so, or the cord may be damaged, possibly leading to a fire or electric shock.
Remove the line cord plug from the outlet before transferring the unit, or it may damage the cord, possibly leading to a fire or electric shock.
Be careful not to contact the print head, as you may get hurt or burned.
Make sure to insert the power plug as far as it will go. Improper insertion of the plug may develop fire or shock hazards.
Do not insert or drop any other time card than specified into the slot. Such misuse may cause a fire or electric shock.
If the unit should be dropped or the case be broken, unplug the unit and contact your dealer for servicing. Further use may lead to a fire or shock hazard.
Daily Care
For cleaning, turn the power off and wipe the case clean of dust and dirt with a dry
cloth, etc.
2

2. FEATURES
This time recorder will provide automatic alignment and basic calculation of total hours. This time recorder will utilize time cards pre-encoded with a bar code and numbered 1 through 100. The time recorder is designed for small businesses as a fast and efficient way to track time for Payroll and Job Costing.
 Automatic top-feed time recorder aligns registrations on time card.
 Prints IN (Start) and OUT (Stop) dates and times.
 The recorder can operate in one of 2 modes; Payroll Mode / Job Cost Mode
 The recorder prints total elapsed time between registrations and also prints a running total of accumulated time per time card on each line.
 In order to properly identify missed punches, the recorder has a "Max In" value that is used to pair punches for calculations.
 The number of cards that can be automatically registered is a maximum of 50 cards.
 The functions for the buttons on the front of the recorder can be set. There are 3 options;
Required / Optional / Disabled
 Automatic Daylight Savings adjustment
 The languages English·Spanish·French can be selected to print "Month" and "the days of the week".
 The clock can be either wall or table mountded.
You can usually obtain technical support and order accessories from the store where you bought the clock. To contact Lathem, go on-line to www.lathem.com or call 800-241-4990 (404-691-1065 outside USA ).
3
3. BEFORE USING TIME RECORDER
Accessories
Keys |
Ribbon cassette |
Part No. VIS6008
Wall mount hardware
MUST USE THE E7 SERIES CARD FROM LATHEM TO INSURE PROPER OPERATION.
An optional battery is sold separately (Part No. VIS 6020) to provide 100% operation of card print mechanism during power failures.
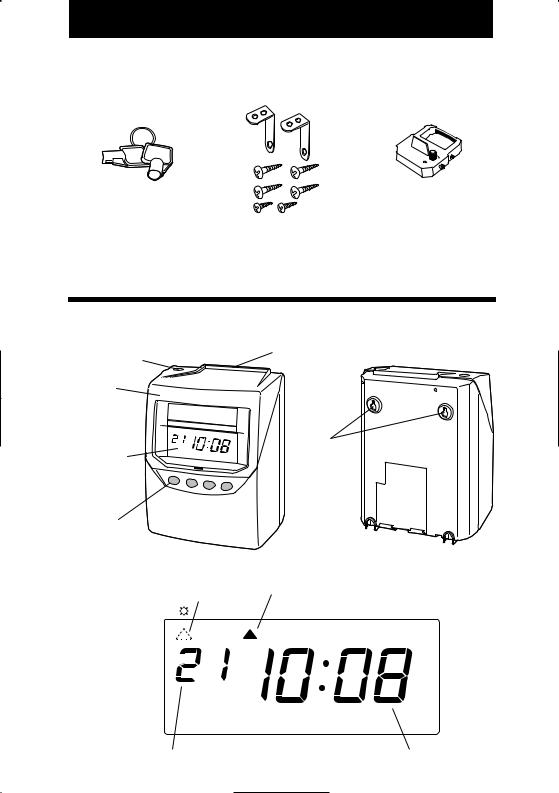
Features
<Front view> |
<Back view> |
Card slot
Key hole
Cover
|
Wall-mounting |
Display |
hole |
|
Control button
< Display >
Daylight saving time indication |
Day of the week indication |
|
|
SU MO TU WE TH FR SA |
|
IN |
OUT |
|
Current date |
Current time |
4 |
|
|
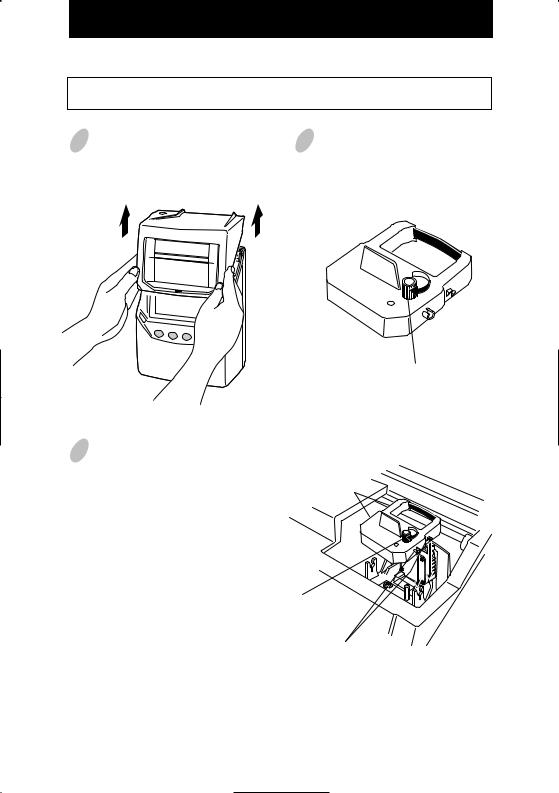
Installing Ribbon Cassette
Make sure the power is on before installing.
1 Hold the left and right sides of the cover and lift up.
2 Turn the knob of the new ribbon cassette in the same direction as the arrow to tighten the ribbon.
3 Place the ribbon cassette inside the time recorder as shown in the figure. Push the ribbon cassette until it snaps into the clasps on both sides. If it is difficult to insert the ribbon cassette, try it while turning the knob.
Knob
Clasp
Knob
Clasp
(located on both sides)
5
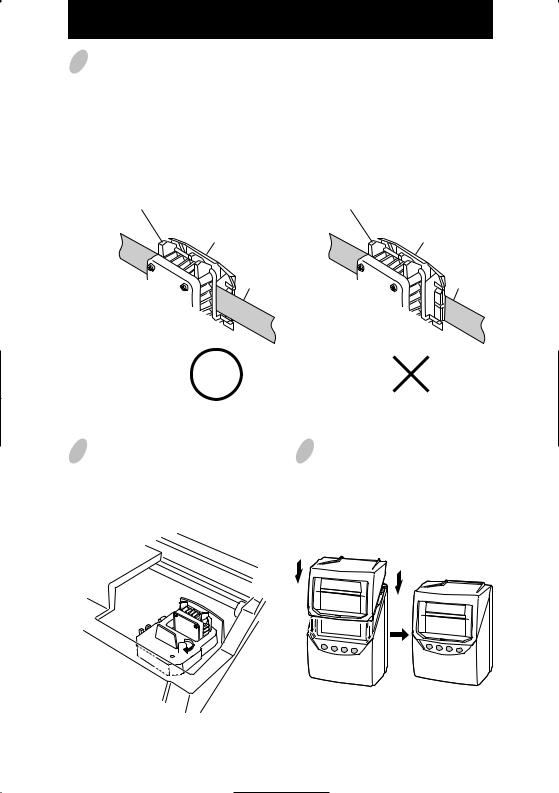
4 Precautions to take when replacing the ribbon
Take the following precautions when inserting a new ribbon cassette.
Install the ribbon cassette so that the ribbon is between the print head and the ribbon mask (see the figure on the left). Printing will not come out properly if the ribbon is placed behind the ribbon mask (see the figure on the right).
Print head |
Print head |
Ribbon mask |
Ribbon mask |
Ribbon |
Ribbon |
5 Turn the knob of the ribbon cassette in the direction of the arrow to tighten the ribbon.
6 Replace the cover by fitting the plugs at both sides of the cover into the holes located on the unit of the body, and while pulling the cover toward yourself, push down.
Knob 


6
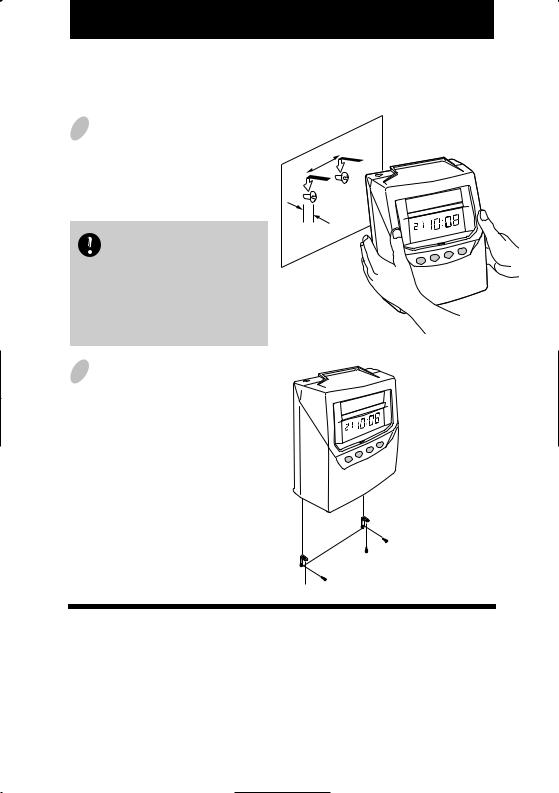
Mounting Unit on Wall
The unit can be mounted on a wall using the supplied mounting fittings. To mount the unit on a wall, take the following steps:
1 Install wall mount screws (supplied) into a wall 3.94 inches (10 cm) apart. Be sure to keep about 0.12 inch ( 3 mm) of the screw head out of the wall.
.94" |
(10cm) |
|
|
3 |
|
The supplied screws are intended for use on a thick wooden wall or wooden column. Do not use them on any other materials. There is a danger that the unit may come off if used on other materials.
(3mm)0.12"
2 Mount the wall mount fittings as shown on the right.
Environmental Conditions
Avoid placing the unit in environments that are:
•humid or dusty
•exposed to direct sunshine
•subject to frequent or continuous vibrations
•outside the temperature range between 23˚F (-5˚C) and 113˚F (45˚C)
•affected by chemicals or ozone
7
4. DAILY OPERATIONS
Once the AC line cord is plugged into the outlet, the recorder can be used immediately. Basic operations, including the time and dates are preset.
It is easy to operate the unit. The time card is automatically pulled in, printed and then ejected.
Refer to "3.BEFORE USING TIME RECORDER".
Do not let any metallic object get into the slot including paper clips. Do not forcefully push in a card, either. These may cause the unit to malfunction.
 The number of cards that can be automatically registered is a maximum of 50 cards.
 When a new card is inserted, the card will automatically be registered, and will print the "IN" print on the first line. The month will be printed on the first line also or on the line when the month and printing line change.
 You can print "IN" and "OUT" as many times as you want per day. Concerning the printing line, it will slide one line down each time you insert the card for "IN" print.
 You can choose 3 functions for the buttons. You must set these modes before inserting any card in order for it to be valid.
Refer to "Functions for the buttons".
 When the card that you are using becomes full, it will show "END" on the display. When the "END" appears, you can use the "Card reassign" mode to transfer the card and have a new card take over from the old one.
Refer to "Card reassign".
 When you want to reset the card (clear the accumulated totals) manually, you can use the "Card reset" mode to reset a sigle card or use the "All cards reset " mode to reset all the cards in memory. It is not necessary to routinely reset cards manually, since the clock does this automatically each pay period (unless using Job Cost Mode ).
Refer to "Card reset" and "All cards reset".
8

Functions for the buttons
You can select one of three functions for the buttons.
Required
You must push the "IN" or "OUT" button immediately prior to inserting the time card. If not, the card will be ejected and an error sign will appear.
NO |
YES |
Optional
When the time card is inserted, the recorder will judge the last imprint and automatically switch the "IN" and "OUT". You may also manually switch the column position of the imprint by pushing the button.
YES |
YES |
Disabled
When the time card is inserted, the recorder will judge the last imprint and automatically switch the "IN" and "OUT". The buttons are disabled for normal operation.
9 |
YES |
NO |
|
|
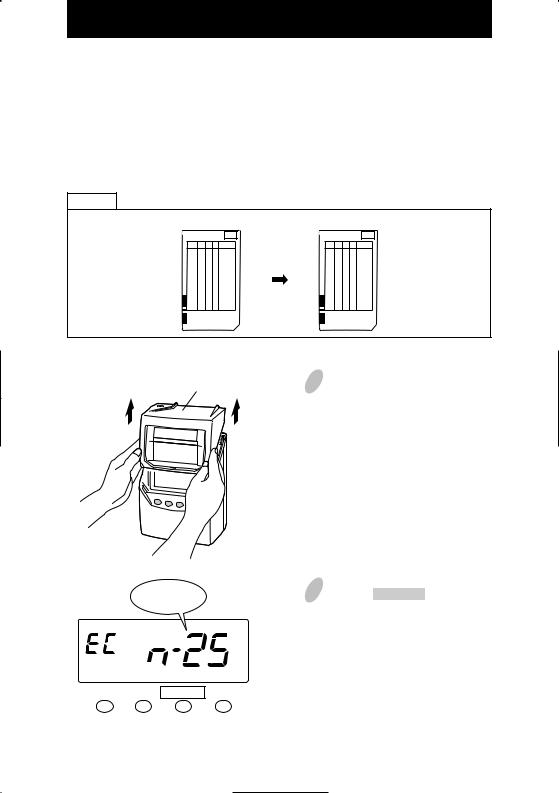
Card reassign
When the card that you are using becomes full (Max 64 punches), it will show "END" on the display and the buzzer will sound. When the "END" appears, you can use the "Card reassign" mode to transfer the card and have a new card take over from the old one.
In this function, it will be usefull........
•when the card has become full before reaching the "Pay Period". [In Payroll Mode]
•when the card that is lost or damaged.
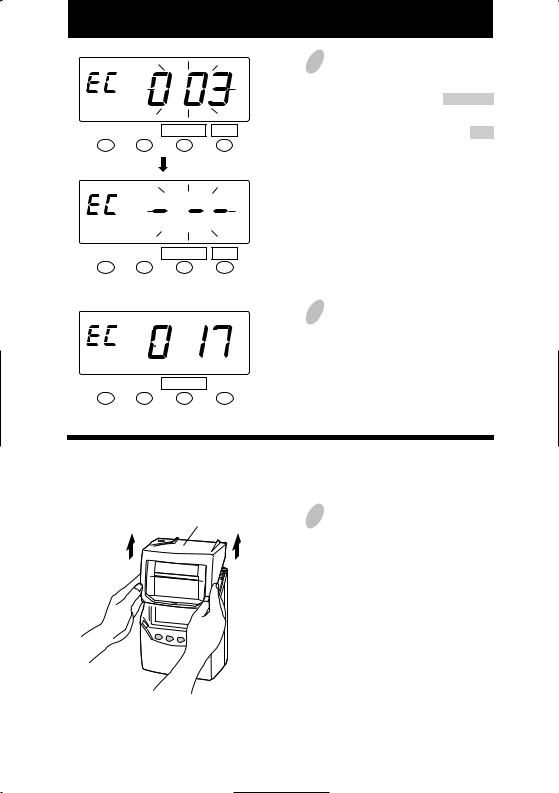
Example
Card of No.3 |
Card of No.17 |
003 |
017 |
|
transfer |
Cover
The number of cards
CHANGE
1
2
Remove the cover.
Push the CHANGE button for 3 seconds.
When you have a card that you are using, the number of cards that you are using will be shown on the display. If there are no cards used at the present state, it will show "n-00" and will end the mode.
10
|
3 After the numbers of cards are |
|
shown, in the example, insert the |
|
card "003" or push the CHANGE |
|
button to show the card number |
CHANGE SET |
"003" and then push the SET |
|
button. |
CHANGE SET
|
|
4 Next insert the card "017" or push |
||||
|
|
the |
|
|
button to pick a new |
|
|
|
CHANGE |
||||
|
|
card number "017" and then push |
||||
|
|
the |
|
button. |
||
|
|
SET |
||||
|
|
When the card number is changed, |
||||
CHANGE |
SET |
|||||
|
|
this mode will finish. |
||||
All cards reset
You want to reset all cards manually.......
Cover |
1 Remove the cover. |
11
 Loading...