

Page 1
Lathem Time Corporation
Page 2

This equipment has been tested and found to comply with the limits for a Class A
digital device, pursuant to Part 15 of FCC Rules. These limits are designed to
provide reasonable protection against harmful interference when the equipment
is operated in a commercial environment. This equipment generates, uses, and
can radiate radio frequency energy and, if not installed and used in accordance
with the instruction manual, may cause harmful interference to radio
communications. Operation of this equipment in a residential area is likely to
cause harmful interference in which case the user will be required to correct the
interference at his or her own expense.
Caution: Changes or modifications not expressly approved by the party
responsible for compliance could void the user's authority to operate the
equipment.
THIS DIGITAL APPARATUS DOES NOT EXCEED THE CLASS A LIMITS FOR RADIO NOISE EMISSIONS
FROM DIGITAL APPARATUS AS SET OUT IN THE RADIO INTERFERENCE REGULATIONS OF THE
CANADIAN DEPARTMENT OF COMMUNICATIONS.
LE PRÉSENT APPAREIL NUMÉRIQUE N'ÉMET PAS DE BRUITS RADIOÉLECTRIQUES DÉPASSANT LES
LIMITES APPLICABLES AUX APPAREILS NUMÉRIQUES DE CLASSE A PRESCRITES DANS LE
RÈGLEMENT SUR LE BROUILLAGE RADIOÉLECTRIQUE ÉDICTÉ PAR LE MINISTÈRE DES
COMMUNICATIONS DU CANADA.
The details of this User's Manual are subject to change even without previous notification.
This User's Manual has been prepared with the utmost care to cover all aspects of the time
clock's use.
Be sure to use your time clock after you have fully understood the hardware and software
specifications and limits.
No part of this publication may be reproduced, stored in a retrieval system, or transmitted,
in any form or by any means, mechanical, photocopying, recording or otherwise.
1.
2.
3.
4.
Lathem Time Corporation
www. lathem. com
(800) 241-4990
This User's Manual and its contents are copyrighted by LATHEM
TIME CORP. with all rights reserved.
WARNING
Page 3

1
Thank you for purchasing our time clock.
For safe and proper operation, please carefully read the manual
before using the time clock and save it for reference.
Features:
Quartz time clock
Dot matrix printer
Perpetual calendar
Automatic daylight saving time
3-way print activation
Automatic
Semi-automatic
Manual
Prints in 4 languages
12 or 24-hour format
Regular minute, 1/10, 1/60,
1/100 or 5/100 of an hour
2 or 4-digit year imprint
13 preprogramed comments
Digital LCD display (Date, Hour,
Minute, Day of the week indication)
Adjustable print position
Prints seconds
Caution:
Avoid placing the unit in environments that are:
• humid or dusty.
• exposed to direct sunshine.
• subject to frequent or continuous vibrations.
• outside the temperature range between -5˚ and 45˚C
(+25˚and 113˚F)
• affected by chemicals or ozone.
Place the time clock close to the wall outlet so that it is easily
accessible to disconnect.
Do not put a heavy object on the clock, or not forcefully press the
cover of the clock. It may cause mechanism trouble and danger
especially when the unit is hung on the wall.
Replace battery with TOSHIBA, part no. CR 2450 TVB only.
Use of another battery may present a risk of fire or explosion.
Main applications: Payroll/job cost recorder or time stamp
•
•
•
•
•
•
•
•
•
•
•
•
•
•
•
•
•
•
•
•
•
•
•
•
•
•
•
•
•
•
•
•
•
•
•
•
•
For questions about the operation of this time clock, or to order
supplies and accessories, please contact Lathem Time at
(800)241-4990.
Page 4

BEFORE USING THE TIME CLOCK
Accessories
Configuration
Wall-mount holes
(Upper side)
Wall-mount fittings
Screws (2 pcs.)
Template
Ribbon cassette
(installed at the factory)
Key
User's manual
<Back view>
<Cover off>
<Front view>
JAN 31AM12:00
JAN 31AM12:00
JAN31A
15mm
30mm
<Print position adjuster>
The print position from the card
edge is adjustable by pressing
and sliding the print position
button on outside bottom.
Cover
Display
Push bar
Key hole
AC adapter
Display
Ribbon cassette
Print head
Control buttons
The print position from the card edge is adjustable by pressing
and sliding the print position button located on the right outside
bottom of the recorder. Maxuim distance from edge of form to
print is approximately 1 3/16"(30mm).
PRINT POSITION ON TIME CARD
2
Page 5

3
QUICK EASY SETUP
NOTICE: Remove the PROTECTION PAD before you plug the AC adapter into the AC outlet.
To setup your time clock, follow next steps:
Step 1
Unlock the key and remove the cover.
Remove the PROTECTIONPAD , and
plug the AC adapter into the time clock.
Replace the cover and lock.
Plug the AC adapter into the AC outlet
and insert a card.
Step 2
Step 4
Step 3
CAUTION
AC outlet
AC adapter
Card
CAUTION
Page 6
4
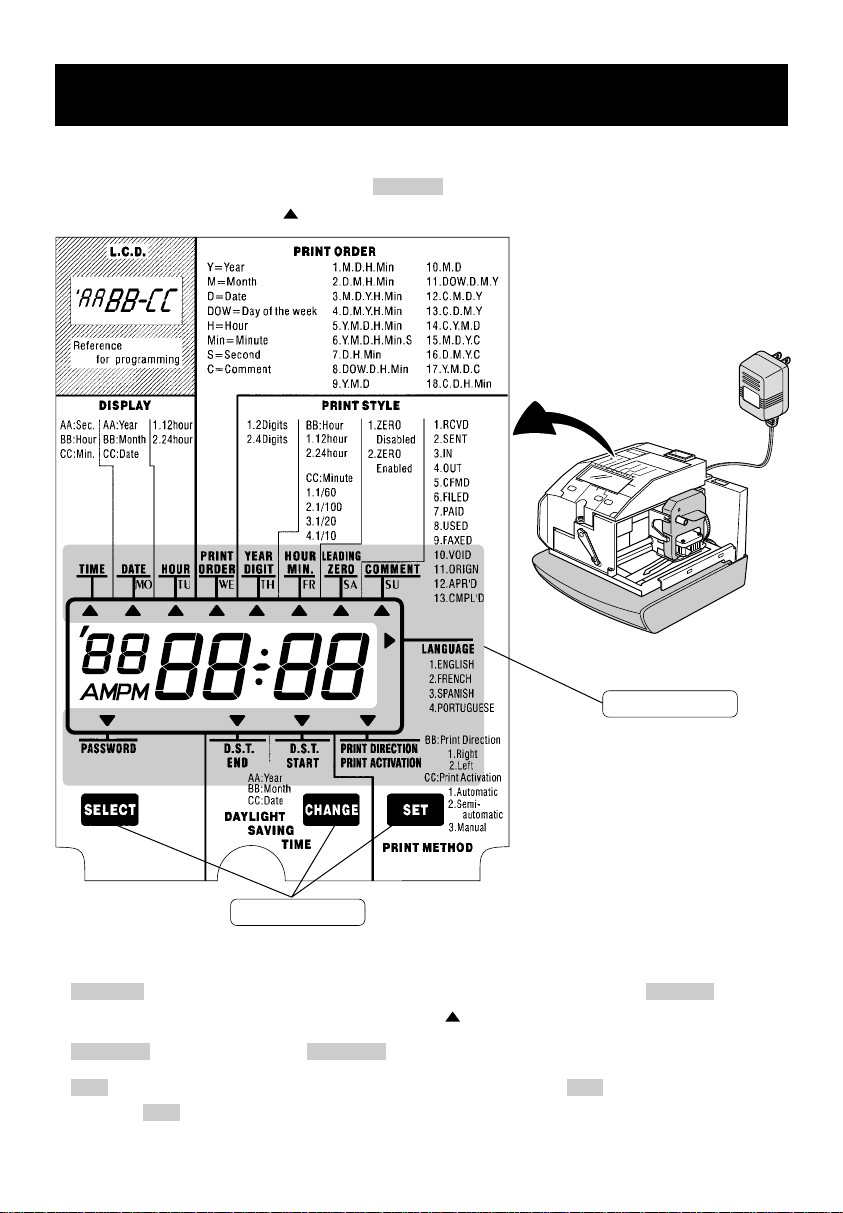
To enter the program setting mode, you should plug the AC adapter into the AC outlet and
remove the cover. Thereafter press the SELECT button once. Then the clock goes into the
program mode showing the " " on the display positioned at the "TIME".
Function of 3 control buttons
SELECT : You can select the desired program setting mode by pressing this SELECT button.
Selected program setting mode is indicated by the " " mark on the display.
CHANGE : When you press the CHANGE button, you can increment the set value.
SET : You can set the value selected on the display by pressing the SET button. Thereafter you
press this SET button again, you can return the clock to the normal operation mode.
HOW TO PROGRAM THE CLOCK
Control buttons
Program modes
Page 7
5
SETTING THE DISPLAY FORMAT
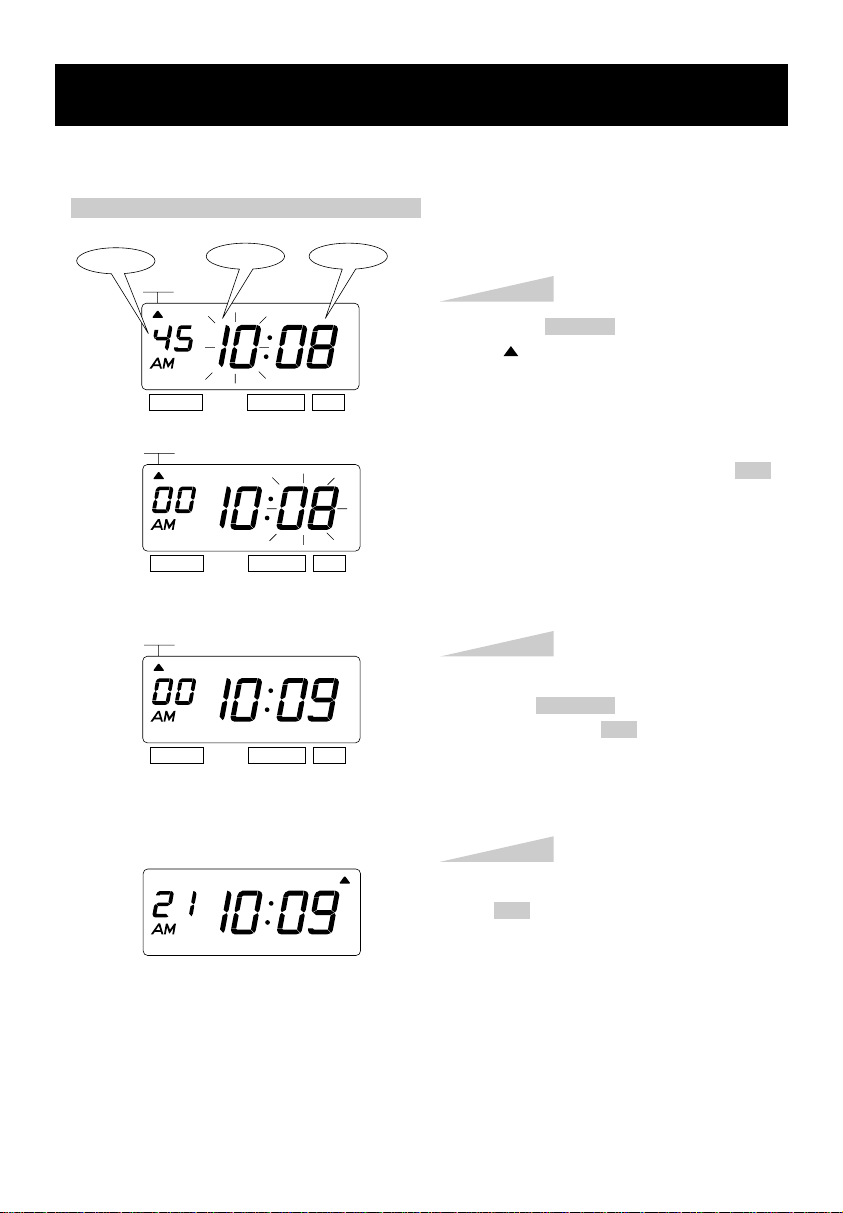
SETTING THE TIME
Example: Change the time from 10:08 to 10:09.
Press the SELECT button and position
the " " mark at the "TIME".
At that moment, the "Hour" flashes. (The
flashing means it can be changed.)
Change the "Hour".
In case of the example, press the SET
button because the hour is not to be
changed.
At that moment, the flashing changes
from "Hour" to "Minute".
Step 1
TIME
SELECT CHANGE SET
Change the "Minute".
Press the CHANGE button to set at "09",
and then press the SET button.
At that moment, the "Second" starts to
run from "00".
Step 2
TIME
SELECT CHANGE SET
SELECT CHANGE SET
TIME
After you finish setting the time, press
the SET button once again.
Now the time setting has been
completed. Replace the cover and lock.
IMPORTANT: If you do not complete
Step 3, the clock will not print.
Step 3
TU WE TH FR SA SUMO
Second
Hour
Minute
Page 8
6
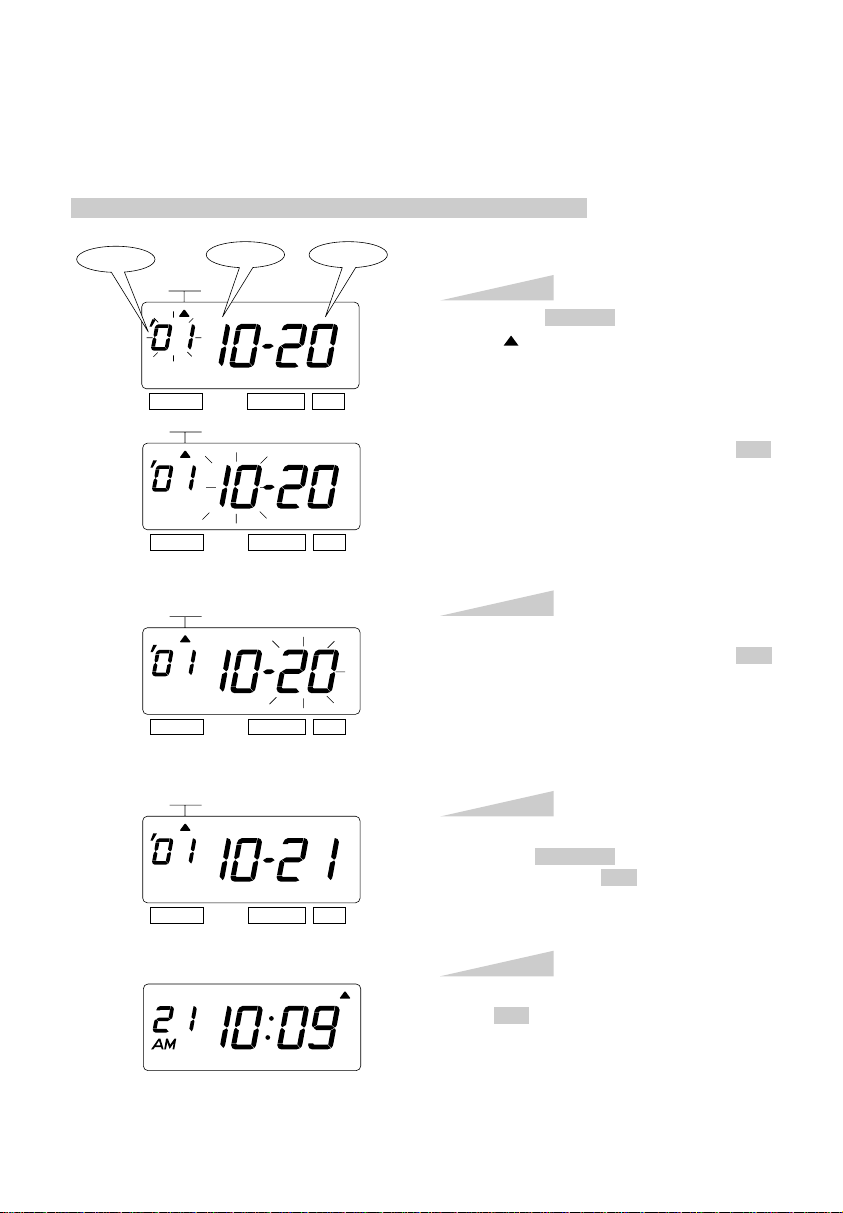
SETTING THE DATE
Example: Change the date from October 20, 2001 to October 21, 2001.
Press the SELECT button and position
the " " mark at the "DATE".
At that moment, the "Year" flashes. (The
flashing means it can be changed.)
Change the "Year".
In case of the example, press the SET
button because the year 2001 is not to be
changed.
At that moment, the flashing changes
from "Year" to "Month".
Step 1
DATE
SELECT CHANGE SET
DATE
SELECT CHANGE SET
DATE
SELECT CHANGE SET
DATE
SELECT CHANGE SET
Change the "Month".
In case of the example, press the SET
button because the month is not to be
changed.
At that moment, the flashing changes
from "Month" to "Date".
Step 2
Change the "Date".
Press the CHANGE button to set at "21",
and then press the SET button.
Step 3
After you finish setting the date, press
the SET button once again.
Now the date setting has been completed.
Replace the cover and lock.
IMPORTANT: If you do not complete
Step 4, the clock will not print.
Step 4
TU WE TH FR SA SUMO
Year
Month
Date
Page 9

7
SETTING THE 12/24 HOUR
Example: Change the hour format to 24 hour.
Press the SELECT button and position
the " " mark at the "HOUR".
At that moment, the flashing digit
indicates "Order Options" of the hour
format. (The flashing means it can be
changed.)
Step 1
HOUR
SELECT CHANGE SET
After you finish setting the 12/ 24 hour,
press the SET button once again.
Now the 12/24 hour setting has been
completed. Replace the cover and lock.
IMPORTANT: If you do not complete
Step 2, the clock will not print.
Step 2
HOUR
SELECT CHANGE SET
1.
2.
Order Options
12 hour
24 hour
Display
PM 3:00
15:00
In case of the example, press the CHANGE
button to set at "2". And then press the SET
button.
TU WE TH FR SA SUMO
Page 10
8
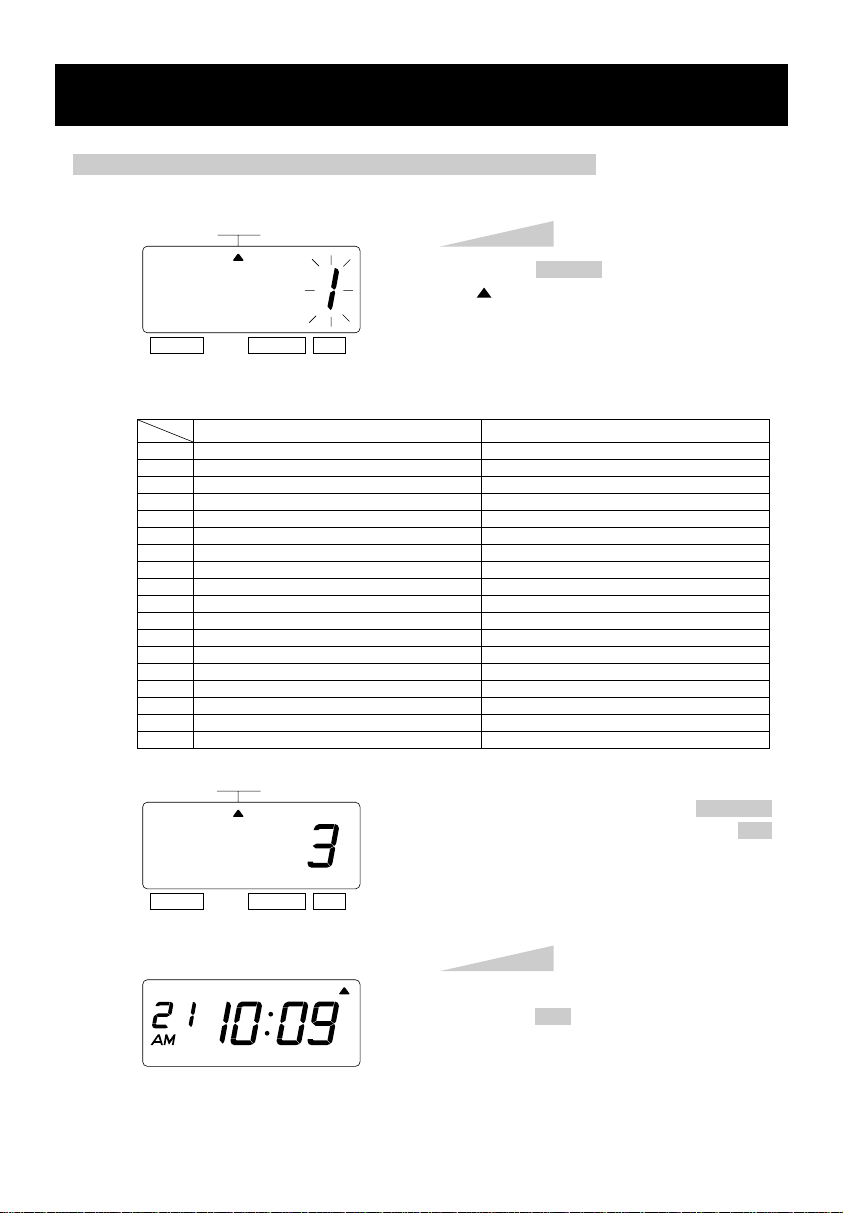
Example: Change the print order to "Month, Date, Year, Hour, Minute".
Press the SELECT button and position the
" " mark at the "PRINT ORDER".
At that moment, the flashing digits indicate
"Order Options" of the print order. (The
flashing means it can be changed.)
Step 1
PRINT
ORDER
SELECT CHANGE SET
PRINT
ORDER
SELECT CHANGE SET
In case of the example, press the CHANGE
button to set at "3". And then press the SET
button.
After you finish setting the print order,
press the SET button once again.
Now the print order setting has been
completed. Replace the cover and lock.
IMPORTANT: If you do not complete
Step 2, the clock will not print.
Step 2
1.
2.
3.
4.
5.
6.
7.
8.
9.
10.
11.
12.
13.
14.
15.
16.
17.
18.
Order Option
M, D, H, Min
D, M, H, Min
M, D, Y, H, Min
D, M, Y, H, Min
Y, M, D, H, Min
Y, M, D, H, Min, S
D, H, Min
DOW, D, H, Min
Y, M, D
M, D
DOW, D, M, Y
C, M, D, Y
C, D, M, Y
C, Y, M, D
M, D, Y, C
D, M, Y, C
Y, M, D, C
C, D, H, Min
Print Example
JAN 31 AM10:00
31 JAN AM10:00
JAN 31 '01 AM10:00
31 JAN '01 AM10:00
'01 JAN 31 AM10:00
'01 JAN 31 AM 10:00:00
31 AM10:00
WE, 31 AM10:00
'01 JAN 31
JAN 31
WE, 31 JAN '01
SENT JAN 31 '01
SENT 31 JAN '01
SENT '01 JAN 31
JAN 31 '01 SENT
31 JAN '01 SENT
'01 JAN 31 SENT
SENT 31 AM10:00
SETTING THE PRINT ORDER
Y=Year, M=Month, D=Date, DOW=Day of the week, H=Hour, Min=Minute
S=Second, C=Comment
TU WE TH FR SA SUMO
Page 11

9
SETTING THE PRINT STYLE
SETTING THE YEAR DIGIT
Example: Change the year imprint to 4 digits.
Press the SELECT button and position
the " "mark at the "YEAR DIGIT".
At that moment, the flashing digit
indicates "Order Options" of the year
imprint. (The flashing means it can be
changed.)
Step 1
YEAR
DIGIT
SELECT CHANGE SET
YEAR
DIGIT
SELECT CHANGE SET
After you finish setting the year digit,
press the SET button once again.
Now the year digit setting has been
completed. Replace the cover and lock.
IMPORTANT: If you do not complete
Step 2, the clock will not print.
Step 2
1.
2.
Order Options
2 Digits
4 Digits
Print Example
JAN 31 '01 AM10:00
JAN 31 2001 AM10:00
In case of the example, press the CHANGE
button to set at "2", and then press the SET
button.
TU WE TH FR SA SUMO
Page 12

10
SETTING THE
HOUR/MIN.
Example: Change the print style of the "Hour" and "Minute" to 24 hour and 1/100 min.
Press the SELECT button and position the
" "mark at the "HOUR /MIN".
At that moment, the flashing digit at the
left indicates "Order Options" of the print
style of the "Hour". (The flashing means it
can be changed.)
Step 1
HOUR
MIN.
SELECT CHANGE SET
HOUR
MIN.
In case of the example, press the CHANGE
button to set at "2". And then press the SET
button.
At that moment, the flashing changes from
"Hour" to "Minute".
1.
2.
Order Options
12 Hour
24 Hour
Print Example
JAN 31 PM3:00
JAN 31 15:00
After you finish setting the hour/minute,
press the SET button once again.
Now the hour/minute setting has been
completed. Replace the cover and lock.
IMPORTANT: If you do not complete
Step 3, the clock will not print.
Step 3
HOUR
MIN.
SELECT CHANGE SET
SELECT CHANGE SET
In case of the example, press the
CHANGE button to set at "2". And then
press the SET button.
Step 2
Change the "Hour".
1.
2.
3.
4.
1/60 Min.
1/100 Min.
JAN 31 AM12:10
JAN 31 AM12.17
1/20 Min. (=5/100 Min.)
1/10 Min.
Change the "Minute".
JAN 31 AM12.15
JAN 31 AM12.1
Order Options Order Options
Print Example Print Example
TU WE TH FR SA SUMO
Type of
Minute
Type of
an hour
Page 13

11
SETTING THE LEADING ZERO
Example: Change the leading zero to "ZERO: Disabled".
Press the SELECT button and position
the " "mark at the "LEADING ZERO".
At that moment, the flashing digit
indicates "Order Options" of the leading
zero.
(The flashing means it can be changed.)
Step 1
LEADING
ZERO
LEADING
ZERO
SELECT CHANGE SET
SELECT CHANGE SET
After you finish setting the leading zero,
press the SET button once again.
Now the leading zero setting has been
completed. Replace the cover and lock.
IMPORTANT: If you do not complete
Step 2, the clock will not print.
Step 2
1.
2.
Order Options
ZERO Disabled
ZERO Enabled
Print Example
JAN 1 PM3:00
JAN 01 PM03:00
In case of the example, press the CHANGE
button to set at "1". And then press the
SET button.
TU WE TH FR SA SUMO
Page 14

12
SETTING THE
COMMENT
Example: Change the comment to "SENT".
Press the SELECT button and position the
" " mark at the "COMMENT".
At that moment, the flashing digits indicate
"Order Options" of the comment.
(The flashing means it can be changed.)
Step 1
COMMENT
COMMENT
SELECT CHANGE SET
SELECT CHANGE SET
After you finish setting the comment, press
the SET button once again.
Now the comment setting has been
completed. Replace the cover and lock.
IMPORTANT: If you do not complete
Step 2, the clock will not print.
Step 2
1.
2.
3.
4.
5.
6.
7.
8.
9.
10.
11.
12.
13.
Order Options
RCVD
SENT
IN
OUT
CFMD
FILED
PAID
USED
FAXED
VOID
ORIGN
APR'D
CMPL'D
Print Example
JAN 31 '01 RCVD
JAN 31 '01 SENT
JAN 31 '01 IN
JAN 31 '01 OUT
JAN 31 '01 CFMD
JAN 31 '01 FILED
JAN 31 '01 PAID
JAN 31 '01 USED
JAN 31 '01 FAXED
JAN 31 '01 VOID
JAN 31 '01 ORIGN
JAN 31 '01 APR'D
JAN 31 '01 CMPL'D
In case of the example, press the CHANGE
button to set at "2". And then press the SET
button.
TU WE TH FR SA SUMO
Page 15

13
SETTING THE LANGUAGE
This setting is available if you select "Month," "Day of the week" or "Comment" in previous
"PRINT ORDER".
Example: Change the print language into French.
Press the SELECT button and position
the " " mark at the "LANGUAGE".
At that moment, the flashing digit
indicates "Order Options" of the print
language. (The flashing means it can be
changed.)
Step 1
LANGUAGE
SELECT CHANGE SET
SELECT CHANGE SET
After you finish setting the language,
press the SET button once again.
Now the language setting has been
completed. Replace the cover and lock.
IMPORTANT: If you do not complete
Step 2, the clock will not print.
Step 2
1.
2.
3.
4.
Order Options
ENGLISH
FRENCH
SPANISH
PORTUGUESE
Print Example
WE, 26 DEC '01
OUT 31 AM10:00
ME, 26 DEC '01
SORT 31 AM10:00
MI, 26 DIC '01
SAL 31 AM10:00
QA, 26 DEZ '01
SAIDA 31 AM10:00
In case of the example, press the
CHANGE button to set at "2". And then
press the SET button.
TU WE TH FR SA SUMO
LANGUAGE
Page 16

14
SETTING THE PRINT METHOD
Example: Change the print direction to "Left" and the print activation to "Manual".
Press the SELECT button and position the
" " mark at the "PRINT DIRECTION;
PRINT ACTIVATION".
At that moment, the flashing digit at the
left indicates "Order Options" of the print
direction. (The flashing means it can be
changed.)
In case of the example, press the
CHANGE button to set at "2". And then
press the SET button.
At that moment, the flashing changes
from the "Print Direction" to the "Print
Activation".
Step 1
PRINT DIRECTION
PRINT ACTIVATION
SELECT CHANGE
SET
Print
activation
PRINT DIRECTION
PRINT ACTIVATION
SELECT CHANGE
SET
Print
direction
1.
2.
Order Options
Right
Left
Change the "Print Direction".
Page 17

15
In case of the example, press the
CHANGE button to set at "3". And then
press the SET button.
Step 2
TU WE TH FR SA SUMO
After you finish setting the print method,
press the SET button once again.
Now the print method setting has been
completed. Replace the cover and lock.
IMPORTANT: If you do not complete
Step 3, the clock will not print.
Step 3
PRINT DIRECTION
PRINT ACTIVATION
SELECT CHANGE
SET
1.
2.
3.
Order Options
Automatic
Semi-automatic
Manual
Change the "Print Activation".
Automatic will allow the clock to print by
simply inserting a card or sheet of paper.
Semi-automatic will allow the clock to print by
pressing the push bar only when a card or piece
of paper is inserted.
Manual will allow the clock to print by pressing
the push bar.
Push bar
Page 18

16
SETTING THE STARTING DATE OF DAYLIGHT SAVING TIME
Example: Daylight saving time starts on Sunday, March 25, 2001.
Press the SELECT button and position
the " " mark at the "D.S.T. START".
At that moment, the "Year" flashes.
(The flashing means it can be changed.)
Change the "Year".
In case of the example, press the
CHANGE button to set at "01". And then
press the SET button.
At that moment, the flashing changes
from "Year" to "Month".
Step 1
D.S.T.
START
SELECT CHANGE
SET
Change the "Month".
Press the CHANGE button to set at "3".
And then press the SET button.
At that moment, the flashing changes
from "Month" to "Date".
Step 2
Change the "Date".
Press the CHANGE button to set at "25".
And then press the SET button.
Step 3
After you finish setting the starting date of
D.S.T., press the SET button once again.
Now the starting date of D.S.T. setting has
been completed.
Go on to the "SETTING THE ENDING
DATE OF DAYLIGHT SAVING
TIME".
Step 4
SETTING THE DAYLIGHT SAVING TIME
Example: Start date Sunday, March 25, 2001.
End date Sunday, October 28, 2001.
If you set as the above, the time clock remembers the start date as the last Sunday of March
and the end date as the last Sunday of October. Once set, the time clock automatically
updates the settings every year thereafter. No further manual setting is necessary.
Year
Date
Month
D.S.T.
START
SELECT CHANGE
SET
D.S.T.
START
SELECT CHANGE
SET
D.S.T.
START
SELECT CHANGE
SET
Page 19

17
SETTING THE ENDING DATE OF DAYLIGHT SAVING TIME
Example: Daylight saving time ends on Sunday, October 28, 2001.
Press the SELECT button and position
the " " mark at the "D.S.T. END".
At that moment, the "Year" flashes. (The
flashing means it can be changed.)
Change the "Year".
In case of the example, press the
CHANGE button to set at "01". And then
press the SET button.
At that moment, the flashing changes
from "Year" to "Month".
Step 1
D.S.T.
END
SELECT CHANGE
SET
Change the "Month".
Press the CHANGE button to set at "10".
And then press the SET button.
At that moment, the flashing changes
from "Month" to "Date".
Step 2
Change the "Date".
Press the CHANGE button to set at "28".
And then press the SET button.
Step 3
After you finish setting the ending date of
D.S.T., press the SET button once again.
Now the ending date of D.S.T. setting has
been completed. Replace the cover and
lock.
IMPORTANT: If you do not complete
Step 4, the clock will not print.
Step 4
Year
Date
Month
D.S.T.
END
SELECT CHANGE
SET
D.S.T.
END
SELECT CHANGE
SET
D.S.T.
END
SELECT CHANGE
SET
Page 20

DELETING THE DAYLIGHT SAVING TIME SETTING
Press the SELECT button and position
the " " mark at the "D.S.T. START".
At that moment, the "Year" flashes. (The
flashing means it can be changed.)
Next, press the SET button. At that
moment, the flashing changes from
"Year" to "Month".
Step 1
D.S.T.
START
SELECT CHANGE
SET
D.S.T.
START
Press the CHANGE button to set at
" ". And then press the SET button.
At that moment, the flashing changes
from "Month" to "Date".
Step 2
Press the SET button again. At that
moment, the flashing changes from
"25" to " ".
Step 3
Press the SET button once again.
Now the D.S.T. deleting has been
completed. Replace the cover and lock.
IMPORTANT: If you do not complete
Step 4, the clock will not print.
Step 4
Year
Date
Month
SELECT CHANGE
SET
D.S.T.
START
SELECT CHANGE
SET
D.S.T.
START
SELECT CHANGE
SET
18
To delete and cancel the daylight saving time setting, change the display of "Month" of the
starting setting to " ".
Example: Change March 25, 2001 of "D.S.T. START" and delete daylight saving time setting.
Page 21

19
SETTING THE PASSWORD
REGISTERING THE PASSWORD
Example: Set the password "1234".
Press the SELECT button and position the
" " mark at the "PASSWORD".
At that moment, first two digits flash. (The
flashing means it can be changed.)
In case of the example, press the CHANGE
button to set at "12". And then press the
SET button.
At that moment, the flashing changes to
last two digits.
Step 1
PASSWORD
SELECT CHANGE
SET
PASSWORD
SELECT CHANGE
SET
PASSWORD
SELECT CHANGE
SET
In case of the example, press the CHANGE
button to set at "34". And then press the
SET button.
Step 2
TU WE TH FR SA SUMO
After you finish registering the password,
press the SET button once again.
Now the password registering has been
completed. Replace the cover and lock.
IMPORTANT: If you do not complete
Step 3, the clock will not print.
Step 3
SELECT CHANGE SET
When the password is set, you are asked to enter it. If the password you entered does not
coincide with the setting, you cannot change the setting values.
You may set a password by any 4-digit number from 0001 to 9998.
Note a number "0000" and "9999" cannot be used as a password.
Page 22

20
HOW TO CHANGE SETTING WHEN THE PASSWORD IS SET
Once the password is set, you have to enter the password for changing any setting.
"99 99" will be displayed when you press the SELECT button before entering.
Example: Password "1234".
Press the SELECT button, at that
moment "99 99" is displayed and first
two digits flashes. (The flashing means it
can be changed.)
In the example, press the CHANGE
button to set at "12". And then press the
SET button.
At that moment, the flashing changes to
last two digits.
Step 1
SELECT CHANGE SET
In case of the example, press the CHANGE
button to set at "34". And then press the
SET button.
At that moment, the " " mark indicates
the "TIME".
Step 2
TIME
SELECT CHANGE SET
SELECT CHANGE SET
SELECT CHANGE SET
Select desired setting mode by pressing
the SELECT button.
Then make settings as explained.
Step 3
Page 23

21
3. SETTING THE DISPLAY FORMAT
CANCELING THE PASSWORD
The code "00 00" must be entered to cancel the password.
Example: Cancel the password "1234".
Press the SELECT button, at that
moment "99 99" is displayed and first
two digits flashes. (The flashing means it
can be changed.)
In case of the example, press the
CHANGE button to set at "12". And then
press the SET button.
At that moment, the flashing changes to
last two digits.
Step 1
TIME
SELECT CHANGE SET
In case of the example, press the
CHANGE button to set at "34". And then
press the SET button.
At that moment, the " " mark indicates
the "TIME".
Step 2
SELECT CHANGE SET
SELECT CHANGE SET
SELECT CHANGE SET
Page 24

22
Press the SELECT button and position
the " " mark at the "PASSWORD".
At that moment, first two digits "12"
flashes. (The flashing means it can be
changed.)
Press the CHANGE button to set at "00".
And then press the SET button.
At that moment, the flashing changes to
last two digits "34".
Step 3
Press the CHANGE button to set at "00".
And then press the SET button.
Step 4
After you finish canceling the password,
press the SET button once again.
Now the password canceling has been
completed. Replace the cover and lock.
IMPORTANT: If you do not complete
Step 5, the clock will not print.
Step 5
PASSWORD
PASSWORD
PASSWORD
SELECT CHANGE
SET
SELECT CHANGE
SET
SELECT CHANGE
SET
TU WE TH FR SA SUMO
Page 25

23
To return all setting to the factory defaults, push the reset switch with a pointed implement.
NOTICE: All your custom settings will be deleted and will revert to the factory defaults when
the reset switch is pushed. To make new settings, please refer to "SETTING".
RESETTING
Reset switch
Page 26

24
Install the supplied wall-mount screws
into a wall by using the template, 9 cm
by 5 cm apart. Be sure to keep about
6 mm of the screw head away from the
wall.
Step 1
Unlock the key and remove the cover.
And then hang it on the wall.
Step 2
Replace the cover and lock.
Step 3
WALL MOUNTING
Caution: The supplied screws are intended for use on a thick wooden wall or wooden column.
Do not use them on any other materials. The time clock may come off if used on other materials.
WALL
WALL
WALL
(Upper side)
Page 27

Unlock the key and remove the cover.
Step 1
Pick up the cassette and remove it.
Step 2
Turn the knob of the new cassette in the
direction of the arrow to tighten the
ribbon.
Step 3
REPLACING THE RIBBON CASSETTE
Place the cassette inside the time clock as
shown in the figure. Keep on pushing in
the cassette until the clasps at both sides
catch and you hear a "pop" sound. If it is
difficult to insert the cassette, try it while
turning the knob.
Step 4
25
Page 28

26
NOTICE: Install the cassette so that the
ribbon is between the print head and the
ribbon mask. Printing will not come out
properly if the ribbon is placed behind
the ribbon mask.
Turn the knob of the cassette in the
direction of the arrow to tighten the
ribbon.
Step 5
Replace the cover and lock.
Step 6
Ribbon
Ribbon mask
Print head
Page 29

27
ERROR No. APPEARS
Refer to the following list for proper operation.
TROUBLESHOOTING
Contact the store from whom you bought
the Time Clock, call Lathem Time directly
at (800) 241-4990.
Correctly insert the card.
Make sure that the ribbon cassette is
correctly inserted in place.
Press the push bar.
Enter the correct password again.
Make sure the correct starting and ending
date of daylight saving time and enter again.
Refer to your owner's manual on the page
related to the item you want to set and enter
again correct setting data.
CPU error
The remaining life of lithium battery for
memory back-up is short.
The card is not inserted in the clock properly.
Cannot print.
The printer motor or home position sensor
is not normal.
Cannot print.
The print head motor or the sensor does not
operate properly.
Incorrect password
D.S.T. setting mistake
Setting data you entered is not usable.
E-00
E-01
E-05
E-30
E-38
E-40
E-41
E-49
No. Error contents Action
OTHER FAILURES
The time clock does not operate.
Ensure the AC adapter is properly plugged into the AC outlet.
The time clock does not print.
Ensure the ribbon is installed correctly.
The card is jammed.
Press the push bar and try to pull out the card at the same time.
•
•
•
Error
Page 30

28
Clock accuracy
Calendar
Printing system
Power failure
compensation
Operating
environment:
Dimension
Weight
Power consumption
Rating of AC adapter
Monthly accuracy ±15sec. (at ordinary temperatures)
Year up to 2099. Automatically adjusted to leap years, 31-day months
and months with thirty or fewer days, and the days of the week.
Dot matrix imprint
Five years of cumulative power failure hours after the date of shipment.
Temperature: -5˚to 45˚C, +25˚ to 113˚F
Humidity: 20 to 80%, no condensation
The unit operates normally at temperatures of 5˚C or below, but the print
density, reaction of the liquid crystal display, and the number of prints
at power failure are inferior to those at normal temperature operation.
160(w) x 143(h) x 172(d) mm, 6.3"(w) x 5.63"(h) x 6.77"(d)
Approx. 1.4 kg. (2.0 kg with AC adapter)
Approx. 13W, AC120V+/- 10%, 60Hz
I/P AC 120V/60Hz O/P AC 15.0V 1300mA
NOTICE: Use only the supplied AC adapter.
SPECIFICATIONS
Page 31

Limited One-Year Warranty
Lathem warrants the model 1000E hardware product against defects in material and
workmanship for a period of one year from date of original purchase. The conditions of this
warranty and the extent of the responsibility of Lathem Time Corporation ("Lathem") under this
warranty are listed below.
1. This warranty will become void when service performed by anyone other than an approved
Lathem warranty service dealer results in damage to the product.
2. This warranty does not apply to any product which has been subject to abuse, neglect, or
accident, or which has had the serial number altered or removed, or which has been
connected, installed, adjusted, or repaired other than in accordance with instructions
furnished by Lathem.
3. This warranty does not cover dealer labor cost for removing and reinstalling the machine for
repair, or any expendable parts that are readily replaced due to normal use.
4. The sole responsibility of Lathem under this warranty shall be limited to repair of this
product, or replacement thereof, at the sole discretion of Lathem.
5. If it becomes necessary to send the product or any defective part to Lathem or any authorized
service dealer, the product must be shipped in its original carton or equivalent, fully insured
with shipping charges prepaid.
Lathem will not assume any responsibility for any loss or damage incurred in shipping.
6. WARRANTY DISCLAIMER: Limitation of Liability. Except in only the limited express
warranty set forth above, there are no expressed or implied warranties of merchantability and
fitness for a particular purpose. In no event will Lathem be liable for any direct, special, or
consequential damages arising out of or in connection with the delivery, use or inability to
use, or performance of this product.
7. Proof of date of purchase is required for warranty service on this product.
8. This Warranty grants specific legal rights. Additional legal rights, which may vary by locale,
may also apply.
9. Should any difficulties arise with the performance of this product during warranty, or with
any Lathem authorized service centers, contact Lathem Time at the address below.
Lathem Time Corporation
200 Selig Drive, SW, Atlanta, Georgia 30336
800-241-4990
www.lathem.com
MANUFACTURER'S WARRANTY
 Loading...