

Page 1

User Manual of Portable Digital Photo Album
JL-016 JL-025
Before attempting to connect, operate or adjust this product, please read these instructions completely. Please save this manual.
Page 2

Contents Page
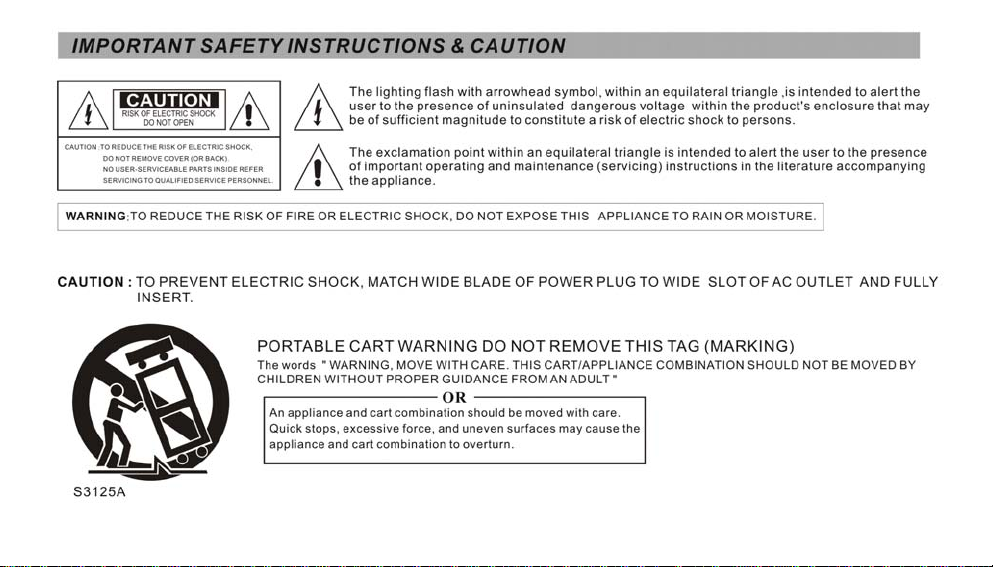
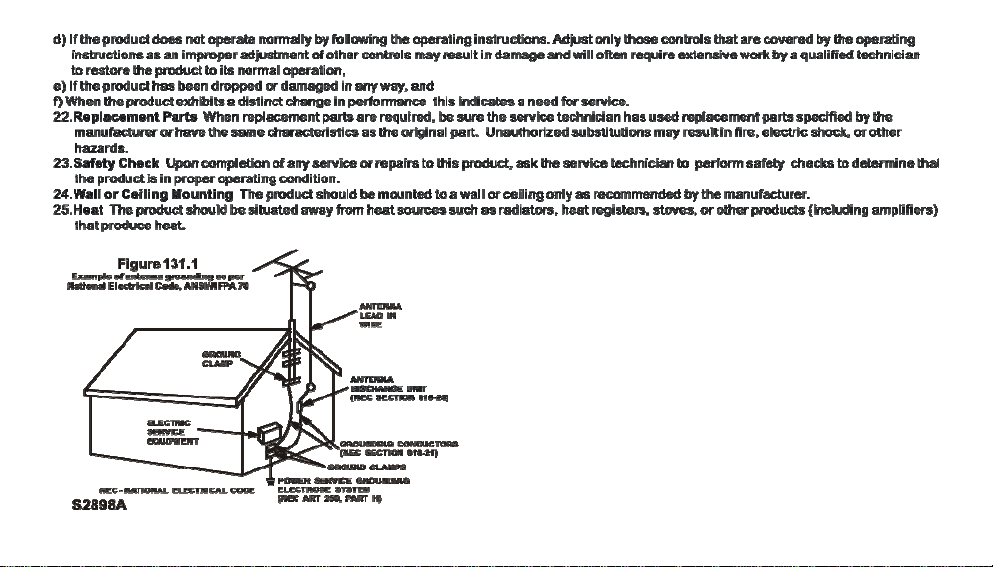
IMPORTANT SAFETY INSTRUCTIONS
PRECAUTIONS
Package Contents
Brief Introduction of Controls
The Remote Control
Quick Start (viewing your photos)
Advanced Features:
Zooming, Rotating &
Deleting Photos / Starting Slideshow
Setting Properties
Using Folder Mode
Switching Between Memory Cards
Viewing Your AVIs (motion jpeg)
Repeating, Deleting AVIs / Starting Slideshow
Table of Contents
1 - 4
5
6
7
8
9 - 10
11 – 26
11
12 - 13
14
15
16
17
Page 3

Returning To Main Menu
Playing On Your TV
Uploading Photos From Your Computer
Uploading Photos From A PC
Uploading Photos From A Mac
Install the stand
Troubleshooting
Specifications
Important : Only use attachments/accessories specified by the manufacturer.
18
19
20 - 21
22 - 24
25
26
27
28
Page 4
1
Page 5

2
Page 6

3
Page 7
4
Page 8
5
Page 9
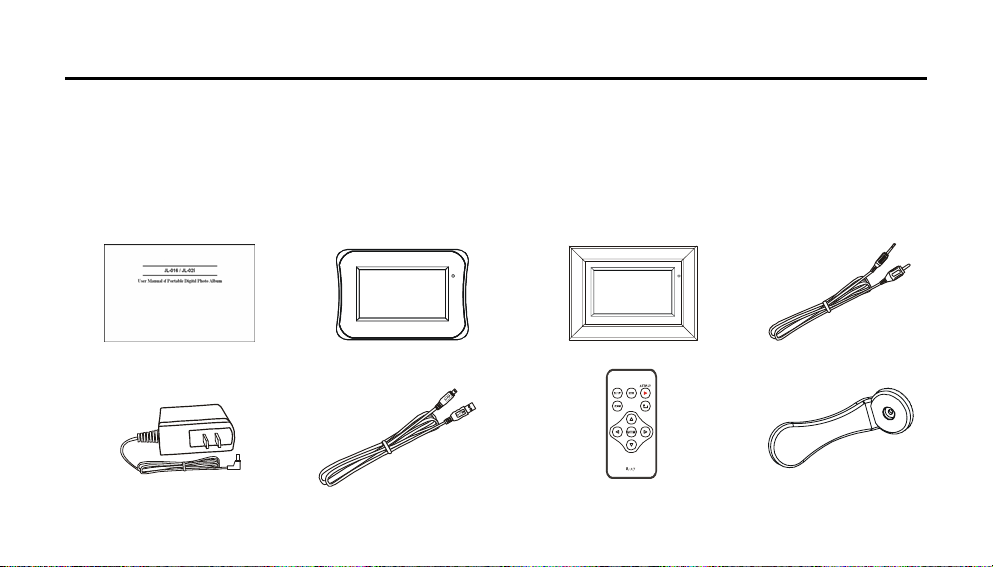
Package Contents
(2) Portable Digital Photo Album (JL-016)
(3) Portable Digital Photo Album (JL-025)
(5) Power Adaptor
(7) Remote Control
(1) (2) (3) (4)
(5) (6) (7) (8)
(4) Video Cord
(6) USB Cable
(8) Stand
(1) Instruction Booklet
6
Page 10

Brief introduction of control elements
Power Switch
ENTER button
MENU button
Navigation button (Left/Right/Up/Down)
Video OUT jack
USB jack
DC IN jack
SD/MMC/MS card slot
7
Page 11
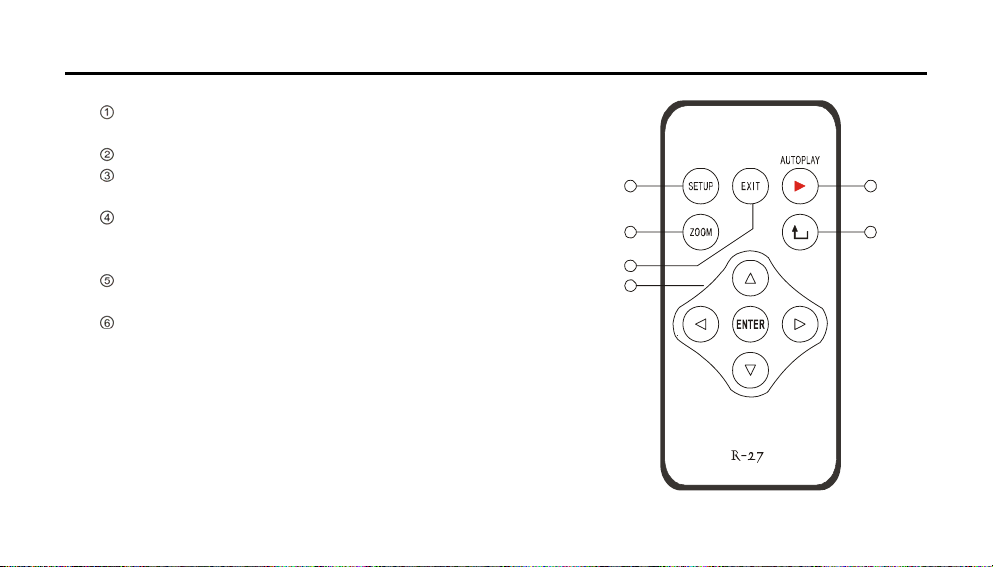
The Remote Control
SETUP button : Press Setup button on Start-up screen to set
setup menu.
Zoom button : Zoom in on photo for closer view.
EXIT button : Press EXIT button to return the thumbnails or setup
menu.
NAVIGATION button (LEFT/RIGHT/UP/POWER/ENTER) :
Press Navigation button to select and playback the photo in the
thumbnails.
AUTOPLAY button : Press AUTOPLAY button to slideshow all
pictures.
ROTATE button : Press Rotate button to rotate photo 90 degrees
clockwise.
1
2
3
4
5
6
8
Page 12

Quick Start: Viewing Your Photos
1. Basic controls
z Press large round Navigation button left, right, up, or down
to highlight items on the screen.
z Press ENTER button to select the item you’ve highlighted.
z Press EXIT button to stop an operation or to return to a
previous screen.
2. Viewing photos
(1) Turn player on and insert memory card into appropriate
slot (SD or MS). You can use any capacity memory card.
The greater the capacity, the more photos you will be able
to show with your player.
(2) Photos on card will appear automatically on screen as
thumbnails. (If folders appear instead, player is in Folder
Mode – see page 15) To view additional thumbnails, press
Navigation button down until additional thumbnails appear.
(3) Using Navigation button, highlight thumbnail you want to
view and press ENTER button.
(4) Selected photo will fill the screen.
(5) To view next photo, press Navigation button right. To view
previous photo, press Navigation button left.
(6) To return to thumbnails, press EXIT button.
9
Page 13

Quick Start: Viewing Your Photos
3. Starting slide show
(1) While viewing any photo, press ENTER button.
(2) Photo tool bar will appear.
(3) Using Navigation button, highlight slideshow icon (third
icon) and press ENTER button.
(4) Slideshow will begin.
(5) To stop slide show, press EXIT button. To return to
thumbnails, press EXIT button again.
Please read through the Advanced Features section of this
manual to review additional player features.
10
Page 14
Advanced Features: Zooming, Rotating & Deleting Photos / Starting Slideshow
1. Zooming, rotating & deleting photos / starting
slideshow
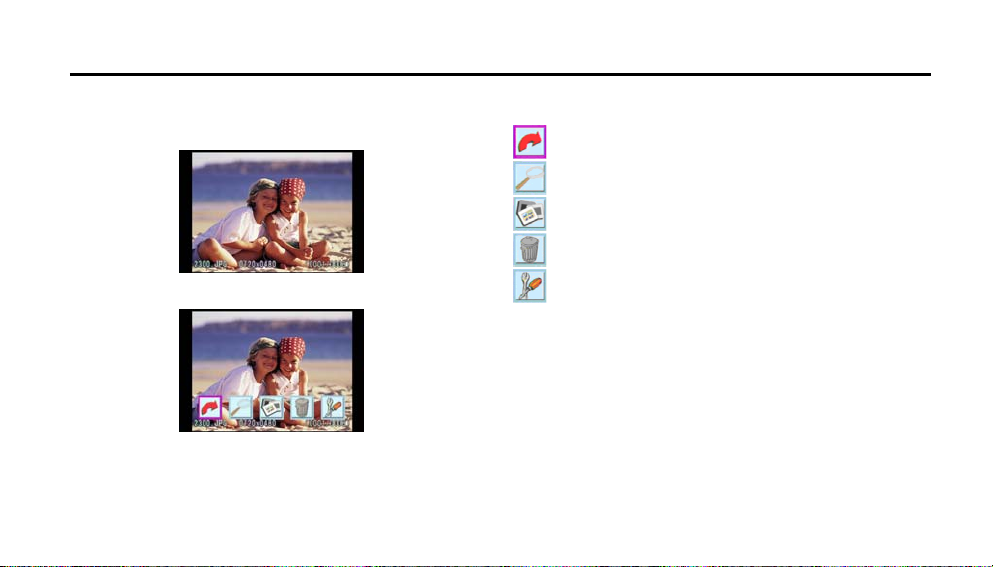
(1) While viewing any photo, press ENTER button.
(2) Photo Tool Bar will appear.
(3)
Using Navigation button, highlight desired tool. Press
ENTER button to effect action (photo will rotate, zoom,
etc.).
(4) Tools:
Rotate : Rotate photo 90 degrees clockwise.
Zoom : Zoom in on photo for closer view.
Slideshow : Start slideshow.
Delete : Delete photo appearing on screen.
Set Up Menu : Bring up Set Up screen to choose your player’s
properties - language, slideshow interval, tv type,
and whether folders and file descriptions appear
on screen.
11
Page 15

Advanced Features : Setting Properties
1. Setting properties
You can use the Setup Menu to choose how your player will
operate.
(1) Using the Navigation button, highlight the tools icon in the
main menu. Press ENTER button.
(2) Setup Menu will appear.
page 13.
The function explaining see
(3) Using Navigation button, change parameters as desired.
(4) Press EXIT button.
(5) If you’ve changed parameters, you will be prompted to
confirm or reject your changes by pushing ENTER
(confirm) or EXIT (reject).
12
Page 16
Advanced Features : Setting Properties
.
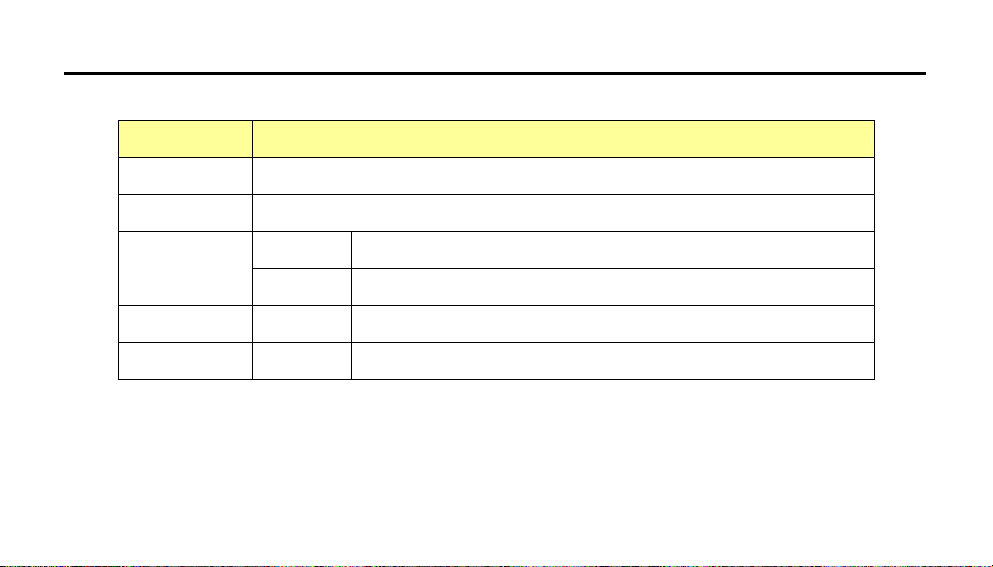
Menu Item Description
Language
Slide Description Set interval time between photos in slideshow mode.
Folder Mode
TV Type TV System NTSC or PAL
Aspect Ratio LCD panel
Change language displayed (English is default).
Yes
No
display
Both files and folders are viewable.
Folders are hidden; only files are viewable.
16 : 9 or 4 : 3
13
Page 17
Advanced Features: Using Folder Mode
1. Understanding folder mode 3. Using folder mode
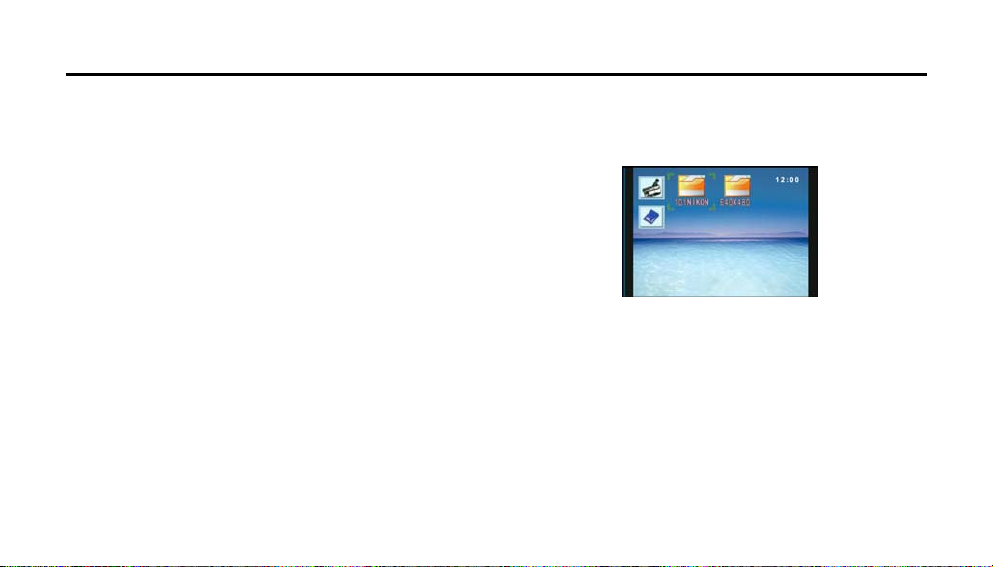
Player can operate in folder or non-folder mode. In folder
mode, folders containing photos and AVIs appear, and you
must open a folder to view thumbnails. In non-folder mode,
folders are not visible – photos and AVIs appear directly as
thumbnails.
2. Activating & deactivating folder mode
Following instructions under Setting Properties (page 13
select “Yes” beside the menu item “Folder Mode” to activate;
select “No” to deactivate.
(1) When folders appear, use Navigation button to highlight
folder containing desired photo or AVI. Press ENTER
button.
(2) Thumbnails contained in selected folder will appear.
14
Page 18
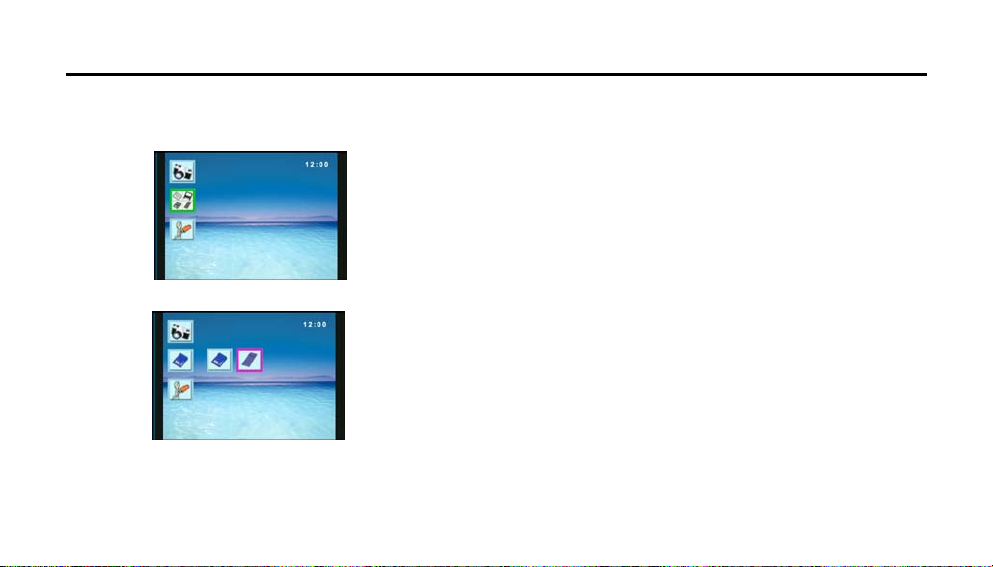
Advanced Features: Switching Between Memory Cards
1. Switching between memory cards
(1) Using Navigation button, highlight memory card tool.
Press ENTER button.
(2) Icons representing memory cards in device will appear.
(3) Using Navigation button, highlight card you wish to use.
Press ENTER button.
(4) Thumbnails of photos or AVIs on the selected memory
card will appear. (If folders appear instead, you are in
Folder Mode – see page 13.)
(5) View photos or AVIs.
15
Page 19
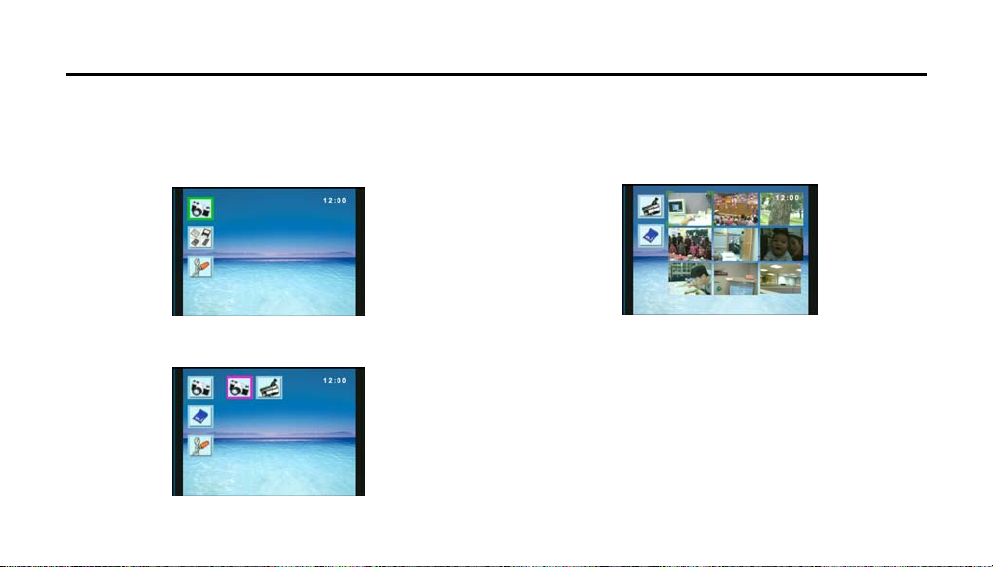
Advanced Features: Viewing Your AVIs (motion jpeg)
1. Viewing AVIs
(1) Turn player on and insert memory card into appropriate
slot (SD or MS).
(2) Using Navigation button, highlight camera icon on the
main menu. Press ENTER button.
(3) Two additional icons appear. Highlight the camcorder
icon. Press ENTER button.
(4) AVIs on card will appear automatically on screen as
thumbnails. (If folders appear instead, player is in Folder
Mode – see page 14.) To view additional thumbnails,
press Navigation button down until additional
thumbnails appear.
(5) Using Navigation button, highlight thumbnail you wish to
view and press ENTER button.
(6) Selected AVI will play.
(7) To view next AVI, press Navigation button right. To view
previous AVI, press Navigation button left.
(8) To return to thumbnails, press EXIT button.
16
Page 20
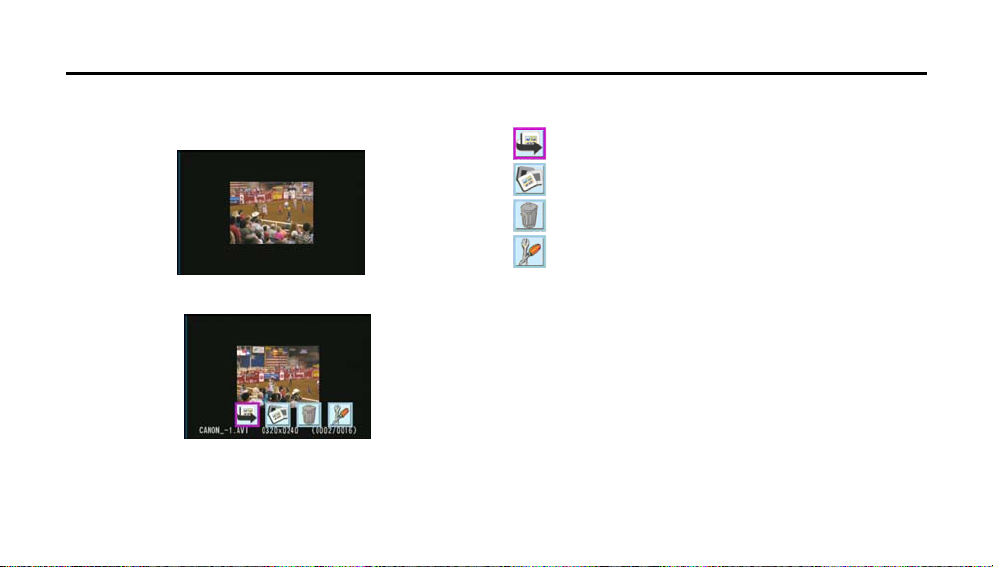
Advanced Features: Repeating & Deleting AVIs / Starting Slideshow
1. Repeating & deleting AVIs / starting slideshow
(1) After viewing an AVI, press ENTER button.
(2) AVI Toolbar will appear.
(3) Using Navigation button, highlight desired tool. Press
ENTER to effect action (AVI will repeat, delete, etc.)
(4) Tools.
Repeat : Replay current AVI.
Slideshow : Starts slideshow (all AVI’s play one after another).
Delete : Deletes current AVI.
Set Up Menu : Bring up Set Up screen to choose your player’s
properties - language, slideshow interval, tv type,
and whether folders and file descriptions appear
on screen.
17
Page 21
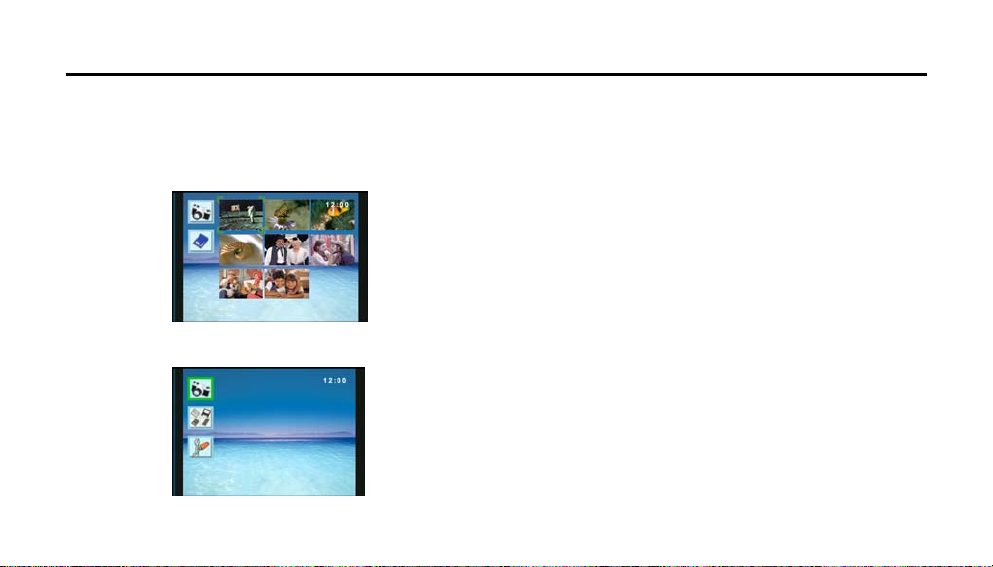
Advanced Features: Returning To Main Menu
1. Returning to main menu
Any time you want to quit or exit a function, press EXIT
b
utton to exit the current screen.
For example,
(1) Thumbnail screen :
(2) Press EXIT button to exit thumbnail screen and return to
main menu.
18
Page 22
Advanced Features: Playing On Your TV
C
TV
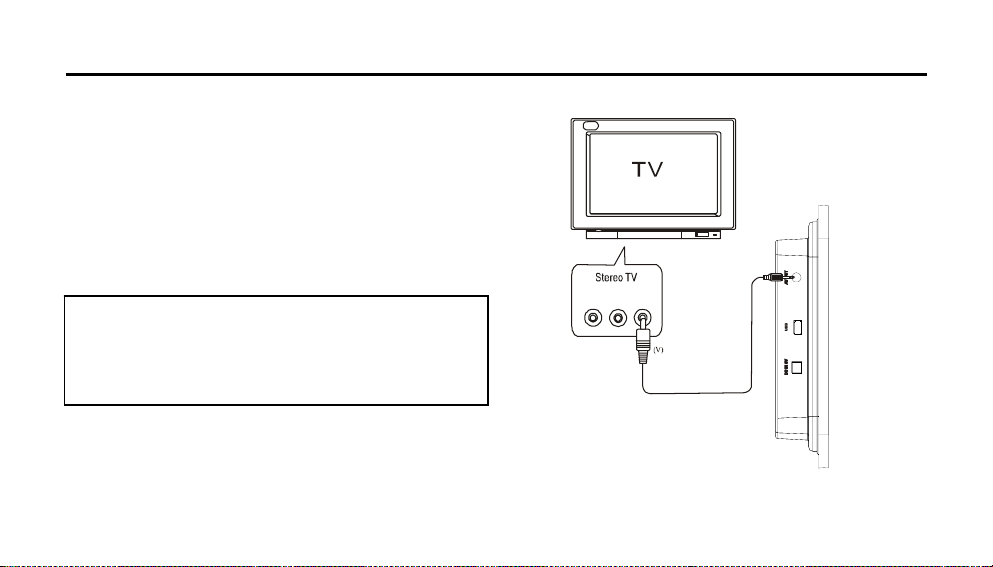
1 . Playing on your TV
z Always refer to your TV instruction manual before
connecting any external devices.
z Turn off and unplug player and TV.
z Connect player to TV using supplied video cord as shown
on the diagram on the right.
z Turn on player and TV.
z Your player’s screen will now be displayed on your TV and
can be operated normally.
Do not connect player through VCR because the picture may
not be played correctly due to copy guard. If your TV does not
have the proper A/V input, you can purchase a video RF
Modulator at your local electronics store.
onnect PlayerDirectly To
Audio Input
LR
Video Input
Y
Video Cord
19
Page 23

Advanced Features: Uploading Photos From Your Computer
1 . Connecting PhotoShare to a PC
z Turn on player.
z To ensure proper connection please power player with AC
adapter.
z Insert memory card.
z Use provided USB cable to connect player to your
computer.
z Refer to pgs (22-24) for additional instructions.
PC
20
Page 24

Advanced Features: Uploading Photos From Your Computer
2 . Connecting PhotoShare to a Mac
z Turn on player.
z To ensure proper connection please power player with
AC adapter.
z Insert memory card.
z Use provided USB cable to connect player to your
computer.
z Refer to pg (25) for additional instruction.
Mac
21
Page 25
Advanced Features: Uploading Photos From Your PC
1. Plug-and-play for Windows 2. Special instruction for Win98
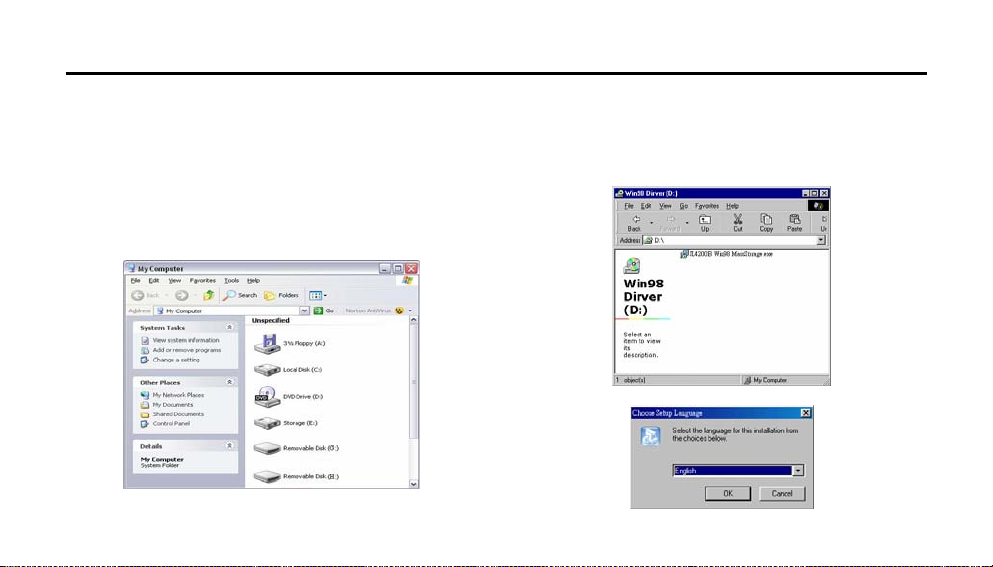
(1) PC operation is simple plug-and-play if your PC is running
Win 2000, Win XP, Win ME, Win Vista or Win 2003. No
additional software is needed. Simply connect player to
available USB port using USB cable included and insert
memory card into appropriate slot. Player will appear as a
disk icon in “My Computer”.
(2) Copy desired photos and AVIs to this disk icon as you
would to any other.
If your PC is running Win 98, install the provided USB driver.:
(1) Run the installer (JL4200B Win98 MassStorage.exe)
(*Please download the USB driver for Win98 from
ftp://ftp.yungfu.com.tw/driver/).
(2) Select language. Press “OK”.
22
Page 26
Advanced Features: Uploading Photos From Your PC
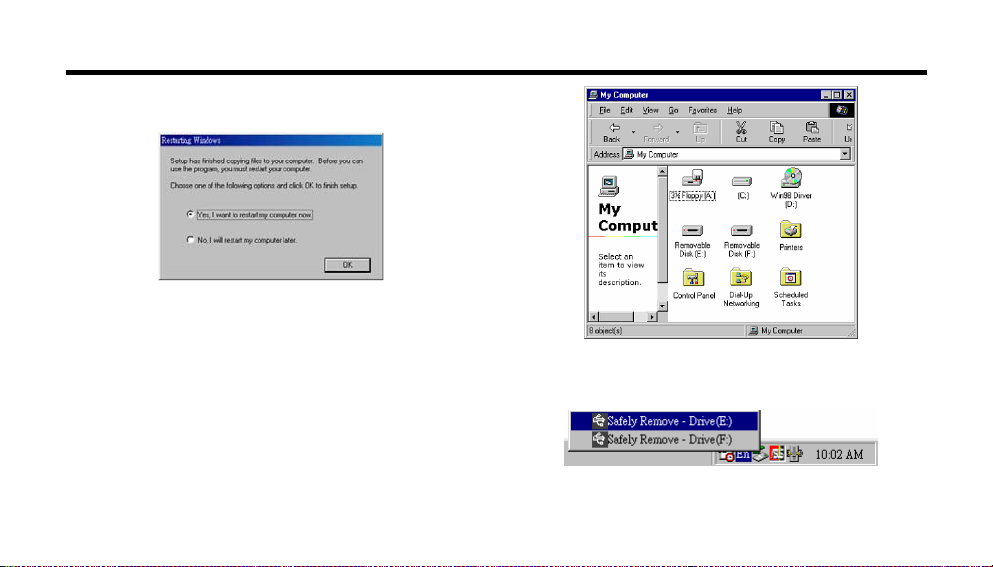
(3) When installation is complete, check “Yes, I want to
restart my computer now”, then press “OK”.
(4) Once computer is restarted, connect player to computer
using USB cable included. Player will appear as a disk
icon in My Computer. Follow plug-and-play directions
above to upload photos.
(5) Before removing player from USB host port, run Safe
Removal to make sure data transfer has finished.
Otherwise data may be lost.
23
Page 27
Advanced Features: Uploading Photos From Your PC
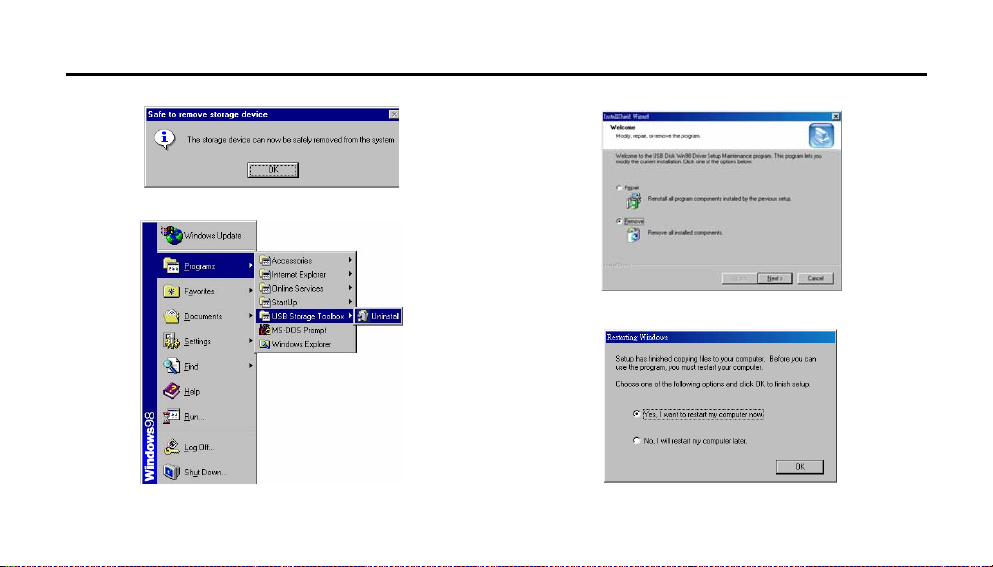
(6) Message box will tell you player can be safely removed.
(7) Alternatively, run the uninstall utility.
Check “Remove”, then “Next” for next step.
Restart the computer once driver is uninstalled.
24
Page 28
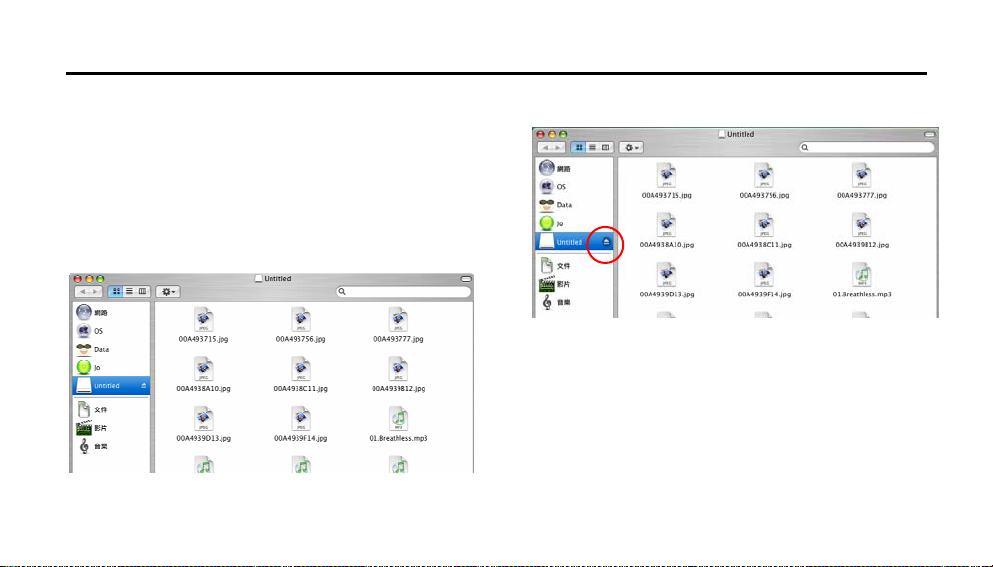
Advanced Features: Uploading Photos From Your Mac
1. Plug-and-play for Mac
(1) Mac operation is simple plug-and-play if your Mac is
running OS9 or higher. No additional software is
needed. Simply connect the player to available USB port
using USB cable included and insert memory card in
appropriate slot. (Player will not function through USB
ports on the keyboard). Player will appear as a disk icon,
as shown below.
(2) Copy desired photos or AVIs to this disk icon as you
would to any other.
(3) After copying desired photos or AVIs, to remove player
from the USB host port, click the icon shown below.
25
Page 29
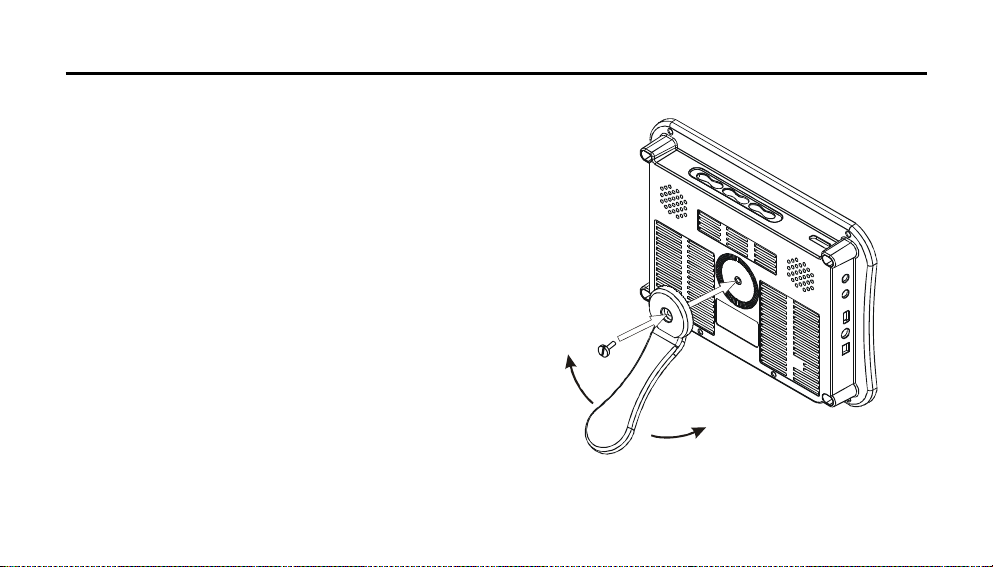
Advanced Features : Install the Stand
Please follow the illustration to screw and fix stand to the
z
main unit.
z You can swivel the stand.
z Display player at home or office.
26
Page 30

Trouble Shooting Q&A
Before requesting service, check this table for a possible cause of the problem. Your simple checks or adjustments will
often eliminate the problem and restore proper operation.
Trouble Possible Reason Solution
No Action Power cord is not properly connected. Check power cord connection.
No picture Memory card is no files. Check memory card.
Picture has distortion The picture file is bad. Ensure that picture file is good
Photos or AVIs Incorrect play mode. Recheck play mode.
will not play
27
Page 31
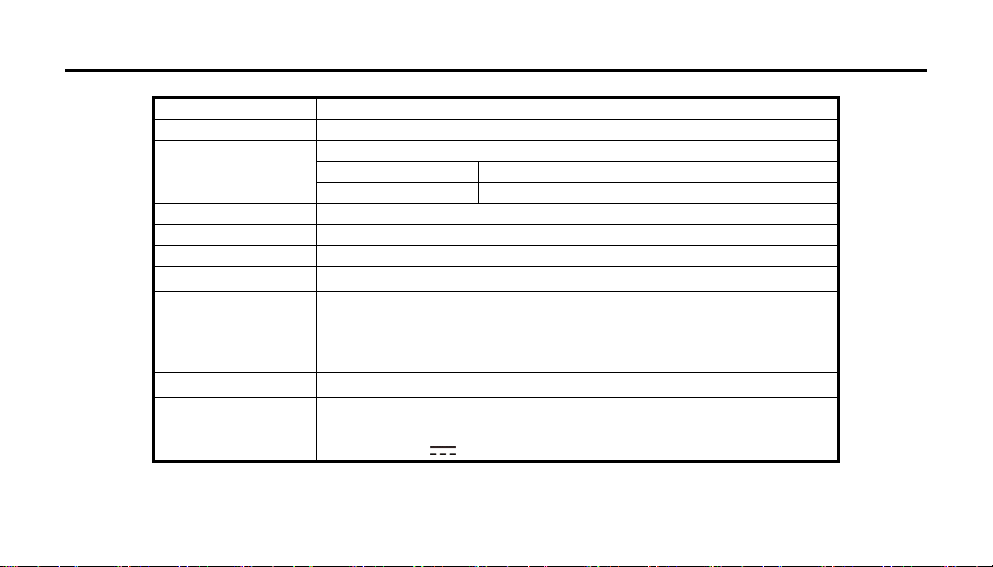
Specification
Model No. JL-016 / JL-025
Display window 7.0” TFT LCD
Jpeg (still photo)
Display
AVI Playback Motion-Jpeg AVI
Memory Card Secure Digital, Memory Stick
USB format 2.0 interface
External Video Out Composite Video Out
Dimensions (mm) JL-016 :
Weight 0.5 Kgs (JL-016) / 0.62 Kgs (JL-025)
Power Supply Adaptor :
※Design and specifications subject to change without notice for improvements.
Non-progressive Jpeg
Maximum Jpeg Resolution 16,384 (Horizontal) X No Limitation (Vertical)
Picture Preview 3 x 3 thumbnail image are shown in one TV screen
235 (W) x 160 (H) x 34 (D)
JL-025 :
250 (W) x 185 (H) x 36 (D)
Input AC : 100 ~ 240V 50/60Hz
Output DC : 9V 1.7A
28
Page 32
520FJL016B
 Loading...