

Page 1

Mobility Wallbox Home / Home Pro
Wallbox
Bedienungsanleitung
Page 2

Bedienungsanleitung – Mobility Wallbox Home / Home Pro2
Page 3

Inhalt
1 Über diese Anleitung 4
1.1 Mitgeltende Dokumente 4
1.2 Darstellungsmittel und Symbole 4
2 Zu Ihrer Sicherheit 5
2.1 Bestimmungsgemäßer Gebrauch 5
2.2 Sicherheitshinweise 5
2.3 Modikation des Produkts 6
3 Produktübersicht 7
3.1 Produktkomponenten 7
3.2 Produktfunktionen 8
4 Auspacken und Lieferumfang prüfen 9
4.1 Auspacken 9
4.2 Lieferumfang prüfen 9
5 Produkt lagern 10
6 Montage vorbereiten 11
6.1 Montageort wählen 11
6.2 Montage beauftragen 11
6.3 Blenden austauschen 11
7 Bedienen 14
7.1 Produkt einschalten 14
7.2 Fahrzeug laden 14
7.3 Ladevorgang beenden 15
7.4 Produkt ausschalten 16
8 Produkt reinigen 17
9 Störungen beheben 18
10 Produkt demontieren 19
11 Produkt und Verpackung entsorgen 20
12 Technische Daten 21
13 Zubehör 22
14 CE-Konformität 23
Hersteller
Lapp Mobility GmbH
Oskar-Lapp-Str. 2
D-70565 Stuttgart
www.lappmobility.com
Bedienungsanleitung – Mobility Wallbox Home / Home Pro 3
Dokument-Nr. 2784060000
Revision: 03/03.2021
Page 4
1 Über diese Anleitung
Die Bedienungsanleitung ist für Personen bestimmt, die das Produkt
bedienen und reinigen sollen.
► Lesen Sie die Bedienungsanleitung vollständig, bevor Sie das Produkt
in Betrieb nehmen.
► Bewahren Sie die Bedienungsanleitung nach dem Lesen auf.
Die Bedienungsanleitung ist Teil des Produkts.
► Wenn Sie das Produkt an Dritte weitergeben, geben Sie auch die
Bedienungsanleitung und die mitgeltenden Dokumente weiter.
1.1 Mitgeltende Dokumente
– Sicherheitshinweise
– Anleitung für die Montage und Demontage
– Anleitung für die Systemvernetzung
Alle Dokumente können Sie von der Website herunterladen
www.lappmobility.com.
1.2 Darstellungsmittel und Symbole
► Handlungsschritt
– Aufzählung
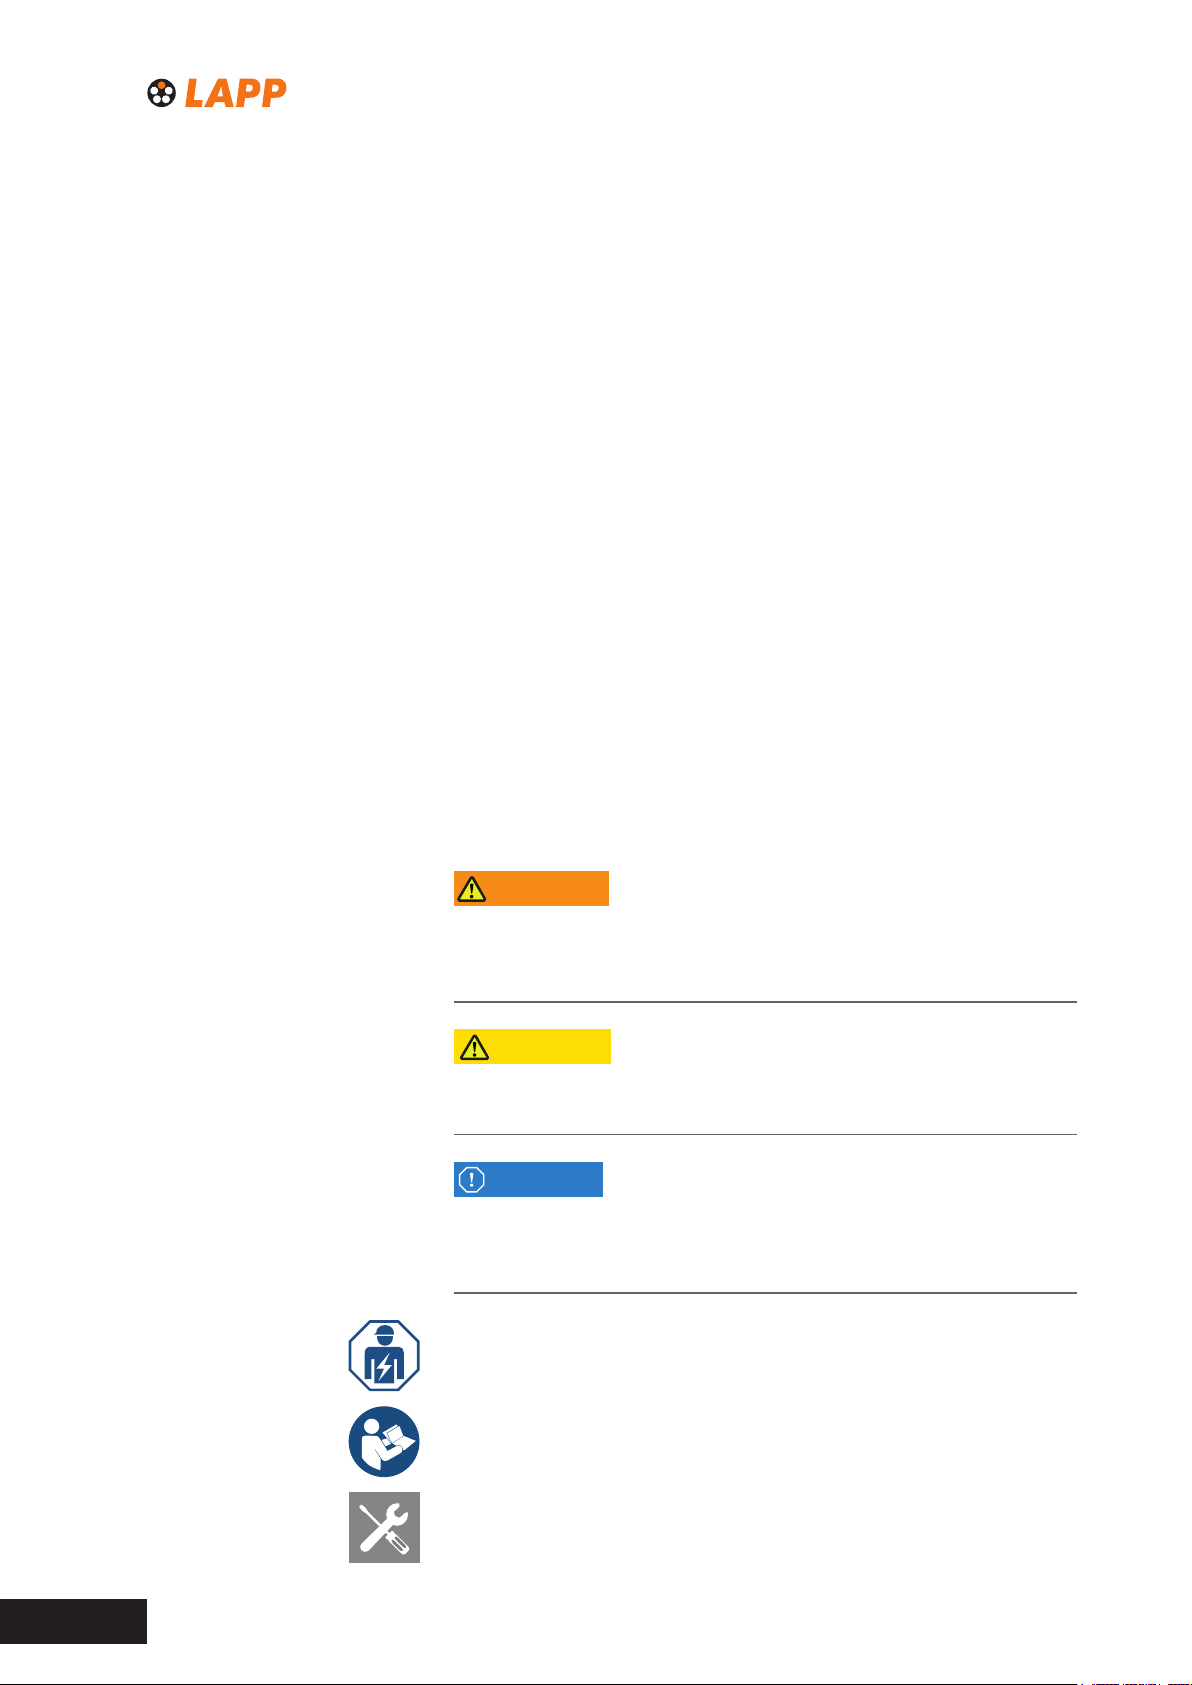
WARNUNG!
Ein Hinweis mit dem Signalwort „WARNUNG“ warnt vor einer Gefahr, die
schwere Verletzungen oder den Tod zur Folge haben kann, wenn sie nicht
vermieden wird.
VORSICHT!
Ein Hinweis mit dem Signalwort „VORSICHT“ warnt vor einer Gefahr, die
Verletzungen zur Folge haben kann, wenn sie nicht vermieden wird.
ACHTUNG!
Ein Hinweis mit dem Signalwort „ACHTUNG“ warnt vor einer Gefahr, die
Sachschäden oder Störungen am Produkt zur Folge haben kann, wenn
sie nicht vermieden wird.
Hinweis auf eine Elektrofachkraft
Hinweis auf weitere Dokumentationen
Hinweis auf benötigtes Werkzeug
Bedienungsanleitung – Mobility Wallbox Home / Home Pro4
Page 5

2 Zu Ihrer Sicherheit
2.1 Bestimmungsgemäßer Gebrauch
Das Produkt ist für das Laden von Elektrofahrzeugen und
Hybridfahrzeugen vorgesehen, die mit Lademodus 3 und Steckertyp 2
aufgeladen werden können. Zum Laden darf nur ein OriginalLadekabel von Lapp Mobility verwendet werden. Um ein Fahrzeug mit
Steckertyp 1 zu laden, ist ein normgerechtes Adapterkabel erforderlich.
Verlängerungskabel dürfen nicht verwendet werden.
Das Produkt darf nur betrieben werden, wenn es auf eine der folgenden
Arten montiert ist:
– an einer Wand
– freistehend, nur mit Originalzubehör für die freistehende Montage von
Lapp Mobility
Für den sicheren Betrieb des Produkts ist ein Fehlerstromschutzschalter
des Typs A in der Hausinstallation oder im Produkt erforderlich. Ein
Produkt ohne integrierten Fehlerstromschutzschalter des Typs A darf nur
betrieben werden, wenn es an eine Hausinstallation mit einem Fehlerstromschutzschalter des Typs A angeschlossen ist.
Für den sicheren Betrieb des Produkts ist ein Leitungsschutzschalter in
der Hausinstallation erforderlich (siehe technische Daten).
Das Produkt ist für den Gebrauch gemäß dieser Bedienungsanleitung
bestimmt. Jegliche Verwendung des Produkts, die von dieser Bedienungsanleitung abweicht, gilt als nicht bestimmungsgemäß.
Beachten Sie die länderspezischen Anforderungen der IEC 61851-1.
2.2 Sicherheitshinweise
Lebensgefahr durch Stromschlag
Bei Arbeiten an der elektrischen Installation des Produkts besteht die
Gefahr eines Stromschlags.
► Alle Arbeiten an der Hausinstallation und an der elektrischen Instal-
lation des Produkts dürfen nur von einer Elektrofachkraft ausgeführt
werden.
Bei der Verwendung beschädigter Leitungen besteht die Gefahr eines
Stromschlags.
► Betreiben Sie das Produkt nicht ohne Fehlerstromschutzschalter und
nicht ohne Leitungsschutzschalter.
► Prüfen Sie das Ladekabel vor jedem Gebrauch auf oensichtliche
Schäden.
► Schützen Sie das Produkt und das Ladekabel vor direkter
Sonneneinstrahlung.
► Verwenden Sie das Produkt nur, wenn das Ladekabel unbeschädigt ist.
Bedienungsanleitung – Mobility Wallbox Home / Home Pro 5
Page 6

Zu Ihrer Sicherheit
Wenn Wasser in das Produkt eindringt, besteht die Gefahr eines
Stromschlags.
► Lassen Sie das Produkt entsprechend der angegebenen IP-Schutzart
montieren.
► Verwenden Sie zur Reinigung des Produkts keinen Hochdruckreiniger.
► Reinigen Sie das Produkt nur mit einem weichen, trockenen Tuch.
Verletzungsgefahr durch beschädigtes Produkt
Ein beschädigtes Produkt kann zu unvorhersehbaren Fehlfunktionen und
Gefährdungen führen.
► Prüfen Sie das Produkt und sein Zubehör vor jedem Einsatz auf
oensichtliche Schäden.
► Verwenden Sie das Produkt und sein Zubehör nur, wenn alle Teile
unbeschädigt sind.
2.3 Modikation des Produkts
Das Produkt darf baulich und technisch nicht verändert werden. Bauliche
und technische Veränderungen beeinträchtigen die Sicherheit und die
Funktionsfähigkeit des Produkts.
Bedienungsanleitung – Mobility Wallbox Home / Home Pro6
Page 7
3 Produktübersicht
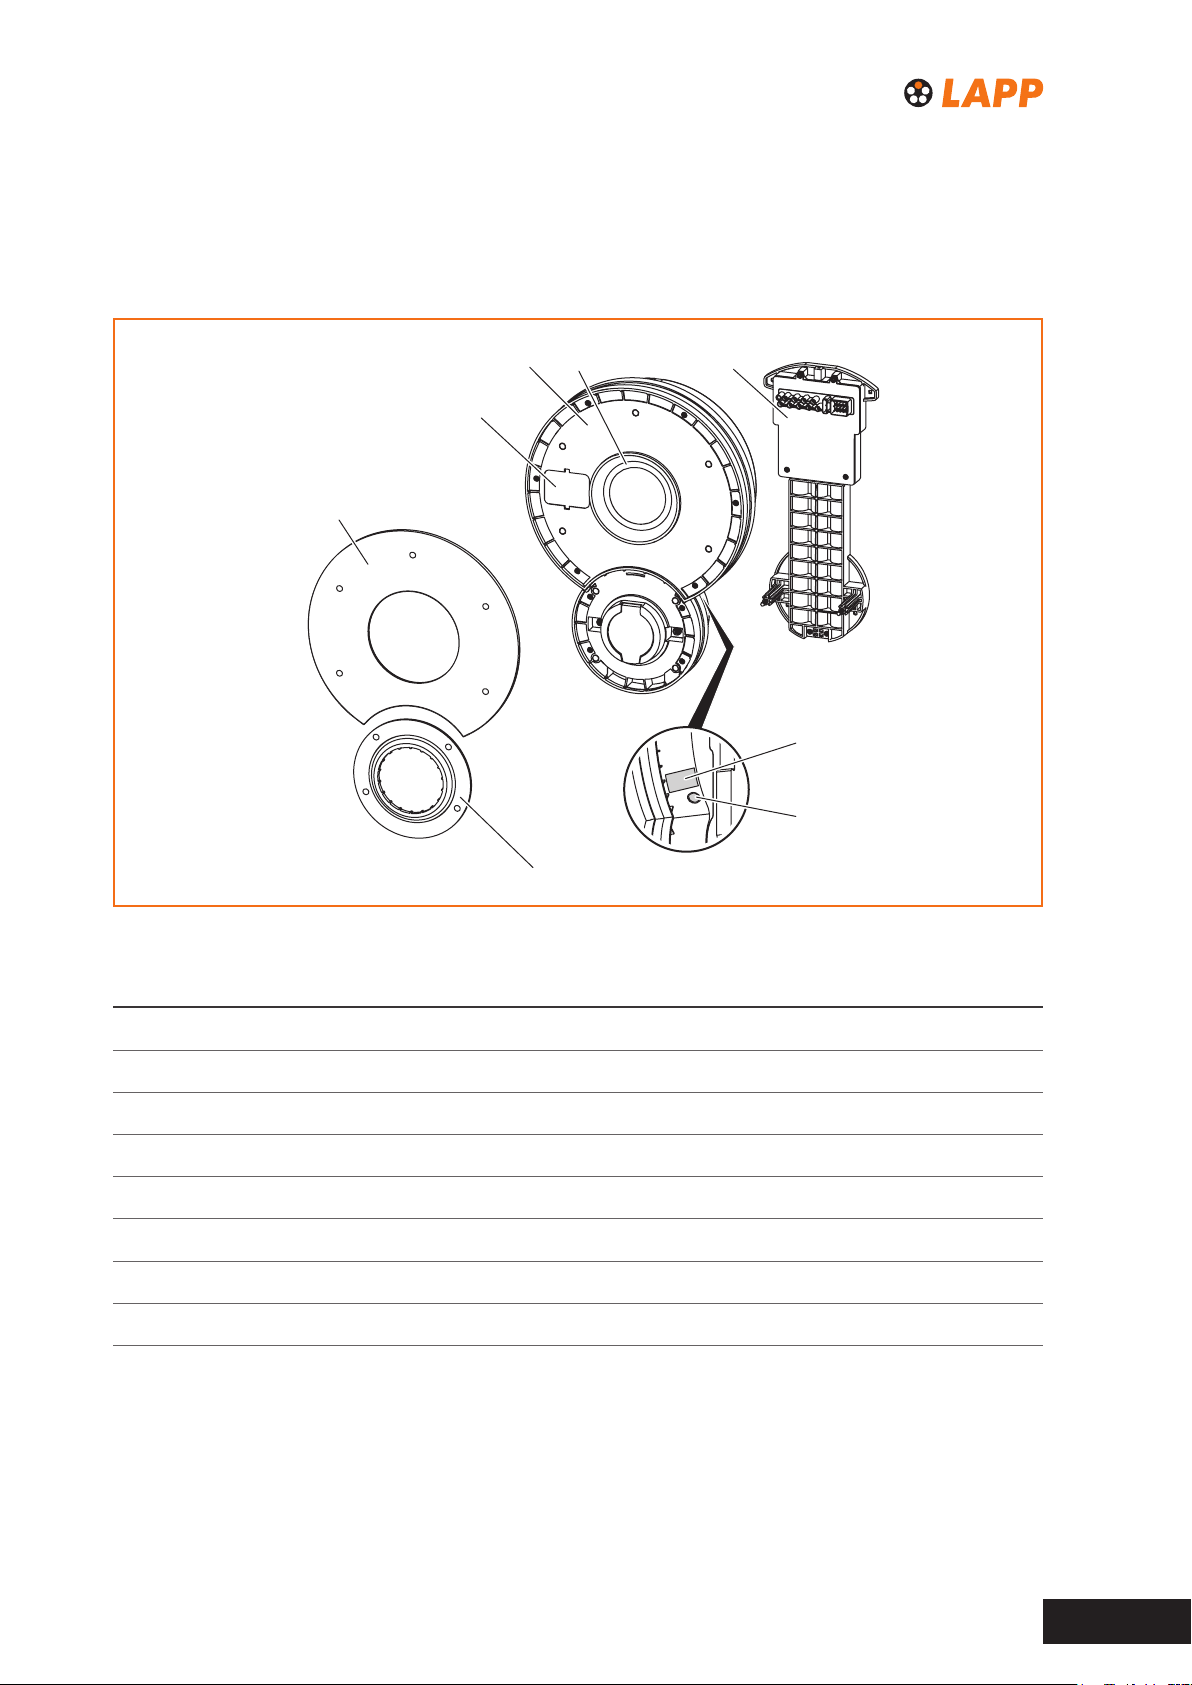
3.1 Produktkomponenten
7
Bild 1 Übersicht der Produktkomponenten
1 2
8
6
3
4
5
Pos. Name Beschreibung
1 Gehäuse
2 LED-Anzeige für die Anzeige des Betriebszustands
3 Montageplatte für die Befestigung des Produkts an einer Wand
4 Typenschild mit Seriennummer und Anschlussdaten des Produkts
5 Ein-/Aus-Taster zum Ein- und Ausschalten des Produkts
6 Blende, klein
7 Blende, groß
8 Wartungsklappe für die Prüfung des optionalen Fehlerstromschutzschalters
Bedienungsanleitung – Mobility Wallbox Home / Home Pro 7
Page 8
Produktübersicht
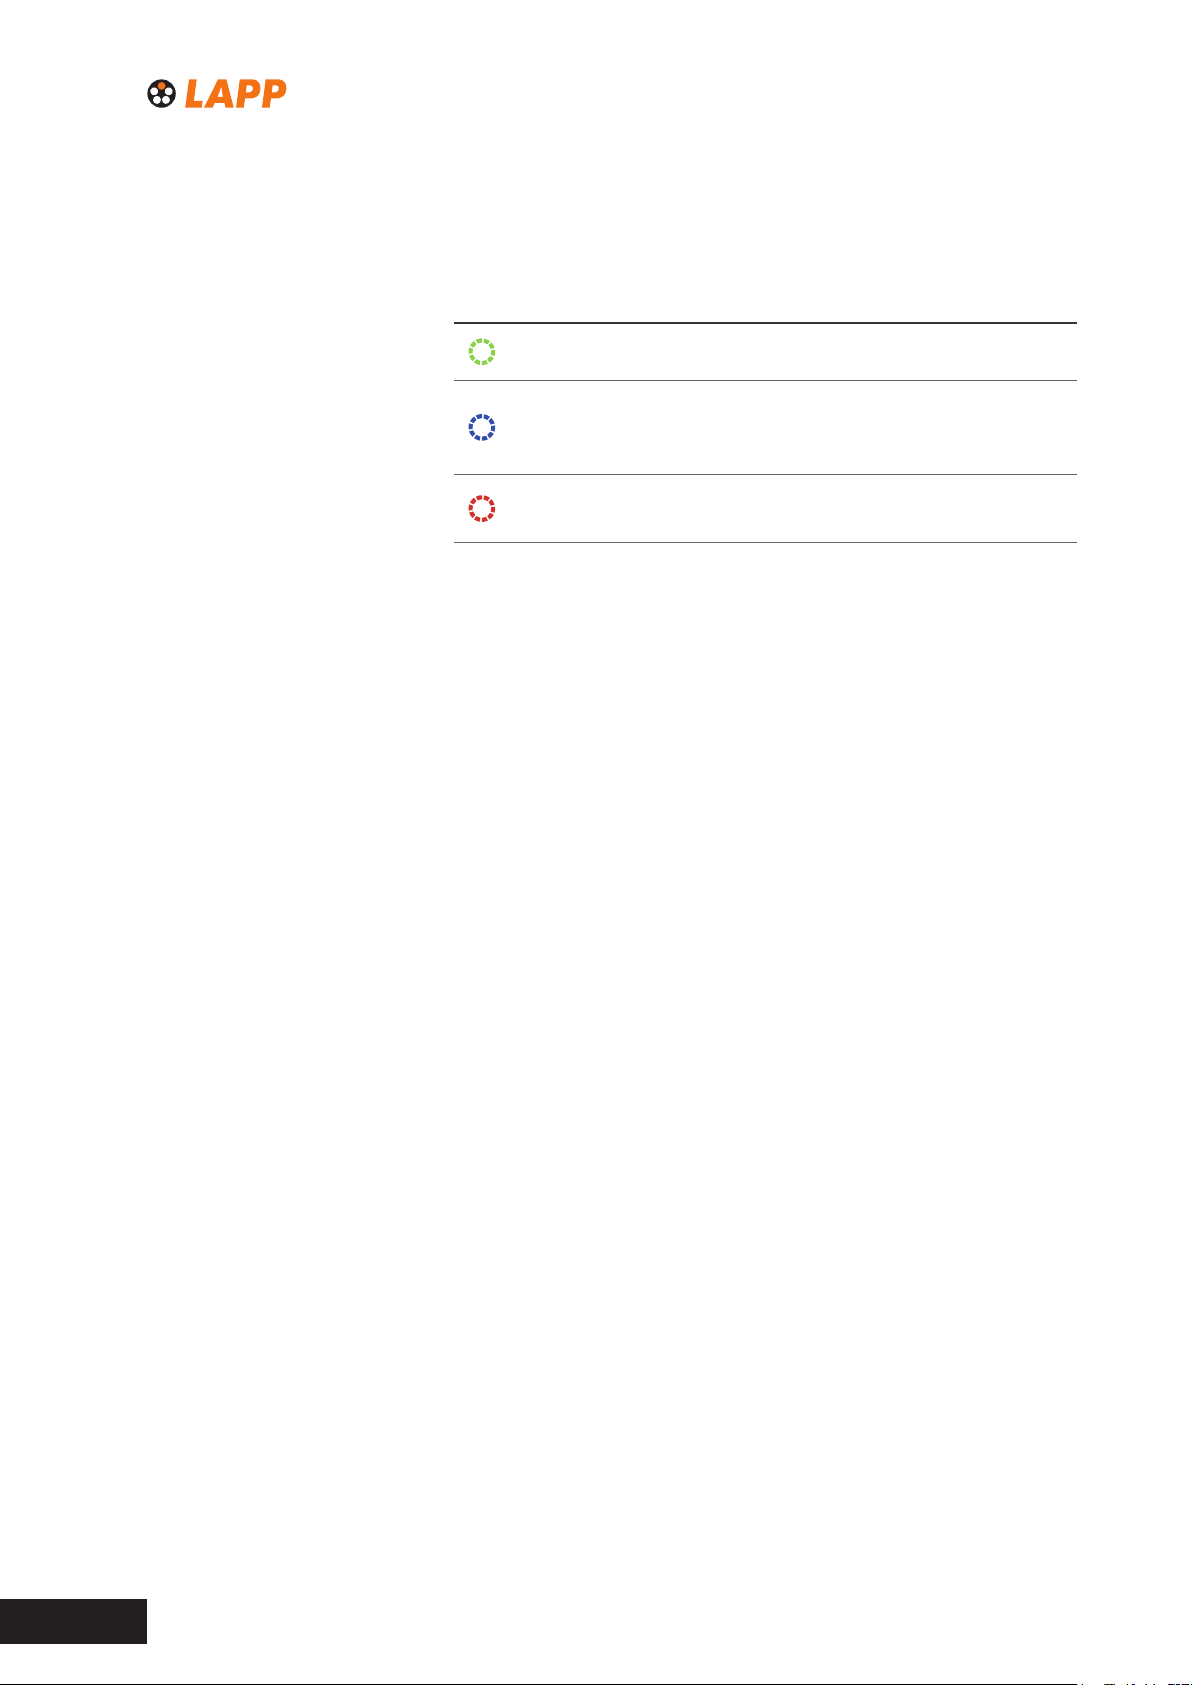
LED-Anzeige
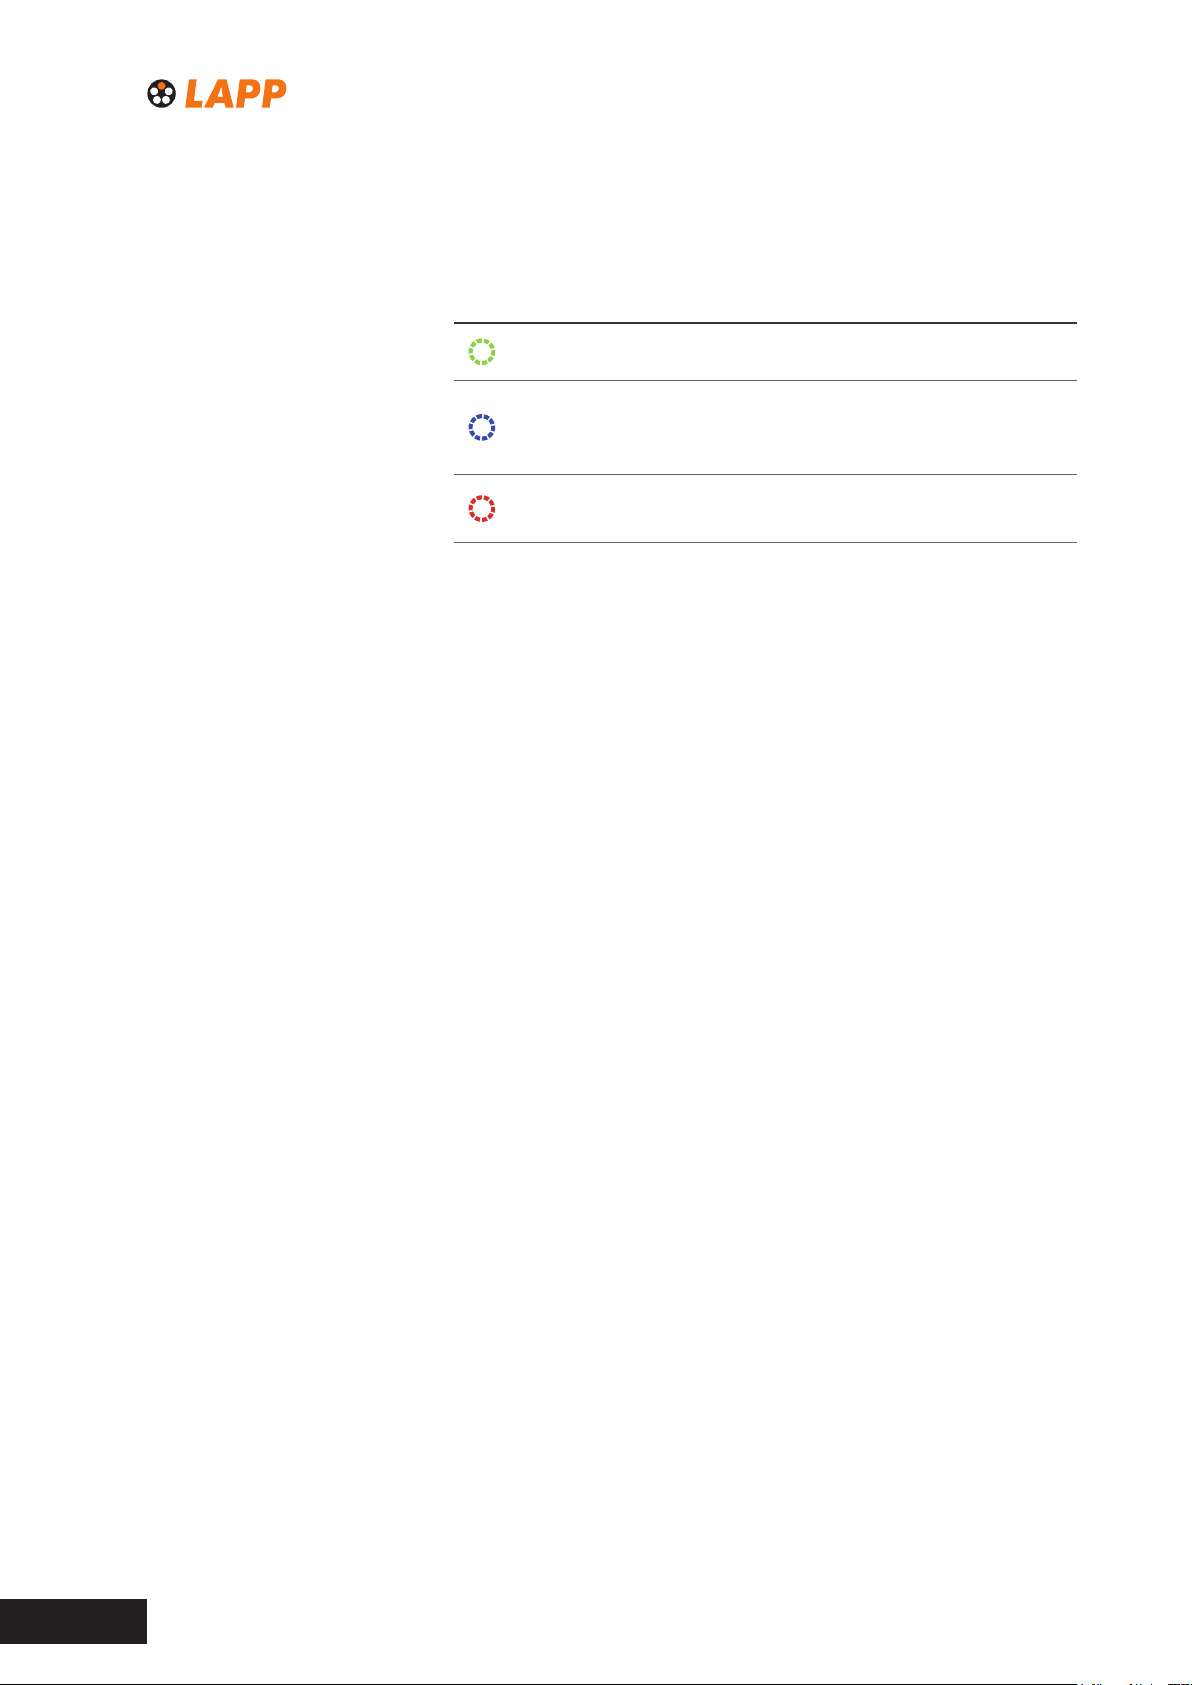
Die Farbe der LED-Anzeige zeigt den Betriebszustand des Produkts an.
Farbe Bedeutung
Grün Das Produkt ist eingeschaltet und betriebsbereit.
Das Produkt hat eine Verbindung zu einem Fahr-
Blau
zeug erkannt und ist bereit für einen Ladevorgang
oder der Ladevorgang läuft.
Rot
Das Produkt hat eine Störung erkannt und unterbricht die Verbindung zum Fahrzeug.
3.2 Produktfunktionen
Sobald der Ladevorgang startet, verriegelt das Fahrzeug den Stecker des
Ladekabels in der Steckdose des Fahrzeugs und die Wallbox verriegelt
den Stecker in der Steckdose der Wallbox. So wird verhindert, dass der
Ladevorgang vorzeitig durch Abziehen des Ladekabels unterbrochen
werden kann.
Verhalten im Störfall
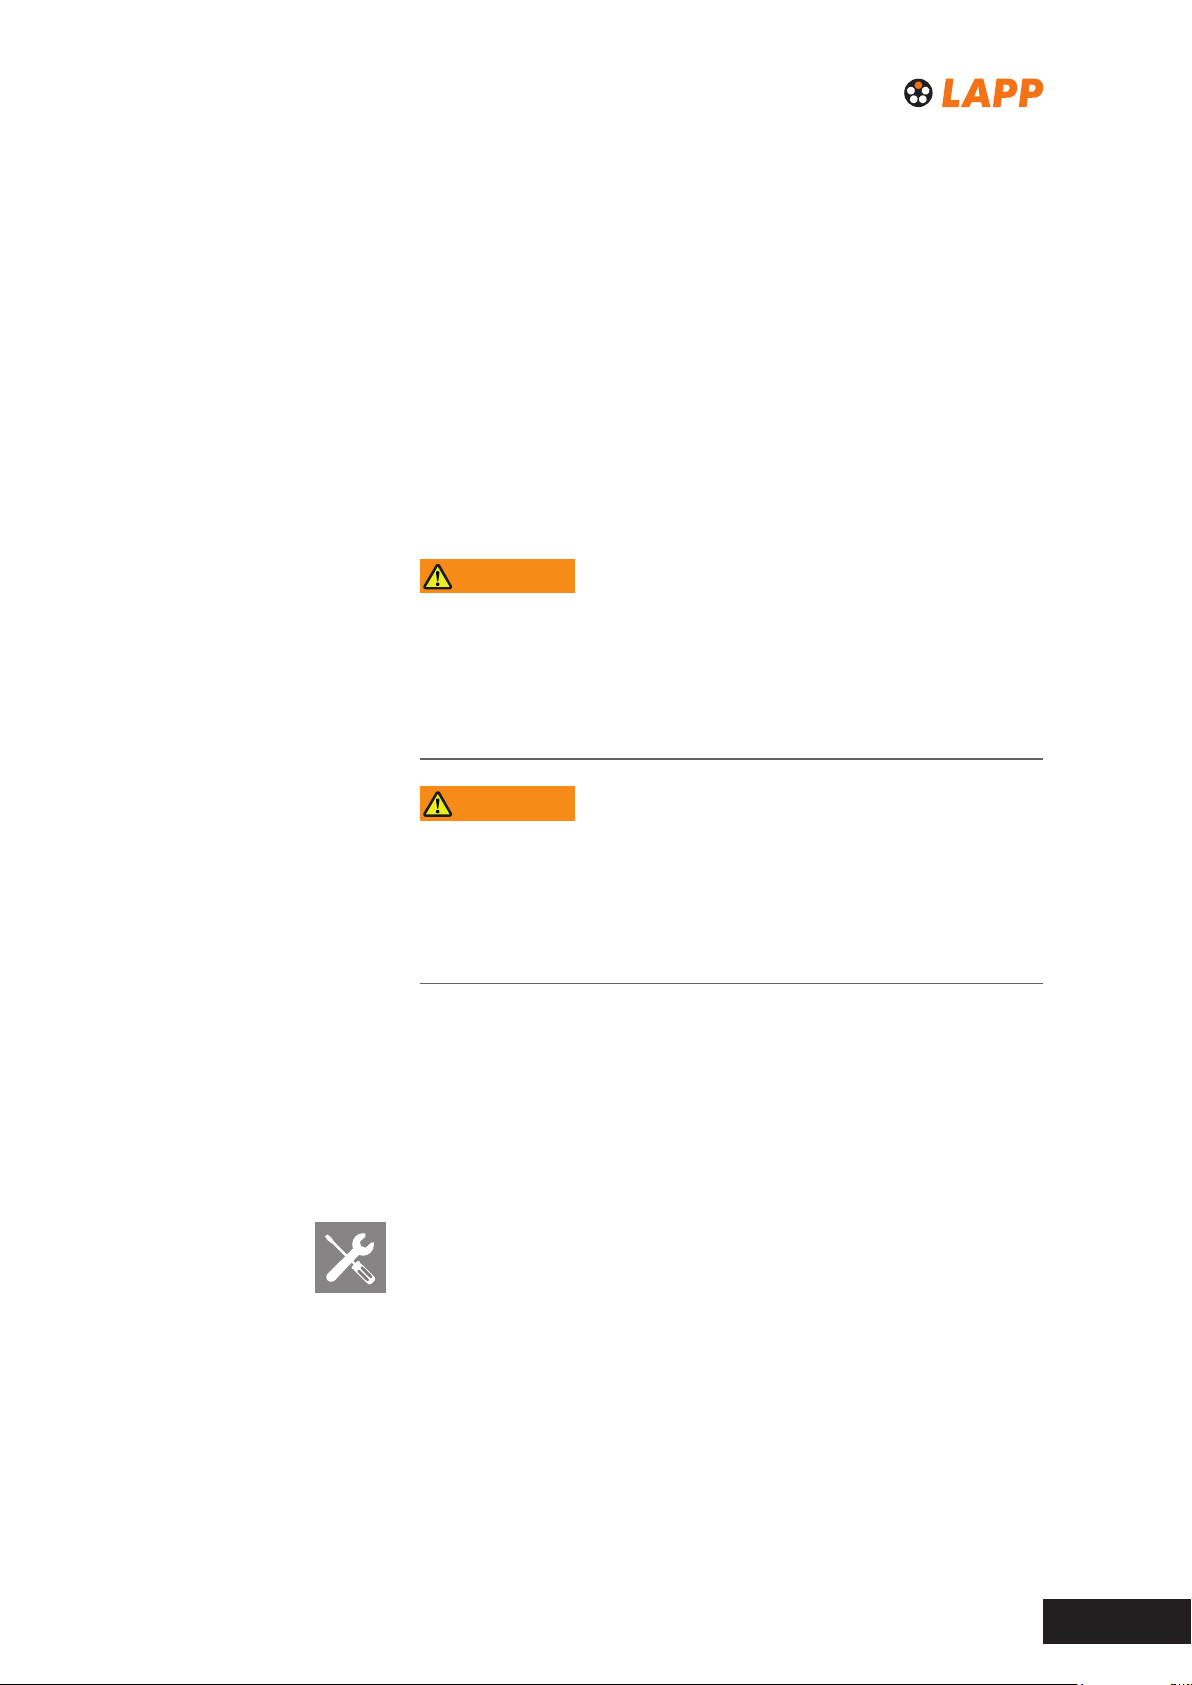
Wenn das Produkt eine Störung feststellt, leuchtet die LED-Anzeige rot.
Wenn das Produkt mit einem Fahrzeug verbunden ist, unterbricht das
Produkt die Verbindung zum Fahrzeug. Der Stecker des Ladekabels kann
in diesem Fall über die Fahrzeug-Software entriegelt werden. Der Stecker
am Produkt wird automatisch entriegelt.
Im Falle eines Stromausfalls können Sie den Stecker am Fahrzeug über
die Fahrzeug-Software entriegeln. Der Stecker am Produkts entriegelt
automatisch.
Kommunikationsfähigkeit
Das Produkt kann mit externen Schnittstellen verbunden werden, zum
Beispiel zur Anbindung an ein Energiemanagementsystem. Diese Anbindung ist in einem separaten Dokument beschrieben (siehe Anleitung
für die Systemvernetzung).
Bedienungsanleitung – Mobility Wallbox Home / Home Pro8
Page 9

4 Auspacken und Lieferumfang
prüfen
4.1 Auspacken
► Nehmen Sie alle Teile des Produkts einschließlich der mitgelieferten
Dokumente aus der Verpackung.
► Bewahren Sie die Verpackung auf, um das nicht montierte Produkt
darin lagern zu können (siehe Kapitel 5 auf Seite 10).
4.2 Lieferumfang prüfen
► Prüfen Sie, ob der Lieferumfang vollständig ist und alle Teile unbeschä-
digt sind.
Artikel Stückzahl
Gehäuse 1
Montageplatte 1
Zugentlastung 1
Dübel, 8 x 50 mm 4
Schlüsselschraube, 5 x 50 mm 4
Unterlegscheibe 4
Schraube 3,5 x 16 mm 1
Schraube 4 x 12 mm 6
Blende, klein 1
Blende, groß 1
Verschlusskappe für Leiterdurchführung (rechts und
links)
Sicherheitshinweise 1
Anleitung für die Montage und Demontage 1
je 1
Bedienungsanleitung – Mobility Wallbox Home / Home Pro 9
Page 10

5 Produkt lagern
WARNUNG!
Verletzungsgefahr durch beschädigtes Produkt
Das Produkt erfüllt die Anforderungen an die Schutzart IP54 nur in
Einbaulage, an einer Wand oder am Originalzubehör zur freistehenden
Montage montiert. Bei unsachgemäßer Lagerung kann das demontierte
Produkt durch eindringenden Staub, Schmutz oder Feuchtigkeit beschädigt werden. Die Betriebssicherheit eines unsachgemäß gelagerten
Produkts ist daher nicht gewährleistet.
► Schützen Sie das nicht montierte Produkt vor Staub, Schmutz und
Feuchtigkeit, z. B. indem Sie es in der Originalverpackung lagern.
► Lagern Sie das Produkt gemäß der empfohlenen Umgebungsbedin-
gungen (siehe Technische Daten auf Seite 21).
Bedienungsanleitung – Mobility Wallbox Home / Home Pro10
Page 11
6 Montage vorbereiten
6.1 Montageort wählen
► Wählen Sie einen Montageort, der die folgenden Anforderungen erfüllt:
– ebene, lotrechte Wand
– ausreichend Platz für das Produkt (siehe Technische Daten auf
Seite 21)
– geeignete Umgebungsbedingungen (siehe Technische Daten auf
Seite 21)
– keine direkte Sonneneinstrahlung
6.2 Montage beauftragen
WARNUNG!
Lebensgefahr durch Stromschlag
Bei Arbeiten an der elektrischen Installation des Produkts besteht die
Gefahr eines Stromschlags.
► Montieren Sie das Produkt keinesfalls selbst.
► Beauftragen Sie eine Elektrofachkraft mit der Montage des Produkts.
WARNUNG!
Verletzungsgefahr durch beschädigtes Produkt
Ein beschädigtes oder unvollständiges Produkt kann zu Fehlfunktionen
und Gefährdungen führen.
► Lassen Sie das Produkt nur montieren, wenn alle Artikel des Liefer-
umfangs vollständig vorhanden und unbeschädigt sind.
6.3 Blenden austauschen
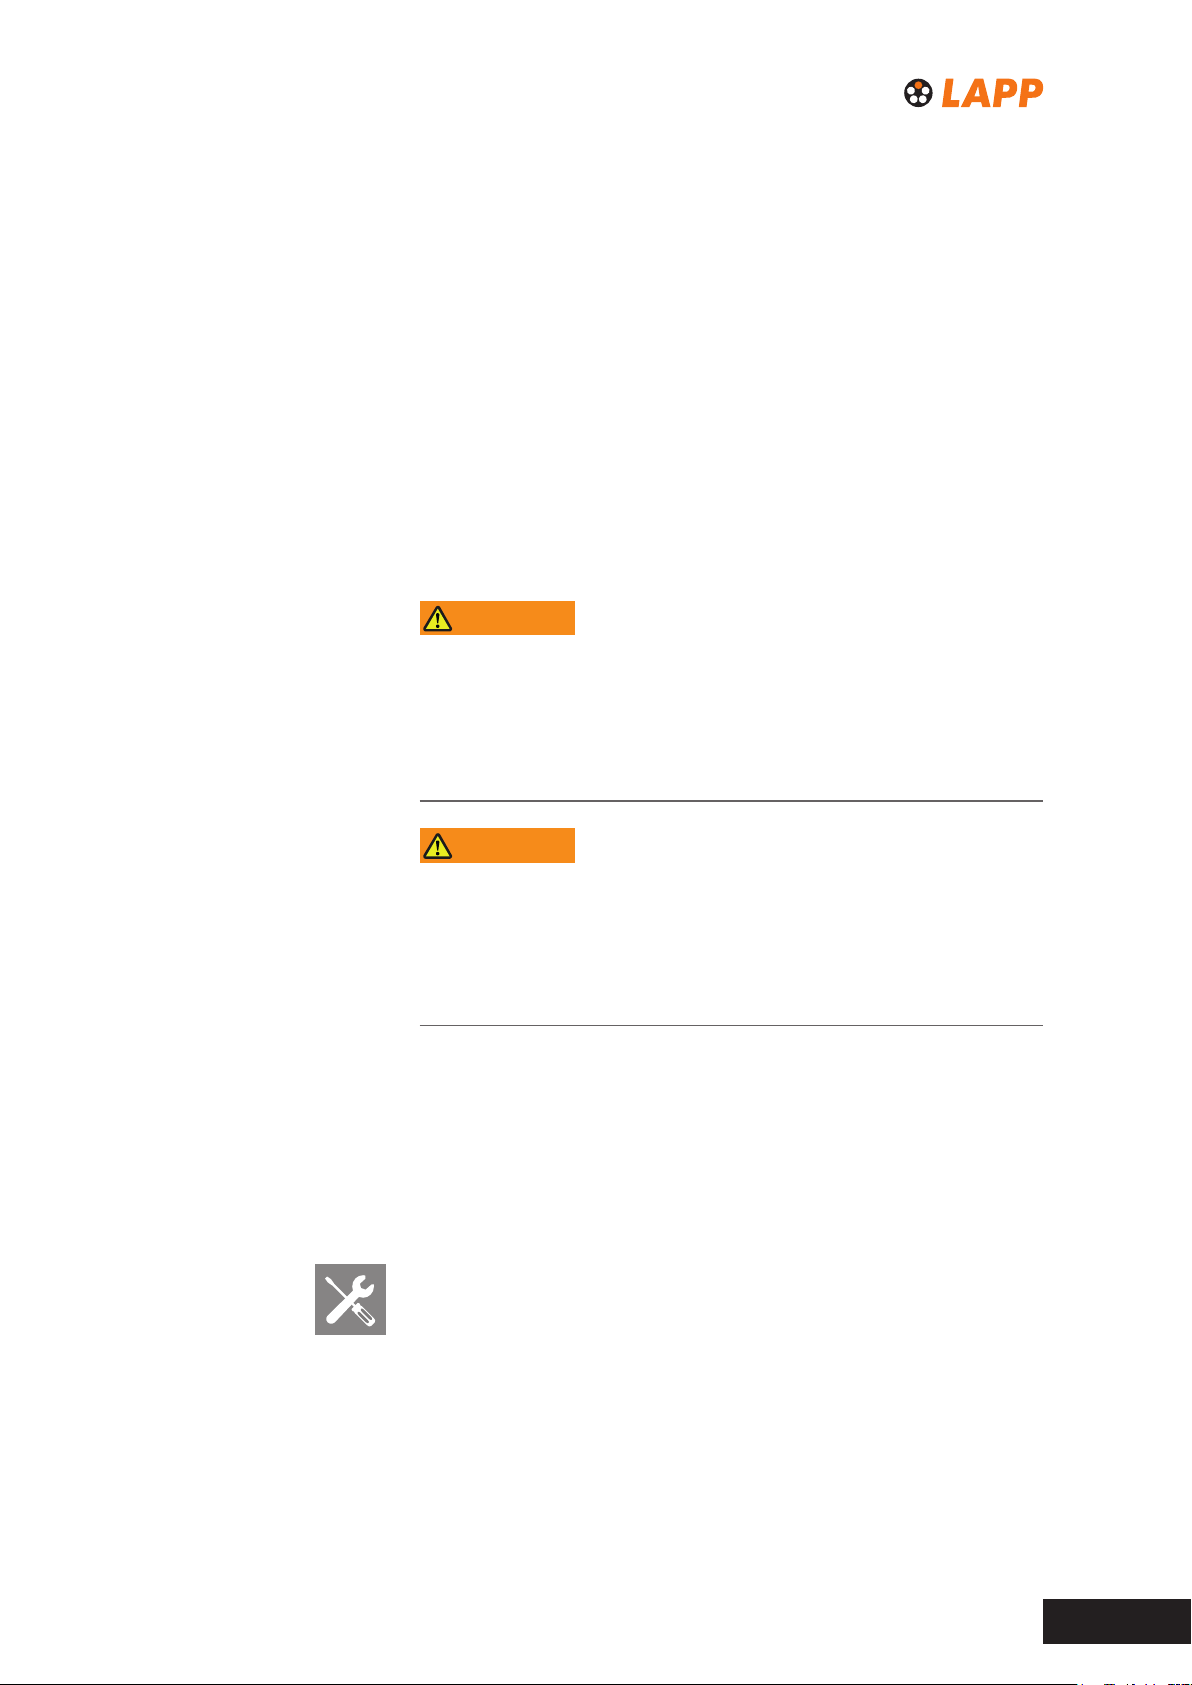
Die Blenden und das Gehäuse sind mit Magneten versehen, welche die
Blenden am Gehäuse halten. Sie können die montierten Blenden jederzeit austauschen.
Blenden vom Gehäuse lösen
Benötigtes Werkzeug: acher Demontagekeil (nicht im Lieferumfang
enthalten)
Bedienungsanleitung – Mobility Wallbox Home / Home Pro 11
Page 12
Montage vorbereiten
ACHTUNG!
Beschädigung der Blenden durch ungeeignetes Werkzeug
Die Blenden und das Gehäuse können durch Werkzeug mit scharfen
Kanten beschädigt werden.
► Verwenden Sie zum Abnehmen der Blenden einen achen
Demontagekeil.
ACHTUNG!
Beschädigung der Blenden durch Herabfallen
Sobald Sie eine Blende an einer Stelle vom Gehäuse abheben, löst sich
die gesamte Blende. Herabfallende Blenden können beschädigt werden.
► Halten Sie die Blende fest, während Sie sie vom Gehäuse lösen.
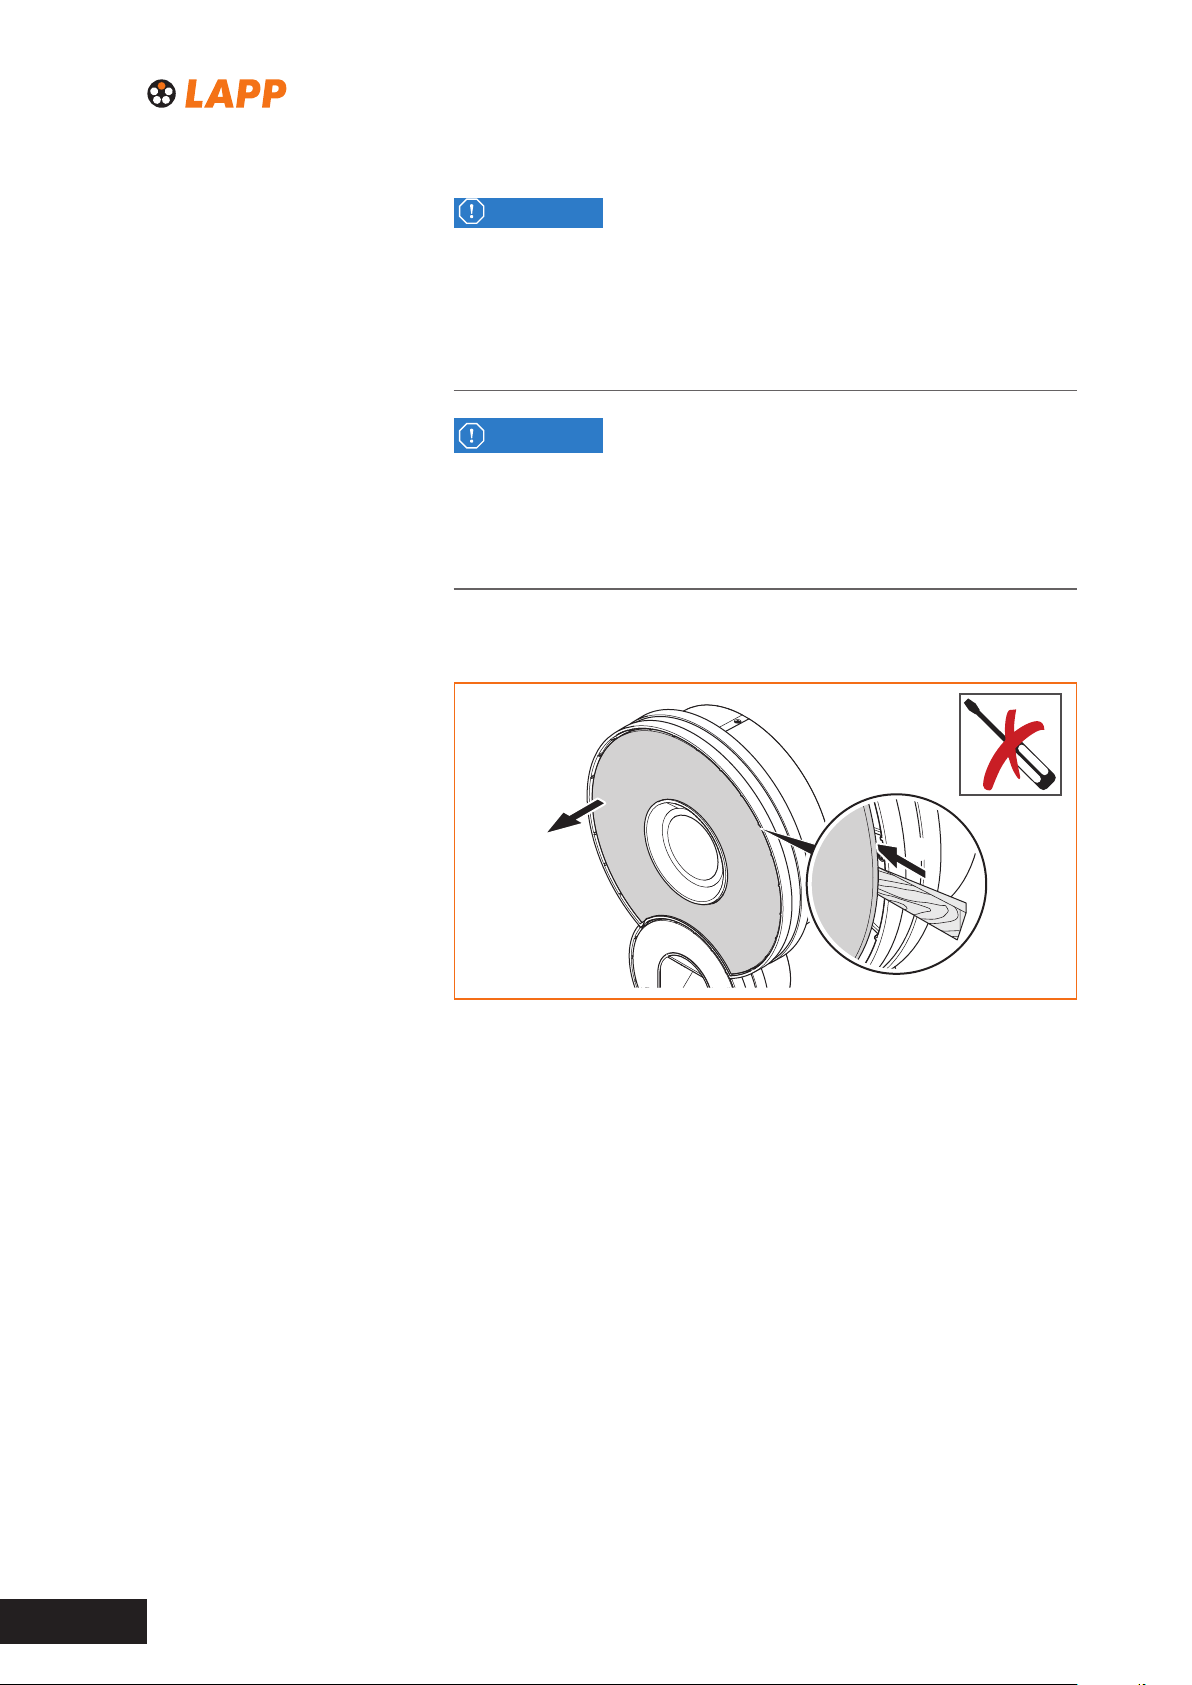
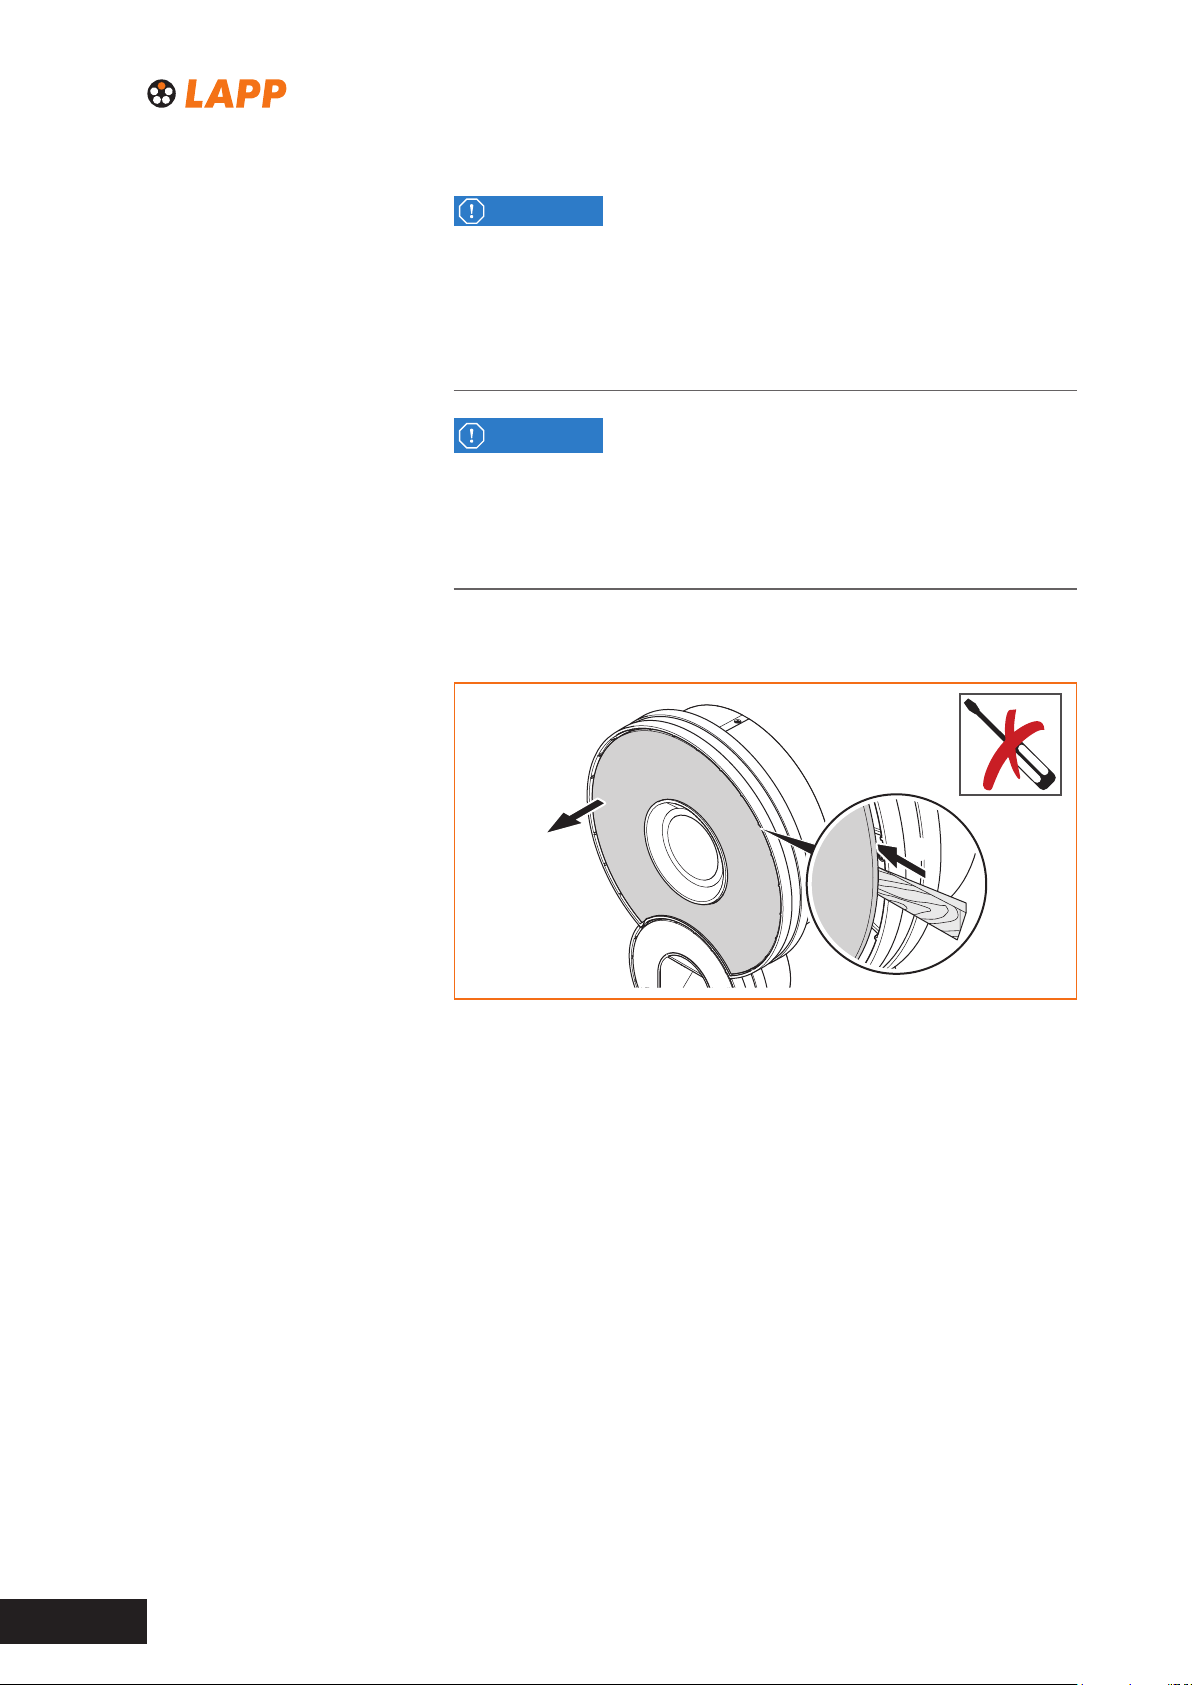
► Lösen Sie die montierten Blenden mit einem achen Demontagekeil
vom Gehäuse (siehe Bild 2).
2.
Bild 2 Blende vom Gehäuse lösen
1.
Bedienungsanleitung – Mobility Wallbox Home / Home Pro12
Page 13
Montage vorbereiten
Blenden am Gehäuse anbringen
ACHTUNG!
Beschädigung der Blenden durch Herabfallen
Wenn die Magnete von Blende und Gehäuse nicht genau übereinander
liegen, kann die Blende herabfallen und beschädigt werden.
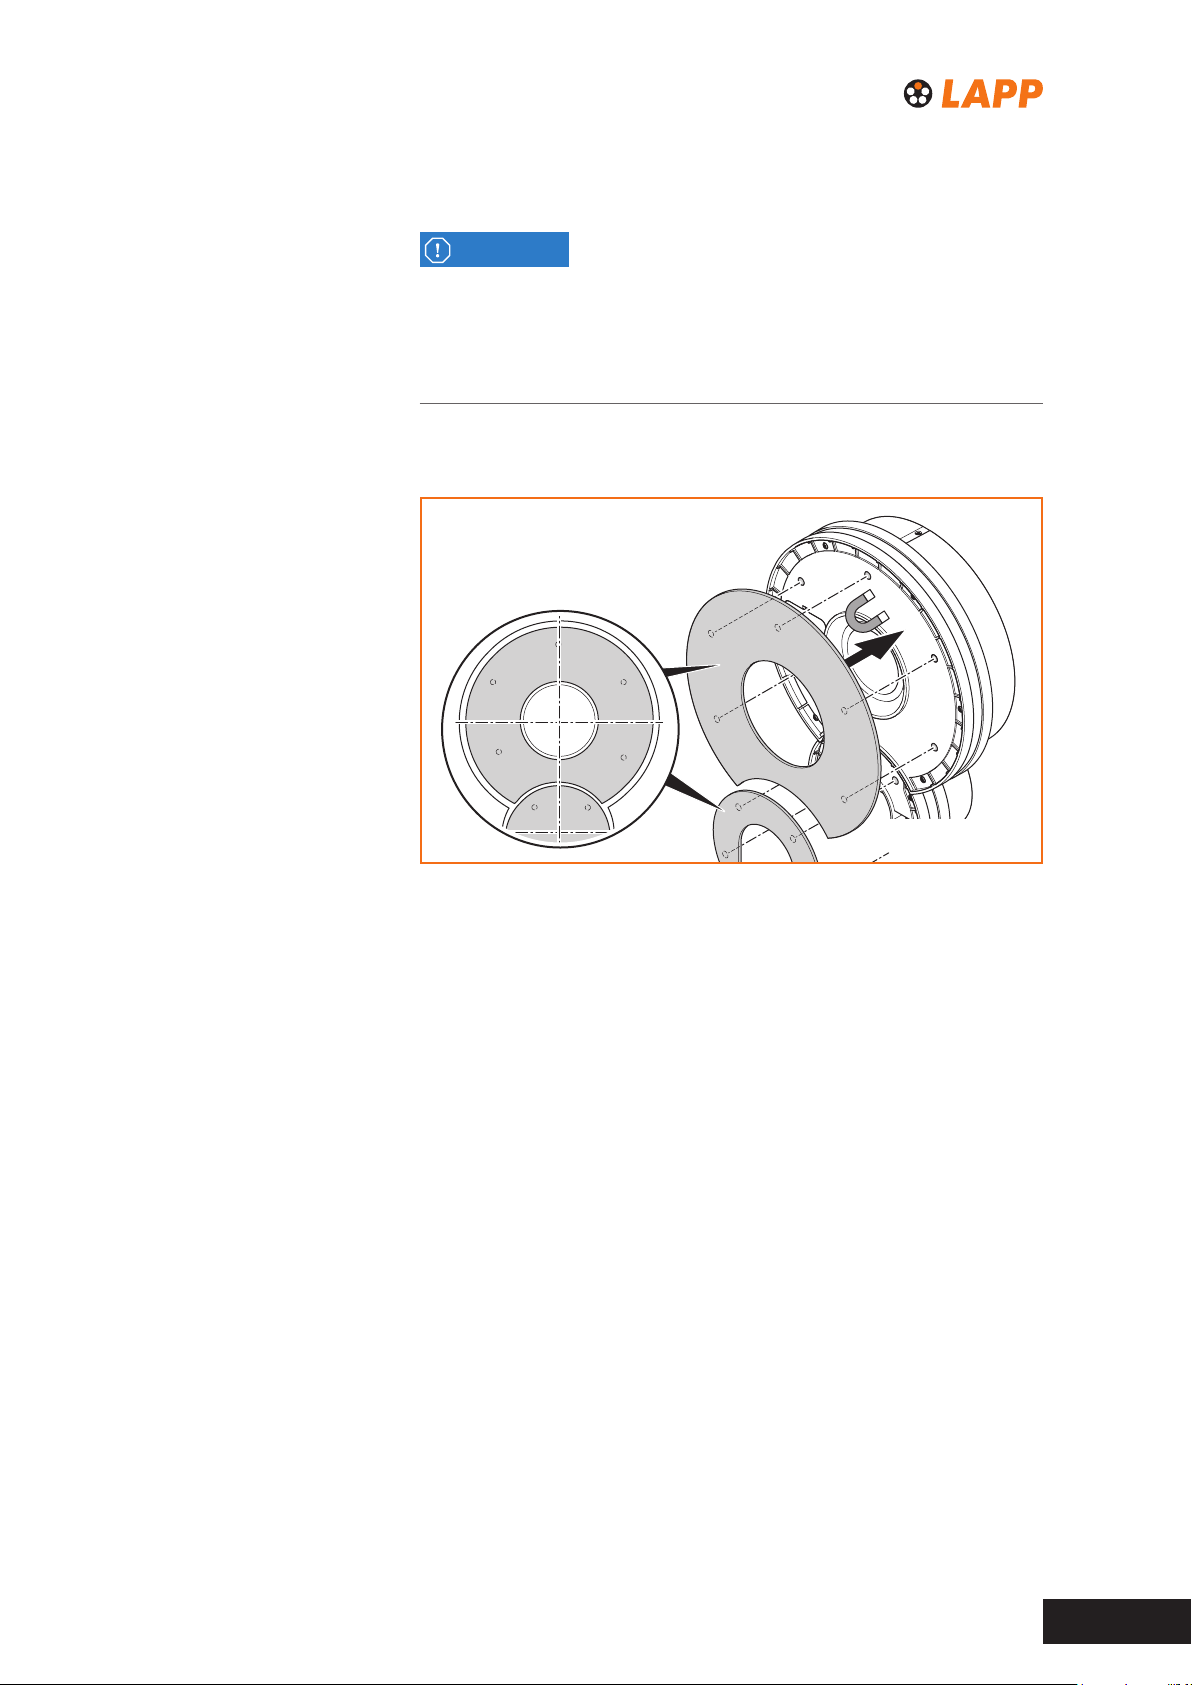
► Stellen Sie sicher, dass die Magnete übereinander liegen und fassen.
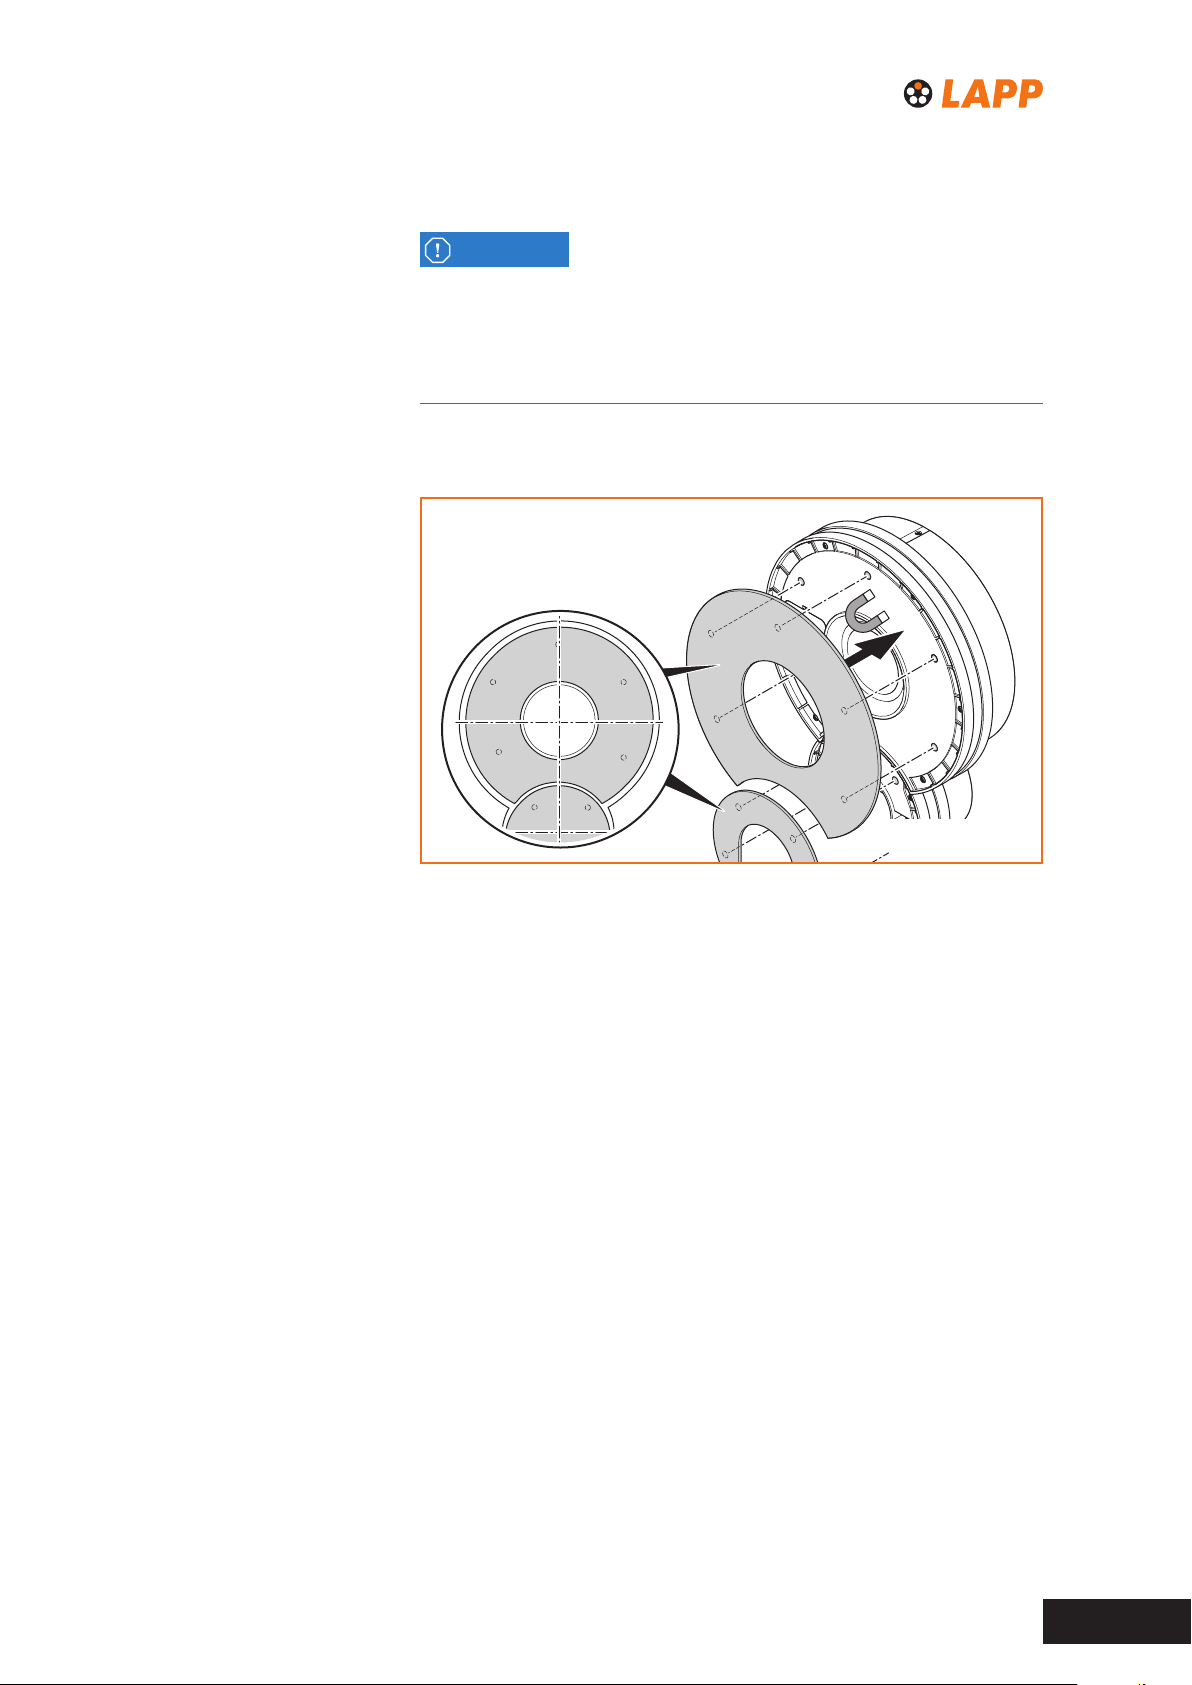
► Setzen Sie jede Blende so auf das Gehäuse, dass die Magnete von
Blende und Gehäuse genau übereinander liegen (siehe Bild 3).
Bild 3 Blenden am Gehäuse anbringen
Bedienungsanleitung – Mobility Wallbox Home / Home Pro 13
Page 14
7 Bedienen
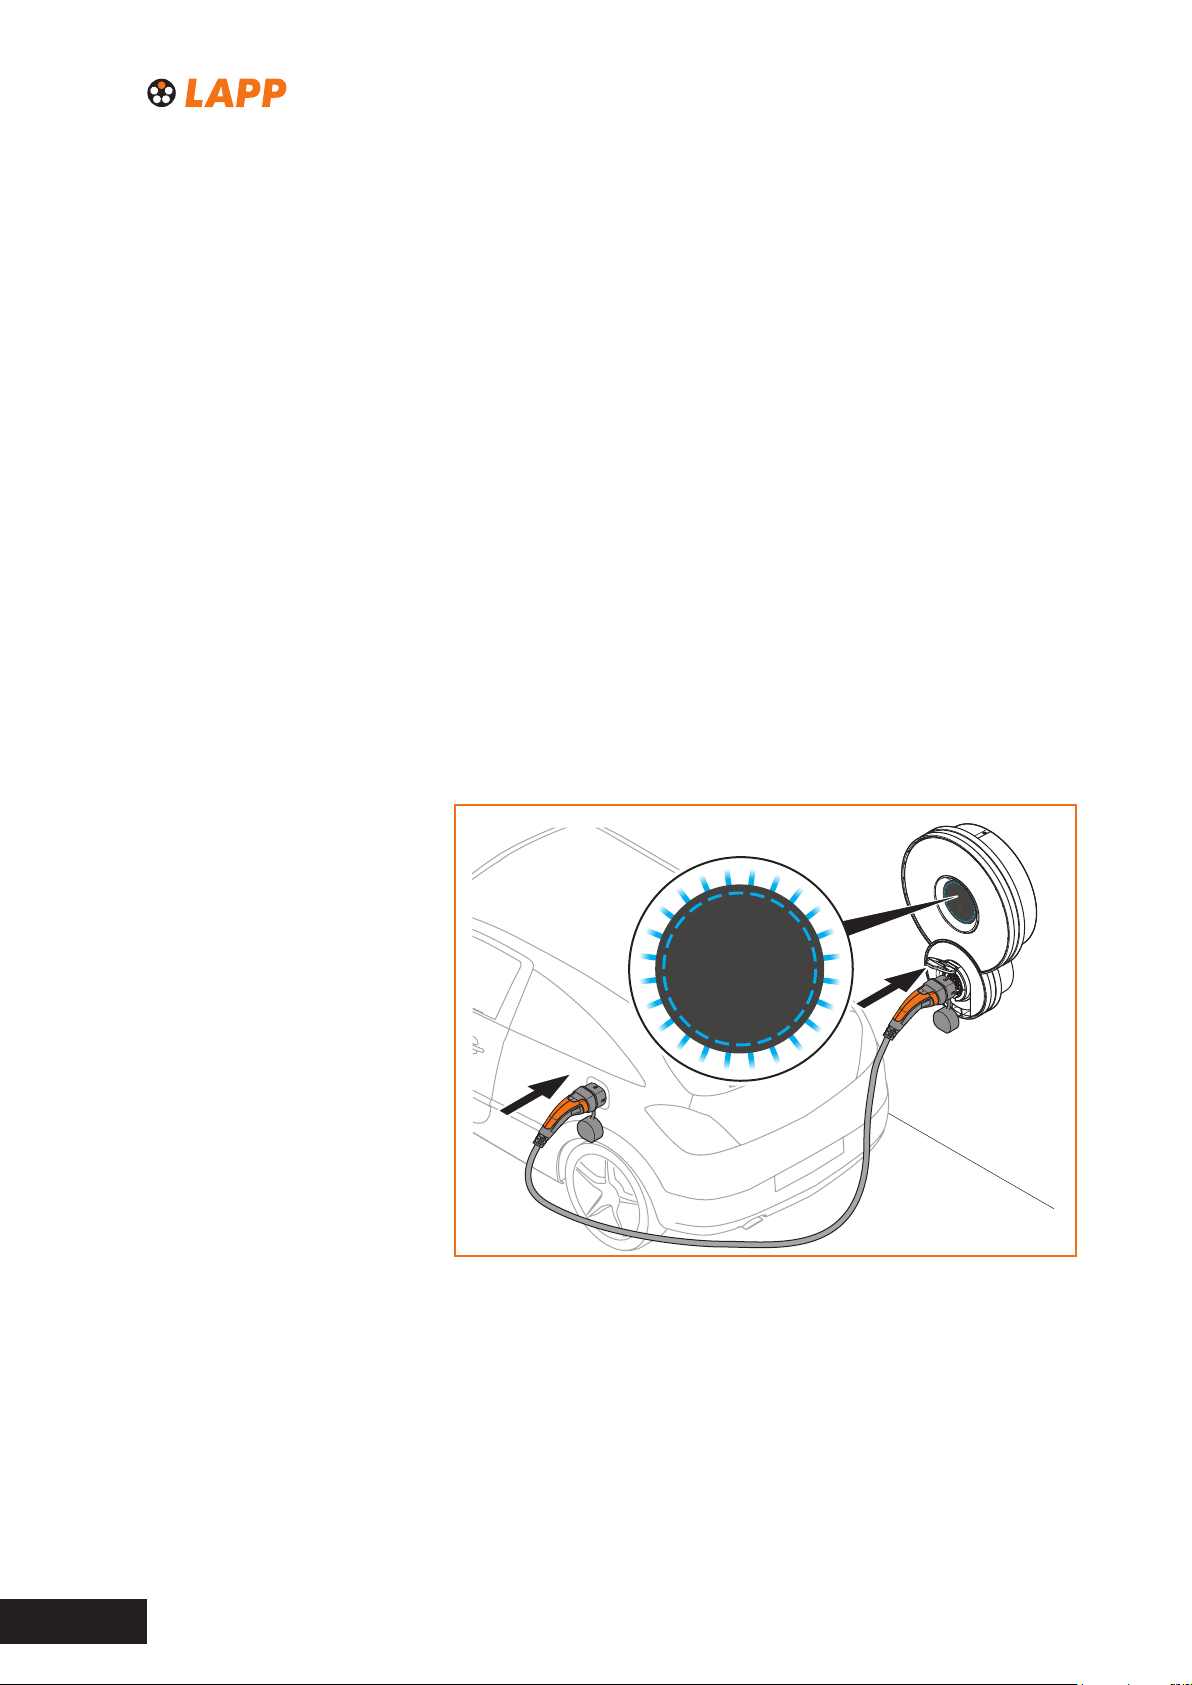
registered - please connect
charging
error
7.1 Produkt einschalten
► Drücken Sie den Ein-/Aus-Taster.
Der Ein-/Aus-Taster rastet ein.
Die LED-Anzeige blinkt grün.
Sobald die LED-Anzeige permanent grün leuchtet, ist das Produkt
betriebsbereit.
7.2 Fahrzeug laden
Voraussetzung: Das Produkt ist eingeschaltet und die LED-Anzeige
leuchtet permanent grün.
Fahrzeug mit dem Produkt verbinden
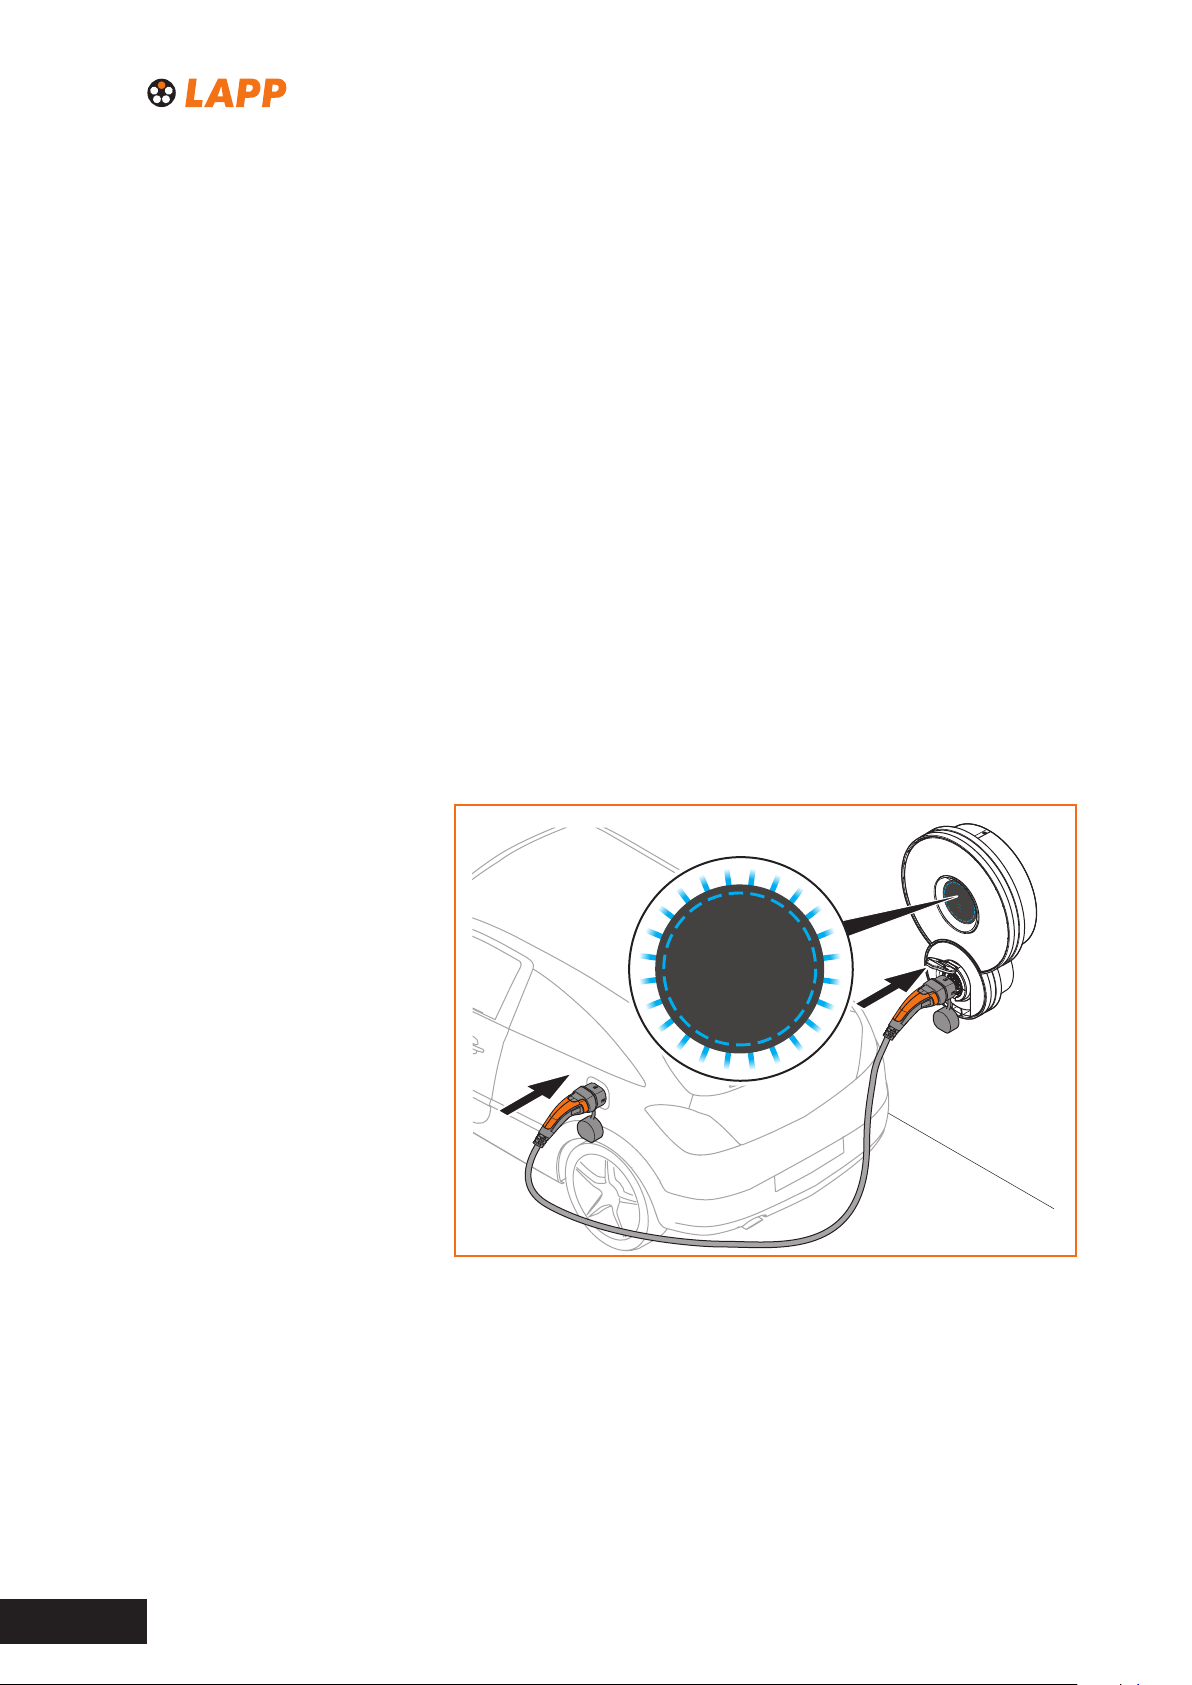
► Stellen Sie mit dem Ladekabel eine Verbindung zwischen dem Produkt
und dem Fahrzeug her (siehe Bild 4).
Die LED-Anzeige leuchtet blau.
Bild 4 Fahrzeug mit dem Produkt verbinden
Ladevorgang am Fahrzeug starten
Das blaue Leuchten der LED-Anzeige signalisiert, dass das Produkt eine
Verbindung zu einem Fahrzeug erkannt hat und bereit ist, das Fahrzeug
zu laden. Das Produkt erhält vom verbundenen Fahrzeug keine Rückmeldung darüber, mit welcher Leistung das Fahrzeug geladen wird.
Bedienungsanleitung – Mobility Wallbox Home / Home Pro14
Page 15
Bedienen
Nur das verbundene Fahrzeug kann den Ladevorgang starten und den
Ladefortschritt anzeigen.
Abhängig vom verbundenen Fahrzeug startet der Ladevorgang entweder
automatisch oder Sie müssen den Ladevorgang manuell am verbunden
Fahrzeug starten.
► Stellen Sie sicher, dass der Ladevorgang startet. Beachten Sie dazu
die Anleitung des verbundenen Fahrzeugs.
Die Stecker an Fahrzeug und Produkt sind verriegelt.
ACHTUNG!
Störung durch nicht verriegelten Stecker
Die Stecker an Fahrzeug und Produkt sind verriegelt, um eine Unterbrechung des Ladevorgangs zu verhindern. Eine Unterbrechung des Ladevorgangs kann zu Störungen am Produkt und an der Fahrzeug-Software
führen.
► Prüfen Sie, ob die Stecker verriegelt sind.
7.3 Ladevorgang beenden
Der Ladevorgang kann nur durch die Software des verbundenen Fahr-
zeugs beendet werden. Beachten Sie die Anleitung zu Ihrem Fahrzeug.
Verbindung zwischen Fahrzeug und Produkt trennen
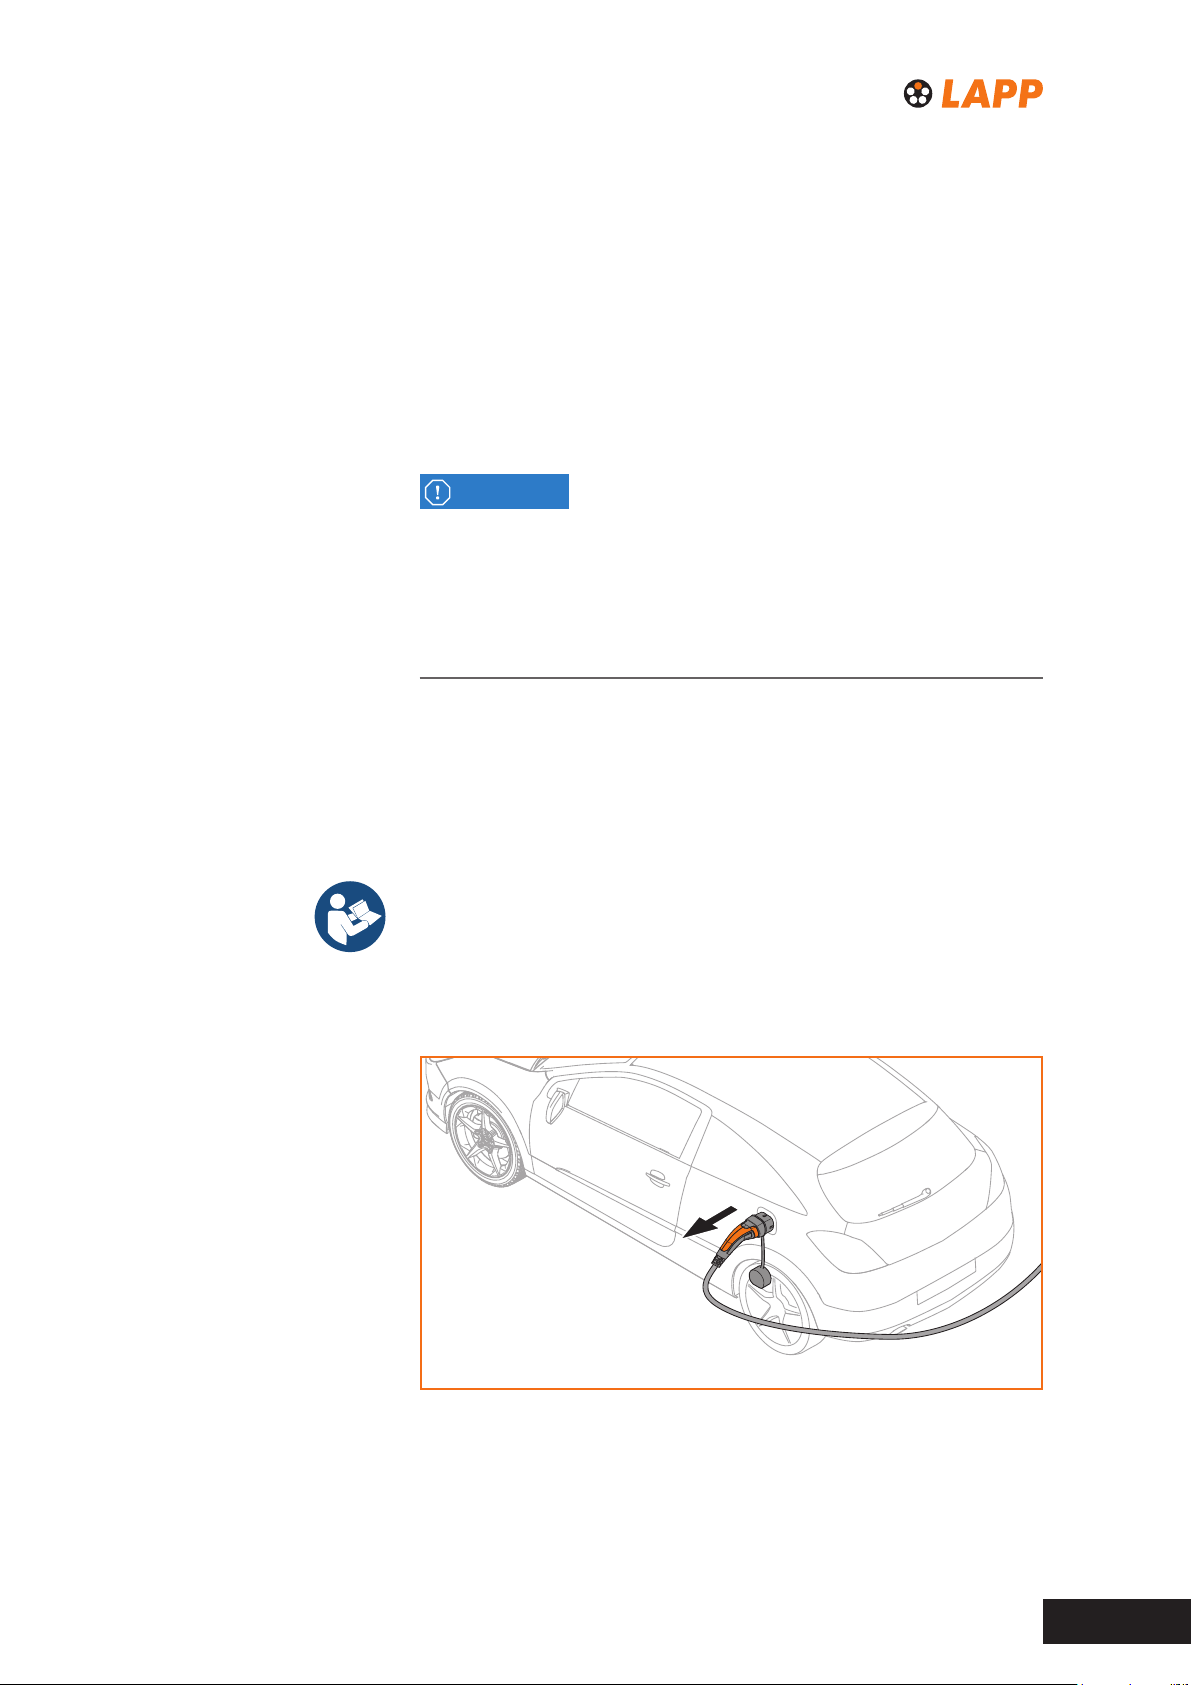
► Beenden Sie den Ladevorgang. Beachten Sie die Anleitung zu Ihrem
Fahrzeug.
Die Stecker an Fahrzeug und Produkt sind entriegelt.
► Stellen Sie sicher, dass der Ladevorgang beendet ist. Beachten Sie die
Anleitung zu Ihrem Fahrzeug.
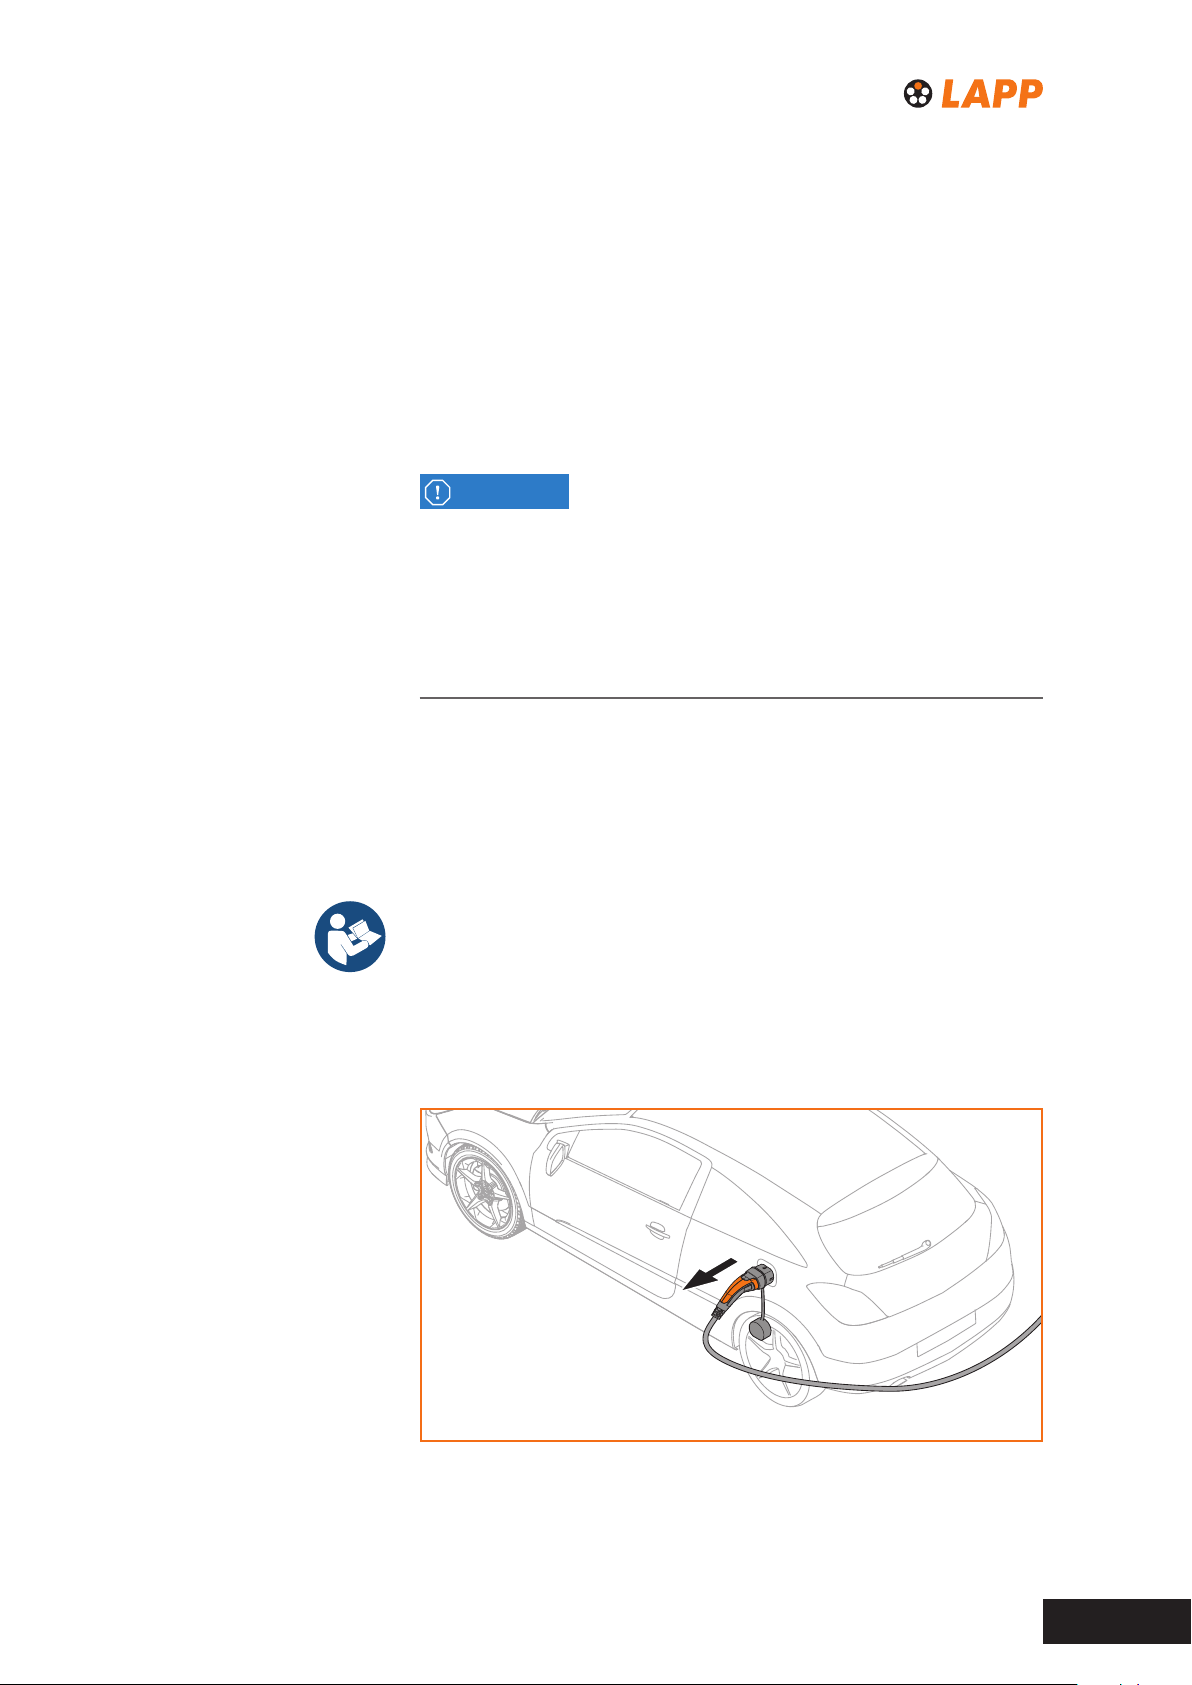
► Entfernen Sie das Ladekabel vom Fahrzeug.
Bild 5 Verbindung trennen
Bedienungsanleitung – Mobility Wallbox Home / Home Pro 15
Page 16
Bedienen
VORSICHT!
Stolpergefahr durch herumliegendes Ladekabel
Wenn das Ladekabel auf dem Boden liegt, können Personen darüber stolpern und das Ladekabel kann durch Quetschen oder Knicken beschädigt
werden.
► Legen Sie das Ladekabel so ab, dass es nicht gequetscht oder ge-
knickt werden kann und keine Stolpergefahr entsteht.
7.4 Produkt ausschalten
ACHTUNG!
Störung durch vorzeitiges Ausschalten des Produkts
Wenn Sie das Produkt ausschalten, während es mit einem Fahrzeug
verbunden ist, können Störungen am Produkt und an der Fahrzeug-Software auftreten.
► Stellen Sie sicher, dass der Ladevorgang beendet ist und dass das
Produkt nicht mit einem Fahrzeug verbunden ist.
► Drücken Sie den Ein-/Aus-Taster.
Die LED-Anzeige erlischt.
Bedienungsanleitung – Mobility Wallbox Home / Home Pro16
Page 17
8 Produkt reinigen
WARNUNG!
Lebensgefahr durch Stromschlag
Wenn Wasser in das Gehäuse eindringt, besteht die Gefahr eines
Stromschlags.
► Reinigen Sie das Produkt nie mit einem Hochdruckreiniger.
► Reinigen Sie das Produkt nur wie in dieser Bedienungsanleitung
beschrieben.
ACHTUNG!
Beschädigung des Produkts durch unsachgemäße Reinigung
Ungeeignete Reinigungsmittel können das Produkt beschädigen.
► Verwenden Sie keine Reinigungsmittel.
► Wischen Sie das Produkt mit einem weichen, trockenen Tuch ab.
Bedienungsanleitung – Mobility Wallbox Home / Home Pro 17
Page 18

9 Störungen beheben
Sobald das Produkt eine Störung feststellt, leuchtet die LED-Anzeige rot.
In der folgenden Tabelle sind mögliche Störungsursachen und Maßnahmen zur Störungsbehebung beschrieben.
► Falls sich die Störung mit den beschriebenen Maßnahmen nicht
beheben lässt, beauftragen Sie eine Elektrofachkraft mit der
Störungsbehebung.
Mögliche Ursache Empfohlene Maßnahme
Funktioniert Ihre Ausstattung?
– Fahrzeug
– Fahrzeug-Software
Versuchen Sie, ein Fahrzeug mit
Steckertyp 1 zu laden?
Weist das Ladekabel oensichtliche, äußere Schäden auf?
Verwenden Sie ein Ladekabel
von einem anderen Hersteller als
Lapp Mobility?
Beachten Sie die Anleitung Ihres
Fahrzeugs.
Verwenden Sie ein normgerechtes
Adapterkabel Typ 1 auf Typ 2.
Verwenden Sie keinesfalls ein
beschädigtes Ladekabel.
Ersetzen Sie das Ladekabel durch
ein unbeschädigtes Original-Ladekabel von Lapp Mobility.
Ersetzen Sie das Ladekabel
durch ein Original-Ladekabel von
Lapp Mobility.
Bedienungsanleitung – Mobility Wallbox Home / Home Pro18
Page 19

10 Produkt demontieren
WARNUNG!
Lebensgefahr durch Stromschlag
Bei Arbeiten an der elektrischen Installation des Produkts besteht die
Gefahr eines Stromschlags.
► Beauftragen Sie eine Elektrofachkraft mit der Demontage des
Produkts.
► Schalten Sie das Produkt aus (siehe Kapitel 7.4 auf Seite 16).
► Reinigen Sie das Produkt (siehe Kapitel 8 auf Seite 17).
► Lassen Sie das Produkt von einer Elektrofachkraft demontieren.
Bedienungsanleitung – Mobility Wallbox Home / Home Pro 19
Page 20

11 Produkt und Verpackung entsorgen
Die EU-Richtlinie 2012/19/EU regelt die Rücknahme und das Recycling
von Elektro- und Elektronikaltgeräten innerhalb der Europäischen Union.
Alle Produkte, die unter diese Richtlinie fallen, sind mit dem Symbol der
durchgestrichenen Mülltonne gekennzeichnet und dürfen nicht in den
allgemeinen Hausmüll entsorgt werden.
► Bitte bringen Sie diese Produkte nach Ende ihres Lebenszyklus zur
Behandlung, Aufarbeitung und Recycling gemäß Ihrer Landesgesetzgebung zu Ihren zuständigen Sammelpunkten oder geben Sie diese
unentgeltlich an Lapp Mobility zurück.
Die Verpackung des Produkts, einschließlich der Spezialfolie, besteht aus
umweltfreundlichen, verrottbaren Materialien. Die Verpackung kann daher
vollständig mit dem Altpapier entsorgt werden.
► Entsorgen Sie die Verpackung des Produkts gemäß den geltenden
örtlichen Vorschriften.
Bedienungsanleitung – Mobility Wallbox Home / Home Pro20
Page 21

12 Technische Daten
Mobility Wallbox Home / Home Pro
Breite x Höhe x Tiefe 351 x 486 x 126 mm
Gewicht 6,06 kg
Stoßfestigkeitsgrad Gehäuse IK08
Betriebstemperatur
Lagertemperatur
Relative Luftfeuchte bei Lagerung 5 % bis 95 %
Schutzart IP54
Verschmutzungsgrad 3
Schutzklasse I
Nennspannung 220 ... 240 V / 380 ... 415 V
Nennstrom 16 A
Bemessungsstoßspannung 4 kV
Isolationsspannung 500 V
Überspannungskategorie III
1)
1)
-25 °C bis +50 °C
-40 °C bis +70 °C
Netzfrequenz 50 / 60 Hz
Leitungsschutzschalter 16 A, installationsseitig vorzusehen
Sicherung für interne Versorgung 8 A, träge
Ladespannung 230 V / 400 V
Ladestrom max. 16 A
Ladeleistung max. 11 kW
Fehlerstromschutzschalter optional: Typ A, mit Schutzleiter überwachung
Kurzschlussstrom C16/C32 6 kA (Energiebegrenzungsklasse 3)
AC-Fehlerstrom 30 mA, installationsseitig vorzusehen
DC-Fehlerstromerkennung 6 mA, serienmäßig
Netzausführung TN / TT / IT
Steckdose nach IEC 62196-1:2014 für Ladekabel Typ 2
Lademodus 3
Unterstütze Ladezustände A, B, C, E, F
EMV-Klassikation Class B
Zulässiger Aufstellbereich frei zugänglicher Bereich
1) keine direkte Sonneneinstrahlung
Bedienungsanleitung – Mobility Wallbox Home / Home Pro 21
Page 22

13 Zubehör
Eine Liste der verfügbaren Zubehörteile nden Sie unter www.lappmobility.com.
Bedienungsanleitung – Mobility Wallbox Home / Home Pro22
Page 23

14 CE-Konformität
Das Produkt erfüllt die Anforderungen der folgenden EU-Richtlinien:
– 2014/30/EU Elek tromagnetische Verträglichkeit von Elektro- und
Elektronikgeräten
– 2014/35/EU Bereitstellung elektrischer Betriebsmittel innerhalb be-
stimmter Spannungsgrenzen
– 2011/65/EU Beschränkung der Verwendung bestimmter gefährlicher
Stoe in Elektro- und Elektronikgeräten (RoHS)
Angewandte Normen
DIN VDE 0100-722; VDE 0100-722:2016-10
IEC 61851-1, DIN EN 61851-1
DIN EN 61851-21
DIN EN 61851-21-2
IEC 61851-21-2
DIN EN 61851-22
DIN EN 62196-1; VDE 0623-5-1
DIN EN 62196-2; VDE 0623-5-2
DIN EN 50620
Bedienungsanleitung – Mobility Wallbox Home / Home Pro 23
Page 24

Lapp Mobility GmbH
Oskar-Lapp-Str. 2
D-70565 Stuttgart
www.lappmobility.com
2784060000
Revision: 03/03.2021
Page 25

Mobility Wallbox Home / Home Pro
Charging station
Operating Instructions
Page 26

Operating Instructions – Mobility Wallbox Home / Home Pro2
Page 27

Contents
1 About these operating instructions
1.1 Applicable documents
1.2 Means of representation and symbols
2 For your safety
2.1 Intended use
2.2 Safety
2.3 Modification of the product
3
3.1
3.2
4
4.1
4.2
5 Storing the product
6 Preparing the installation
6.1 Choosing an installation site
6.2 Commissioning the installation
6.3 Replacing the covers
Instructions
Product
Product
Product
Unpacking and checking the scope
of delivery
Unpacking
Checking the scope of delivery
overview
components
functions
10
11
11
11
11
4
4
4
5
5
5
6
7
7
8
9
9
9
7 Operating
7.1 Switching on the product
7.2 Charging the vehicle
7.3 Stopping the charging process
7.4 Switching off the product
Cleaning the product
8
9 Troubleshooting 18
10
Dismantling the product
Disposal of product and packaging 20
11
12
Technical data
Accessories
13
14
CE conformity
14
14
14
15
16
17
19
21
22
23
Manufacturer
Lapp Mobility GmbH
Oskar-Lapp-Str. 2
D-70565 Stuttgart
www.lappmobility.com
Operating Instructions – Mobility Wallbox Home / Home Pro
Dokument-Nr. 2784060000
Revision:
Translated from German
21/02/2023
3
Page 28
1 About these operating instructions
The operating instructions are intended for persons who are to operate and
clean the product.
► Read the operating instructions completely before operating the
product.
► Keep the operating instructions after reading them.
The operating instructions are part of the product.
► If you pass the product on to third parties, also pass on the
operating instructions and the applicable documents.
1.1 Applicable documents
– Safety instructions
– Instructions for assembly and disassembly
– Instructions for system networking
All documents can be downloaded from the website
www.lappmobility.com.
1.2 Means of representation and symbols
► Instruction for action
– Enumeration
WARNING!
An information with the signal word "WARNING" warns of a danger that
can result in serious injuries or death if it is not avoided.
CAUTION!
An information with the signal word "CAUTION" warns of a danger that
can result in injuries if it is not avoided.
NOTICE!
An information with the signal word "NOTICE" warns of a danger that
can result in damage to property or malfunction of the product if it is not
avoided.
Reference to a qualified electrician
Reference to further documentation
Reference to required tools
Operating Instructions – Mobility Wallbox Home / Home Pro4
Page 29

2 For your safety
2.1 Intended use
The product is intended for charging electric vehicles and hybrid
vehicles that can be charged with Mode 3 and Type 2 connector. Only
an original Lapp Mobility charging cable may be used for charging. To
charge a vehicle with Type 1 connector, a standard-compliant adapter
cable is required. Extension cables must not be used.
The product may only be operated when it is mounted in one of the
following ways:
– on a wall
– freestanding, only with original accessories for freestanding mounting
from Lapp Mobility.
For safe operation of the product, a type A residual current circuit
breaker is required in the building installation or in the product. A
product without an integrated type A residual current device may only be
operated if it is connected to a house installation with a type A residual
current circuit breaker.
For safe operation of the product, a circuit breaker is required in the
building installation (see technical data).
The product is intended for use in accordance with these operating
instructions. Any use of the product that deviates from these operating
instructions is considered improper.
Observe the country-specific requirements of IEC 61851-1.
2.2 Safety instructions
Danger to life due to electric shock
There is a risk of electric shock when working on the electrical
installation of the product.
► All work on the domestic installation and the electrical installation of
the product may only be carried out by a qualified electrician.
There is a risk of electric shock if damaged cables are used.
► Do not operate the product without a residual current circuit breaker or
a miniature circuit breaker.
► Check the charging cable for obvious damage before each use.
► Protect the product and the charging cable from direct sunlight.
► Only use the product if the charging cable is undamaged.
Operating Instructions – Mobility Wallbox Home / Home Pro 5
Page 30

For your safety
If water enters the product, there is a risk of electric shock.
► Have the product mounted according to the specified IP protection
degree.
► Do not use a high-pressure cleaner to clean the product.
► Only use a soft, dry cloth to clean the product.
Risk of injury due to damaged product
A damaged product can lead to unforeseeable malfunctions and
hazards.
► Check the product and its accessories for obvious damage before
each use.
► Only use the product and its accessories if all parts have not been
damaged.
2.3 Modification of the product
The product must not be structurally or technically modified. Structural
and technical modifications impair the safety and functionality of the
product.
Operating Instructions – Mobility Wallbox Home / Home Pro6
Page 31
3
Product overview
3.1
Product components
7
1 2
8
6
3
4
5
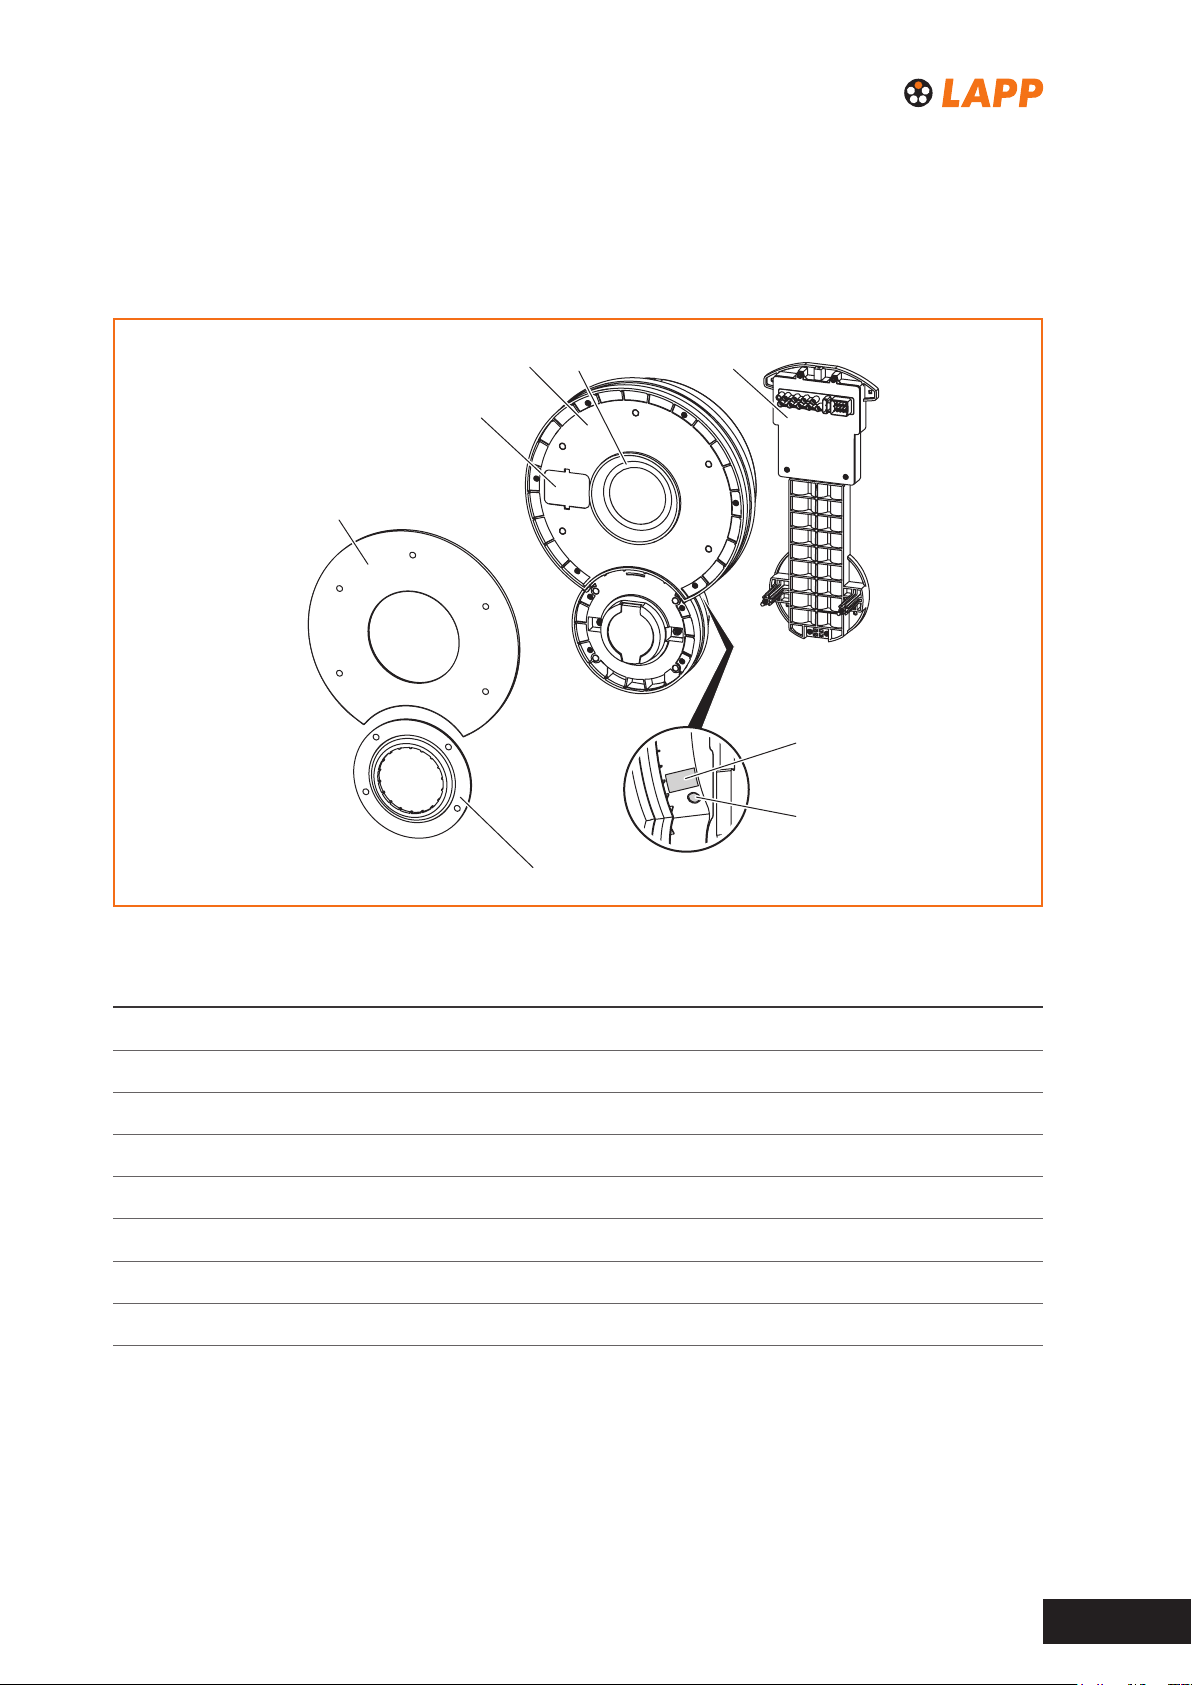
Fig. 1 Overview of the product components
Pos. Name Description
1 Housing
2 LED display for displaying the operating status
3 Mounting plate for mounting the product on a wall
4 Nameplate with serial number and connection data of the product
5 On/off button for switching the product on and off
6
7
8 Maintenance lid for testing the optional residual current circuit breaker
Cover, small
Cover, big
Operating Instructions – Mobility Wallbox Home / Home Pro 7
Page 32
Product overview
LED indicator
The colour of the LED indicator shows the operating status of the product.
Colour Meaning
Green The product is switched on and ready for operation.
The product has detected a connection to a
Blue
vehicle and is ready for charging or charging is in
progress.
Red
The product has detected a fault and is
disconnecting from the vehicle.
3.2 Product functions
As soon as the charging process starts, the vehicle locks the plug of the
charging cable in the socket of the vehicle and the charging station locks
the plug in the socket of the charging station. This prevents the charging
process from being interrupted prematurely by disconnecting the
charging cable.
Response in the event of a malfunction
If the product detects a malfunction, the LED indicator lights up red. If
the product is connected to a vehicle, the product disconnects from the
vehicle. In this case, the plug of the charging cable can be unlocked via
the vehicle software. The plug on the product is automatically unlocked.
In the event of a power failure, you can unlock the plug on the vehicle
via the vehicle software. The plug on the product unlocks automatically.
Communication capability
The product can be connected to external interfaces, for example to
connect to an energy management system. This connection is described
in a separate document (see instructions for system networking).
Operating Instructions – Mobility Wallbox Home / Home Pro8
Page 33

4 Unpacking and checking the scope
of delivery
4.1 Unpacking
► Remove all parts of the product, including the documents supplied,
from the packaging.
► Keep the packaging so that you can store the unassembled product
in it (see chapter 5 on page 10).
4.2 Checking the scope of delivery
► Check that the scope of delivery is complete and that all parts are
undamaged.
Item Quantity
Housing
Mounting plate 1
Strain relief 1
Dowel, 8 x 50 mm
Lag screw, 5 x 50 mm
Washer 4
Screw 3.5 x 16 mm 1
Screw 4 x 12 mm
Cover, small 1
Cover, big 1
Closing cap for conductor bushing (right and left)
Safety instructions
Instructions for assembly and disassembly
1 each
1
4
4
6
1
1
Operating Instructions – Mobility Wallbox Home / Home Pro 9
Page 34

5 Storing the product
WARNING!
Risk of injury due to damaged product
The product meets the requirements for protection degree IP54 only
when mounted in the installation position, on a wall or on the
original equipment for freestanding installation. If stored improperly,
the dismantled product may be damaged by penetrating dust, dirt or
moisture. The operational safety of an improperly stored product is
therefore not guaranteed.
► Protect the unassembled product from dust, dirt and moisture, e.g.
by storing it in its original packaging.
► Store the product in accordance with the recommended ambient
conditions (see Technical data on page 21).
Operating Instructions – Mobility Wallbox Home / Home Pro10
Page 35
6 Preparing the installation
6.1 Choosing an installation site
► Choose an installation site that meets the following requirements:
– level, plumb wall
– sufficient space for the product (see Technical data on page 21)
– suitable environmental conditions (see Technical data on page 21)
– no direct sunlight
6.2 Commissioning the installation
WARNING!
Danger to life due to electric shock
There is a risk of electric shock when working on the electrical
installation of the product.
► Never install the product yourself.
► Ask a qualified electrician to install the product.
WARNING!
Risk of injury due to damaged product
A damaged or incomplete product can lead to malfunctions and
hazards.
► Only have the product assembled if all items in the scope of
delivery are complete and undamaged.
6.3 Replacing the covers
The covers and the housing are equipped with magnets that keep the
covers in place on the housing. You can replace the mounted covers at
any time.
Detaching the covers from the housing
Required tools:
flat dismantling wedge (not included in the
scope of delivery)
Operating Instructions – Mobility Wallbox Home / Home Pro 11
Page 36
Preparing the installation
NOTICE!
Damage to the covers caused by improper tools
The covers and the housing can be damaged by tools with sharp
edges.
► Use a flat dismantling wedge to remove the covers.
NOTICE!
Damage to the covers due to falling
As soon as you lift a cover off the housing at one point, the entire cover
comes off. Falling covers can be damaged.
► Hold the cover while detaching it from the housing.
► Use a flat dismantling wedge to detach the mounted covers from the
housing (see Fig. 2).
2.
Fig. 2 Detaching the cover from the housing
1.
Operating Instructions – Mobility Wallbox Home / Home Pro12
Page 37
Preparing the installation
Attaching the covers to the housing
NOTICE!
Damage to the covers due to falling down
If the magnets of the cover and the housing are not exactly aligned, the
cover may fall down and be damaged.
► Make sure that the magnets are aligned and in contact with each other.
► Place each cover on the housing so that the magnets of the cover
and the housing are exactly on top of each other (see Fig. 3).
Fig. 3 Attaching the covers to the housing
Operating Instructions – Mobility Wallbox Home / Home Pro 13
Page 38
7 Operating
registered - please connect
charging
error
7.1 Switching on the product
► Press the on/off button.
The on/off button engages.
The LED indicator flashes green.
As soon as the LED indicator is permanently green, the product is
ready for operation.
7.2 Charging the vehicle
Precondition: The product is switched on and the LED display is
permanently lit green.
Connecting the vehicle to the product
► Use the charging cable to establish a connection between the product
and the vehicle (see Fig. 4).
The LED indicator lights up blue.
Fig. 4 Connecting the vehicle to the product
Starting the charging process on the vehicle
The blue light of the LED indicator signals that the product has detected
a connection to a vehicle and is ready to charge the vehicle. The product
does not receive any feedback from the connected vehicle about the
power at which the vehicle is being charged.
Operating Instructions – Mobility Wallbox Home / Home Pro14
Page 39
Operating
Only the connected vehicle can start the charging process and display
the charging progress.
Depending on the connected vehicle, the charging process either starts
automatically or you have to start the charging process manually on the
connected vehicle.
► Make sure that the charging process starts. Follow the instructions of
the connected vehicle.
The plugs on the vehicle and product are locked.
NOTICE!
Malfunction due to unlocked plug
The plugs on the vehicle and product are locked to prevent interruption
of the charging process. Interrupting the charging process can lead to
faults in the product and the vehicle software.
► Check whether the plugs are locked.
7.3 Stopping the charging process
Charging can only be stopped by the software of the connected
vehicle. Follow the instructions for your vehicle.
Disconnecting the vehicle from the product
► Stop the charging process. Follow the instructions for your vehicle.
The connectors on the vehicle and product are unlocked.
► Make sure that the charging process is finished. Follow the instructions
for your vehicle.
► Remove the charging cable from the vehicle.
Fig. 5 Disconnecting the vehicle
Operating Instructions – Mobility Wallbox Home / Home Pro 15
Page 40
Operating
CAUTION!
Risk of tripping due to the charging cable lying around
If the charging cable is lying on the floor, people can trip over it and the
charging cable can be damaged by being crushed or kinked.
► Place the charging cable so that it cannot be crushed or kinked
and so that there is no risk of tripping.
7.4 Switching off the product
NOTICE!
Malfunction due to premature switching off of the product
If you switch off the product while it is connected to a vehicle, the
product and the vehicle software may malfunction.
► Make sure that charging is finished and that the product is not
connected to a vehicle.
► Press the on/off button.
The LED indicator goes out.
Operating Instructions – Mobility Wallbox Home / Home Pro16
Page 41
8 Cleaning the product
WARNING!
Danger to life due to electric shock
If water enters the housing, there is a risk of electric shock.
► Never clean the product with a high-pressure cleaner.
► Only clean the product as described in these operating
instructions.
NOTICE!
Damage to the product due to improper cleaning
Unsuitable cleaning agents can damage the product.
► Do not use any cleaning agents.
► Wipe the product clean with a soft, dry cloth.
Operating Instructions – Mobility Wallbox Home / Home Pro 17
Page 42

9 Troubleshooting
As soon as the product detects a malfunction, the LED indicator lights up
red. The following table describes possible causes of malfunctions and
measures for troubleshooting.
► If the fault cannot be remedied with the measures described,
ask a qualified electrician to remedy the fault.
Possible cause Recommended measure
Does your equipment work?
– Vehicle
– Vehicle software
Are you trying to charge the
vehicle with a connector Type 1?
Does the charging cable show
obvious signs of external
damage?
Are you using a charging cable
from a manufacturer other than
Lapp Mobility?
Refer to the instructions for your
vehicle.
Use a standardised Type 1 to
Type 2 adapter cable.
Never use a damaged charging
cable.
Replace the charging cable with
an undamaged original charging
cable from Lapp Mobility.
Replace the charging cable with
an original Lapp Mobility charging
cable.
Operating Instructions – Mobility Wallbox Home / Home Pro18
Page 43

10 Dismantling the product
WARNING!
Danger to life due to electric shock
There is a risk of electric shock when working on the electrical
installation of the product.
► Ask a qualified electrician to dismantle the product.
► Switch off the product (see chapter 7.4 on page 16).
► Clean the product (see chapter 8 on page 17).
► Have the product dismantled by a qualified electrician.
Operating Instructions – Mobility Wallbox Home / Home Pro 19
Page 44

11 Disposal of product and packaging
The EU Directive 2012/19/EU regulates the collection and recycling of
waste electrical and electronic equipment within the European Union. All
products covered by this directive are marked with the symbol of the
crossed-out wheeled bin and must not be disposed of with general
household waste.
► At the end of their life cycle, please take these products to your local
collection points for treatment, refurbishment and recycling in
accordance with your national legislation or return them to Lapp
Mobility free of charge.
The packaging of the product, including the special film, is made of
environmentally friendly, decomposable materials. The packaging can
therefore be disposed of completely with the waste paper.
► Dispose of the product packaging in accordance with the
applicable local regulations.
Operating Instructions – Mobility Wallbox Home / Home Pro20
Page 45

12 Technical data
Mobility Wallbox Home / Home Pro
Width x Height x Depth 351
Weight
Impact resistance rating of housing
Operating temperature
Storage temperature
1)
1)
x 486 x 126 mm
6.06 kg
IK08
-25 °C to +50 °C
-40 °C to +70 °C
Relative humidity during storage 5 % to 95 %
IP degree of protection
IP54
Pollution degree 3
Protection class I
Nominal voltage
220 ... 240 V / 380 ... 415 V
Nominal current 16 A
Nominal surge voltage
Insulation voltage
Overvoltage category
Mains frequency 50 / 60
4 kV
500 V
III
Hz
Circuit breaker 16 A, to be provided on the installation side
Fuse for the internal supply
Charging voltage
Max. charging current
Max. charging power
8 A, slow-blow
230 V / 400 V
16 A
1 1 kW
Residual current circuit breaker (RCD) optional: type A, with protective conductor monitoring
Short circuit fault current C16/C32 6 kA (Energy limiting class 3)
AC fault current
DC residual fault current detection
Mains version
Socket according to IEC 62196-1:2014
Charging mode
30 mA, to be provided on the installation side
6 mA, standard
TN / TT / IT
for charging cable Type 2
3
Supported charging conditions A, B, C, E, F
EMC classification Class B
Permissible installation area
1) no direct sunlight
freely accessible area
Operating Instructions – Mobility Wallbox Home / Home Pro 21
Page 46

13 Accessories
A list of available accessories can be found at www.lappmobility.com.
Operating Instructions – Mobility Wallbox Home / Home Pro22
Page 47

14 CE conformity
The product complies with the requirements of the following EU directives:
– 2014/30/EU Electromagnetic compatibility of electrical and electronic
equipment
– 2014/35/EU Making available on the market of electrical equipment
designed for use within certain voltage limits
– 2011/65/EU Restriction of the use of certain hazardous substances
in electrical and electronic equipment (RoHS)
Applied standards
DIN VDE 0100-722; VDE 0100-722:2016-10
IEC 61851-1, DIN EN 61851-1
DIN EN 61851-21
DIN EN 61851-21-2
IEC 61851-21-2
DIN EN 61851-22
DIN EN 62196-1; VDE 0623-5-1
DIN EN 62196-2; VDE 0623-5-2
DIN EN 50620
Operating Instructions – Mobility Wallbox Home / Home Pro 23
Page 48

Lapp Mobility GmbH
Oskar-Lapp-Str. 2
D-70565 Stuttgart
www.lappmobility.com
2784060000
Revision: 21/02/2023
Translated from German
 Loading...