

Page 1

SCS1600 and SCS3200 User Guide
Part. No. 900-234
Rev. D December 2003
Page 2

Copyright & Trademark
© 2003, Lantronix. All rights reserved. No part of the contents of this book may be
transmitted or reproduced in any form or by any means without the written permission of
Lantronix. Printed in the United States of America.
Ethernet is a trademark of XEROX Corporation. UNIX is a registered trademark of The
Open Group. Windows 95, Windows 98, Windows 2000, and Windows NT are
trademarks of Microsoft Corp. Netscape is a trademark of Netscape Communications
Corporation.
Contacts
Lantronix Corporate Headquarters
15353 Barranca Parkway
Irvine, CA 92618, USA
Phone: 949-453-3990
Fax: 949 453-3995
Technical Support
Phone: 800-422-7044 or 949-453-7198
Fax: 949-450-7226
Online: www.lantronix.com/support
E-mail
support@lantronix.com
Sales Offices
For a current list of our domestic and international sales offices, go to the Lantronix web
site at
http://www.lantronix.com/about/contact/index.html
Disclaimer & Revisions
Operation of this equipment in a residential area is likely to cause interference in which
case the user, at his or her own expense, will be required to take whatever measures
may be required to correct the interference.
Note: This product has been designed to comply with the limits for a Class A
digital device pursuant to Part 15 of FCC Rules. These limits are designed to
provide reasonable protection against such interference when operating in a
commercial environment. This equipment generates, uses, and can radiate radio
frequency energy, and if not installed and used in accordance with this guide,
may cause harmful interference to radio communications.
Changes or modifications to this device not explicitly approved by Lantronix will void the
user's authority to operate this device.
The information in this guide may change without notice. The manufacturer assumes no
responsibility for any errors that may appear in this guide.
Date Rev. Part No. Comments
4/02 C 900-234
12/03 D 900-234
Reformatted manual; added section on SSH Connections; added
information about Break Safe feature.
Added new features: SSH connections, enhanced security, break
sequences, modem mode, boot gateway, DHCP, and additional
authentication for Web browser. Expanded list of cables and added list
of adapters available from Lantronix. Updated contacts and warranty
information.
i
Page 3

Contents
Copyright & Trademark ________________________________________________i
Contacts ___________________________________________________________i
Disclaimer & Revisions ________________________________________________ i
Contents __________________________________________________________ ii
1: Introduction to the SCS Family ___________________________ 1-1
Features _________________________________________________________1-1
Protocol Support ___________________________________________________1-2
2: Connections and Physical Requirements___________________ 2-1
Connections_______________________________________________________2-1
Pinouts __________________________________________________________2-2
RJ45 Serial Connectors __________________________________________2-2
RJ45 to DB25 __________________________________________________2-3
RJ45 to DB9 ___________________________________________________2-4
Cables and Adapters________________________________________________2-5
Specifications _____________________________________________________2-6
Power ________________________________________________________2-6
Temperature ___________________________________________________2-6
Humidity ______________________________________________________2-6
Altitude _______________________________________________________2-6
3: Installation ____________________________________________ 3-1
Connecting the SCS ________________________________________________3-1
Assigning an IP Address _____________________________________________3-2
EZWebCon Method______________________________________________3-2
DHCP Method__________________________________________________3-4
Command Line Method___________________________________________3-4
ARP and Ping Method____________________________________________3-5
UNIX Host_____________________________________________________3-5
Windows Host__________________________________________________3-5
Changing the IP Address Permanently_______________________________3-5
BOOTP or RARP Reply Method____________________________________3-6
Configuring the SCS ________________________________________________3-6
EZWebCon Method______________________________________________3-6
Web Browser Method ____________________________________________3-8
ii
Page 4

Telnet Login Method _____________________________________________3-1
Command Line Method___________________________________________3-1
4: Application Setup ______________________________________ 4-1
Login Banner Pages ________________________________________________4-1
Menus ___________________________________________________________4-1
Connecting ____________________________________________________4-1
Enabling Menu Mode ____________________________________________4-2
Creating the Menu_______________________________________________4-3
Using Menu/Connection Commands ________________________________4-4
Enabling Menu Mode for a Port ____________________________________4-5
Using the Menu_________________________________________________4-6
Remote User Dial-Up _______________________________________________4-7
Break Sequences __________________________________________________4-8
Serial Breaks___________________________________________________4-8
Alternate Break Sequences _______________________________________4-8
Modem Mode______________________________________________________4-9
Event Port Logging and Email Notification ______________________________4-10
Creating an Email Site __________________________________________4-11
Dial-Out ISP Connection ____________________________________________4-12
Com Port Redirector _______________________________________________4-13
SSH Connections _________________________________________________4-14
Defining Supported SSH Connections ______________________________4-14
Creating an AUTHORIZED_KEYS File______________________________4-14
Shared Key Authentication Process ________________________________4-15
Setting up RSA Shared Key Authentication (for SSHv1) ________________4-15
Setting up DSA Shared Key Authentication (for SSHv2) ________________4-16
Setting up Username/Password Authentication (SSHv1 or SSHv2)________4-16
Forming SSH Incoming Connections (Unix and Non-Unix)_______________4-17
Non-Unix Platforms_____________________________________________4-17
UNIX Platforms ________________________________________________4-17
Security Enhancements_____________________________________________4-18
Incoming Security ______________________________________________4-18
Port User Restrictions___________________________________________4-18
5: Troubleshooting________________________________________ 5-1
Technical Support __________________________________________________5-1
LEDs ____________________________________________________________5-2
iii
Page 5

Power-up Troubleshooting ___________________________________________5-3
BOOTP Troubleshooting_____________________________________________5-4
RARP Troubleshooting ______________________________________________5-4
Boot Prompt Commands_____________________________________________5-4
Flash_________________________________________________________5-5
Flush NVR_____________________________________________________5-5
Help__________________________________________________________5-5
Init 451 _______________________________________________________5-5
Set Server BOOTP {Enabled, Disabled}______________________________5-5
Set Server Hardware xx-xx-xx _____________________________________5-6
Set server IPAddress ip_address ___________________________________5-6
Set server loadhost ip_address_____________________________________5-6
Set Server RARP {Enabled, Disabled} _______________________________5-6
Set Server Secondary ip_address __________________________________5-6
Set Server Software filename ______________________________________5-6
Set Server Bootgateway ip_address_________________________________5-5
Show Server ___________________________________________________5-6
6: Updating Software______________________________________ 6-1
Choosing the Right Software File ______________________________________6-1
Obtaining Software _________________________________________________6-1
Via the Web ___________________________________________________6-1
Via FTP_______________________________________________________6-1
Reloading Software_________________________________________________6-2
EZWebCon Method______________________________________________6-2
FTP Method ___________________________________________________6-2
Web Interface Method____________________________________________6-2
Command Line Methods__________________________________________6-3
TFTP Method __________________________________________________6-3
MOP _________________________________________________________6-3
Troubleshooting Flash ROM Updates___________________________________6-4
A: Compliance and Warranty Information_______________________1
Compliance Information_______________________________________________ 1
Warranty __________________________________________________________ 2
iv
Page 6

11:: IInnttrroodduuccttiioonn ttoo tthhee SSCCSS FFaammiillyy
The Lantronix SCS family of Secure Console Servers enables IT professionals to
remotely and securely configure and administer servers, routers, switches, telephone
equipment, or other devices equipped with a serial port.
Features
TCP/IP compatibility
Remote networking
− Dial-in access
− Dial-out ISP connections
− Event port logging
− Email event notification
− Authentication
− Accountability
Browser-based configuration
− HTML pages in firmware
− Server configuration via any browser
EZWebCon utility
− Provides initial SCS configuration
− Extracting and downloading configuration to multiple SCS units.
Command line editing
Context-sensitive online help
Re-loadable operating code
− Stored in Flash ROM
− Upgradeable using FTP, TFTP, and EZWebCon
Diagnostics for network and serial line troubleshooting
Break safe for Sun Solaris systems (Solaris Ready Certified)
Note: See Using Menu/Connection Commands for information on how to send
intentional breaks to connected equipment.
1-1
Page 7

SCS1600/3200 User Guide 1: Introduction to the SCS Family
Protocol Support
The SCS supports the TCP/IP network protocol as well as:
SSH, Telnet, and Rlogin for connections in and out of the SCS
DNS and WINS for text-to-IP address name resolution
SNMP for remote monitoring and management
FTP for file transfers and firmware upgrades
TFTP for firmware upgrades
BOOTP, RARP, and DHCP for IP address assignment
HTTP for easy browser-based configuration
NTP for time synchronization and authentication
NAT for enabling private networks to share a connection to the Internet.
SSH (Secure Shell): A secure transport protocol based on public-key cryptography.
Telnet: This terminal protocol provides an easy-to-use method of creating terminal
connections to any network host supporting Telnet.
Rlogin: Allows you to initiate a TCP/IP login session.
DNS (Domain Name Servers): Lets a network nameserver translate text node names
into numeric IP addresses.
SNMP (Simple Network Management Protocol): Commands that allow system
administrators to monitor and manage nodes on a LAN (Local Area Network) and
respond to queries from other network hosts. One community name can be configured
with read/write access. Refer to the SCS Reference Manual for SNMP configuration
instructions.
BOOTP, RARP, and DHCP: Methods for automatically assigning an IP address and
network settings.
NTP (Network Time Protocol): Used to synchronize time on networked computers and
equipment.
NAT (Network Address Translation): Allows private networks to share a single
connection to the Internet. With Port Mapping, specific IP Ports can be mapped from the
Internet to a private IP address and port.
1-2
Page 8
22:: CCoonnnneeccttiioonnss aanndd PPhhyyssiiccaall RReeqquuiirreemmeennttss
This chapter provides a physical description of the unit and requirements for installing
and connecting it. The topics include:
Connections
Pinouts
Cables and Adapters
Specifications
Connections
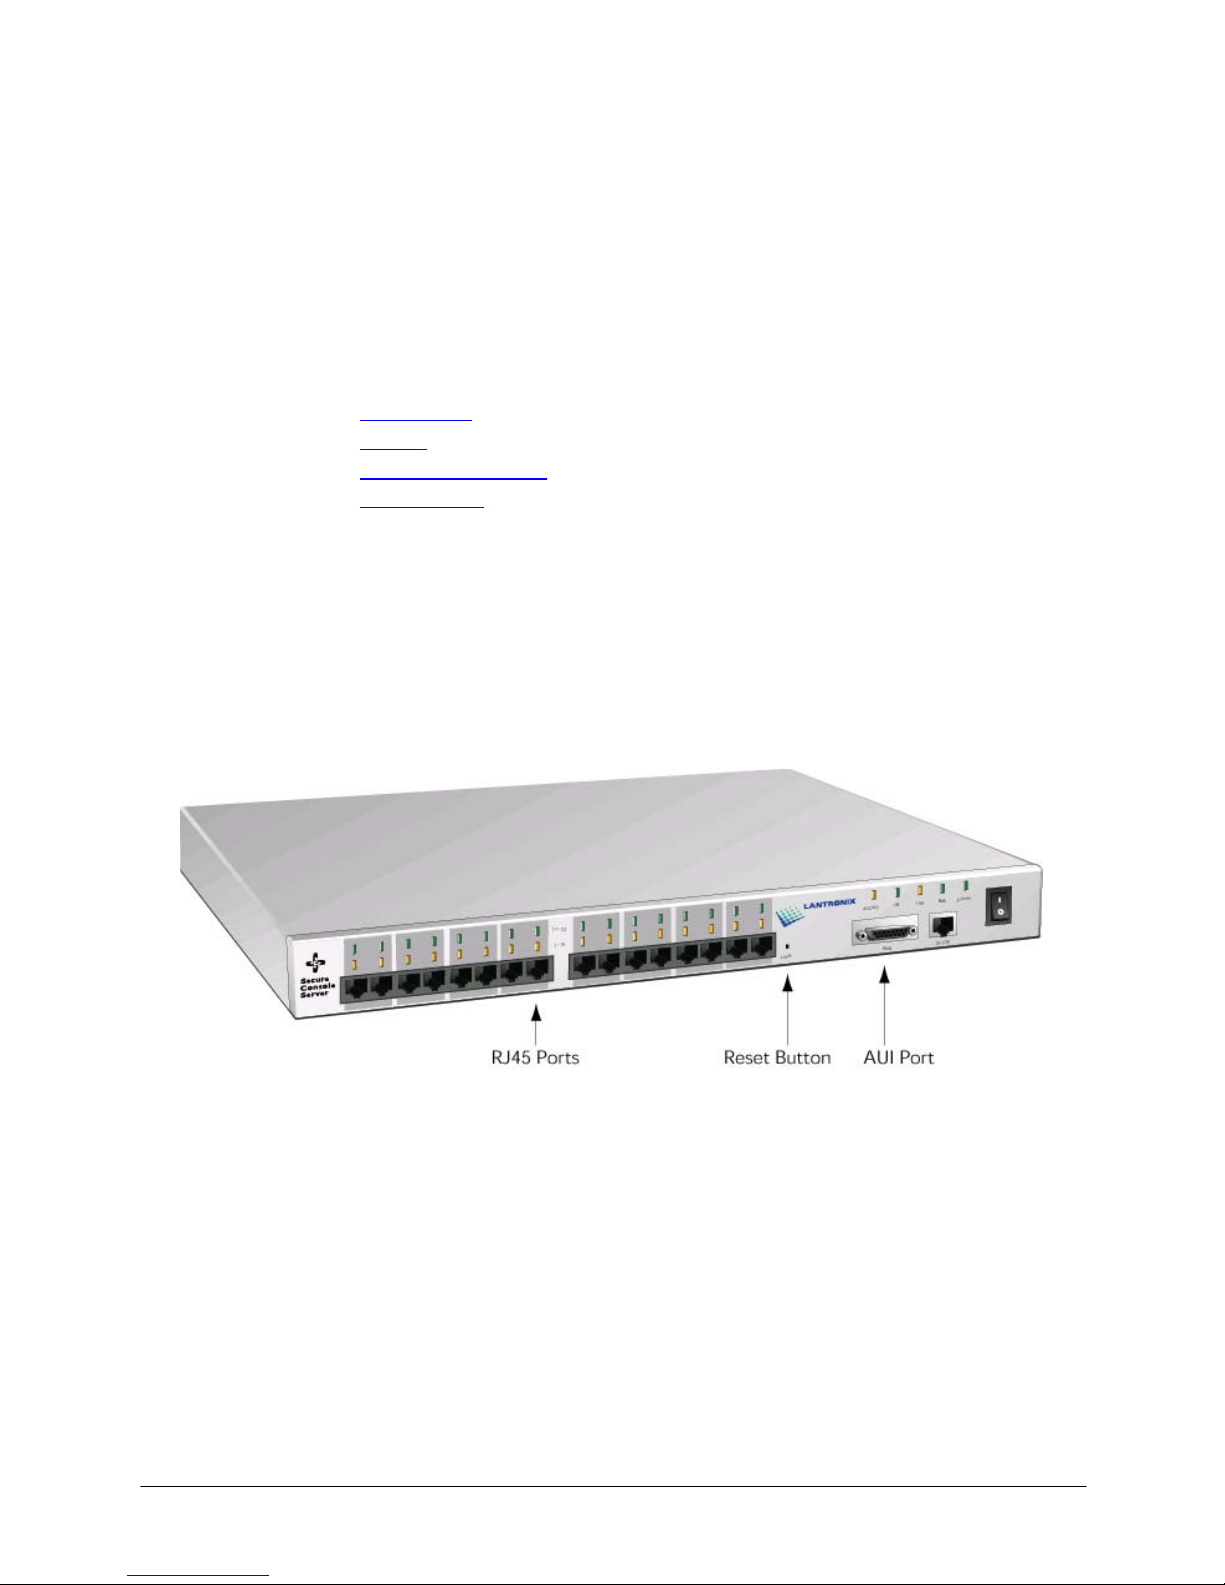
The SCS1600 and SCS3200 are distinguished by the number of asynchronous RJ45
serial ports they are equipped with. The SCS1600 has 16 ports, while the SCS3200 has
32 ports. Both units include an AUI connector and a UTP port (10/100BASE-T) for
Ethernet connections. They both support baud rates between 300 and 230,400 bits per
second.
SCS1600 Front Panel
2-1
Page 9

SCS1600/3200 User Guide 2: Connections and Physical Requirements
SCS3200 Front Panel
Note: The Reset button returns the SCS to its factory default configuration when
you press and hold it during the power-up and boot process. Resetting to factory
default will enable DHCP.
Pinouts
The SCS3200 has 32 asynchronous RJ45 serial ports. The SCS1600 has 16
asynchronous RJ45 serial ports. Pinout information for these ports is discussed in the
following sections.
RJ45 Serial Connectors
Lantronix servers are RS-423 compliant and are thus limited by the equipment at the
remote end of the serial line. If the SCS is connected to an RS-232 device, it is subject to
the RS-232 limits shown below. If connected to an RS-423 device, it is subject to the RS423 limitations.
RS-232 lines are limited to 15m (50 ft) in length at 9600 baud, and 2 m (6 ft) at 115.2K
baud. RS-423 lines are limited to 300m (1000 ft) at 9600 baud, 85m (260 ft) at 115.2K
baud, and 40m (120 ft) at 230.4K baud. They will generally work at longer lengths.
The pinout of the serial ports is displayed below.
2-2
Page 10
SCS1600/3200 User Guide 2: Connections and Physical Requirements
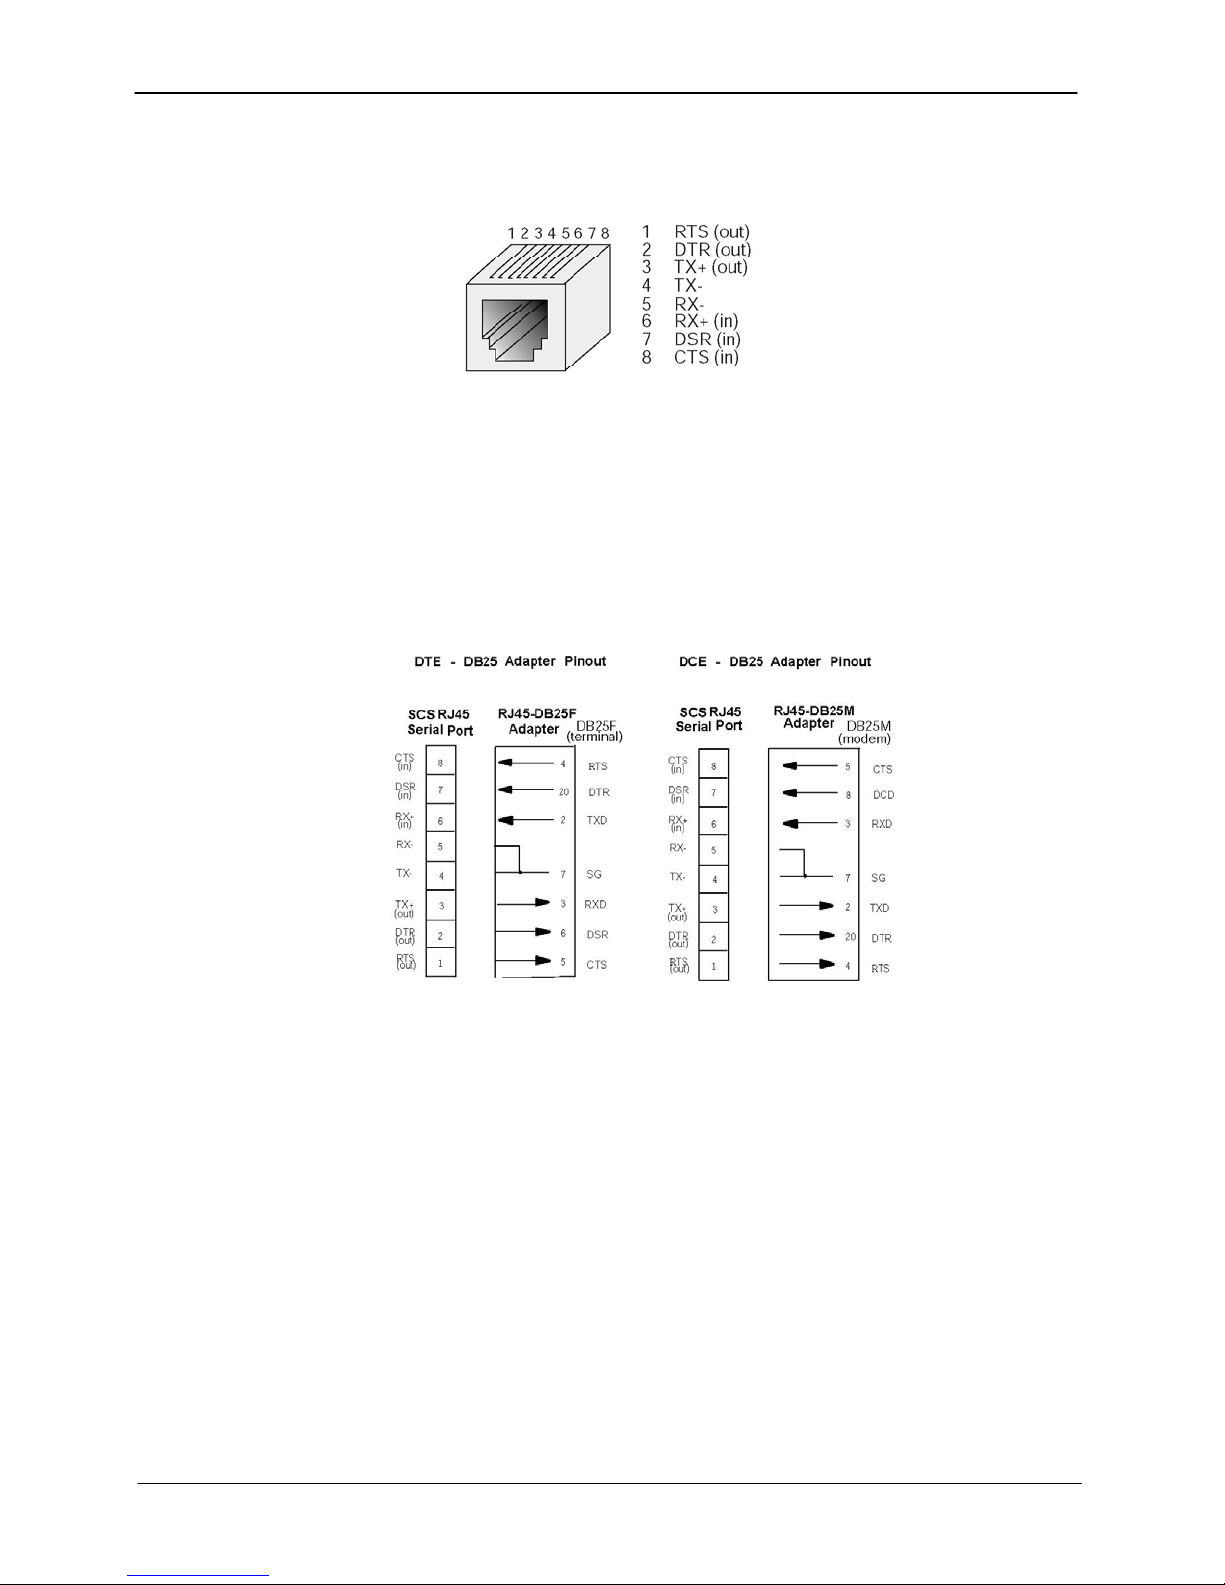
RJ45 Serial Connector
RJ45 to DB25
If you are connecting an RJ45 port to a DTE device (such as a terminal) that has a DB25
connector, you will need to use an RJ45-DTE DB25 adapter. To connect an RJ45 port to
a DB25 connector on a DCE device, you will need an RJ45-DCE DB25 adapter. The
pinout information for both connections is shown below.
Pinouts of RJ45-DB25 Connections
2-3
Page 11

SCS1600/3200 User Guide 2: Connections and Physical Requirements
RJ45 to DB9
The arrows in the figure below represent the direction of the signal. Both the transmit and
receive ground signals on the SCS connector are wired to the signal ground on a DB9
adapter.
RJ45-DTE DB9 Adapter
2-4
Page 12

SCS1600/3200 User Guide 2: Connections and Physical Requirements
Cables and Adapters
Lantronix offers the following accessory cables and adapters for use with the SCS
products. Contact Lantronix for details.
Lantronix Cable Part Numbers
Part Description
500-101
500-102
500-103
500-104
500-137 Cable: 10’ (3M) RJ45-RJ45 Rolled
200.0062 Cable: 6.6’ (2M) RJ45 to RJ45 Cat5
200.0063 Cable: 16.4’ (5M) RJ45 to RJ45 Cat5
200.0064 Cable: 32.8’ (10M) RJ45 to RJ45 Cat5
2000065 Cable: 49.2’ (15M) RJ45 to RJ45 Cat5
200.0112 Cable: 100’ (30M) RJ45 to RJ45 Cat5
Cable: 6' (1.8M) RJ45 to DB9 Male connects to DCE Device (modems, csu/dsu,
etc.)
Cable: 6' (1.8M) RJ45 to DB25 Male connects to DCE Device (modems, csu/dsu,
etc.)
Cable: 6' (1.8M) RJ45 to DB9 Female connects to DTE Device (terminals, printers,
console ports, etc.)
Cable: 6' (1.8M) RJ45 to DB25 Female connects to DTE Device (terminals, printers,
console ports, etc.)
Adapters listed below are pinned for use with straight through Cat5 cable.
Lantronix Adapter Part Numbers
Part Description
200.2066A Adapter: RJ45 to DB25M DCE for ETS, SCSxx00, SCSxx05
200.2067A Adapter: RJ45 to DB25F DCE for ETS, SCSxx00, SCSxx05
200.2069A Adapter: RJ45 to DB9M DCE for ETS, SCSxx00, SCSxx05
200.2070A
200.2071 Adapter: RJ45 to DB25M DTE for ETS, SCSxx00, SCSxx05
200.2072 Adapter: RJ45 to DB25F DTE for ETS, SCSxx00, SCSxx05
200.2073 Adapter: RJ45 to DB9M DTE for ETS, SCSxx00, SCSxx05
200.2074 Adapter: RJ45 to DB9F DTE r for ETS, SCSxx00, SCSxx05
200.2225 Adapter: RJ45 to RJ45 Rolled Coupler
Adapter: RJ45 to DB9F DCE for ETS, SCSxx00, SCSxx05
2-5
Page 13

SCS1600/3200 User Guide 2: Connections and Physical Requirements
Specifications
Power
The unit can operate using 100 to 240 Volts AC without switches or jumpers.
Voltage 95 to 250 Volts AC 3-wire single phase, autoranging
Frequency 47 to 63HZ
Operating Current 0.5 Amps (maximum
Power consumption 35 Watts
Temperature
Note: Rapid temperature changes may affect operation. Do not operate near heating or
cooling devices or areas that open to the outdoors.
Operating range 5° to 50° C (41° to 122° F)
Storage range -40° to 66° C (-40° to 151° F)
Max. temp change 20° C (36° F) per hour
Humidity
Operation 10% to 90% non-condensing
Ideal 40% to 60%
Storage 10% to 90% non-condensing
Altitude
Note: For operations above 2.4 km (8,000 ft), decrease the operating temperature rating
by 1.8°C for each 1,000 m (1°F for each 1,000 ft).
Operation 2.4 km (8,000 ft)
Storage 9.1 km (30,000 ft)
2-6
Page 14
33:: IInnssttaallllaattiioonn
This chapter covers all of the steps needed to get the SCS online and working.
EZWebCon is the preferred method for initial configuration, but this chapter also explains
alternative methods such as the command line interface. The full command set is
discussed in the SCS Reference Manual. Before you begin, consider the following
points:
The IP address must be configured before any TCP/IP functionality is available.
You cannot use the web browser interface until an IP address is assigned.
Most configuration commands require privileged user status. You must enter the
Set Privileged command to become the privileged user. The default privileged
password is system.
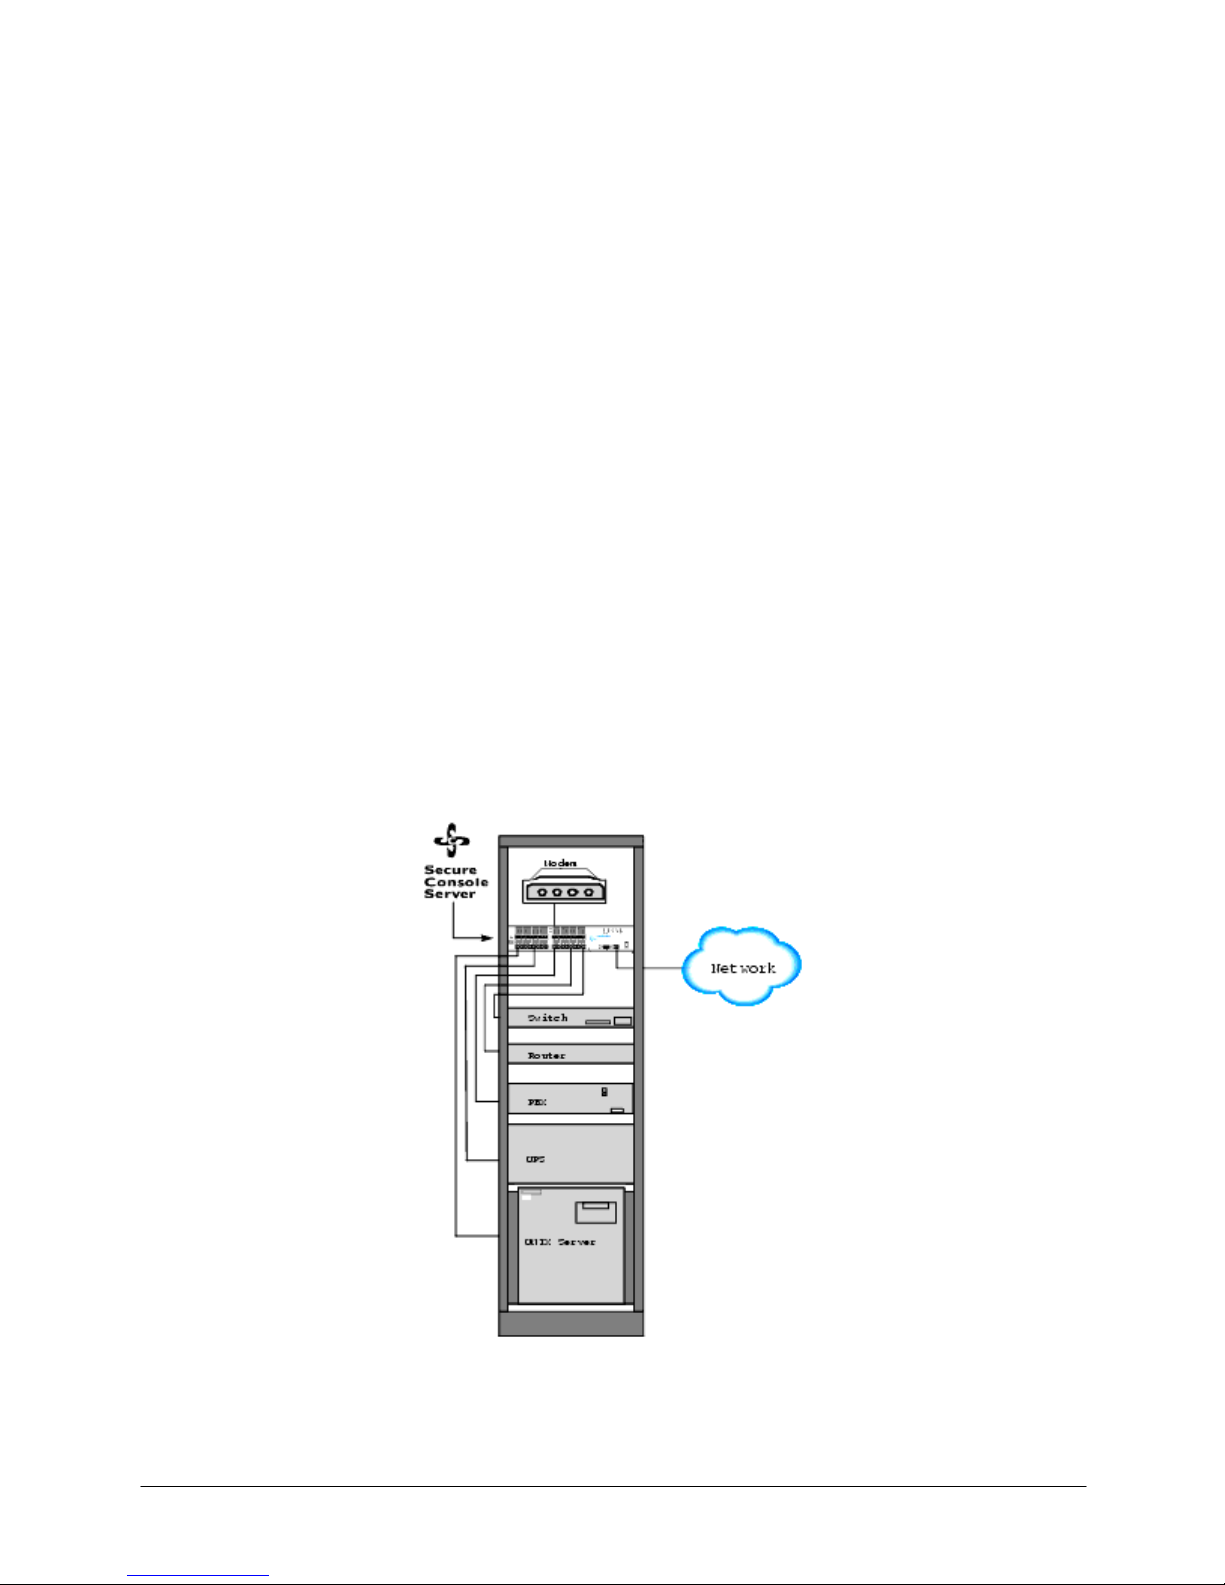
Connecting the SCS
Your SCS should be rack mounted in a secured environment. Refer to the following
illustration of a typical installation.
Installation Overview
3-1
Page 15

SCS1600/3200 User Guide 3: Installation
1. Mount or place the SCS in a secure location.
2. Connect your active serial devices to the SCS's RJ45 serial connectors.
3. Connect the Ethernet network to the SCS via the 10/100BASE-T port
not both ports.
4. Connect the power cord to a power outlet.
5. Set the power switch to ON.
6. Confirm the following:
a) The green Power LED lights up immediately.
b) After about 20 seconds, the green Link LED lights up.
c) After about 30 seconds, the green OK LED blinks every two seconds.
Assigning an IP Address
You must assign an IP address to the SCS before you can perform any configurations.
We recommend you use the first method listed below, EZWebCon.
EZWebCon Method
EZWebCon is the recommended method for initially configuring the SCS. EZWebCon is
located on the distribution CD-ROM. Installation instructions are provided in the README
file.
Use the following steps to assign an IP address using EZWebCon:
1. Start EZWebCon.
or the AUI port,
2. On the menu bar, click Action Assign IP Address. The Assign IP address –
Select Device window displays.
Select the Device
3. Select the SCS that appears in the next window and click Next. The Assign IP
address -Assignment Method Select window displays.
3-2
Page 16

SCS1600/3200 User Guide 3: Installation
Select the Assignment Method
4. Select Assign Specific IP and click Next. The Assign address – IP Settings window
displays.
Enter IP Settings
5. Enter the IP-related settings:
a) For IP Address, enter the desired IP address.
b) For Subnet Mask, change the values provided only if you wish to use a mask
other than the default. The default value should be correct in most cases.
6. For Gateway Address, select None.
7. Click Next. The Assign IP address – Assignment Status window displays.
3-3
Page 17

SCS1600/3200 User Guide 3: Installation
Assign IP
8. Click the Assign IP... button.
9. Wait for instructions from EZWebCon.
For assistance once EZWebCon is running, refer to EZWebCon's online help.
DHCP Method
If DHCP is enabled on the SCS, the SCS will accept an IP address, gateway address,
and subnet mask from a DHCP host. DHCP can be enabled or disabled with the following
command:
Set/Define Server DHCP [Enabled | Disabled]
DHCP is disabled in production. Resetting the unit to factory defaults via the reset button,
command line, or web interface will enable DHCP. (See page.3-1for information on
resetting hardware or page 5-5 for information on the Flush NVR command.)
Command Line Method
To assign an IP address to the SCS via a terminal:
1. Attach a terminal to the first serial port (port 1) and press Enter. You see a Local>
prompt at which you can enter configuration commands.
2. Once you are connected, become the privileged user and enter the Define IP
IPaddress command.
Note: The default privileged password is system.
Entering IP Address at Local Prompt
Local> SET PRIVILEGED
Password> system (not echoed)
Local>> DEFINE IP IPADDRESS 192.0.1.228
3. Reboot the SCS for the IP address to take effect.
3-4
Page 18

SCS1600/3200 User Guide 3: Installation
4. If the SCS encounters an Ethernet network problem while booting, it sends an alert
message to port and waits ten seconds to detect serial port activity before attempting
to finish booting. If you press Enter when the error message is displayed, you will
access the Boot> prompt.
Note: For more information on Boot Configuration Program (BCP)
commands, see Troubleshooting.
ARP and Ping Method
The ARP/ping method is available under UNIX and Windows. If the SCS has no IP
address, it sets its address from the first directed IP packet it receives.
When the SCS receives the ping packet, it notices that its IP address is not set and
sends out broadcasts to see if another node is using the specified address. If no
duplicate is found, the SCS uses that IP address and responds to the ping packet.
UNIX Host
1. Create an entry in the host's ARP table and substitute the SCS's hardware address
and intended IP address.
2. Ping that IP address. This process typically requires super-user privileges.
Entering ARP and Ping (UNIX)
# arp -s 192.0.1.228 00:80:a3:xx:xx:xx
% ping 192.0.1.228
Windows Host
1. Type ARP -A at the DOS command prompt to verify that there is at least one entry in
the ARP table.
2. If there is no other entry beside the local machine, ping another IP machine on your
network to build the ARP table. This has to be a host other than the machine on
which you are working.
3. Use the following commands to ARP the IP address to the SCS and make the SCS
acknowledge the IP assignment.
Entering ARP and Ping (Windows)
C:\ ARP -S 192.0.1.228 00-80-A3-XX-XX-XX
C:\ PING 192.0.1.228
Note: If the ARP command works, replies from the IP address display.
Changing the IP Address Permanently
With the ARP method, the SCS does not save the learned IP address permanently. This
procedure is just a temporary measure to enable a web browser or allow an administrator
to Telnet into the SCS. Once logged in, the administrator can enter the Define IP
IPaddress command to make the address permanent.
3-5
Page 19

SCS1600/3200 User Guide 3: Installation
Changing the IP Address
% telnet 192.0.1.228 7000
# access (not echoed)
Lantronix Version n.n/n (yymmdd)
Type Help at the `Local_>' prompt for assistance.
Username> [gopher]
Local> SET PRIVILEGED
Password> system (not echoed)
Local>> DEFINE IP IPADDRESS 192.0.1.228
Note: The default login password is access. The default privileged password is
system. After you have entered both passwords and gained access, change
those passwords from their default settings.
BOOTP or RARP Reply Method
A host-based BOOTP or RARP server can provide information for the SCS to use to
configure an IP address. See the host-based documentation pages for configuration
information. Keep in mind that many BOOTP daemons do not reply to a BOOTP request
if the download file name in the configuration file does not exist. If this is the case, create
a file in the download path to get the BOOTP daemon to respond.
BOOTP and RARP are enabled by default on the SCS. If you wish to disable them, use
the Define Server BOOTP Disabled and Define Server RARP Disabled commands.
Configuring the SCS
Once you have assigned the IP address, you can configure your SCS using any of the
methods discussed below:
EZWebCon Method
If you have just assigned the IP address using EZWebCon, you may want to continue
using EZWebCon to launch the web browser interface for SCS configuration. The
EZWebCon user interface allows you to set up menus and change passwords without
needing to know commands.
Once the IP address for your SCS is set, perform the following steps to launch the web
browser interface from EZWebCon.
1. Click to select the device you wish to configure.
2. On the menu bar, click Action Manage. This action launches the web browser
interface to your device.
3-6
Page 20

SCS1600/3200 User Guide 3: Installation
Authentication on the Web Browser Interface
3. Type login (default username) in the Username field and access (default login
password) in the Password field.
4. Click the Login button. The Server Configuration window displays.
Server Configuration Window
5. Select a link from the left navigation column to configure the SCS. The root
(privileged) level authorization window displays.
3-7
Page 21

SCS1600/3200 User Guide 3: Installation
Root Level Authentication
6. Type root in the Username field and system (default privileged password) in the
Password field. (If a “remember password” popup window displays, select No and
re-enter the password if necessary.)
7. Click the Login button. The desired configuration page displays.
Note: For added security, change the login and privileged passwords from their
default settings. You can set both passwords in the Server section of the web
pages.
Web Browser Method
To launch the web browser interface outside of EZWebCon, open a standard
browser and enter the SCS's IP address (for example, http://172.19.21.51) or
resolvable text name into the URL/Location field. Follow the login process
starting with step 3 in EZWebCon Method above.
Sample Web Browser Login
3-8
Page 22

Telnet Login Method
Standard Telnet connections are not encrypted and pose a security risk. Incoming Telnet
and SSH (Secure Shell) are enabled by default to allow TCP/IP connections.
To form a Telnet connection to the SCS:
1. Enter the Telnet command followed by the SCS's IP address, a space, and 7000.
2. Enter the login password. The default login password is access. Until authentication
is configured and users are added, any username works.
Forming a Telnet Connection
%telnet 192.0.1.88 7000
#access (not echoed)
Lantronix SCS Version n.n/n (yymmdd)
Type Help at the ‘Local>’ prompt for
assistance.
Enter Username>
Command Line Method
To monitor or configure the SCS via a terminal, attach a terminal to the serial port (port)
and press Enter. You will see a Local> prompt at which you can enter configuration
commands. See the SCS Reference Manual for a complete list of available commands.
Note: For overall help, type and enter Help in a command line. For information regarding
a specific command, type and enter Help <command>. For information regarding a
command you do not fully know, type and enter the partial command followed by a
question mark as follows: Help <xxx?>.
3-1
Page 23

44:: AApppplliiccaattiioonn SSeettuupp
This chapter describes how to configure or use:
Login Banner Pages
Menus
Remote User Dial-Up
Break Sequences
Event Port Logging and Email Notification
Dial-Out ISP Connection
SSH Connections
Login Banner Pages
Banner Pages allow you to display text messages to users before and after
authentication. Banner text information is taken from two files named prelogin.txt and
postlogin.txt stored in the /ram or /flash directory on the SCS. The SCS does not store
or display files stored in the /ram directory after rebooting.
To implement login and logout banner text:
1. Create text files named prelogin.txt and/or postlogin.txt.
2. FTP to the IP address of the SCS.
3. Log in with the username root and enter the privileged password (system by
default).
4. Change directories to /flash.
5. “Put” the text files into the desired directory.
6. Reboot the SCS.
Subsequent users logging in or out of the SCS see the text in the prelogin.txt and
postlogin.txt files, respectively. The standard company/product/version banner
displays if either of these two files is not present in the SCS.
7. To configure an external serial modem, attach the modem to any serial port and
Menus
Connecting
The SCS console server allows you to remotely manage devices and equipment from
anywhere on the network or from a remote dial-in through an attached modem. To use
the SCS as a console server, connect its serial ports to the serial console/management
ports of equipment such as UNIX servers, PBX switches, routers, network switches, or
other similar devices.
4-1
Page 24

SCS1600/3200 User Guide 4: Application Setup
Internet
d
d
Console Server Example
or
Intranet
In-Ban
SCS
UNIX
Server
PBX
Modem
Phone Line
PC
Router
Switch
Out-of-Ban
PC
Once you have completed the physical connections, you can establish an SSH or Telnet
connection to the SCS's IP address and socket number of the desired port.
The SCS's serial ports allow three types of socket connections: SSH connections at
socket 22xx, Telnet IAC interpretation at socket 20xx, and raw TCP connections at
socket 30xx, where xx is the port number. For example, to open a Telnet connection to
port 2 of an SCS at IP address 192.0.1.168, issue the command telnet 192.0.1.168 2002
from your system prompt.
Note: The syntax for SSH connections depends on your SSH client software.
Enabling Menu Mode
If others need to access devices attached to the SCS, but you wish to limit their options,
use menu mode. Menus allow users to access often-used hosts and services without
needing to know command syntax, the IP address of the non-local devices, or the socket
numbers involved. You can enable menu mode on either individual serial ports or on port
0 (the network port template) so users who Telnet to the SCS see the configured menu
rather than the Local> prompt.
When menu mode is enabled, a user who logs in to an SCS port (or, if menu mode is
enabled for port 0, a user who Telnets to the SCS) sees a menu listing various
descriptive entries. Each menu entry corresponds to a command. For example, selecting
option 4 from the following menu connects the user to the SCS Local> prompt.
1) Cisco Router
2) Sun Server
3) Linux Server
Enter Selection:
Sample Menu
Lantronix Console Server
4) Local> Prompt
5) Logout
6)
4-2
Page 25

SCS1600/3200 User Guide 4: Application Setup
For a single global menu, the system administrator defines menus using the menu
configuration web page. For multiple, group, or nested menus, the system administrator
defines menu text files and uploads them to the SCS. For more information on defining
menus, see the SCS Reference Manual.
Creating the Menu
Create a menu with the web browser interface by performing the following steps:
1. Click the Menu link under the Quick Setup options.
Menu Settings
2. Enter a title for your menu in the Title field.
3. Create menu entries by entering a description, which will be displayed in the menu,
and a corresponding command that will be run when that entry is selected.
Each menu entry can do one of the following:
Connect to a device on the network using a Telnet command.
Telnet Menu Entry
Connect to a device attached to the SCS with a Connect Local Port command.
The port is the port name listed in the SCS, such as port_2.
4-3
Page 26

SCS1600/3200 User Guide 4: Application Setup
Connect Local Menu Entry
Access a local service on the SCS with a general SCS command.
Local Service Menu Entry
Note: The Exit command, which only works in menu mode, allows users
to return to the SCS Local> prompt. It is helpful to include this command
in your menus until you have fully tested them--otherwise there is no way
for users on menu mode ports to return to the Local> prompt. To return
to the menu from the Local> prompt, type menu.
4. Click the Update button to save the menu settings.
Using Menu/Connection Commands
You can change a port name to reference the type of device that port is connected to. For
example, a port attached to a router could be named router. To change the name of a
port, open the configuration page for that port (Ports Configure) and enter the new
name in the Port Name field.
Changing the Port Name
You can enter more than one command in the Command field by separating each
command with a semicolon (;). The most common use of this is in the form:
connect {local or remote} portname;command
for example: connect local port_2;disconnect.
This command can be shortened to con loc port_2;disc. The disconnect command
closes the connection to that port when you return to the menu.
The SCS has default hot keys defined for Telnet connections to a port or from the menu.
To change the default hot key; see the SCS Reference Manual.
Ctrl+L: Allows you to jump back to the menu from a port connection.
Ctrl+F: Allows you to jump forward to another connect session.
Ctrl+B: Allows you to jump backward to a previous connect session.
Ctrl+Y: Allows you to send a break from a Telnet or SSH connection. (The SCS will not
cause unintentional breaks that can halt a Sun Solaris server.)
If you would like to open more than one port connection and jump between those
connections, remove the disconnect command from your menu entry. Then, use the
default hot keys to return to the menu (Ctrl+L) and select another connection. Once more
4-4
Page 27

SCS1600/3200 User Guide 4: Application Setup
than one connection is open, you can jump between connections using the Ctrl+B and
Ctrl+F hot keys.
Note: If you do not include the disconnect command in the menu entry, you
must manually disconnect each session using the disconnect command at the
Local> prompt or from a menu selection. An alternative is to enable Inactivity
Logout on each port to automatically logout a port. See the SCS Reference
Manual for additional information.
To switch between several connections from a serial port using a terminal, you must
configure four things on the serial port configuration pages: the Local switch, Forward
switch, Backward switch, and the Break Control setting (which must be changed from
Local to Remote).
Enabling Menu Mode for a Port
For a port to use the menu you just configured, you must enable menu mode for that port.
Menu mode can also be enabled on port 0 for any users who Telnet to the SCS.
After you define and save all menu items, perform the following steps to enable menu
mode.
1. Click the Ports link under Advanced Settings.
Serial Port Page
2. Click the Configure link next to the desired serial port.
3. Check the Menu checkbox.
4-5
Page 28

SCS1600/3200 User Guide 4: Application Setup
Enabling Menu Mode
4. Click the Update Port Settings button.
5. If desired, enable menu mode on other ports by repeating these steps.
Using the Menu
Once you have both configured the menu and enabled menu mode on a port, you can
test the menu by forming a Telnet connection to that port.
When you log into a port with menu mode enabled, you are presented with an initial login
screen.
Login Screen
Lantronix SCSxx Version B3.6/3 (000410)
Type HELP at the 'Local> ' prompt for
assistance.
Username>
1. Enter your user name (in this case, user) and press Enter.
Login Screen, part 2
Username> user
Press <CR> to continue...
2. As instructed, press Enter once more to see the actual menu.
3. Type the number of the desired menu option and press Enter. For example, to
connect to the Linux server, type 3 and then press Enter.
4-6
Page 29

SCS1600/3200 User Guide 4: Application Setup
Remote User Dial-Up
Dial-up access to the SCS can be accomplished either using a data-link protocol,
typically PPP, or using an ASCII-based terminal connection with a terminal emulation
application such as HyperTerminal.
Connectivity to the SCS from a remote location requires that you create a user account,
connect and configure a modem, enable authentication, and specify an IP address range
for use during remote sessions.
To configure your SCS for remote user dial-up:
1. Create a user account.
a) From the Quick Setup column on the left, select Users.
b) Enter the user name and click Create.
c) Click the Configure link next to the user name.
d) Enter a password in the Password field.
e) For a PPP connection, type set PPP in the Login Command field.
f) For a terminal emulation connection to the console menu, enter menu in the
Login Command field.
g) For a terminal emulation connection to the local SCS prompt, leave the Login
Command field blank.
h) Click the Update button.
Creating a User Account
2. Follow these steps:
a) Click the Modem link.
b) Click the Configure link for the port with the attached modem.
c) Select the modem type from the drop-down list.
4-7
Page 30

SCS1600/3200 User Guide 4: Application Setup
d) If you want to enable authentication, check the Authenticate Users box.
e) Click the Update button.
Note: If you inserted a PC-card modem while the SCS was powered up,
you need to restart the SCS.
3. Specify an IP Pool address range for remote users:
a) Click the Modems or Back to Modems link.
b) Enter the IP pool address range for remote users.
Note: The IP pool range must be in the same subnet range as the SCS
IP address and cannot be used by any other device on the network. If
only one modem is connected to the SCS, then only one IP address is
required for the pool. For this configuration, enter the same IP address in
the Start and End fields.
4. Reboot the SCS for the pool range settings to take effect.
Break Sequences
This section describes how to specify serial breaks and alternate break sequences.
Serial Breaks
Break conditions originating from serial connections are controlled on a per port basis.
Break conditions originating from incoming Telnet and SSH connections are based on the
settings for port 0, the network (template) port.
You must define where the break condition will be processed using the Set/Define Port
Break [ Local | Remote ] command for each serial port and port 0.
The default break sequence for port 0 is <Ctrl+Y>. There is no default break sequence
for the serial ports.
Alternate Break Sequences
You can additionally specify an alternate break (AltBreak) character for use with terminals
that cannot natively generate a break condition and for Telnet or SSH clients that cannot
generate break IAC sequences. The syntax for specifying an AltBreak sequence is:
Set/Define Port Break Character [ <char> | None ]
where <char> is a single character enclosed in quotes. You can specify non-printable
characters using the notation \xx, where xx is the hexadecimal representation for the
desired character. The Show Port command displays the current setting.
The table below shows some examples to help you understand how the SCS handles
breaks.
4-8
Page 31

SCS1600/3200 User Guide 4: Application Setup
Examples of Alternate Break Sequences
If
The user Telnets to a remote
network host from a local
(SCS) serial port
The user issues a Connect
Local command to another
serial port from a local (SCS)
serial port
The user Telnets to the SCS
Local> prompt and issues a
Connect Local command to
a serial port
And Then
The serial port is set to
Break = Local
The Serial port is set to
Break = Remote
The user serial port is set to
Break = Local
The user serial port is set to
Break = Remote
Template port 0 is set to
Break = Local
Template port 0 is set to
Break = Remote
The AltBreak sequence returns the
user to a local (SCS) command
prompt.
The AltBreak sequence causes the
SCS to transmit a Telnet Break
IAC sequence to the remote host.
The AltBreak sequence returns the
user to a local (SCS) command
prompt.
The AltBreak sequence causes a
break condition to be generated to
the target port.
Note: The target port’s break
settings do not apply or affect this
situation.
The AltBreak sequence returns the
user to a local (SCS) command
prompt.
The AltBreak sequence causes a
break condition to be generated to
the target port.
Note: The target port’s break
settings do not apply or affect this
situation.
Modem Mode
Modem mode allows the SCS to emulate a modem for performing network connections.
To configure specific ports to emulate modems, use the following command:
When the port is in modem mode, the following modem commands are available:
Set/Define Port <n> Modem Emulation [Enabled | Disabled]
4-9
Page 32

SCS1600/3200 User Guide 4: Application Setup
Modem Mode Commands
Command Function
ATC Provides passthru to the normal CLI
ATDT ipaddress Forms a TCP connection
Enables or disables echo command:
ATEx
ATH Hangs up (disconnects) network session
ATI Displays software version information
ATQx
ATS[xx=yy]
ATSxx? Shows register value
ATVx
ATX[y] Accepted and ignored
ATZ Restores settings from NVR
AT&F Resets modem NVR to factory settings
AT&V Views current and NVR settings
AT&W Writes settings to NVR
AT&Z Restores settings from NVR
0 = echo off
1 = echo on (default)
Enables or disables result codes:
0 = result codes on (default)
1 = result codes off
Sets/shows register:
0: 0 means ATA answers; otherwise SCS autoanswers
All other registers are unimplemented.
Bit 0 sets response type:
0 = numeric responses
1 = text responses (default)
Bit 1 sets response to unknown AT commands:
0 = do not accept unknown AT commands
1 = do accept unknown AT commands (default)
The SCS holds DTR low until it forms a valid network session. The attached device can
then monitor the SCS DTR output by tying it to its CD input. In addition, the SCS has
DSRLogout enabled, so if the attached device drops its DTR, the network connection
terminates, and the serial port logs out.
Event Port Logging and Email Notification
You can configure each SCS serial port to store its console output in a log file. If email
notification is also enabled, a system administrator receives an email through an SMTP
mailserver if the connected device reboots or otherwise produces a burst of console
output.
To enable email notification, configure the features discussed in the following sections.
For more information on any of these features, see the SCS Reference Manual.
To enable port event logging:
1. Click the Ports link under Advanced Settings.
4-10
Page 33

SCS1600/3200 User Guide 4: Application Setup
2. Click Configure next to the desired serial port. The Serial Port Settings window
displays.
Serial Port Settings
3. Enable port logging (also referred to as serial logging) by changing the Serial Log
Size from 0 to any number between 1 and 250 Kbytes.
Enabling Serial Logging and Email Events
This setting creates a log file on the /ram disk in the format /ram/Port_xx.log
where xx is the port name and changes the specified port to access remote.
4. Click the Email Events checkbox. This setting enables email notification for the serial
log.
5. Click the Update Port Settings button to save changes.
6. When a port that has Email Events enabled receives a burst of 20 or more
characters in its serial log, the port buffers incoming data for up to 25 seconds or until
the log file reaches 1500 bytes before sending the contents of the file via email.
Creating an Email Site
Once port buffering is enabled, configure an email site for that port. An email site
contains the information necessary to generate and send an email message at any
system crash.
4-11
Page 34

SCS1600/3200 User Guide 4: Application Setup
Note: Email sites are not related to the sites used by the SCS to manage
connections. Sites are discussed in the SCS Reference Manual.
To create an Email site using the web browser interface:
1. Click the Email link under Advanced Settings.
2. Choose a port from the Create Email Site pull-down menu. You can also select a
default. The settings for the default email site are used if a port-specific email site is
not completely configured.
3. Click the Create button.
4. Configure the email site:
a) In the To field, enter the email address for the recipient. To enter a series of
email addresses, separate each address with a comma. The maximum number
of characters for this field is 64.
b) In the From field, enter the text to be displayed in the From field of the email
message. The maximum number of characters for this field is 32.
c) In the Mailhost field, enter a valid SMTP mailhost. The mailhost can be either a
numeric IP address or, if a nameserver and domain name are configured, a
hostname. The maximum number of characters for this field is 24.
d) In the Reply-to field, enter an email address that will receive any responses to
the email message. The maximum number of characters for this field is 32.
e) In the Subject: field, enter the text that will be displayed in the subject line. The
maximum number of characters for this field is 48.
Configuring an Email Site
5. Click the Update button to save changes.
Dial-Out ISP Connection
In some cases, you may require the SCS to connect to an ISP to access email or the
Internet. You can configure the SCS to automatically connect to an ISP and accept a
dynamically assigned IP address from the ISP.
When you configure a dial-out ISP connection using the web browser interface, a site
named outgoing is created. Once the site is properly configured, outbound packets
should cause the site outgoing to start and dial out using the modem.
4-12
Page 35

SCS1600/3200 User Guide 4: Application Setup
1. Configure a modem to handle connections from the SCS as described earlier.
2. Click the Dial-Out link under Quick Setup.
3. Complete the following fields:
a) The Remote Username and Password for the ISP.
b) The Port that the modem is attached to (for a PC card modem, enter port 3).
c) The ISP's Telephone number.
d) If necessary, a static IP Address.
Note: Most ISPs assign a dynamic IP address. Set the IP address field
on the web page to DYNAMIC for this situation.
e) Specify a Nameserver.
Configuring a Dial-Out ISP Connection
4. Click the Update button. The default route is now set to site outgoing.
Note: Local Ethernet routes should not be used. To share an ISP connection
with the local LAN, NAT (Network Address Translation) must be used. For
more information on SCS IP routing and NAT, see the SCS Reference
Manual.
5. Reboot the SCS for these changes to take effect.
Com Port Redirector
The Com Port Redirector application allows Microsoft Windows-based PCs to access
modems or other serial devices connected to a Secure Console Server as if those serial
devices were local Comm ports. The Redirector creates virtual comm ports and
intercepts communications from existing device software, then redirects those
communications over the IP network to the serial ports on your SCS. The Com Port
Redirector works in the background.
4-13
Page 36

SCS1600/3200 User Guide 4: Application Setup
The Com Port Redirector software and installation instructions are included on the
distribution CD-ROM or from the Lantronix web site at:
ftp://ftp.lantronix.com/pub/redirector
SSH Connections
Secure Shell (SSH) is a program that uses strong user authentication and encryption
methods to secure communication from one host to another on a network. The SCS
products support SSHv1 and the more robust SSHv2. This section describes how to
configure the SCS to support either method. To use SSH you need an SSH client
program on your computer.
Defining Supported SSH Connections
By default, the SCS is configured to allow both SSHv1 and SSHv2 client connections. In
the default mode, the remote client is prompted to choose the version to use when an
SSH connection attempt is made to or from the SCS.
You can change this setting and specify the types of SSH connections allowed from the
command prompt of the SCS. Use the following syntax:
Set/Define Protocol SSH Mode [ V1Only | V1Prefer | V2Prefer | V2Only ]
In conjunction with the Set/Define SSH Mode command, you can use the following
parameters
SSH Parameters
Parameter
V1ONLY
V2ONLY
V1PREFER
V2PREFER (default)
Incoming (host to SCS) Outbound (SCS to host)
SCS offers only SSHv1
connections
SCS offers only SSHv2
connections
SCS offers both v1 and v2
and the client chooses
SCS offers both v1 and v2
and the client chooses
Effect
SCS only connects using SSHv1
SCS only connects using SSHv2
If both SSHv1 and SSHv2 are available,
chooses SSHv1
If both SSHv1 and SSHv2 are available,
chooses SSHv2
If a compatible protocol version is not agreed upon (one node wants SSHv1 and the
other wants SSHv2), the connection does not occur.
Creating an AUTHORIZED_KEYS File
RSA and DSA are commonly used Internet encryption and authentication systems
included as part of the web browsers from Netscape and Microsoft. To use RSA and DSA
user authentication for connections to the SCS, you must create an
AUTHORIZED_KEYS file and store it in the /flash/ssh/ directory of the SCS.
The AUTHORIZED_KEYS file consists of each user’s public key. For example, on a
UNIX host, your public key is stored in a file called .ssh/identity.pub. The SSH client’s
key generation software creates both an unreadable private key file (often called
identity) and a human readable public key file (identity.pub).
4-14
Page 37

SCS1600/3200 User Guide 4: Application Setup
Note: Not all clients come with this program. If yours does not, you may need to
use the Username/Password Authentication method described below.
Once you have created a public key file:
1. Copy the contents of the public key file (identity.pub) to a text file.
2. Save the file with the name AUTHORIZED_KEYS. (AUTHORIZED_KEYS file names
are case sensitive.)
Note: Make sure there is no file extension. In Windows, you may need to
save the file as a .txt file and then rename the file to remove the extension.
Shared Key Authentication Process
RSA, DSA, and/or username/password authentication can be used to ensure only
authorized users access the SCS and connected equipment. The following sections
explain how to configure each of these.
Briefly, here’s how public/private key authentication works on the SCS. We assume that
the user’s public/private key pair has been generated. In this example, RSA user
authentication is used. DSA authentication is similar.
1. The SSH client on the user’s computer sends the public half of the user’s identity key
to the SCS.
2. The SCS checks to see if this user’s identity key is listed in the AUTHORIZED_KEYS
(or AUTHORIZED_KEYS2) file on the SCS.
If the user’s identity key is not listed in the AUTHORIZED_KEYS file on the SCS,
then the authentication attempt fails. If the identity key is listed, then the process
continues.
3. The SSH client then sends the private half of the user’s identity key to the SCS.
4. The SCS compares the private half of the user’s identity key to the key stored in the
host_rsa_key (or host_dsa_key) file on the SCS.
5. If the private keys match, then the user’s identity is confirmed and an SSH
connection forms.
If RSA or DSA user authentication fails, the SCS prompts for a username and password
(or just a password, if the SSH client forwarded the username). The user’s name and
password are then checked against the Radius, SecurID, or local user databases, in
order of their precedence settings. (See the SCS Reference Manual for information on
authentication precedence.)
Setting up RSA Shared Key Authentication (for SSHv1)
This procedure assumes you have generated the RSA authentication keys and copied
the public half of the key pair to a file called AUTHORIZED_KEYS on your local
computer.
1. FTP to the IP address of the SCS.
2. Log in with the username of root and enter the privileged password (system by
default).
3. Change directories to /flash/ssh/.
4. “Put” the AUTHORIZED_KEYS file into that directory.
5. Reboot the SCS.
4-15
Page 38

SCS1600/3200 User Guide 4: Application Setup
RSA Method from Unix (OpenSSH) - No Passphrase
sshuser@UNIXHOST /# SSH –1 SSHUSER 172.19.21.51
Lantronix SCS Version B1.0/405(011102)
Type HELP at the ‘Local_33>’ prompt for assistance.
Username>
RSA Method from Unix (OpenSSH) - with Passphrase
sysadmin@UNIXHOST/# -1sysadmin
172.19.21.51
sysadmin@172.19.21.51’s password:
Lantronix SCS200 Version B1.0/405(011102)
Type HELP at the ‘Local_34>’ ‘prompt for assistance
Username>
Username/Password Authentication Setup
New authentication keys are generated within a few minutes based on the list of
authorized user public keys. A file called host_rsa_key contains the authorized users’
private identity keys. A file called host_rsa_key.pub contains the authorized users’
public identity keys.
As you add individual users, add their public keys to the AUTHORIZED_KEYS file on
your workstation and FTP the updated file to the SCS.
Setting up DSA Shared Key Authentication (for SSHv2)
This procedure assumes you have generated the DSA authentication keys and copied
the public half of the key pair to a file called AUTHORIZED_KEYS2 on your local
computer.
1. FTP to the IP address of the SCS.
2. Log in with the username root and enter the privileged password (system by
default).
3. Change directories to /flash/ssh/.
4. Put the AUTHORIZED_KEYS2 file into that directory.
5. Reboot the SCS. New authentication keys will be generated within a few minutes
based on the list of authorized user public keys.
A file called host_dsa_key contains the authorized users’ private identity keys. A file
called host_dsa_key.pub contains the authorized users’ public keys.
As you add individual users, add their public keys to the AUTHORIZED_KEYS2 file on
your workstation and FTP the updated file to the SCS.
Setting up Username/Password Authentication (SSHv1 or SSHv2)
The SCS also supports username/password authentication through an internal user
database, Radius, or SecureID.
If RSA authentication fails, the SCS prompts for a username and password (or just a
password, if the SSH client forwarded the username). The SCS checks the user’s name
and password against the Radius, SecureID, and local authentication databases, in order
4-16
Page 39

SCS1600/3200 User Guide 4: Application Setup
of their precedence settings, if configured. You can use the SCS’s web interface to
configure authenticated users and set the authentication precedences.
Note: The SCS does not update expired local passwords or run login scripts at
this point in the SSH process.
Authenticated User from Unix (OpenSSH)
sshuser@UNIXHOST /# ssh -l sshuser 172.19.21.51
The authenticity of host '172.19.21.51 (172.19.21.51)' can't be established.
RSA1 key fingerprint is e8:9b:7f:ee:9d:58:47:88:2e:72:a3:61:84:67:d0:d1.
Are you sure you want to continue connecting (yes/no)? yes
Warning: Permanently added '172.19.21.51' (RSA1) to the list of known hosts.
sshuser@172.19.21.51's password:
Lantronix SCS200 Version B1.0/405(011102)
Type HELP at the 'Local_33> ' prompt for assistance.
Username>
Forming SSH Incoming Connections (Unix and Non-Unix)
Non-Unix Platforms
To form an SSH connection from a non-Unix platform to an SCS:
1. Start your SSH client software.
2. Enter the SCS host name or IP Address and specify the public key file to use.
3. If connecting directly to a serial port on the SCS, specify the port number 22xx,
where xx is the port number.
4. If your RSA key is passphrase protected, enter your password.
5. If you are not using an RSA key, specify the username and password the SCS will
use to authenticate you.
UNIX Platforms
To form a connection from Unix, your computer must have an SSH client installed
(OpenSSH, for example).
1. At the command prompt enter ssh followed by the SCS host name or IP Address.
You may also specify a username by adding a –1 (username) or
(username)@hostname.
Forming an SSH Connection (UNIX)
% ssh –l (username) (hostname or IP)
or
% ssh (username)@(hostname or IP)
Depending on whether your RSA key pair is passphrase protected, you may then
be prompted for a password.
2. To connect to a specific SCS port, use serial port 22xx, where xx is the port number.
4-17
Page 40

SCS1600/3200 User Guide 4: Application Setup
Forming an SSH Connection to a Port
% ssh -p2202 (hostname or IP)
Security Enhancements
This section describes methods for increasing the security of the SCS.
Incoming Security
You can make the SCS into a highly secure host by turning off the FTP and HTTP
services using the command:
Set/Define Proto [ HTTP | FTP ] [Enabled | Disabled]
Note: The web interface will no longer be available.
You can further restrict access to only SSH connections to the SCS command line and
serial ports, using the following command:
Set/Define Server Incoming Secure
The Server Incoming Secure command disallows unsecure Telnet and TCP connection
attempts. Access is through SSH only.
Port User Restrictions
You can constrain user access to specific ports on the SCS using the Set/Def
Authentication User command. This command currently only affects users
authenticated against the local SCS database.
To reject network connections to ports not on a user’s port target list, use the command:
Set/Define Authentication User <username> Port Target <portlist>
To reject serial logins to ports not on a user’s port list, use the command:
Set/Define Authentication User <username> Port Serial <portlist>
To show the user's current port restrictions, use the command:
Show Authentication User <username>
To reset the permissions back to the default, use the command:
Set/Define Authentication User <username> Port Factory
4-18
Page 41

55:: TTrroouubblleesshhoooottiinngg
This chapter discusses how you can diagnose and fix errors quickly without having to
contact a dealer or Lantronix. It helps to connect a terminal to the serial port while
diagnosing an error to view summary messages that may be displayed.
When troubleshooting, always ensure that the physical connections (power cable,
network cable, and serial cable) are secure. If you have trouble with wireless networking,
it may help to connect the SCS to a wired Ethernet network to verify that it is working
properly and to check the wireless settings.
Note: Some unexplained errors might be caused by duplicate IP addresses on
the network. Make sure that your SCS's IP address is unique.
Technical Support
If you are experiencing an error that is not described in this chapter, or if you are unable
to fix the error, you may:
Check our online knowledge base at www.lantronix.com/support.com
E-mail us at support@lantronix.com
Call us at:
(800) 422-7044 Domestic
(949) 453-7198 International
(949) 450-7226 Fax
Our phone lines are open from 6:00AM - 5:30 PM Pacific Time Monday through Friday
excluding holidays.
Firmware downloads, FAQs, and the most up-to-date documentation are available at:
www.lantronix.com/support
Technical Support Europe, Middle East, and Africa
Phone: +49 (0) 7720 3016 57
E-mail:
eu_techsupp@lantronix.com
5-1
Page 42

SCS1600/3200 User Guide 5: Troubleshooting
When you report a problem, please provide the following information:
Your name, and your company name, address, and phone number
Lantronix SCS model number
Lantronix SCS serial number
Software version (use the Show Server command to display)
Network configuration, including the information from a Netstat command
Description of the problem
Debug report (stack dump), if applicable
Status of the unit when the problem occurred (please try to include information
on user and network activity at the time of the problem)
LEDs
LEDs indicate serial port activity. On the SCS1600, two LEDs indicate receive and
transmit activity for each serial port. On the SCS3200, a single LED does the same for
each port. The five other LEDs on the right side of the unit are labeled:
Activity
OK
100
Link
Power
A red LED during boot mode typically signals an error, but red LED patterns during
normal operations do not signal an error. Refer to the following table for an understanding
of LED functions.
LED Functions
LED Function
TX
RX
Indicates that the serial port associated with this LED is currently transmitting
(SCS1600 only)
Indicates that the serial port associated with this LED is currently receiving
(SCS1600 only)
Activity Indicates network activity
OK Indicates the general status of the SCS
100 Indicates that there is a valid 100BASE-T connection
Link Indicates that the 10/100BASE-T port has established a good link
Power Indicates that the SCS is currently receiving power
5-2
Page 43

SCS1600/3200 User Guide 5: Troubleshooting
Power-up Troubleshooting
Problem situations and error messages are listed in the table below. If you cannot find
an explanation for your problem, try to match it to one of the other errors. If you cannot
remedy the problem, contact your dealer or Lantronix Technical Support.
Problems and Error Messages
Problem/Message Error Remedy
The SCS is connected to
a power source, but there
is no LED activity.
The SCS is unable to
complete power-up
diagnostics.
The SCS completes its
power-up and boot
procedures, but there's
no noticeable serial
activity.
The terminal shows a
Boot> prompt rather
than a Local> prompt.
The terminal shows a
Boot> prompt rather
than a Local> prompt.
The SCS passes powerup diagnostics, but
attempts to download
new Flash ROM code
from a network host.
The unit or its power supply is
damaged.
This generally indicates a hardware
fault. One of the LEDs will be solid
red for three seconds, followed by
one second of another color.
There is a problem with the serial
connection or the set- up of the serial
device.
A rapidly blinking OK LED may signal
boot failure.
The SCS is not connected properly to
the Ethernet.
The SCS Ethernet address is invalid.
Init Noboot command was entered.
If the OK LED blinks rapidly, the
Flash ROM code may be corrupt.
If you did not request a TFTP boot,
the flash ROM code is corrupt. The
unit will remain in boot mode.
Contact your dealer or Lantronix Technical
Support for a replacement.
Note the blinking LED and its color, and then
contact your dealer or Lantronix Technical
Support. The SCS will not be operational until the
fault is fixed.
Check the terminal setup and the physical
connections, including the cable pinouts. Try
another serial device or cable, or cycle power on
the SCS.
Reboot the unit. When the SCS is running
normally, the OK LED blinks every two seconds.
Ensure that the SCS is firmly connected to a
functional and properly terminated network node.
The SCS Ethernet address is on the bottom of the
unit. Use the Set Server Hardware command to
set the correct address (enter the last three hex
pairs of the address), and then reboot.
Boot Prompt.
See
Reboot the unit. If you get the same message, you
will need to reload Flash ROM.
See Updating Software.
5-3
Page 44

SCS1600/3200 User Guide 5: Troubleshooting
BOOTP Troubleshooting
If the BOOTP request is failing and you have configured your host to respond to the
request, check these areas:
BOOTP Troubleshooting
Area to Check Explanation
BOOTP is in your system's
/etc/services file.
The SCS is in the loadhost's
/etc/hosts file.
The download file is in the
correct directory and is
world-readable.
The SCS and host are in the
same IP network.
BOOTP must be an uncommented line in /etc/services.
The SCS must be in this file for the host to answer a BOOTP or
TFTP request.
The download file must be in the correct directory and world-
readable. Specify the complete pathname for the download file in
the BOOTP configuration file, or add a default pathname to the
download filename.
Some hosts do not allow BOOTP replies across routed IP networks.
Either use a host running a different operating system or put the
SCS in the same IP network as the host.
RARP Troubleshooting
If the unit is unable to get an IP address using RARP, check these areas:
RARP Troubleshooting
Area to Check Explanation
The SCS name and
hardware address in the
host's /etc/ethers file
The SCS name and IP
address in the /etc/hosts
file
The operating system
The SCS name and hardware address must be in this file for the
host to answer an RARP request.
The SCS name and IP address must be in this file for the host to
answer a RARP request.
Many operating systems do not start an RARP server at boot time.
Check the host's RARPD documentation for details, or use the ps
command to see if there is an RARPD process running.
Boot Prompt Commands
If the Boot> prompt appears on the serial console instead of the Local> prompt, one of
two things may be wrong. Either the SCS does not have enough information to boot, or
the network or flash reloading procedure has failed. If pressing Enter does not display a
prompt, press any other key. The Boot> prompt should appear.
If the SCS does not have enough information to boot, or the network or flash reloading
procedure has failed, it prints a message to the console and waits ten seconds for serial
port activity. If the SCS detects serial port activity, it continues booting provided the flash
is good. However, if the user presses a key during that time period, the SCS displays the
Boot> prompt.
5-4
Page 45

SCS1600/3200 User Guide 5: Troubleshooting
Note: If you see the message "Will attempt another download in x minutes,"
press any key for the Boot> prompt.
You can enter a series of commands called Boot Configuration Program (BCP)
commands at the Boot> prompt to configure the SCS. These commands are a subset of
the entire SCS command set. For example, a typical TCP/IP configuration might use the
following commands:
BCP Command Examples
Boot> SET SERVER IPADDRESS 192.0.1.229
Boot> SET SERVER SOFTWARE /tftpboot/SCS200.SYS
Boot> SET SERVER LOADHOST 192.0.1.188
Boot> SET SERVER SECONDARY 192.0.1.22
Boot> FLASH
% Initialization begins in 5 seconds.....
These commands set the SCS's address, the software loadfile, and the loadhost's IP
address (as well as that of a backup loadhost). The SCS then reboots using the Flash
command and attempts to load the file firmware file from the host at 192.0.1.188.
Flash
This command forces the SCS to download new operational code and reload it into Flash
ROM. This is necessary when a new version of software is released and you wish to
upgrade your unit. If the SCS cannot download the file, the code in Flash ROM is still
usable.
Flush NVR
This command is used to restore the SCS's non-volatile RAM to its factory default
settings. It resets everything that is configurable on the SCS, including the unit's IP
address.
Help
Displays a one-page summary of available commands and what they do.
Init 451
Reboots the SCS after it has been configured. If the SCS can find and load the specified
software loadfile, it restarts itself with full functionality. If the loadfile is not found, the SCS
attempts to reload continuously. If there is an error, or if the console's Enter key is
pressed, the SCS re-enters the Boot Configuration Program.
Set Server BOOTP {Enabled, Disabled}
Enables or disables the sending of BOOTP queries during the boot sequence. It is
enabled by default.
Set Server Bootgateway ip_address
Specifies the address of a router so TFTP upgrades can be performed over a routed
network. This requires Boot version 1.3 or higher. TFTP (UDP port 69) must not be
blocked on the routers.
5-5
Page 46

SCS1600/3200 User Guide 5: Troubleshooting
Set Server Hardware xx-xx-xx
Specifies the last three numbers of the SCS's Ethernet address. The first three numbers
are supplied automatically.
The Ethernet address should have been set at the factory. Setting an incorrect address
could cause serious network problems.
Set Server IPAddress ip_address
Specifies this SCS's IP address. Uses the standard numeric format.
Set Server loadhost ip_address
Specifies the host to attempt to load the file from. The IP address should be in standard
numeric format (no text names are allowed).
Set Server RARP {Enabled, Disabled}
Enables or disables the sending of RARP queries during the boot sequence. It is enabled
by default.
Set Server Secondary ip_address
Specifies a backup loadhost. The IP address should be in standard numeric format (no
text names are allowed). The backup loadhost is queried if the primary host cannot load
the server.
Set Server Software filename
Specifies the name of the file to load. The SCS automatically adds .SYS to the filename
you specify. Note that all protocols must have a filename specified (either the default or
set by the user). For more information, see Updating Software. TCP/IP users must use
the Software option to specify the loadhost, the loadfile, and their own network address.
TFTP users can specify a complete path name (up to 31 characters) if the file is located
in a directory other than the default. The case of the filename must match that of the
filename loaded onto the host computer.
Show Server
Use this command when issuing other commands to view the current SCS setup.
5-6
Page 47

66:: UUppddaattiinngg SSooffttwwaarree
Choosing the Right Software File
Lantronix intends to provide multiple software files for each SCS model. The software file
name corresponds to the model name, as shown in the table below.
Software Files
Software File Name Models Supported
SCS1600.SYS SCS1600
SCS3200.SYS SCS3200
The SCS stores its software in Flash ROM. The software controls the initialization
process, the operation of the SCS, and the processing of commands. The contents of
Flash ROM can be updated by downloading a new version of the operational software.
Obtaining Software
You can obtain a current firmware file and release notes for the SCS from the Lantronix
web site (www.lantronix.com) or by using anonymous FTP (ftp.lantronix.com).
Via the Web
You can download the latest version of the firmware from the Technical Support area of
the Lantronix web site. The files are listed as:
SCS1600.SYS
SCS3200.SYS
Note: Netscape Navigator may try to open the file as an ASCII text file. To avoid
this, hold down the Shift key when choosing the software file.
Via FTP
The SCS software resides on the Lantronix FTP server (ftp.lantronix.com). Most of these
files are binary data, so the binary option must be used to transfer the files. All released
files are in the pub directory. Always download the README file in the pub directory
before downloading anything else; it contains a list of available software files.
To log into the FTP server, type anonymous as the username and enter your full email
address as the password.
6-1
Page 48

SCS1600/3200 User Guide 6: Updating Software
Reloading Software
The SCS stores software in Flash ROM to control the initialization process, operation,
and command processing. You can update the contents of Flash ROM by downloading a
new version of the operational software via EZWebCon, FTP, the web interface, TFTP, or
MOP. Regardless of which protocol you use to update Flash ROM, the following points
are important:
The Flash ROM software file name should not be changed.
The download file should be world-readable on the host.
The path name has a sixteen-character length limit.
The file name has a twelve-character limit for the filename.
Note:
If you experience problems reloading Flash ROM, refer to Troubleshooting
Flash ROM Updates
EZWebCon Method
You can use EZWebCon to update your software.
1. In EZWebCon, highlight the SCS.
2. Select Action Reload Firmware.
.
3. Follow the EZWebCon prompts.
FTP Method
Note: This feature is supported on firmware versions v1.0/5 and higher.
1. Use an FTP client to open an FTP session to the IP address of the SCS.
2. Log in with the username of root.
3. Enter the privileged user password (the default is system).
4. Make sure your FTP client is set to do a binary transfer.
5. Stay in the same directory; the default login directory is the correct directory.
6. Do an FTP Put of the scs***.sys file (for example, scs3200.sys for the SCS3200).
Once the file is downloaded, the SCS writes the file to Flash (this takes a few moments)
and then automatically reboots. After rebooting, the unit runs the new firmware.
Web Interface Method
This method requires an external TFTP server. You can obtain one for Windows from the
Lantronix web site.
1. Open your web browser and enter the IP address of the SCS in the URL field.
2. Under Advanced Settings, select Server.
3. Specify the TFTP loadhost and verify the software file.
4. Check the Reload Firmware checkbox.
5. Click the Update Server Settings button.
6-2
Page 49

SCS1600/3200 User Guide 6: Updating Software
Command Line Methods
If BOOTP or RARP is enabled on the SCS, the download process is delayed by
approximately 30 seconds. The SCS first tries TFTP, and then tries MOP loading,
provided that it has enough information to try each download method.
Downloading and rewriting the Flash ROM and rebooting take approximately two minutes
from the time the Initialize Reload command is issued. If the SCS cannot find or access
the download file, you can reboot the SCS with the code still in Flash ROM. The
OK/Activity LED blinks quickly while the SCS is booting (and reloading code) and then
slowly when it returns to normal operation.
Note: Before entering the Initialize Reload command, check your settings using
the List Server Boot command.
If you are attempting to update the operating code of an SCS not on a local network, you
must specify a boot gateway (router). To specify the boot gateway, use the command:
Set/Define Server Boot Gateway <ip_address>
The SCS directs subsequent IP traffic to the specified IP address.
Note: This functionality requires boot code V1.3.
TFTP Method
Some TFTP implementations require a specific directory for the firmware file. See your
host's documentation for instructions.
To manually configure the SCS's IP parameters for a TFTP software reload, use the
following process:
1. Log in to the SCS via Telnet or by direct serial connection.
2. Enter the commands shown in the figure below.
Configuring TCP/IP Reload
Local> SET PRIVILEGED
Password> SYSTEM (not echoed)
Local>> DEFINE SERVER LOADHOST nnn.nnn.nnn.nnn
Local>> DEFINE SERVER SOFTWARE "/SCS1600.SYS"
Local>> LIST SERVER BOOT
Local>> INITIALIZE RELOAD
Note: For instructions on how to log into the SCS to enter these commands, see
Installation
The path and filename are case-sensitive and must be enclosed in quotation
marks. When attempting to boot across an IP router, configure the router to proxy-ARP
for the SCS.
.
MOP
The firmware filename is the only parameter that the SCS needs to reload via MOP.
Make sure the service characteristic is enabled on the host's Ethernet circuit, copy the
firmware file to the MOM$LOAD directory, and reload the SCS using the Initialize
Reload command. Be sure to use binary mode for any file transfers.
6-3
Page 50

SCS1600/3200 User Guide 6: Updating Software
Troubleshooting Flash ROM Updates
Running the following checks can solve problems that may occur when updating the
Flash ROM:
Troubleshooting Flash ROM Updates
Protocol Area to Check
Check the file and directory permissions.
Ensure the loadhost name and address are specified correctly and that their case
matches that of the filenames on the host system.
TFTP
MOP
FTP
Ensure the file and pathnames are enclosed in quotes to preserve case.
Ensure that TFTP is enabled on the host; several major UNIX vendors ship their
systems with TFTP disabled by default.
For remote network reload, specify a boot gateway (router) with the Set/Define
Server Boot Gateway <ip_address> command.
Ensure that the Ethernet circuit has the service characteristic enabled.
Ensure that the MOM$LOAD search path includes the directory containing the
firmware file.
Ensure that you are using firmware version v1.0/5 and higher.
Ensure that your FTP client is set to do a binary transfer.
6-4
Page 51

AA:: CCoommpplliiaannccee aanndd WWaarrrraannttyy IInnffoorrmmaattiioonn
Compliance Information
(according to ISO/IEC Guide 22 and EN 45014)
Manufacturer’s Name & Address:
Lantronix 15353 Barranca Parkway, Irvine, CA 92618 USA
Declares that the following product:
Product Name & Model: Secure Console Server SCS1600 and SCS3200
Conforms to the following standards or other normative documents:
Safety:
EN60950: 1992+A1, A2, A3, A4, A11
Electromagnetic Emissions:
EN55022: 1998 (CISPR 22, Class A: 1993, A1: 1995, A2: 1996)
IEC 1000-3-2/A14: 2000
IEC 1000-3-3: 1994
Electromagnetic Immunity:
EN55024: 1998 Information Technology Equipment-Immunity Characteristics
IEC61000-4-2: 1995 Electro-Static Discharge Test
IEC61000-4-3: 1996 Radiated Immunity Field Test
IEC61000-4-4: 1995 Electrical Fast Transient Test
IEC61000-4-5: 1995 Power Supply Surge Test
IEC61000-4-6: 1996 Conducted Immunity Test
IEC61000-4-8: 1993 Magnetic Field Test
IEC61000-4-11: 1994 Voltage Dips & Interrupts Test
Supplementary Information:
This Class A digital apparatus complies with Canadian ICES-003 (CSA) and has been verified as
being compliant within the Class A limits of the FCC Radio Frequency Device Rules (FCC Title 47,
Part 15, Subpart B CLASS A), measured to CISPR 22: 1993 limits and methods of measurement of
Radio Disturbance Characteristics of Information Technology Equipment. This product also
complies with the requirements of the Low Voltage Directive 72/23/EEC and the EMC Directive
89/336/EEC.
Manufacturer’s Contact:
Director of Quality Assurance, Lantronix
15353 Barranca Parkway, Irvine, CA 92618 USA
Tel: 949-453-3990
Fax: 949-453-3995
1
Page 52

SCS1600/3200 User Guide A: Compliance and Warranty Information
Warranty
Lantronix warrants each Lantronix product to be free from defects in material and
workmanship for a period of ONE YEAR after the date of shipment. During this period, if
a customer is unable to resolve a product problem with Lantronix Technical Support, a
Return Material Authorization (RMA) will be issued. Following receipt of a RMA number,
the customer shall return the product to Lantronix, freight prepaid. Upon verification of
warranty, Lantronix will -- at its option -- repair or replace the product and return it to the
customer freight prepaid. If the product is not under warranty, the customer may have
Lantronix repair the unit on a fee basis or return it. No services are handled at the
customer's site under this warranty. This warranty is voided if the customer uses the
product in an unauthorized or improper way, or in an environment for which it was not
designed.
Lantronix warrants the media containing its software product to be free from defects and
warrants that the software will operate substantially according to Lantronix specifications
for a period of 60 DAYS after the date of shipment. The customer will ship defective
media to Lantronix. Lantronix will ship the replacement media to the customer.
* * * *
In no event will Lantronix be responsible to the user in contract, in tort (including
negligence), strict liability or otherwise for any special, indirect, incidental or
consequential damage or loss of equipment, plant or power system, cost of capital, loss
of profits or revenues, cost of replacement power, additional expenses in the use of
existing software, hardware, equipment or facilities, or claims against the user by its
employees or customers resulting from the use of the information, recommendations,
descriptions and safety notations supplied by Lantronix. Lantronix liability is limited (at its
election) to:
Refund of buyer's purchase price for such affected products (without interest)
Repair or replacement of such products, provided that the buyer follows the
above procedures.
There are no understandings, agreements, representations or warranties, express or
implied, including warranties of merchantability or fitness for a particular purpose, other
than those specifically set out above or by any existing contract between the parties. Any
such contract states the entire obligation of Lantronix. The contents of this document
shall not become part of or modify any prior or existing agreement, commitment or
relationship.
For details on the Lantronix warranty replacement policy, go to our web site at
http://www.lantronix.com/support/warranty/index.html
2
 Loading...