

Page 1
P101
ROVER Thermal Ticket PrinterROVER Thermal Ticket Printer
Internet Gateway Ticket Printer
LP-P101
LPP101_UG_ENB01W
Quick Installation Guide for the Access Code Ticket Printer
used with the LanPro’s ROVER LP-ROV106
The LP-P101, is an access code ticket printer that prints pre-programmed tickets on demand. A tablet
computer or laptop is required to initiate ticket printing by touching buttons on the screen, exactly like
a point of sale terminal. The buttons are preset using the ticket printer administration page on the
gateway.
The ROVER LP-ROV106 Internet Controller Gateway has a ticket printer interface.
This manual will guide you on the installation of the LP-P101.
Please download the product manual at: http://www.lanpro.com
Powering the LP-P101
The LP-P101 needs a 12 VDC power supply able to deliver up to 3 Ampere. We recommend that you use
the Power Supply included in the package to power the LP-P101 to prevent damage to the unit and
comply with safety regulations.
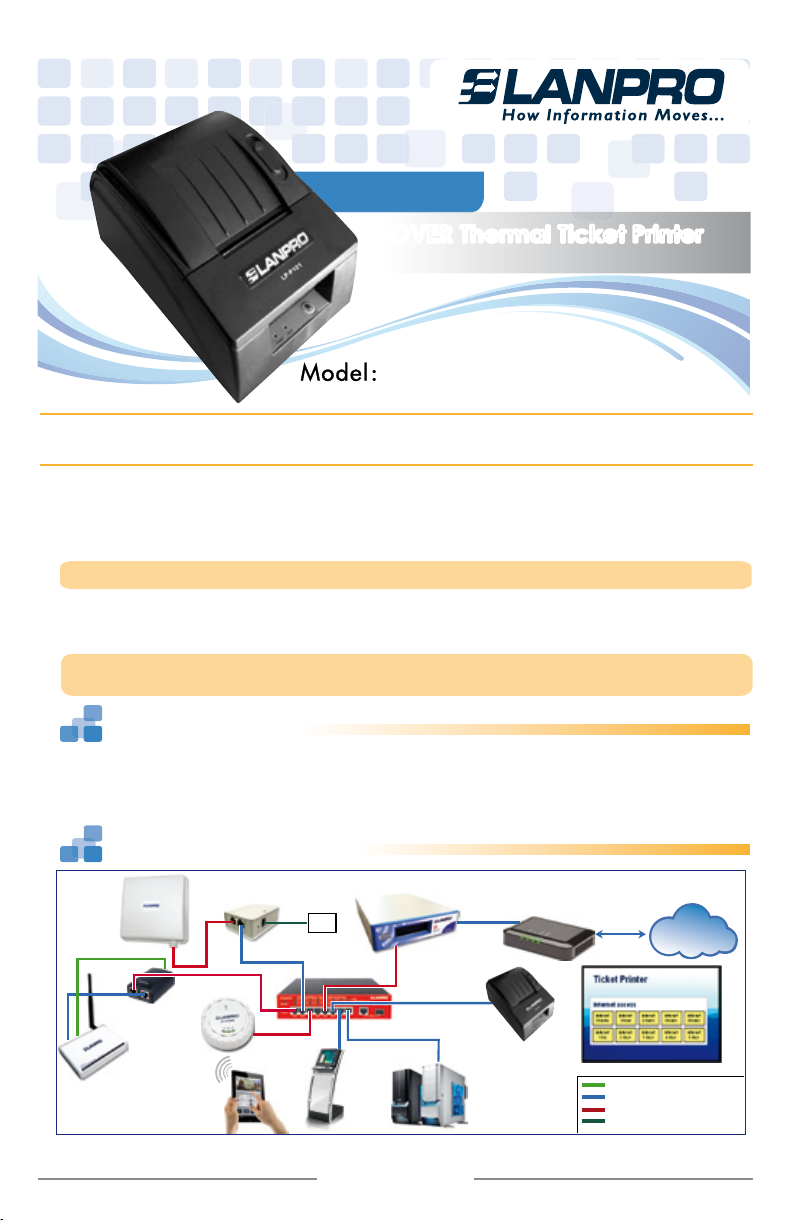
Typical Installation Scheme
DC
LP-SW902FGP
LP-ROV106
LAN
WAN
LP-P101
DSL / Cable / Router
Internet
LP-289ai
LP-PoE151
LP-N24V2
Injector
LP-C300N
Wireless Internet
Android 7” tablet or Apple iPad
is used to display the ticket buttons.
Touching a button prints a ticket with
an access code on the LP-P101
Internet
Kiosk
www.lanpro.com
Business
center
computer
DC 5, 9, 12 VDC
Data 10/100/1000 M CAT 5e / 6 cable
Data + PoE 48 VDC (af)
DC 15 VDC
Figure 1
Page 2
The LP-P101 ticket printer has a LAN port underneath the unit. An Ethernet cable must be connected to
the LAN port either directly to the ROVER LP-ROV106 LAN port, or connected to the ROVER LAN port
through a switch.
The tablet computer or laptop that is used to control ticket printing will connect to the ROVER LP-ROV106
via the wireless network.
Printer Configuration
Connect your LP-P101 ticket printer to the ROVER LP-ROV106 Gateway Controller via a LAN port as
shown in the diagram of figure 1. An intermediate switch will be necessary to share the ROVER
LP-ROV106 LAN Port and connect wireless access points and the printer.
Connect your laptop computer to the LAN port of the ROVER gateway.
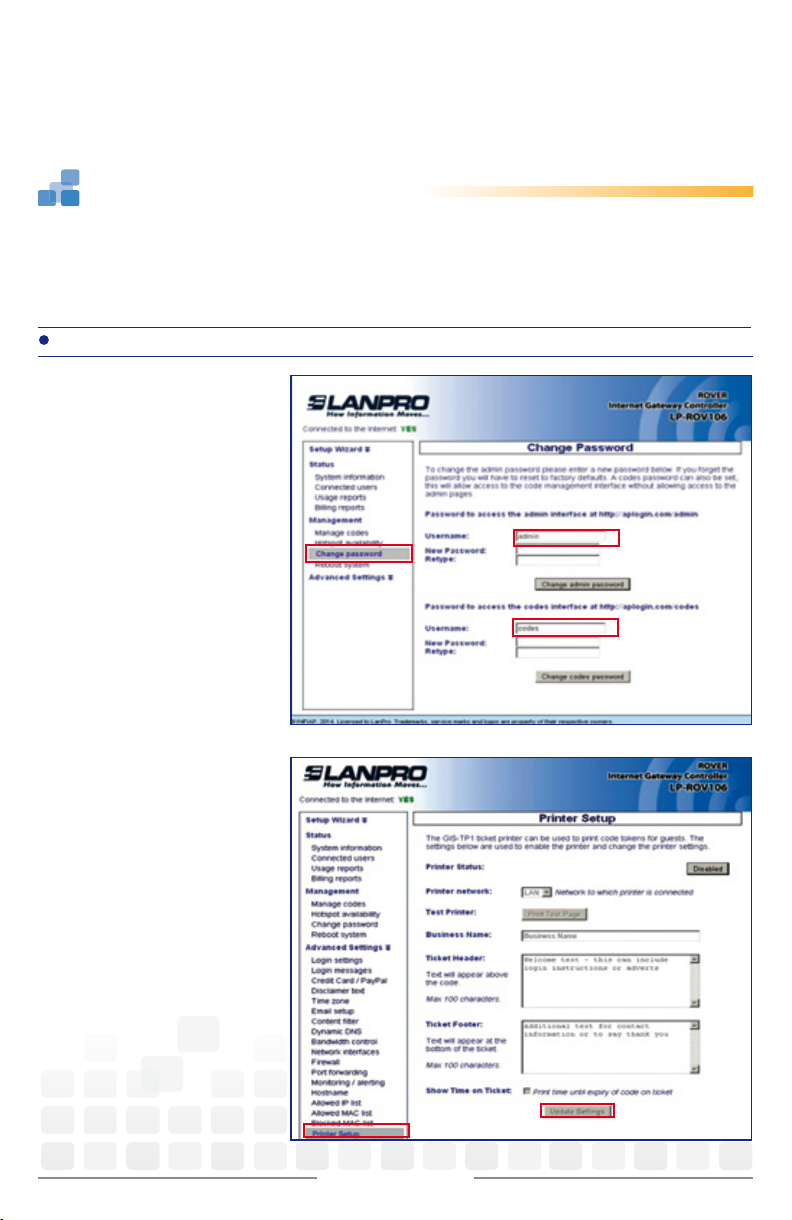
STEP 1: Login as Admin
Open your computer browser and
login as ADMIN (see below). First
you must create a CODES login
password as this is the login used by
the print control computer (a tablet
or laptop).
Connect your computer to a LAN
port via an Ethernet cable. Open
your browser and type in the URL to
login to the Admin pages of your
gateway:
http://aplogin.com/admin
The username is admin, and the
password is the one that you
entered with the wizard. When the
page opens, select the Advanced
Settings> printer Setup page.
Please see the manual for more
information.
Figure 2
Next go to Advanced Settings >
Printer Setup, in the ADMIN menu.
Ensure that printer status is enabled
and then fill in the three fields of
data that will be printed together
with the code. Check the box to
print expiry time if required. Click
the update settings button. Return
to the printer setup page and click
the Print Test Page button and verify
that a ticket is printed.
Figure 3
www.lanpro.com
Page 3
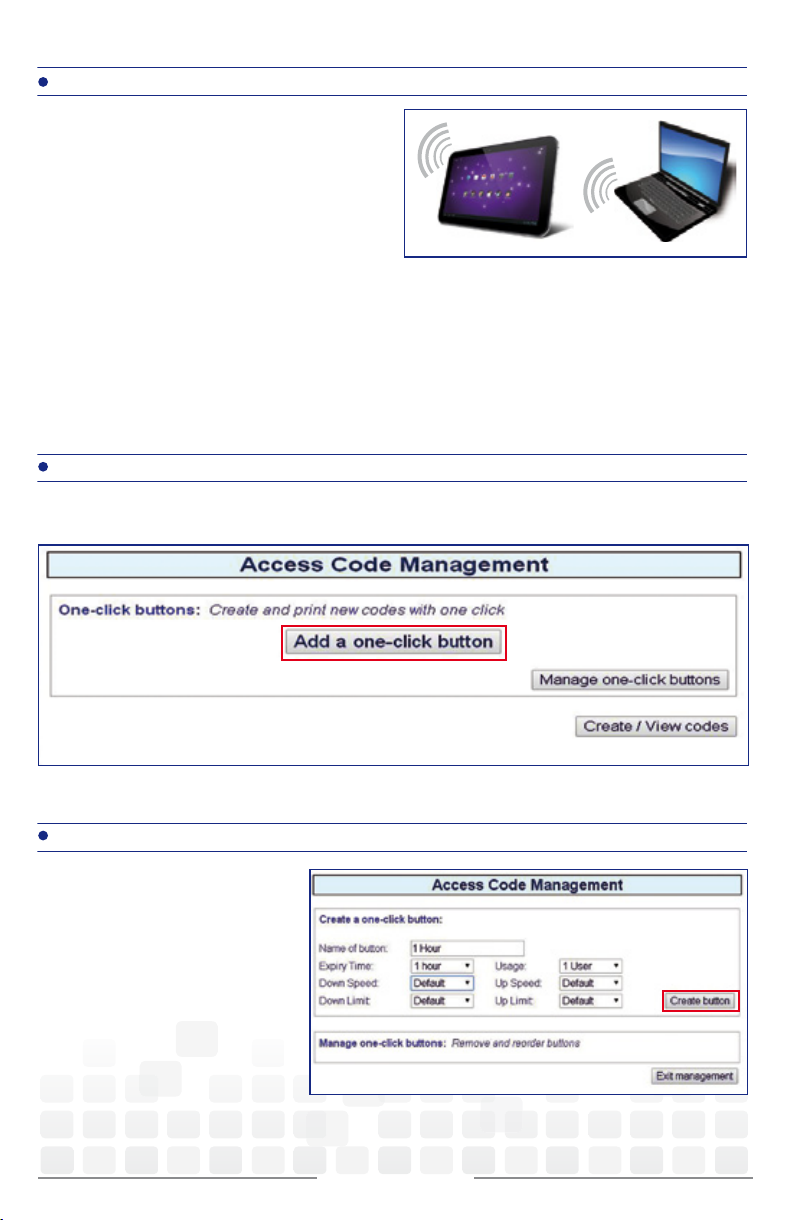
STEP 2: Login with your Tablet or Laptop
Access code ticket printing requires a tablet or
laptop computer to select and print the required
ticket using buttons on the display. A tablet will
permit touch button printing. This type of input is
exactly like a point of sale terminal screen.
Connect your tablet wirelessly to the ROVER
LP-ROV106 Gateway Controller and then open a
browser.
Type the login:
http://aplogin.com/codes
A box will open prompting for the username (codes)
and the password that you entered previously.
The login page picture will be shown as a
background to the one-click buttons printer control
Figure 4
page.
STEP 3: Add a one-click button
The one-click button is displayed on the screen and is used to print an access code ticket. Click ‘Add a
one-click button’ to proceed.
STEP 4: Configure the one-click button
Type the button name which will
appear in the button, then select the
access code characteristics that will be
used to generate the access code.
Finally click ‘Create button’.
Figure 5
Figure 6
www.lanpro.com
Page 4
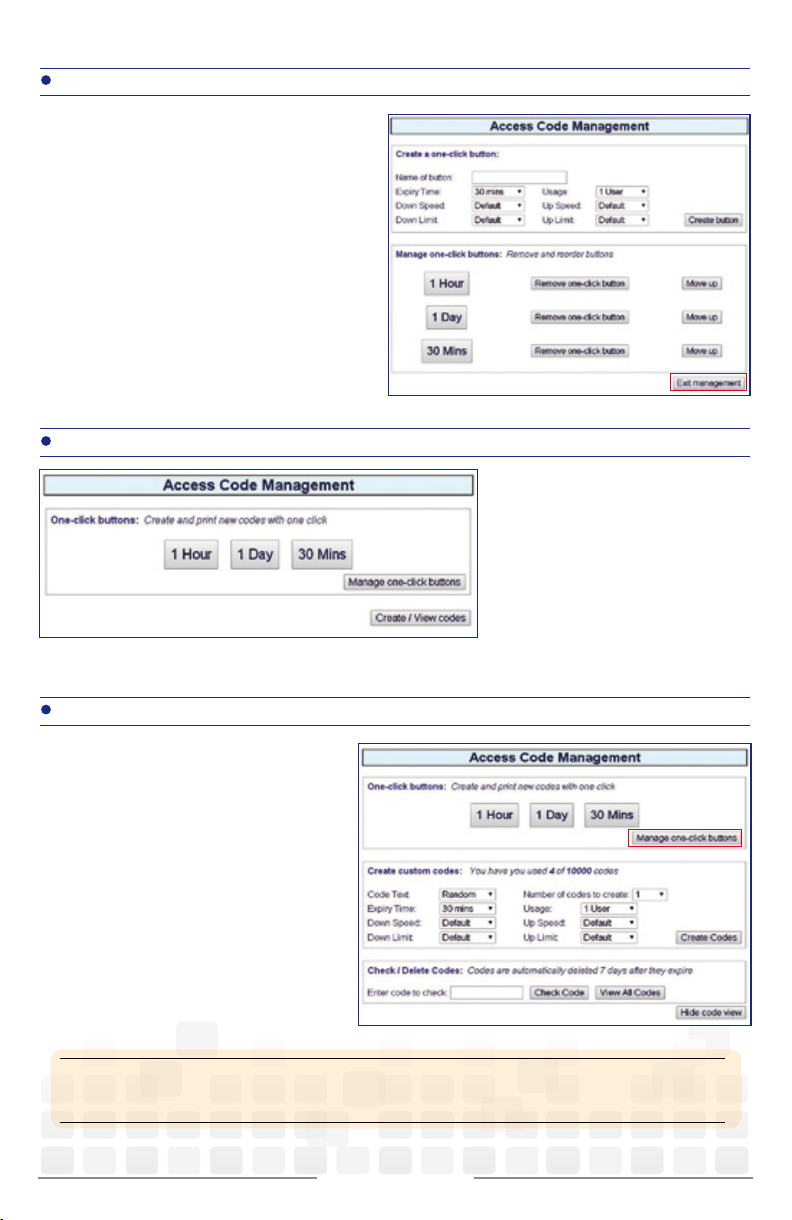
STEP 5: Add more buttons or delete buttons
After adding a button, more buttons can be
added. Buttons can also be deleted. When all
buttons have been generated click the ‘Exit
management’ button.
Figure 7
STEP 6: Start printing tickets
Figure 8
The display with buttons is used to
initiate printing of access code tickets.
Using a Ta blet computer, touch the
button to print the ticket. With a laptop
click the mouse.
STEP 7: Manage one-click buttons
Click ‘Manage one-code buttons’ to make
any changes to the buttons. Click ‘Create
custom codes’ and ‘View codes’ for
additional features.
Figure 9
Designed and Manufactured under LanPro™ standards and specifications. LanPro™ is a member of One Network Alliance Group of Companies.
LanPro™ products are made in one of the following countries: USA, China, Taiwan, Thailand and Korea. The exact country of origin is unknown.
LanPro America: 1880 NW 93rd Av, Doral, Florida 33172, USA. Main web page: www.lanpro.com Support: [email protected]
LanPro™, How Information Moves... and LanProfessional are US registered brands.
www.lanpro.com
 Loading...