

Page 1
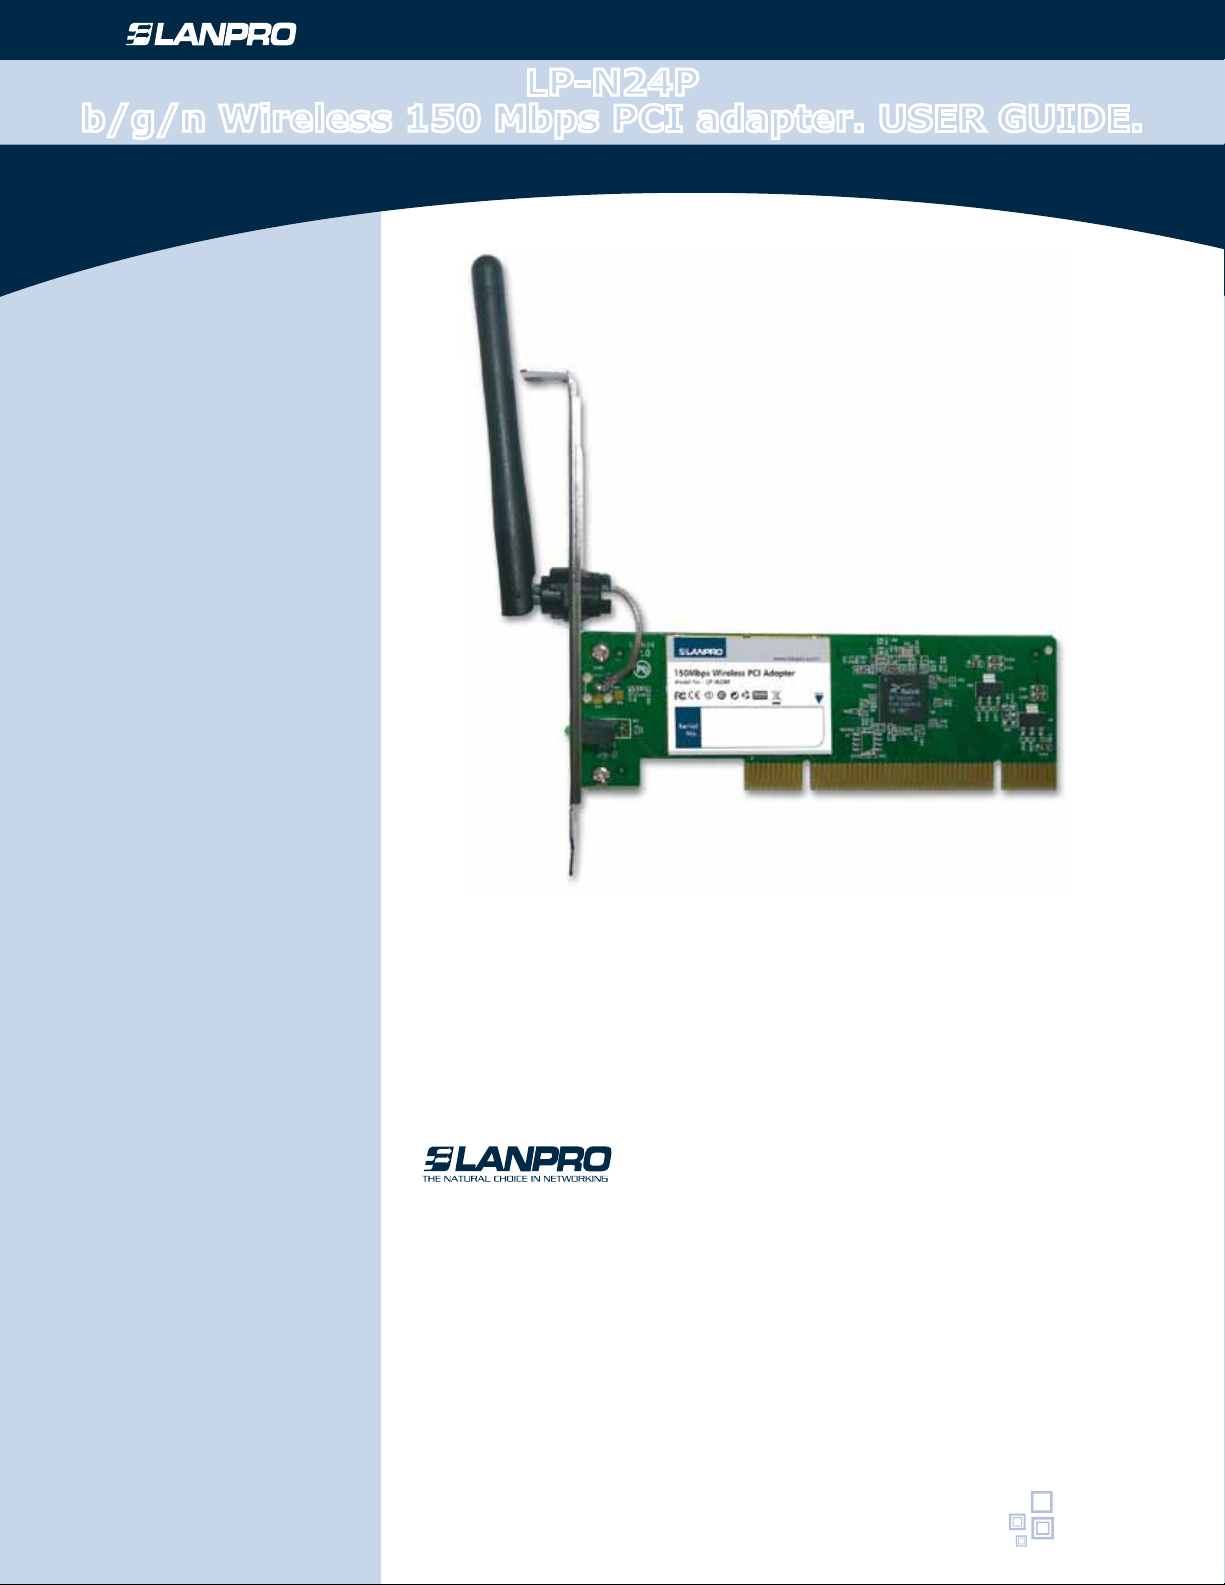
Wireless - Equipment
LP-N24P
b/g/n Wireless 150 Mbps PCI adapter. USER GUIDE.
LPN24P_UG_ENB01W
LP-N24P
b/g/n Wireless 150 Mbps PCI
adapter. USER GUIDE.
is the registered trademark of LanPro Inc. All the
products and product names mentioned herein are the trademarks or registered
trademarks of their respective holders. Copyright of the whole product as
integration, including its accessories and software, belongs to LanPro Inc.
Without the permission of LanPro Inc., any individual or party is not allowed to
copy, plagiarize, reproduce, or translate it into other languages.
All the photos and product specications mentioned in this guide are for
references only. Upgrades of software and hardware may occur, and if there are
changes, LanPro Inc. is not responsible for notifying in advance. If you would
like to know more about our product information, please visit our website at
www.lanpro.com.
www.lanpro.com
Page 2

Wireless - Equipment - LP-N24P - USER GUIDE
Table of Contents
1.- Copyright Statement
Chapter 1 Product Introduction ................................................................................3
1.1 Package Contents ...............................................................................................3
1.2 LED Indicator Description ...................................................................................3
1.3 Product Features ................................................................................................3
1.4 Product Usage ....................................................................................................3
1.5 Before Installation ..............................................................................................3
1.6 Disable other manufacturers’ wireless network adapters ...................................4
1.7 Product Maintenance ..........................................................................................4
2.- Chapter 2 Installation Guide PCI network adapter..................................................5,6,7
3.- Chapter 3 How to use the Windows Built-in Wireless Conguration..........................7
3.1 Wireless Network Connection under Windows XP .........................................7,8,9
3.2 Wireless Network Connection under VISTA ..............................................9,10,11
3.3 Wireless Network Connection under Windows 7 ..........................................11,12
4.- Chapter 4 LanPro Wireless Utility............................................................................13
4.1 Station mode (Client Mode) ...............................................................................13
4.1.1 Site Survey .....................................................................................................14
4.1.2 Link Information ........................................................................................15,16
4.1.3 Prole ...............................................................................16,17,18,19,20,21,22
4.1.4 About .............................................................................................................22
4.2 AP mode .......................................................................................................22,23
4.2.1 Cong AP ........................................................................................................24
4.2.2 Advanced ........................................................................................................24
4.2.3 Access Control List .........................................................................................25
4.2.4 Associate List ..................................................................................................25
4.2.5 AP Mode under Windows 7...............................................................................26
5.- Appendix 1: Acronyms and Terms ..........................................................................26
6.- Appendix 2: How to Set WPS.....................................................26,27,28,29,30,31,32
7.- Appendix 3: FAQ............................................................................................32,33,34
8.- Appendix 4 :Regulatory Information........................................................................34
2
www.lanpro.com
Page 3

Wireless - Equipment - LP-N24P - USER GUIDE
Chapter 1 Product Introduction
1
Thank you for choosing this LanPro wireless adapter.
The LanPro wireless adapter supports IEEE wireless standards, and is able to quickly process le transfer, video, multi-
media and other applications that require higher bandwidth.
This LanPro wireless adapter also integrates wireless conguration program, which makes it easy and quick to set
up the wireless client. Besides, Soft AP is supported for fast wireless network establishment, and WPS encryption
supported for you to quickly encrypt and secure your wireless network.
All in all, the LanPro wireless adapter is easy-to-use, and of robust signal, long transmitting distance.
1.1 Package Contents
One Wireless network adapter.
One Software CD (includes user guide and driver).
The above list is for your reference only, the actual contents may differ according to the product you purchase.
1.2 LED Indicator Description
There is one status LED indicator on the side of the wireless network adapter. It lights up and stays ON when working
correctly, and ashes when transferring data.
1.3 Product Features
Supports soft AP feature.
Detects wireless network and adjusts transmitting rate automatically.
Provides two working modes: Infrastructure and Ad-Hoc.
Supports WEP data encryption and WPA-PSK/WPA2-PSK encryption methods.
Supports WPS (Wi-Fi Protected Setup) encryption to secure your wireless network.
Complies with Windows 7/XP/ 2000/Vista and Linux and MAC OS.
1.4 Product Usage
This LanPro Wireless Adapter offers a fast, reliable and extendable solution for wireless access.
It is mostly used in the following circumstances:
1
Enables staff members who require higher mobility, to have access to the wireless network
anywhere inside their company.
2
Enables wireless communication for companies or places which are not suitable for wired LAN
installation because of budget or building environment restrictions, such as historical buildings,
rentals, or places for short-term usage.
3
Suitable for Enterprises or individuals requiring to regularly alter the networking topology
Supports WEP data encryption and WPA-PSK/WPA2-PSK encryption methods.
4
Helps enterprises or individuals who would like to use wireless to establish wireless network
quickly and frees them from the trouble of cable distribution.
1.5 Before Installation
1
Please read through the whole user guide before you install and use this product.
2
Please close or uninstall the conguration programs of other manufacturers’ before you install
the conguration programs of LanPro network adapters to avoid possible UI (user interface)
conict.
3
To avoid possible network conicts between this LanPro network adapter and those of other
manufacturers, we recommend that you rst disable the network adapters of other manufacturers
before installing the driver.
3
www.lanpro.com
Page 4
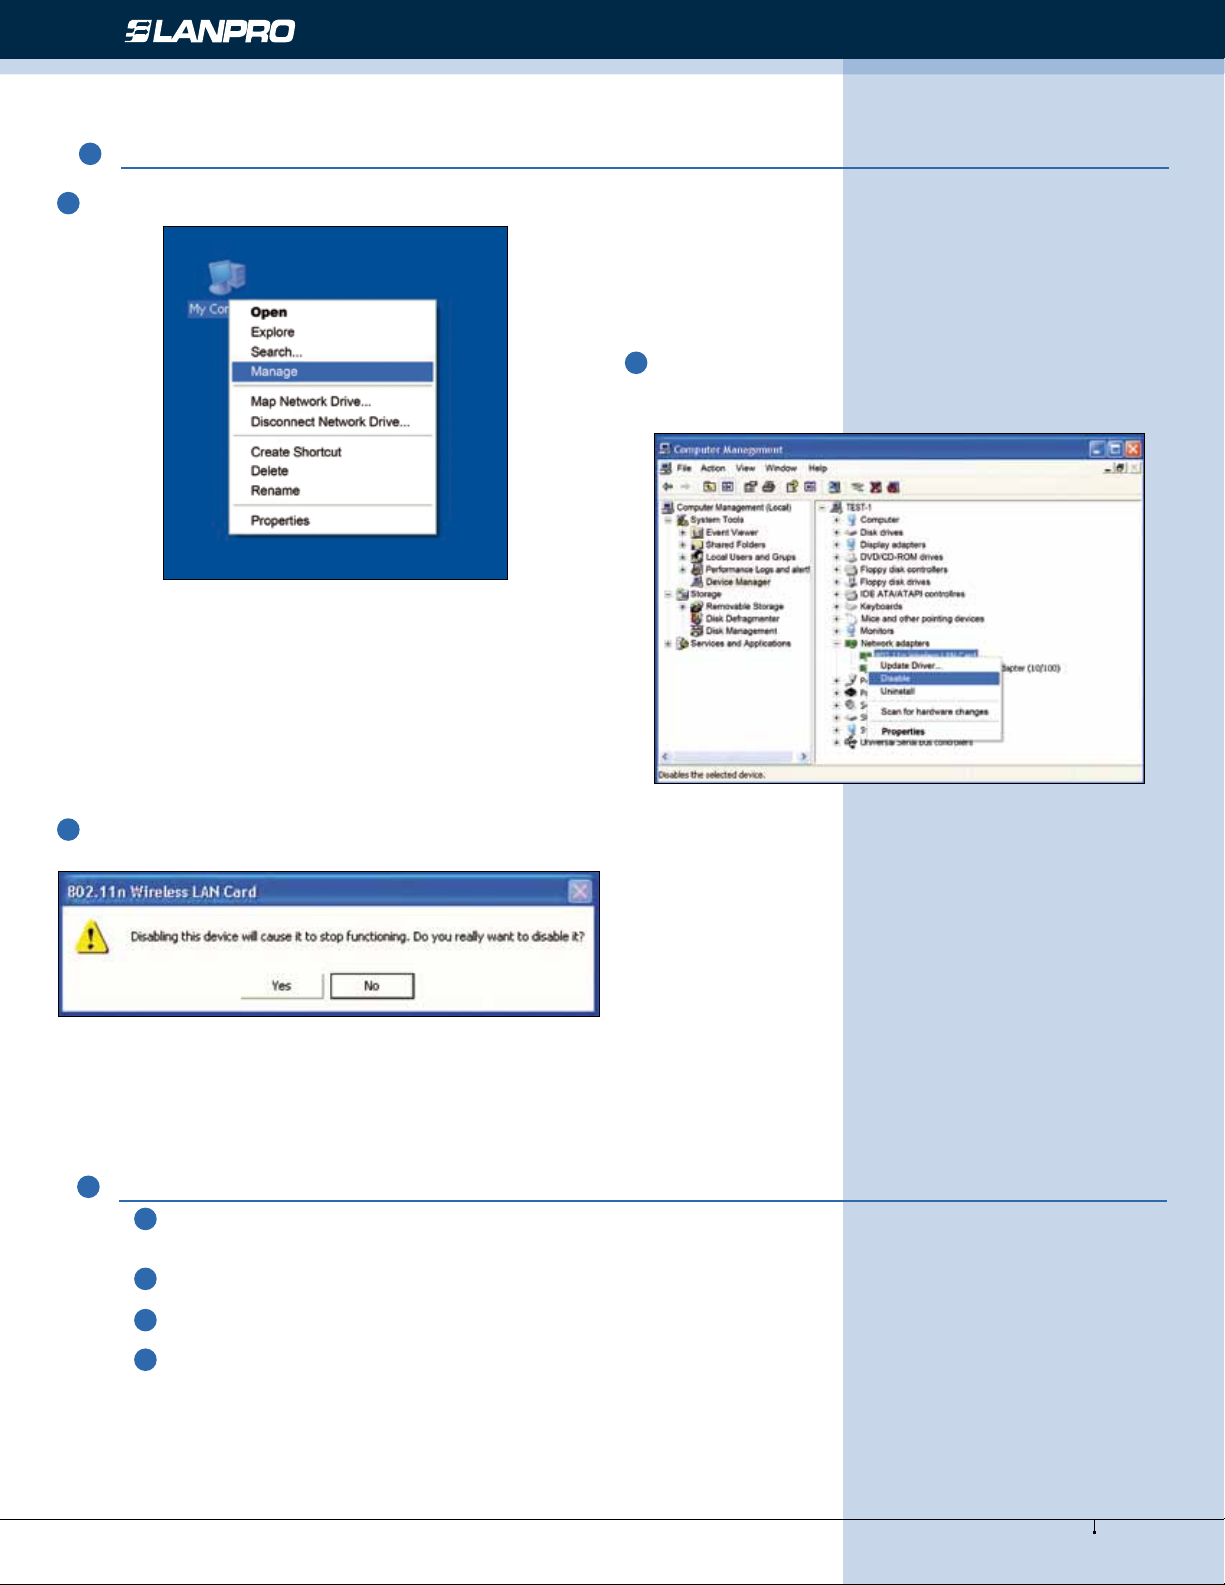
1.6 Disable other manufacturers wireless network adapters
1
Right click “My Computer” and select “Manage”.
Wireless - Equipment - LP-N24P - USER GUIDE
2
On the Computer Management screen, select: “Device
Manager” - “Network adapters”, and right click the
network adapter you want to disable and click “Disable”.
3
Click the “Yes” button on the dialogue box to disable the
network adapter.
1.7 Product Maintenance
1
Please keep the product away from water and humid environment to guarantee its normal
performance.
2
Protect it against hazardous substances (such as acids, alkalis etc).
3
Please don’t directly expose the adapter to the sunlight or excessive heat.
4
Please contact LanPro tech support if any problems occur, at http://www.lanpro.com.
4
www.lanpro.com
Page 5
Wireless - Equipment - LP-N24P - USER GUIDE
Chapter 2 Installation Guide PCI network adapter
2
This chapter will guide you through the process of installing the network adapter software package, with the included
software CD. The package integrates driver and conguration software. Thus, when you are installing the driver, the
conguration software will be installed automatically as well.
The software installation steps and operating guide in this user guide are explained under Windows XP, Installation
steps for other operating systems are similar.
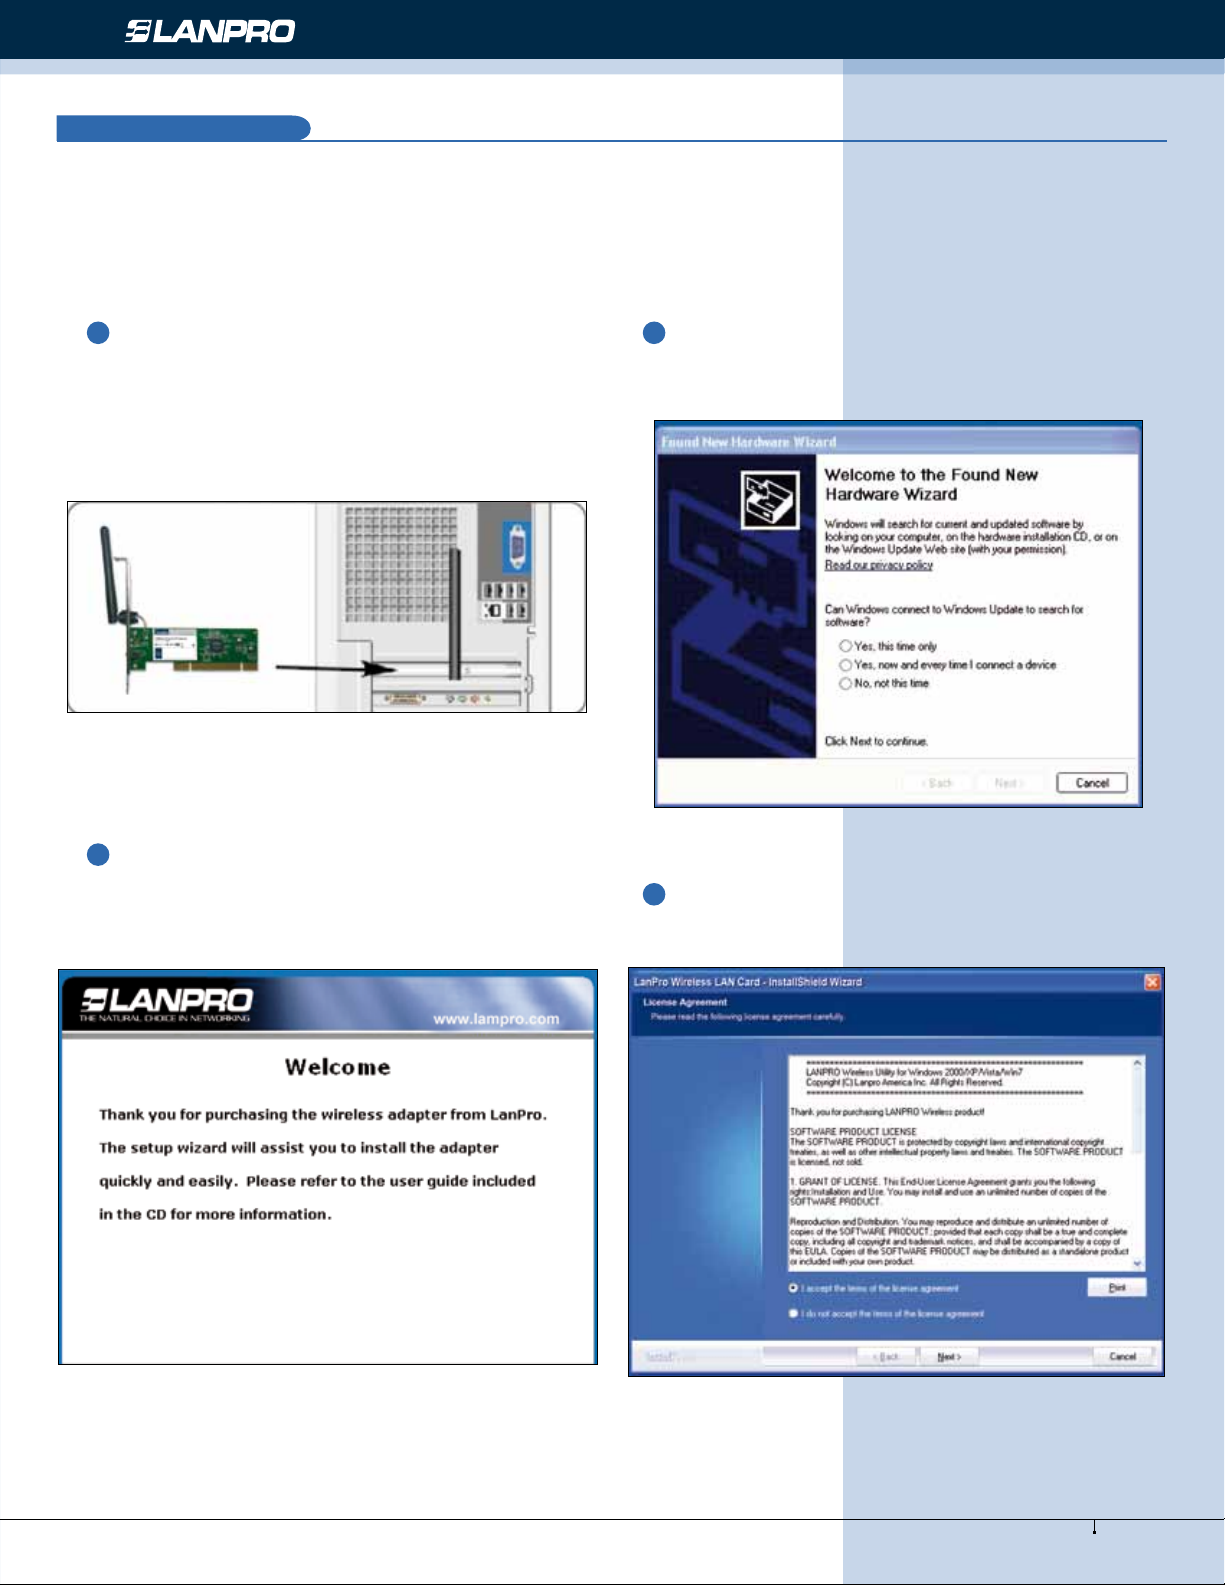
1
Insert the wireless adapter into the PCI slot of your
computer when it is turned off and then start it (Please
make sure the PCI adapter’s “gold ngers” are clean. If the
PCI adapter can’t be identied after being inserted into the
mainboard slot, or if the adapter can’t scan signals after the
driver being installed, please shut down your computer and
clean the adapter, and then re-install it).
3
Put the included software CD into the CD drive of
your computer, and the driver should run automatically , a
Welcome screen should pop up, just click the “RUN” button.
(Double click “LanPro.exe” in the software CD and manually
install when it doesn’t auto-run).
2
When The “Found New Hardware Wizard” system
dialogue pops-up, we recommend that you select “Cancel”
and use the included Setup Wizard software CD for fast
installation.
4
Select “I accept the terms of the license agreement”
and click “Next”.
5
www.lanpro.com
Page 6
Wireless - Equipment - LP-N24P - USER GUIDE
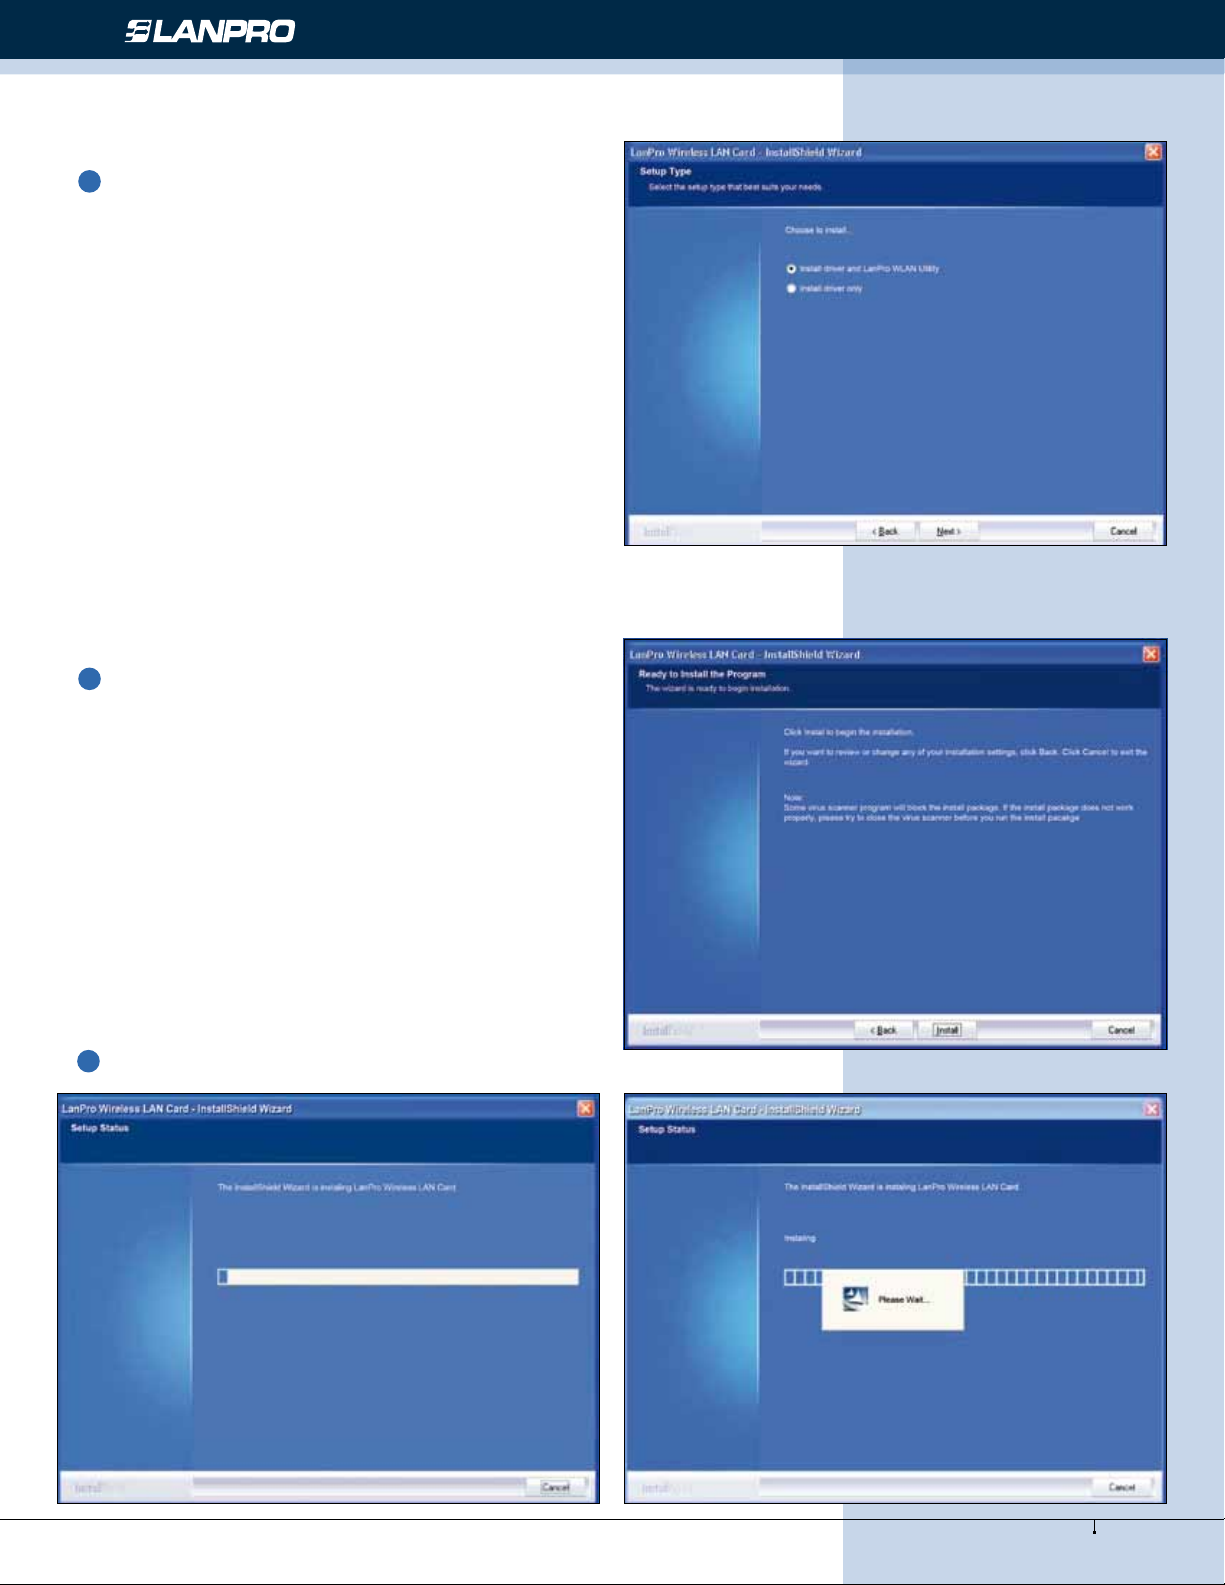
5
Two set up types are provided: one is “Install driver
only”, the other is “Install driver and LanPro WLAN Cong
Tool”.
NOTE: you may select the second method when you are accustomed to use the WINDOWS built-in wireless
conguration program. However, this program doesn’t support AP mode, WPS, and the WPS button on the
wireless adapter. To use these advanced features, the rst method is recommended.
6
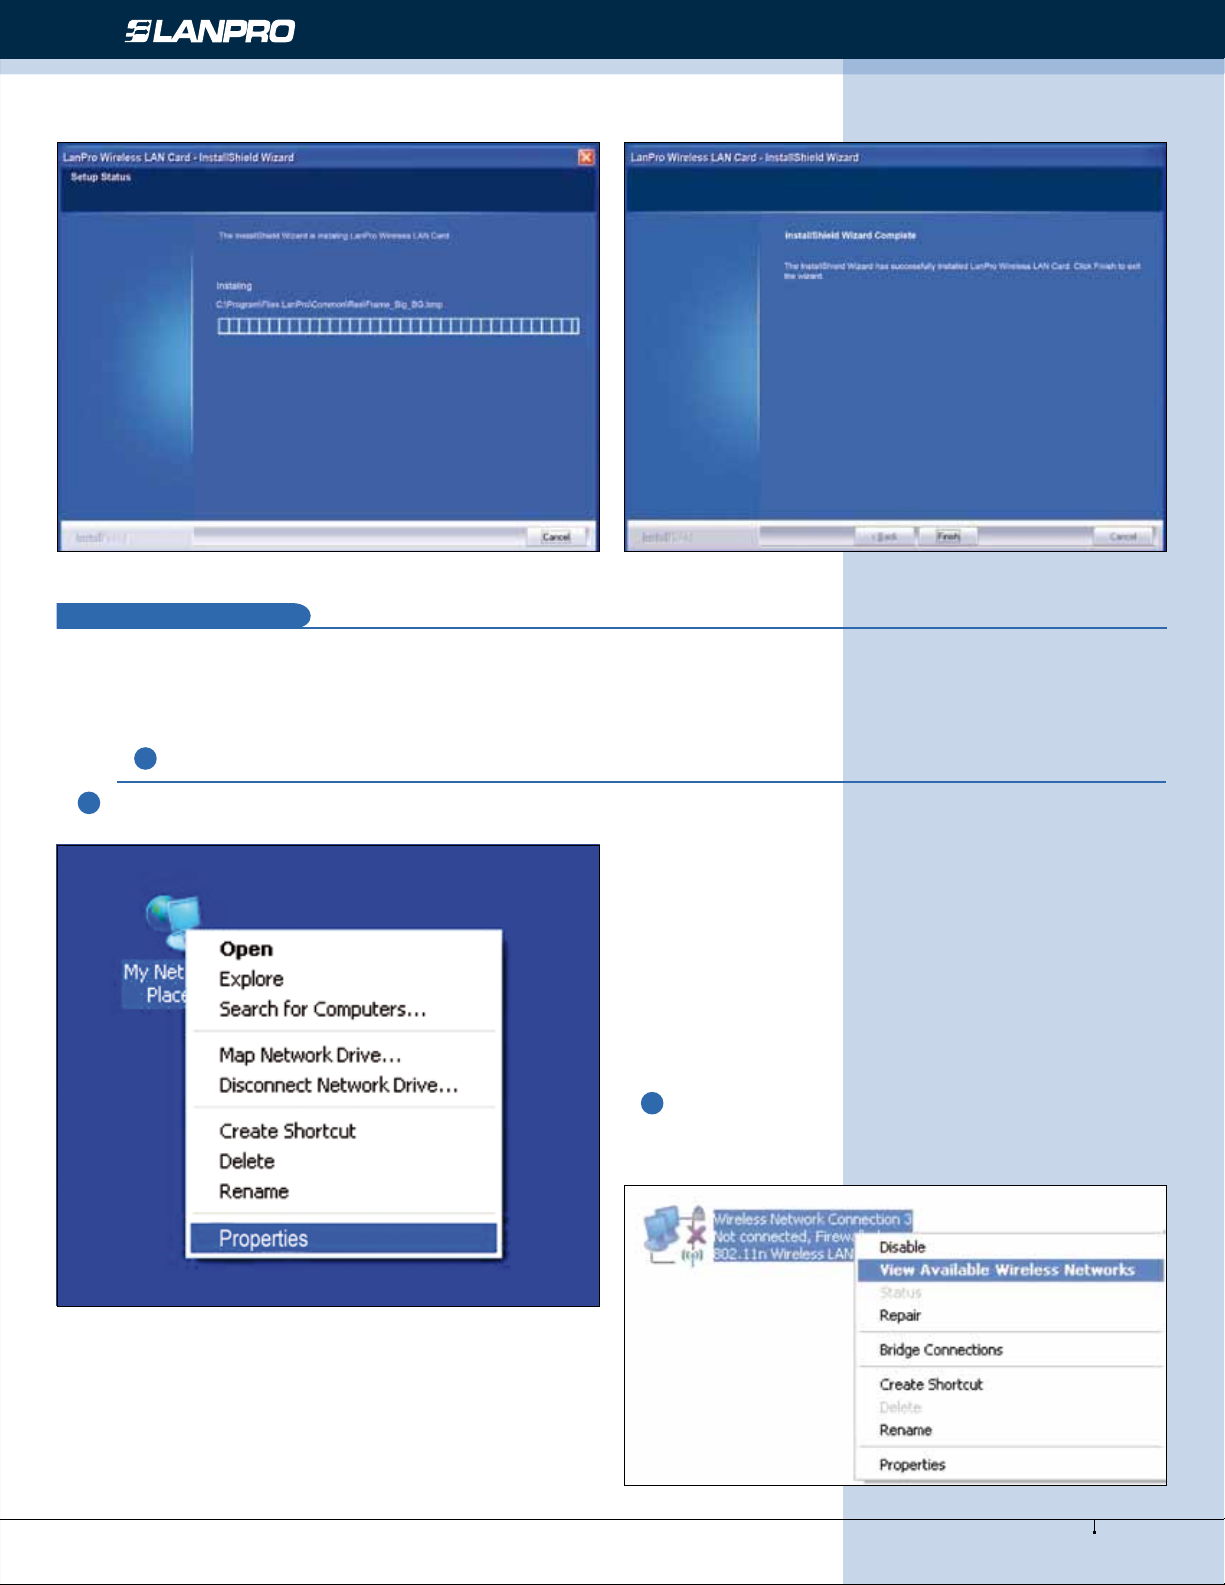
Click “Install” to begin the driver installation.
7
Click “Finish” to complete the installation.
6
www.lanpro.com
Page 7
Wireless - Equipment - LP-N24P - USER GUIDE
Chapter 3 How to use the Windows Built-in Wireless Conguration
3
This chapter explains to users who don’t install LanPro conguration program how to use Windows Built-in Wireless
Conguration to connect to the wireless network .
Use of the Windows Built-in Wireless Conguration requires enabling Windows Wireless Conguration service (the
default is enabled).
3.1 Wireless Network Connection under Windows XP
1
Right click “My Network Places” on the desktop and
select “Properties”.
2
Open the network connection. Right click “Wireless
Network Connection” and select “View Available Wireless
Networks” as shown below.
7
www.lanpro.com
Page 8
Wireless - Equipment - LP-N24P - USER GUIDE
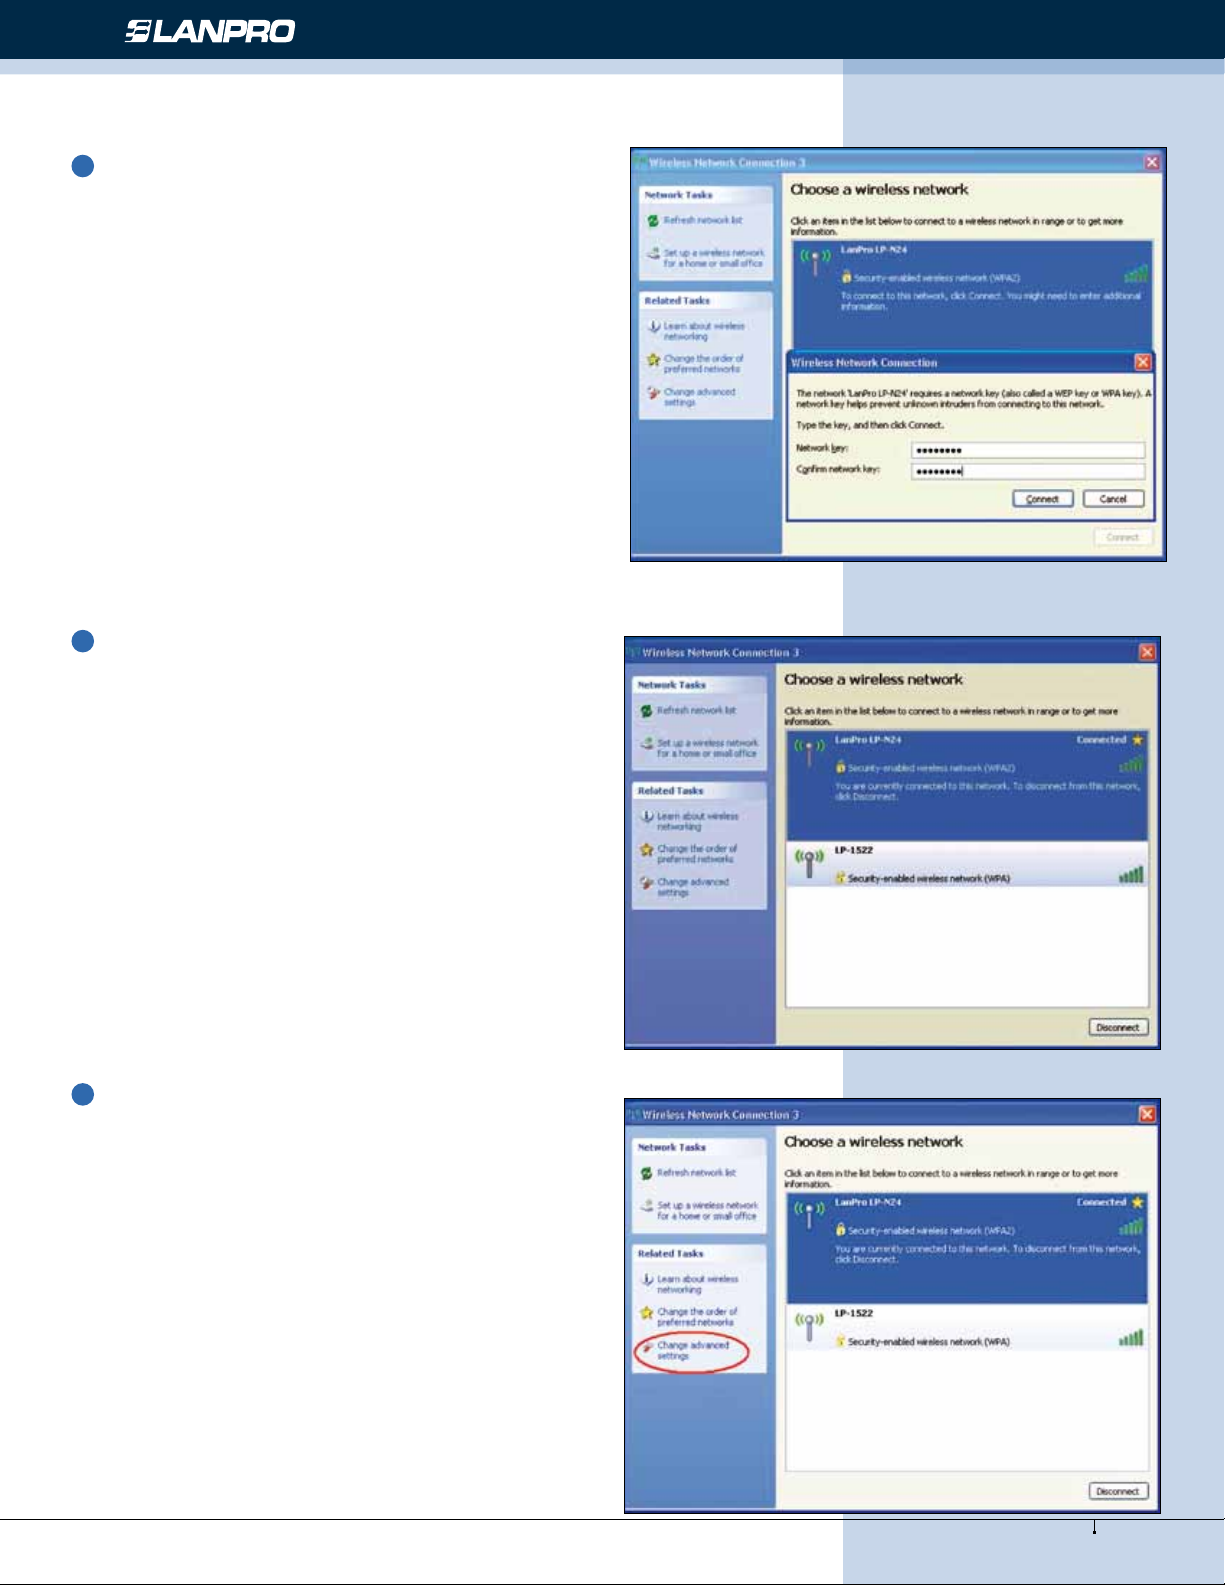
3
On the right of the screen displayed are the currently
scanned wireless networks. If the one you want to connect
has not been scanned, click “Refresh Network List” to update
the network list.
Select the wireless network you want to connect, and click
“Connect” or double click this wireless network. Input the
key in the key dialogue box (the key input is case-sensitive)
then click “Connect”.
NOTE: If the wireless device you are connecting to is not encrypted, the key dialogue box will not pop up.
4
When it shows “Connected” as the picture below, then
you can enjoy wireless access to Internet now.
5
You can modify wireless network key from “Change
advanced settings”.
8
www.lanpro.com
Page 9
Wireless - Equipment - LP-N24P - USER GUIDE
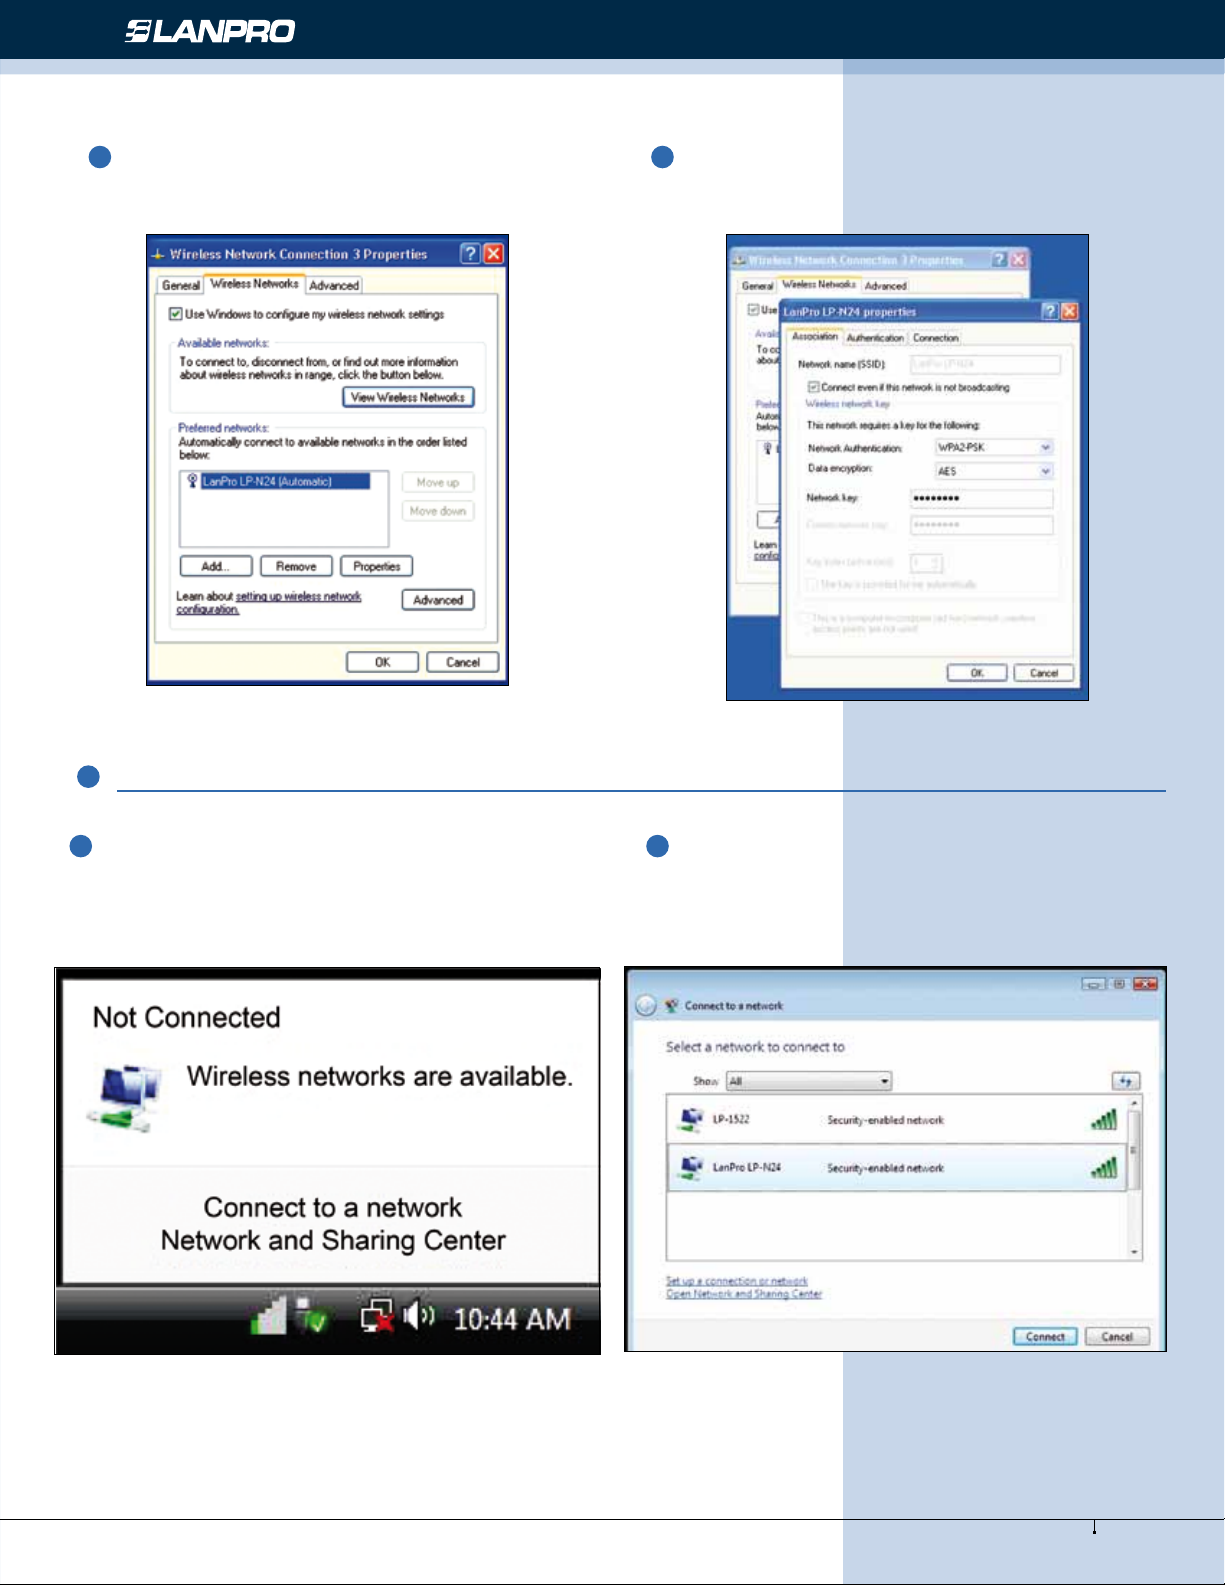
6 7
Select “Wireless Networks” and choose the one you
want to modify, and then click “Properties”.
Modify the key in the appearing dialogue box.
3.2 Wireless Network Connection under VISTA
1 2
Click the Wireless Connection icon in the lower right
corner of your desktop and select “Connect to a network” as
shown below.
Se lect t h e wire less n etwor k you w i sh to c o nnec t
and click “Connect” or double click the wireless network to
connect. Click the Refresh icon in the upper right corner to
update the network list if you don’t nd the specied wireless
network.
9
www.lanpro.com
Page 10
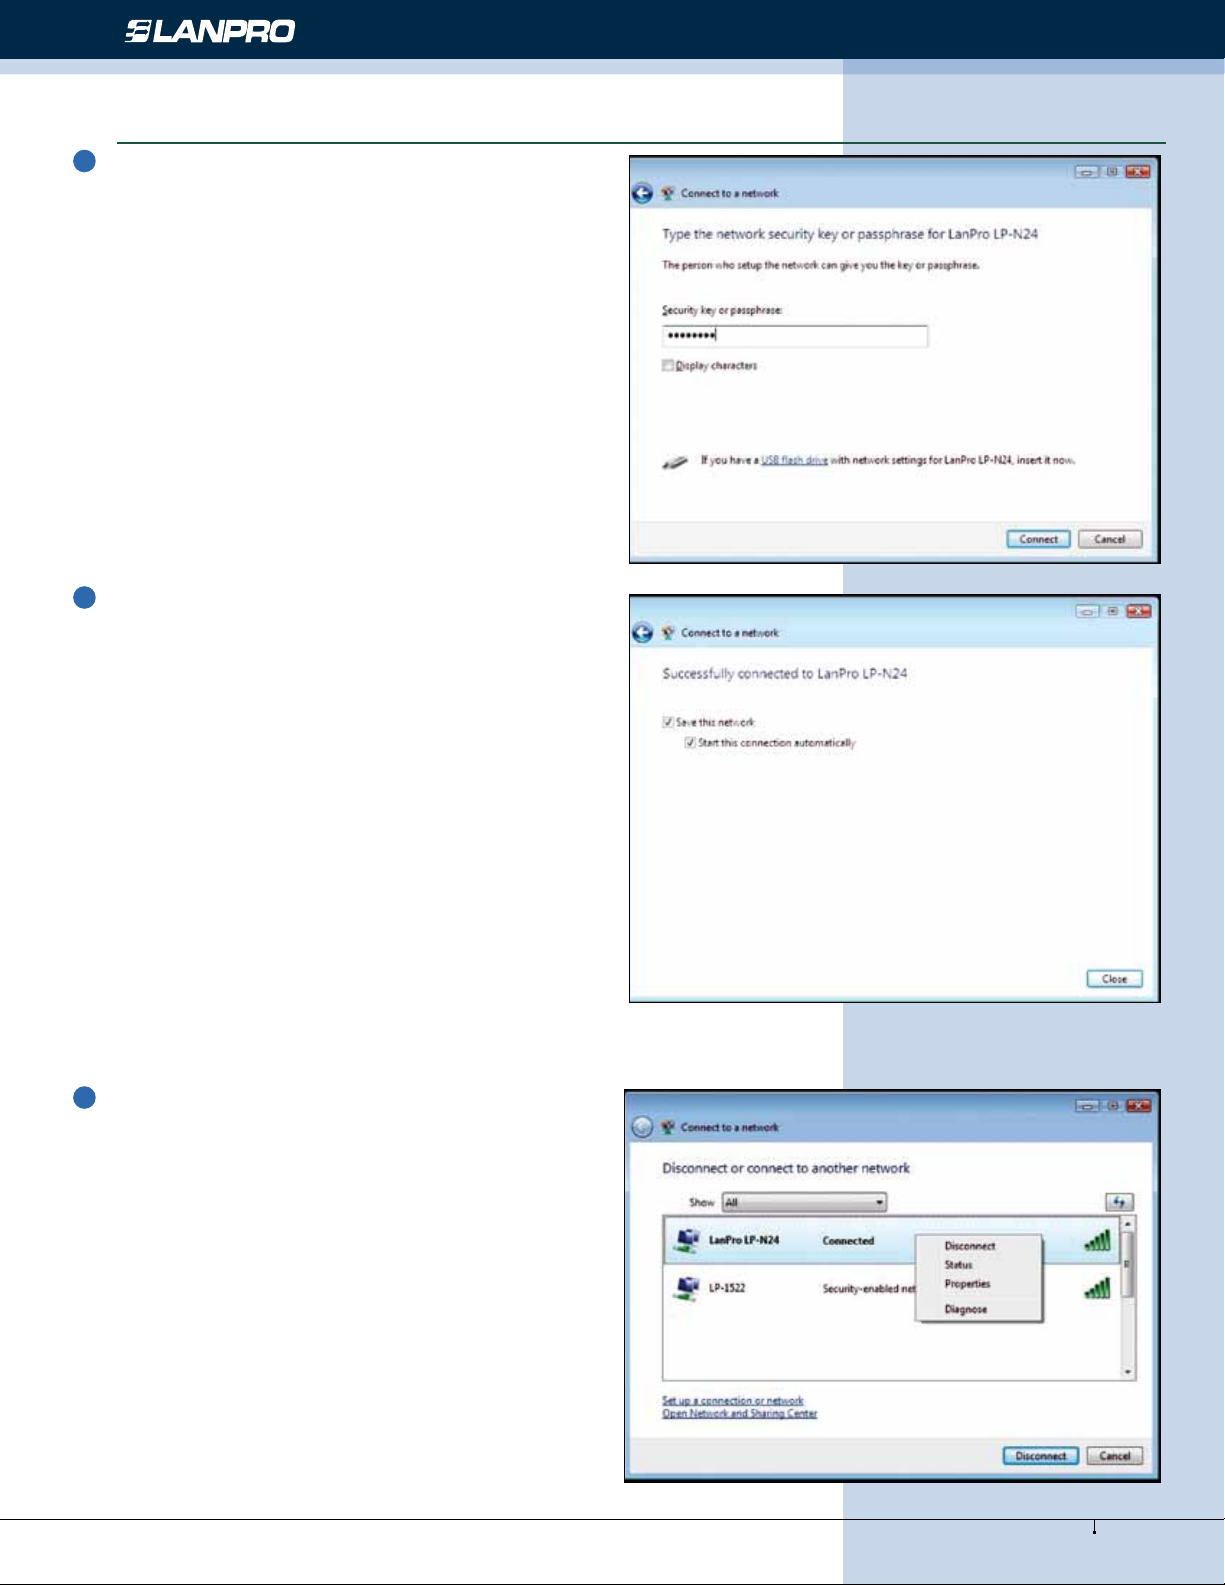
3
If the wireless network that you are connecting has
security mode enabled, you’ll be prompted to enter the
network key. Click “Connect” after you enter the correct key.
4
The following screen will appear after successfully
connected to the wireless network.network key. Click
“Connect” after you enter the correct key.
Wireless - Equipment - LP-N24P - USER GUIDE
5
If you want to change the wireless network key, just
right click the wireless network’s SSID and then select
“Properties”.
10
www.lanpro.com
Page 11
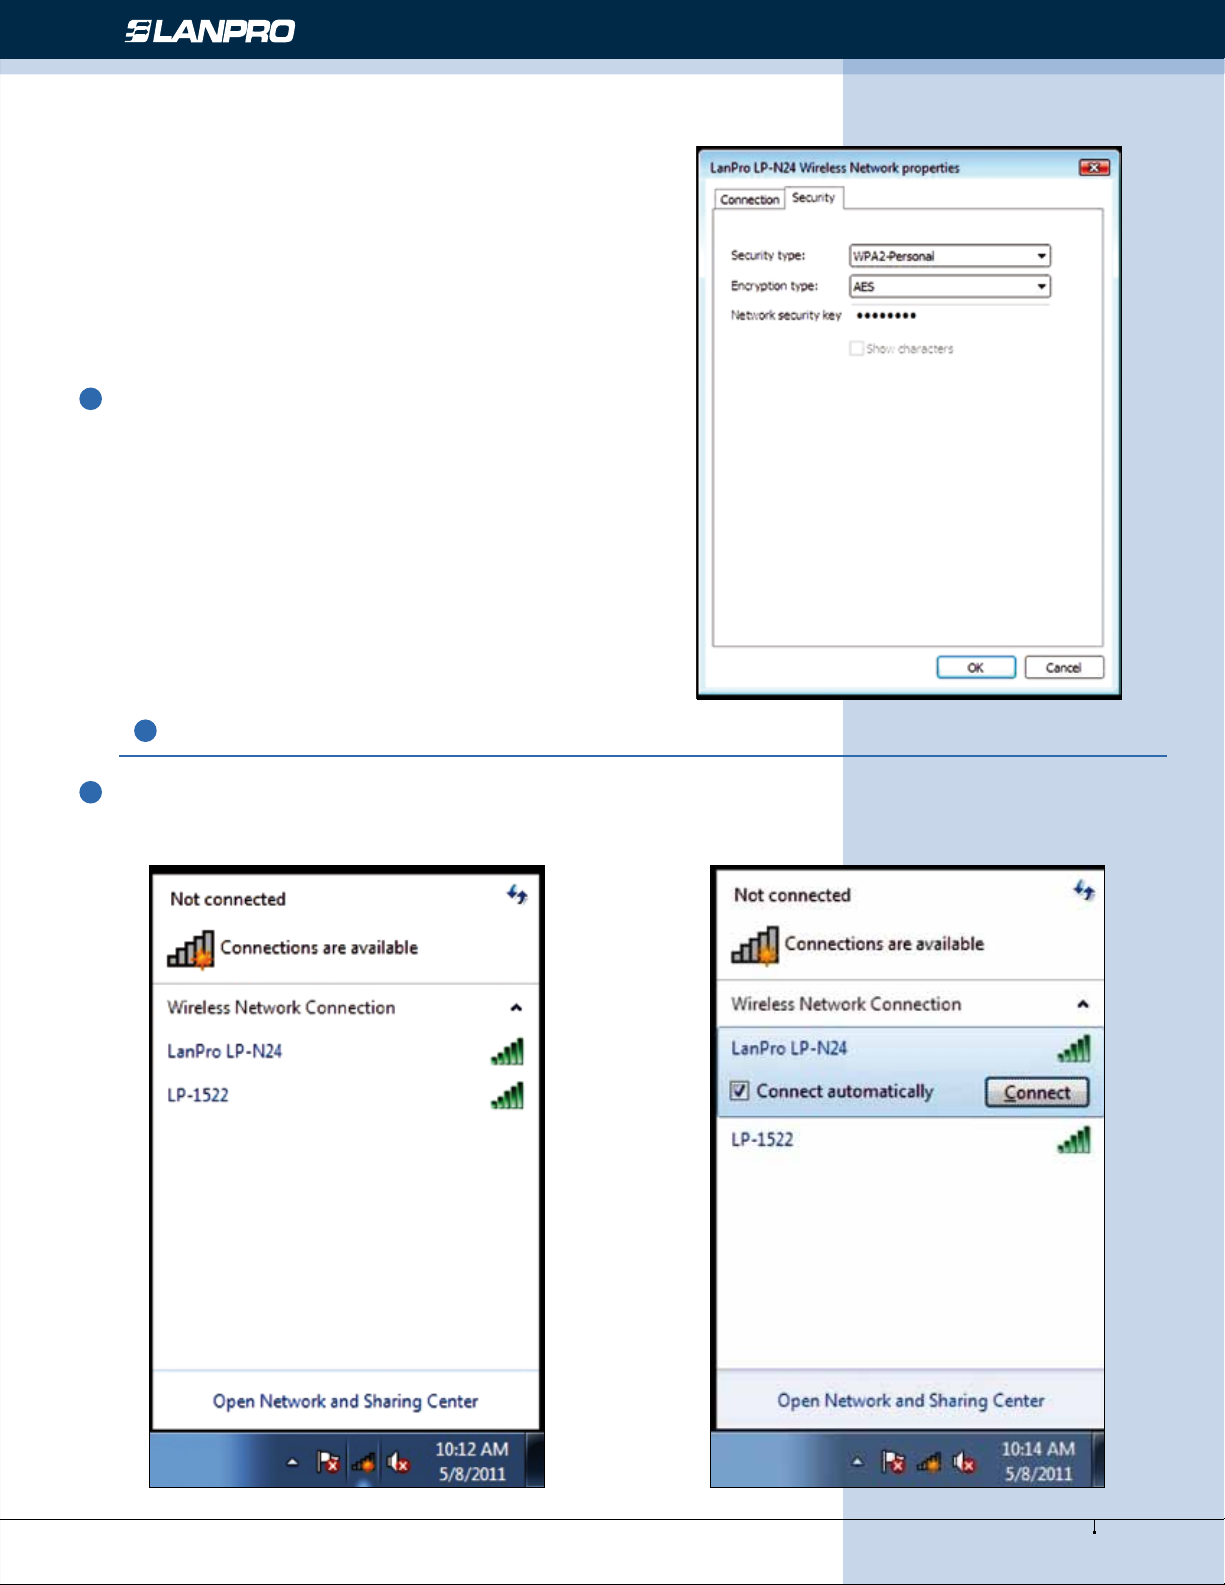
6
You can modify the key from the appearing dialogue
box.
Wireless - Equipment - LP-N24P - USER GUIDE
3.3 Wireless Network Connection under Windows 7
1
Click the wireless connection in the lower right corner of the computer’s desktop to view the available wireless
networks. Select the wireless network you wish to connect to and click “Connect” or double click the wireless network to
connect. If you don’t nd the specied one, please click the refresh icon in the upper right corner to update the list.
11
www.lanpro.com
Page 12
Wireless - Equipment - LP-N24P - USER GUIDE
F
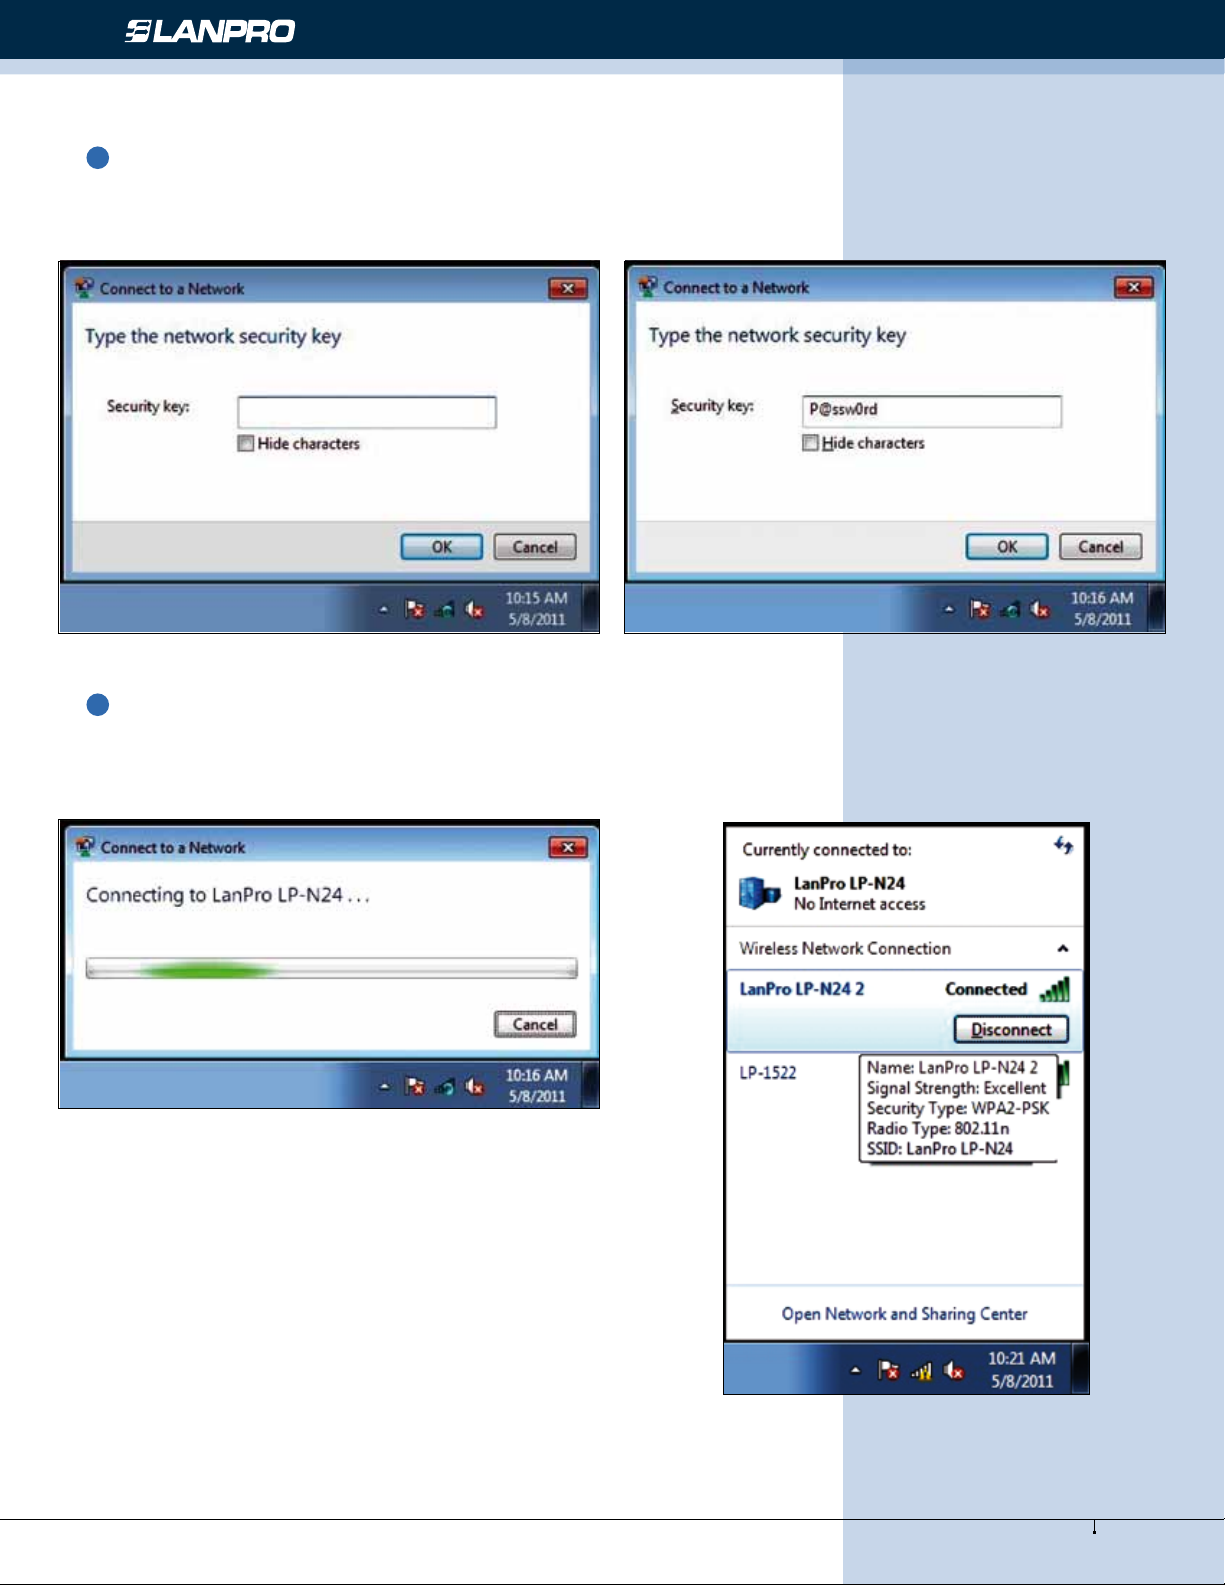
2
If the wireless network you are connecting to is encrypted, you’ll be prompted to enter the key. Click “Ok” after you
enter the correct key.
3
It shows “Connected” after successfully connected. You can disconnect it, view its status or modify the wireless
network properties by right click the wireless network.
12
www.lanpro.com
Page 13
Wireless - Equipment - LP-N24P - USER GUIDE
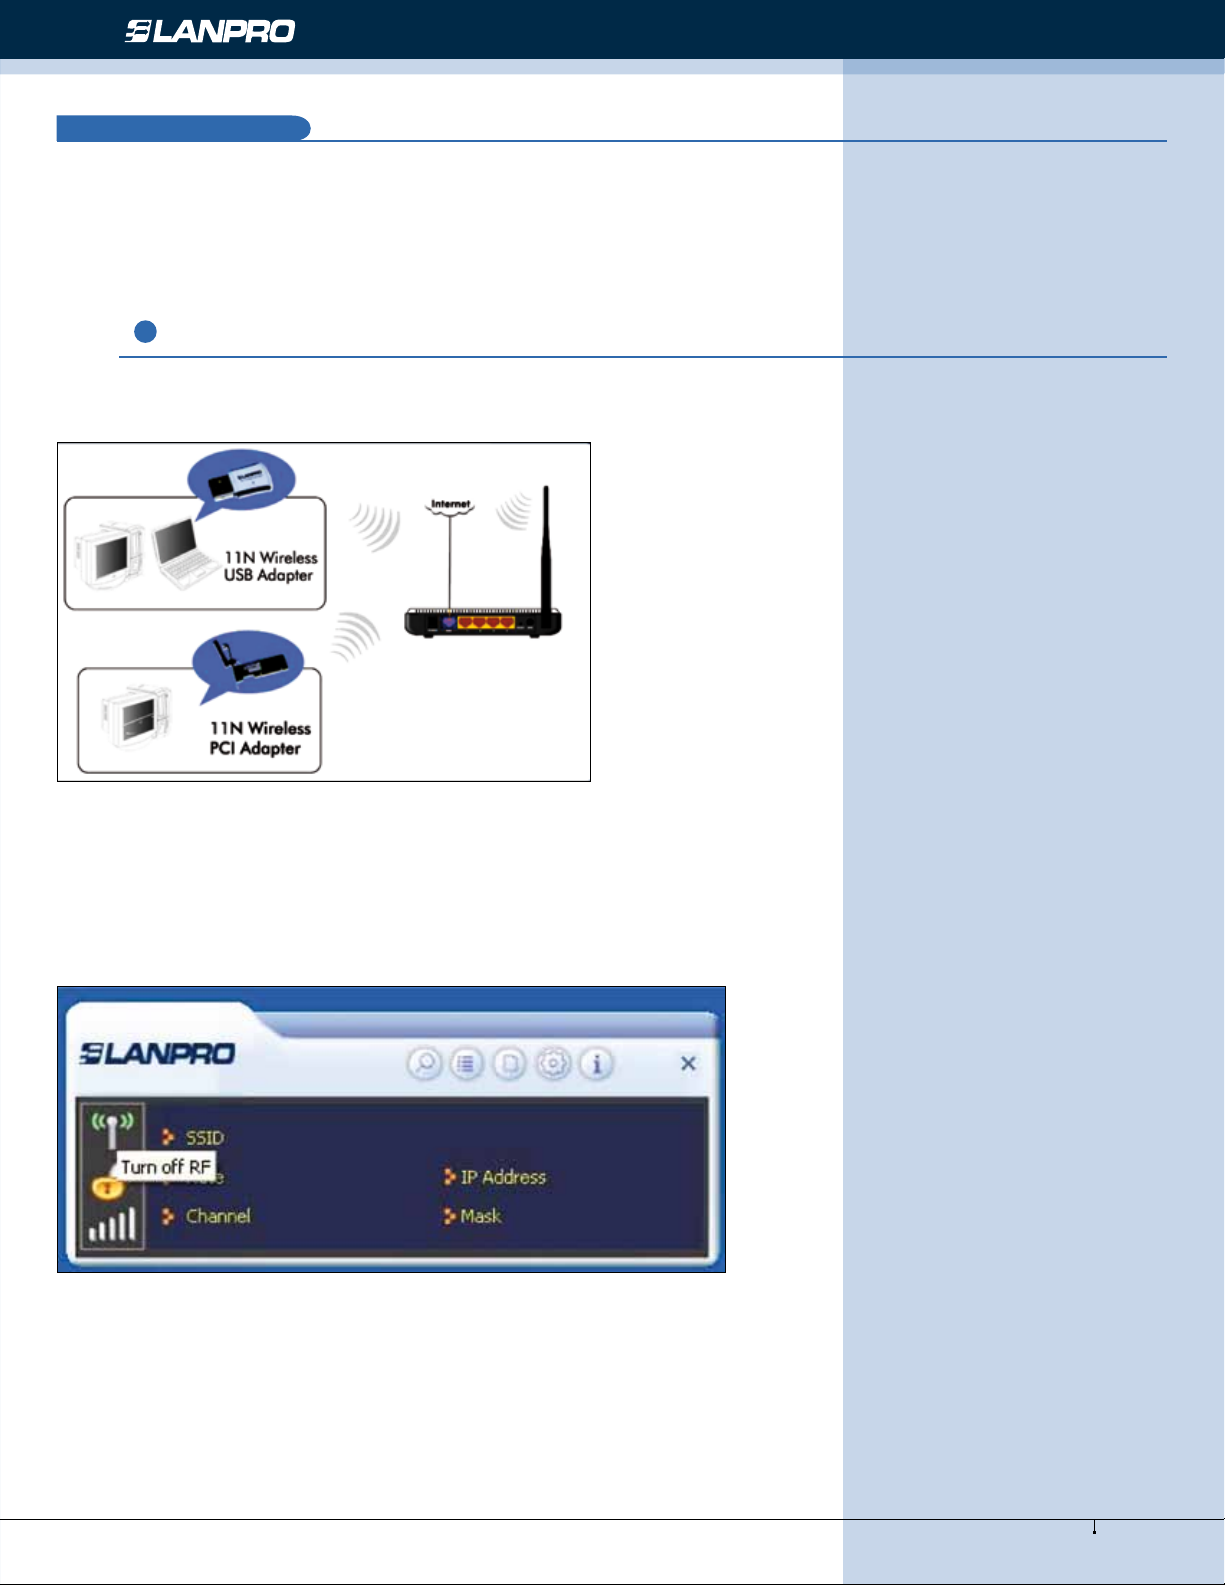
Chapter 4 LanPro Wireless Utility
4
When you are installing the driver, select “Install driver and LanPro WLAN Cong Tool” and the adapter driver and client
utility will be installed. All functions of this adapter can be congured via LanPro’s utility interface (in the following text
it is abbreviated as UI).
Select “Start”—“All Programs” — “LanPro Wireless”— LanPro Wireless Utility”, or click the “LanPro Wireless Utility”
shortcut on your PC’s desktop to start the UI.
4.1 Station mode (Client Mode)
Station mode (Client Mode) Overview.
It is a common solution to use the wireless network adapter as a client to receive signals.
Main interface for station mode
The function buttons on the top (From L to R) are respectively Site Survey, Link Information, Prole, Advanced, About, Help,
and MiniSize. While the left column displays Turn On/Off RF, Security /No security, and Signal status.
13
www.lanpro.com
Page 14
Wireless - Equipment - LP-N24P - USER GUIDE
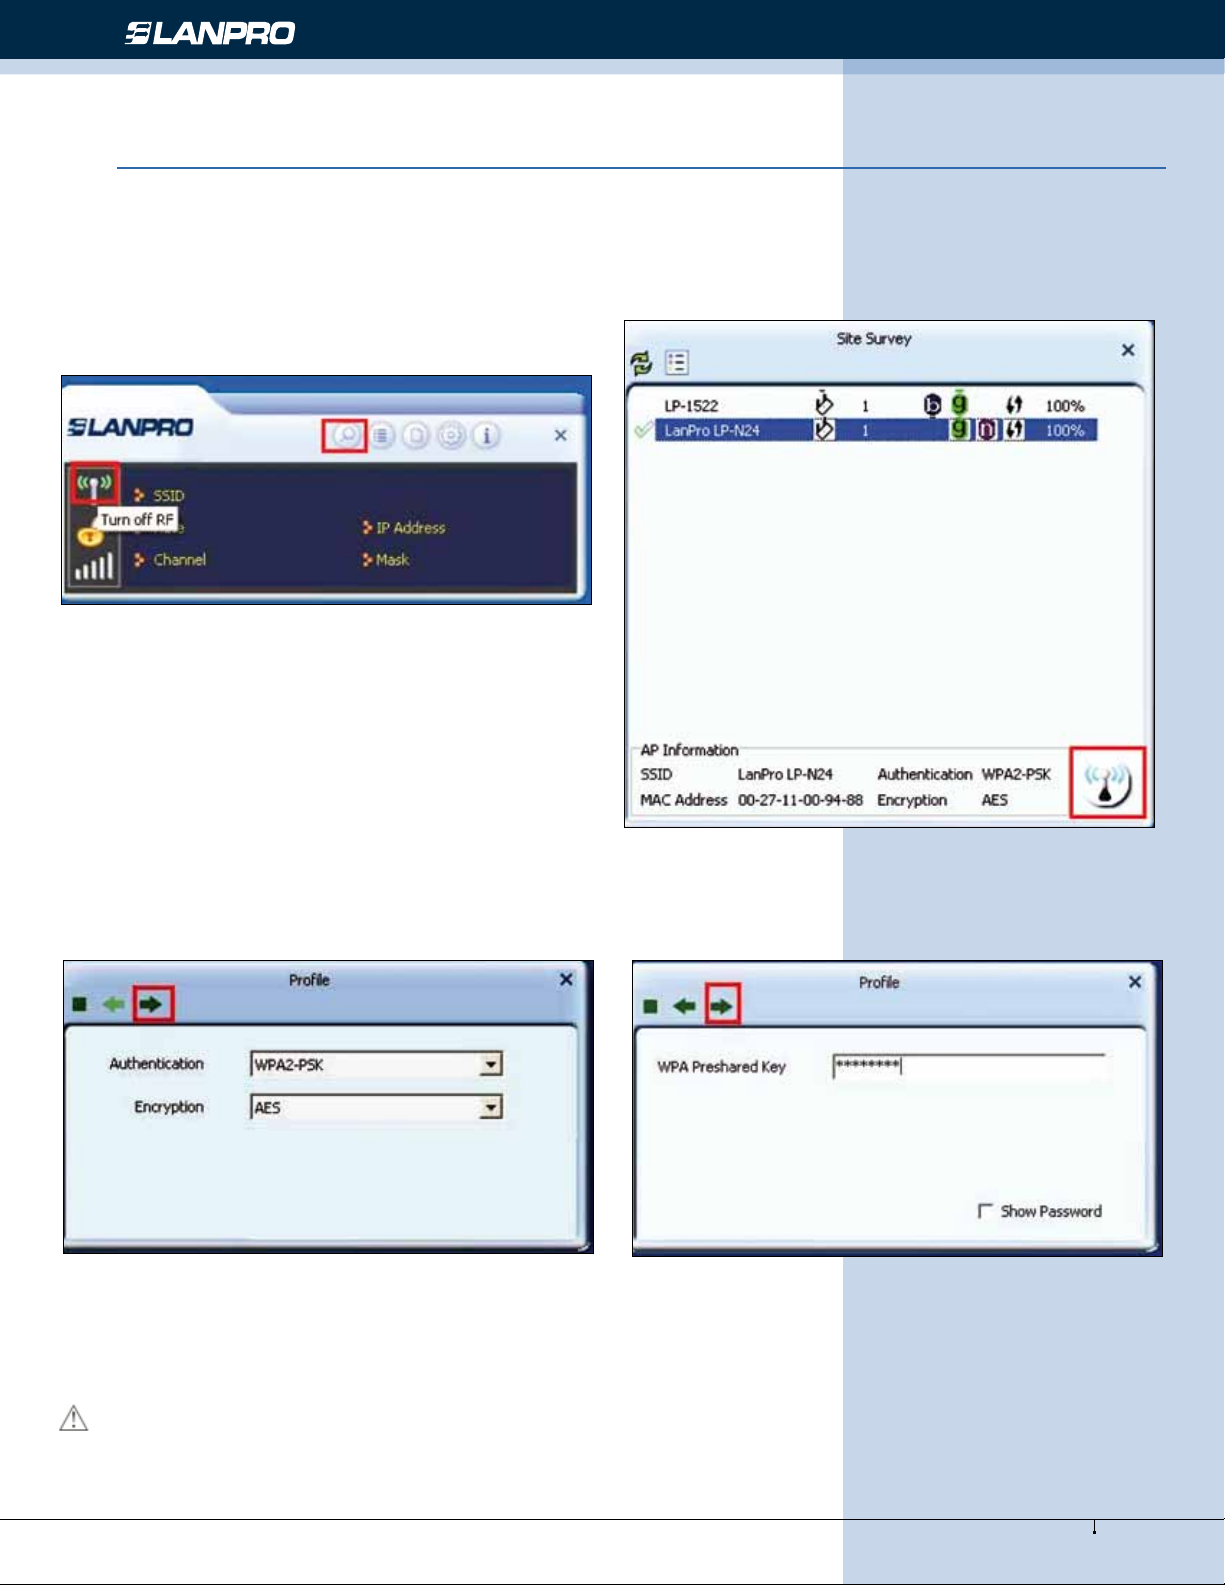
4.1.1 Site Survey
The “Site Survey” screen displays currently scanned wireless signals and you can click one to connect the signal. Select
one and you may view the AP’s MAC address, wireless mode (B/G/N), authentication type, and encryption type, or WPS
authentication and signal strength.
Before you connect to a wireless network, please click the “Rescan” button to update the wireless network list and select
the one you wish to connect, then click the “Connect” icon.
For the networks that are not encrypted, you can directly click “Connect”. However, for the encrypted wireless networks, a
“Prole” dialog will pop up and you must select the corresponding authentication type and encryption type, and then click
the “Next” button to input the correct key. Please note that this type of connection will not create a prole, thus in the next
time connect to this network you still need to select it manually.
The detailed explanations about the authentication and encryption are as follows:
WEP: Supports 10/26-bit Hex characters and 5/13-bit ASCII.
WPA-PSK: Supports 8-63-bit ASCII and 8-64-bit Hex characters.
WPA2-PSK: Supports 8-63-bit ASCII and 8-64-bit Hex characters.
WPA-PSK/WPA2-PSK: Supports 8-63-bit ASCII and 8-64 -bit hex characters.
NOTE:
The Hex characters consist of numbers 0~9 and letters a-f.
ASCII characters consist of any Arabic digitals/letters and characters.
14
www.lanprod.com
Page 15
Wireless - Equipment - LP-N24P - USER GUIDE
4.1.2 Link Information
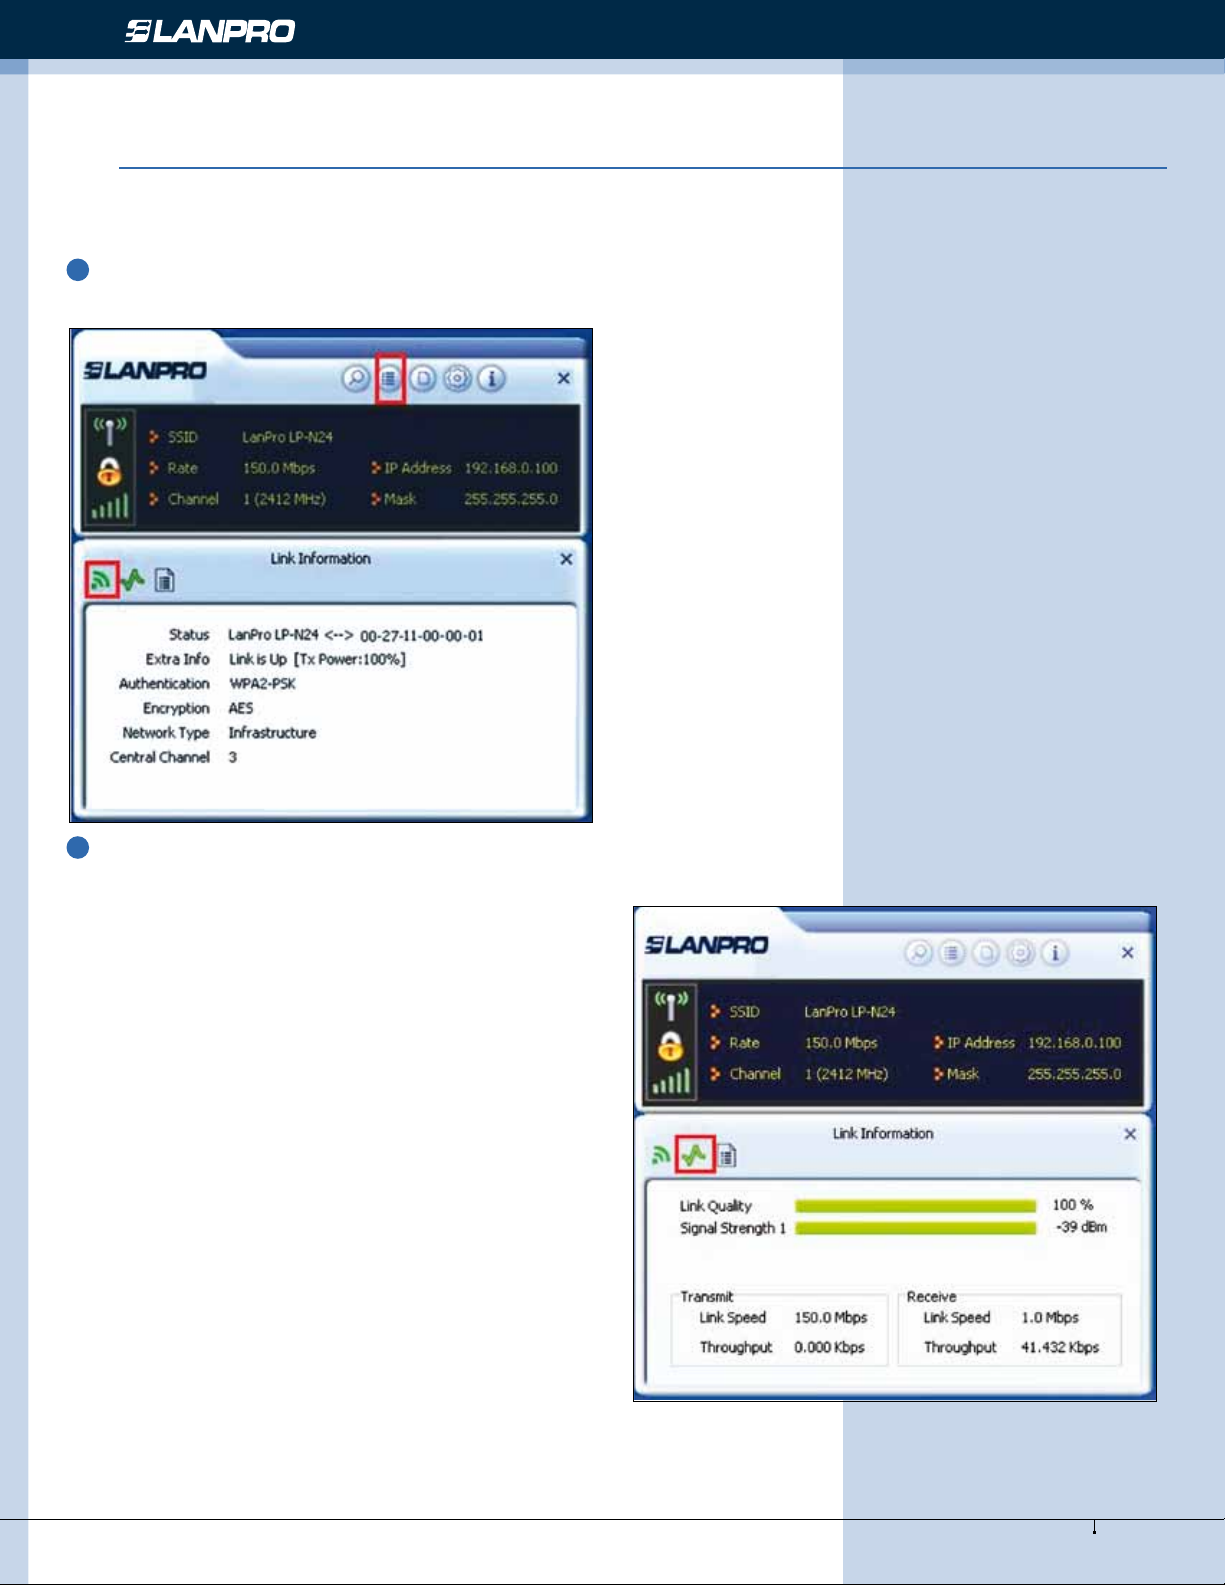
After successfully connected to one wireless network, you can view its detailed information by clicking the “Link Information”
on the main interface.
1
“Link Status ” scre en dis plays the de tailed informatio n of the connected AP including its SSID, MAC ad dress,
authentication type, encryption type, network type and channel.
2
“Throughput” screen displays the signal strength of each of the wireless adapter’s antennas and the link quality.
15
www.lanpro.com
Page 16
Wireless - Equipment - LP-N24P - USER GUIDE
3
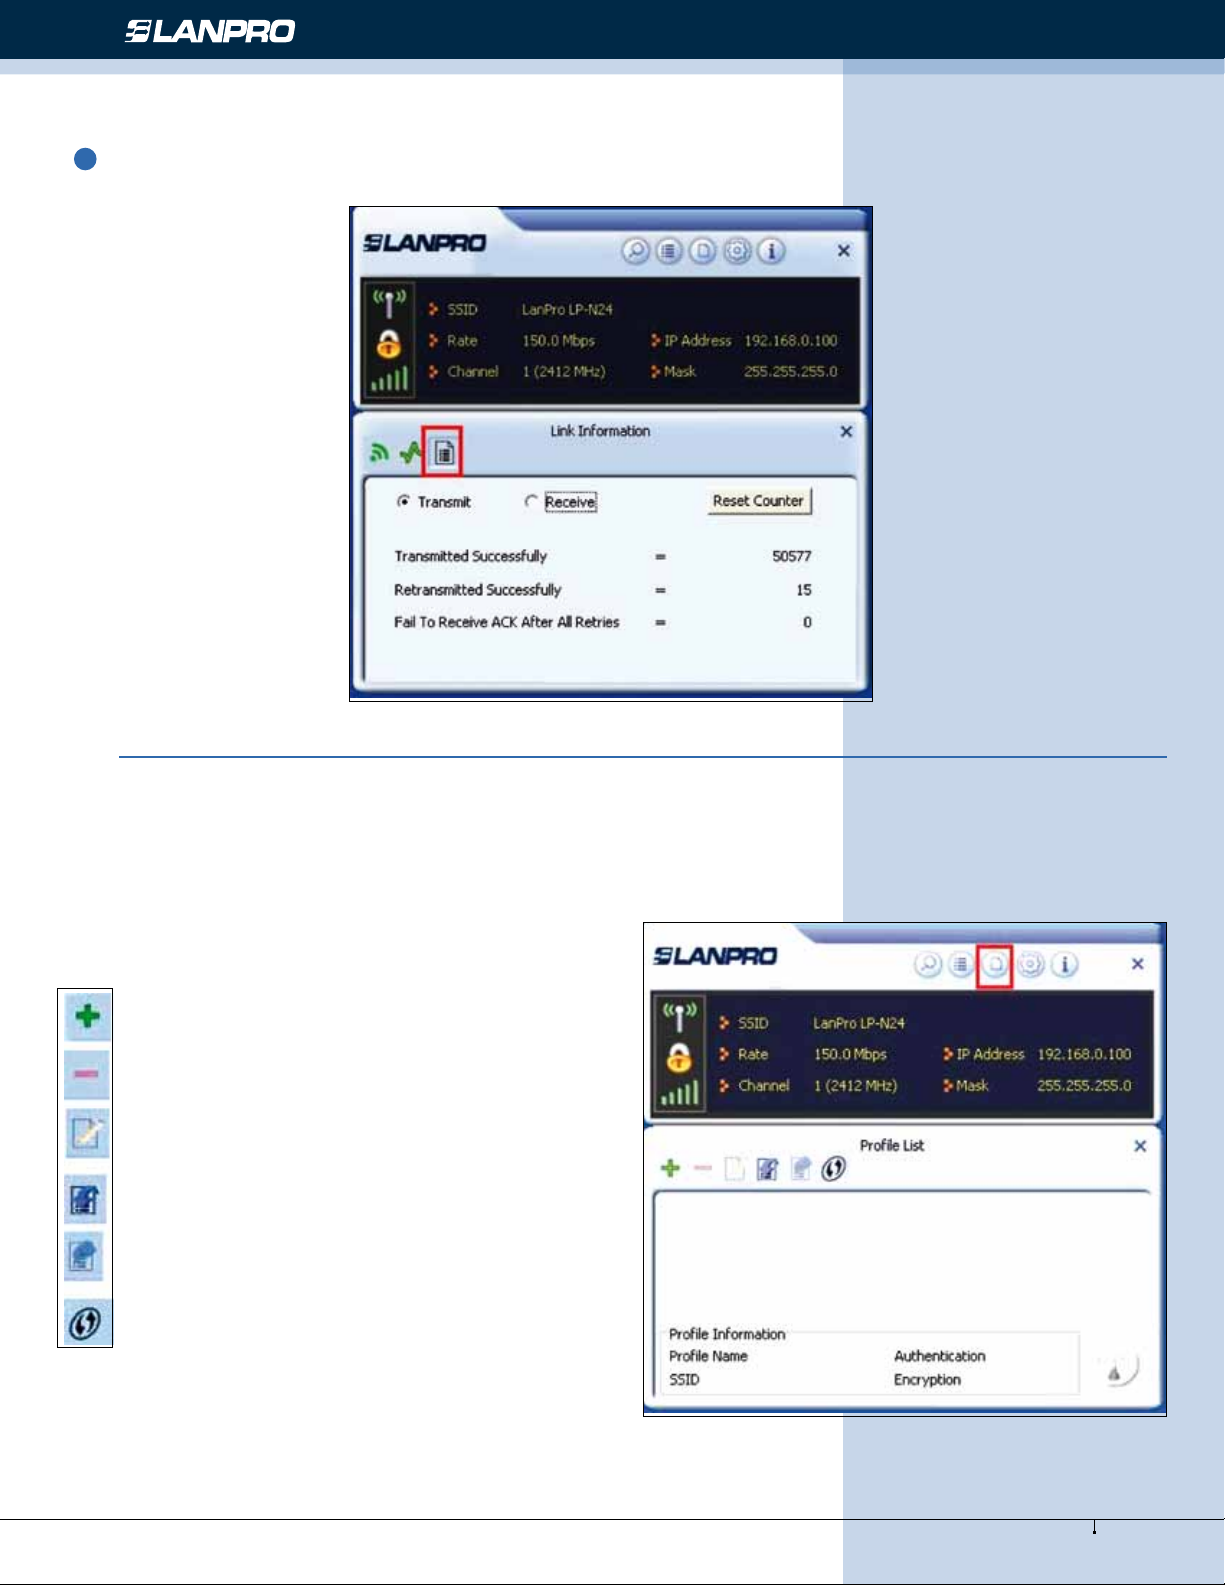
”Statistics” screen is used to count the total Rx and Tx data packets, including transmitted, retransmitted and fail to
receive ACK after all retries. You can click the “Reset Counter” button to clear the count.
4.1.3 Prole
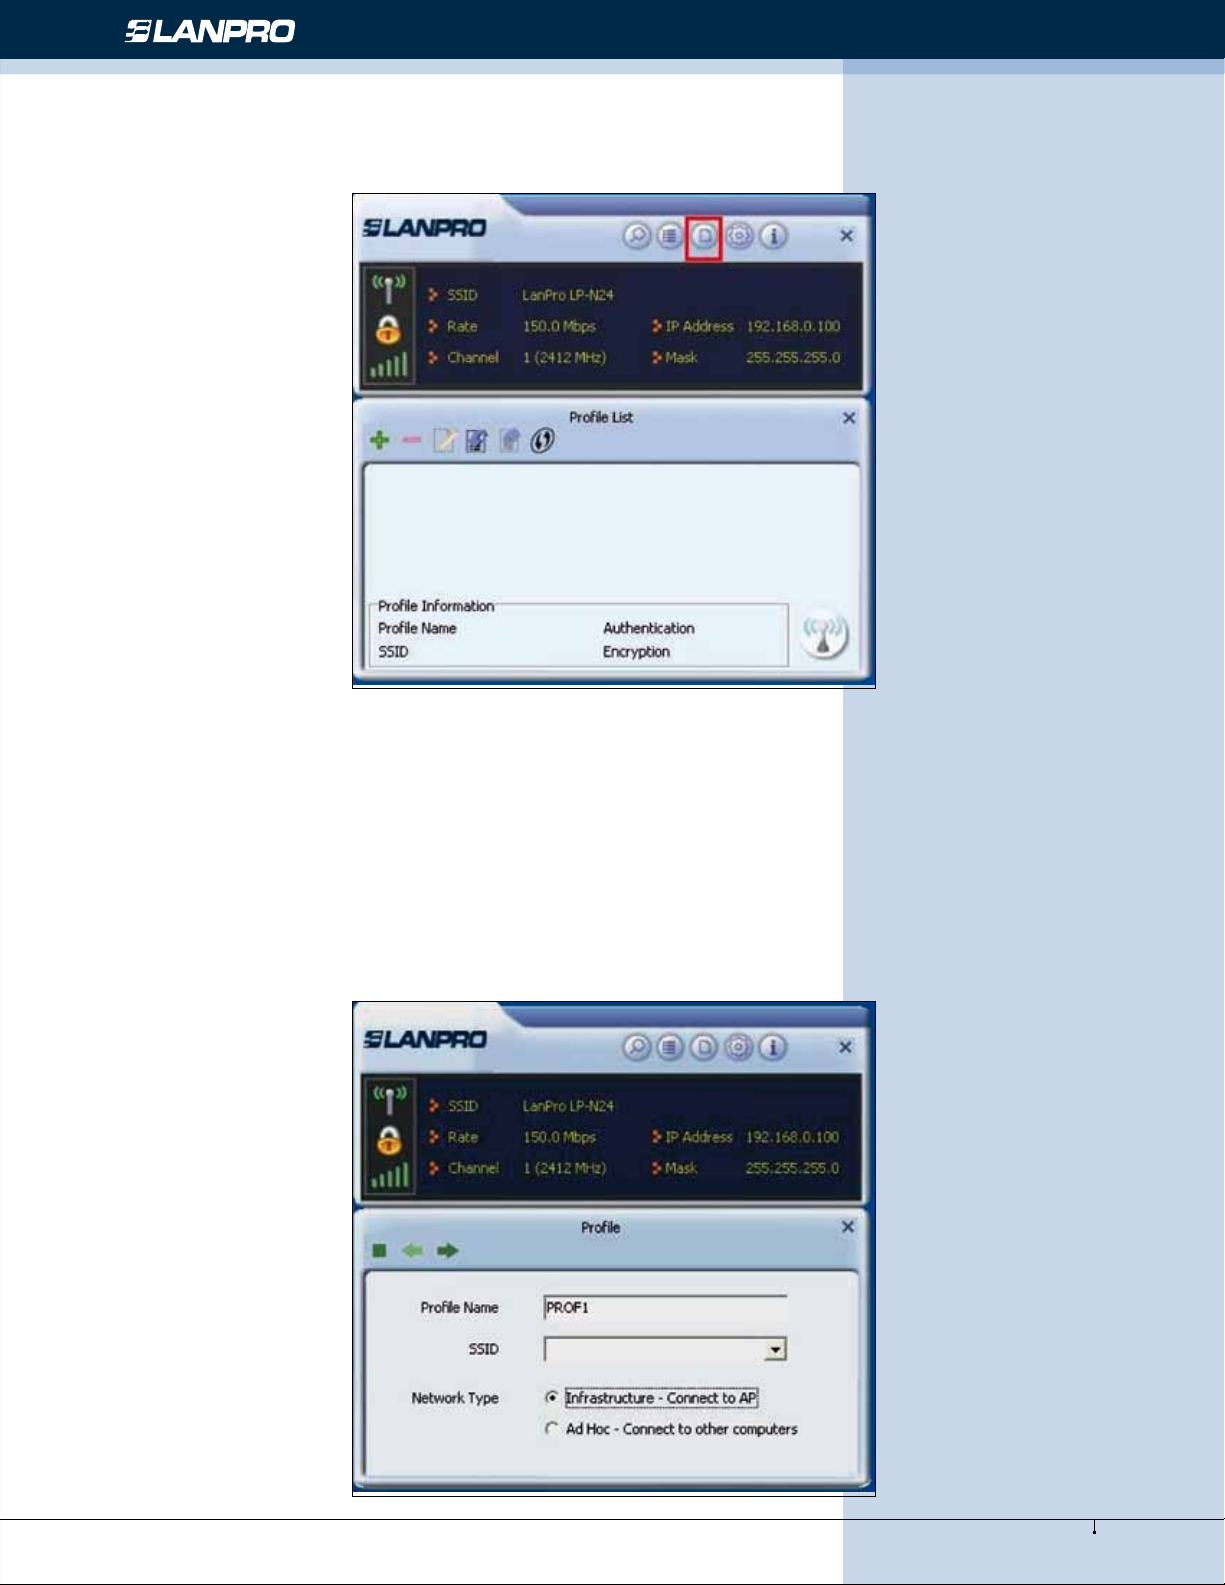
Except the above common connection type, you can also connect to the wireless network by adding a prole on the “Prole”
screen. The Prole screen is used to save the wireless network parameters. When the adapter is successfully connected to
a network, the prole name of this network will automatically be added here, which helps the adapter to quickly connect
to the wireless network next time. However, there’s one exception when you have set the hidden SSID, namely the SSID,
can not be scanned, then you must manually connect by adding the prole name. The main interface is as shown below.
Add: create a new prole
Delete: delete the existing prole
Edit: modify the existing prole
Import: import the previously congured prole.
Export: export the congured prole.
Add WPS Prole: WPS setting requires that the
connecting wireless device support WPS function.
WPS helps you to fulll wireless encryption fast as
well as secure your wireless network.
For detailed setting steps, refer to appendix2.
16
www.lanpro.com
Page 17
Wireless - Equipment - LP-N24P - USER GUIDE
There are two network types for your option when clicking the “Add” button to add wireless adapter connection: Infrastructure
and Ad-Hoc.
Infrastructure is an application mode that integrates the wired and wireless LAN architectures. It is different from Ad-Hoc
in that in this mode the computer installed with the wireless network adapter has to fulll the wireless communication via
AP or wireless router. It can be devided into two modes: “wireless AP + wireless network adapter” and “wireless router +
wireless network adapter”.
Ad-Hoc is a special wireless mobile network application mode. All nodes in the network are equal. It is usually used to share
resources by connecting the opposing computer’s wireless adapter.
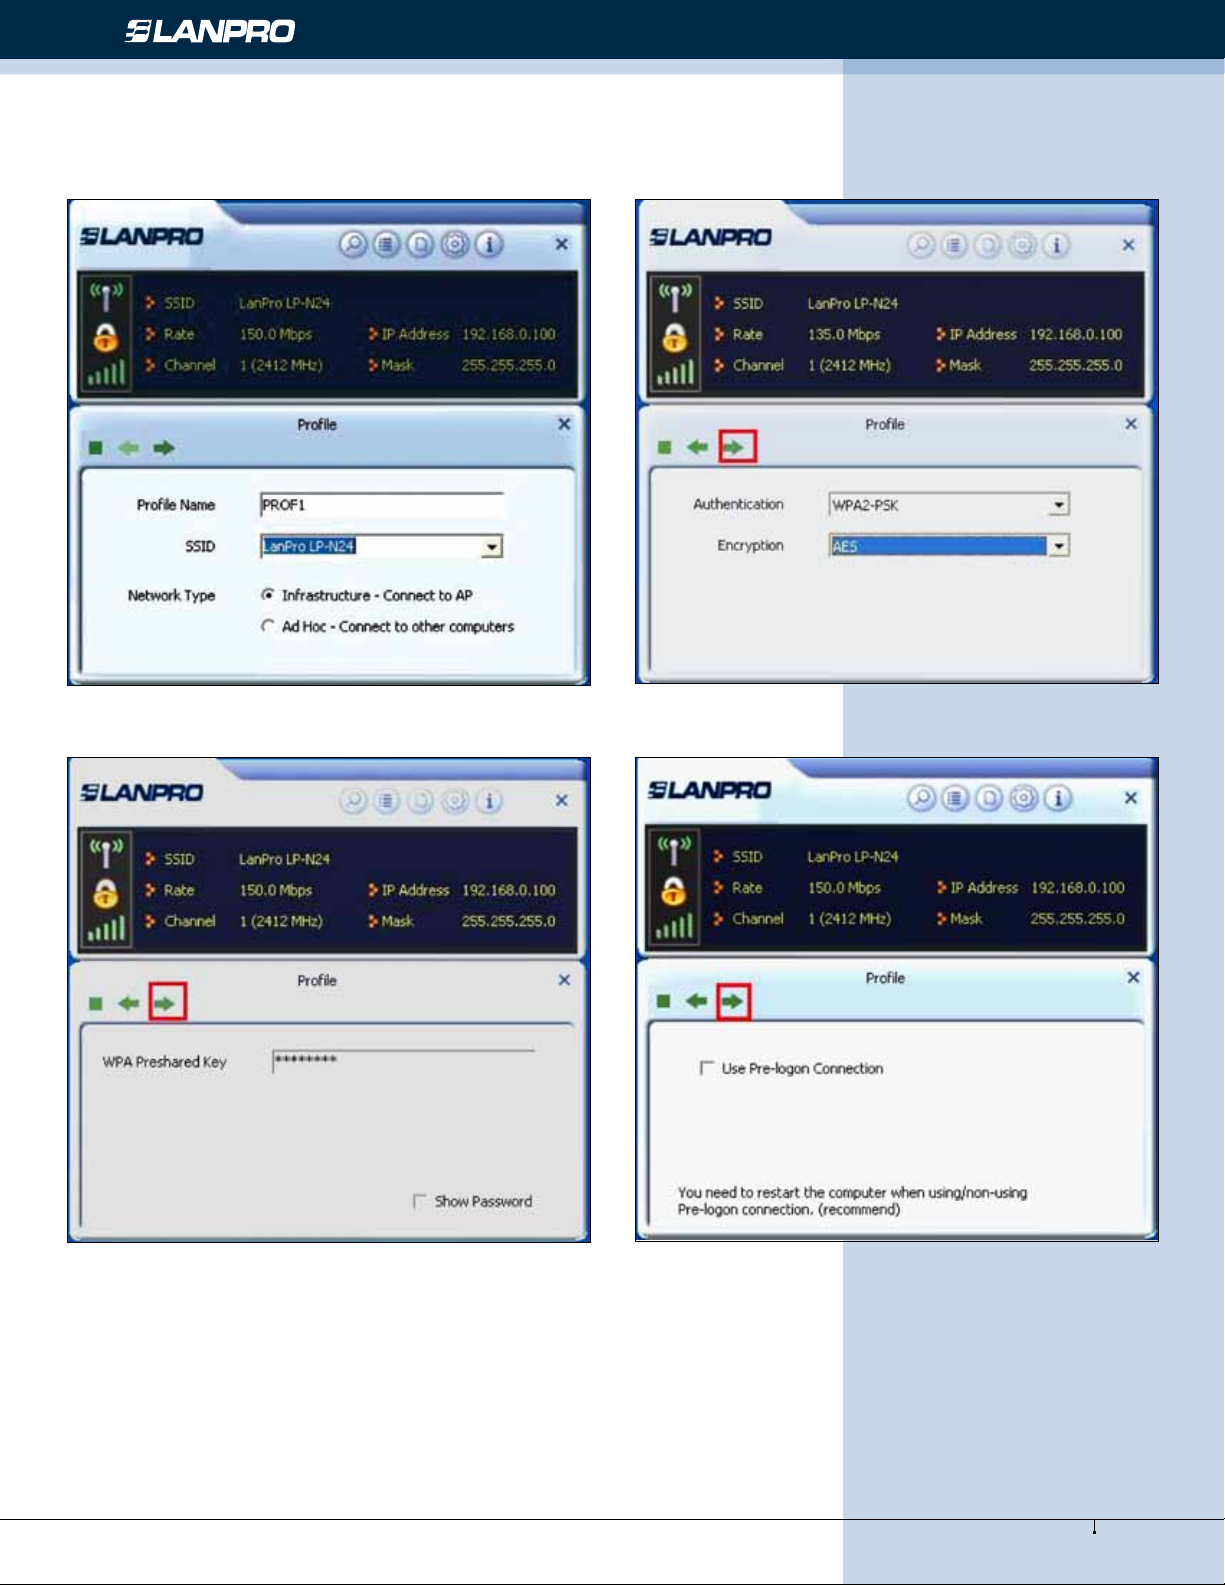
1. Infrastructure Prole Management
When you are connecting the wireless adapter to an AP or a wireless router, please select the Infrastructure mode.
Click the “Add”button and select the network type as ”Infrastructure”, and enter the prole name and SSID or you can nd
the SSID you wish to connect from the drop-down list.
17
www.lanpro.com
Page 18
Wireless - Equipment - LP-N24P - USER GUIDE
Click the next button to select the authentication type and encryption type such as WPA - PSK2 and AES, and then input
the key and click next.
18
www.lanpro.com
Page 19
Wireless - Equipment - LP-N24P - USER GUIDE
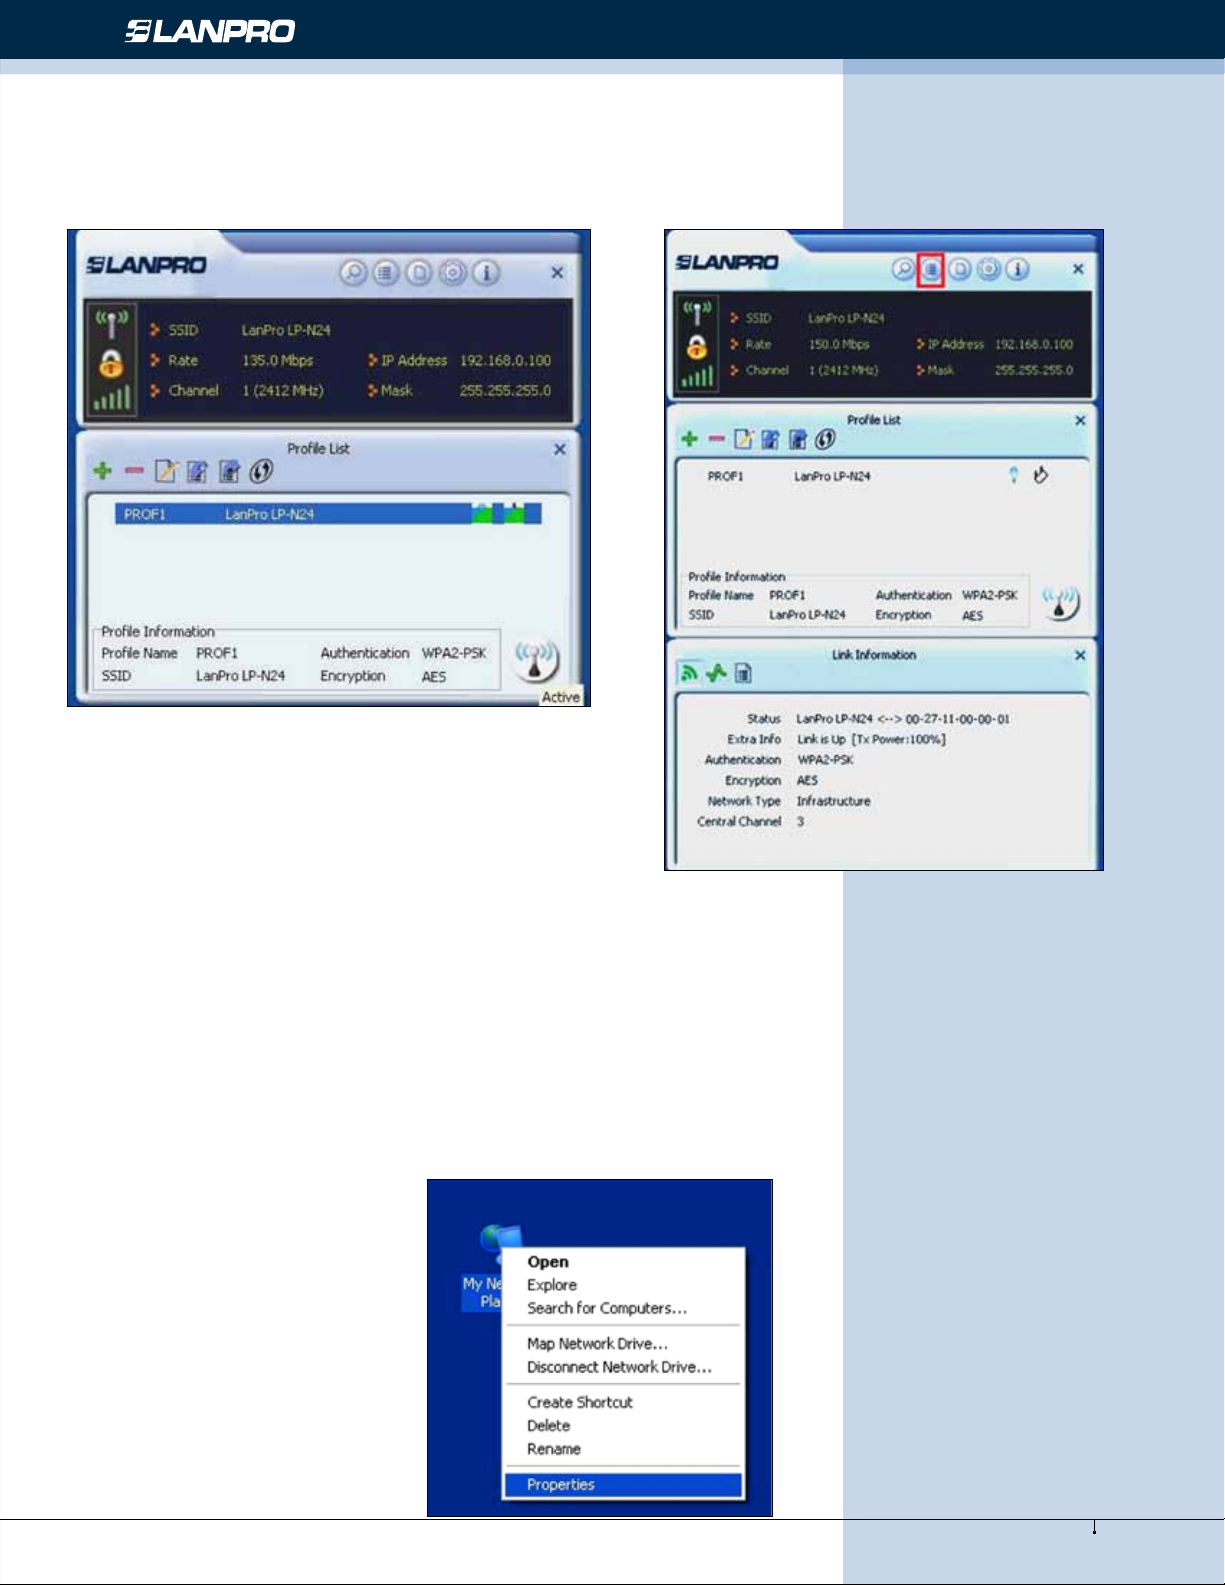
After a prole is successfully added, the prole name can be seen on the prole list, you can edit, import or export the
prole, click “Active” to nish the connection, now you can also view the detailed connection status on the “Link Information”
screen.
NOTE:
If the SSID broadcast function of the wireless router or AP you wish to connect is disabled, then the wireless
adapter can not scan the SSID, thus you need to connect by creating the corresponding prole.
2.Ad-Hoc Prole management
Using the Ad-hoc mode to establish a wireless network requires that each computer should be equipped with a wireless
network adapter. By connecting these wireless adapters, computers are able to share the resources. The detailed setting
steps are as follows:
1) Firstly you’ll have to allocate a static IP to each wireless adapter to be connected in Ad-hoc mode.
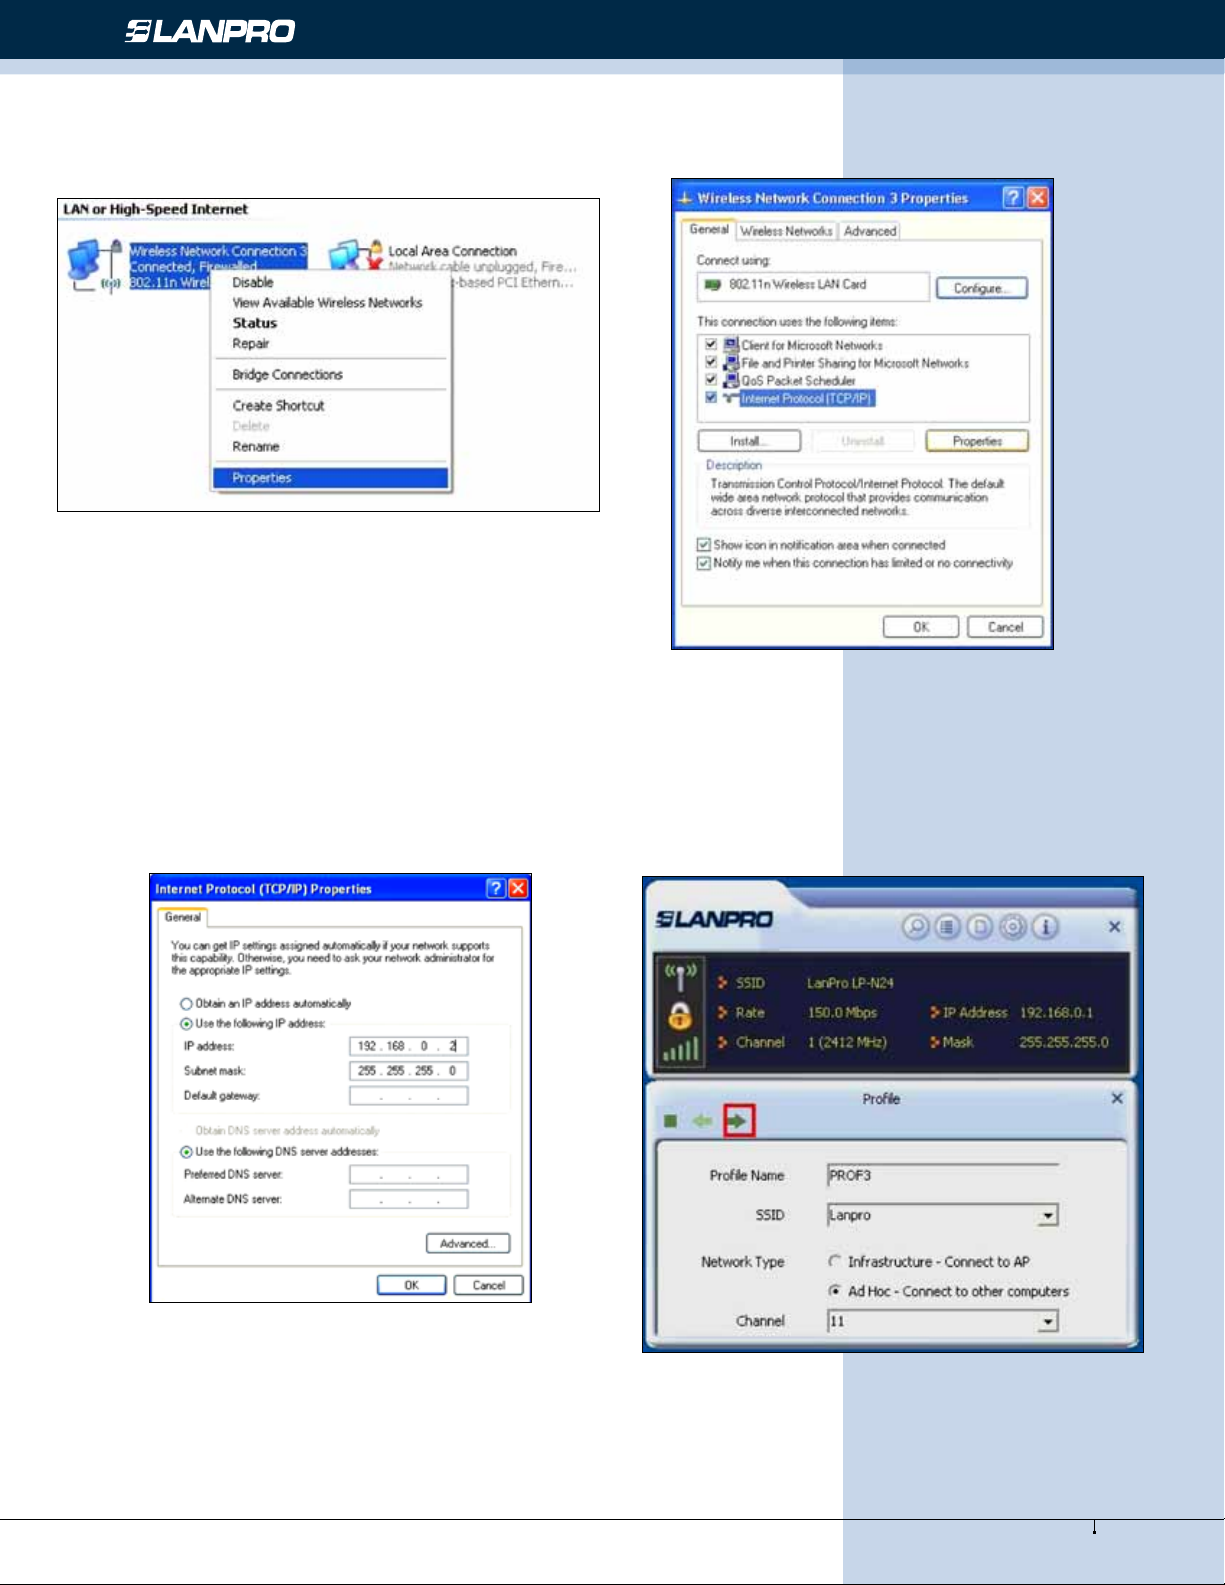
a. Right click “My Network Places” on your computer’s desktop and select “Properties”.
19
www.lanpro.com
Page 20
Wireless - Equipment - LP-N24P - USER GUIDE
b. Right click “Wireless Network Connection”, and select
“Properties”
c. Select “Internet Protocol (TCP/IP)” and click “Properties”.
d. Please enter the IP address and subnet mask, and make
sure this IP address is not used by other devices in the
network.For example: if your wireless adapter’s IP address is
192.168.0.1, then set other wireless adapters’ IP addresses
within the range of 192.168.0.2—192.168.0.254. Click “Ok”
to save the settings.
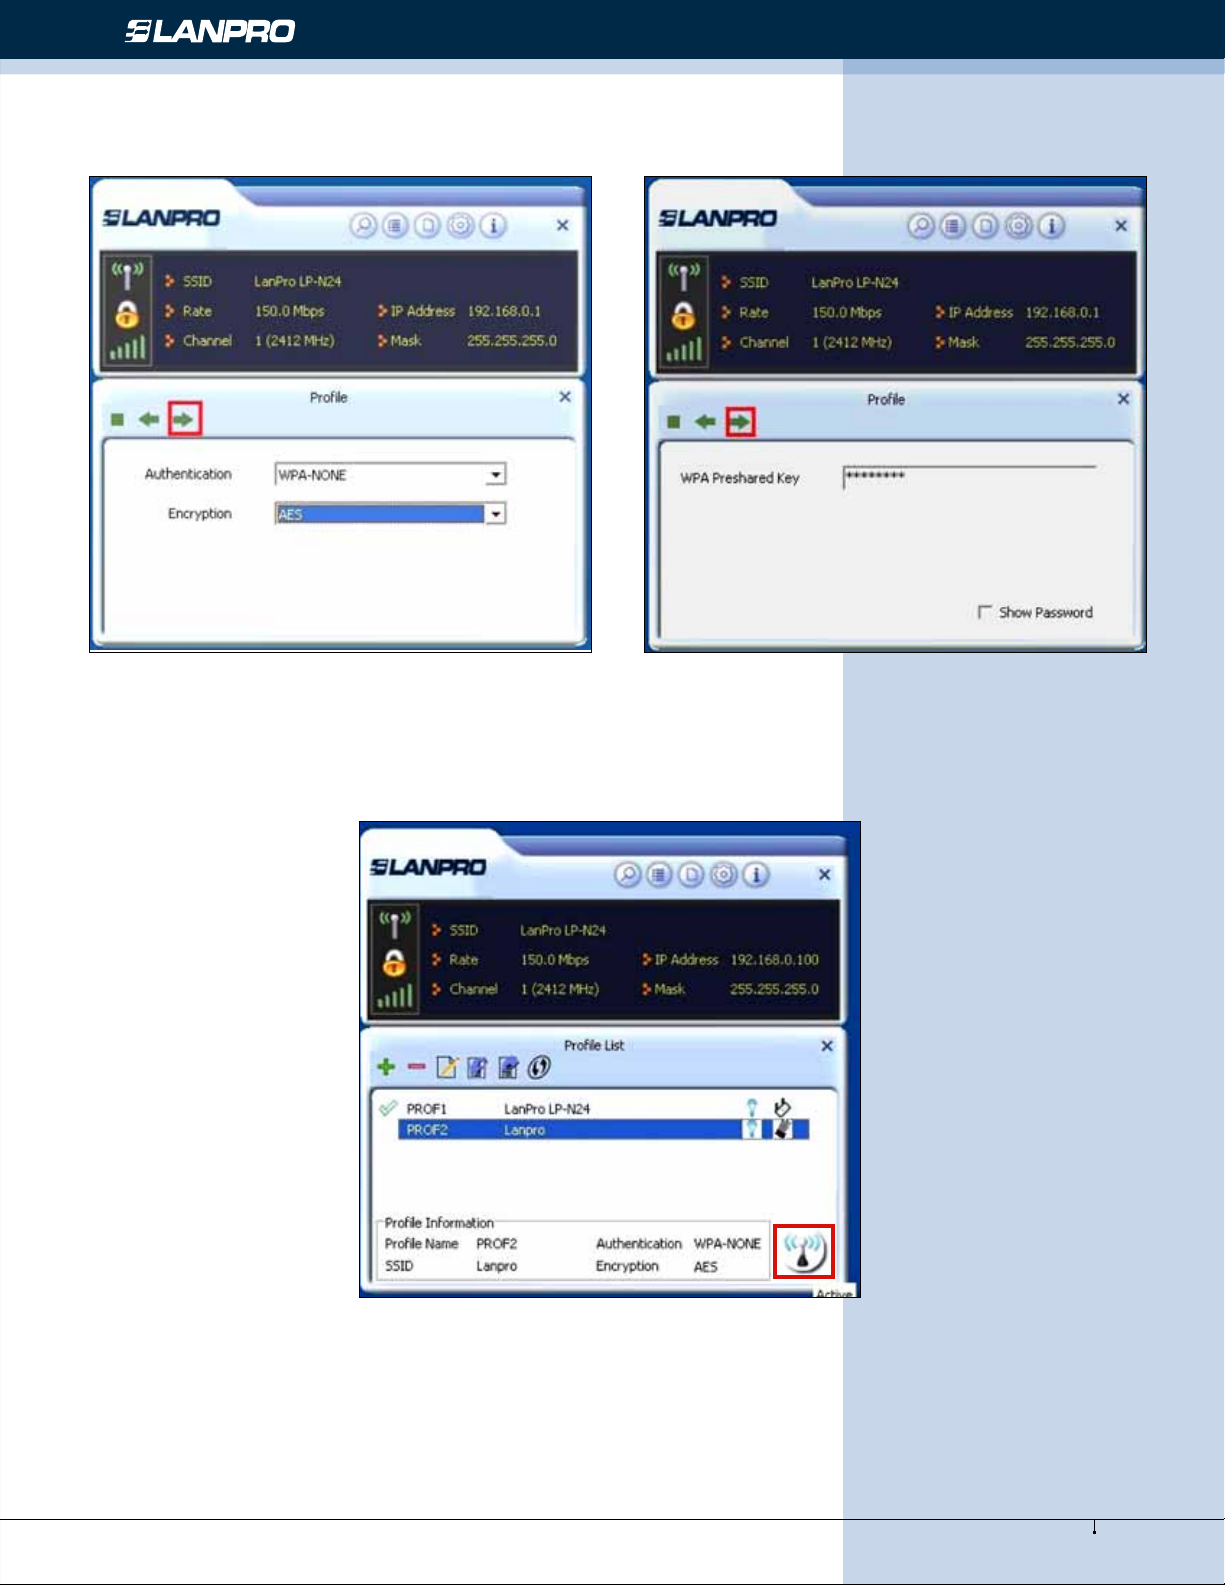
2) Create a new Ad-hoc prole.
Click the “Add” button and enter the network name in the
SSID eld to identify the wireless network, and select Ad-
hoc as the network type and then select the channel.
20
www.lanpro.com
Page 21
Wireless - Equipment - LP-N24P - USER GUIDE
Click the “Next” button to select the authentication type and encryption type and then input the correct key and click “Next”.
After a prole is successfully added, the prole can be seen on the prole list, select it and click the “Active” icon on the
lower right corner.
21
www.lanpro.com
Page 22
Wireless - Equipment - LP-N24P - USER GUIDE
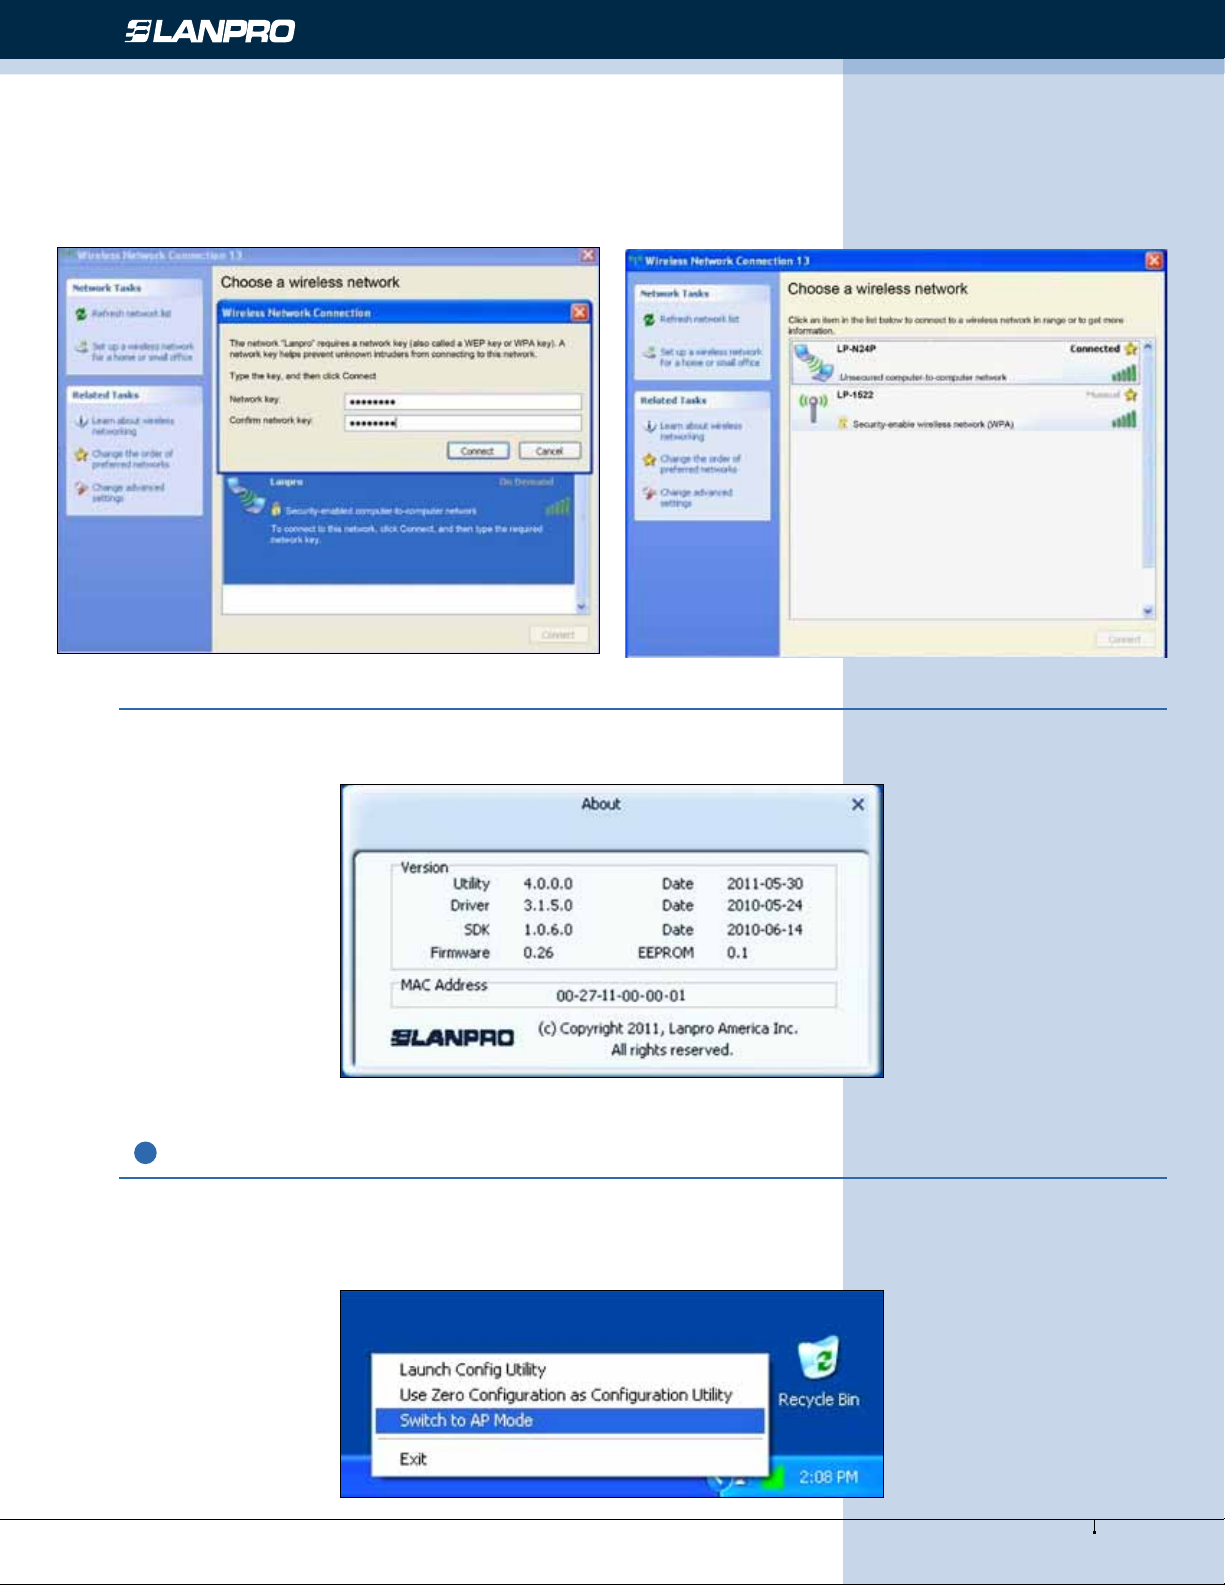
Once that prole has been activated, search for that wireless
network as seen from the other clients, and then double
click the wireless network you have congured and you’ll be
prompted for the key. After entering the key, click “Connect”.
4.1.4 About
When the highlighted part shows “Connected“, it indicates
the connection is successful.
This screen mainly displays the version information of the UI’s different programs as well as LanPro’s copyright statement.
4.2 AP mode
When you want to use the wireless adapter’s AP function, please right click the UI icon on the taskbar of your computer
desktop and select “Switch to AP Mode”.
22
www.lanpro.com
Page 23
Wireless - Equipment - LP-N24P - USER GUIDE
In this mode, the wireless adapter acts as an AP to transmit wireless signal and create a wireless network, while allowing
other wireless clients to access this network.
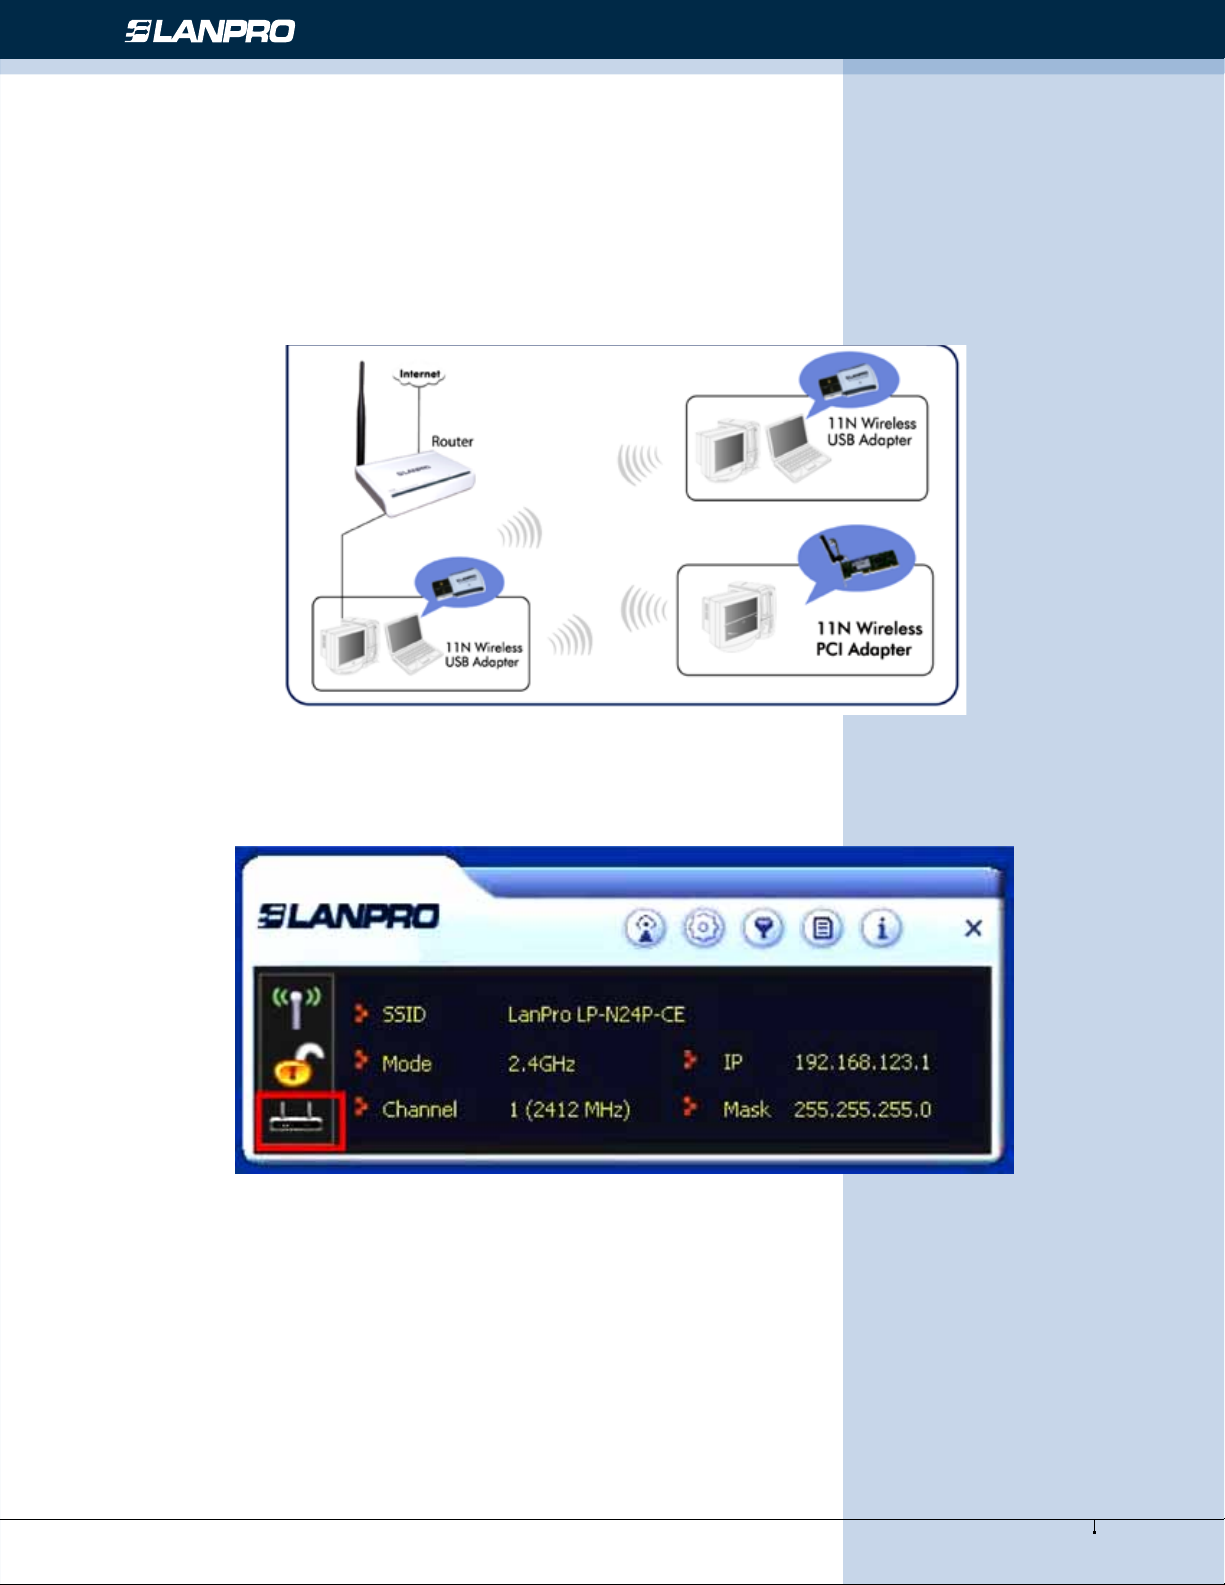
As shown in the diagram below: The PC in the left has already accessed to the Internet by using a wired network adapter,
meanwhile, you install a LanPro wireless adapter (take a USB wireless adapter as an example) and its UI on this computer,
and set the adapter to AP mode.
By using the wireless adapters to scan the AP’S SSID to connect, the computers in the right can also access to the Internet
after it is successfully connected.
In this mode, the client utility differs from that in station mode, and the main interface is as shown below.
When it is switched to AP mode, the wireless adapter will automatically set its IP address as 192.168.123.1, and other
clients that connected to this AP will automatically obtain the IP addresses of: 192.168.123.X(X is any integer from 2 to
254). The function buttons on the top (From L to R )are respectively Cong AP, Advanced, Access Control List, Associate
List, About and MiniSize, while the left column displays Turn On/Off RF, Security /No security, and AP mode icon.
23
www.lanpro.com
Page 24
Wireless - Equipment - LP-N24P - USER GUIDE
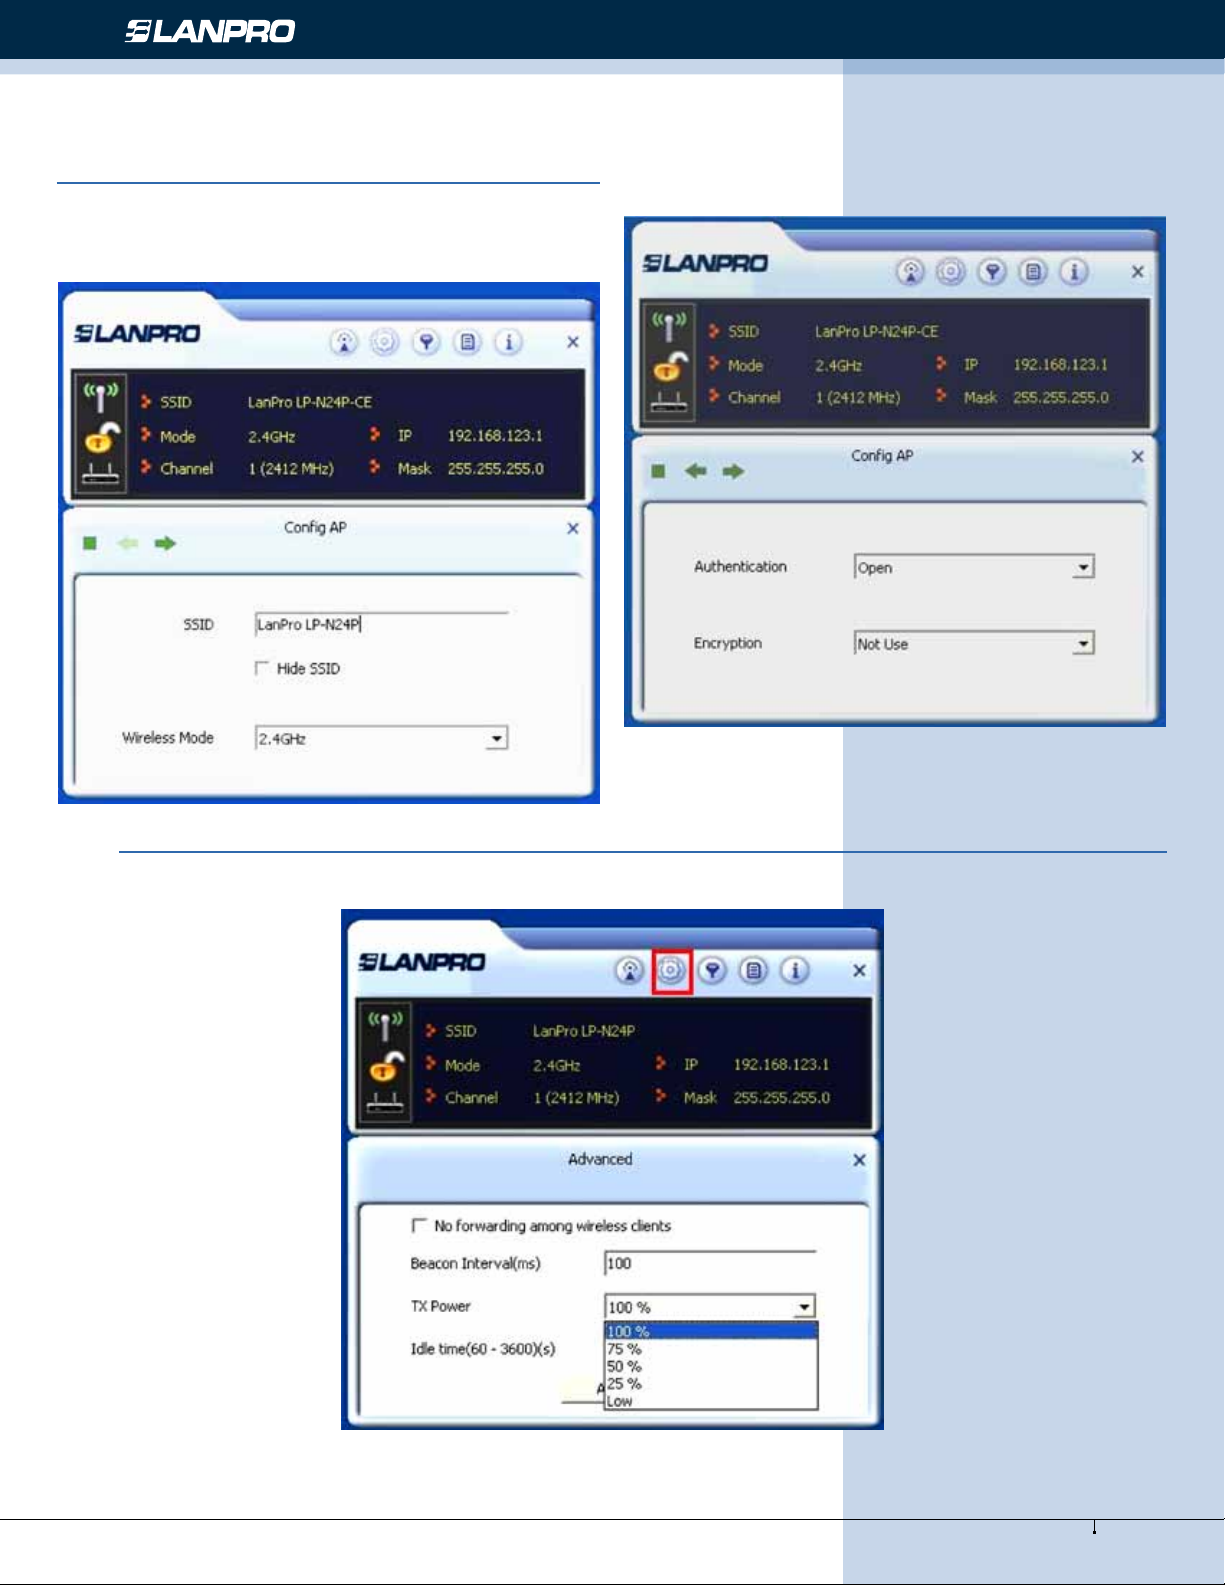
4.2.1 Cong AP
This screen is used to set the AP’s general parameters
including SSID, wireless mode, channel, authentication type
and encryption type, as shown in the picture below.
Here the authentication type is set as “Open” and the
encryption type “Not Use”.
4.2.2 Advanced
This screen is used to set the advanced parameters of the wireless adapter when working in AP mode, such as No forwarding
among wireless clients and TX power.
No forwarding among wireless clients: This feature isolates the communications among the wireless clients that are
connected to the wireless adapter in AP mode.
TX power: To adjust the transmit power for the wireless adapter.
24
www.lanpro.com
Page 25
Wireless - Equipment - LP-N24P - USER GUIDE
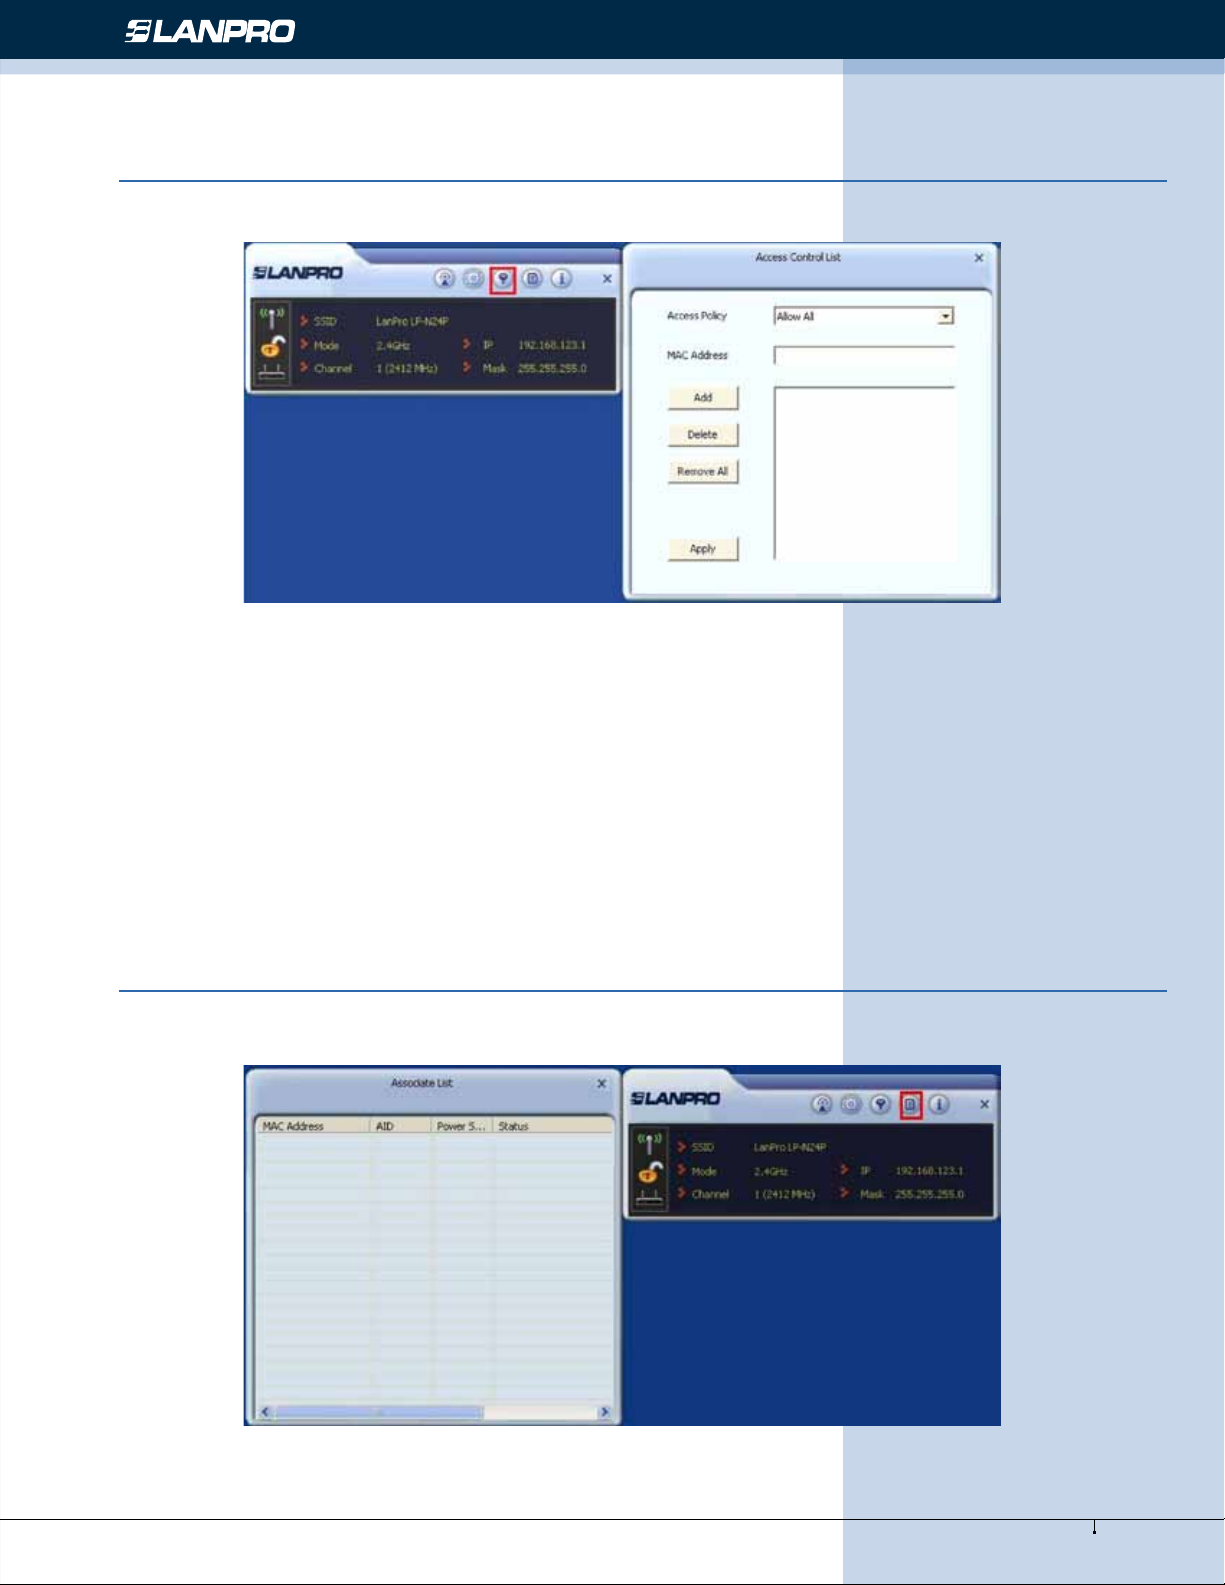
4.2.3 Access Control List
Access Control is based on the wireless adapter’ MAC addresses to allow or reject a specied client’s access to this wireless
network.
Access Policy:
Disable: To disable the lter function.
Allow All: To permit all hosts whose wireless MAC addresses are included in the list to access the wireless network, other
hosts whose wireless MAC addresses have not been added to the list will be prohibited by default.
Reject All: To prohibit all hosts whose wireless MAC addresses are included in the list from accessing the wireless network,
other hosts whose wireless MAC addresses have not been added to the list will be permitted by default.
MAC Address: To input the client’s wireless MAC address you want to lter in the physical address eld.
Add: to add the entered wireless client MAC address to the list.
Delete: to delete an existing MAC address in the list.
Remove All: to delete all clients’ wireless MAC addresses in the list.
Add the MAC address of the client’s wireless network adapter to the list and select “All Allow” in the access policy drop-down
list, computers whose wireless MAC addresses are not included in the list will be rejected by default. Select “All reject”, and
only the host computers whose wireless MAC addresses are included in the list can not access the AP wireless network.
4.2.4 Associate List
When there is a client connected to this AP and has successfully obtained the IP address, then the client’s MAC address, AID
and Status can be seen on the list.
25
www.lanpro.com
Page 26
Wireless - Equipment - LP-N24P - USER GUIDE
4.2.5 AP Mode under Windows 7
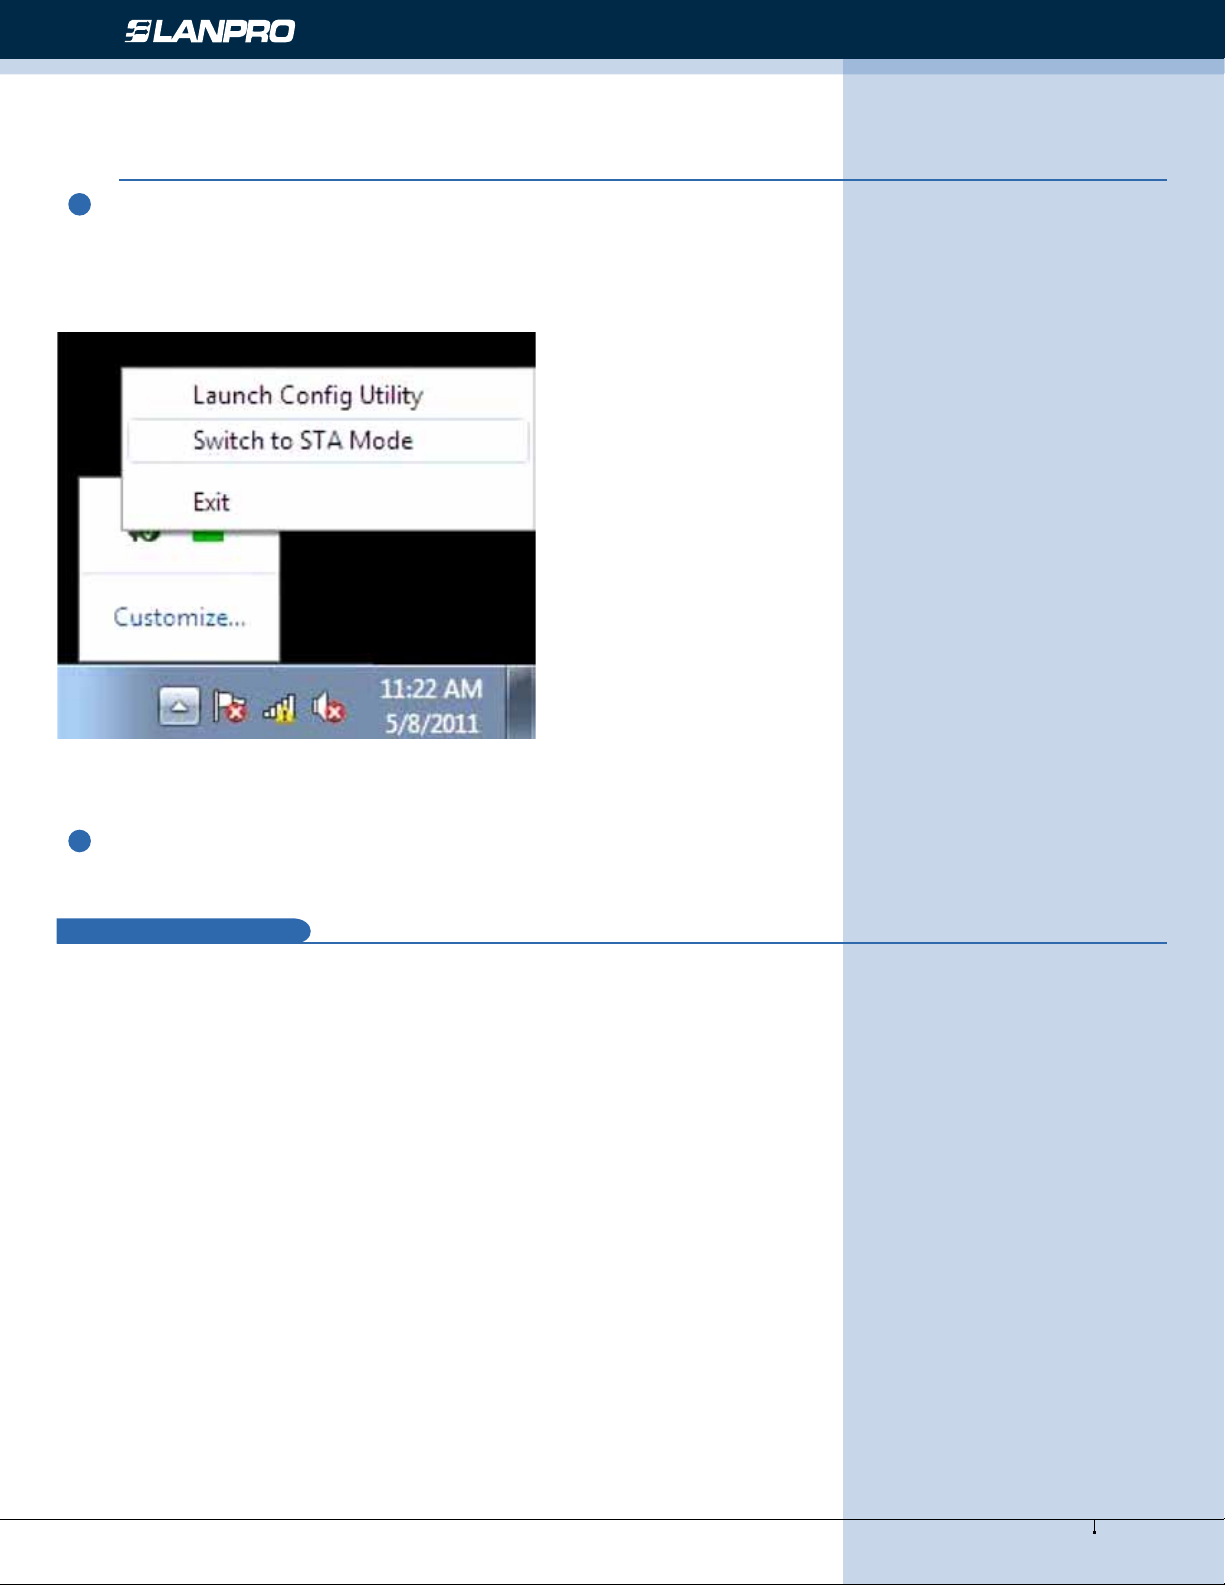
1
Under Windows 7, wireless adapters are allowed to work in both STA and AP modes. Here, the wireless adapter acts
not only as a client, but also an AP to send wireless signal, which equals to an amplier. Right click the UI icon on the lower
right corner of the computer desktop and select “Switch to STA Mode”.
2
You can change the SSID on the Cong AP screen and control the number of the connected clients by modifying the
maximum number of peers. AP mode has only one encryption method which is WPA2-AES by default and cannot be modied.
Appendix 1: Acronyms and Terms
5
Appendix 1: Acronyms and Terms
WLAN Wireless Local Area Network
802.11 A family of specications developed by the IEEE for WLAN technology.
802.11a An extension to 802.11 WLAN standards that provides up to 54 Mbps transmission in the 5 GHz UNI radio band.
802.11b An extension to 802.11 WLAN standard that provides up to 11 Mbps transmission in the 2.4 GHz ISM radio band.
802.11b uses DSSS modulation.
802.11g An extension to 802.11 WLAN standard that provides up to 54 Mbps transmission in the 2.4 GHz ISM radio band.
802.11b uses OFDM modulation and is backwards compatible with 802.11b.
802.11n higher transmission rate, supports Multi-Input Multi-Output (MIMO) technology.
WEP Wired Equivalent Privacy. A security protocol for WLANs dened in the IEEE 802.11 standard.
WPA Wireless Protected Access, adopts rotating keys.
RSN Robust Security Network, A substitute for WPA, and it adopts 802.1x standard and advanced encryption
ICS Microsoft Internet Connection Sharing enables multi-computer to share access to Internet via one PC.
26
www.lanpro.com
Page 27
Wireless - Equipment - LP-N24P - USER GUIDE
Appendix 2: How to Set WPS
6
WPS setting supports two modes: PBC and PIN. The detailed setting steps are as follows:
1. Wireless Connection in PBC Mode
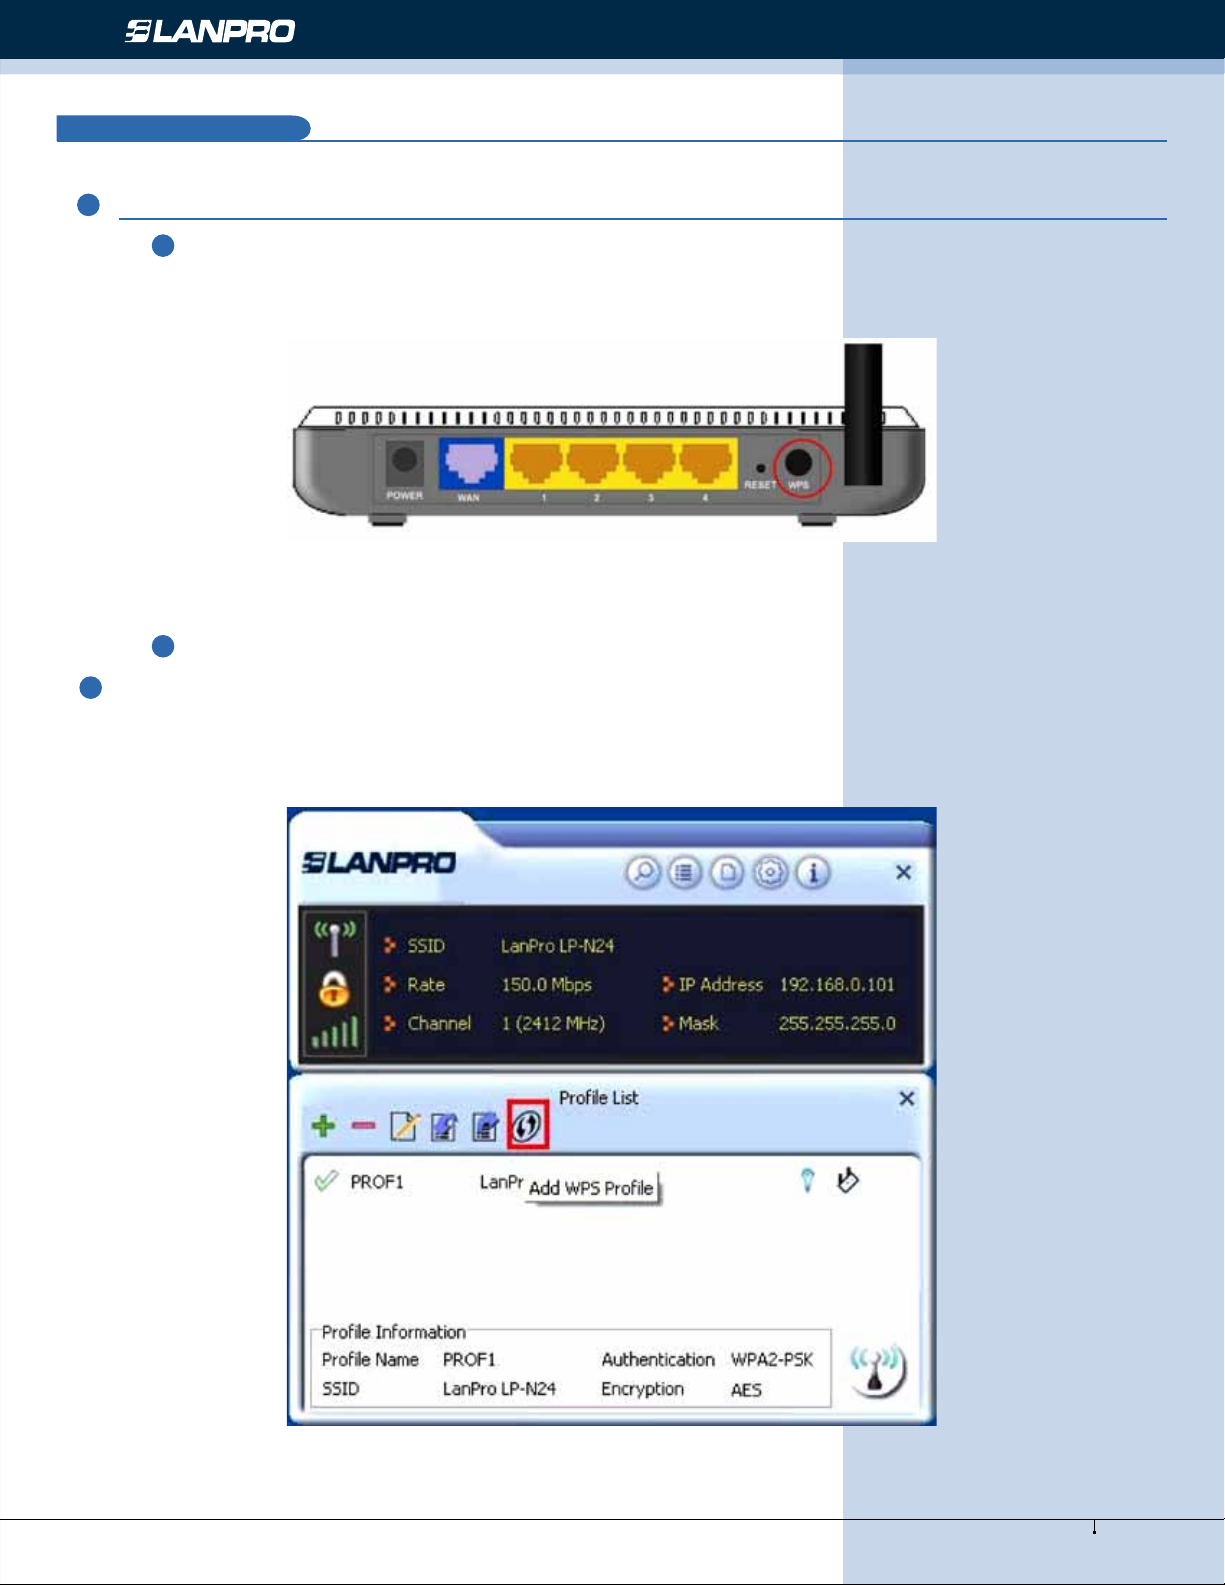
1.1 Enable the router’s WPS-PBC feature
If your router provides WPS button, just press and hold it for about 1 second, then the WPS LED will be ashing for about
2 minutes, which indicates the router’s WPS feature has been enabled. Otherwise, you can also log on to the router’s webbased utility to enable the PBC mode in WPS settings screen (For detailed settings, please refer to your router’s user guide).
1.2 Perform PBC connection on the UI of the wireless adapter
1
On the main interface of LanPro’s UI, click “Prole”—“Add WPS Prole”.
27
www.lanpro.com
Page 28
2
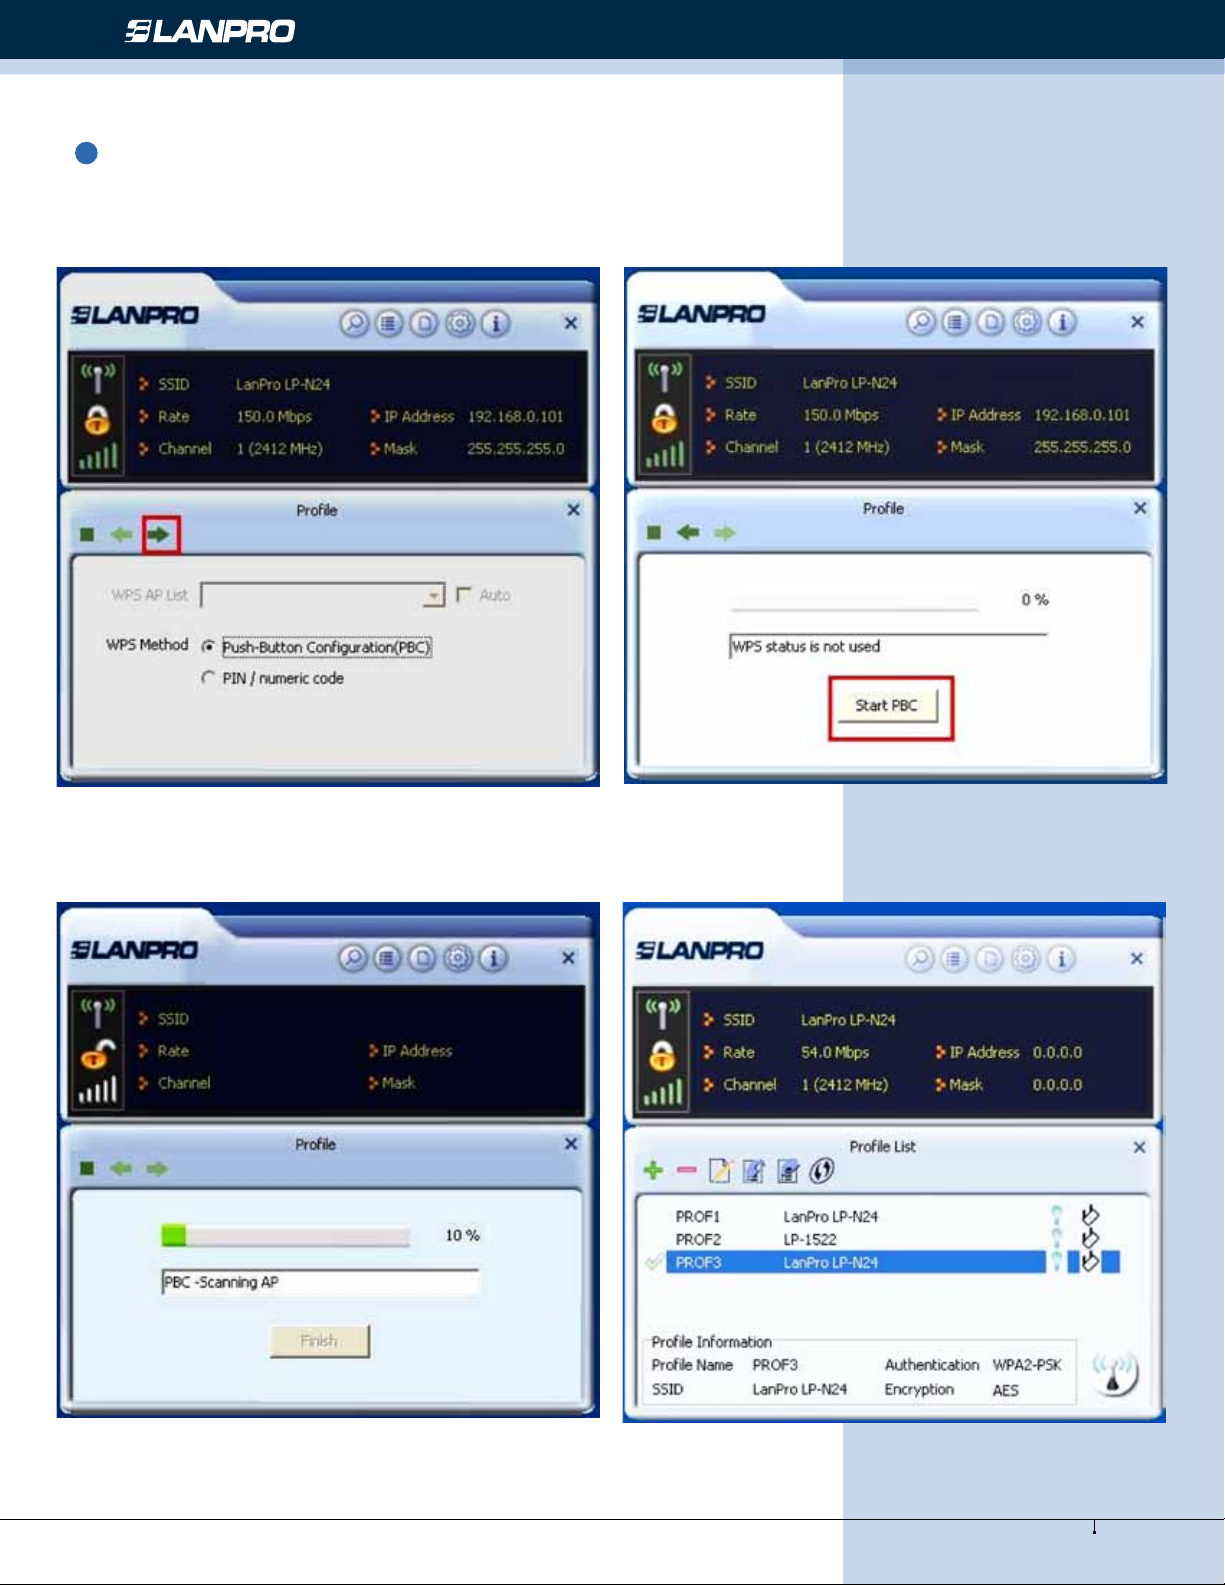
On the Prole screen, select “Push-Button
Conguration”(PBC) and then click the “Next” button, select
“Start PBC” two minutes after the router enables the WPS
function. The connection is established when the negotiating
process nishes.
Wireless - Equipment - LP-N24P - USER GUIDE
Start PBC:
Negotiating process: A prole forms automatically after the connection is
successfully established.
28
www.lanpro.com
Page 29
Wireless - Equipment - LP-N24P - USER GUIDE
1.3 Using the wireless adapter’s WPS button to perform PBC connection
If your wireless adapter provides a WPS button, you may use the button to perform PBC connection.
a) Run the adapter’s UI and switch to STATION mode
b) Two minutes after the router’s WPS-PBC is enabled, press the adapter’s WPS button to connect in PBC mode.
c) You may view the PBC connection process on the UI’s PBC screen.
2. Wireless Connections in PIN Mode
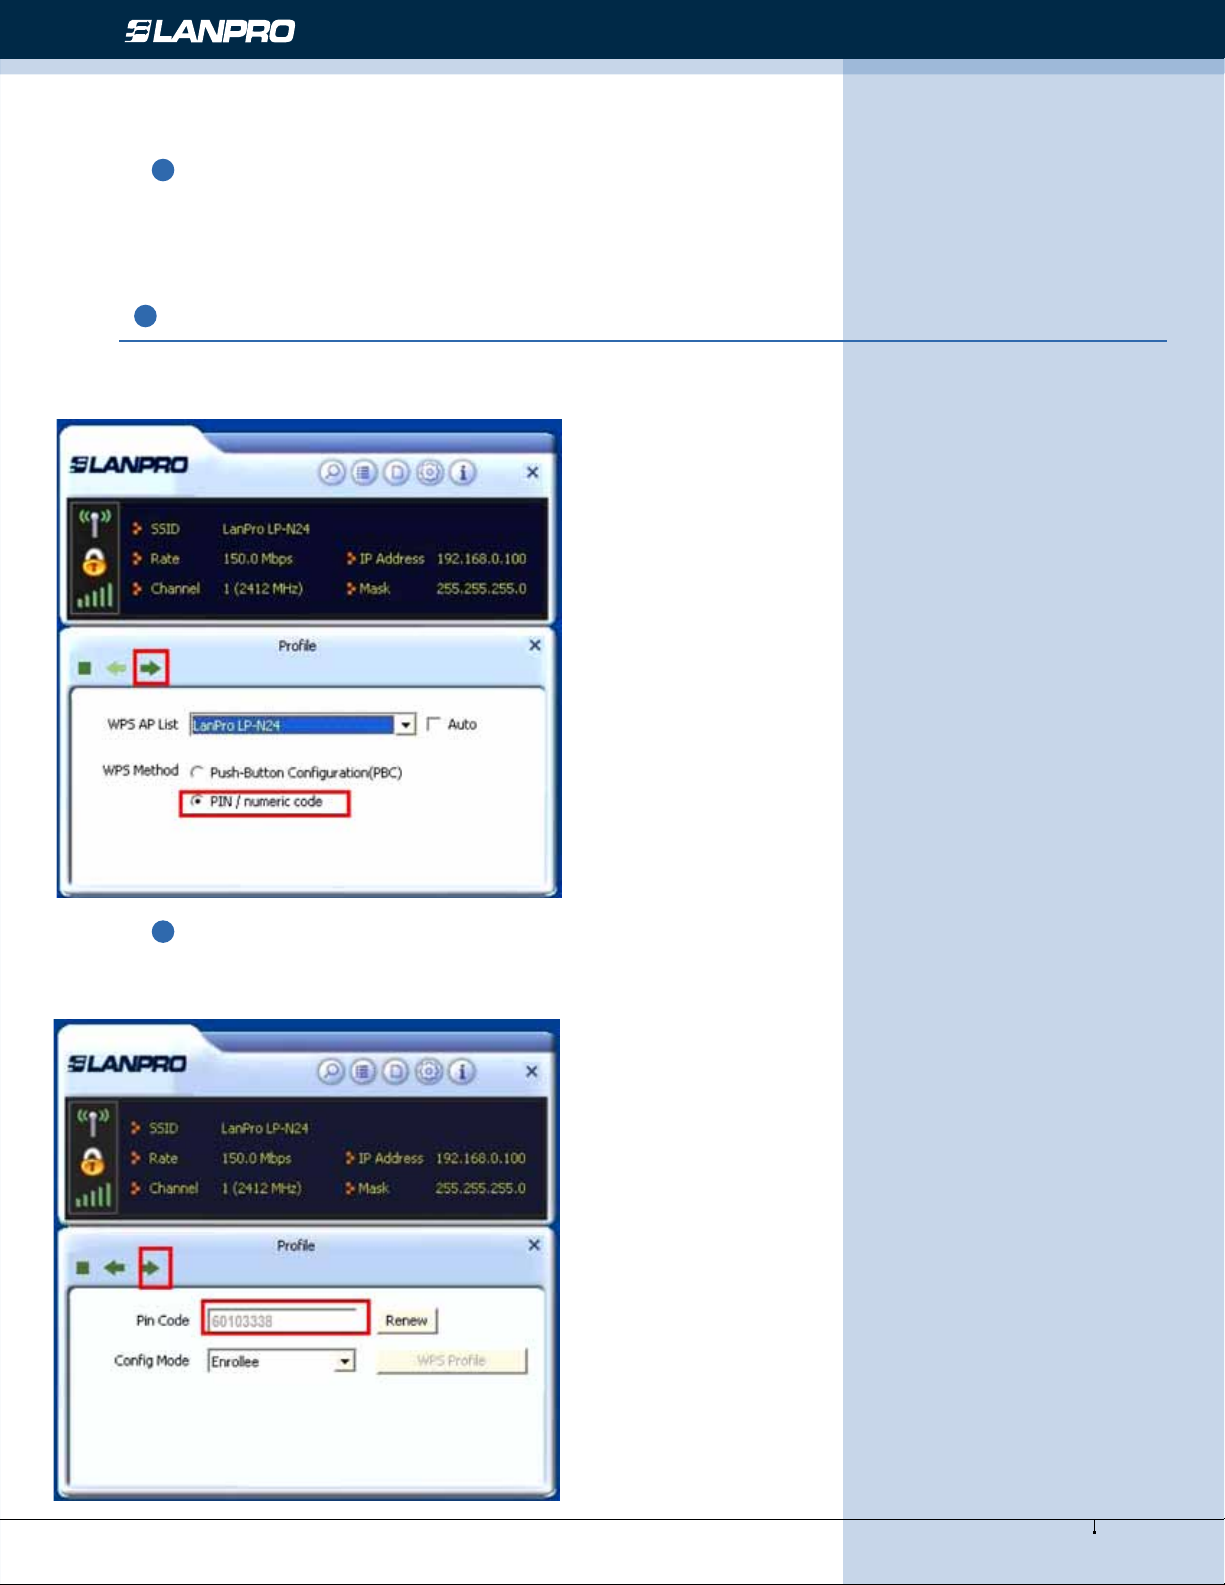
On the “Add WPS Prole” screen, select “PIN ” as the WPS Method. You may select the wireless AP to be connected in WPS
mode on the WPS AP drop-down List, or select “Auto “and then click the next button.
2.1 Enrollee Mode
The PIN code eld lists the adapter’s current PIN code, when you select “Enrollee” as the Cong Mode, you need to copy
this PIN code and input it in the PIN code eld of the router’s WPS setting screen.
29
www.lanpro.com
Page 30
Wireless - Equipment - LP-N24P - USER GUIDE
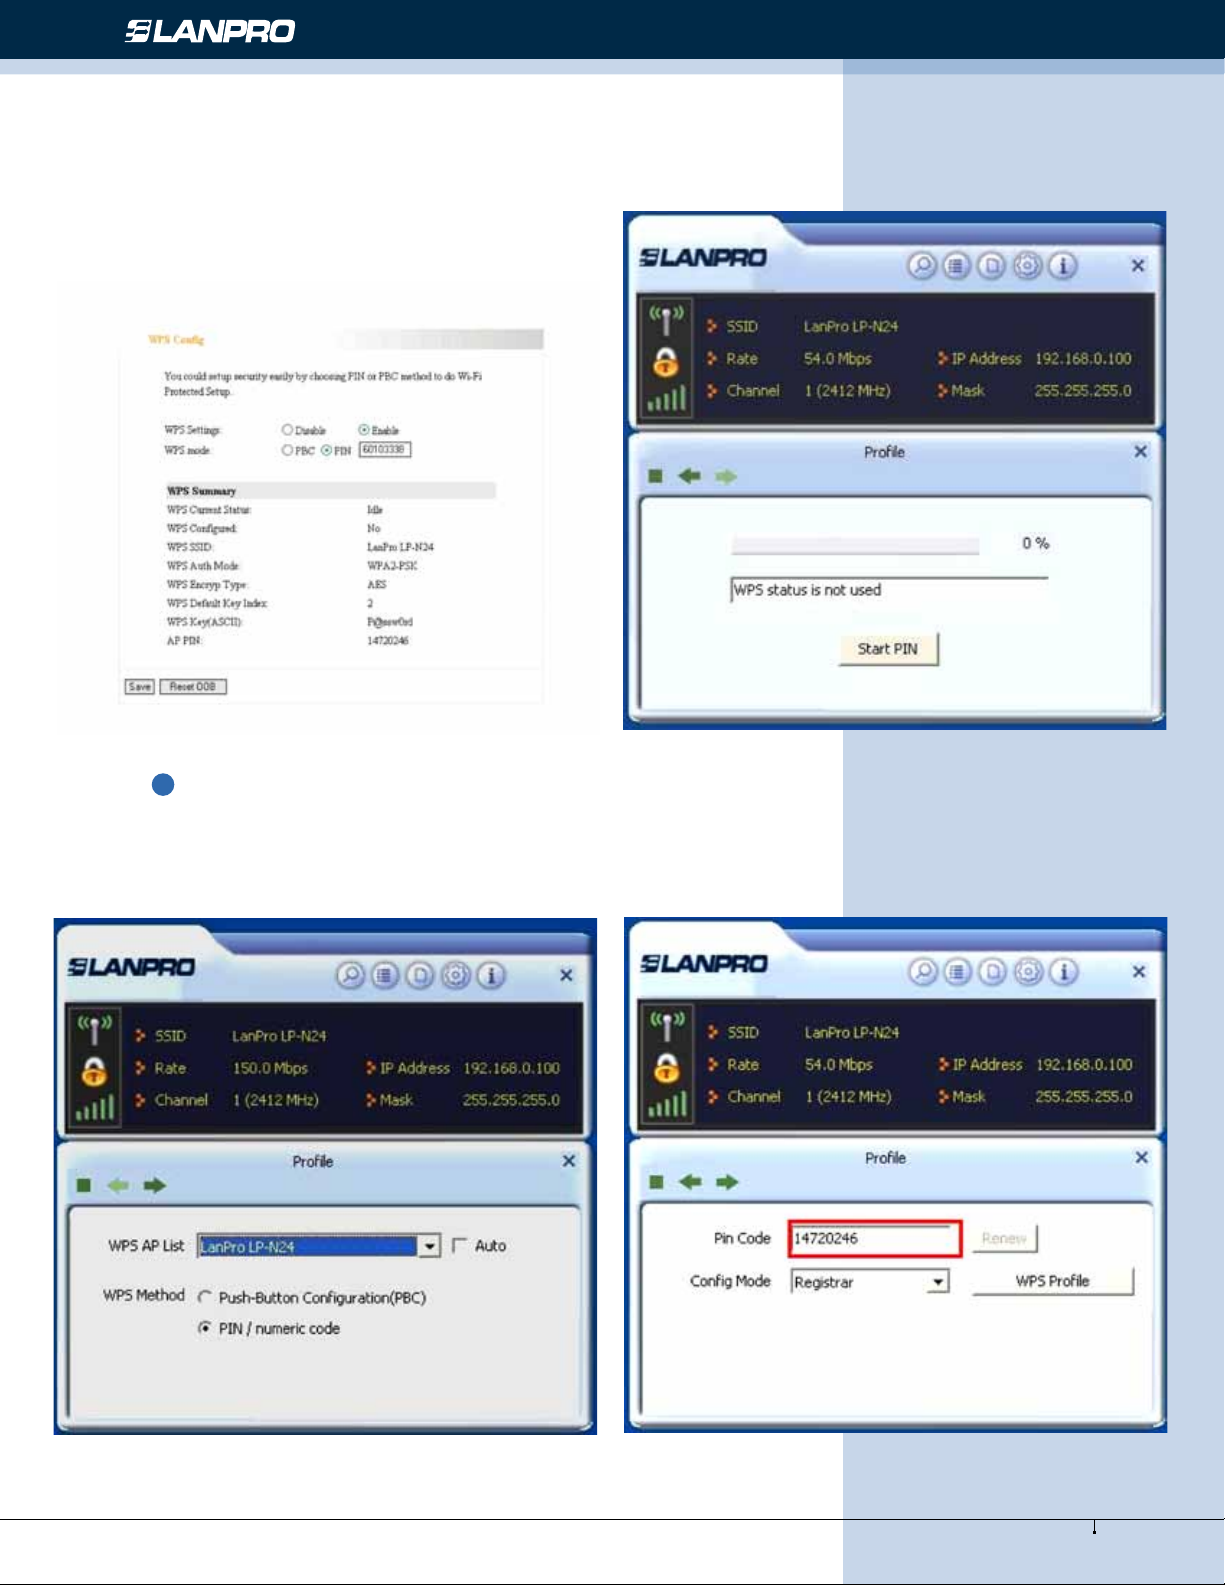
Here we take LanPro’s LP-N24 as an example. First enter its
WPS conguration screen, enable WPS settings and select
PIN for WPS mode and then input 60103338 in the PIN
code eld, and then click the “Save” button. When the WPS
indicator of the Router starts ashing, it indicates that WPS
feature is enabled.
Click the next button on the Prole screen and click “Start
PIN” to start the PIN code negotiation.
2.2 Registrar Mode
On the “Add WPS Prole” screen, select the SSID of the AP that
need to negotiate in WPS mode instead of selecting”Auto”.
Then select ”PIN” as the WPS method and click the next
button to display the following screen:
Select “Registrar” as the cong mode and enter the router’s
PIN code, such as 14720246 that displays on the router’s
WPS screen in section 2.1, in the PIN code eld here.
30
www.lanpro.com
Page 31
Wireless - Equipment - LP-N24P - USER GUIDE
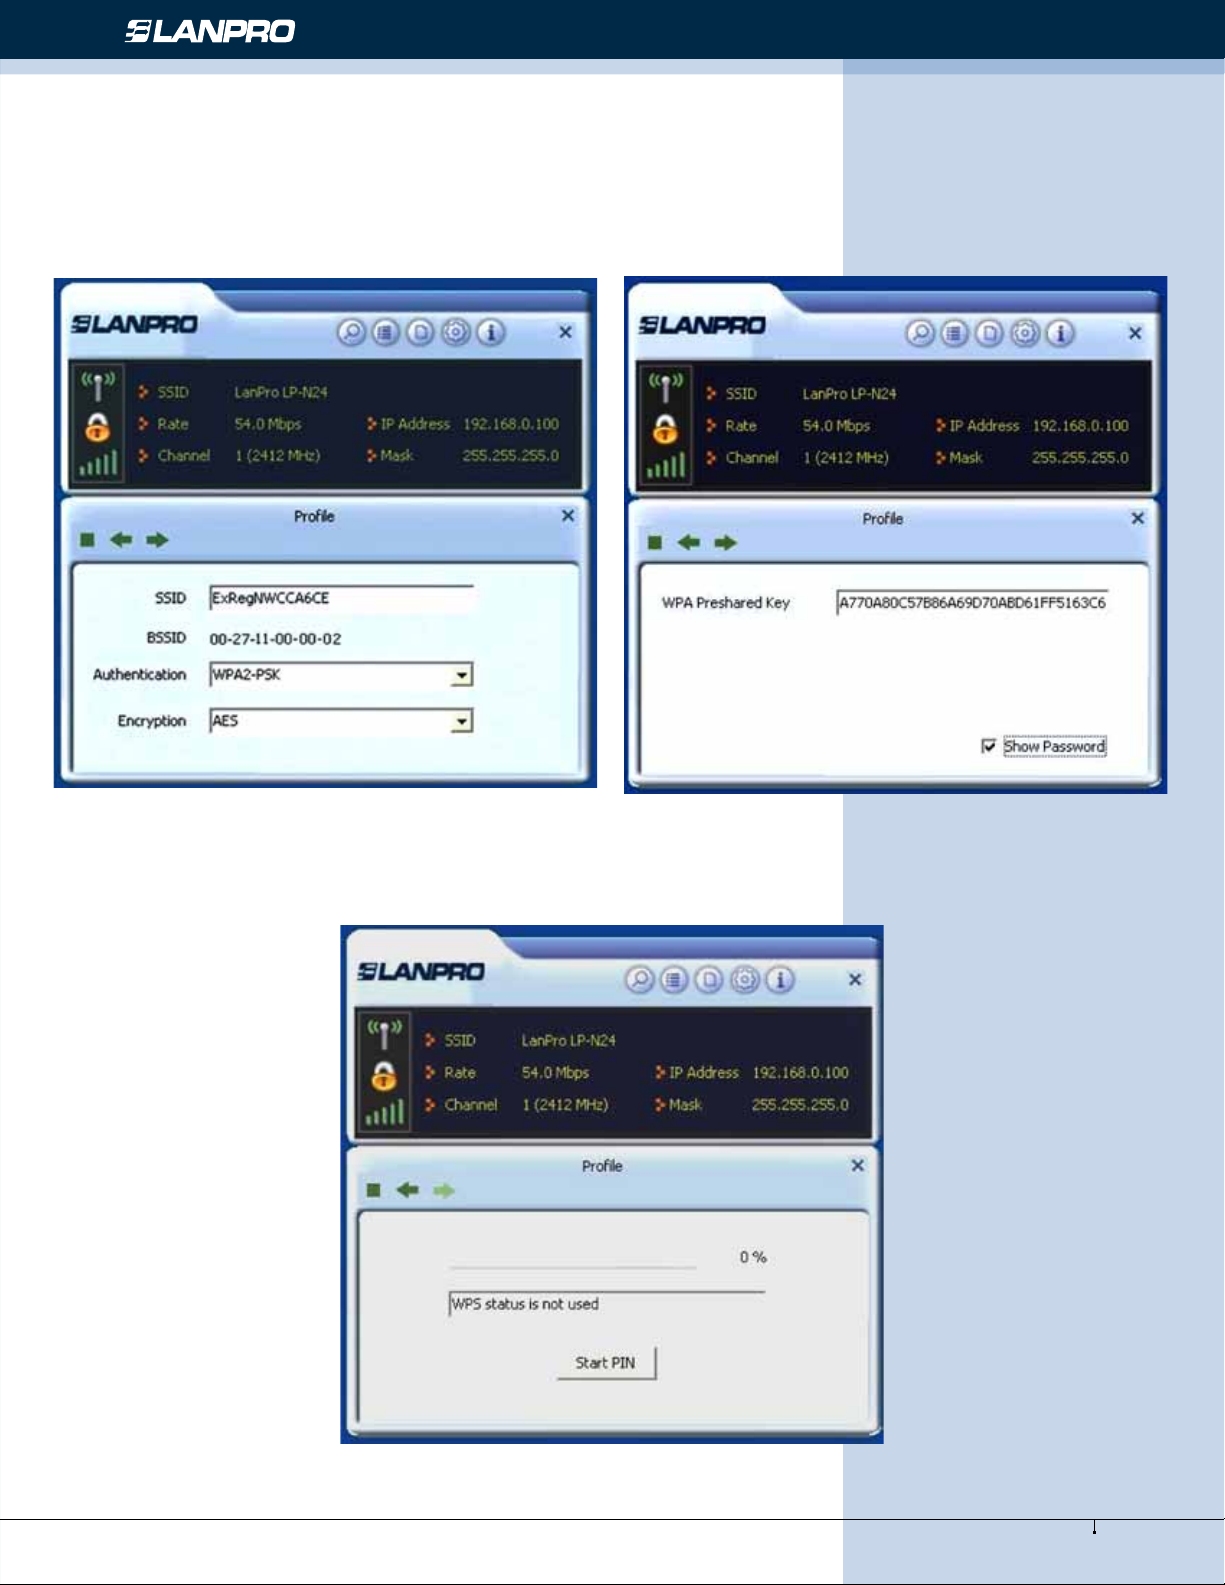
Now you can view the SSID, authentication type, and
encrytion type that need to be negotiated by the WPS in
registrar mode. These values can be modied but we
recommend using the default. Here we use the defaut
setting and then click the next buton.
You can view the negotiation key on the screen below, but
you are not recommended to modify it, just click the next
buton.
Then click “Start PIN” on the screen below to perform WPS connection.
31
www.lanpro.com
Page 32
Wireless - Equipment - LP-N24P - USER GUIDE
NOTE:
1. Under the WPS connection mode, when multiple routers simultaneously enable the WPS function, it may cause connection
failure.
2. If the router connect to the adapter using the WPS, only one client can be connected at one time, and so if the router
need to connect to multiple clients through WPS, you should repeat the WPS operation.
Appendix 3: FAQ
7
Q1: Micros oft ICS service is pending.
A1: If ICS serv ice cann ot be en abled af ter a lo ng time, please re-switc h from S tation M ode to A P Mod e, if no t
successful , please restart th e comput er.
Q2: ICS is already bound b y a nother n etwork d evice.
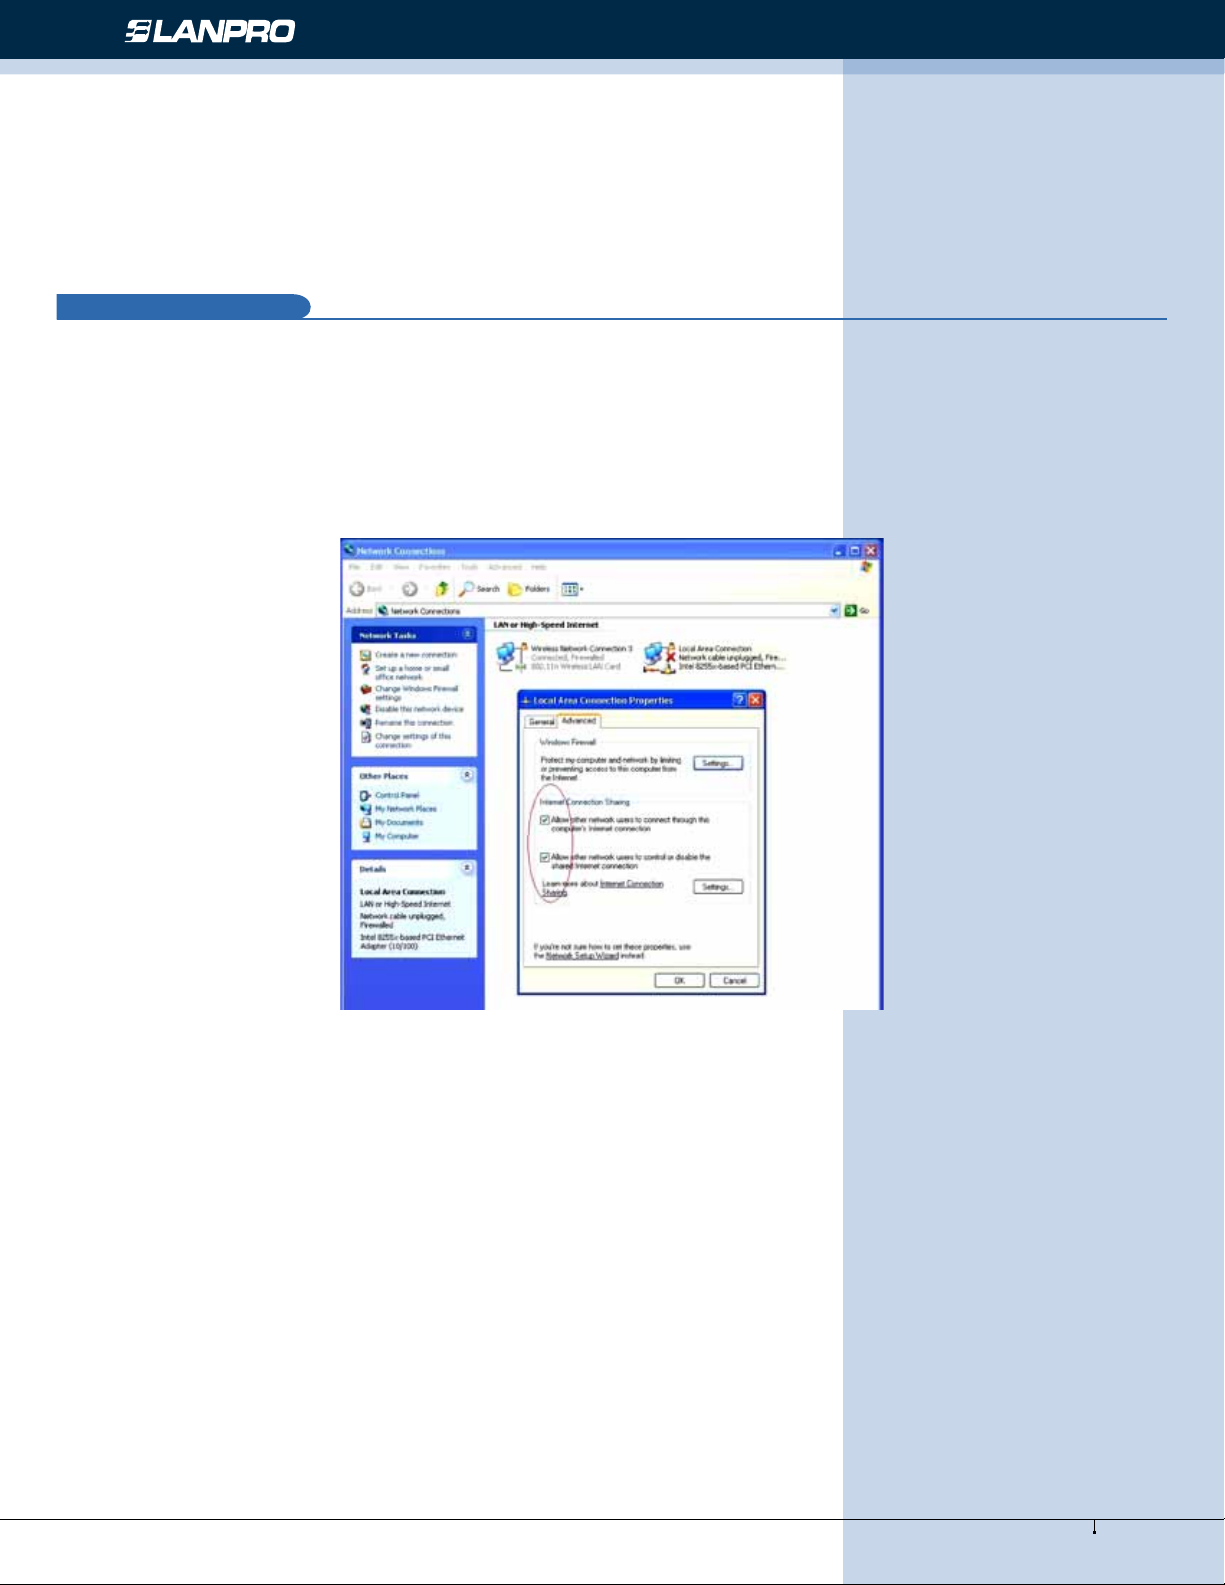
A2: Mic rosoft ICS service can only combine one g roup of WAN and L AN. T his m essage indicates ICS may have
been en abl ed by ot her netw ork adapter s. Pleas e manually cancel I CS and r e-s witch to AP mode .
Manually enable or cancel ICS.
Q3: Failed to enable ICS.
A3: Microsoft ICS service can only combine one group of WAN and LAN. This message indicates ICS may have been enabled
by other network adapters.
1. Please manually cancel or restart and cancel ICS, then re-switch to AP mode.
2. This dialogue box appears because virtual wi- miniport adapter can only be used by one wireless network adapter at a
time. Please disable any other non-LanPro wireless network adapters and re-switch to AP mode.
Q4: Under Windows 7, when I switch from station mode to AP mode, the screen ashes “Disabling ICS, please wait……”and
immediately return to station screen.
A4: This is because you have disabled “Microsoft Virtual WiFi Miniport Adapter”, please re-enable it and then switch to AP
mode.
32
www.lanpro.com
Page 33
Wireless - Equipment - LP-N24P - USER GUIDE
Q5: Client cannot obtain IP when connected to soft AP of the wireless network adapter.
A5: Manually set an IP address at the same net segment as that of the AP and the gateway and DNS at the IP address of
AP.Thus, communication can be achieved.
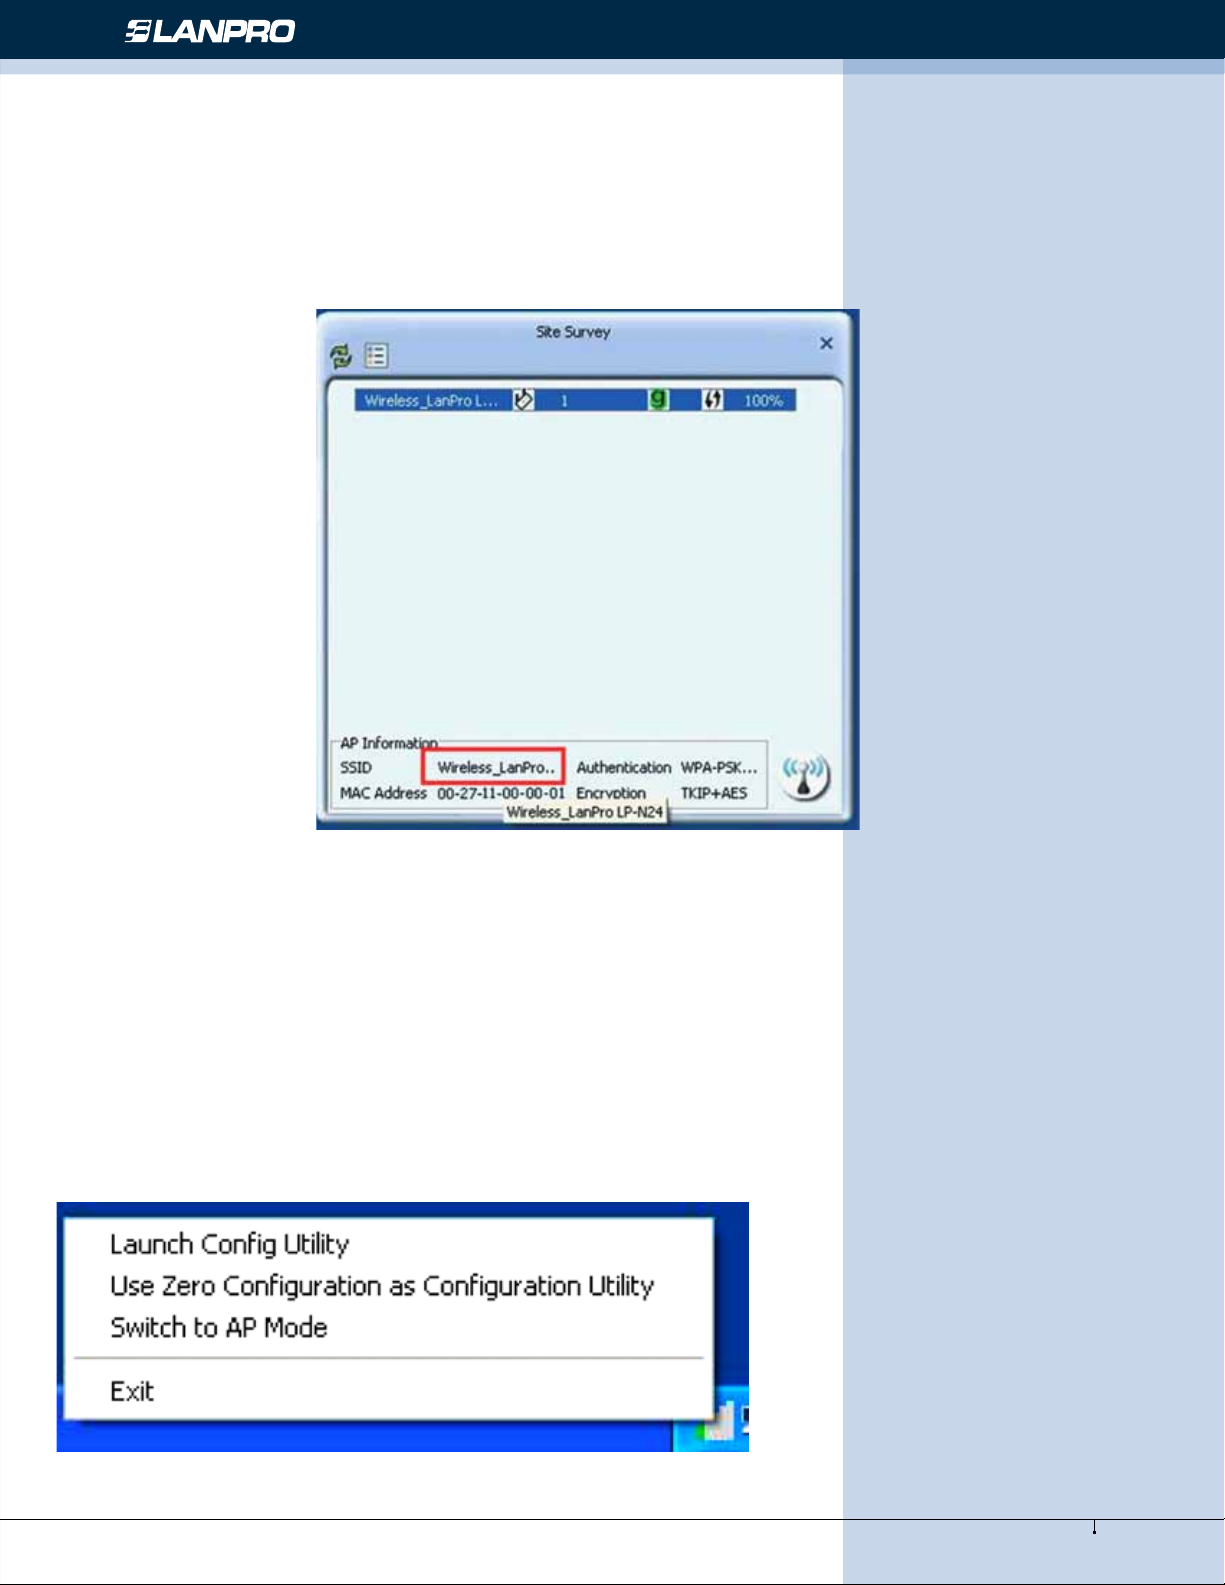
Q6: The SSID is not fully displayed on the wireless network list, what should I do?
A6: Keep the mouse on the displayed SSID for about 2 seconds, as the below picture shows,and you’ll see the full SSID on
the appearing box.
Q7: Under Windows 2000 system, IP address can not be obtained when it is switched to AP Mode.
A7: Under Windows 2000 system, you have to manually congure sharing and then switch to AP. And an IP address of
192.168.0.1 will be obtained.
If you still have any problem, please contact our customer service or visit our website: www.lanpro.com
Q8: Sometimes the UI can not be moved by the mouse and also can not be minisized, why?
A8: When you are performing some congurations or connections ,the UI only activates the currently operating window,other
windows are locked and can not be operated, but it will restore to normal when you close or nish the current conguration
and connection .
Q9: How to exit the UI?
A9: Right click the system tray icon and click “Exit” on the appearing dialog.
33
www.lanpro.com
Page 34

Wireless - Equipment - LP-N24P - USER GUIDE
Q10: Now that the LanPro LP-N24P wireless adapter’s driver can be installed without the Software CD, why it still provide
the CD?
A10: Some functions are missing for the drive integrated in the LP-N24P adapter, and also the drive does not support
the WPS button and AP mode, however, by installing the drive on the CD, the UI can be installed to fulll these advanced
features.
Q11: Why I can not normally use the Drive integrated in LP-N24P under MAC operating system?
A11: LP-N24P can only integrates the drive under Windows system, to use LP-N24P under MAC system, please insert the
LP-N24P to the computer with MAC OS; the system will identify the adapter as a CD, pop this CD out, and then install the
MAC drive included in the CD.
Technical Support: [email protected]
Appendix 4 :Regulatory Information
8
Eu Declaration or Declaration of Conformity
Hereby, LANPRO INC, declares that this Wireless Adapter is in compliance with the essential requirements and other
relevant provisions of Directive 1999/5/EC.
FCC Statement
This equipment has been tested and found to comply with the limits for a Class B digital device, pursuant to part 15 of
the FCC rules. These limits are designed to provide reasonable protection against harmful interference in a residential
installation. This equipment generates, uses and can radiate radio frequency energy and, if not installed and used in
accordance with the instructions, may cause harmful interference to radio communications. However, there is no guarantee
that interference will not occur in a particular installation. If this equipment does cause harmful interference
to radio or television reception, which can be determined by turning the equipment off and on, the user is encouraged to
try to correct the interference by one or more of the following measures:
-Reorient or relocate the receiving antenna.
-Increase the separation between the equipment and receiver.
-Connect the equipment into an outlet on a circuit different from that to which the receiver is connected.
-Consult the dealer or an experienced radio/TV technician for help.
To assure continued compliance, any changes or modications not expressly approved by the party responsible for compliance
could void the user’s authority to operate this equipment. (Example- use only shielded interface cables when connecting to
computer or peripheral devices).
“The antenna(s) used for this transmitter must not be co-located or operating in conjunction with any other antenna or
transmitter.”
FCC Radiation Exposure Statement
This equipment complies with FCC radiation exposure limits set forth for an uncontrolled environment. This equipment
should be installed and operated with the minimum distance
of 20 cm. Operation is subject to the following two conditions:
1) This device may not cause interference and
2) This device must accept any interference, including interference that may cause undesired operation of the device.
Caution!
The manufacturer is not responsible for any radio or TV interference caused by unauthorized modications to this equipment.
Such modications could void the user authority to operate the equipment.
34
www.lanpro.com
 Loading...