

Page 1
Wireless - Equipment
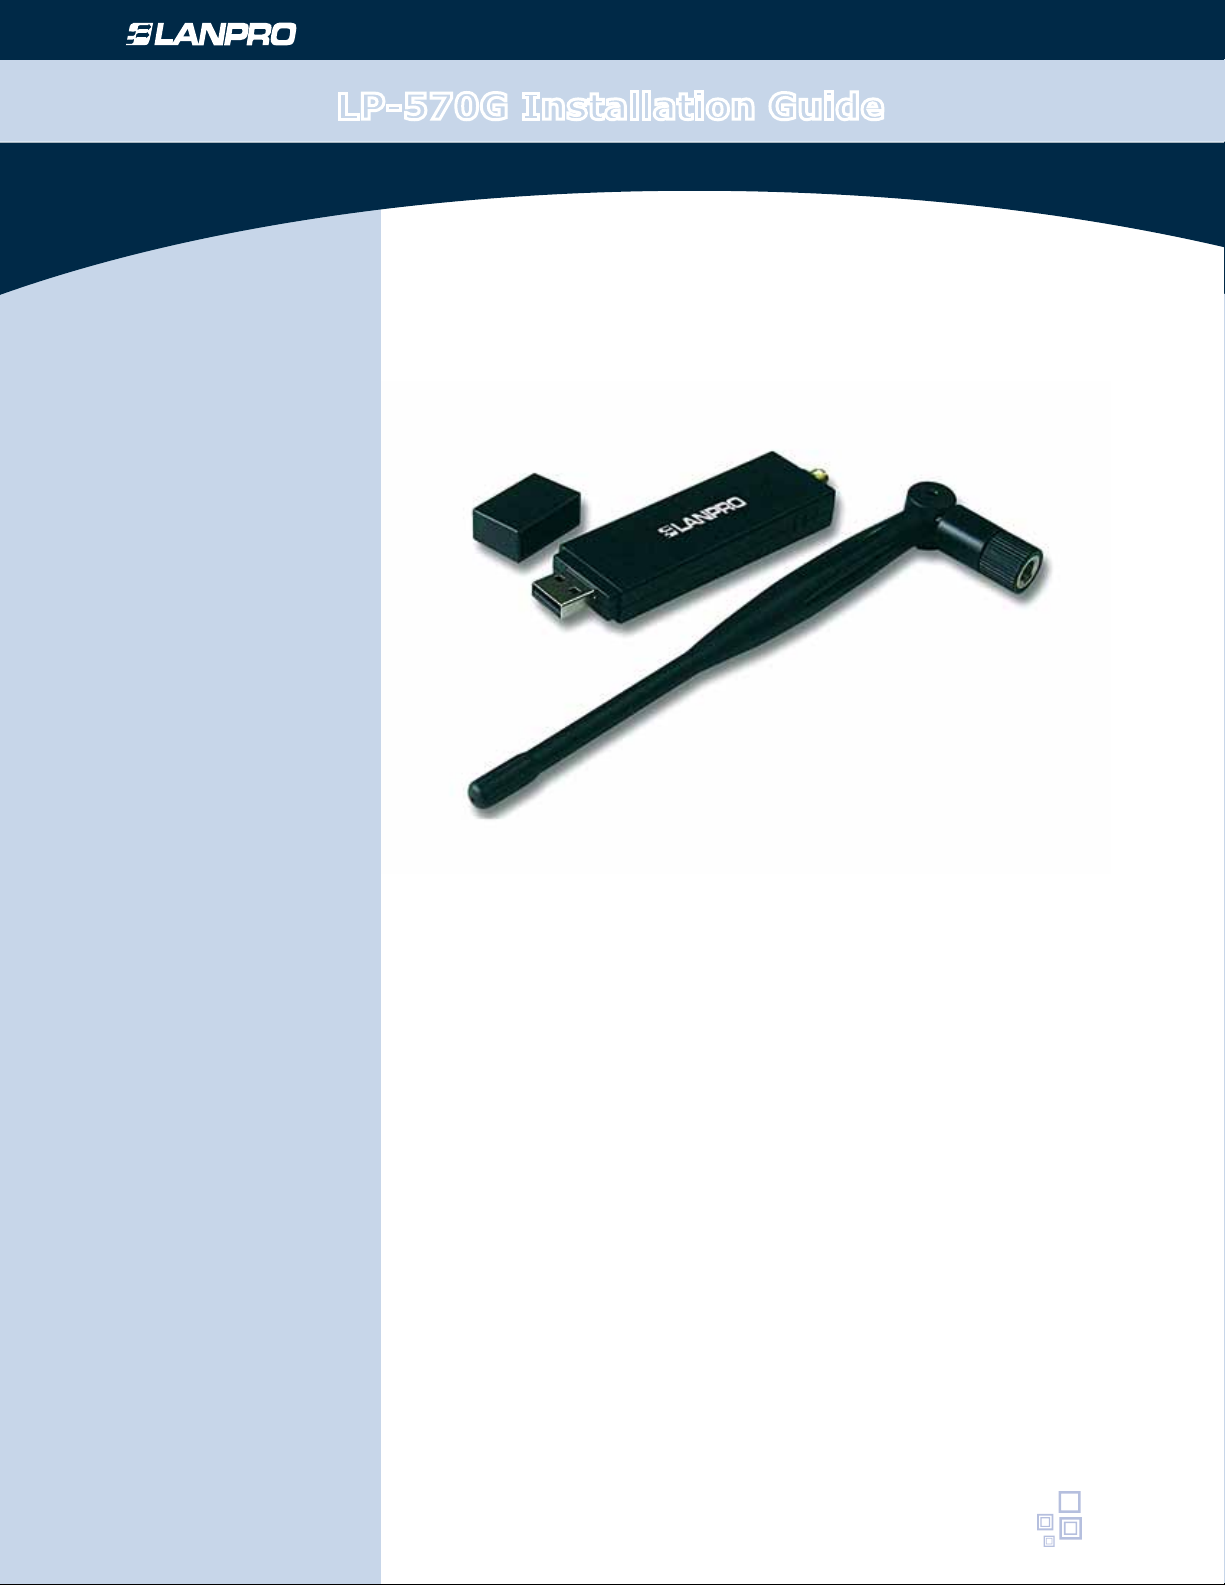
LP-570G Installation Guide
LP570G_IG_ENB01W
LP-570G
Installation Guide
www.lanpro.com
Page 2
Wireless - Equipment - 2.4 GHz - LP-570G - Installation guide
This manual will Guide you in the Installation of your LP-570G.
Before you proceed with the installation, please read the following Notes:
Note 1: The following installation was operated under Windows XP. (Procedures are similar to Windows
98SE/Me/2000.)
Note 2: If you have installed the WLAN USB driver & utility already, please uninstall the old version rst.
Note 3: Do not insert the wireless LAN adapter into your computer until the procedure of Install the
Driver & Utility has been performed.
Installation
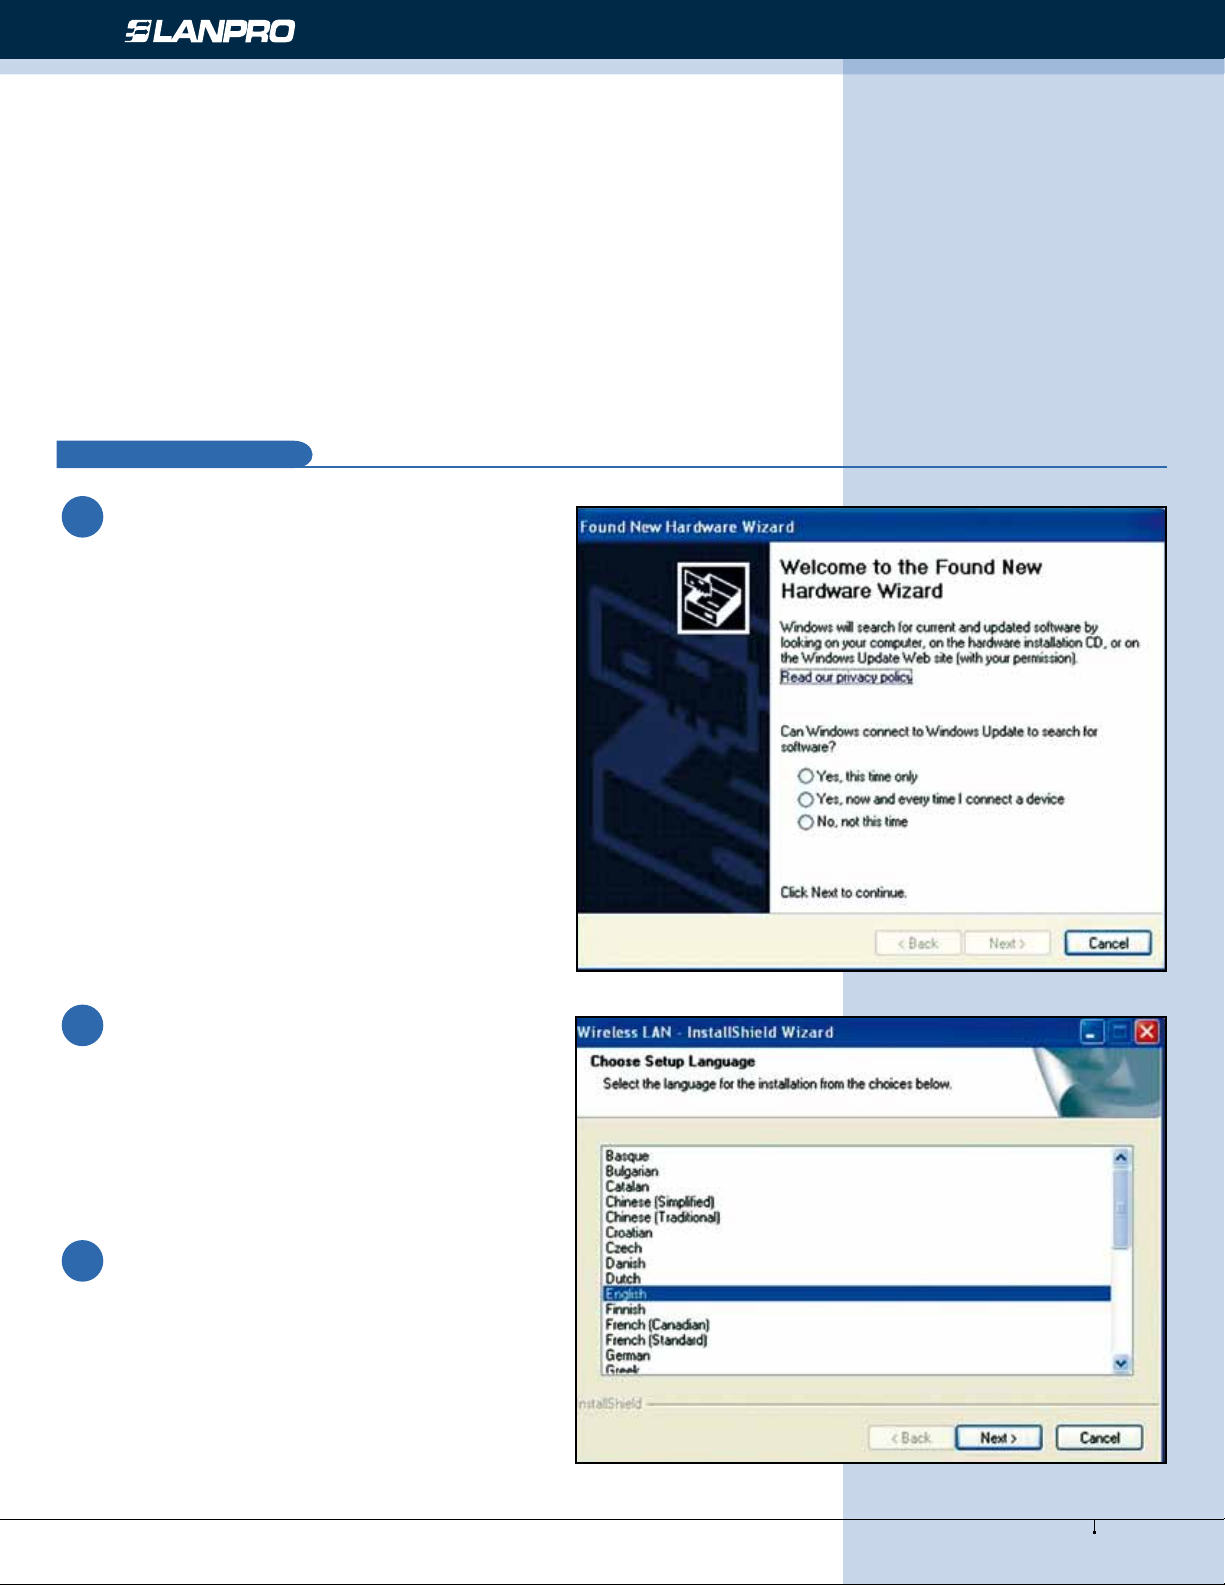
A
If you insert the Wireless LAN USB
1
Adaptor into your computer USB port
after installing the software program from
the CD, the following window pops up.
Click Cancel.
2
Choose a set up language.
3
Figure 1
Figure 2
2
www.lanpro.com
Page 3
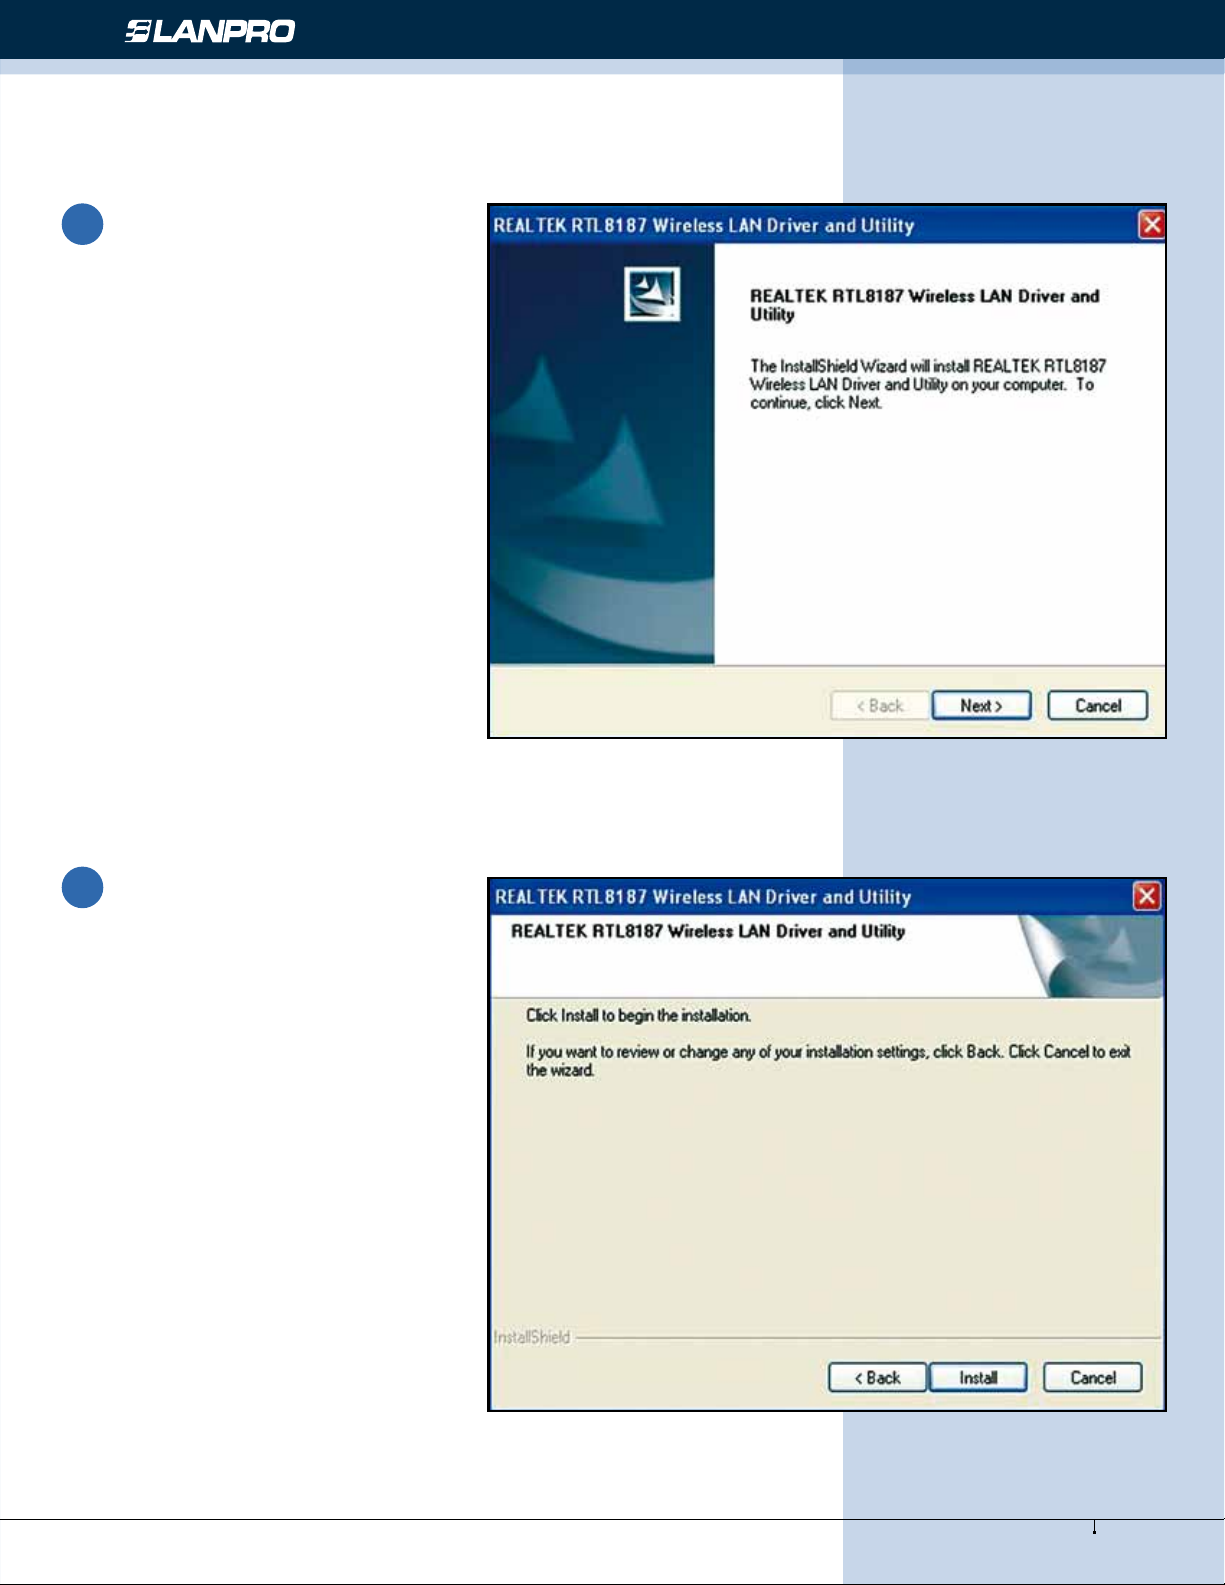
Click Next to process the
4
installation.
Wireless - Equipment - 2.4 GHz - LP-570G - Installation guide
Figure 3
Click Install to WLAN USB
5
adaptor installation.
Figure 4
3
www.lanpro.com
Page 4

On the Windows Logo Software
6
Installation screen, click
Continue Anyway to continue.
Note: Not all the drivers will have
this message box.
Wireless - Equipment - 2.4 GHz - LP-570G - Installation guide
Click Finish to complete the
7
installation.
After setup, restart your computer.
8
Figure 5
Figure 6
4
www.lanpro.com
Page 5
Uninstallation
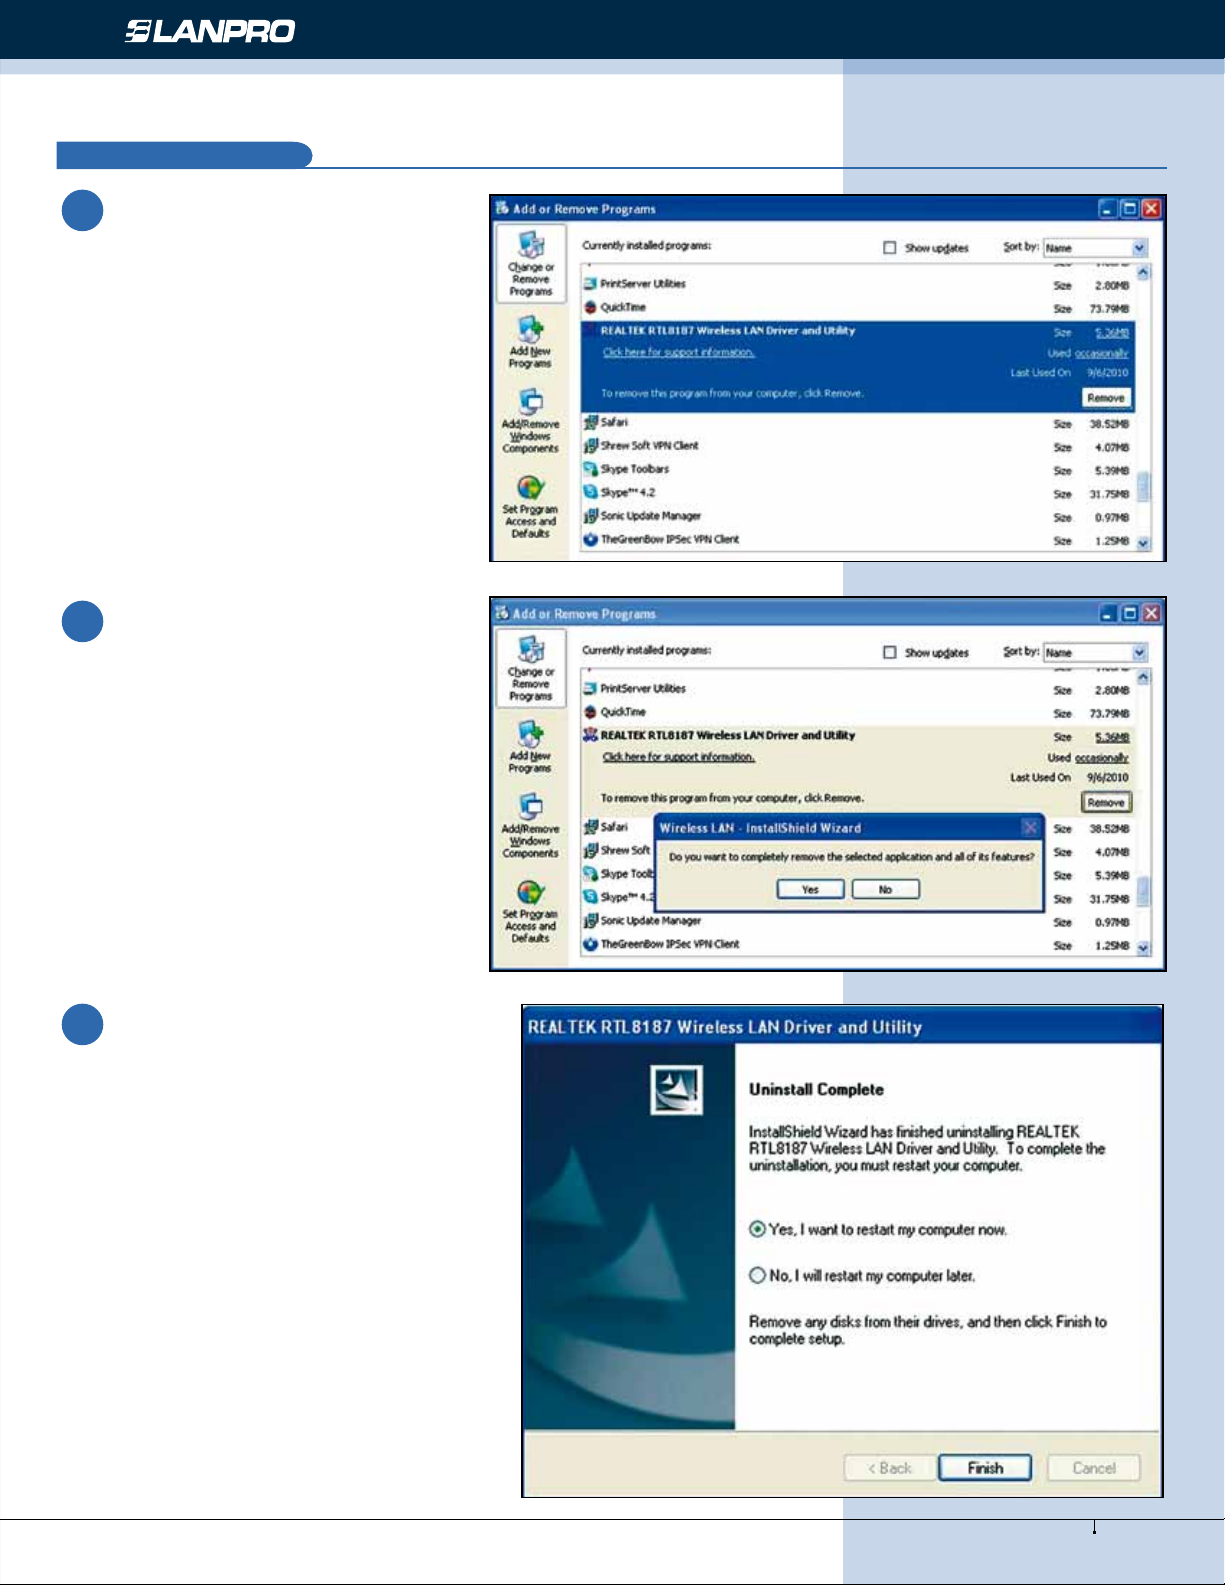
B
Uninstall the WLAN USB Adaptor
1
Driver from Wireless Network
Driver and Utility or Control
Panel. Click Uninstall (or
Change/Remove) to remove
Wireless LAN USB Adaptor driver.
Wireless - Equipment - 2.4 GHz - LP-570G - Installation guide
Figure 7
Click Yes if you want to remove
2
Wireless LAN USB Adaptor Driver.
Click Finish to complete the
3
uninstallation.
Figure 8
Figure 9
5
www.lanpro.com
Page 6

Wireless - Equipment - 2.4 GHz - LP-570G - Installation guide
Making a Basic Network Connection
C
In the following instruction for making a network connection, we use the utility we provided to congure your
wireless network settings.
Note: For Windows XP users that want to congure your wireless network using this Utility, please perform
the following procedures to disable your native Windows XP wireless support (Wireless Zero Conguration
Service)
Double click this icon
1
on your desktop to start
the utility
or this icon in the task
bar.
Figure 10
Ad-Hoc Mode
D
An Ad-Hoc mode wireless network connects two
computers directly without the use of a router or AP. It
is also known as a peer-to-peer network. For example,
we can install this wireless adapter to two computers
respectively. The communication between the two
computers is an Ad-Hoc mode network.
Figure 11
Double click this icon on your
1
desktop to start the utility
or this icon in the task bar.
6
www.lanpro.com
Page 7
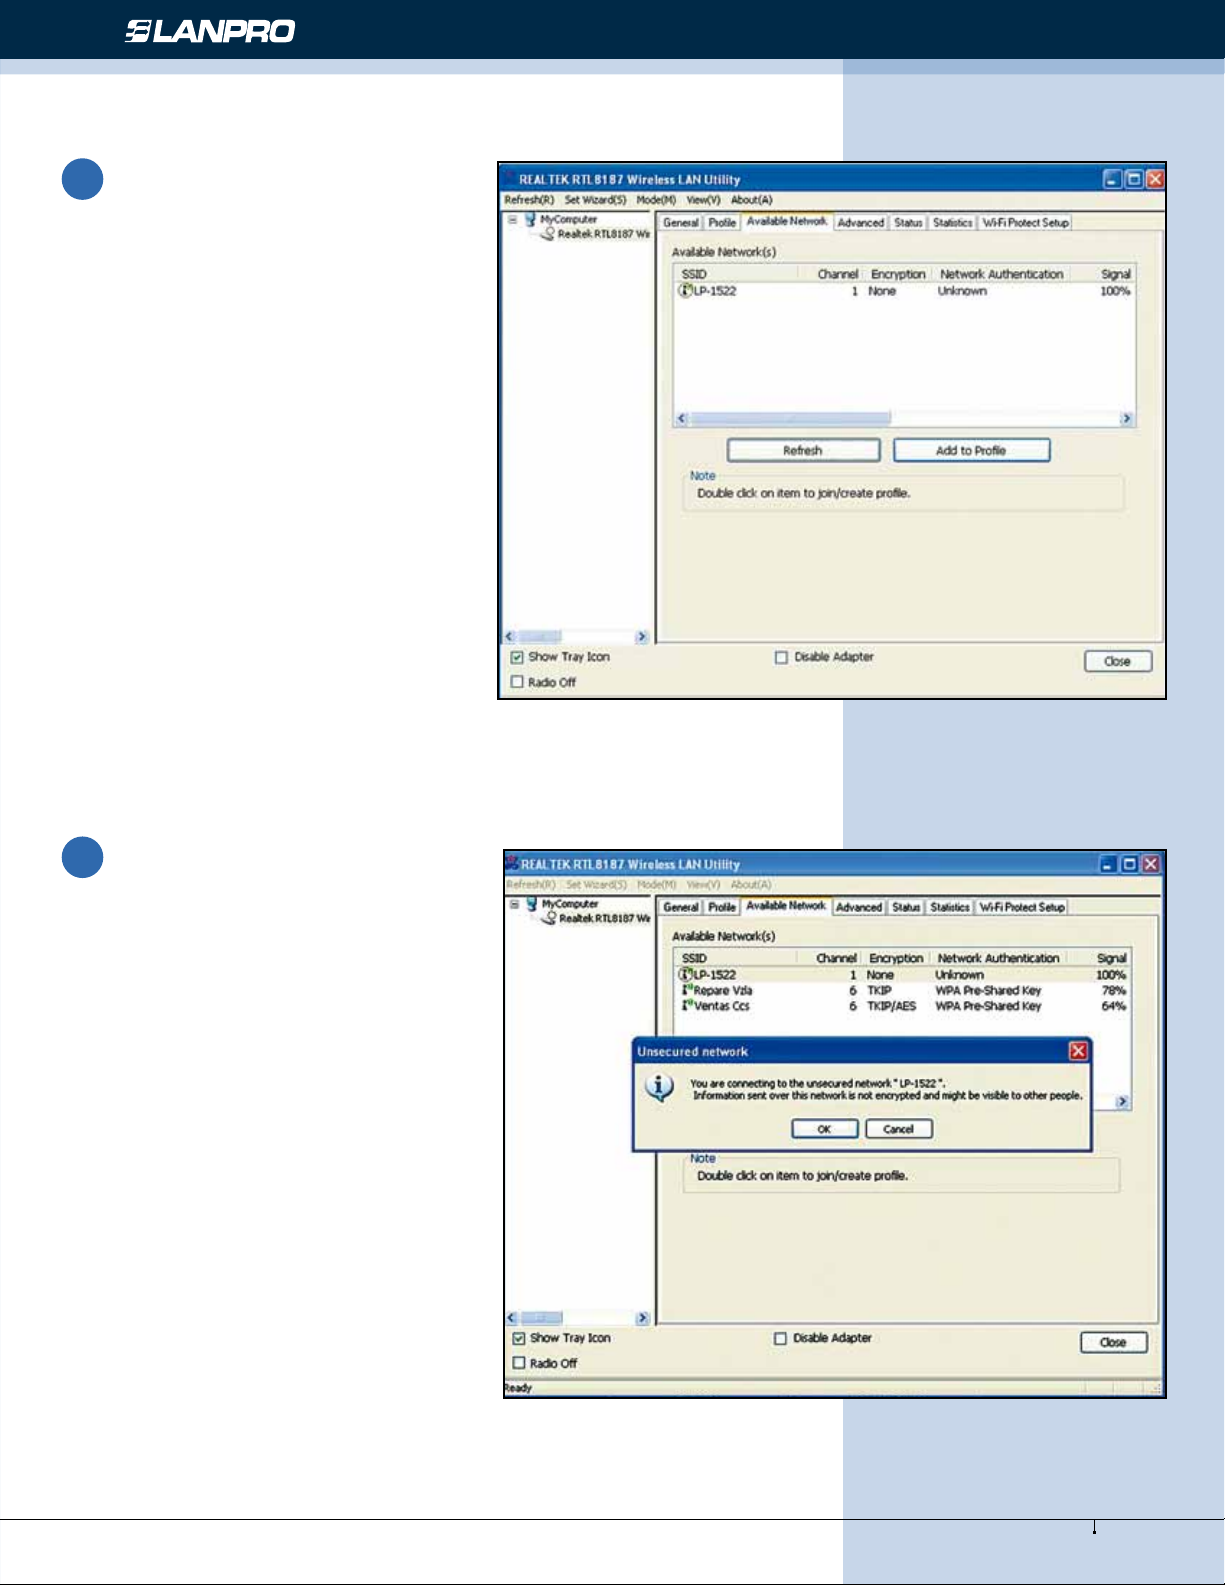
Click the Available Network
2
button to scan available wireless
network adapters. Double click on
the network adapter that you are
going to connect to.
Figure 12
Wireless - Equipment - 2.4 GHz - LP-570G - Installation guide
Click the OK button to conrm
3
that you are connecting to an open
wireless network.
Figure 13
7
www.lanpro.com
Page 8
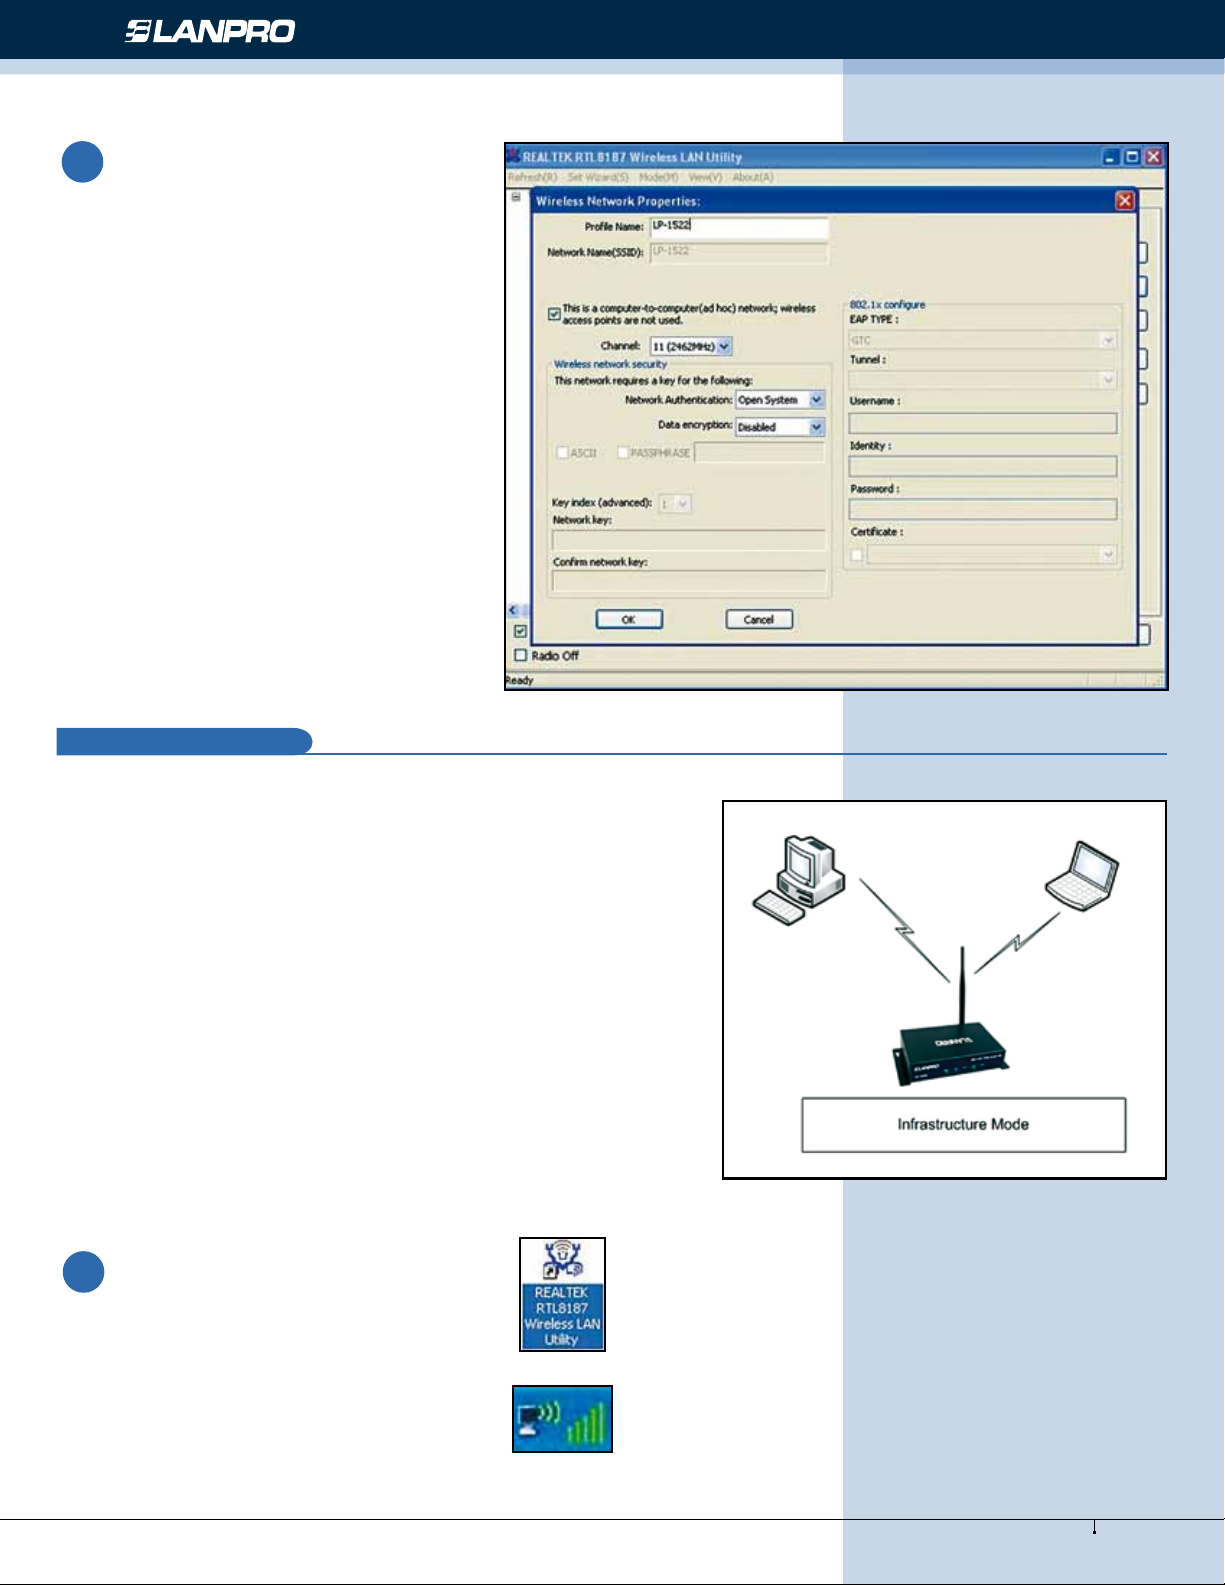
Click OK to add this network into
4
the prole list.
Note: This example is an open
wireless network. If you are going to
connect to a Wireless adapter with
security protection, you will have to
congure the encryption settings
in this prole to be corresponding
to the other wireless adapter.
Please click on the Network
Authentication drop list to select
an authentication method, and then
select a Data encryption type. Fill
in each required blanks and click
OK.
Wireless - Equipment - 2.4 GHz - LP-570G - Installation guide
Figure 14
Infrastructure mode
E
An Infrastructure Mode network contains at least one wireless
client and one wireless AP or router. This client connects to
Internet or intranet by communicating with this wireless AP.
Figure 15
To use this adapter in Infrastructure Mode:
Double click this icon on your
1
desktop to start the utility
or this icon in the task bar.
8
www.lanpro.com
Page 9
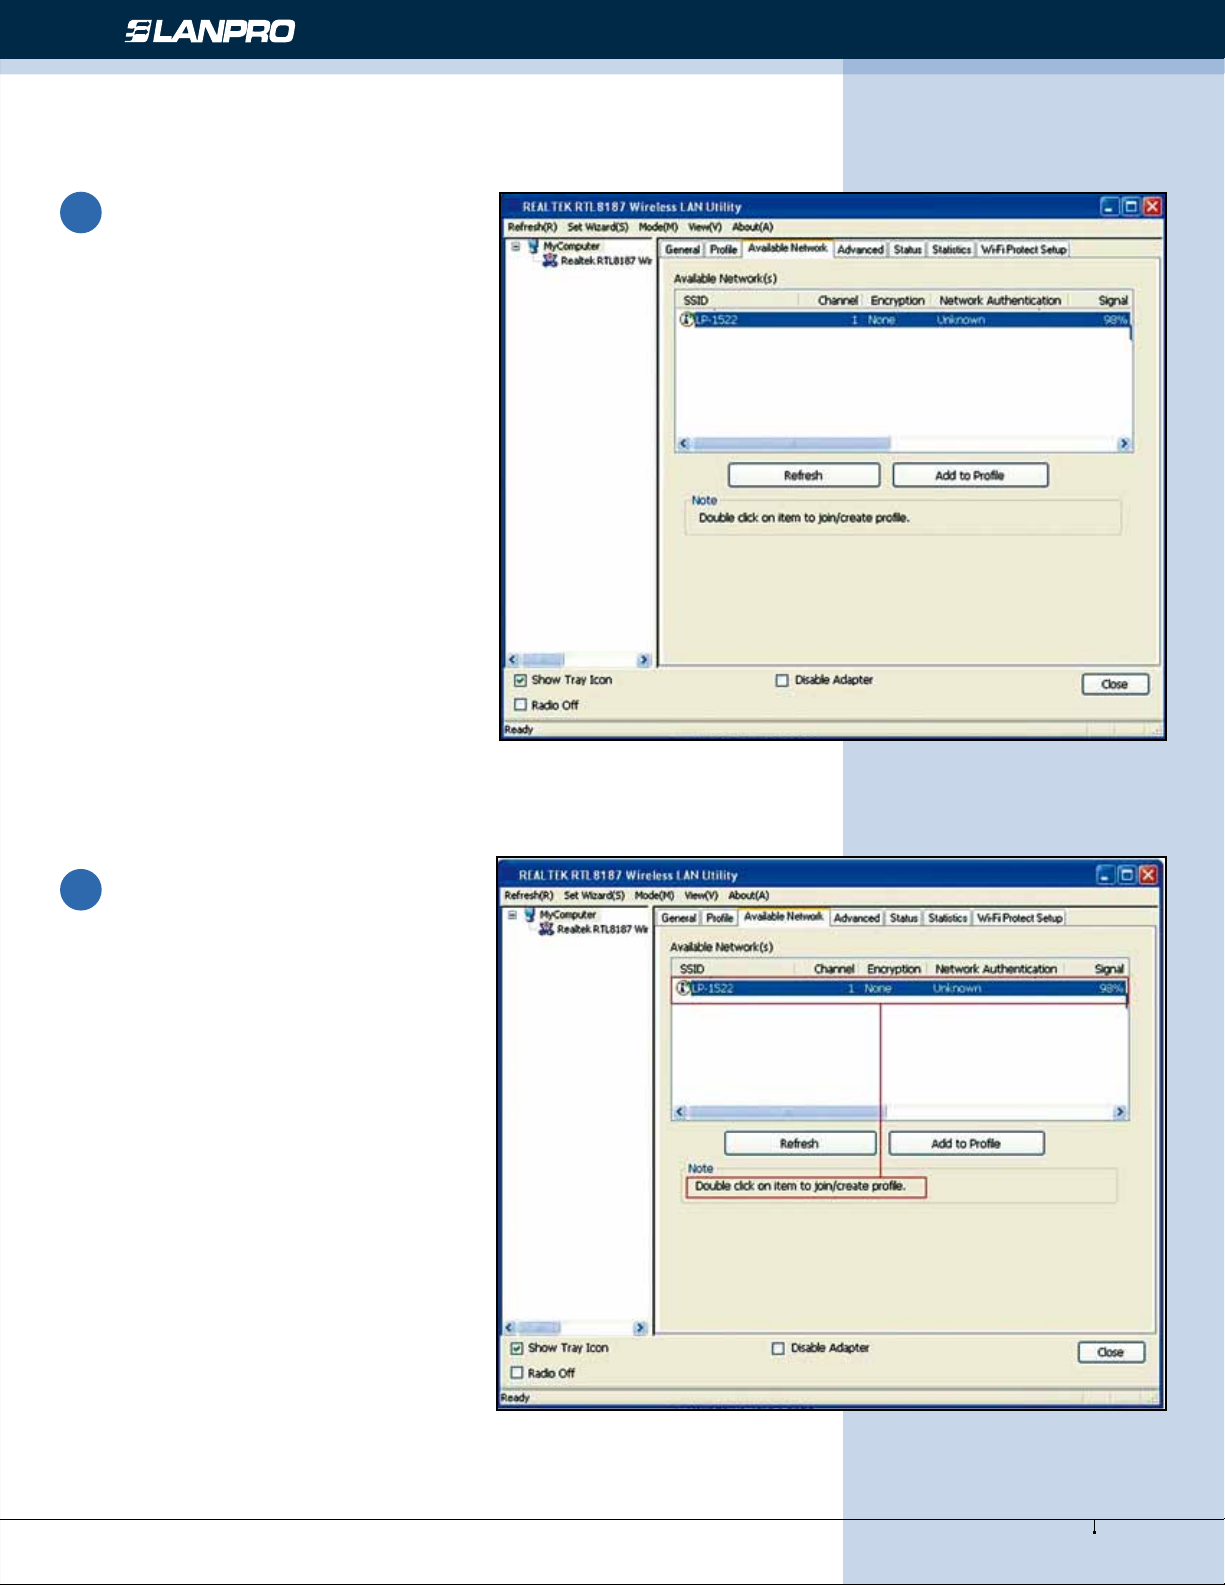
2
Click the Available Network
button to scan available access
points. Double click on the AP that
you are going to connect to.
Figure 16
Wireless - Equipment - 2.4 GHz - LP-570G - Installation guide
Double click to create prole that
3
you are connecting to an open
wireless network.
Figure 17
9
www.lanpro.com
Page 10
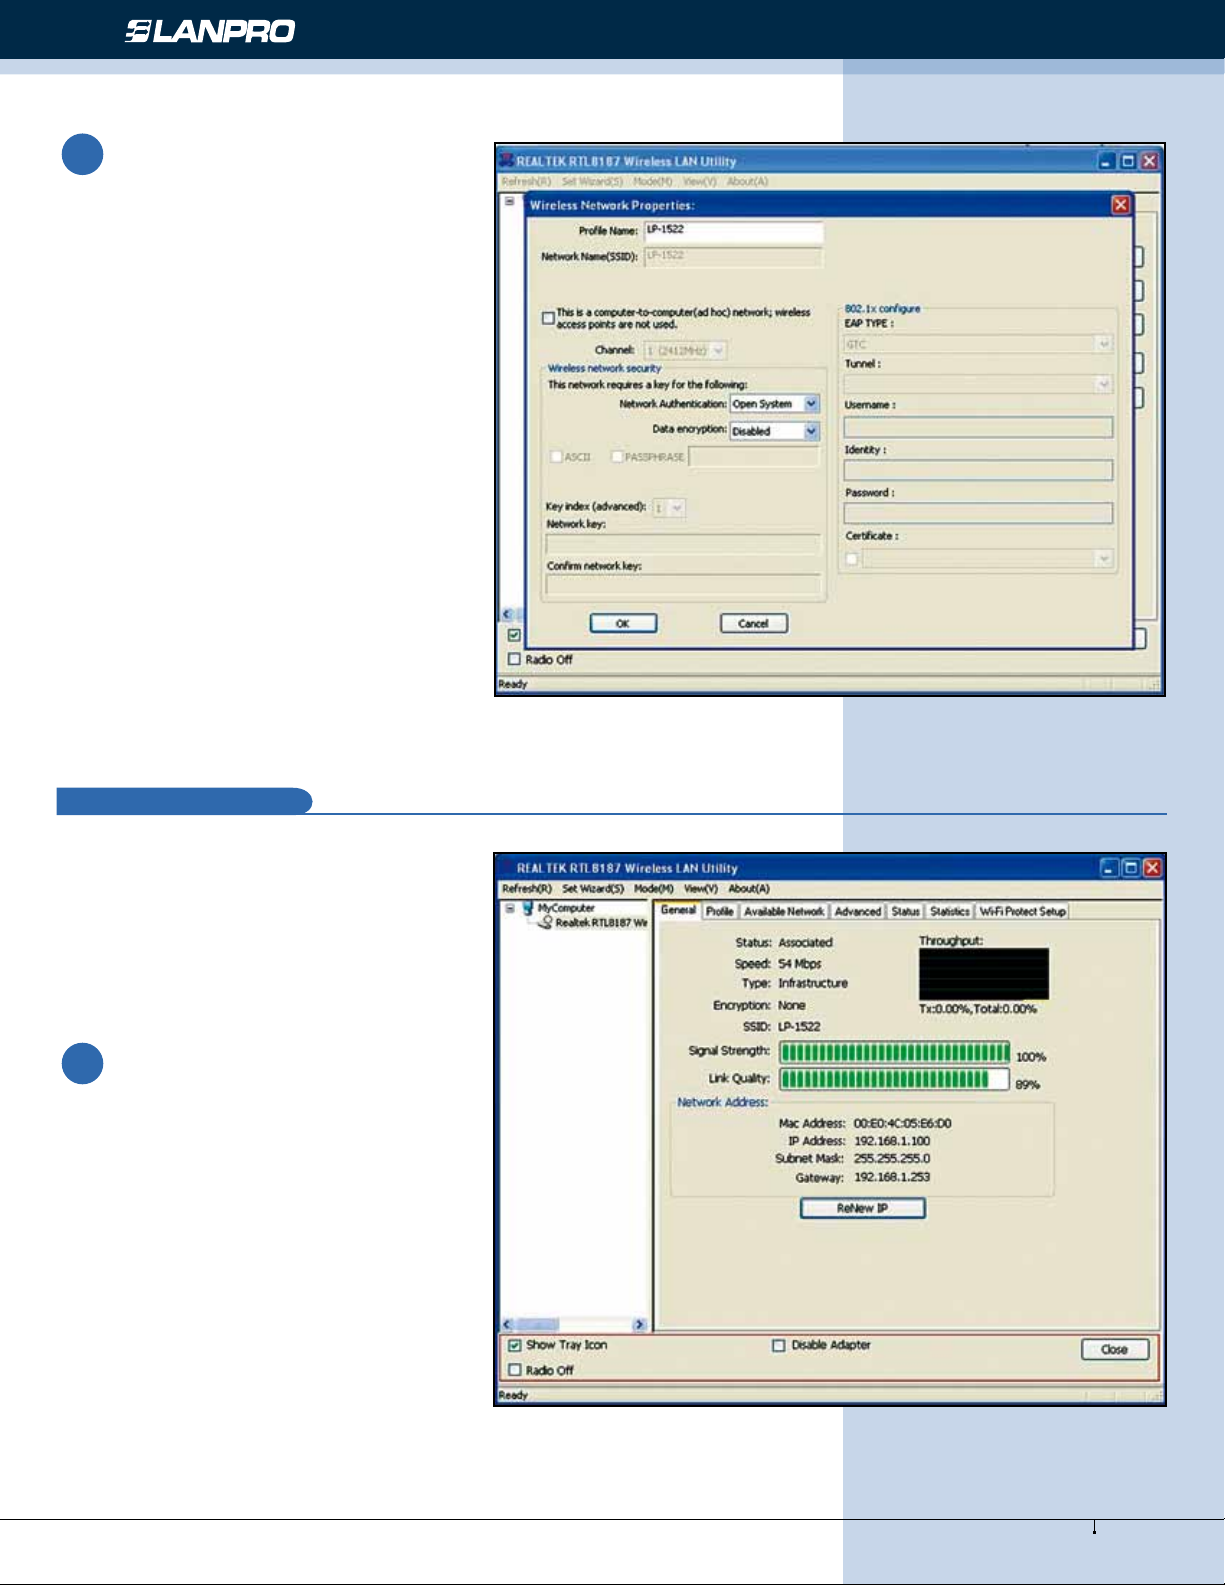
Click OK to add this network into
4
the prole list.
Note: This example is an open wireless
network. If you are going to connect
to an AP with security protection, you
will have to congure the encryption
settings in this prole to correspond to
your AP. Please click on the Network
Authentication drop list to select an
authentication method, and then select
a “Data encryption” type. Fill in each
required blanks and click OK.
Tip: Windows XP and Windows 2000
users is also allowed to connect to your
wireless network with the RT-Set setup
wizard. Please refer to Appendix for
more information.
Wireless - Equipment - 2.4 GHz - LP-570G - Installation guide
Figure 18
Introduction to the Wireless LAN Utility
F
Note: This management instruction uses
Windows XP as the presumed operation
system. Some functions are not
supported in Windows 98se or Windows
ME.
Starting the Wireless LAN Utility
1
Figure 19
10
www.lanpro.com
Page 11
Wireless - Equipment - 2.4 GHz - LP-570G - Installation guide
You may click on the tabs above to congure this adapter.
2
The checkboxes below provide the following functions:
• Show Tray Icon
• Radio Off
• Disable Adapter
Check this checkbox to show the utility icon on yoursystem
Show Tray Icon
tray, which is in the notication area at the lower-right corner
of the windows desktop. You may also uncheck it to remove
the utility icon from system tray.
Radio Off
Disable Adapter
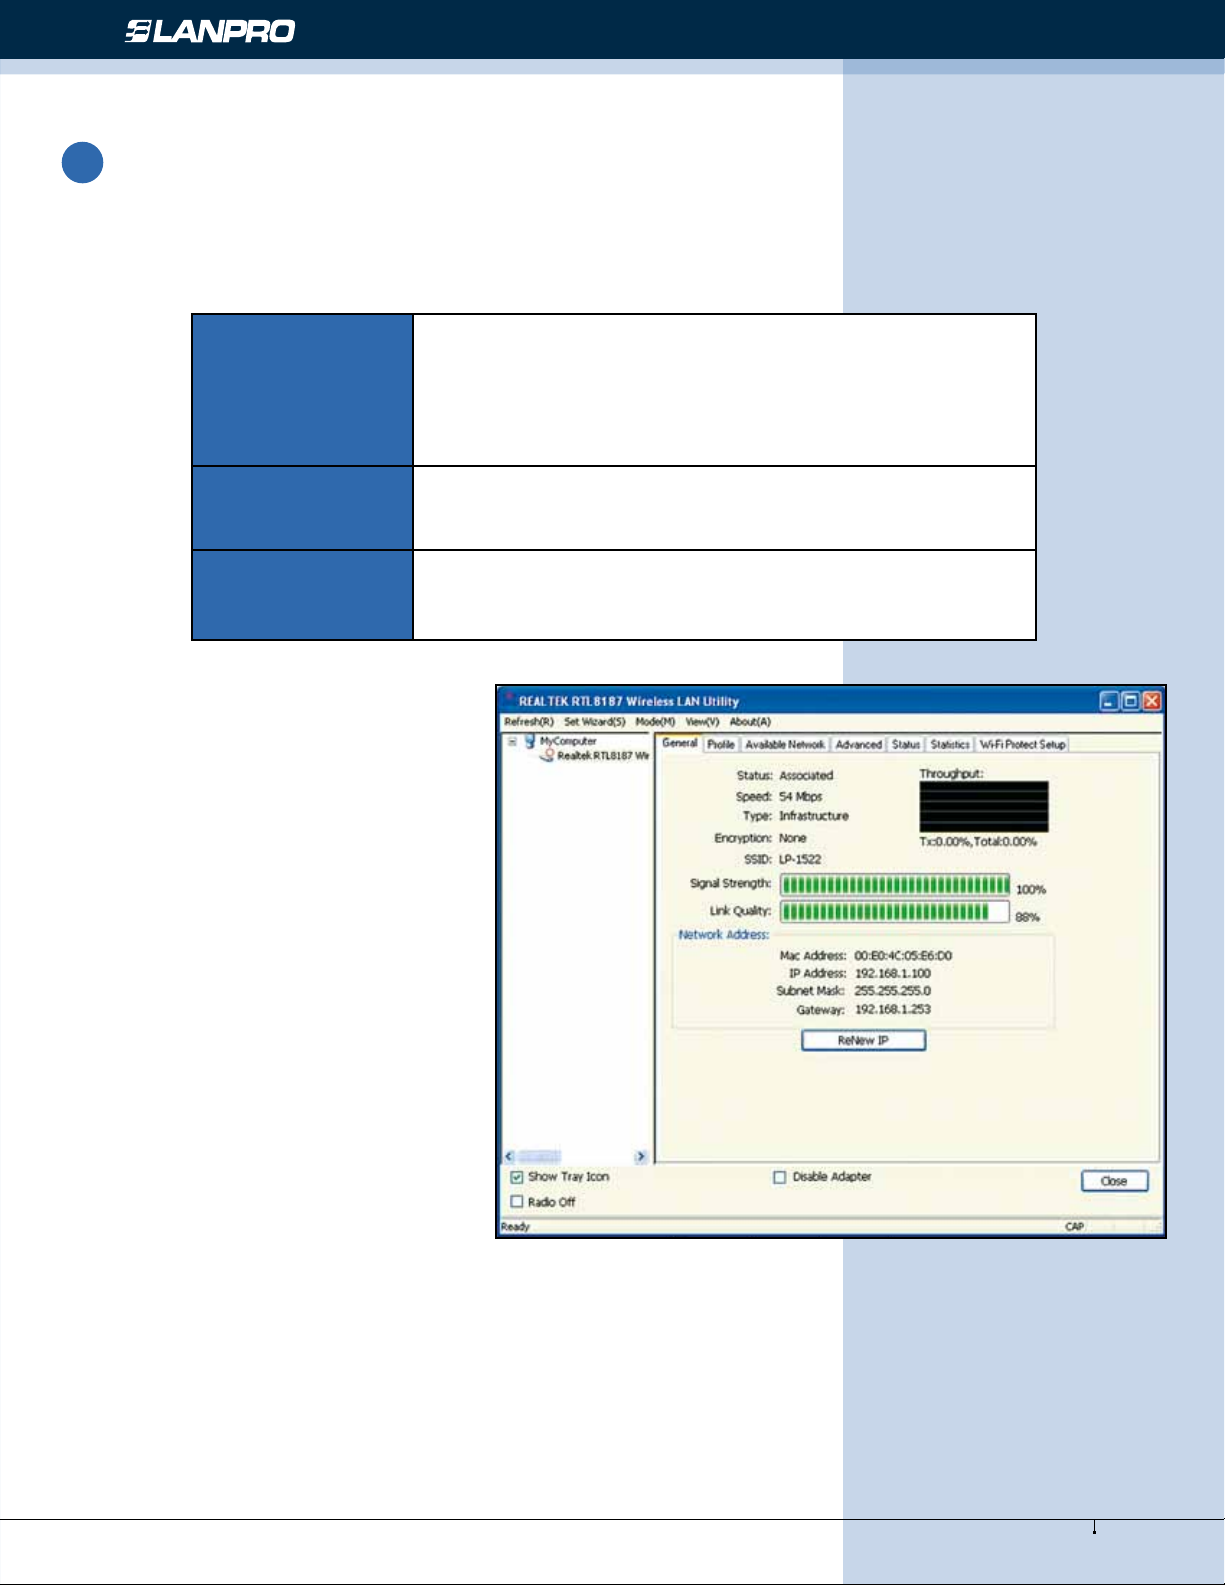
General
After starting the utility, the general
page pops up This General tab provides
the information of your current wireless
network connection. You may click the
Renew IP button to refresh those listed
information.
Check this checkbox to prevent this adapter form transmitting
or receiving signals. Uncheck it to communicate.
Check this checkbox to disable this wireless, Uncheck it to
enable this adapter again.
Status:
Speed:
Type:
Encryption:
SSID:
Signal Strength:
Link Quality:
Network Address:
Figure 20
Check if the device associated to target network.
The current connection speed.
Infrastructure mode or Ad-Hoc mode.
The performing encryption mode for connecting to current network prole.
The SSID (network name) of the connected wireless network.
Indicates the signal strength detected by this adapter.
Indicates the link quality of this wireless connection.
Shows the current IP addresses settings for this adapter.
11
www.lanpro.com
Page 12

Prole
The Prole tab lists the preferred
connections. You can click the buttons
beside to do congure each connection.
Figure 21
Wireless - Equipment - 2.4 GHz - LP-570G - Installation guide
Add:
Remove:
Click this button to add a connection prole for this adapter.
To remove a connection prole, click this prole on the prole list and click this button to
delete it.
Edit:
To modify the congurations for a prole, click this prole on the prole list and click this
button to edit.
Duplicate:
To make a copy of a prole, click the prole that going to be copied, and click this button
to copy it.
Set Default:
To select a prole as your default wireless connection, click this prole on the list and click
this button. You may also double click on each prole to select it as your default wireless
connection.
Available Network
This available tab lists the reachable
wireless network of this adapter.
Refresh:
Click this button to
rescan available networks
around the adapter.
Add to Prole:
To add an available
Network to your prole
list, select the
Available Network and
click this button to add.
Figure 22
12
www.lanpro.com
Page 13
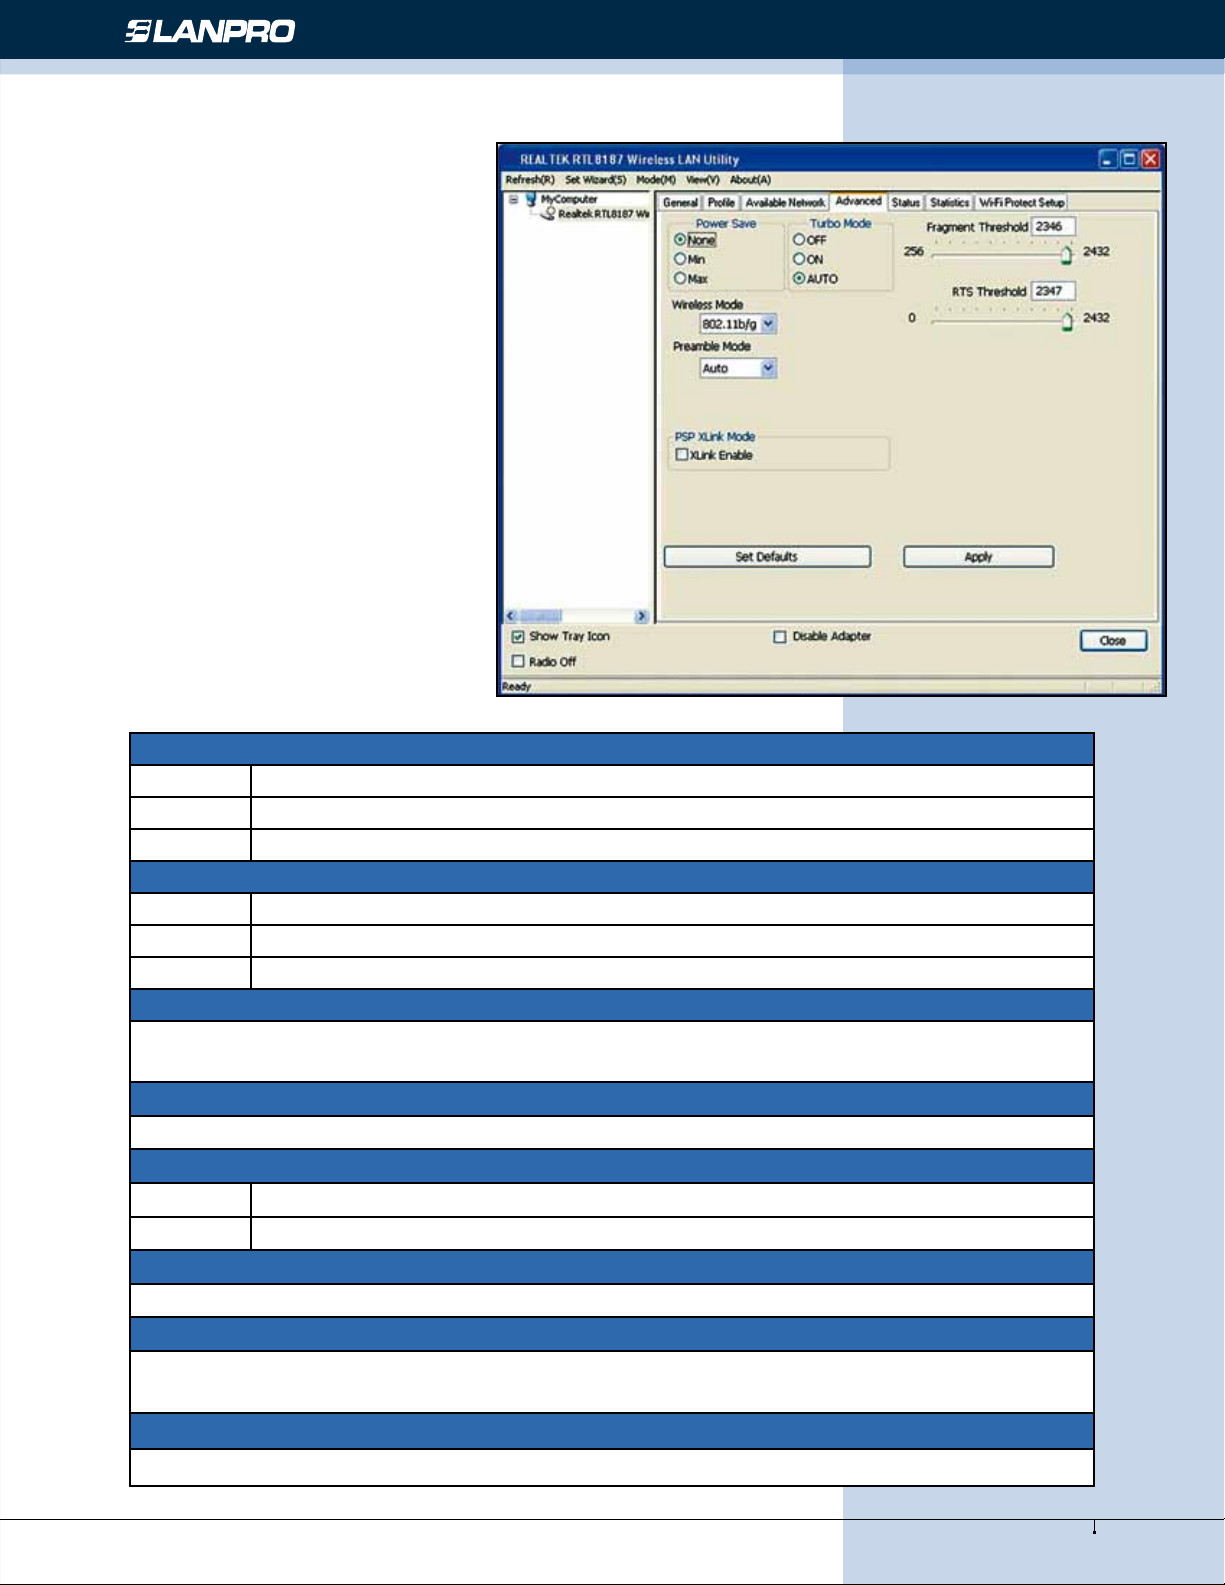
Advanced
This Advanced tab provides advanced
congurations to this adapter. Every
modication in this tab will be performed
after clicking the Apply button.
To restore the default settings of the
advanced tab, click the Set defaults
button to perform restoring.
Figure 23
Wireless - Equipment - 2.4 GHz - LP-570G - Installation guide
Power Save
None Disable Power saving function
Min Minimum power consumption
Max Maximum power consumption
Turbo Mode
Off Disable turbo mode
On Enable turbo mode
Auto Enable or disable turbo mode automatically according to thedetected environment
Fragment Threshold
The maximum size of a packet that is going to be segmented and transmitted. Select the size from
256 to 2432(default) bytes.
RTS Threshold
Select the RTS Threshold form 0 to 2432(default)
Wireless Mode
802.11g/b Connect to a 802.11b/g network (2.4GHz/54Mbps)
802.11b Connect to a 802.11b network (2.4GHz/11Mbps)
802.11b Preamble Mode
Select the preamble mode to be long, short or auto detection mode.
Channel Plan
Select your region from the drop list. Please note that it is necessary for you to select a correct region.
Selecting an incorrect region may again the applicable law.
PSP XLink Mode
If you are using the PS2 or X-box for wireless connection
13
www.lanpro.com
Page 14
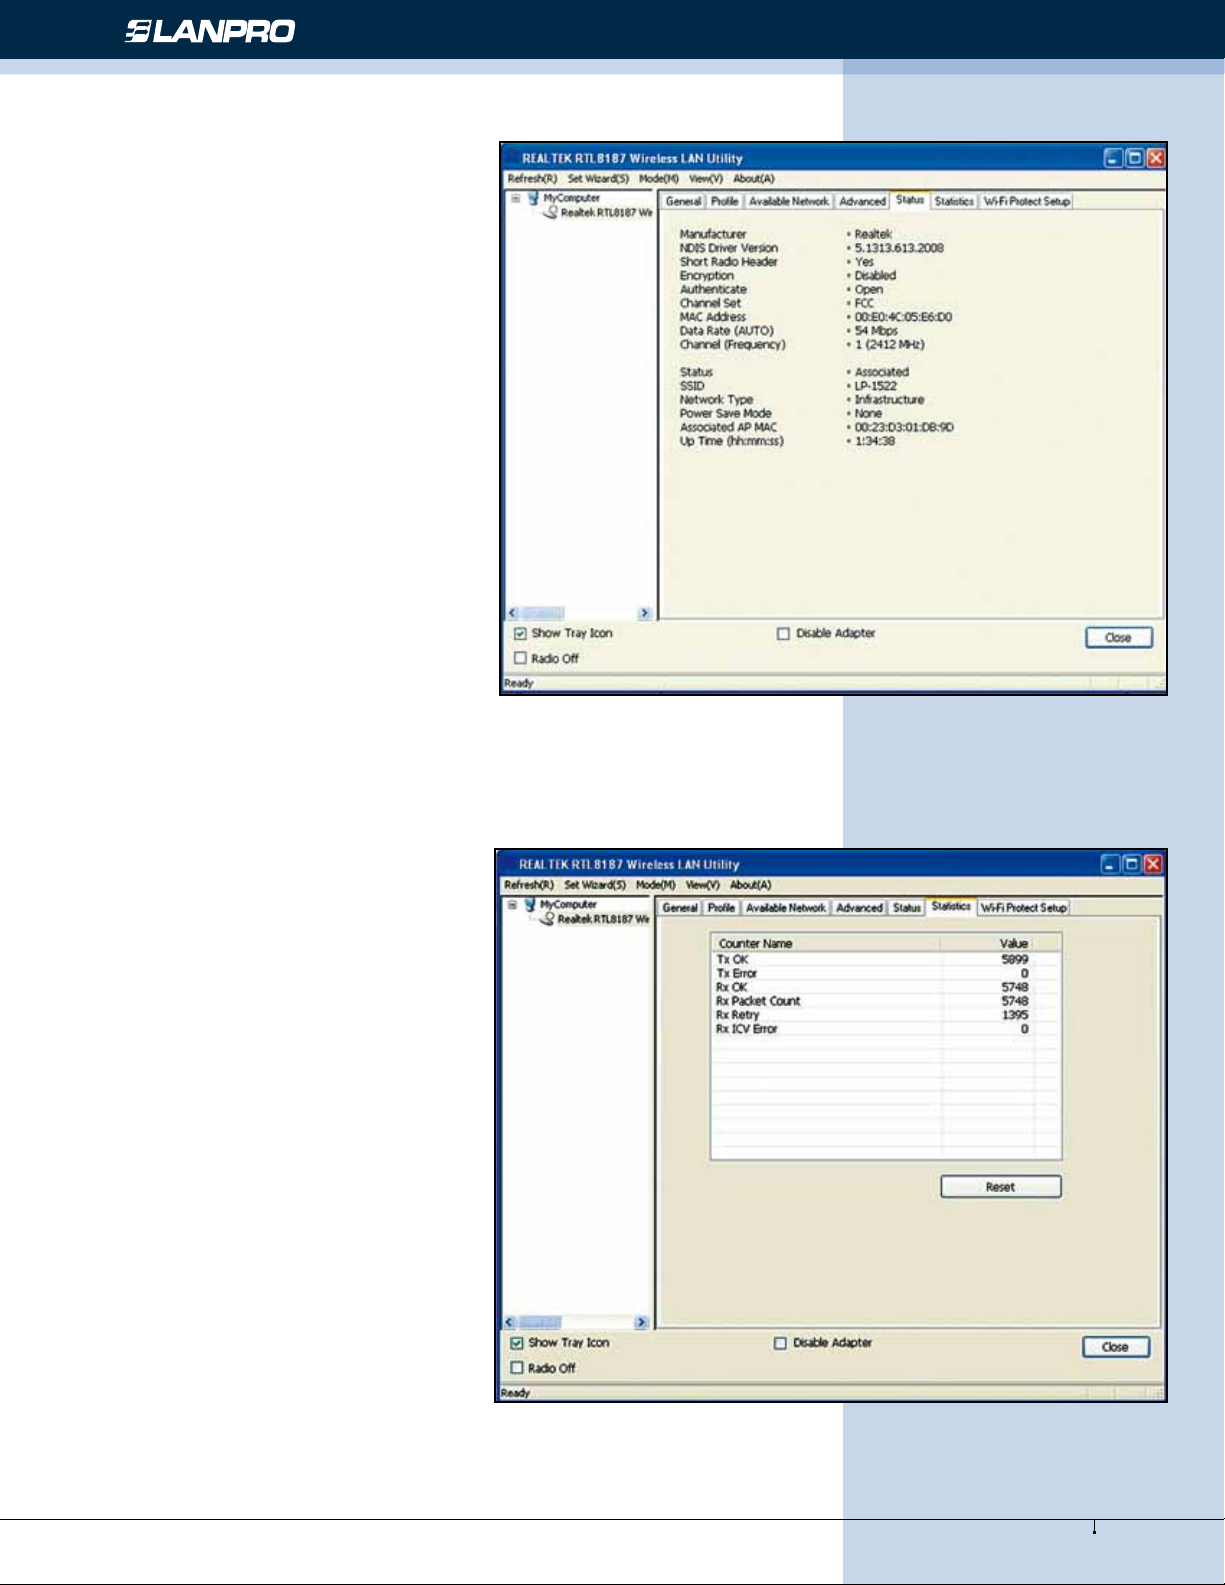
Status
This tab shows the current connection
status of this adapter.
Figure 24
Wireless - Equipment - 2.4 GHz - LP-570G - Installation guide
Statistics
See this tab to show the transmission
activity record. Clicking the Reset
button recounts the values from zero.
Figure 25
14
www.lanpro.com
Page 15
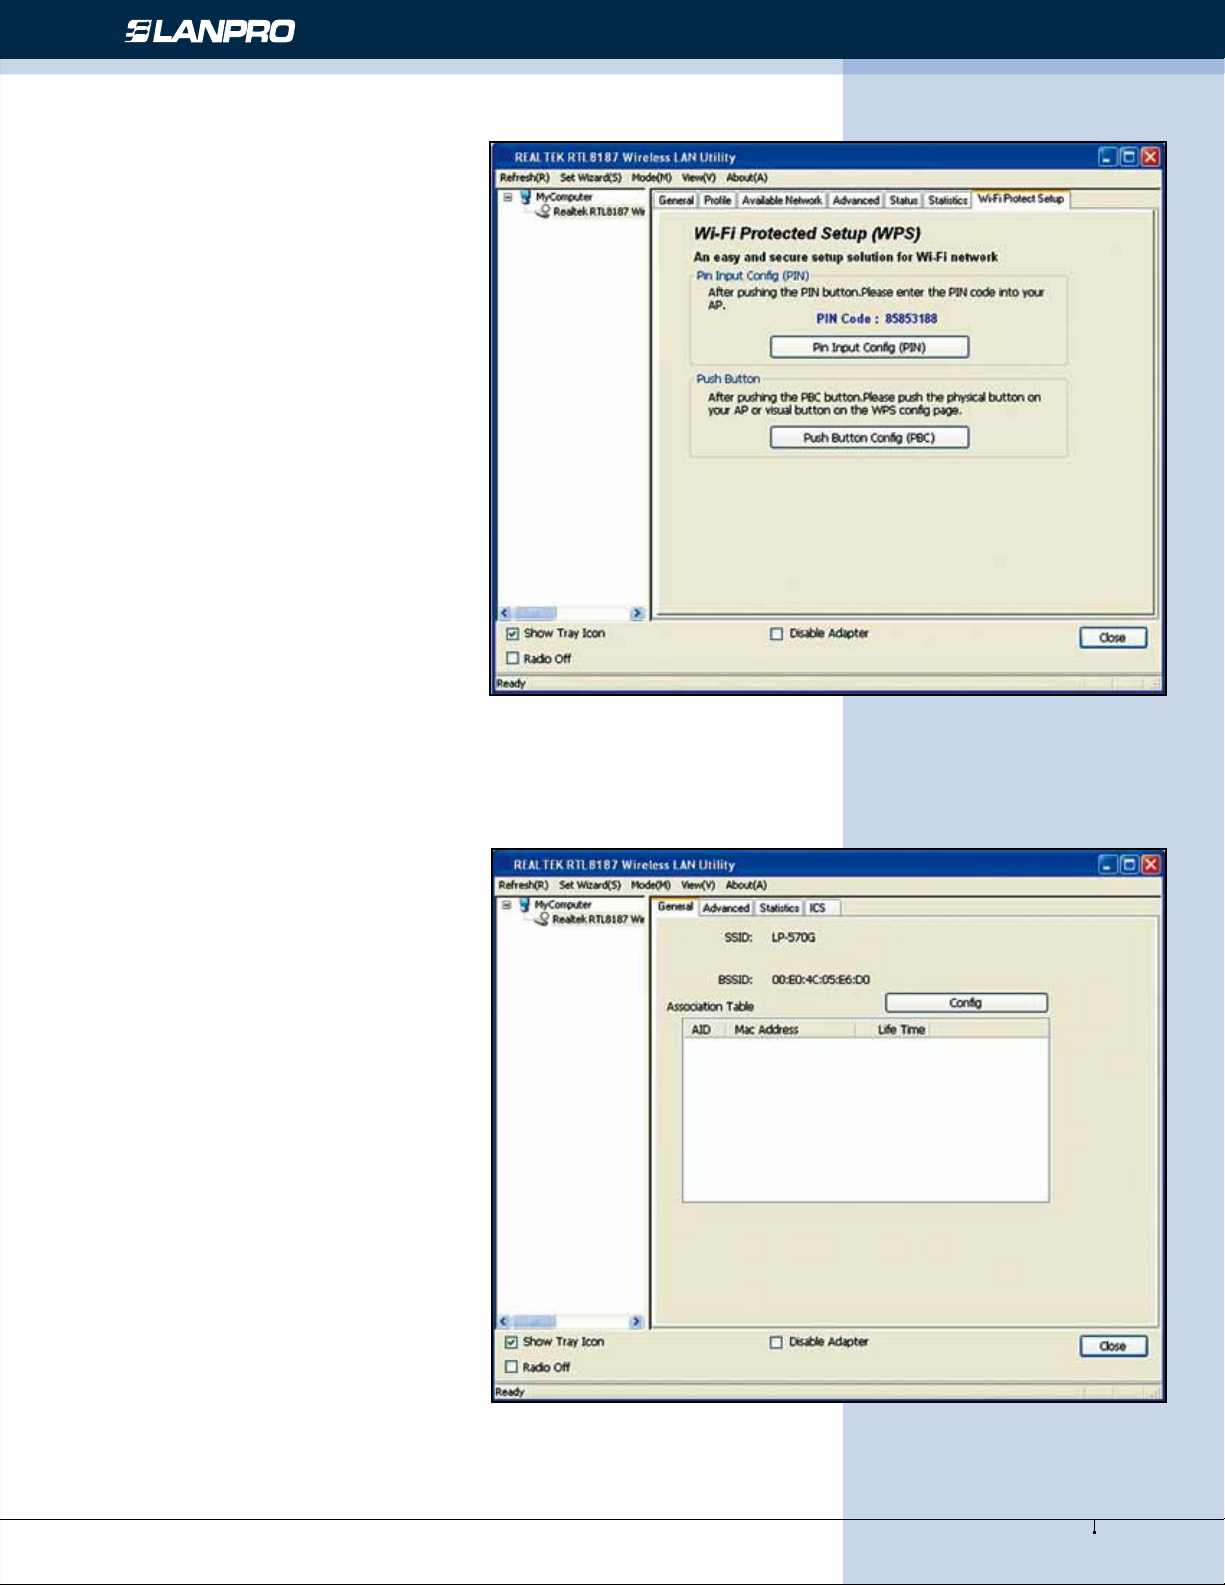
Wi-Fi Protected Setup
This device provides Wi-Fi Protected
Setup, an easy and secure Wi-Fi network setup solution, which contains two
options of operation methods, each one
will be functional.
PIN Method: After pushing the PIN
button, please enter your PIN code into
your AP.
PBC Method: After pushing the PBC
button, please push the physical button
on your AP or visual button on the WPS
conguration page.
Wireless - Equipment - 2.4 GHz - LP-570G - Installation guide
Figure 26
AP mode management guide
General
After conguring the adapter in AP
mode, this General page shows up,
which shows the general information of
this AP.
SSID: The SSID (network name) of the
wireless network constructed by this AP.
BSSID: The MAC address of this AP.
Cong: Click this button to change
congurations to this AP.
Association Table: Shows the information of those devices that associated
with this AP including their MAC addresses and the time that they connected
with this device.
Figure 27
15
www.lanpro.com
Page 16
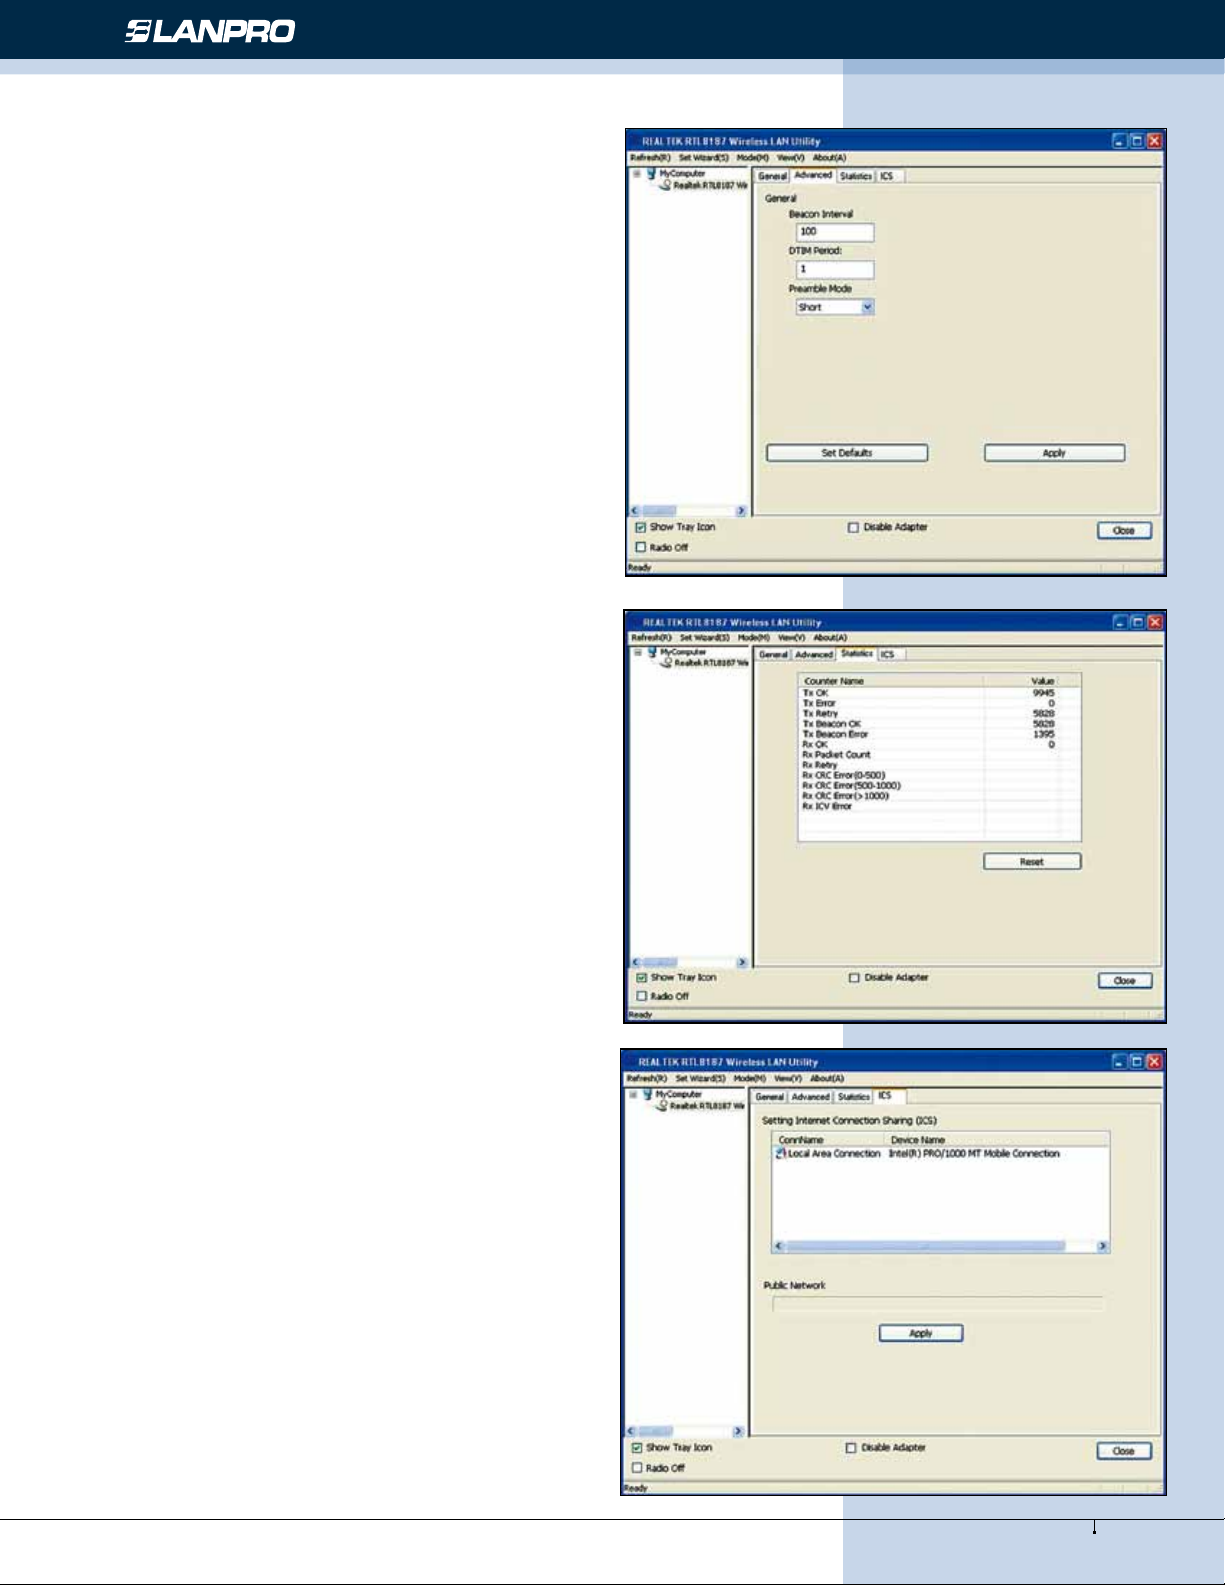
Advanced
Wireless - Equipment - 2.4 GHz - LP-570G - Installation guide
Beacon Interval:
DTIM Period:
Dene the interval between
beacons from 20~1000.
Set the DTIM period between
1~255.
Preamble Mode:
Click the drop list to select the
preamble to be long, short or
auto.
Set Defaults:
Click this button to restore the
settings above to default.
Apply:
Click this button to execute
changes.
Figure 28
Statistics
See this tab to show the transmission activity record.
Clicking the Reset button recounts the values from
zero.
Figure 29
Internet Connection Sharing (ICS)
This page allows users to select the adapter for
connect to public network.
Please click on the device that are used for connecting
to public network and click the Select button, and
then click the Apply button to execute.
Figure 30
16
www.lanpro.com
 Loading...