

Page 1
Active Products - Cameras
www.lanpro.com
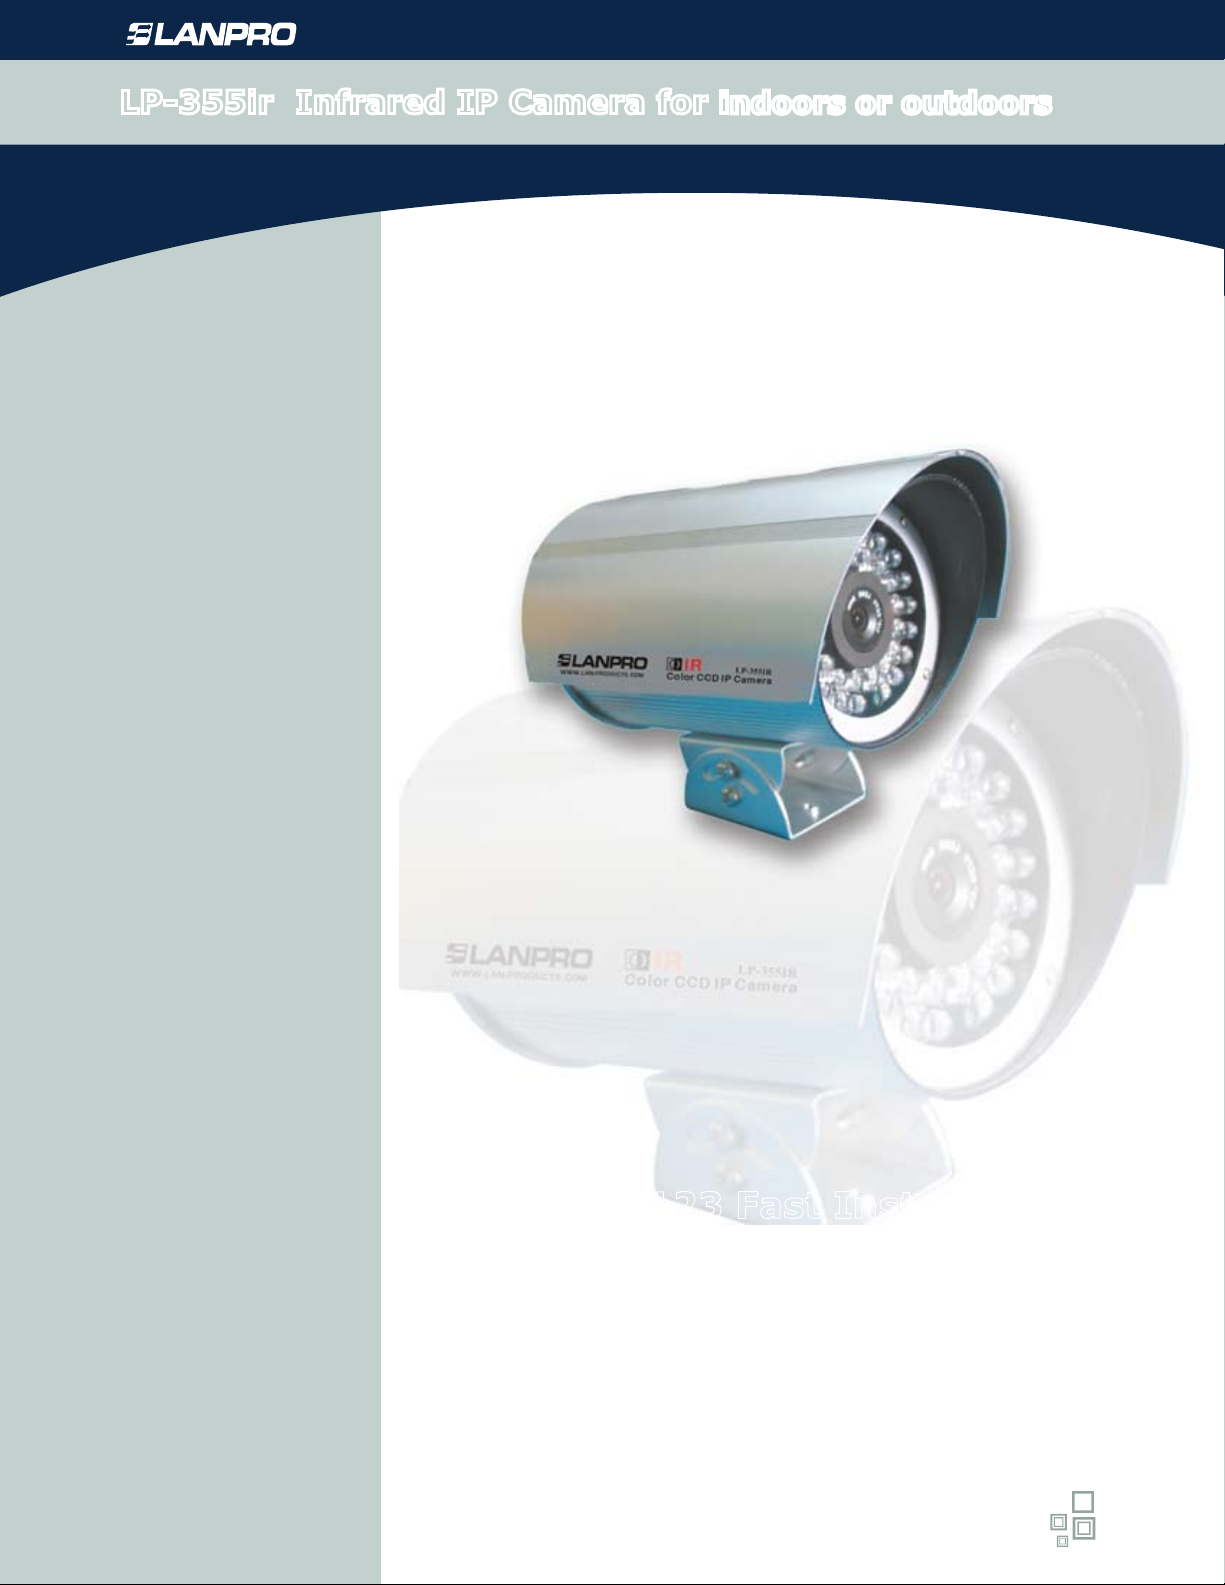
LP-355ir Infrared IP Camera for indoors or outdoors
LP355ir_M123_ENB01W
LP-355ir 123 Fast Installation
Guide without Router (Basic)
Page 2
Active Products - Cameras - LP-355ir
This fast installation Guide will let you perform a fast installation of the LP-355ir video camera
Preparing the camera for installation
A
1
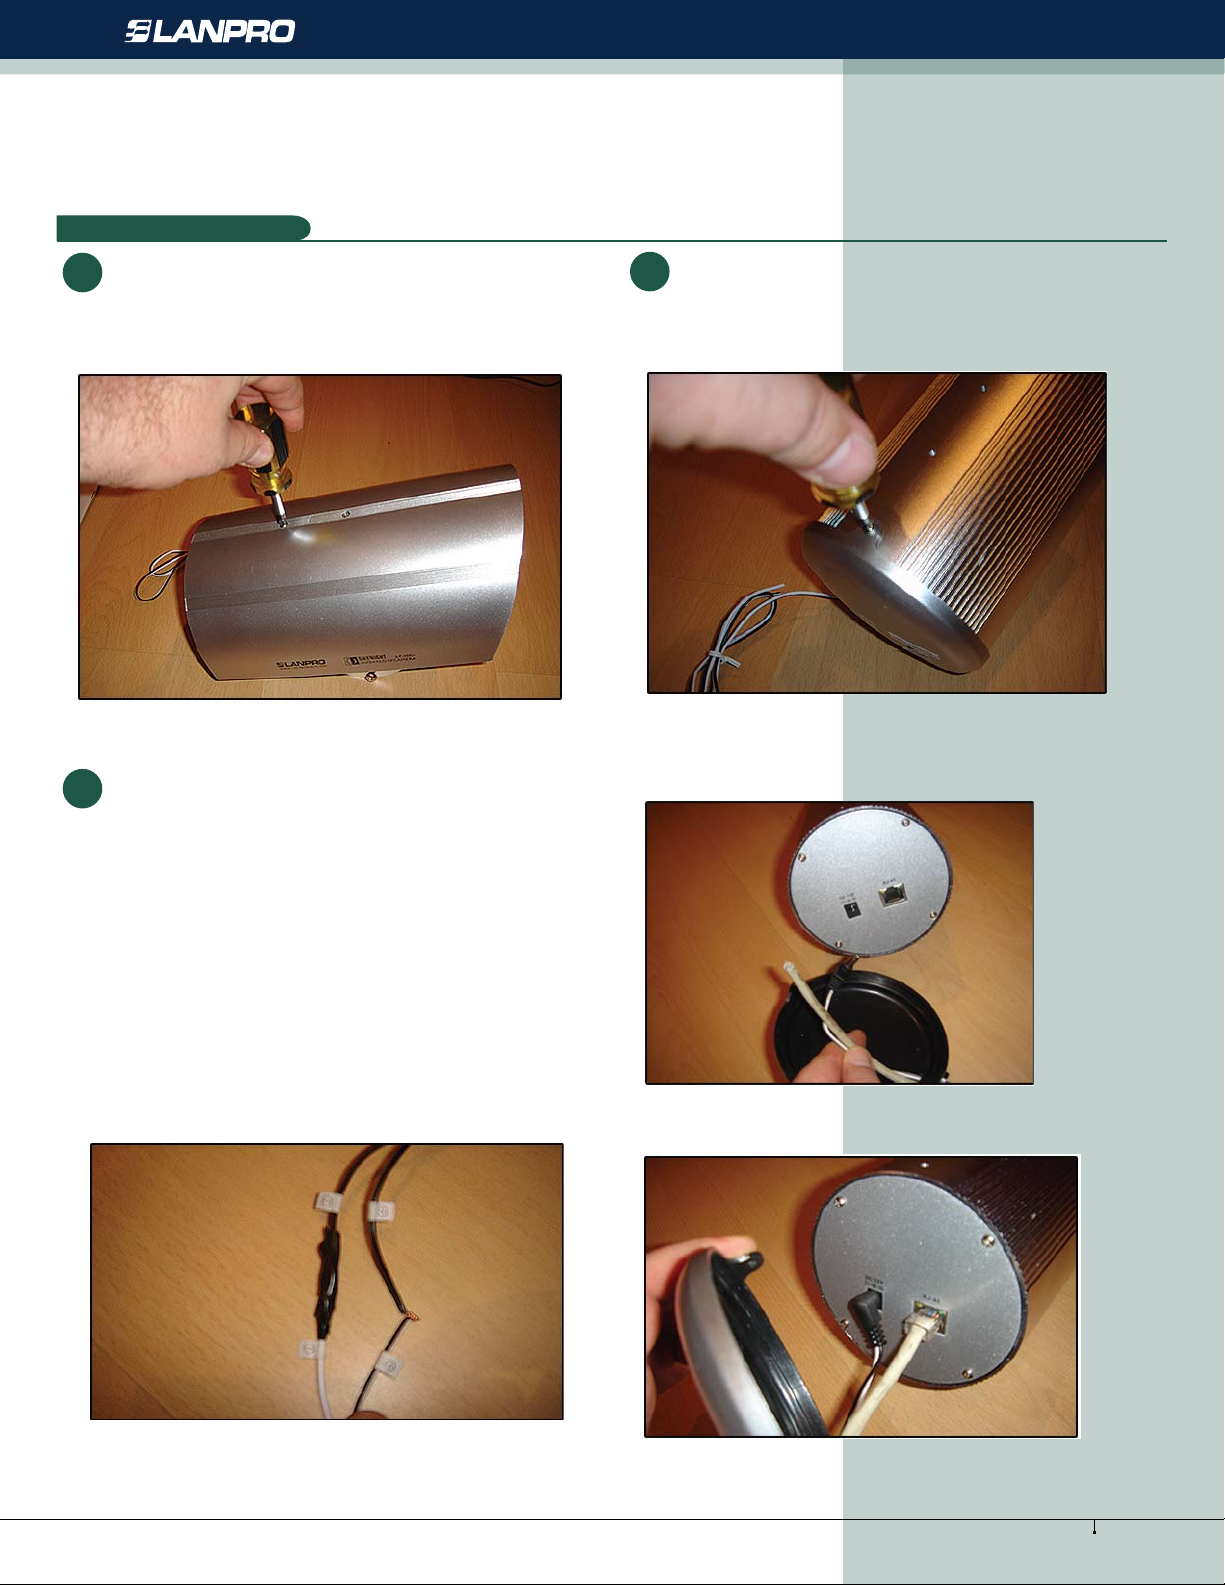
Remove the screws and upper protector of the camera as
shown in gure 1.
Figure 1
3
Insert one end of an UTP cable, made to the required lenght.
As shown in gure 3. Attach the RJ45 connector as per the
568a, 568b standard for patchcords, make a joint between
the power cable and the transformer’s cable, taking in
account the proper polarity as shown in gure 4, insert the
network cable end and the power cable through the orice
as shown in gure 5. Put the cover in place and secure it with
the screw. Put the camera cover in place and the camera’s
upper protector(Note: Please certify the patchcord rst)
2
Remove the cable connections cover’s screw and the cover
itself as shown in gure 2:
Figure 2
Figure 4
Figure 3
Figure 5
2
www.lanpro.com
Page 3

B.- Camera conguration and setup:
B
Active Products - Cameras - LP-355ir
1
Connect the camera to the hub or switch, also connect the
computer from where you will congure the camera.
Figure 6
2
Go to the network card “properties” and change it’s address
to this one: 192.168.1.1 subnet 255.255.255.0 as shown
in gure 6
3
Open your preferred browser as shown in gure 7 and go to the following address: 192.168.1.126
Figure 7
3
www.lanpro.com
Page 4
4
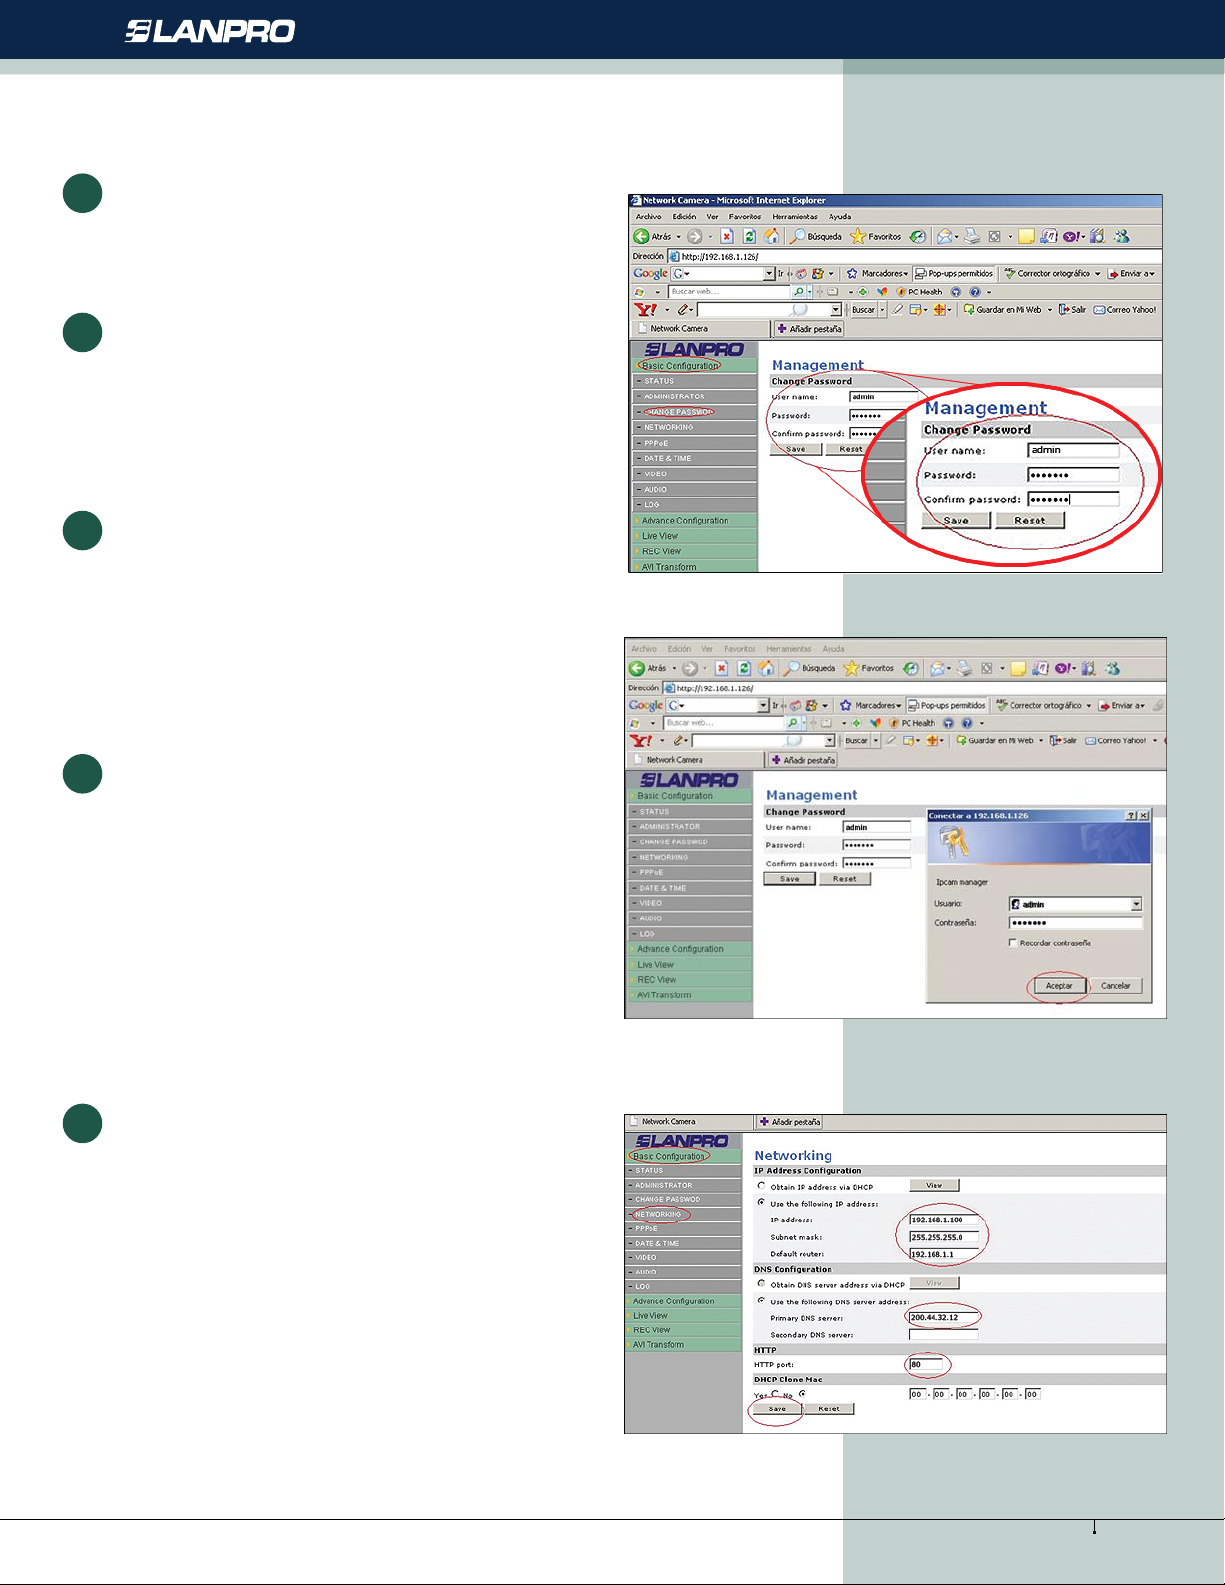
The LanPro´s camera management window will pop-up as
shown in gure 8.
5
Select the “Change password” option and place the new
password in the “Password” box, repeat it in the “conrm
password” box, remember to take note of it and store in a
safe place for future reference.
6
Proceed to select the “Save” option.
Active Products - Cameras - LP-355ir
Figure 8
7
The validation window will pop-up again asking for the User,
and the Password, as shown in gure 9, please ll the boxes
with the user: “admin” and the new password.
8
The camera´s management system pops-up a window
shown in gure 10. In that window select option: “Basic
Conguration” and then: “Networking”. Place the
previously established address for the camera in the “Lan
IP Address” box, remember that it should be inside the
equipments network segment, I.E.: if your equipments have
the following addresses: 192.168.10.x place a valid excluded
address: 192.168.10.100 . This number “100” should
be alternated for each camera depending on the network
conguration. Place a mask in the box: “Lan Netmask
Address” and your “Lan Gateway Address”. Continue
by selecting “Save”, a counter will pop-up showing the
progress of the change.
Figure 9
Figure 10
4
www.lanpro.com
Page 5
9
Please go to the NIC card properties of your PC and change
the address to the one that was used by your network
PC´s I.E.: 192.168.100.2 subnet 255.255.255.0 or set it in
Automatic if you have an ISP with DHCP service.
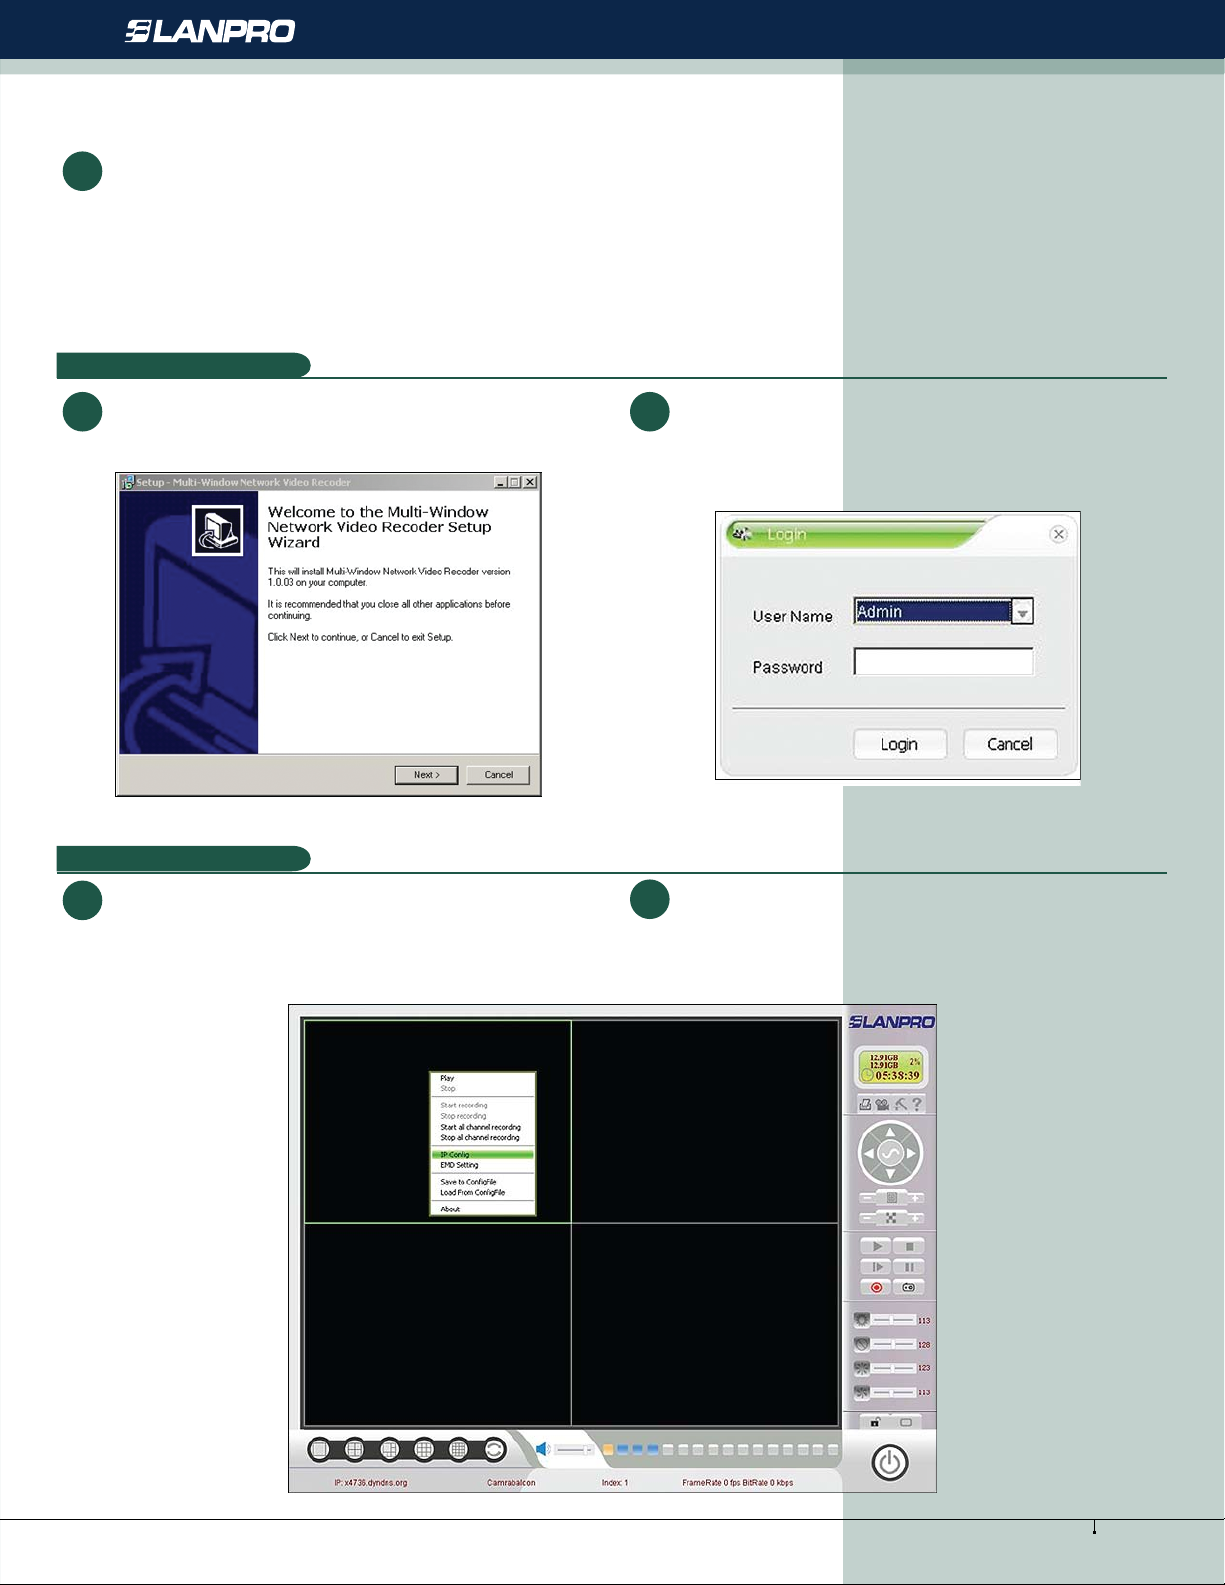
Run the Multi-Windows-LANPRO software that came with the camera, a window
like the one shown in gure 11 will pop-up.
C
Active Products - Cameras - LP-355ir
Repeat steps 1 and 2 for each camera you wish to
connect, remember to change the IP address for each
camera that is in the same segment, taking care not to
repeat them. I.E.: Camera 1: 192.168.10.100, camera
2: 192.168.10.101 and so on.
1
Follow the installer instructions:
Figure 11
Console cameras setup:
D
1
A window, like the one in gure 13 appears. You can congure
the cameras in this window.
2
Once nished, a window will pop-up as shown in gure 12
for validation. In the “Password” box write the word:
“Admin”
Figure 12
2
Moving the pointer of your mouse to the black frame
corresponding to each camera, press the right button of
your Mouse and select “IP Cong” as shown in gure 13:
Figure 13
5
www.lanpro.com
Page 6
Active Products - Cameras - LP-355ir
3
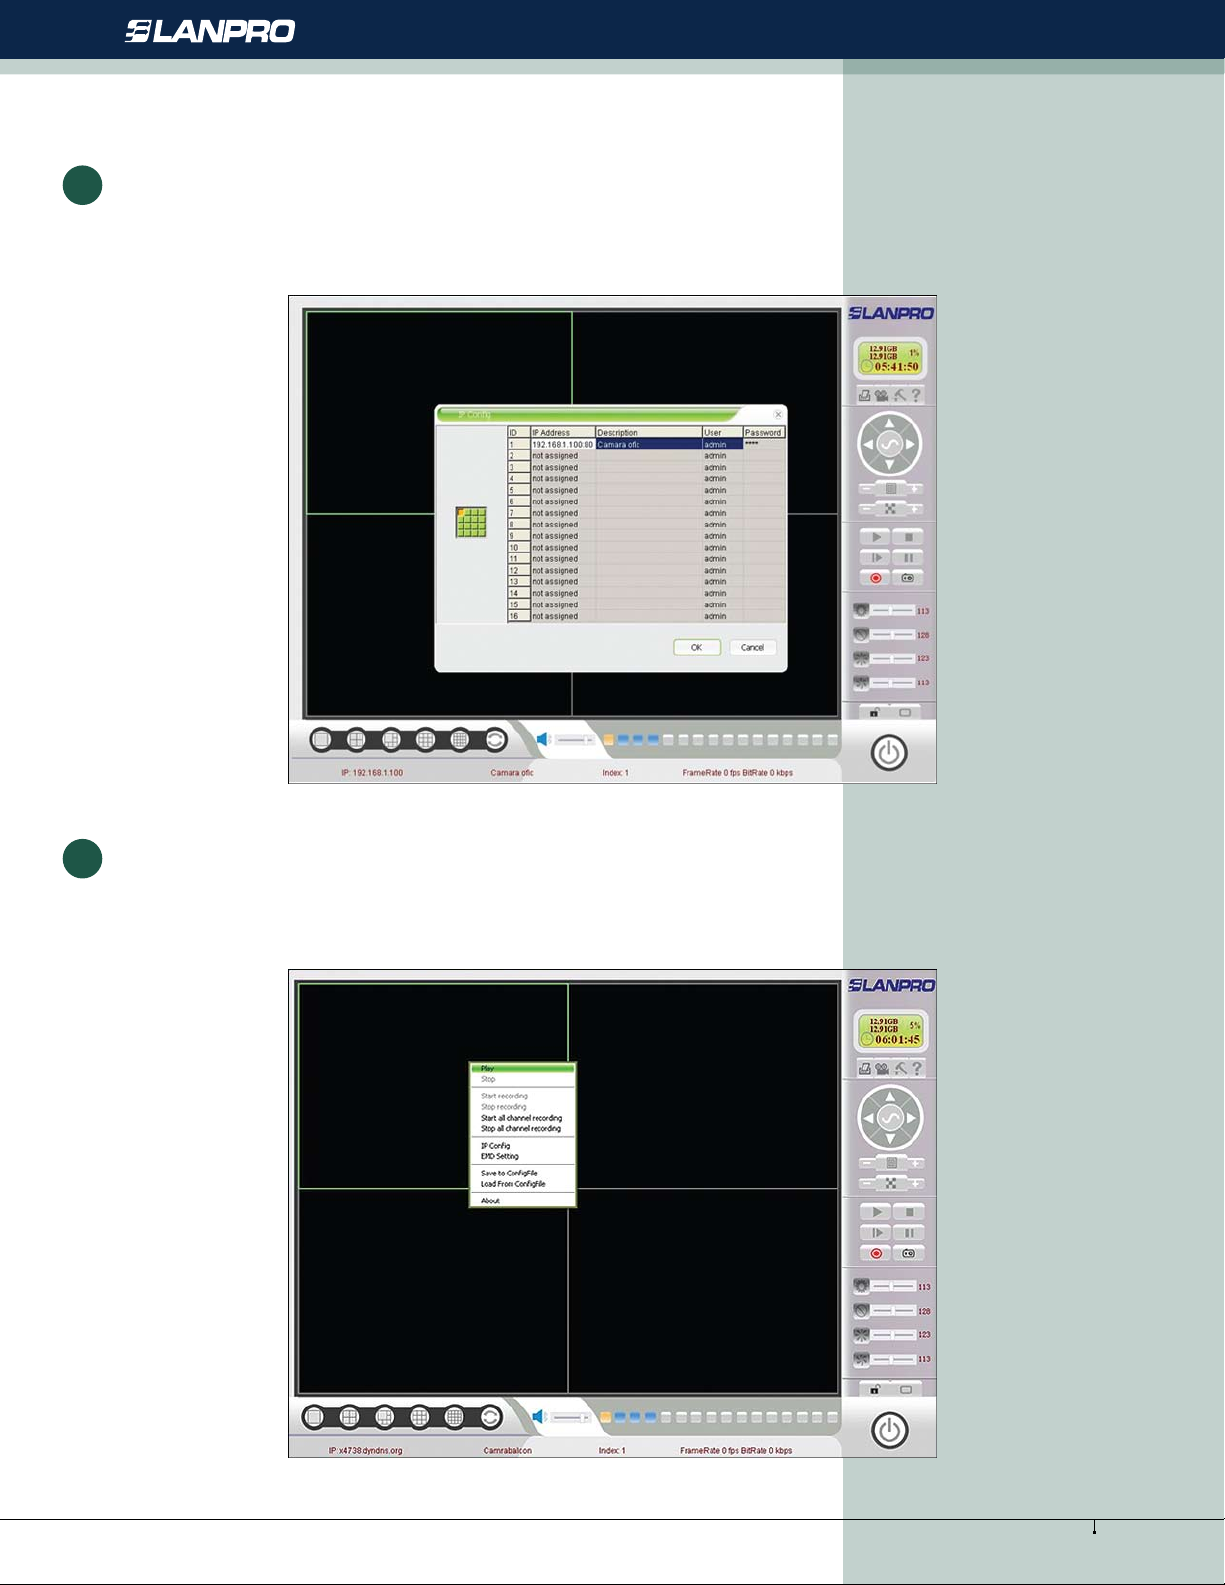
Fill in the values corresponding to each camera in the window shown in gure 14 and press “OK”, (Note: remember to use
the password that you congured for each camera before, the description is for reference purposes only:
Figure 14
4
Placing the pointer in each black frame of each camera, press the right button of the Mouse and select “Play” for each
congured camera, as shown in gure 15:
Figure 15
6
www.lanpro.com
Page 7
Active Products - Cameras - LP-355ir
5
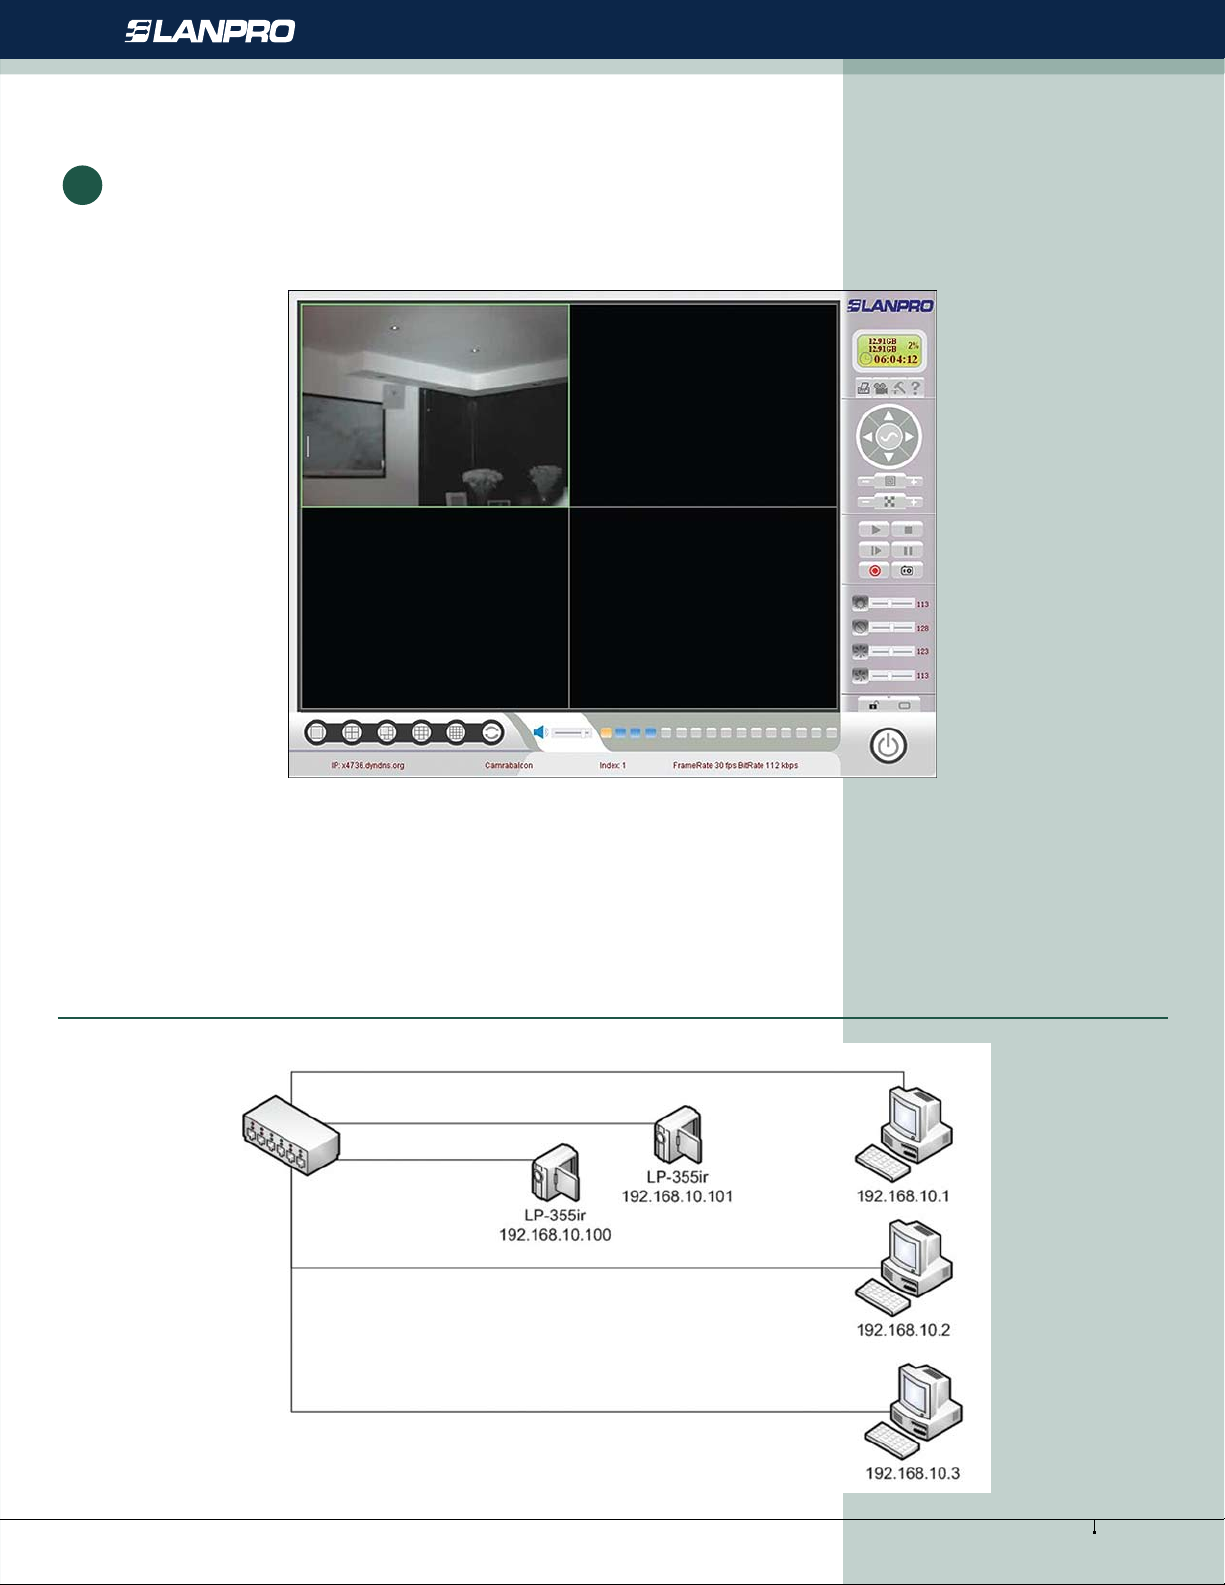
The image corresponding to each camera will appear(See gure 16). Remember to locate and x them as per your
convenience. Enjoy your LP-355ir!.
Figure 16
Note: In order to be able to access your cameras from your browser, you must enable the Activex controls
installation in your browser´s security properties Tab. Then, use the IP address you established in the step 2 for
each camera. Once done, place the IP address you assigned to each camera in step 2, I.E.: http://192.168.10.100
we recommend using the centralized cameras console.
Diagrama sencillo de cámaras en internet:
7
www.lanpro.com
 Loading...