

Page 1
Getting Started
1
Faxing
2
Programming
3
Troubleshooting
4
Operating Instructions
Basic Features
For safe and correct use of this machine, please be sure to read the Safety Information before you use it.
Page 2

Introduction
This manual contains detailed instructions and notes on the operation and use of this machine. For your
safety and benefit, read this manual carefully before using the machine. Keep this manual in a handy
place for quick reference.
Notes:
Some illustrations in this manual might be slightly different from the machine.
Certain options might not be available in some countries. For details, please contact your local dealer.
Laser Safety:
CDRH Regulations
This equipment complies with requirements of 21CFR Subchapter J for class1 laser products. This
equipment contains a AlGaAs laser diode of 5 milliwatt or 6.2 milliwatt, 770-795 nm wavelength. This
equipment does not emit hazardous light, since the beam is totally enclosed during all customer modes
of operation and maintenance.
Caution:
Use of controls or adjustments or performance of procedures other than those specified in this manual
might result in hazardous radiation exposure.
Machine Types
The model names of the machine do not appear in the following pages. Check the type of your machine
before reading this manual.
• Type1: NIC FAX Unit optional
• Type2: NIC FAX Unit standard
Two kinds of size notation are employed in this manual. With this machine refer to the inch version.
For good copy quality, the supplier recommends that you use genuine toner from the supplier.
The supplier shall not be responsible for any damage or expense that might result from the use of parts
other than genuine parts from the supplier with your office products.
Important
Contents of this manual are subject to change without prior notice. In no event will the company be liable for direct, indirect, special, incidental, or consequential damages as a result of handling or operating the machine.
Power Source:
120V, 60Hz
Please be sure to connect the power cord to a power source as above. For details about the power
source, see Chapter 10, “Connecting the Power and Switching On” in the Advanced Features manual.
Declaration of Conformity
Product Name: Facsimile
Model Number: 3770/F640/LF412/FAX4430L, 3770nf/F650/LF417e/FAX4430NF
Responsible party: Ricoh Corporation
Address: 5 Dedrick Place, West Caldwell, NJ 07006
Telephone number: 973-882-2000
This device complies with part 15 of FCC Rules.
Operation is subject to the following two conditions:
1. This device may not cause harmful interference, and
2. this device must accept any interference received,
including interference that may cause undesired operation.
Notes:
For information about the latest available drivers, see the relevant manufacturer's Web site.
Page 3

TABLE OF CONTENTS
What Do You Want to Do with This Machine? .................................................... 1
Notice ......................................................................................................................3
Safety Information ...................................................................................................... 5
Safety During Operation ..........................................................................................5
Safety During Operation ..........................................................................................5
Important Safety Instructions ...............................................................................9
Important Safety Instructions ..................................................................................... 9
Caution ....................................................................................................................9
Position of the RCAUTION Label ...................................................................... 10
ENERGY STAR Program ..................................................................................... 11
Energy Saver Modes................................................................................................12
Remarks................................................................................................................14
How to Read This Manual ...................................................................................16
Paper Mark............................................................................................................... 17
Manuals for This Machine ................................................................................... 18
Basic Features (this manual) ...................................................................................18
Advanced Features .................................................................................................. 18
Before You Use This Machine ................................................................................. 18
NIC FAX Unit Manual (on CD-ROM)........................................................................18
NIC FAX Unit CD-ROM Manual...............................................................................18
1. Getting Started
Machine Types .....................................................................................................19
Guide to Components ......................................................................................... 20
Front View ................................................................................................................ 20
Side View ................................................................................................................. 22
Control Panel........................................................................................................ 23
Reading the Display ................................................................................................. 26
Reading the Display and Using Keys ....................................................................26
Standby Display.....................................................................................................27
Communication Display ......................................................................................... 27
Display Prompts ....................................................................................................28
Energy Saver Mode Display .................................................................................. 28
Restricted Access Display ..................................................................................... 29
Turning On or Off the Power............................................................................... 30
Turning On the Power .............................................................................................. 30
Turning Off the Power .............................................................................................. 30
2. Faxing
Transmission Modes ........................................................................................... 31
Switching between Memory Transmission and Immediate Transmission................32
Placing Originals..................................................................................................33
Placing Originals in the ADF ....................................................................................34
Originals Unsuitable for the Auto Document Feeder (ADF) .....................................35
Memory Transmission.........................................................................................36
i
Page 4

Canceling a Memory Transmission....................................................................38
Before Pressing the Start Key..................................................................................38
While Scanning the Original.....................................................................................38
When an Original Is Jammed ................................................................................... 38
During Transmission ................................................................................................38
While Awaiting Transmission ...................................................................................39
Immediate Transmission.....................................................................................41
If the Connection Could Not Be Made......................................................................42
Canceling an Immediate Transmission .............................................................43
Before Pressing the Start Key..................................................................................43
After Pressing the Start Key.....................................................................................43
When an Original Is Jammed ................................................................................... 43
Scan Settings .......................................................................................................44
Resolution ................................................................................................................44
Original Type ............................................................................................................ 46
Changing Scan Settings...........................................................................................46
Dialing ...................................................................................................................47
Entering Numbers Directly .......................................................................................47
Pause .................................................................................................................... 48
Tone ...................................................................................................................... 48
Using Quick Dials .....................................................................................................49
Using Speed Dials....................................................................................................50
Using Group Dials....................................................................................................51
When specifying a group with a Quick Dial ...........................................................52
When specifying a group with the Group Key .......................................................52
Reception Modes .................................................................................................54
Selecting the Reception Mode ................................................................................. 54
Receiving Messages in Manual Receive .................................................................55
3. Programming
Own Name/Fax Header/Own Fax Number ......................................................... 57
Own Name / Fax Header .........................................................................................58
Programming ......................................................................................................... 58
Editing.................................................................................................................... 59
Deleting ................................................................................................................. 60
Own Fax Number ..................................................................................................... 61
Programming ......................................................................................................... 61
Editing.................................................................................................................... 62
Deleting ................................................................................................................. 63
Quick Dial ............................................................................................................. 65
Programming............................................................................................................ 66
Editing ..................................................................................................................... 68
Deleting ................................................................................................................... 69
Quick Dial Key Label (Dial Label) ............................................................................ 70
Label paper............................................................................................................71
Speed Dial............................................................................................................. 73
Programming ........................................................................................................... 74
Editing ...................................................................................................................... 76
Deleting ................................................................................................................... 77
ii
Page 5

Groups .................................................................................................................. 79
Programming ........................................................................................................... 79
Editing ...................................................................................................................... 82
Deleting .................................................................................................................... 85
To delete a destination from a group..................................................................... 85
To delete an entire group ......................................................................................86
Entering Characters............................................................................................. 88
Available Characters ................................................................................................ 88
Keys ......................................................................................................................... 88
How to Enter Characters..........................................................................................89
4. Troubleshooting
Loading Paper in the Main Paper Tray............................................................... 91
Replacing the Toner Cartridge ........................................................................... 92
Toner Cartridge Storage......................................................................................95
Adjusting Volume ................................................................................................ 96
Clearing Original Jams........................................................................................98
Clearing a Copy, Fax, or Print Jam .................................................................... 99
Error Messages .................................................................................................. 101
Indicators............................................................................................................103
Solving Problems...............................................................................................104
When Things Don't Go as Expected ................................................................106
Printing the Help List......................................................................................... 107
INDEX....................................................................................................... 108
iii
Page 6

iv
Page 7

What Do You Want to Do with This
Machine?
This is a summary of this machine's features including which pages to consult
for detailed information.
I want ... Reference
to specify several destinations with a single
key
to print Quick Dial key labels that can be attached to the control panel so that I can find
quickly the Quick Dial with the destination I
want to specify programmed in
to check whether a fax transmission was successful or not
to find a stored Speed Dial quickly p.44 “Telephone Directory”, Advanced Fea-
to send a fax at a specific time p.5 “Sending at a Specific Time (Send Later)”,
to cut down on my telephone bill p.136 “Economy Transmission”, Advanced
to cut down on my paper consumption p.76 “Two in One”, Advanced Features and p.76
to prevent many sheets of paper from being
printed out if fax messages are received during
the night or on holidays
to block out unwanted messages p.116 “Authorized Reception”, Advanced Fea-
to send a message on a two-sided original p.53 “Duplex Original Settings”, Advanced
to send a fax message which has the large number of pages in one transmission
to have multiple copies of incoming messages p.75 “Multi-copy Reception”, Advanced Fea-
to retry a failed transmission p.31 “Retrying a Failed Transmission”, Ad-
to change destination(s) or alter the transmission time for a file queued for transmission
to find frequently used functions by just pressing a single key instead of searching through
several menus
to prevent my message being picked up casually by anyone at the other end
p.51 “Using Group Dials” and p.79 “Groups”
p.70 “Quick Dial Key Label (Dial Label)”
p.34 “Checking the Transmission Result (TX
Status)”, Advanced Features
tures
Advanced Features
Features and p.20 “Transfer Request”, Advanced Features
“Two-sided Reception”, Advanced Features
p.137 “Energy Save Timer”, Advanced Features
tures
Features
p.55 “Batch Original Documents Transmission”, Advanced Features
tures
vanced Features
p.27 “Changing Transmission Files”, Advanced Features
p.101 “User Function Keys”, Advanced Features
p.7 “Sending Confidential Messages”, Advanced Features and p.161 “Personal Boxes”,
Advanced Features
1
Page 8

I want ... Reference
to prevent a received message being picked up
casually by other people
to have backups automatically made of faxes I
send
to have backups automatically made of incoming faxes
to restrict access to the machine to specified users
to monitor machine usage by user or department
to receive messages while I am away on a trip p.129 “Forwarding”, Advanced Features
to program in memory a document I often use p.97 “Auto Documents”, Advanced Features
to perform multiple keypad operations with a
single key
p.37 “Printing a Confidential Message”, Ad-
vanced Features and p.42 “Printing Personal
Box Messages”, Advanced Features
p.134 “Backup File Transmission Settings”,
Advanced Features
p.129 “Forwarding”, Advanced Features and
p.161 “Personal Boxes”, Advanced Features
p.29 “Restricted Access”
p.29 “Restricted Access” and p.9 “User Code
Transmission”, Advanced Features
p.95 “Programs”, Advanced Features
2
Page 9

Notice
R CAUTION:
Use of controls, adjustments, or performance of procedures other than those
specified herein may result in hazardous radiation exposure.
Direct (or indirect reflected) eye contact with the laser beam may cause serious eye damage.
Safety precautions and interlock mechanisms have been designed to prevent any possible laser
beam exposure to the operator.
Note to users in the United States of America
-Note:
This equipment has been tested and found to comply with the limits for a Class
B digital device, pursuant to Part 15 of the FCC Rules. These limits are designed
to provide reasonable protection against harmful interference in a residential installation. This equipment generates, uses and can radiate radio frequency energy and, if not installed and used in accordance with the instructions, may cause
harmful interference to radio communications. However, there is no guarantee
that interference will not occur in a particular installation. If this equipment does
cause harmful interference to radio or television reception, which can be determined by turning the equipment off and on, the user is encouraged to try to correct the interference by one more of the following measures:
• Reorient or relocate the receiving antenna.
• Increase the separation between the equipment and receiver.
• Connect the equipment into an outlet on a circuit different from that to which
the receiver is connected.
• Consult the dealer or an experienced radio /TV technician for help.
-Caution:
Changes or modifications not expressly approved by the party responsible for
compliance could void the user's authority to operate the equipment.
3
Page 10

-Notice about the Telephone Consumer Protection Act (Valid in USA
only)
The Telephone Consumer Protection Act of 1991 makes it unlawful for any person to use a computer or other electronic device, including FAX machines, to
send any message unless such message clearly contains in a margin at the top or
bottom of each transmitted page or on the first page of the transmission, the date
and time it is sent and an identification of the business or other entity, or other
individual sending the message and the telephone number of the sending machine or such business, other entity, or individual. (The telephone number provided may not be a 900 number or any other number for which charges exceed
local or long-distance transmission charges.)
In order to program this information into your FAX machine, you should complete the following steps: Follow the FAX HEADER programming procedure in
the Programming chapter of the operating instructions to enter the business
identification and telephone number of the terminal or business. This information is transmitted with your document by the FAX HEADER feature. In addition to the information, be sure to program the date and time into your machine.
Note to users in Canada
-Note:
This Class B digital apparatus complies with Canadian ICES-003.
Remarque concernant les utilisateurs au Canada
-Avertissement:
Cet appareil numérique de la classe B est conforme à la norme NMB-003 du Canada.
For users in the state of California
Perchlorate Material - special handling may apply, see www.dtsc.ca.gov/hazardouswaste/perchlorate
4
Page 11

Safety Information
R
R
R
R
When using this machine, the following safety precautions should always be followed.
Safety During Operation
In this manual, the following important symbols are used:
WARNING:
CAUTION:
Indicates a potentially hazardous situation which, if instructions
are not followed, could result in death or serious injury.
Indicates a potentially hazardous situation which, if instructions are not
followed, may result in minor or moderate injury or damage to property.
5
Page 12

R WARNING:
• Connect the power cord directly into a wall outlet and never use an
extension cord.
• Disconnect the power plug (by pulling the plug, not the cable) if the
power cable or plug becomes frayed or otherwise damaged.
• To avoid hazardous electric shock or laser radiation exposure, do
not remove any covers or screws other than those specified in this
manual.
• Turn off the power and disconnect the power plug (by pulling the
plug, not the cable) if any of the following occurs:
• You spill something into the machine.
• You suspect that your machine needs service or repair.
• The external housing of your machine has been damaged.
• Do not incinerate spilled toner or used toner. Toner dust might ig-
nite when exposed to an open flame.
• Disposal can take place at our authorized dealer.
• Dispose of the used toner cartridge in accordance with the local
regulations.
• Keep the machine away from flammable liquids, gases, and aerosols. A fire or an electric shock might occur.
• Connect the machine only to the power source described on the inside front cover of this manual. Connect the power cord directly into
a wall outlet and do not use an extension cord.
• Do not damage, break or make any modifications to the power cord.
Do not place heavy objects on it. Do not pull it hard nor bend it more
than necessary. These actions could cause an electric shock or fire.
• If the power cord is damaged (exposure of the core, disconnection,etc.), contact your service representative to change a new one.
Operating the machine with a damaged power cord may cause an
electric shock or fire.
6
Page 13

R CAUTION:
• Protect the machine from dampness or wet weather, such as rain and
snow.
• Unplug the power cord from the wall outlet before you move the machine.
While moving the machine, you should take care that the power cord will
not be damaged under the machine.
• When you disconnect the power plug from the wall outlet, always pull the
plug (not the cable).
• Do not allow paper clips, staples, or other small metallic objects to fall inside the machine.
• Keep toner (used or unused) and toner cartridge out of reach of children.
• For environmental reasons, do not dispose of the machine or expended
supply waste at household waste collection points. Disposal can take
place at an authorized dealer.
• The inside of the machine could be very hot. Do not touch the parts with
a label indicating "hot surface". Otherwise an injury might occur.
• Our products are engineered to meet high standards of quality and functionality, and we recommend that you use only the expendable supplies
available at an authorized dealer.
• Before moving the machine, be sure to disconnect all external connections, especially the power cord from the wall outlet. Damaged power
cords are a fire and electric shock hazard.
• To disconnect the power cord, pull it out by plug. Do not drag the cord
itself. Doing so may result in damage to the cord, leading to fire or electric
shock.
• For safety reason, unplug the power cord from the wall outlet if the machine will not be used for an extended period of time such as holidays.
• The fusing section of this machine might be very hot. Caution should be
taken when removing misfed paper.
• Keep the machine away from humidity and dust. Otherwise a fire or an
electric shock might occur. Do not place the machine on an unstable or
tilted surface. If it topples over, an injury might occur.
• Do not use aluminum foil, carbon paper, or similar conductive paper to
avoid a fire or a machine failure.
• Make sure the room where you are using the machine is well ventilated
and spacious. Good ventilation is especially important when the machine
is used heavily.
• Do not open toner cartridges forcefully. Toner can spill, dirtying your
clothes or hands, and possibly resulting in accidental ingestion.
7
Page 14

• If toner or used toner is inhaled, gargle with plenty of water and move into
a fresh air environment. Consult a doctor if necessary.
• If toner or used toner gets into your eyes, flush thoroughly with eyswash
or water. Consult a doctor if necessary.
• If toner or used toner is swallowed, dilute by drinking a large amount of
water. Consult a doctor if necessary.
• Avoid getting toner on your clothes or skin when removing a paper jam
or replacing toner. If your skin comes into contact with toner, wash the affected area throughly with soap and water.
• If toner gets on your clothing, wash with cold water. Hot water will set the
toner into the fabric and may make removing the stain impossible.
• During operation, rollers for transporting the paper and originals revolve.
A safety device is being installed so that the machine can be operated
safely. But take care not to touch the rollers during operation. An injury
might occur.
• Fire and breakdown can result from heavy accumulation of dust inside
this machine. Consult your service representative for details about and
charges for cleaning the machine’s interior.
• If you have to move the machine when the optional paper tray unit is attached, do not push on the main unit's top section. Doing so can cause
the optional paper tray unit to detach, possibly resulting in injury.
• To reduce the risk of fire, use only No. 26 AWG or larger telecommunication line cord.
• Pour réduire le risque d'incendie, utiliser uniquement des conducteurs de
télécommunications 26 AWG ou de section supérieure.
8
Page 15

Important Safety Instructions
Important Safety Instructions
Caution
When using your telephone equipment, basic safety precautions should always
be followed to reduce the risk of fire, electric shock and injury to persons, including the following:
• Do not use this product near water, for example, near a bath tub, wash bowl,
kitchen sink or laundry tub, in a wet basement or near a swimming pool.
• Avoid using a telephone during an electrical storm. There may be a remote
risk of electric shock from lightning.
• Do not use a telephone in the vicinity of a gas leak to report the leak.
• Use only the power cord and batteries indicated in this manual. Do not dispose of batteries in a fire. They may explode. Check with local codes for possible special disposal instructions.
Save these instructions.
IMPORTANTES MESURES DE SÉCURITÉ
Certaines mesures de sécurité doivent être prises pendant l'utilisation de matéri-
al téléphonique afin de réduire les risques d'incendle, de choc électrique et de
blessures. En voici quelquesunes:
• Ne pas utiliser l'appareil près de l'eau, p.ex., près d'une balgnoire, d'un lavabo, d'un évier de cuisine, d'un bac à laver, dans un sous-sol humide ou près
d'une piscine.
• Éviter d'utiliser le téléphone (sauf s'il s'agit d'un apparell sans fil) pendant un
orage électrique. Ceci peut présenter un risque de choc électrique causé par la
foudre.
• Ne pas utiliser l'appareil téléphonique pour signaler une fulte de gaz s'il est
situé près de la fuite.
• Utiliser seulement le cordon d'alimentation et le type de piles indiqués dans
ce manual. Ne pas jeter les piles dans le feu: elles peuvent exploser. Se conformer aux règlements pertinents quant à l'élimination des piles.
Conserver ces instructions.
9
Page 16
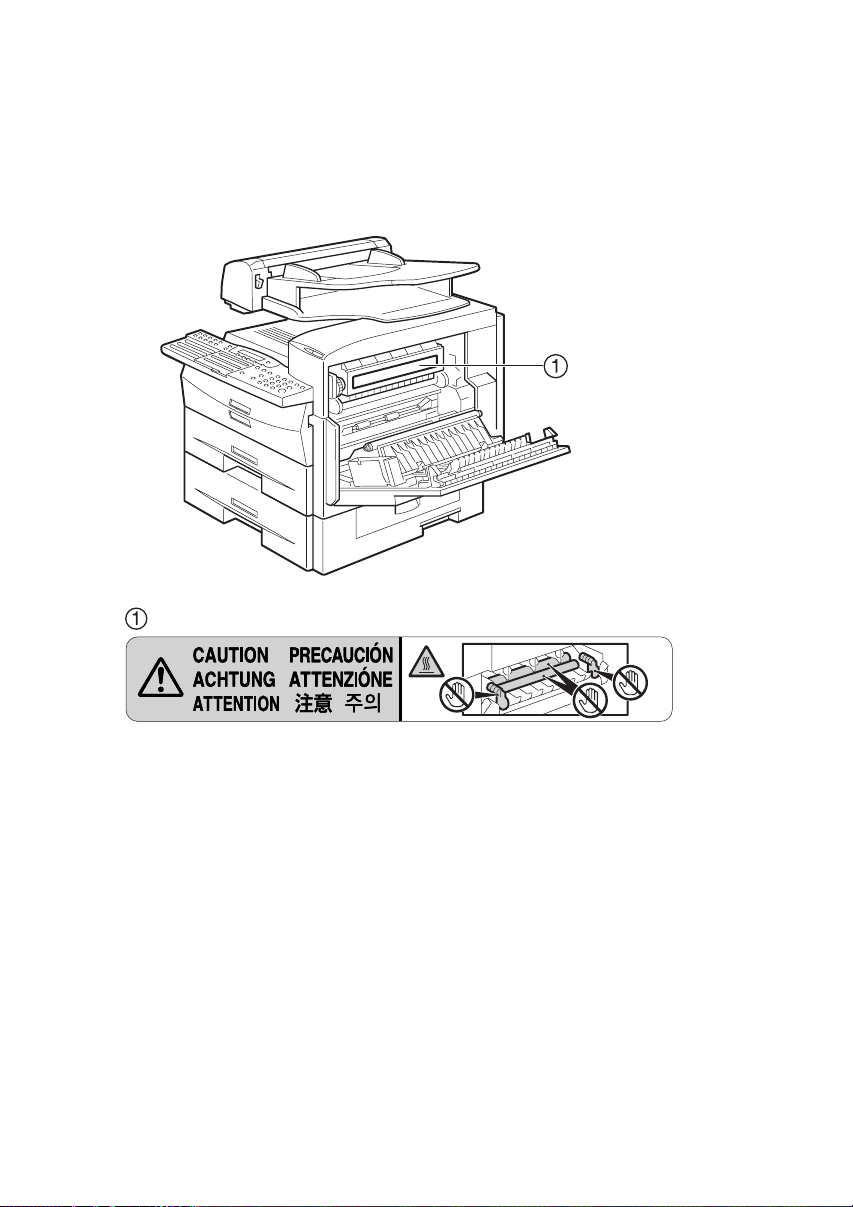
Position of the RCAUTION Label
This machine has a RCAUTION label at the position shown below. For safety,
please follow the instructions and handle the machine as indicated.
The inside of the machine becomes very hot. Do not touch the inside. Doing so
could result in a burn.
AZX002
High temperature. Be careful of hot parts when clearing paper jams.
10
AZX003
Page 17
ENERGY STAR Program
ENERGY STAR® Program
The ENERGY STAR
computers and other office equipment.
The program backs the development and dissemination of products that feature energy saving
functions.
It is an open program in which manufacturers participate voluntarily.
Targeted products are computers, monitors, printers, facsimiles, copiers, scanners, and multi-
function devices. Energy Star standards and logos are internationally uniform.
®
Program encourages energy conservation by promoting energy efficient
• Low-power Mode
At the factory, this fax machine was set to enter the low power mode 5 minutes
after the last operation is completed. To exit the low power mode, press the {En-
ergy Saver/Clear Modes} key. The machine can start printing in about 40 seconds
from the Energy Saving Standby mode or in about 30 seconds from the Fax
Standby Mode.
❖ Specifications
Specification Power Consumption Default Time
Without NIC FAX unit installed
With NIC FAX unit installed 6.0W
2.0W 5 minutes
11
Page 18

Energy Saver Modes
Energy Saver mode enables you to avoid using unnecessary power and economize on electricity. Although we recommend you use this mode from the viewpoint of environmental consciousness, you can also turn it off.
When you install this machine for the first time, Energy Saver mode is turned on
by default.
Two types of Energy Saver mode are available:
• Fax Standby: Use when you receive faxes regularly.
• Energy Saver Standby: Use when you want to economize on power consumption.
Choose the one that best suits your circumstances.
Even though the control panel display isn't on in Energy Saver mode, indicators
that blink or light during communication or reception still work. When the Receive File indicator lights, exit Energy Saver mode and take the appropriate action.
Energy Saver
mode type
Fax Standby Display is off
Energy Saver
Standby
*1
When options are not installed.
*2
6W when the NIC FAX unit (option for Type1) is installed.
Status How long be-
The machine maintains the
heating roller temperature at
half the full temperature; warm
up takes less time. (Heater half
cool)
Display is off
The machine lets the heating
roller cool to room temperature; warm-up takes longer.
(Heater off)
fore you can
print after exiting Energy Saver mode
Within about 30
seconds
Within about 40
seconds
Power consumption
Type1: 15W
Type2: 20W
Type1: 2W
Type2: 6W
*2
You can turn Energy Saver mode on or off with the User Parameters. By default,
Energy Saver Standby is turned on.
The machine enters Energy Saver mode when:
• Nobody uses the machine for about 5 minutes (the machine automatically enters Energy Saver mode).
• The user holds down the {Energy Saver/Clear Modes} key for about 2 seconds.
*1
12
Page 19

To exit Energy Saver mode:
• In Energy Saver Standby mode, press the {Energy Saver/Clear Modes} key.
• In FAX Standby mode, press any key.
• Place an original.
• Pick up the optional handset or the external telephone handset.
Note
❒ When you load paper in Energy Saver mode, an error message will not be dis-
played even if the tray is not pushed in correctly.
❒ After loading paper, press the {Energy Saver/Clear Modes} key and check that
"Ready” is shown on the display.
Reception in Energy Saver mode
In Energy Saver mode, originals that have been stored in memory are still sent
and the machine can still receive messages.
When a message is received in Energy Saver mode, the machine prints it and returns to Energy Saver mode.
Recycled Paper
In accordance with the ENERGY STAR Program, we recommend use of recycled
paper which is environmentally friendly. Please contact your sales representative for recommended paper.
13
Page 20

Remarks
Be sure to read the following information before you use this machine:
• Do not turn off the power during output. Make sure that output has completed before you turn off the power.
• Do not open the front cover, right cover, lower right cover, main paper tray,
or optional paper tray unit while paper is being printed out. The machine will
stop printing and paper may become jammed.
• Do not move, tilt, or shake the machine during output.
• Be sure to make a copy of information stored in the machine memory. This
information might be deleted when you operate the machine improperly or
some trouble occurs with the machine.
•Note beforehand that the company is not liable for damages resulting from
malfunctions of the machine, loss of information stored in memory, or use of
the machine.
• If sending or receiving an important message by fax , confirm that the message is sent or received with a telephone call.
• Be sure to ventilate the room where the machine is used to maintain a comfortable work environment. If the machine is used for a long period of time in
a room with bad ventilation, you may notice an unpleasant odor.
• Sudden changes in temperature or humidity may cause condensation to form
inside the machine. This can result in patchy output. In this case, wait a while
before reattempting copying or requesting a fax be sent again.
Important
❒ Make sure that 100% appears on the display before you turn off the power. If
the power is turned off for 12 hours or longer, all documents stored in memory are deleted.
Note
❒ If the power is turned off, fax documents cannot be received. The power
should normally be turned on.
The fax machines in current use are classified by communication speed. Internationally defined standards include G4, G3, and G2. This machine can communicate with G3 fax machines.
When the other party's machine does not support the same functions as this machine, settings made with those functions might be invalid or transmission
might not be possible.
• If the other party's machine does not support the resolution at which you are
sending, this machine automatically switches to a resolution which is supported. See p.44 “Resolution”.
• Polling Reception requires that the other party's machine can perform Polling
Transmission. See p.13 “Polling Reception”, Advanced Features .
14
Page 21

If the other party's machine does not have paper loaded of the same size and orientation as your original, the message may be split and printed on two or more
sheets, or reduced and printed on one sheet.
• For example, if the other party's machine has A5 paper loaded and it receives
a A4 size document, the A4 size image will be reduced to A5 size and printed
on A5 paper. For further information, see p.79 “When There Is No Paper of
the Correct Size”, Advanced Features .
15
Page 22

How to Read This Manual
R
R
Symbols
The following set of symbols is used in this manual.
WARNING:
This symbol indicates a potentially hazardous situation that might result in
death or serious injury when you misuse the machine without following the instructions under this symbol. Be sure to read the instructions, all of which are described in the Safety Information section.
CAUTION:
This symbol indicates a potentially hazardous situation that might result in minor or moderate injury or property damage that does not involve personal injury
when you misuse the machine without following the instructions under this
symbol. Be sure to read the instructions, all of which are described in the Safety
Information section.
* The statements above are notes for your safety.
Important
If this instruction is not followed, paper might be misfed, originals might be
damaged, or data might be lost. Be sure to read this.
Preparation
This symbol indicates information or preparations required prior to operating.
Note
This symbol indicates precautions for operation, or actions to take after abnormal operation.
Limitation
This symbol indicates numerical limits, functions that cannot be used together,
or conditions in which a particular function cannot be used.
Reference
This symbol indicates a reference.
{}
Keys built into the control panel of the machine.
16
Page 23
Paper Mark
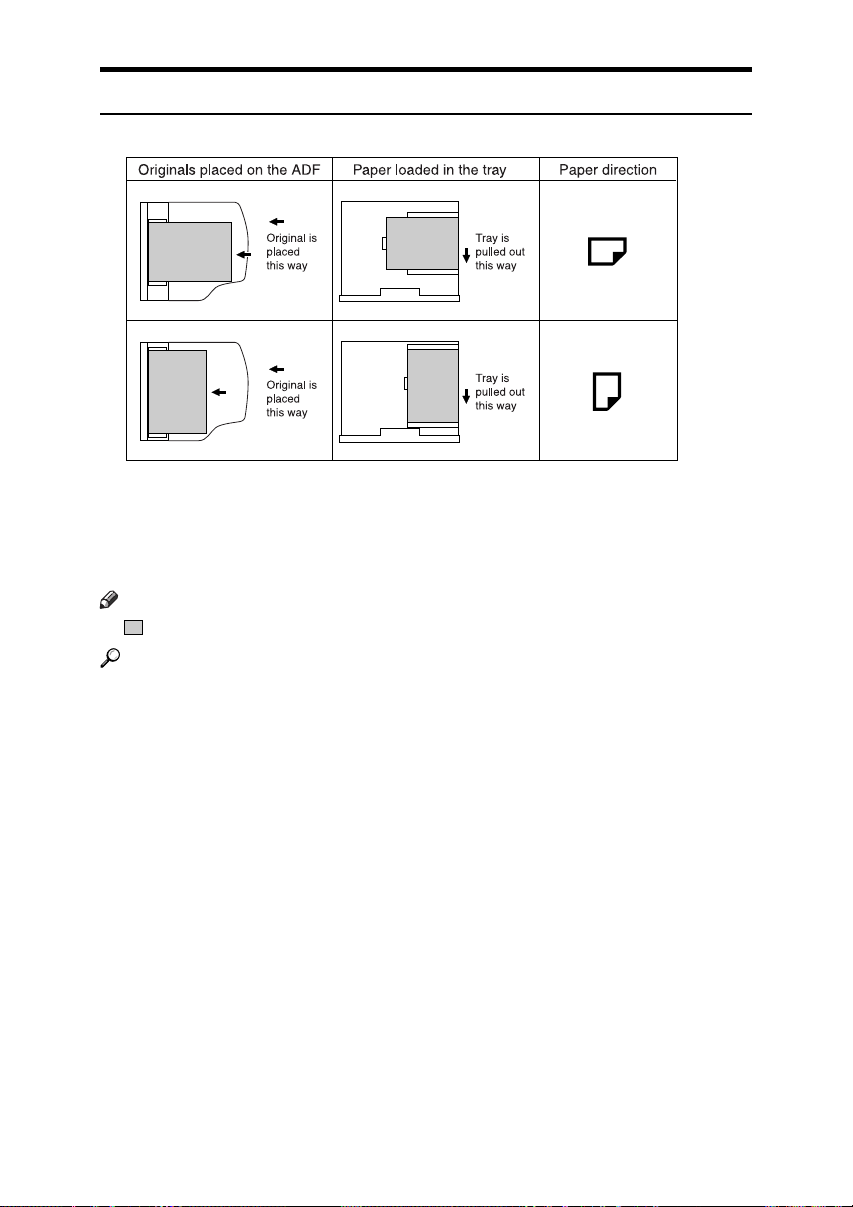
Paper directions in this book are shown as follows.
GFKAMI0N
Portrait direction for originals is shown as K, and landscape direction for originals is shown as L.
Portrait direction for paper in the paper tray is shown as K, and landscape direction for paper in the paper tray is shown as L.
Note
❒ represents originals or paper.
Reference
For details about the Auto Document Feeder (ADF), see p.20 “Guide to Components”.
17
Page 24

Manuals for This Machine
Instructions for the optional and the Extra G3 Interface Unit (G3 Interface Unit Type410) are included in the Basic Features and Advanced Features manuals.
Basic Features (this manual)
The Basic Features manual explains the most frequently used fax functions and
operations.
Advanced Features
The Advanced Features manual describes more advanced functions and also explains settings for key operators.
Before You Use This Machine
The Before You Use This Machine manual explains how to set up your machine.
NIC FAX Unit Manual (on CD-ROM)
The NIC Fax Unit manual explains about the Scanner function, Internet Fax
function, IP-Fax function, and LAN FAX function.
Note
❒ The NIC FAX unit is option for Type1.
NIC FAX Unit CD-ROM Manual
Introduces the contents of the NIC FAX CD-ROM and the necessary operating
environment for the CD-ROM. How to access the NIC FAX unit manual in PDF
file on the CD-ROM is also explained.
Note
❒ The NIC FAX unit is option for Type1.
18
Page 25
1. Getting Started
Machine Types
This machine comes in two types.
Type1 Type2
NIC FAX Unit Option Standard
Papar Tray Unit first Option Option
second Option Option
Bypass Tray Unit Option Standard
19
Page 26
Getting Started
Guide to Components
1
Front View
The following illustration is for Type1.
1. ADF cover
Cover for the ADF.
2. Release button
Push this button to open the ADF.
3. Auto Document Feeder (ADF)
Set multi-page originals here to have
them automatically scanned in one page
at a time.
4. Output tray
Received fax messages and copies are
stacked here.
5. Control panel
Operate the machine using keys and
watching the display on the control panel.
6. Front cover
Open this cover when changing the toner
cartridge and the photo conductor unit
inside the machine.
AZX004
7. Main paper tray
Load paper here.
8. Optional paper tray unit (Option)
You can load more paper here.
9. Lower right cover
Open this cover to remove jammed paper
fed from the optional paper tray unit.
10. Bypass tray unit (Option for
Type1)
A received fax message will be printed on
paper in this tray if there is no paper
loaded in the paper trays. A received
message also will be printed on paper in
this tray if the size of that paper is more
suitable for the message than the size of
paper in the paper trays.
When making copies on custom size paper, thick paper, or special paper, use this
tray.
20
Page 27

11. Status indicators
• hAlarm
Blinks red when an error occurs.
Check the display and read the message to identify the problem (such as a
paper jam or an open the cover).
• 0Communicating
Lights during fax transmission or reception.
12. Right cover
Open this cover to remove jammed paper
fed from the paper tray.
13. Original output tray guide
Prevents originals from falling from the
original output tray.
14. Original output tray
Scanned originals are stacked here.
15. Original tray
Place originals here for sending a fax and
copying.
16. Original guide
Adjust the original guide to match the
size of the originals.
Guide to Components
1
21
Page 28
Getting Started
Side View
1
ZHMH010N
1. Output tray guide
Pull out and raise the end fence to support large paper.
2. Main power switch
The power turns your machine on and
off.
Important
❒ Make sure that 100% appears on
the display before you turn off the
power. If the power is turned off
for 12 hours or longer, all documents stored in memory are deleted.
3. Optional Handset
This permits voice communication.
22
4. Handset/external telephone con-
nector
Reference
p.194 “Connecting to a Telephone
Line”, Advanced Features
5. G3 line connector
Reference
p.194 “Connecting to a Telephone
Line”, Advanced Features
6. Memory card slot
Insert the optional 40MB memory card
here.
7. Ventilation Hole
Prevents overheating. Do not obstruct
the ventilation hole by placing an object
near it. If the machine overheats, a malfunction might occur.
Page 29
Control Panel
The following illustration is for Type2.
Control Panel
1
ZHMS020N
1. User Function keys
Each of these can be programmed for
rapid access to frequently used functions.
❖ Functions programmed by default
❖ Type1
Key Function
F1 Print Journal
F2 Fax Header Print
F3 Group Dial
❖ Type2
Key Function
F1 Print Journal
F2 Fax Header Print
F3 Group Dial
F4 E-mail Message
F5 Internet Fax
F9 JPEG
F10 Scan to E-mail
2. {Help} key
Press the Help key when you want to
print a help list.
3. {User Tools} key
Press to access the User Tools settings
and customize various functions to meet
your specific requirements.
4. Display
This guides you through tasks and informs you of the machine status. Messages appear here.
5. {Cancel} key
Press to cancel an operation or return to
the previous display.
6. 0 1 keys
Press to move the cursor or select functions.
7. {OK} key
Press to answer " Yes " to a question displayed on the display.
8. {Job Information} key
Press to search for information about a
specific job.
9. {Trans. Option} key
Press to change the transmission option
settings. The indicator lights when option settings are changed.
23
Page 30
Getting Started
10. Add Toner indicator
Blinks when toner is low and lights continuously when toner has completely run
out. See p.92 “Replacing the Toner Car-
1
tridge”.
11. Load Paper indicator
Lights when a paper tray is empty or the
paper tray is not fully inserted.
12. Receive File indicator
Lights when a message has been received
into memory.
13. {Energy Saver/Clear Modes} key
• Energy Saver: Hold down this key for
about 2 seconds to manually enter Energy Saver mode. The machine automatically enters Energy Saver mode
about 5 minutes after the last operation is carried out. See p.203 “Energy
Saving”, Advanced Features .
• Clear Modes: Cancel the current settings and return to the standby mode
(except when accessing the User
Tools).
14. {Copy} key
Press to copy the originals currently loaded in the ADF.
15. Quick Dial keys
Use to dial numbers with a single touch
or to enter letters and symbols. Also use
for the Group Dial function.
You can select from two types of keyboard layout: QWERTY (as shown in the
illustration) and ABCDEF. See p.155
“Key Layout”, Advanced Features .
17. {Stamp} key
Press this key to switch the Stamp function on. See p.53 “Stamp”, Advanced Fea-
tures .
18. Original Type key
• Color Scan (Only for Type2, and
Type1 with the optional NIC FAX
unit)
Select when scanning color originals
using the optional scanner function.
•Halftone
Select halftone when faxing or copying photographs or illustrations with
fine gradations. Also it can be used for
color originals.
19. {Memory Trans.} key
Press this key to switch between Memory
Transmission and Immediate Transmission modes.
When the indicator is not lit, Immediate
Transmission is selected, and when the
indicator is lit, Memory Transmission is
selected.
20. Resolution key
Press to select the level of detail (Standard, Detail, Super Fine, Extra Super Fine
or 300 dpi) to be sent. 300 dpi can be selected only with the scanner function of
Type2 and Type1 with the optional NIC
FAX unit.
16. Quick Dial Key Flip Plate
There are two Quick Dial Key Flip Plates.
• To access Quick Dials {01} to {30}, flip
both plates right.
• To access Quick Dials {31} to {60}, flip
one plate left.
• To access Quick Dials {61} to {90}, flip
both plates left.
Note
❒ Make sure the plate is flat against the
control panel when you use Quick
Dial keys.
24
Note
❒ When receiving fax messages or copy-
ing with Extra Super Fine, the optional 40MB memory card is required.
❒ To select 300 dpi, the NIC FAX unit
(Option for Type1) is required.
ZHMS190E
Page 31

21. {Speed Dial} key
Press to specify a destination programmed in a Speed Dial.
22. {On Hook Dial} key
Use to dial a number from the number
keys without having to lift the handset.
23. {Pause/Redial} key
Pause: Inserts a pause when you are dialing or storing a fax number. A pause cannot be inserted as the first digit. See p.48
“Pause”.
Redial: Press to redial one of the last ten
numbers. See p.44 “Redial”, Advanced
Features .
24. Number keys
Use to dial fax numbers or enter the number of copies.
25. {Start} key
Press to start all tasks.
26. {Clear/Stop} key
Clear: Deletes one character or digit.
Stop: Interrupts the current operation
(transmission, scanning, copying or
printing).
Control Panel
1
25
Page 32

Getting Started
Reading the Display
The machine status and instructions are shown on the display.
1
Important
❒ Do not apply a strong shock or force of about 30N
to the panel display. Otherwise, the display might be damaged.
*1
N = Newton
*2
lbf = weight pound
*1
(about 6.8 lbf
*2
) or more
Note
❒ The functions which are shown on the display depend on what options are
installed.
Reading the Display and Using Keys
❖ Standby Display
ZHMX010N
A Display for the machine status or currently selected function.
B Display for the messages.
Items which can be selected or specified.
❖ Menu Display
ZHMS230E
A Display for items which can be selected.
B Press the {Cancel} key to cancel the selected function or entered value, and re-
turn to the previous display.
C Press 0 or 1 to display another function on the display or move the brack-
ets to select other values.
D Press the {OK} key to set a selected function or entered value, and return to
the previous display.
26
Page 33

Control Panel
Standby Display
While the machine is on standby (immediately after it is turned on or after the
{Cancel} key is pressed), the following display is shown.
❖ Returning the machine to the standby display
To return the machine to the standby display manually, do one of the following:
• If you have placed an original and have not pressed the {Start} key, remove
the original.
• If you have not set an original, press the {Energy Saver/Clear Modes} key.
• If you are in User Tools mode, press the {User Tools} key or the {Cancel} key.
Communication Display
While the machine is communicating, the status is displayed.
❖ Memory Transmission
The destination's (Receiver's) name or fax number appears on the top of the
display.
1
❖ Memory Reception
The destination's (Sender's) name or fax number appears on the top of the display.
Note
❒ Even when the machine is sending a fax message from memory or receiv-
ing a fax message into memory, you can still scan the next original into
memory.
❖ Immediate Transmission
27
Page 34

Getting Started
Display Prompts
Depending on the situation, the machine will show various prompts on the display.
1
❖ Instructions and Requests
❖ Questions
❖ Selections
❖ Status
Energy Saver Mode Display
When the machine is not used for a fixed period, the machine goes into Energy
Saver Mode automatically.
-Exiting Energy Saver Mode
To exit Energy Saver mode manually:
• In Energy Saver Standby mode, press the {Energy Saver/Clear Modes} key.
• In Fax Standby mode, press any key.
• Place an original.
• Pick up the optional handset or the external telephone handset.
28
Page 35

Control Panel
Restricted Access Display
When the following display appears, the Restricted Access function is on.
To exit the Res tri cte d Acc ess disp lay , en ter you r use r co de (t he P erso nal Box SUB
code). You can check your Personal Box SUB code on the Personal Box list. See
p.169 “Printing the Box List”, Advanced Features .
A Enter your personal code with the number keys.
Note
❒ When you make a mistake, press the {Clear/Stop} key and try again.
B Press the {OK} key.
Note
❒ When you enter a user code which is not programmed, an error message
appears and the Restricted Access display is shown.
1
-Restricted Access
Use this function to restrict access to the machine or monitor machine usage by
user or department. When turned on, users must enter a previously assigned
code before they can use the machine.
In order to use this function, you need to program user codes (Personal Box SUB
codes) beforehand. See p.161 “Personal Boxes”, Advanced Features .
Note
❒ Turn this function on or off with the User Parameters (switch 05, bit 4). See
p.139 “User Parameters”, Advanced Features .
❒ When Restricted Access is turned on, incoming faxes are received and printed
as normal.
❒ User names printed on all reports are those used by the Personal Box func-
tion.
29
Page 36

Getting Started
Turning On or Off the Power
Note
1
❒ This machine automatically enters
Energy Saver mode if you do not
use the machine for a while.
Turning On the Power
A Confirm that the power cord is
plugged into the outlet firmly.
B Turn on the power.
Turning Off the Power
Important
❒ Make sure that 100% appears on
the display before you turn off the
power. If the power is turned off
for 12 hours or longer, all documents stored in memory are deleted. The storage time might be
shorter if the surrounding temperature is low or the machine has
been on for less than a week.
❒ Fax files programmed in memory
will not be deleted while the optional 40MB memory card is installed.
A Turn off the power.
30
Page 37

Transmission Modes
2. Faxing
There are two types of transmission.
❖ Memory Transmission
The fax is stored in memory, and
then transmitted automatically.
This is convenient when you want
to remove originals quickly.
You can send the same fax to more
than one destination in a single operation. This technique is referred
to as Broadcasting.
❖ Immediate Transmission
The machine dials immediately
and transmits the fax while scanning.
This is convenient when you want
to send a fax immediately and
want to check whether you have
successfully connected with the
other party's fax machine.
The fax is not stored in memory.
Transmitter
(This machine)
Receiver
GDRH240E
Important
❒ Make sure that 100% appears on
the display before you turn off the
power. If the power is turned off
for 12 hours or longer, all documents stored in memory are deleted. As soon as the power is turned
on, the Power Failure Report is
printed to help you identify deleted documents. See p.172 “Power
Failure Report”, Advanced Features
.
31
Page 38

Faxing
Switching between Memory
Transmission and Immediate
Transmission
Press the {Memory Trans.} key to
switch between Memory Transmis-
2
sion and Immediate Transmission.
When the indicator of the {Memory
Trans.} key is not lit, Immediate
Transmission is selected. When the
indicator of the {Memory Trans.} key is
lit, Memory Transmission is selected.
ZHMS040E
Note
❒ You can set whether the machine is
in Memory Transmission mode or
Immediate Transmission mode
right after the power is turned on
or the {Energy Saver/Clear Modes}
key is pressed with the User Parameters (switch 00, bit 6). See
p.139 “User Parameters”, Advanced
Features .
❒ You can set whether the Transmis-
sion mode returns to the default after each transmission with the
User Parameters (switch 01, bit 7).
See p.139 “User Parameters”, Ad-
vanced Features .
32
Page 39

Placing Originals
Placing Originals
You can place your originals in the
ADF.
❖ How to place A4, B5 JIS (Japanese
Industrial Standard), A5, 5
1
/2"x11", 81/2"x14", and 8"x13" size
8
1
/2"x81/2",
originals
1
❖ How to place A5 and 8
/2"x51/2" size
originals
Note
❒
When sending a fax, the image output
at the other end depends on
the size and orientation of paper
used in the receiver's terminal. If
the receiver does not use paper of
the same size and orientation as
that of the original, the fax image
size may be reduced on output,
trimmed at the both edges, or divided into two or more sheets.
When sending an important original, we recommend that you ask
the receiver about the size and orientation of the paper used in their
terminal.
❒ Make sure that all ink, correcting
fluid, etc. has completely dried before setting your original. If it is
still wet, the scanner will be
marked and those marks will appear on the received image. When
the scanner is dirty, a warning
message is displayed after scanning is complete. See p.59 “Scanner Cleaning Message”, Advanced
Features .
❒ If you try to scan an almost com-
pletely blank original (for example
the wrong side of an original), an
alarm sounds. See p.59 “Blank
Sheet Detect”, Advanced Features .
❒ You can place the original any time
up until you press the {Start} key.
2
33
Page 40

Faxing
A
Placing Originals in the ADF
Use the ADF to scan a stack of originals in one operation. The ADF can
handle one-sided originals.
Note
2
❒ The maximum original length is
600 mm (23.7”) with manual assistance.
❒
Place all the originals to be scanned
in a single stack.
❒ When scanning two-sided origi-
nals, use the duplex original function. See p.53 “Duplex Original
Settings”, Advanced Features .
❒ When you want to place originals
for a transmission individually or
more than two times, use the Batch
Original Documents Transmission
function. See p.55 “Batch Original
Documents Transmission”, Ad-
vanced Features .
❒ Do not open the ADF while it is
scanning the originals or an original could become jammed.
❒
If an original jams, press the {Clear/Stop
key, and then remove the original
carefully.
❒ The maximum number of originals
you can place in the ADF is 70
sheets for A4 and 8
sheets for 8
❒ If your original is bent or folded,
flatten it before you place it.
1
/2"x14" size originals.
1
/2" x 11", 30
}
Adjust the original guide to match
the size of your originals. Align
the edges of your originals and
stack them in the ADF face up.
Adjust the original guide to match
the size of the originals again
Note
❒ Place the originals gently.
.
34
Reference
For information about the sizes
and number of originals that can
be placed in the ADF, see p.200
“Acceptable Types of Originals”,
Advanced Features .
Page 41

Originals Unsuitable for the
Auto Document Feeder (ADF)
Do not set the following types of originals in the Auto Document Feeder
(ADF) because they may be damaged.
• Originals of sizes other than those
specified on p.200 “Acceptable
original sizes”, Advanced Features
• Originals with staples or clips
• Perforated or torn originals
• Curled, folded, or creased originals
•Pasted originals
• Originals with any kind of coating,
such as thermo-sensitive paper, art
paper, aluminum foil, carbon paper, or conductive paper
• Originals with indexes, tags, or
other projecting parts
• Originals of inappropriate thickness such as postcards
• Bound originals such as books
• Originals with a smooth or shiny
front surface
• Thin and soft originals
• Transparent originals, such as
OHP transparencies or translucent
paper
• Originals with pencil writing on
the back
Placing Originals
2
Note
❒ To avoid damage to important
originals through mishaps such as
paper jams, we recommend that
you place copies of such originals.
35
Page 42

Faxing
Memory Transmission
Memory Transmission is convenient
because:
• Fax originals can be scanned much
more quickly. Your fax is stored in
2
memory, and then sent automatically, meaning you do not have to
wait for your original to be sent.
• While your fax is being sent, another user can operate the machine
(people do not have to wait long to
use the fax machine).
•You can send the same original to
more than one place with the same
operation. (Broadcasting)
Important
❒ Make sure that 100% appears on
the display before you turn off the
power. If the power is turned off
for 12 hours or longer, all documents stored in memory are deleted. As soon as the power is turned
on, the Power Failure Report is
printed to help you identify deleted files. See p.172 “Power Failure
Report”, Advanced Features .
Limitation
❒ If memory is full (0% appears on
the display), Memory Transmission is disabled. Use Immediate
Transmission instead.
Note
❒ Maximum number of destinations
per Memory Transmission: 250
❒ The maximum number of destina-
tions awaiting Memory Transmission that you can specify is 250.
❒ The theoretical maximum number
of destinations you can enter with
the number keys is 100, but this
will depend on the amount of
memory currently available.
❒ The number of pages that you can
store in memory depends on the
original images and the scan settings. You can store up to 1280
standard pages (ITU-T #1 chart,
Resolution: Standard, Original
Type: Halftone Off).
❒ You can expand the amount of
memory available for storing originals up to 2,200 pages by installing the optional 40MB memory
card.
❒ Maximum number of Memory
Transmission files: 250
A Make sure that the Memory
Transmission indicator is lit.
ZHMS040E
If it is not lit, press the {Memory
Trans.} key.
B Place the original.
Note
❒ Do not open the ADF while it is
scanning originals.
Reference
p.33 “Placing Originals”
C Select any scan settings you re-
quire.
Reference
p.44 “Scan Settings”
36
Page 43

Memory Transmission
D Dial.
If you want to send the same fax to
more than one destination, press
the {OK} key, and then dial another destination. Repeat this step for
all destinations.
Note
❒ If you make a mistake, press the
{Clear/Stop} key, and then enter
the correct number again.
❒ When destinations are specified
using Quick Dial keys successively, those destinations can be
added without pressing the
{OK} key. You can set whether
to require to press the {OK} key
when specifying destinations
using Quick Dial keys successively with the User Parameters
(switch 09, bit 6). See p.139 “User Parameters”, Advanced Fea-
tures .
❒ When one G3 line is set as the
PSTN line (Outside) and the
other as the PABX line (Extension), you need to choose which
line you use for each transmission with the Line Select function.
E Press the {Start} key.
2
ZHMS030N
The machine starts scanning the
original.
The machine calls the destination.
The name or fax number which is
programmed as the Own Name or
Own Fax Number at the other end
is shown on the top of the display.
Reference
p.57 “Own Name/Fax Header/Own Fax Number”
After transmission, the standby
display reappears.
Reference
p.47 “Dialing”
p.51 “Selecting the Line”, Ad-
vanced Features
37
Page 44

Faxing
Canceling a Memory Transmission
Before Pressing the Start Key
A Press the {Energy Saver/Clear
2
Modes} key.
ZHMS040N
Note
❒ When you have already placed
the original, you can also cancel
the transmission by removing
the original from the machine.
When an Original Is Jammed
A Read the message in the display.
The following displays appear one
after the other.
B Press the {OK} key.
C Remove the original.
Reference
p.98 “Clearing Original Jams”
While Scanning the Original
During Transmission
A Press the {Clear/Stop} key.
Use this procedure to cancel a transmission after the original has been
scanned.
38
ZHMS050N
The machine will stop storing the
data from the original and the data
will not be sent.
Note
❒ If transmission finishes while you
are carrying out this procedure, it
will not be canceled.
❒ If you cancel a message while it is
being sent, transmission is halted
as soon as you finish this procedure. However, some pages of
your message may have already
been sent and will be received at
the other end.
❒ During transmission, you can can-
cel the transmission by pressing
the {Clear/Stop} key.
Page 45

Canceling a Memory Transmission
A Press the {Job Information} key,
and confirm that " 1. Cancel TX /
RX " is displayed.
ZHMS080E
The Information menu is displayed.
B Press the {OK } key.
C Display the file you want to de-
lete.
Enter the file number with the
number keys, or search using 0 or
1.
While Awaiting Transmission
Use this procedure to cancel a transmission after the original has been
scanned.
Note
❒ If transmission finishes while you
are carrying out this procedure, it
will not be canceled.
❒ If you cancel a message while it is
being sent, transmission is halted
as soon as you finish this procedure. However, some pages of
your message may have already
been sent. All pages, up to the page
before scanning stopped, are sent
to the other end.
A Press the {Job Information} key,
and confirm that "1. Cancel TX /
RX" is displayed.
2
“Cancel File” and “Transmitting...” are shown one after the other in the display.
D Press the {OK} key.
E Press 0 or 1 to select " Yes "
F Press the {OK} key.
The file is deleted, and the standby
display reappears.
ZHMS080E
B Press the {OK} key.
39
Page 46

Faxing
C Display the file you want to de-
lete.
Enter the file number with the
number keys, or search using 0 or
1.
2
If you are unable to find the file, it
has already been sent.
D Press the {OK} key.
E Press 0 or 1 to select " Yes ”.
F Press the {OK} key.
The file is deleted, and the standby
display reappears
40
Page 47

Immediate Transmission
Immediate Transmission
Immediate Transmission is convenient when:
• You want to send an original immediately as it is scanning.
• You want to quickly check whether you have successfully connected
with the other party's fax machine.
• Your machine's memory is getting
full.
The machine dials immediately after
you press the {Start} key. The message is scanned and transmitted page
by page without being stored in
memory.
Note
❒ You can only specify one destina-
tion for Immediate Transmission.
❒ When the Backup File Transmis-
sion Setting is on, Immediate
Transmission cannot be used. See
p.134 “Backup File Transmission
Settings”, Advanced Features .
A Check that the Memory Trans-
mission indicator is not lit.
B Place your original.
Reference
p.33 “Placing Originals”
C Select any scan settings you re-
quire.
Reference
p.44 “Scan Settings”
D Dial.
Note
❒ If you make a mistake, press the
{Clear/Stop} key, and then enter
the correct number again.
❒ When one G3 line is set as the
PSTN line (Outside) and the
other as the PABX line (Extension), you need to choose which
line you use for each transmission with the Line Select function.
2
ZHMS040E
If it is lit, press the {Memory Trans.}
key.
Reference
p.47 “Dialing”
p.51 “Selecting the Line”, Ad-
vanced Features
41
Page 48

Faxing
E Press the {Start} key.
If the Connection Could Not Be
Made
If it is not possible to make a connection with the number you specified
because the line was busy or there
2
ZHMS030N
The machine calls the destination.
While it is dialing, the number or
name which is programmed as the
Own Name or Own Fax Number
in the machine of the other party is
shown on the display. When connected, the machine starts scanning the original.
Reference
p.57 “Own Name/Fax Header/Own Fax Number”
was a line problem, the machine redials automatically.
When you want to remove originals
quickly or want to send other fax
messages, press the {Clear/Stop} key
and then resend the fax message using Memory Transmission.
Note
❒ If communication stops during Im-
mediate Transmission, an original
could be jammed. Remove the
jammed original and send it again.
See p.98 “Clearing Original Jams”.
42
After transmission the standby
display reappears.
Page 49

Canceling an Immediate Transmission
Canceling an Immediate Transmission
Before Pressing the Start Key
A
Press the {Energy Saver/Clear Modes
key.
ZHMS040N
Note
❒ When you have already placed
the original, you can also cancel
the transmission by removing
the original from the machine.
After Pressing the Start Key
A Press the {Clear/Stop} key, and
then remove the original.
When an Original Is Jammed
}
A Read the message on the display.
B Remove the original.
Reference
p.98 “Clearing Original Jams”
2
Note
❒
If the transmission finishes while
you are carrying out this procedure, it will not be canceled.
ZHMS050N
43
Page 50

Faxing
Scan Settings
You may want to send many different
types of fax messages. Some of these
may be difficult to reproduce at the
other end. However, your machine
2
has two settings that you can adjust to
help you transmit your fax message
with the best possible image quality.
❖ Resolution:
Standard, Detail, Super Fine, Extra Super Fine
❖ Original Type:
Halftone, Color Scan (Option for
Type1)
Note
❒ You can set whether the machine
returns to the same settings after
the power is turned on with the
User Parameters (switch 01, bit 7).
See p.139 “User Parameters”, Ad-
vanced Features .
Resolution
Images and text are scanned into the
machine by converting them to a sequence of dots. The frequency of dots
determines the quality of the image
and how long it takes to transmit.
Therefore, images scanned at high
resolution (Super Fine) have high
quality but transmission takes longer.
Conversely, low resolution (Stan-
dard) scanning results in less quality
but faster transmission. Choose the
setting that matches your needs
based upon this trade off between
speed and image clarity.
❖ Detail (8 × 7.7 lines/mm, 200 × 200 dpi)
Select for originals containing
small characters or when you require greater clarity. This resolution is twice as fine as Standard.
❖ 300 × 300 dpi
Select when you use the scanner
function. For details, see Chapter3,
“Using Scan to E-mail Functions”
in the NIC FAX unit manual.
Note
❒ To select 300 × 300 dpi, the NIC
FAX unit (Option for Type1) is
required.
❖ Super Fine (16 × 15.4 lines/mm, 400 ×
400 dpi)
This is suitable for originals with
small characters like newspapers.
Select for originals with very fine
details or when you require finer
image clarity than Detail. This resolution is eight times as fine as
Standard.
❖ Extra Super Fine (24 × 23.1 lines/mm,
600 × 600 dpi)
This is suitable for originals with
small characters or geometric figures like newspapers.
Select when you require finer image clarity than Super Fine.
❖ Standard (8 × 3.85 lines/mm, 200 ×
100 dpi)
Select for originals containing normal sized characters.
44
Page 51

Scan Settings
Limitation
❒ If the other party's machine does
not support the resolution at
which you are sending, this machine automatically switches to a
resolution which is supported.
This machine can send with Stan-
dard, Detail, Super Fine and Extra
Super Fine. Even if you send the
original with Extra Super Fine, the
other party's machine may receive
it with Fine (8x15.4 lines/mm, 200
x 400 dpi) or Detail (8x7.7
lines/mm, 200 x 200 dpi).
❒ When copying or receiving with
Extra Super Fine, the optional
40MB memory card is required.
Turn on the ”Ex. Super Fine” with
the User Parameters (switch 20; bit
1,3). See p.139 “User Parameters”,
Advanced Features .
❒ When sending with Extra Super
Fine, turn on the ”Ex. Super Fine”
with the User Parameters (switch
20, bit 2). See p.139 “User Parameters”, Advanced Features .
❒ To select 300 x 300 dpi, the NIC
FAX unit (Option for Type1) is required. 300 x 300 dpi can be used
with the scanner function. When
sending fax messages with 300 x
300 dpi, the machine switches to
Detail automatically.
❒ You can set the resolution type af-
ter the power is turned on or the
{Energy Saver/Clear Modes} key is
pressed with the User Parameters
(switch 00; bit 5,4). See p.139 “User
Parameters”, Advanced Features .
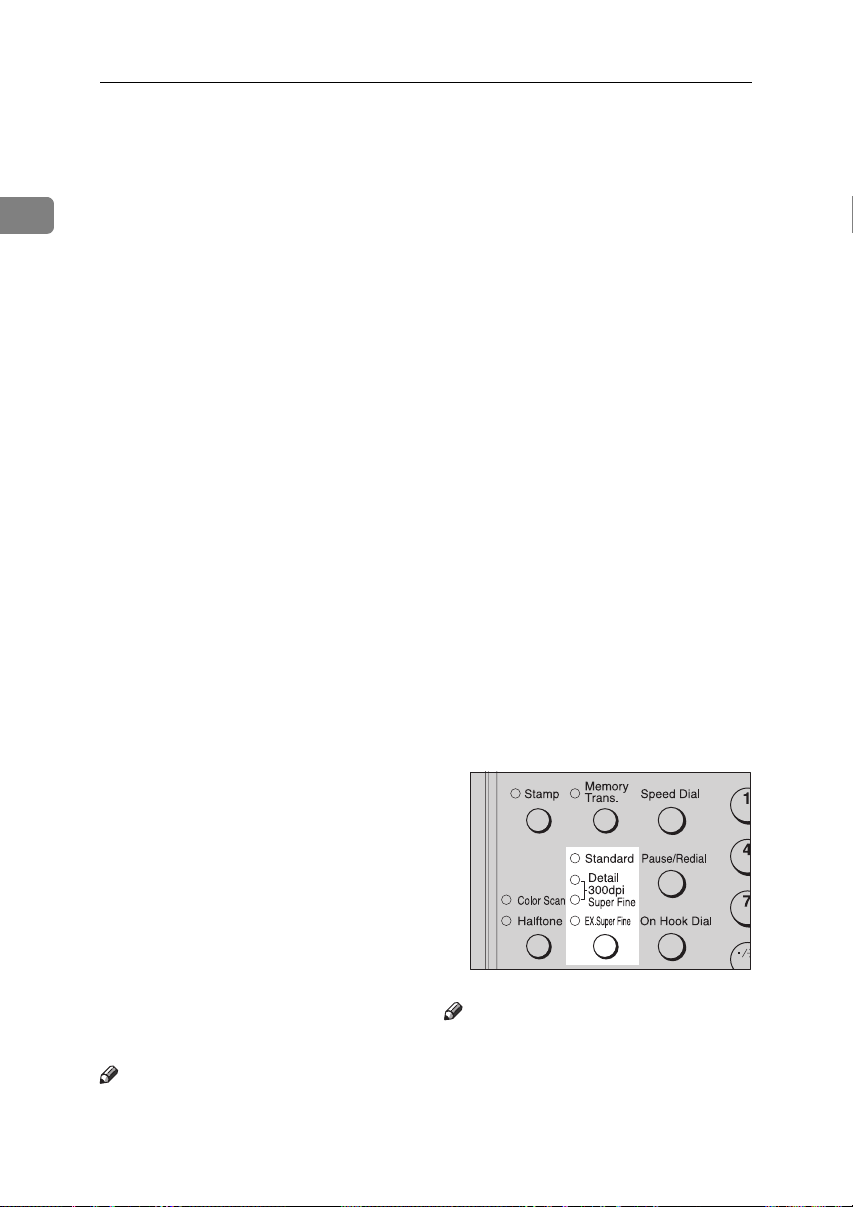
A Press the {Resolution} key to
switch between resolutions.
The indicators above the key show
the current selection.
2
Note
❒ This machine can receive fax mes-
sages with Standard, Detail, Su-
per Fine, and Extra Super Fine
(optional).
❒ You can check the resolution type
with the Journal.
❒ When turning on the "Ex. Super
Fine" with the User Parameters
(switch 20; bit 2,3), sending or receiving faxes on multiple lines
may not be possible. Copies and
received documents may not be
printed either.
ZHMS190E
Note
❒ When Detail and Super Fine
are lit at the same time, 300 x 300
dpi (optional) is selected.
45
Page 52

Faxing
Original Type
If your original contains photographs
or colored illustrations, select Half-
tone to optimize image clarity.
When you select Color Scan, color
2
originals can be scanned with the
scanner function (optional). For details, see “Scanning a Color Original”
in the NIC FAX unit manual.
Note
❒ If you select Halftone, the trans-
mission will take longer than when
it is not selected.
❒ Color Scan cannot be selected with
fax transmission.
❒ You can set whether Halftone is se-
lected after the power is turned on
or the {Energy Saver/Clear Modes}
key is pressed with the User Parameters (switch 00, bit 7). See
p.139 “User Parameters”, Advanced
Features .
-Speed Mode and Standard
Mode
Halftone has two modes, Speed mode
and Standard mode. When you select
Speed mode, faxes can be transmitted
faster, but the resulting images could
be inferior to those sent with Standard mode.
Note
❒ You can set the mode for Halftone
with the User Parameters (switch
10, bit 7). See p.139 “User Parameters”, Advanced Features .
Changing Scan Settings
When scanning multiple originals using the ADF, you can set scan settings
for every page.
A Check which pages you want to
change the scan settings for.
A Press the {Original Type} key.
B Make the scan settings for the
next page while the previous page
is scanned.
46
ZHMS090E
ZHMS250E
Page 53

Dialing
Dialing
There are four main ways to dial a
number:
❖ Entering numbers directly
See p.47 “Entering Numbers Directly”.
❖ Using Quick Dials
See p.49 “Using Quick Dials”.
❖ Using Speed Dials
See p.50 “Using Speed Dials”.
❖ Using Group Dials
See p.51 “Using Group Dials”.
Entering Numbers Directly
Enter numbers directly using the
number keys on the right side of the
control panel.
Note
❒ Maximum length of a fax number:
254 digits
❒ You can insert pauses and tones in
a fax number. See p.48 “Pause”
and p.48 “Tone”
❒ A pause is shown as a “-” on the
display.
A Place your original, and then se-
lect any scan settings you require.
B Enter the fax number with the
number keys.
The digits appear on the display as
you enter them.
2
Note
❒ If you make a mistake, press the
{Clear/Stop} key and enter
again.
❒ If you want to send this mes-
sage to more than one destination, press the {OK} key, and
then enter the next destination.
C Press the {Start} key.
-Limitations When Dialing with
the Number Keys
Fax numbers entered with the number keys are stored in internal memory (separate from memory for storing
original data). Therefore, using the
number keys, you cannot program
more than 100 numbers in total for
the following:
• Destinations specified in a Memory Transmission (including Confidential Transmission and Polling
Reception)
• Transfer Stations and End Receivers specified in a Transfer Request
• Destinations and Transfer Stations
Specified in a Group
For example, when 90 destinations
are programmed in a Group with the
number keys, only 10 destinations
can be dialed for Memory Transmission from the number keys.
47
Page 54

Faxing
Note
❒ When this machine is requested to
transfer a call (i.e. becomes a
Transfer Station), two fax numbers
are automatically stored. Therefore, the number of destinations
that can be dialed from the number
2
keys decreases by two whenever
this machine is requested to transfer a call.
❒ When a total of 100 fax numbers is
stored, Memory Transmission dialing with number keys cannot be
used. Use Immediate Transmission, or Memory Transmission dialing with Quick Dial, Speed Dial,
or Group Dial.
❒ If a Group is defined when there
are files queued for transmission,
no additional fax numbers can be
stored even if the number of destinations specified from the number
keys is less than 100. That is because the fax numbers have been
dialed from the number keys for
some of the waiting files. When the
waiting files have been sent and
their fax numbers are deleted from
memory, additional fax numbers
can be dialed.
❒ The display shows the percentage
of free space in memory for storing
documents. Since fax numbers are
stored in separate memory, dialing
fax numbers from the number keys
does not change the percentage on
the display.
Pause
Press the {Pause/Redial} key when dialing or storing a number to insert
about a two-second pause.
ZHMS100E
Note
❒ You cannot insert a pause before
the first digit of a fax number.
❒ A pause is shown as a "-" on the
display.
❖ When Entering a Pause
❒ You can insert a pause in numbers
stored in Quick Dials and Speed
Dials.
Tone
This function allows a machine connected to a pulse dialing line to send
tonal signals (for example if you want
to use a special service on a tone dialing line).
To use Tone, perform one of the following ways:
• Press the User Function key with
the Tone function programmed in.
• Press the {p} key.
48
Page 55

Dialing
Preparation
To use the User Function key with
the Tone function programmed in,
you need to assign this function to
a User Function key beforehand.
See p.101 “User Function Keys”,
Advanced Features .
Limitation
❒ You cannot place a tone before the
first digit of a fax number.
❒ Some services may not be available
when using the Tone feature.
Note
❒ A tone is shown as a “ • ” on the
display.
❒ You can choose whether to use the
{p} key as a Tone key with the
User Parameters. See p.139 “User
Parameters”, Advanced Features .
When using Tone with On Hook Dial
A Press the {On Hook Dial} key.
C Press the User Function key ( {F1}
to {F10} ) in which“Tone”is programmed.
2
ZHMS170E
D Enter a code number for receiving
a special service with the number
keys.
Note
❒ The entered number will be sent
by tonal signals.
Using Quick Dials
You can specify a destination simply
by pressing a Quick Dial.
ZHMS240E
B Enter the fax number with the
number keys.
Preparation
You must program the destination's fax number in a Quick Dial
beforehand. Additionally, you can
program a name for the destination in the Quick Dial. To program,
edit, or delete a Quick Dial, see
p.65 “Quick Dial”.
Note
❒ To check the contents of all Quick
dials, print the Quick Dial list. See
p.105 “Reports/Lists”, Advanced
Features .
❒ Switch between Quick Dials {01}
to {30}, {31} to {60}, and {61} to
{90} with the Quick Dial Key Flip
Plates.
Reference
p.47 “Dialing”
49
Page 56

Faxing
A Place your original, and then se-
lect any scan settings you require.
B Press the Quick Dial key in which
2
the destination number is programmed.
ZHMS110E
If the destination's name has been
programmed, the name is shown
on the display. If it is not, the fax
number is shown.
Using Speed Dials
You can specify a destination simply
by pressing the {Speed Dial} key and a
Speed Dial code (000 to 199).
Preparation
You must program the destination's fax number in a Speed Dial
beforehand. Additionally, you can
program a name for the destination in the Speed Dial. To program,
edit, or delete Speed Dial, see p.73
“Speed Dial”.
Note
❒ To check the contents of all Speed
Dials, print the Speed Dial list. See
p.105 “Reports/Lists”, Advanced
Features .
❒ You can use codes 000-199 for
Speed Dials.
❒ You can have the label stored with
a Speed Dial printed on the first
page received at the other end.
A Place your original, and then se-
lect any scan settings you require.
Note
❒ If you make a mistake, press the
{Clear/Stop} key and try again.
❒ If you want to dial another des-
tination, press the {OK} key and
dial another fax number.
B Press the {Speed Dial} key.
C Press the {Start} key.
50
ZHMS120E
Page 57

Dialing
Note
❒ “Enter No.” and “Search A/Z”
are shown one after the other in
the display above. If a search
letter is programmed with a
Speed Dial, you can find this
number quickly using the Telephone Directory function. See
p.44 “Telephone Directory”,
Advanced Features .
C Enter the three digit code (000 to
199) for the destination with the
number keys.
Note
❒ If the destination's name has
been programmed, the name is
shown on the display. If it is not,
the fax number is shown.
❒ If you want to dial another des-
tination, press the {OK} key and
dial another fax number.
❒ If you make a mistake, press the
{Clear/Stop} key and try again.
D Press the {Start} key.
Using Group Dials
You can store multiple destinations as
a single Group and easily specify
these destinations by selecting the
Group.
The method for specifying Groups
differs according to the way they
were programmed.
❖ When not programmed in a Quick Dial
Use the User Function key. Group
Dial is assigned to {F3} as a default. If this setting is changed,
program the Group function in a
User Function key ( {F1} to {F10} ).
See p.101 “User Function Keys”,
Advanced Features . When you want
to specify a destination, press the
User Function key with the Group
function programmed in, and then
press the Group number with the
number keys.
Preparation
You must program the destinations' fax numbers in a Group beforehand. Additionally, you can
program the destination names
and the Group name in the Group.
To program, edit, or delete
Groups, see p.79 “Groups”.
Note
❒
Quick Dials programmed for Groups
cannot be used for any other function.
❒ To check the contents of all
Groups, print the Group Dial list.
See p.105 “Reports/Lists”, Ad-
vanced Features .
❒ You cannot use Immediate Trans-
mission with Groups. You can
only use Memory Transmission.
❒ You can store up to 250 destina-
tions. If you register the same destination with a Speed Dial, Quick
Dial, or number keys in different
groups, it is only counted as one
item.
2
❖ When programmed in a Quick Dial
Press the Quick Dial key in which
a Group is programmed.
51
Page 58

Faxing
When specifying a group with a Quick
Dial
Preparation
You must program Groups in
Quick Dials beforehand. See p.79
“Groups”.
2
A Make sure that the Memory
Transmission indicator is lit.
D Press the {Start} key.
When specifying a group with the Group
Key
Note
❒ Group Dial is assigned to {F3} as a
default. If this setting is changed,
you must program the Group
function in a User Function key beforehand. See p.101 “User Function Keys”, Advanced Features .
A Make sure that the Memory
Transmission indicator is lit.
ZHMS040E
If it is not lit, press the {Memory
Trans.} key.
B Place your original, and then se-
lect any scan settings you require.
If it is not lit, press the {Memory
Trans.} key.
ZHMS040E
C Press the Quick Dial key in which
the Group is programmed.
Note
❒ Group Number is displayed. If
the group name is programmed, the group name is
also displayed.
❒ If you make a mistake, press the
{Clear/Stop} key and try again.
❒ If you want to dial another des-
tination, press the {OK} key,
and then dial another fax number.
52
B Place your original, and then se-
lect any scan settings you require.
C Press the User Function key with
the Group function programmed
in.
Page 59

D Enter the Group number (1 to 9)
with the number keys.
Note
❒ Group Number is displayed. If
the group name is programmed, the group name is
also displayed.
❒ If you want to specify another
Group, press the {OK} key, and
then repeat step C above.
❒ If you make a mistake, press the
{Clear/Stop} key. The display
will return to that in step B.
E Press the {Start} key.
Dialing
2
53
Page 60

Faxing
Reception Modes
The machine can treat incoming fax
messages and telephone calls in two
ways.
❖ Manual Receive
2
Use this mode if your line is shared
by a fax machine and a telephone
but you want to answer all calls
yourself and decide whether they
are fax transmissions or telephone
calls.
The machine will ring continuously until you answer the call, so you
have to be near the machine at all
times.
❖ Auto Receive
Use this mode if you have a dedicated fax line. The machine assumes all calls are fax
transmissions. It will ring once to
alert you of an incoming call, and
then it starts receiving.
A Press the {User Tools} key.
ZHMS130E
B Press 0 or 1 until " 2. Fax Fea-
tures " is displayed.
C Press the {OK} key.
Selecting the Reception Mode
Select the Reception Mode using the
following procedure.
D Press 0 or 1 until " 3. Setup " is
Note
❒ When the optional extra G3 inter-
face unit is installed, only Auto Receive can be used with G3-2.
❒ You can assign the procedure of
selecting the Reception Mode to a
User Function key. See p.101 “User
Function Keys”, Advanced Features
. When you press the User Function key in which it is assigned,
proceed to step H in the following
procedure.
❒ The optional handset is necessary
to use this machine as a telephone.
displayed.
E Press the {OK} key.
F Press 0 or 1 until “ 4. Reception
Mode “ is displayed.
54
Page 61

G Press the {OK} key.
H Press 0 or 1 to select the recep-
tion mode.
I Press the {OK} key.
J Press the {User Tools} key to re-
turn to the standby display.
Receiving Messages in Manual
Receive
In this mode you have to answer the
call yourself and decide whether it is
a fax or a telephone call.
The procedure for answering a call is
as follows:
Reception Modes
2
A Pick up the handset and listen to
the other end.
B If you hear a voice, continue your
conversation as you would normally.
C If you hear a fax tone, remove any
originals from the ADF.
D Press the {Start} key.
E Replace the handset.
55
Page 62

Faxing
2
56
Page 63

3. Programming
Own Name/Fax Header/Own Fax Number
Make sure that all necessary settings
are made before connecting your machine to the telephone line.
❖ Own Name
This should be your name or company name in 20 characters or less.
During communication, if the other party's fax machine supports
Own Name, this replaces the Own
Fax Number that follows. This
name will appear on the display of
the other party's fax machine, and
the name programmed on that machine will appear on yours.
Limitation
❒ The programmed name will not
be used unless the other party
has a machine of the same make
that supports the Own Name
function.
❖ Fax Header
This is ordinarily your name or
company name. Your fax header
can be up to 32 characters long and
is printed on the header of every
page you send.
You can program Fax Header1 or
Fax Header2. When you send originals using Quick Dial or Speed Dial, you can select which Fax
Header will be printed on the message received by the other party.
Important
❒ In the USA, the Fax Header
must contain the telephone
number of the line your machine is connected to. It will be
printed on the header of every
page you send. Required in the
USA.
Note
❒ In the USA, law requires that
your fax number be included in
the fax Header. Register the fax
number and switch on Fax
Header Print with User Parameters. See p.139 “User Parameters”, Advanced Features .
❖ Own Fax Number (Required by inter-
national law)
This is your fax machine's phone
number that must include country
and area codes using up to 20 characters or less. During any communication, your Own Fax Number
appears on their display. (Conversely, their Own Fax Number
appears on your display.)
Note
❒ In some areas, the Own Fax
Number is preprogrammed by
your service representative and
cannot be re-programmed by
the user.
Important
❒ When sending a fax, your Own Fax
Number is required by international law. You cannot legally connect a fax machine to the telephone
system if the Own Fax Number is
not programmed.
❒ You can confirm the Own Name,
Fax Header, and Own Fax Number
settings in the User Parameters
List. See p.139 “User Parameters”,
Advanced Features .
57
Page 64

Programming
Note
❒ When the optional extra G3 inter-
face unit is installed, register using
the “G3–2 Analog Line”. See p.151
“G3 Analog Line”, Advanced Fea-
tures .
❒ Make sure that the machine is in
standby mode before performing
the following procedures.
3
Own Name / Fax Header
The following procedure describes
how to program/edit/delete Own
Name and Fax Header.
Programming
D Press 0 or 1 until " 3. Setup " is
displayed.
E Press the {OK} key.
F Press 0 or 1 until "5. Fax Infor-
mation" is displayed.
G Press the {OK} key.
A Press the {User Tools} key.
Confirm that " 1. Own Name " is
displayed.
H Press the {OK} key.
B Press 0 or 1 until "2. Fax Fea-
tures" is displayed.
C Press the {OK} key.
58
ZHMS130E
I Enter your Own Name.
Reference
p.88 “Entering Characters”
J Press the {OK} key.
Page 65

Own Name/Fax Header/Own Fax Number
K Press 0 or 1 until " 2. Fax Header
1" or “3. Fax Header 2”is displayed.
L Press the {OK} key.
The programmed Own Name is
displayed.
M Press 0 or 1 to move the cursor,
and then enter your fax number
after the programmed Own
Name.
Note
❒ You need to add your fax num-
ber to the prorammed Own
Name in this step so that your
Fax Header contains both your
Own Name and your fax number.
N Press the {OK} key.
Editing
A Press the {User Tools} key.
3
ZHMS130E
B Press 0 or 1 until " 2. Fax Fea-
tures " is displayed.
C Press the {OK} key.
D Press 0 or 1 until " 3. Setup " is
displayed.
Note
❒ When you program both Fax
Header1 and Fax Header2, repeat from steps K to N.
O Press the {User Tools} key.
The standby display reappears.
E Press the {OK} key.
F Press 0 or 1 until "5. Fax Infor-
mation" is displayed.
59
Page 66

Programming
G Press the {OK} key.
B Press 0 or 1 until " 2. Fax Fea-
tures " is displayed.
H Press 0 or 1 to select the item
that you want to edit.
C Press the {OK} key.
I Press the {OK} key.
3
D Press 0 or 1 until " 3. Setup " is
J Press the {Clear/Stop} key, and
then reenter Own Name or Fax
Header.
K Press the {OK} key.
L Press the {User Tools} key.
The standby display reappears.
Deleting
displayed.
E Press the {OK} key.
F Press 0 or 1 until "5. Fax Infor-
mation" is displayed.
A Press the {User Tools} key.
60
G Press the {OK} key.
H Press 0 or 1 to select the item
that you want to delete.
I Press the {OK} key.
ZHMS130E
J Press the {Clear/Stop} key.
K Press the {OK} key.
Page 67

Own Name/Fax Header/Own Fax Number
L Press the {User Tools} key.
The standby display reappears.
Own Fax Number
The following procedure describes
how to program/edit/delete the
Own Fax Number.
Programming
A Press the {User Tools} key.
ZHMS130E
E Press the {OK} key.
F Press {2}{2}{2}{2}.
G Press the {OK} key.
H Press 0 or 1 until " 13. G3 Ana-
log Line" is displayed.
Note
❒ The code for each function that
appears on the display varies
depending on the installed options.
3
Press 0 or 1 until " 2. Fax Fea-
B
tures " is displayed.
C Press the {OK} key.
D Press 0 or 1 until " 4. Key Op.
Tools" is displayed.
I Press the {OK} key.
Confirm that “1. Own Fax No.” is
displayed.
J Press the {OK} key.
K Enter your Own Fax Number.
61
Page 68

Programming
L Press the {OK} key.
M Press the {User Tools} key.
The standby display reappears.
Editing
3
A Press the {User Tools} key.
E Press the {OK} key.
F Press {2}{2}{2}{2}.
G Press the {OK} key.
H Press 0 or 1 until " 13. G3 Ana-
log Line" is displayed.
ZHMS130E
B Press 0 or 1 until " 2. Fax Fea-
tures " is displayed.
Note
❒ The code for each function that
appears on the display varies
depending on the installed options.
I Press the {OK} key.
C Press the {OK} key.
D Press 0 or 1 until " 4. Key Op.
Tools" is displayed.
62
Confirm that “1. Own Fax No.” is
displayed.
J Press the {OK} key.
The programmed Own Fax Number is displayed.
Page 69

Own Name/Fax Header/Own Fax Number
K Press the {Clear/Stop} key, and
then reenter the Own Fax Number.
L Press the {OK} key.
M Press the {User Tools} key.
The standby display reappears.
Deleting
A Press the {User Tools} key.
D Press 0 or 1 until " 4. Key Op.
Tools" is displayed.
E Press the {OK} key.
3
F Press {2}{2}{2}{2}.
G Press the {OK} key.
H Press 0 or 1 until " 13. G3 Ana-
log Line" is displayed.
ZHMS130E
B Press 0 or 1 until " 2. Fax Fea-
tures " is displayed.
C Press the {OK} key.
Note
❒ The code for each function that
appears on the display varies
depending on the installed options.
I Press the {OK} key.
Confirm that “1. Own Fax No.” is
displayed.
J Press the {OK} key.
The programmed Own Fax Number is displayed.
63
Page 70

Programming
K Press the {Clear/Stop} key.
L Press the {OK} key.
3
M Press the {User Tools} key.
The standby display reappears.
64
Page 71

Quick Dial
Quick Dial
To save time, you can program a fax
number that you use often into a
Quick Dial key. Then, whenever you
are sending a message to that location, just press that Quick Dial key to
dial.
You can program the following items
in each key:
❖ Destination fax number
You can program the destination
fax number using up to 254 digits.
You can also select SUB code, SEP
code, SID, PWD (maximum 20 digits), Tone, and Pause. See p.45
“SUB/SID (SUB Code Transmission)”, Advanced Features ; p.46
“SEP/PWD (SEP Code Polling
Transmission)”, Advanced Features
; p.48 “Tone”, and p.48 “Pause”.
❖ Destination name
You can program the destination
name using up to 20 characters.
❖ Others
• Label (whether to print the destination name on faxes sent to
this number)
• Select Fax Header
You can select to print Fax
Header1 or Fax Header2 on the
fax messages that the other party receives.
Note
❒ When a programmed Quick Dial
key is being used for a standby
Memory Transmission, the messages "
Cannot Change.
is in Use. Cannot Delete.
displayed and you cannot change
or delete the destination for this
key.
❒ If a Quick Dial key with a pro-
grammed destination is programmed with Auto Document,
the document is sent by just pressing the Quick Dial key. See p.58
“Auto Document”, Advanced Fea-
tures .
❒ You can assign the procedure of
programming Quick Dial to a User
Function key. See p.101 “User
Function Keys”, Advanced Features
. When you press the User Function key to which it is assigned,
proceed to step F in the following
procedure.
❒ Make sure that the machine is in
standby mode before performing
the following procedure.
This Dial is in Use.
", or“ This Dial
” is
3
Important
❒ We recommend that you print the
Quick Dial list and keep it when
you program or change fax numbers. See p.105 “Reports/Lists”,
Advanced Features .
65
Page 72

Programming
Programming
Note
❒ There are 90 Quick Dials available.
F Display the number of the Quick
Dial key you want to program.
Press a Quick Dial key, or search
using 0 or 1.
A Press the {User Tools} key.
Note
❒ If a Quick Dial has already been
3
ZHMS130E
B Press 0 or 1 until " 2. Fax Fea-
tures " is displayed.
programmed, the contents are
displayed. Press 0 or 1 to select a Quick Dial that is not programmed, and then press the
{OK} key.
G Press the {OK} key.
H Enter a fax number with the num-
ber keys.
C Press the {OK} key.
Confirm that " 1. Program / Delete
" is displayed.
D Press the {OK} key.
Confirm that " 1. Prog. Quick Dial "
is displayed.
E Press the {OK} key.
66
Note
❒ If you make a mistake, press the
{Clear/Stop} key and try again.
❒ You can redial the number.
Press the {Pause/Redial} key before entering a fax number with
the number keys, and the last 10
fax numbers dialed are displayed. Press 0 or 1 to select
the fax number you want to
specify, and then press the {OK}
key.
❒ You can insert a pause “-” by
pressing the {Pause/Redial} key
(you cannot enter a pause before the first digit of a fax number).
Page 73

Quick Dial
❒ You can program SUB, SEP,
SID, and PWD in this step with
the Dial Option function. See
p.45 “SUB/SID (SUB Code
Transmission)”, Advanced Fea-
tures and p.46 “SEP/PWD (SEP
Code Polling Transmission)”,
Advanced Features .
I Press the {OK} key.
If you do not program the destination name, proceed to step
J Enter the destination name.
Reference
p.88 “Entering Characters”
Note
❒ Under rare circumstances, gar-
bled characters may appear
during name programming if
you use the {Pause/Redial} key
to display the fax number of
parties located in other countries. If this happens, simply delete the garbled characters using
0 or 1 and the {Clear/Stop}
keys, and then enter the destination name.
K Press the {OK} key.
L Press 0 or 1 to select "On" or
"Off".
Note
❒ Label insertion allows the re-
ceiver name that is programmed in a Quick Dial or
Speed Dial to be printed on the
fax when it is received at the
other end. See p.56 “Label Inser-
.
K
tion”, Advanced Features .
3
M Press the {OK} key.
N Press 0 or 1 to select "Hdr. 1" or
"Hdr. 2".
O Press the {OK} key.
If you want to program another
Quick Dial, proceed to step E.
P Press the {User Tools} key.
The standby display reappears.
67
Page 74

Programming
Editing
A Press the {User Tools} key.
F Display the number of the Quick
Dial key you want to edit.
Press a Quick Dial key, or search
using 0 or 1.
G Press the {OK} key.
3
ZHMS130E
B Press 0 or 1 until " 2. Fax Fea-
tures " is displayed.
C Press the {OK} key.
If you do not edit the number, proceed to step I.
H Press the {Clear/Stop} key, and
then reenter the fax number with
the number keys.
Note
❒ If you make a mistake, press the
{Clear/Stop} key and try again.
I Press the {OK} key.
Confirm that " 1. Program / Delete
" is displayed.
D Press the {OK} key.
Confirm that " 1. Prog. Quick Dial "
is displayed.
E Press the {OK} key.
68
If you do not edit the destination
name, proceed to step K.
J Press the {Clear/Stop} key, and
then reenter the destination
name.
Reference
p.88 “Entering Characters”
Page 75

Quick Dial
Note
❒ Under rare circumstances, gar-
bled characters may appear
during name registration if you
use the {Pause/Redial} key to
display the fax number of parties located in other countries. If
this happens, simply delete the
garbled characters using 0 or
1 and the {Clear/Stop} keys,
and then enter the destination
name.
K Press the {OK} key.
The name is programmed.
L Press 0 or 1 to select either "On"
or "Off".
M Press the {OK} key.
Deleting
A Press the {User Tools} key.
3
ZHMS130E
B Press 0 or 1 until "2. Fax Fea-
tures" is displayed.
C Press the {OK} key.
N Press 0 or 1 to select "Hdr. 1" or
"Hdr. 2".
O Press the {OK} key.
If you want to edit another Quick
Dial, proceed to step E.
P Press the {User Tools} key.
The standby display reappears.
Confirm that " 1. Program / Delete
" is displayed.
D Press the {OK} key.
E Press 0 or 1 until "2. Delete
Quick Dial" is displayed.
F Press the {OK} key.
69
Page 76

Programming
G Display the Quick Dial key that
you want to delete.
Press a Quick Dial key or search by
pressing 0 or 1.
B Press 0 or 1 until "2. Fax Fea-
tures" is displayed.
C Press the {OK} key.
H Press the {OK} key.
3
The programmed data (fax number and name) is deleted.
If you want to delete another
Quick Dial key, proceed to step F.
I Press the {User Tools} key.
The standby display reappears.
Quick Dial Key Label (Dial
Label)
You can print a template that can be
used to make labels for Quick Dial
keys. The template will have the destination or Group names programmed in Quick Dial keys on it.
D Press 0 or 1 until "2. Reports /
Lists" is displayed.
E Press the {OK} key.
F Press 0 or 1 until "4. Quick Dial
Label" is displayed.
G Press the {OK} key.
A Press the {User Tools} key.
70
H Press the {Start} key.
After Quick Dial Label is printed,
the standby display reappears.
ZHMS130E
Page 77

Label paper
Quick Dial
3
1. Quick Dial key number
The number of the Quick Dial key the
destination is programmed in.
GFFORM1N
2. Destination
The other party's name or Group name
programmed in the Quick Dial.
71
Page 78

Programming
3. The name of an Auto Document
The name for a document programmed
as an Auto Document.
4. The name of a program
When a program is stored on the Quick
Dial key, the name is printed.
5. The contents of the User Function
keys
The contents of the User Function keys is
printed.
3
6. FAX HEADER1 and FAX
HEADER2
The name programmed as FAX
HEADER1 and FAX HEADER2.
72
Page 79

Speed Dial
Speed Dial
If you program numbers in Speed Dials, you can specify the fax number
simply by pressing the {Speed Dial}
key and entering a three-digit Speed
Dial number.
You can program the following items
in a Speed Dial:
❖ Destination fax number
You can program the destination
fax number using up to 254 digits
for each number.
You can also select SUB code, SEP
code, SID, PWD (maximum 20 digits), Tone, and Pause. See p.45
“SUB/SID (SUB Code Transmission)”, Advanced Features ; p.46
“SEP/PWD (SEP Code Polling
Transmission)”, Advanced Features
; p.48 “Tone”; and p.48 “Pause”.
❖ Destination name
You can program the destination
name using up to 20 characters.
❖ Other items
•Label Insertion
If you turn Label Insertion on,
the receiver name programmed
in Speed Dial will be printed on
the fax message when it is received at the other end. The
name will be printed at the top
of the page and will be preceded
by “To”. See p.56 “Label Insertion”, Advanced Features .
• Telephone Directory search letter
You can program a search letter
(A/a to Z/z). See p.44 “Telephone Directory”, Advanced Fea-
tures .
• Select Fax Header
You can select to print Fax
Header1 or Fax Header2 on fax
messages that the other party
receives.
Important
❒ We recommend that you print the
Speed Dial list and keep it when
you program or change a destination. See p.105 “Reports/Lists”,
Advanced Features .
Limitation
❒ When a programmed Speed Dial is
being used for a standby Memory
Transmission, the message “
Dial is in Use. Cannot
Change.
Use. Cannot Delete.
played and you cannot change or
delete the destination for this key.
Note
❒ Make sure that the machine is in
standby mode before performing
the following procedures.
”, or “ This Dial is in
This
” is dis-
3
73
Page 80

Programming
Programming
Note
❒ There are 200 numbers available.
❒ You can specify codes 000 to 199.
A Press the {User Tools} key.
3
ZHMS130E
B Press 0 or 1 until " 2. Fax Fea-
tures " is displayed.
F Press the {OK} key.
G Display the number of the Speed
Dial you want to program (000 to
199).
Enter the Speed Dial number with
the number keys, or search using
0 or 1.
Note
❒ If you make a mistake, press the
{Clear/Stop} key and try again.
❒ If a Speed Dial number has al-
ready been programmed, the
contents are displayed. Press 0
or 1 to select an unprogrammed number, and then
press the {OK} key.
H Press the {OK} key.
C Press the {OK} key.
Confirm that " 1. Program / Delete
" is displayed.
D Press the {OK} key.
E Press 0 or 1 until " 3. Prog.
Speed Dial " is displayed.
74
I Enter a fax number with the num-
ber keys.
Note
❒ If you make a mistake, press the
{Clear/Stop} key and try again.
Page 81

Speed Dial
❒ You can redial the number.
Press the {Pause/Redial} key before entering a fax number with
the number keys, and the last 10
fax numbers dialed are displayed. Press 0 or 1 to select
the fax number you want to
specify, and then press the {OK}
key.
❒ You can insert a pause “-” by
pressing the {Pause/Redial} key
(you cannot enter a pause before the first digit of a fax number).
❒ You can program SUB, SEP,
SID, and PWD in this step with
the Dial Option function. See
p.45 “SUB/SID (SUB Code
Transmission)”, Advanced Fea-
tures and p.46 “SEP/PWD (SEP
Code Polling Transmission)”,
Advanced Features .
J Press the {OK} key.
If you do not program the destination name, proceed to step
K Enter the destination name.
N Press the {OK} key.
The search letter is programmed.
O Press 0 or 1 to select "On" or
"Off".
3
Note
❒ Label insertion allows the desti-
nation name that is programmed in Quick Dial or
Speed Dial to be printed on the
fax when it is received at the
other end. See p.56 “Label Insertion”, Advanced Features .
P Press the {OK} key.
Q Press 0 or 1 to select "Hdr. 1" or
.
L
"Hdr. 2".
Reference
p.88 “Entering Characters”
L Press the {OK} key.
M Enter the search letter (A/a to Z/z)
for Telephone Directory.
R Press the {OK} key.
If you want to program another
Speed Dial number, proceed to
step F.
S Press the {User Tools} key.
The standby display reappears.
75
Page 82

Programming
Editing
A Press the {User Tools} key.
G Display the number of the Speed
Dial you want to edit (000 to 199).
Enter the Speed Dial number with
the number keys, or search using
0 or 1.
H Press the {OK} key.
3
ZHMS130E
If you do not edit the number, pro-
B Press 0 or 1 until " 2. Fax Fea-
tures " is displayed.
C Press the {OK} key.
ceed to step
I Press the {Clear/Stop} key, and
then reenter the fax number with
the number keys.
Note
❒ If you make a mistake, press the
{Clear/Stop} key and try again.
.
J
Confirm that " 1. Program / Delete
" is displayed.
D Press the {OK} key.
E Press 0 or 1 until " 3. Prog.
Speed Dial " is displayed.
F Press the {OK} key.
76
J Press the {OK} key.
If you do not edit the destination
name, proceed to step
.
L
K Press the {Clear/Stop} key, and
then reenter the Destination
name.
Reference
p.88 “Entering Characters”
L Press the {OK} key.
Page 83

Speed Dial
M Enter the search letter (A/a to Z/z)
for Telephone Directory.
N Press the {OK} key.
O Press 0 or 1 to select "On" or
"Off".
P Press the {OK} key.
Q Press 0 or 1 to select "Hdr. 1" or
"Hdr. 2".
Deleting
A Press the {User Tools} key.
3
ZHMS130E
B Press 0 or 1 until " 2. Fax Fea-
tures " is displayed.
C Press the {OK} key.
R Press the {OK} key.
If you want to edit another Speed
Dial number, proceed to step F.
S Press the {User Tools} key.
The standby display reappears.
Confirm that " 1. Program / Delete
" is displayed.
D Press the {OK} key.
E Press 0 or 1 until " 4. Delete
Speed Dial " is displayed.
F Press the {OK} key.
77
Page 84

Programming
G Display the Speed Dial number
you want to delete (000 to 199).
Enter the Speed Dial number with
the number keys or search using 0
or 1.
H Press the {OK} key.
3
The programmed data (fax number and name) is deleted.
If you want to delete another
Speed Dial number, proceed to
step F.
I Press the {User Tools} key.
The standby display reappears.
78
Page 85

Groups
If you regularly broadcast originals to
the same set of destinations, you can
combine these numbers into a group.
Then just select the group and each
number will be dialed in sequence automatically.
You can enter destination numbers
using Quick Dial keys, Speed Dials,
or the number keys.
You can program the following items
in a Group:
❖ Destination fax numbers (up to 250
numbers for each group)
You can program the destination
fax number using up to 254 digits
for each number.
❖ Group name
You can program the group name
using up to 20 characters.
Important
❒ It is recommended that you print
the Group Dial list and keep it after
programming or editing Groups.
See p.105 “Reports/Lists”, Ad-
vanced Features .
Groups
Programming
There are two ways of programming
Groups:
❖ Programming groups in Quick Dial
keys
If you program a group in a Quick
Dial key, you can specify that
group by pressing the Quick Dial
key. However, if you use Quick
Dial keys to program groups, you
will be able to program fewer
Quick Dial keys .
Note
❒ You cannot program another
function in a Quick Dial key already used for a group. Also,
you cannot program groups in a
Quick Dial key already used for
another function.
❖ Assigning groups to the Group Dial
key
Use the User Function key with the
Group Dial function programmed
in. You need to assign the Group
Dial function to a User Function
key beforehand. Group Dial is assigned to {F3} as a default. See
p.101 “User Function Keys”, Ad-
vanced Features .
To send a fax, press the Group Dial
key, and then enter the group
number (1 to 9). To specify a group
using a Group Dial key, one more
step is required than when using a
Quick Dial key. However, multiple
groups can be programmed in a
Group Dial key, thus leaving the
Quick Dial keys to be used more
effectively.
3
79
Page 86

Programming
Reference
p.51 “Using Group Dials”
Note
❒ Make sure that the machine is in
standby mode before performing
the following procedures.
❒ You can program up to nine
groups.
❒ The maximum number of destina-
3
tions you can program in a group
is 250.
❒ The combined maximum number
of destinations you can program in
all groups is 390. This number can
be composed of up to 90 Quick
Dial numbers, 200 Speed Dial
numbers, and 100 numbers entered directly with the number
keys.
❒ If you program 100 destinations
with the number keys, Memory
Transmission using the number
keys becomes unavailable, and
only Immediate Transmission is
Group1 Group2 Total Num-
Quick Dial
[01]
Quick Dial
[03]
Quick Dial
[05]
Speed Dial
[04]
Speed Dial
[06]
Number keys
12345678
Number keys
87654321
Quick Dial
[01]
Quick Dial
[05]
Speed Dial
[04]
Speed Dial
[09]
Number keys
12345678
ber of items
Reference
p.47 “Limitations When Dialing
with the Number Keys”
A Press the {User Tools} key.
8
available.
❒ If you program a group with the
number keys when a file is waiting
to be transmitted, a message is displayed. You sometimes cannot
program any more destinations
even when the number of specified
destination is 99 or less.
❒ It is recommended that you print
the Group Dial list and keep it
ZHMS130E
when you program or change destinations. See p.105 “Reports/Lists”, Advanced Features .
❒ If you program the same destina-
tion in different groups, it is only
counted as one item.
B Press 0 or 1 until "2. Fax Fea-
tures" is displayed.
❒ The table below shows how to
count numbers.
80
Page 87

Groups
C Press the {OK} key.
Confirm that " 1. Program / Delete
" is displayed.
D Press the {OK} key.
E Press 0 or 1 until " 5. Prog.
Group Dial " is displayed.
F Press the {OK} key.
G Display the number of the Group
you want to program (1 to 9).
Enter the group number with the
number keys, or search using 0 or
1.
Note
❒ If a group has already been pro-
grammed, the contents are displayed. Press 0 or 1 to select a
group number that is not programmed, and then press the
{OK} key.
I Specify the destination using one
of the following three methods:
Enter the fax number with the
number keys.
Press a Quick Dial key.
3
Press the {Speed Dial} key, and
then enter a Speed Dial number.
Note
❒ If you make a mistake, press the
{Clear/Stop} key and try again.
❒ You can use “Redial” when
specifying the destination. See
p.44 “Redial”, Advanced Features
.
❒ To enter a pause (“-”), press the
{Pause/Redial} key.
❒ You can program SUB, SEP,
SID, and PWD in this step with
the Dial Option function. See
p.45 “SUB/SID (SUB Code
Transmission)”, Advanced Fea-
tures and p.46 “SEP/PWD (SEP
Code Polling Transmission)”,
Advanced Features .
J Press the {OK} key.
H Press the {OK} key.
Confirm that “Add” is selected.
K Press the {OK} key.
81
Page 88

Programming
L Repeat steps I to K for all the des-
tinations you want to program in
the Group.
S Press the Quick Dial key you
want to program the Group in.
M If you finished adding a destina-
tion, press the 0 or 1 to select "
Exit ".
3
N Press the {OK} key.
If you do not program the Group
name, proceed to step
.
P
O Enter the Group name.
Reference
p.88 “Entering Characters”
P Press the {OK} key.
T Press the {OK} key.
U Press the {User Tools} key.
The standby display reappears.
Editing
You can edit the group name or add
destinations for programmed groups.
To edit a destination:
❖ For destinations programmed in
Quick Dial or Speed Dial
Edit the contents of the programmed Quick Dial or Speed Dial.
See p.65 “Quick Dial” and p.73
“Speed Dial”.
Q Press 0 or 1 to select whether to
assign the Group to a Quick Dial
key.
If you want to assign the Group to
a Quick Dial key, select “Yes”.
If you do no t, sele ct “No” , and then
proceed to step
.
T
R Press the {OK} key.
82
❖ For destinations programmed with
number keys
Delete the destination you want to
edit from the group, and then program the new destination.
Note
❒ When a programmed Group is be-
ing used for a standby Memory
Transmission, you cannot edit the
group name or add destinations
for the group.
Page 89

Groups
A Press the {User Tools} key.
ZHMS130E
B Press 0 or 1 until " 2. Fax Fea-
tures " is displayed.
C Press the {OK} key.
Confirm that " 1. Program / Delete
" is displayed.
D Press the {OK} key.
F Press the {OK} key.
G Display the number of the Group
you want to edit (1 to 9).
Enter the group number with the
number keys, or search using 0 or
1.
H Press the {OK} key.
Confirm that “Yes” is selected.
If you do not add a destination,
press 0 or 1 to select “No”, and
then proceed to step
.
O
I Press the {OK} key.
Confirm that “Add” is selected.
J Press the {OK} key.
3
E Press 0 or 1 until " 5. Prog.
Group Dial " is displayed.
83
Page 90

Programming
K Specify the destination using one
of the following three methods:
Enter the fax number with the
number keys.
Press a Quick Dial key.
O Press the {OK} key.
Programmed Group name is displayed.
If you do not edit the Group name,
proceed to step
.
Q
P Press the {Clear/Stop} key, and
3
Press the {Speed Dial} key and enter a Speed Dial number.
then enter another name.
Q Press the {OK} key.
R Press 0 or 1 to select whether to
Note
❒
You can use “Redial” when specifying the destination.
“Redial”, Advanced Features .
L Press the {OK} key.
Confirm that “Add” is selected.
See p.44
assign the Group to a Quick Dial
key.
If you want to assign the Group to
a Quick Dial key, select “Yes”.
If you do not, select “No”, and then
proceed to step
.
U
S Perform one of the following pro-
M To add another destination, re-
peat steps
to L.
J
N If you finished adding a destina-
tion, press the 0 or 1 to select "
Exit ".
cedures:
When the group was assigned to
a Quick Dial key
A Press 0 or 1 to select whether
to change the assigned Quick
Dial key.
84
If you want to assign the Group
to another Quick Dial key, select
“Yes”.
If you do not, select “No”, and
then proceed to step U.
Page 91

Groups
B Press the {OK} key.
When the group was not
assigned to a Quick Dial key
A Press the {OK} key.
T Press the Quick Dial key you
want to assign the Group.
U Press the {OK} key.
If you want to edit another Group,
proceed to step
.
F
V Press the {User Tools} key.
The standby display reappears.
To delete a destination from a group
The following procedure describes
how to delete a destination from a
group.
A Press the {User Tools} key.
3
ZHMS130E
B Press 0 or 1 until " 2. Fax Fea-
tures " is displayed.
C Press the {OK} key.
Deleting
Note
❒ When a programmed Group is be-
ing used for a standby Memory
Transmission, you cannot delete
the destination for the Group.
❒ When you delete a destination
from a group programmed in a
Quick Dial or a Speed Dial, the
contents of the Quick Dial or Speed
Dial are not deleted.
Confirm that " 1. Program / Delete
" is displayed.
D Press the {OK} key.
E Press 0 or 1 until " 5. Prog.
Group Dial " is displayed.
85
Page 92

Programming
F Press the {OK} key.
G Display the group number for the
destination you want to delete (1
to 9).
Enter the group number with the
number keys, or search using 0 or
3
1.
H Press the {OK} key.
M Press the {OK} key.
To delete another destination, repeat steps
to M.
J
N Press the {User Tools} key.
The standby display reappears.
To delete an entire group
The following procedure describes
how to delete all destinations from a
Group.
A Press the {User Tools} key.
Confirm that “Yes” is selected.
I Press the {OK} key.
J Press 0 or 1 to select "Delete".
K Press the {OK} key.
L Press 0 or 1 to display the desti-
nation you want to delete.
86
ZHMS130E
B Press 0 or 1 until " 2. Fax Fea-
tures " is displayed.
C Press the {OK} key.
Confirm that " 1. Program / Delete
" is displayed.
Page 93

D Press the {OK} key.
E Press 0 or 1 until " 6. Delete
Group Dial " is displayed.
Groups
F Press the {OK} key.
G Display the number of the group
you want to delete (1 to 9).
Enter the group number with the
number keys, or search using 0 or
1.
H Press the {OK} key.
I Press the {User Tools} key.
The standby display reappears.
3
87
Page 94

Programming
Entering Characters
This section describes how to enter characters.
Available Characters
•Letters:
ABCDEFGHIJKLMNOPQRSTUVWXYZabcdefghijklmnopqrstuvwxyz
•Symbols:
3
– _ (space) . , ( ) / @ & $ !” ' # p % + : ; < = > ? ^ [ ] ` { | } ∼
•Numbers:
0123456789
Keys
The following illustration is for Type1.
1. 0 or 1
Use to move the cursor left or right and to
select a symbol.
2. {OK} key
Press to program entered characters.
3. Quick Dial keys
Press these keys to enter upper and lower
case letters.
There are two types of keyboard layout.
See p.155 “Key Layout”, Advanced Fea-
tures .
88
ZHMS060N
• QWERTY layout
ZHMS140E
•ABCDEF layout
ZHMS150E
Page 95

4. {ABC/abc} key (Quick Dial 21, 51,
or 81)
Use to switch between upper and lower
case.
5. Space key (Quick Dial 29, 59, or
89)
Press to enter a space.
6. {Symbols} key (Quick Dial 30, 60,
or 90)
Press to enter symbols.
7. Number keys
Use to enter numbers.
8. {Clear/Stop} key
Deletes the character at the cursor position. If the cursor is placed to the right of
the last character at the right end of a line,
that character will be deleted.
Entering Characters
How to Enter Characters
The following procedure describes
how to enter characters.
Note
❒ When you enter a character, it is
displayed at the position of the
cursor. If there is a character at the
cursor position, the entered character is displayed before the character.
A Enter letters, symbols, or num-
bers.
Characters are entered and the cursor moves.
• For letters, press the Quick Dial
keys.
• For symbols, press the {Sym-
bols} key and 0 or 1 to select
the symbol, and then press the
{OK} key.
• For numbers, press the number
keys.
3
Note
❒ When you make a mistake,
press the {Clear/Stop} key.
❒ When you want to insert a char-
acter, move the cursor to the
character right of the position
you want to enter the character,
and enter the character. The inserted character is displayed left
of the cursor position.
B Press the {OK} key.
89
Page 96

Programming
See p.121 “Multi-copy Reception”, Advanced Features .
-Wild Cards
When you program other parties'
Own Name or Own Fax Numbers for
multiple destinations, you can program a sequence of characters common to these identifications as a wild
card instead of programming every
identification.
3
If a destination has an Own Name or
Own Fax Number containing a wild
•Specified Tray
See p.123 “Specified Tray”, Ad-
vanced Features .
• Two-sided Reception
See p.126 “Two-sided Reception”, Advanced Features .
•Forwarding
See p.129 “Forwarding”, Ad-
vanced Features .
card, the machine determines that the
destination matches the registered
destination.
❖ Not using a wild card
Destination to be
registered(Own
Name)
NEW YORK
BRANCH
HONG KONG
BRANCH
SYDNEY BRANCH
Number of programmed identifications
3
❖ Using a wild card
Destination to be
registered(Own
Name)
BRANCH 1
Note
Number of programmed identifications
❒ You can program up to 50 wild
cards.
❒ Spaces are neglected when the ma-
chine compares identifications.
❒ You can use wild cards for the fol-
lowing functions:
•Authorized Reception
See p.116 “Authorized Reception”, Advanced Features .
•Memory Lock
See p.119 “Memory Lock”, Ad-
vanced Features .
90
• Multi Copy Reception
Page 97

4. Troubleshooting
Loading Paper in the Main Paper Tray
If there is no paper in the main paper
tray, the B indicator on the control
panel lights.
Use the following procedure to load
paper.
Important
❒ When loading paper, be careful
not to pinch your fingers inside the
machine.
❒ Before loading paper, make sure
that the machine is not delivering a
copy or a received fax message.
❒ Do not use stapled paper or con-
ductive paper, such as carbon paper or silver coated paper.
Note
❒ You can load up to 250 sheets in
the main paper tray.
❒ Regarding paper types and sizes
that can be used, see p.202 “Recommended paper sizes and
types”, Advanced Features .
A Pull out the main paper tray until
it stops.
B Push the metal plate down, and
then square the paper and load it
into the tray.
Important
❒ Do not stack paper over the lim-
it mark.
Note
❒ Fan the paper before setting it in
the tray.
C Push the main paper tray in until
it stops.
91
Page 98

Troubleshooting
R
R
Replacing the Toner Cartridge
When the Add Toner indicator (D)
starts to blink, the toner cartridge is
almost empty. About 50 pages can be
printed while the Add Toner indicator blinks, but replace the toner cartridge soon.
When the Add Toner indicator (D)
remains lit, printing is not possible.
WARNING:
• Do not incinerate used toner
4
or toner cartridge. Toner dust
might ignite when exposed to
an open flame. Dispose of
used toner cartridge in accordance with local regulations.
CAUTION:
• Keep toner (used or unused) and
toner cartridges out of reach of
children.
• Do not open toner cartridges
forcefully. Toner can spill, dirtying your clothes or hands, and
possibly resulting in accidental
ingestion.
• If toner or used toner is inhaled,
gargle with plenty of water and
move into a fresh air environment. Consult a doctor if necessary.
• If toner or used toner gets into
your eyes, flush thoroughly with
eyswash or water. Consult a
doctor if necessary.
• If toner or used toner is swallowed, dilute by drinking a large
amount of water. Consult a doctor if necessary.
• Avoid getting toner on your
clothes or skin when removing a
paper jam or replacing toner. If
your skin comes into contact with
toner, wash the affected area
throughly with soap and water.
• If toner gets on your clothing,
wash with cold water. Hot water
will set the toner into the fabric
and may make removing the
stain impossible.
92
Page 99

Replacing the Toner Cartridge
Important
❒ Used toner cartridges can be recy-
cled. Please contact the seller of
this machine.
❒ Make sure the power is turned on
when replacing the toner cartridge.
❒ Fault may occur if you use toner
other than the recommended type.
❒ Do not leave the front cover open
for a protracted length of time. Exposing the toner cartridge to light
for an extended period of time may
cause it to deteriorate, so replace
the cartridge as quickly as possible.
❒ Do not position the toner cartridge
upside down or at an angle.
A Open the front cover.
C Prepare the new toner cartridge.
Hold the cartridge horizontally
and shake it gently from side to
side a few times.
4
D Remove the tape from the toner
cartridge.
ZHMH090E
B Push the lever (A) and pull out
the old toner cartridge holding A
and B.
E Insert the toner cartridge and
make sure it locks securely into
place.
93
Page 100

Troubleshooting
F Close the front cover.
ZHMH100E
Important
4
❒ The front cover will not close
properly if the toner cartridge is
set into the machine incorrectly.
If the cover will not close, remove the cartridge and set it
again.
-When Toner Runs Out
Even if toner runs out and the Add
Toner indicator (D) is lit, transmission operations are possible.
94
Reference
p.36 “Memory Transmission”
p.41 “Immediate Transmission”
 Loading...