

Page 1
Before Using the Machine
1
Basics
2
Printing Functions
3
Troubleshooting
4
User Tools
5
Remarks
6
Operating Instructions
Entering Text
7
Specifications
8
Read this manual carefully before you use this machine and keep it handy for future reference. For safe and correct use, be sure to read the
Safety Information before using the machine.
Page 2

Introduction
This manual contains detailed instructions and notes on the operation and use of this machine. For your
safety and benefit, read this manual carefully before using the machine. Keep this manual in a handy
place for quick reference.
Important
Contents of this manual are subject to change without prior notice. In no event will the company be liable for direct, indirect, special, incidental, or consequential damages as a result of handling or operating the machine.
Notes
Some illustrations in this manual might be slightly different from the machine.
Certain options might not be available in some countries. For details, please contact your local dealer.
Two kinds of size notation are employed in this manual. With this machine refer to the inch version.
For good print quality, the supplier recommends that you use genuine master and ink from the supplier.
The supplier shall not be responsible for any damage or expense that might result from the use of parts
other than genuine parts from the supplier with your office products.
Power Source
120V, 60Hz, 4.5A or more
Please be sure to connect the power cord to a power source as above. For details about power source,
see p.202 “Power Connection”.
Trademark
PostScript
®
and Acrobat® are registered trademarks of Adobe Systems Incorporated.
Other product names used herein are for identification purposes only and might be trademarks of their
respective companies. We disclaim any and all rights to those marks.
Symbols
In accordance with IEC 60417, this machine uses the following symbols for the main switch:
• a means POWER ON.
• b means POWER OFF.
Page 3

Manuals for This Machine
The following manuals describe the operational procedures of this machine. For
particular functions, see the relevant parts of the manual.
Note
❒ Manuals provided are specific to machine type.
❒ Adobe Acrobat Reader/Adobe Reader is necessary to view the manuals as a
PDF file.
❒ To view HTML manuals, a Web browser must be installed.
❖ Safety Information (paper)
Describes information about the safety precautions.
❖ Easy Operation Guide (paper/PDF file - CD-ROM
*1
)
Describes information about the control panel and basic operations.
❖ Operating Instructions (this manual)
Describes operations, functions, User Tools (initial setting, mode setting, etc.)
and troubleshooting.
❖ Network Guide (PDF file - CD-ROM
*1
)
Describes procedures for configuring the machine and computers in a network environment.
❖ Printer Reference (PDF file - CD-ROM
*1
)
Describes system settings and operations for the machine's printer function.
❖ Preparations for Use as a Printer (paper/PDF file - CD-ROM
*1
)
Describes procedures for connecting the Ethernet and USB cables to the machine.
❖ Manuals for DeskTopBinder Lite
DeskTopBinder Lite is a utility included on the CD-ROM labeled “Document
Management Utility”.
• DeskTopBinder Lite Setup Guide (HTML - CD-ROM
*2
)
Describes the installation of, and the operating environment for DeskTopBinder Lite in detail. This guide can be displayed from the [Setup] dialog
box when DeskTopBinder Lite is installed.
• DeskTopBinder Introduction Guide (HTML - CD-ROM
*2
)
Describes operations of DeskTopBinder Lite and provides an overview of
its functions. This guide is added to the [Start] menu when DeskTopBinder
Lite is installed.
❖ Other manuals
• PostScript3 (PDF file - CD-ROM
*1
Provided on the CD-ROM labeled “Operating Instructions”
*2
Provided on the CD-ROM labeled “Document Management Utility”
*1
)
i
Page 4

What You Can do with this Machine
Below is a quick summary of this machine's features and where to look for
more information.
❖ Basic Procedure
See p.49 “Basic Procedure”.
❖ Saving Energy
See p.51 “Saving Energy”.
❖ Printing onto Various Kinds of Paper
See p.52 “Printing onto Various
Kinds of Paper”.
❖ Image Rotation
See p.56 “Image Rotation”.
❖ Selecting Original Type
See p.57 “Selecting Original Type”.
❖ Master Making Density
See p.58 “Master Making Density”.
❖ Adjusting the Position of Printed Im-
ages
See p.59 “Adjusting the Position of
Printed Images”.
❖ Preset Reduce/Enlarge
See p.63 “Preset Reduce/Enlarge”.
AUX003S
❖ Zoom
See p.64 “Zoom”.
❖ Auto Reduce/Enlarge
See p.66 “Auto Reduce/Enlarge”.
*Paper feed direction
❖ Changing the Printing Speed
See p.60 “Changing the Printing
Speed”.
ii
GRPOSI0E
Page 5
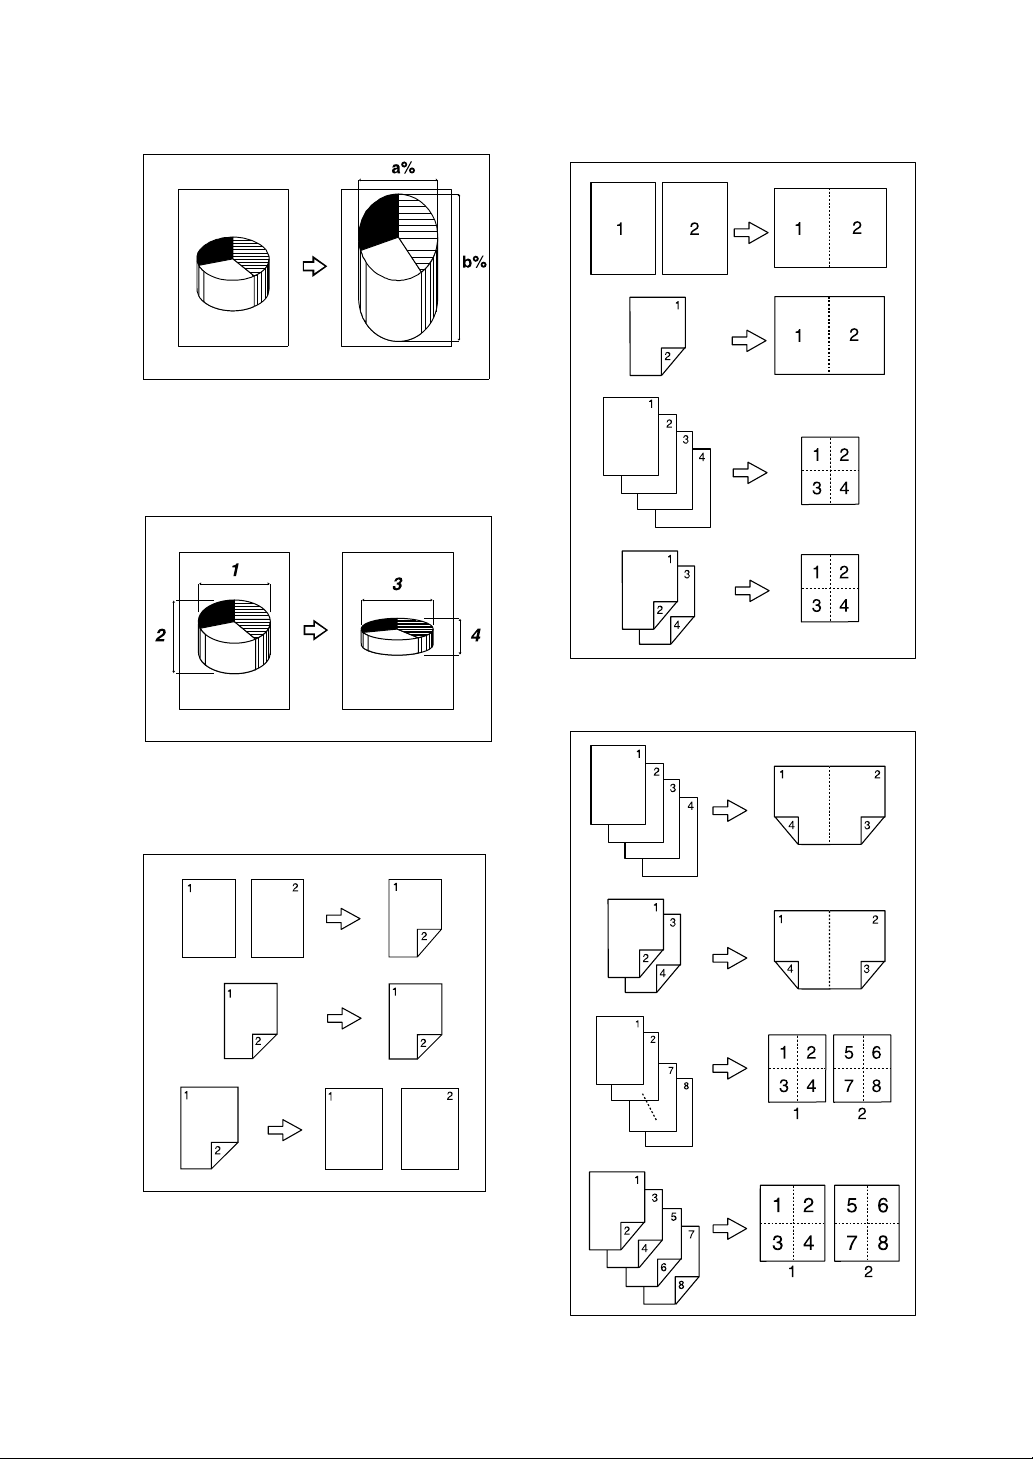
❖ Directional Magnification (%)
See p.68 “Directional Magnification (%)”.
CP2P01EE
❖ Directional Size Magnification (mm)
See p.69 “Directional Size Magnification (mm)”.
❖ Combine
See p.74 “Combine”.
•One-Sided Combine
❖ Duplex
See p.70 “Duplex”
AUX157S
•Two-Sided Combine
CP2M01EE
AUX160S
AUX300S
iii
Page 6
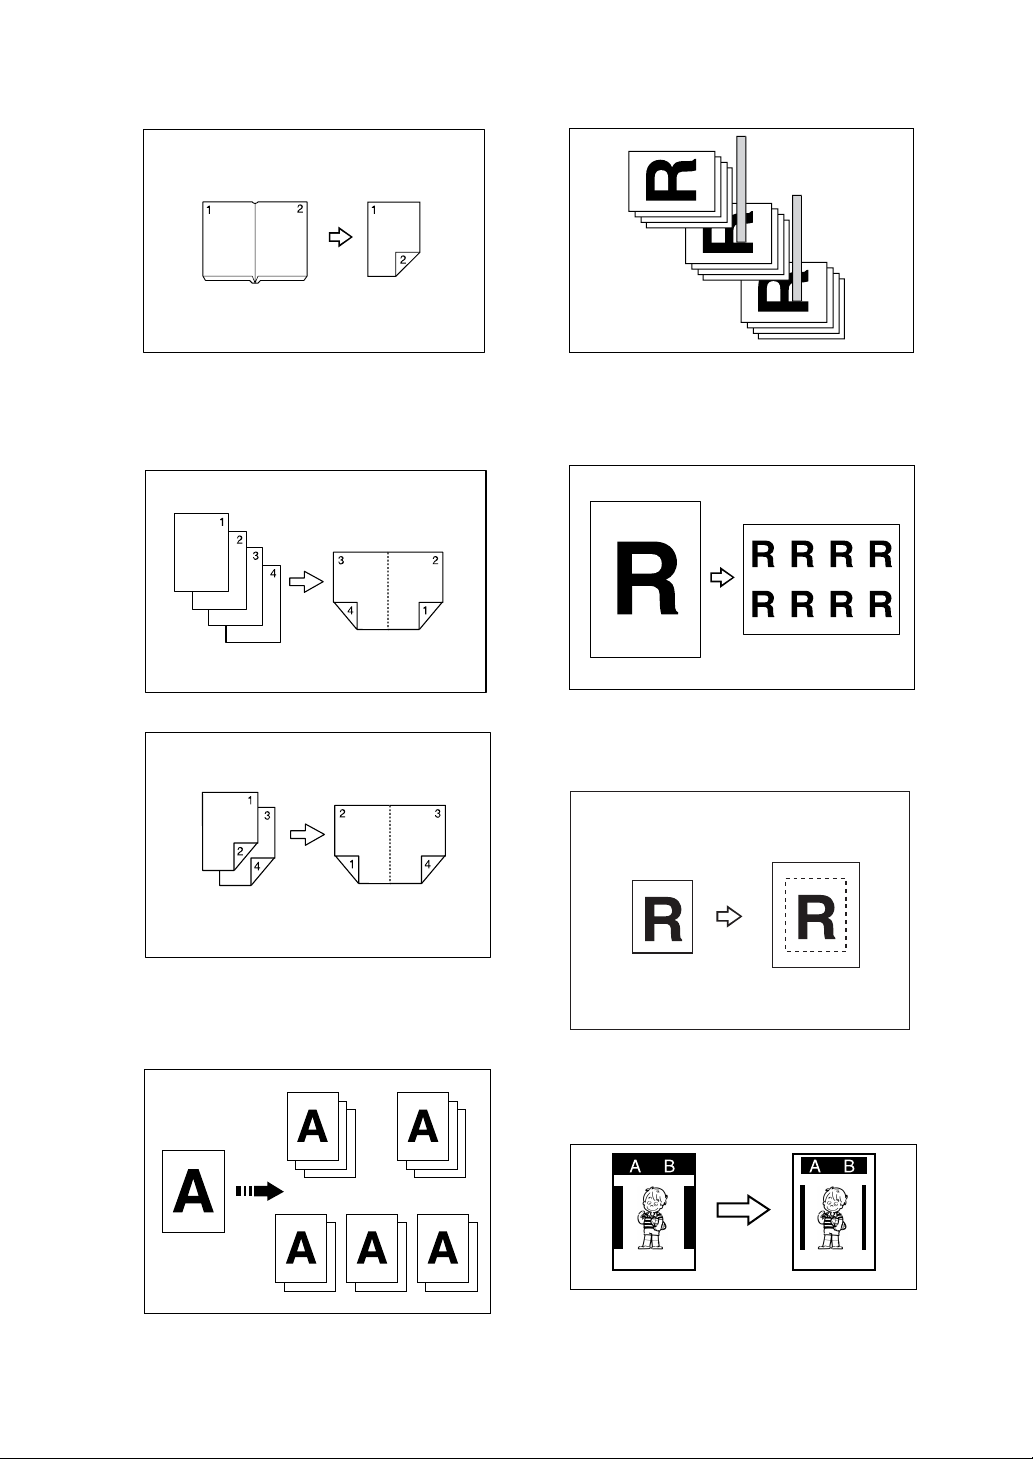
❖ Series
See p.85 “Series”
❖ Separate
See p.95 “Separate”.
❖ Booklet/Magazine
See p.86 “Booklet/Magazine”
AUX014S
AUX015S
AUY037S
❖ Image Repeat
See p.96 “Image Repeat”.
❖ Centring
See p.100 “Centring”.
❖ Class Settings
See p.90 “Class Settings”.
iv
AUX018S
GCCNTR0E
❖ Erase Border
See p.100 “Erase Border”.
ACY068S
AJK210S
Page 7
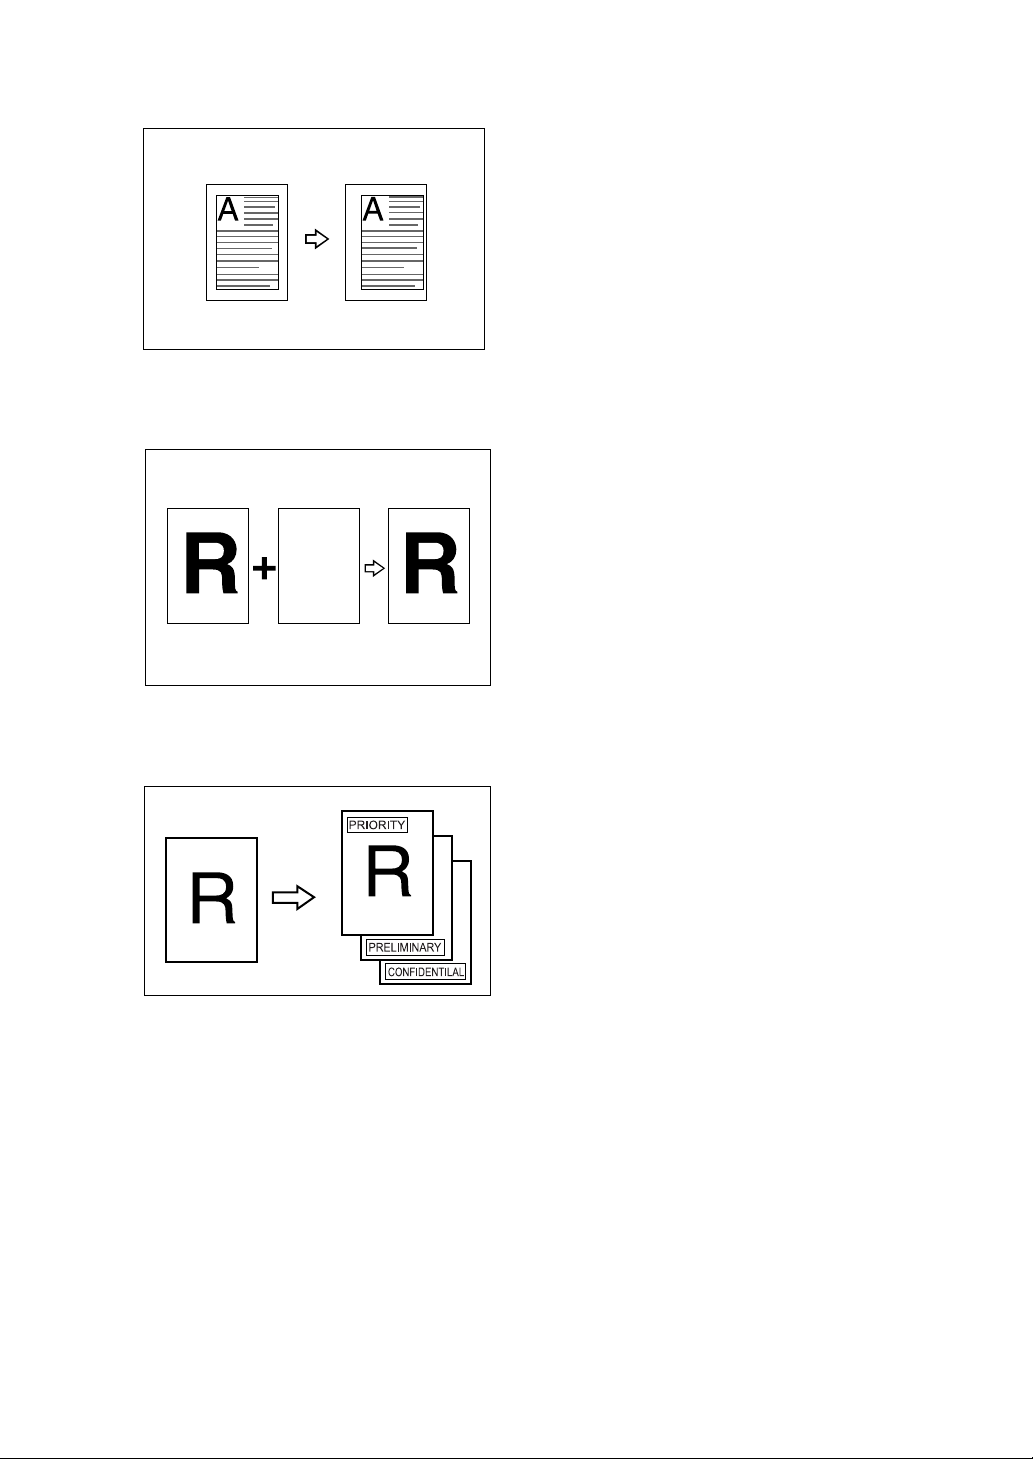
❖ Margin Adjustment
See p.101 “Margin Adjustment”.
❖ Security
See p.123 “Security”.
❖ Conserving the Master
See p.124 “Conserving the Master”.
❖ Storing Files
See p.125 “Storing Files”.
❖ Programs
See p.131 “Programs”.
❖ Overlay
See p.102 “Overlay”.
ABCDE ABCDE ABCDE ABCDE ABCDE
ABCDE ABCDE ABCDE ABCDE ABCDE
ABCDE ABCDE ABCDE ABCDE ABCDE
ABCDE ABCDE ABCDE ABCDE ABCDE
ABCDE ABCDE ABCDE ABCDE ABCDE
ABCDE ABCDE ABCDE ABCDE ABCDE
ABCDE ABCDE ABCDE ABCDE ABCDE
ABCDE ABCDE ABCDE ABCDE ABCDE
ABCDE ABCDE ABCDE ABCDE ABCDE
ABCDE ABCDE ABCDE ABCDE ABCDE
ABCDE ABCDE ABCDE ABCDE ABCDE
ABCDE ABCDE ABCDE ABCDE ABCDE
ABCDE ABCDE ABCDE ABCDE ABCDE
ABCDE ABCDE ABCDE ABCDE ABCDE
ABCDE ABCDE ABCDE ABCDE ABCDE
ABCDE ABCDE ABCDE ABCDE ABCDE
ABCDE ABCDE ABCDE ABCDE ABCDE
ABCDE ABCDE ABCDE ABCDE ABCDE
ABCDE ABCDE ABCDE ABCDE ABCDE
ABCDE ABCDE ABCDE ABCDE ABCDE
ABCDE ABCDE ABCDE ABCDE ABCDE
ABCDE ABCDE ABCDE ABCDE ABCDE
❖ Preset Stamp
See p.105 “Preset Stamp”.
ABCDE ABCDE ABCDE ABCDE ABCDE
ABCDE ABCDE ABCDE ABCDE ABCDE
ABCDE ABCDE ABCDE ABCDE ABCDE
ABCDE ABCDE ABCDE ABCDE ABCDE
ABCDE ABCDE ABCDE ABCDE ABCDE
ABCDE ABCDE ABCDE ABCDE ABCDE
ABCDE ABCDE ABCDE ABCDE ABCDE
ABCDE ABCDE ABCDE ABCDE ABCDE
ABCDE ABCDE ABCDE ABCDE ABCDE
ABCDE ABCDE ABCDE ABCDE ABCDE
ABCDE ABCDE ABCDE ABCDE ABCDE
ABCDE ABCDE ABCDE ABCDE ABCDE
ABCDE ABCDE ABCDE ABCDE ABCDE
ABCDE ABCDE ABCDE ABCDE ABCDE
ABCDE ABCDE ABCDE ABCDE ABCDE
ABCDE ABCDE ABCDE ABCDE ABCDE
ABCDE ABCDE ABCDE ABCDE ABCDE
ABCDE ABCDE ABCDE ABCDE ABCDE
ABCDE ABCDE ABCDE ABCDE ABCDE
ABCDE ABCDE ABCDE ABCDE ABCDE
ABCDE ABCDE ABCDE ABCDE ABCDE
ABCDE ABCDE ABCDE ABCDE ABCDE
GROVER0E
❖ Making Colour Prints
See p.134 “Making Colour Prints”.
❖ Printing from the computer
See Printer Reference.
❖ Make–up
See p.107 “Make-Up Printing Features”, p.110 “Command Sheets
for Make-Up Printing”, and p.117
“Make-Up Printing”.
❖ Quality Start
See p.121 “Quality Start”.
❖ Economy Mode
See p.121 “Economy Mode”.
❖ Skip Feed
See p.122 “Skip Feed”.
GRSTAM0E
v
Page 8

TABLE OF CONTENTS
Manuals for This Machine ......................................................................................i
What You Can do with this Machine ....................................................................ii
Notice ......................................................................................................................1
Information about Installed Software.......................................................................... 3
How to Read This Manual .....................................................................................9
Safety Information ...............................................................................................10
Safety During Operation...........................................................................................10
Positions of RWARNING and RCAUTION Labels ...........................................12
Guide To Components ........................................................................................14
Internal Indicators.....................................................................................................16
Options .................................................................................................................17
Option List ................................................................................................................17
Guide to Major Options ............................................................................................18
Control Panel........................................................................................................21
Display Panel ...........................................................................................................23
Turning On the Power .........................................................................................25
Turning On the Main Power .....................................................................................25
Turning On the Power ..............................................................................................25
Turning Off the Power ..............................................................................................25
Turning Off the Main Power .....................................................................................26
1. Before Using the Machine
Originals ...............................................................................................................27
Size and Weights of Recommended Originals.........................................................27
Sizes difficult to detect .............................................................................................29
Print Paper............................................................................................................30
Recommended Paper Size and Type ......................................................................30
Recommended for the LCIT.....................................................................................30
Recommended for the LCOT ...................................................................................31
Non-recommended Paper........................................................................................31
Storing Paper ...........................................................................................................33
Printing Size .........................................................................................................34
2. Basics
Printing Preparations ..........................................................................................35
Using the Paper Feed Tray and Delivery Tray .........................................................35
Using the LCIT and LCOT........................................................................................38
Using the Tape Dispenser........................................................................................43
After Printing ........................................................................................................44
Folding the Paper Feed Tray and Delivery Tray ......................................................44
Uninstalling the LCIT................................................................................................46
Placing Originals..................................................................................................47
Placing Originals on the Exposure Glass.................................................................47
Placing Originals in the ARDF..................................................................................48
Original Orientation ..................................................................................................48
vi
Page 9

Basic Procedure...................................................................................................49
Panel Beeper ...........................................................................................................50
Auto Reset ...............................................................................................................50
Saving Energy..........................................................................................................51
Auto Off Timer..........................................................................................................51
Printing onto Various Kinds of Paper ................................................................ 52
Printing onto Thick Paper.........................................................................................52
Printing onto Standard Paper...................................................................................52
Printing onto Envelopes ...........................................................................................52
Printing onto Special Paper......................................................................................53
Making a Master and Prints ................................................................................54
Selecting Cycle Setting ............................................................................................55
Image Rotation.........................................................................................................56
Selecting Original Type ............................................................................................57
Master Making Density.............................................................................................58
Sample Print and Adjustment.............................................................................59
Adjusting the Position of Printed Images .................................................................59
Changing the Printing Speed ...................................................................................60
3. Printing Functions
Printing Functions ...............................................................................................63
Preset Reduce/Enlarge ............................................................................................63
Zoom ........................................................................................................................64
Auto Reduce/Enlarge ...............................................................................................66
Directional Magnification (%) ...................................................................................68
Directional Size Magnification (mm).........................................................................69
Duplex ......................................................................................................................70
Combine...................................................................................................................74
Series .......................................................................................................................85
Booklet/Magazine.....................................................................................................86
Class Settings ..........................................................................................................90
Separate...................................................................................................................95
Image Repeat...........................................................................................................96
Centring..................................................................................................................100
Erase Border ..........................................................................................................100
Margin Adjustment .................................................................................................101
Overlay...................................................................................................................102
Preset Stamp .........................................................................................................105
Make-Up Printing Features ....................................................................................107
Command Sheets for Make-Up Printing ................................................................110
Make-Up Printing ...................................................................................................117
Quality Start ...........................................................................................................121
Economy Mode ......................................................................................................121
Skip Feed ...............................................................................................................122
Security ..................................................................................................................123
Conserving the Master ...........................................................................................124
vii
Page 10

Storing Files .......................................................................................................125
Storing Data ...........................................................................................................125
Changing a Stored File's User Name, File Name, or Password ............................127
Searching for Stored Files......................................................................................128
Printing Stored Files...............................................................................................129
Deleting Stored Files..............................................................................................130
Printing or Deleting Stored Files Using a Web Browser.........................................130
Programs ............................................................................................................131
Storing a Program ..................................................................................................131
Recalling a Program...............................................................................................132
Changing a Stored Program ..................................................................................132
Changing a Program Name ...................................................................................132
Protecting a Program .............................................................................................132
Deleting a Program ................................................................................................133
Making Colour Prints.........................................................................................134
Changing the Colour Drum Unit .............................................................................134
Making Colour Prints..............................................................................................136
Printing in Two Colours ..........................................................................................136
Combination Chart.............................................................................................138
4. Troubleshooting
If Your Machine Does Not Operate as You Want ............................................141
If you Cannot Make Clear Prints....................................................................... 143
Faint Prints .............................................................................................................143
Black Lines/Stained Prints .....................................................................................143
Dirty Background....................................................................................................144
Dotted Prints ..........................................................................................................147
If You Cannot Make Prints as You Want..........................................................148
Combine.................................................................................................................148
Storing Files ...........................................................................................................149
Duplex ....................................................................................................................149
BLoading Paper ................................................................................................150
Loading Paper into the Paper Feed Tray ...............................................................150
Loading Paper into LCIT ........................................................................................151
jAdding Ink ......................................................................................................152
CReplacing the Master Roll .............................................................................154
Placing a New Roll of Tape in the Optional Tape Dispenser .........................156
x Clearing Misfeeds .........................................................................................157
“x + A” Paper Misfeeds in the Paper Feed Section..............................................157
”x + A + B” Paper Misfeeds in the Paper Feed Section .......................................158
“x + B” Paper or Master Wrapped Around the Drum............................................ 159
“x + C” Paper Misfeeds in the Paper Exit Section................................................163
“x + D” Master Misfeeds in the Master Feed Section...........................................164
“x + B + D” Master Misfeeds in the Master Feed Section ....................................165
“x + E” Master Misfeeds in the Master Eject Section ...........................................165
“x + B + E” Master Misfeeds in the Master Eject Section.....................................166
“x + P” Original Misfeeds Occur in the ARDF ......................................................167
“x + Z” Paper Misfeeds in the Duplex Unit ...........................................................168
“x + B + Z” Paper Misfeeds in the Duplex Unit..................................................... 169
When Paper Misfeeds in the LCIT .........................................................................170
viii
Page 11

Changing the Paper Size...................................................................................172
Changing the Paper Size of the Paper Feed Tray .................................................172
Changing the Paper Size of LCIT ..........................................................................173
MWhen the Open Cover/Unit Indicator Lights ...............................................174
kRemoving the Used Master...........................................................................175
When Multiple Sheets Are Fed at the Same Time...........................................176
When Prints Are Not Delivered in a Neat Stack ..............................................177
When Printing on Small Size Paper .......................................................................177
5. User Tools
User Tools Menu ................................................................................................179
System Settings .....................................................................................................179
Maintenance...........................................................................................................181
Master Making/Print Settings .................................................................................181
Accessing User Tools (System Settings/Master Making/Print Settings)......184
Changing Default Settings .....................................................................................184
Quitting User Tools ................................................................................................184
Settings You Can Change with User Tools .....................................................185
System Settings .....................................................................................................185
Master Making/Print Settings .................................................................................190
User Code ...........................................................................................................195
Registering a User Code........................................................................................195
Changing a User Code...........................................................................................196
Deleting a User Code.............................................................................................196
Displaying the Counter for Each User Code ..........................................................196
Printing the Counter for All User Codes .................................................................197
Clearing the Counter ..............................................................................................197
6. Remarks
Do's and Don'ts..................................................................................................199
Where to Put Your Machine ..............................................................................201
Machine Environment ............................................................................................201
Moving....................................................................................................................202
Power Connection..................................................................................................202
Access to the Machine ...........................................................................................203
Maintaining Your Machine ................................................................................204
Cleaning the Exposure Glass.................................................................................204
Cleaning the exposure glass cover ........................................................................204
Cleaning the Auto Document Feeder.....................................................................205
Cleaning the paper feed roller (paper feed tray) ....................................................205
Cleaning the paper feed roller (LCIT)..................................................................... 205
Other Functions .................................................................................................206
Enquiry ...................................................................................................................206
Changing the Display Language ............................................................................207
Counter/Data Print .............................................................................................208
Displaying the Counter...........................................................................................208
Print the log data and programmed class list .........................................................208
ix
Page 12

7. Entering Text
Entering Text ......................................................................................................211
Available Characters ..............................................................................................211
Keys .......................................................................................................................211
Entering Text..........................................................................................................212
8. Specifications
Main Unit.............................................................................................................213
Options ...............................................................................................................217
Auto Document Feeder capable of scanning both sides of a sheet
(ARDF Type 4640)...............................................................................................217
Twin Colour Press Roller Printing System TC-IIR..................................................218
Large Capacity System (LS3000R)........................................................................ 219
Other Options.........................................................................................................220
Consumables .....................................................................................................221
INDEX....................................................................................................... 222
x
Page 13

Notice
Important
Do not copy or print any item for which reproduction is prohibited by law.
Copying or printing the following items is generally prohibited by local law:
bank notes, revenue stamps, bonds, stock certificates, bank drafts, checks, passports, driver's licenses.
The preceding list is meant as a guide only and is not inclusive. We assume no
responsibility for its completeness or accuracy. If you have any questions concerning the legality of copying or printing certain items, consult with your legal
advisor.
Notice To Wireless LAN Interface (optional) Users
Notes to users in the United States of America
Notice:
This equipment has been tested and found to comply with the limits for a Class
B digital device, pursuant to Part 15 of the FCC Rules. These limits are designed
to provide reasonable protection against harmful interference in a residential installation. This equipment generates, uses and can radiate radio frequency energy and, if not installed and used in accordance with the instructions, may cause
harmful interference to radio communications. However, there is no guarantee
that interference will not occur in a particular installation. If this equipment does
cause harmful interference to radio or television reception, which can be determined by turning the equipment off and on, the user is encouraged to try to correct the interference by one more of the following measures:
• Reorient or relocate the receiving antenna.
• Increase the separation between the equipment and receiver.
• Connect the equipment into an outlet on a circuit different from that to which
the receiver is connected.
• Consult the dealer or an experienced radio/TV technician for help.
This device complies with part 15 of the FCC Rules.
Operation is subject to the following two conditions:
(1) This device may not cause harmful interference, and (2) this device must accept any interference received, including interference that may cause undesired
operation.
1
Page 14

Warning:
Changes or modifications not expressly approved by the party responsible for
compliance could void the user's authority to operate the equipment.
Note to users in Canada
Note:
This Class B digital apparatus complies with Canadian ICES-003.
Operation is subject to the following two conditions:
(1) This device may not cause interference, and (2) this device must accept any
interference, including interference that may cause undesired operation of the
device.
IEEE 802.11b I/F Unit Type 1:
This device complies with RSS-210 of Industry Canada.
The term “IC:” before the certification/registration number only signifies that
the Industry Canada technical specifications were met.
To prevent radio interference to the licensed service, this device is intended to
be operated indoors and away from windows to provide maximum shielding.
Equipment (or its transmit antenna) that is installed outdoors is subject to licensing.
Remarque concernant les utilisateurs au Canada
Avertissement:
Cet appareil numérique de la classe B est conforme á la norme NMB-003 du Canada.
L'utilisation de ce dispositif est autorisée seulement aux conditions suivantes: (1)
il ne doit pas produire de brouillage et (2) l'utilisateur du dispositif doit être prêt
á accepter tout brouillage radioélectrique reçu, même si ce brouillage est susceptible de compromettre le fonctionnement du dispositif.
IEEE 802.11b I/F Unit Type 1:
Ce dispositif est conforme á la norme CNR-210 d'Industrie Canada.
L'expression «IC:» avant le numéro d'homologation/enregistrement signifie
seulement que les spécifications techniques d'Industrie Canada ont été respectées.
Pour empêcher que cet appareil cause du brouillage au service faisant l'objet
d'une licence, il doit être utilisé á l'intérieur et devrait être placé loin des fenêtres
afin de fournir un écran de blindage maximal.
Si le matériel (ou son antenne d'emission) est installe á l'extérieur, il doit faire
l'objet d'une licence.
2
Page 15

Information about Installed Software
expat
• The software including controller, etc. (hereinafter “software”) installed on
this product uses the expat Version 1.95.2 (hereinafter “expat”) under the conditions mentioned below.
• The product manufacturer provides warranty and support to the software of
the product including the expat, and the product manufacturer makes the initial developer and copyright holder of the expat, free from these obligations.
• Information relating to the expat is available at:
http://expat.sourceforge.net/
Copyright (c) 1998, 1999, 2000 Thai Open Source Software Centre, Ltd. and Clark
Cooper.
Permission is hereby granted, free of charge, to any person obtaining a copy of
this software and associated documentation files (the “Software”), to deal in the
Software without restriction, including without limitation the rights to use,
copy, modify, merge, publish, distribute, sublicense, and/or sell copies of the
Software, and to permit persons to whom the Software is furnished to do so, subject to the following conditions:
The above copyright notice and this permission notice shall be included in all
copies or substantial portions of the Software.
THE SOFTWARE IS PROVIDED “AS IS”, WITHOUT WARRANTY OF ANY
KIND, EXPRESS OR IMPLIED, INCLUDING BUT NOT LIMITED TO THE
WARRANTIES OF MERCHANTABILITY, FITNESS FOR A PARTICULAR
PURPOSE AND NONINFRINGEMENT. IN NO EVENT SHALL THE AUTHORS OR COPYRIGHT HOLDERS BE LIABLE FOR ANY CLAIM, DAMAGES OR OTHER LIABILITY, WHETHER IN AN ACTION OF CONTRACT,
TORT OR OTHERWISE, ARISING FROM, OUT OF OR IN CONNECTION
WITH THE SOFTWARE OR THE USE OR OTHER DEALINGS IN THE SOFTWARE.
3
Page 16

NetBSD
1. Copyright Notice of NetBSD
For all users to use this product:
This product contains NetBSD operating system:
For the most part, the software constituting the NetBSD operating system is not
in the public domain; its authors retain their copyright.
The following text shows the copyright notice used for many of the NetBSD
source code. For exact copyright notice applicable for each of the files/binaries,
the source code tree must be consulted.
A full source code can be found at http://www.netbsd.org/.
Copyright © 1999, 2000 The NetBSD Foundation, Inc.
All rights reserved.
Redistribution and use in source and binary forms, with or without modification, are permitted provided that the following conditions are met:
A Redistributions of source code must retain the above copyright notice, this list
of conditions and the following disclaimer.
B Redistributions in binary form must reproduce the above copyright notice,
this list of conditions and the following disclaimer in the documentation
and/or other materials provided with the distribution.
C All advertising materials mentioning features or use of this software must
display the following acknowledgment:
This product includes software developed by The NetBSD Foundation, Inc.
and its contributors.
D Neither the name of The NetBSD Foundation nor the names of its contribu-
tors may be used to endorse or promote products derived from this software
without specific prior written permission.
THIS SOFTWARE IS PROVIDED BY THE NETBSD FOUNDATION, INC. AND
CONTRIBUTORS ''AS IS'' AND ANY EXPRESS OR IMPLIED WARRANTIES,
INCLUDING, BUT NOT LIMITED TO, THE IMPLIED WARRANTIES OF MERCHANTABILITY AND FITNESS FOR A PARTICULAR PURPOSE ARE DISCLAIMED. IN NO EVENT SHALL THE FOUNDATION OR CONTRIBUTORS
BE LIABLE FOR ANY DIRECT, INDIRECT, INCIDENTAL, SPECIAL, EXEMPLARY, OR CONSEQUENTIAL DAMAGES (INCLUDING, BUT NOT LIMITED TO, PROCUREMENT OF SUBSTITUTE GOODS OR SERVICES; LOSS OF
USE, DATA, OR PROFITS; OR BUSINESS INTERRUPTION) HOWEVER
CAUSED AND ON ANY THEORY OF LIABILITY, WHETHER IN CONTRACT, STRICT LIABILITY, OR TORT (INCLUDING NEGLIGENCE OR OTHERWISE) ARISING IN ANY WAY OUT OF THE USE OF THIS SOFTWARE,
EVEN IF ADVISED OF THE POSSIBILITY OF SUCH DAMAGE.
4
Page 17

2. Authors Name List
All product names mentioned herein are trademarks of their respective owners.
The following notices are required to satisfy the license terms of the software
that we have mentioned in this document:
• This product includes software developed by the University of California,
Berkeley and its contributors.
• This product includes software developed by Jonathan R. Stone for the NetBSD Project.
•This product includes software developed by the NetBSD Foundation, Inc.
and its contributors.
• This product includes software developed by Manuel Bouyer.
• This product includes software developed by Charles Hannum.
• This product includes software developed by Charles M. Hannum.
• This product includes software developed by Christopher G. Demetriou.
• This product includes software developed by TooLs GmbH.
• This product includes software developed by Terrence R. Lambert.
• This product includes software developed by Adam Glass and Charles Hannum.
• This product includes software developed by Theo de Raadt.
• This product includes software developed by Jonathan Stone and Jason R.
Thorpe for the NetBSD Project.
• This product includes software developed by the University of California,
Lawrence Berkeley Laboratory and its contributors.
• This product includes software developed by Christos Zoulas.
• This product includes software developed by Christopher G. Demetriou for
the NetBSD Project.
• This product includes software developed by Paul Kranenburg.
• This product includes software developed by Adam Glass.
• This product includes software developed by Jonathan Stone.
• This product includes software developed by Jonathan Stone for the NetBSD
Project.
• This product includes software developed by Winning Strategies, Inc.
•This product includes software developed by Frank van der Linden for the
NetBSD Project.
• This product includes software developed for the NetBSD Project by Frank
van der Linden.
• This product includes software developed for the NetBSD Project by Jason R.
Thorpe.
• The software was developed by the University of California, Berkeley.
• This product includes software developed by Chris Provenzano, the University of California, Berkeley, and contributors.
5
Page 18

Sablotron
Sablotron (Version 0.82) Copyright (c) 2000 Ginger Alliance Ltd. All Rights Reserve
a) The application software installed on this product includes the Sablotron software Version 0.82 (hereinafter, “Sablotron 0.82”), with modifications made by
the product manufacturer. The original code of the Sablotron 0.82 is provided by
Ginger Alliance Ltd., the initial developer, and the modified code of the Sablotron 0.82 has been derived from such original code provided by Ginger Alliance Ltd.
b) The product manufacturer provides warranty and support to the application
software of this product including the Sablotron 0.82 as modified, and the product manufacturer makes Ginger Alliance Ltd., the initial developer of the Sablotron 0.82, free from these obligations.
c) The Sablotron 0.82 and the modifications thereof are made available under the
terms of Mozilla Public License Version 1.1 (hereinafter, “MPL 1.1”), and the application software of this product constitutes the “Larger Work” as defined in
MPL 1.1. The application software of this product except for the Sablotron 0.82
as modified is licensed by the product manufacturer under separate agreement(s).
d) The source code of the modified code of the Sablotron 0.82 is available at: http://support-download.com/services/device/sablot/notice082.html.
e) The source code of the Sablotron software is available at: http://www.gingerall.com.
f) MPL 1.1 is available at: http://www.mozilla.org/MPL/MPL-1.1.html.
JPEG LIBRARY
• The software installed on this product is based in part on the work of the Independent JPEG Group.
6
Page 19

SASL
CMU libsasl
Tim Martin
Rob Earhart
Rob Siemborski
Copyright (c) 2001 Carnegie Mellon University. All rights reserved.
Redistribution and use in source and binary forms, with or without modification, are permitted provided that the following conditions are met:
A Redistributions of source code must retain the above copyright notice, this list
of conditions and the following disclaimer.
B Redistributions in binary form must reproduce the above copyright notice,
this list of conditions and the following disclaimer in the documentation
and/or other materials provided with the distribution.
C The name “Carnegie Mellon University” must not be used to endorse or pro-
mote products derived from this software without prior written permission.
For permission or any other legal details, please contact:
Office of Technology Transfer
Carnegie Mellon University
5000 Forbes Avenue
Pittsburgh, PA 15213-3890
(412) 268-4387, fax: (412) 268-7395
[email protected]
D Redistributions of any form whatsoever must retain the following acknowl-
edgment:
“This product includes software developed by Computing Services at Carnegie Mellon University (http://www.cmu.edu/computing/).”
CARNEGIE MELLON UNIVERSITY DISCLAIMS ALL WARRANTIES WITH
REGARD TO THIS SOFTWARE, INCLUDING ALL IMPLIED WARRANTIES
OF MERCHANTABILITY AND FITNESS, IN NO EVENT SHALL CARNEGIE
MELLON UNIVERSITY BE LIABLE FOR ANY SPECIAL, INDIRECT OR CONSEQUENTIAL DAMAGES OR ANY DAMAGES WHATSOEVER RESULTING
FROM LOSS OF USE, DATA OR PROFITS, WHETHER IN AN ACTION OF
CONTRACT, NEGLIGENCE OR OTHER TORTIOUS ACTION, ARISING OUT
OF OR IN CONNECTION WITH THE USE OR PERFORMANCE OF THIS
SOFTWARE.
7
Page 20

MD4
Copyright (C) 1990-2, RSA Data Security, Inc. All rights reserved.
License to copy and use this software is granted provided that it is identified as
the “RSA Data Security, Inc. MD4 Message-Digest Algorithm” in all material
mentioning or referencing this software or this function.
License is also granted to make and use derivative works provided that such
works are identified as “derived from the RSA Data Security, Inc. MD4 MessageDigest Algorithm” in all material mentioning or referencing the derived work.
RSA Data Security, Inc. makes no representations concerning either the merchantability of this software or the suitability of this software for any particular
purpose. It is provided “as is” without express or implied warranty of any kind.
These notices must be retained in any copies of any part of this documentation
and/or software.
MD5
Copyright (C) 1991-2, RSA Data Security, Inc. Created 1991. All rights reserved.
License to copy and use this software is granted provided that it is identified as
the “RSA Data Security, Inc. MD5 Message-Digest Algorithm” in all material
mentioning or referencing this software or this function.
License is also granted to make and use derivative works provided that such
works are identified as “derived from the RSA Data Security, Inc. MD5 MessageDigest Algorithm” in all material mentioning or referencing the derived work.
RSA Data Security, Inc. makes no representations concerning either the merchantability of this software or the suitability of this software for any particular
purpose. It is provided “as is” without express or implied warranty of any kind.
These notices must be retained in any copies of any part of this documentation
and/or software.
8
Page 21

How to Read This Manual
R
R
Symbols
The following set of symbols is used in this manual.
WARNING:
This symbol indicates a potentially hazardous situation that might result in
death or serious injury when you misuse the machine without following the instructions under this symbol. Be sure to read the instructions, all of which are described in the Safety Information section.
CAUTION:
This symbol indicates a potentially hazardous situation that might result in minor or moderate injury or property damage that does not involve personal injury
when you misuse the machine without following the instructions under this
symbol. Be sure to read the instructions, all of which are described in the Safety
Information section.
* The statements above are notes for your safety.
Important
If this instruction is not followed, paper might be misfed, originals might be
damaged, or data might be lost. Be sure to read this.
Preparation
This symbol indicates information or preparations required prior to operating.
Note
This symbol indicates precautions for operation, or actions to take after abnormal operation.
Limitation
This symbol indicates numerical limits, functions that cannot be used together,
or conditions in which a particular function cannot be used.
Reference
This symbol indicates a reference.
[]
Keys that appear on the machine's display panel.
{}
Keys built into the machine's control panel.
9
Page 22

Safety Information
R
R
When using this machine, the following safety precautions should always be followed.
Safety During Operation
In this manual, the following important symbols are used:
WARNING:
CAUTION:
Indicates a potentially hazardous situation which, if instructions
are not followed, could result in death or serious injury.
Indicates a potentially hazardous situation which, if instructions are not
followed, may result in minor or moderate injury or damage to property.
R WARNING:
• Do not damage, break or make any modifications to the power cord.
Do not place heavy objects on it. Do not pull it hard nor bend it more
than necessary. These actions could cause an electric shock or fire.
• Disconnect the power plug (by pulling the plug, not the cable) if the
power cable or plug becomes frayed or otherwise damaged.
• To avoid hazardous electric shock, do not remove any covers or
screws other than those specified in this manual.
• Turn off the power and disconnect the power plug (by pulling the plug,
not the cable) if any of the following occurs:
• You spill something into the machine.
• You suspect that your machine needs service or repair.
• The external housing of your machine has been damaged.
• Keep the machine away from flammable liquids, gases, and aerosols.
A fire or an electric shock might occur.
• Connect the power cord directly into a wall outlet and never use an extension cord.
• Only connect the machine to the power source described in this manual.
• Disposal can take place at our authorized dealer or at appropriate collection sites.
10
Page 23

R CAUTION:
• After you move the machine, use the caster fixture to fix it in place. Otherwise the machine might move or come down to cause an injury.
• If you use the machine in a confined space, make sure there is a continuous
air turnover.
• Keep the machine away from humidity and dust. Otherwise a fire or an electric shock might occur.
• Protect the machine from dampness or wet weather, such as rain and snow.
• Do not place the machine on an unstable or tilted surface. If it topples over,
an injury might occur.
• Unplug the power cord from the wall outlet before you move the machine.
While moving the machine, you should take care that the power cord will not
be damaged under the machine.
• When you disconnect the power plug from the wall outlet, always pull the
plug (not the cable).
• Do not allow paper clips, staples, or other small metallic objects to fall inside
the machine.
• For environmental reasons, do not dispose of the machine or expended
supply waste at household waste collection points. Disposal can take place
at an authorized dealer.
• When disposing of a used ink container, reattach the cap to prevent ink from
splattering.
• Be careful not to get ink on your clothes when replacing an ink container. Ink
stains on clothes are hard to remove.
• Be careful not to cut yourself on any sharp edges when you reach inside the
machine to remove misfed sheets of paper or masters.
• If ink comes into contact with your eyes, rinse immediately in running water.
For other symptoms, consult a doctor.
• Keep the ink or ink container out of reach of children.
• If ink is ingested, induce vomiting by drinking a strong saline solution. Con-
sult a doctor immediately.
• If your skin comes into contact with ink, wash the affected area thoroughly
with soap and water.
• While printing, do not touch the belt at the end of the paper delivery tray.
Otherwise, an injury might occur.
• Our products are engineered to meet the high standards of quality and functionality, and we recommend that you only use the expendable supplies
available at an authorized dealer.
11
Page 24
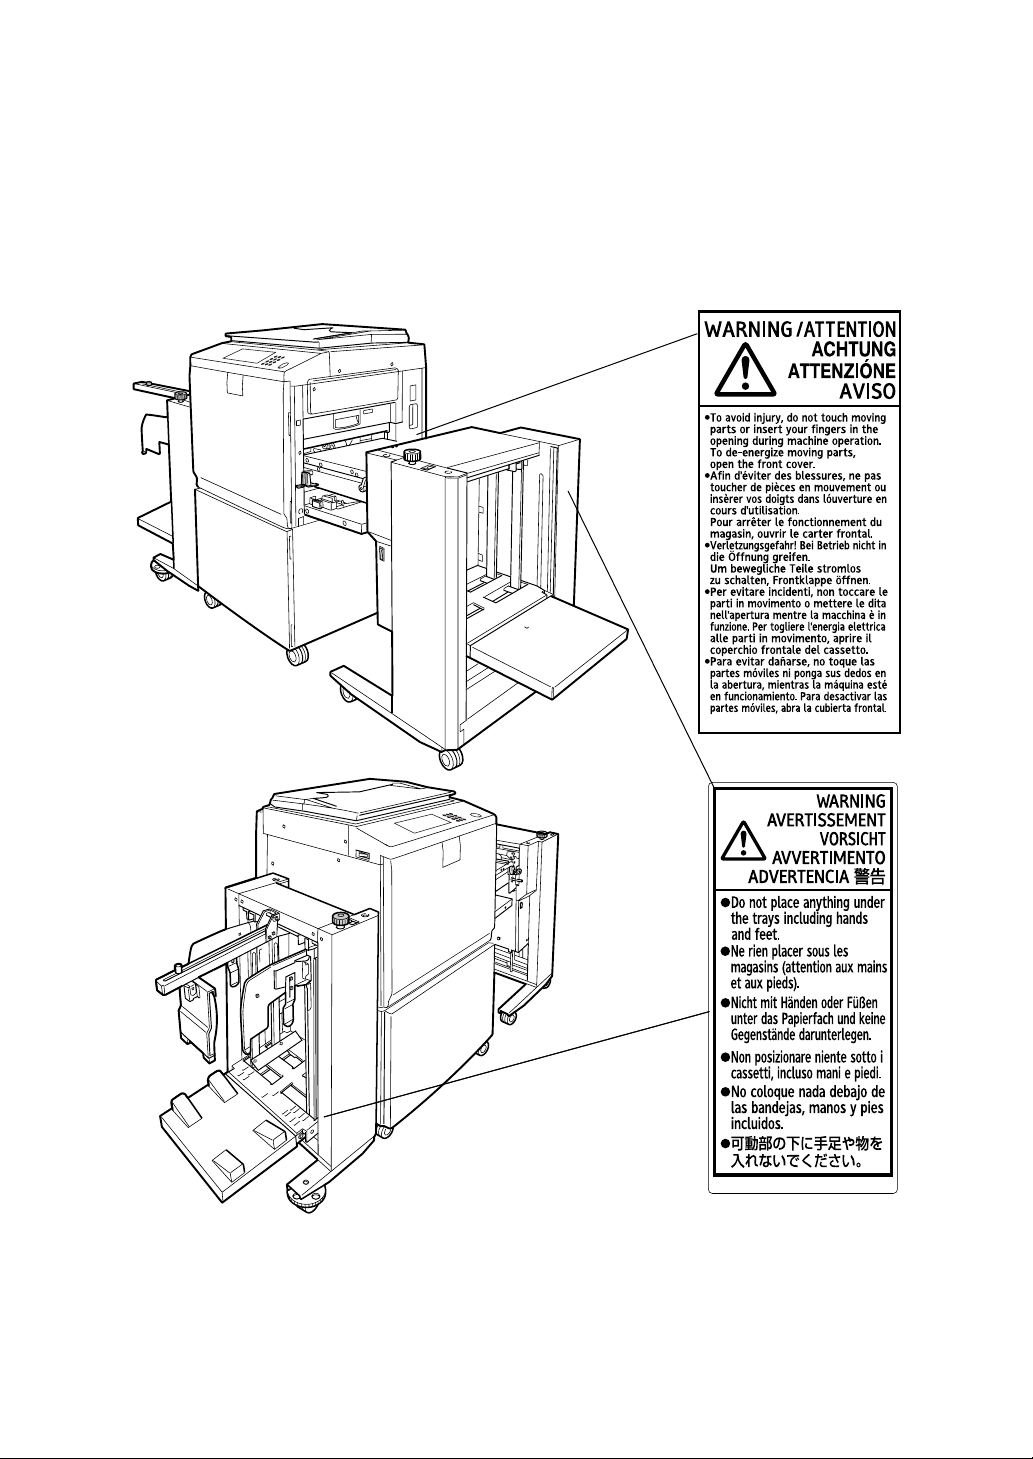
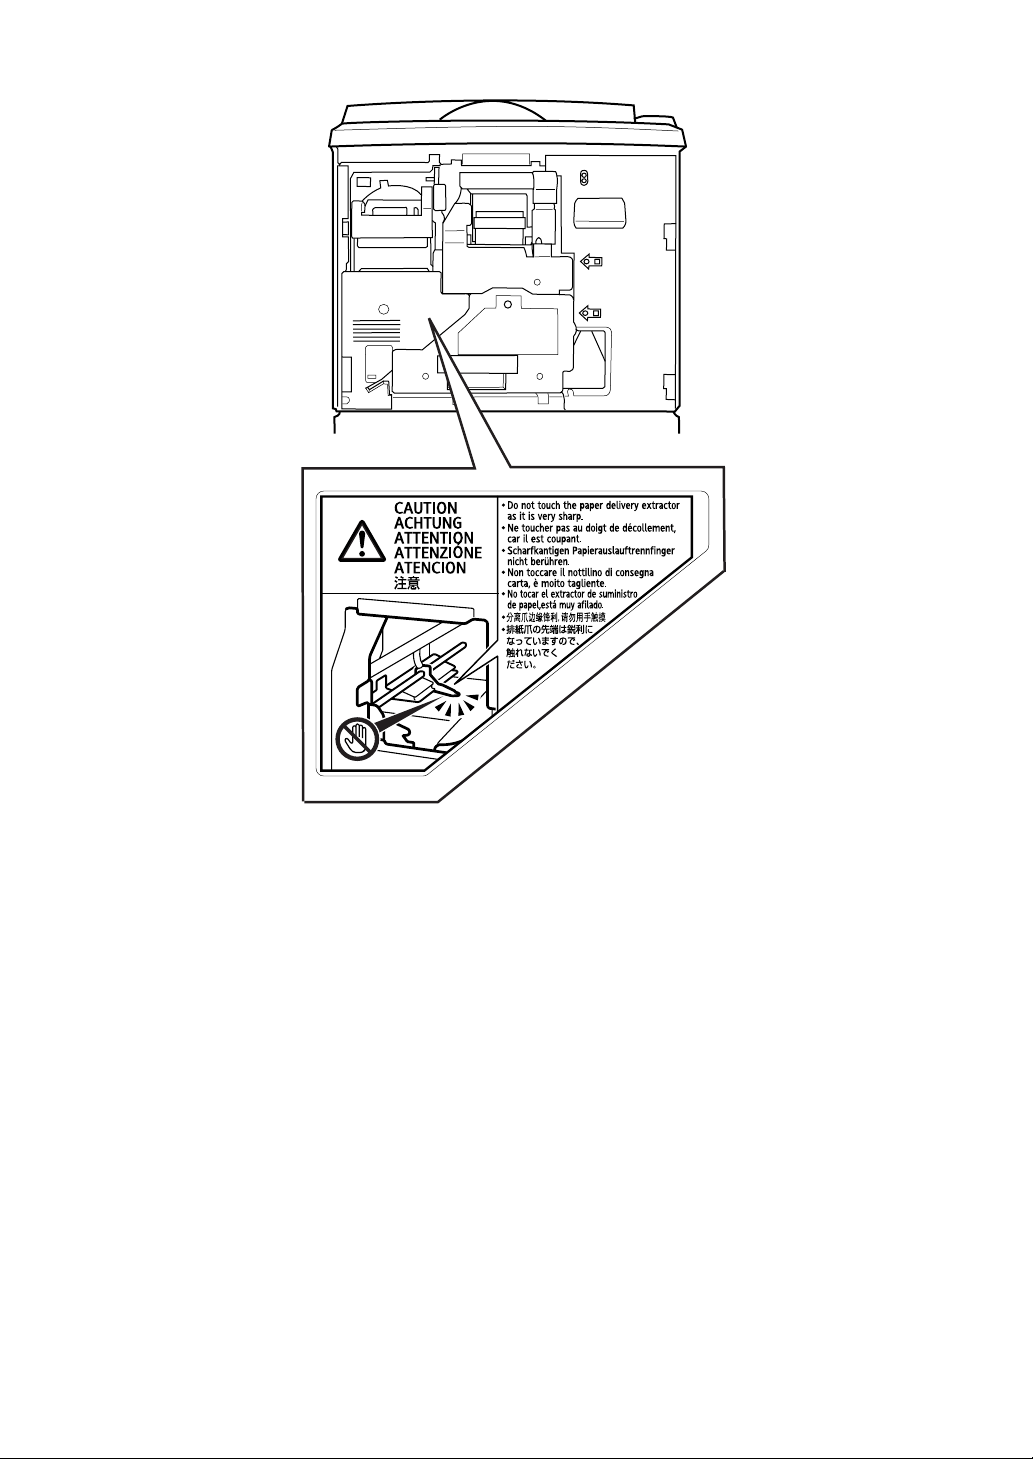
Positions of RWARNING and RCAUTION
Labels
This machine has labels for RWARNING and RCAUTION at the positions
shown below. For safety, please follow the instructions and handle the machine
as indicated.
12
AUX036S
Page 25
AUX167S
13
Page 26
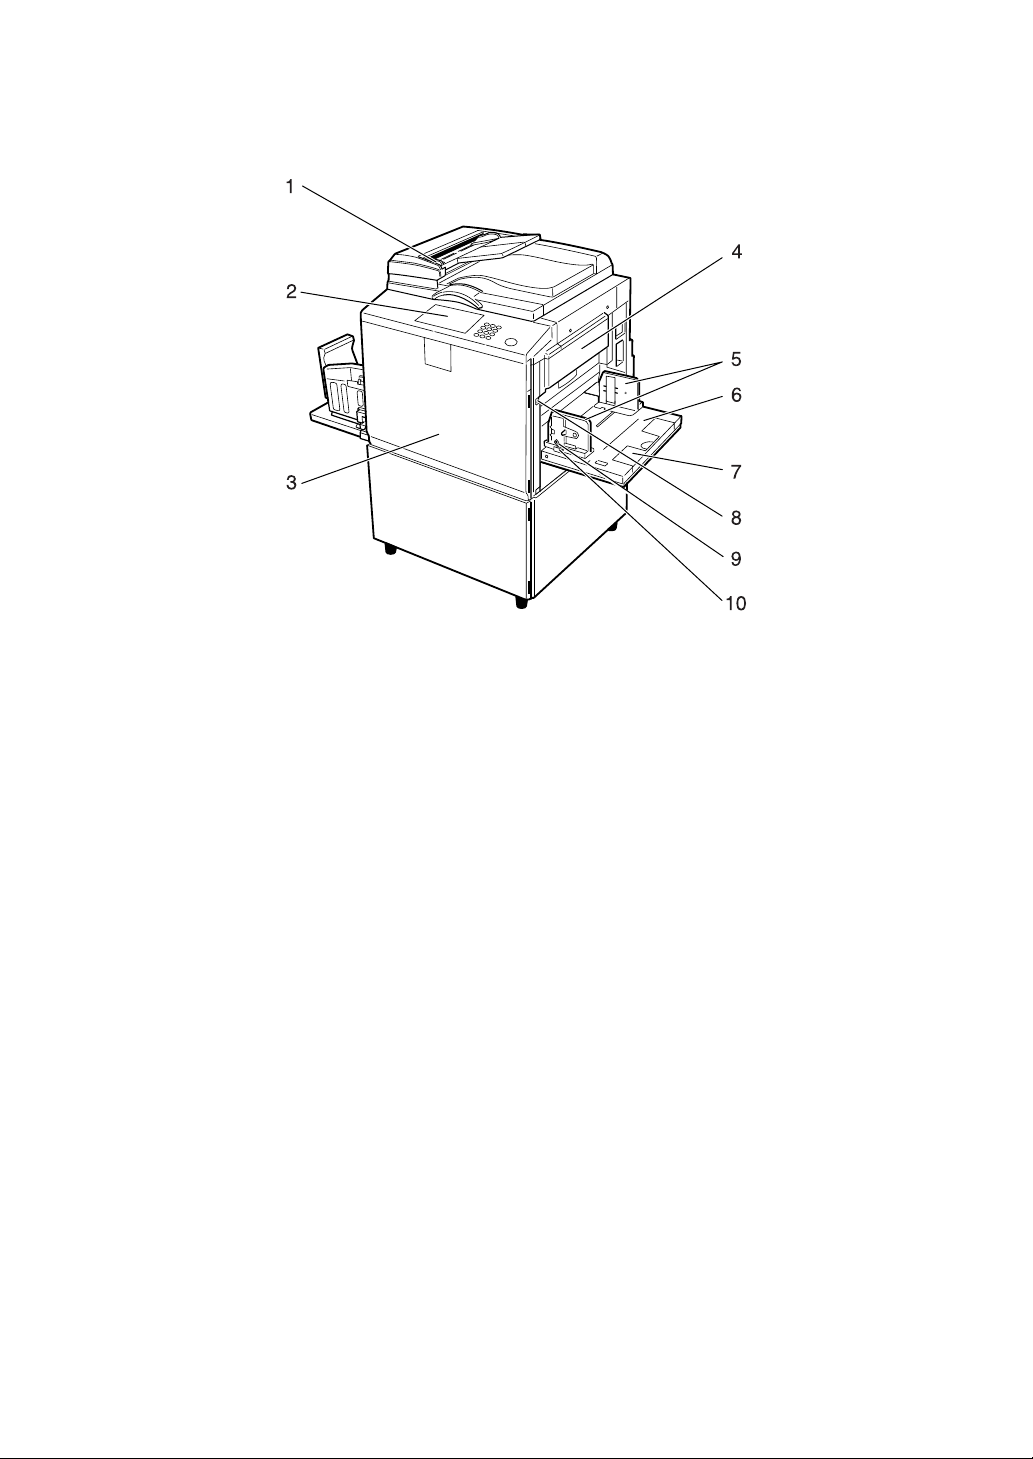
Guide To Components
AUY026S
1. Exposure glass cover (optional) or
Auto Document Feeder capable of
scanning both sides of a sheet
(ARDF) (optional)
Lower this cover over an original on the
exposure glass. If you have the ARDF,
load a stack of originals here. They will
be fed automatically, one by one.
(The illustration shows the ARDF.)
2. Control panel
See p.21 “Control Panel”.
3. Front cover
Open to access the inside of the machine.
4. Master making unit
Open this unit when installing the master.
5. Paper feed side plates
Prevent paper skewing.
6. Paper feed tray
Load paper here.
9. Paper feed side plates knob lock
lever
Locks the paper feed side plates.
10. Paper feed side plates knob
Use to move the side plates.
7. Extender
Slide out when loading larger paper.
8. Paper feed tray down key
Press to lower the paper feed tray.
14
Page 27
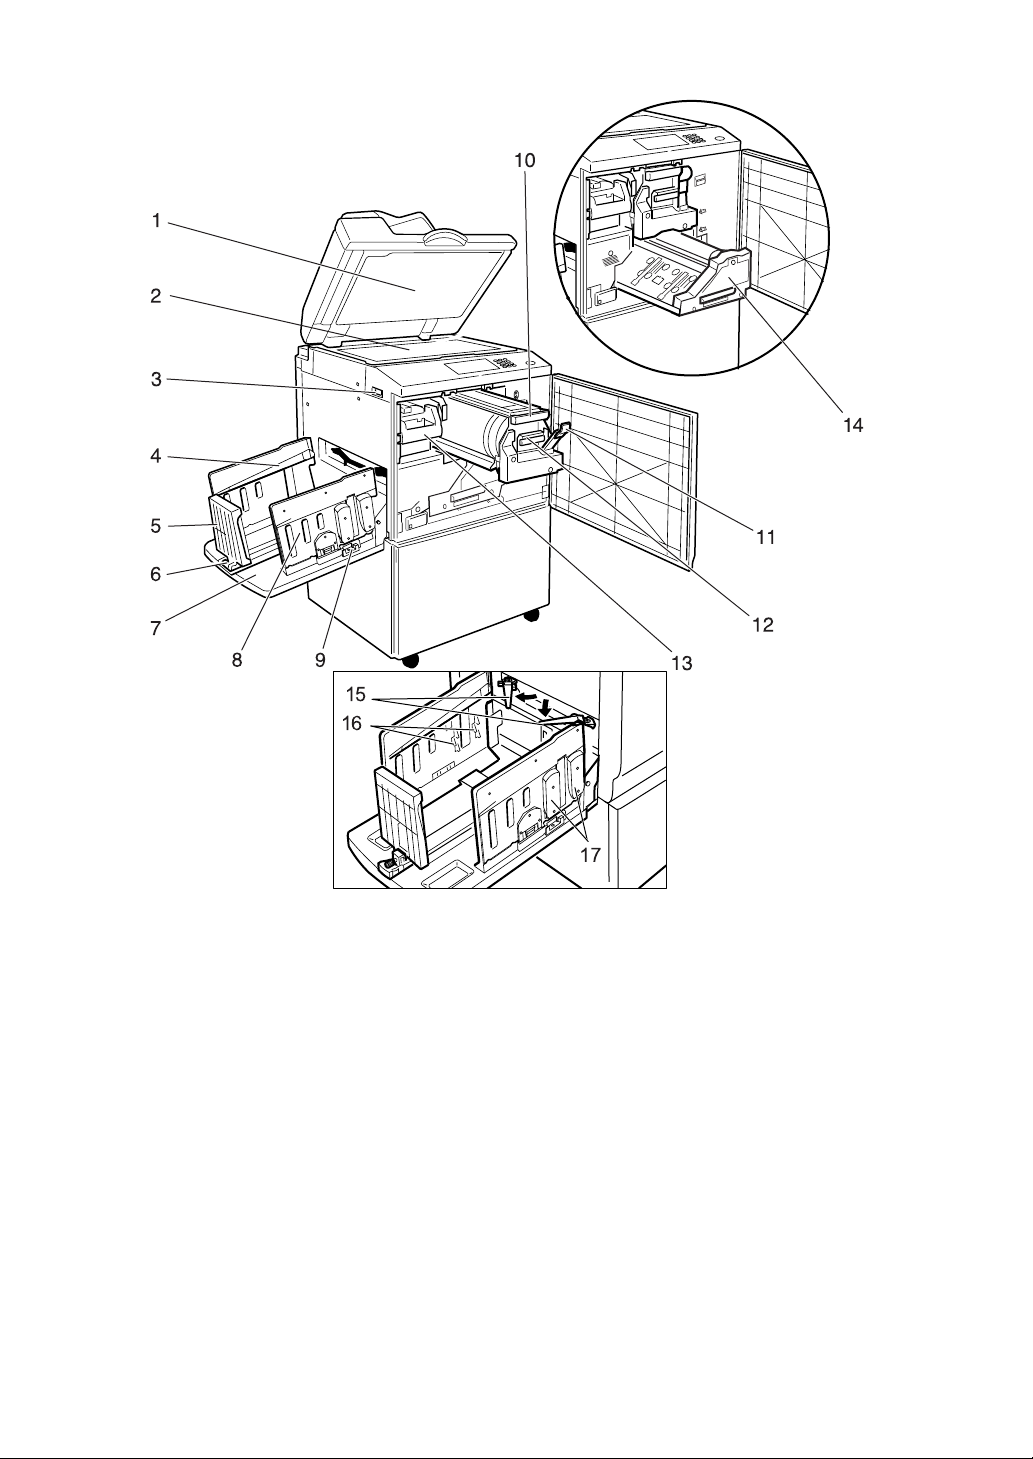
AUX023S
1. Exposure glass cover (optional) or
Auto Document Feeder capable of
scanning both sides of a sheet
(ARDF) (optional)
Lower this cover over an original on the
exposure glass. If you have the ARDF,
load a stack of originals here. They will
be fed automatically, one by one.
(The illustration shows the ARDF.)
2. Exposure glass
Position originals here face down for
printing.
3. Main switch
Use to turn the power on or off.
4. Paper alignment wings
Lift or lower the wings depending on the
type of paper being used.
5. Paper delivery end plate
This plate aligns the leading edge of prints.
6. Paper delivery end plate knob
Use to move the end plate.
7. Paper delivery tray
Completed prints are delivered here.
8. Paper delivery side plates
Use to align the prints on the paper delivery tray.
9. Paper delivery side plate knobs
Use to move the side plates.
10. Drum unit
The master is wrapped around this unit.
11. Drum unit lock lever B1
Lower to unlock and pull out the drum unit.
15
Page 28
12. Ink holder
Set the ink cartridge in this holder.
13. Master eject unit handle E1
Use to pull out the master eject unit.
14. Duplex unit
Allows you to print on both sides of a
piece of paper.
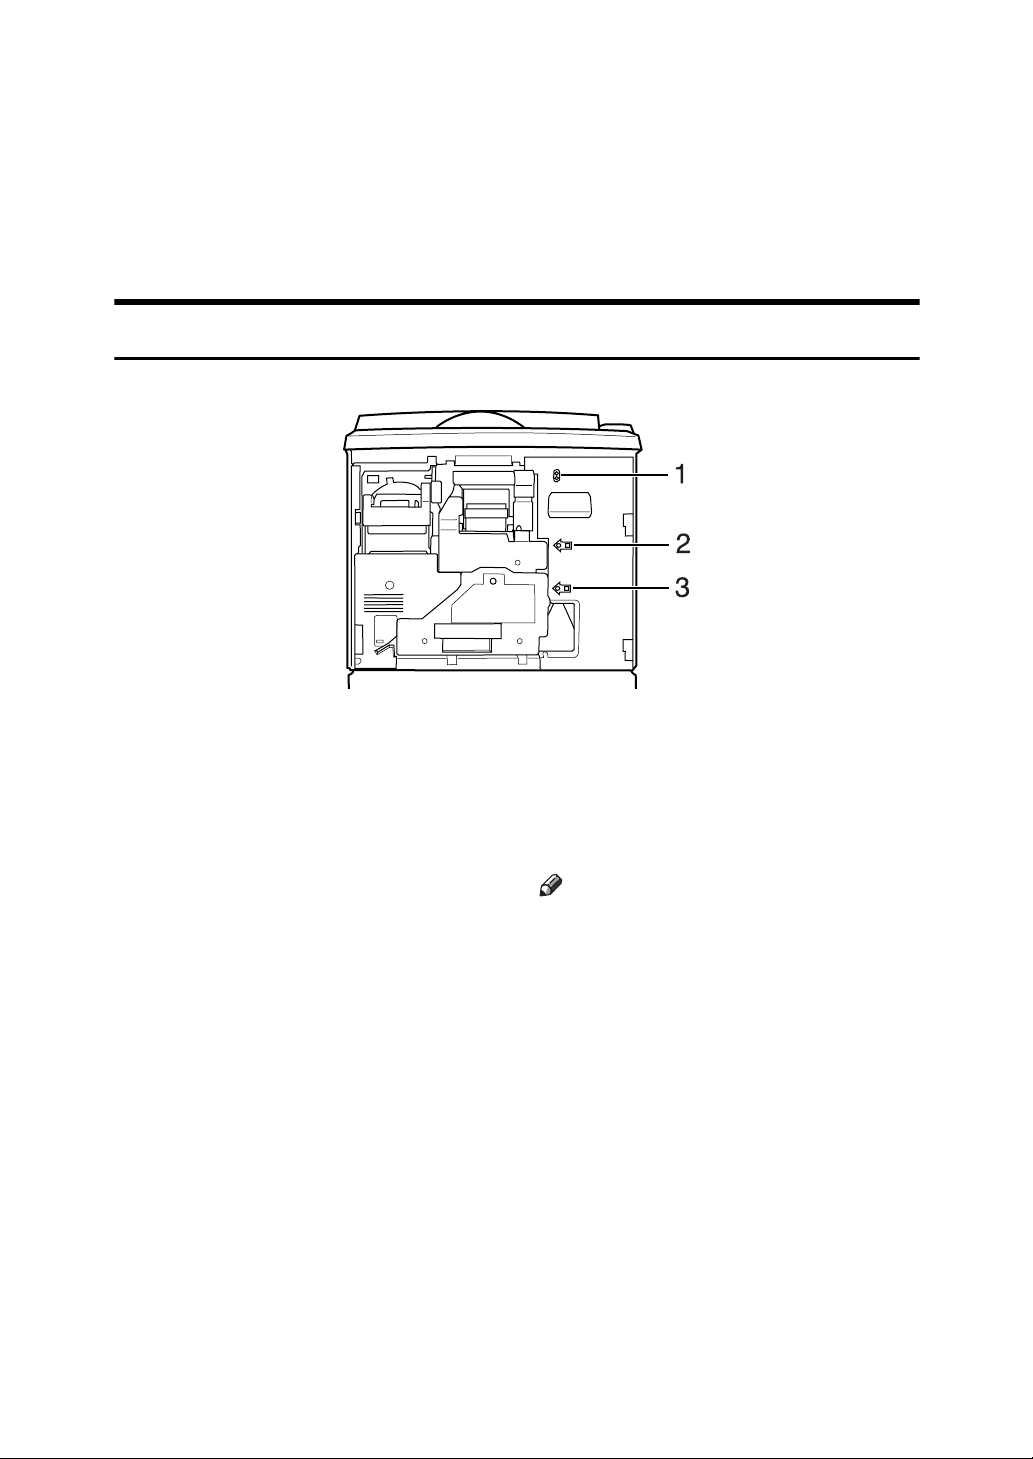
Internal Indicators
15. Trailing edge guides
Swing out these guides when you use A4,
1
/2" × 11"KL paper.
8
16. Buffer fins
Use to stack prints neatly.
17. Chocks
Use to adjust the buffer fins.
1. Drum position indicator
This indicates the stopped position of the
drum.
• Green: A green light indicates the drum
is in the standard (normal) position.
• Red: The drum cannot be removed.
2. Drum Unit unlocking switch
To take out the drum, press the switch to
release the lock. When the drum is unlocked, the green indicator will light.
AUY059S
3. Duplex Unit unlocking switch
To take out the duplex unit, press the
switch to release the lock. When the duplex unit is unlocked, the green indicator
will light.
Note
❒ The unit can be taken out only when
the unlocking switch light is green.
❒ The drum and the duplex unit cannot
be taken out at the same time.
16
Page 29

Options
Option List
Options Model Name
Auto Document Feeder capable of scanning
both sides of a sheet (ARDF)
Exposure Glass Cover Platen Cover Type 1018
Large Capacity System (LCS) LS3000R
Drum unit Drum Type 4640(L)
Twin colour press roller printing system TC-IIR
PostScript board PostScript3 Board Type 2
IEEE 1284 parallel board IEEE 1284 Parallel Board Type 1
IEEE 802.11b interface board IEEE 802.11b I/F Unit Type 1
Memory unit Memory Unit Type C (128 MB/256 MB)
HDD board Extension HDD Type 1
Tape dispenser –
Key counter –
ARDF Type 4640
17
Page 30
Guide to Major Options
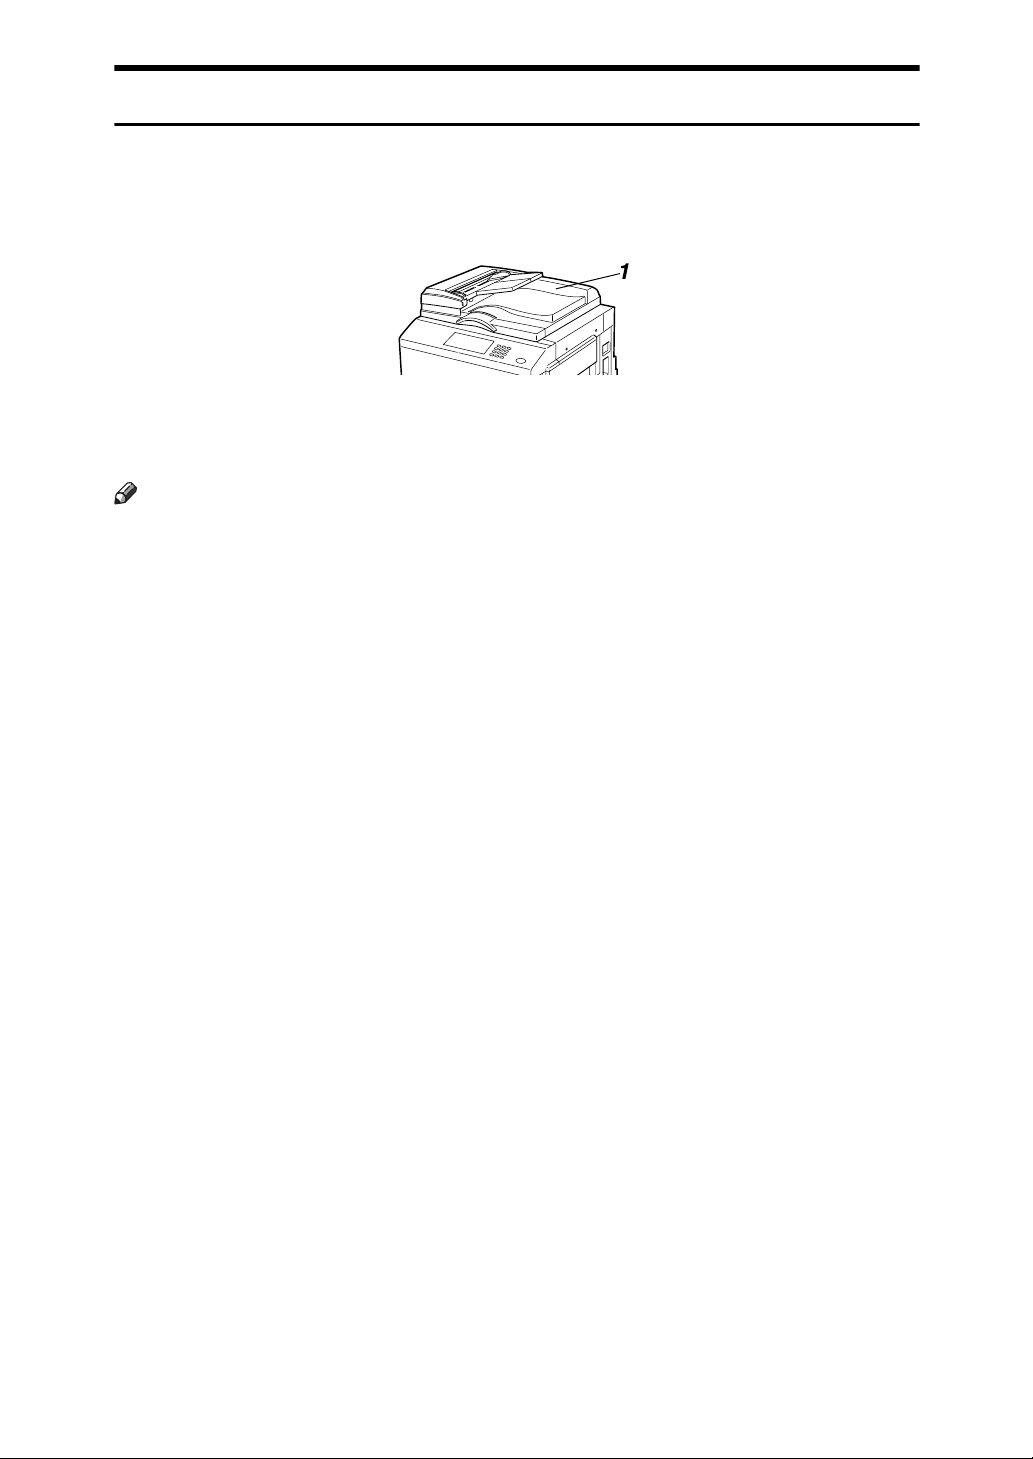
❖ Auto Document Feeder capable of scanning both sides of a sheet (ARDF)
Load a stack of originals here. They will be fed automatically, one by one.
AJK155S
1. ARDF capable of scanning both
sides of a sheet
Note
❒ Two-sided originals can be scanned
using ARDF. Place the original with
the first page face-up.
18
Page 31
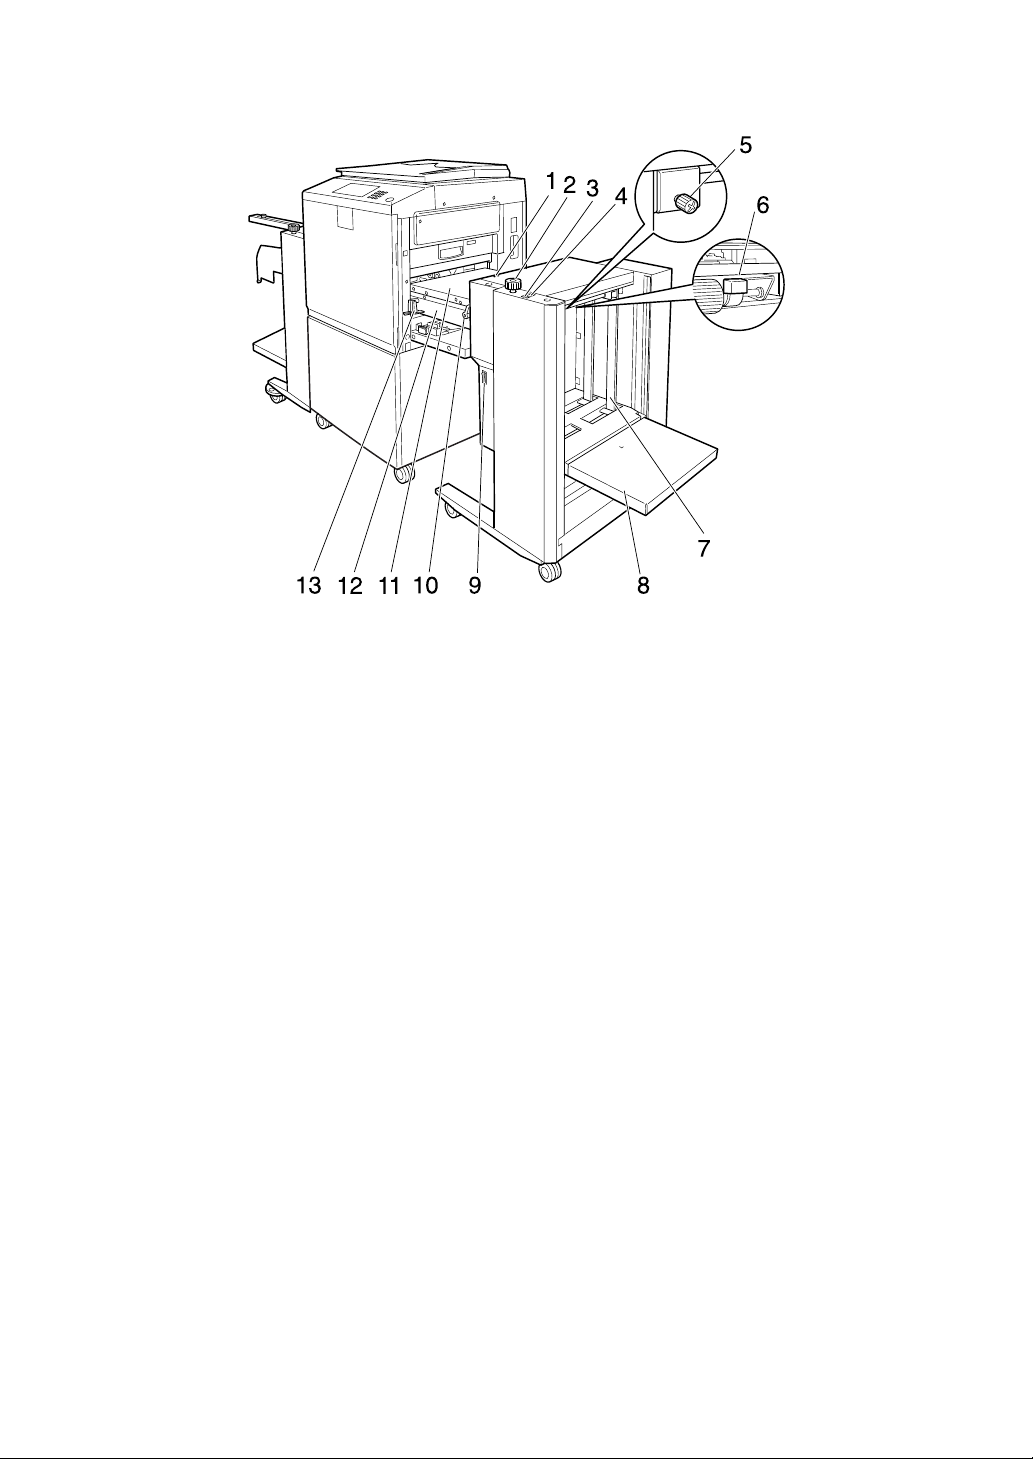
❖ Large Capacity System (LCS): Large capacity input tray (LCIT)
1. Indicators
AJK143S
2. Side guide adjustment knob
3. Down button
4. Up button
5. Side guide screw
6. Feeding pressure lever
7. Side guides
8. Input tray
9. Power switch
10. Cover release lever
11. Cover
12. Intermediate feeding section
13. LCIT release lever
19
Page 32
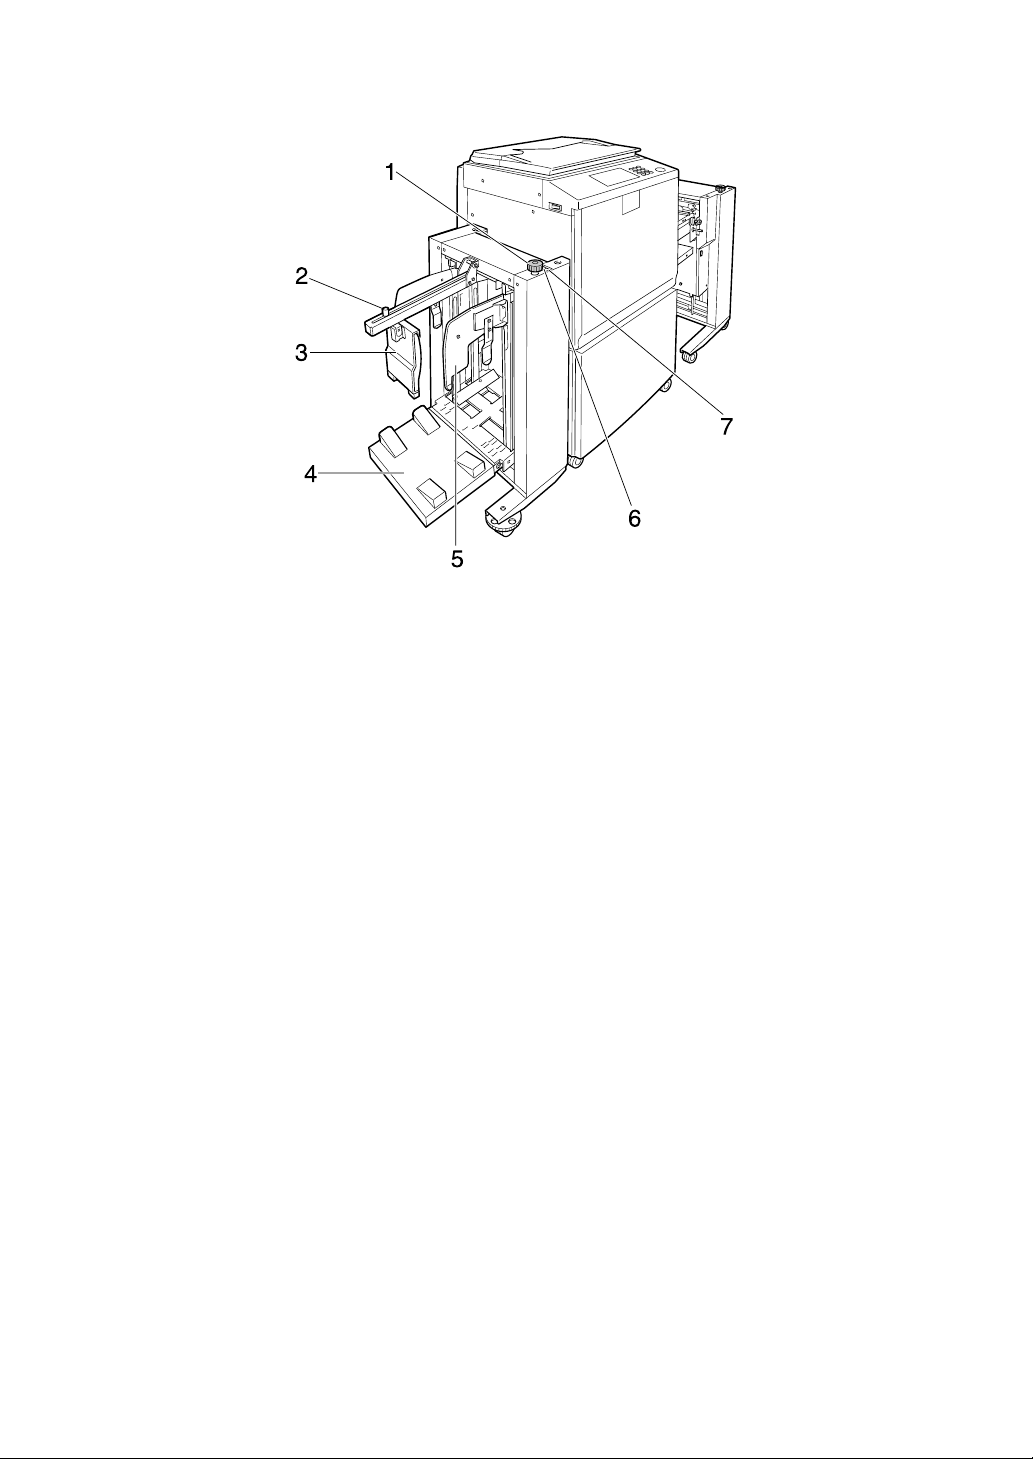
❖ Large Capacity System (LCS): Large capacity output tray (LCOT)
AJK146S
1. Side guide adjustment knob
2. End plate screw
3. End plate
4. Output tray
5. Side guides
6. Up button
7. Down button
20
Page 33
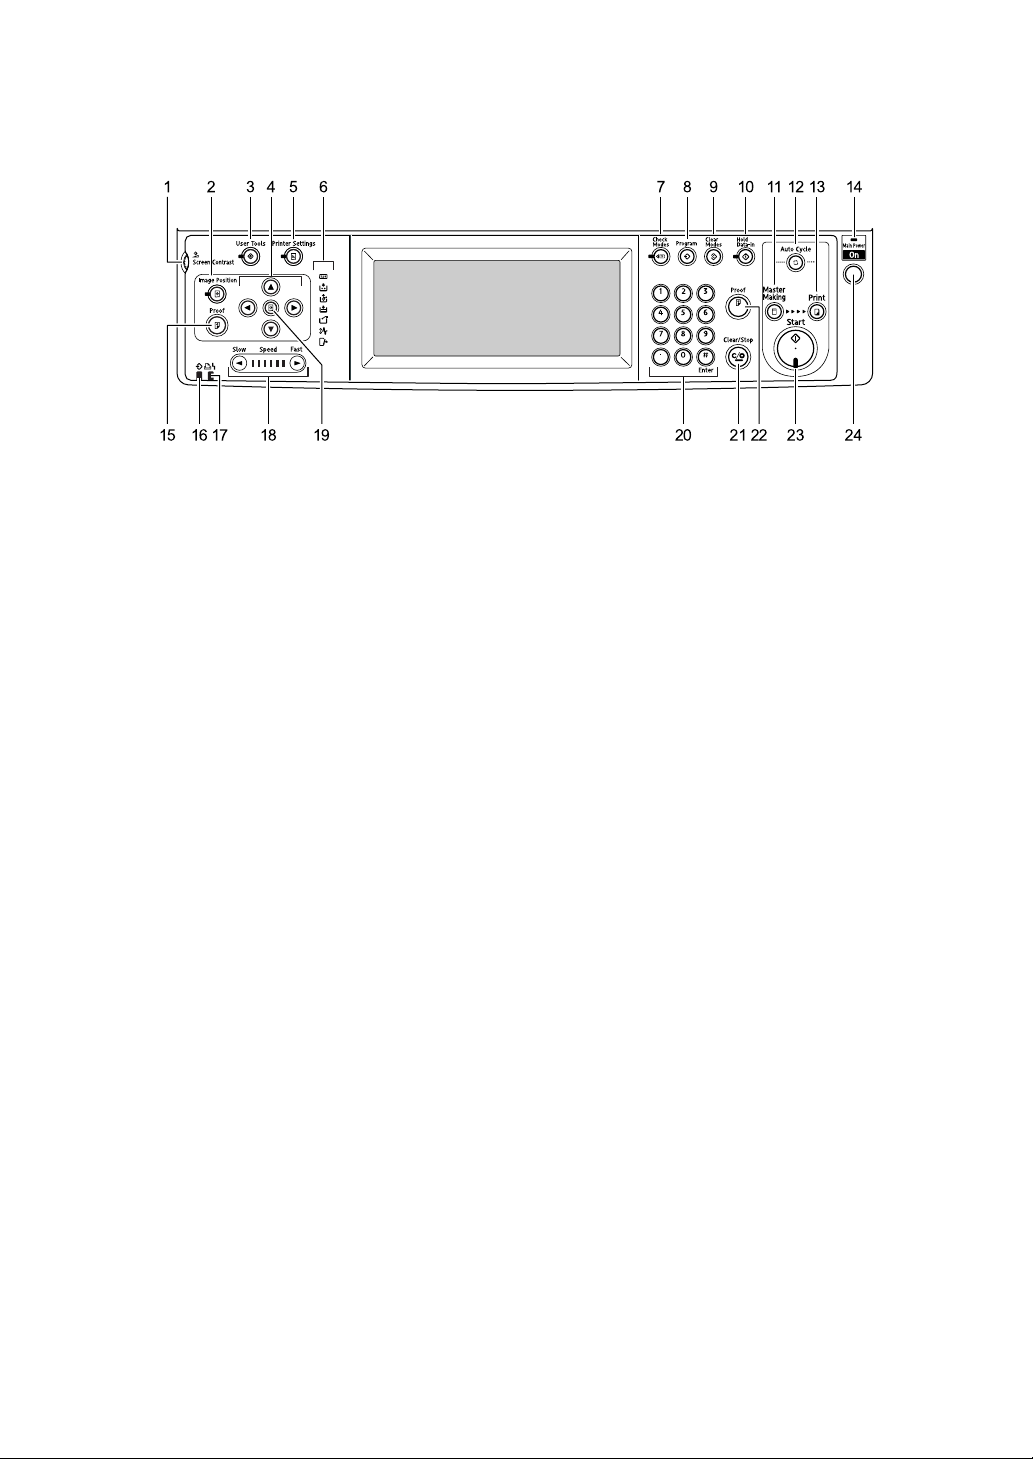
Control Panel
AUX201S
1. Screen contrast knob
Use to adjust the brightness of the display panel.
2. {Image Position} key
Press to activate the position setting keys.
3. {User Tools} key
Press to change the default settings to
meet your requirements.
4. Position Setting keys
Press to adjust the position of printed images.
5. {Printer Settings} key
Press to change the default settings for
online printing.
6. Indicators
M: Open Cover/Unit indicator. See p.174
“MWhen the Open Cover/Unit Indicator Lights”.
Let you know the status of the machine.
u: Key Counter indicator. The light
turns on when Key Counter mode is on
and [Restricted Access] is on in the settings
and the Key Counter or Key card is not
set. If [User Code Management] is On, The
light turns on when the user code entry
screen is displayed. See p.188 “Administrator Tools”
j: Add Ink indicator. See p.152 “jAdding Ink”.
C: Master End indicator. See p.154
“CReplacing the Master Roll”.
B: Load Paper indicator. See p.150
“BLoading Paper”.
k: Master Eject indicator. See p.175
“kRemoving the Used Master”.
x: Misfeed indicator. See p.157 “x
Clearing Misfeeds”.
7. {Check Modes} key
Press this key to check settings.
8. {Program} key
Press to register frequently used settings,
or to recall registered settings.
9. {Clear Modes} key
Press to clear previously entered print job
settings.
10. {Hold Data-in} key
Press to reject the online print temporarily.
11. {Master Making} mode select key
Press to select the master making mode.
12. {Auto Cycle} key
Press to make masters and prints in a single operation.
13. {Print} mode select key
Press to select the print mode.
14. Main power indicator
The main power indicator lights up when
the main switch is turned on.
21
Page 34

15. {Proof} key
Press to make a proof print.
Note
❒ Same as 22.
16. Data In indicator (Green)
• On: Master Making is in progress.
• Blinking: Data is being received.
• Off: Master Making and printing are
completed.
17. Error indicator (Red)
• On: An error has occurred. Master
Making and printing stops.
• Off: Normal status
18. Speed setting keys
Press to adjust the printing speed. See
p.60 “Changing the Printing Speed”.
19. {Initial position} key
Press to reset to the default image position.
21. {Clear/Stop} key
•Clear
Press to delete a number entered.
•Stop
Press to stop a job in progress.
22. {Proof} key
Press to make a proof print.
Note
❒ Same as 15.
23. {Start} key
Press to start making masters or printing.
24. Operation switch
Press to operate the machine in Energy
Saver mode.
To go back into the Energy Saver mode,
press this switch.
20. Number keys
Press to enter the desired number of
prints and data for selected modes.
22
Page 35
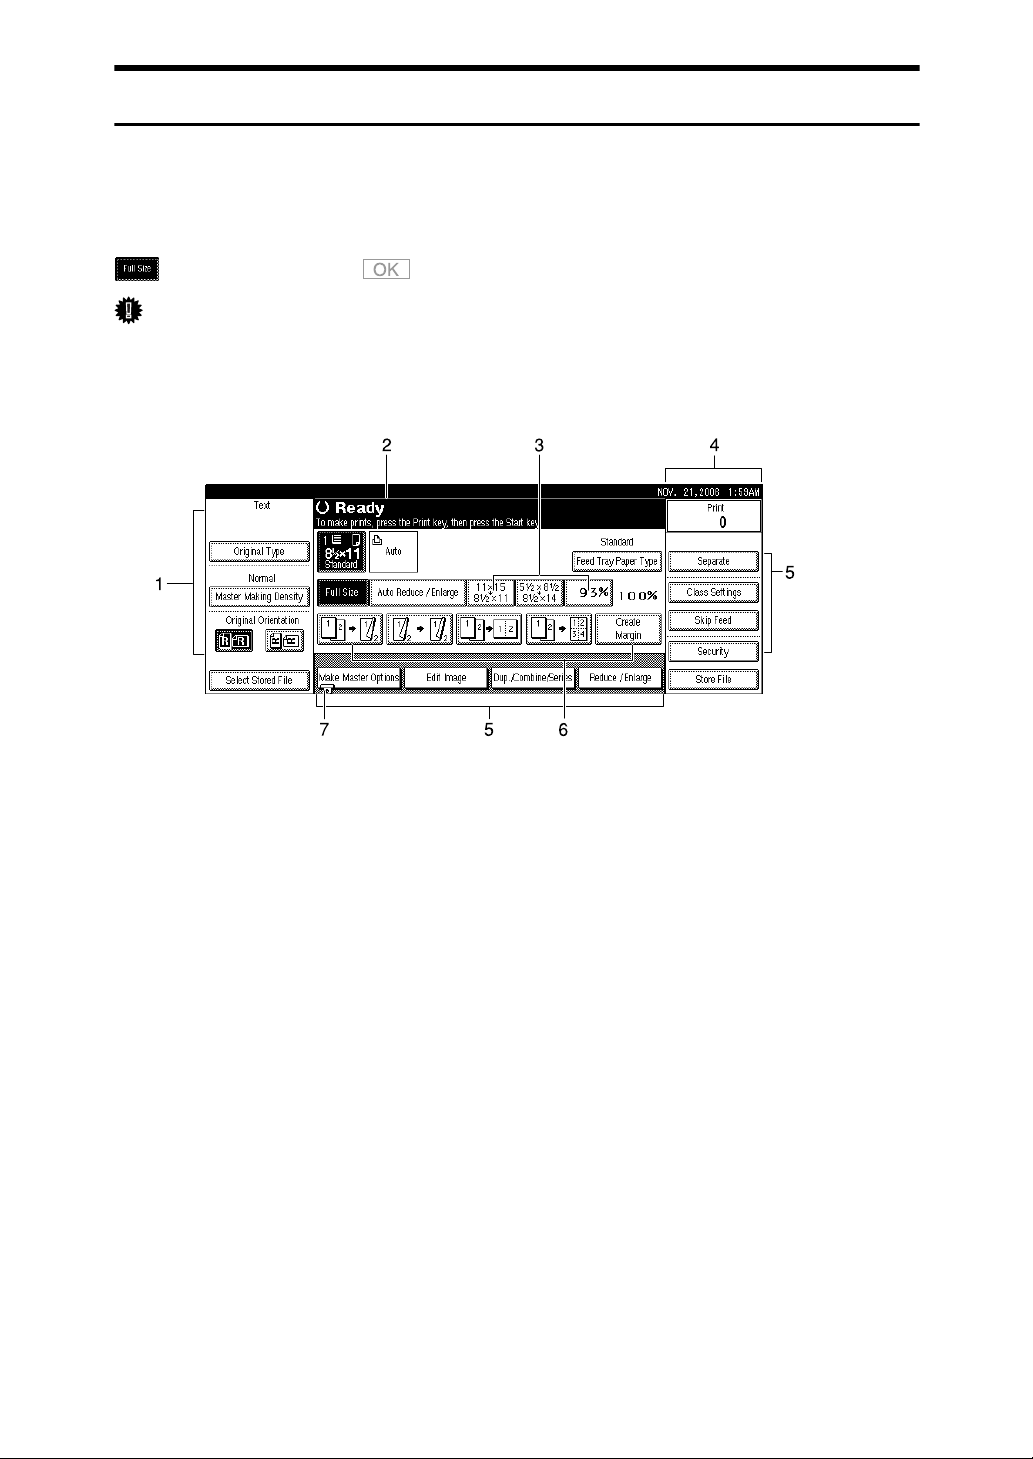
Display Panel
The display panel shows machine status, error messages and function menus.
The function items displayed serve as selector keys. You can select or specify an
item by lightly pressing them.
When you select or specify an item on the display panel, it is highlighted like
. Keys appearing as cannot be used.
Important
❒ A force or impact of more than 30 N (about 3 kgf) will damage the display
panel.
1. Original functions.
2. Operational status and messages.
3. You can register up to three fre-
quently used reduce/enlarge ratios
other than the fixed reduce/enlarge
ratios.
4. Numbers of prints set.
5. Displays available functions.
Press a function name to display its
menu. For example, press [Reduce /
Enlarge] to bring up the Reduce/En-
large menu.
6. Displays contents of the Shortcut
keys. You can register frequently
used functions in these keys.
7. A clip mark indicates the current-
ly selected function.
AUX200S
23
Page 36

Common Key Operations
The following keys are common to all screens.
❖ Key list
[OK] Acknowledges a selected function or entered values, and then returns
to the previous display
[Cancel] Deletes a selected function or entered values, and then returns to the
previous display
[UPrev.], [TNext] Moves to the previous page or the next page when all functions cannot
be displayed on one page.
[OK] [Yes] Closes displayed messages.
[Clear] Clears entered values and does not change the settings.
[Exit] Returns to the previous display.
24
Page 37
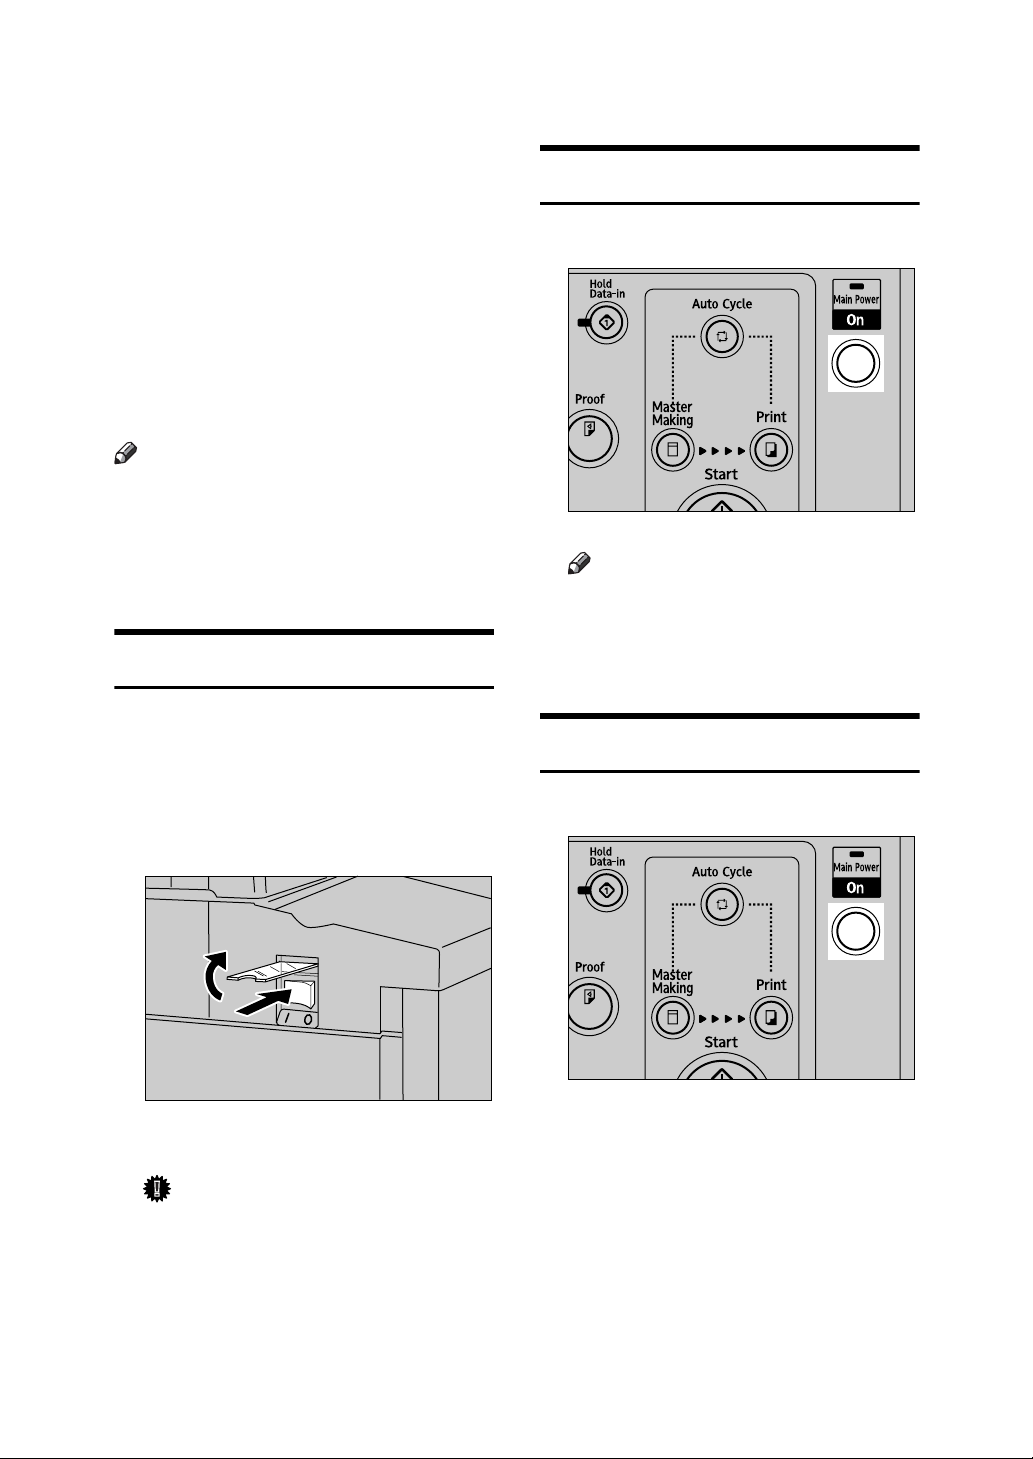
Turning On the Power
❖ Main switch (left side of the machine)
Turning off this switch will completely turn off power to the machine.
❖ Operation switch (right side of the
control panel)
Press to activate the machine.
When the machine has finished
warming up, you can make master
and prints.
Note
❒ This machine automatically enters
Energy Saver Mode or turns itself
off if you do not use it for a certain
period. See p.51 “Saving Energy”
and p.51 “Auto Off Timer”.
Turning On the Main Power
Turning On the Power
A Press the operation switch.
AJK806S
Note
❒ If the power is not turned on
when the operation switch is
pressed, check if the main power switch is on. If not, turn it on.
A Make sure that the power cord is
firmly plugged into the wall outlet.
B Open the switch cover and turn
on the main switch.
AJK144S
The main power indicator turns on.
Important
❒ Do not turn off the main power
immediately after it has been
turned on. Otherwise it may result in damage to the hard disk
or memory, leading to the malfunctioning of the machine.
Turning Off the Power
A Press the operation switch.
AJK806S
25
Page 38
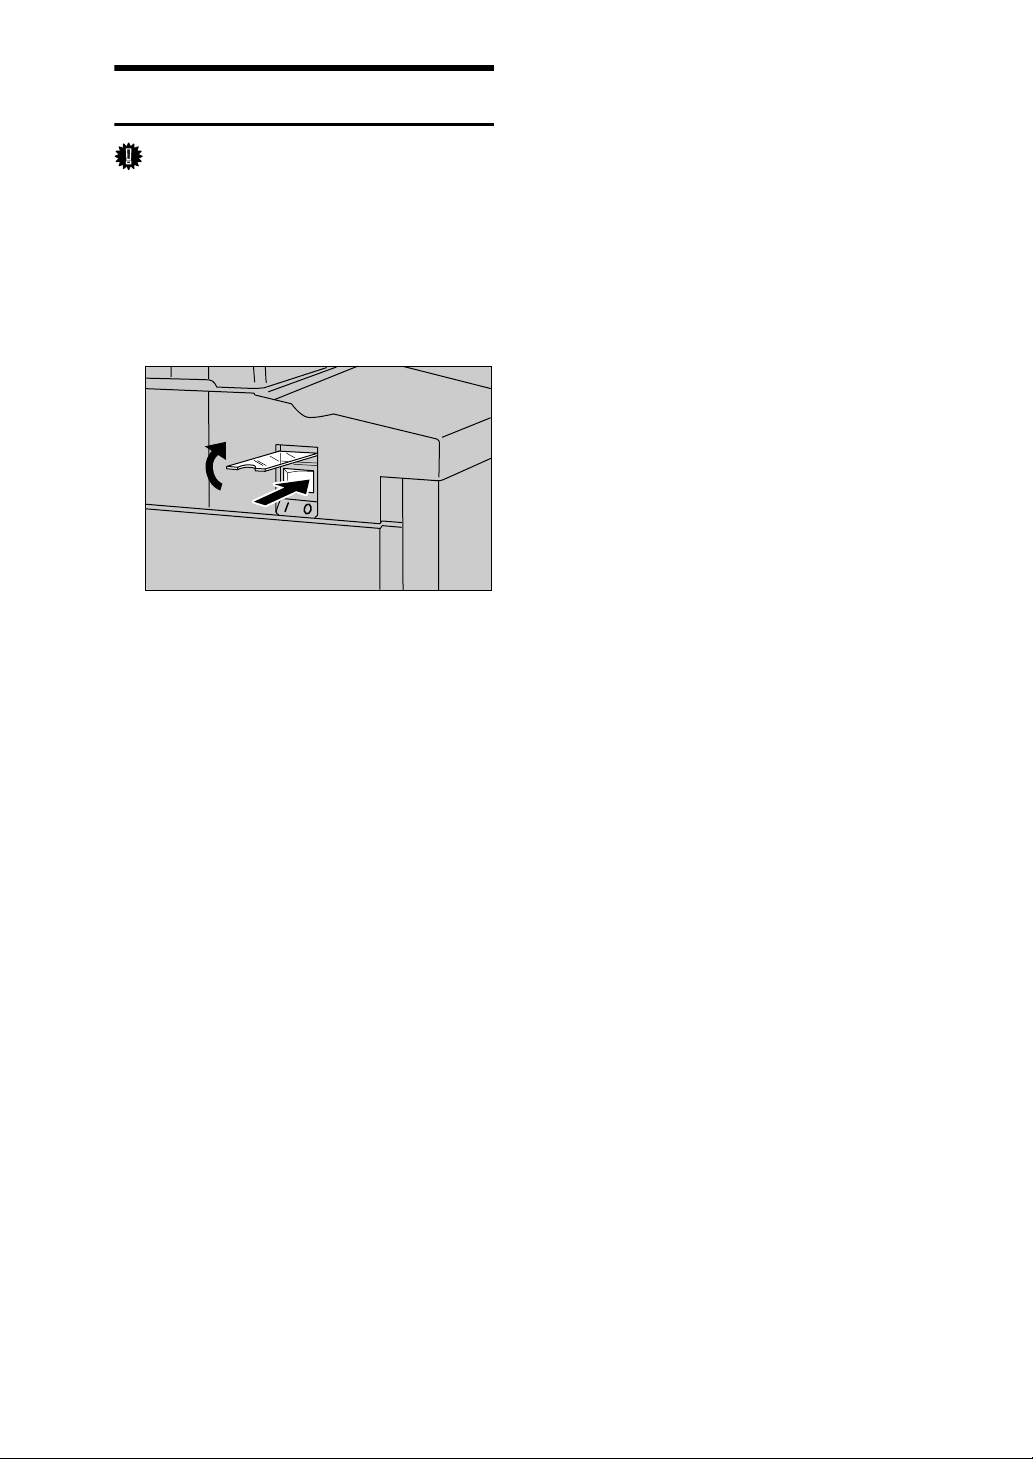
Turning Off the Main Power
Important
❒ Be sure to turn off the main switch
before pulling out the power plug.
Not doing this may result in damage to the hard disk or memory.
A Open the switch cover, and turn
off the main switch.
AJK145S
The main power indicator goes off.
26
Page 39
1. Before Using the Machine
Originals
Size and Weights of Recommended Originals
❖ Metric version
Where original is
placed Original size Original weight
Exposure glass A3 L, B4 JIS (Japanese Industrial
Standard) L, A4 KL,
B5 JIS KL
ARDF A3 L, B4 JIS L, A4 KL,
B5 JIS KL, A5KL
--
❖ 1 sided original
52–128 g/m
2
❖ 2 sided original
52–105 g/m
2
❖ Inch version
Where original is
placed Original size Original weight
Exposure glass
ARDF
1
11" × 17" L, 8
1
/2" × 11" KL
8
11" × 17" L, 8
1
/2" × 11" KL, 51/2" × 81/2" KL
8
/2" × 14" L,
1
/2" × 14" L,
--
❖ 1 sided original
14–34 lb.
❖ 2 sided original
14–28 lb.
Note
❒ The maximum number of originals that can be placed in the ARDF is about
2
50 (80 g/m
, 20 lb).
❒ If you do not lift the exposure glass cover more than 30° when you place an-
other original, the machine might not detect the next original size correctly.
27
Page 40

1
Before Using the Machine
Non compatible originals for the ARDF
Placing the following types of originals in the ARDF can cause paper misfeeds
or result in damage to the originals. Place these originals on the exposure glass
instead.
• Originals other than those specified on p.27 “Size and Weights of Recommended Originals”
• Perforated or torn originals
• Curled, folded, or creased originals
• Pasted originals
• Originals with any kind of coating, such as thermal fax paper, art paper, label
paper, aluminum foil, carbon paper, or conductive paper.
• Originals with indexes, tags, other projecting parts
• Stapled or clipped original
• Sticky originals such as translucent paper
• Thin originals that have low stiffness
• Thick originals such as postcards
• Bound originals such as books
• Transparent originals such as OHP transparencies or translucent paper
28
Page 41
Originals
Sizes difficult to detect
It is difficult for the machine to automatically detect the sizes of the following
types of originals, Set the desired range when using [Erase Boarder] function to
print..
• Originals with indexes, tags, or other protrusions
• Transparent originals such as OHP transparencies or translucent paper
• Text or picture dense original
• Originals containing solid images
• Originals containing solid images around their edges
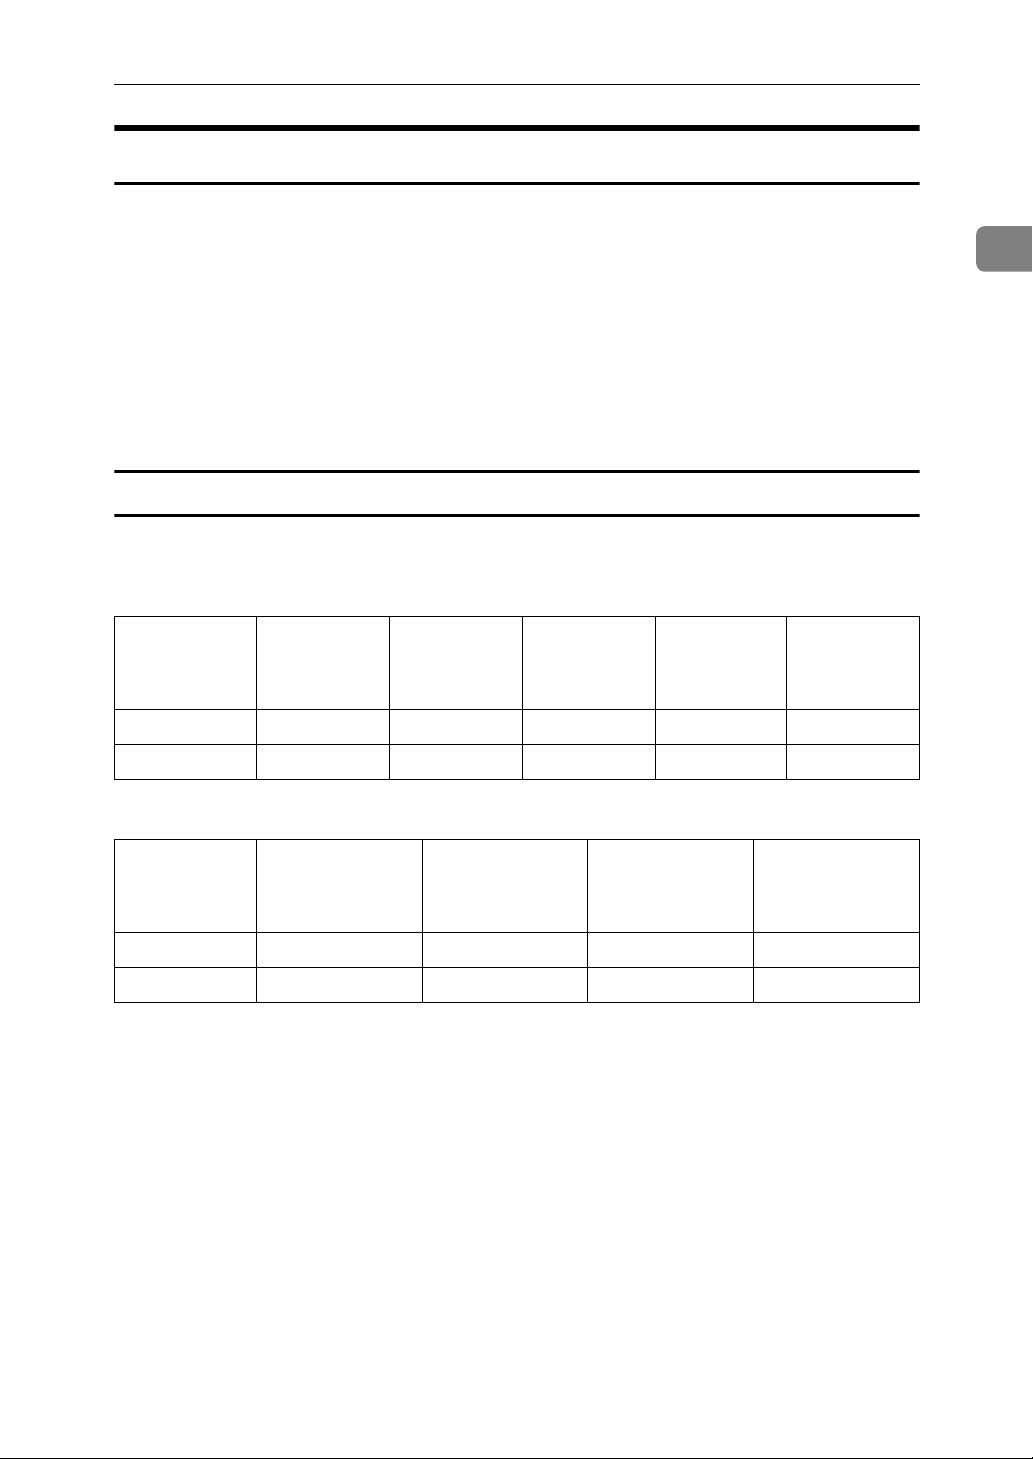
Sizes Detectable by Auto Paper Select
❍ : Detectable size × : Undetectable size
❖ Metric version
Size A3 L B4 JIS L A4 KL B5 JIS KL A5 KL
1
Location of the
original
Exposure glass ❍❍❍❍×
ARDF ❍❍ ❍❍❍
❖ Inch version
Size 11" × 17" L
Location of the
original
Exposure glass ❍❍❍ ×
ARDF ❍❍❍❍
1
/2" × 14" L 81/2" × 11" KL 51/2" × 81/2" KL
8
29
Page 42
Before Using the Machine
Print Paper
1
Recommended Paper Size and Type
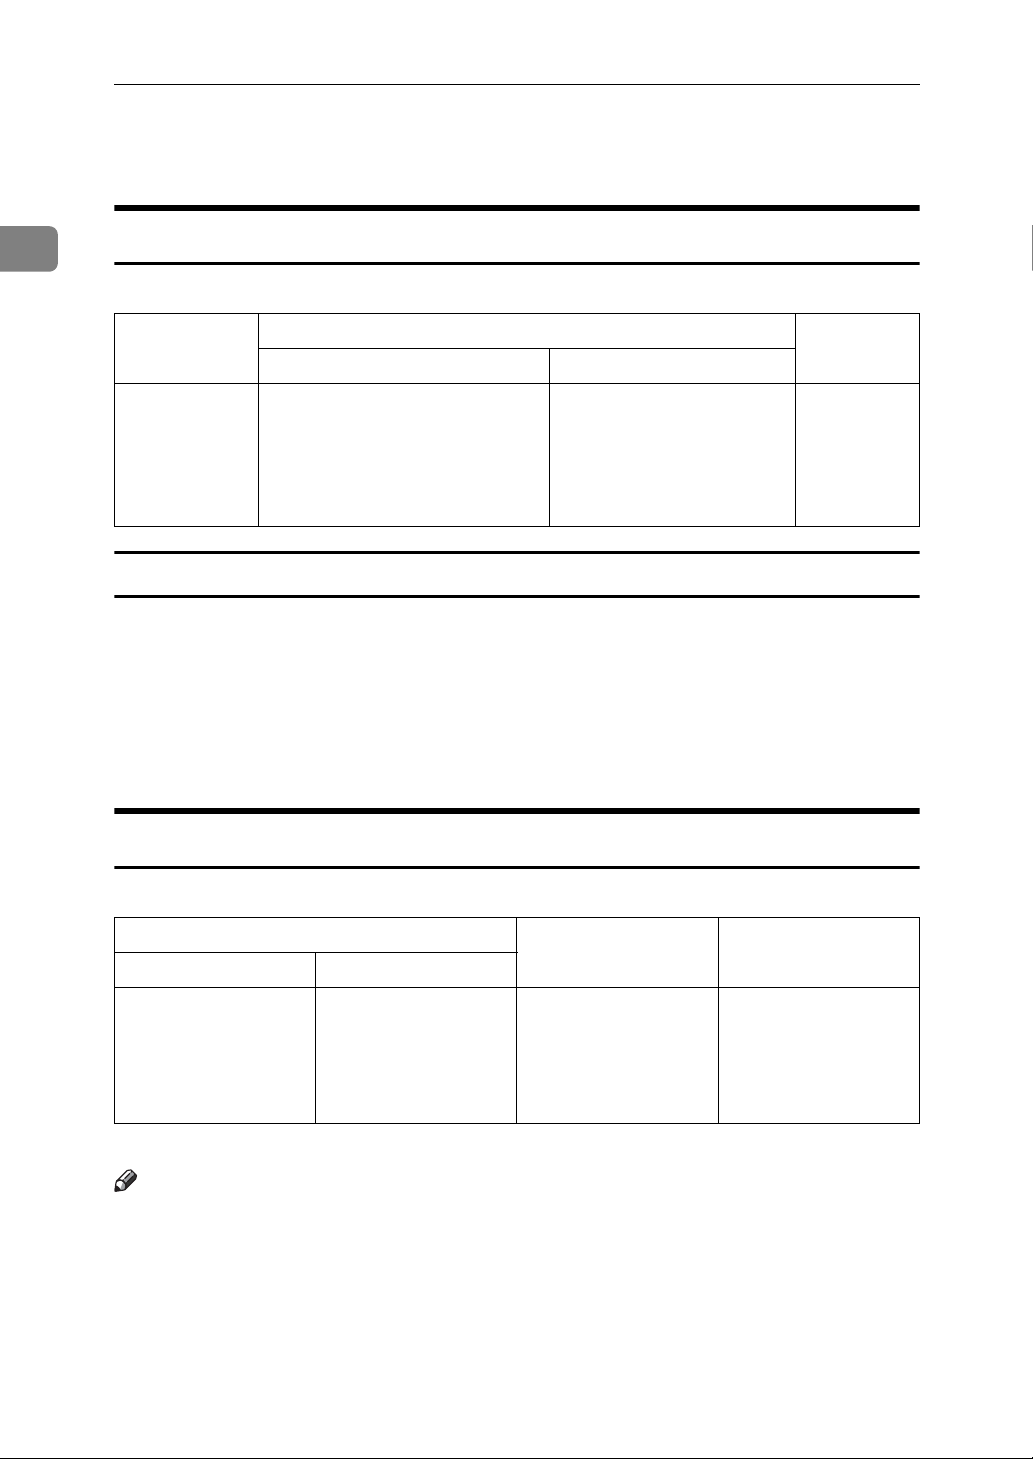
The following limitations apply:
Paper Size Paper
Metric Inch
Paper feed tray A3 L, B4 JIS L, A4 KL,
B5 JIS KL, A5 L, B6 JIS L,
A6 L, 8" × 13" L
Others (Vertical: 70 - 297 mm,
Horizontal: 148 - 432 mm)
Duplex Printing
The following paper are available for duplex printing.
❖ Paper Size
A4K, 81/2" × 11"K, B5 JISK.
❖ Paper Weight
64–105 g/m2, 17–28 lb.
11" × 17" L, 8
1
8
/2" × 11" KL,
1
/2" × 81/2" KL
5
Others (Vertical: 2.76" - 11.7",
Horizontal: 5.83" - 17")
1
/2" × 14" L,
Weight
47.1 - 209.3
2
,
g/m
12.5 - 55.6 lb
Recommended for the LCIT
The size and quantity of paper that can be loaded on the LCIT are as follows.
Paper size Paper weight Tray capacity
Metric version Inch version
Maximum: 297 × 432
mm (325 × 447 mm
Minimum: 128 × 182
mm
*1
When the image position is set to 0 mm (0")
Maximum: 11.6" ×
*1
)
17.0" (12.7" × 17.5"
Minimum: 5.1" × 7.1"
47.1 – 209.3 g/m
*1
(12.5 – 55.61 lb.)
)
2
Note
❒ Tray capacity is based on using high quality 80 g/m2 (20 lb.) paper. The num-
ber of sheets shown is approximate.
30
3000 sheets
(80 g/m
Paper stack height:
Less than 320 mm
(12.5")
2
, 20 lb.)
Page 43
Recommended for the LCOT
Paper size Paper weight Tray capacity
Print Paper
Metric version Inch version
Maximum: 297 × 432
mm (325 × 447 mm
Minimum: 70 × 148
mm (When the LCIT
is installed: 128 × 182
mm)
*1
When the image position is set to 0 mm (0")
Maximum: 11.6" ×
*1
)
17.0" (12.7" × 17.5"
Minimum: 2.8" × 5.9"
(When the LCIT is installed: 5.1" × 7.1")
47.1 – 209.3 g/m
*1
)
(12.5 – 55.61 lb.)
2
3000 sheets
(80 g/m
Paper stack height:
Less than 345 mm
(13.5")
2
, 20 lb.)
Note
❒ Tray capacity is based on using high quality 80 g/m2 (20 lb.) paper. The num-
ber of sheets shown is approximate.
Non-recommended Paper
The following types of paper are not recommended for this machine:
• Roughly cut paper
• Paper of different thickness in the same stack
2
• Envelopes heavier than 85 g/m
• Folded, curled, creased, or damaged paper
, 22 lb.
1
• Damp paper
• Torn paper
• Slippery paper
• Rough paper
• Paper with any kind of coating (such as carbon)
• Short grain paper
• Thin paper that has low stiffness
• Paper that is prone to generate a lot of paper dust
• Grained paper loaded with the direction of the grain perpendicular to the
feed direction
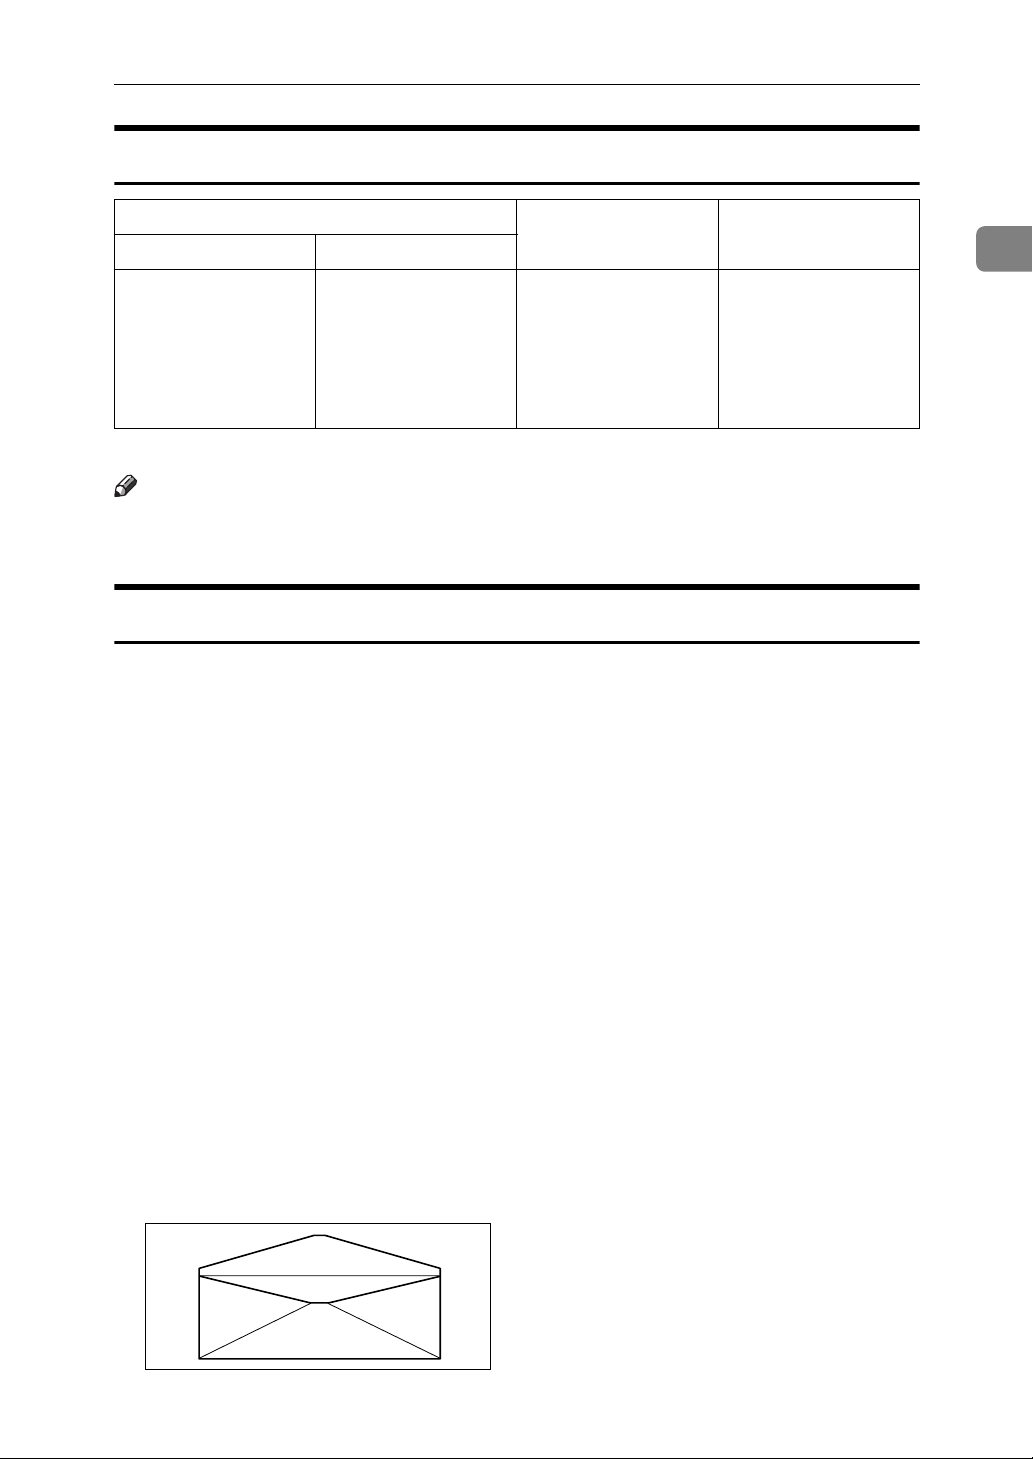
• Certain types of long thin envelopes.
E.g. international mail envelopes
ZFXX040E
31
Page 44
1
Before Using the Machine
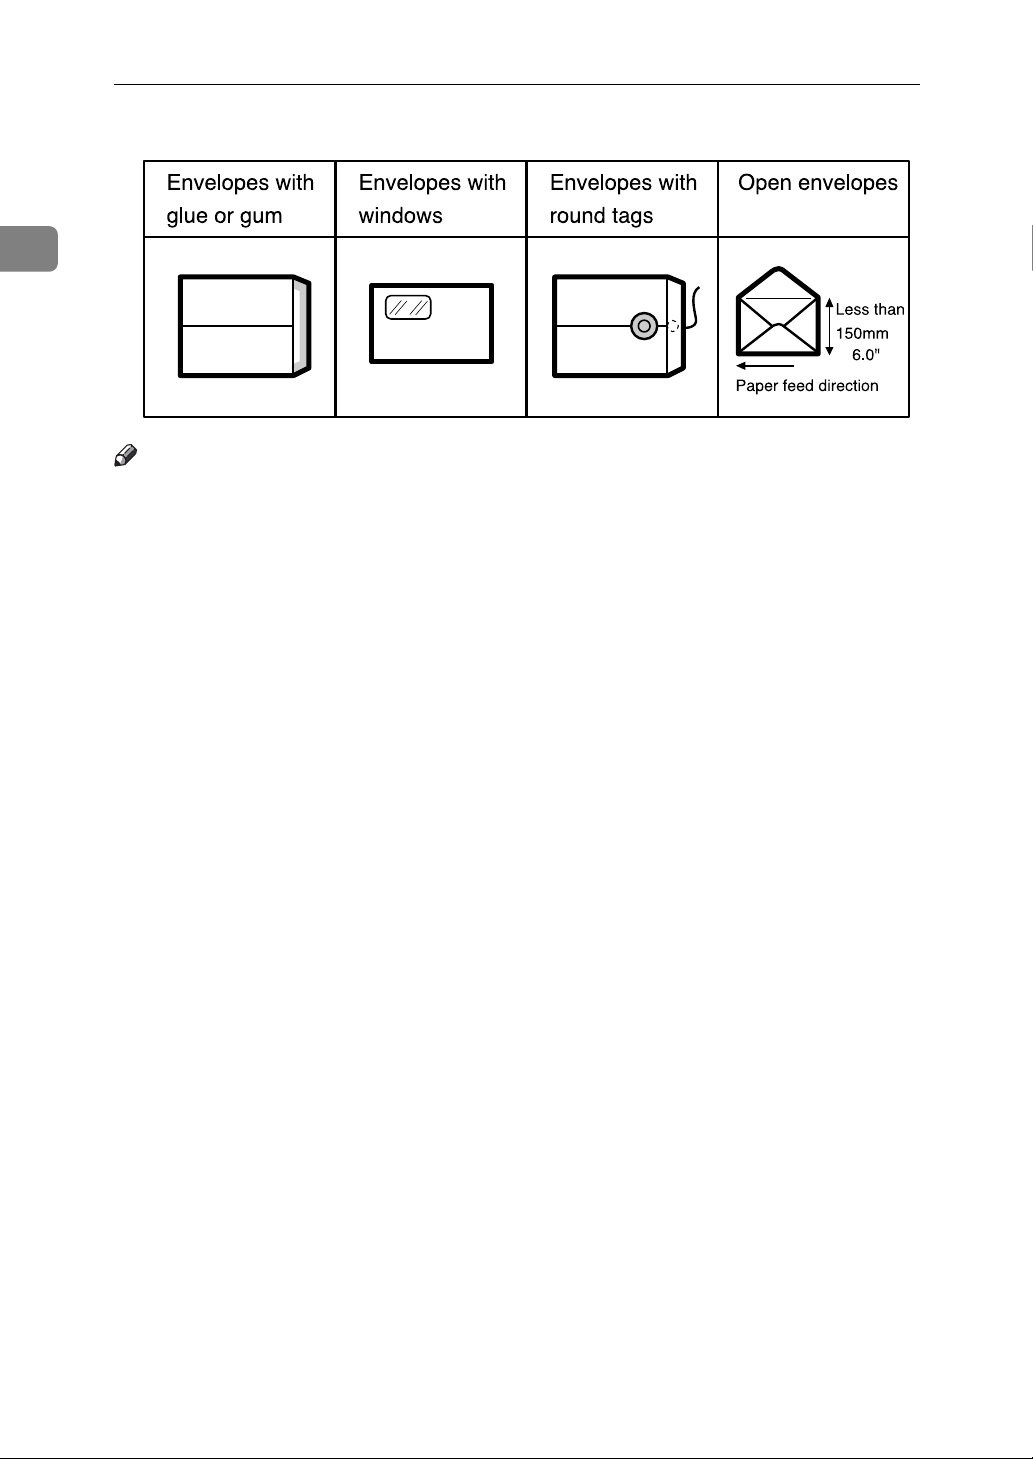
• The following types of envelopes
Note
❒ Do not use inkjet paper. It does not absorb ink well, print will smudge if
rubbed, and the back of paper may be dirtied.
❒ If you print on rough grained paper, the print image might be blurred.
❒ You can use A3 (297 × 420 mm) or 11" × 17" originals or printing paper. When
you want to print the entire image of an A3, 11" × 17" original, select Reduce
mode because the maximum print areas are as follows:
• Metric version: 290 × 412 mm, 11.4" × 16.2"
• Inch version: 290 × 422 mm, 11.4" × 16.6"
2
❒ When you use A3, 11" × 17" and 209.3 g/m
speed down to setting 1, 2, or 3.
❒ Paper that has no margins or has solid images printed on its leading edge can
become wrapped around the drum and smudged as a result of contact with
the machine's internal components. To prevent these problems, attach a margin of 6 mm (or wider for duplex printing) to the paper's leading edge.To
print an original that has a solid image on its leading edge onto thin paper,
place the original in the reverse direction. If printing in a high speed, lower
the print speed.
, 55.6 lb paper, slow the printing
32
Page 45
Print Paper
Important
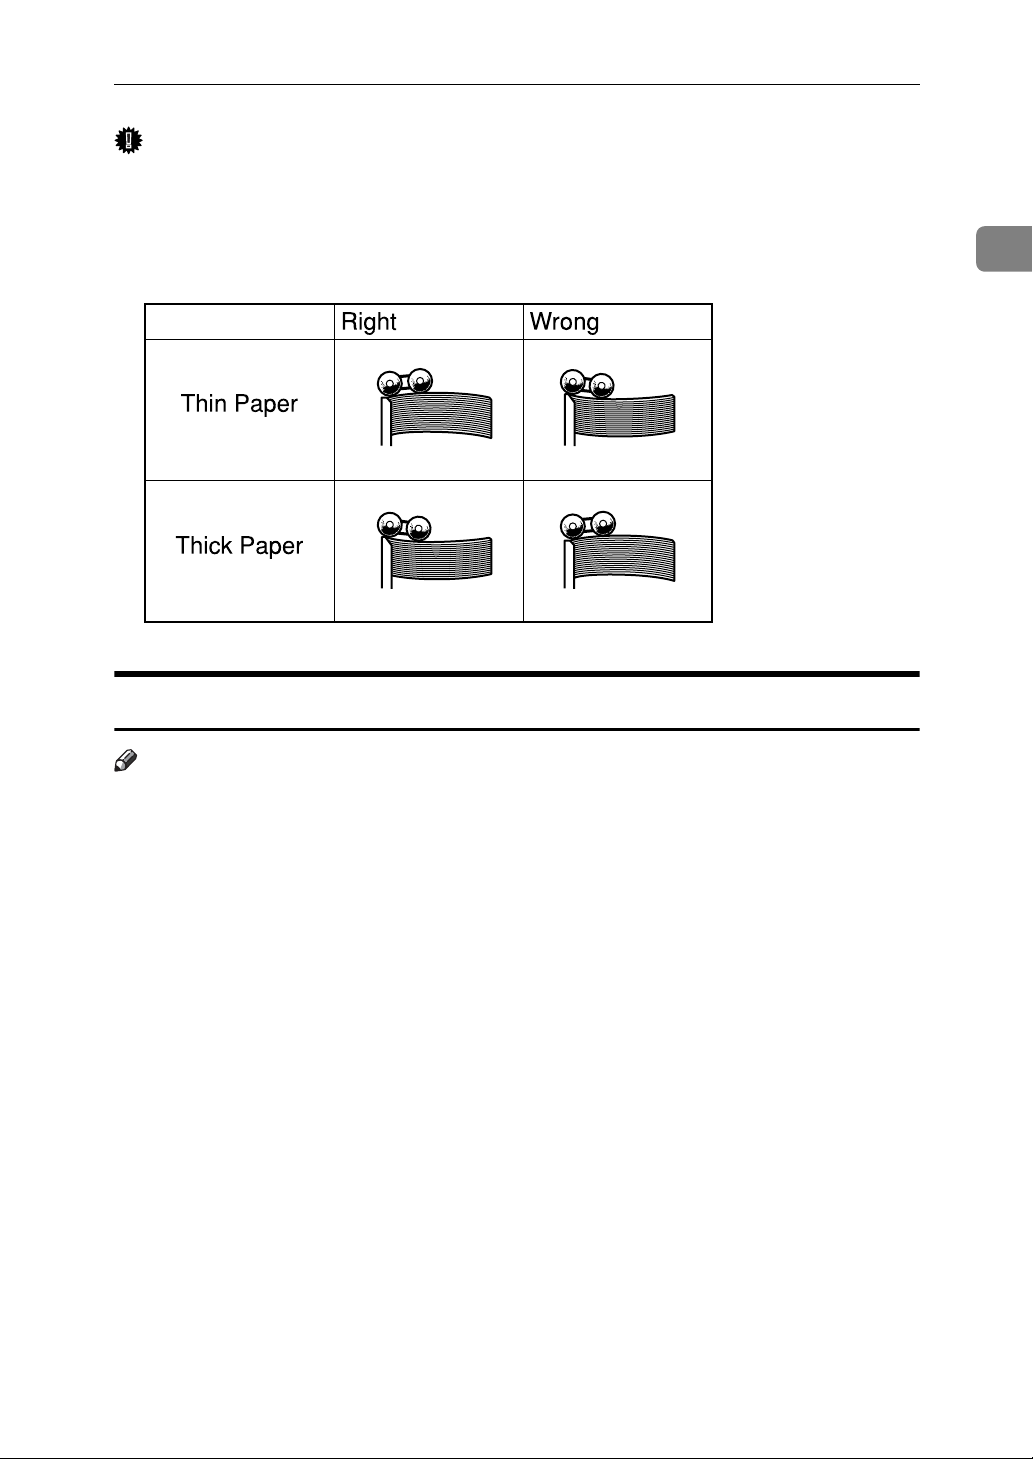
❒ Correct curls in the paper before placing it in the machine. When you cannot
correct the paper curl, stack the paper with the curl face down or face up as
shown in the illustration. If the paper is curled, it might wrap around the
drum or stains might appear and while printing in the duplex mode, paper
misfeed is more likely to occur near the duplex unit.
TPEY990E
1
Storing Paper
Note
❒ When storing paper, the following precautions should always be taken:
• Do not store paper where it will be exposed to direct sunlight.
• Avoid storing paper in humid (greater than 70%) areas.
• Store on a flat surface.
❒ Keep open reams of paper in the package and store as you would unopened
paper.
33
Page 46
1
Before Using the Machine
Printing Size
Maximum print size
❖ 1 Sided
•Metric version:
290 × 410 mm, 11.4" × 16.1" (approx. A3 size)
• Inch version:
290 × 420 mm, 11.4" × 16.5"
❖ 2 Sided
•Metric version:
290 × 200 mm, 11.4" × 7.8" (approx. A4 size)
• Inch version:
275 × 205 mm, 10.8" × 8.0"
At low temperatures, the maximum print size may be somewhat smaller.
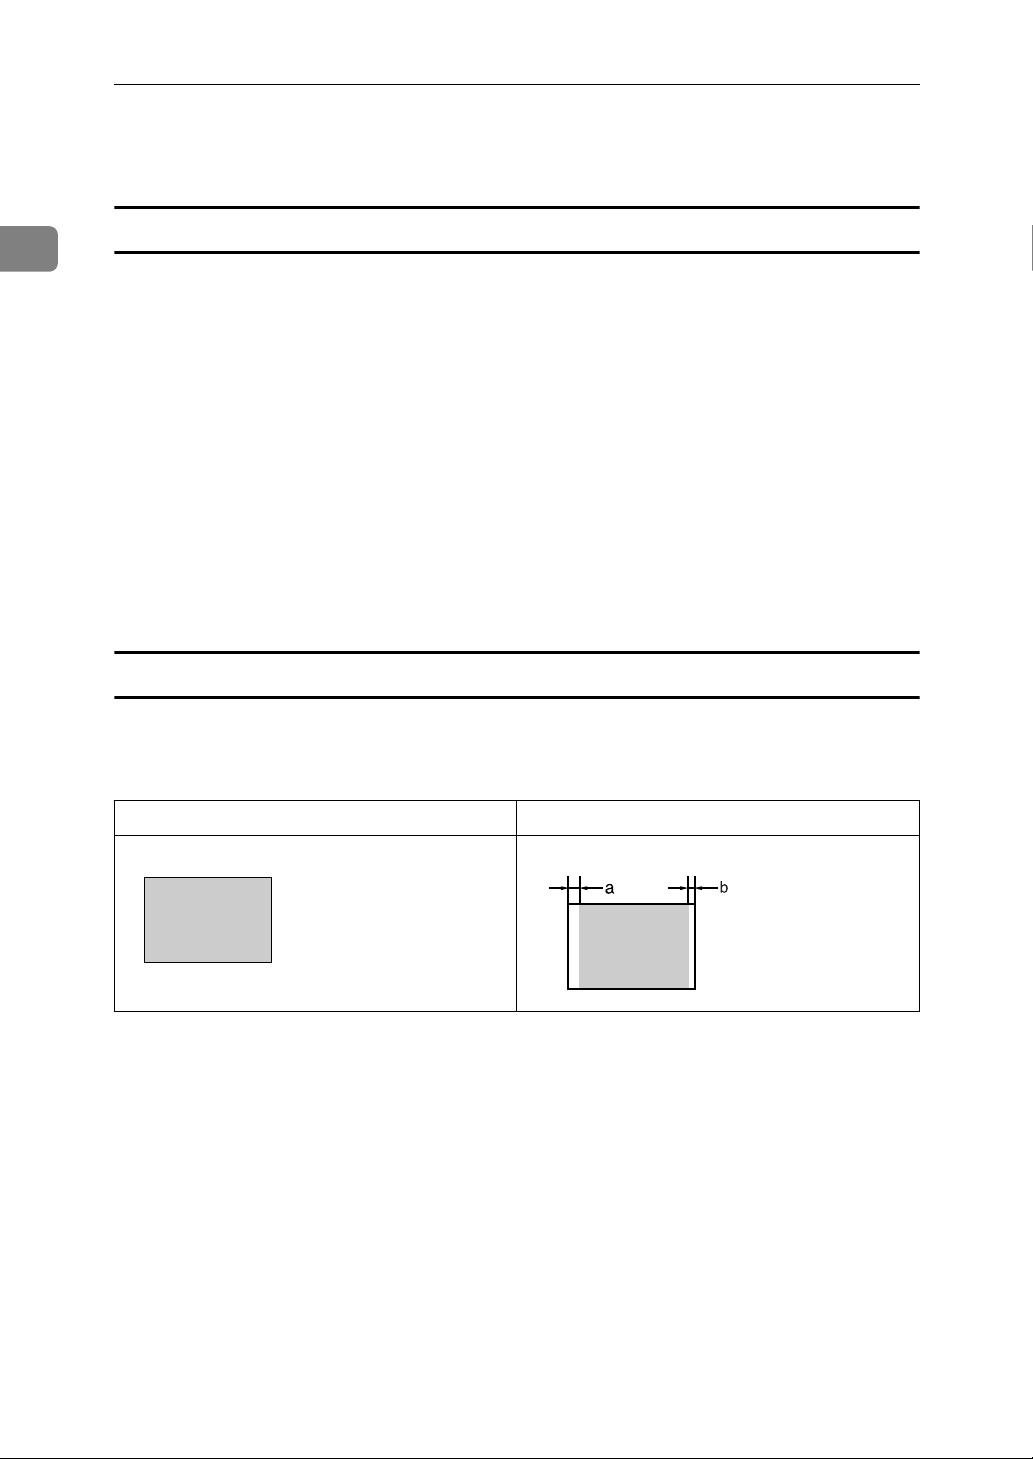
Range that cannot be printed
The first 6 mm, 0.24", of the leading edge and the last 2 mm, 0.08", of the trailing
edge cannot be printed. Make sure the leading edge margin is at least 6 mm,
0.24", and the trailing edge margin is at least 2 mm, 0.08".
Original Print
a = 6 mm, 0.24"
b = 2 mm, 0.08"
34
Page 47
Printing Preparations
2. Basics
Using the Paper Feed Tray and Delivery Tray
Loading Paper
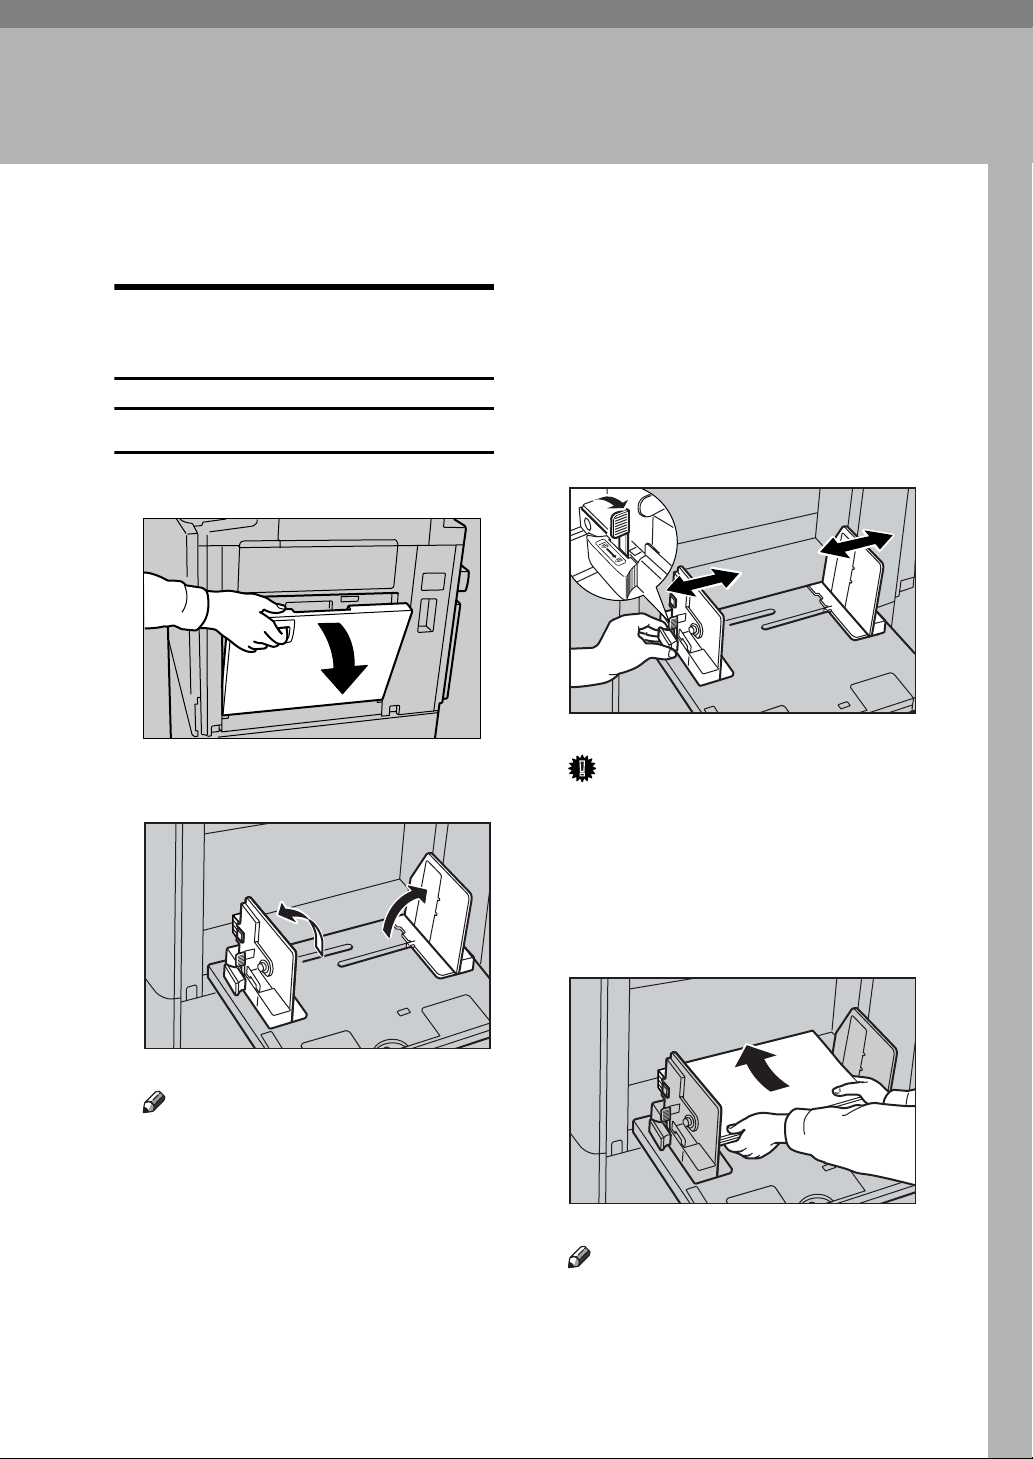
A Carefully open the paper feed tray.
ZDCY130E
B Lift the paper feed side plates.
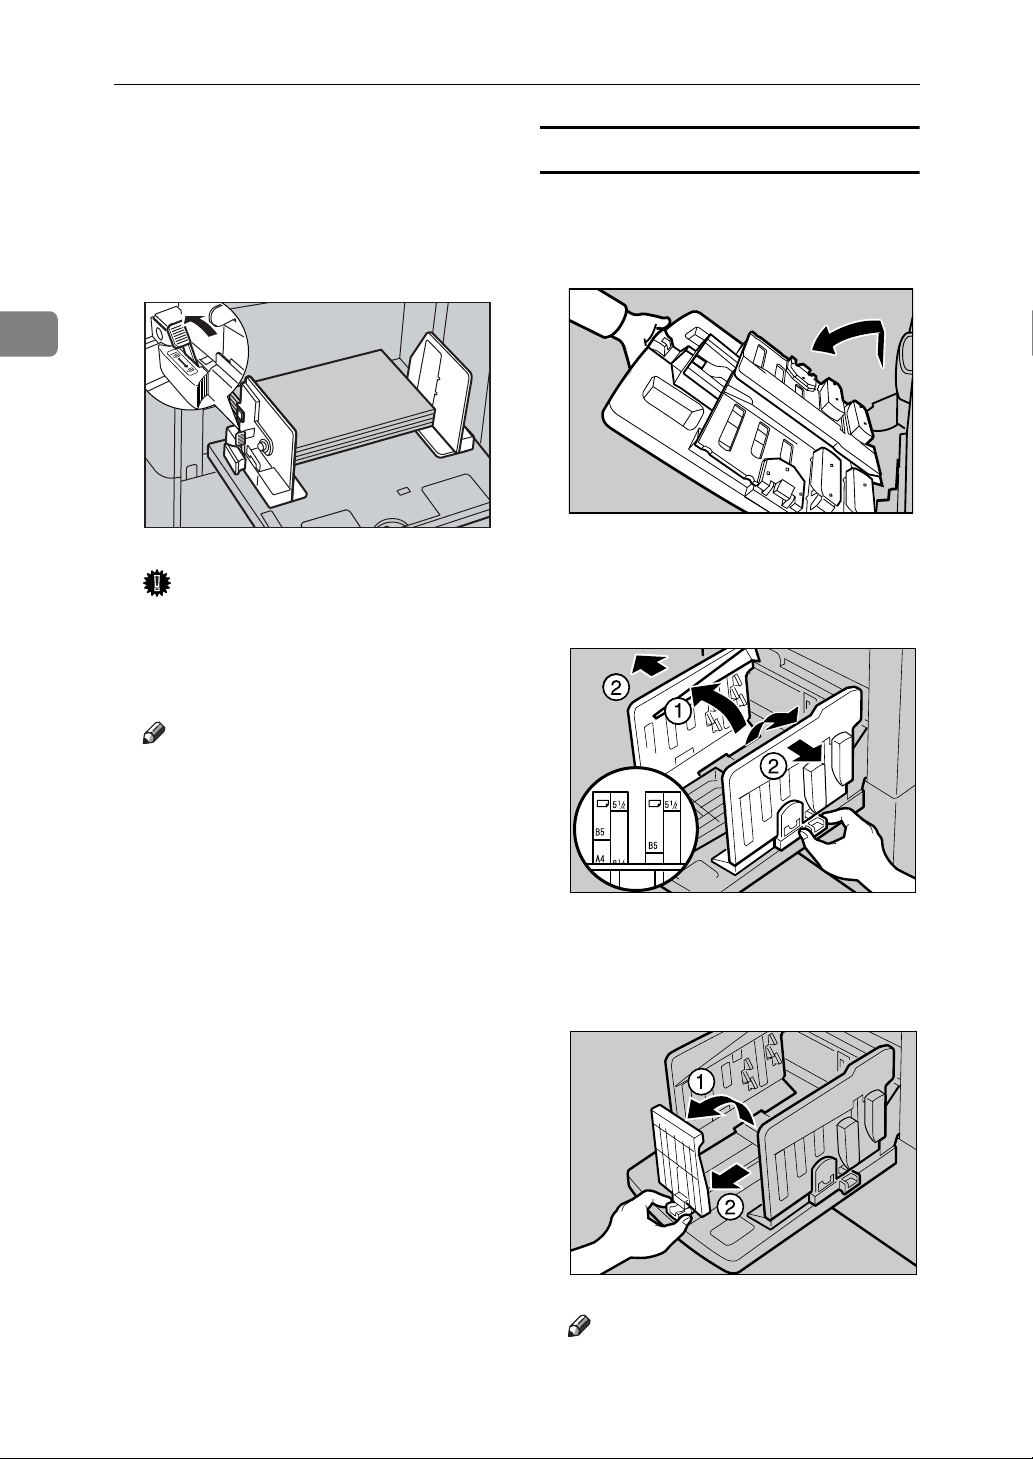
C Make sure that the paper feed
side plates knob lock lever is
raised (lock is released), and then
grasp the paper feed side plates
knob and adjust the paper feed
side plates to match the paper
size.
AUY029S
Important
❒ Always adjust the position with
the lock lever for the paper feed
side plates in the raised position
(lock released).
AUY028S
Note
❒ When loading larger paper, slide
out the extender.
D Place the paper on the paper feed
tray.
AUY030S
Note
❒ Correct the paper curl before
loading the paper. If you cannot
do so, stack the paper with the
curl face down.
35
Page 48
Basics
2
E Make sure that the paper feed
side plates are touching both
sides of the paper, and then push
the lock lever for the side plates
down to lock the side plates into
position.
AUY041S
Important
❒ Always make sure that you
push the lock lever for the side
plates down to lock the side
plates into position.
Setting Up The Paper Delivery Tray
A Raise the paper delivery tray slight-
ly, and then gently lower it with
your hand.
ABL022S
B Lift the paper delivery side plates
and adjust them to match the paper size.
Note
❒ Make sure that the paper size
and orientation in the display
panel correspond with the actual paper size and orientation set
on the paper feed tray.
AUX031S
C Lift the paper delivery end plate
and adjust it to match the paper
size.
ACY064S
36
Note
❒ The inside of the plates should
correspond to the paper size.
Page 49
Printing Preparations
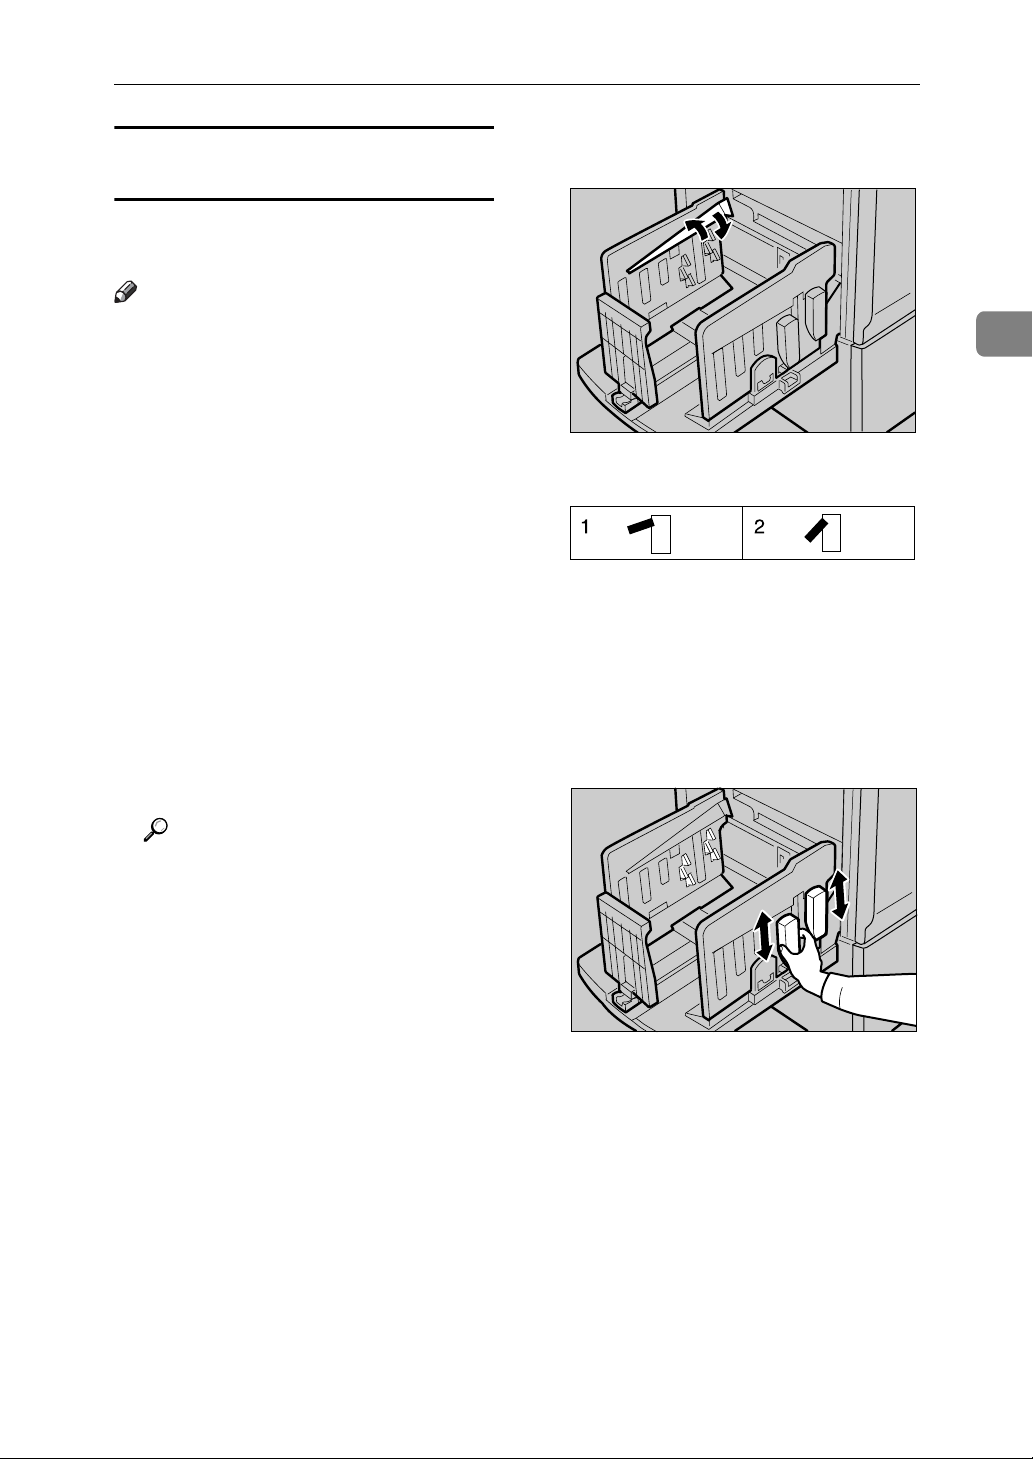
Adjusting the Paper Alignment Wings and Chocks
Use the paper alignment wings and
chocks to stack printed paper neatly.
Note
❒ Prints may be delivered curled up
if they contain large areas of solid
image. If this happens, raise the
paper alignment wings to about 45
degrees. When printing on B5
JISL K or A4K of 52.3 g/m
2
, 13.9
lb or thinner, slide the chocks up
together.
❒ Depending on the type of paper
you are using, you may not be able
to load to capacity (1000 sheets)
when the wings are raised.
❒ When printing on 52.3 g/m
2
, 13.9
lb or thinner at a fast speed, paper
jams (C) may occur in the paper
exit area. If this happens, do the
following:
• Decrease print speed.
❖ Paper alignment wings
Adjust the paper alignment wings.
2
ACY053S
1. Raise the wings fully.
2. Raise the wings to about 45 degrees.
❖ Chocks
Slide the chocks up or down to adjust the buffer fins to match the paper size and thickness.
Reference
p.60 “Changing the Printing
Speed”
• Lower the paper alignment wings.
• Push the end plate toward the
paper delivery tray edge.
❒ When the paper alignment wings
are raised, prints may not be delivered neatly stacked, depending on
paper type. If this happens, lower
the wings.
ACY054S
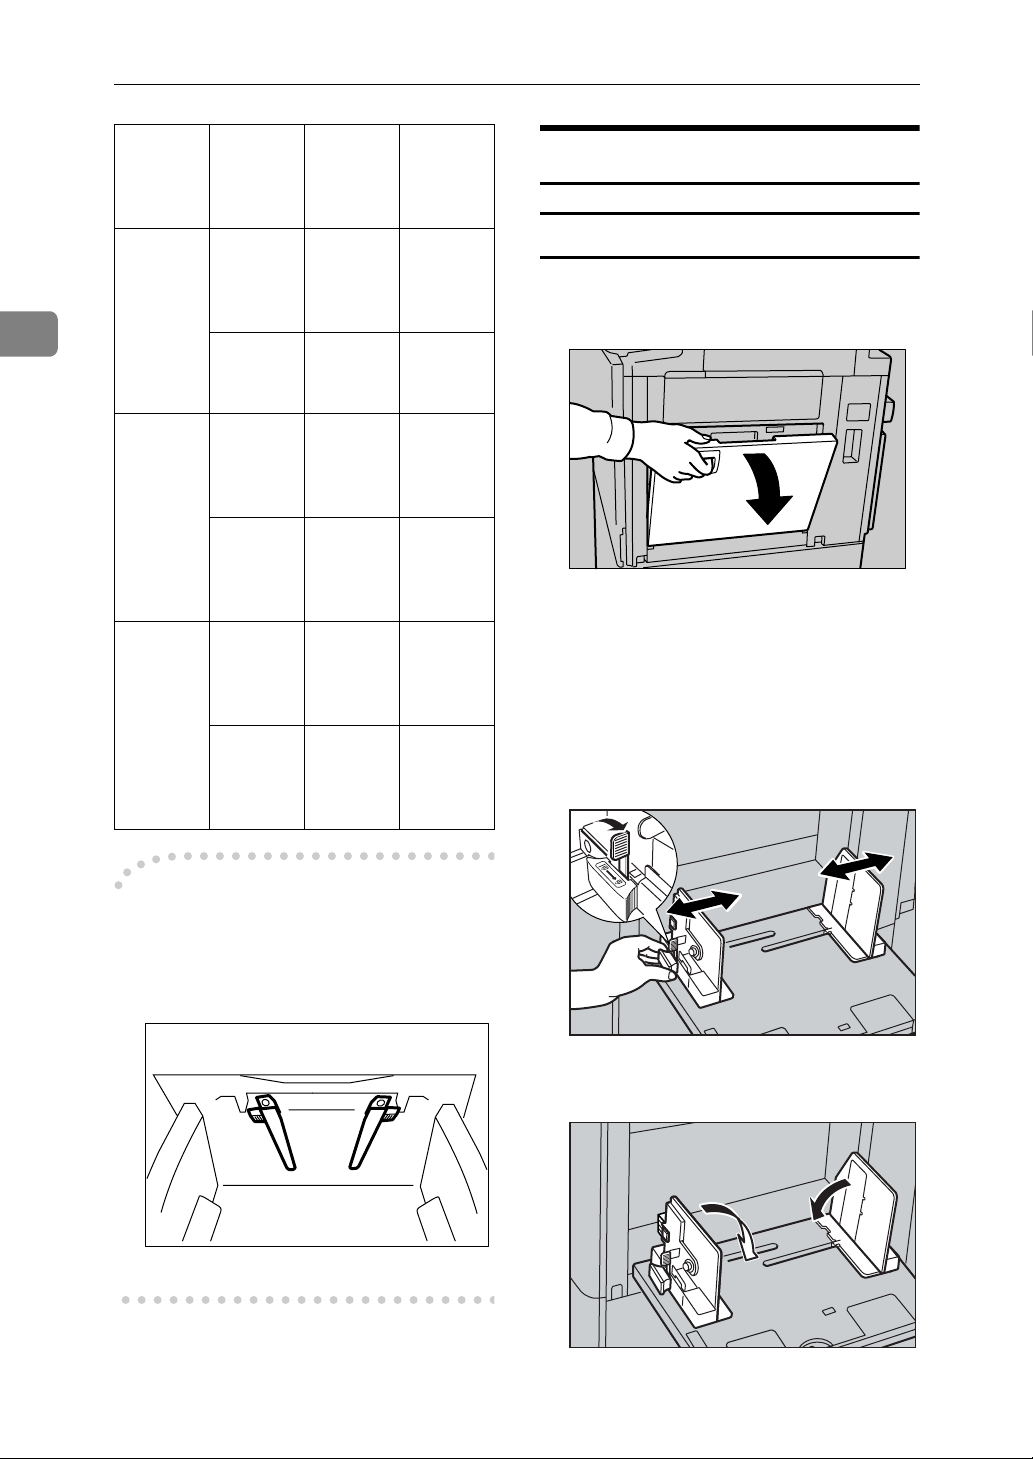
Adjust the paper alignment wings
and chocks according to paper size
and thickness, as follows:
37
Page 50
Basics
2
Paper
Weight
128 g/m
34 lb or
thicker
52.3 g/m
– 128
2
,
g/m
13.9 lb to
34 lb
52.3
2
,
g/m
13.9 lb or
thinner
Paper
Size
2
A3 L,
,
11" ×
17"L,
B4 JIS L
A4 KL,
B5 JIS
KL
2
A3 L,
11" ×
17"L,
B4 JIS L
A4 KL,
B5 JIS
KL
A3 L,
11" ×
17"L,
B4 JIS L
A4 KL,
B5 JIS
KL
Paper
alignment
wings
Lower
the
wings.
Lower
the
wings.
Raise the
wings
fully.
Raise the
wings to
about 45
degrees.
Raise the
wings to
about 45
degrees.
Raise the
wings to
about 45
degrees.
Chocks
Down
Down
Up
Up
Down
Down
Using the LCIT and LCOT
Installing the LCIT
A Open the paper feed tray of the
machine.
ZDCY130E
B Make sure that the paper feed
side plates knob lock lever is
raised (lock is released), and then
grasp the paper feed side plates
knob and move the side guides of
the paper feed tray of the machine
to the widest position.
-Using the trailing edge guides
When printing on A4KL, 81/2"KL,
B5 JISKLsize paper, swing out the
guides as shown below:
38
AUY029S
C Lower the paper feed side plates.
AUX032S
AUY044S
Page 51
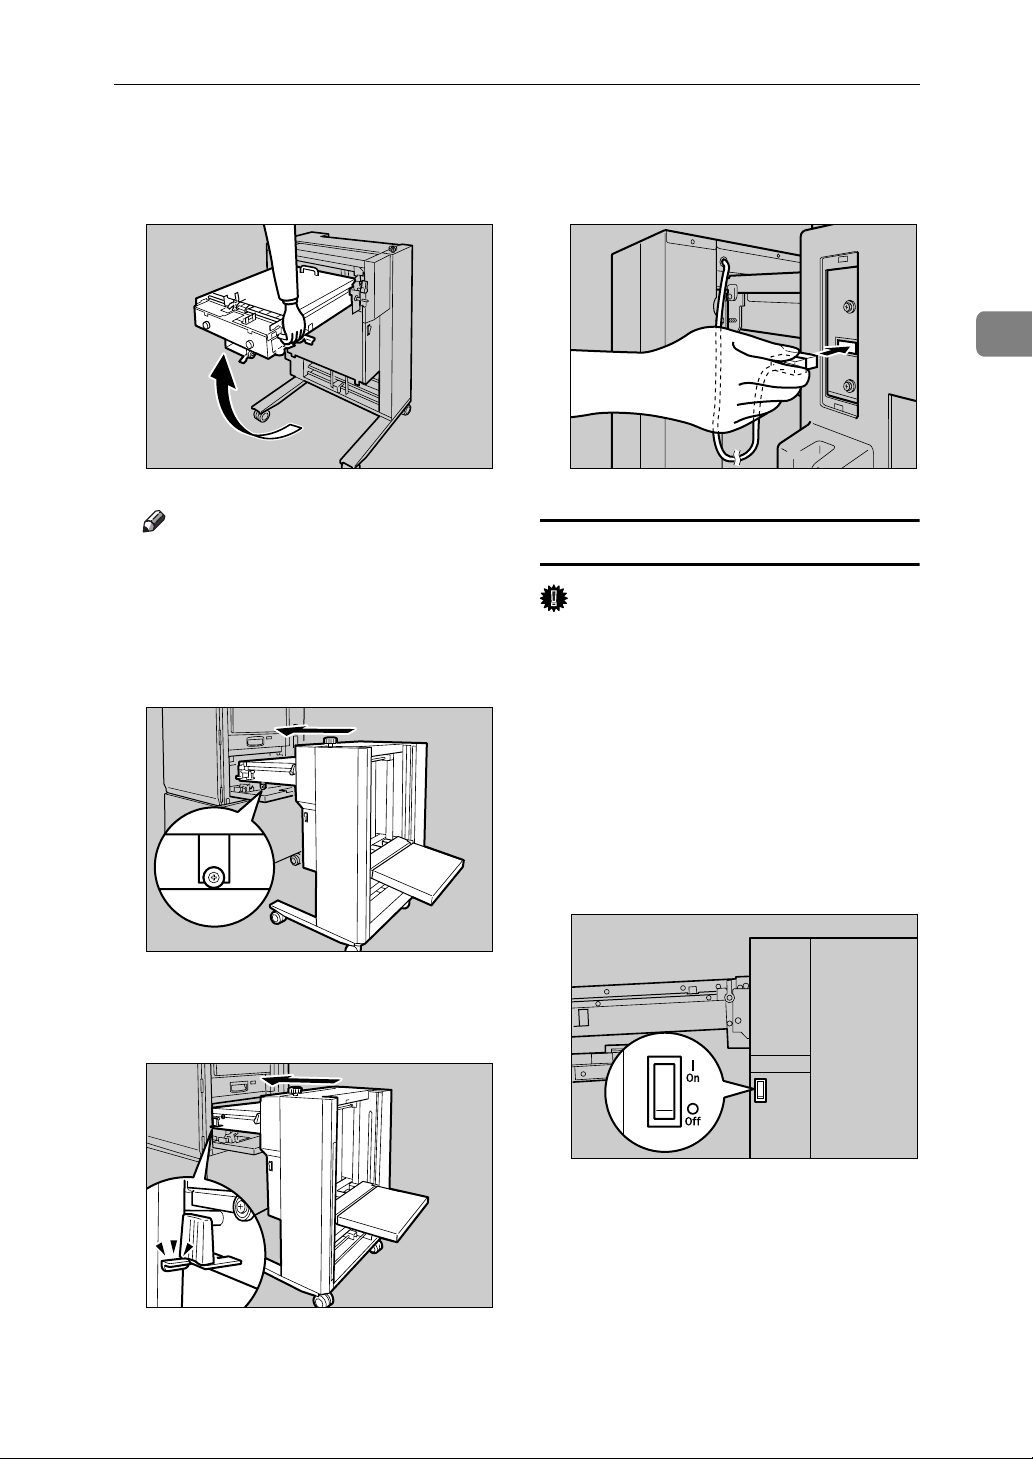
Printing Preparations
D Hold the handle and unfold the
intermediate feeding section of
the LCIT.
ABQ004S
Note
❒ Do not release the handle.
E Lift the end of the intermediate
feeding section and put it down
placing the wheeled support bar
onto the paper feed tray.
G Plug the LCIT optical cable into
the slot located at the left side of
the back of the machine.
2
ACY066S
Turning On the Power
Important
❒ Make sure to turn on the power
switch of the LCS first, and then
turn on the main switch of the machine.
AJK157S
F Push the LCIT into the machine
until it clicks.
ABQ006S
A Make sure that the power cord is
firmly plugged into the wall outlet.
B Turn the power switch on.
The green indicator blinks.
ABQ011S
39
Page 52
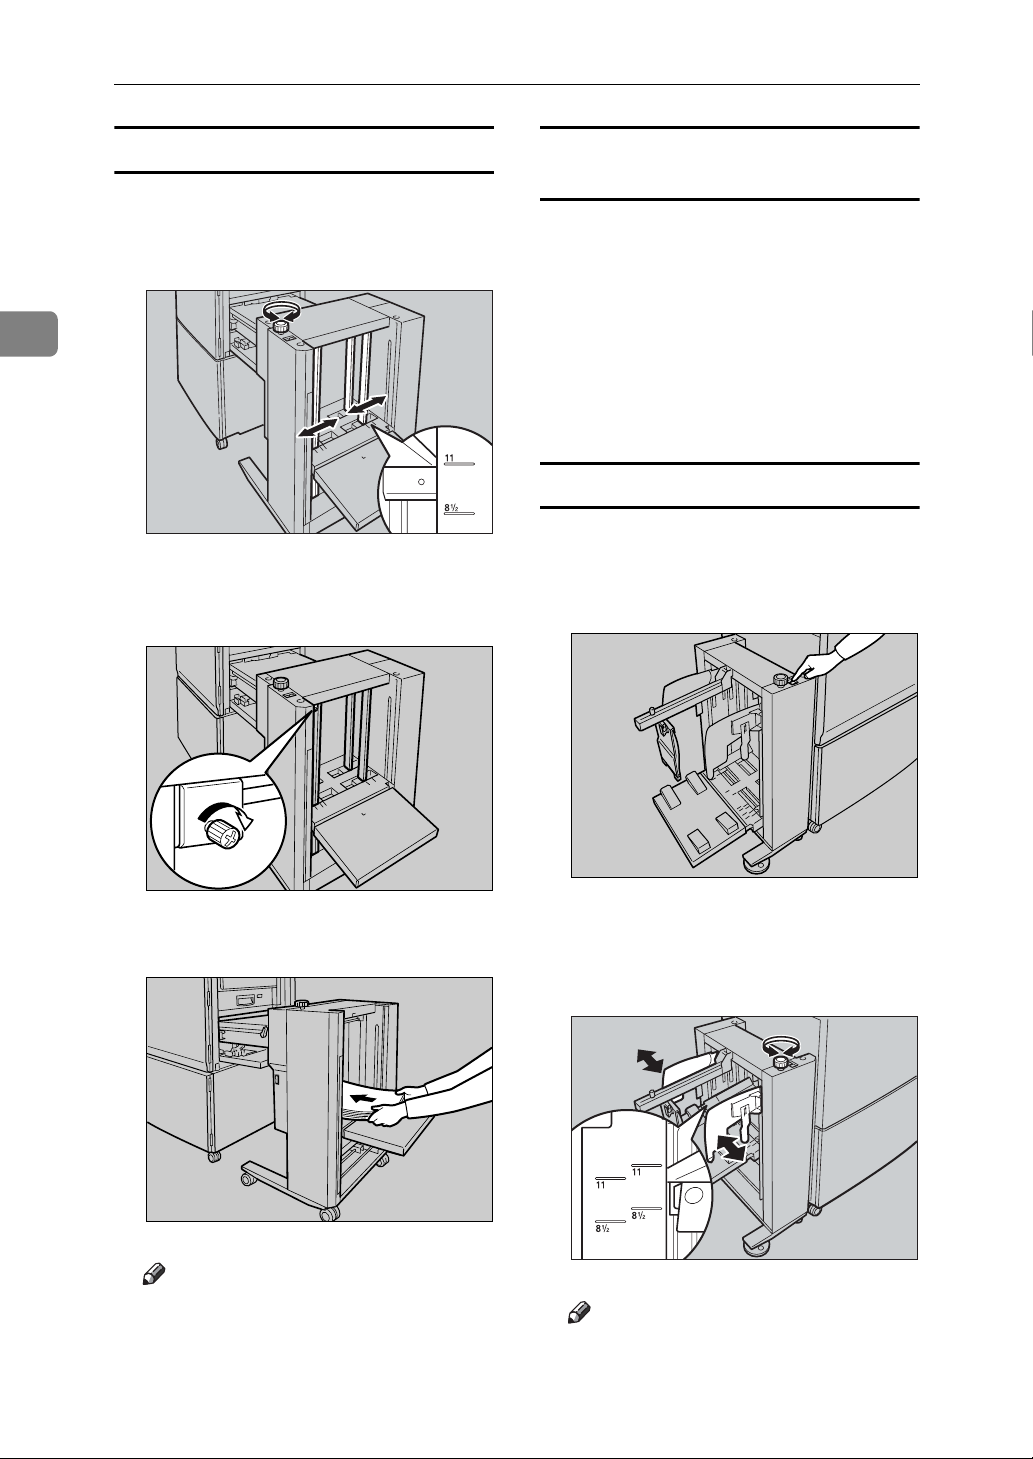
Basics
2
Loading Paper
A Turn the side guide adjustment
knob to adjust the side guides to
the paper size.
ABQ041S
B Tighten the screw to lock the side
guides.
Loading Paper Smaller than B6 JIS (128 ×
182 mm, 5.0" × 7.1" )
Paper smaller than B6 JIS must be
loaded directly onto the paper feed
tray of the machine. The LCIT must
be detached.
A Detach the LCIT.
B Load paper onto the paper feed
tray.
Setting up the LCOT
A Press the up button to lift the out-
put tray.
The output tray goes up.
C Load paper.
40
AJK166S
ABQ016S
Note
❒ The leading edge of the paper
must touch the inside of the
LCIT.
AJK160S
B Turn the side guide adjustment
knob to adjust the side guides to
the paper size.
ABQ042S
Note
❒ Align the inside of the side guides
with the appropriate mark on the
output tray.
Page 53
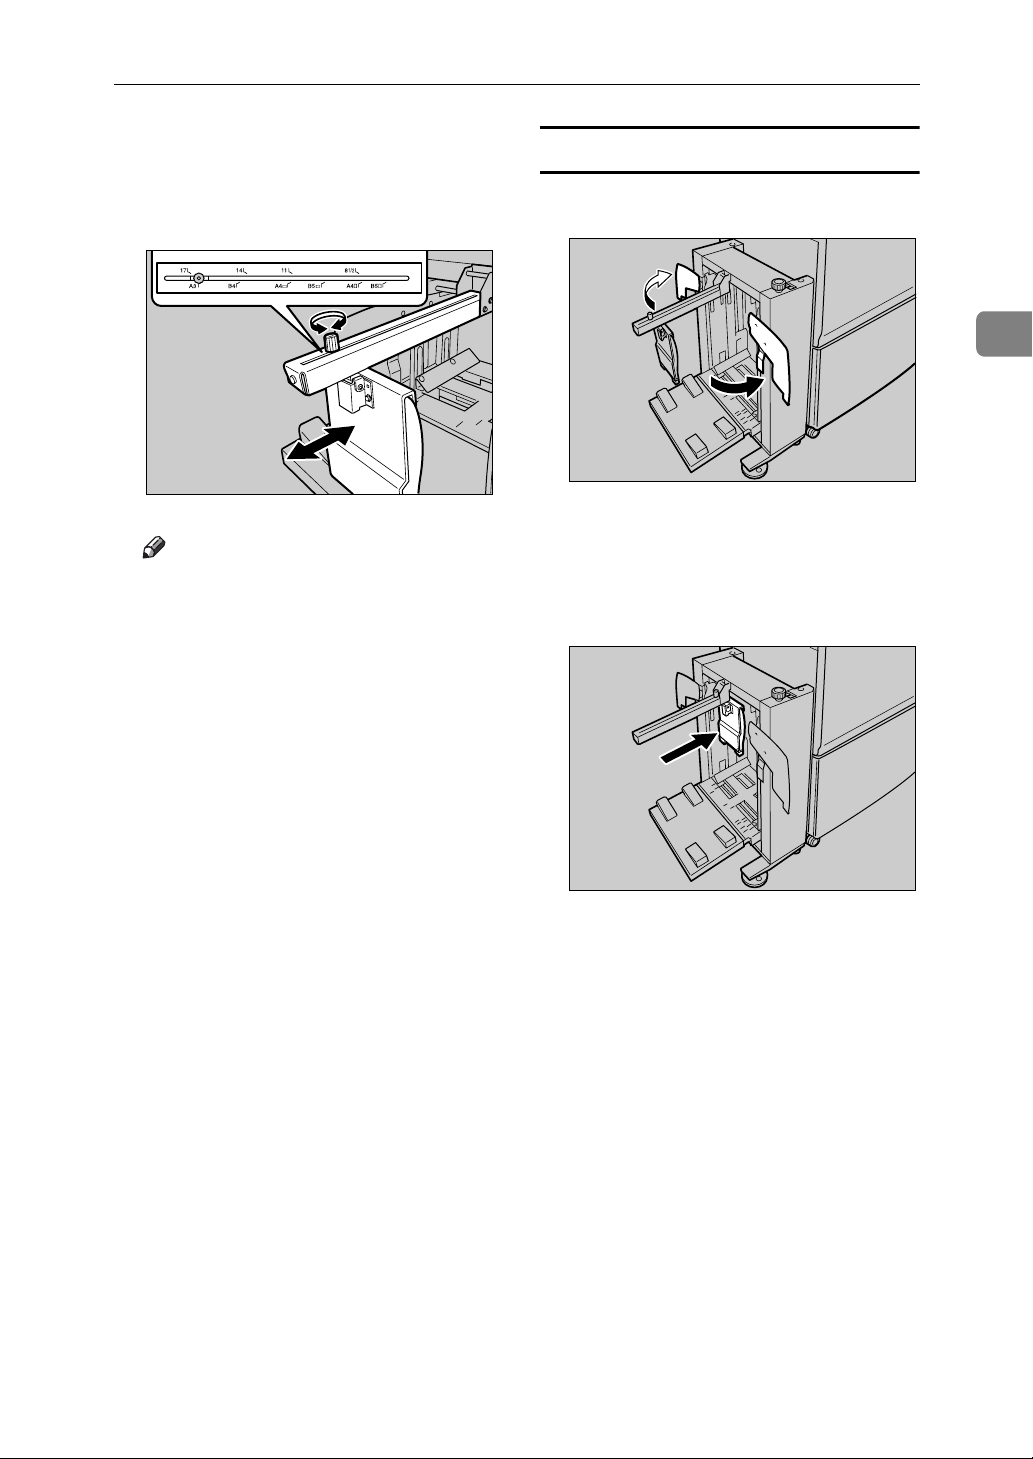
Printing Preparations
C Loosen the screw for the end plate,
adjust it to the paper size, and then
tighten the screw to lock the end
plate.
ABQ020S
Note
❒ Align the screw with the appro-
priate paper size mark.
Printing on Paper Smaller than B6 JIS
A Move the side guides outward.
2
AJK162S
B Loosen the screw for the end
plate, move it as close to the machine as possible, and then tighten the screw to lock the end plate.
AJK163S
41
Page 54
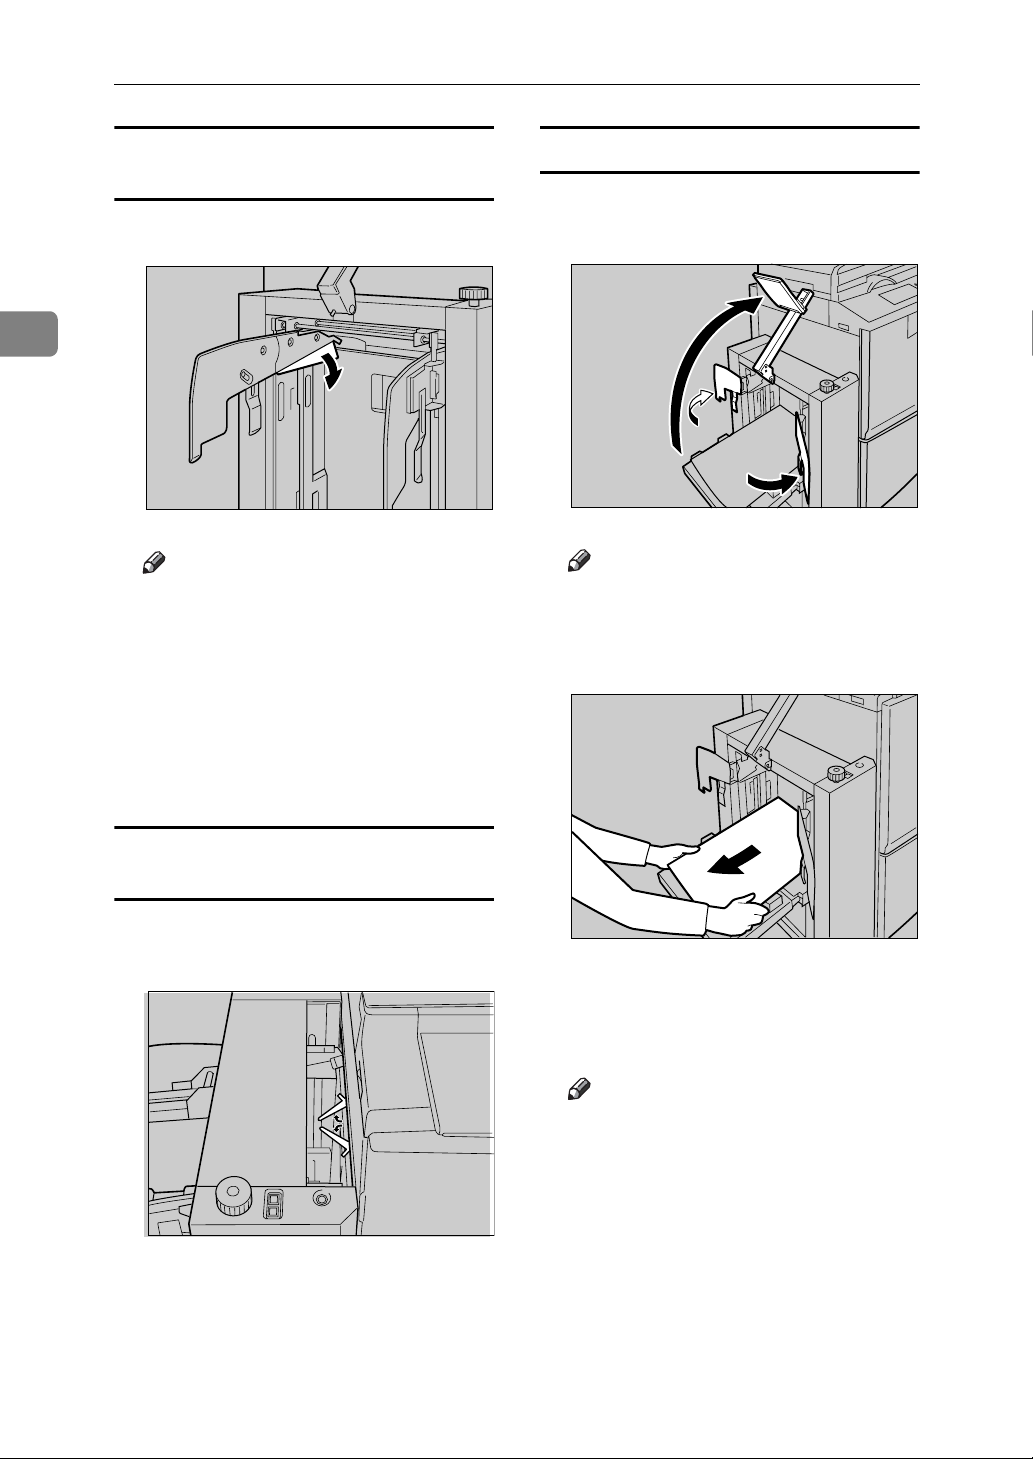
Basics
2
Printing on 81.4 g/m2 (21.6 lb.) or Heavier
Paper
A Lower the paper alignment wings.
ABQ023S
Note
❒ Depending on the type of paper
that you are using, you might
not be able to use the full capacity (3000 sheets) of the LCOT
when the wings are lifted.
❒ Lift the paper alignment wings
when B5 JISKL or A4K prints
are delivered curled up.
Removing Prints
A Move the side guides outward,
and then lift the end plate arm.
AJK164S
Note
❒ Lift the end plate arm complete-
ly before releasing it.
B Remove prints.
Printing on Sizes Smaller than A4 or 81/2" ×
11"
KL
Paper
A Swing out the guides as shown in
the illustration.
42
ABQ027S
C Move the side guides and end
plate arm back to their original
positions.
Note
❒ Lower the end plate arm com-
pletely before releasing it.
AJK311S
Page 55
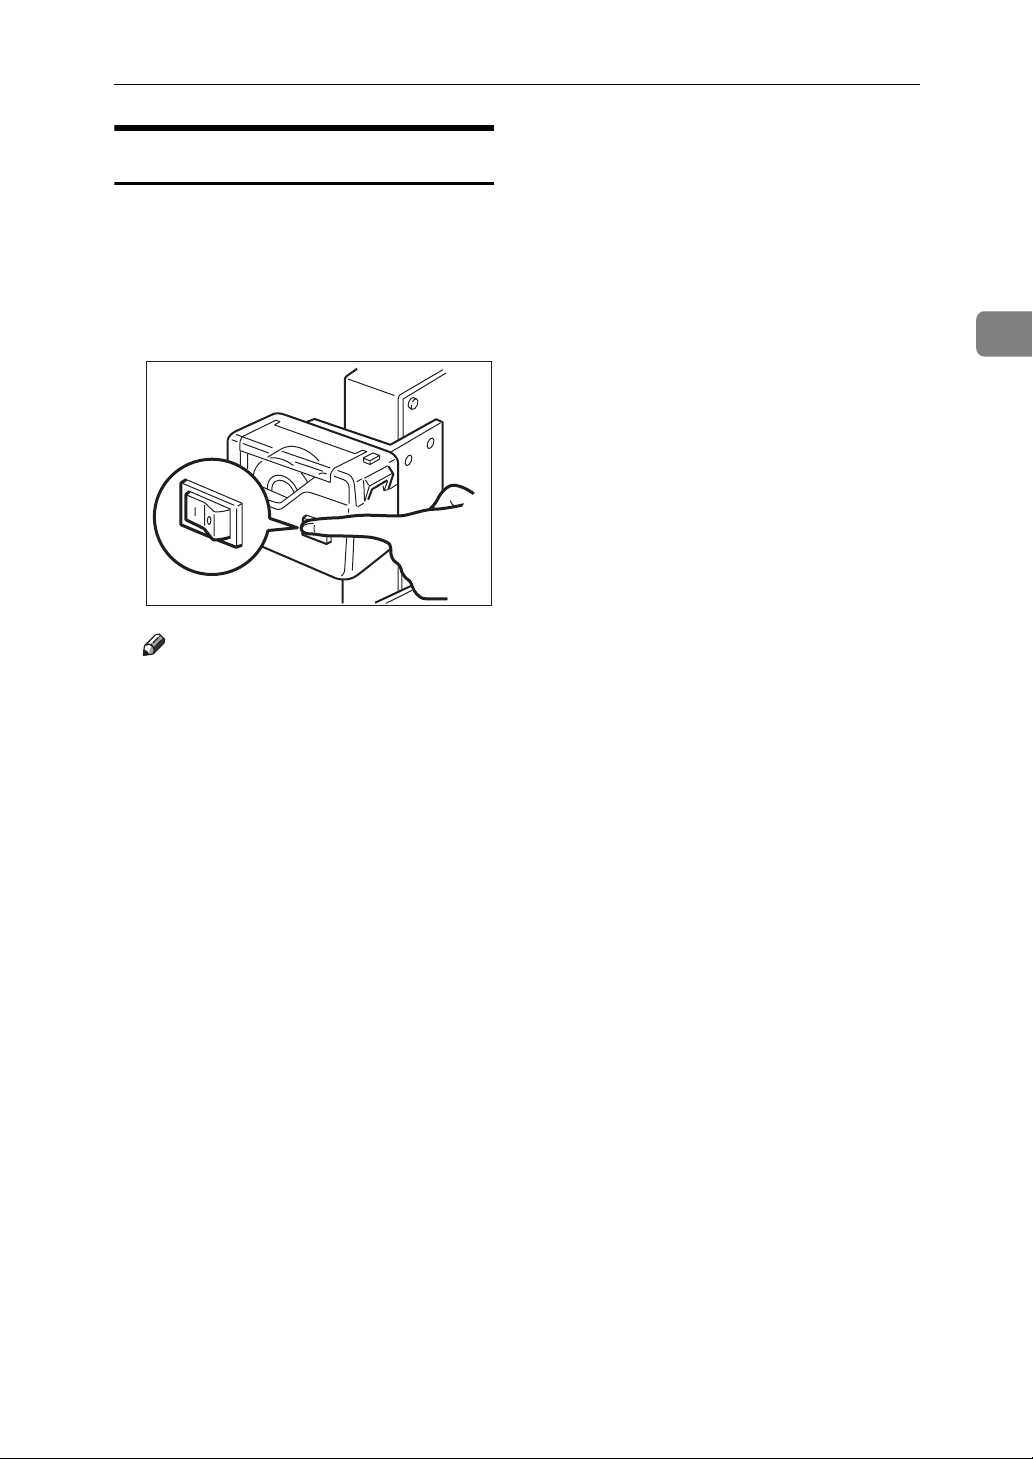
Using the Tape Dispenser
When the optional tape dispenser is
attached to the machine, turn on the
power to the tape dispenser after
turning on the machine.
Printing Preparations
A Turn on the tape dispenser switch.
On
Off
TSLP013E
Note
❒ Make sure to turn off the power
to the tape dispenser when
turning off the machine.
2
43
Page 56
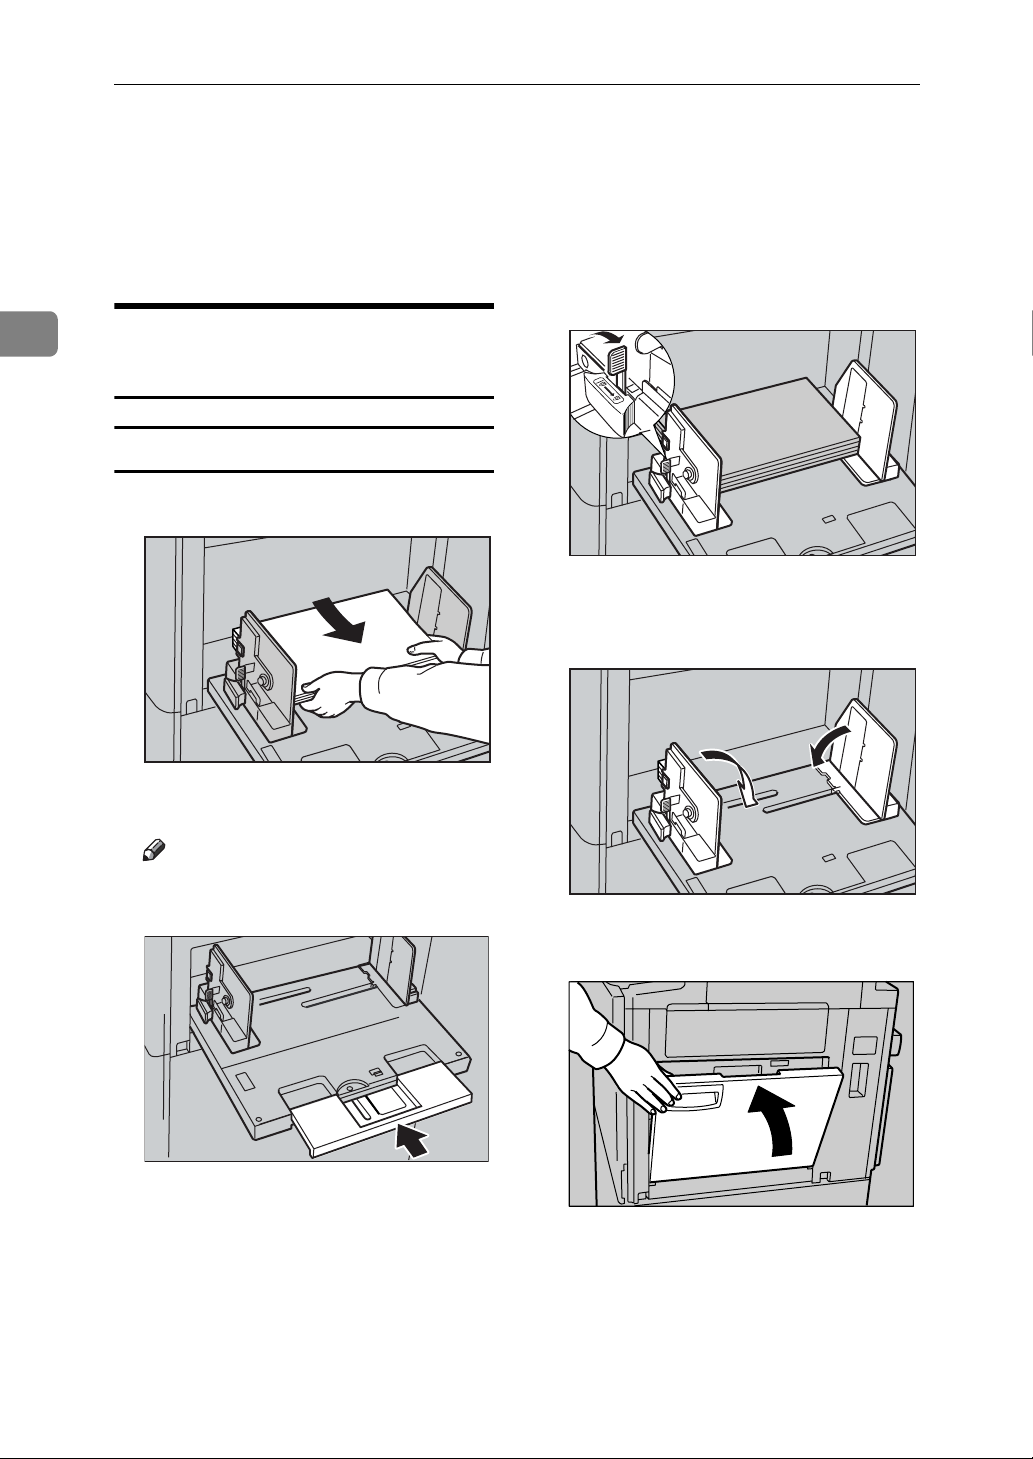
Basics
After Printing
2
This section shows you how to return
the paper feed tray and paper delivery tray to their original positions.
Folding the Paper Feed Tray and Delivery Tray
Folding the Paper Feed Tray
A Remove the paper from the tray.
AUY042S
B After the paper feed tray has stopped
moving, raise the paper feed side
plates knob lock lever to release the
side plates.
AUY024S
C Adjust the side plates to A3L or
A4K, and then lower them.
The paper feed tray will lower.
Note
❒ If the extender has been slided
out, push it back.
AUY016S
AUY044S
D Gently close the paper feed tray.
ACY013S
44
Page 57
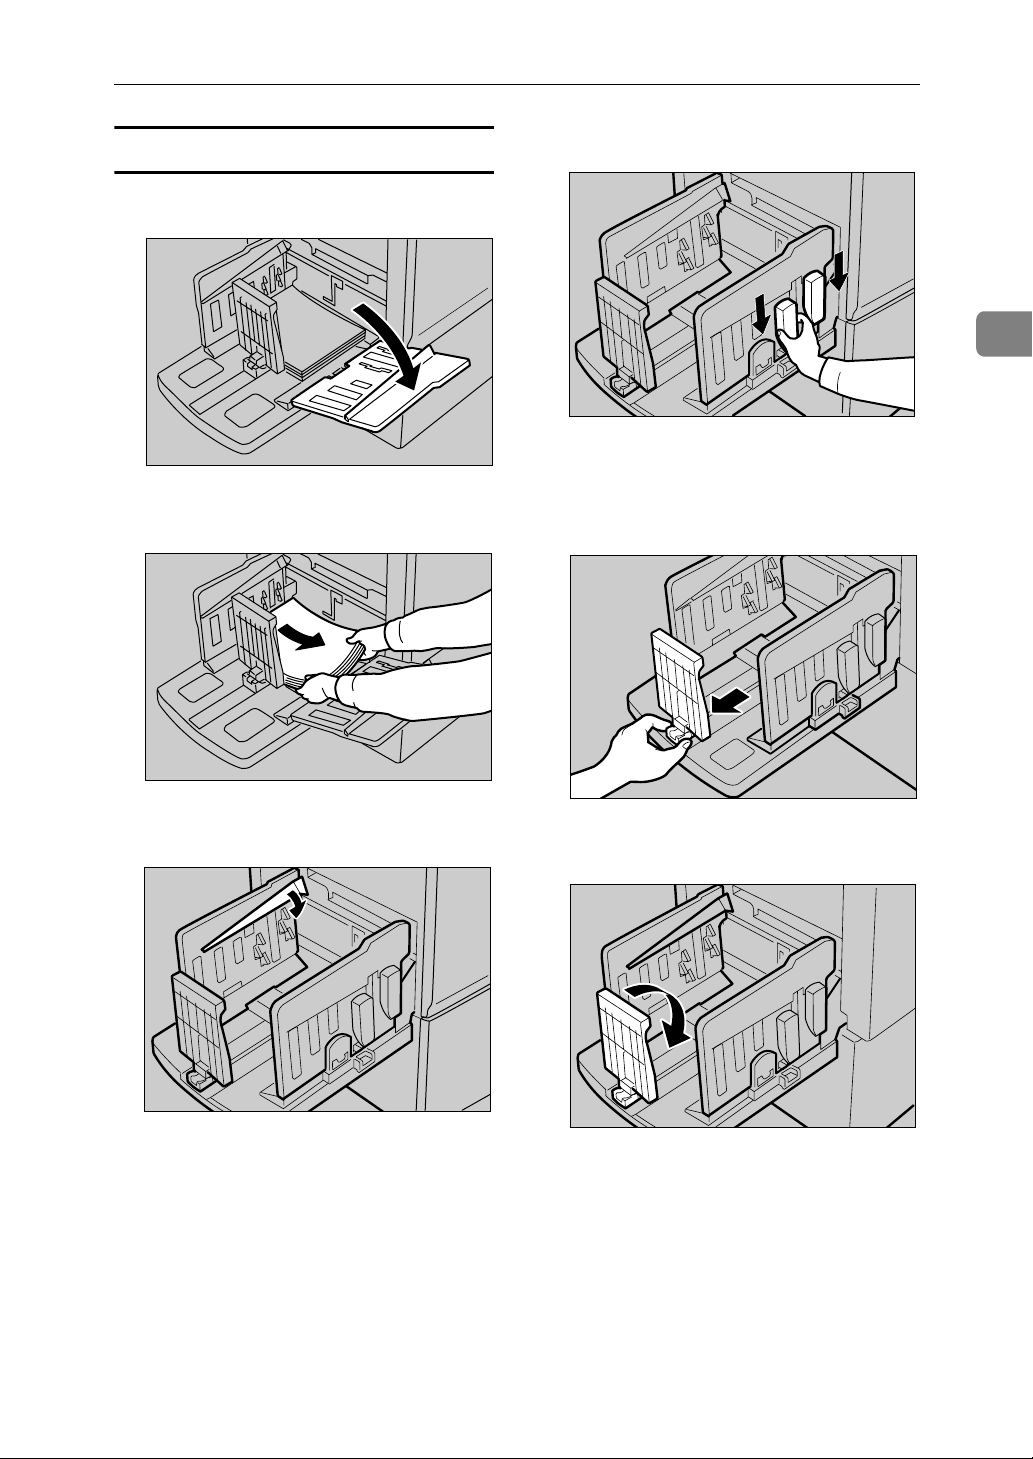
After Printing
Folding the Paper Delivery Tray
A Slightly lower one of the side plates.
ACY050S
B Remove the prints from the tray.
D Slide the chocks down.
2
ACY060S
E Move the paper delivery end plate
until its handle is flush with the end
of the tray.
ACY051S
C Lower the paper alignment wings.
ACY059S
AUX169S
F Lower the paper delivery end plate.
AFG055S
45
Page 58
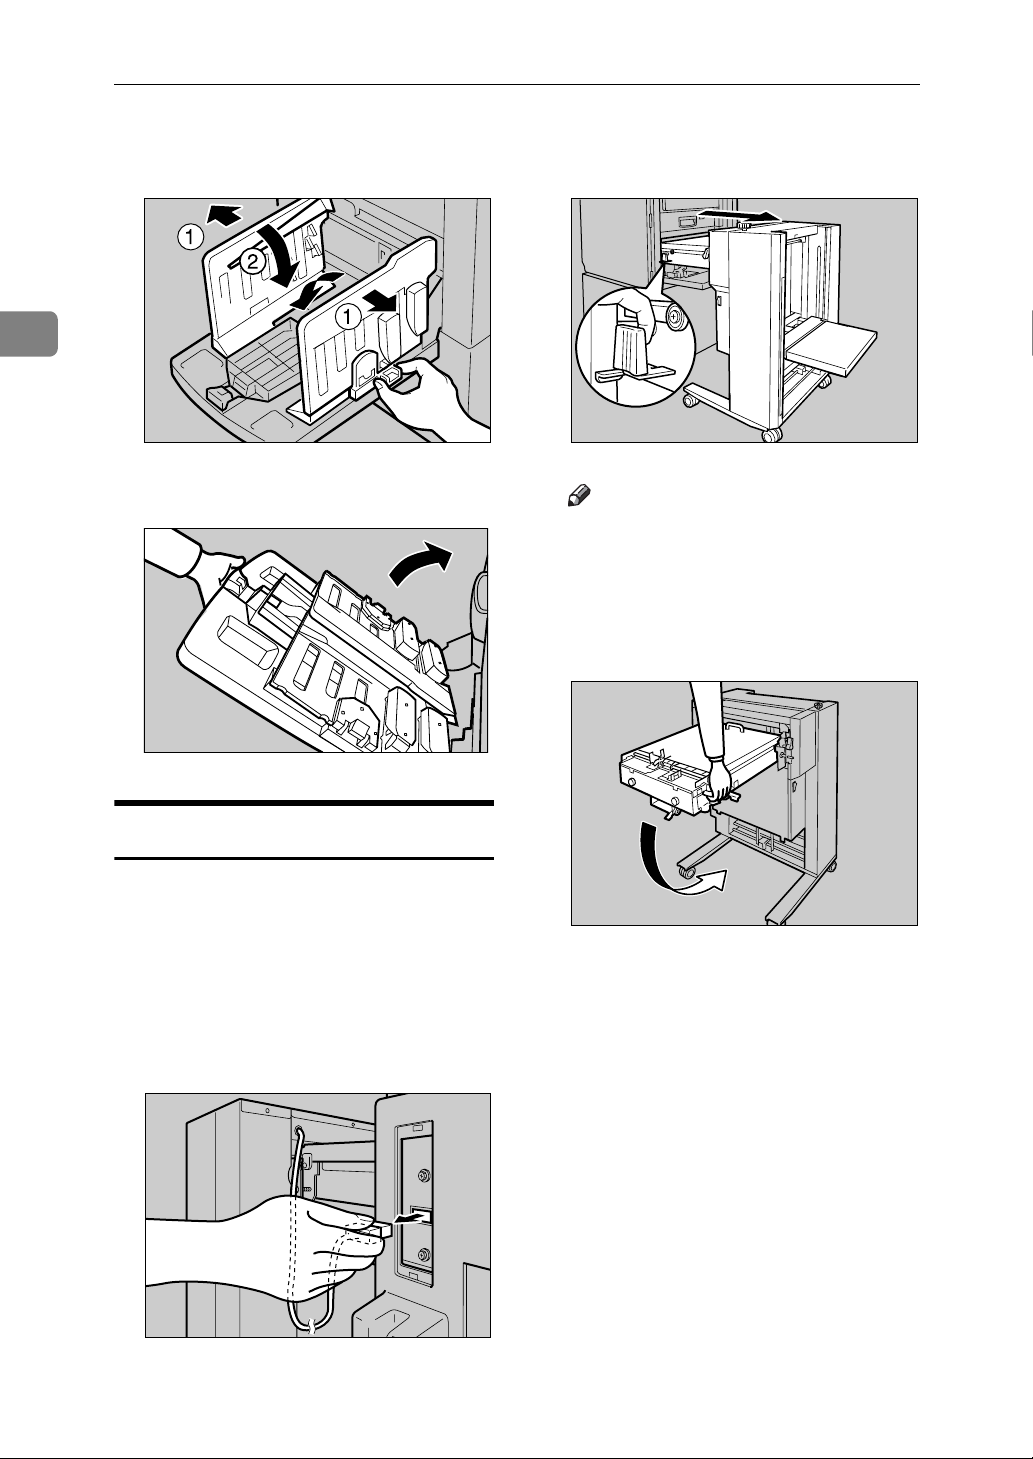
Basics
2
G Move the side plates to the widest
position, and then lower them.
ACY055S
H Close the paper delivery tray.
D While pulling the LCIT release le-
ver, detach the LCIT.
ABQ009S
Note
❒ Be sure to hold the handle of the
intermediate feeding section
when you detach the LCIT.
E Fold the intermediate feeding sec-
tion.
ABL023S
Uninstalling the LCIT
A Turn off the main switch of the
machine, and then turn off the
power switch of the LCIT.
B Unplug the power cord of the
LCIT from the wall outlet.
C Unplug the LCIT optical cable.
ABQ010S
46
ACY067S
Page 59
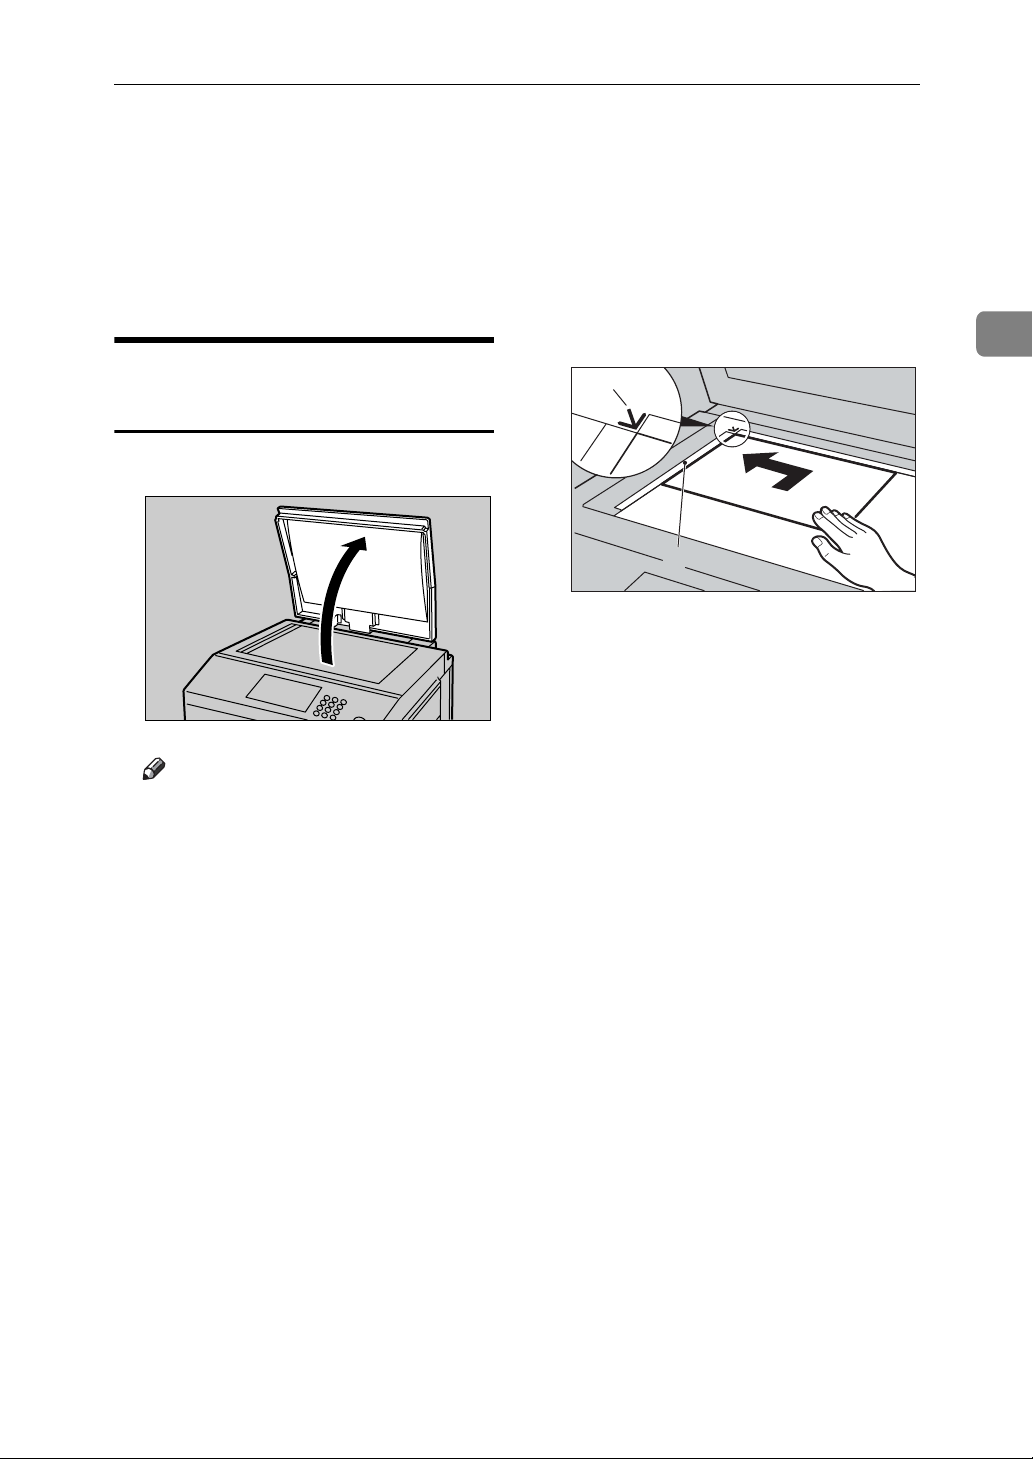
Placing Originals
Placing Originals
When using the exposure glass, place
the originals face down.
When using the ARDF, place the originals face up.
Placing Originals on the Exposure Glass
A Lift the exposure glass cover.
AJK109S
Note
❒ Be sure to lift the exposure glass
cover more than 30 degrees.
❒ When scanning a book or thick
original, the “Auto Erase Original Border” function automatically erases all shadows on the
border. To scan a thick original
without using this function, you
can also erase the border by setting margin size. See p.101 “Auto Erase Original Border”
B Place the original face down on
the exposure glass. The original
should be aligned with the left
scale.
2
1
2
AUY010S
1. Positioning mark
2. Left scale
C Lower the exposure glass cover.
47
Page 60
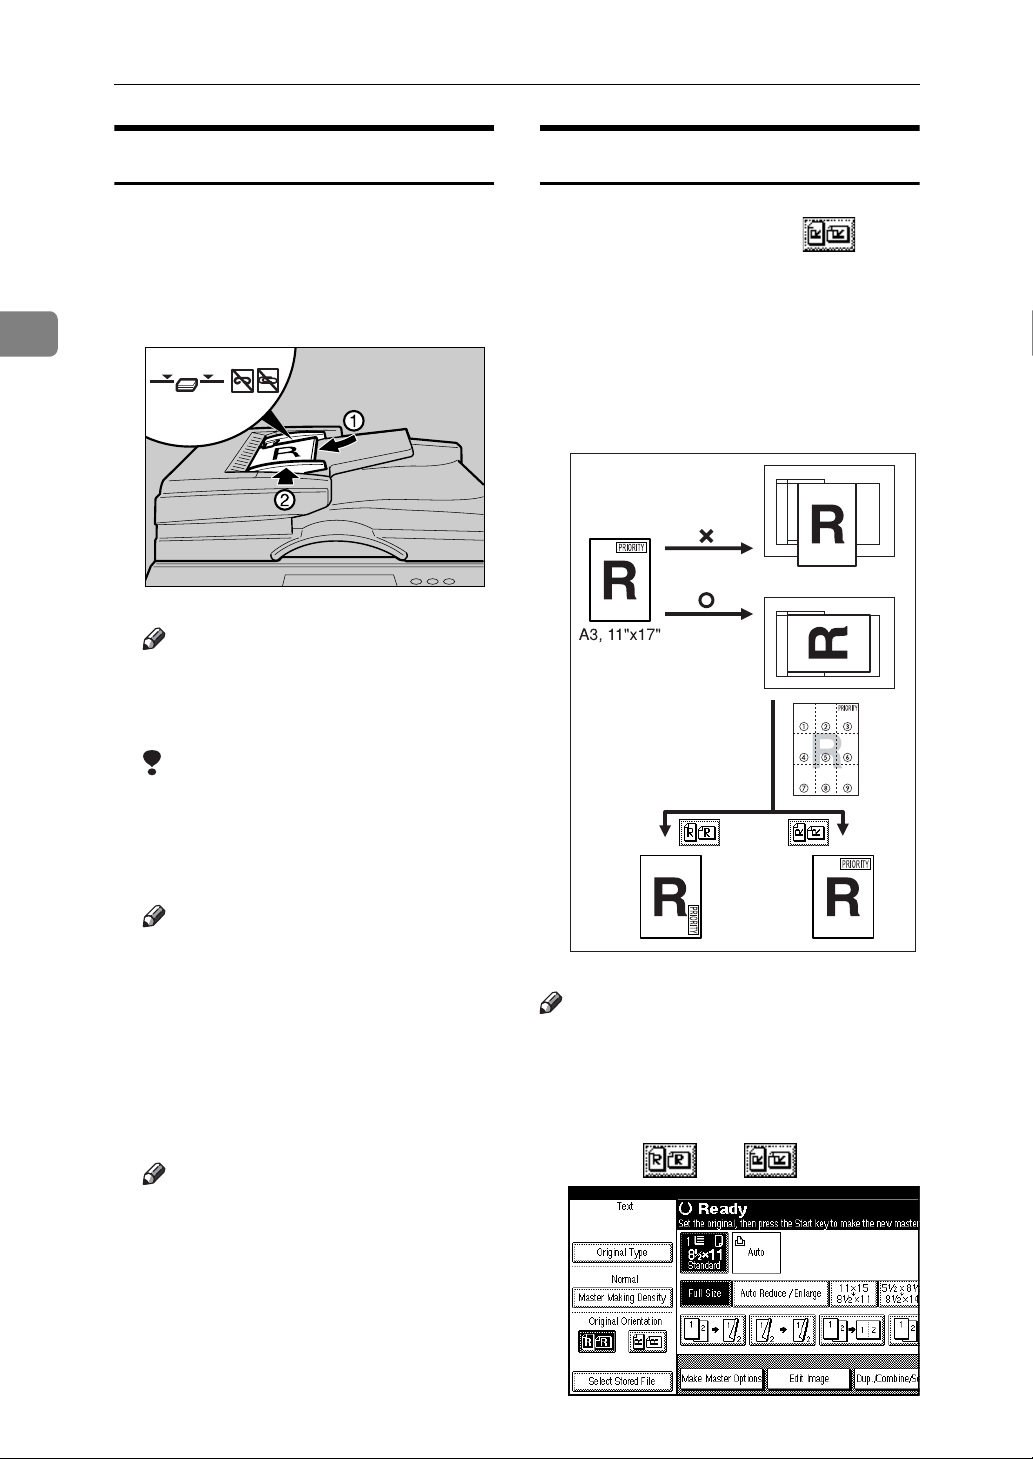
Basics
2
Placing Originals in the ARDF
A Adjust the guide to the original
size.
B Insert the aligned originals face
up into the ARDF.
AUY011S
Note
❒ To avoid originals misfeeding, fan
the originals before placing them
in the ARDF.
Original Orientation
When printing A3K, B4 JISKor 11" ×
17"K size originals, select as the
Original Orientation. The machine will
then rotate the print image by 90°. This
is useful for printing large originals using the Combine, or Stamp functions.
For example, to print A3Kor 11" × 17"K
originals with the Stamp function selected:
Limitation
❒ Approximately 50 originals (80
❒ To avoid jamming, fan the orig-
❒ The guides must fit snugly against
2
g/m
, 20 lb) can be inserted at a
time in the ARDF. The first (top)
original will be fed first.
Note
inals before placing them in the
ARDF.
both sides of the stack.
C Adjust print settings as necessary,
and then press the {Start} key.
Note
❒ If the next original has been
placed in the ARDF before the
machine stops, that original is
fed automatically.
AJK300S
Note
❒ It is recommended that you use the
Original Orientation function with
the Auto Paper Select or Preset Reduce/Enlarge function.
A Select [] or []
48
Page 61
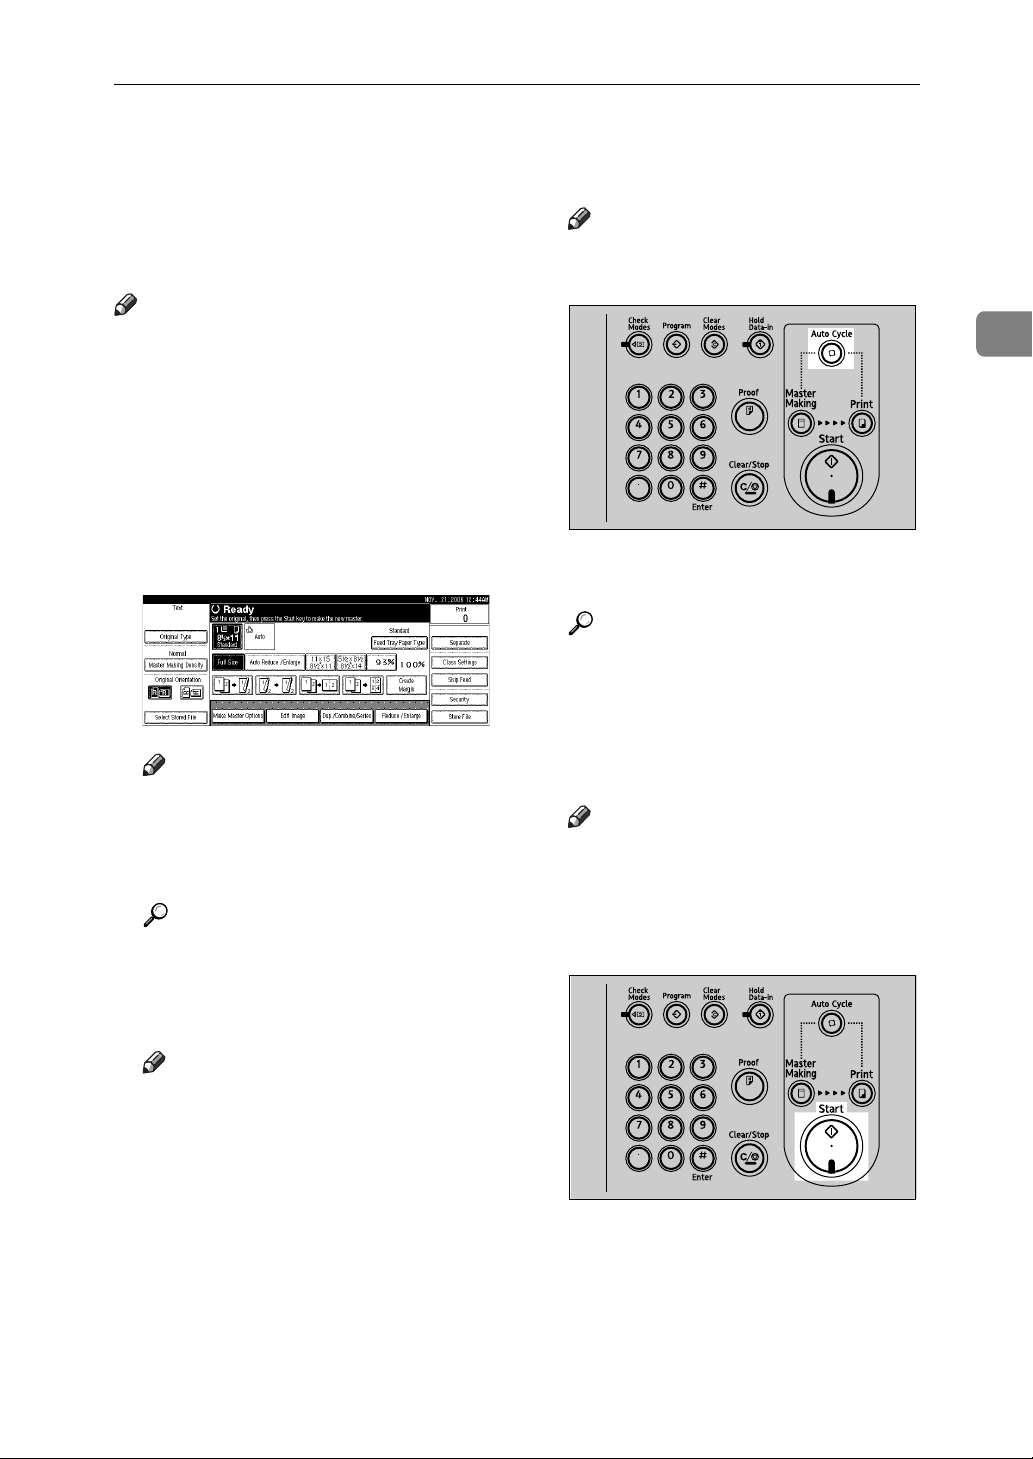
Basic Procedure
Basic Procedure
When Auto Cycle mode is on, you
can process masters and make prints
in a single operation.
Note
❒ The Auto Cycle mode is set to “on”
as default.
❒ For details about step-by-step mas-
ter and print making, see p.54
“Making a Master and Prints”.
A Make sure "d Ready" appears on
the display.
❖ Initial print display
Note
❒ If the machine has user codes
set, enter your user code using
the number keys, and then
press [#].
Reference
p.195 “User Code”
Note
❒ Check the {Auto Cycle} mode se-
lect key is lit.
2
AJK405S
C Place the originals.
Reference
p.47 “Placing Originals”
D Make the necessary settings.
E Enter the required number of
prints using the number keys.
Note
❒ Set a print quantity between 1
(minimum) and 9999 (maximum).
F Press the {Start} key.
B Make sure no previous settings
remain.
Note
❒ If previous settings remain,
press the {Clear Modes} key before entering your settings.
AJK408S
Master making and printing starts.
49
Page 62

Basics
2
-How to operate
❖ To stop the machine during a multi-
print run
Press the {Clear/Stop} key.
❖ To return the machine to the initial
condition after printing
Press the {Clear Modes} key.
❖ When clearing entered values
Press the {Clear/Stop} key or [Clear]
on the display.
❖ To check the settings
Press the {Check Modes} key.
Panel Beeper
The beeper sounds and an error message is displayed if you leave originals on the exposure glass after
printing. See p.185 “Panel Beeper”
Auto Reset
If not used for a certain period of time
after printing, the machine will return
to the initial condition. This function
is called “Auto Reset”.
Note
❒ You can change the time the ma-
chine waits before Auto Reset
starts. See p.185 “System Auto Reset Timer”.
❒ The machine will not enter Auto
Reset in the following cases if:
• a warning message appears
• there is no ink
• originals or paper are jammed
50
• it is making master or printing
• it is printing the second page of
a combined print job
• it is loading original images into
memory
• you are making changes with
User Tools
• there is no paper
•there is no master
• the master delivery box is full
• originals are left in the ARDF
•a cover is open
• you select “Off” for “System Auto
Reset Timer” with User Tools
Page 63

Basic Procedure
Saving Energy
If not used for a certain period of time
after printing, the machine will enter
the Energy Saver or Auto Off mode to
reduce energy consumption.
❖ Energy Saver mode
The display goes off. Printing from
a computer is possible in this
mode.
To operate the machine, press the
Operation switch, or place originals on the exposure glass or in the
ARDF.
To go back into the Energy Saver
mode, press the Operation switch.
❖ Auto Off mode
The machine turns off automatically. To use it, turn the main switch
on.
Note
❒ You can select which mode the ma-
chine enters after a specified period has passed following job
completion. See p.186 “Energy
Saver Option”.
❒ You can change the time the ma-
chine waits before Energy Saver or
Auto Off mode starts. See p.185
“Energy Saver Timer”.
Note
❒ The machine will not automatical-
ly enter the Energy Saver or Auto
Off mode in the following cases if:
• a warning message appears
• there is no ink
• originals or paper are jammed
• it is making master or printing
• it is loading original images into
memory
• there is no paper
•there is no master
• originals are left in the ARDF
•a cover is open
• you are making changes with
User Tools
• the user code entry screen is displayed
• the Data In indicator is lit or blinking
• you are setting the mode on the
control panel
• it is stopping on the online printing mode
• the stored file's screen is displayed
• the overlay mode with selecting
stored file is set.
2
Auto Off Timer
You can set the machine to turn itself
off at a specified time everyday.
Make the timer setting in User Tools.
See p.185 “Auto Off Timer”.
Note
❒ The machine will not automatical-
ly turn itself off if you are using it
at the set time.
51
Page 64
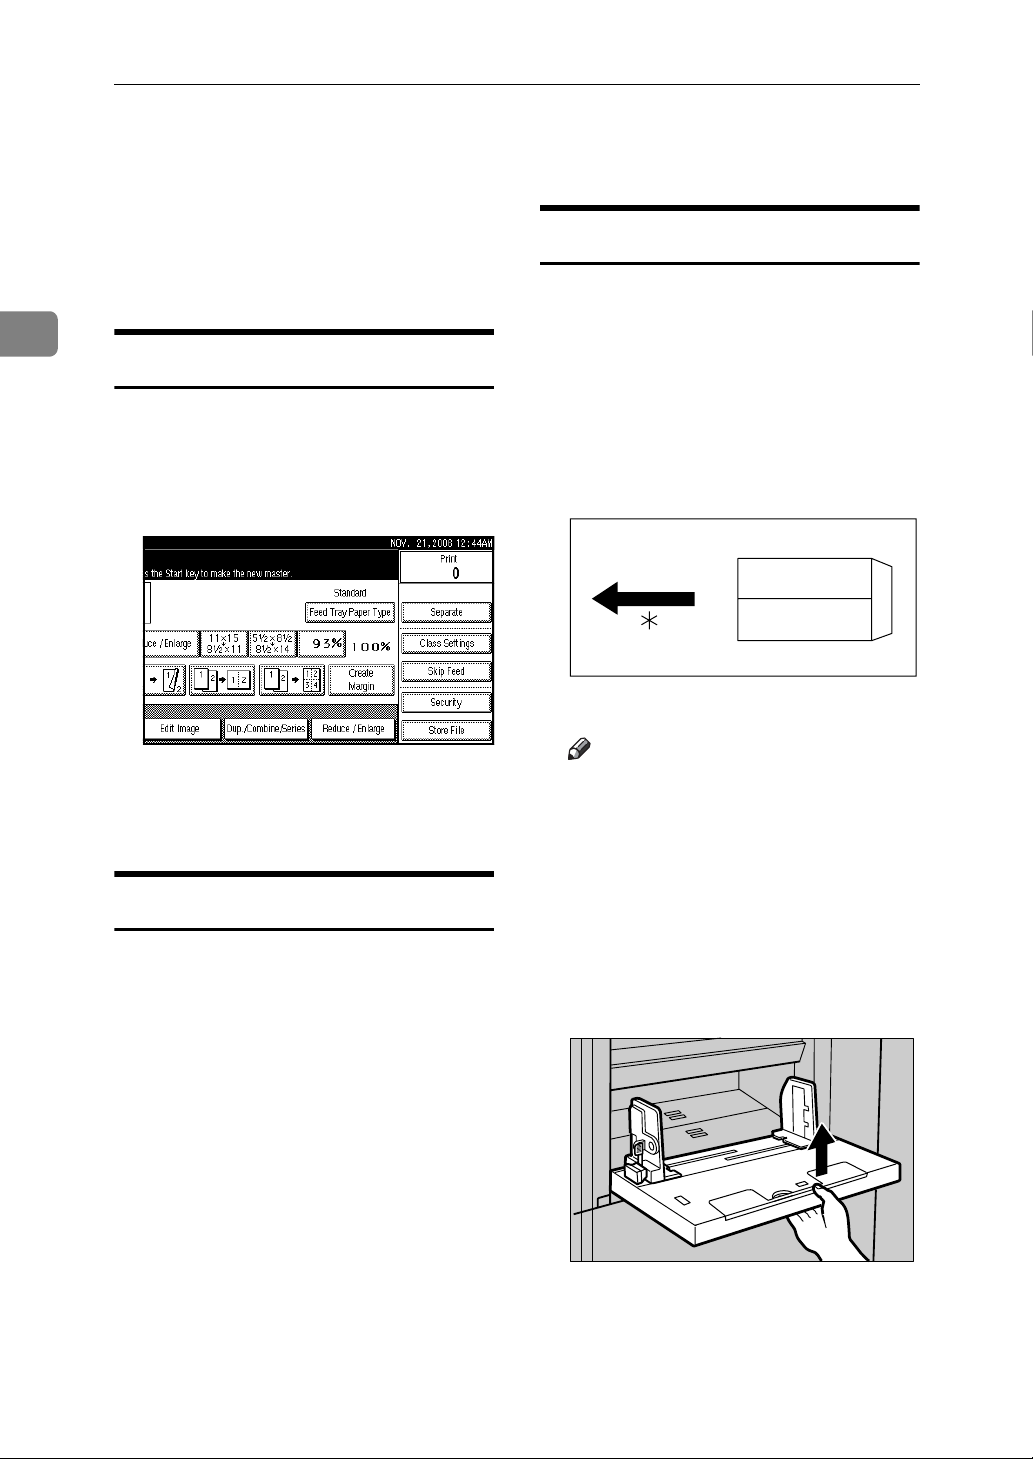
Basics
Printing onto Various Kinds of Paper
Before printing onto thick paper, thin
paper, envelopes or special kinds of
paper loaded in the paper feed tray,
you must select the paper type.
Printing onto Envelopes
A Press [Feed Tray Paper Type].
2
Printing onto Thick Paper
If you wish to print onto thick (128 to
209.3 g/m
paper, perform the following steps.
2
, 34 to 55.6 lb or heavier)
A Press [Feed Tray Paper Type].
B Press [Thick Paper].
C Press [OK].
Printing onto Standard Paper
If you wish to print onto standard
(47.1 to 105 g/m
perform the following steps.
2
, 12.5 to 28 lb) paper,
B Select [Special Paper] .
C Press [OK].
D Place the envelopes in the paper
feed tray as shown in the illustration.
GRENVE0E
* Paper feed direction
Note
❒ When you use envelopes, the
paper feed tray capacity is
about 150 sheets (85 g/m
or enough to load a stack up to
105 mm, 4.1" high.
2
, 22 lb)
E If your envelopes do not feed in
well, lift the paper feed tray a little, and then lower it so that it
slants up slightly.
A Press [Feed Tray Paper Type].
B Make sure that [Standard] is select-
ed.
C Press [OK].
52
ZDZY030E
Page 65

Printing onto Special Paper
Preparation
To use this function, you have to
register the special paper type in
[User 1], or [User 2] with User Tools.
See p.187 “Paper Type: User1–2”.
A Press [Feed Tray Paper Type].
B Select [User 1] or [User 2].
C Press [OK].
Printing onto Various Kinds of Paper
2
53
Page 66
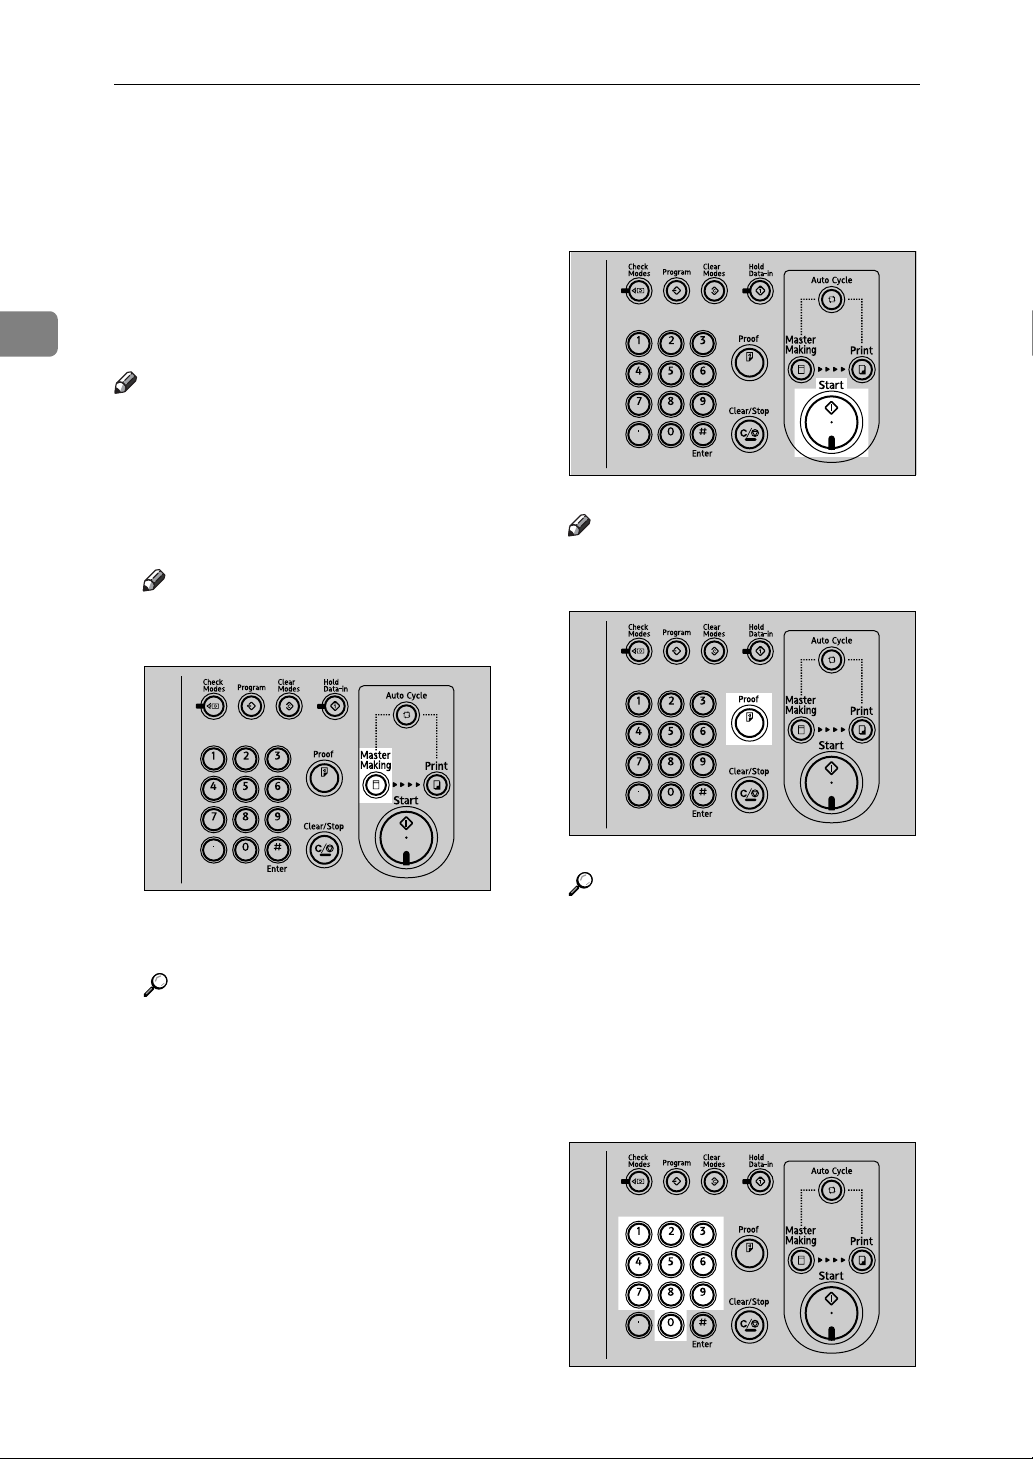
Basics
Making a Master and Prints
2
Using the default settings, you can
process masters and make prints in a
single operation. This is called "Auto
Cycle". You can also make masters
and prints in separate operations. See
the procedure below.
Note
❒ To create masters and make prints
in a single operation, see p.49 “Basic Procedure”.
A Make sure the {Master Making}
mode select key is lit.
Note
❒ If it is not lit, press the {Master
Making} mode select key.
C Press the {Start} key.
AJK408S
Note
❒ Press the {Proof} key to check
the image before making prints.
B Place your originals.
Reference
p.47 “Placing Originals”
54
AJK406S
AJK403S
Reference
To change the image position,
see p.59 “Adjusting the Position
of Printed Images”.
D Make sure the {Print} mode select
key is lit.
E Enter the required number of
prints using the number keys.
AJK402S
Page 67
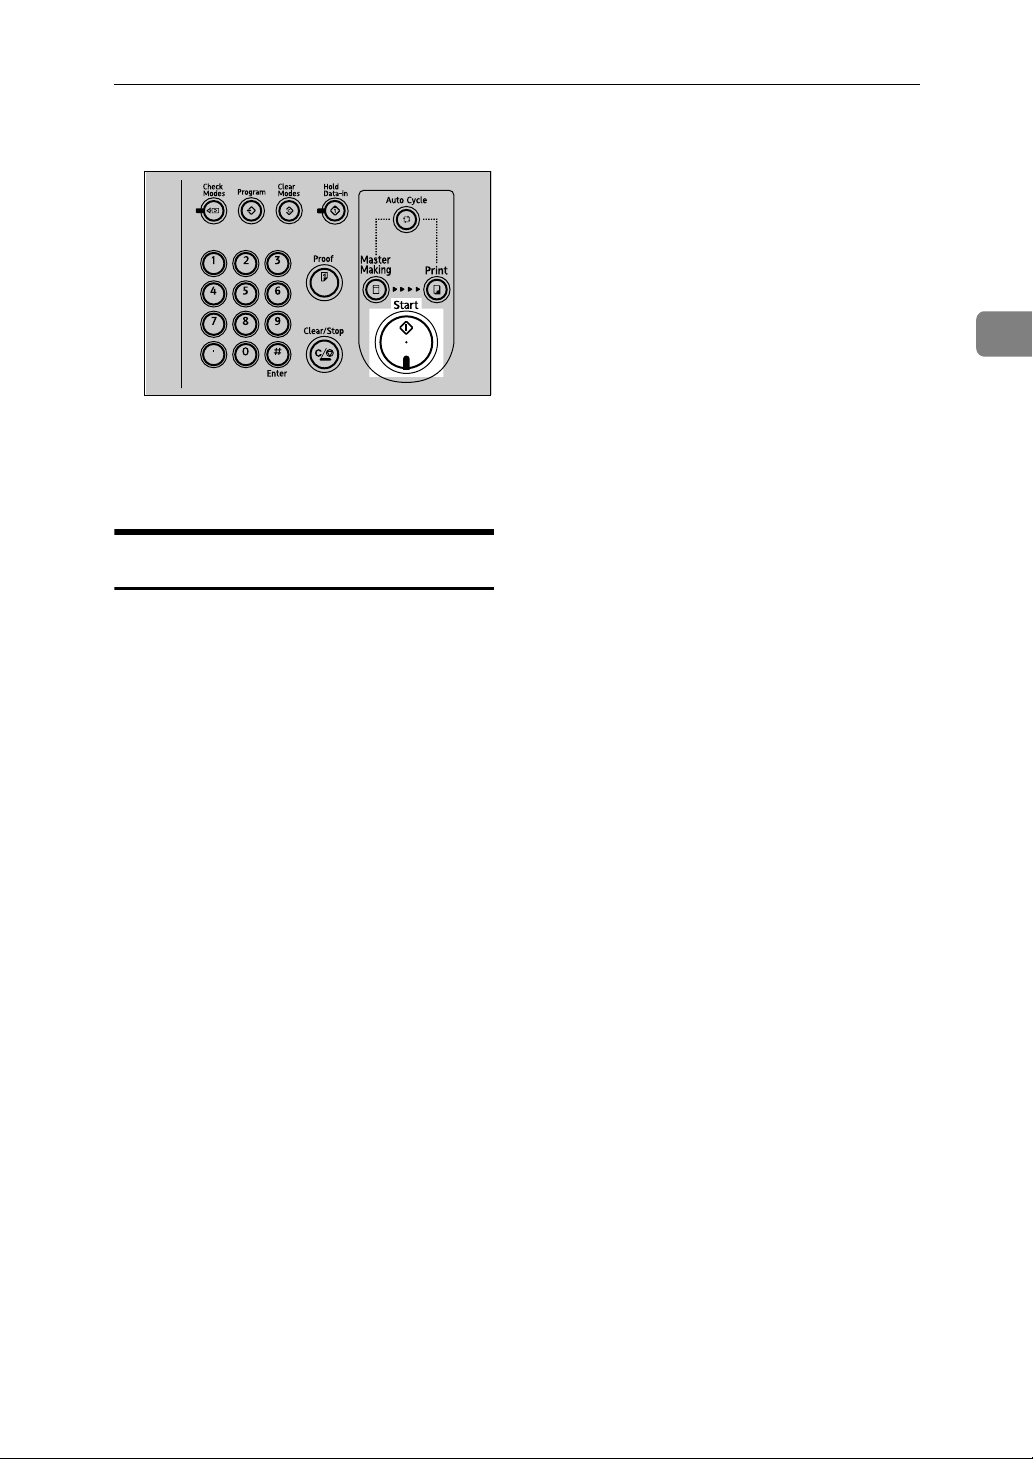
F Press the {Start} key.
AJK408S
When the print job finishes, press
the {Clear Modes} key. Previously
entered job settings are cleared.
Selecting Cycle Setting
When printing from a computer, one
of the four master making and printing cycles listed below can be selected. For details about Cycle Settings,
see Printer Reference.
•Auto Cycle
•Original Page Cycle
Making a Master and Prints
2
•Master Cycle
•Master/Print Cycle
55
Page 68
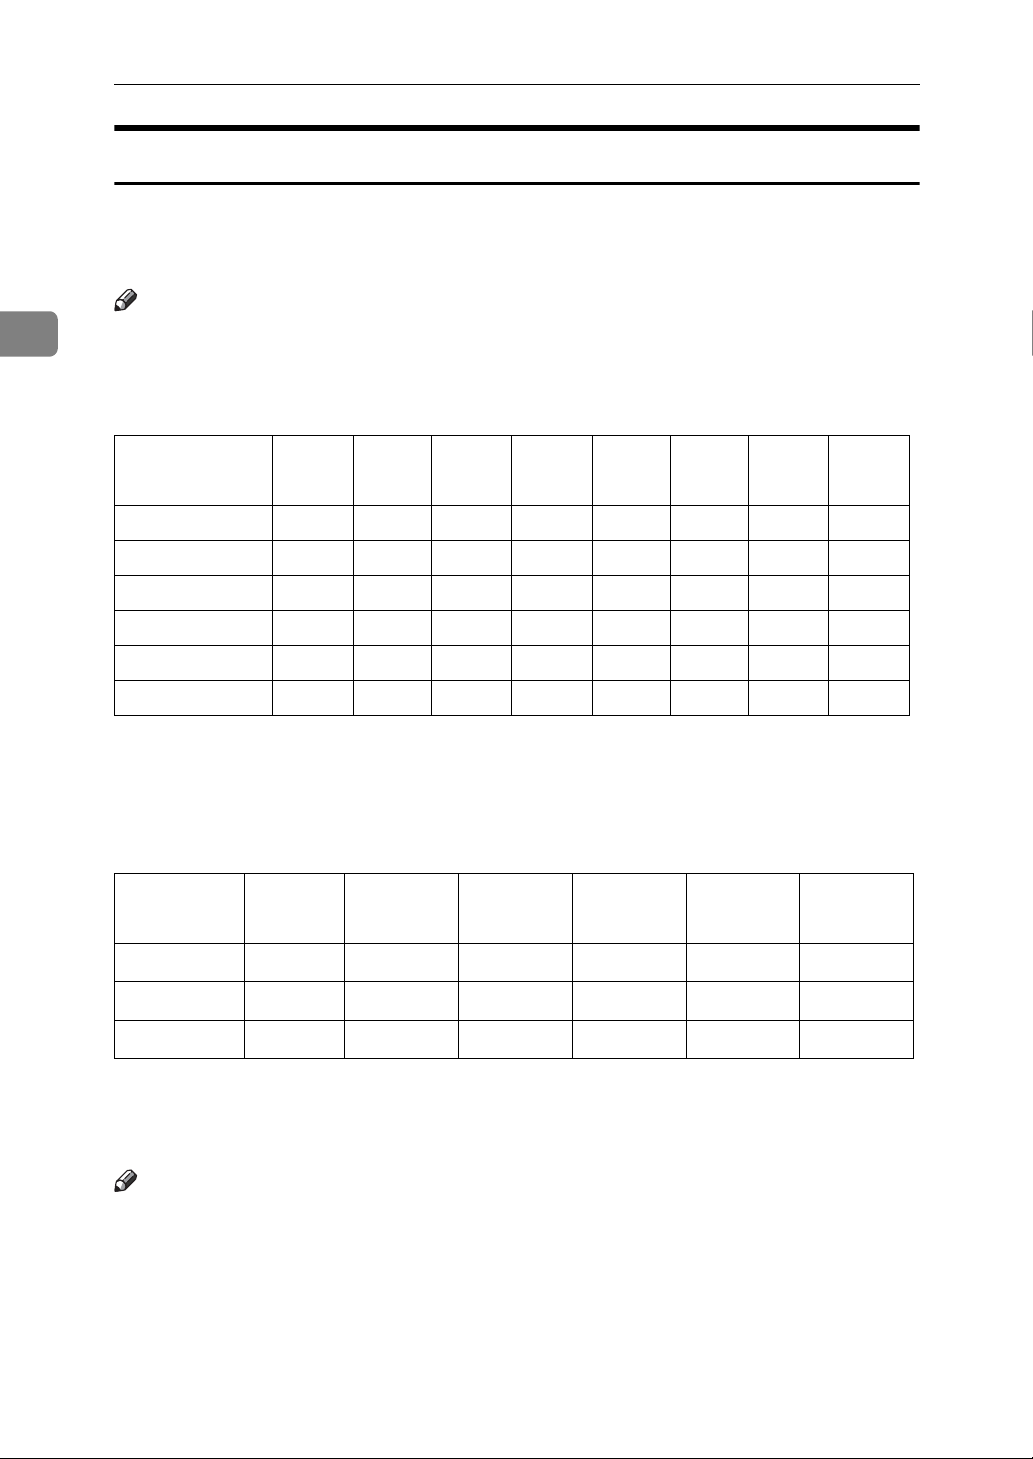
2
Basics
Image Rotation
When your original setting orientation is different from the paper orientation,
the machine automatically rotates the original image by 90° to match the paper
orientation.
Note
❒ The following tables list the combinations that can be used in Image Rotation
mode.
❖ Metric version
Original A3L B4
Paper
A4L -- -- -- ★ -- ★ -- ★
A4K ★★★-- ★ -- ★ --
B5 JISL -- -- -- ★ -- ★ -- ★
B5 JISK ★★★-- ★ -- ★ --
A5L -- -- -- ★ -- ★ -- ★
B6 JISL -- -- -- ★ -- ★ -- ★
JISL
A4L A4K B5
JISL
B5
JISK
A5L✩ A5K✩
★: The machine automatically rotates the original image by 90° to match the pa-
per orientation.
✩: Place these originals in the optional ARDF.
❖ Inch version
Original 11" ×
Paper
1
/2" × 11"L
8
1
8
/2" × 11"K
1
/2" × 81/2"L
5
1
/2" ×
8
17"L
-- -- -- ★ -- ★
★★ ★ -- ★ --
-- -- -- ★ -- ★
14"L
81/2" ×
11"L
81/2" ×
11"K
51/2" ×
1
/2"L✩
8
1
5
/2" × 81/2"
K✩
★: The machine automatically rotates the original image by 90° to match the pa-
per orientation.
✩: Place these originals in the optional ARDF.
Note
❒ If you use Zoom mode, custom size originals or paper, the image will not be
rotated.
❒ It takes longer than usual to make masters in Image Rotation mode.
❒ You can cancel Image Rotation mode with User Tools. See p.194 “Auto Rota-
tion”.
56
Page 69
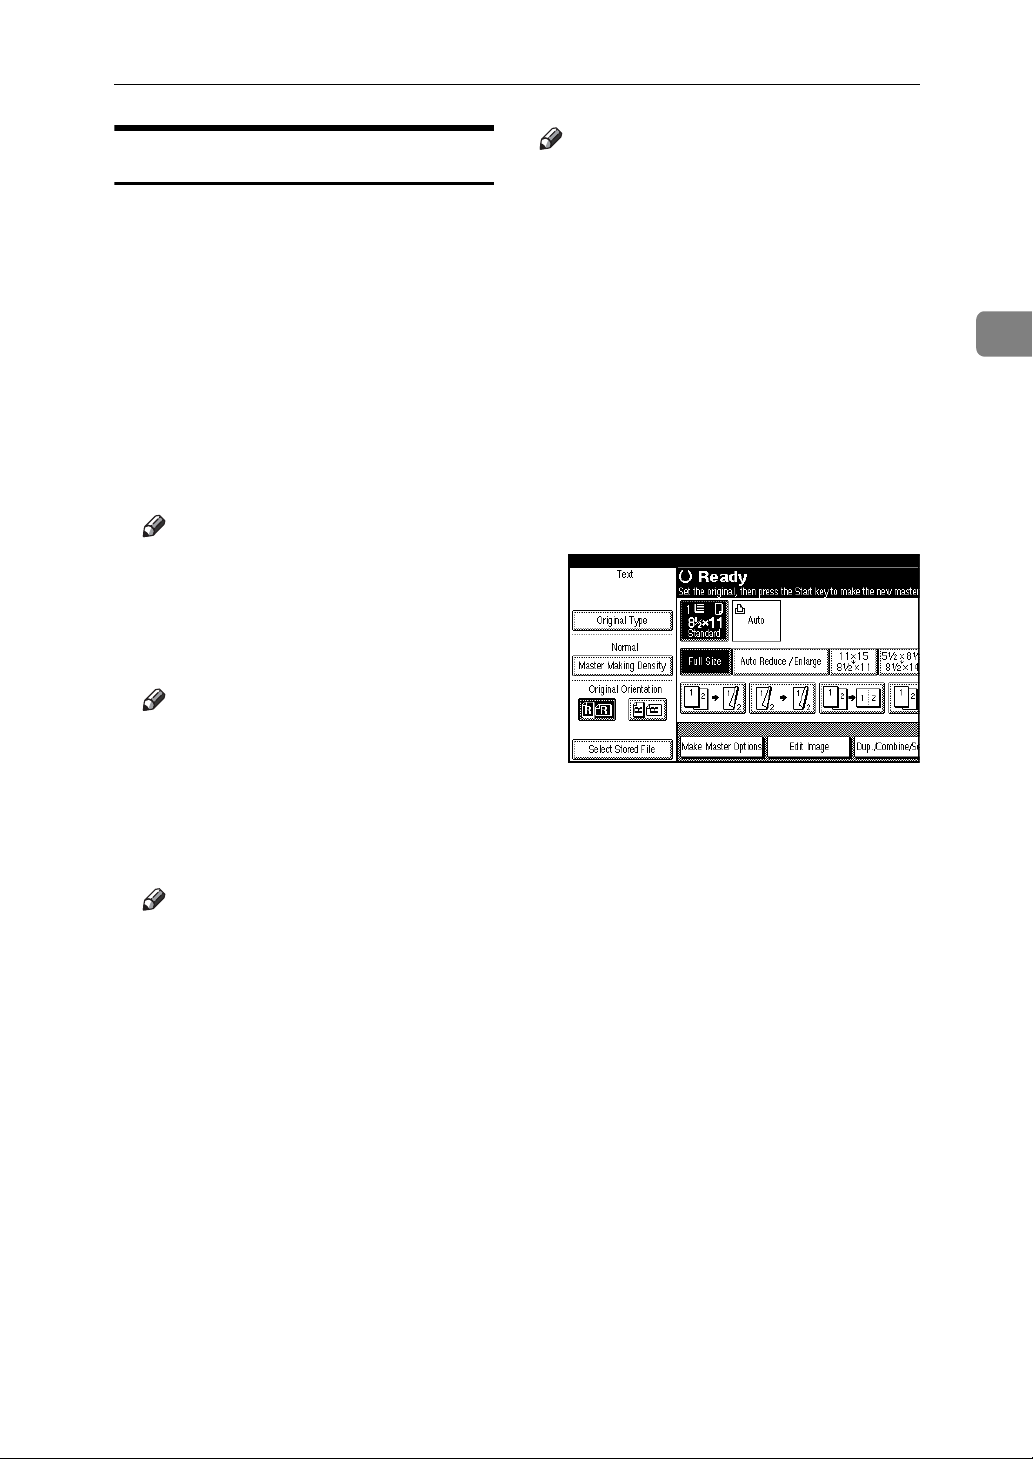
Making a Master and Prints
Selecting Original Type
The following can be selected as the
original document type.
❖ Text
Specify this if the original document consists primarily of text.
❖ Text/Photo
If the original document contains a
combination of text and photographs, it is printed using the optimum image balance.
Note
❒ Contrast can be selected.
❖ Photo
Specify this for photographs, pictures, or coloured documents.
Note
❒ Contrast and screen can be select-
ed.
Note
❒ Masters are normally produced
using [Text].
❒ If [Photo] is selected for original
documents that contain both text
and photographs, text may appear
too light. If this is the case, select
[Text / Photo] .
❒ Black ink printed using [Pale] can
produce a grayish colour.
❒ Coloured ink printed using [Pale]
can produce pale colours for background images.
A Press [Original Type].
2
❖ Pencil
Specify this for originals drawn/written in pencil.
Note
❒ Set documents drawn/written
in pencil on the exposure glass.
❖ Pale
When printing pale colours, the
master is created using pale colour
print.
57
Page 70
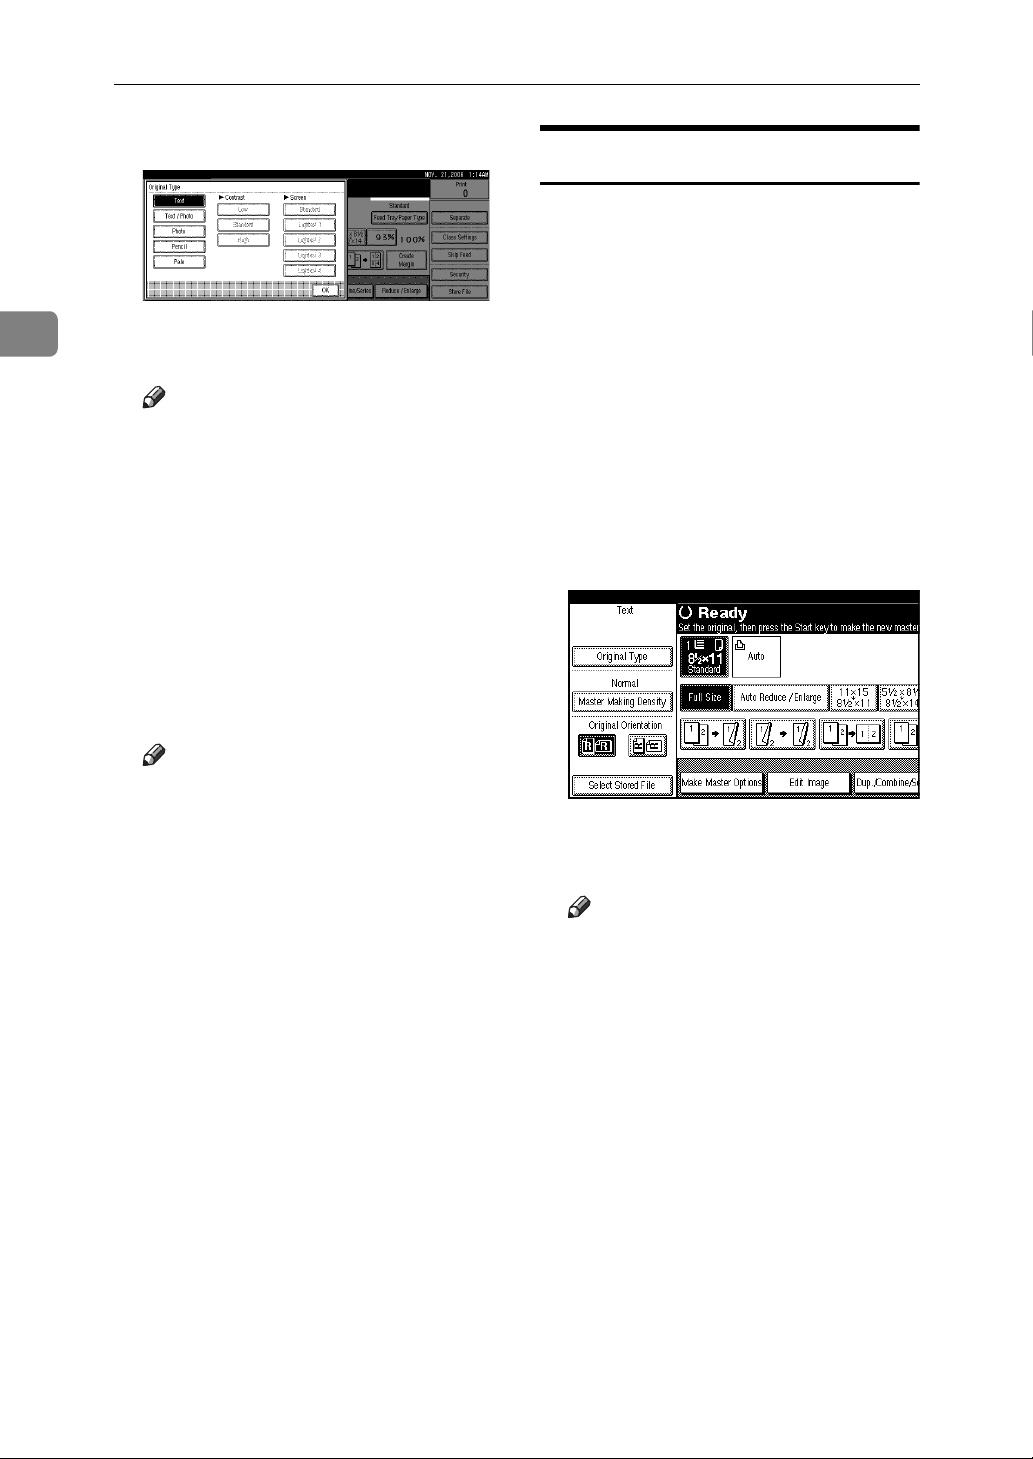
Basics
2
B Select the type of original.
Adjust the contrast in the [Text /
Photo]and [Photo] modes.
Note
❒ Contrast adjustment is effective
only if the [Text / Photo] or [Pho-
to] mode is selected.
• Selecting [High] increases the
sharpness of the image outline.
• Selecting [Low] increases the
smoothness of the image outline.
Adjust the screen in the [Photo]
modes.
Master Making Density
You can adjust the print image density before making a master in the following cases.
• When printing from faint originals, set the image density darker.
• When printing from originals that
have many fine lines, set the image
density darker.
• When printing from originals that
have many bold lines or blurred
letters, set the image density lighter.
A Press [Master Making Density].
Note
❒ Screen adjustment is effective
only if the [Photo] mode is selected.
❒ Screen can be selected in five
levels, [Standard], [Lightest 1],
[Lightest 2], [Lightest 3]and [Light-
est 4].
C Press [OK].
B Select the density, and then press
[OK].
Note
❒ Density can be selected in four
levels, [Light], [Normal], [Dark]
and [Very Dark].
❒ To darken the density, select
[Dark] or [Very Dark], and to lighten the density, select [Light].
58
Page 71
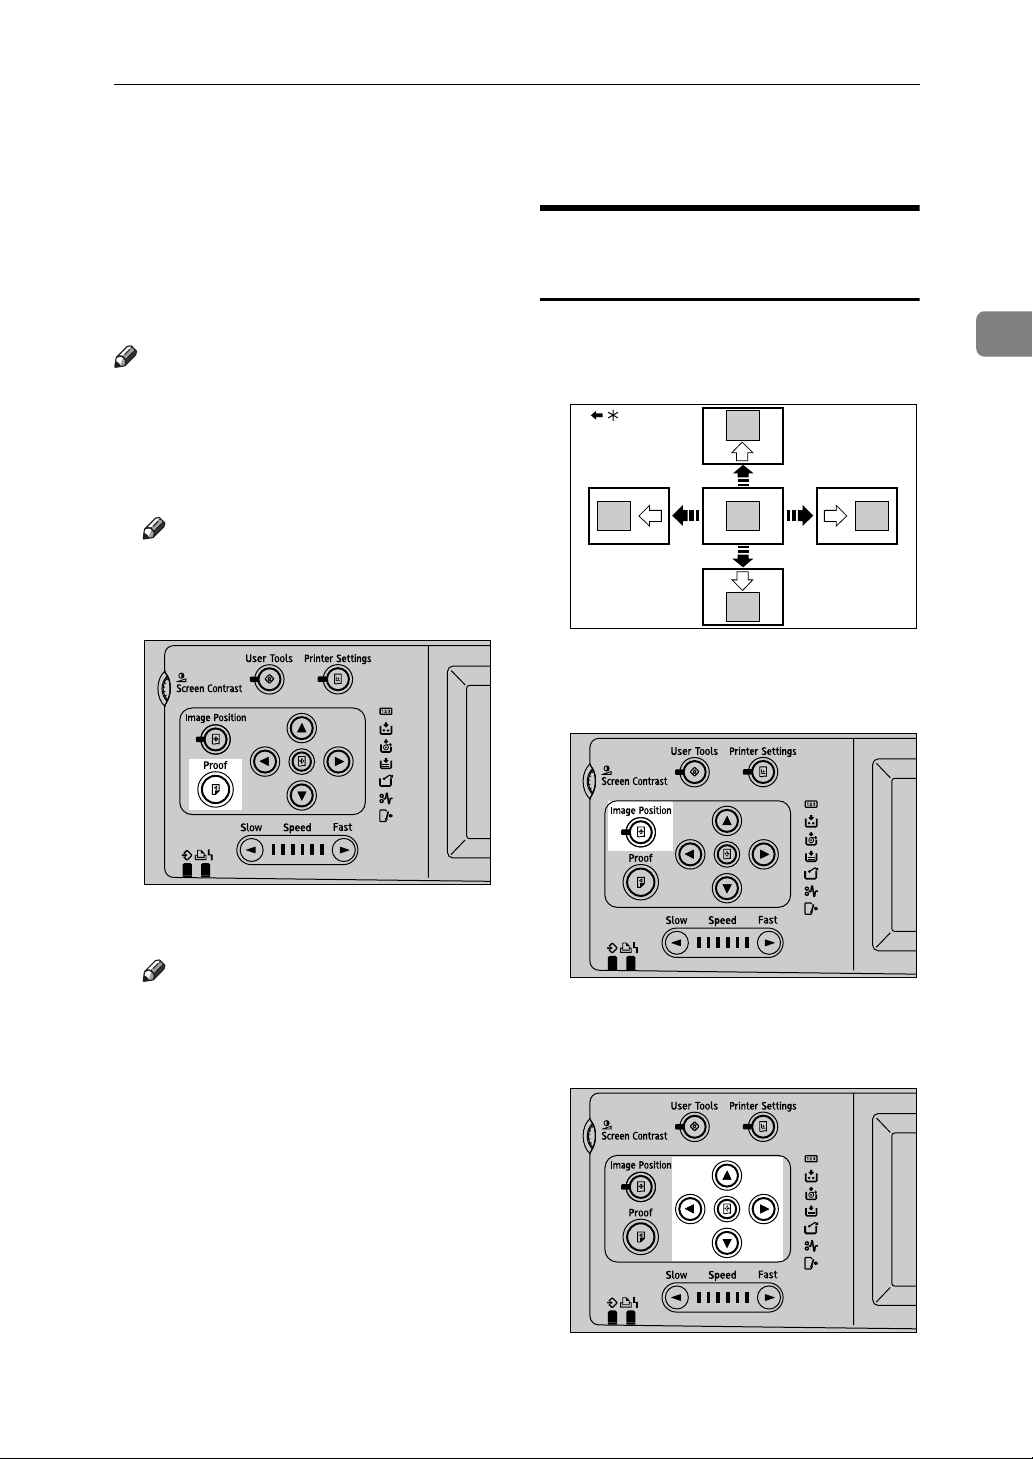
Sample Print and Adjustment
Once the master making has been
completed, it is possible to confirm
the print finish before pressing the
{Print} mode select key to start the
printing process.
Note
❒ After completing the master mak-
ing, it is only possible to adjust the
print position and speed
A Press the {Proof} key.
Note
❒ You can also use the {Proof} key
arranged in the right part of the
control panel.
Adjusting the Position of Printed Images
Use the following procedure to adjust
the position of print images as required.
Sample Print and Adjustment
2
GRPOSI0E
AUX204S
A single printed page is ejected.
Note
❒ Press the key continuously to
eject printed pages in succession.
❒ A sample print in duplex print
mode prints at printing speed 1.
* Paper feed direction
A Press {Image position}.
AUX203S
B Adjust image position using the
{T}, {U}, {V}, and {W} keys.
AUX205S
59
Page 72

Basics
2
Note
❒ When you shift the image for-
ward, leave a 10 mm, 0.4" margin at the leading edge. If there
is no margin, paper might wrap
around the drum and cause a
misfeed.
❒ One push of either scroll key
shifts the image position by 0.25
mm, 0.01".
❒ The {T} and {U} keys shift the
image vertically by 10 mm, 0.4"
per press up or down for both
one- and two-sided printing. In
two-sided print mode, margins
at the top and bottom of the paper apply equally to both front
and back. However, margins on
the right and left side of the paper can be set individually.
❒ The {V} and {W} keys shift the
image laterally by 15 mm, 0.6"
per press right and left for onesided printing, or 2.5 mm, 0.1"
in either direction for two-sided
printing.
❒ When you reset to the default
position, press the {Initial posi-
tion} key.
Changing the Printing Speed
Use the {W} or {V} key to adjust the
printing speed. The relationship between printing speed and print quality depends on the type of paper you
use.
Limitation
❒ When printing on paper longer than
364 mm or 14.4", the maximum print
speed is 120 sheets/minute.
❒ When selecting thick paper or spe-
cial paper on “Feed Tray Paper
Type”, the maximum print speed
is 120 sheets/minute.
❒ When selecting duplex mode, the
maximum print speed is 120
sheets/minute.
❒ When duplex printing, the last page
prints at printing speed 1 regardless of the printing speed setting.
C Press [Exit].
D Press the {Proof} key to check the
image position.
60
Page 73
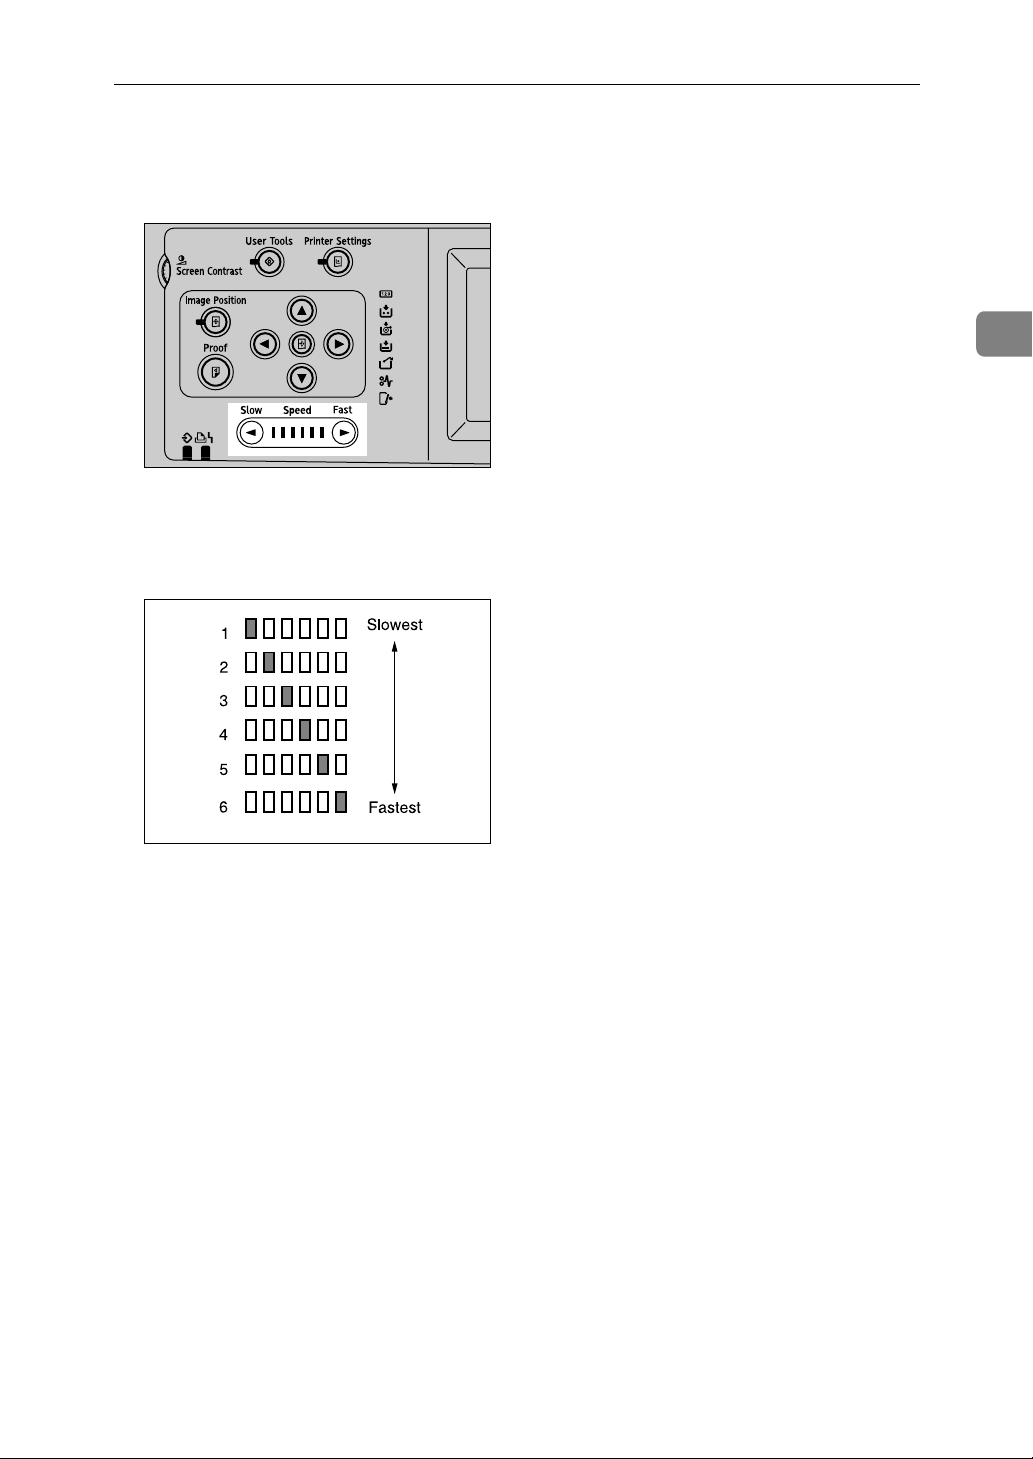
A Press the {V} key to increase the
speed, or the {W} key to reduce
the speed.
AUX206S
The printing speed changes in six
increments as follows:
Sample Print and Adjustment
2
1. 60 sheets/minute
2. 75 sheets/minute
3. 90 sheets/minute
4. 105 sheets/minute
5. 120 sheets/minute
6. 135 sheets/minute
AJK142S
61
Page 74

2
Basics
62
Page 75
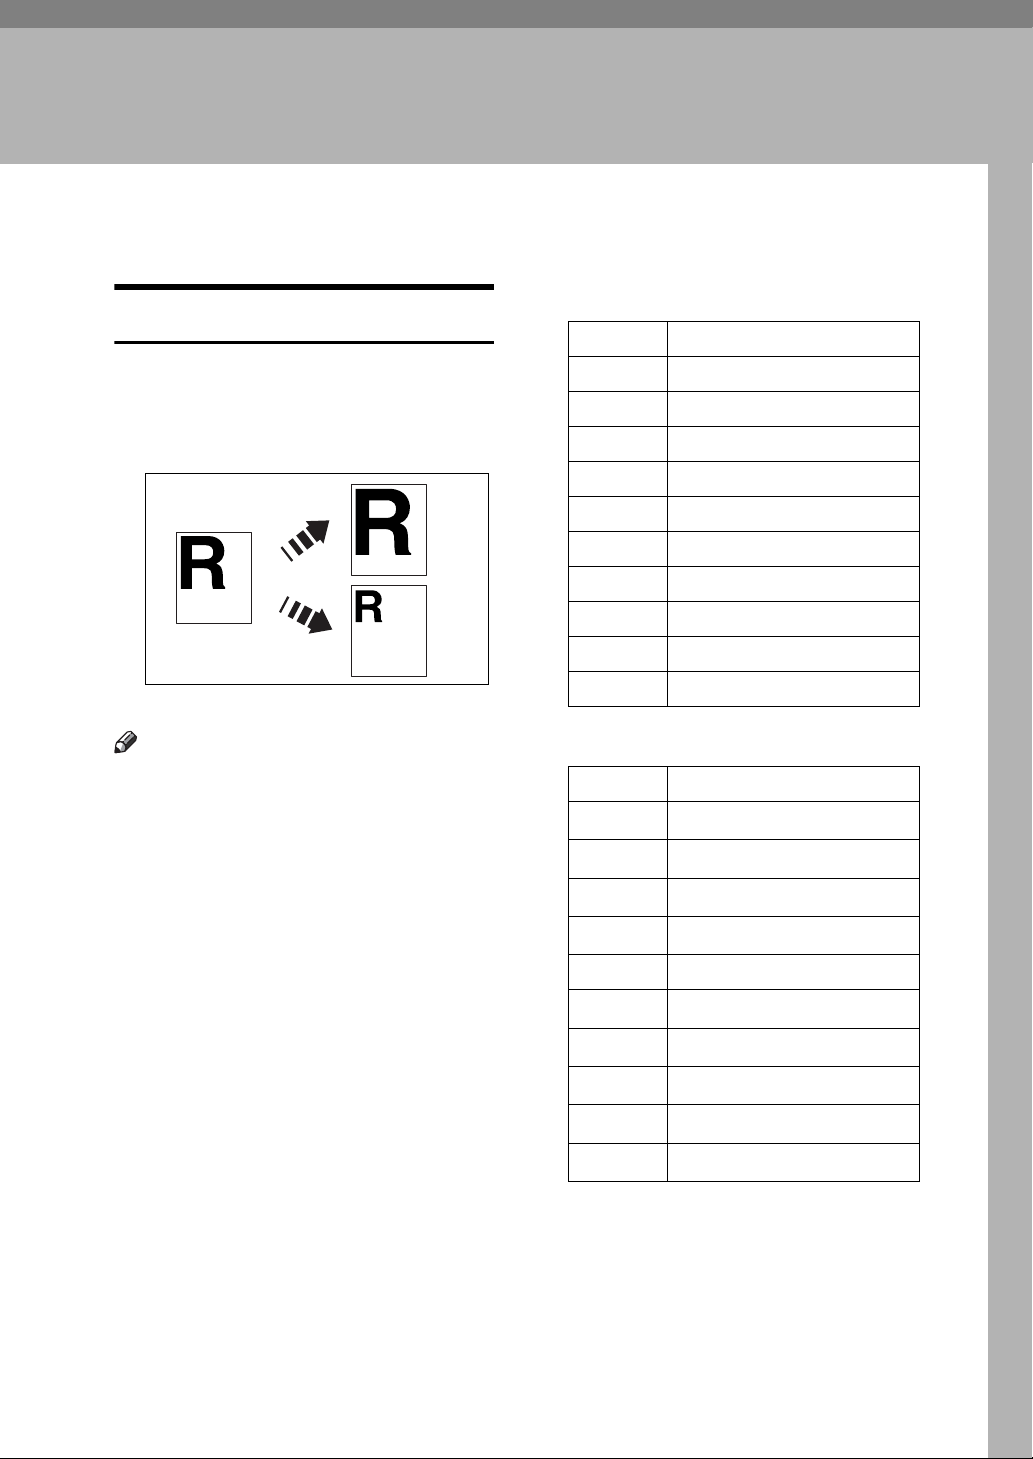
3. Printing Functions
Printing Functions
Preset Reduce/Enlarge
Use this function to reduce or enlarge
originals by a preset ratio. A total of 9
ratios are available (3 enlargement ratios, 6 reduction ratios).
❖ Metric version
Ratio (%) Original → Print paper size
200 A5 → A3, B6 JIS → B4 JIS
141 A4 → A3, A5 → A4
122 A4 → B4 JIS, A5 → B5 JIS
115 B4 JIS → A3, B5 JIS → A4
93 —
87 A3 → B4 JIS, A4 → B5 JIS
82 B4 JIS → A4, B5 JIS → A5
71 A3 → A4, B4 JIS → B5 JIS,
61 A3 → B5 JIS, A4 → B6 JIS
AUX003S
Note
❒ You can select a ratio regardless of
the size of an original or printing
paper. With some ratios, parts of
the image might not be printed or
margins will appear on prints.
❒ You can change the preset repro-
duction ratios with User Tools. See
p.190 “Reproduction Ratio”.
❒ Prints can be reduced or enlarged
as follows:
50 A3 → A5, B4 JIS → B6 JIS
❖ Inch version
Ratio (%) Original → Print paper size
200
155
129
121
93 —
85
77
74
65
50
1
/2" × 8 1/2" → 11" × 17"
5
1
/2" × 8 1/2" → 8 1/2" × 14"
5
1
8
/2" × 11" → 11" × 17"
1
/2" × 14" → 11" × 17"
8
1
/2" × 11"
F → 8
1
/2" × 14" → 8 1/2" × 11"
8
11" × 15" → 8
11" × 17" → 8
11" × 17" → 5
1
/2" × 11"
1
/2" × 11"
1
/2" × 8 1/2"
63
Page 76
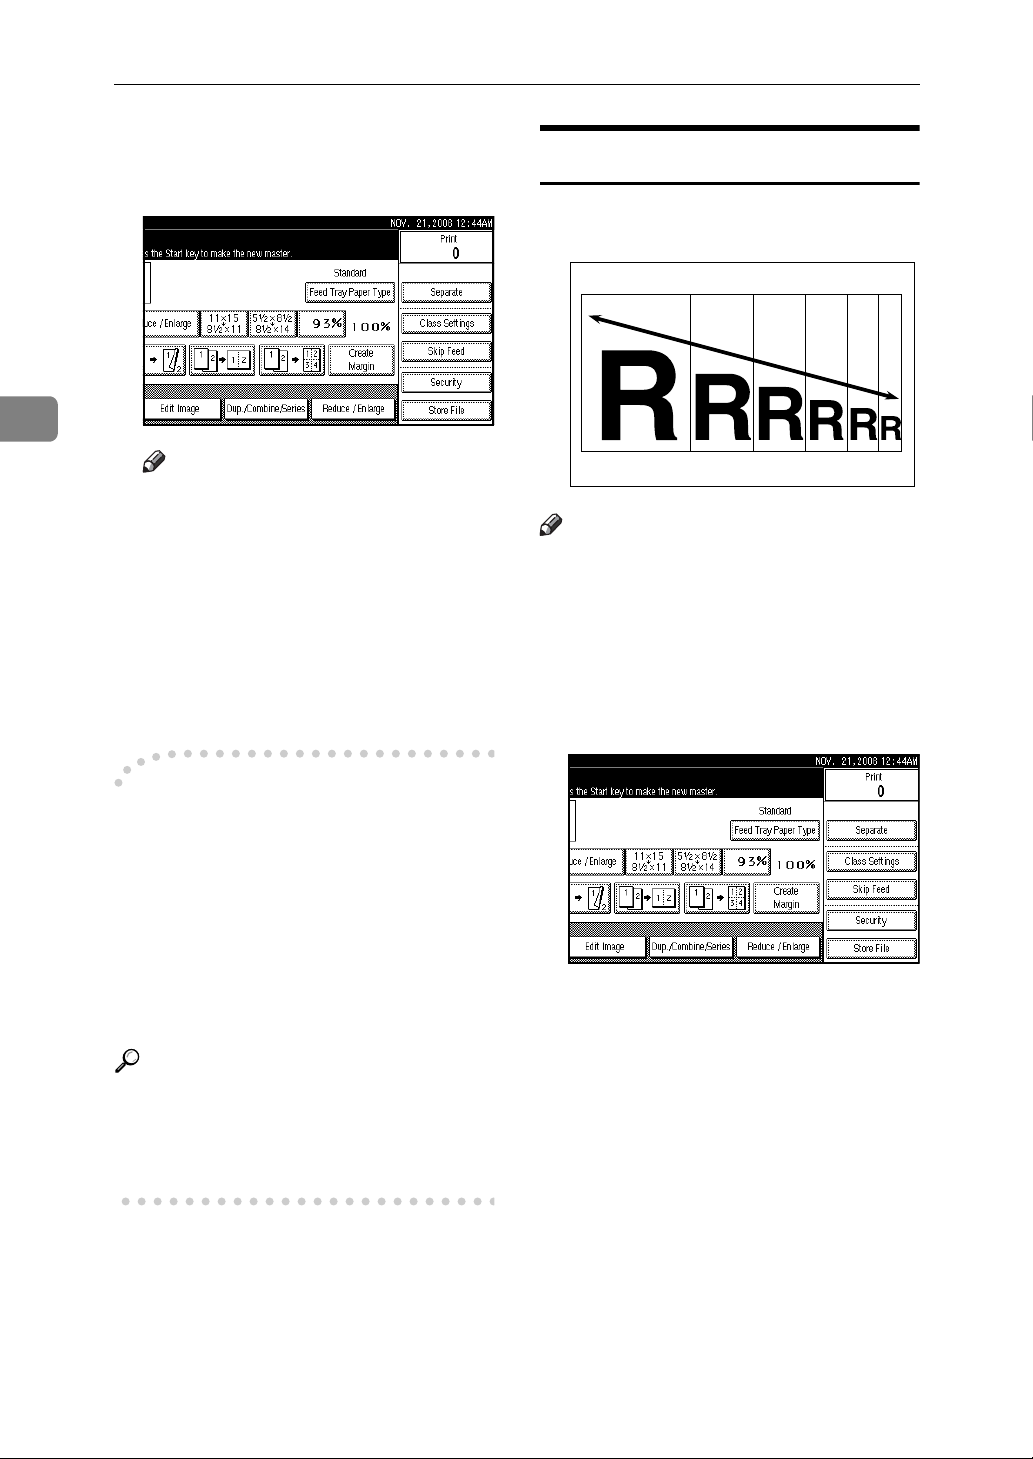
Printing Functions
3
A Place the originals.
B Press [Reduce / Enlarge].
Note
❒ To select a preset ratio on the
initial display, press the shortcut Reduce/Enlarge key, and
then proceed to step
.
E
C Press [Enlarge] or [Reduce].
D Select a ratio, and then press [OK].
E Press the {Start} key.
Zoom
You can change the reproduction ratio in increments of 1%.
Note
❒ You can select a preset ratio close
to the ratio using [Reduce] or [En-
large], and then adjust it further,
using [n] or [o].
A Place the originals.
B Press [Reduce / Enlarge].
-Create margin mode
Use Create Margin to reduce the image to 93% of its original size with the
center as reference. You can assign
this function to a shortcut key on the
initial display. By combining it with
the Reduce / Enlarge function, you
can also provide the Reduce / Enlarge print with a margin.
Reference
Related initial settings
p.191 “Ratio for Create Margin”
p.194 “Function Key:F1–5”
64
Page 77

C Enter the ratio.
To select the ratio using [n] and
[o]
A Select a preset ratio close to the
ratio using [Reduce] or [Enlarge].
B Adjust the ratio further, using
[n] or [o].
Printing Functions
Note
❒ Pressing [n] or [o] changes
the ratio in increments of 1%.
Pressing and holding down
[n] or [o] changes it in increments of 10%.
❒ If you have incorrectly en-
tered the ratio, readjust it using [n] or [o].
To enter the ratio using the
number keys
A Press [Mag. Ratio].
B Enter the ratio using the num-
ber keys.
C Press [#].
D Press [OK].
D Press the {Start} key.
3
65
Page 78
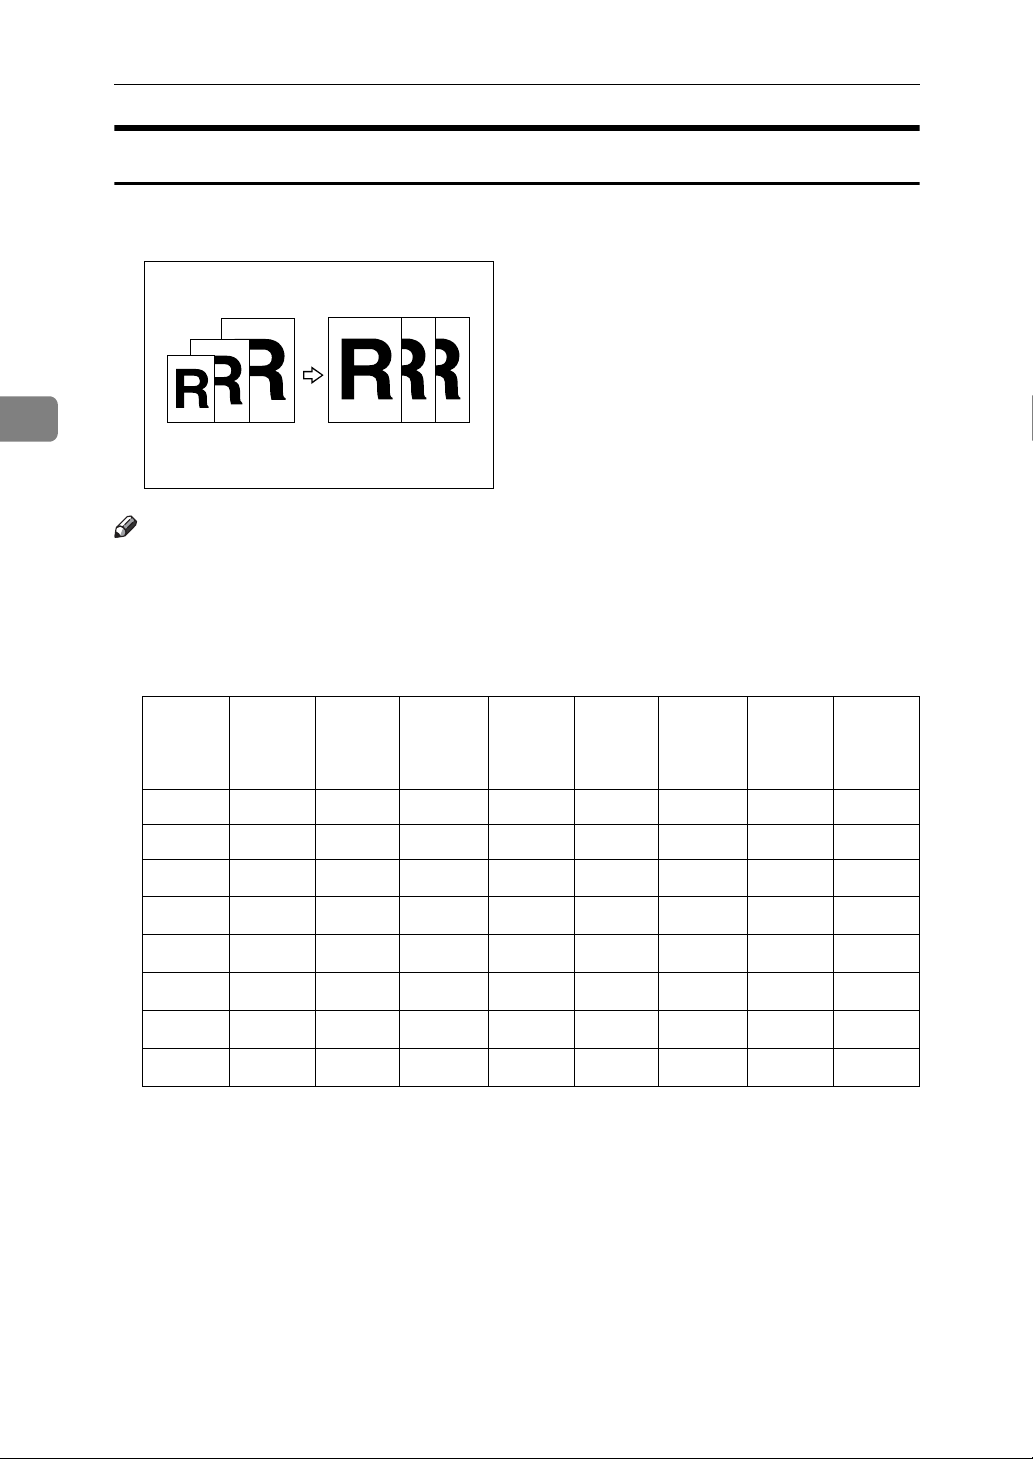
3
Printing Functions
Auto Reduce/Enlarge
The machine can choose an appropriate reproduction ratio based on the paper
and original sizes you select.
Note
❒ The range of ratios you can select are 50 – 200%.
❒ The table below shows the reproduction ratios that can be selected for various
combinations of original and paper size.
❖ Metric version
Origi-
A3L B4
nal
JISL
A4L A4K B5
JISL
B5
JISK
Paper
A3L 100% 115% 141% -- 163% -- 200% --
B4 JISL 87% 100% 122% -- 141% -- 173% --
*1
A4L 71% 82% 100%
A4K
71%
*1
82%
*1
100%
B5 JISL 61% 71% 87%
B5 JISK
61%
*1
71%
*1
87%
A5L 50% 50% 71%
B6 JISL -- 50% 61%
*1
The machine automatically rotates the original image by 90° to match the paper
100%
*1
100%
87%
*1
87%
71%
61%
115%
*1
115%
*1
100%
*1
100%
*1
82%
*1
71%
115%
115%
100%
100%
82%
71%
*1
*1
*1
*1
direction and selects an appropriate reproduction ratio. See p.56 “Image Rotation”.
*2
Place these originals in the optional ARDF.
A5L
141%
141%
122%
122%
100%
87%
*2
A5K
141%
*1
141%
122%
*1
122%
100%
87%
*2
*1
*1
*1
*1
66
Page 79
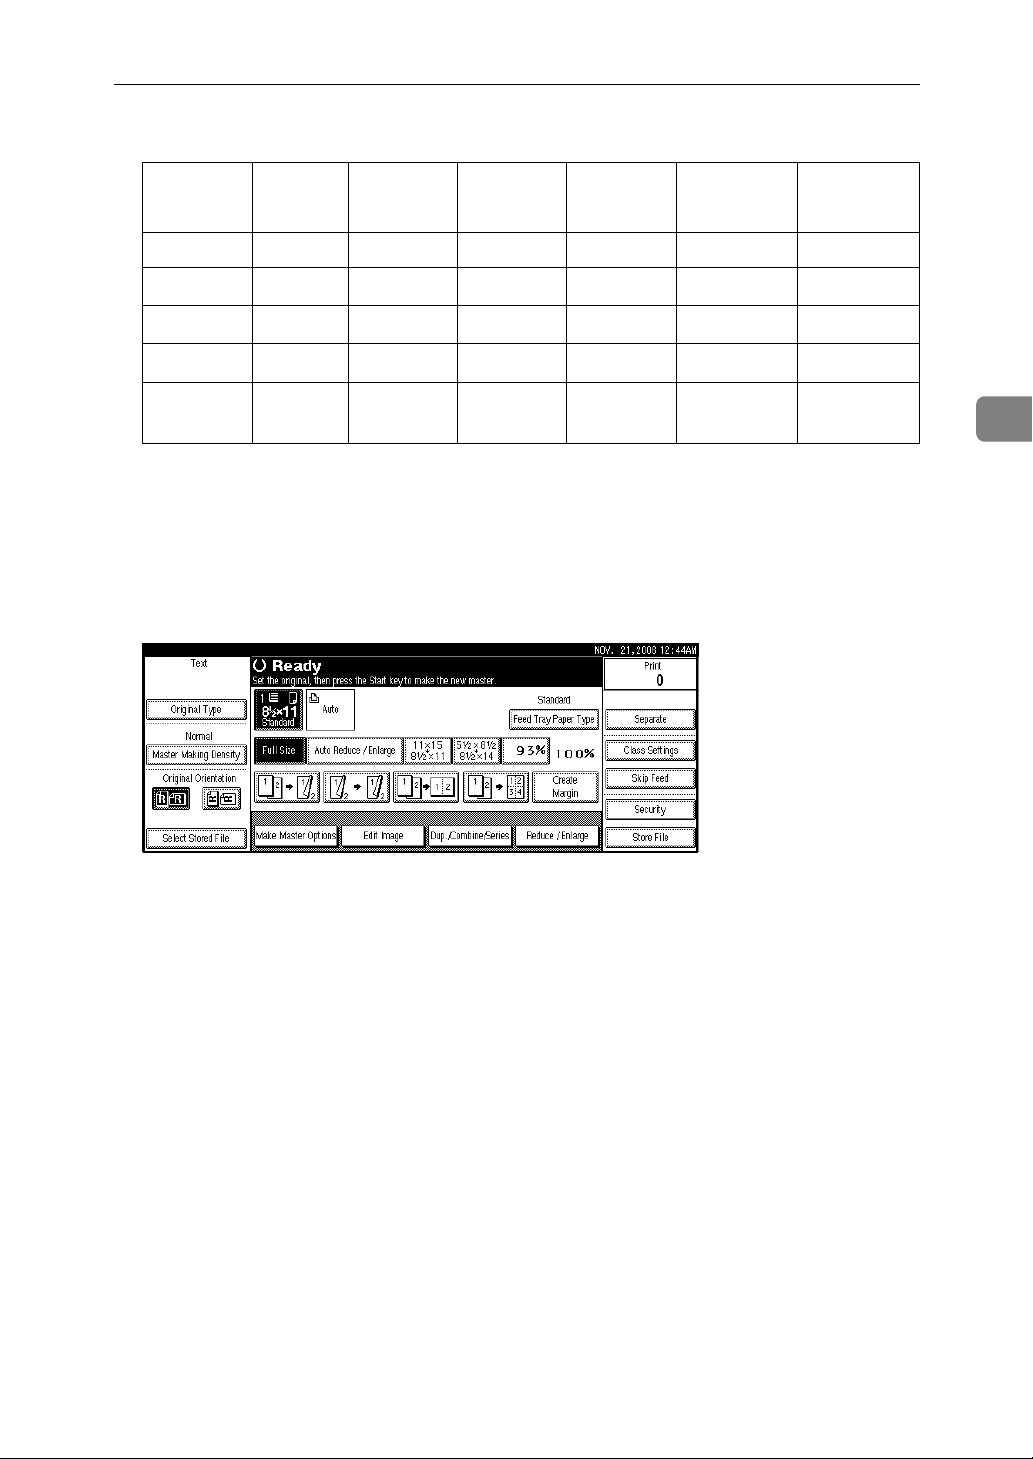
❖ Inch version
Printing Functions
Original 11" ×
Paper
11" × 17"L 100% 121% 129% -- 200% --
81/2" × 14"
81/2" × 11"
81/2" × 11"K65%
81/2" × 51/2"
L
*1
The machine automatically rotates the original image by 90° to match the paper
17"L
77% 100% -- -- 155% --
L
65% 77% 100%
L
*1
50% 61% 65%
1
/2" ×
8
14"L
77%
81/2" ×
11"L
*1
100%
81/2" ×
11"K
*1
100%
*1
100%
*1
65%
81/2" ×
1
5
/2"L
129%
129%
100%
*2
*1
direction and selects an appropriate reproduction ratio. See p.56 “Image Rotation”.
*2
Place these originals in the optional ARDF.
A Place the originals.
B Press [Auto Reduce / Enlarge].
81/2 ×
1
5
/2" K
129%
129%
100%
*2
*1
*1
3
C Press the {Start} key.
67
Page 80
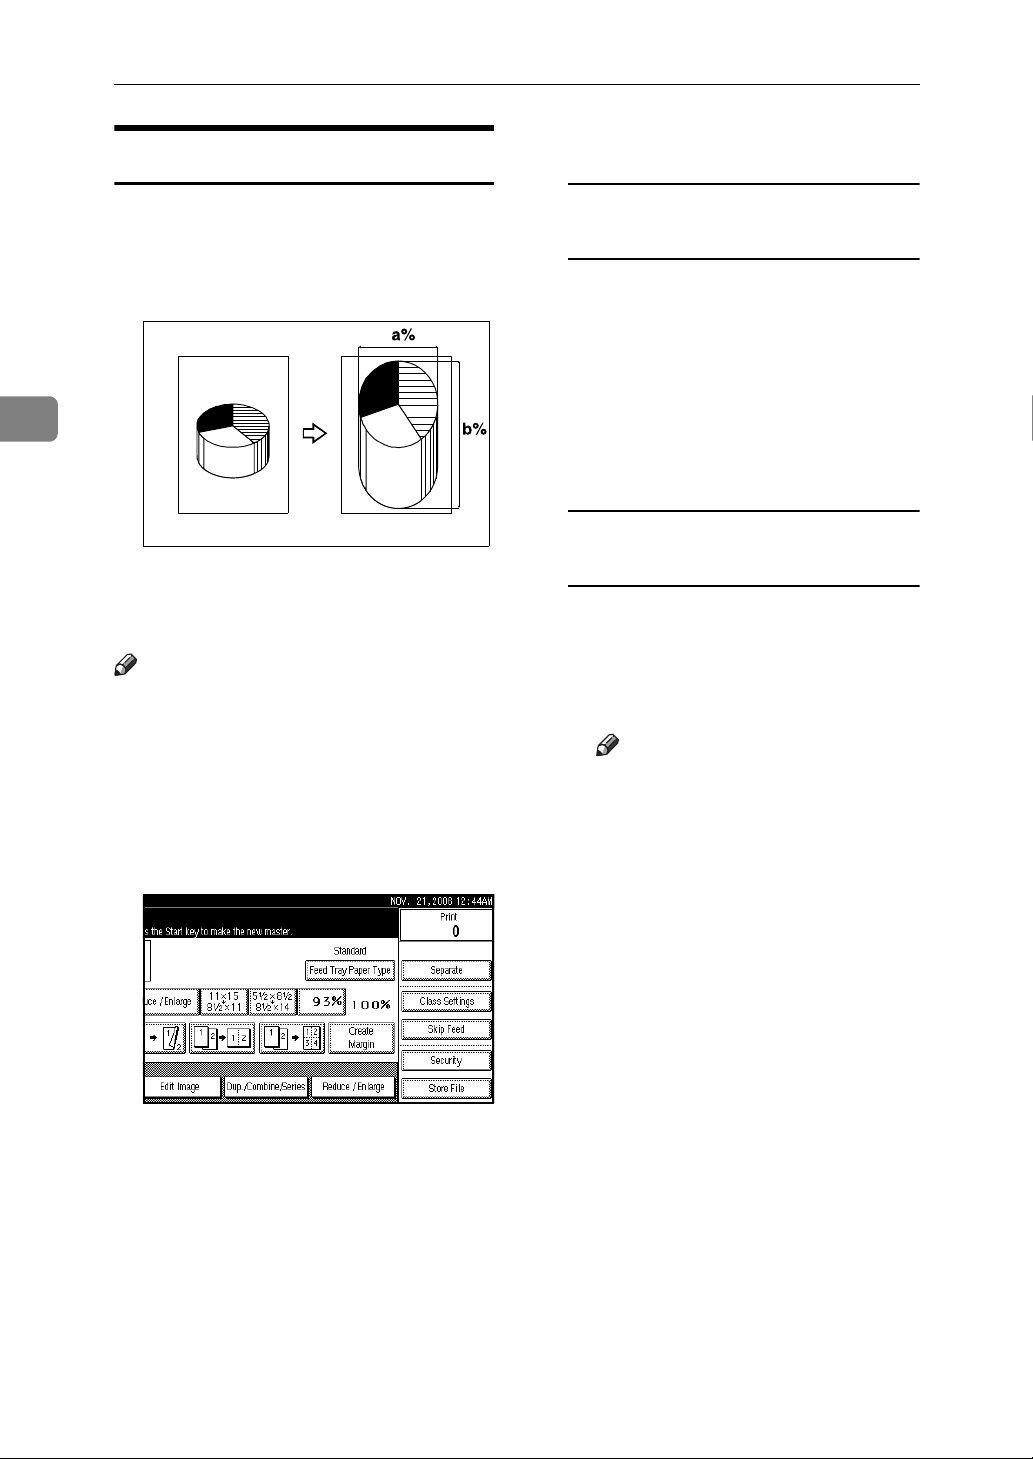
Printing Functions
3
Directional Magnification (%)
Prints can be reduced or enlarged at
different reproduction ratios, horizontally and vertically.
CP2P01EE
a: Horizontal ratio
b: Vertical ratio
Note
❒ You can also select a preset ratio
close to the ratio using [Reduce] or
[Enlarge], and then adjust it further,
using [n] or [o].
A Place the originals.
B Press [Reduce / Enlarge].
D Press [Direct. Mag.%].
To enter the ratio using the
number keys
A Press [Horizontal].
B Enter the ratio using the num-
ber keys, and then press [#].
C Press [Vertical].
D Enter the ratio using the num-
ber keys, and then press [#].
E Press [OK].
To specify a ratio using [n] and
[o]
A Press [With no].
B Press [Horizontal].
C Adjust the ratio using [n] or
[o].
Note
❒ Pressing [n] or [o] changes
the ratio in increments of 1%.
Pressing and holding down
[n] or [o] changes it in increments of 10%.
❒ If you have incorrectly en-
tered the ratio, readjust it using [n] or [o].
C Press [Specified Ratio].
68
D Press [Vertical].
E Adjust the ratio using [n] or
[o].
F Press [OK].
E Press [OK].
F Press the {Start} key.
Page 81
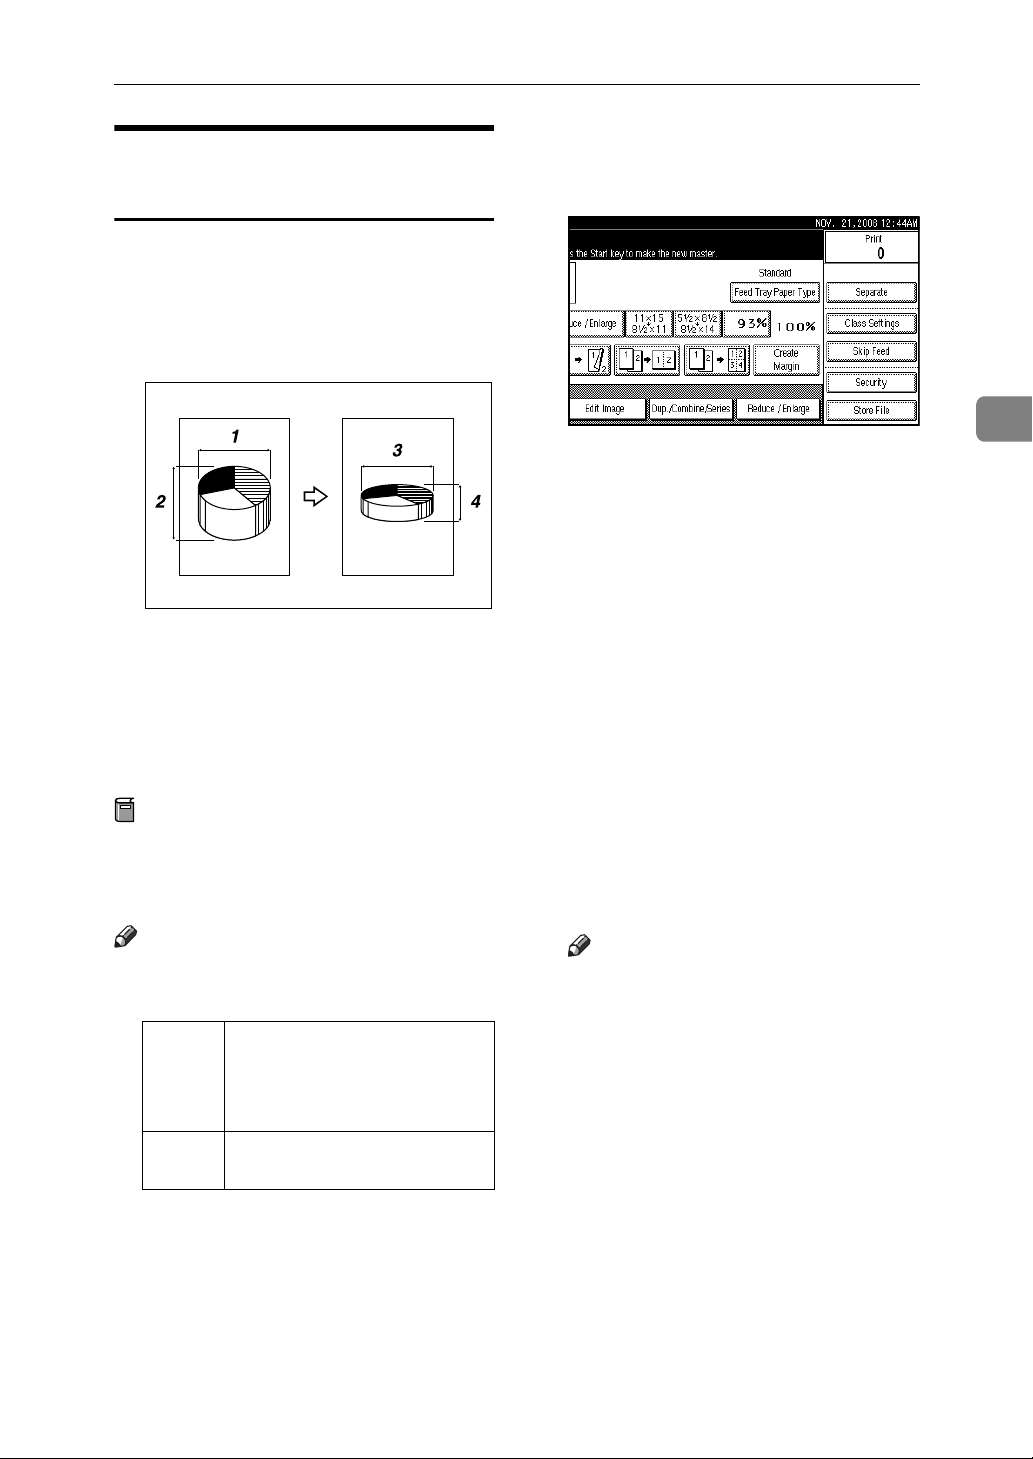
Printing Functions
Directional Size Magnification (mm)
A suitable reproduction ratio is automatically selected when you enter the
horizontal and vertical lengths of the
original and print image you require.
CP2M01EE
1. Horizontal original size
2. Vertical original size
3. Horizontal print size
4. Vertical print size
Preparation
Specify the vertical and horizontal
size of the original and that of the
prints, as shown.
A Place the originals.
B Press [Reduce / Enlarge].
3
C Press [Specified Ratio].
D Press [Direct. Mag. mm].
E Enter the horizontal size of the orig-
inal using the number keys, and
then press [#].
F Enter the horizontal size of the
print using the number keys, and
then press [#].
G Enter the vertical size of the origi-
nal using the number keys, and
then press [#].
H Enter the vertical size of the print
using the number keys, and then
press [#].
Note
❒ You can enter sizes within the fol-
lowing ranges:
Metric
version
Inch
version
Vertical: 1–999 mm (increments of 1 mm)
Horizontal: 1–999 mm (increments of 1 mm)
0.1"–99.9" (increments of 0.1")
Note
❒ To change the length, press the
key you want to change, and
then enter the new value.
I Press [OK] twice.
J Press the {Start} key.
69
Page 82
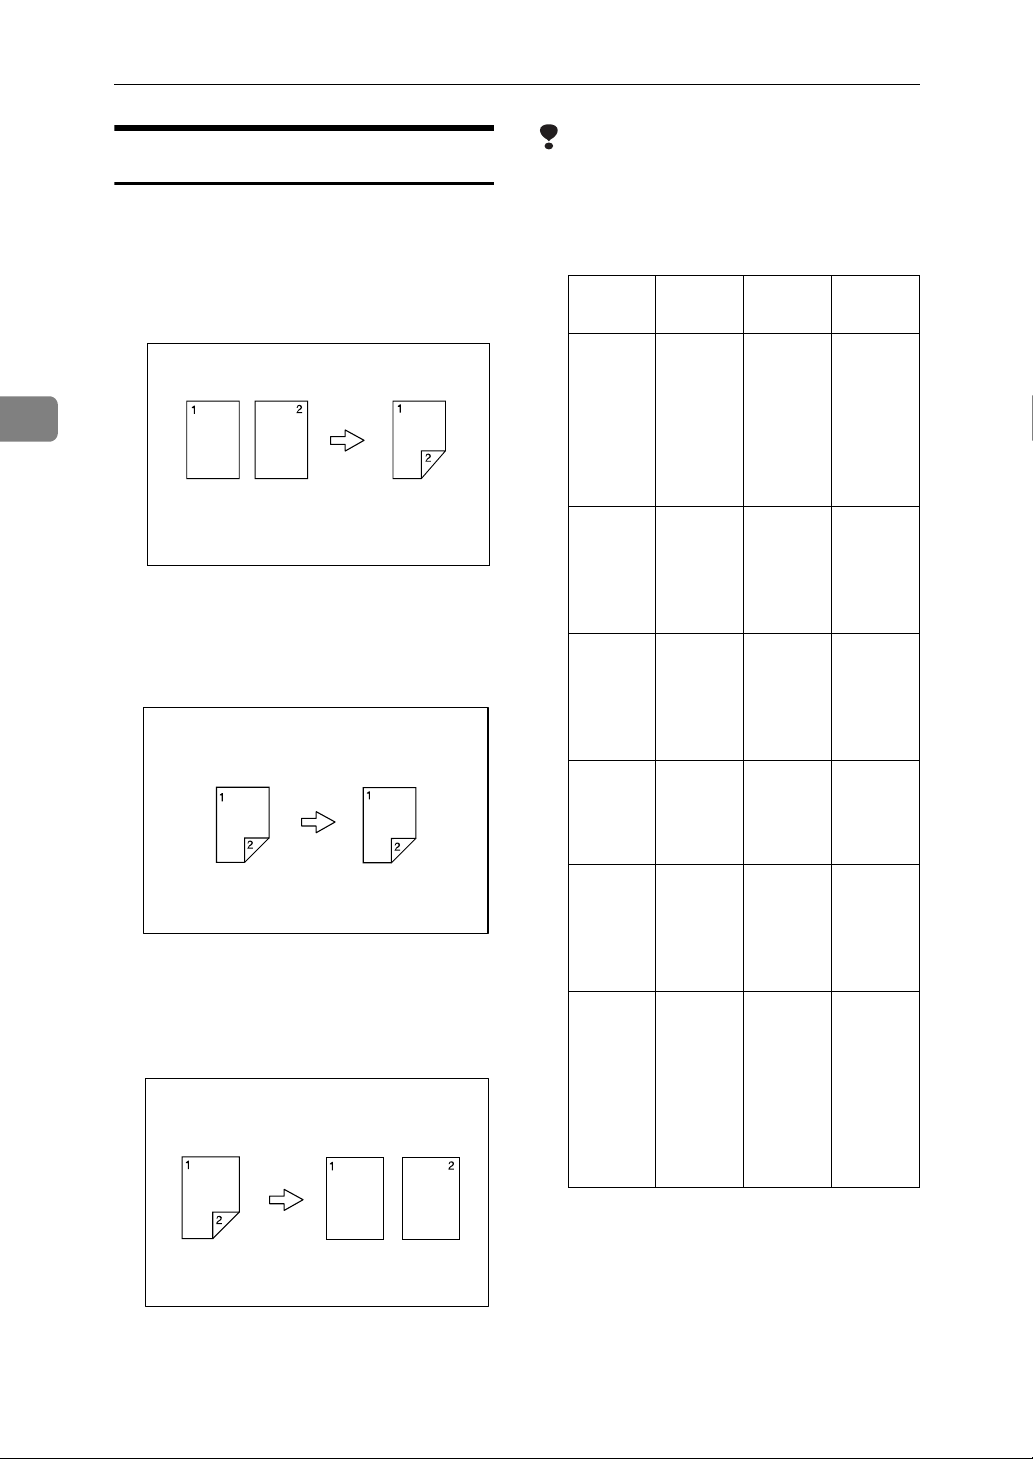
Printing Functions
3
Duplex
There are three types of duplex mode.
❖ 1 Sided →2 Sided
Prints 2 one-sided pages on 1 twosided page.
AUX011S
❖ 2 Sided →2 Sided
Prints 1 two-sided page on 1 twosided page.
Limitation
❒ Some functions cannot be com-
bined, depending on the type of
duplex. (O: Available function –:
Unavailable function)
Erase
Paper
Bor-
⇒
der
p.100
“Erase
Border”
Make-Up
⇒
p.117
“MakeUp Printing”
Over-
⇒
lay
p.102
“Overlay”
1 Sided
→
2 Sided
––❍
–––
–––
2 Sided
→
2 Sided
2 Sided
→
1 Sided
❖ 2 Sided →1 Sided
Prints each side of a two-sided
original onto two separate pages.
AUX012S
AUX013S
Stamp⇒
p.105
“Preset
Stamp”
Storing
Files
p.125
“Storing
Files”
Printing
Stored
Files
p.129
“Printing
Stored
Files”
––❍
––❍
⇒
❍ ––
⇒
❒ When duplex printing, the machine
cannot perform skip feed. If skip
feed has been set, cancel skip feed by
pressing the {Start} key to begin duplex printing.
70
Page 83
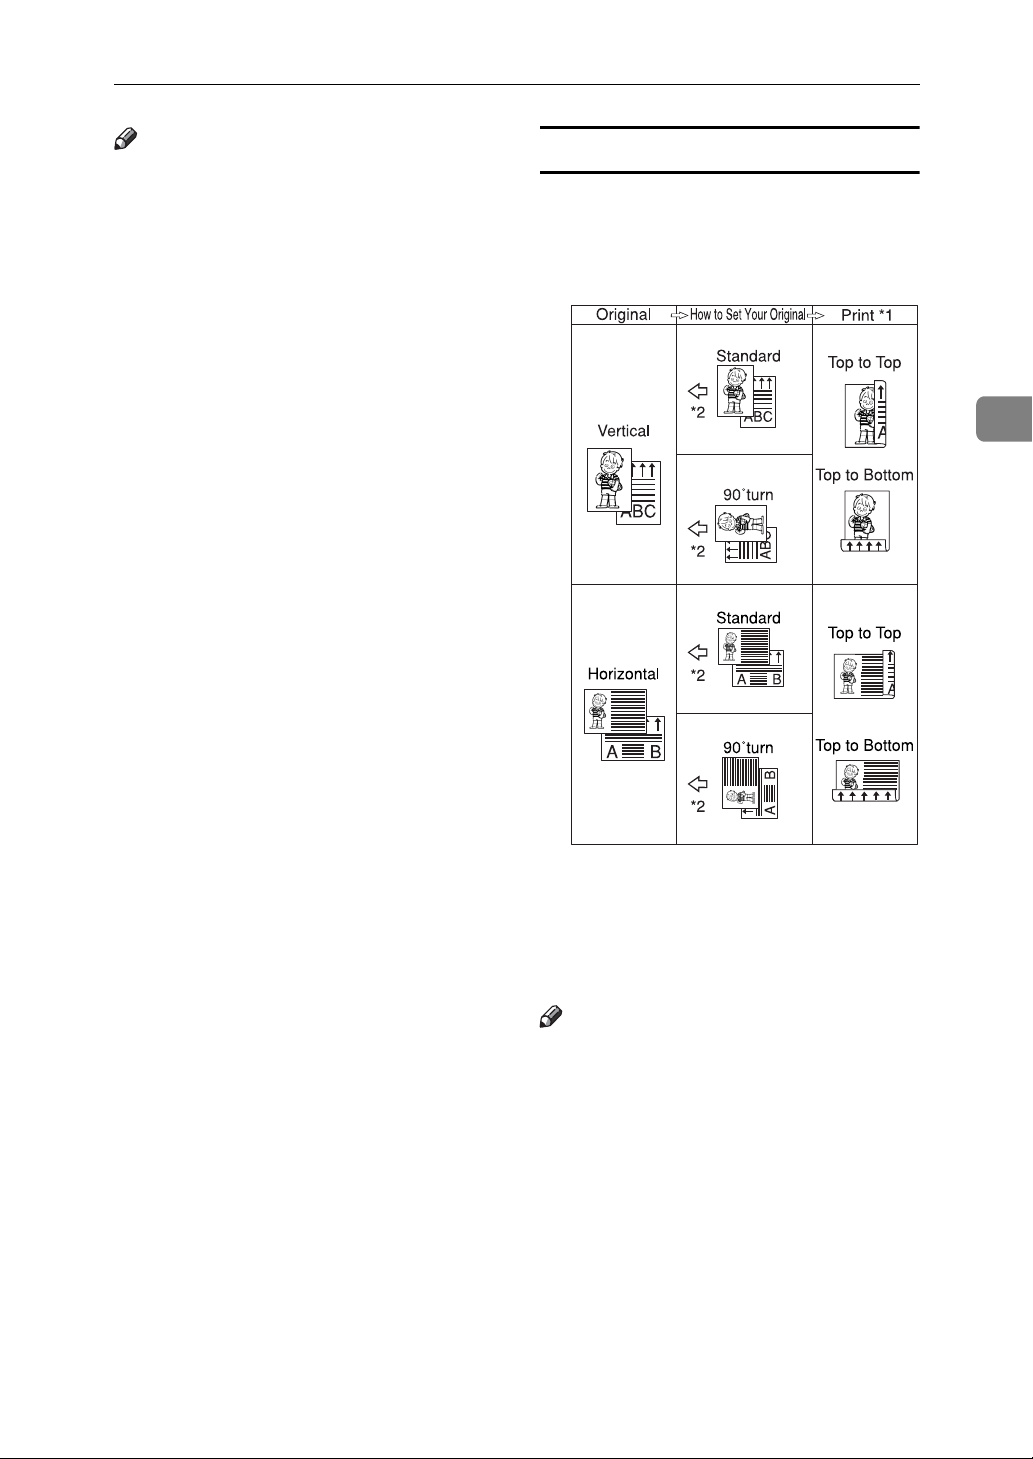
Printing Functions
Note
❒ Two-sided printing is possible if
Create Margin is selected.
❒ Two-sided printing is possible if
Erase Original Border selected.
This setting applies to both the
front and back sides and cannot be
individually specified for either.
❒ Settings for two-sided printing are
cancelled when the machine is
switched off, during Auto Reset, or
when the settings are reset with the
{Clear Modes} key
❒ When printing pages with solid
images on the leading edge or
when printing data in duplex
mode, make sure to scan the pages
with solid images as the front side
of a two-sided page to prevent
dirty or smeared prints.
Original orientation and completed prints
The resulting print image will differ
according to the orientation in which
you place your originals (vertical K
or horizontal L ).
3
AUX037S
*1 The table shows the orientation of
images on the front and back of copies, not the orientation of delivery.
*2 Paper feed direction
Note
❒ The following paper size and weight
are available for duplex mode.
❖ Paper Size
❒ A4K, 81/2" × 11"K, B5 JISK
❖ Paper Weight
❒ 64–105 g/m2, 17–28 lb.
71
Page 84
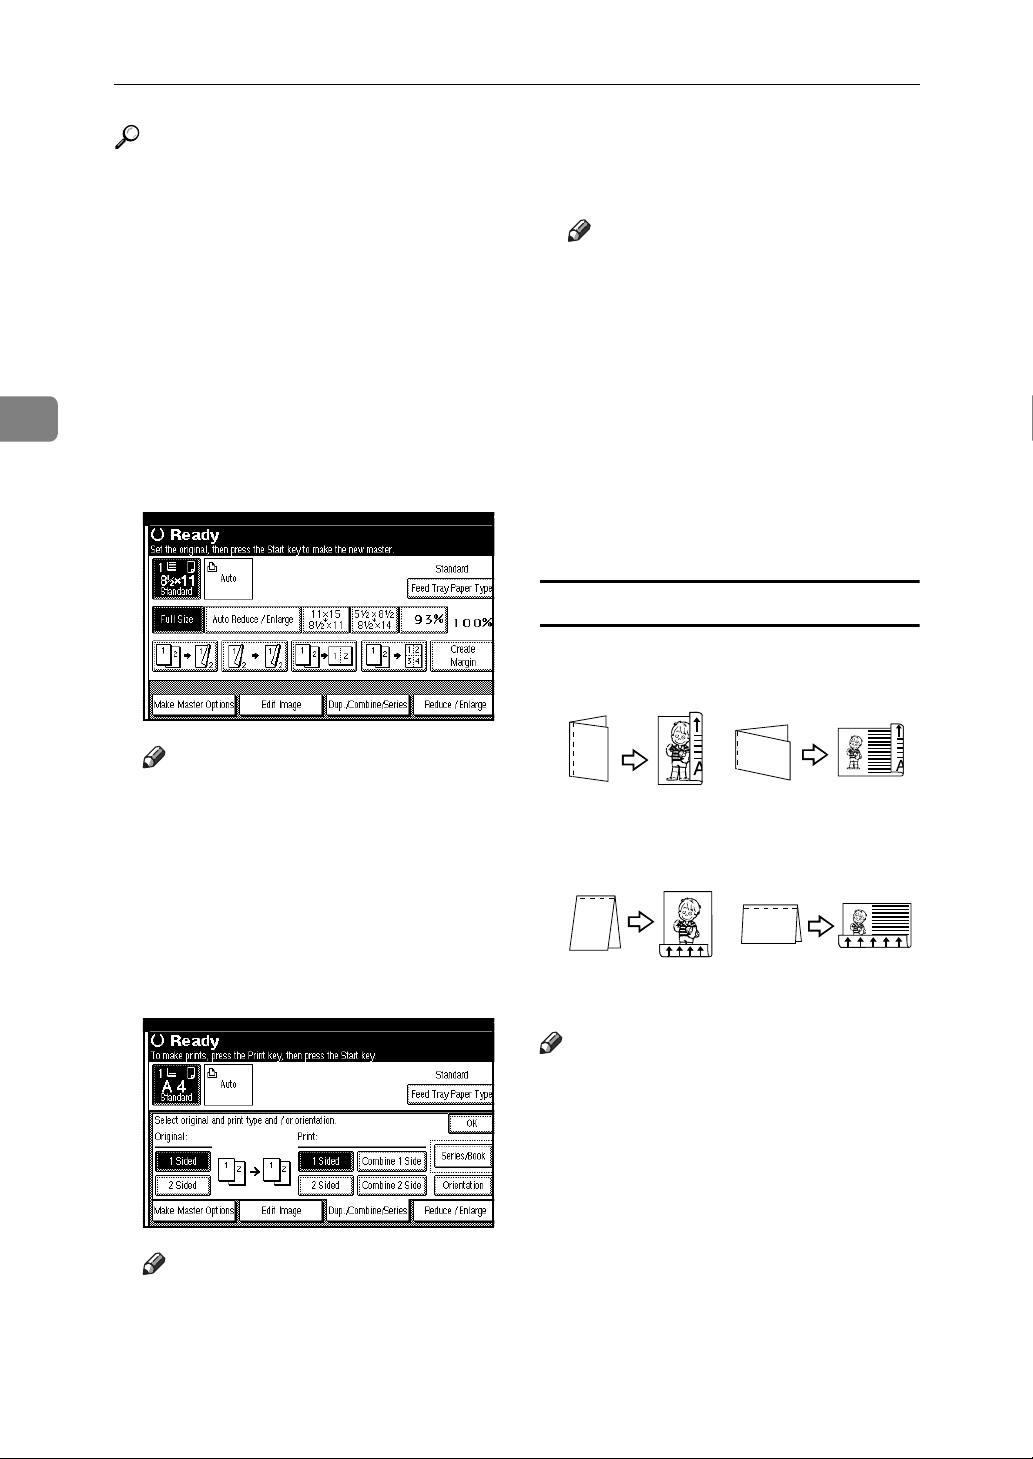
Printing Functions
3
Reference
p.101 “Margin Adjustment”
Related initial settings
p.192 “Front Margin: Left/Right”
p.193 “Back Margin: Left / Right”
p.193 “Front Margin: Top / Bottom”
p.193 “Back Margin: Top / Bottom”
A Place the originals.
B Press [Dup./Combine/Series].
D Press [OK].
E Press the {Start} key.
Note
❒ When placing an original on the
exposure glass, start with the
first page to be printed. When
placing an original in the ARDF,
set the first page on the top.
❒ When placing an original on the
exposure glass, press the {q}
key after all the originals have
been scanned.
❒ Prints come out first page face-
up.
Originals and print orientation
You can select the orientation.
•Top to Top
Note
❒ You can also select “1 Sided to 2
Sided” or ”2 Sided to 2 Sided”directly by pressing the
Function Key. In that case, proceed to
.
E
C Select [1 Sided] or [2 Sided] for Origi-
nal, and then select [1 Sided] or [2
Sided] for print.
Note
❒ To change the print orientation,
press [Orientation] . See p.72
“Originals and print orientation”.
72
Duplex1
• Top to Bottom
Duplex2
Note
❒ You can change the default orien-
tation with User Tools. See p.192
“Print Orientation in Duplex
Mode” and p.192 “Copy Orientation in Duplex Mode”.
Page 85
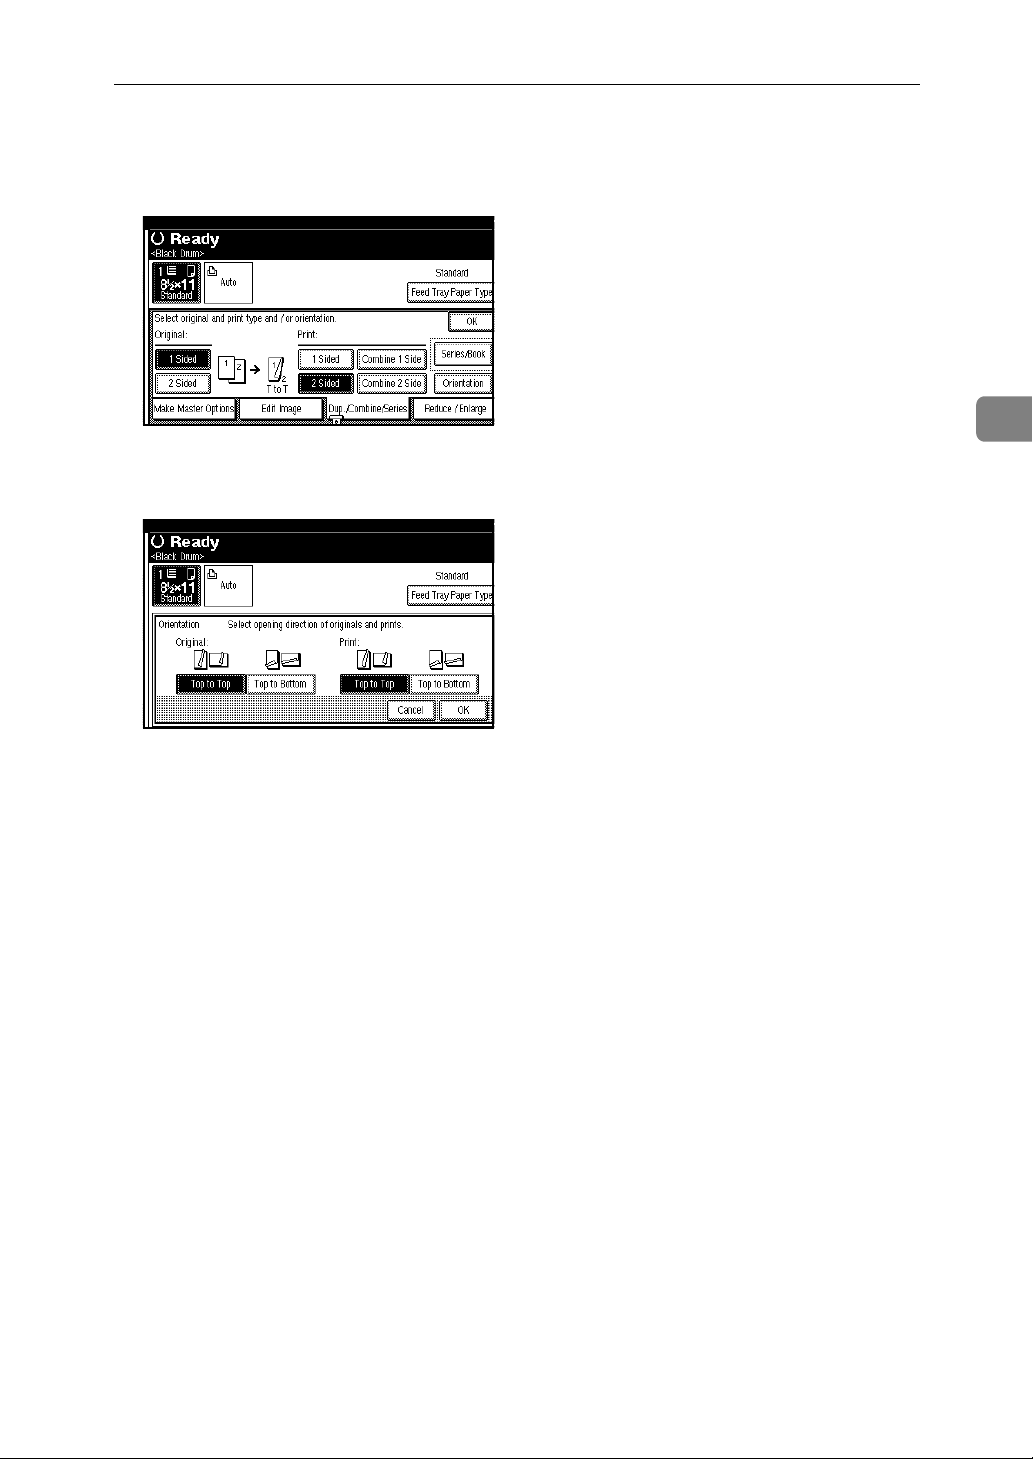
A Press [Dup./Combine/Series].
B Press [Orientation].
C Select the orientation (Origi-
nal/Print), and then press [OK].
Printing Functions
3
73
Page 86
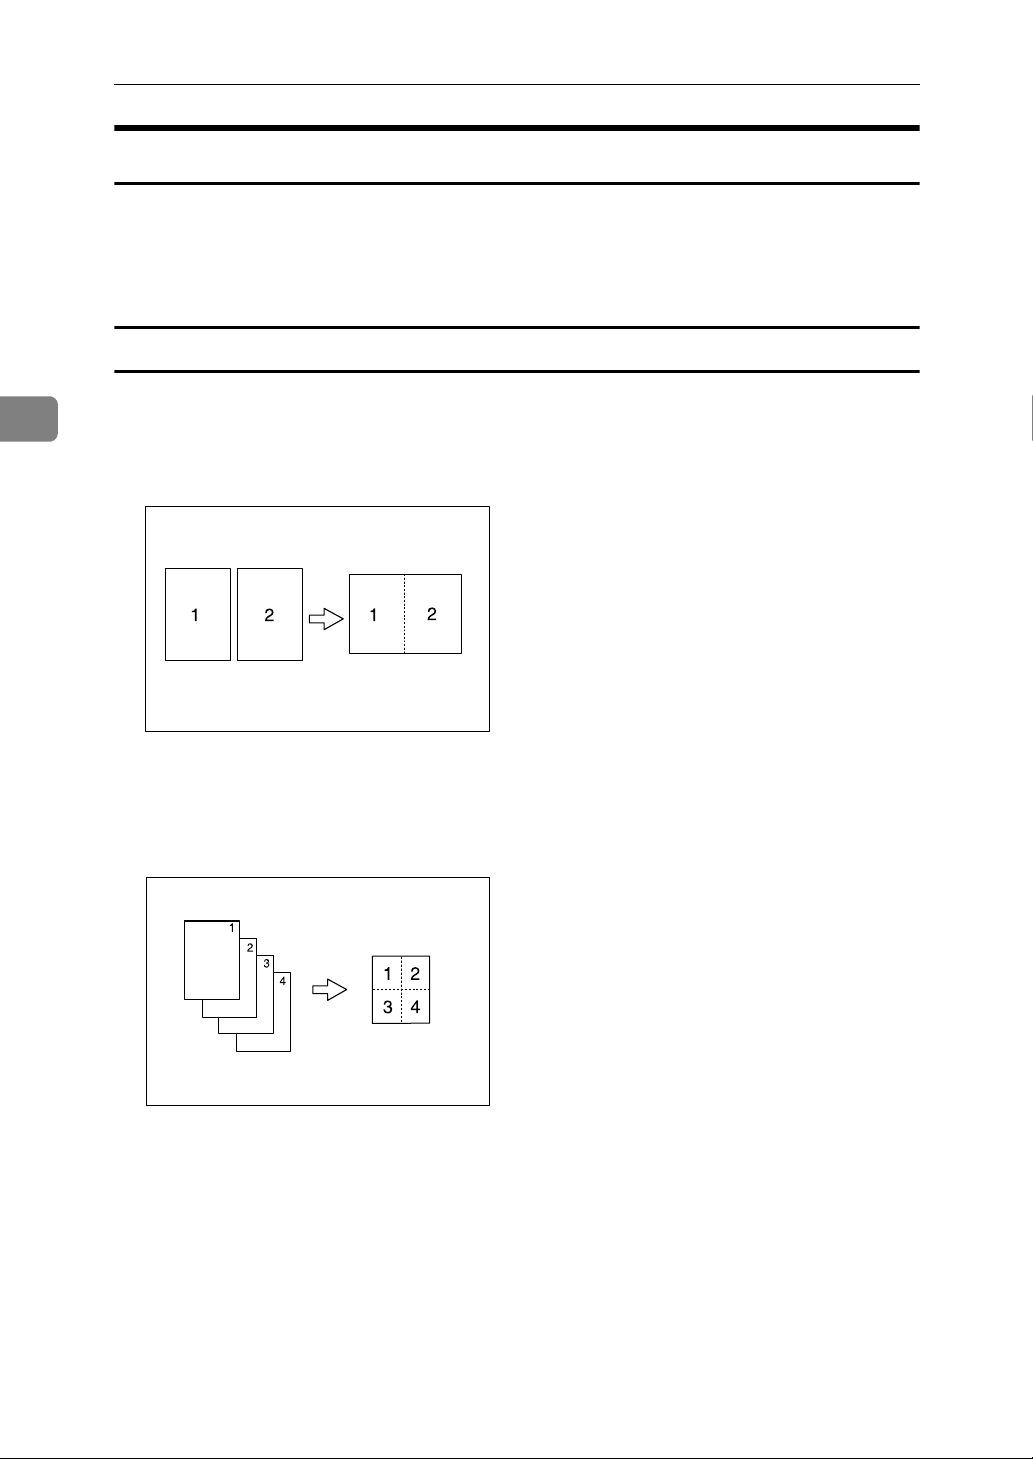
3
Printing Functions
Combine
The Combine function is available in two different modes: One-Sided Combine
in which multiple originals are combined and printed together on one side of the
page, and Two-Sided Combine in which multiple originals are combined and
printed together on both sides of the page.
One-Sided Combine
Use this function to combine originals onto one sheet of paper.
❖ 1 Sided 2 Pages → Combine 1 Side
AUX004S
Prints 2 one-sided originals to one side of a sheet.
❖ 1 Sided 4 Pages → Combine 1 Side
AUX005S
Prints 4 one-sided originals to one side of a sheet.
74
Page 87
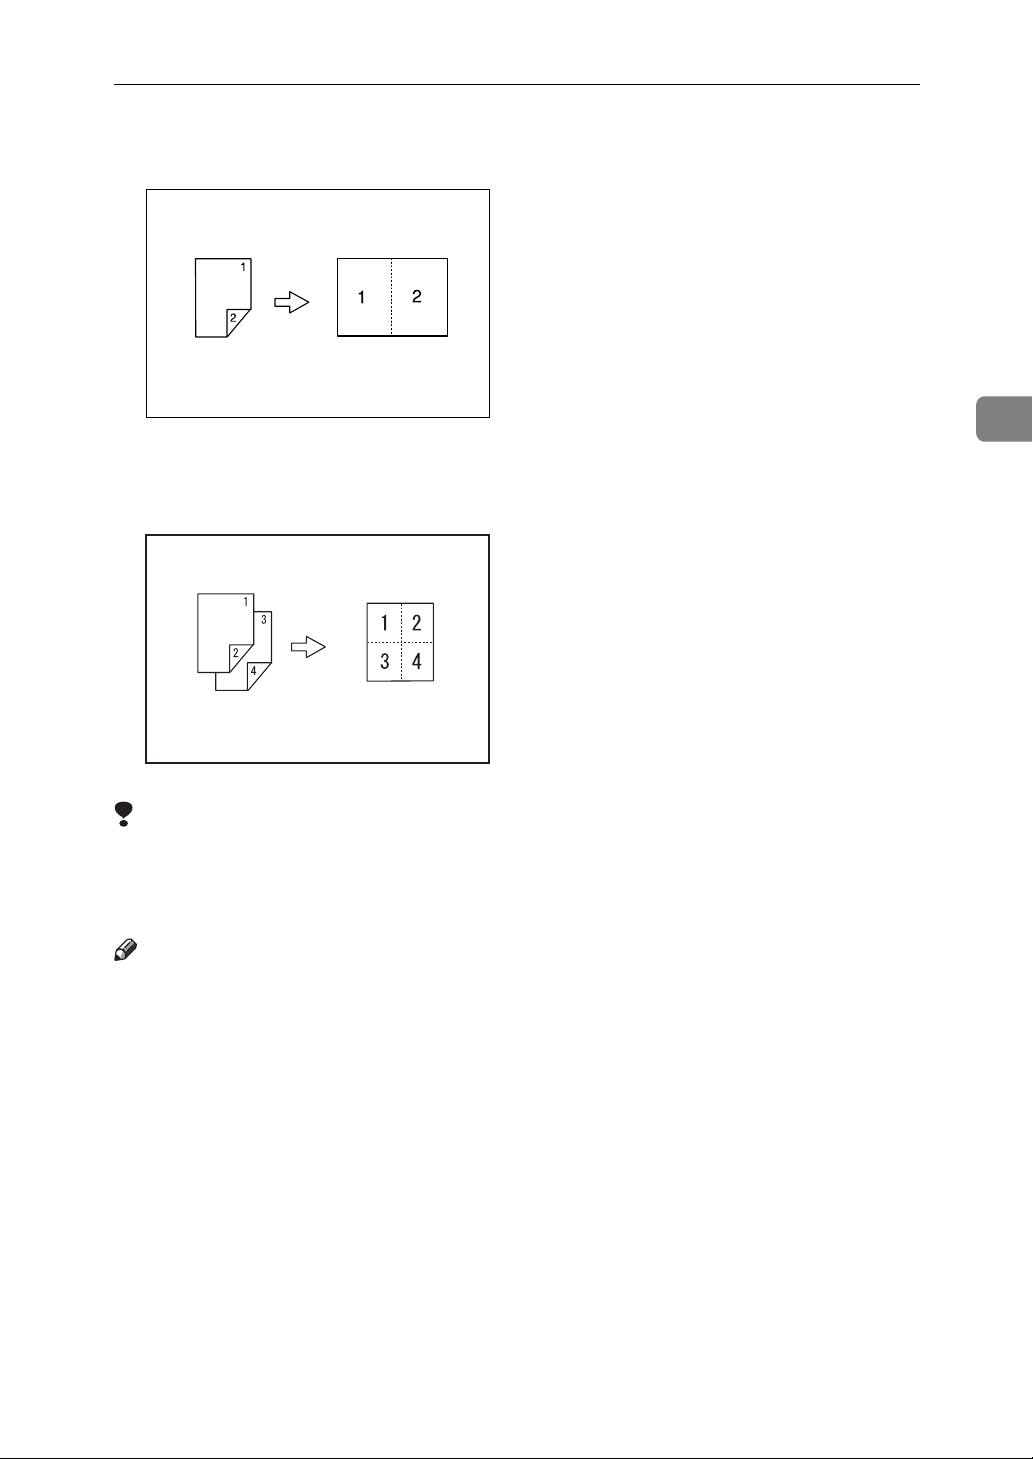
❖ 2 Sided 2Page → Combine 1 Side
Prints 1 two-sided original to one side of a sheet.
Printing Functions
AUX006S
❖ 2 Sided 4 Pages → Combine 1 Side
Prints 2 two-sided originals to one side of a sheet.
GCSHVYBJ
Limitation
❒ You cannot print with originals different in size and orientation.
❒ If the reproduction ratio is under 49%, it is automatically adjusted to 50%.
Parts of the image might not be printed.
Note
❒ You can print a separation line in between the combined images. See p.191
“Combine/Image Repeat Separation Line”.
❒ You can set the machine to automatically cancel Combine mode once you
have finished using it. See p.193 “Cancel Combine/Repeat Setting”.
❒ If the orientation of originals is different from that of the paper, the machine
will automatically rotate the image by 90° to make prints properly.
❒ When the printer finishes scanning in the specified number of originals, it au-
tomatically starts master making. However, if the number of originals is less
than the number of expected pages to be combined, press the {q} key when
finished scanning in the originals. Pressing the {q} key signals the end of
scanning, and initiates master making, even if the actual number of scanned
originals falls short of the specified number for combination.
3
75
Page 88
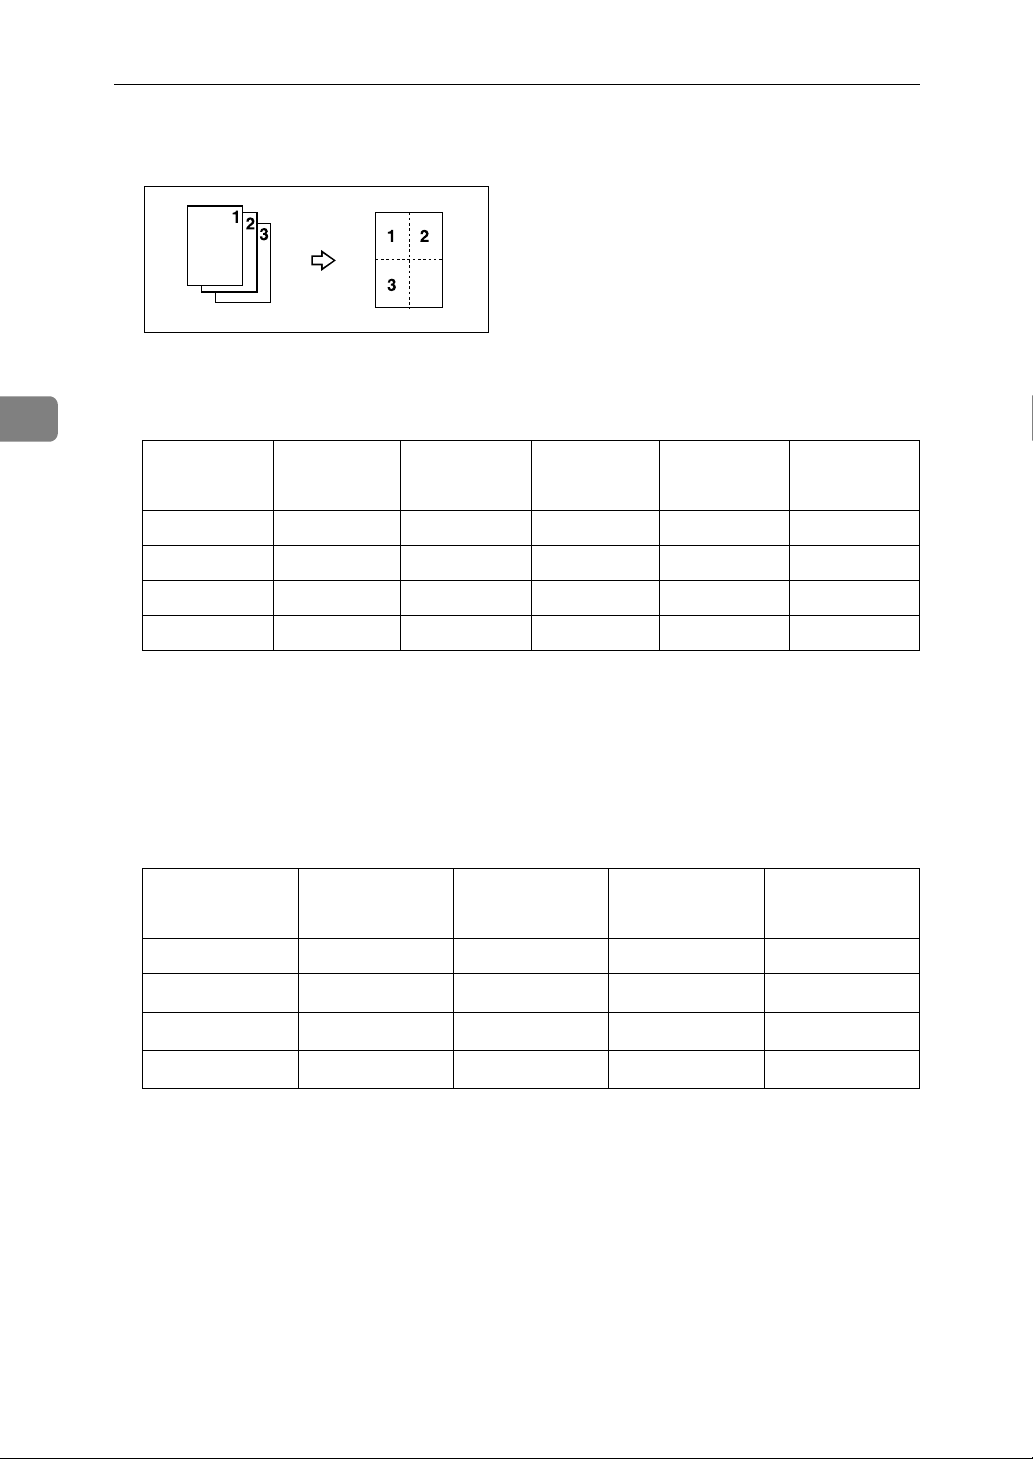
Printing Functions
❒ If the number of originals placed is less than the number specified for com-
bining, the last page segment is left blank as shown.
❒ Refer to the following tables when you select the original and paper sizes:
3
❖ Metric version
Original A3L B4 JISL A4KL B5 JISKL A5KL*3
Paper
A3L *2 *2 *2 *2 *2
B4 JISL *1 *2 *2 *2 *2
A4KL *1 *1 *2 *2 *2
B5 JISKL –*1*1*2*2
❒ *1: You can use these original and paper sizes to combine 4 one-sided origi-
nals.
❒ *2: You can use these original and paper sizes to combine 2 or 4 one-sided
originals.
❒ *3: Only available when placing the original on the exposure glass.
❖ Inch version
Original 11" × 17"L
Paper
11" × 17"L *2 *2 *2 *2
1
8
/2" × 14"L
1
/2" × 11"KL
8
1
/2" × 81/2"L
5
*1 *2 *2 *2
*1 *1 *2 *2
––*1*2
1
/2" × 14"L 81/2" × 11"KL 51/2" ×
8
8
1
/2"KL*3
❒ *1: You can use these original and paper sizes to combine 4 one-sided origi-
nals.
❒ *2: You can use these original and paper sizes to combine 2 or 4 one-sided
originals.
❒ *3: Only available when placing the original on the exposure glass.
76
Page 89
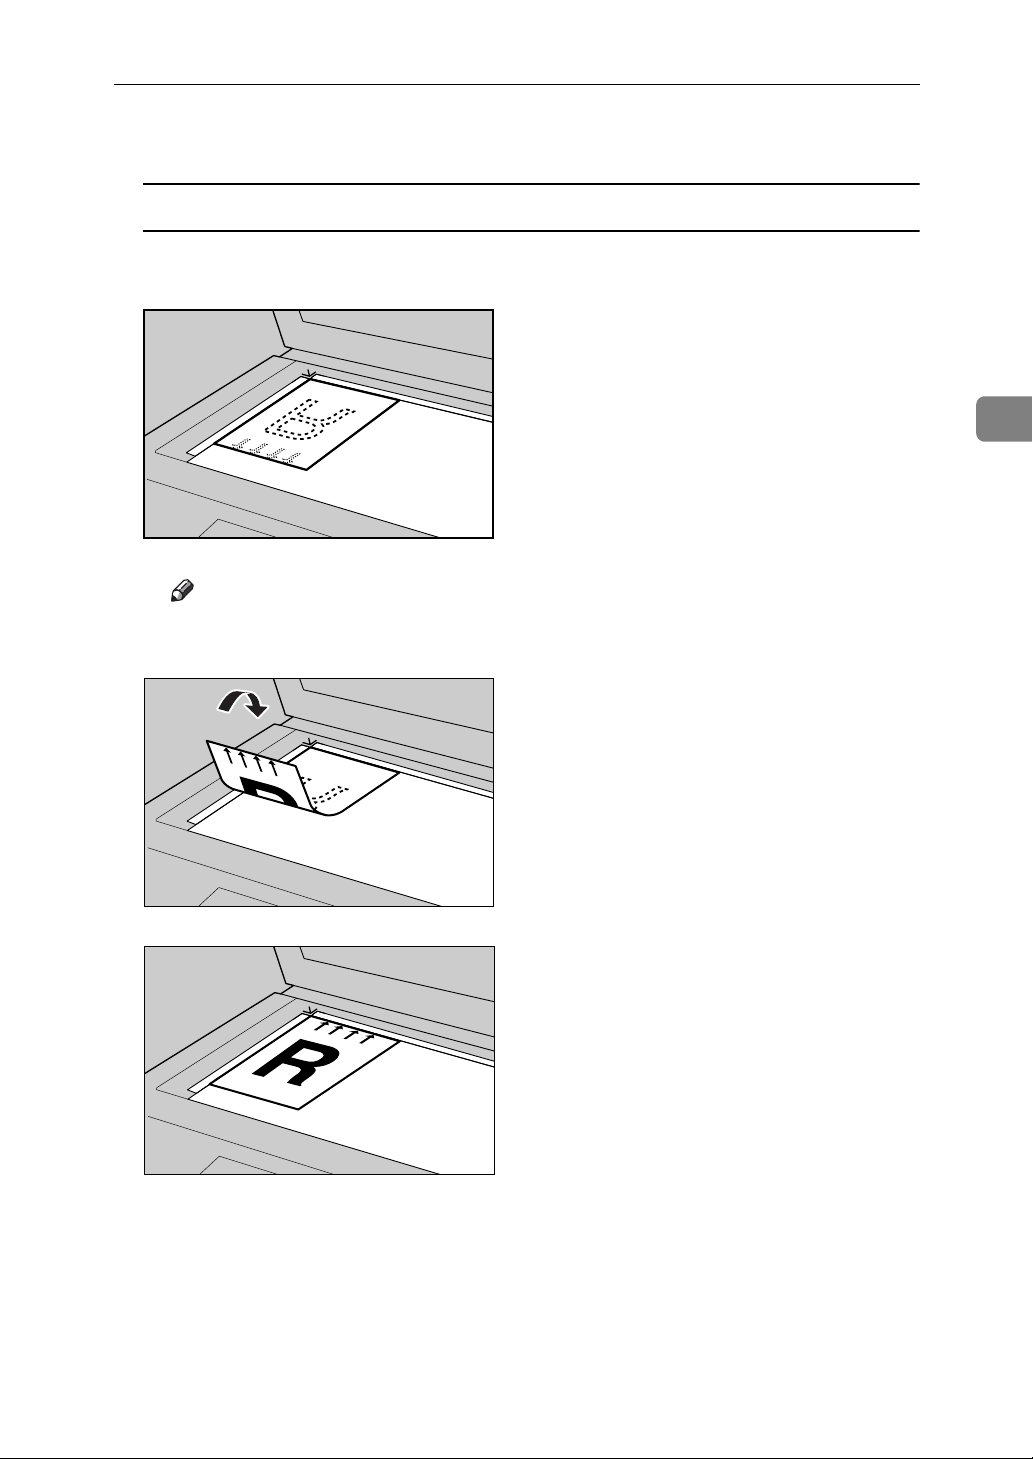
Printing Functions
A Place the originals.
Placing the original (K) on the exposure glass
A Place the original face down with its leading edge towards you, as
shown below.
AUY083S
Note
❒ When scanning the back side of two-sided original, turn over as shown
below.
3
AUY084S
AUY085S
77
Page 90
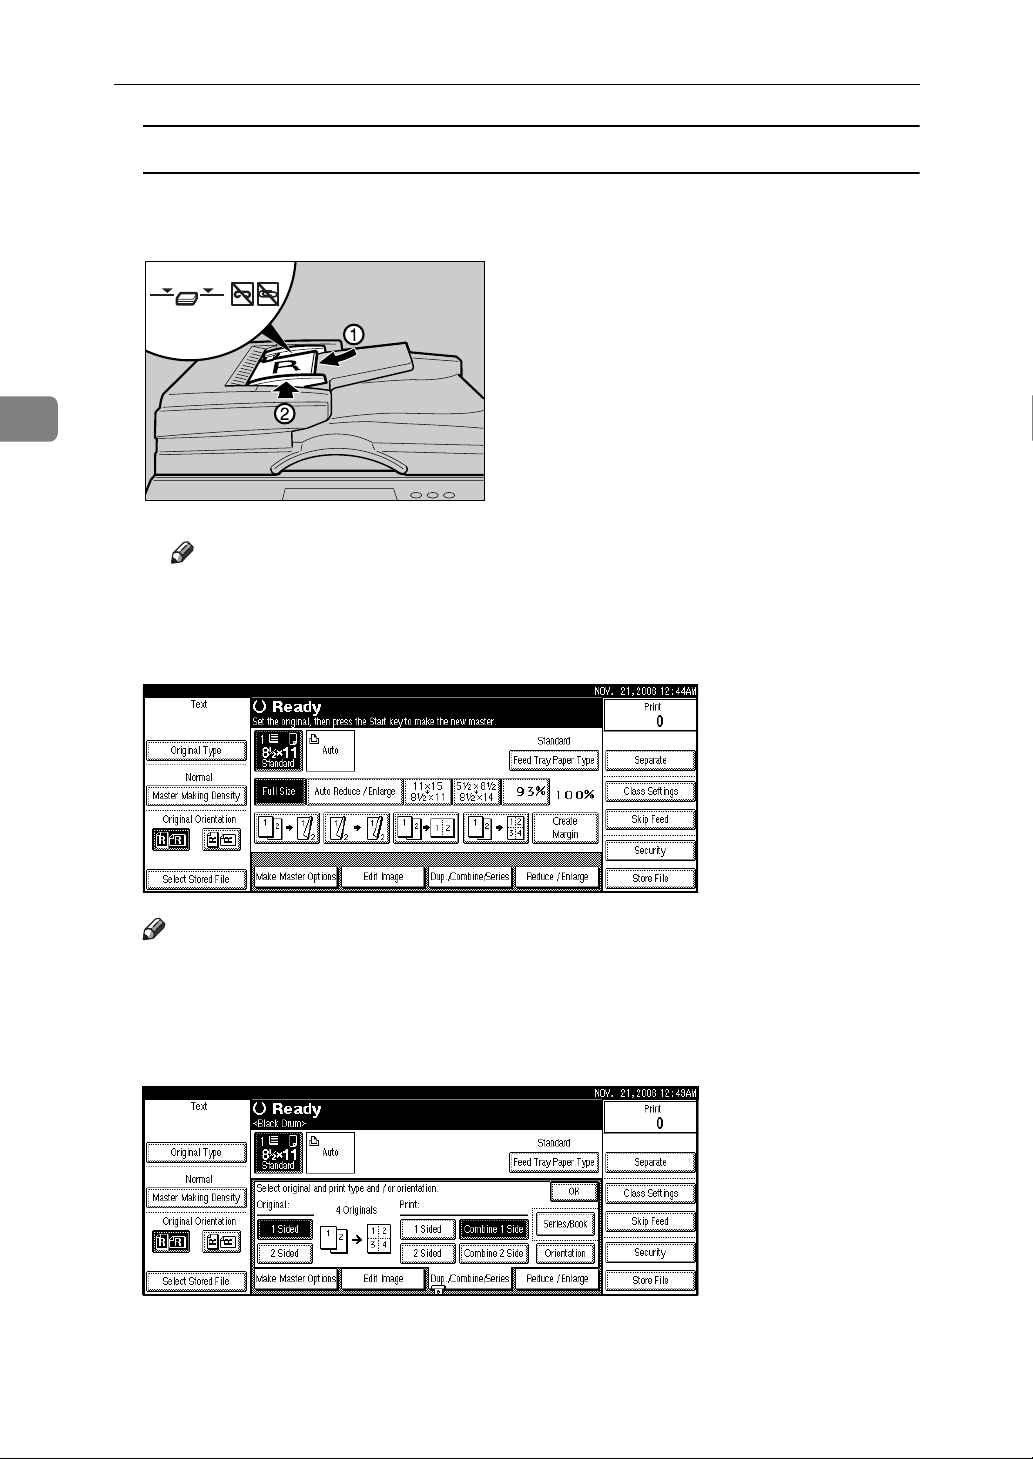
3
Printing Functions
Placing the originals (K) in the optional ARDF
A Place the originals face up with the first page on the top.
B Adjust the document guides to the original size.
AUY011S
Note
❒ To avoid originals misfeeding, fan the originals before placing them in
the ARDF.
B Press [Dup./Combine/Series].
Note
❒ You can also select “1 Sided to 2 Sided” or ”2 Sided to 2 Sided”directly by
pressing the Function Key. In that case, proceed to
.
E
C Select [1 Sided] or [2 Sided] for Original, and then select [Combine 1 Side] for
print.
78
Page 91
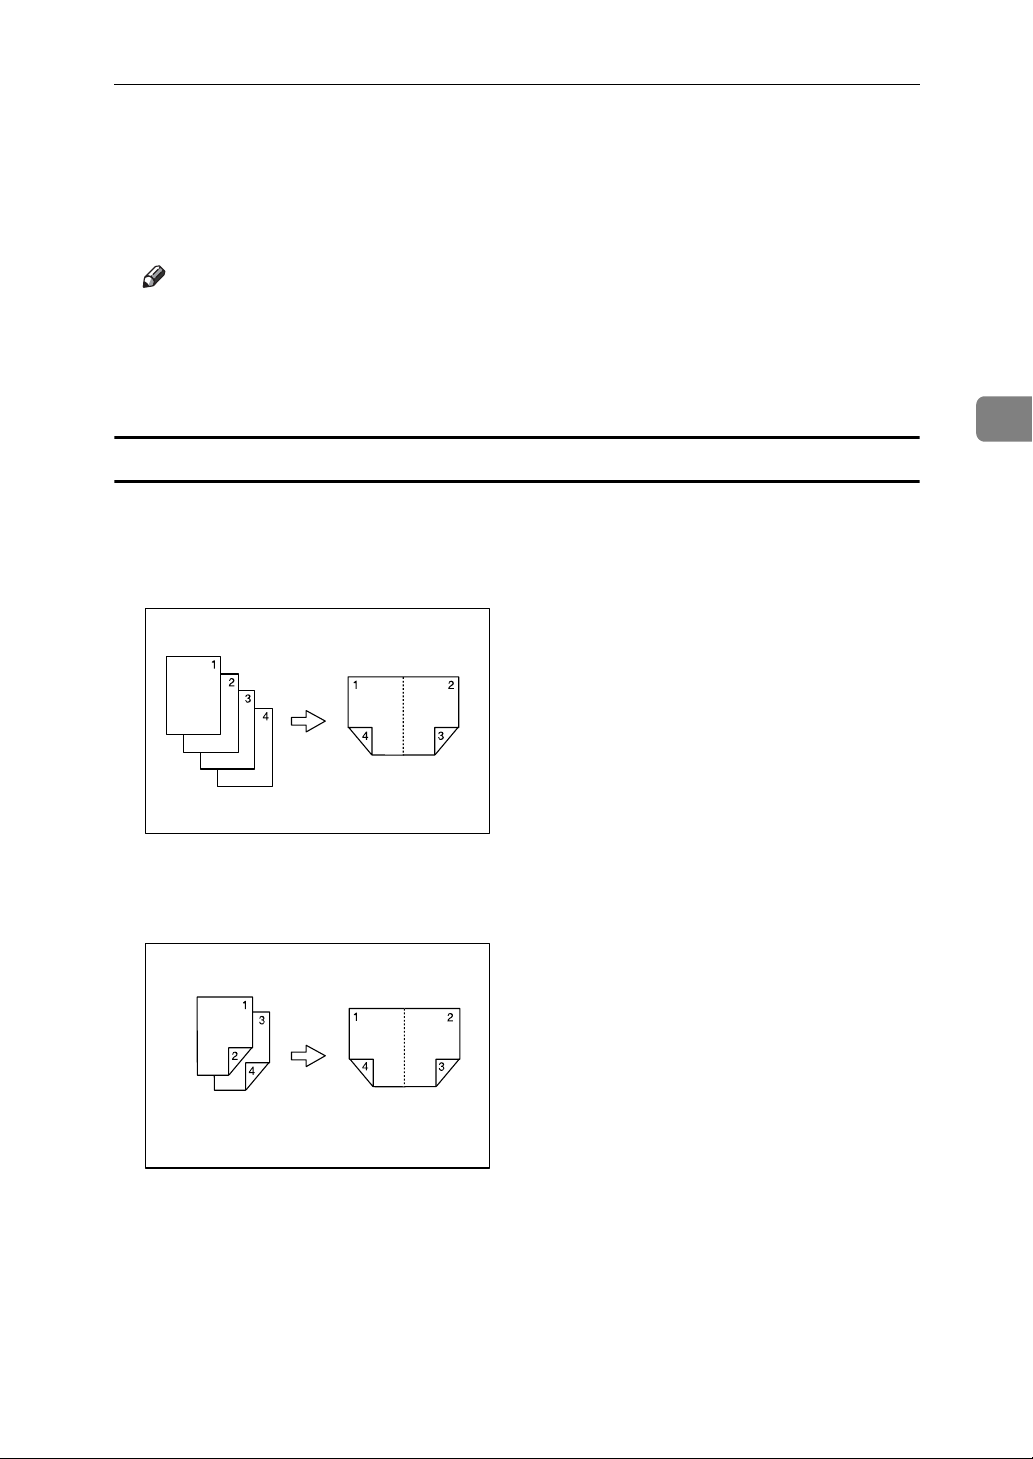
Printing Functions
D Select the number of originals to be combined.
E Press [OK].
F Press the {Start} key.
Note
❒ The machine selects the reproduction ratio automatically.
❒ When placing an original on the exposure glass or one sheet at a time in the
optional ARDF, repeat steps
the {q} key.
Two-Sided Combine
Combines various pages of originals into one sheet with two sides.
❖ 1 Sided 4 Pages → Combine 2 Side
Prints 4 one-sided originals to one sheet with two pages per side.
and F. After placing the last original, press
A
3
AUX007S
❖ 2 Sided 4 Pages → Combine 2 Side
Prints 2 two-sided originals to one sheet with two pages per side.
AUX008S
79
Page 92
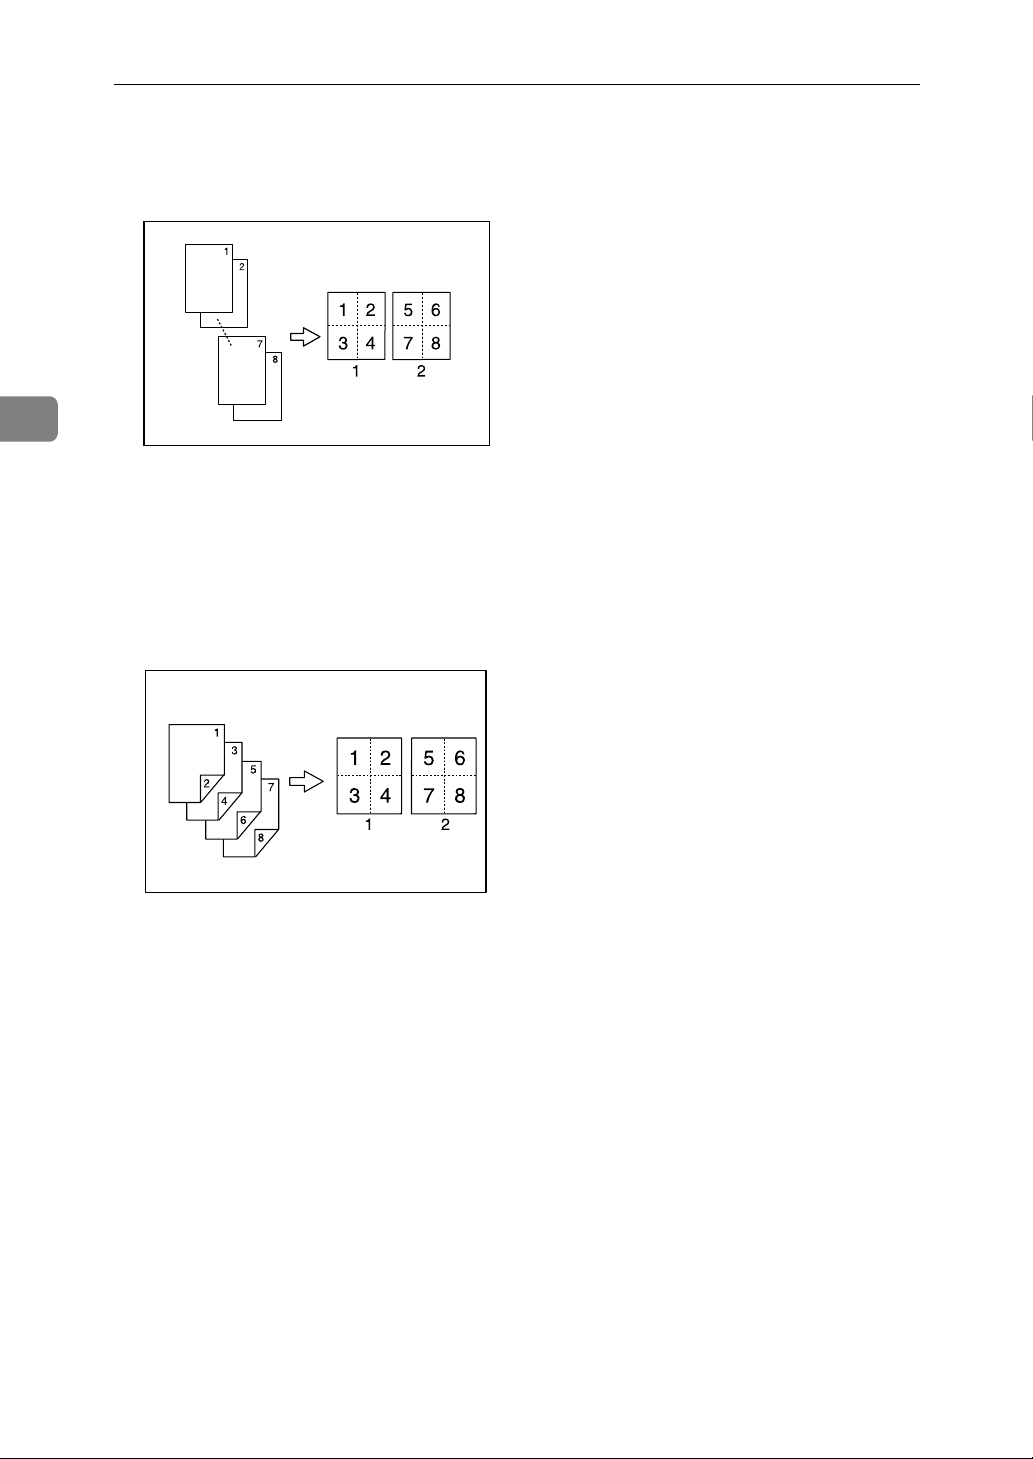
3
Printing Functions
❖ 1 Sided 8 Pages → Combine 2 Side
Prints one-sided originals to one sheet with four pages per side.
AUX009S
1. Front
2. Back
❖ 2 Sided 8 Pages → Combine 2 Side
Prints 4 two-sided originals to one sheet with four pages per side.
80
AUX010S
1. Front
2. Back
Page 93
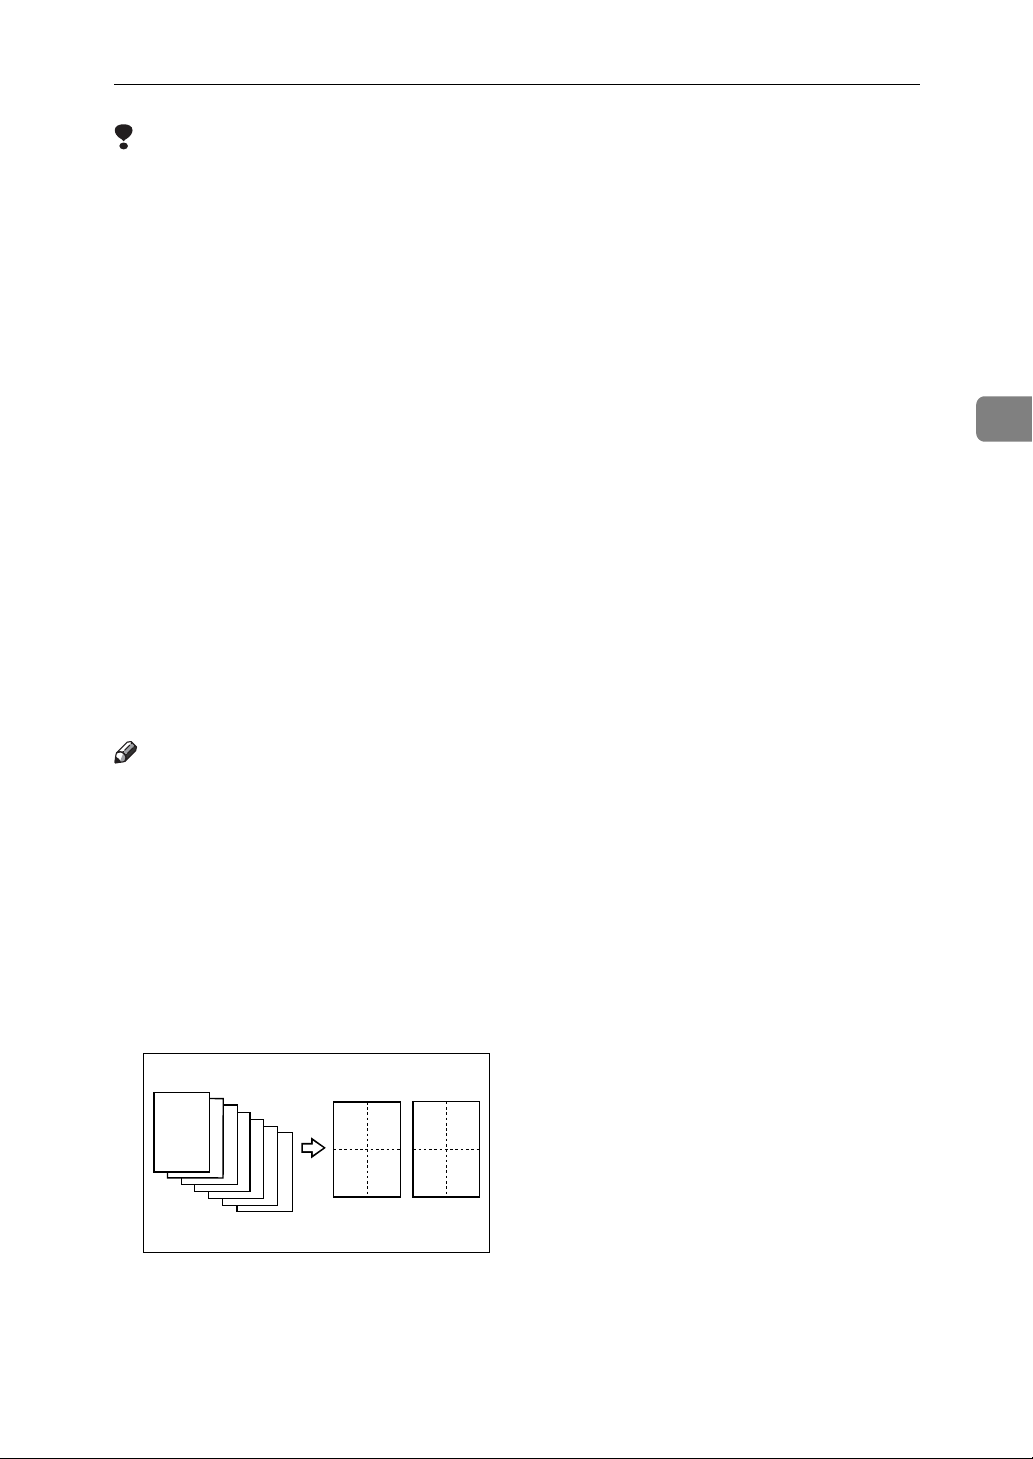
Printing Functions
Limitation
❒ The paper sizes you can use are A4K, 81/2" × 11" K or B5 JISK.
❒ You cannot print with originals different in size and orientation.
❒ If the reproduction ratio is under 49%, it is automatically adjusted to 50%.
Parts of the image might not be printed.
❒ The following paper size and weight are available for 2 sided combine.
❖ Paper Size
❒ A4K, 81/2" × 11"K, B5 JISK
❖ Paper Weight
❒ 64–105 g/m2, 17–28 lb.
❒ When selected Two-Sided Combine, following functions cannot be used to-
gether.
• Erase Paper Border
• Make-Up
•Overlay
•Stamp
• Storing Files
• Searching for Printing Stored Files
Note
❒ You can print a separation line in between the combined images. See p.191
“Combine/Image Repeat Separation Line”.
❒ You can set the machine to automatically cancel Combine mode once you
have finished using it. See p.193 “Cancel Combine/Repeat Setting”.
❒ If the orientation of originals is different from that of the paper, the machine
will automatically rotate the image by 90° to make prints properly.
❒ If the number of originals placed is less than the number specified for com-
bining, the last page segment is left blank as shown.
3
1. Front
2. Back
1
2
3
4
5
6
7
21
56
3
4
7
12
AUX041S
81
Page 94
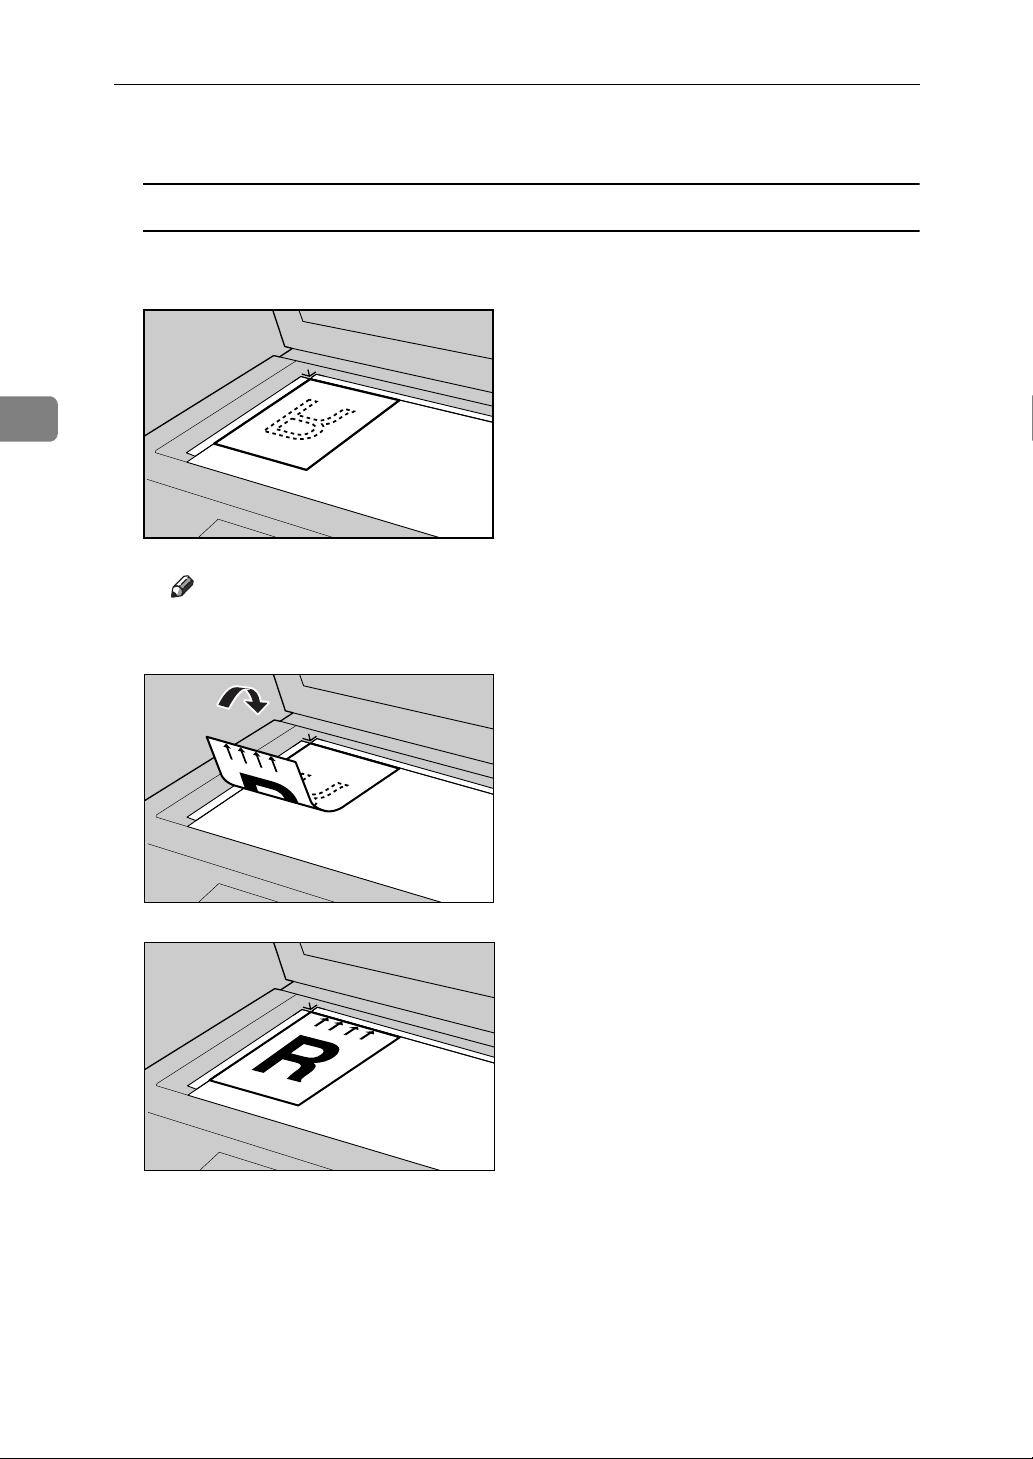
3
Printing Functions
A Place the originals.
Placing the original (K) on the exposure glass
A Place the original face down with its leading edge towards you, as
shown below.
ZDCH110E
Note
❒ When scanning the back side of two-sided original, turn over as shown
below.
82
AUY084S
AUY085S
Page 95
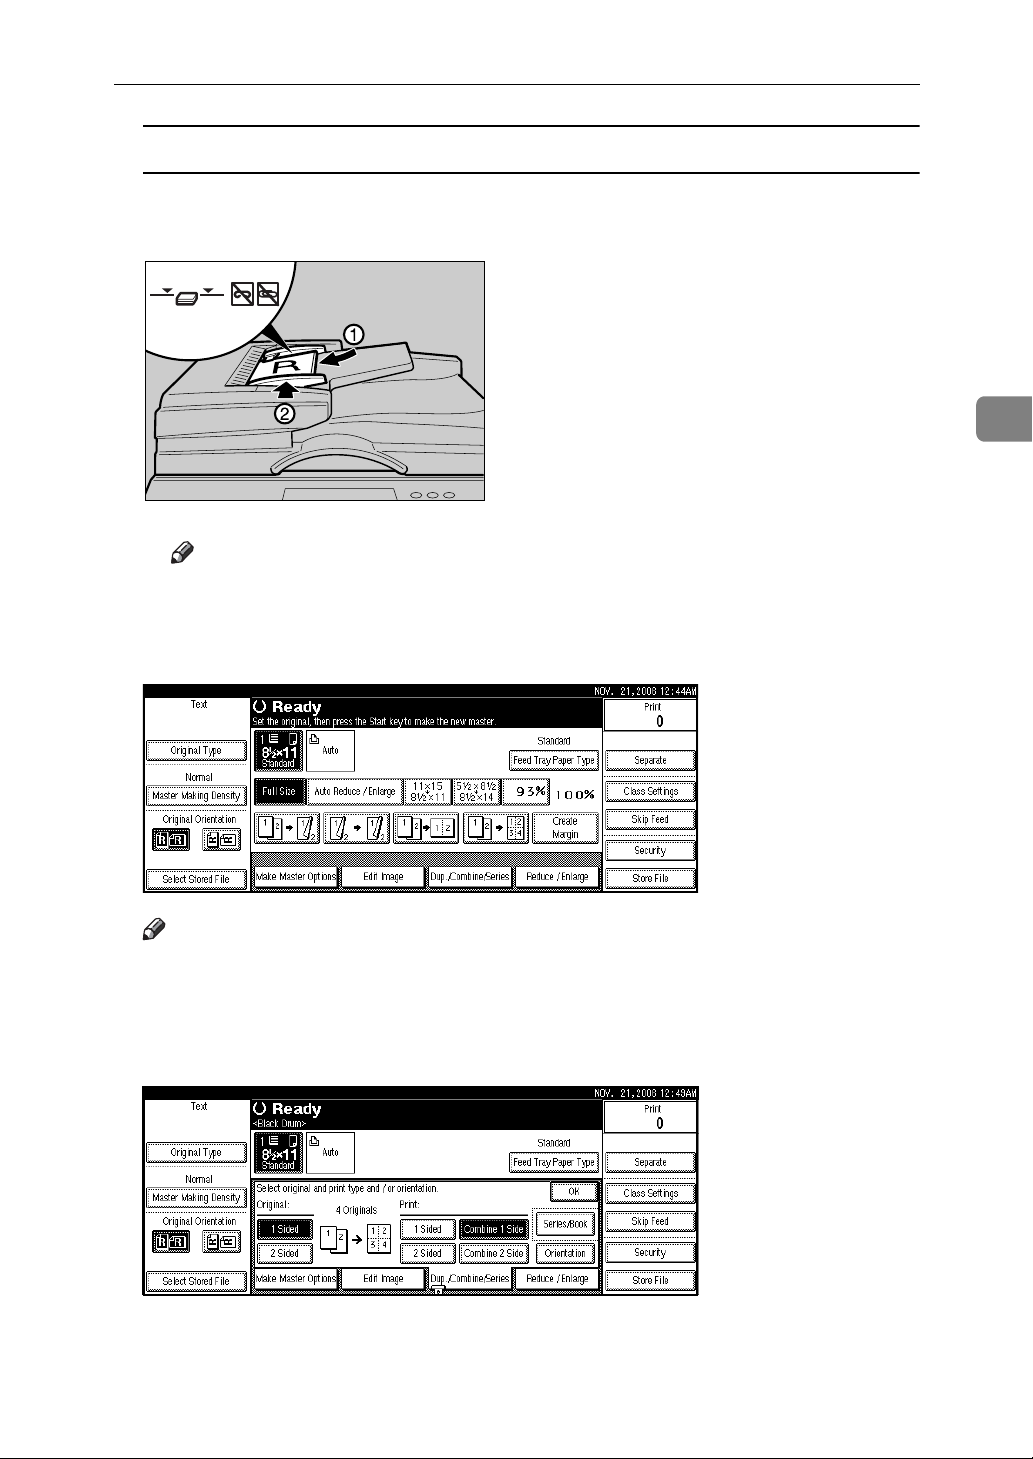
Printing Functions
Placing the originals (K) in the optional ARDF
A Place the originals face up with the first page on the top.
B Adjust the document guides to the original size.
AUY011S
Note
❒ To avoid originals misfeeding, fan the originals before placing them in
the ARDF.
3
B Press [Dup./Combine/Series].
Note
❒ You can also select “1 Sided to 2 Sided” or ”2 Sided to 2 Sided”directly by
pressing the Function Key. In that case, proceed to
.
D
C Select [1 Sided] or [2 Sided] for Original, and then select [Combine 2 Side] for
print.
83
Page 96

3
Printing Functions
D Select the number of originals to be combined.
E Press [OK] twice.
F Press the {Start} key.
Note
❒ The machine selects the reproduction ratio automatically.
❒ When placing an original on the exposure glass or one sheet at a time in the
optional ARDF, repeat steps
the {q} key.
and F. After placing the last original, press
A
84
Page 97
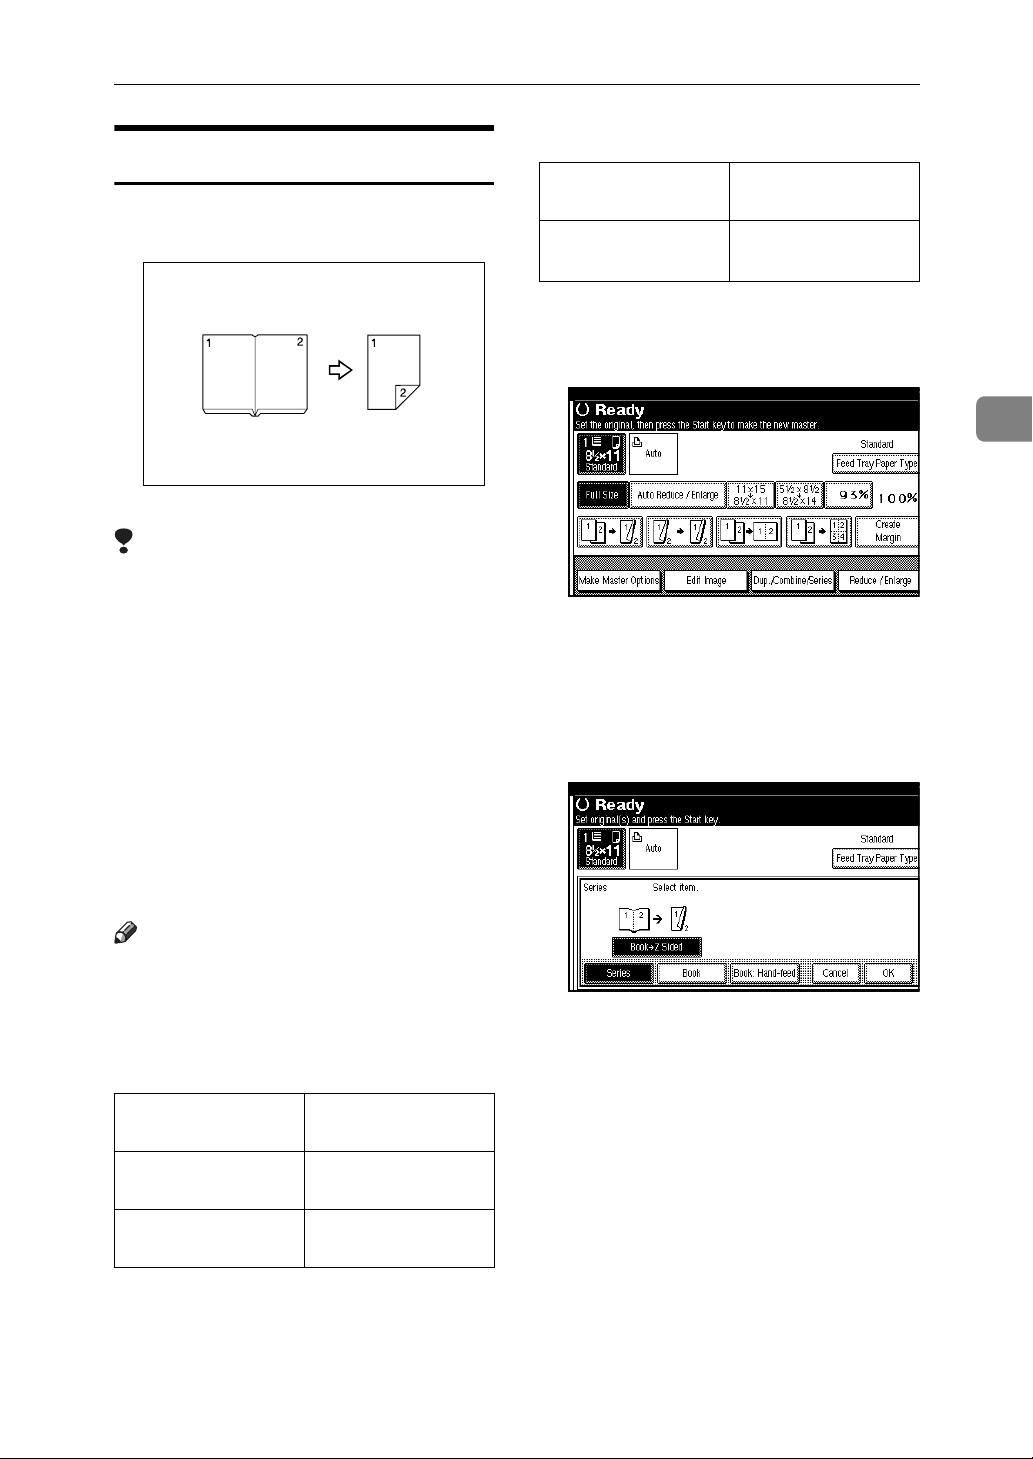
Series
Separately prints the two facing pages
of a bound original onto two sheets.
AUX014S
Limitation
❒ You cannot use the Series function
from the ARDF.
❒ When selected Series function, fol-
lowing functions cannot be used
together.
• Erase Paper Border
• Make-Up
•Overlay
•Stamp
Printing Functions
❖ Inch version
Paper for two-sided
Original
11" × 17"L
printing
81/2" × 11"K × 1
sheet (two-sided)
A Place the originals.
B Press [Dup./Combine/Series].
C Press [Series/Book].
D Press [Series].
E Select [Book→2 Sided], and then
press [OK].
3
• Storing Files
• Searching for Printing Stored Files
Note
❒ See the following table for original
and print paper sizes when using a
100% ratio.
❖ Metric version
Paper for two-sided
Original
A3L A4K × 1 sheet
B4 JISL B5 JISK × 1 sheet
printing
(two-sided)
(two-sided)
F Press [OK].
G Press the {Start} key.
85
Page 98
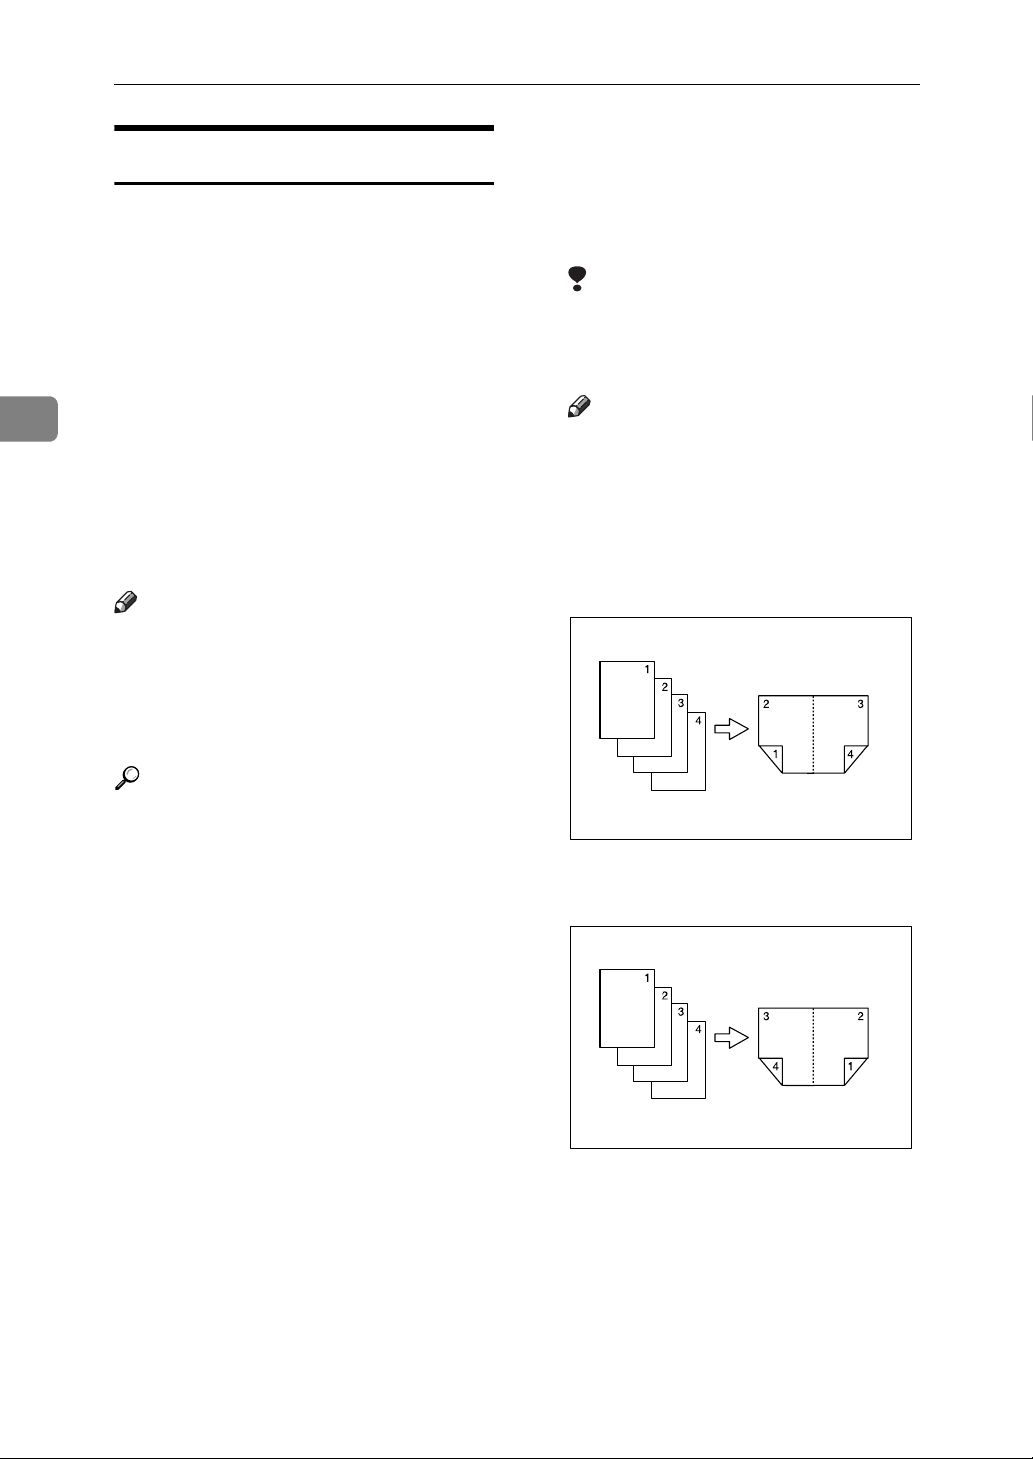
3
Printing Functions
Booklet/Magazine
Multiple Originals are printed in paginated order using two methods of
bookbinding:
•Booklet/Magazine
This is the normal binding method
and uses the two-sided printing
function to print in paginated order
on A4K, 8
• Booklet/Magazine (Hand-feed)
This method requires the user to
manually turn the prints over and
place them on the paper tray. It
prints in paginated order on A3L,
11"×17"L and B4L.
Note
❒ In bookbinding mode, the printer
automatically selects Auto Reduce/Enlarge, which automatically sets the scale of the original to fit
the size of the paper.
1
/2" × 11" K and B5 JISK.
❖ 1 Sided→Booklet / 1 Sided→Booklet
(Hand-feed)
Prints multiple one-sided originals
as a page-ordered foldable booklet
(as in the illustration).
Limitation
❒ "1 Sided→Booklet (Hand-feed)"
can be used only if the optional
HDD board is installed.
Note
❒ The Hand-feed method requires
you to manually turn over each
printed sheet and place them
one at a time in the paper feed
tray.
❖ Open to left
Reference
Related initial settings
p.192 “Orientation: Booklet, Magazine”
AUX016S
❖ Open to right
AUX015S
86
Page 99
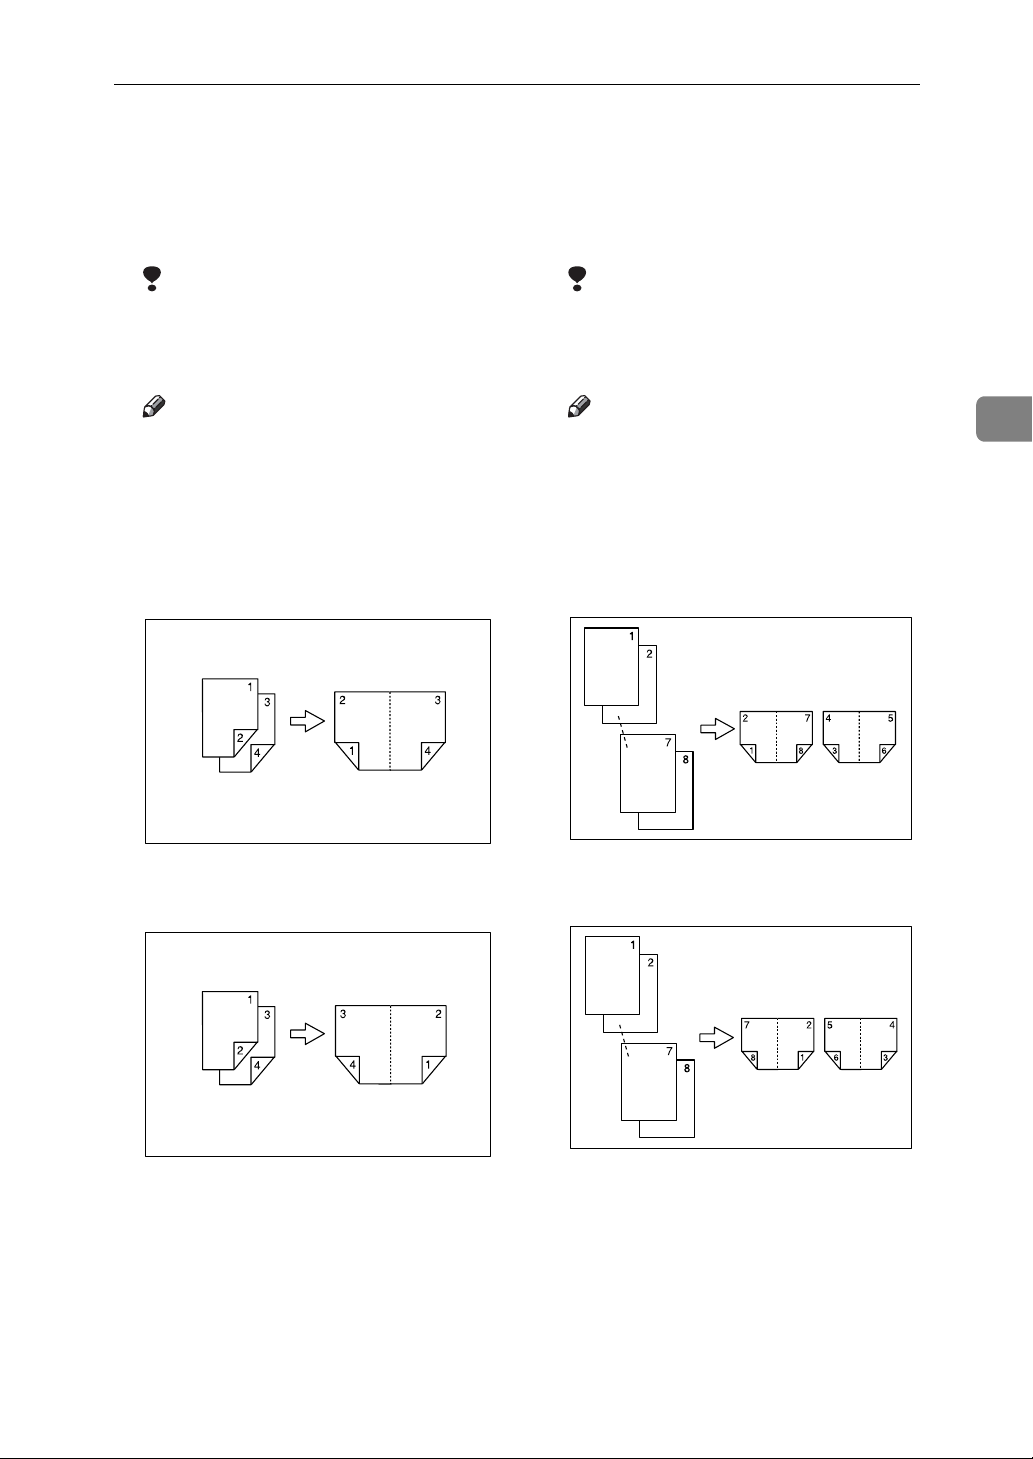
Printing Functions
❖ 2 Sided→Booklet / 2 Sided→Booklet
(Hand-feed)
Prints multiple two-sided originals
as a page-ordered foldable booklet
(as in the illustration).
Limitation
❒ "2 Sided→Booklet (Hand-feed)"
can be used only if the optional
HDD board is installed.
Note
❒ The Hand-feed method requires
you to manually turn over each
printed sheet and place them
one at a time in the paper feed
tray.
❖ Open to left
❖ 1 Sided→Magazine / 1 Sided→Maga-
zine (Hand-feed)
Prints two or more originals to
make prints in page order when
they are folded and stacked.
Limitation
❒ These functions can be used only
if the optional HDD board is installed.
Note
❒ The Hand-feed method requires
you to manually turn over each
printed sheet and place them
one at a time in the paper feed
tray.
❖ Open to left
3
❖ Open to right
AUX018S
AUX017S
AUX020S
❖ Open to right
AUX019S
87
Page 100
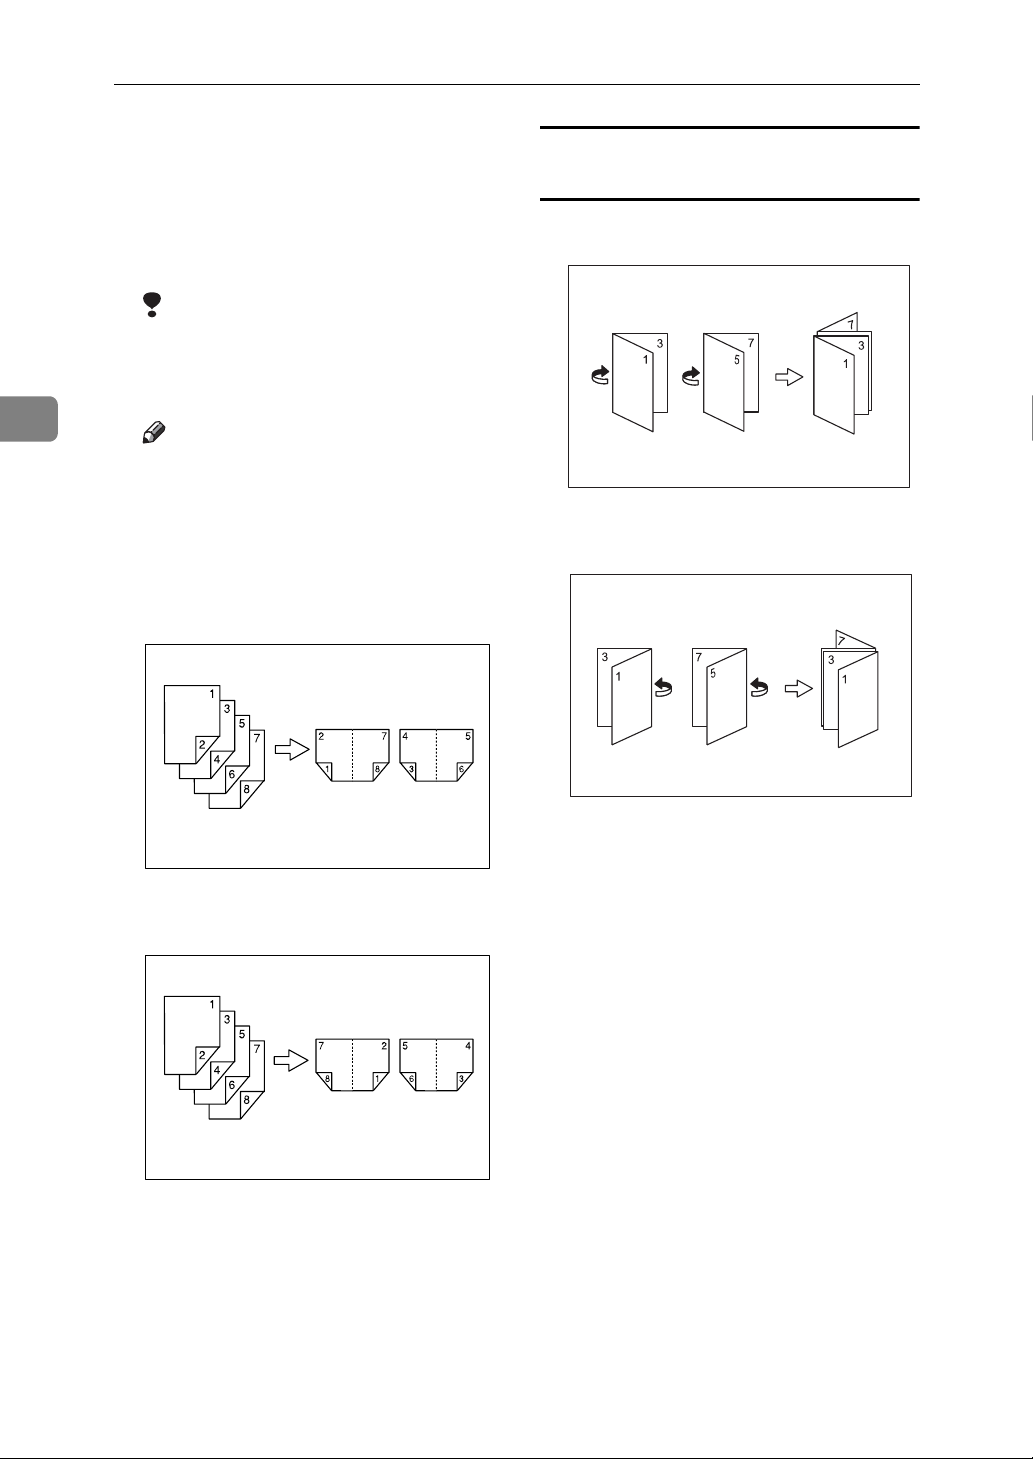
Printing Functions
3
❖ 2 Sided→Magazine / 2 Sided→Maga-
zine (Hand-feed)
Prints two or more originals of
two-sided to make prints in page
order when they are folded and
stacked.
Limitation
❒ These functions can be used only
if the optional HDD board is installed.
Note
❒ The Hand-feed method requires
you to manually turn over each
printed sheet and place them
one at a time in the paper feed
tray.
❖ Open to left
How to fold and unfold prints to make a booklet
❖ Open to left
AUX152S
❖ Open to right
❖ Open to right
AUX151S
AUX021S
AUX022S
88
 Loading...