


OPERATING INSTRUCTIONS - 1.2
BEFORE SWITCHING ON

SPECIFICATIONS
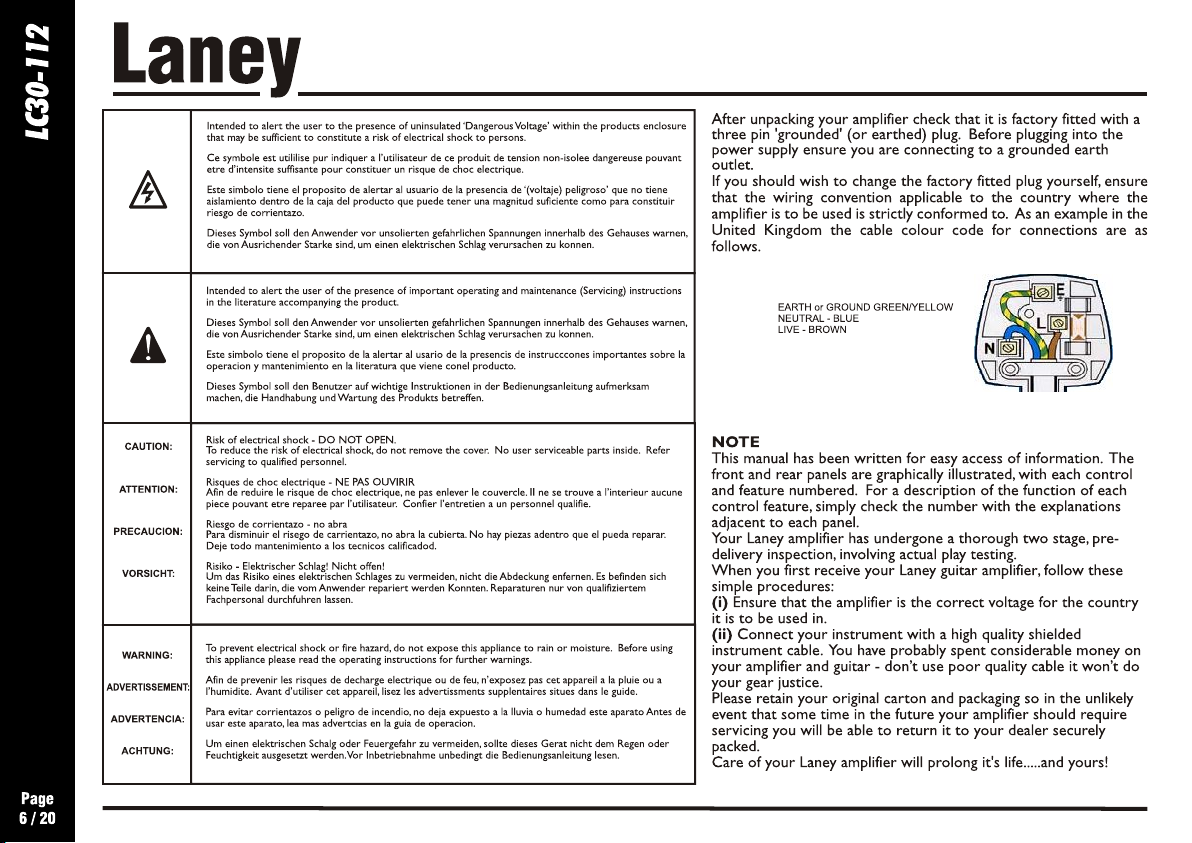
Supply Voltage ~100V, ~120V, ~230V, ~240V 50/60Hz Factory Option
Mains Fuse (~220V>240V = T2A L 250V) (~100>120V = T5A L 250V)
HT Fuse T500mA L
Power Consumption 100W
Output Power Rating 50W
Loudspeaker 12” Celestion 8 Ohms
Loudspeaker outputs Extension speaker socket (Minimum 8 Ohm Impedance)
Features Pure Class A/B Valve tone
2 x EL34B-STR Power Tubes (Matched Set TAD)
4 x 12AX7/ECC83 Preamp tubes (TAD)
Hi & Lo Gain Inputs
FX Loop with Switchable Level & By-pass
Footswitchable Channel and Reverb (FS2 Optional)
Reverb Digital Reverb
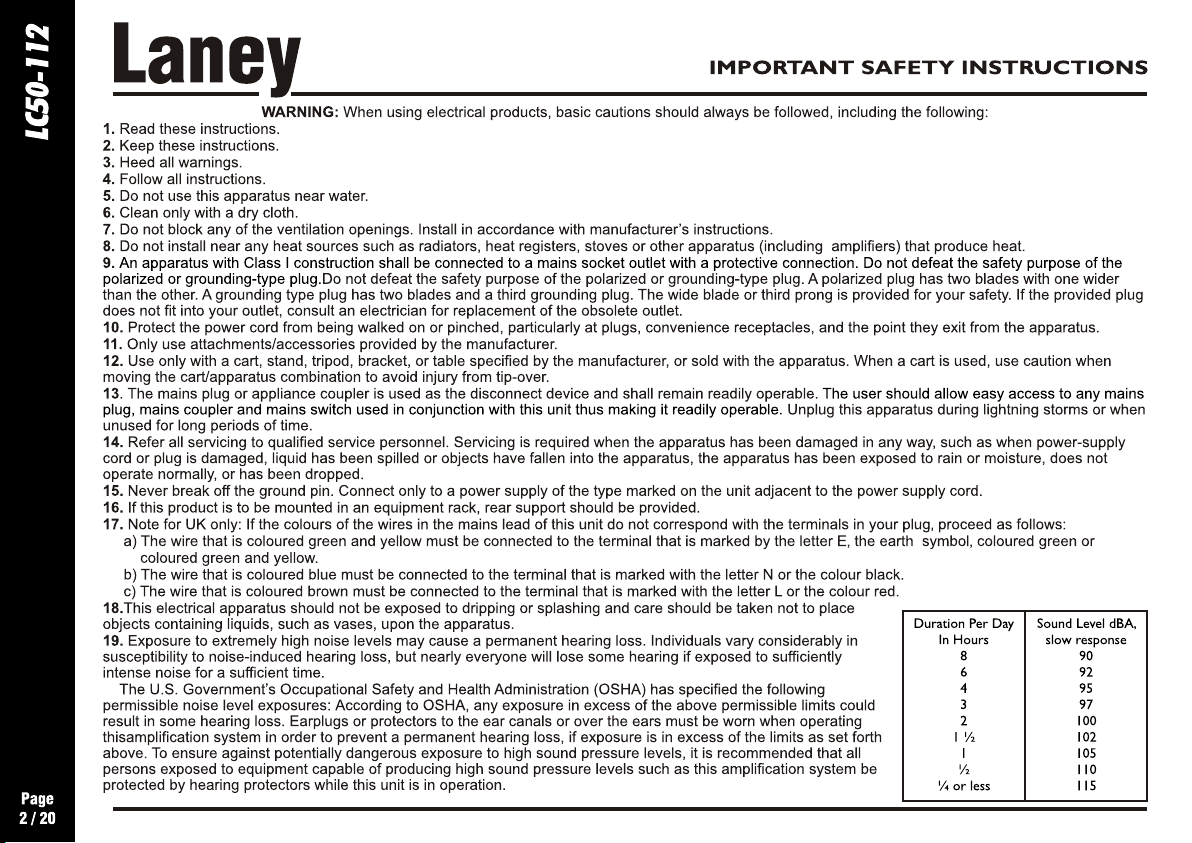
EQ Passive Bass, Middle and Treble (Separate EQ for Clean and Drive)
Bright Switch
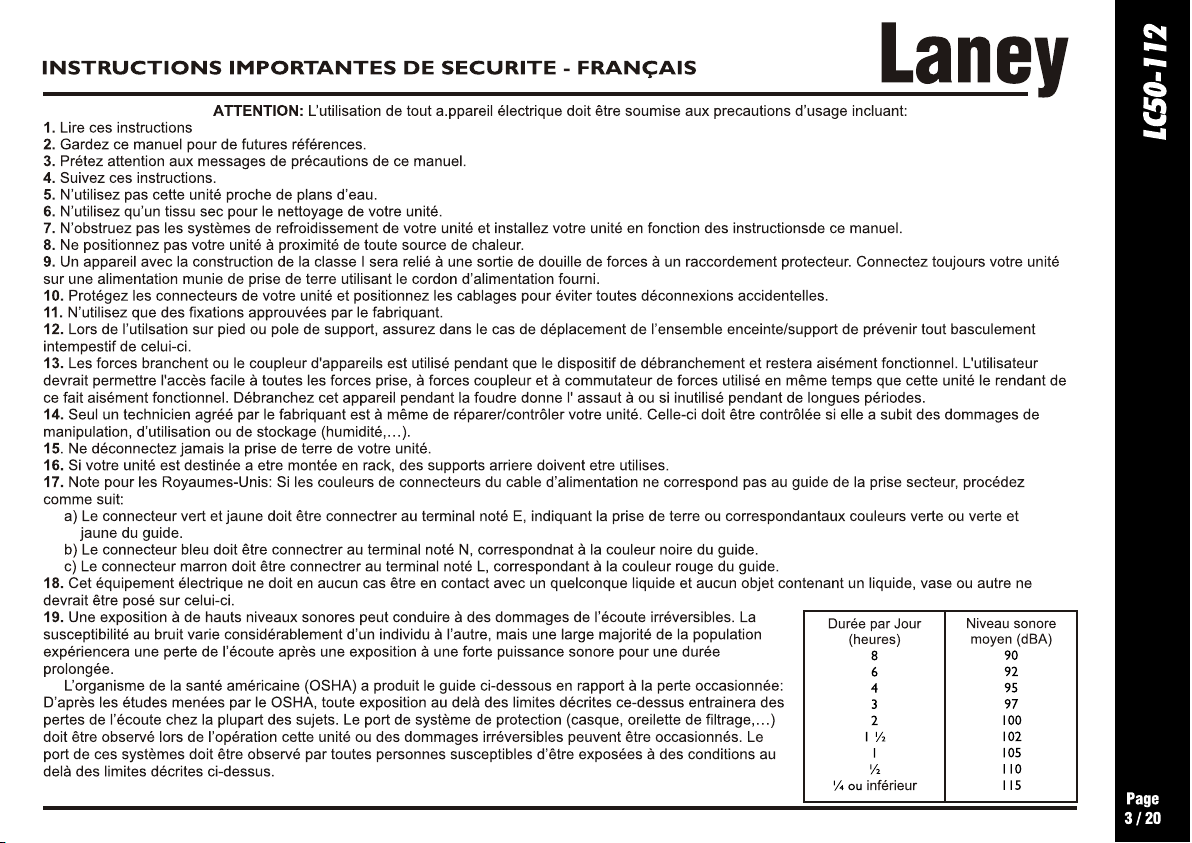
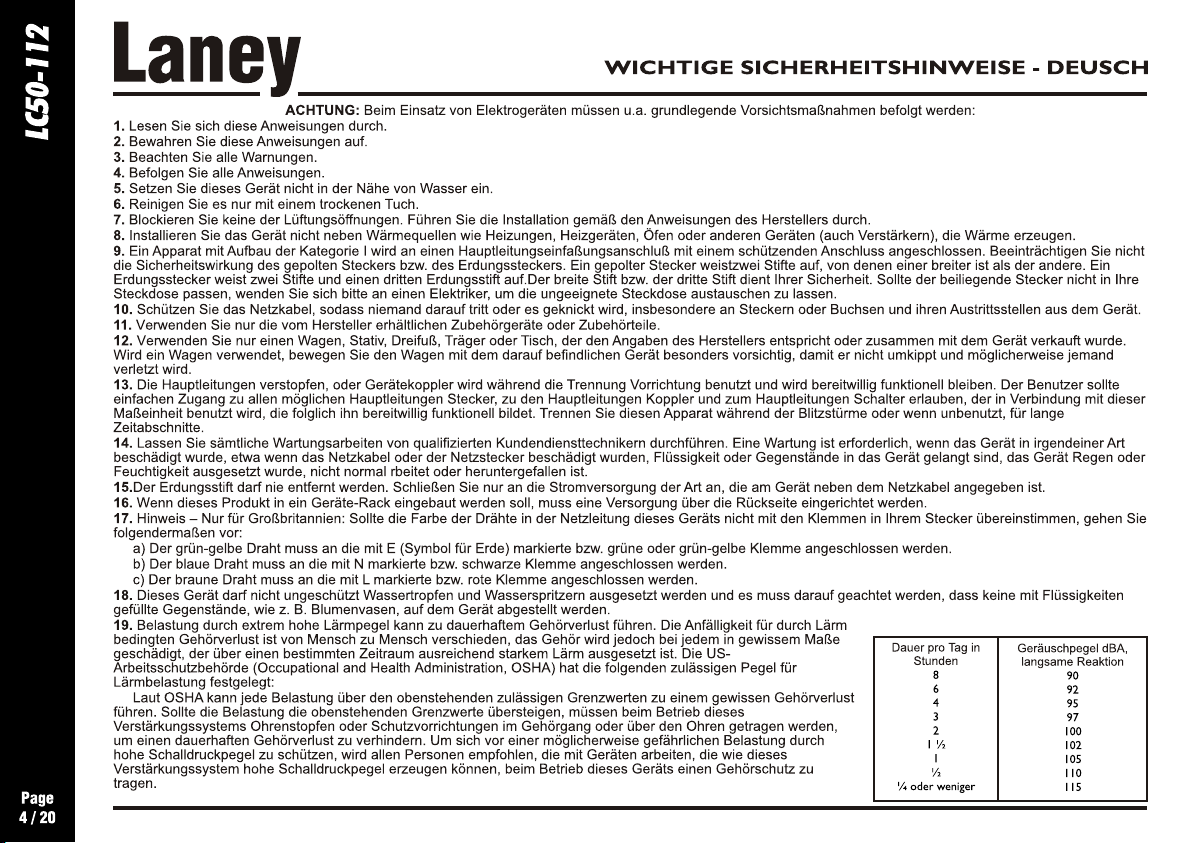
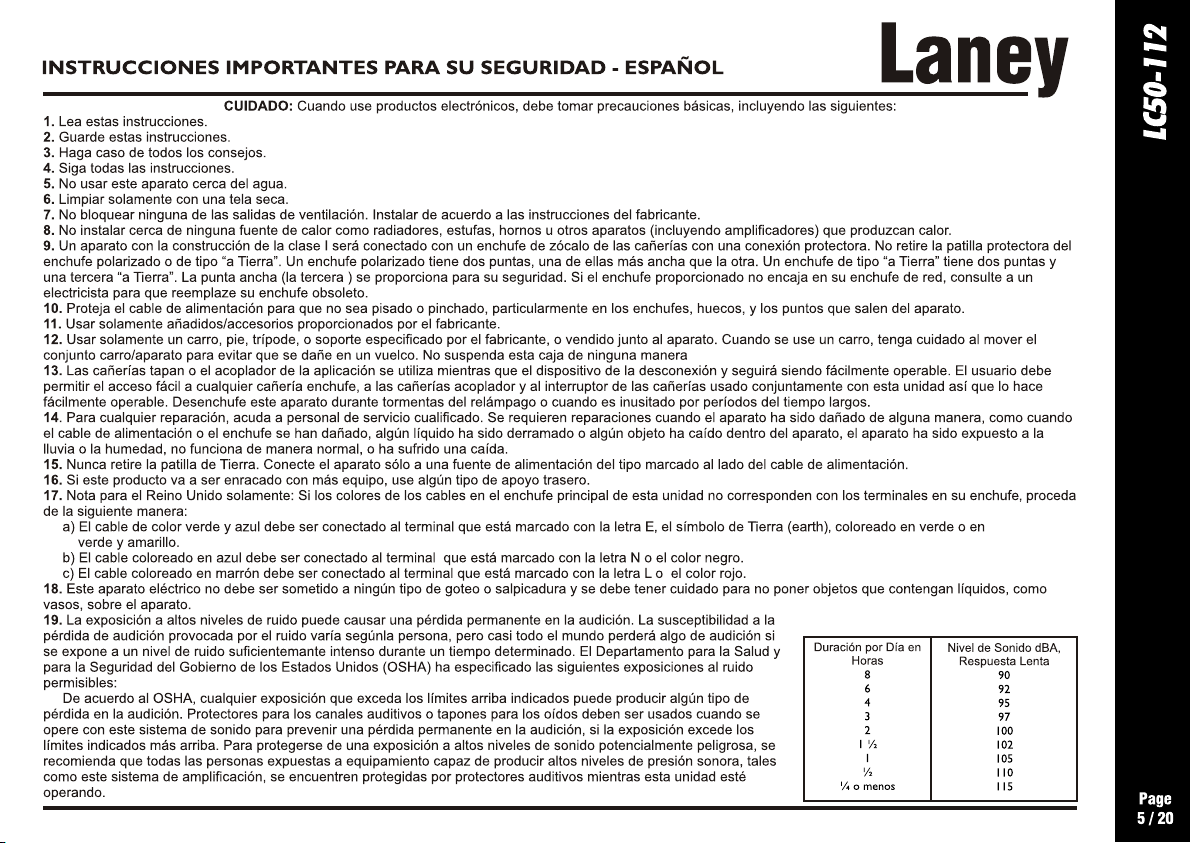
Modern Switch
Input Impedance 1MOhm/47pF
Size (H*W*D) 451*558*278 (Base)
Unit Weight 23Kg
This product conforms to the requirements of the following European Regulations, Directives & Rules:-
In order to reduce environmental damage, at the end of its useful life, this product must not be disposed of along with normal
household waste to landfill sites. It must be taken to an approved recycling centre according to the recommendations of the
WEEE (Waste Electrical and Electronic Equipment) directive applicable in your country.
CE Mark (93/68/EEC), Low Voltage (72/23/EEC), EMC (2004/108/EEC),
RoHS (EU2002/95/EC), WEEE (EU2002/96/EC)

INTRODUCTION
Page
8 / 20

Laney
The LC50-112’s 50W Class A/B output stage oozes classic, warm tube tones: The harder you drive it, the better it sounds.
Plus with enough gain for contemporary tones, it also has a mean, spiteful side to it as well – making it ideal for any style of
playing. Perfect for studio and practice use, but also equally at home or on stage by itself or plugged into a Laney extension
cabinet, the sound will blow you away.
LC50-112
Your LC50-112 should give you years of trouble-free amplification, however please take time to read this manual and familiarise
yourself with the controls as it will allow you to get the best from your amplifier. We hope you enjoy using your LC50-112 as
much as we enjoyed designing and making it.
Best wishes from all at Laney
Page
9 / 20

Laney
FRONT PANEL CONTROLS
LC50-112
Page
10 / 20
1
INPUT
4
HI
3
2
1
LO
0
5
6
10
GAIN VOLUMEBASS
5
4
3
7
2
8
1
9
0
BRIGHT CHANNEL STANDBY POWER
2 3 4 678 10 12 13 1495
1
HI INPUT:
‘Hi’ stands for high gain. This input is designed for the connection of low output level guitars making it well
CLEAN CHANNEL DRIVE CHANNEL MASTER
5
4
6
3
7
2
8
1
9
0
10
MIDDLE TREBLE DRIVE
5
4
6
3
7
2
8
1
9
0
10
5
4
6
10
6
3
7
2
8
1
9
0
10
5
4
6
3
7
2
8
1
9
0
10
5
4
3
7
2
8
1
9
0
5
4
6
3
7
2
8
1
9
0
10
MIDDLE TREBLE REVERB
5
4
6
3
7
2
8
1
9
0
10
5
4
6
3
7
2
8
1
9
0
10
VOLUMEMODERN BASS
4
6
3
7
2
8
1
9
0
10
TONE
5
6
10
11 1716
3
7
2
8
1
9
15
5
4
6
7
8
9
0
10
suited for guitars with single coiled or low gain humbucker type pickups. Use of high gain pickups in this input may drive the
preamp too hard causing a "mushy" sound. Only use good quality guitar cable.
2
LO INPUT: ‘
Lo’ stands for low gain. This input is attenuated down approximately 50% from the Hi input and is designed for
high output level guitars. It is useful in obtaining output that is "tight" not "mushy" from high gain humbucker type pickups
Only use good quality guitar cable.
3
GAIN Sets the level of tube preamplifier Gain or how dirty your sound is. This control should be used in conjunction with
:
the Volume control, setting low levels of gain with high levels of volume will give the cleanest preamplifier sound with tube
output stage overdrive at high volume settings. Setting a medium gain level and medium volume will give a nice crisp tone
with just a little break up and warmth, again with the ability to drive the output stage at higher volume settings. Setting a high
level on the gain control and a low setting on the volume will give you a nice blues tone, with the ability to again drive the
output tubes at higher volume settings. Having set the gain and volume controls to your desired sound try backing off your
guitar volume and tone controls for lots of other cool sounds. Good tube amplifiers have the unique ability to produce a
wide range of sounds by using only your guitar controls, playing weight and style.
4
BRIGHT:
Adds brightness and life to the treble frequencies of your guitar when on the clean channel. The switch has more
effect at low Gain Volume control settings. Use in conjunction with the Treble and Tone controls for optimum performance.
5
BASS, MIDDLE, TREBLE: These are a traditional set of passive tone controls for the clean channel. Passive controls have
the advantage of always sounding musical at any of their settings mainly due to their unique interactive nature. This gives
players a more natural set of tools to create their ideal sound. (Try them all set at midway (5) as a good starting point).
6
VOLUME Sets how loud the clean channel is. Try cranking it up a little to drive the power tubes harder for that real retro
:
sound and feel that only a quality tube amplifier can deliver. Now use your guitar volume to control the amount of distortion.
LC50
1
0
.

7
CHANNEL Switch in to enable the 'Drive' channel. (This switch must be in the disengaged position in order for
SWITCH:
the drive to be switched remotely via a foot switch.)
8
DRIVE LED:
This led will illuminate when the Drive channel is activated with the Drive switch (8) or an optional Laney FS2
remote footswitch.
9
DRIVE:
Sets the level of tube preamplifier drive or how dirty your sound is. This control should be used in conjunction with
the Drive Volume (12) Setting low levels of gain with high levels of volume will give a clean preamplifier sound with tube
output stage overdrive. Setting a medium drive level and medium Drive Volume will give a nice crisp bluesy tone, again with
the ability to drive the output stage at higher Drive Volume settings. Setting a high level on the Drive control and a low
setting on the Drive Volume will give you a punchy hard rock tone, with the ability to again drive the output tubes at higher
Drive volume settings. Having set the Drive and Drive Volume controls to your desired sound try backing off your guitar
volume and tone controls for lots of other cool sounds. Good tube amplifiers have the unique ability to produce a wide
range of sounds by using only your guitar controls, playing weight and style.
10
MODERN: The modern switch applies a degree of compression & bass lift to the signal, providing massive smooth sustain.
11
BASS, MIDDLE, TREBLE: These are a traditional set of passive tone controls for the Drive channel and work in a similar
way as those for the clean channel, except that they operate post distortion giving a wider range of distorted tone.
12
DRIVE VOL: . It is useful to experiment with drive levels and drive volumes. If you
Sets how loud the 'Drive' channel is
want a very open, warm and semi overdriven sound try reducing the amount of drive and increasing the drive volume. This
reduces pre amp gain but pushes the power amp section and makes it work harder giving you a very desirable level of power
-
amp distortion which is a very pleasing “retro” style sound.
13
TONE:
The tone control works in a similar fashion to the Tone control you probably have on your guitar except that it
uniquely works at the other end of the amplification chain. This has the ability to not only control the overall top end
response but also reduce upper end harmonics on the output stage and preamplifier overdrive sounds. This will give you
bright cutting sounds at high settings and smooth rounded sounds at lower settings. (Midway (5) is a good starting point)
14
REVERB: Controls how loud the built in reverb sounds.
15
POWER LED: This led will be lit when the amplifier is switched on.
(Always switch off and disconnect the power
cord when not in use)
16
STANDBY: Disconnects the main HT voltage from the tubes but keeps the tubes warm so that they are ready to go
instantly. Switch off for short breaks when you don’t want to wait for the tubes to warm up again.
17
POWER: Main power switch for the unit. Tube amplifiers take between 30 seconds and 2 minutes to warm up and be ready
to play after switching on, this is normal. Use in conjunction with the standby switch.
Page
11 / 20

Page
12 / 20
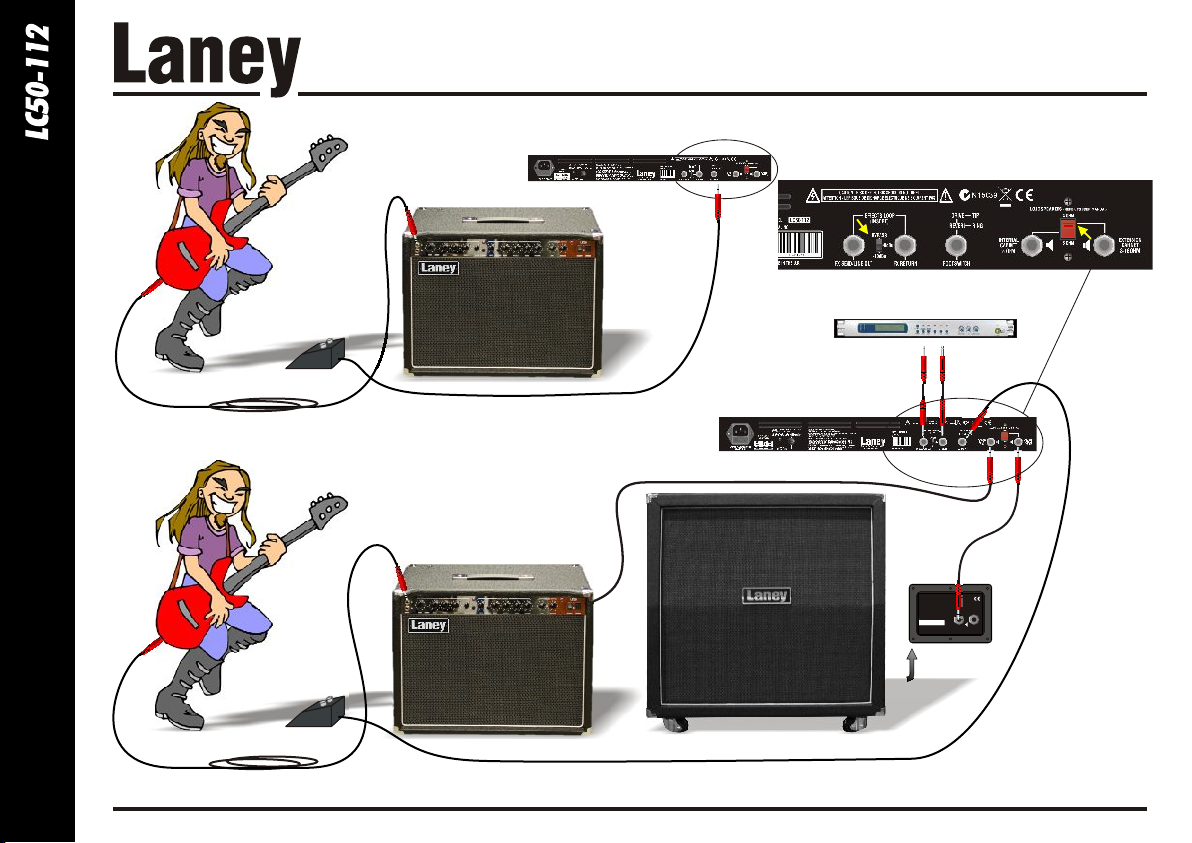
REAR PANEL CONTROLS
Spare power fuse
included in the tray.
1 2 3 4 5 6 7 8 9 10 11
1
POWER INLET SOCKET: Connect to your power source. Make sure the specified voltage is correct for your country!
2
POWER FUSE: This drawer contains the main safety fuse for the unit. The fuse protects the AC power to the amplifier.
USE ONLY THE CORRECT SIZE AND RATING OF FUSE AS SPECIFIED ON THE PANEL. If a fuse blows or fails and a
replacement of the same size and rating is installed and it in turn blows, the amplifier has suffered a malfunction internally and
needs immediate service from a qualified technician. DO NOT TRY USING A FUSE OF HIGHER RATING. Using a fuse that
is too large in current rating may cause serious, irreparable damage to the amplifier and presents a serious fire hazard. The
mains fuse ratings are detailed in the specs section at the rear of this manual
3
HT FUSE: This fuse protects the DC power to the tubes within the amplifier. USE ONLY THE CORRECT SIZE AND
RATING FUSE AS SPECIFIED ON THE PANEL. If a fuse blows or fails and a replacement of the same size and rating is
installed and it in turn blows, the amplifier has suffered a malfunction, at this point check the output tubes and replace faulty
ones if required. Should tubes not be the problem the amplifier should be checked out by a qualified technician. Do not try
using a fuse of greater value. Using a fuse that is too large in current rating may cause serious, irreparable damage to the
amplifier. Fuses are designed to protect, do not take chances.
4
SERIAL NO: Displays the model and serial number of the unit.
5
EFFECTS LOOP: SEND/LINE OUT: Connect the input of your external effect to this socket. All of the signal leaves the
amplifier via the `Send’ socket to be processed and comes back from the effects via the `Return` socket. This socket can also

be used to control another L 5 -112 amplifier connected to this socket via its own return socket. Some Effects are better
C 0
suited to being between the guitar and amplifer input - these are foot pedal types / distortion / wah wah pedals etc. Rack
mount effects will work better in the FX loop on the amplifer rear. Stomp boxes are normally designed for small signals such
as a guitar output whereas rack mount FX are designed for the higher signal level obtained from an FX send. This socket can
also be used as a Line Level Out.
6
BY-PASS/LEVEL SWITCH: This switch allows the effects loop to be by-passed if not in use, it also gives you the option
of running the FX loop at 0dB (750mV) or at -10dB (250mV) to suit your processor.
7
EFFECTS LOOP: RETURN: Connect the output from your external effects to this socket. The effects loop allows you to
connect external effects such as tremolo’s, chorus and delays to your amplifier. All of the signal leaves the amplifier via the
`Send’ socket and comes back from the effects via the `Return` socket. Use the output level control on your FX to control
how loud the FX return signal sounds. This is an insert type control, therefore you need to set the Dry/ Wet mix in your FX
processor.
8
FOOTSWITCH SOCKET: Provided for the connection of a Laney FS2 footswitch (optional) .This allows you to remotely
switch between the clean/drive channel and & switch the built in reverb On/Off.
9
INTERNAL CABINET: y a ¼” (6.3mm)
cabinet connected ensure that switch ( ) is set to 8 ohms. In use your C 0 should always have
a speaker connected otherwise you risk damaging the C 0 ’s output transformer.
10
IMPEDANCE SELECTOR SWITCH: This optimises the C 0 ’s output for 4 or 8-16 ohm loads. When using with
The internal loudspeaker is connected b jack to this socket. With no extension
the impedance selector 6 L 5 -112
L 5 -112
L 5 -112
the ‘on board’ speaker set to it 8 ohms. If using an 8-16 ohm extension cabinet at the same time as the onboard speaker, set
the switch to 4 ohms. If you set it wrong it will reduce the life of your output tubes and won’t sound as good.
11
EXTENSION CABINET: Use to connect an 8-16 ohm extension cabinet. Please note mismatched impedance will reduce
the amplifiers performance and in some cases may cause damage to your amplifier. Try the L 5 -112 into a Laney extension
C 0
cabinet - you will be amazed what this baby cranks out.
Page
13 20

QUICK START SETTINGS - suggestions only, experiment!
Page
14 / 20
ON
5
INPUT
4
HI
3
2
1
LO
0
GAIN VOLUMEBASS
4
6
3
7
2
8
1
9
0
10
CLEAN
ON
5
INPUT
4
HI
3
2
1
LO
0
GAIN VOLUMEBASS
4
6
3
7
2
8
1
9
0
10
CLEAN CRUNCH
5
INPUT
4
HI
3
2
1
LO
0
GAIN VOLUMEBASS
4
6
3
7
2
8
1
9
0
10
BLUES LEAD
5
INPUT
4
HI
3
2
1
LO
0
GAIN VOLUMEBASS
4
6
3
7
2
8
1
9
0
10
ROCK LEAD
CLEAN CHANNEL DRIVE CHANNEL MASTER
5
5
4
6
3
7
2
8
1
9
0
10
MIDDLE TREBLE DRIVE
CLEAN CHANNEL DRIVE CHANNEL MASTER
5
5
4
6
3
7
2
8
1
9
0
10
MIDDLE TREBLE DRIVE
CLEAN CHANNEL DRIVE CHANNEL MASTER
5
5
4
6
3
7
2
8
1
9
0
10
MIDDLE TREBLE DRIVE
CLEAN CHANNEL DRIVE CHANNEL MASTER
5
5
4
6
3
7
2
8
1
9
0
10
MIDDLE TREBLE DRIVE
5
4
6
3
7
2
8
1
9
0
10
5
4
6
3
7
2
8
1
9
0
10
5
4
6
3
7
2
8
1
9
0
10
5
4
6
3
7
2
8
1
9
0
10
5
4
6
10
6
10
6
10
6
10
6
3
7
2
8
1
9
0
10
5
4
6
3
7
2
8
1
9
0
10
5
4
6
3
7
2
8
1
9
0
10
5
4
6
3
7
2
8
1
9
0
10
5
4
6
3
7
2
8
1
9
0
10
5
4
6
3
7
2
8
1
9
0
10
On
5
4
6
3
7
2
8
1
9
0
10
On
5
4
6
3
7
2
8
1
9
0
10
5
4
3
7
2
8
1
9
0
5
4
3
7
2
8
1
9
0
5
4
3
7
2
8
1
9
0
On
5
4
3
7
2
8
1
9
0
5
4
6
3
7
2
8
1
9
0
10
MIDDLE TREBLE REVERB
5
4
6
3
7
2
8
1
9
0
10
MIDDLE TREBLE REVERB
5
4
6
3
7
2
8
1
9
0
10
MIDDLE TREBLE REVERB
5
4
6
3
7
2
8
1
9
0
10
MIDDLE TREBLE REVERB
5
4
6
3
7
2
8
1
9
0
10
5
4
6
3
7
2
8
1
9
0
10
4
6
3
7
2
8
1
9
0
10
VOLUMEMODERN BASS
5
4
6
3
7
2
8
1
9
0
10
5
4
6
3
7
2
8
1
9
0
10
4
6
3
7
2
8
1
9
0
10
VOLUMEMODERN BASS
5
4
6
3
7
2
8
1
9
0
10
5
4
6
3
7
2
8
1
9
0
10
4
6
3
7
2
8
1
9
0
10
VOLUMEMODERN BASS
5
4
6
3
7
2
8
1
9
0
10
5
4
6
3
7
2
8
1
9
0
10
4
6
3
7
2
8
1
9
0
10
VOLUMEMODERN BASS
Suggested starting place, adjust the Tone to taste.
5
5
4
6
10
6
3
7
9
7
2
8
8
1
9
0
10
LC50
1
0
TONEBRIGHT CHANNEL STANDBY POWER
5
5
4
6
10
6
3
7
9
7
2
8
8
1
9
0
10
LC50
1
0
TONEBRIGHT CHANNEL STANDBY POWER
5
5
4
6
10
6
3
7
9
7
2
8
8
1
9
0
10
LC50
1
0
TONEBRIGHT CHANNEL STANDBY POWER
5
5
4
6
10
6
3
7
9
7
2
8
8
1
9
0
10
LC50
1
0
TONEBRIGHT CHANNEL STANDBY POWER

USER SETTINGS - Store your own cool sounds
INPUT
INPUT
INPUT
INPUT
HI
3
2
1
LO
4
HI
3
2
1
LO
0
HI
3
2
1
LO
HI
3
2
1
LO
5
4
6
7
8
ON
9
OFF
0
10
GAIN VOLUMEBASS
BRIGHT CHANNEL STANDBY POWER
5
6
7
8
ON
9
OFF
10
GAIN VOLUMEBASS
BRIGHT CHANNEL STANDBY POWER
5
4
6
7
8
ON
9
OFF
0
10
GAIN VOLUMEBASS
BRIGHT CHANNEL STANDBY POWER
5
4
6
7
8
ON
9
OFF
0
10
GAIN VOLUMEBASS
BRIGHT CHANNEL STANDBY POWER
CLEAN CHANNEL DRIVE CHANNEL MASTER
5
4
3
2
1
0
5
4
6
3
7
2
8
1
9
0
10
MIDDLE TREBLE DRIVE
CLEAN CHANNEL DRIVE CHANNEL MASTER
5
4
3
2
1
0
5
4
6
3
7
2
8
1
9
0
10
MIDDLE TREBLE DRIVE
CLEAN CHANNEL DRIVE CHANNEL MASTER
5
4
3
2
1
0
5
4
6
3
7
2
8
1
9
0
10
MIDDLE TREBLE DRIVE
CLEAN CHANNEL DRIVE CHANNEL MASTER
5
4
3
2
1
0
5
4
6
3
7
2
8
1
9
0
10
MIDDLE TREBLE DRIVE
5
4
6
3
7
2
8
1
9
0
10
5
4
6
3
7
2
8
1
9
0
10
5
4
6
3
7
2
8
1
9
0
10
5
4
6
3
7
2
8
1
9
0
10
5
4
6
10
6
10
6
10
6
10
6
3
7
2
8
1
9
0
10
5
4
6
3
7
9
7
2
8
1
9
0
10
5
4
6
3
7
2
8
1
9
0
10
5
4
6
3
7
2
8
1
9
0
10
5
4
6
3
7
2
8
ON
1
9
OFF
0
10
5
4
6
3
7
2
8
ON
1
OFF
7
8
ON
9
OFF
7
8
ON
9
OFF
9
0
10
5
4
6
3
2
1
0
10
5
4
6
3
2
1
0
10
5
4
3
7
2
8
ON
1
9
OFF
0
5
4
3
2
8
ON
1
OFF
0
5
4
3
7
2
8
ON
1
9
OFF
0
5
4
3
7
2
8
ON
1
9
OFF
0
5
4
6
3
7
2
8
1
9
0
10
MIDDLE TREBLE REVERB
5
4
6
3
7
2
8
1
9
0
10
MIDDLE TREBLE REVERB
5
4
6
3
7
2
8
1
9
0
10
MIDDLE TREBLE REVERB
5
4
6
3
7
2
8
1
9
0
10
MIDDLE TREBLE REVERB
5
4
6
3
7
2
8
1
9
0
10
5
4
6
3
7
2
8
1
9
0
10
4
6
3
7
2
8
1
9
0
10
VOLUMEMODERN BASS
5
4
6
3
7
2
8
1
9
0
10
5
4
6
3
7
2
8
1
9
0
10
4
6
3
7
2
8
1
9
0
10
VOLUMEMODERN BASS
5
4
6
3
7
2
8
1
9
0
10
5
4
6
3
7
2
8
1
9
0
10
4
6
3
7
2
8
1
9
0
10
VOLUMEMODERN BASS
5
4
6
3
7
2
8
1
9
0
10
5
4
6
3
7
2
8
1
9
0
10
4
6
3
7
2
8
1
9
0
10
VOLUMEMODERN BASS
TONE
TONE
TONE
TONE
5
5
5
5
5
4
6
10
6
10
6
10
6
10
6
3
7
9
7
8
9
7
9
7
9
7
2
8
2
8
8
8
1
9
0
10
5
4
6
3
7
8
1
9
0
10
5
4
6
3
7
2
8
1
9
0
10
5
4
6
3
7
2
8
1
9
0
10
LC50
1
0
LC50
1
0
LC50
1
0
LC50
1
0
Page
15 / 20

Page
16 / 20
TUBE AMPLIFIER SURVIVAL TIPS
• Tube amplifiers; generally sound much warmer/sweeter than solid state transistor amplifiers but they also need a little more
respect due to the fragile glass tubes themselves. The LC50-112 uses top quality tubes, which should give you years of trouble free
service, however like all tube amps; it is important to treat it with a certain amount of care.
• Tubes are fragile glass components; they can easily be damaged if thrown in and out of vehicles,
• Make sure the impedance; of your cabinets matches the setting on your amplifier. Improper impedance matching will result in
reduced output power output and compromised sound at best and amplifier failure/premature tube failure at worst.
• Allow the amplifier; to warm up to room temperature before switching it on, The sudden thermal shock generated can crack
the cold glass tube housing plus any moisture is bad news around high voltage electronics.
• Allow the amplifier; to cool down after playing before moving. Hot tubes are more susceptible to damage than cool ones.Use
good quality loudspeaker leads, cheap leads are often not up to the job of handling the large requirements for loudspeakers and can
often short out.
• Tube amplifiers; don't like running into a open circuit. A tubes life expectancy is based upon a number of factors which include
operating temperature, how hard and how often it is played, vibration due to travel etc. Tubes should be changed in your amplifier if
you notice any change in your amplifiers performance etc. They need not be changed at any regular interval.
• Typical problems; with preamp tubes can be a crackly noise, hiss, hum and microphony. The preamp tubes can safely be changed
with no action required if they fail or reduce in performance. Typical output tube problems can be blown HT fuse; sound lacking in
punch, sound lacks extreme highs or lows and low level hum. The Output tubes can be replaced singularly if you replace them with the
exact same type AND grade as factory fitted otherwise they should be replaced as a quad set. See the diagram following to see how
to check the tube grade fitted. Exact replacement preamp tubes and matched sets of output tubes are available from Laney via your
dealer.
• To change a tube; switch off the unit and unplug from the mains supply. Wait for the tubes to cool down. Lay amplifier down on
its front face and remove the protective grille held in place with four screws. You should now be able to access the underside of the
amplifier chassis. Preamp tubes have a spring retainer which must be pulled away, the tube can then be gently pulled out. Take care
when pushing the new tube in to make sure the pins are all aligned properly. The output tubes have a spring retainer fitted to the tube
socket which grips the base of the tube. The tube must be released from this by pushing the retaining clips down with one hand, whilst
gently rocking and pulling the tube from its socket with the other. Take care when pushing the replacement tube past the retaining
clips to ensure that the rib on the base of the tube is aligned in its locating slot in the socket.
• ;
Amplifier connection In order to avoid damage, it is advisable to establish and follow a pattern for turning on and off your
equipment. With all system parts connected, effects processors etc. BEFORE turning on your guitar amplifier. Many products have
large transient surges at turn on and off which can cause damage to your speakers. By turning on your guitar amplifier LAST and
making sure its Volume controls are set to minimum any transients from other equipment will not reach your loudspeakers. Wait until
V4V5V6V7
V1V2V3
all system parts have stabilised; usually a couple of seconds. Similarly when turning off your system always turn down the Volume
V1 RT030 ECC83 Hi Grade 005570
V2,3 R T003 ECC83 Select 005548
V4 NN003 ECC83 005548
V5,6
EL34 EL34
005091
controls on your guitar amplifier and then turn off its power before turning off other equipment.
• Servicing: The user should not attempt to service these products. Refer all servicing to qualified service personnel.
EL34B
Grade Number
V1b
BASS
DRIVE
CLEAN
EQ
MID
HI INPUT
PAD
LO INPUT
BLOCK DIAGRAM
V1a
MODERN
TREBLE
V3b
GAIN
V3a
BRIGHT
BRIGHT
BASS
V2b
DRIVE
EQ
MID
V2a
CLEAN
VOLUME
TREBLE
DRIVE
VOLUME
LINE OUT
FX SEND
REVERB
FOOTSWITCH
REVERB
LEVEL
FX RETURN
BYPASS
0 dB
10dB
V1
V2
V3
TONE
CONTROL
V4a
V4b
V4
TONE
V5
V6
V5
INTERNAL
8Ohms
LOUDSPEAKER
4Ohms
EXTERNAL
LOUDSPEAKER
8-16 OHMS
V6
Page
17 / 20
LC50-112 SAMPLE SYSTEMS
FX Controller
Input
Output
Laney
Laney
Power To The Music
Power To The Music
Model RB115
Model RB115
Power Rating 300W Program
Power Rating 300W Program
GS412A
Serial Number:
Serial Number:
Input
Input
Link
Link
DESIGNED IN THE UK BY LANEY
DESIGNED IN THE UK BY LANEY
8 Ohms
8 Ohms
www.laney.co.uk
www.laney.co.uk
Page
18 / 20

NOTES
Page
19 / 20

 Loading...