

Page 1

Page 2

CUB-RANGE
INTRODUCTION
Welcome to the CUB-SUPER range.
The CUB-SUPER range oers the tone conscious guitar player boutique tone without the boutique price
tag.
Time proven construction methods rened over 50 years of tube amp building and premium components
means that whilst the CUB-SUPER range appears deceptively simple they are reassuringly toneful. From
gently compressing cleans to touch sensitive crunches and full-on leads without a hint of harshness, it’s
dicult to nd a bad sound in the CUB-SUPER range.
The CUB-SUPER range was designed to free up space on your pedal board by ditching your boost pedal!
Why? Because the CUB-SUPER range has a superb BOOST pedal built into the front end of the circuit. It
works in exactly the same way as kicking in your favourite boost pedal on your board – it boosts your guitar
signal and hits the rst preamp tube in the amp….HARD, and as every guitar player should know hitting a
tube amp hard just makes everything sound better! So free some space and get more from your rig.
Available in 2 combo options, a head and 2 matching cabinet options, hand designed boutique aesthetics
and dynamic interactive tone is now available to everyone.
This manual explains the key features of your CUB-SUPER amp. Read it thoroughly and keep it safe for
future reference.
USER MANUAL
www.laney.co.uk
2
Page 3
CUB-RANGE
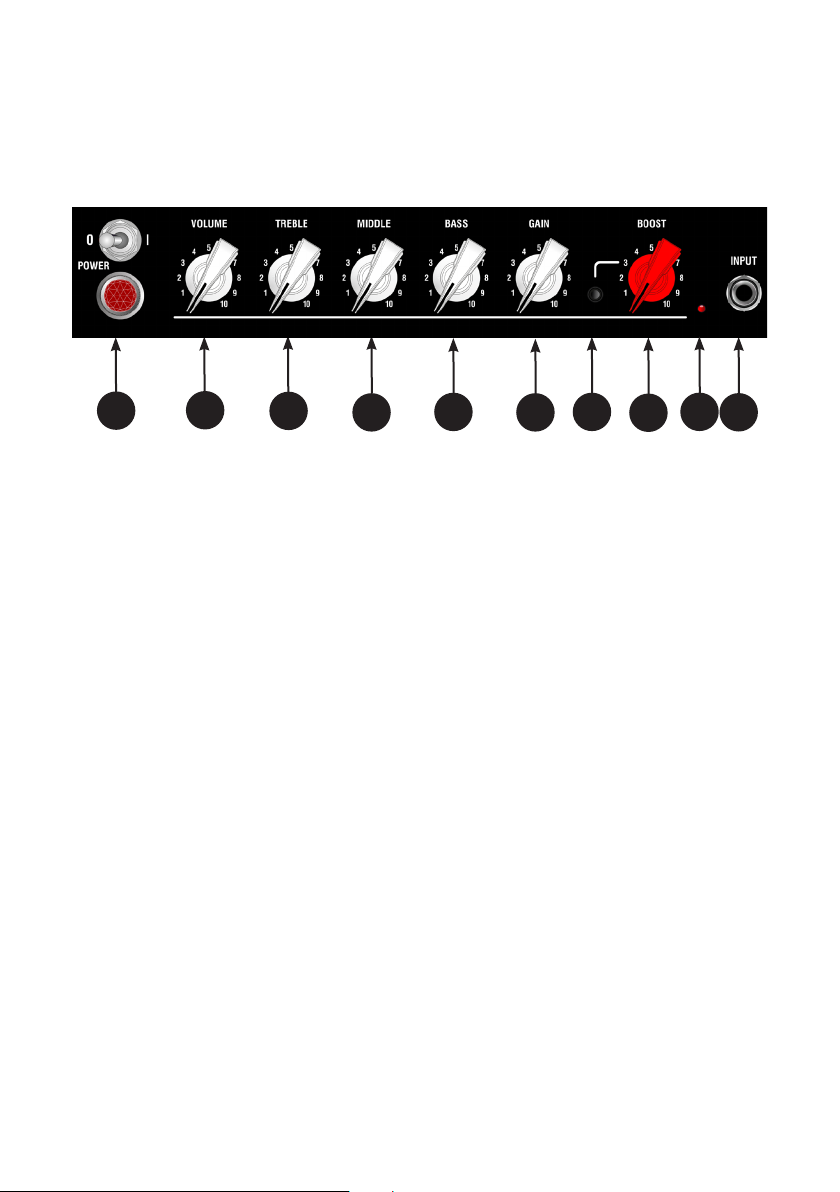
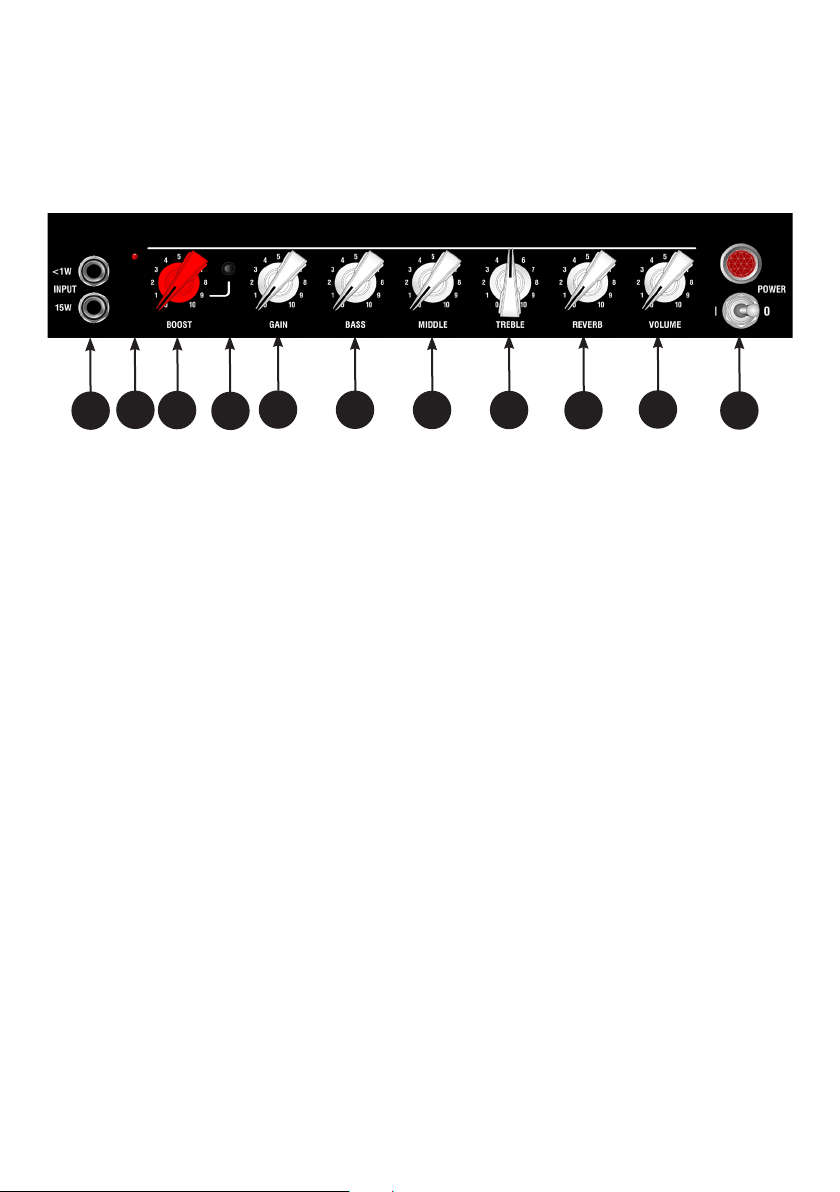
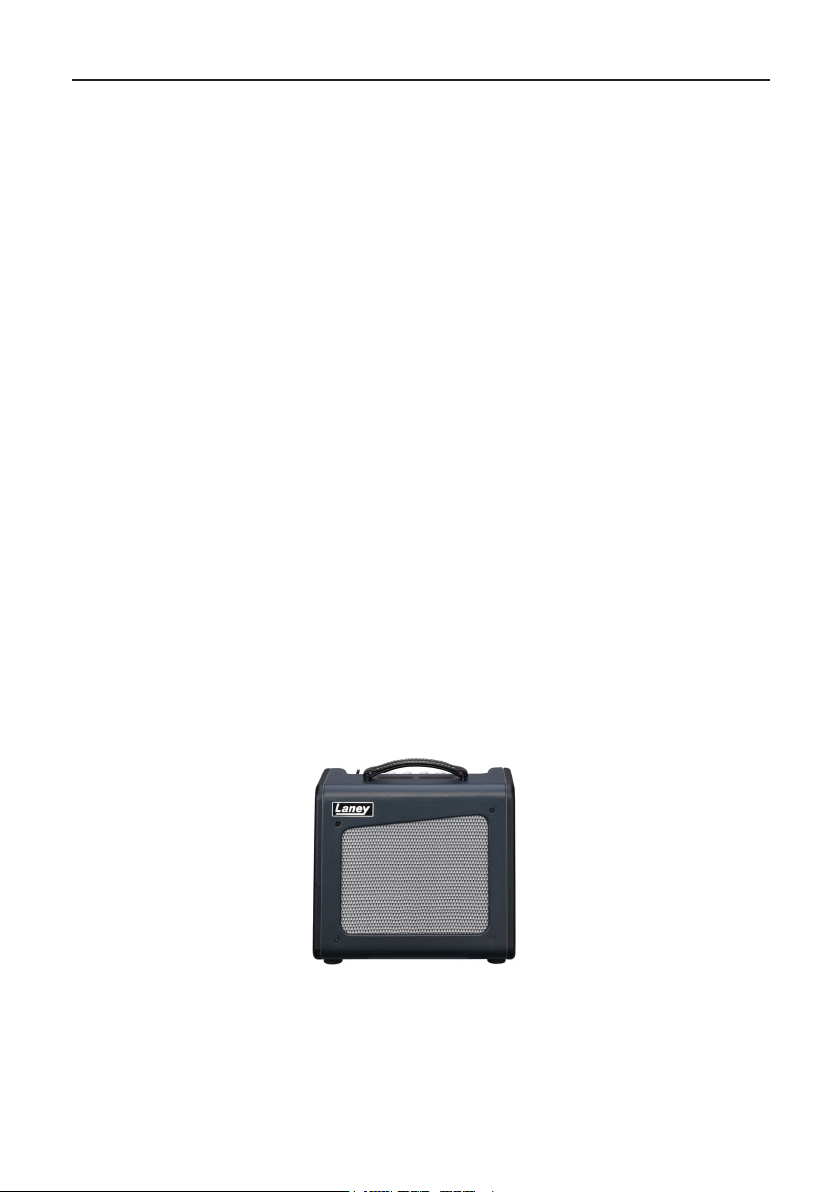
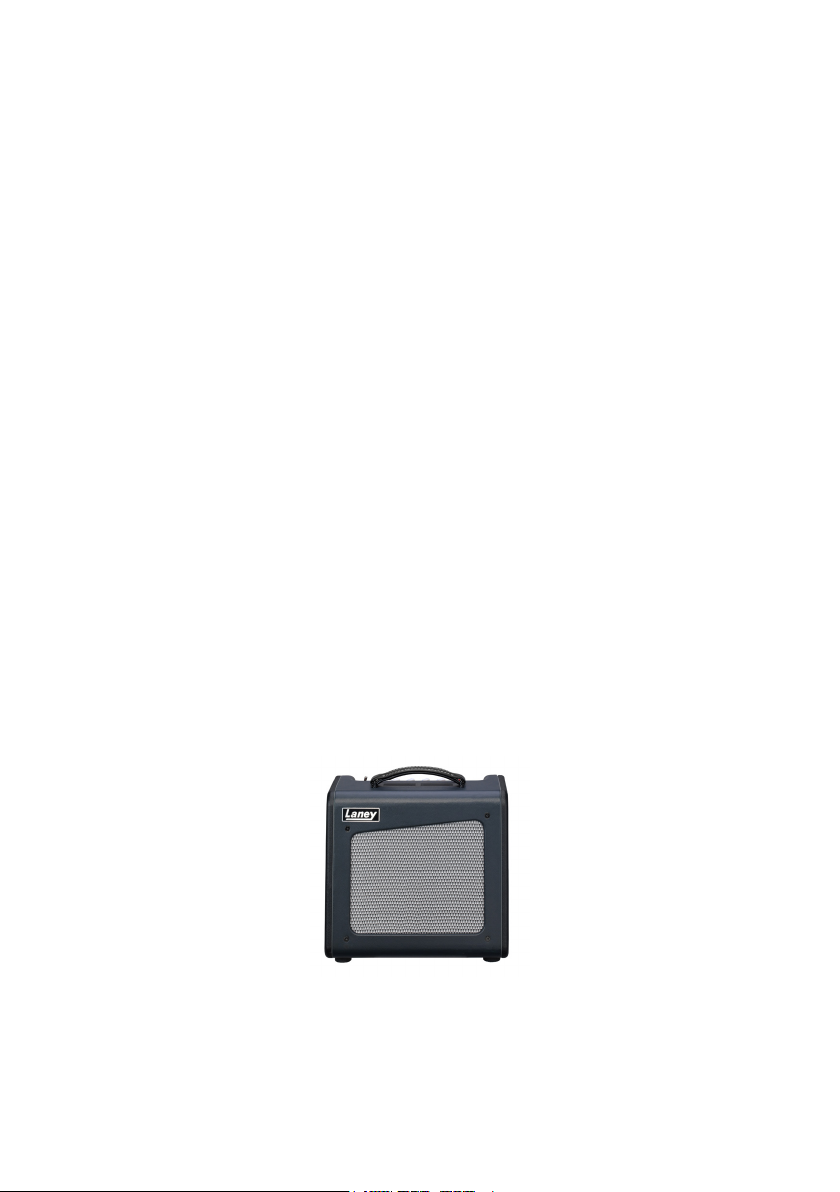
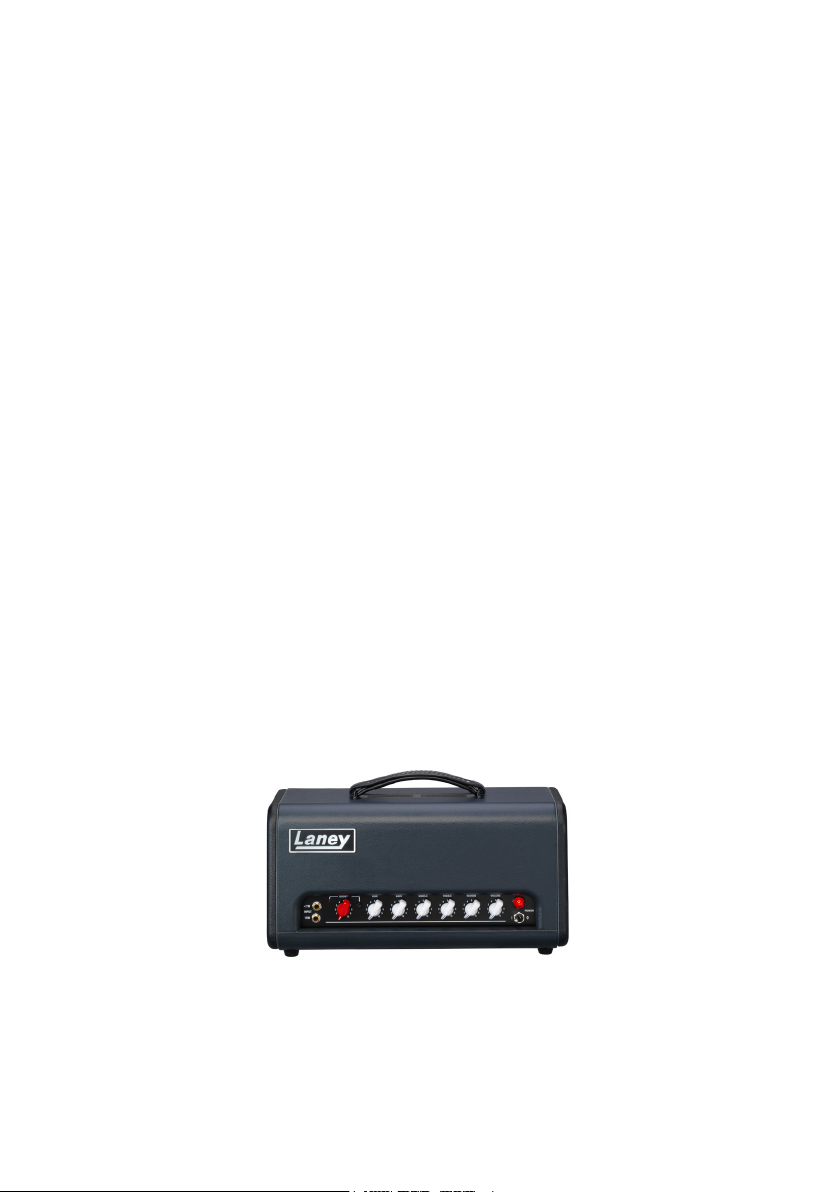
CUB-SUPER10 FEATURES
USER MANUAL
1 2 3
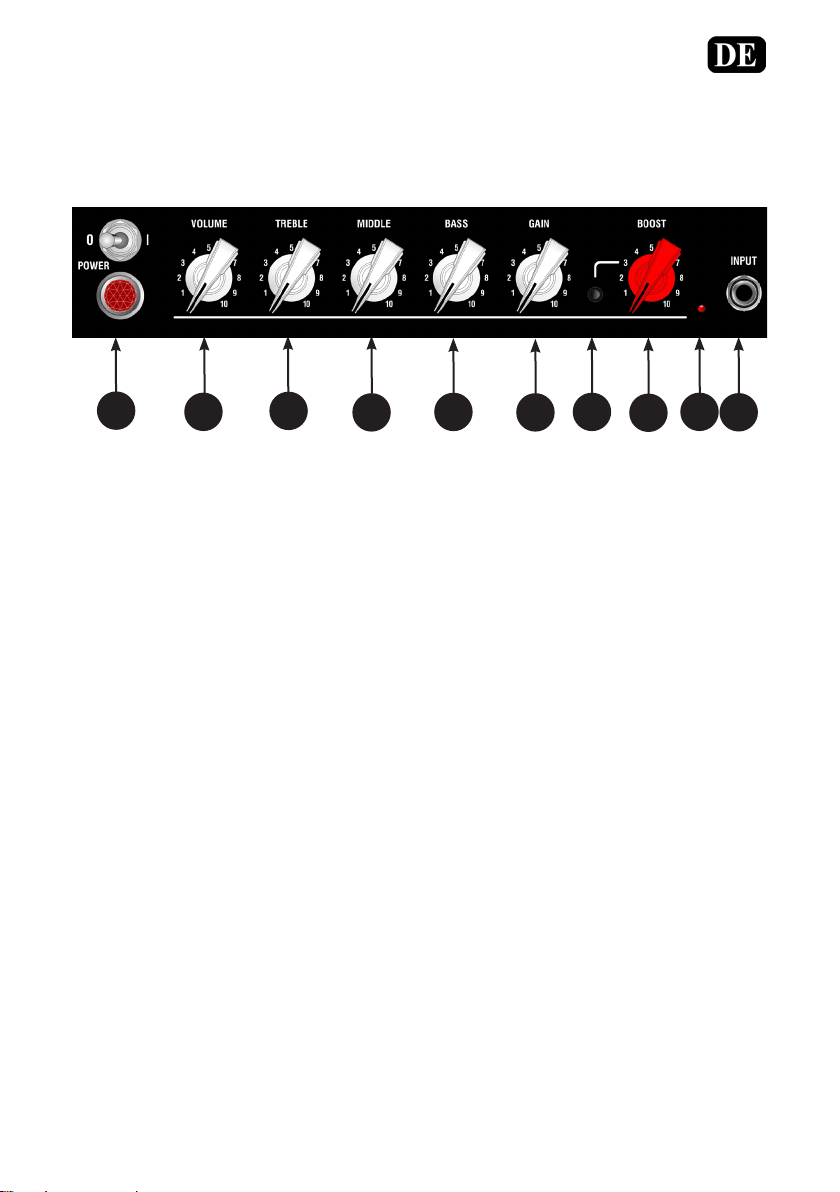
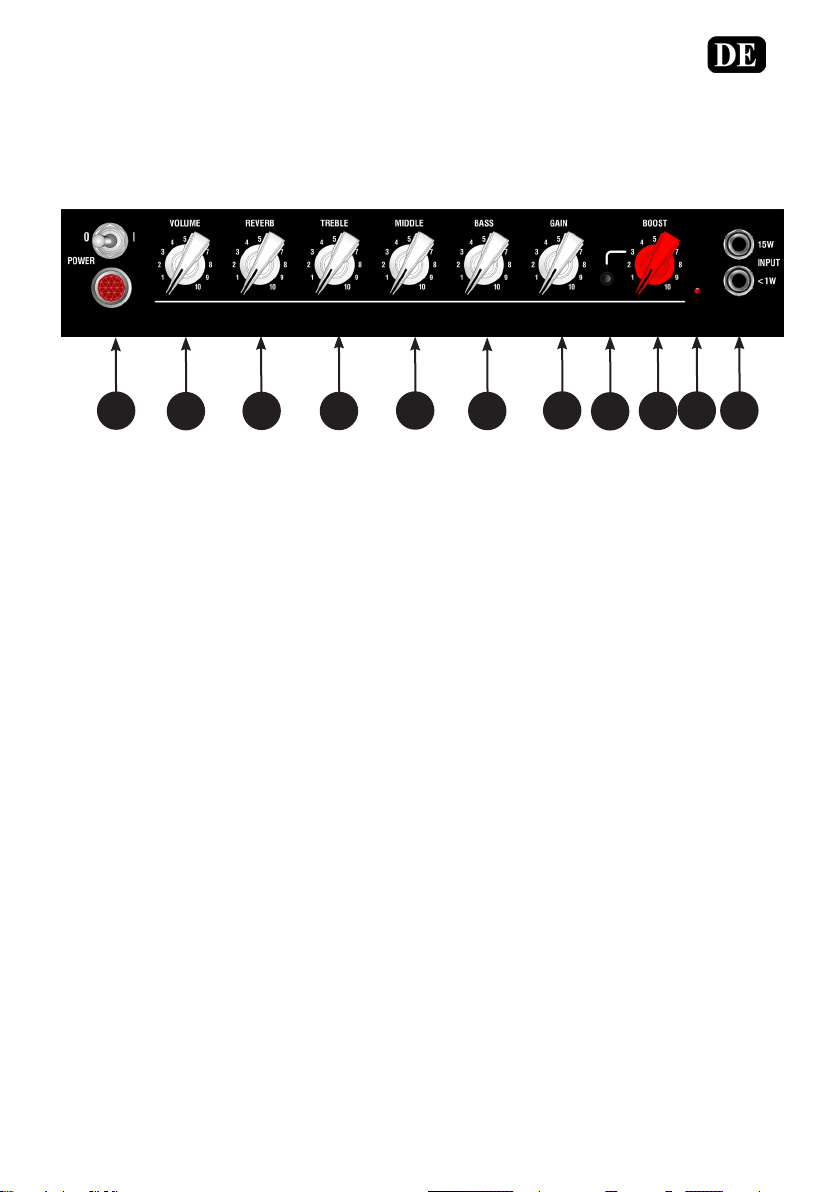
1 - POWER SWITCH & LAMP - Indicates that the amplier is powered up and ready to play.
2 - VOLUME - Controls the overall listening volume of the amplier and is used in conjunction with the
Gain control (6).
3 - TREBLE - Controls the amps high end response. Start at 4 or 5 and adjust depending on how dark or
bright you want the amplier to sound.
4 - MIDDLE - Controls the amps midrange response. Start at 4 or 5, lower settings will scoop the mids,
higher levels will allow you to actually hear the guitar in the mix.
5 - BASS - Controls the bass or bottom end of the amplier’s response. As the amp gets louder you may
want to back this o a bit. Start at 7-10 for bedroom volumes.
6 - GAIN - Controls the level of gain/distortion present in the guitar signal. Used in conjunction with the
volume control (2). For clean guitar sounds with plenty of headroom set the gain control low whilst
setting the volume control to the required level. As you dial more gain into the signal it might be
necessary to reduce the volume level accordingly.
7 - BOOST SWITCH - Engages the onboard pre-boost. This is just like kicking in your favourite boost pedal
in front of the amplier.
4
5
7
6
8
10
9
8 - BOOST KNOB - Dials in the amount of pre boost hitting the rst tube in the ampliers signal path.
Dialling in more BOOST will have the eect of pushing a clean amp into warm tube clipping or naturally
compressing an already clipping amplier.
www.laney.co.uk
3
Page 4
CUB-RANGE
CUB-SUPER10 FEATURES
USER MANUAL
11
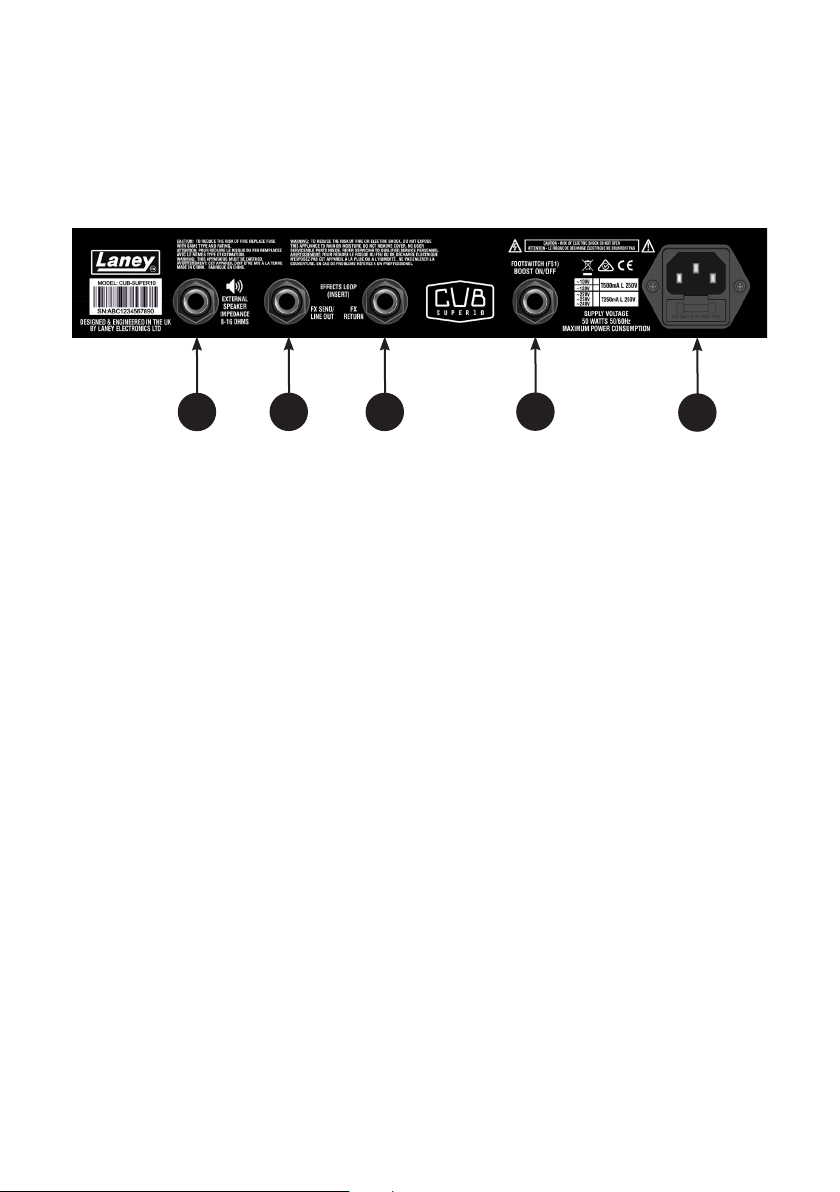
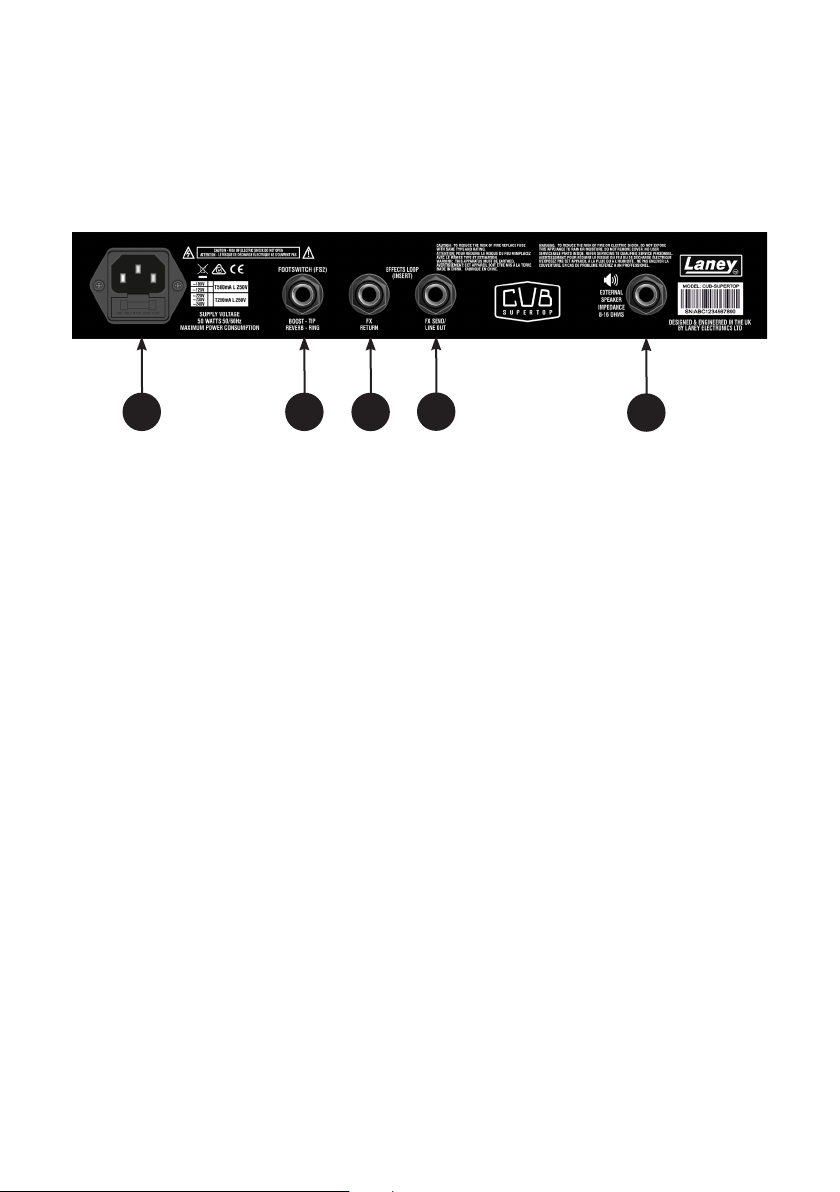
9 - BOOST LED - Indicates that the BOOST is engaged.
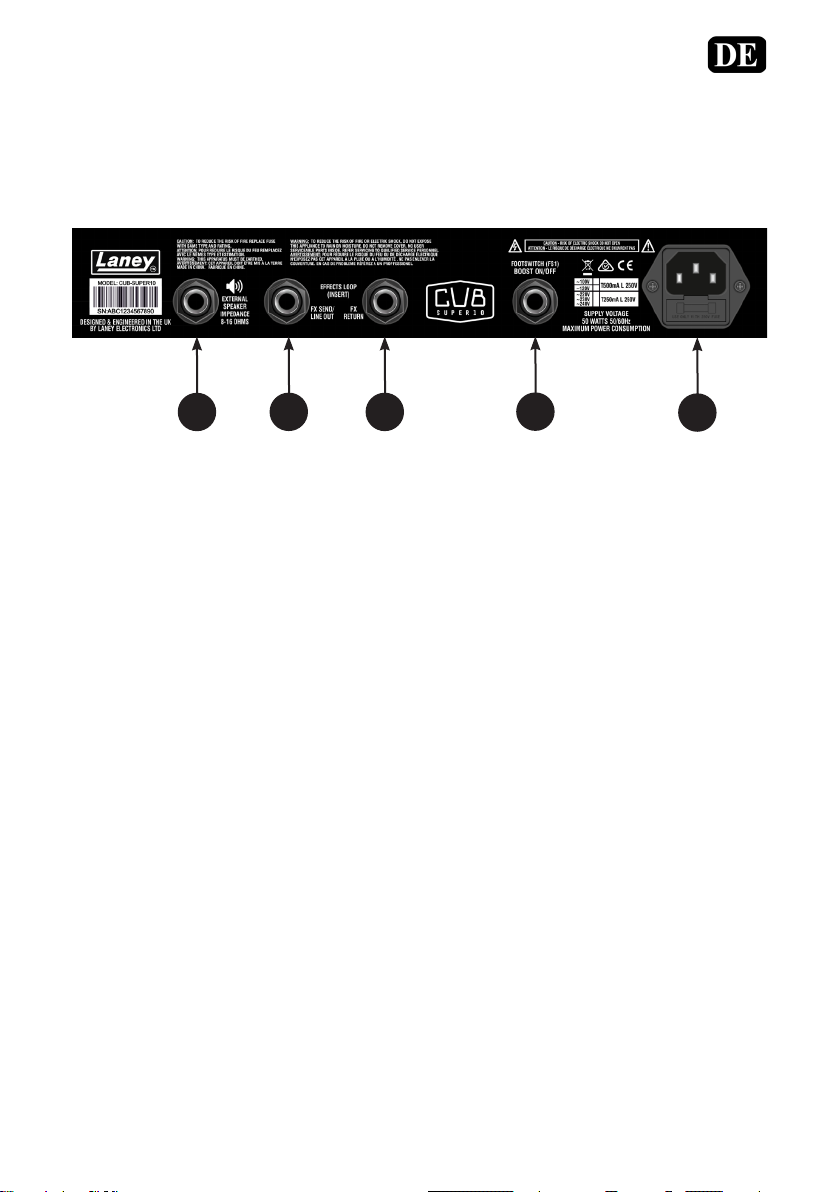
10 - INPUT SOCKET - Plug a good quality guitar lead in here.
11 - EXTERNAL SPEAKER. - Your CUB-SUPER10 is loaded with a HH Custom designed 8 Ohm Internal
speaker. Should you want to run an external speaker cabinet it can be connected here. Please use a
good quality SPEAKER cable. Connecting an external speaker cabinet will disconnect the internal
speaker. Please make sure you use the correct impedance of speaker cabinet from 8 - 16 Ohms.
12 - FX LOOP SEND - This is where you plug the INPUT of your Eect(s). Use a high quality shielded
guitar cable. This socket can also be used as a line out.
13 - FX LOOP RETURN - This is where you plug the OUT of your Eect(s). Use a high quality shielded
guitar cable.
14 - FOOTSWITCH SOCKET - This is where you plug in the footswitch. FS1-Mini optional extra. Enables
remote switching of the boost circuit. Ensure the boost switch (7) is switched in.
15 - POWER SOCKET - Plug in the supplied IEC power cord here
12
13
14
15
www.laney.co.uk
4
Page 5
CUB-RANGE
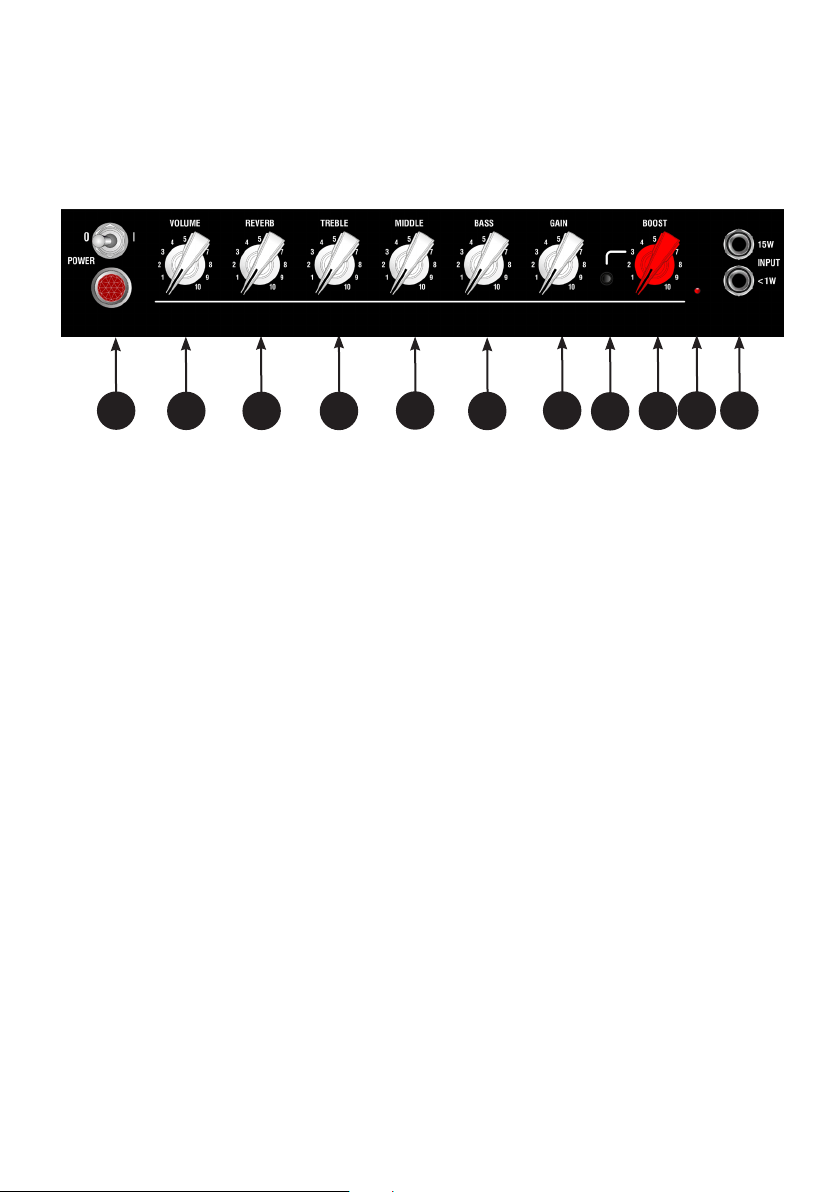
CUB-SUPER12 FEATURES
USER MANUAL
1 2 3
1 - POWER SWITCH & LAMP - Indicates that the amplier is powered up and ready to play.
2 - VOLUME - Controls the overall listening volume of the amplier and is used in conjunction with the
Gain control (6).
3 - REVERB - Sets the level of the on board reverb. The onboard reverb is a high-quality spring reverb
algorithm used in the acclaimed BCC-SECRET PATH reverb engine.
4 - TREBLE - Controls the amps high end response. Start at 4 or 5 and adjust depending on how dark or
bright you want the amplier to sound.
5 - MIDDLE - Controls the amps midrange response. Start at 4 or 5, lower settings will scoop the mids,
higher levels will allow you to actually hear the guitar in the mix.
6 - BASS - Controls the bass or bottom end of the amplier’s response. As the amp gets louder you may
want to back this o a bit. Start at 7-10 for bedroom volumes.
7 - GAIN - Controls the level of gain/distortion present in the guitar signal. Used in conjunction with the
volume control (2). For clean guitar sounds with plenty of headroom set the gain control low whilst
setting the volume control to the required level. As you dial more gain into the signal it might be
necessary to reduce the volume level accordingly.
4
5
6
7
9
8
11 10
8 - BOOST SWITCH - Engages the onboard pre-boost. This is just like kicking in your favourite boost pedal
in front of the amplier.
www.laney.co.uk
5
Page 6
CUB-RANGE
CUB-SUPER12 FEATURES
USER MANUAL
13 12
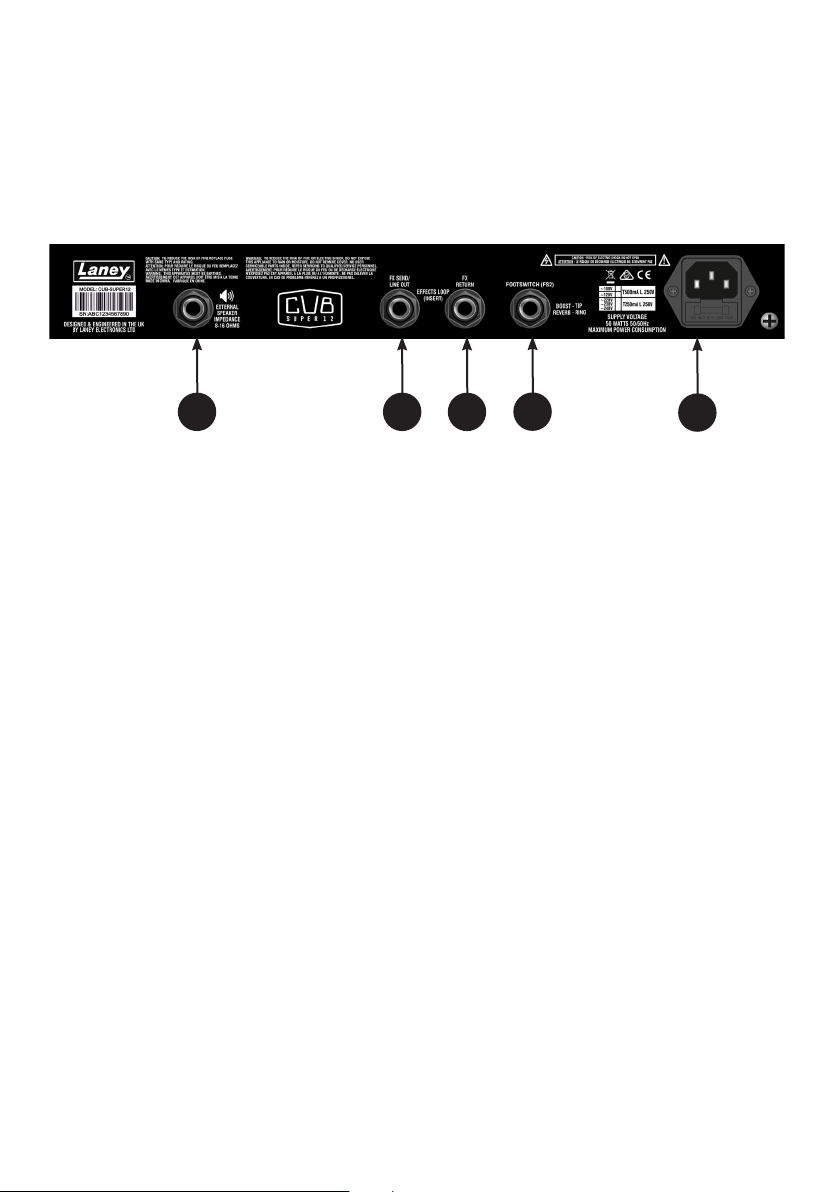
9 - BOOST - Determines the amount of pre boost hitting the rst tube in the ampliers signal path.
Dialling in more BOOST will have the eect of pushing a clean amp into warm tube clipping or
naturally compressing an already clipping amplier.
10 - BOOST LED - Indicates that the BOOST is engaged.
11 - INPUT SOCKET - 15W & <1W inputs. Plugging into the 15W input socket accesses the full power
of the amplier - producing 15 watts RMS of tube tone. Plugging into the <1Watt input switches the
output power stage down to <1 watt RMS. Ideal for recording or bedroom playing.
12 - EXTERNAL SPEAKER - Your CUB-SUPER12 is loaded with a HH Custom designed 8 Ohm Internal
speaker. Should you want to run an external speaker cabinet it can be connected here. Please use a
good quality SPEAKER cable. Connecting an external speaker cabinet will disconnect the internal
speaker. Please make sure you use the correct impedance of speaker cabinet from 8 - 16 Ohms.
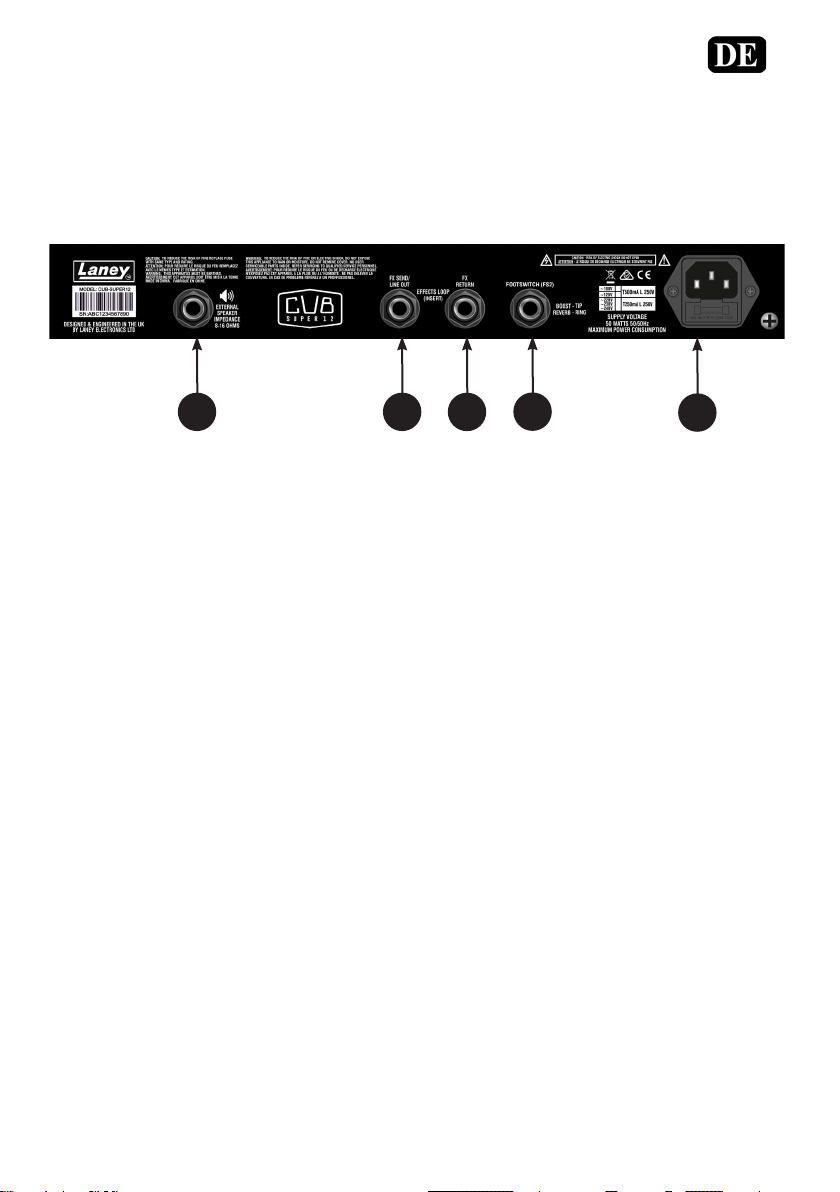
13 - FX LOOP SEND - This is where you plug the INPUT of your Eect(s). Use a high quality shielded
guitar cable. This socket can also be used as a line out.
14 - FX LOOP RETURN - This is where you plug the OUT of your Eect(s). Use a high quality shielded
guitar cable.
15 - FOOTSWITCH SOCKET - This is where you plug in the footswitch. FS2-Mini optional extra. Enables
remote switching of the boost circuit and reverb. Ensure the boost switch (7) is switched in and the
reverb level is set above zero.
14
15
16
16 - POWER SOCKET - Plug in the supplied IEC power cord here.
6
www.laney.co.uk
Page 7
CUB-RANGE
CUB-SUPERTOP FEATURES
USER MANUAL
1 3 4
2
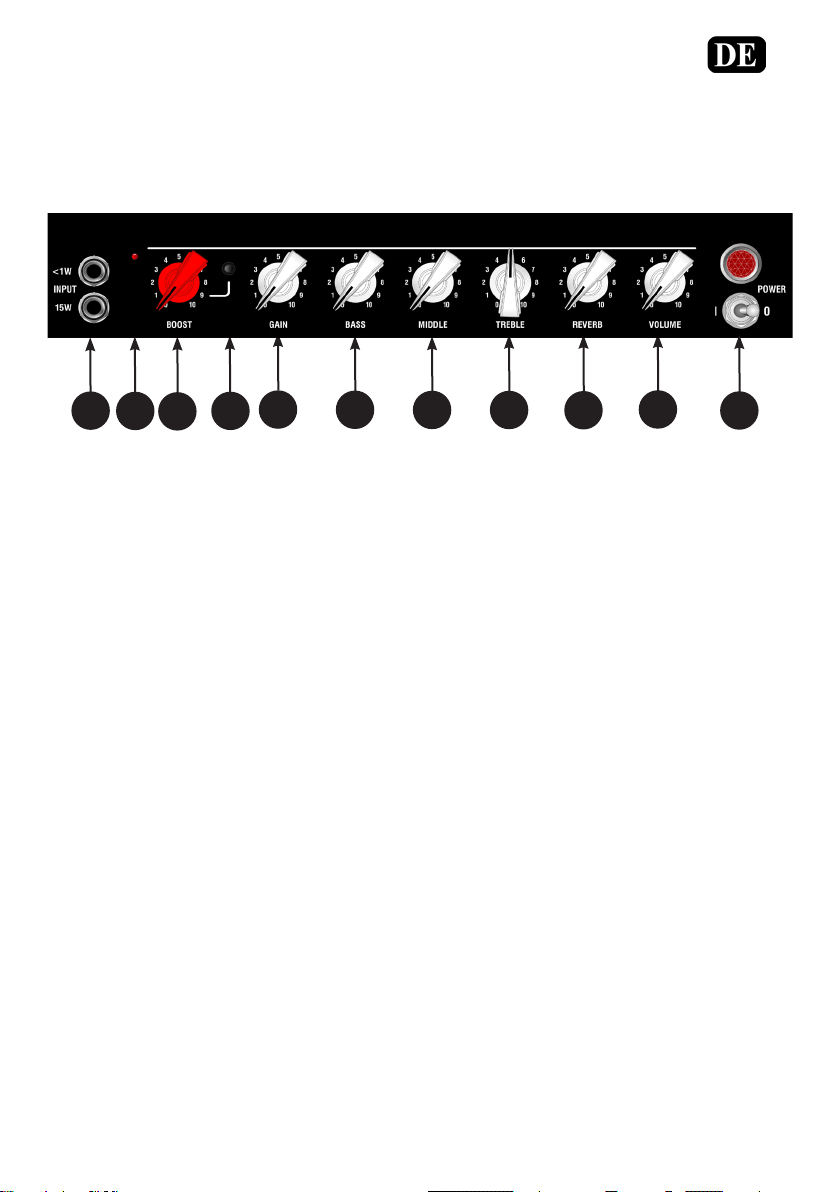
1 - INPUT SOCKET - 15W & <1W inputs. Plugging into the 15W input socket accesses the full power
of the amplier - producing 15 watts RMS of tube tone. Plugging into the <1Watt input switches the
output power stage down to <1Watt RMS. Ideal for recording or bedroom playing.
2 - BOOST LED - Indicates that the BOOST is engaged.
3 - BOOST - Determines the amount of pre boost hitting the rst tube in the ampliers signal path.
Dialling in more BOOST will have the eect of pushing a clean amp into warm tube clipping or
naturally compressing an already clipping amplier.
4 - BOOST SWITCH - Engages the onboard pre-boost. This is just like kicking in your favourite boost
pedal in front of the amplier.
5 - GAIN - Controls the level of gain/distortion present in the guitar signal. Used in conjunction with the
volume control (2). For clean guitar sounds with plenty of headroom set the gain control low whilst
setting the volume control to the required level. As you dial more gain into the signal it might be
necessary to reduce the volume level accordingly.
6 - BASS - Controls the bass or bottom end of the amplier’s response. As the amp gets louder you may
want to back this o a bit. Start at 7-10 for bedroom volumes.
7 - MIDDLE - Controls the amps midrange response. Start at 4 or 5, lower settings will scoop the mids,
higher levels will allow you to actually hear the guitar in the mix.
5
6
7
8
9
10
11
8 - TREBLE - Controls the amps high end response. Start at 4 or 5 and adjust depending on how dark or
bright you want the amplier to sound.
www.laney.co.uk
7
Page 8
CUB-RANGE
CUB-SUPERTOP FEATURES
USER MANUAL
13 12
9- REVERB - Sets the level of the on board reverb. The on board reverb is a high-quality spring reverb
algorithm used in the acclaimed BCC-SECRET PATH reverb engine.
10 - VOLUME - Controls the overall listening volume of the amplier and is used in conjunction with the
Gain control (6).
11 - POWER SWITCH & LAMP - Indicates that the amplier is powered up and ready to play.
12 - POWER SOCKET - Plug in the supplied IEC power cord here
13 - FOOTSWITCH SOCKET - This is where you plug in the footswitch. FS2-Mini optional extra. Enables
remote switching of the boost circuit. Ensure the boost switch (7) is switched in.
14 - FX LOOP RETURN - This is where you plug the OUT of your Eect(s). Use a high quality shielded
guitar cable.
15 - FX LOOP SEND - This is where you plug the INPUT of your Eect(s). Use a high quality shielded
guitar cable. This socket can also be used as a line out.
16 - EXTERNAL SPEAKER. - Connect an external cabinet (8 - 16 Ohms) here. Please use a
good quality SPEAKER cable. Try the CUB-212 & CUB-112 cabinets.
14
15
16
www.laney.co.uk
8
Page 9
CUB-RANGE
USER MANUAL
Technical Specications
CUB-SUPER10
Product GUITAR Amplier
Power 6 Watts RMS
Channels Single Channel with FS Boost
Features Volume
Treble
Middle
Bass
Gain
Boost Switch
Boost
External Speaker socket
FX loop/LINE OUT send
FX Loop Return
Footswitch socket (FS1-MINI)
Speaker 1 x 10 HH Custom Designed Driver
Unit Size/mm 339x373x212 (HxWxD)
Unit Weight 9.6 Kg
Carton Size mm 430x440x275 (HxWxD)
Packed Weight 12.6 Kg
Power Consumption 50W
CUB-SUPER10
In the interest of continued product develoment, Laney reserve the right to amend product specication without prior notice
www.laney.co.uk
9
Page 10
CUB-RANGE
USER MANUAL
Technical Specications
CUB-SUPER12
Product GUITAR Amplier
Power <1 Watt - 15 Watts RMS
Channels Single Channel with FS Boost
Features Volume
Treble
Middle
Bass
Gain
Boost Switch
Boost
Reverb
External Speaker socket
FX loop/LINE OUT send
FX Loop Return
Footswitch socket (FS2-MINI)
Speaker 1 x 12 HH Custom Designed Driver
Unit Size/mm 399x430x233 (HxWxD)
Unit Weight 11.7 Kg
Carton Size mm 480x495x295 (HxWxD)
Packed Weight 15.5 Kg
Power Consumption 50W
CUB-SUPER12
In the interest of continued product develoment, Laney reserve the right to amend product specication without prior notice
10
www.laney.co.uk
Page 11
CUB-RANGE
Technical Specications
CUB-SUPERTOP
Product GUITAR HEAD
Power <1 Watt - 15 Watts RMS
Channels Single Channel with FS Boost
Features Volume
Treble
Middle
Bass
Gain
Boost Switch
Boost
Reverb
External Speaker socket
FX loop/LINE OUT send
FX Loop Return
Footswitch socket (FS2-MINI)
Speaker NA
Unit Size/mm 210x430x176 (HxWxD)
Unit Weight 7.5 Kg
Carton Size mm 295x555x240 (HxWxD)
Packed Weight 10 Kg
Power Consumption 50W
USER MANUAL
11
CUB-SUPERTOP
Manufacturer: Laney Electronics Ltd.
© 2020 Laney Electronics Ltd. May not be reproduced without prior written consent
In the interest of continued product develoment, Laney reserve the right to amend product specication without prior notice
www.laney.co.uk
Page 12
CUB-RANGE
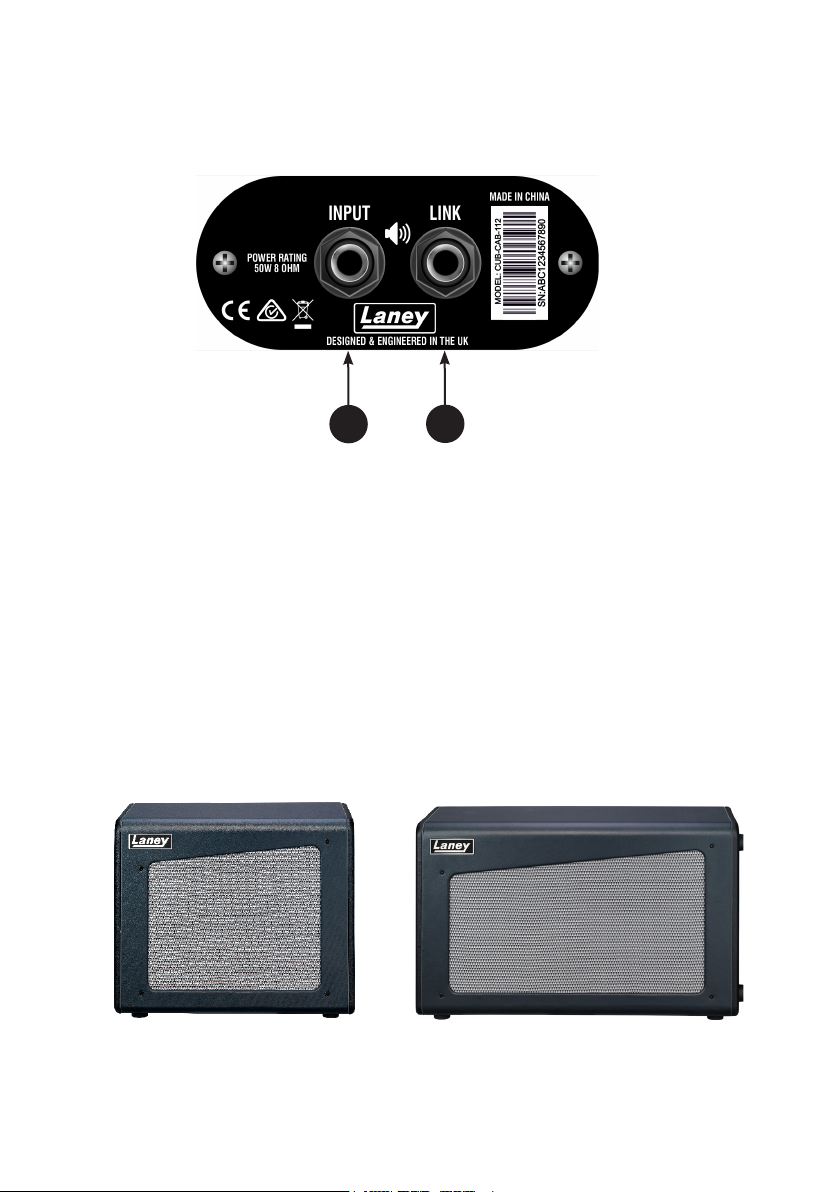
CUB-112 & CUB-212 FEATURES
USER MANUAL
CUB-112 panel shown
1
2
1 - INPUT SOCKET - Using a good quality speaker cable, connect to the amplier speaker socket ensuring
to use the correct 8 Ohm rated output if a single 8 Ohm extension cabinet is being used. If two 8 Ohm
extension cabinets or a single 4 Ohm extension cabinet are to be used please ensure that you connect to
the 4 Ohm rated output on the amplier.
2 - LINK SOCKET - Optional link out to input socket on an additional 8 Ohm extension speaker.
CUB-112
Power handling: 50 Watts
Speaker: 1 x 12 HH Custom
Designed Driver
Impedance 8 Ohm impedance
Unit Size/mm 430x520x230 (HxWxD)
Unit Weight 10.4 Kg
Power handling: 100 Watts
Speaker: 2 x 12 HH Custom
Designed Driver
Impedance 8 Ohm impedance
Unit Size/mm 430x700x230 (HxWxD)
Unit Weight 13.8 Kg
CUB-212
12
CUB-112
In the interest of continued product development, Laney reserve the right to amend product specication without prior notice
CUB-212
www.laney.co.uk
Page 13
EN
GENERAL INSTRUCTIONS
In order to take full advantage of your new product and enjoy long and trouble-free performance, please read this owner's manual
carefully, and keep it in a safe place for future reference.
1) Unpacking: On unpacking your product please check carefully for any signs of damage that may have occurred whilst in transit
from the factory to your dealer. In the unlikely event that there has been damage, please re-pack your unit in its original carton Laney
and consult your dealer. We strongly advise you to keep your original transit carton, since in the unlikely event that your unit should
develop a fault, you will be able to return it to you dealer for rectification securely packed.
2) Amplifier Connection: In order to avoid damage, it is advisable to establish and follow a pattern for turning on and off your
system. With all system parts connected, turn on source equipment, tape decks, cd players, mixers, effects processors etc, BEFORE
turning on your amplifier. Many products have large transient surges at turn on and off which can cause damage to your speakers.
By turning on your amplifier LAST and making sure its level control is set to a minimum, any transients from other equipment bass
should not reach your loud speakers. Wait till all system parts have stabilised, usually a couple of seconds. Similarly when turning off
your system always turn down the level controls on your amplifier and then turn off its power before turning off other equipment.bass
3) Cables: Never use shielded or microphone cable for any speaker connections as this will not be substantial enough to handle the
amplifier load and could cause damage to your complete system.
4) Servicing: The user should not attempt to service these products. Refer all servicing to qualified service personnel.
IMPORTANT SAFETY INSTRUCTIONS
Intended to alert the user to the presence of uninsulated ‘Dangerous Voltage’ within the products enclosure that may be
sufficient to constitute a risk of electrical shock to persons.
Ce symbole est utililise pur indiquer a l’utilisateur de ce produit de tension non-isolee dangereuse pouvant etre d’intensite
suffisante pour constituer un risque de choc electrique.
Este simbolo tiene el proposito de alertar al usuario de la presencia de ‘(voltaje) peligroso’ que no tiene aislamiento dentro de
la caja del producto que puede tener una magnitud suficiente como para constituir riesgo de corrientazo.
Dieses Symbol soll den Anwender vor unsolierten gefahrlichen Spannungen innerhalb des Gehauses warnen, die von
Ausrichender Starke sind, um einen elektrischen Schlag verursachen zu konnen.
Intended to alert the user of the presence of important operating and maintenance (Servicing) instructions in the literature
accompanying the product.
Dieses Symbol soll den Anwender vor unsolierten gefahrlichen Spannungen innerhalb des Gehauses warnen, die von
Ausrichender Starke sind, um einen elektrischen Schlag verursachen zu konnen.
Este simbolo tiene el proposito de la alertar al usario de la presencis de instrucccones importantes sobre la operacion y
mantenimiento en la literatura que viene conel producto.
Dieses Symbol soll den Benutzer auf wichtige Instruktionen in der Bedienungsanleitung aufmerksam machen, die Handhabung
und Wartung des Produkts betreffen.
CAUTION:
ATTENTION:
PRECAUCION:
VORSICHT:
WARNING:
ADVERTISSEMENT:
ADVERTENCIA:
ACHTUNG:
Risk of electrical shock - DO NOT OPEN.
To reduce the risk of electrical shock, do not remove the cover. No user serviceable parts inside. Refer servicing to qualified
personnel.
Risques de choc electrique - NE PAS OUVIRIR
Afin de reduire le risque de choc electrique, ne pas enlever le couvercle. II ne se trouve a l’interieur aucune piece pouvant etre
reparee par l’utilisateur. Confier l’entretien a un personnel qualifie.
Riesgo de corrientazo - no abra
Para disminuir el risego de carrientazo, no abra la cubierta. No hay piezas adentro que el pueda reparar. Deje todo
mantenimiento a los tecnicos calificadod.
Risiko - Elektrischer Schlag! Nicht offen!
Um das Risiko eines elektrischen Schlages zu vermeiden, nicht die Abdeckung enfernen. Es befinden sich keine Teile darin, die
vom Anwender repariert werden Konnten. Reparaturen nur von qualifiziertem Fachpersonal durchfuhren lassen.
To prevent electrical shock or fire hazard, do not expose this appliance to rain or moisture. Before using this appliance please
read the operating instructions for further warnings.
Afin de prevenir les risques de decharge electrique ou de feu, n’exposez pas cet appareil a la pluie ou a l’humidite. Avant
d’utiliser cet appareil, lisez les advertissments supplentaires situes dans le guide.
Para evitar corrientazos o peligro de incendio, no deja expuesto a la lluvia o humedad este aparato Antes de usar este aparato,
lea mas advertcias en la guia de operacion.
Um einen elektrischen Schalg oder Feuergefahr zu vermeiden, sollte dieses Gerat nicht dem Regen oder Feuchtigkeit
ausgesetzt werden. Vor Inbetriebnahme unbedingt die Bedienungsanleitung lesen.
Page 14

FCC COMPLIANCY STATEMENT
This device complies with Part 15 of the FCC rules Operation is subject to the following two conditions:
1) This device may not cause harmful interference
2) This device must accept any interference received, that may cause undesired operation.
Warning: Changes or modification to the equipment not approved by Laney can void the user's authority to use the
equipment.
Note: This equipment has been tested and found to comply with the limits for Class B digital device, pursuant to Part 15 of
the FCC Rules. These limits are designed to provide reasonable protection against harmful interference in a residential
installation. This equipment generates, uses and can radiate radio frequency energy and if not installed and used in
accordance with the instructions, may cause harmful interference to radio communications. However, there is no
guarantee that interference will not occur in a particular installation. If this equipment does cause harmful interference to
radio or television reception, which can be determined by turning the equipment off and on, the user is encouraged to try
and correct the interference by one or more of the following measures.
Reorient or relocate the receiving antenna.
Increase the separation between the equipment and receiver.
Connect the equipment into an outlet on a circuit different from that to which the receiver is connected.
Consult the dealer or an experienced radio/TV technician for help.
--------------------------------------------------------------------------------------------------------------------------------------------------------This product conforms to the requirements of the following European Regulations, Directives & Rules:
CE Mark (93/68/EEC), Low Voltage (2014/35/EU), EMC (2014/30/EU),
RoHS (2011/65/EU), ErP (2009/125/EU).
--------------------------------------------------------------------------------------------------------------------------------------------------------In order to reduce environmental damage, at the end of its useful life, this product must not be disposed of along with
normal household waste to landfill sites. It must be taken to an approved recycling centre according to the
recommendations of the WEEE (Waste Electrical and Electronic Equipment) directive applicable in your country.
--------------------------------------------------------------------------------------------------------------------------------------------------------SIMPLIFIED EU DECLARATION OF CONFORMITY
EN
Hereby, Laney Electronics Ltd. declares that the radio equipment is in compliance with Directives 2014/53/EU, 2011/65/EU,
2009/125/EU
Full text of the EU declaration of conformity is available at the following internet address:
support.laney.co.uk/approvals
---------------------------------------------------------------------------------------------------------------------------------------------------------
Page 15

IMPORTANT SAFETY INSTRUCTIONS
WARNING: When using electrical products, basic cautions should always be followed, including the following:
1. Read these instructions.
2. Keep these instructions safe.
3. Heed all warnings.
4. Follow all instructions.
5. Do not use this apparatus near water.
6. Clean only with a dry cloth.
7. Do not block any of the ventilation openings. Install in accordance with manufacturer’s instructions.
8. Do not install near any heat sources such as radiators, heat registers, stoves or other apparatus (including amplifiers) that produce
heat.
9. An apparatus with Class I construction shall be connected to a mains socket outlet with a protective connection. Do not defeat the
safety purpose of the polarized or grounding-type plug. A polarized plug has two blades with one wider than the other. A grounding
type plug has two blades and a third grounding prong. The wide blade or third prong is provided for your safety. If the provided plug
does not fit into your outlet, consult an electrician for replacement of the obsolete outlet.
10. Protect the power cord from being walked on or pinched, particularly at plugs, convenience receptacles, and the point they exit
from the apparatus.
11. Only use attachments/accessories provided by the manufacturer.
12. Use only with a cart, stand, tripod, bracket, or table specified by the manufacturer, or sold with the apparatus. When a cart is used,
use caution when moving the cart/apparatus combination to avoid injury from tip-over.
13. The mains plug or appliance coupler is used as the disconnect device and shall remain readily operable. The user should allow easy
access to any mains plug, mains coupler and mains switch used in conjunction with this unit thus making it readily operable. Unplug
this apparatus during lightning storms or when unused for long periods of time.
14. Refer all servicing to qualified service personnel. Servicing is required when the apparatus has been damaged in any way, such as
when power-supply cord or plug is damaged, liquid has been spilled or objects have fallen into the apparatus, the apparatus has been
exposed to rain or moisture, does not operate normally, or has been dropped.
15. Never break off the ground pin. Connect only to a power supply of the type marked on the unit adjacent to the power supply
cord.
16. If this product is to be mounted in an equipment rack, rear support should be provided.
17. Note for UK only: If the colours of the wires in the mains lead of this unit do not correspond with the terminals in your plug‚
proceed as follows:
a) The wire that is coloured green and yellow must be connected to the terminal that is marked by the letter E‚ the earth symbol‚
coloured green or
coloured green and yellow.
b) The wire that is coloured blue must be connected to the terminal that is marked with the letter N or the colour black.
c) The wire that is coloured brown must be connected to the terminal that is marked with the letter L or the colour red.
18.This electrical apparatus should not be exposed to dripping or splashing and care should be taken not to place objects containing
liquids, such as vases, upon the apparatus.
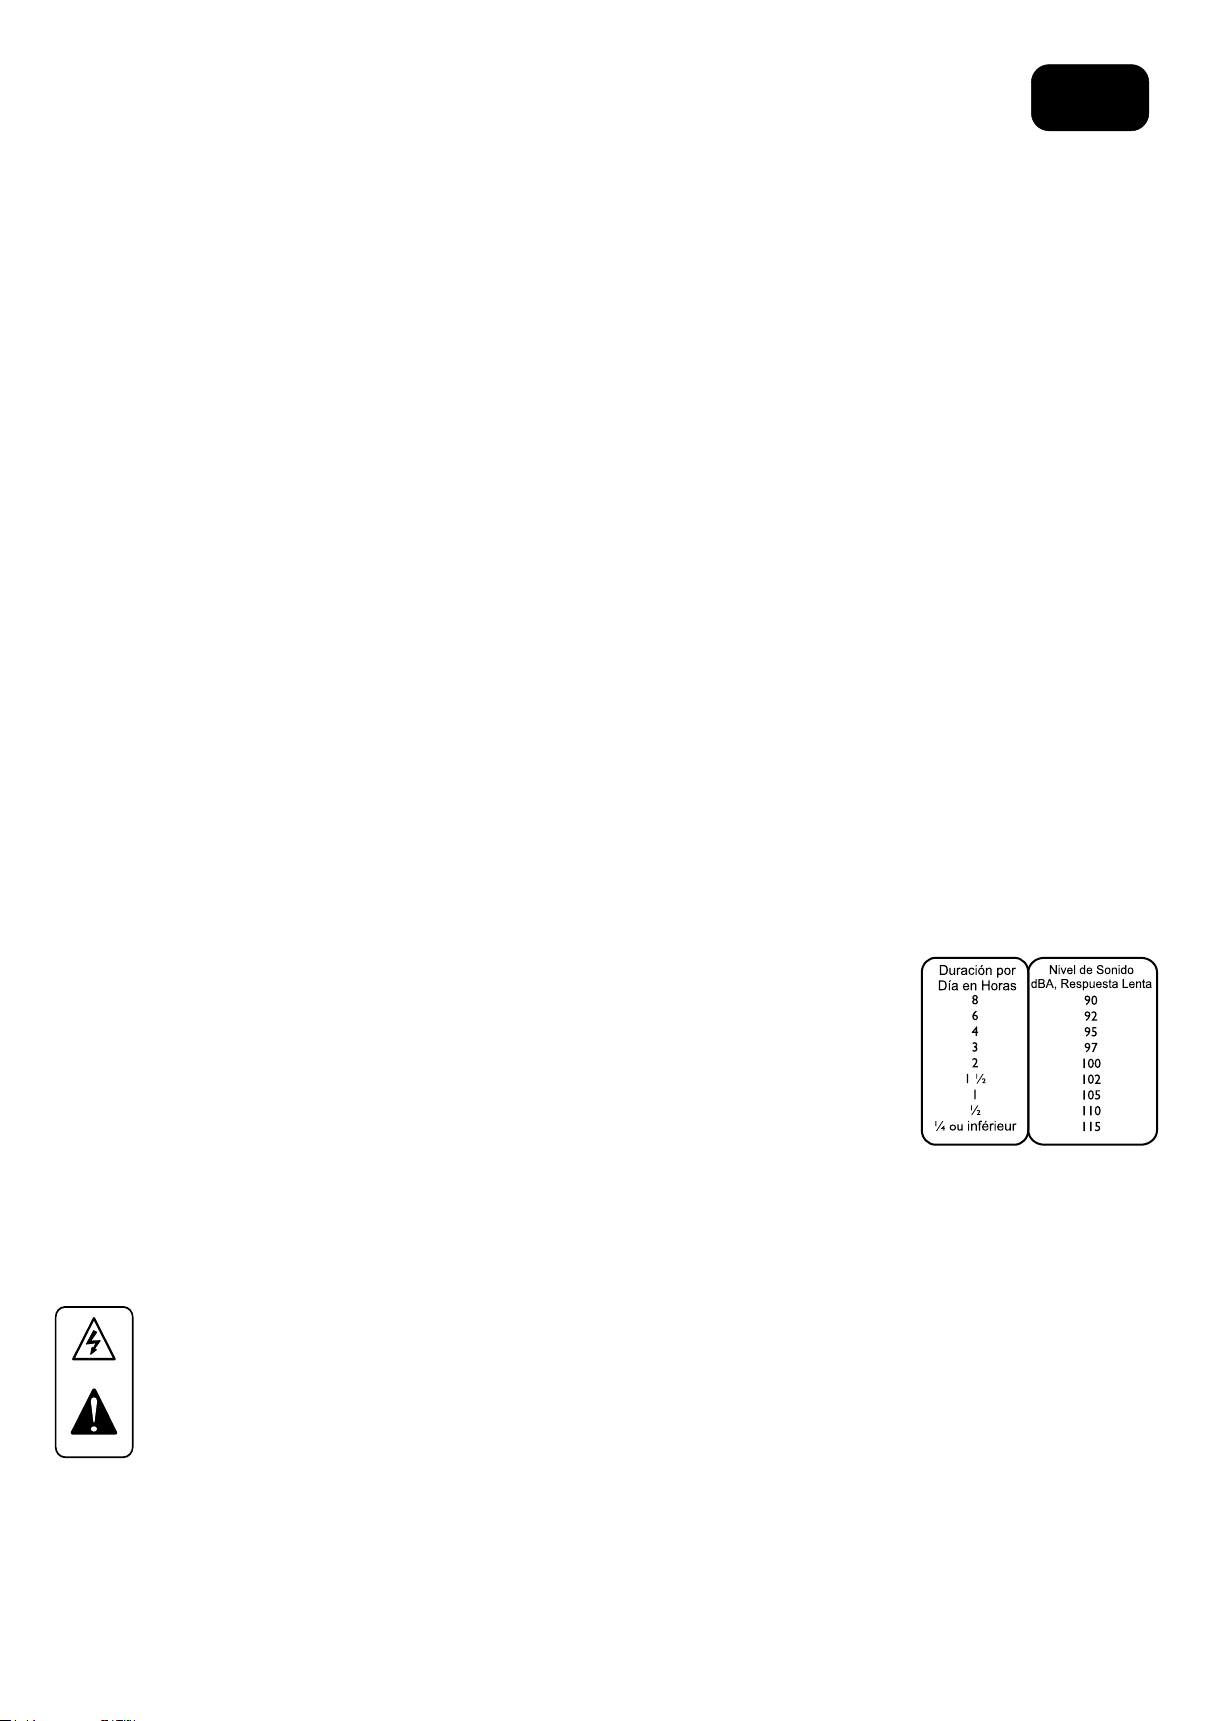
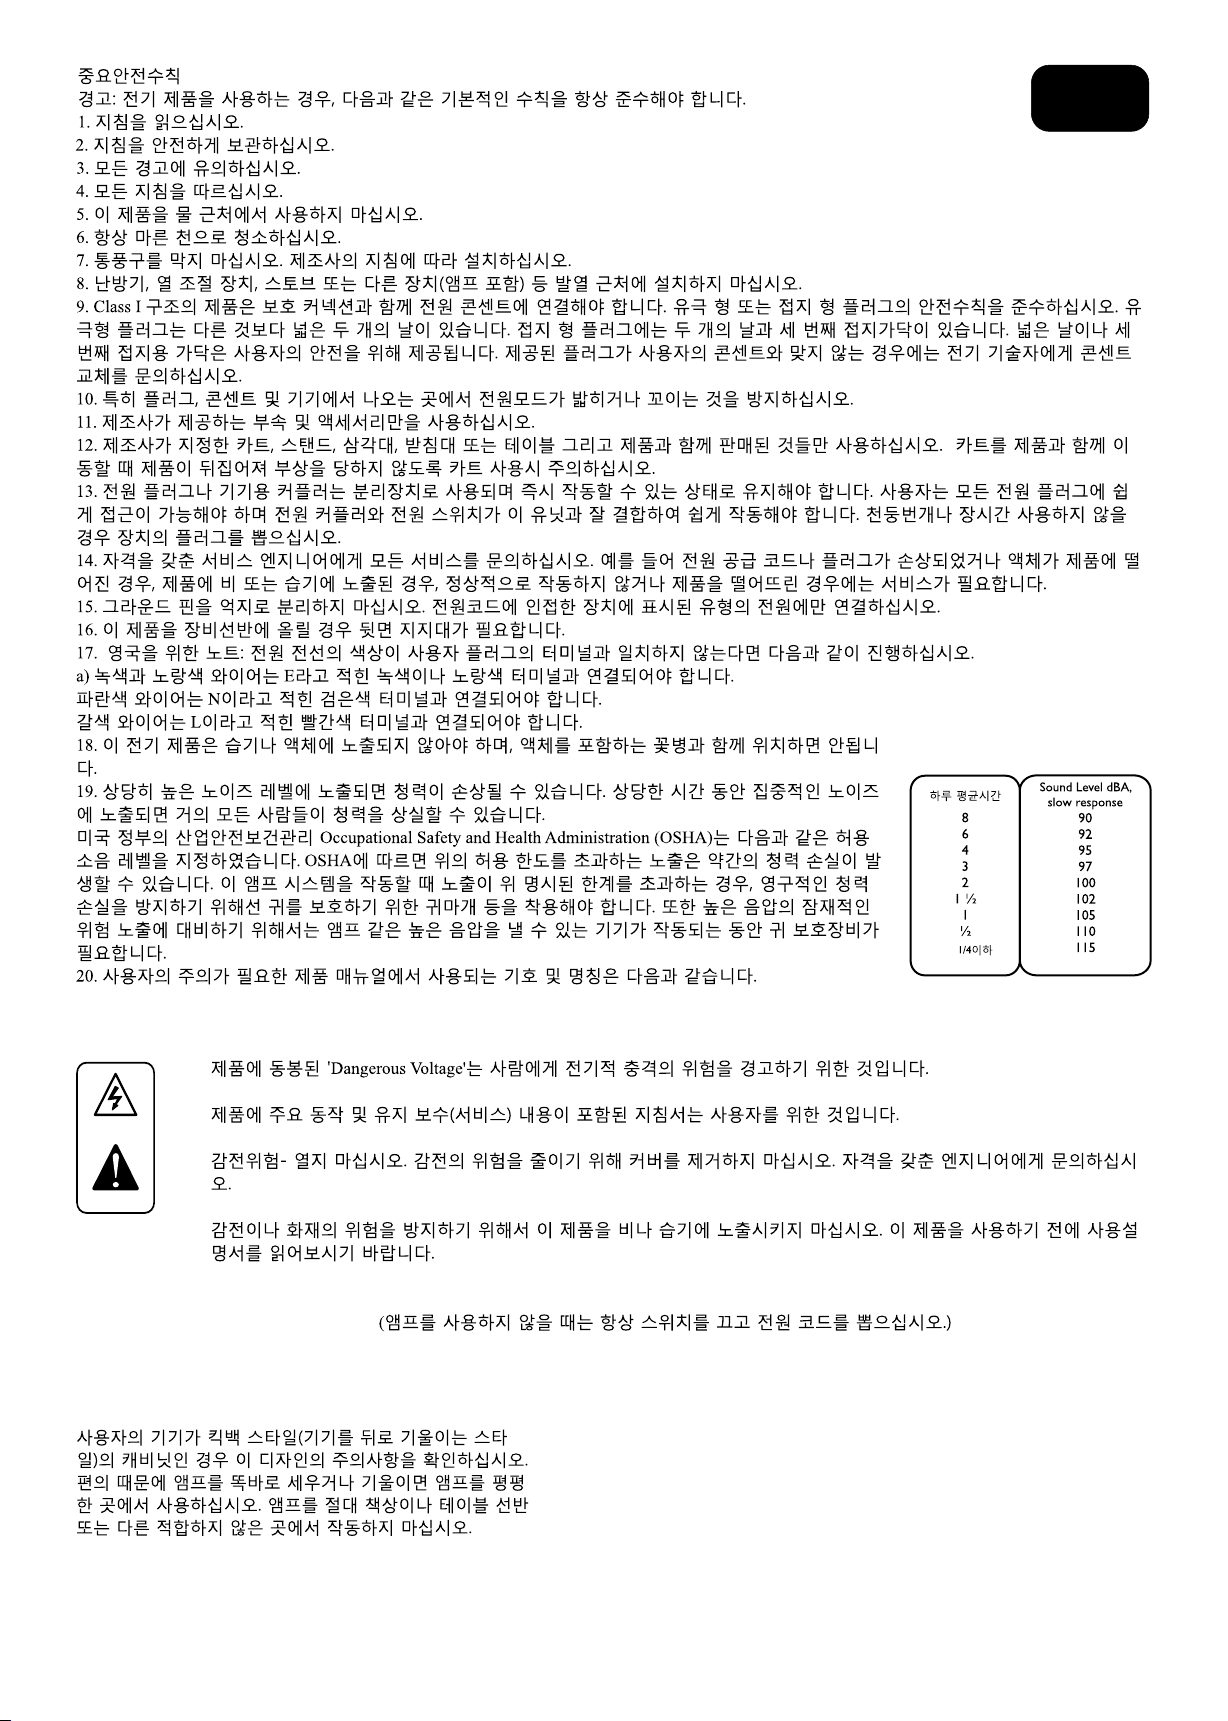
19. Exposure to extremely high noise levels may cause a permanent hearing loss. Individuals vary
considerably in susceptibility to noise-induced hearing loss, but nearly everyone will lose some
hearing if exposed to sufficiently intense noise for a sufficient time.
The U.S. Government’s Occupational Safety and Health Administration (OSHA) has specified the
following permissible noise level exposures: According to OSHA, any exposure in excess of the above
permissible limits could result in some hearing loss. Earplugs or protectors to the ear canals or over
the ears must be worn when operating this amplification system in order to prevent a permanent
hearing loss, if exposure is in excess of the limits as set forth above. To ensure against potentially
dangerous exposure to high sound pressure levels, it is recommended that all persons exposed to
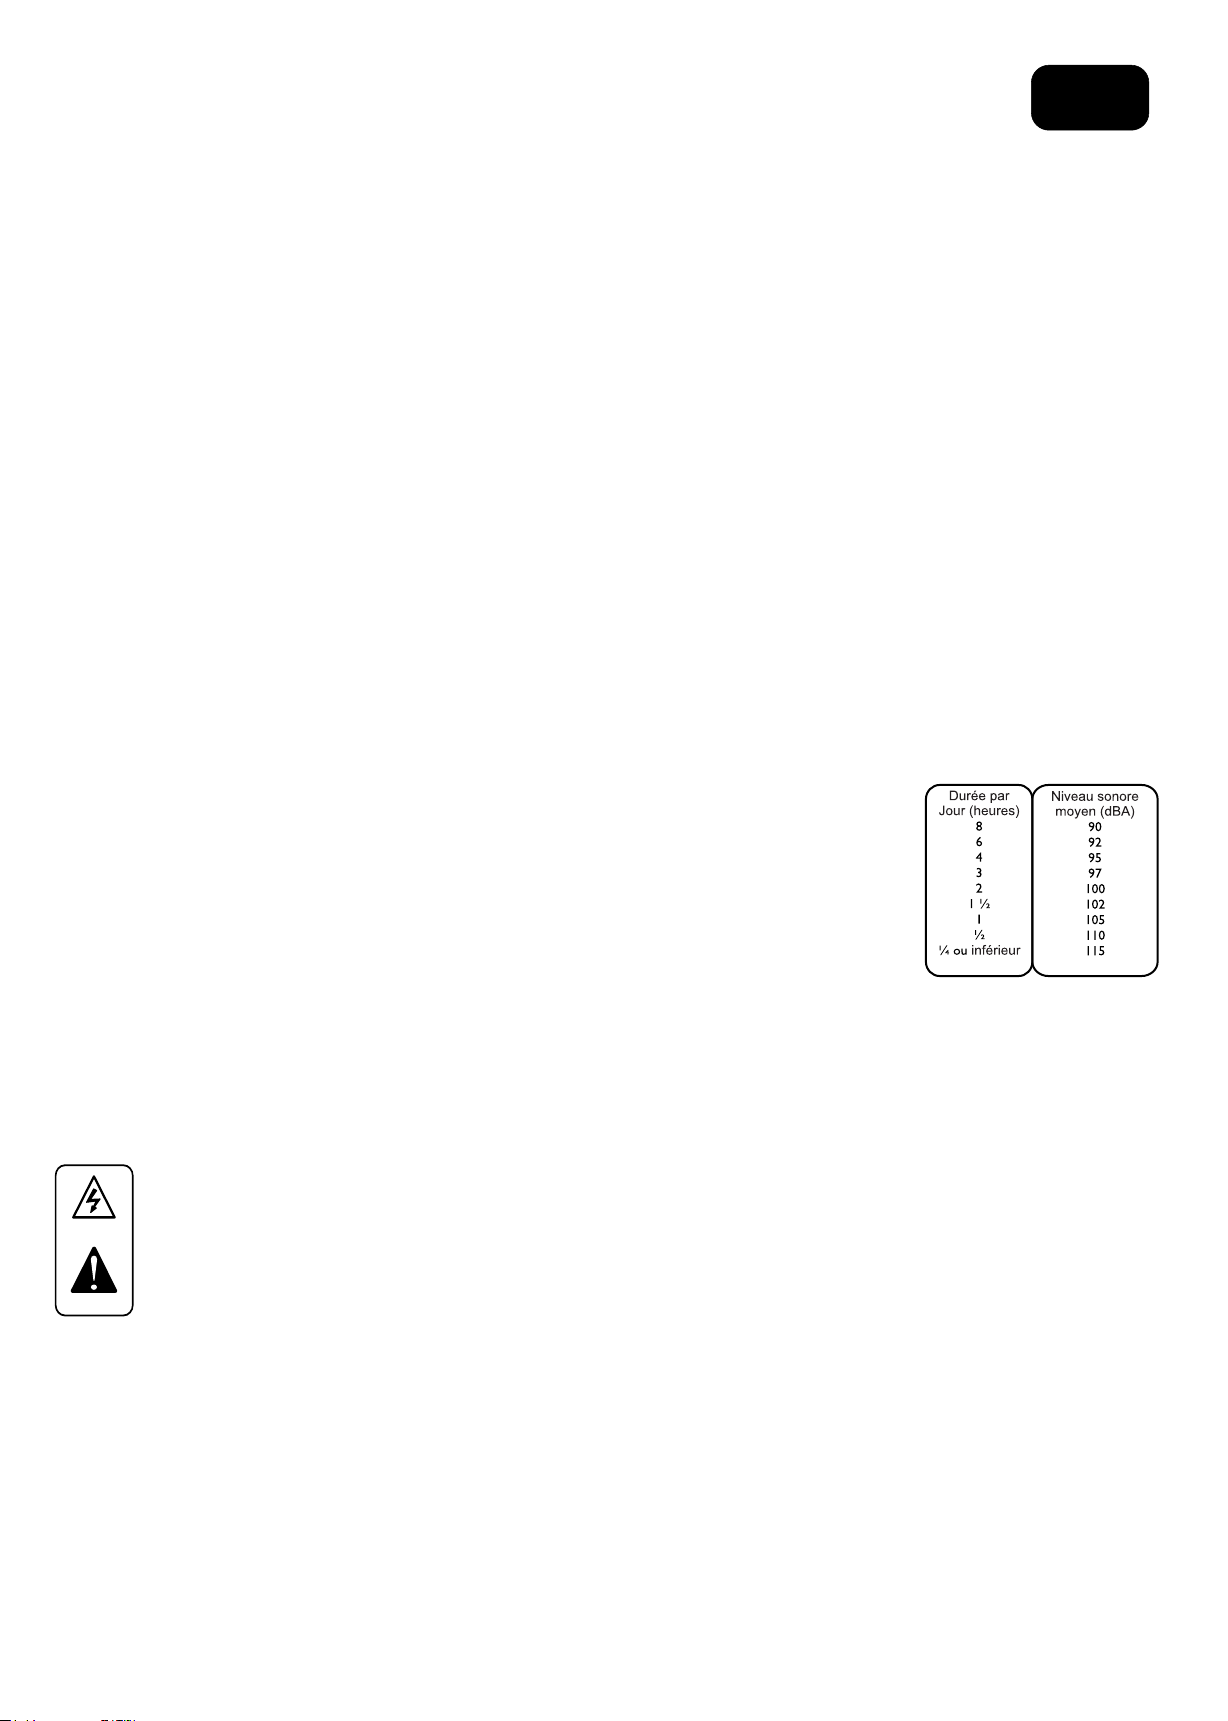
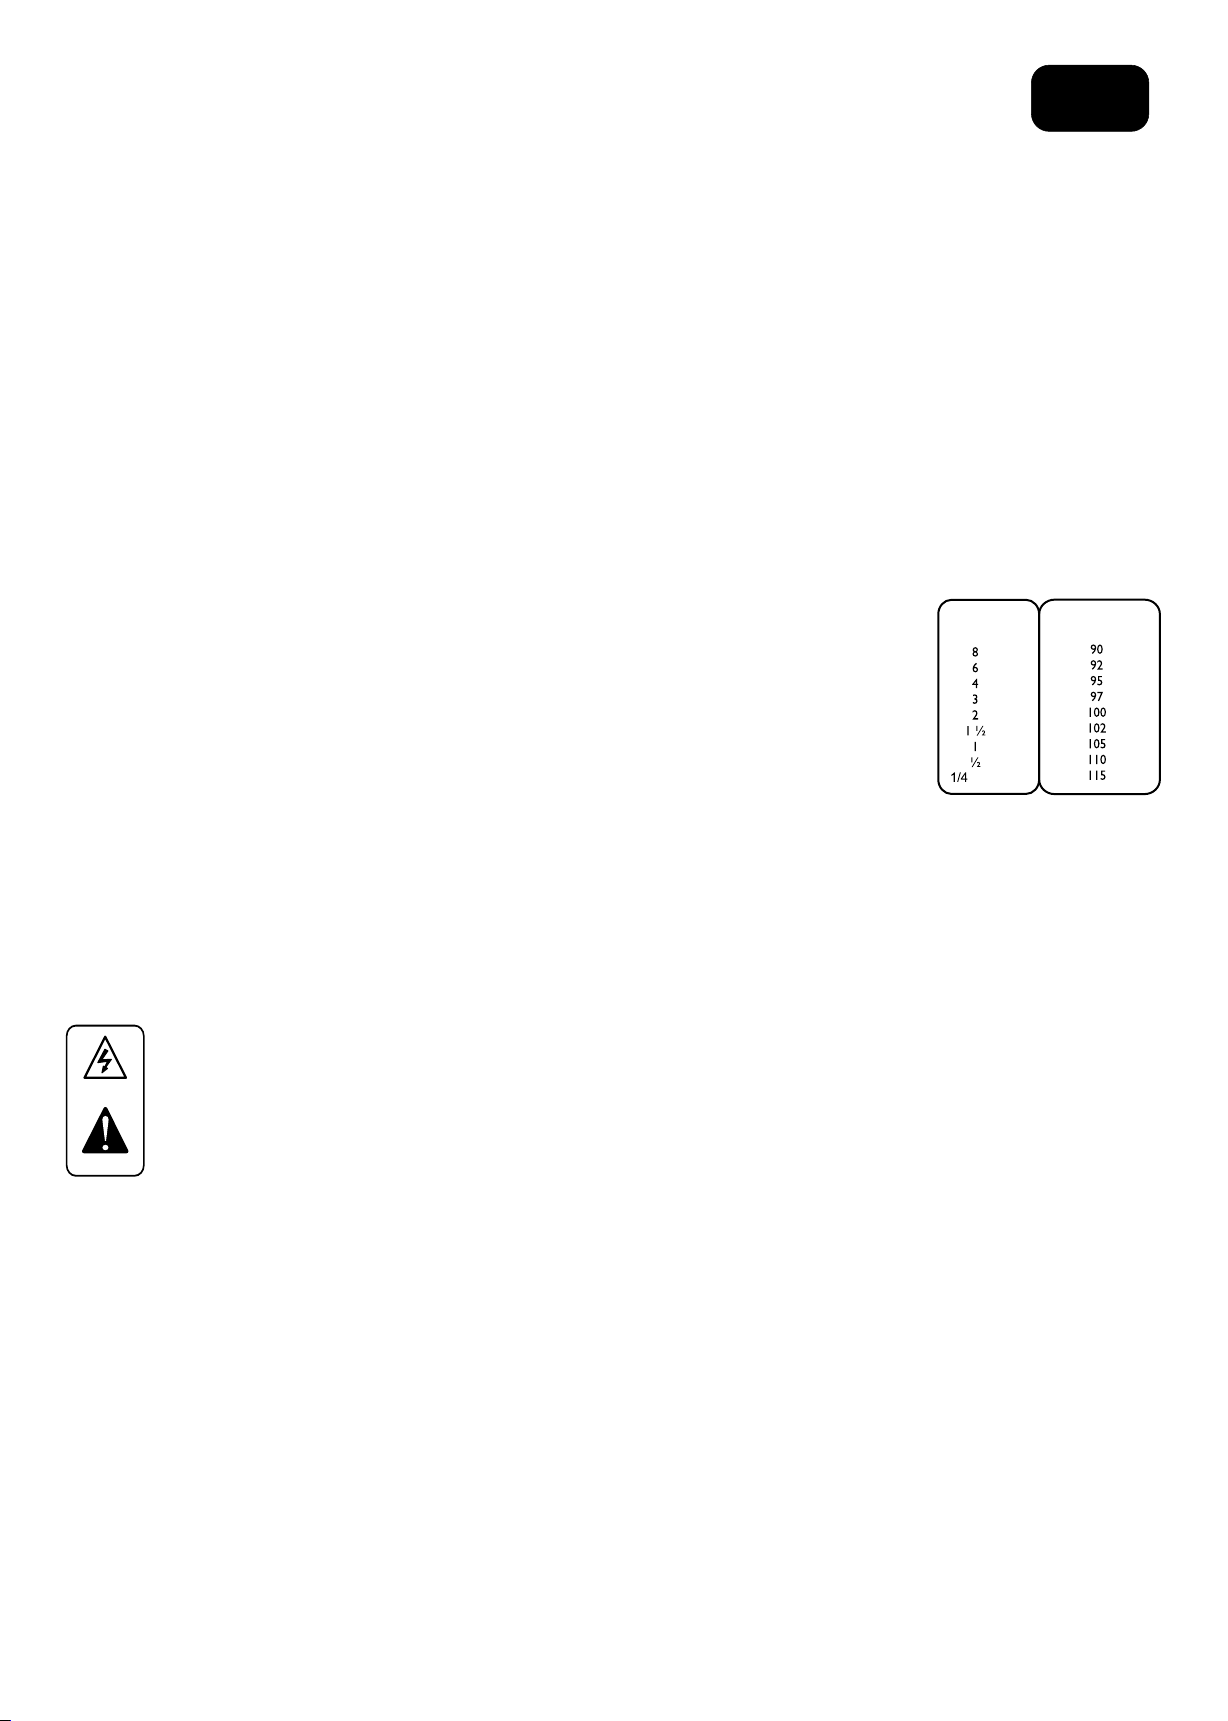
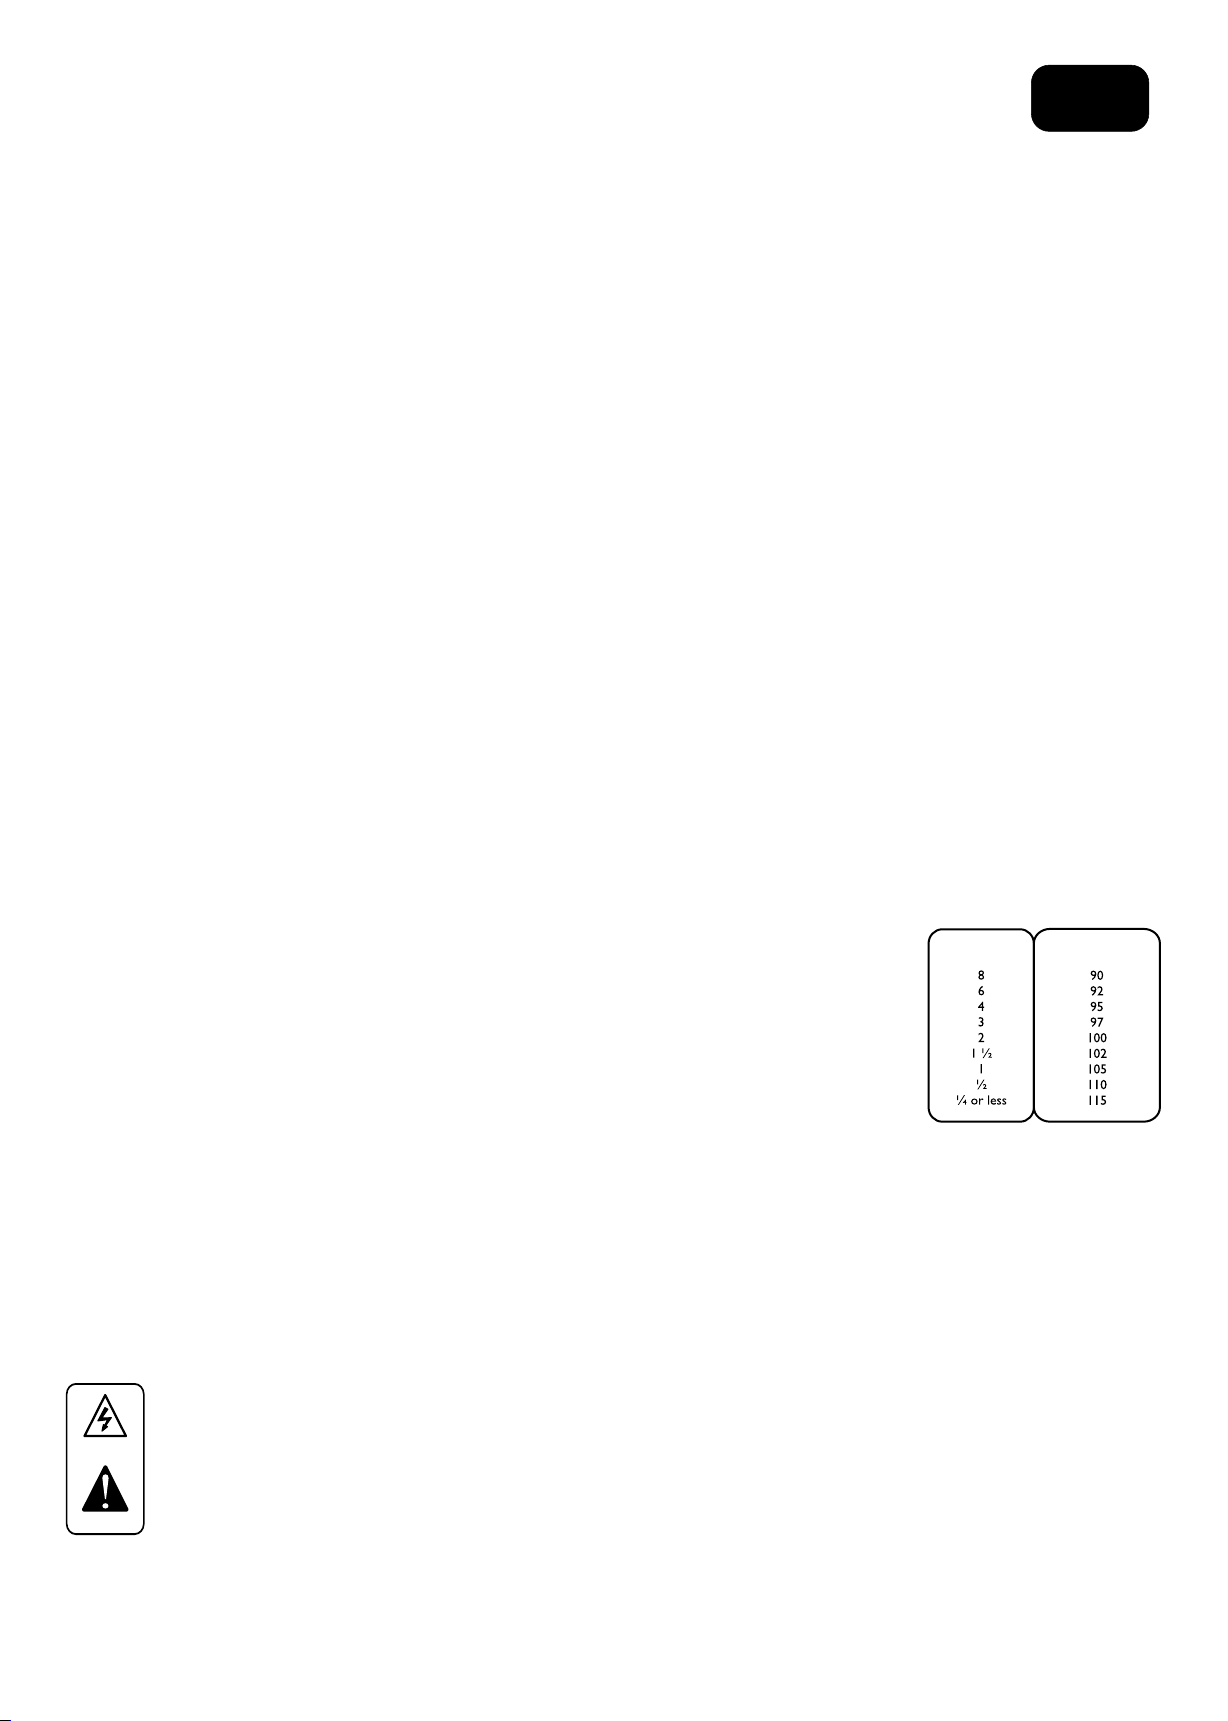
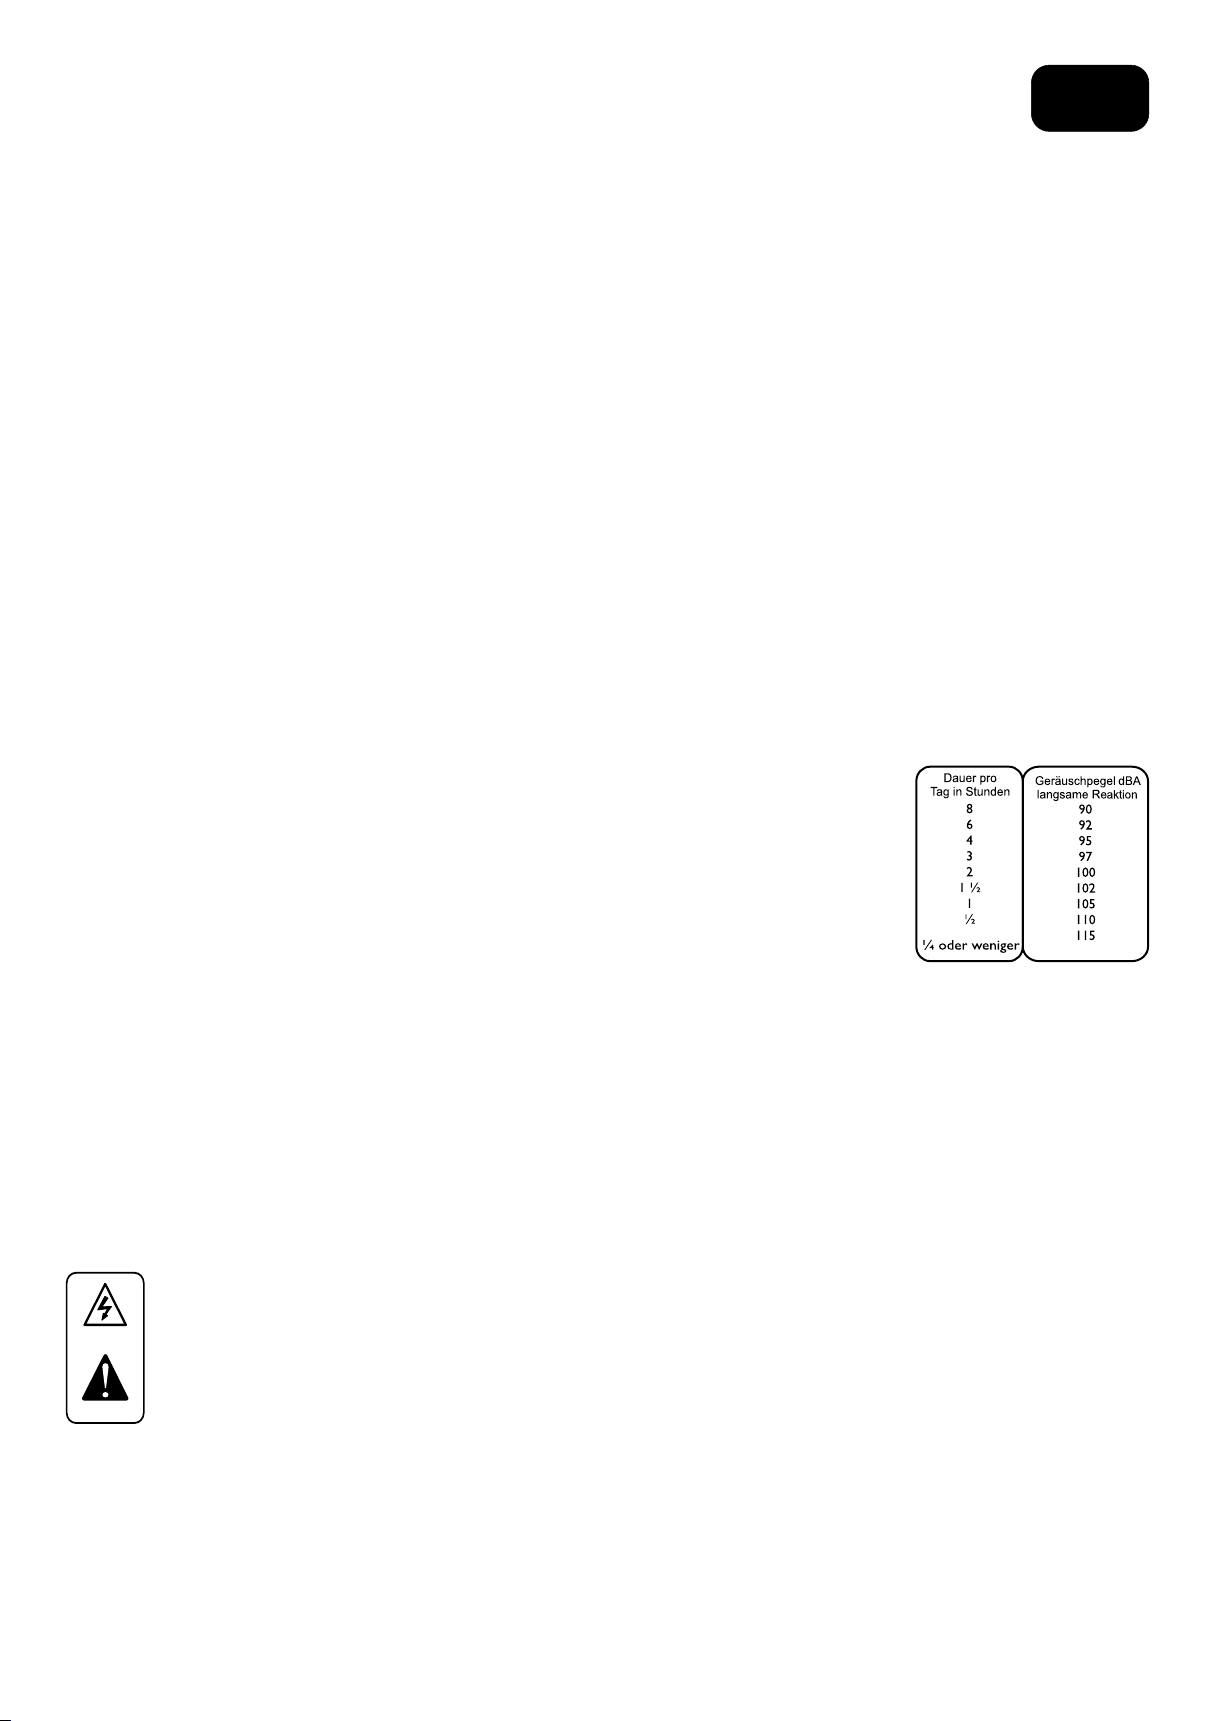
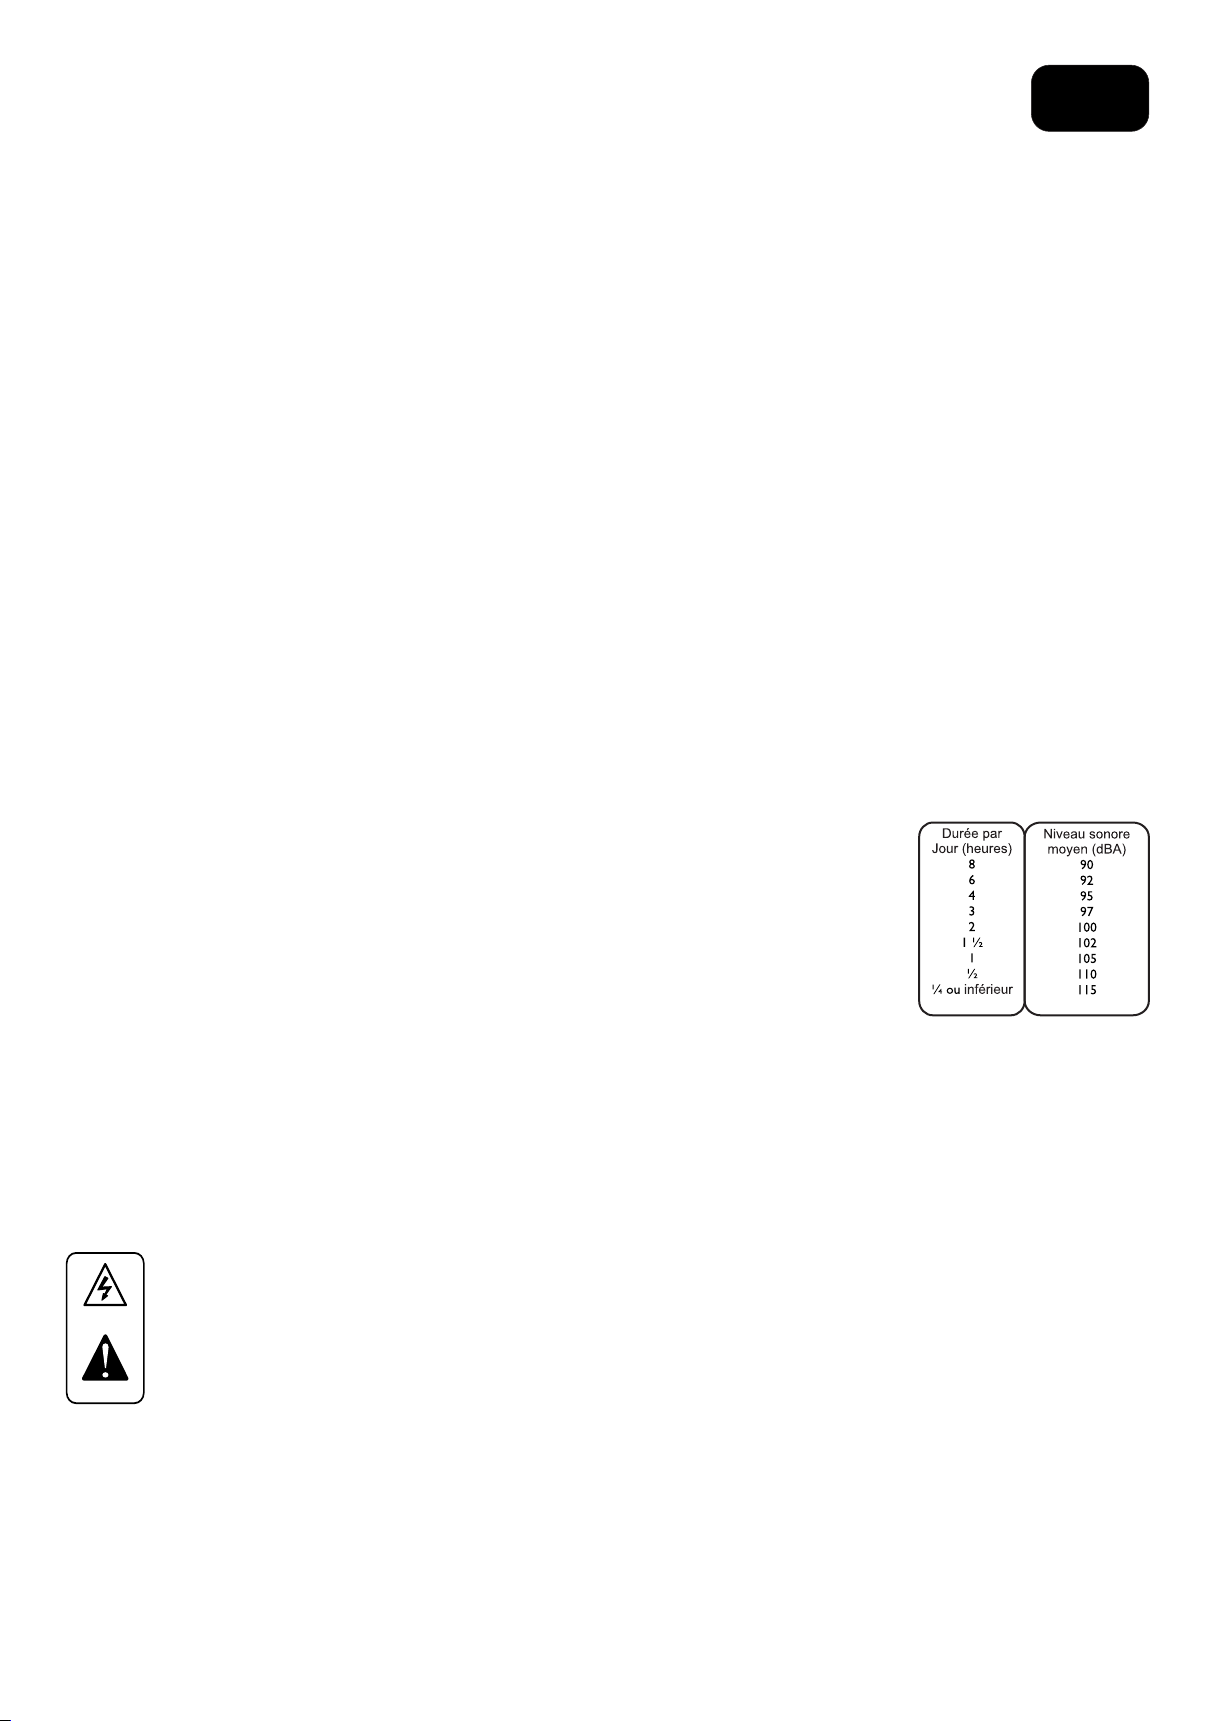
Duration Per
Day in Hours
8
6
4
3
2
1 ½
1
½
¼ or less
equipment capable of producing high sound pressure levels such as this amplification system be
protected by hearing protectors while this unit is in operation.
20. Symbols & nomenclature used on the product and in the product manuals, intended to alert the operator to areas where extra
caution may be necessary, are as follows:
EN
Sound Level dBA,
slow response
90
92
95
97
100
102
105
110
115
Intended to alert the user to the presence of high ‘Dangerous Voltage’ within the products enclosure that may be sufficient to
constitute a risk of electrical shock to persons.
CAUTION:
Intended to alert the user of the presence of important operating and maintenance (Servicing) instructions in the literature
accompanying the product.
WARNING:
Risk of electrical shock - DO NOT OPEN. To reduce the risk of electrical shock, do not remove the cover. No user
serviceable parts inside. Refer servicing to qualified personnel.
To prevent electrical shock or fire hazard, do not expose this
appliance to rain or moisture. Before using this appliance please
read the operating instructions.
If your appliance features a tilting mechanism or a kickback style
cabinet, please use this design feature with caution. Due to the
ease with which the amplifier can be moved between straight
and tilted back positions, only use the amplifier on a level,
stable surface. DO NOT operate the amplifier on a desk,
table, shelf or otherwise unsuitable non-stable platform.
Page 16
INSTRUCCIONES IMPORTANTES DE SEGURIDAD
CUIDADO: Cuando use productos electrónicos, debe tomar precauciones básicas, incluyendo las siguientes:
1. Lea estas instrucciones.
2. Guarde estas instrucciones.
3. Haga caso de todos los consejos.
4. Siga todas las instrucciones.
5. No usar este aparato cerca del agua.
6. Limpiar solamente con un trapo seco.
7. No bloquear ninguna de las salidas de ventilación. Instalar de acuerdo a las instrucciones del fabricante.
8. No instalar cerca de ninguna fuente de calor como radiadores, estufas, hornos u otros aparatos (incluyendo amplificadores) que
produzcan calor.
9. Un aparato con la construcción de clase I deberá conectarse a una toma de corriente que disponga una conexión con protección.
No retire la patilla protectora del enchufe polarizado o con conexión a tierra. Un enchufe polarizado tiene dos clavijas, una más
ancha que la otra. Un enchufe con toma de tierra tiene dos clavijas y un tercer diente de tierra. La clavija ancha (la tercera) se
proporciona para su seguridad. Si el enchufe proporcionado no encaja en su toma de red, consulte a un electricista para que se
reemplace por la obsoleta.
10. Proteja el cable de alimentación para que no sea pisado o pinchado, particularmente en los enchufes, habitáculos y el punto de
salida del aparato.
11. Usar solamente componentes y accesorios proporcionados por el fabricante.
12. Usar solamente un carro, pie, trípode, o soporte especificado por el fabricante, o vendido junto al aparato. Cuando se use un
carro, tenga cuidado al mover el conjunto carro/aparato para evitar que se dañe en un vuelco.
13. El cable de alimentación o conector del aparato se usa como dispositivo de desconexión y debe permanecer accesible. El usuario
debe permitir un acceso fácil a cualquier entrada principal, interruptor haciéndolo así más operativo. Desenchufe este aparato
durante tormentas eléctricas o cuando no se use en largos períodos de tiempo.
14. Para cualquier reparación, acuda a personal de servicio cualificado. Se requieren reparaciones cuando el aparato ha sido dañado
de alguna manera, como cuando el cable de alimentación o el enchufe se han dañado, algún líquido ha sido derramado o algún
objeto ha caído dentro del aparato, el aparato ha sido expuesto a la lluvia o la humedad, no funciona de manera normal, o ha
sufrido una caída.
15. Nunca retire la patilla de Tierra. Conecte el aparato sólo a una fuente de alimentación del tipo marcado al lado del cable de
alimentación.
16. Si este producto va a ser instalado en una unidad de rack, use algún tipo de apoyo trasero.
17. Nota para el Reino Unido solamente: Si los colores de los cables en el enchufe principal de esta unidad no corresponden con los
terminales en su enchufe‚ proceda de la siguiente manera:
a) El cable de color verde y azul debe ser conectado al terminal que está marcado con la letra E‚ el símbolo de Tierra (earth)‚
coloreado en verde o en verde y amarillo.
b) El cable coloreado en azul debe ser conectado al terminal que está marcado con la letra N o el color negro.
c) El cable coloreado en marrón debe ser conectado al terminal que está marcado con la letra L o el color rojo.
18. Este aparato eléctrico no debe ser sometido a ningún tipo de goteo o salpicadura y se debe tener cuidado para no poner objetos
que contengan líquidos, como vasos, sobre el aparato.
19. La exposición a altos niveles de ruido puede causar una pérdida permanente en la audición. La
susceptibilidad a la pérdida de audición provocada por el ruido varía según la persona, pero casi todo
el mundo perderá algo de audición si se expone a un nivel de ruido suficientemente intenso durante
un tiempo determinado. El Departamento para la Salud y para la Seguridad del Gobierno de los
Estados Unidos (OSHA) ha especificado las siguientes exposiciones al ruido permisibles:
De acuerdo al OSHA, cualquier exposición que exceda los límites arriba indicados puede producir
algún tipo de pérdida en la audición. Protectores para los canales auditivos o tapones para los oídos
deben ser usados cuando se opere con este sistema de sonido para prevenir una pérdida
permanente en la audición, si la exposición excede los límites indicados más arriba. Para protegerse
de una exposición a altos niveles de sonido potencialmente peligrosa, se recomienda que todas las
personas expuestas a equipamiento capaz de producir altos niveles de presión sonora, tales como este sistema de amplificación, se
encuentren protegidas por protectores auditivos mientras esta unidad esté operando.
20. Símbolos y nomenclatura utilizada en el producto y en los manuales de producto, destinado a alertar al usuario de las áreas
donde la precaución adicional pueden ser necesarias, son las siguientes:
ES
La intención de alertar al usuario de la presencia de "tensión peligrosa" alto dentro del recinto los productos puede ser
suficiente para constituir un riesgo de descarga eléctrica para las personas.
CAUTION:
WARNING:
Para evitar descargas eléctricas o incendios, no exponga este aparato a la lluvia ni a la humedad. Antes de usar este aparato, por favor
Si el aparato cuenta con un mecanismo de inclinación o un gabinete estilo de contragolpe, por favor use esta característica con
La intención de alertar al usuario de la presencia de importantes de operación y mantenimiento (servicio) en la literatura
que acompaña al producto.
Riesgo de choque eléctrico - NO ABRIR. Para reducir el riesgo de descarga eléctrica, no retire la cubierta. No hay piezas
que el usuario pueda reparar. Solicite la revisión al personal cualificado.
lea las instrucciones de funcionamiento.
precaución. Debido a la facilidad con que puede ser que el amplificador se mueva entre las posiciones recta e inclinada, utilice sólo
el amplificador sobre una superficie nivelada y estable. NO haga funcionar el amplificador en un escritorio, mesa, estantería o
plataforma no estable o no apta.
Page 17
CONSIGNES DE SÉCURITÉ IMPORTANTES
ATTENTION: L'utilisation de tout appareil électrique doit être soumise aux précautions d'usage incluant:
1. Lisez ces instructions
2. Gardez ce manuel pour de futures références.
3. Prêtez attention aux messages de précautions de ce manuel.
4. Suivez ces instructions.
5. N'utilisez pas cet appareil à proximité de plans d'eau.
6. N'utilisez qu'un tissu sec pour le nettoyage de votre appareil.
7. N'obstruez pas les systèmes de refroidissement de votre appareil et installez votre appareil en fonction des instructions de ce manuel.
8. Ne positionnez pas votre appareil à proximité de toute source de chaleur.
9. Un appareil avec la construction de la classe I sera relié à une prise munie d'une liaison à la terre. Branchez toujours votre appareil sur
une alimentation munie de prise de terre utilisant le cordon d'alimentation fourni.
10. Protégez les connecteurs de votre appareil et positionnez les câblages pour éviter toutes déconnexions accidentelles.
11. N'utilisez que des fixations approuvées par le fabriquant.
12. Lors de l'utilisation sur pied ou perche de support, assurez dans le cas de déplacement de l'ensemble enceinte/support de prévenir
tout basculement intempestif de celui-ci.
13. La fiche secteur est utilisée pour couper l'alimentation de l'appareil et doit rester facilement accessible. Débranchez cet appareil
pendant les orages ou s'il est inutilisé pendant de longues périodes.
14. Seul un technicien agréé par le fabriquant est à même de réparer/contrôler votre appareil. Celui-ci doit être contrôlé s'il a subi des
dommages de manipulation, d'utilisation ou de stockage (humidité, …).
15. Ne déconnectez jamais la prise de terre de votre appareil.
16. Si votre appareil est destiné à être monté en rack, des supports arrière doivent être utilisés.
17. Note pour le Royaume-Uni : Si les couleurs des fils du câble d'alimentation ne correspondent pas aux fiches de la prise secteur,
procédez comme suit:
a) Le fil vert et jaune doit être branché sur la borne repérée par la lettre E, ou le symbole de terre, ou par les couleurs vert ou verte
et jaune.
b) Le fil bleu doit être branché sur la borne repérée par la lettre N, ou par la couleur noire.
c) Le fil marron doit être branché sur la borne repérée par la lettre L, ou par la couleur rouge.
18. Cet équipement électrique ne doit en aucun cas être en contact avec un quelconque liquide et aucun objet contenant un liquide, tels
qu'un vase ou autre récipient.
19. Une exposition à de hauts niveaux sonores peut entraîner des dommages irréversibles de l'audition.
La sensibilité au bruit varie considérablement d'un individu à l'autre, mais la majorité de la population
ressentira une perte d'audition après une exposition à une forte puissance sonore pendant une durée
prolongée.
L'organisme de la santé américaine (OSHA) a produit le guide ci-dessous en rapport à l'exposition
autorisée aux niveaux de bruit:
D'après les études menées par l'OSHA, toute exposition au delà des limites décrites ci-dessous
entraînera des pertes de audition chez la plupart des sujets. Le port de système de protection (casque,
oreillette de filtrage, etc…) doit être observé lors de l'utilisation de cet appareil sans quoi des
dommages irréversibles peuvent être occasionnés. Le port de ces systèmes doit être observé par toutes
personnes susceptibles d'être exposées à des conditions au delà des limites décrites ci-dessous.
20. Symboles utilisés sur les produits et dans les manuels des produits, destinés à alerter l'opérateur des zones ou des précautions
supplémentaires pouvant être nécessaires:
FR
Ce symbole est utilisé pour prévenir l'utilisateur de la présence d'une tension non isolée dangereuse à l'intérieur du boîtier de l'appareil, et
pouvant être suffisante pour constituer un risque de choc électrique.
Ce symbole est utilisé pour prévenir l'utilisateur de la présence d'instructions d'utilisation et de maintenance dans le mode
CAUTION:
WARNING:
Afin de prévenir tout risque de choc électrique et d'incendie, n'exposez pas cet appareil à la pluie ou à l'humidité. Avant d'utiliser cet appareil,
lisez attentivement les instructions d'utilisation de ce mode d'emploi.
Si votre appareil est équipé d'un mécanisme de basculement ou si son boîtier est conçu comme retour, veuillez utiliser cette
caractéristique avec prudence. En raison de la facilité avec laquelle l'amplificateur peut être basculé entre les positions droite et inclinée,
utilisez uniquement l'amplificateur sur une surface plane et stable. NE PAS faire fonctionner l'amplificateur sur un bureau, une table, une
étagère ou autre plate-forme inappropriée.
d'emploi accompagnant l'appareil.
Risque de choc électrique – NE PAS OUVRIR Afin de réduire les risque de choc électrique, ne pas ouvrir le capot. Il n'y a aucune
pièce à l'intérieur pouvant être réparée par l'utilisateur. Veuillez confier la maintenance à un personnel qualifié.
Page 18
重要安全说明
告:使用电产品时,应终基本的注事项,括各项:
1. 阅读这些说明。
2. 确保此类说明放置于安全处。
3. 注意所有警告。
4. 请遵守所有说明。
5. 请勿在近水处使用该电器。
6. 仅可用干布清洁该电器。
7. 请勿堵塞该电器上的任何通风口。根据制造商的说明进行安装。
8. 请勿将该电器安装在靠近热源,如散热器、热风机、炉子或其他发热设备(包括功率放大器)。
9. 与 I类建筑设备连接时,应连接到带保护的电源插座上。不要忽视极性或接地类型插头的安全作用。极性插头具有两个片
状电极,其中一个较宽。接地类型插头具有两个片状电极和第三只接地脚。宽片状电极或第三只接地极用于保证使用者及电
器的安全。如所提供的插头不适用于插座,须请专业人员更换,切勿自行更换电源插座。
10. 保护电源线,不被踩踏或挤压,尤其在插头、插座以及电源线的连接处。
11. 仅可采用制造商提供的附件或配件。
12. 仅可使用制造商指定的、或与该电器一同出售的货车、台架、三脚架、支架或台桌。使用货车,及移动货车/搬运该电器
时,须注意,避免倾翻产生损坏。
13. 电源插头或该电器的转接插头,应保持其易操作性。用户应使用与该电器匹配的电源插头、连接器和电源开关,应易于
操作。在雷雨或长时间不使用时,拔下该电源插头。
14. 当该电器受到任何方式的损坏时,如:电源线或插头被损坏、液体泼溅或物体落入电器内、该电器放置于有雨水或潮湿
CN
处、及该电器坠落后,无法正常运行,需进行检修时,必须请有资格认证的维修人员进行维修。
15. 请勿折断电源插头上的接地极。仅可连接到在插头的片状电极旁边已标注符号的极性上。
16. 如此电器须安装在设备架上,应提供后部支架。
17. 仅适用于英国的注意事项。如该电器的电源线中电缆颜色与插头片状电极不相符,请按照以下步骤进行操作:
a) 黄绿色电缆须连接至标有字母“E”的电极,为接地符号。颜色为黄绿色或绿色。
b) 蓝色电缆须连接至标有字母“N”的电极,颜色为蓝色或黑色。
c) 棕色电缆须连接至标有字母“L”的电极,颜色为棕色或红色。
18. 该电器不能放置于有水滴或有水溅出的地方,须注意,不要将盛有液体的容器,如花瓶放在该电器上。
19.如果人处于极高噪音级中可能会造成永久失聪。每个人受噪音导致听力损害的差异很大。然而若
长时间处于极强噪音中,任何人几乎都会造成不同程度的听力损害。美国政府职业安全健康管理
局(OSHA)指定了以下允许范围内的噪音级别,见右表:根据OSHA,任何超出上述允许的极限
范围可导致不同程度的听力损害。在运行该电器时,人体处于超出了以上设定的限制,须佩戴耳
塞或配备耳朵的保护装置,以预防永久性听力损害。为避免可能处于强声压程度的危险,该电器
运行时,建议处于强声压程度下的所有人均配备听力保护装置。
20. 用于产品和说明书上的符号和术语是为了提醒操作人员注意需要额外注意的地方,具体如下:
旨在提醒使用者小心产品空箱内的未绝缘“危险电压”,这可能足以对人构成触电危险。
旨在提醒使用者与产品一起提供的说明书中的重要操作和维护(保修)说明。小心触电-不能打开
CAUTION:
WARNING:
21.
如果你的产品是倾斜的结构或是后倾款式的箱体,请小心使用该设计征。由于功可在和后倾式间转
换,请在平坦、固的面使用该产品。请不要在桌子、架子或其不合、不固的平上使用该功。
为了降低触电风险,请不要打开盖子。里面不含任何用户可用的配件。请将维修交于被许可的人员。
为避免触电或火灾,请不要将本产品置于雨中或潮湿环境中。在使用本产品前,请仔细阅读操作说明。
2000m
该产品仅适用于非热带气候条件下安全使用该产品仅用于2000m地全使用
Page 19
安全上の重要な注意事項
電子機器を使用する際は、下記の注意事項に従ってご使用ください。
ご使用前には必ずこの説明書をお読みください。
説明書は大切に保管してください。
すべての注意事項を確認してください。
水などの液体を本体にこぼしたり、内部にかからないように注意してください。
掃除するときは、乾いた布のみを使用してください。
通気孔は絶対に塞がないでください。
ラジエーター、ヒートレジスター、ストーブ等、熱を発する装置(アンプを含む)
の近くには決して置かないでください。
電源コードは、踏まれたりはさまれたりしないように注意してください。
メーカーによって供給されたパーツ以外は使用しないでください。
キャスター等は、付属品を使用してください。転倒等の事故がないように十分注意してください。
長時間使用しない時、また雷雨の時などはコンセントを抜いてください。
電源コードやプラグの破損、強い衝撃や、液濡れ等の理由で正常に装置が動作しない場合は、
ご購入店にご相談ください。
激しい騒音環境下では、永続的な難聴を引き起こす可能性があります。
騒音性 難聴への影響度には個人差がありますが、
激しい騒音の中にある一定の期間さらされた場合、
ほとんどの人の聴覚に悪影響を及ぼす可能性があります。米国政府の
労働安全衛生局(OSHA)は、ノイズレベルの許容量(条件)
を定めています: OSHAによると、許容量を超える騒音は、
少なからず難聴に繋がる可能性があります。 このアンプシステムを操作する際、
万が一制限値を超えている場合は、永続的な 難聴を防ぐためにも耳栓などを使用してください。
機材またはマニュアルに記載された記号、及び名称は、ご使用時に注意が必要なものとなります。
下記をご参照ください。
1日の間
それ以下
JP
騒音レベル(dBA)
答が遅い
機材内部には、人に感電する危険性のある“高電圧”が流れている場合があります。
付属の冊子に書かれている操作上、または管理上(サービス上)重要な事項を確認してください。
製品カバーを開けないでください。感電の危険性を減らすためにも、蓋は取り外さないでください。
CAUTION:
WARNING:
(アンプを使用しないときは、スイッチをオフにし、電源コードは抜いてください)
場合は、アプライアンスの機能傾斜機構やキックバック スタイルのキャビネットは、
注意してこのデザイン機能を使用してください。
アンプ ストレートと戻って傾斜の位置間で移動できますがしやすさのため、
水平で安定した表面に、アンプのみ使用します。
デスク、テーブル、
棚またはそれ以外の場合に不適切な
nonstable プラットフォーム上増幅器を
操作しないでください。
内部にはユーザーが修理できる部品はありません。資格ある技術者の指示を仰いでください。
感電や火災の危険を防止するため、この装置を雨や湿気にさらさないでください。使用する前には、
必ず取扱説明書をお読みください。
Page 20
KR
CAUTION:
WARNING:
Page 21
INSTRUÇÕES DE SEGURANÇA
AVISO: Ao usar produtos elétricos, adverte básica devem ser sempre seguidas, incluindo as seguintes:
1. Leia estas instruções.
2. Guarde estas instruções de segurança.
3. Preste atenção a todos os avisos.
4. Siga todas as instruções.
5. Não use este aparelho perto da água.
6. Limpe apenas com um pano seco.
7. Não bloqueie qualquer uma das aberturas de ventilação. Instale de acordo com as instruções do fabricante.
8. Não instale perto de fontes de calor, como radiadores, aquecedores, fogões ou outros aparelhos (incluindo amplificadores) que
produzem calor.
9. Um aparelho com a construção de classe I devem ser conectado a uma tomada eléctrica com ligação de proteção. Não anule a
finalidade de segurança da ficha polarizada ou do tipo terra. Uma ficha polarizada possui duas lâminas, uma mais larga que a outra.
Uma ficha do tipo terra tem duas lâminas e um terceiro pino de aterramento. A lâmina larga ou o terceiro pino são fornecidos para
sua segurança. Se a ficha fornecida não encaixar na sua tomada, consulte um electricista para a substituição da tomada obsoleta.
10. Proteja o cabo de alimentação de pisadelas ou apertos, especialmente nas fichas, receptáculos de conveniência e no ponto de saída
do aparelho.
11. Utilize apenas ligações / acessórios fornecidos pelo fabricante.
12. Use somente com o carrinho, estrutura, tripé, suporte, ou mesa especificados pelo fabricante ou vendidos com o aparelho. Quando
utilizar um carrinho, tenha cuidado ao mover o conjunto carrinho / dispositivo para evitar danos provocados pela queda.13. A ficha
da tomada ou aparelho forem utilizados como dispositivo de desconexão e deve estar sempre acessível. O usuário deve permitir o
acesso fácil a qualquer ficha, acoplador de alimentação e interruptor de rede usada em conjunto com esta unidade, assim, tornandoo acessível. Desligue o aparelho durante tempestades com raios ou quando não for utilizado por longos períodos de tempo.
14. Solicite a assistência de pessoal qualificado. A manutenção é necessária quando o aparelho tiver sido danificado de qualquer
maneira, como quando o cabo de alimentação ou a ficha estiverem danificados, líquido foi derramado ou objetos caídos dentro do
aparelho, o aparelho tenha sido exposto à chuva ou umidade, não operar normalmente, ou se tiver caído.
15. Nunca quebre o pino terra. Ligue apenas a uma fonte de energia do tipo marcadas na unidade adjacente ao cabo de fornecimento
de energia.
16. Se este produto for para ser montado em um bastidor de equipamentos, o suporte traseiro deve ser fornecido.17. Nota para o
Reino Unido: Se as cores dos fios do cabo de alimentação da unidade não correspondem com os terminais na ficha, faça o seguinte:
a) O fio que é colorido verde e amarelo tem de ser ligado ao terminal que está marcada com a letra E, o símbolo de terra, de cor
verde ou
colorido em verde e amarelo.
b) O fio é de cor azul, que tem de ser ligado ao terminal que está marcada com a letra N ou a cor preta.
c) O fio que é castanho deve ser ligado ao terminal que está marcada com a letra L ou a cor vermelha.Aparelhos elétricos.
18.This não deve ser exposto a respingos e os cuidados devem ser tomados para não colocar objetos que contenham líquidos, tais
como vasos, sobre o aparelho.
19. A exposição a níveis de ruído extremamente alta pode causar uma perda permanente da audição. Os
indivíduos variam consideravelmente a susceptibilidade ao ruído induzido perda de audição, mas quase
todo mundo vai perder alguma audição se expostos a ruído suficientemente intensa durante um
tempo suficiente.
Segurança do Trabalho do governo dos EUA e Administração de Saúde (OSHA) especificou os
seguintes exposições de nível de ruído admissíveis: de acordo com OSHA, a exposição em excesso
dos limites admissíveis acima poderia resultar em alguma perda de audição. Tampões ou protectores
para o canal auditivo ou sobre as orelhas, deve ser usada quando se opera este sistema de
amplificação de modo a evitar a perda permanente da audição, se a exposição for superior a dos
limites tal como descrito acima. Para garantir contra a exposição potencialmente perigoso para
elevados níveis de pressão de som, recomenda-se que todas as pessoas expostas a um equipamento capaz de produzir níveis
elevados de pressão sonora, como este sistema de amplificação de ser protegidos por protetores auditivos enquanto esta unidade
está em operação.
20. Símbolos e nomenclatura utilizados no produto e nos manuais de produtos, destinados para alertar o operador para as áreas onde
o cuidado extra pode ser necessário, são os seguintes:
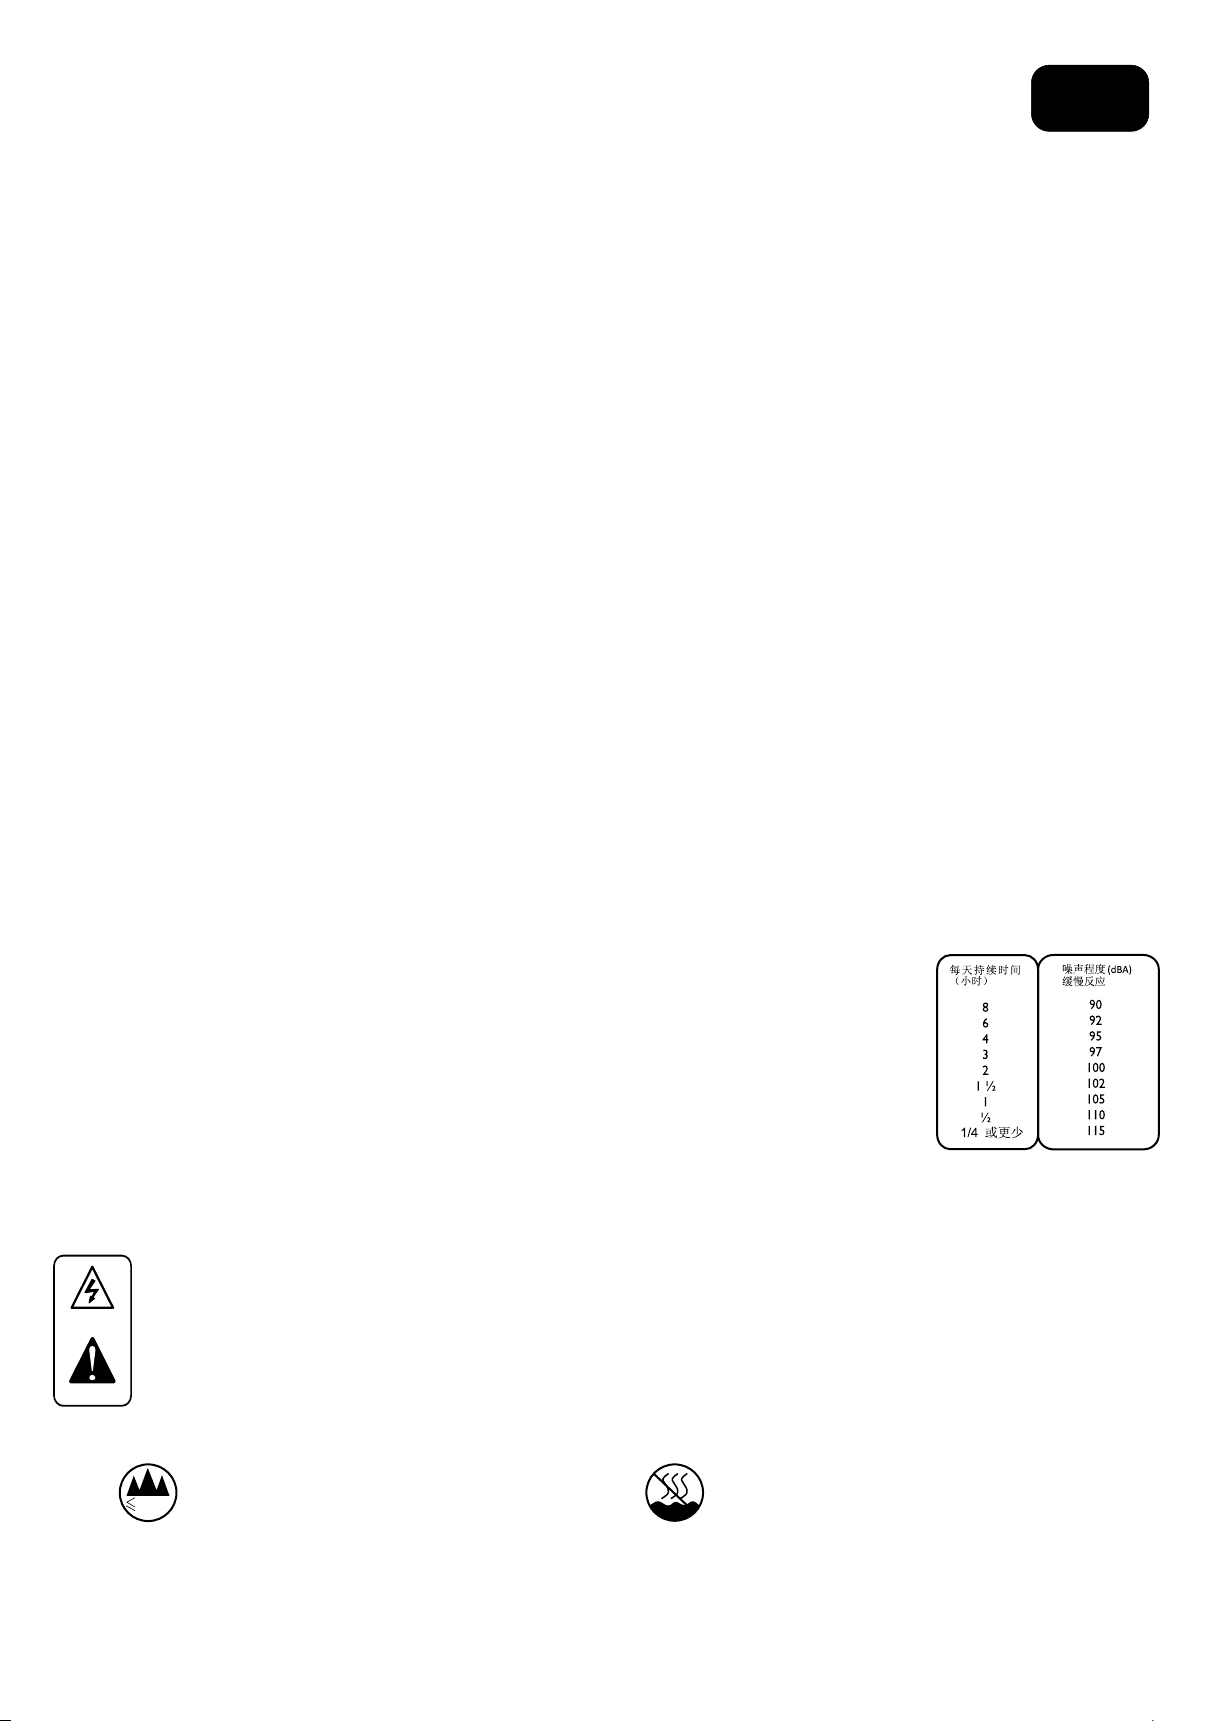
duração por
Dia em Horas
PT
DBA Nível de som,
resposta lenta
Com a intenção de alertar o utilizador para a presença de "tensão perigosa" alto dentro do recinto produtos que poderá ser suficiente
para constituir um risco de choque elétrico para as pessoas.
Com a intenção de alertar o usuário da presença de importantes de operação e manutenção (assistência) na literatura que
acompanha o produto.
CAUTION:
WARNING:
Se o seu aparelho possui um mecanismo de inclinação ou um armário estilo propina, por favor, use esse recurso de design com cautela.
Devido à facilidade com que o amplificador pode ser movida entre as posições de costas rectas e inclinada, usar apenas o amplificador
numa superfície plana e estável. NÃO operar o amplificador em uma escrivaninha, mesa, prateleira ou de alguma forma inadequada
plataforma nonstable.
Risco de choque elétrico - NÃO ABRA. Para reduzir o risco de choque eléctrico, não remover a tampa. Não existem peças
no interior. Consulte um técnico qualificado.
Para evitar choque elétrico ou risco de incêndio, não exponha este aparelho à chuva ou umidade. Antes de utilizar este
aparelho, leia atentamente as instruções de operação.
Page 22
WICHTIGE SICHERHEITSHINWEISE
DE
ACHTUNG: Beim Einsatz von Elektrogeräten müssen u.a. grundlegende Vorsichtsmaßnahmen befolgt werden:
1. Lesen Sie sich diese Anweisungen durch.
2. Bewahren Sie diese Anweisungen auf.
3. Beachten Sie alle Warnungen.
4. Befolgen Sie alle Anweisungen.
5. Setzen Sie dieses Gerät nicht in der Nähe von Wasser ein.
6. Reinigen Sie es nur mit einem trockenen Tuch.
7. Blockieren Sie keine der Lüftungsöffnungen. Führen Sie die Installation gemäß den Anweisungen des Herstellers durch.
8. Betreiben Sie das Gerät nicht neben Wärmequellen wie Heizungen, Heizgeräten, Öfen oder anderen Geräten (auch Verstärkern), die
Wärme erzeugen.
9. Verwenden Sie nur Kaltgeräte-Netzkabel aus dem Fachhandel.
10. Schützen Sie das Netzkabel, sodass niemand darauf tritt oder es geknickt wird, insbesondere an Steckern oder Buchsen am Gerät.
11. Verwenden Sie nur die vom Hersteller erhältlichen Zubehörgeräte oder Zubehörteile.
12. Verwenden Sie nur einen Wagen, Stativ, Dreifuß, Träger oder Tisch, der den Angaben des Herstellers entspricht oder zusammen mit
dem Gerät verkauft wurde. Wird ein Wagen verwendet, bewegen Sie den Wagen mit dem darauf befindlichen Gerät besonders
vorsichtig, damit es nicht umkippt und möglicherweise jemand verletzt wird.
13. Der Netzstecker bzw. Gerätestecker wird zum Trennen vom Stromnetz verwendet und muß immer leicht zugänglich sein.
Der Benutzer sollte auf einfachen Zugang zu allen Netzsteckern,Gerätesteckern und Netz-Schaltern achten
Ziehen Sie den Netzstecker bei Gewitter heraus oder wenn das Gerät längere Zeit nicht benutzt wird.
14. Lassen Sie sämtliche Wartungsarbeiten von qualifizierten Kundendiensttechnikern durchführen. Eine Wartung ist erforderlich, wenn
das Gerät in irgendeiner Art beschädigt wurde, etwa wenn das Netzkabel oder der Netzstecker beschädigt wurden, Flüssigkeit oder
Gegenstände in das Gerät gelangt sind, das Gerät Regen oder Feuchtigkeit ausgesetzt wurde, nicht normal arbeitet oder
heruntergefallen ist.
15. Schließen Sie das Gerät nur an eine Stromquelle an, die am Gerät neben dem Netzkabel angegeben ist.
16. Wenn dieses Produkt in ein Geräte-Rack eingebaut werden soll, muss eine Versorgung über die Rückseite eingerichtet werden.
18. Dieses Gerät darf nicht ungeschützt Wassertropfen und Wasserspritzern ausgesetzt werden und es muss darauf geachtet werden,
dass keine mit Flüssigkeiten gefüllte Gegenstände, wie z. B. Blumenvasen, auf dem Gerät abgestellt werden.
19. Belastung durch extrem hohe Lärmpegel kann zu dauerhaftem Gehörverlust führen. Die Anfälligkeit
für durch Lärm bedingten Gehörverlust ist von Mensch zu Mensch verschieden, das Gehör wird
jedoch bei jedem in gewissem Maße geschädigt, der über einen bestimmten Zeitraum ausreichend
starkem Lärm ausgesetzt ist. Die US-Arbeitsschutzbehörde (Occupational and Health Administration,
OSHA) hat die folgenden zulässigen Pegel für Lärmbelastung festgelegt:
Laut OSHA kann jede Belastung über den obenstehenden zulässigen Grenzwerten zu einem
gewissen Gehörverlust führen. Sollte die Belastung die obenstehenden Grenzwerte übersteigen,
müssen beim Betrieb dieses Verstärkungssystems Ohrenstopfen oder Schutzvorrichtungen im
Gehörgang oder über den Ohren getragen werden, um einen dauerhaften Gehörverlust zu verhindern.
Um sich vor einer möglicherweise gefährlichen Belastung durch hohe Schalldruckpegel zu schützen,
wird allen Personen empfohlen, die mit Geräten arbeiten, die wie dieses Verstärkungssystem hohe Schalldruckpegel erzeugen können,
beim Betrieb dieses Geräts einen Gehörschutz zu tragen.
20. Symbole und Nomenklatur, die auf dem Produkt und in den Handbüchern stehen, sollen den Bediener auf die Bereiche, in denen
besondere Vorsicht notwendig sein kann, alarmieren und sind wie folgt:
Sollen den Benutzer auf das Vorhandensein von "gefährlicher Hoch- Spannung" im Gerätegehäuse hinweisen, um die Gefahr eines
elektrischen Schlages für Personen zu vermeiden..
Sollen den Benutzer auf das Vorhandensein wichtiger Betriebs-und Wartungsanweisungen in der begelegten Dokumentation
aufmerksam machen.
Gefahr eines elektrischen Schlags - NICHT ÖFFNEN. Um die Gefahr eines elektrischen Schlags zu reduzieren, darf die
Abdeckung entfernen. Keine zu wartenden Teile im Inneren. Überlassen Sie die Wartung qualifiziertem Fachpersonal.
CAUTION:
Gefahr eines elektrischen Schlags - NICHT ÖFFNEN. Um die Gefahr eines elektrischen Schlags zu vermeiden, darf die
Abdeckung nicht geöffnet werden.. Überlassen Sie die Wartung qualifiziertem Fachpersonal.
WARNING:
Wenn Ihr Gerät über einen Kippmechanismus oder eine “Tilt-back“- Funktion verfügt, beutzen Sie diese Funktion mit Vorsicht.
Aufgrund der Leichtigkeit, mit der der Verstärker zwischen geraden und schrägen Rücken Positionen bewegt werden kann, verwenden
Sie nur den Verstärker auf einer ebenen, stabilen Oberfläche. NICHT den Verstärker auf einem Schreibtisch, Tisch, Regal oder sonst
eine ungeeignete nicht stabile Plattform stellen.
Page 23
IMPORTANTI ISTRUZIONI DI SICUREZZA
IT
AVVERTENZA: Quando si usano prodotti elettrici, alcune precauzioni dovrebbero essere sempre seguite, tra cui le seguenti:
1. Leggere queste istruzioni.
2. Conservare queste istruzioni di sicurezza.
3. Osservare tutte le avvertenze.
4. Seguire tutte le istruzioni.
5. Non utilizzare questo apparecchio vicino all'acqua.
6. Pulire solo con un panno asciutto.
7. Non ostruire le aperture di ventilazione. Installare in conformità con le istruzioni del produttore.
8. Non installare vicino a fonti di calore come radiatori, regolatori di calore, stufe o altri apparecchi (inclusi gli amplificatori) che producono calore.
9. Un apparecchio in Classe I deve essere collegato a una presa di corrente di rete con connessione di protezione. Non annullare l'obiettivo di
sicurezza della spina polarizzata o con messa a terra. Una spina polarizzata ha due lame, una più larga dell'altra. Una spina con messa a terra ha due
lame e un terzo polo di terra. La lama più larga o il terzo polo servono per la sicurezza. Se la spina fornita non è adatta alla propria presa, consultare
un elettricista per la sostituzione della presa obsoleta.
10. Proteggere il cavo di alimentazione venga calpestato o schiacciato, soprattutto in corrispondenza delle spine, delle prese e al punto in cui esce
dall'apparecchio.
11. Usare solo dispositivi opzionali / accessori forniti dal produttore.
12. Usare solo con un carrello, supporto, cavalletto, sostegno o tavola specificate dal produttore o venduti con l'apparecchio. Quando si usa un
carrello, prestare attenzione, muovendo il carrello / la combinazione di apparecchi, a non ferirsi-over.
13. La spina dell'alimentazione o apparecchio viene utilizzato come dispositivo di scollegamento e deve restare sempre operativo. L'utente deve
consentire un facile accesso a qualsiasi presa di rete, accoppiatore di rete e interruttore di rete utilizzato in combinazione con l'unità rendendo così
facilmente accessibile. Scollegare l'apparecchio durante i temporali o se non viene utilizzato per lunghi periodi di tempo.
14. Per l'assistenza rivolgersi a personale qualificato. L'assistenza è necessaria quando l'apparecchio è stato danneggiato in qualsiasi modo, come ad
esempio quando il cavo di alimentazione o la spina sono danneggiati, è stato versato del liquido o degli oggetti sono caduti all'interno, l'apparecchio è
stato esposto a pioggia o umidità, non funziona normalmente, o è stato fatto cadere.
15. Non rompere il pin di terra. Collegare ad una presa di potenza del tipo indicato sull'apparecchio adiacente al cavo di alimentazione.
16. Se il prodotto deve essere montato in un rack, supporto posteriore dovrebbe essere fornito.
17. Nota per solo Regno Unito: Se i colori dei fili del cavo di alimentazione di questa unità non corrispondono con i terminali della spina, procedere
come segue:
a) Il cavo colorato verde e giallo deve essere collegato al terminale contrassegnato con la lettera E, il simbolo di massa, di colore verde o
di colore verde e giallo.
b) Il filo che è di colore blu deve essere collegato al terminale contrassegnato con la lettera N o il nero.
c) il cavo marrone deve essere collegato al terminale contrassegnato con la lettera L o di colore rosso. 18.This
apparecchio elettrico non deve essere esposto a gocce o schizzi e si deve prestare attenzione a non posizionare
oggetti contenenti liquidi, come vasi, sopra l'apparecchio.
19. L'esposizione a livelli sonori molto elevati può causare la perdita permanente dell'udito. Gli individui La
sensibilità al rumore perdita dell'udito causata, ma quasi tutti si perde un po 'di danni in caso di esposizione al
rumore sufficientemente intenso per un tempo sufficiente.
Sicurezza sul lavoro del governo degli USA and Health Administration (OSHA) ha elaborato la seguente tabella
di tolleranza ai rumori: Secondo l'OSHA, l'esposizione prolungata ai limiti riportati qui a fianco potrebbe causare
perdita di udito. Tappi per le orecchie o protezioni per il condotto orecchie o sopra le orecchie devono essere
indossati quando si adopera questo sistema di amplificazione, al fine di evitare la perdita permanente dell'udito, se si
superano i limiti di cui sopra. Per assicurarsi contro un'esposizione potenzialmente pericolosa ad elevati livelli di
pressione sonora, si raccomanda che tutte le persone esposte ad apparecchi in grado di produrre elevati livelli di
pressione sonora, come questo sistema di amplificazione essere protetti da dispositivi di protezione dell'udito mentre l'unità è in funzione.
20. Simboli e nomenclatura utilizzati sul prodotto e nei manuali dei prodotti, finalizzate ad avvisare l'operatore di aree in cui cautela possono essere
necessari, sono i seguenti:
Scopo di avvisare l'utente della presenza di 'tensioni pericolose' alta all'interno del prodotto che può essere sufficiente per costituire un rischio di
scossa elettrica per le persone.
Destinato per avvisare l'utente della presenza di importanti operativi e di manutenzione (assistenza) nella documentazione che accompagna il
prodotto.
Rischio di scossa elettrica - NON APRIRE. Per ridurre il rischio di scosse elettriche, non rimuovere il coperchio. Non ci sono parti
riparabili dall'utente. Per la manutenzione rivolgersi a personale qualificato.
CAUTION:
WARNING:
scaffale o comunque inadatti piattaforma nonstable.
Per evitare scosse elettriche o incendi, non esporre questo apparecchio alla pioggia o all'umidità. Prima di utilizzare questo apparecchio
leggere le istruzioni per l'uso.
Se il vostro apparecchio è dotato di un meccanismo di inclinazione o di un mobile in stile contraccolpo, si prega di utilizzare questa
caratteristica di design con cautela. A causa della facilità con cui l'amplificatore può essere spostato tra le posizioni schiena dritta e
inclinata, utilizzare solo l'amplificatore su una superficie piana e stabile. NON utilizzare l'amplificatore su una scrivania, tavolo, uno
Page 24

Page 25
CUB-RANGE
CUB-SUPER10 FEATURES
USER MANUAL
1 2 3
1 - POWER SWITCH & LAMP - Zeigt an, dass der Verstärker eingeschaltet und spielbereit ist.
2 - VOLUME - Steuert die Gesamtlautstärke des Verstärkers und wird in Verbindung mit der Gain-
Steuerung (6) verwendet.
3 - TREBLE - Steuert den Höhenanteil. Beginnen Sie bei 4 oder 5 und passen Sie an, je nachdem, wie
dunkel oder.
4 - MIDDLE - Steuert den Mittelbereich der Verstärker. Beginnen Sie bei 4 oder 5.
5 - BASS - Steuert den Bass oder das untere Ende der Frequenzen des Verstärkers.
6 - GAIN - Steuert den Gain/Distortion-Grad im Gitarrensignal. Wird in Verbindung mit dem
Lautstärkeregelung (2). Für saubere Gitarrenklänge mit viel Headroom die Gain-Kontrolle niedrig
die Lautstärkeregelung auf die erforderliche Ebene zu setzen. Bei mehr Verzerrung den Gain wieter
auf und Volume anpassen.
7 - BOOST SWITCH - Schaltet den Onboard-Pre-Boost ein. Das ist wie in Ihrem Lieblings-Boost-Pedal zu
treten vor dem Verstärker.
8 - BOOST KNOB - Bestimmt die Menge des Pre-Boost, der die erste Röhre im Signalpfad der Verstärker
trit.
4
5
7
6
8
10
9
www.laney.co.uk
2
Page 26
CUB-RANGE
CUB-SUPER10 FEATURES
USER MANUAL
11
9 - BOOST LED.
10 - INPUT SOCKET - Stecken Sie hier eine gute Qualität Gitarre Lead in.
11 - EXTERNAL SPEAKER. - Ihr CUB-SUPER10 ist mit einem HH Custom Design 8 Ohm Internen
Lautsprecher ausgestattet. Wenn Sie einen externen Lautsprecher betreiben möchten, kann dieser
hier angeschlossen werden. Bitte verwenden Sie ein hochwertiges SPEAKER-Kabel.
12 - FX LOOP SEND - Hier schließen Sie den INPUT Ihrer Eect(s) an. Verwenden Sie hochwertige
abgeschirmte Gitarrenkabel. Dieser Sockel kann auch als Line-Out verwendet werden.
13 - FX LOOP RETURN - Hier schließen Sie das OUT Ihres Eekts an. Verwenden Sie hochwertige
abgeschirmte Gitarrenkabel.
14 - FOOTSWITCH SOCKET - Hier stecken Sie den Fußschalter ein. FS1-Mini optional extra.
15 - POWER SOCKET - Stecken Sie hier das mitgelieferte IEC-Netzkabel ein.
12
13
14
15
www.laney.co.uk
3
Page 27
CUB-RANGE
CUB-SUPER12 FEATURES
USER MANUAL
1 2 3
1 - POWER SWITCH & LAMP - Gibt an, dass der Verstärker eingeschaltet und spielbereit ist.
2 - VOLUME - Steuert die Gesamtlautstärke des Verstärkers und wird in Verbindung mit dem
Verstärkungskontrolle (7).
3 - REVERB - Legt die Höhe des On-Board-Reverbs fest. Der Onboard Hall ist ein hochwertiger Federhal
lalgorithmus, der in der gefeierten BCC-SECRET PATH Hall Engine verwendet wird.
4 - TREBLE - Steuert die Ampere High-End-Antwort. Beginnen Sie bei 4 oder 5 und passen Sie an, je
nachdem, wie dunkel oder hell, so dass der Verstärker erklingen soll
5 - MIDDLE - Steuert den Mittelbereich der Verstärker. Beginnen Sie bei 4 oder 5.
6 - BASS - Steuert den Bass oder das untere Ende der Frequenzen des Verstärkers.
7 - GAIN - Steuert den Gain/Distortion-Grad im Gitarrensignal. Wird in Verbindung mit dem
Lautstärkeregelung (2). Für saubere Gitarrenklänge mit viel Headroom die Gain-Kontrolle niedrig
die Lautstärkeregelung auf die erforderliche Ebene zu setzen. Bei mehr Verzerrung den Gain wieter auf
und Volume anpassen.
8 - BOOST SWITCH - Schaltet den Onboard-Pre-Boost ein. Das ist wie in Ihrem Lieblings-Boost-Pedal zu
treten vor dem Verstärker.
4
5
6
7
9
8
11 10
www.laney.co.uk
4
Page 28
CUB-RANGE
CUB-SUPER12 FEATURES
USER MANUAL
13 12
9 - BOOST - Bestimmt die Menge des Pre-Boost, der die erste Röhre im Signalpfad der Verstärker trit.
10 - BOOST LED.
11 - INPUT SOCKET - 15W & <1W Eingänge. Das Einstecken in die 15W-Eingangsbuchse greift auf
die volle Leistung des Verstärkers zu und erzeugt 15 Watt RMS oder Röhrenton. Das Einstecken in
den <1Watt-Eingang schaltet die Ausgangsleistungsstufe bis <1 Watt RMS. Ideal für Aufnahme oder
im Schlafzimmer zu spielen.
12 - EXTERNAL SPEAKER - Ihr CUB-SUPER12 ist mit einem HH Custom Design 8 Ohm Internen
Lautsprecher ausgestattet. Wenn Sie einen externen Lautsprecher betreiben möchten, kann dieser
hier angeschlossen werden. Bitte verwenden Sie einhochwertiges SPEAKER-Kabel.
13 - FX LOOP SEND - Hier schließen Sie den INPUT Ihrer Eect(s) an. Verwenden Sie hochwertige
abgeschirmte Gitarrenkabel. Dieser Sockel kann auch als Line-Out verwendet werden.
14 - FX LOOP RETURN - Hier schließen Sie das OUT Ihres Eekts an. Verwenden Sie hochwertige
abgeschirmte Gitarrenkabel.
15 - FOOTSWITCH SOCKET - Hier stecken Sie den Fußschalter ein. FS2-Mini optional extra.
16 - POWER SOCKET - Stecken Sie hier das mitgelieferte IEC-Netzkabel ein.
14
15
16
www.laney.co.uk
5
Page 29
CUB-RANGE
CUB-SUPERTOP FEATURES
USER MANUAL
1 3 4
2
1 - INPUT SOCKET - - INPUT SOCKET - 15W & <1W Eingänge. Das Einstecken in die 15W Eingangsbuchse greift auf die volle Leistung des Verstärkers zu und erzeugt 15 Watt RMS oder
Röhrenton. Das Einstecken in den <1Watt-Eingang schaltet die Ausgangsleistungsstufe bis <1Watt
RMS. Ideal für Aufnahme oder im Schlafzimmer zu spielen.
2 - BOOST LED.
3 - BOOST - Bestimmt die Menge des Pre-Boost, der die erste Röhre im Signalpfad der Verstärker trit.
4 - BOOST SWITCH - Schaltet den Onboard-Pre-Boost ein. Das ist wie in Ihrem Lieblings-Boost zu kicken
Pedal vor dem Verstärker.
5 - GAIN - Steuert den Gain/Distortion-Grad im Gitarrensignal. Wird in Verbindung mit dem
Lautstärkeregelung (2). Für saubere Gitarrenklänge mit viel Headroom die Gain-Kontrolle niedrig
die Lautstärkeregelung auf die erforderliche Ebene zu setzen.
6 - BASS - Steuert den Bass oder das untere Ende der Frequenzen des Verstärkers.
7 - MIDDLE - Steuert den Mittelbereich der Verstärker. Beginnen Sie bei 4 oder 5
8 - TREBLE - Steuert die Ampere High-End-Antwort. Beginnen Sie bei 4 oder 5 und passen Sie an, je
nachdem, wie dunkel oder hell, so dass der Verstärker erklingen soll
5
6
7
8
9
10
11
www.laney.co.uk
6
Page 30
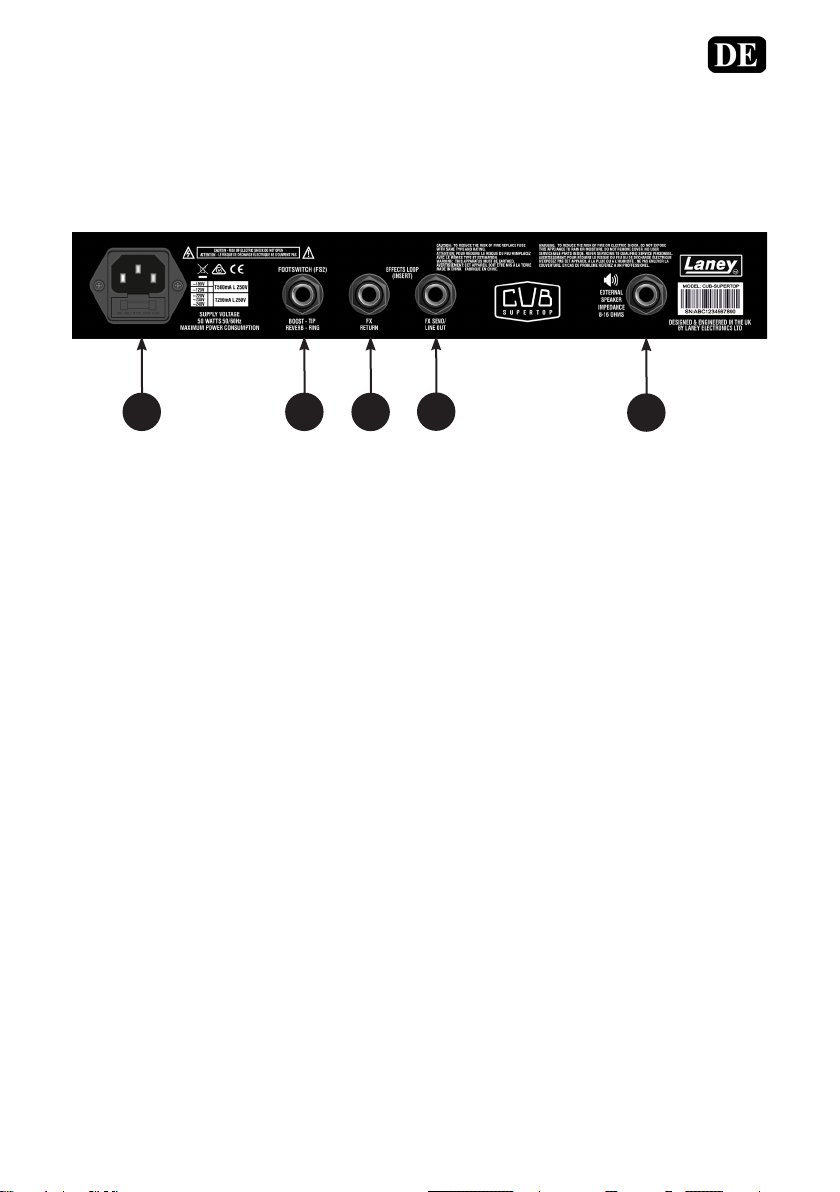
CUB-RANGE
CUB-SUPERTOP FEATURES
USER MANUAL
13 12
9- REVERB - Legt die Höhe des On-Board-Reverbs fest. Der Onboard Hall ist ein hochwertiger
Federhall algorithmus, der in der gefeierten BCC-SECRET PATH Hall Engine verwendet wird.
10 - VOLUME - Steuert die Gesamthörlautstärke des Verstärkers und wird in Verbindung mit dem
Verstärkungskontrolle (5).
11 - POWER SWITCH & LAMP - Gibt an, dass der Verstärker eingeschaltet und spielbereit ist.
12 - POWER SOCKET - Stecken Sie hier das mitgelieferte IEC-Netzkabel ein
13 - FOOTSWITCH SOCKET - Hier stecken Sie den Fußschalter ein. FS2-Mini optional extra.
14 - FX LOOP RETURN - THier schließen Sie das OUT Ihres Eekts an. Verwenden Sie hochwertige
abgeschirmte Gitarrenkabe.
15 - FX LOOP SEND - Hier schließen Sie den INPUT Ihrer Eect(s) an. Verwenden Sie hochwertige
abgeschirmte Gitarrenkabel. Dieser Sockel kann auch als Line-Out verwendet werden.
16 - EXTERNAL SPEAKER. - Schließen Sie hiereinen Lautsprecher(8 - 16 Ohm) an. Bitte verwenden Sie
eine hochwertiges SPEAKER-Kabel. Probieren Sie die Boxen CUB-212 & CUB-112 aus.
14
15
16
www.laney.co.uk
7
Page 31

CUB-RANGE
USER MANUAL
Technische Daten
CUB-SUPER10
Product GUITAR Amplier
Power 6 Watts RMS
Channels Single Channel with FS Boost
Features Volume
Treble
Middle
Bass
Gain
Boost Switch
Boost
External Speaker socket
FX loop/LINE OUT send
FX Loop Return
Footswitch socket (FS1-MINI)
Speaker 1 x 10 HH Custom Designed Driver
Unit Size/mm 339x373x212 (HxWxD)
Unit Weight 9.6 Kg
Carton Size mm 430x440x275 (HxWxD)
Packed Weight 12.6 Kg
Power Consumption 50W
CUB-SUPER10
In the interest of continued product develoment, Laney reserve the right to amend product specication without prior notice
www.laney.co.uk
8
Page 32

CUB-RANGE
USER MANUAL
Technische Daten
CUB-SUPER12
Product GUITAR Amplier
Power <1 Watt - 15 Watts RMS
Channels Single Channel with FS Boost
Features Volume
Treble
Middle
Bass
Gain
Boost Switch
Boost
Reverb
External Speaker socket
FX loop/LINE OUT send
FX Loop Return
Footswitch socket (FS2-MINI)
Speaker 1 x 12 HH Custom Designed Driver
Unit Size/mm 399x430x233 (HxWxD)
Unit Weight 11.7 Kg
Carton Size mm 480x495x295 (HxWxD)
Packed Weight 15.5 Kg
Power Consumption 50W
CUB-SUPER12
In the interest of continued product develoment, Laney reserve the right to amend product specication without prior notice
www.laney.co.uk
9
Page 33

CUB-RANGE
USER MANUAL
Technische Daten
CUB-SUPERTOP
Product GUITAR HEAD
Power <1 Watt - 15 Watts RMS
Channels Single Channel with FS Boost
Features Volume
Treble
Middle
Bass
Gain
Boost Switch
Boost
Reverb
External Speaker socket
FX loop/LINE OUT send
FX Loop Return
Footswitch socket (FS2-MINI)
Speaker NA
Unit Size/mm 210x430x176 (HxWxD)
Unit Weight 7.5 Kg
Carton Size mm 295x555x240 (HxWxD)
Packed Weight 10 Kg
Power Consumption 50W
10
CUB-SUPERTOP
Manufacturer: Laney Electronics Ltd.
© 2020 Laney Electronics Ltd. May not be reproduced without prior written consent
In the interest of continued product develoment, Laney reserve the right to amend product specication without prior notice
www.laney.co.uk
Page 34

CUB-RANGE
CUB-112 & CUB-212 FEATURES
USER MANUAL
CUB-112 panel
1
2
1 - INPUT SOCKET - Schließen Sie mit einem hochwertigen Lautsprecherkabel an die Verstärker-Lautsprecherbuchse
an und stellen Sie sicher, dass Sie den richtigen 8 Ohm-Nennausgang verwenden, wenn ein einzelner 8 Ohm verwendet
wird. Wenn zwei 8 Ohm Boxen oder eine einzige 4 Ohm Box zu verwenden sind - bitte stellen Sie sicher, dass Sie
den 4 Ohm Nennausgang am Verstärker anschließen. Wenn Impedanzen nicht korrekt übereinstimmen, kann dies zu
Schäden an Ihrem Gerät führen!
2 - LINK SOCKET - Optionaler Link-Out zum Eingangssockel an einem zusätzlichen 8- oder 16-Ohm-Erweiterungsbox.
Leistungsaufnahme: 50 Watt
Lautsprecher: 1 x 12 HH Custom Designed
Treiber
Impedanz: 8 Ohm Impedanz
Einheitsgröße/mm: 430x520x230 (HxBxT)
Stückgewicht: 10.4 kg
CUB-112
Leistungsaufnahme: 100 Watt
Lautsprecher: 2 x 12 HH Custom Designed
Treiber
Impedanz: 8 Ohm Impedanz
Einheitsgröße/mm: 430x700x230 (HxBxT)
Stückgewicht: 13,8 kg
CUB-212
11
CUB-112
Im Interesse einer kontinuierlichen Produktentwicklung behält sich Laney das Recht vor, die Produktspezikation ohne vorherige
Ankündigung zu ändern.
CUB-212
www.laney.co.uk
Page 35

Page 36

CUB-RANGE
CUB-SUPER10 FEATURES
USER MANUAL
1 2 3
1 - INTERRUPTEUR GÉNÉRAL & LAMPE - Indique que l’ampli est en marche et prêt à être utilisé
2 - VOLUME - Contrôle le niveau général de l’ampli et à utiliser avec le contrôle de Gain (6).
3 - AIGU - Contrôle la réponse de l’ampli dans les fréquences aiguës. Commencez par un réglage 4 ou 5 et
ajustez-le pour avoir un son sourd ou brillant.
4 - MEDIUM -Contrôle la réponse de l’ampli dans les fréquences médiums. Commencez par un réglage
4 ou 5, les valeurs plus basses coupent les médiums et les valeurs plus hautes feront sortir le son de la
guitare du mélange.
5 - GRAVE - Contrôle la réponse de l’ampli dans les fréquences graves. Si vous jouez fort, il faudra cer-
tainement baisser un peu ce réglage. Pour répéter en appartement, un réglage 7-10 est approprié.
6 - GAIN - Contrôle le niveau de gain/distorsion du signal de la guitare. A utiliser avec le contrôle de
volume (2). Pour un son clair avec beaucoup de réserve, baissez le gain et ajustez le volume pour avoir
le niveau désiré. Au fur et à mesure que vous montez le gain, il peut être nécessaire de réduire le volume
général.
7 - INTERRUPTEUR BOOST - Active le pré-boost intégré. C’est comme si vous activiez votre pédale de
boost favorite avant l’ampli.
4
5
7
6
8
10
9
8 - BOOST - Détermine le volume de pré-boost de la première lampe dans le trajet du signal. En montant
le réglage du BOOST, vous allez saturer le son pour avoir un écrêtage chaud ou une compression d’un signal
déjà saturé.
www.laney.co.uk
2
Page 37

CUB-RANGE
CUB-SUPER10 FEATURES
USER MANUAL
11
9 - BOOST LED
10 - PRISE D’ENTRÉE - Branchez votre câble (de bonne qualité) de guitare dans cette prise.
11 - PRISE HP EXTERNE - Votre CUB-SUPER10 est équipé en interne d’un HP HH spécialement conçu
de 8 Ohm. Vous pouvez brancher une enceinte externe dans cette prise. Veuillez utiliser un câble d’enceinte
de bonne qualité. Si vous branchez une enceinte externe, le HP interne est déconnecté. Veuillez vérier
l’impédance de votre enceinte externe : de 8 à 16 Ohms.
12 - PRISE ENVOI EFFET - Reliez cette prise à la prise d’entrée de votre (vos) eet(s). Utilisez un câble
guitare de haute qualité. Cette sortie peut aussi servir de sortie Ligne
13 - PRISE RETOUR EFFET - Reliez cette prise à la prise de sortie de votre (vos) eet(s). Utilisez un
câble guitare de haute qualité.
14 - PRISE PÉDALE - Branchez votre pédalier FS1-Mini (en option) dans cette prise.
15 - PRISE ALIMENTATION - Branchez le câble d’alimentation dans cette prise.
12
13
14
15
www.laney.co.uk
3
Page 38

CUB-RANGE
CUB-SUPER12 FEATURES
USER MANUAL
1 2 3
1 - INTERRUPTEUR GÉNÉRAL & LAMPE - Indique que l’ampli est en marche et prêt à être utilisé
2 - VOLUME - Contrôle le niveau général de l’ampli et à utiliser avec le contrôle de Gain (7).
3 - RÉVERB- Ajuste le niveau de la réverb intégrée. La réverb intégrée est un algorithme de réverb à res
sort de haute qualité utilisé dans le célèbre processeur de réverb BCC-SECRET PATH.
4 - AIGU - Contrôle la réponse de l’ampli dans les fréquences aiguës. Commencez par un réglage 4 ou 5 et
ajustez-le pour avoir un son sourd ou brillant.
5 - MEDIUM -Contrôle la réponse de l’ampli dans les fréquences médiums. Commencez par un réglage
4 ou 5, les valeurs plus basses coupent les médiums et les valeurs plus hautes feront sortir le son de la
guitare du mélange.
6 - GRAVE - Contrôle la réponse de l’ampli dans les fréquences graves. Si vous jouez fort, il faudra
certainement baisser un peu ce réglage. Pour répéter en appartement, un réglage 7-10 est approprié.
7 - GAIN - Contrôle le niveau de gain/distorsion du signal de la guitare. A utiliser avec le contrôle de
volume (2). Pour un son clair avec beaucoup de réserve, baissez le gain et ajustez le volume pour avoir
le niveau désiré. Au fur et à mesure que vous montez le gain, il peut être nécessaire de réduire le
volume général.
4
5
6
7
9
8
11 10
8 - INTERRUPTEUR BOOST - Active le pré-boost intégré. C’est comme si vous activiez votre pédale de
boost favorite avant l’ampli.
www.laney.co.uk
4
Page 39

CUB-RANGE
CUB-SUPER12 FEATURES
USER MANUAL
13 12
9 - BOOST - Détermine le volume de pré-boost de la première lampe dans le trajet du signal. En montant
le réglage du BOOST, vous allez saturer le son pour avoir un écrêtage chaud ou une compression d’un
signal déjà saturé.
10 - BOOST LED
11 - PRISE D’ENTRÉE - Branchez votre câble (de bonne qualité) de guitare dans cette prise.
12 - PRISE HP EXTERNE - Votre CUB-SUPER10 est équipé en interne d’un HP HH spécialement conçu
de 8 Ohm. Vous pouvez brancher une enceinte externe dans cette prise. Veuillez utiliser un câble
d’enceinte de bonne qualité. Si vous branchez une enceinte externe, le HP interne est déconnecté.
Veuillez vérier l’impédance de votre enceinte externe : de 8 à 16 Ohms.
13 - PRISE ENVOI EFFET - Reliez cette prise à la prise d’entrée de votre (vos) eet(s). Utilisez un câble
guitare de haute qualité. Cette sortie peut aussi servir de sortie Ligne
14 - PRISE RETOUR EFFET - Reliez cette prise à la prise de sortie de votre (vos) eet(s). Utilisez un
câble guitare de haute qualité.
15 - PRISE PÉDALE - Branchez votre pédalier FS1-Mini (en option) dans cette prise.
14
15
16
16 - PRISE ALIMENTATION - Branchez le câble d’alimentation dans cette prise.
5
www.laney.co.uk
Page 40

CUB-RANGE
CUB-SUPERTOP FEATURES
USER MANUAL
1 3 4
2
1 - PRISES D’ENTRÉE - Entrées 15W & <1W. Branchez votre guitare dans la prise 15W pour accéder
à la puissance maximale de l’ampli - 15 watts RMS de puissance lampe. Si vous utilisez l’entrée <1Watt,
l’étage de sortie de l’ampli bascule en mode <1 watt RMS. Idéal pour les enregistrements ou pour jouer en
appartement
2 - BOOST LED
3 - BOOST - Détermine le volume de pré-boost de la première lampe dans le trajet du signal.
En montant le réglage du BOOST, vous allez saturer le son pour avoir un écrêtage chaud ou une compression d’un signal déjà saturé.
4 - INTERRUPTEUR BOOST - Active le pré-boost intégré. C’est comme si vous activiez votre pédale de
boost favorite avant l’ampli.
5 - GAIN - Contrôle le niveau de gain/distorsion du signal de la guitare. A utiliser avec le contrôle de
volume (2). Pour un son clair avec beaucoup de réserve, baissez le gain et ajustez le volume pour avoir
le niveau désiré. Au fur et à mesure que vous montez le gain, il peut être nécessaire de réduire le volume
général.
6 - GRAVE - Contrôle la réponse de l’ampli dans les fréquences graves. Si vous jouez fort, il faudra certainement baisser un peu ce réglage. Pour répéter en appartement, un réglage 7-10 est approprié
5
6
7
8
9
10
11
7 - MEDIUM - Contrôle la réponse de l’ampli dans les fréquences médiums. Commencez par un réglage
4 ou 5, les valeurs plus basses coupent les médiums et les valeurs plus hautes feront sortir le son de la
guitare du mélange.
www.laney.co.uk
6
Page 41

CUB-RANGE
CUB-SUPERTOP FEATURES
USER MANUAL
13 12
8 - AIGU - Contrôle la réponse de l’ampli dans les fréquences aiguës. Commencez par un réglage 4 ou 5 et
ajustez-le pour avoir un son sourd ou brillant.
9 - RÉVERB - Ajuste le niveau de la réverb intégrée. La réverb intégrée est un algorithme de réverb à ressort de haute qualité utilisé dans le célèbre processeur de réverb BCC-SECRET PATH.
10 - VOLUME - Contrôle le niveau général de l’ampli et à utiliser avec le contrôle de Gain (5).
11 - INTERRUPTEUR GÉNÉRAL & LAMPE - Indique que l’ampli est en marche et prêt à être utilisé.
12 - PRISE ALIMENTATION - Branchez le câble d’alimentation dans cette prise.
13 - PRISE PÉDALE - Branchez votre pédalier FS2-Mini (en option) dans cette prise.
14 - PRISE RETOUR EFFET - Reliez cette prise à la prise de sortie de votre (vos) eet(s). Utilisez un câble
guitare de haute qualité.
15 - PRISE ENVOI EFFET - Reliez cette prise à la prise d’entrée de votre (vos) eet(s). Utilisez un câble
guitare de haute qualité. Cette sortie peut aussi servir de sortie Ligne.
16 - PRISE HP EXTERNE - Vous pouvez brancher une enceinte externe (8 à 16 Ohms ) dans cette prise.
Veuillez utiliser un câble d’enceinte de bonne qualité. Essayez les enceintes CUB-212 ou CUB-112.
14
15
16
www.laney.co.uk
7
Page 42

CUB-RANGE
USER MANUAL
Caractéristiques Techniques
CUB-SUPER10
Produit AmplicateurpourGUITARE
Puissance 6 Watts RMS
Canaux Canal simple avec Boost par pédale
Fonctions Volume
Aigu
Médium
Grave
Gain
Interrupteur Boost
Boost
Prise pour HP Externe
Boucled’eetEnvoi/SortieLigne
Boucled’eetRetour
Prise pour pédalier (FS1-MINI)
HP 1 x 10” HH conception spéciale
Dimensions 339 x 373 x 212mm (H x L x P)
Poids 9,6 Kg
Dimensions du carton 430 x 440 x 275mm (H x L x P)
Poids total 12,6 Kg
Consommation 50W
CUB-SUPER10
Intheinterestofcontinuedproductdeveloment,Laneyreservetherighttoamendproductspecicationwithoutpriornotice
www.laney.co.uk
8
Page 43

CUB-RANGE
USER MANUAL
Caractéristiques Techniques
CUB-SUPER112
Produit AmplicateurpourGUITARE
Puissance <1 Watt - 15 Watts RMS
Canaux Canal simple avec Boost par pédale
Fonctions Volume
Aigu
Médium
Grave
Gain
Interrupteur Boost
Boost
Prise pour HP Externe
Boucled’eetEnvoi/SortieLigne
Boucled’eetRetour
Prise pour pédalier (FS2-MINI)
HP 1 x 12” HH conception spéciale
Dimensions 399 x 430 x 233mm (H x L x P)
Poids 11,7 Kg
Dimensions du carton 480 x 495 x 295mm (H x L x P)
Poids total 15,5 Kg
Consommation 50W
CUB-SUPER12
Intheinterestofcontinuedproductdeveloment,Laneyreservetherighttoamendproductspecicationwithoutpriornotice
www.laney.co.uk
9
Page 44

CUB-RANGE
USER MANUAL
Caractéristiques Techniques
CUB-SUPERTOP
Produit Têted’amplicateurpourGUITARE
Puissance <1 Watt - 15 Watts RMS
Canaux Canal simple avec Boost par pédale
Fonctions Volume
Aigu
Médium
Grave
Gain
Interrupteur Boost
Boost
Prise pour HP Externe
Boucled’eetEnvoi/SortieLigne
Boucled’eetRetour
Prise pour pédalier (FS2-MINI)
HP Sans
Dimensions 210 x 430 x 176mm (H x L x P)
Poids 7,5 Kg
Dimensions du carton 295 x 555 x 240mm (H x L x P)
Poids total 10 Kg
Consommation 50W
10
CUB-SUPERTOP
Manufacturer: Laney Electronics Ltd.
©2020LaneyElectronicsLtd.Maynotbereproducedwithoutpriorwrittenconsent
Intheinterestofcontinuedproductdeveloment,Laneyreservetherighttoamendproductspecicationwithoutpriornotice
www.laney.co.uk
Page 45

CUB-RANGE
CARACTÉRISTIQUES DES CUB-112 & CUB-212
USER MANUAL
CUB-112 panel
1
2
1 - PRISE D’ENTRÉE – A l’aide d’un câble HP de bonne qualité, reliez cette prise à la sortie de votre ampli en
vous assurant que cette sortie corresponde à une impédance de 8 Ohms si une seule enceinte de 8 Ohms
est branchée. Si deux enceintes de 8 Ohms ou une seule enceinte de 4 Ohms sont utilisées, assurez-vous
de connecter la sortie 4 Ohms de votre ampli. Une mauvaise adaptation d’impédance peut entraîner des
dégâts dans votre appareil !
2 - PRISE SÉRIE – Sortie optionnelle pour brancher une enceinte supplémentaire de 8 ou 16 Ohms.
Puissance 50 Watts
HP: HP 1 x 12” HH de conception
spéciale
Impédance 8 Ohms
Dimensions/mm 430x520x230(HxLxP)
Poids 10.4 Kg
CUB-112
Puissance 100 Watts
HP: HP 2 x 12” HH de conception
spéciale
Impédance 8 Ohms
Dimensions/mm 430x700x230(HxLxP)
Poids 13.8 Kg
CUB-212
11
CUB-112
Dans l’intérêt d’un développement continu de ses produits,
Laneyseréserveledroitdemodierlescaractéristiquesdecesproduitssanspréavis
CUB-212
www.laney.co.uk
Page 46

Page 47

CUB-RANGE
CUB-SUPER10 FEATURES
USER MANUAL
1 2 3
1 - Botón POWER & LAMPARA INDICADORA - Indica que el amplicador esta prendido y listo para
funcionar.
2 - Control de VOLUMEN - Controla o volume geral do amplicador e é usado em conjunto com
controle de Ganho (6).
3 - TREBLE - Controla la respuesta de las frecuencias altas del amplicador. Ajuste en 4 o 5 para comen
zar y continúe de acuerdo con el tipo de sonido que desea obtener.
4 - MIDDLE - Controla la respuesta de las frecuencias medias del amplicador. Comience en 4 o 5. Note
que cuanto más bajo se encuentra el ajuste las frecuencias medias son cerradas y cuanto más hacia
arriba, más la guitarra sobresale en la mezcla.
5 - BASS - Controla las bajas frecuencias del amplicador. Conforme el amplicador se toca más alto, se
puede notar que es bueno bajar un poco este ajuste. Comience en 7-10 cuando en volumen bajo como,
por ejemplo, en su dormitorio.
6 - GAIN - Controla el nivel de Ganancia/distorsión presente en la señal de la guitarra. Usado en conjunto
con el control de volumen general (2). Para sonidos limpios con mucha banda de sonido ajuste el
control de ganancia hacia abajo y el volumen de acuerdo. Al ir poniendo más ganancia puede ser que
sea necesario reducir el volumen para obtener el sonido deseado.
4
5
7
6
8
10
9
7 - Llave BOOST - Acciona la función de Boost incluida. Esto es como accionar su pedal de distorsión
favorito en el amplicador.
www.laney.co.uk
2
Page 48

CUB-RANGE
CUB-SUPER10 FEATURES
USER MANUAL
11
8 - Control BOOST - Determina la cantidad de pre empuje que llega a la primera válvula en el camino de
la señal del amplicador. Al poner más cantidad de BOOST se nota el efecto de rempujar el sonido
limpio del amplicador a una sobrecarga de válvula caliente o a una compresión natural de la sobre
carga.
9 - BOOST LED -
10 - Conector INPUT - Aquí se conecta su guitarra siempre con un cable de buena calidad.
11 - Salida EXTERNAL SPEAKER - Su amplicador CUB-SUPER10 se encuentra cargado con altavoz
hecho especialmente por HH y con impedancia de 8 Ohm. Caso desee conectar una caja adicional
externa, use este conector. Por favor, use apenas cables de alta calidad para conectar la CAJA. La
conexión de una caja externa apaga el altavoz interno. Al usar este conector, siempre quede atento al
uso de la impedancia correcta entre 8 a 16 Ohm.
12 - Salida FX LOOP SEND - Aqui se conecta o cabo que vai para a Entrada (INPUT) de seu(s) efeito(s).
Use um cabo blindado de alta qualidade. Esta saída pode ser usada como uma saída de linha (line out)
13 - Entrada FX LOOP RETURN - Aquí es por donde vuelve la señal de su(s) efecto(s) usando la salida
OUT de los mismos. Use apenas cables de guitarra, blindados y con alta calidad.
12
13
14
15
14 - Entrada del FOOTSWITCH - Conecte aqui seu pedal de controle. A LANEY oferece o modelo FS1-
Mini como OPCIONAL e este não acompanha o produto.
15 - Conector de POWER - Aquí se conecta el cable de alimentación incluido de tipo IEC.
www.laney.co.uk
3
Page 49

CUB-RANGE
CUB-SUPER12 FEATURES
USER MANUAL
1 2 3
1 - Botón POWER & LAMPARA INDICADORA - Indica que el amplicador esta prendido y listo para
funcionar.
2 - Control de VOLUMEN - Controla o volume geral do amplicador e é usado em conjunto com
controle de Ganho (7).
3 - REVERB -Ajusta el nivel de la reverberación incluida. El efecto de reverberación incluido es de alta
calidad y con el algoritmo tipo resorte usado en el aclamado pedal BCC-SECRET PATH.
4 - TREBLE - Controla la respuesta de las frecuencias altas del amplicador. Ajuste en 4 o 5 para comen
zar y continúe de acuerdo con el tipo de sonido que desea obtener.
5 - MIDDLE - Controla la respuesta de las frecuencias medias del amplicador. Comience en 4 o 5. Note
que cuanto más bajo se encuentra el ajuste las frecuencias medias son cerradas y cuanto más hacia
arriba, más la guitarra sobresale en la mezcla.
6 - BASS - Controla las bajas frecuencias del amplicador. Conforme el amplicador se toca más alto, se
puede notar que es bueno bajar un poco este ajuste. Comience en 7-10 cuando en volumen bajo como,
por ejemplo, en su dormitorio.
7 - GAIN - Controla el nivel de Ganancia/distorsión presente en la señal de la guitarra. Usado en conjunto
con el control de volumen general (2). Para sonidos limpios con mucha banda de sonido ajuste el
control de ganancia hacia abajo y el volumen de acuerdo. Al ir poniendo más ganancia puede ser que
sea necesario reducir el volumen para obtener el sonido deseado.
4
5
6
7
9
8
11 10
www.laney.co.uk
4
Page 50

CUB-RANGE
CUB-SUPER12 FEATURES
USER MANUAL
13 12
8 - Llave BOOST - Acciona la función de Boost incluida. Esto es como accionar su pedal de distorsión
favorito en el amplicador.
9 - Control BOOST - Determina la cantidad de pre empuje que llega a la primera válvula en el camino de
la señal del amplicador. Al poner más cantidad de BOOST se nota el efecto de rempujar el sonido
limpio del amplicador a una sobrecarga de válvula caliente o a una compresión natural de la sobre
carga.
10 - BOOST LED
11 - Entradas INPUT - 15W & <1W. Conecte su guitarra a la entrada de 15W para tener toda la potencia del
amplicador - produciendo 15 watios RMS de sonido de válvula. Al conectar en la entrada <1Watt, el amplicador
reduce su potencia para menos que <1Watt RMS. Esto es ideal para grabar o para practicar en su dormitorio.
12 - Salida EXTERNAL SPEAKER - Salida EXTERNAL SPEAKER. - El amplicador CUB-SUPER12 se encuentra
cargado con altavoz hecho especialmente por HH y con impedancia de 8 Ohm. La conexión de una caja externa
apaga el altavoz interno. Al usar este conector, siempre quede atento al uso de la impedancia correcta entre 8 a
16 Ohm.
13 - Salida FX LOOP SEND - Aqui se conecta o cabo que vai para a Entrada (INPUT) de seu(s) efeito(s).
Use um cabo blindado de alta qualidade. Esta saída pode ser usada como uma saída de linha (line out)
14 - Entrada FX LOOP RETURN - Aquí es por donde vuelve la señal de su(s) efecto(s) usando la salida
OUT de los mismos. Use apenas cables de guitarra, blindados y con alta calidad.
14
15
16
15 - Entrada del FOOTSWITCH - Conecte aqui seu pedal de controle. A LANEY oferece o modelo FS1 Mini como OPCIONAL e este não acompanha o produto.
16 - Conector de POWER - Aquí se conecta el cable de alimentación incluido de tipo IEC.
www.laney.co.uk
5
Page 51

CUB-RANGE
CUB-SUPERTOP FEATURES
USER MANUAL
1 3 4
2
1 - Entradas INPUT - 15W & <1W. Conecte su guitarra a la entrada de 15W para tener toda la potencia del
amplicador - produciendo 15 watios RMS de sonido de válvula. Al conectar en la entrada <1Watt, el amplicador
reduce su potencia para menos que <1Watt RMS. Esto es ideal para grabar o para practicar en su dormitorio.
2 - BOOST LED
3 - Control BOOST - Determina la cantidad de pre empuje que llega a la primera válvula en el camino de
la señal del amplicador. Al poner más cantidad de BOOST se nota el efecto de rempujar el sonido
limpio del amplicador a una sobrecarga de válvula caliente o a una compresión natural de la sobre
carga.
4 - Llave BOOST - Acciona la función de Boost incluida. Esto es como accionar su pedal de distorsión
favorito en el amplicador.
5 - GAIN - Controla el nivel de Ganancia/distorsión presente en la señal de la guitarra. Usado en conjunto
con el control de volumen general (2). Para sonidos limpios con mucha banda de sonido ajuste el
control de ganancia hacia abajo y el volumen de acuerdo. Al ir poniendo más ganancia puede ser que
sea necesario reducir el volumen para obtener el sonido deseado.
6 - BASS - Controla las bajas frecuencias del amplicador. Conforme el amplicador se toca más alto, se
puede notar que es bueno bajar un poco este ajuste. Comience en 7-10 cuando en volumen bajo como,
por ejemplo, en su dormitorio.
5
6
7
8
9
10
11
7 - MIDDLE - Controla la respuesta de las frecuencias medias del amplicador. Comience en 4 o 5. Note
que cuanto más bajo se encuentra el ajuste las frecuencias medias son cerradas y cuanto más hacia
arriba, más la guitarra sobresale en la mezcla.
www.laney.co.uk
6
Page 52

CUB-RANGE
CUB-SUPERTOP FEATURES
USER MANUAL
13 12
8 - TREBLE - Controla la respuesta de las frecuencias altas del amplicador. Ajuste en 4 o 5 para comen
zar y continúe de acuerdo con el tipo de sonido que desea obtener.
9 - REVERB -Ajusta el nivel de la reverberación incluida. El efecto de reverberación incluido es de alta
calidad y con el algoritmo tipo resorte usado en el aclamado pedal BCC-SECRET PATH.
10 - Control de VOLUMEN - Controla o volume geral do amplicador e é usado em conjunto com
controle de Ganho (5).
11 - Botón POWER & LAMPARA INDICADORA - Indica que el amplicador esta prendido y listo para funcionar.
12 - Conector de POWER - Aquí se conecta el cable de alimentación incluido de tipo IEC.
13 - Entrada del FOOTSWITCH - Conecte aqui seu pedal de controle. A LANEY oferece o modelo FS1-
Mini como OPCIONAL e este não acompanha o produto.
14 - Entrada FX LOOP RETURN - Aquí es por donde vuelve la señal de su(s) efecto(s) usando la salida
OUT de los mismos. Use apenas cables de guitarra, blindados y con alta calidad.
15 - Entrada del FOOTSWITCH - Conecte aqui seu pedal de controle. A LANEY oferece o modelo FS1 Mini como OPCIONAL e este não acompanha o produto.
16 - Salida EXTERNAL SPEAKER - Salida EXTERNAL SPEAKER. - Aquí se conecta la caja. Al usar este conector,
siempre quede atento al uso de la impedancia correcta que es entre 8 a 16 Ohm. Pruebe las cajas CUB-212 &
CUB-112 para un sonido espectacular.
14
15
16
www.laney.co.uk
7
Page 53

CUB-RANGE
USER MANUAL
Especicaciones Técnicas
CUB-SUPER10
Producto Amplicador para GUITARRA
Potencia 6 Watios RMS
Canales Canal único con rempuje vía pedal
Funciones Volumen
Control Treble
Control Middle
Control Bass
Control de Ganancia
Llave Boost
Control de Boost
Conector para caja externa
Conector FX loop/LINE OUT
Conector FX Loop Return
Conector para pedal de control
(FS1-MINI opcional)
Altavoz 1 altavoz de 10 pulgadas HH Custom
Dimensiones /mm 339x373x212 (AxLxA)
Peso Neto 9.6 Kg
Embalaje/mm 430x440x27.5 (AxLxA)
Peso Bruto 12.6 Kg
Consumo 50W
CUB-SUPER10
In the interest of continued product develoment, Laney reserve the right to amend product specication without prior notice
www.laney.co.uk
8
Page 54

CUB-RANGE
USER MANUAL
Especicaciones Técnicas
CUB-SUPER12
Producto Amplicador de GUITARRA
Potencia <1 Watio a/o 15 Watios RMS
Canales Canal único con rempuje vía pedal
Funciones Volumen
Control Treble
Control Middle
Control Bass
Control de Ganancia
Llave Boost
Control de Boost
Conector para caja externa
Conector FX loop/LINE OUT
Conector FX Loop Return
Conector para pedal de control
(FS2-MINI opcional)
Altavoz 1 altavoz de 12 pulgadas HH Custom
Dimensiones/mm 399x430x233 (AxLxA)
Peso Neto 11.7 Kg
Embalaje/mm 480x495x295 (AxLxA)
Peso Bruto 15.5 Kg
Consumo 50W
CUB-SUPER12
In the interest of continued product develoment, Laney reserve the right to amend product specication without prior notice
9
www.laney.co.uk
Page 55

CUB-RANGE
USER MANUAL
Especicações Técnicas
CUB-SUPERTOP
Producto Amplicador de GUITARRA tipo CABEZAL
Potencia <1 Watt - 15 Watts RMS
Canales Canal único con rempuje vía pedal
Funciones Volumen
Control Treble
Control Middle
Control Bass
Control de Ganancia
Llave Boost
Control de Boost
Conector para caja externa
Conector FX loop/LINE OUT
Conector FX Loop Return
Conector para pedal de control
(FS2-MINI opcional)
Altavoz No disponible
Dimensiones /mm 210x430x176 (AxLxA)
Peso Neto 7.5 Kg
Embalaje mm 295x555x240 (AxLxA)
Peso Bruto 10 Kg
Consumo 50W
10
CUB-SUPERTOP
Manufacturer: Laney Electronics Ltd.
© 2020 Laney Electronics Ltd. May not be reproduced without prior written consent
In the interest of continued product develoment, Laney reserve the right to amend product specication without prior notice
www.laney.co.uk
Page 56

CUB-RANGE
RECURSOS DEL CUB-112 & CUB-212
USER MANUAL
CUB-112 panel
1
2
1 – CONECTOR DE ENTRADA – Haciendo uso de un cable de cajas de alta calidad, conecte la salida de su ampli-
cador en este conector de entrada. Tenga seguridad de usar la salida de 8 Ohm correcta desde su amplicador caso
se utilice un gabinete de 8 Ohm. Al utilizar dos gabinetes de 8 Ohm o un solo gabinete de 4 Ohm, tenga seguridad de
conectar la salida de 4 Ohm en su amplicador. ¡La falla en observar la impedancia correcta puede causar daños a su
equipo!
2 – CONECTOR DE LINK – Conector opcional de salida para conexión a gabinetes adicionales de 8 o 16 Ohm.
Potencia Max: 50 Watts
Altavoz: 1 de 12 pulgadas - HH Custom
Impedancia 8 Ohm
Dimensiones /mm 430x520x230 (AxAxP)
Peso Neto 10.4 Kg
CUB-112
Potencia Max.: 100 Watts
Altavoces: 2 de 12 pulgadas cada - HH
Custom
Impedancia 8 Ohm
Dimensiones /mm 430x700x230 (AxAxP)
Peso Neto 13.8 Kg
CUB-212
CUB-112
En el interés de Desarrollo continuado de nuestros equipos, Laney se reserva el derecho de cambiar las especicaciones sin aviso anterior.
CUB-212
11
www.laney.co.uk
Page 57

Page 58

CUB-RANGE
CUB-SUPER10 FEATURES
USER MANUAL
1 2 3
1 - 전원이 켜져 있는지 알려줍니다.
2 - 총 출력량을 조절하며 Gain control (6)과 연결이 되어있습니다.
3 - 앰프의 높은 주파수를 조절합니다. 4나 5부터 시작하여 어둡게 또는 밝게
원하시는지 알아내어 조절하십시오.
4 - 앰프의 중간 주파수를 조절합니다. 4나 5부터 시작하여 미들을 낮추실 수
있고 믹스에 기타를 더 잘 들리게 하기 위해서 올리실 수 있습니다.
5 - 앰프의 베이스 또는 낮은 주파수를 조절합니다. 앰프 음량이 커질수록 줄
이시는 걸 추천합니다. 방에서 연주할 시 7-10 부터 조절하십시오
6 - 기타 신호에 게인/디스토션을 조절합니다. Volume control (2)와 연결이
되어있습니다. 클린한 기타톤을 위해서는 gain control을 낮게 잡고 volume
control을 조절하십시오. Gain control을 올릴수록 volume control을 낮추셔야
할 수도 있습니다.
7 - 내부장착 된 pre-boost를 작동시킵니다. 이 기능은 앰프 앞에 부스트 페달
을 작동시키는 것과 같은 효과를 줍니다.
8 - 앰프 신호 경로의 첫 진공관에 pre boost 양을 정해줍니다. Boost를 올릴
시에 마치 클린 앰프를 따듯한 진공관 clipping 또는 이미 clipping 된 앰프에
자연스러운 압축된 소리를 만들어줍니다.
4
5
7
6
8
10
9
www.laney.co.uk
2
Page 59

CUB-RANGE
CUB-SUPER10 FEATURES
USER MANUAL
11
9 - BOOST LED -
10 - 파손되지 않은 케이블을 이용하여 기타를 연결해 주십시오
11 - 당신의 CUB-SUPER10은 HH Custom 8 Ohm 내부 스피커가 장착되어 있
습니다. 외부 스피커를 장착하기 위해선 여기로 연결하십시오. 파손되지 않은
케이블을 이용하여 연결해 주십시오. 8-16 Ohm의 맞는 인피던스 스피커를 사
용하십시오.
12 - 이펙터를 연결하는 곳입니다. 고급의 차폐된 케이블을 사용하십시오. 이
단자는 라인 아웃으로도 사용 가능합니다.
13 - 이펙터 아웃을 입력하는 곳입니다. 고급의 차폐된 케이블을 사용하십시
오.
14 - 풋 스위치를 연결하는 곳입니다. FS1-Mini optional extra
15 - 전원장치를 연결하십시오
12
13
14
15
www.laney.co.uk
3
Page 60

CUB-RANGE
CUB-SUPER12 FEATURES
USER MANUAL
1 2 3
1 - 전원이 켜져 있는지 알려줍니다.
2 - 총 출력량을 조절하며 Gain control (7)과 연결이 되어있습니다.
3 - 내부 장착된 리버브 양을 조절하십시오. 내부 장착된 리버브는 고급의 스프
링 리버브이여 BBC-SECRET PATH에 사용된 알고리듬으로 되어있습니다.
4 - 앰프의 높은 주파수를 조절합니다. 4나 5부터 시작하여 어둡게 또는 밝게
원하시는지 알아내어 조절하십시오
5 - 앰프의 중간 주파수를 조절합니다. 4나 5부터 시작하여 미들을 낮추실 수
있고 믹스에 기타를 더 잘 들리게 하기 위해서 올리실 수 있습니다.
6 - 앰프의 베이스 또는 낮은 주파수를 조절합니다. 앰프 음량이 커질수록 줄
이시는 걸 추천합니다. 방에서 연주할 시 7-10 부터 조절하십시오
7 - 기타 신호에 게인/디스토션을 조절합니다. Volume control (2)와 연결이
되어있습니다. 클린한 기타톤을 위해서는 gain control을 낮게 잡고 volume
control을 조절하십시오. Gain control을 올릴수록 volume control을 낮추셔야
할 수도 있습니다.
4
5
6
7
9
8
11 10
www.laney.co.uk
4
Page 61

CUB-RANGE
CUB-SUPER12 FEATURES
USER MANUAL
13 12
8 - 내부장착 된 pre-boost를 작동시킵니다. 이 기능은 앰프 앞에 부스트 페달을 작동
시키는 것과 같은 효과를 줍니다.
9 - 앰프 신호 경로의 첫 진공관에 pre boost 양을 정해줍니다. Boost를 올릴 시에 마치
클린 앰프를 따듯한 진공관 clipping 또는 이미 clipping 된 앰프에 자연스러운 압축된
소리를 만들어줍니다.
10 - BOOST LED
11 - 15W & <1W inputs. 15W 잇풋은 앰프의 최고력을 뽑아주며 15 와트 RMS 또는
튜브 톤을 만들어줍니다. <1Watt 잇풋은 아웃풋 파워 스테이지를 <1Watt RMS로 내려
줍니다. 레코딩 또는 실내 연주에 적합합니다.
12 - 당신의 CUB-SUPER12은 HH Custom 8 Ohm 내부 스피커가 장착되어 있습니다. 외
부 스피커를 장착하기 위해선 여기로 연결하십시오. 파손되지 않은 케이블을 이용하여
연결해 주십시오. 8-16 Ohm의 맞는 인피던스 스피커를 사용하십시오.
13 - 이펙터를 연결하는 곳입니다. 고급의 차폐된 케이블을 사용하십시오. 이 단자는 라
인 아웃으로도 사용 가능합니다.
14 - 이펙터 아웃을 입력하는 곳입니다. 고급의 차폐된 케이블을 사용하십시오.
15 - 풋 스위치를 연결하는 곳입니다. FS1-Mini optional extra
16 - 전원장치를 연결하십시오
14
15
16
www.laney.co.uk
5
Page 62

CUB-RANGE
CUB-SUPERTOP FEATURES
USER MANUAL
1 3 4
2
1 - 15W & <1W inputs. 15W 잇풋은 앰프의 최고력을 뽑아주며 15 와트 RMS 또는 튜
브 톤을 만들어줍니다. <1Watt 잇풋은 아웃풋 파워 스테이지를 <1Watt RMS로 내려줍
니다. 레코딩 또는 실내 연주에 적합합니다.
2 - BOOST LED
3 - 앰프 신호 경로의 첫 진공관에 pre boost 양을 정해줍니다. Boost를 올릴 시에 마치
클린 앰프를 따듯한 진공관 clipping 또는 이미 clipping 된 앰프에 자연스러운 압축된
소리를 만들어줍니다.
4 - 내부장착 된 pre-boost를 작동시킵니다. 이 기능은 앰프 앞에 부스트 페달을 작동
시키는 것과 같은 효과를 줍니다.
5 -기타 신호에 게인/디스토션을 조절합니다. Volume control (2)와 연결이
되어있습니다. 클린한 기타톤을 위해서는 gain control을 낮게 잡고 volume
control을 조절하십시오. Gain control을 올릴수록 volume control을 낮추셔야
할 수도 있습니다.
6 - 앰프의 베이스 또는 낮은 주파수를 조절합니다. 앰프 음량이 커질수록 줄이
시는 걸 추천합니다. 방에서 연주할 시 7-10 부터 조절하십시오
7 - 앰프의 중간 주파수를 조절합니다. 4나 5부터 시작하여 미들을 낮추실 수
있고 믹스에 기타를 더 잘 들리게 하기 위해서 올리실 수 있습니다.
5
6
7
8
9
10
11
www.laney.co.uk
6
Page 63

CUB-RANGE
CUB-SUPERTOP FEATURES
USER MANUAL
13 12
8 - 앰프의 높은 주파수를 조절합니다. 4나 5부터 시작하여 어둡게 또는 밝게 원하시는
지 알아내어 조절하십시오
9 - 내부 장착된 리버브 양을 조절하십시오. 내부 장착된 리버는 고급의 스프링 리버브
이여 BBC-SECRET PATH에 사용된 알고리듬으로 되어있습니다.
10 - 총 출력량을 조절하며 Gain control (5)과 연결이 되어있습니다
11 - 전원이 켜져 있는지 알려줍니다.
12 - 전원장치를 연결하십시오
13 - 풋 스위치를 연결하는 곳입니다. FS2-Mini optional extra
14 - 이펙터 아웃을 입력하는 곳입니다. 고급의 차폐된 케이블을 사용하십시오
15 - 이펙터를 연결하는 곳입니다. 고급의 차폐된 케이블을 사용하십시오. 이 단자는 라
인 아웃으로도 사용 가능합니다.
16 - 파손되지 않은 케이블을 이용하여 연결해 주십시오. 8-16 Ohm의 맞는 인피던스
스피커를 사용하십시오. CUB-212 & CUB-112 케비넷을 사용해 보십시오
14
15
16
www.laney.co.uk
7
Page 64

CUB-RANGE
USER MANUAL
Technical Specications
CUB-SUPER10
Product GUITAR Amplier
Power 6 Watts RMS
Channels Single Channel with FS Boost
Features Volume
Treble
Middle
Bass
Gain
Boost Switch
Boost
External Speaker socket
FX loop/LINE OUT send
FX Loop Return
Footswitch socket (FS1-MINI)
Speaker 1 x 10 HH Custom Designed Driver
Unit Size/mm 339x373x212 (HxWxD)
Unit Weight 9.6 Kg
Carton Size mm 430x440x275 (HxWxD)
Packed Weight 12.6 Kg
Power Consumption 50W
CUB-SUPER10
In the interest of continued product develoment, Laney reserve the right to amend product specication without prior notice
www.laney.co.uk
8
Page 65

CUB-RANGE
USER MANUAL
Technical Specications
CUB-SUPER12
Product GUITAR Amplier
Power <1 Watt - 15 Watts RMS
Channels Single Channel with FS Boost
Features Volume
Treble
Middle
Bass
Gain
Boost Switch
Boost
Reverb
External Speaker socket
FX loop/LINE OUT send
FX Loop Return
Footswitch socket (FS2-MINI)
Speaker 1 x 12 HH Custom Designed Driver
Unit Size/mm 399x430x233 (HxWxD)
Unit Weight 11.7 Kg
Carton Size mm 480x495x295 (HxWxD)
Packed Weight 15.5 Kg
Power Consumption 50W
CUB-SUPER12
In the interest of continued product develoment, Laney reserve the right to amend product specication without prior notice
9
www.laney.co.uk
Page 66

CUB-RANGE
USER MANUAL
Technical Specications
CUB-SUPERTOP
Product GUITAR HEAD
Power <1 Watt - 15 Watts RMS
Channels Single Channel with FS Boost
Features Volume
Treble
Middle
Bass
Gain
Boost Switch
Boost
Reverb
External Speaker socket
FX loop/LINE OUT send
FX Loop Return
Footswitch socket (FS2-MINI)
Speaker NA
Unit Size/mm 210x430x176 (HxWxD)
Unit Weight 7.5 Kg
Carton Size mm 295x555x240 (HxWxD)
Packed Weight 10 Kg
Power Consumption 50W
CUB-SUPERTOP
Manufacturer: Laney Electronics Ltd.
© 2020 Laney Electronics Ltd. May not be reproduced without prior written consent
In the interest of continued product develoment, Laney reserve the right to amend product specication without prior notice
10
www.laney.co.uk
Page 67

CUB-RANGE
CUB-112 & CUB-212 기능
USER MANUAL
CUB-112 panel
1
2
1 – INPUT SOCKET - 양호한 품질의 스피커 케이블을 사용하여 앰프 스피커 소켓에 연
결하여 단일 8Ω 확장 캐비닛을 사용하는 경우 올바른 8Ω 정격 출력을 사용하십시오.
2개의 8Ω 확장 캐비닛 또는 1개의 4Ω 확장 캐비닛을 사용할 경우, 앰프의 4Ω 정격 출
력에 연결하십시오. 임피던스를 올바르게 일치시키지 않으면 장비가 손상될 수 있습니
다
2 - LINK SOCKET - 추가 8 또는 16Ω 확장 스피커의 입력 소켓에 대한 링크 아웃.
전원 취급: 50와트
스피커: 1 x 12 HH 맞춤 설계 드라
이버
임피던스 8Ω 임피던스
단위 크기/mm 430x520x230(HxWxD)
단위 무게 10.4Kg
CUB-112
전원 취급: 100와트
스피커: 2 x 12 HH 맞춤형 드라이
버
임피던스 8Ω 임피던스
단위 크기/mm 430x700x230(HxWxD)
단위 무게 13.8Kg
CUB-212
11
CUB-112
지속적인 제품 개발을 위해, Laney는 사전 통지 없이 제품 사양을 수정할 권리를 보유한다.
CUB-212
www.laney.co.uk
Page 68

Page 69

CUB-RANGE
USER MANUAL
ddはじめ に
CUB-SUPERシリーズ
この度はCUB-SUPERシリーズをご購入いただき誠にありがとうございます。CUBE-SUPERシ
リーズは高級感のある外観を持つ高性能オールチューブ・ギターアンプです。本製品の性
能を最大限に発揮させ、安全に末永くお使いいただくため、ご使用になる前にこの取扱い
説明書を必ずお読みください。
www.laney.co.uk
2
Page 70

CUB-RANGE
CUB-SUPER10 FEATURES
USER MANUAL
1 2 3
1 - POWER SWITCH & LAMP - 電源スイッチ、および電源ONインジケーターです。
2 - VOLUME - アンプの ボリュームをコントロールします。
3 - TREBLE - 高域をコントロールします。
4 - MIDDLE - 中域をコントロールします。.
5 - BASS - 低域をコントロールします。
6 - GAIN - 入力信号のゲインをコントロールします。クリーンサウンドにはゲインを小さめ
に、歪みのあるサウンドにはゲインを上げて使用します。
7 - BOOST SWITCH - ブーストをONにします。
8 - BOOST KNOB - ブーストをコントロールします。
4
5
7
6
8
10
9
www.laney.co.uk
3
Page 71

CUB-RANGE
CUB-SUPER10 FEATURES
USER MANUAL
11
9 - BOOST LED -
10 - INPUT SOCKET - ギターを繋ぎます。高品質なギターケーブルを使用してください。
11 - EXTERNAL SPEAKER. - 本製品はHHカスタムデザインスピーカー(8Ω)を搭載していま
す。また、外部スピーカーを接続することもできます。この場合、内部スピーカーの接続は遮
断されます。接続には高品質なスピーカーケーブルを使用してください。インピーダンスは
8-16Ωです。
12 - FX LOOP SEND - エフェクト用出力端子です。外部エフェクターの入力へ接続します。高
品質なギターケーブルを使用してください。
13 - FX LOOP RETURN - Tエフェクト入力端子です。外部エフェクターからの出力を接続し
ます。
14 - FOOTSWITCH SOCKET - フットスイッチを接続します。
15 - POWER SOCKET - 電源コードを接続します。
12
13
14
15
www.laney.co.uk
4
Page 72

CUB-RANGE
CUB-SUPER12 FEATURES
USER MANUAL
1 2 3
1 - POWER SWITCH & LAMP - 電源スイッチ、および電源ONインジケーターです。
2 - VOLUME - アンプの ボリュームをコントロールします。
3 - REVERB - リバーブをコントロールします。BCC-SECRET PATHリバーブエンジンを搭載し
ています。
4 - TREBLE - 高域をコントロールします。
5 - MIDDLE - 中域をコントロールします。
6 - BASS - 低域をコントロールします。
7 - GAIN - 入力信号のゲインをコントロールします。クリーンサウンドにはゲインを小さめ
に、歪みのあるサウンドにはゲインを上げて使用します。
8 - BOOST SWITCH -ブーストをONにします。
4
5
6
7
9
8
11 10
www.laney.co.uk
5
Page 73

CUB-RANGE
CUB-SUPER12 FEATURES
USER MANUAL
13 12
9 - BOOST - ブーストをコントロールします。
10 - BOOST LED
11 - INPUT SOCKET - 最大出力15Wアンプ用入力端子です。<1W入力端子に接続すると出
力は1W以下になり、レコーディングや練習用に適したボリュームで使用することができま
す。
12 - EXTERNAL SPEAKER - 本製品はHH Custom designedスピーカー(8Ω)を搭載してい
ます。また、外部スピーカーを接続することもできます。この場合、内部スピーカーの接続は
遮断されます。接続には高品質なスピーカーケーブルを使用してください。インピーダンス
は8-16Ωです。
13 - FX LOOP SEND - エフェクト出力端子です。外部エフェクターの入力を接続します。高品
質なギターケーブルを使用してください。
14 - FX LOOP RETURN - エフェクト入力端子です。外部エフェクターからの出力を接続しま
す。
15 - FOOTSWITCH SOCKET - フットスイッチを接続します。
16 - POWER SOCKET - 電源コードを接続します。
14
15
16
www.laney.co.uk
6
Page 74

CUB-RANGE
CUB-SUPERTOP FEATURES
USER MANUAL
1 3 4
2
1 - INPUT SOCKET - 最大出力15Wアンプ用入力端子です。<1W入力端子に接続すると出力
は1W以下になり、レコーディングや練習用に適したボリュームで使用することができます。
2 - BOOST LED
3 - BOOST - ブーストをコントロールします。
4 - BOOST SWITCH - ブーストをONにします。
5 - GAIN - 入力信号のゲインをコントロールします。クリーンサウンドにはゲインを小さめ
に、歪みのあるサウンドにはゲインを上げて使用します。
6 - BASS -低域をコントロールします。
7 - MIDDLE - 中域をコントロールします。
8 - TREBLE - 高域をコントロールします。
5
6
7
8
9
10
11
www.laney.co.uk
7
Page 75

CUB-RANGE
CUB-SUPERTOP FEATURES
USER MANUAL
13 12
9- REVERB -リバーブをコントロールします。BCC-SECRET PATHリバーブエンジンを搭載し
ています。
10 - VOLUME - アンプの ボリュームをコントロールします。
11 - POWER SWITCH & LAMP - 電源スイッチ、および電源ONインジケーターです。
12 - POWER SOCKET -電源コードを接続します。
13 - FOOTSWITCH SOCKET - フットスイッチを接続します。
14 - FX LOOP RETURN -エフェクト入力端子です。外部エフェクターからの出力を接続しま
す。
15 - FX LOOP SEND - エフェクト出力端子です。外部エフェクターの入力へ接続します。高品
質なギターケーブルを使用してください。
16 - EXTERNAL SPEAKER. - 外部スピーカー(8-16Ω)を接続します。高品質なスピーカーケ
ーブルを使用してください。CUB-212、CUB-112キャビネットを推奨します。
14
15
16
www.laney.co.uk
8
Page 76

CUB-RANGE
USER MANUAL
dddddTechnical Specications
CUB-SUPER10
製品 ギターコンボアンプ
アンプ出力 6 Watts RMS
チャンネル シングル+FSブースト
コントロール Volume
Treble
Middle
Bass
Gain
Boost Switch
Boost
External Speaker socket
FX loop/LINE OUT send
FX Loop Return
Footswitch socket (FS1-MINI)
スピーカー 1 x 10 HH Custom Designed Driver
寸法 339x373x212 (HxWxD)
質量 9.6 Kg
梱包寸法(mm) 430x440x275 (HxWxD)
重量 12.6 Kg
消費電力 50W
CUB-SUPER10
In the interest of continued product develoment, Laney reserve the right to amend product specication without prior notice
www.laney.co.uk
9
Page 77

CUB-RANGE
USER MANUAL
Technical Specications
CUB-SUPER12
製品 ギターコンボアンプ
アンプ出力 <1 Watt - 15 Watts RMS
チャンネル Single Channel with FS Boost
コントロール Volume
Treble
Middle
Bass
Gain
Boost Switch
Boost
Reverb
External Speaker socket
FX loop/LINE OUT send
FX Loop Return
Footswitch socket (FS2-MINI)
スピーカー 1 x 12 HH Custom Designed Driver
寸法 399x430x233 (HxWxD)
質量 11.7 Kg
梱包寸法(mm) 480x495x295 (HxWxD)
重量 15.5 Kg
消費電力 50W
10
CUB-SUPER12
In the interest of continued product develoment, Laney reserve the right to amend product specication without prior notice
www.laney.co.uk
Page 78

CUB-RANGE
USER MANUAL
Technical Specications
CUB-SUPERTOP
製品 ギターアンプヘッド
アンプ出力 <1 Watt - 15 Watts RMS
チャンネル シングル+FSブースト
コントロール Volume
Treble
Middle
Bass
Gain
Boost Switch
Boost
Reverb
External Speaker socket
FX loop/LINE OUT send
FX Loop Return
Footswitch socket (FS2-MINI)
スピーカー 無し
寸法 210x430x176 (HxWxD)
質量 7.5 Kg
梱包寸法 295x555x240 (HxWxD)
重量 10 Kg
消費電力 50W
11
CUB-SUPERTOP
Manufacturer: Laney Electronics Ltd.
© 2020 Laney Electronics Ltd. May not be reproduced without prior written consent
In the interest of continued product develoment, Laney reserve the right to amend product specication without prior notice
www.laney.co.uk
Page 79

CUB-RANGE
CUB-112 & CUB-212キャビネット
USER MANUAL
CUB-112 panel
1
2
1 – INPUT SOCKET - ギターアンプを接続します 接続するアンプの出力インピーダンスが
8Ωであることを確認してください。注意入力インピーダンスが8Ωのスピーカーを2台並列、ま
たは4Ωスピーカー1台を増設するには、接続するアンプの出力インピーダンスを4Ωに設定し
てください。
2 - LINK SOCKET - スピーカーを増設するときに使用します。入力インピーダンスが8Ω、ま
たは16Ωのスピーカーを接続してください。
出力: 50W
スピーカー: 1x12インチ
HHカスタムドライバー
インピーダンス 8Ω
尺寸/mm 430x520x230(HxWxD)
質量 10.4Kg
CUB-112
出力: 100W
スピーカー: 2x12インチ
HHカスタムドライバー
インピーダンス 8Ω
尺寸/mm 430x5700x230(HxWxD)
質量 13.8Kg
CUB-212
12
CUB-112
In the interest of continued product develoment, Laney reserve the right to amend product specication without prior notice
CUB-212
www.laney.co.uk
Page 80

Page 81

CUB-RANGE
CUB-SUPER10 FEATURES
USER MANUAL
1 2 3
1 - Tecla POWER & INDICADOR - Indica que o amplicador está ligado e pronto para funcionar.
2 - Controle de VOLUME - Controla o volume geral do amplicador e é usado em conjunto com o
controle de Ganho (6).
3 - TREBLE - Controla a resposta das frequências agudas do amplicador. Ajuste em 4 ou 5 para
começar e continue de acordo com o tipo de sonoridade desejada.
4 - MIDDLE - Controla a resposta das frequências médias do amplicador. Começe em 4 ou 5. Note que
quanto mais baixo se encontre o ajuste, as frequências médias são mais fechadas e quanto mais alto,
maior é a presença da guitarra no mix.
5 - BASS - Controla as frequências graves do amplicador. Conforme o amplicador tem seu volume
aumentado, pode ser necessário abaixar este ajuste. Comece entre 7 e 10 para um ajuste em seu
quarto de dormir ou baixo volume.
6 - GAIN - Controla o nível de Ganho/distorção no sinal da guitarra. Usado em conjunto com o controle
de volume geral (2). Para sons limpos e banda sonora mais ampla, ajuste este controle para abaixo. Ao
ir aumentando o ganho, pode ser que seja necessário reduzir o volume para obter o efeito desejado.
7 - Chave BOOST - Aciona a função de Boost incluída. Isto é como ligar um pedal de Boost em seu
amplicador.
4
5
7
6
8
10
9
8 - Controle BOOST - Determina a quantidade de ganho que chega na primeira válvula do caminho do
sinal no amplicador. Ao aumentar o ganho se nota o efeito de saturação do som limpo ou uma com
pressão natural dessa saturação.
www.laney.co.uk
2
Page 82

CUB-RANGE
CUB-SUPER10 FEATURES
USER MANUAL
11
9 - BOOST LED - Indicates that the BOOST is engaged.
10 - Conector INPUT - Aqui se conecta a guitarra sempre com cabos de alta qualidade.
11 - Saída EXTERNAL SPEAKER - Seu amplicador CUB-SUPER10 possui um alto-falante feito
especialmente pela HH e com impedância de 8 Ohms. Caso deseje conectar uma caixa adicional
externa, use este conector. Por favor, use apenas cabos de caixa de alta qualidade. A conexão de uma
caixa externa desliga o alto-falante interno. Ao usar esta saída que atento para que a impedância
correta da caixa a ser ligada seja entre 8 ou 16 Ohm.
12 - Saída FX LOOP SEND - Aqui se conecta o cabo que vai para a Entrada (INPUT) de seu(s) efeito(s).
Use um cabo blindado de alta qualidade. Esta saída pode ser usada como uma saída de linha (line out)
13 - Entrada FX LOOP RETURN - Nesta entrada se conecta o OUT de seus efeitos fazendo a volta para o
amplicador. Use apenas cabos de guitarra, blindados e de alta qualidade para evitar ruídos.
14 - Entrada FOOTSWITCH - Conecte aqui seu pedal de controle. A LANEY oferece o modelo FS1-Mini
como OPCIONAL e este não acompanha o produto.
15 - Conector POWER - Conecte neste conector o cabo de força tipo IEC fornecido e depois na
tomada elétrica.
12
13
14
15
www.laney.co.uk
3
Page 83

CUB-RANGE
CUB-SUPER12 FEATURES
USER MANUAL
1 2 3
1 - Tecla POWER & INDICADOR - Indica que o amplicador está ligado e pronto para funcionar.
2 - Controle de VOLUME - Controla o volume geral do amplicador e é usado em conjunto com o
controle de Ganho (7).
3 - REVERB - - Ajusta o nível de reverberação. O efeito de reverberação incluso é de alta qualidade e usa o
algoritmo tipo Mola utilizado no aclamado pedal BCC-SECRET PATH..
4 - TREBLE - Controla a resposta das frequências agudas do amplicador. Ajuste em 4 ou 5 para
começar e continue de acordo com o tipo de sonoridade desejada.
5 - MIDDLE - Controla a resposta das frequências médias do amplicador. Começe em 4 ou 5. Note que
quanto mais baixo se encontre o ajuste, as frequências médias são mais fechadas e quanto mais alto,
maior é a presença da guitarra no mix.
6 - BASS - Controla as frequências graves do amplicador. Conforme o amplicador tem seu volume
aumentado, pode ser necessário abaixar este ajuste. Comece entre 7 e 10 para um ajuste em seu
quarto de dormir ou baixo volume.
7 - GAIN - Controla o nível de Ganho/distorção no sinal da guitarra. Usado em conjunto com o controle
de volume geral (2). Para sons limpos e banda sonora mais ampla, ajuste este controle para abaixo. Ao
ir aumentando o ganho, pode ser que seja necessário reduzir o volume para obter o efeito desejado.
4
5
6
7
9
8
11 10
8 - Chave BOOST - Aciona a função de Boost incluída. Isto é como ligar um pedal de Boost em seu
amplicador.
www.laney.co.uk
4
Page 84

CUB-RANGE
CUB-SUPER12 FEATURES
USER MANUAL
13 12
14
15
9 - Controle BOOST - Determina a quantidade de ganho que chega na primeira válvula do caminho do
sinal no amplicador. Ao aumentar o ganho se nota o efeito de saturação do som limpo ou uma com
pressão natural dessa saturação
10 - BOOST LED
11 - Entradas INPUT - 15W & <1W. Conecte sua guitarra na entrada de 15W para obter toda a potência
do amplicador - produzindo 15 watts RMS de som puro de válvula. Ao conectar-se na entrada de
<1Watt, o amplicador reduz sua potência para menos que 1Watt RMS. Isto é ideal para gravar ou
para praticar em seu quarto.
12 - Saída EXTERNAL SPEAKER - Seu amplicador CUB-SUPER12 possui um alto-falante feito especial
mente pela HH e com impedância de 8 Ohms. Caso deseje conectar uma caixa adicional externa,
use este conector. Por favor, use apenas cabos de caixa de alta qualidade. A conexão de uma caixa
externa desliga o alto-falante interno. Ao usar esta saída que atento para que a impedância correta
da caixa a ser ligada seja entre 8 ou 16 Ohm
13 - Saída FX LOOP SEND - Aqui se conecta o cabo que vai para a Entrada (INPUT) de seu(s) efeito(s).
Use um cabo blindado de alta qualidade. Esta saída pode ser usada como uma saída de linha (line out)
14 - Entrada FX LOOP RETURN - Nesta entrada se conecta o OUT de seus efeitos fazendo a volta para o
amplicador. Use apenas cabos de guitarra, blindados e de alta qualidade para evitar ruídos.
15 - Entrada FOOTSWITCH - Conecte aqui seu pedal de controle. A LANEY oferece o modelo FS2-Mini
como OPCIONAL e este não acompanha o produto.
16
16 - Conector POWER - Conecte neste conector o cabo de força tipo IEC fornecido e depois tomada elétrica.
www.laney.co.uk
5
Page 85

CUB-RANGE
CUB-SUPERTOP FEATURES
USER MANUAL
1 3 4
2
1 - Entradas INPUT - 15W & <1W. Conecte sua guitarra na entrada de 15W para obter toda a potência
do amplicador - produzindo 15 watts RMS de som puro de válvula. Ao conectar-se na entrada de <1Watt,
o amplicador reduz sua potência para menos que 1Watt RMS. Isto é ideal para gravar ou para praticar em
seu quarto.
2 - BOOST LED - Indicates that the BOOST is engaged.
3 - Controle BOOST - Determina a quantidade de ganho que chega na primeira válvula do caminho do
sinal no amplicador. Ao aumentar o ganho se nota o efeito de saturação do som limpo ou uma compressão
natural dessa saturação..
4 - Chave BOOST - Aciona a função de Boost incluída. Isto é como ligar um pedal de Boost em seu
amplicador.
5 - GAIN - Controla o nível de Ganho/distorção no sinal da guitarra. Usado em conjunto com o controle
de volume geral (9). Para sons limpos e banda sonora mais ampla, ajuste este controle para abaixo. Ao ir
aumentando o ganho, pode ser que seja necessário reduzir o volume para obter o efeito desejado.
6 - BASS - Controla as frequências graves do amplicador. Conforme o amplicador tem seu volume
aumentado, pode ser necessário abaixar este ajuste. Comece entre 7 e 10 para um ajuste em seu quarto de
dormir ou baixo volume.
5
6
7
8
9
10
11
7 - MIDDLE - Controla a resposta das frequências médias do amplicador. Comece em 4 ou 5. Note que
quanto mais baixo se encontre o ajuste, as frequências médias são mais fechadas e quanto mais alto, maior
é a presença da guitarra no mix.
www.laney.co.uk
6
Page 86

CUB-RANGE
CUB-SUPERTOP FEATURES
USER MANUAL
13 12
8 - TREBLE - Controla a resposta das frequências agudas do amplicador. Ajuste em 4 ou 5 para começar
e continue de acordo com o tipo de sonoridade desejada
9- REVERB - SAjusta o nível de reverberação. O efeito de reverberação incluso é de alta qualidade e usa o
algoritmo tipo Mola utilizado no aclamado pedal BCC-SECRET PATH..
10 - Controle de VOLUME - Controla o volume geral do amplicador e é usado em conjunto com o
controle de Ganho (5).
11 - Tecla POWER & INDICADOR - Indica que o amplicador está ligado e pronto para funcionar .
12 - Conector POWER - Conecte neste conector o cabo de força tipo IEC fornecido e depois na tomada
elétrica.
13 - Entrada FOOTSWITCH - Conecte aqui seu pedal de controle. A LANEY oferece o modelo FS2-Mini
como OPCIONAL e este não acompanha o produto.
14 - Entrada FX LOOP RETURN - Nesta entrada se conecta o OUT de seus efeitos fazendo a volta para
o amplicador. Use apenas cabos de guitarra, blindados e de alta qualidade para evitar ruídos.
15 - Saída FX LOOP SEND - Aqui se conecta o cabo que vai para a Entrada (INPUT) de seu(s) efeito(s).
Use um cabo blindado de alta qualidade. Esta saída pode ser usada como uma saída de linha (line out).
14
15
16
16 - Saída EXTERNAL SPEAKER - Para conectar uma caixa adicional externa, use este conector. Por
favor, use apenas cabos de caixa de alta qualidade. Ao usar esta saída que atento para que a
impedância da caixa a ser ligada seja entre 8 ou 16 Ohm
www.laney.co.uk
7
Page 87

CUB-RANGE
USER MANUAL
Especicações Técnicas
CUB-SUPER10
Produto Amplicador para GUITARRA
Potência 6 Watts RMS
Canais Canal único com ganho acionável via pedal
Funções Volume
Controle de agudos - Treble
Controle de médios - Middle
Controle de graves - Bass
Controle de Ganho
Chave Boost
Controle de Boost
Conector para caixa externa
Conector FX loop/LINE OUT
Conector FX Loop Return
Conector para pedal de controle
(FS1-MINI opcional)
Alto-falante 1 alto-falante de 10 polegadas HH Custom
Dimensões /mm 339x373x212 (AxLxP)
Peso Líquido 9.6 Kg
Embalagem/mm 430x440x27.5 (AxLxP)
Peso Bruto 12.6 Kg
Consumo 50W
CUB-SUPER10
In the interest of continued product develoment, Laney reserve the right to amend product specication without prior notice
www.laney.co.uk
8
Page 88

CUB-RANGE
USER MANUAL
Especicações Técnicas
CUB-SUPER12
Produto Amplicador de GUITARRA
Potência <1 Watt a/o 15 Watts RMS
Canais Canal único com ganho acionável via pedal
Funções Volume
Controle de agudos - Treble
Controle de médios - Middle
Controle de graves - Bass
Controle de Ganho
Chave Boost
Controle de Boost
Conector para caixa externa
Conector FX loop/LINE OUT
Conector FX Loop Return
Conector para pedal de controle
(FS2-MINI opcional)
Alto-falante 1 alto-falante de 12 polegadas HH Custom
Dimensões/mm 399x430x233 (AxLxP)
Peso Líquido 11.7 Kg
Embalagem/mm 480x495x295 (AxLxP)
Peso Bruto 15.5 Kg
Consumo 50W
CUB-SUPER12
In the interest of continued product develoment, Laney reserve the right to amend product specication without prior notice
www.laney.co.uk
9
Page 89

CUB-RANGE
USER MANUAL
Especicações Técnicas
CUB-SUPERTOP
Produto Amplicador de GUITARRA tipo CABEÇOTE
Potência <1 Watt - 15 Watts RMS
Canais Canal único com ganho acionado via pedal
Funções Volume
Controle de agudos - Treble
Controle de médios - Middle
Controle de graves - Bass
Controle de Ganho
Chave Boost
Controle de Boost
Conector para caixa externa
Conector FX loop/LINE OUT
Conector FX Loop Return
Conector para pedal de controle
(FS2-MINI opcional)
Alto-falante Não disponível
Dimensões/mm 210x430x176 (AxLxP)
Peso Líquido 7.5 Kg
Embalagem/mm 295x555x240 (AxLxP)
Peso Bruto 10 Kg
Consumo 50W
10
CUB-SUPERTOP
Manufacturer: Laney Electronics Ltd.
© 2020 Laney Electronics Ltd. May not be reproduced without prior written consent
In the interest of continued product develoment, Laney reserve the right to amend product specication without prior notice
www.laney.co.uk
Page 90

CUB-RANGE
RECURSOS DO CUB-112 & CUB-212
USER MANUAL
CUB-112 panel
1
2
1 – CONECTOR DE ENTRADA – Fazendo uso de um cabo para caixas de alta qualidade, conecte a saída de seu
amplicador neste conector. Assegure-se de usar a saída correspondente a 8 Ohms desde seu amplicador ao utilizar
um único gabinete de 8 Ohms. Ao utilizar dois gabinetes de 8 Ohms ou somente um gabinete de 4 Ohms, assegure-se
de conectar a saída de 4 Ohms em seu amplicador. A falha em observar a impedância correta pode causar danos a seu
equipamento!
2 – CONECTOR DE LINK – Conector opcional de saída para a conexão de gabinetes adicionais de 8 ou 16 Ohms.
Potência Max: 50 Watts
Alto-Falante: 1 de 12 polegadas - HH Custom
Impedância 8 Ohms
Dimensões /mm 430x520x230 (AxLxP)
Peso Líquido 10.4 Kg
CUB-112
Potência Max.: 100 Watts
Alto-Falantes: 2 de 12 polegadas cada - HH
Custom
Impedância 8 Ohms
Dimensões /mm 430x700x230 (AxAxP)
Peso Líquido 13.8 Kg
CUB-212
CUB-112
No interesse de manter o desenvolvimento de seus produtos, a Laney se reserva o direito de mudar as especicações sem aviso prévio.
CUB-212
11
www.laney.co.uk
Page 91

Page 92

CUB-RANGE
INTRODUCTION
Welcome to the CUB-SUPER range.
The CUB-SUPER range oers the tone conscious guitar player boutique tone without the boutique price
tag.
Time proven construction methods rened over 50 years of tube amp building and premium components
means that whilst the CUB-SUPER range appears deceptively simple they are reassuringly toneful. From
gently compressing cleans to touch sensitive crunches and full-on leads without a hint of harshness, it’s
dicult to nd a bad sound in the CUB-SUPER range.
The CUB-SUPER range was designed to free up space on your pedal board by ditching your boost pedal!
Why? Because the CUB-SUPER range has a superb BOOST pedal built into the front end of the circuit. It
works in exactly the same way as kicking in your favourite boost pedal on your board – it boosts your guitar
signal and hits the rst preamp tube in the amp….HARD, and as every guitar player should know hitting a
tube amp hard just makes everything sound better! So free some space and get more from your rig.
Available in 2 combo options, a head and 2 matching cabinet options, hand designed boutique aesthetics
and dynamic interactive tone is now available to everyone.
This manual explains the key features of your CUB-SUPER amp. Read it thoroughly and keep it safe for
future reference.
USER MANUAL
www.laney.co.uk
2
Page 93

CUB-RANGE
CUB-SUPER10 FEATURES
USER MANUAL
1 2 3
1 - 电源(Power)开关及指示灯- 音箱已接通电源并已可使用
2 - 音量(Volume) - 控制音箱整体音量大小,与增益(6)旋钮一起使用.
3 - 高频(Treble) - 控制音箱的高频响应,从4或5开始调节,使音色更低沉或更
明亮.
4 - 中频(Middle) - 控制音箱的中频响应,从4或5开始调节,把数值调低可使
频下潜,把数值提高可以突出吉他的声音
5 - 低频(Bass) - 控制音箱的低频响应,在大音量的情况下你可能需要更少的低
频。在卧室使用时可在7-10之间调节
6 - 增益(Gain) - 控制吉他信号的增益/失真强度,与音量旋钮(2)一起使用。吉
他使用清音音色时可以把增益调小再把音量调整到所需要的位置。调高增
益的同时需要相应的调低音量。
7 - 激励器开关 - 打开板载前级激励器,相当于在音箱前接上激励器单块。
8 - 激励器(Boost) - 调节吉他信号进入第一个电子管的激励强度。调高此项可
使清音信号变成温暖的电子管失真,或在失真信号上加上自然压缩。
4
5
7
6
8
10
9
www.laney.co.uk
3
Page 94

CUB-RANGE
CUB-SUPER10 FEATURES
USER MANUAL
11
9 - BOOST LED -
10 - 输入插口(INPUT) - 此处接入吉他连线
11 - 外接箱体(EXTERNAL SPEAKER) - CUB-SUPER10本身使用定制的8英寸HH
喇叭。如需要使用其他喇叭箱体可以通过喇叭线接入此处,请使用优质的
喇叭连线。当通过该接口使用其他喇叭箱体时,音箱自带的HH喇叭将自动
断开连接,请确保外接的喇叭箱体的阻抗在8-16欧姆之间。
12 - 效果环送出(FX LOOP SEND) - 此处接口应与外接效果器的输入(INPUT)相
连。请使用优质的带屏蔽的连线。该接口也可作线路输出(Line Out)使用。
13 - 效果环返送(FX LOOP RETURN) - 此处接口应与外接效果器的输出(OUT)连
接。请使用优质的带屏蔽的连线。
14 - 脚踏插口(FOOTSWITCH SOCKET) - 此处可接入控制脚踏,推荐FS1-Mini(
另购)。
15 - 电源插口(POWER SOCKET) - 此处接入电源线。
12
13
14
15
www.laney.co.uk
4
Page 95

CUB-RANGE
CUB-SUPER12 FEATURES
USER MANUAL
1 2 3
1 - 电源(Power)开关及指示灯- 音箱已接通电源并已可使用.
2 - 音量(Volume) - 控制音箱整体音量大小,与增益(7)旋钮一起使用.
3 - 混响(REVERB) - 控制板载混响效果的强度。CUB-SUPER12自带高品质弹簧
式混响,使用BCC-SECRET PATH混响效果器的算法引擎。
4 - 高频(Treble) - 控制音箱的高频响应,从4或5开始调节,使音色更低沉或更
明亮.
5 - 中频(Middle) - 控制音箱的中频响应,从4或5开始调节,把数值调低可使中
频下潜,把数值提高可以突出吉他的声音
6 - 低频(Bass) - 控制音箱的低频响应,在大音量的情况下你可能需要更少的低
频。在卧室使用时可在7-10之间调节
7 - 增益(Gain) - 控制吉他信号的增益/失真强度,与音量旋钮(2)一起使用。吉
他使用清音音色时可以把增益调小再把音量调整到所需要的位置。调高增
益的同时需要相应的调低音量。
8 - 激励器开关 - 打开板载前级激励器,相当于在音箱前接上激励器单块。
4
5
6
7
9
8
11 10
www.laney.co.uk
5
Page 96

CUB-RANGE
CUB-SUPER12 FEATURES
USER MANUAL
13 12
9 -激励器(Boost) - 调节吉他信号进入第一个电子管的激励强度。调高此项可
使清音信号变成温暖的电子管失真,或在失真信号上加上自然压缩。
10 - BOOST LED
11 - 输入插口(INPUT SOCKET) - 15W & <1W输入。使用15W插口时,音箱将全
功率(15瓦)工作,使用<1W时,音箱以小于1瓦的输出功率工作,适合录音
或卧室练习时使用。
12 - 外接箱体(EXTERNAL SPEAKER) - CUB-SUPER12本身使用定制的8英寸HH
喇叭。如需要使用其他喇叭箱体可以通过喇叭线接入此处,请使用优质的
喇叭连线。当通过该接口使用其他喇叭箱体时,音箱自带的HH喇叭将自动
断开连接,请确保外接的喇叭箱体的阻抗在8-16欧姆之间。
13 - 效果环送出(FX LOOP SEND) - 此处接口应与外接效果器的输入(INPUT)相
连。请使用优质的带屏蔽的连线。该接口也可作线路输出(Line Out)使用。
14 - 效果环返送(FX LOOP RETURN) - 此处接口应与外接效果器的输出(OUT)连
接。请使用优质的带屏蔽的连线。
15 - 脚踏插口(FOOTSWITCH SOCKET) - 此处可接入控制脚踏,推荐FS2-Mini(
另购)。
14
15
16
16 - 电源插口(POWER SOCKET) - 此处接入电源线。
6
www.laney.co.uk
Page 97

CUB-RANGE
CUB-SUPERTOP FEATURES
USER MANUAL
1 3 4
2
1 - 输入插口(INPUT SOCKET) - 15W & <1W输入。使用15W插口时,音箱将全
功率(15瓦)工作,使用<1W时,音箱以小于1瓦的输出功率工作,适合录音或
卧室练习时使用。
2 - BOOST LED
3 - 激励器(Boost) - 调节吉他信号进入第一个电子管的激励强度。调高此项可
使清音信号变成温暖的电子管失真,或在失真信号上加上自然压缩。
4 - 激励器开关 - 打开板载前级激励器,相当于在音箱前接上激励器单块。
5 - 增益(Gain) - 控制吉他信号的增益/失真强度,与音量旋钮(2)一起使用。吉
他使用清音音色时可以把增益调小再把音量调整到所需要的位置。调高增
益的同时需要相应的调低音量。
6 - 低频(Bass) - 控制音箱的低频响应,在大音量的情况下你可能需要更少的低
频。在卧室使用时可在7-10之间调节
7 - 中频(Middle) - 控制音箱的中频响应,从4或5开始调节,把数值调低可使中
频下潜,把数值提高可以突出吉他的声音
8 - 高频(Treble) - 控制音箱的高频响应,从4或5开始调节,使音色更低沉或更
明亮.
5
6
7
8
9
10
11
www.laney.co.uk
7
Page 98

CUB-RANGE
CUB-SUPERTOP FEATURES
USER MANUAL
13 12
9- 混响(REVERB) - 控制板载混响效果的强度。CUB-SUPER12自带高品质弹簧
式混响,使用BCC-SECRET PATH混响效果器的算法引擎。
10 - 音量(Volume) - 控制音箱整体音量大小,与增益(5)旋钮一起使用
11 - 电源(Power)开关及指示灯- 音箱已接通电源并已可使用
12 - 电源插口(POWER SOCKET) - 此处接入电源线。
13 - 脚踏插口(FOOTSWITCH SOCKET) - 此处可接入控制脚踏,推荐FS2-Mini(
另购)。
14 - 效果环返送(FX LOOP RETURN) - 此处接口应与外接效果器的输出(OUT)连
接。请使用优质的带屏蔽的连线。
15 - 效果环送出(FX LOOP SEND) - 此处接口应与外接效果器的输入(INPUT)相
连。请使用优质的带屏蔽的连线。该接口也可作线路输出(Line Out)使用。
16 -外接箱体(EXTERNAL SPEAKER) - 如需要使用其他喇叭箱体可以通过喇叭
线接入此处,请使用优质的 喇叭连线。当通过该接口使用其他喇叭箱体
时,音箱自带的HH喇叭将自动断开连接,请确保外接的喇叭箱体的阻抗在
8-16欧姆之间。
14
15
16
www.laney.co.uk
8
Page 99

CUB-RANGE
USER MANUAL
技术参数
CUB-SUPER10
产品 吉他放大器
功率 10瓦
通道 单通道带激励,可脚踏控制
功能 音量
高频
中频
低频
增益
激励器开关
激励器
外接箱体插口
效果环/线路输出 送出
效果环返回
脚踏插口 (FS1-MINI)
扬声器 1 x 10 HH 定制扬声器
尺寸/mm 339x373x212 (HxWxD)
重量 9.6 Kg
包装尺寸 mm 430x440x27.5 (HxWxD)
包装重量 12.6 Kg
耗电功率 50W
CUB-SUPER10
In the interest of continued product develoment, Laney reserve the right to amend product specication without prior notice
www.laney.co.uk
9
Page 100

CUB-RANGE
USER MANUAL
技术参数
CUB-SUPER12
产品 吉他放大器
功率 <1瓦 - 15瓦
通道 单通道带激励,可脚踏控制
功能 音量
高频
中频
低频
增益
激励器开关
激励器
外接箱体插口
效果环/线路输出 送出
效果环返回
脚踏插口 (FS2-MINI)
扬声器 1 x 12 HH 定制扬声器
产品尺寸/mm 399x430x233 (HxWxD)
产品重量 11.7 Kg
包装尺寸mm 480x495x295 (HxWxD)
包装重量 15.5 Kg
耗电功率 50W
10
CUB-SUPER12
In the interest of continued product develoment, Laney reserve the right to amend product specication without prior notice
www.laney.co.uk
 Loading...