

Laney Audiohub AH-Freestyle User Manual

1). Read & Retain these Instructions carefully before installing or operating this product.
2). Comply with Warnings: All warnings and instructions for these products should be adhered to.
3). Unpacking: On unpacking your product please check carefully for any signs of damage that may have occurred whilst in transit from the Laney factory to your
dealer. In the unlikely event that there has been damage, please repack your unit in its original carton and consult your dealer. We strongly advise you to keep your
original transit carton, since in the unlikely event that your unit should develop a fault, you will be able to return it to you dealer for rectification securely packed.
4). Amplifier Connection: In order to avoid damage , it is advisable to establish and follow a pattern for turning on and off your system. With all system parts
connected, turn on source equipment, CD/MP3 players, mixers/recorders, etc, BEFORE turning on your guitar amplifier. Many products have large transient surges
at turn on and off which can cause damage to your speakers. By turning on your guitar amplifier LAST and making sure its level control is set to a minimum, any
transients from other equipment should not reach your loud speakers. Wait till all system parts have stabilised, usually a couple of seconds. Similarly when turning
off your system always turn down the level controls on your guitar amplifier and then turn off its power before turning off other equipment
5). Servicing: Refer all servicing to qualified service personnel. Servicing is required when the apparatus has been damaged in any way, such as when the DC Power
Supply is damaged, liquid has been spilled or objects have fallen into the apparatus, the apparatus has been exposed to rain or moisture, does not operate normally,
or has been dropped.
6).Placement: This electrical apparatus should not be exposed to dripping or splashing and care should be taken not to place objects containing liquids,
such as vases, upon the apparatus.
Do not install near any heat sources such as radiators, heat registers, stoves or other apparatus (including amplifiers) that produce heat. Do not block any
of the ventilation openings.
Use only with a cart, stand, tripod, bracket, or table specified by the manufacturer, or sold with the apparatus. When a cart is used, use caution when moving
the cart/apparatus combination to avoid injury from tip-over.
7). When using the DC power Supply: Only use the approved DC power supply provided by the manufacturer. Rating 12Vdc 500mA. Protected
by a 125°C thermal fuse.
Make sure that the line voltage at the installation matches the input voltage on the DC power Supply.
Protect the power cord on the DC power Supply from being walked on or pinched, particularly at plugs, convenience receptacles, and the point they exit
from the apparatus.(See notes on using the DC Power Supply page 6).
8). Batteries: Use only alkaline batteries (LR6) in the product. (See notes on fitting and replacing batteries page 6-7).
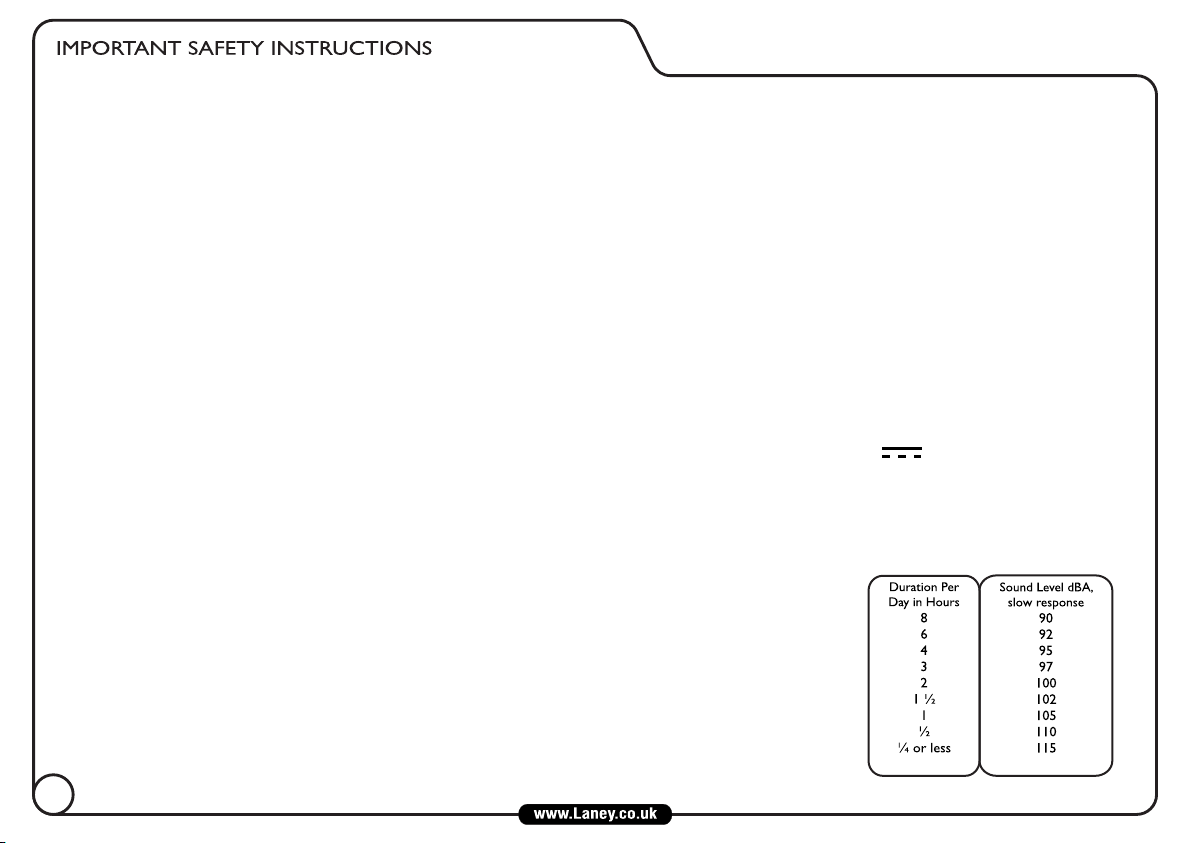
9).Sound Levels: Exposure to extremely high noise levels may cause a permanent hearing loss. Individuals vary
considerably in susceptibility to noise-induced hearing loss, but nearly everyone will lose some hearing if exposed to
sufficiently intense noise for a sufficient time.
The U.S. Government’s Occupational Safety and Health Administration (OSHA) has specified the following permissible
noise level exposures: According to OSHA, any exposure in excess of the above permissible limits could result in
some hearing loss. Earplugs or protectors to the ear canals or over the ears must be worn when operating this
amplification system in order to prevent a permanent hearing loss, if exposure is in excess of the limits as set forth
above. To ensure against potentially dangerous exposure to high sound pressure levels, it is recommended that all
persons exposed to equipment capable of producing high sound pressure levels such as this amplification system be
protected by hearing protectors while this unit is in operation.
10). Maintenance: Clean only with a dry cloth.
Care of your Laney amplifier will prolong it's life.....and yours!
2

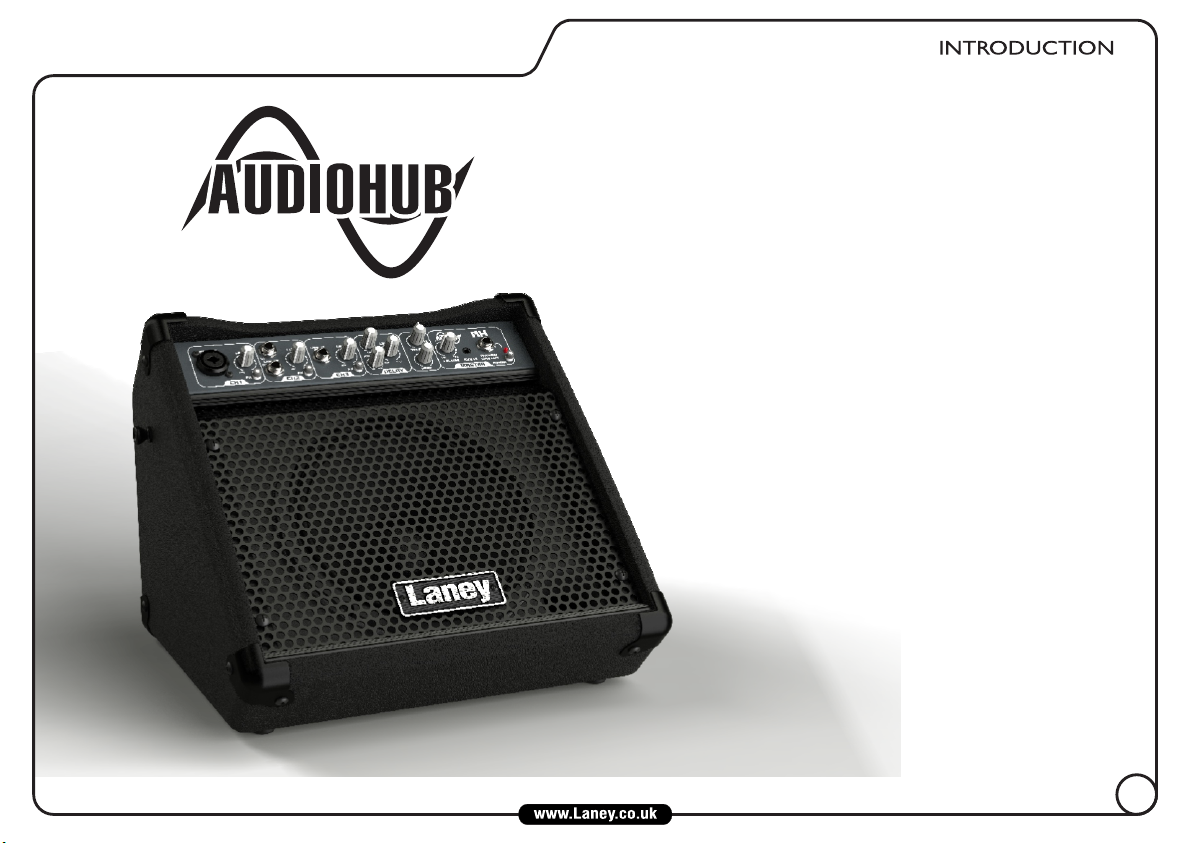
The Audiohub range of multi instrument amplifiers is designed to
be the centre of your audio world.
The portable AH-FREESTYLE, great for bedroom, practice or
busking, features 3 independent channels allowing connection
of balanced XLR, line and Hi-Impedance/Instruments, as well
as a dedicated Aux In.
The AH-FREESTYLE can be run from a wall mounted
mains adaptor, or from batteries in the rear
compartment. It is equipped with a delay unit with
Time and Feedback controls, and an FX send switch
on each channel.
Ideal for keyboards, vocals, electronic drums and
playing recorded audio, the Audiohub series
features custom drivers to ensure that
whatever sound source you use is produced
and projected correctly and clearly. Add to
this ‘Road Ruggedness,’ solid construction,
hard waring vinyl and a metal front Grille.
The AH-FREESTYLE is the ideal solution
for all of your audio performance and
rehearsal needs...wherever you are!
5
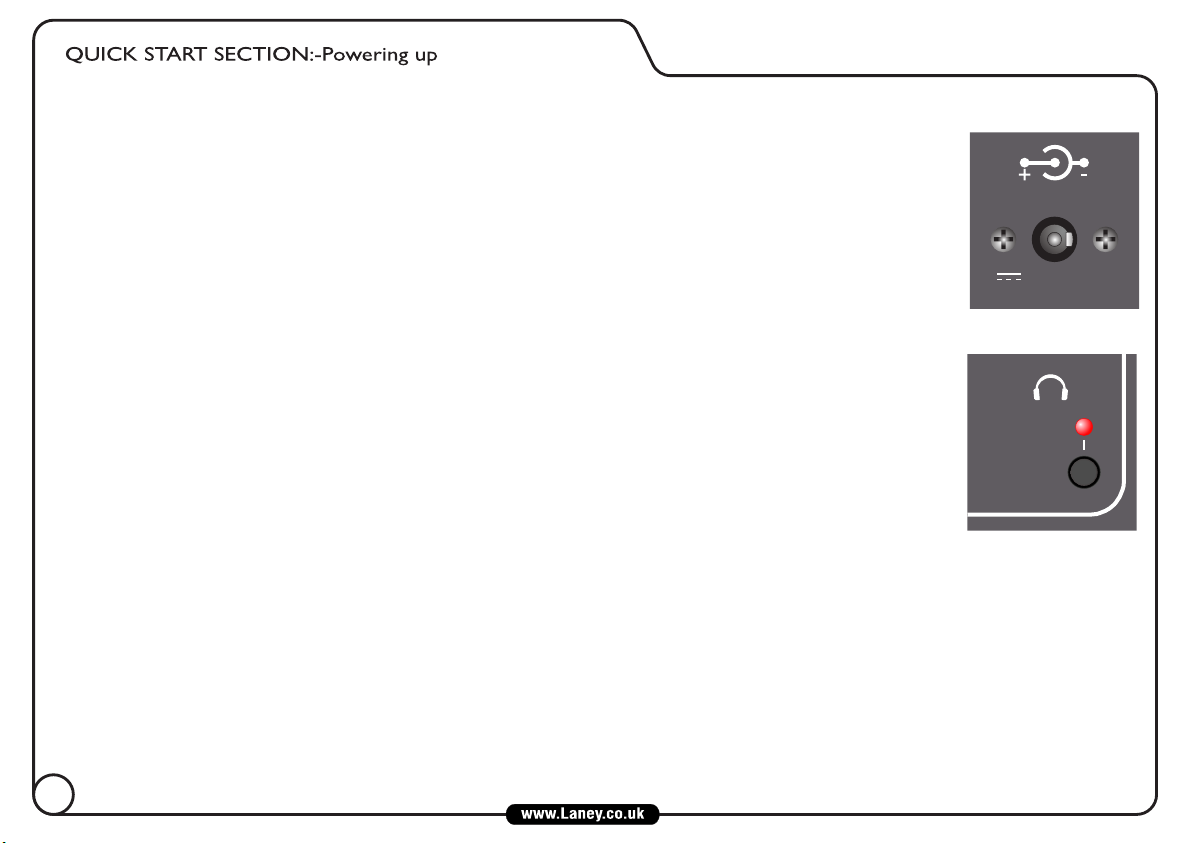
DC Power Supply: Your AH-Freestyle comes supplied with a 12V DC Power Supply, this is easily fitted
between the mains outlet and the amp. When using the amp with the power supply a few precautions should
be followed:
1). Only use the DC Power supply that is supplied by the manufacturer. The use of other DC Power Supplies
may cause damage or other problems.
2). Turn the power switch to OFF and disconnect any other attached devices, before plugging in and turning
ON the DC Power Supply.
3). When the DC Plug is connected to the socket, the battery compartment is isolated from the unit. Both
the DC Power Supply and the battery tray are independent of each other.
4). Although no harm will come to the batteries if left in place whilst the DC Power supply is being used, it
is recommended that they be removed. Use either one power source or the other.
REAR
5.5 x 2.1 mm
12V DC 500mA
Power Consumption 6W
FRONT
Batteries: The use of a DC Power Supply is recommended as the units main power source, however,
should you prefer to use batteries, use only Alkaline type (LR6).
Used continuously the batteries will last for approximately 40 hours. (This will vary greatly with the actual
conditions of use).
PHONES/
LINE OUT
POWER
As the batteries run down, the power indicator on the fascia panel will become dim when the battery power
is too low. Replace the batteries or revert to the DC Power Supply.
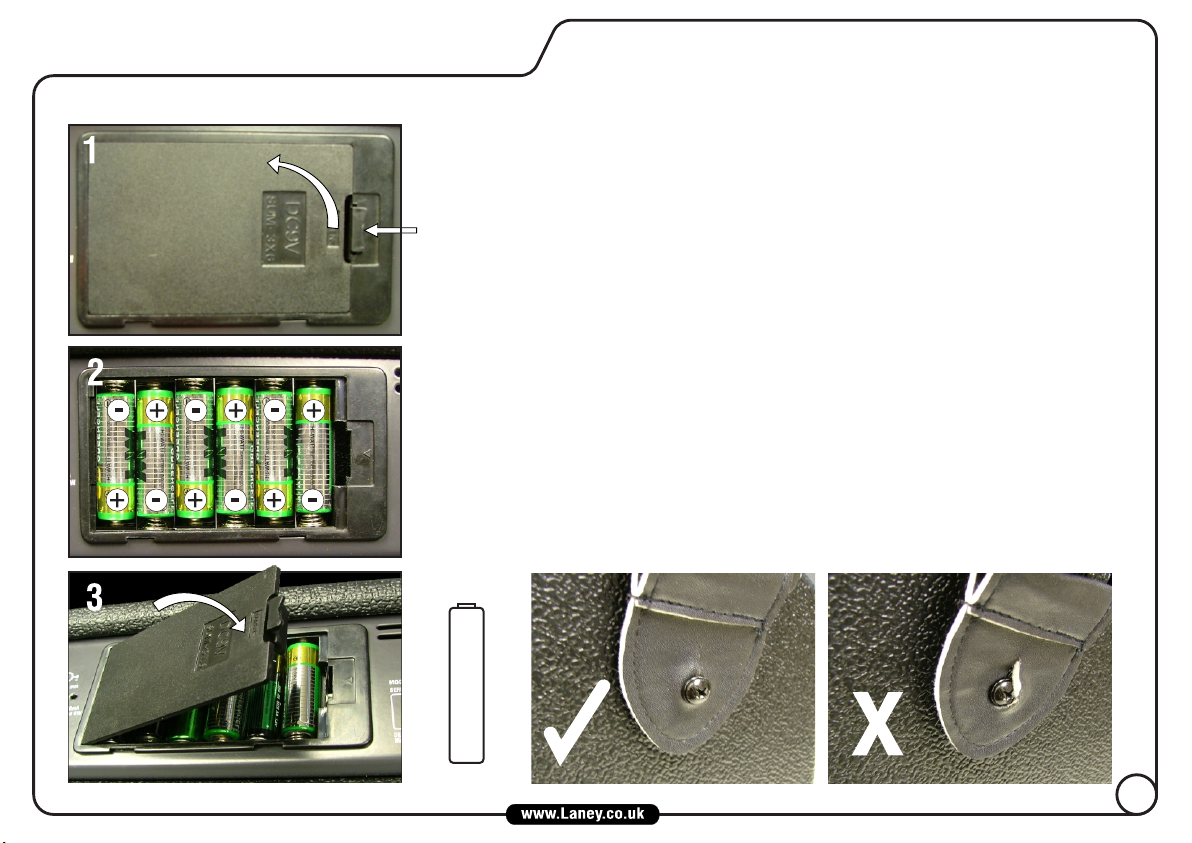
Fitting Batteries: When installing or replacing batteries, always turn the power switch to the OFF position and disconnect
any other devices you have may have connected. This prevents damage to your speaker and/or other devices. Follow the photo
sequence to fit a set of batteries.
1). Turn the amplifier around to access the battery tray that is located on the back the chassis, place the amp on a piece of felt
or cloth to avoid damage.
2). Push the catch to release, then lift out the lid of the battery tray and insert 6 AA batteries, ensure that the orientation is
correct to the legend on the tray.
3). When closing the lid of the battery tray, insert the tabs opposite the catch first, then push the lid down until a click is heard.
6
If used incorrectly batteries may leak or explode and cause damage or injury, please
take the following precautions.
1). Carefully follow the installation instructions for fitting new batteries, especially the
polarity.
2). Avoid mixing new batteries with old or part used batteries.
3). Avoid mixing battery types.
4). Do not try to recharge or take apart alkaline batteries.
5). Remove the batteries from the unit if it is not going to be used for a long time.
6). If batteries have leaked in the battery tray, remove the batteries and all traces of
the discharge from the tray. Use caution so that none of the discharge gets near the
skin or the eyes. Any affected areas should be immediately rinsed with cold running
water, seek medical advice,
7). Do not dispose of used batteries in fire or water systems. Batteries must not be
exposed to excessive heat such as sunlight, fire or the like.
8). Used batteries should always be disposed of in compliance with the current
regulations applicable to the country/region where you live.
Attaching the Strap: Attach the supplied strap to the buttons on each side of the
cabinet securely, so that it does not become detached causing damage or injury.
+
-
7
FRONT & REAR PANEL CONTROLS
10
MIC/LINE
LEVEL LEVEL LEVEL
MIN MAX MIN MAX
FX
1
)
(
L
LINE
)
(
R
2
LINE/INST
(HI-Z)
FX
MIN MAX
FX
TIME
FEEDBACK
LEVEL
MIN
TREBLE
MAX
BASS
MIN MAX
VOLUME
AUX IN
PHONES/
LINE OUT
POWER
9
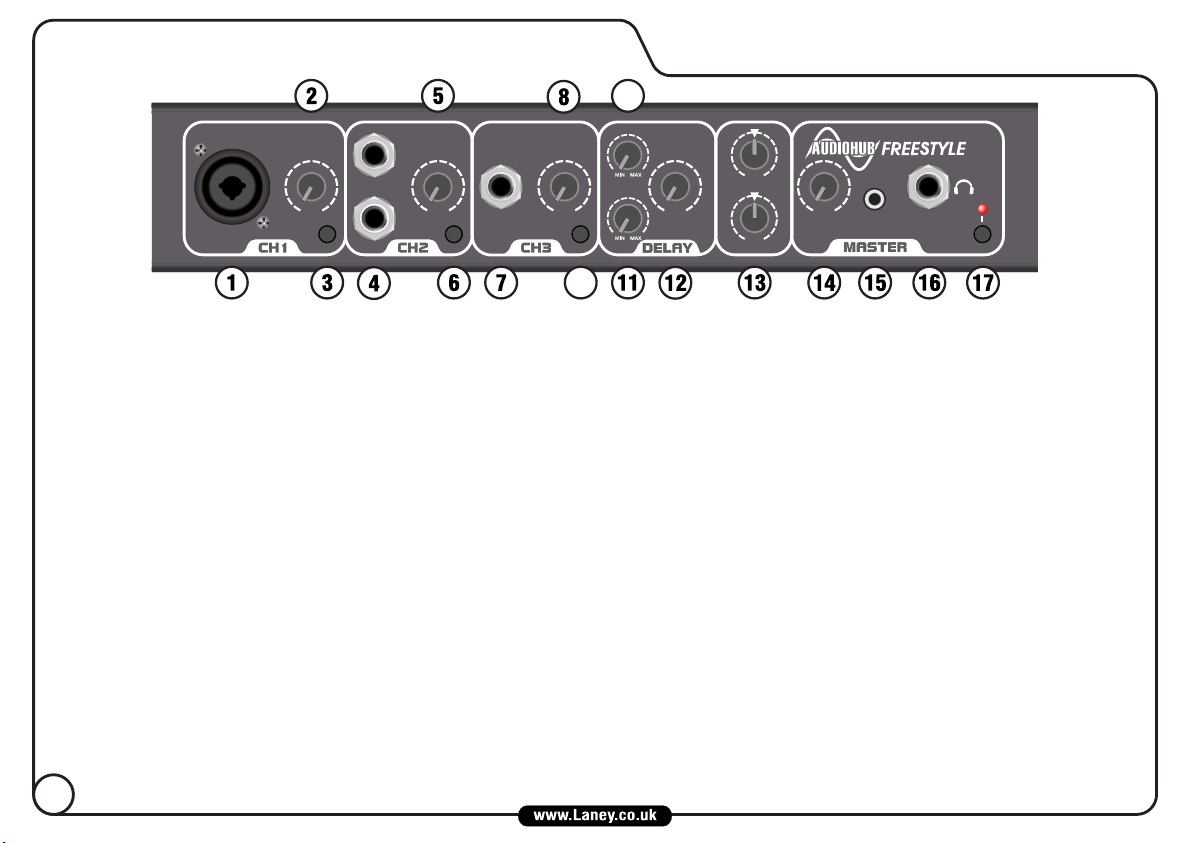
1. CH1 MIC/LINE INPUT: Combi Socket providing either a Balanced XLR input for low impedance microphone signals
(200-600 Ohms), or an Unbalanced Jack input socket for connection of all line level signals (keyboard, signal processor, sample,
drum machine, etc.).
2. CH1 LEVEL: Adjusts the channel level, enabling the user to balance levels across channels.
3. FX SEND: When pushed in, this switch routes the channel signal to the built in digital delay.
4. CH2 STEREO LINE INPUT: 2 x Unbalanced Jack sockets for connection of a stereo line signal. Sockets may also be
used to connect a single mono source, or two individual sources. When connecting independent sources, use the output
controls on your device to adjust the balance between the two signals. Active instruments may also be connected here.
5. & 6. CH2 LEVEL & FX: See CH 1 LEVEL & FX.
7. CH3 LINE/INSTRUMENT INPUT: Unbalanced high impedance input for connection of high impedance devices such
as electric guitars/basses, or regular line devices. This channel features +6dB gain compared to the other line inputs, so take
care if connecting a line level device here.
8. & 9. CH3 LEVEL & FX: See CH1 LEVEL & FX. As this channel has more gain than the other line inputs, don’t be
surprised if you find that you need to set this control lower than the others when using line level devices.
10. DELAY TIME Controls the amount of time between repeats of the inbuilt delay. Turning this control clockwise will
increase the delay time.
11. DELAY FEEDBACK This controls the amount of repeats in the inbuilt delay. Turning the control clockwise increases the
amount of repeats.
8
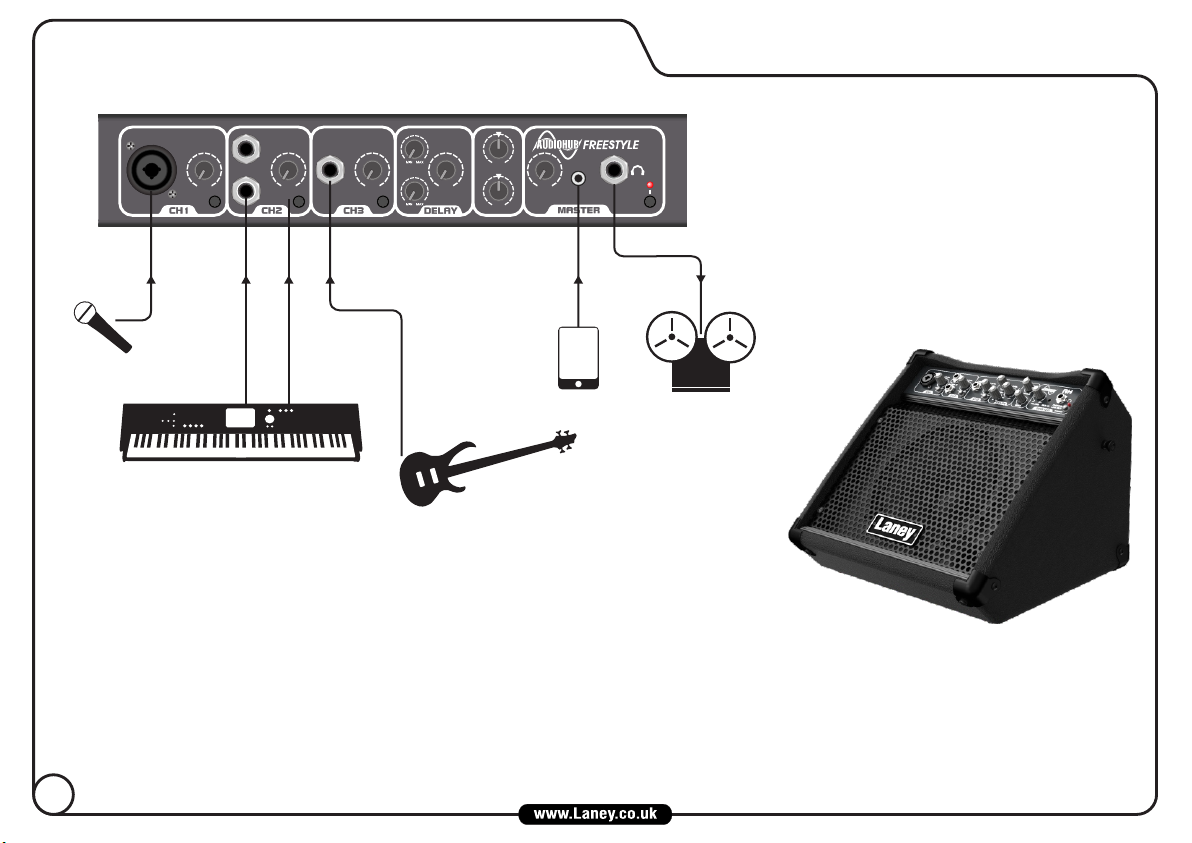
SAMPLE SETUP
MIC
MIC/LINE
LEVEL LEVEL LEVEL
(L)
LINE IN
(R)
MIN MAX MIN MAX MIN MAX
FX
LINE IN/
INST
FX
FX
TIME
FEEDBACK
MIN
LEVEL
TREBLE
BASS
MIN MAX
VOLUME
AUX IN
PHONES/
LINE OUT
POWER
MAX
MP3
RECORD OUT
KEYBOARD
BASS
SPECIFICATIONS
Power Supply 12V DC Power Supply or 6 “AA” size Batteries
Output Power Rating 5W
Loudspeaker Custom Designed 8” 8 Ohm Driver
Features 1 x Combi Skt (Balanced Mic XLR, Unbalanced Line jack)
1 x Stereo Unbalanced Line (2 x Jacks)
1 x Line/Hi-Z Instrument (Jack)
Headphones/Line out, Delay with timer, Feedback & Level controls.
Master Volume Level. AUX IN
Size (H*W*D) 314*360*278 Unit Weight 7Kg
Included Items DC Power Supply, Guitar Style Carry Strap
10
CONTROLES DEL PANEL FRONTAL
LZ B 1 2 3 4
10
MIC/LINE
LEVEL LEVEL LEVEL
MIN MAX MIN MAX
FX
1
)
(
L
LINE
)
(
R
2
LINE/INST
(HI-Z)
FX
MIN MAX
FX
TIME
FEEDBACK
LEVEL
MIN
TREBLE
MAX
BASS
MIN MAX
VOLUME
AUX IN
PHONES/
LINE OUT
POWER
9
1.CH1 MIC/LINE INPUT: El conector combinado proporciona una entrada balanceada XLR de baja impedancia para señal de micrófono (200-600 Ohms), o una de Jack
sin balancear para conectar cualquier señal de línea (teclado, procesador de señal, sampler, caja de ritmos, etc.).
2. CH1 LEVEL: Ajusta el nivel del canal, equilibrando los niveles independientemente para cada canal.
3. FX SEND: Cuando está pulsado éste conmutador envía la señal del canal a un delay digital.
4. CH2 STEREO LINE INPUT: 2 x conectores Jack sin balancear para señal estéreo. Los conectores pueden usarse para una fuente mono, o dos fuentes individuales.
Cuando la señal provenga de dos fuentes, utilice los controles de salida para ajustar el balance entre las dos señales. Esta entrada también admite instrumentos
activos.
5/6. CH2 LEVEL & FX: Mirar CH 1 LEVEL & FX.
7. CH3 LINE/INSTRUMENT INPUT: Entrada de alta ganancia para conectar dispositivos de alta ganancia tales como guitarras eléctricas/bajos o dispositivos de línea
normal. Este canal cuenta con un aumento de +6dB, con lo cual debe tener cuidado si conecta un dispositivo de línea aquí.
8/9. CH3 LEVEL & FX: Mirar CH1 LEVEL & FX. Como este canal tiene más ganancia que las otras entradas de línea, no se sorprenda si necesita poner este control más
bajo que otros si conecta aquí un dispositivo de señal.
10. DELAY TIME: Controla el espacio de tiempo entre las repeticiones del delay integrado. Gírelo en el sentido de las agujas del reloj para incrementar el tiempo del
delay.
11. DELAY FEEDBACK: Controla la cantidad de repeticiones del delay integrado. Gírelo en el sentido de las agujas del reloj para incrementar la cantidad de repeticiones.
12. DELAY LEVEL: Controla el nivel de mezcla del delay integrado. Use el delay para añadir atmósfera a su sonido, o crear interesantes efectos.
13. TREBLE & BASS: La ecualización es mejor usarla sutilmente. Cortando o añadiendo demasiado, o usando configuraciones extremas puede reducir la claridad y la
dinámica. El punto medio es un buen inicio.
14. MASTER VOLUME: Ajusta el nivel de salida general del amplificador o de los auriculares.
15. AUX INPUT: Entrada de Jack de 3.5mm para una fuente auxiliar como un reproductor Mp3.Esta entrada está controlada por el Volumen Master. La ecualización
afecta a la entrada auxiliar, pero el delay no.
16. PHONES/LINE OUT: Conector de auriculares estéreo. Desconecta el altavoz interno para que pueda practicar sin molestar. Asegúrese de que el volume está bajado
antes de conectar los auriculares. También es una salida balanceada para grabación o conexión a otro amplificador.
17. POWER SWITCH & LED: Interruptor principal de encendido ON/OFF del amplificador, el led iluminado significa encendido.
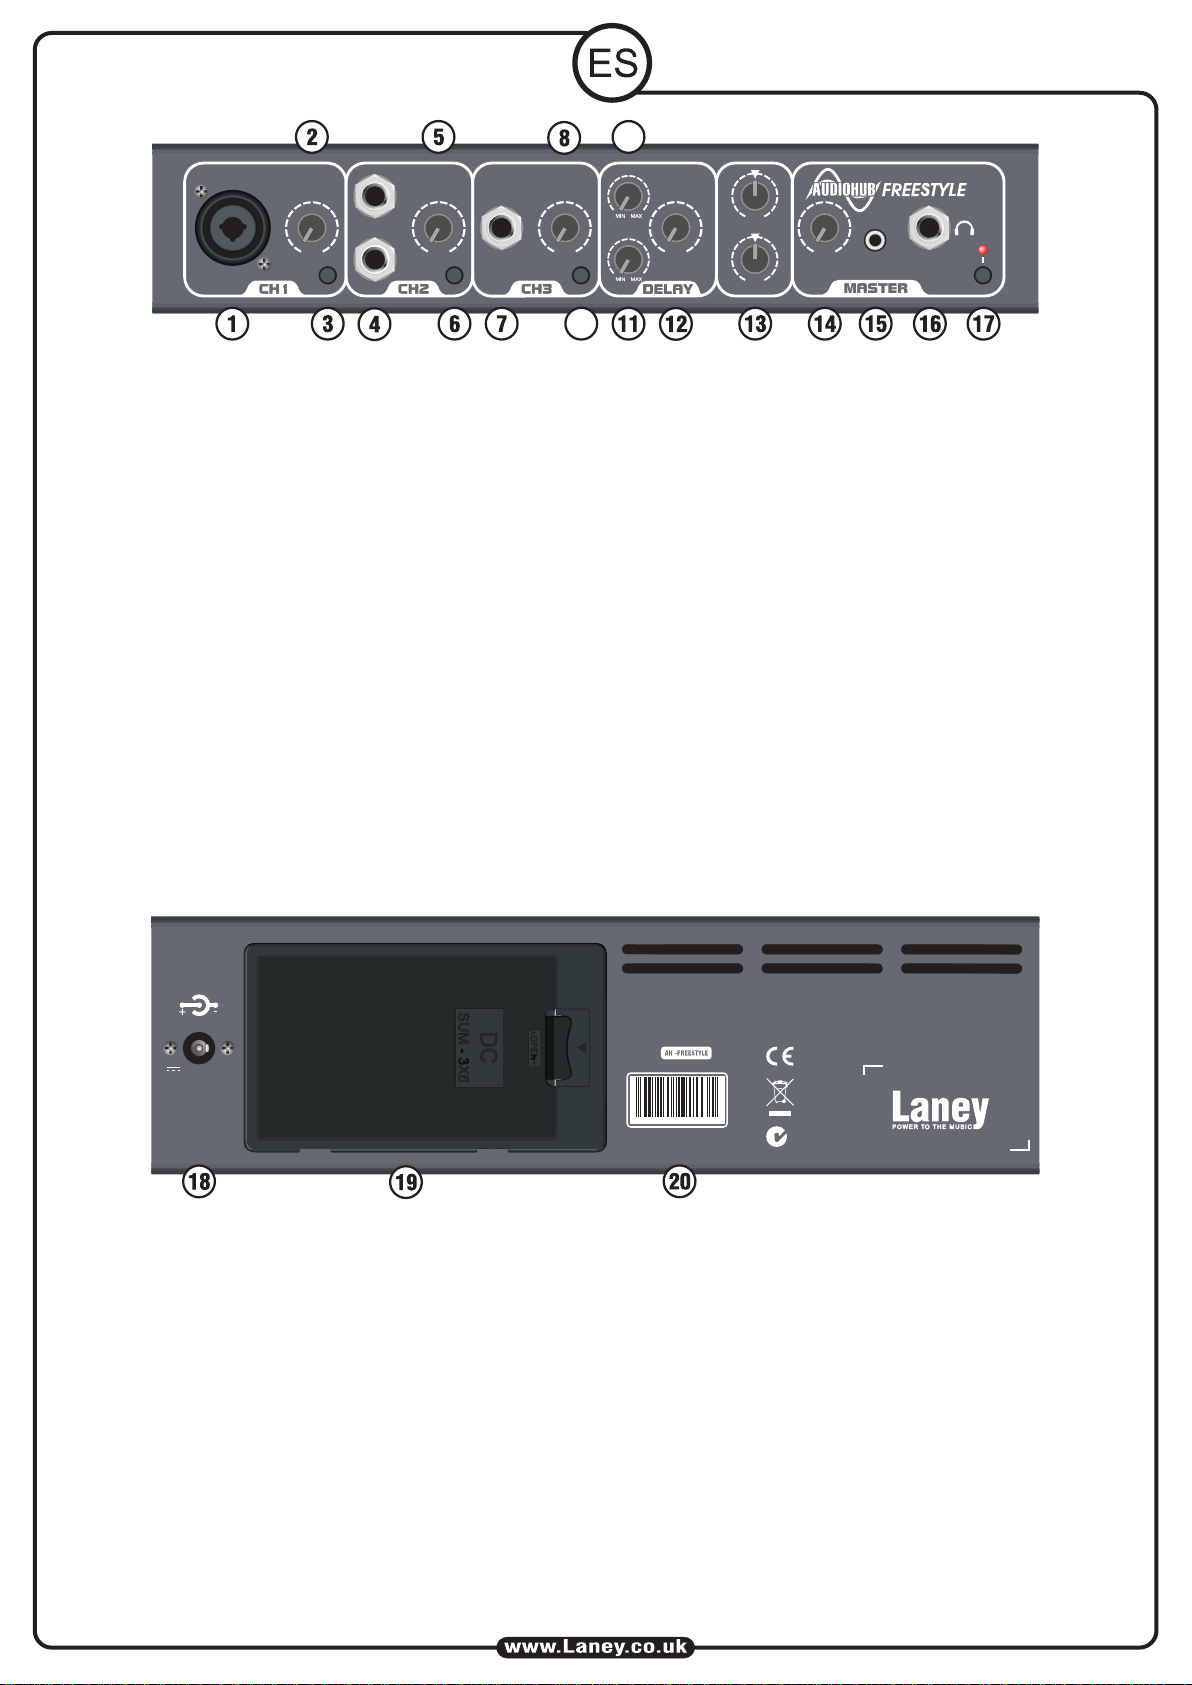
CONTROLES DEL PANEL TRASERO
5.5 x 2.1 mm
MODEL:
12V DC 500mA
Power Consumption 6W
18. CONECTOR DE CORRIENTE 12V DC: Úselo para conectar la fuente de alimentación incluida.
19. COMPARTIMENTO BATERÍAS: Úselo cuando quiera alimentar la unidad con baterías, introduzca 6 baterías alcalinas AA como se indica en las páginas 6 y 7.
20. NÚMERO DE SERIE: Modelo y número de serie del amplificador.
SERIAL NO:
DESIGNED AND ENGINEERED IN THE UK
MADE IN CHINA. FABRIQUE EN CHINE.
N1 503 9
www.laney.co.uk
 Loading...