

Page 1

A
ACOUSTIC
FrescoFrescoFresco
Page 2
WELCOME
Dear Player,
Thank you very much for purchasing your new Laney product and becoming part of the worldwide Laney family.
Each and every Laney unit is designed and built with the utmost attention to care and detail, so I trust yours will give you
many years of enjoyment.
Laney products have a heritage which stretches back to 1967 when I first began building valve amplifiers in my parents’
garage.
Since then we have moved on from strength to strength developing an extensive range of guitar, bass, public address, multi
instrument and keyboard amplification products along with a list of Laney endorsees that includes some of the world’s
most famous and respected musicians.
At the same time we believe we have not lost sight of the reason Laney was founded in the first place - a dedication to
building great sounding amplification for working musicians.
Warm Regards,
Lyndon Laney
Chairman and Founder.
2
Page 3
INTRODUCTION
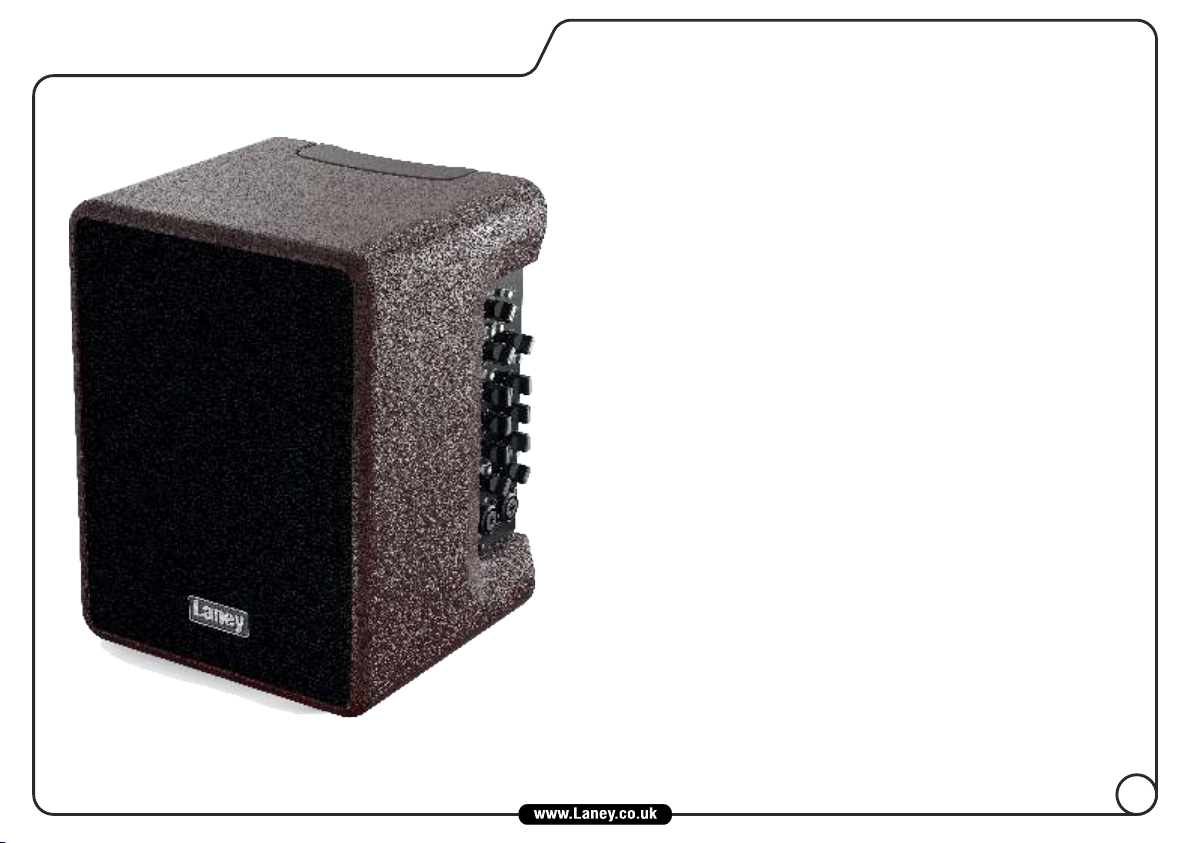
Welcome and thank you for choosing the A-FRESCO.
The A-FRESCO is a professional, compact and portable acoustic
guitar amplifier, powered via battery or via the included PSU and
dedicated to delivering a clean and clear amplified acoustic guitar
tone wherever you need it.
Whether in the studio, on stage or out-doors, the A-FRESCO
delivers every time.
The A-FRESCO was designed with complete portability in mind and
features a compact cabinet design and ergonomic carrying handle
plus a top hat for pole or tripod mounting. The A-FRESCO gives you
total freedom to play where you want indoors or out.
When you are out and about using a set of high quality fully charged
Lithium ION batteries the A-FRESCO can deliver up to 24hrs of
non–stop operation.
The A-FRESCO is equipped with two independent channels capable of
accepting either XLR or Jack inputs via the combi inputs so whatever
output system your acoustic guitar has the A- FRESCO has it covered.
Although designed primarily for acoustic guitar the A-FRESCO is
equally at home handling a keyboard or a vocal mic, making the AFRESCO ideally suited as a small PA system for party jams or street
performances.
Please continue to read the rest of this manual as it is the key to
getting the best out of your A-FRESCO.
3
Page 4

IMPORTANT SAFETY INSTRUCTIONS
1). Read & Retain these Instructions carefully before installing or operating this product.
2). Comply with Warnings: All warnings and instructions for these products should be adhered to.
3). Unpacking: On unpacking your product please check carefully for any signs of damage that may have occurred whilst in transit from the Laney factory to your
dealer. In the unlikely event that there has been damage, please repack your unit in its original carton and consult your dealer. We strongly advise you to keep your
original transit carton, since in the unlikely event that your unit should develop a fault, you will be able to return it to you dealer for rectification securely packed.
4). Amplifier Connection: In order to avoid damage , it is advisable to establish and follow a pattern for turning on and off your system. With all system parts
connected, turn on source equipment, CD/MP3 players, mixers/recorders, etc, BEFORE turning on your guitar amplifier. Many products have large transient surges at
turn on and off which can cause damage to your speakers. By turning on your guitar amplifier LAST and making sure its level control is set to a minimum, any transients
from other equipment should not reach your loud speakers. Wait till all system parts have stabilised, usually a couple of seconds. Similarly when turning off your system
always turn down the level controls on your guitar amplifier and then turn off its power before turning off other equipment
5). Servicing: Refer all servicing to qualified service personnel. Servicing is required when the apparatus has been damaged in any way, such as when the DC Power
Supply is damaged, liquid has been spilled or objects have fallen into the apparatus, the apparatus has been exposed to rain or moisture, does not operate normally, or has
been dropped.
6).Placement: This electrical apparatus should not be exposed to dripping or splashing and care should be taken not to place objects containing liquids, such as
vases, upon the apparatus.
Do not install near any heat sources such as radiators, heat registers, stoves or other apparatus (including amplifiers) that produce heat. Do not block any of the
ventilation openings.
Use only with a cart, stand, tripod, bracket, or table specified by the manufacturer, or sold with the apparatus. When a cart is used, use caution when moving the
cart/apparatus combination to avoid injury from tip-over.
7). When using the DC power Supply: Only use the approved DC power supply provided by the manufacturer. Rating 12VDC 3A. Protected by a
125°C thermal fuse.
Protect the power cord on the DC power Supply from being walked on or pinched, particularly at plugs, convenience receptacles, and the point they exit from
the apparatus.(See notes on using the DC Power Supply page 5).
8). Batteries: Use alkaline batteries or in the product. (See notes on fitting and replacing batteries page 12).Li-ion
9).Sound Levels: Exposure to extremely high noise levels may cause a permanent hearing loss. Individuals vary considerably in susceptibility to noise-induced
hearing loss, but nearly everyone will lose some hearing if exposed to sufficiently intense noise for a sufficient time.
The U.S. Government’s Occupational Safety and Health Administration (OSHA) has specified the following permissible
noise level exposures: According to OSHA, any exposure in excess of the above permissible limits could result in some
hearing loss. Earplugs or protectors to the ear canals or over the ears must be worn when operating this amplification
system in order to prevent a permanent hearing loss, if exposure is in excess of the limits as set forth above. To ensure
against potentially dangerous exposure to high sound pressure levels, it is recommended that all persons exposed to
equipment capable of producing high sound pressure levels such as this amplification system be protected by hearing
protectors while this unit is in operation.
10). Maintenance: Clean only with a dry cloth.
11). Pole Stand: Don’t over-extend poles/tripods; ensure at least 4 x the diameter is still inside the outer pole.
Make sure the legs have a good splay on the tripod, but do not obstruct doorways or other access-ways. Ensure the unit
is stable and cannot fall over.
Care of your Laney amplifier will prolong it's life.....and yours!
4
Page 5
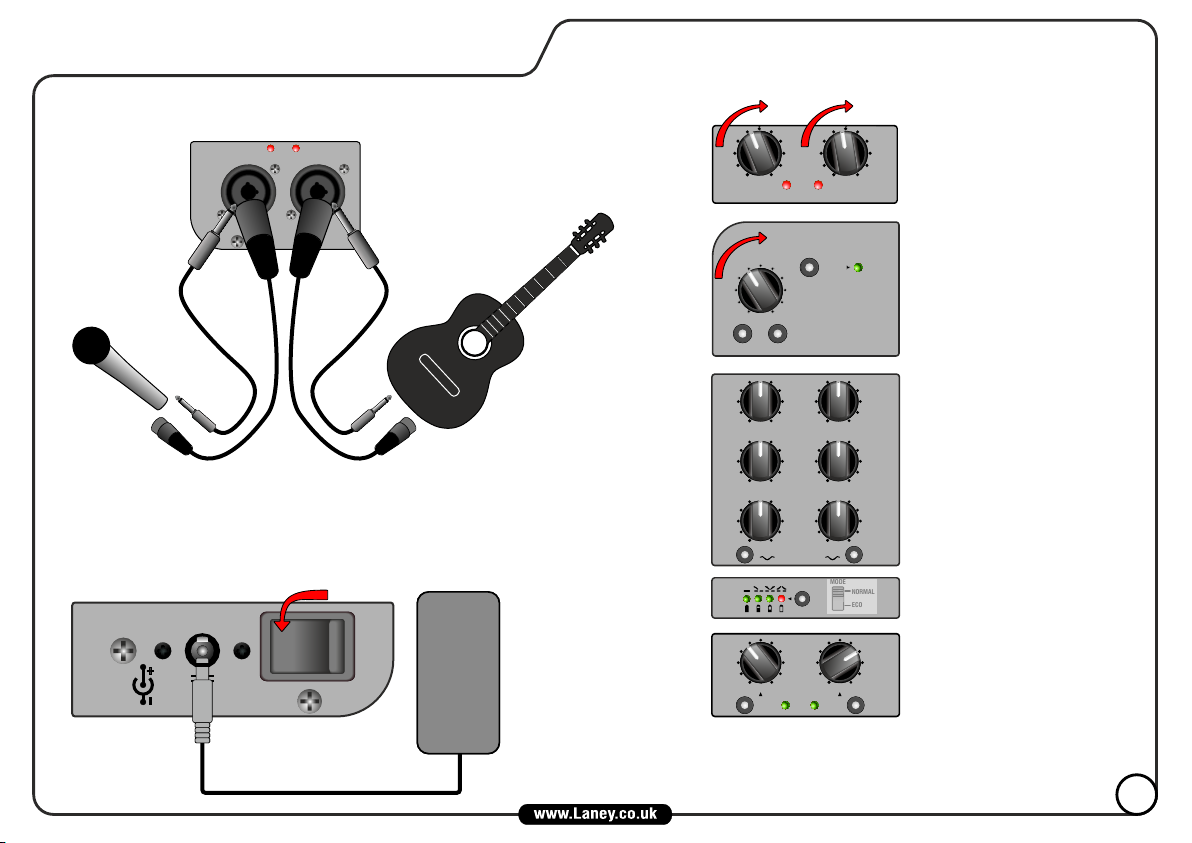
QUICK START
1. CONNECT
PEAK
CH1 CH2
Instrument
Microphone
Guitar, ukulele, banjo,
mandolin or violin for
example.
2. POWER-UP
For battery power options, please see pages 10-11 before continuing.
The Power switch located on the Rear panel will bring the A-Fresco to life.
Power Consumption 36W
12V DC 3A
5.5 x 2.1mm
|
POWER
0
3. SET LEVELS
4. ADD EQ
5. ADD EQ
100 100
CH1 CH2
VOLUMEVOLUMEVOLUME
10
0
1010
00
ANTI-FEEDBACKANTI-FEEDBACKANTI-FEEDBACK PHASEPHASEPHASE
0
-5
+5
0
-5
+5
0
-5
+5
SHAPE
100 100
CHR ADJ CHR ADJ
CHORUS CHORUS
LEVEL
PEAK
ACOUSTIC
ACOUSTICACOUSTIC
TREBLE
MIDDLE
BASS
REVERB
EQ
AAA
( )
BATTERY
MUTEMUTEMUTE
FrescoFrescoFresco
0
-5
0
-5
0
-5
SHAPE
MODE
HOLD
Slowly increase the Level
control until the Peak led
begins to flash during the
loudest peaks of the music.
Increase the Volume control
until the required listening
POWERPOWERPOWER
level is achieved.
Fine tune your sound with
the 3-band EQ and Shape
+5
control, add to the overall
tone with Cabinet EQ (17),
or experiment with a
+5
+5
NORMAL
ECO
mixture of the three.
If required, add independently
assignable Chorus and
Reverb.
12V/3A included DC power supply.
5
Page 6

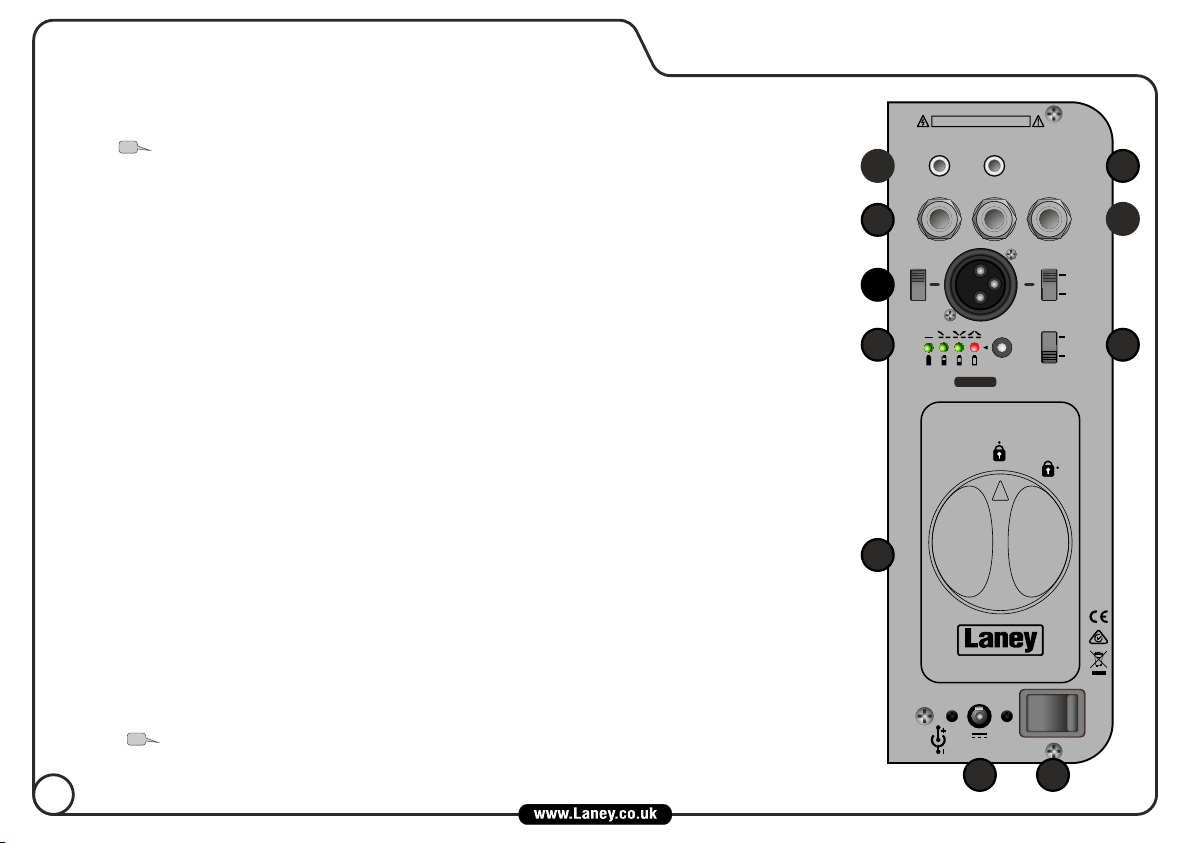
FRONT PANEL CONTROLS
1. CH1/CH2 MIC/LINE INPUT: Combi sockets provide the flexibility to connect either a
balanced XLR or unbalanced jack terminated cable. Set Level control (2) to minimum before
connecting a device to the Mic/Line inputs. For best results, always use a good quality instrument/mic
cable.
Phantom Power (15V non switchable) is available from the XLR Inputs only. This is for
TIP
use with condenser microphones, but dynamic mic’s won’t be damaged if used.
VOLUME
0
MUTE
POWER
10
2. LEVEL/PEAK: Use together to find the optimum level for your signal. Adjust the Level so the
Peak only lights during the very highest peaks of the connected signal.
Peak illuminates constantly = possible distortion. Damage won’t occur to the amplifier,
TIP
but audio quality may suffer.
Peak is never illuminated = slightly reduced signal to noise ratio as amplifier is not
TIP
running at optimum levels.
3. SHAPE: Engages an EQ circuit to give a brighter, more extended top end and scooped mid to
provide more definition.
4. EQ: A traditional set of tone controls giving the player a natural set of tools to shape their ideal
sound. As a starting point, set the EQ controls to the 0 position.
5. CHORUS: To engage the Chorus press the Chorus switch. The adjacent LED lights only when the
effect is active. To adjust the chorus amount, press and hold the Chorus switch (while the chorus is
active) and adjust using the Reverb control. Once you release the Chorus switch, the LED will briefly
flash to indicate the setting has been stored.
TIP
The amplifier is shipped with a Chorus level of 3.
6. REVERB LEVEL: Use these to independently control the reverb/chorus for channels 1 and 2.
The Reverb Level increases progressively as you move the control from 0 to 10.
TIP
Also controls Chorus Level (when the Chorus button is pushed down).
6
6
5
4
3
2
1
ANTI-FEEDBACK PHASE
100 100
CHR ADJ CHR ADJ
CHORUS
0
-5
+5
0
-5
+5
0
-5
+5
SHAPE
100 100
CH1 CH2
REVERB
TREBLE
MIDDLE
BASS
LEVEL
PEAK
CHORUS
-5
-5
-5
SHAPE
0
+5
0
+5
0
+5
Page 7

Audio feedback is caused when a loop occurs between a
microphone or guitar pickup and the loudspeaker. Commonly
caused by pointing a microphone at a speaker or simply by the
Amp
two being too close. The result is an unpleasant screeching or
whistling sound. The A-Fresco is equipped to deal with this.
7. ANTI-FEEDBACK: When the Anti-Feedback control is enabled the A-Fresco actively and
automatically searches for signs of feedback (over multiple frequencies) and greatly reduces the
possibility of it before becoming a serious problem.
TIP
It is recommended that Anti-Feedback is enabled if acoustic guitars or microphones are
connected.
8. Switches the phase of the signal from the amplifier. When you play any acoustic guitar PHASE:
the sound it produces is a waveform, the same applies to an acoustic guitar plugged into an acoustic
amplifier. It is not uncommon for these two waveforms to be out of phase with each other. To a
player sat close to an amplifier this poses a small problem if the wave forms are out of phase as they
are destructive to each other and cancel each other out. This would cause the guitar to sound a little
thin and lack-lustre. Engaging the phase switch switches the phase of the amplified signal removing the
problem of destructive interference. However sometimes the low frequencies being in phase can
cause acoustic feed back problems, to avoid this try operating the phase reversal switch. Most times
this will cure the problem. One thing to point out is that the audience does not hear any phase
problems as by the time the sound wave reaches them any phase differences have been cancelled out
naturally.
9. VOLUME: To control the overall output level from Phones, FX Send, D.I. Out and Speakers.
10. MUTE: This will mute Inputs 1 and 2, but not signals connected to AUX IN or FX RETURN.
TIP
The Power Led will flash when the Mute is enabled.
11. POWER: Illuminates when the Power Switch is set to on.
FRONT PANEL CONTINUED
10
8
7
9
VOLUME
0
10
ANTI-FEEDBACK PHASE
100 100
CHR ADJ CHR ADJ
CHORUS
0
-5
+5
0
-5
+5
0
-5
+5
SHAPE
100 100
CH1 CH2
REVERB
TREBLE
MIDDLE
BASS
LEVEL
PEAK
MUTE
CHORUS
-5
-5
-5
SHAPE
11
POWER
0
+5
0
+5
0
+5
7
Page 8
REAR PANEL CONTROLS
12. PHONES: For silent practice or late night playing just connect your favourite headphones to the 3.5mm
jack socket.
TIP
When headphones are connected, the internal loudspeakers are automatically turned off.
13. AUX IN: Play along to your favourite tracks by connecting a MP3 player (or any other line level device)
using a stereo 3.5mm jack. (See sleep mode disable page 11)
14. FX LOOP: Gives you the option to route the pre-amp signal through an additional FX unit. This could
be in addition to or as an alternative to the onboard FX.
15. REMOTE: Connect an FS2-Mini (2-way) foot switch and independently control Reverb and Chorus
remotely.
Ring: Chorus
Tip: Reverb
16. D.I. OUT: This socket provides a balanced output for direct injection of the amplifier signal into a
mixing desk mic input. Using the Source switch, choose if the signal is Pre or Post EQ, FX and Mute. Refer to
the block diagram on page 13.
Finally, a ground lift switch is also provided to reduce the possibility of earth loop induced hum (when
connecting to other equipment).
Note: the DI out level is nominal 500mV, depending on your equipment you may have to use
a pad on the input to avoid overloading.
17. EQ: This dual function switch allows you to select one of four pre-defined EQ curves allowing you to
adjust the tonal balance. To toggle from one to the next simply press the switch momentarily. An adjacent
LED will clearly indicate what’s selected. The EQ setting will be stored in memory, ready for use next time.
Flat: General purpose EQ setting - ideal for floor use.
Bass: An increase in the low frequency content of your audio. Use when the A-Fresco is pole mounted to
compensate for bass loss.
Loud: An increase in both low and high frequencies. Ideal for pole mounted use with added definition.
Vocal: Decreases the amount of bass and emphasises the vocal content. Also ideal for outdoors.
BATTERY MONITOR: Press and hold the Mode switch (for around a second) the EQ LEDS reconfigure
to indicate the available/remaining battery life. The battery meter will display for as long as you hold the
switch.
TIP
For the most reliable battery level check, there shouldn’t be any sound from the speakers. This
could be done by turning down input level, disconnecting/muting input signals or by turning the
Master Volume (9) to minimum.
8
ATTENTION - RISQUE DE DÉCHARGE ÉLECTRIQUE, NE S'OUVRE PAS
PHONES
12
FX SEND REMOTE
14
GND
16
GND
LIFT
17
FULL
MODEL
DESIGNED AND ENGINEERED IN THE UK BY LANEY
19
Power Consumption 36W
MADE IN CHINA. FABRIQUE EN CHINE.
CAUTION - RISK OF ELECTRIC SHOCK DO NOT OPEN
AUX IN
FX RETURN
EQ
A-FRESCO
BATTERY
12V DC 3A
5.5 x 2.1mm
20
D.I. OUT
HOLD
( )
BATTERY
|
POWER
TIP - REVERB
RING - CHORUS
SOURCE
MODE
21
PRE
POST
NORMAL
ECO
13
15
18
0
Page 9

REAR PANEL CONTINUED
18. POWER MODE: A-Fresco The comes equipped with two power modes:
Normal: Maximum output level available and intended for use with DC supply, or Li-Ion cells.
ECO: Reduced output level aimed at prolonged battery life for use with Li-Ion or Alkaline cells.
Intelligent Power Switching: Works to provide best sound quality whilst also conserving battery life - normal mode only.
Sleep mode: In either power mode, the amplifier will enter a sleep state after a short period of inactivity to conserve battery life. As soon
as signal is detected at channel 1 or 2 inputs, the amplifier will wake instantly without missing a beat.
Sleep mode over-ride: You may temporarily over-ride the sleep mode by pressing and holding the EQ button (17) for one second whilst
turning the power on. The four EQ LED’s will illuminate then extinguish to confirm sleep over-ride is active and will remain active until the
power is turned off and on.
TIP
Use this mode when signal is connected to the Aux input only, ie no signal connected to CH1 or CH2 or when you never wish
the A-fresco to enter a sleep mode.
19. BATTERY COMPARTMENT: The A-Fresco comes with a quick release (no tools required) supporting two battery power pack
types, allowing you to choose which best suits your needs. For more information on battery use, please see pages 10-11.
20. DC INLET: The A-Fresco comes supplied with a high quality universal 12V Power Supply unit which will work around the world with
all regional mains voltages.
TIP
If the DC adaptor is used any batteries are isolated and not charged. To avoid possible damage, please use supplied PSU only!
21. POWER: The main power switch for the unit.
POWER OPTIONS:
The A-Fresco can be powered using four possible methods. We recommend using the included mains adapter if at all possible for best
performance. Other options in order of best performance are:
N1503 9
1. - Mains power using DC adaptor
2. - 4*18650 Li-Ion batteries
3. - 12V D.C. power bank (12V/3A Min)
4.- 8*AA batteries
1
2
3
4
9
Page 10
BATTERY TYPES
1. 4* Lithium-ion 18650 cells offer the best performance and are recommended.
Constant high discharge rate recommended at 6A or above, with a 3AH or greater
capacity for best life. We recommend quality, Self-resetting batteries with a high trip
current. Please note, Lithium batteries must be the protected, button top type;
unprotected cells must never be used in this product and could pose a severe fire
risk.
Lithium batteries are not all created equally, many are sub-standard with very low or
inconsistent protection levels. Sub-standard batteries could affect the performance of
the A-Fresco or reduce the run time, or both! In some circumstances, these substandard batteries may also trigger the batteries own protection circuit too early,
The following Lithium batteries have been tested and
found to work acceptably in this product
* Batteries not included.
Type
Brand
Samsung
Keeppower
Enerpower
Panasonic
NCR18650
XTAR
3400mAH(Black)
NCR18650B
EVVA
NCR18650 (Black)
NCR18650B (Blue)
NCR18650B (Green) (MH12210)
making the A-Fresco appear to shutdown. Always use the best high quality batteries!
Battery Pack Optional Accessory: BP-18650 : (4*18650 batteries and charger)
2. 8*AA alkaline (LR6) or 8*NiMH (CR6) cells can be used, but are not recommended for best performance
Most AA cells cannot provide the necessary power levels for constant full power use in Normal mode and are best used in ECO mode
or at modest listening levels, or for vocals.
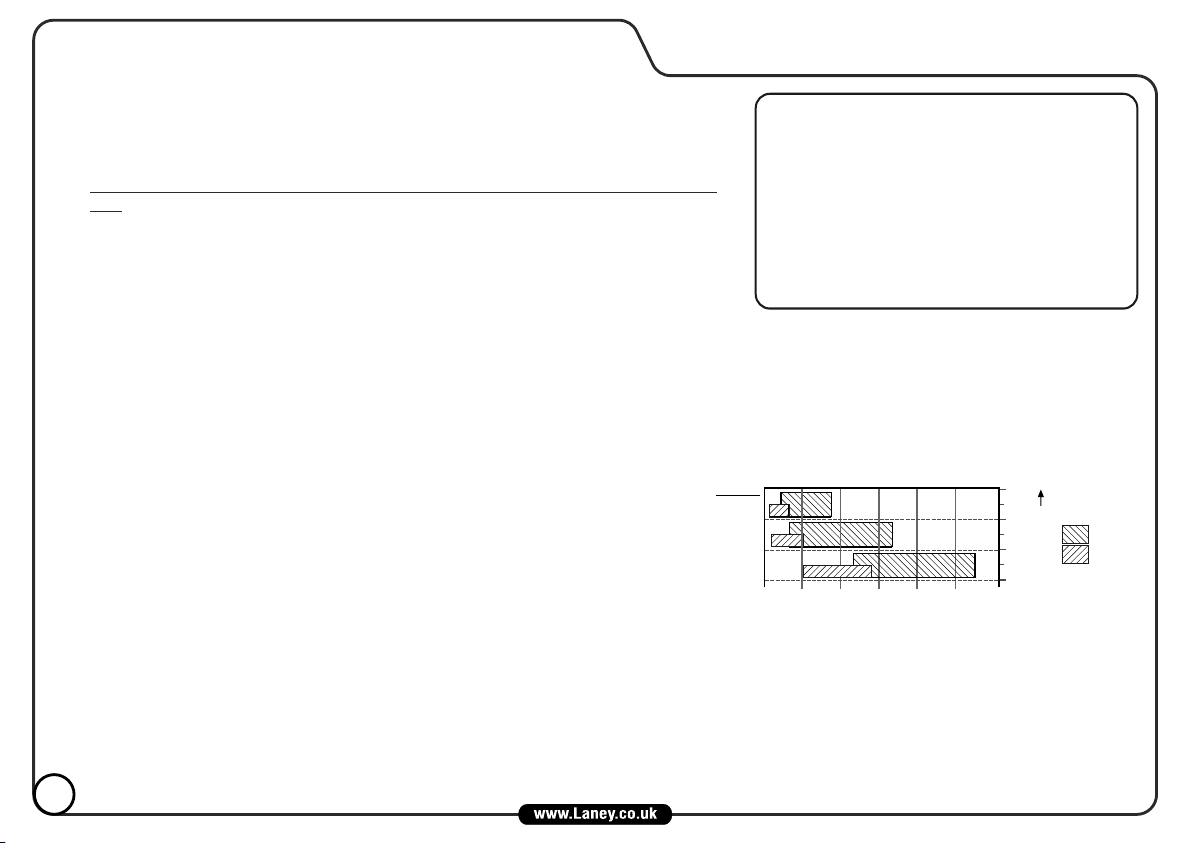
About the batteries:
The table to the right is intended to give you an idea of the usage time for your
battery choice. This is a guide only as battery life is determined by many factors.
BATTERY SAFETY:
If used incorrectly batteries may leak or explode and cause damage or injury, please
Operating Mode
Normal
Normal
ECO
0
Typical Battery Life (Hours)
5
10 15 20 25 30
Maximum
Normal
Quiet
Battery Type
Li-Ion
AA
Listening Level
take the following precautions.
1: Avoid mixing new batteries with old or part used batteries.
2: Avoid mixing different types of batteries.
3: Do not try to recharge or take apart alkaline batteries.
4: Remove the batteries from the unit if it is not going to be used for a long time.
5: If batteries have leaked in the battery tray, remove the batteries and all traces of the discharge from the tray. Use caution so that none of
the discharge gets near the skin or the eyes. Any affected areas should be immediately rinsed with cold running water, seek medical advice.
6: Do not dispose of used batteries in fire or water systems. Batteries must not be exposed to excessive heat such as sunlight, fire or the like.
7: Used batteries should always be disposed of in compliance with the current regulations applicable to the country/region where you live.
10
Page 11

BATTERIES - FITTING AND REPLACING
1.
|
POWER
0
1b.
1c.
2.
Recommended:
4* Lithium-ion (Li-ion)
8* AA alkaline or
NiMH re-chargable.
18650 protected.
3a. 3b. 3c.
1a: Turn off the power to the A-Fresco.
1b: Turn the release mechanism clockwise and
carefully slide the power pack out of the unit.
1c: Before removing the battery pack, unlock by
turning the release mechanism anti-clockwise.
2: Load your chosen battery holder with cells
taking special care with battery polarity.
When reinserting the 18650 or AA battery
pack, please note the orientation.
TOP
THIS END
OUT,
FACING
CONTACTS
SEE USER
MANUAL FOR
RECOMMENDED
18650 CELLS
TOP
THIS END
OUT, FACING
CONTACTS
SEE USER MANUAL FOR
RECOMMENDED
AA CELLS
3a: Insert the battery holder into the power
pack and click into place.
3b: Slide the power pack into the A-Fresco.
11
3c: Set the release mechanism to the lock
position.
Page 12
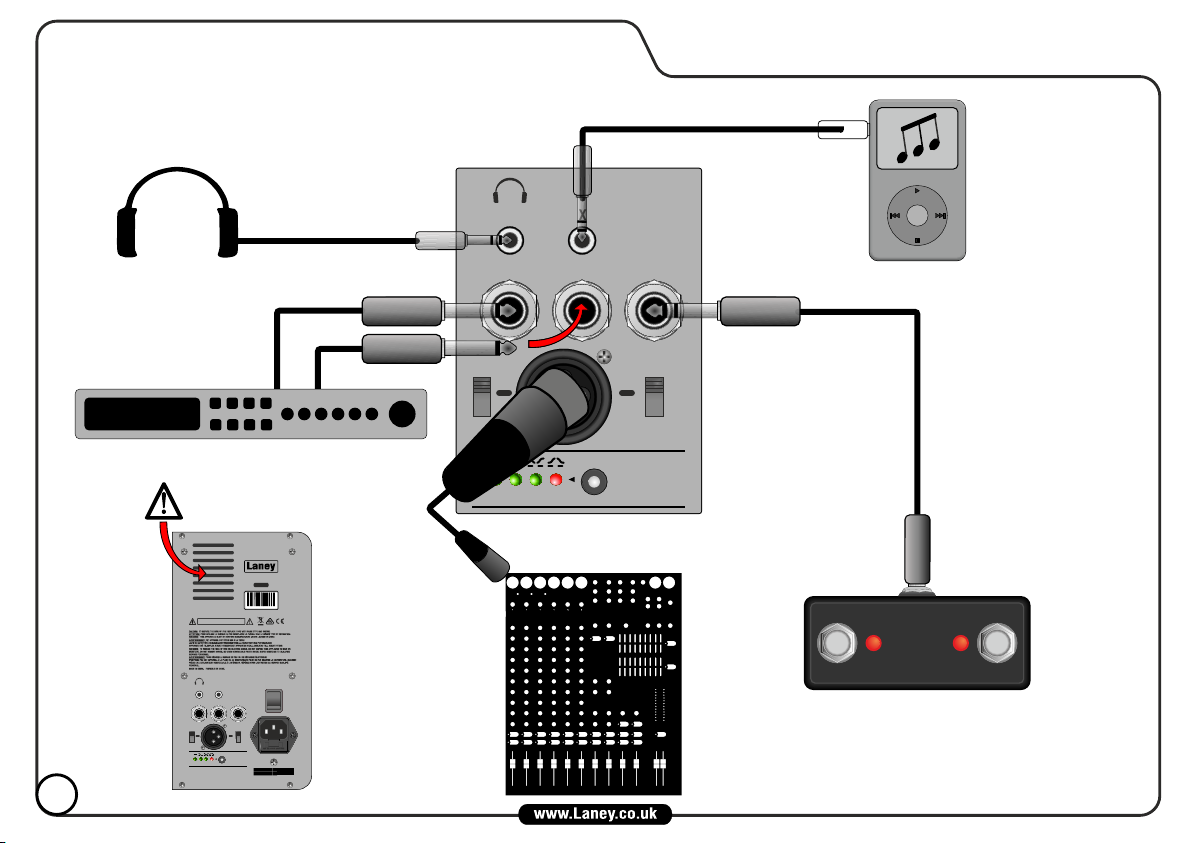
SAMPLE SETUP
Here are some ideas for what you could connect to your A-Fresco:
12
Headphones
External FX
Do Not Cover Vent On Rear Panel.
CAUTION - RISK OF ELECTRIC SHOCK DO NOT OPEN
ATTENTION - RISQUE DE DÉCHARGE ÉLECTRIQUE, NE S'OUVRE PAS
PHONES
FX RETURN
FX SEND
GND
GND
LIFT
AUX IN
TIP - REVERB
RING - CHORUS
REMOTE
SOURCE
D.I. OUT
CABINET
EQ
MODEL
A-DUO
SERIAL NUMBER
L
Z
B
1
2
3
4
DESIGNED AND ENGINEERED IN THE UK
POWER
PRE
POST
100V,115V~
220V,230V,240V~
SUPPLY VOLTAGE & FUSE RATING
POWER CONSUMPTION
100 WATTS 50/60Hz
T3.15A L 250V
PHONES
FX SEND
GND
GND
LIFT
AUX IN
FX RETURN
RING - CHORUS
REMOTE
D.I. OUT
CABINET
EQ
TIP - REVERB
SOURCE
Phone/MP3
PRE
POST
Mixer
|
0
T1.6A L 250V
(External devices shown in the diagram are not included within the A-Fresco package.)
Laney FS2-Mini foot switch
Page 13
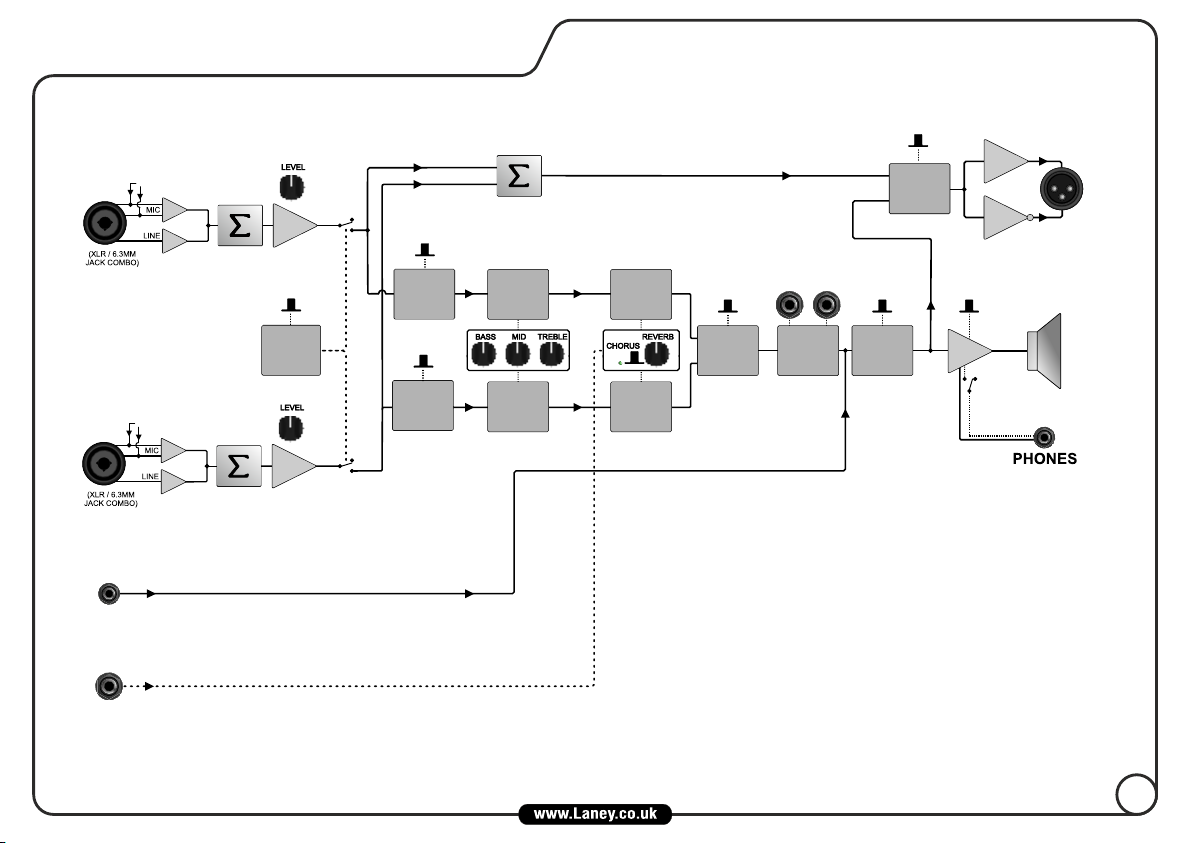
CHANNEL 1CHANNEL 1CHANNEL 1
PHANTOM POWER
MUTEMUTEMUTE
SHAPESHAPESHAPE
EQEQEQ
FXFXFX
ANTIANTI
ANTI
FEEDBACKFEEDBACK
FEEDBACK
SENDSENDSEND
FX LOOPFX LOOPFX LOOP
RETURNRETURNRETURN
PHASEPHASEPHASE
BLOCK DIAGRAM
D.I. SOURCED.I. SOURCED.I. SOURCE
D.I. OUT
PREPREPRE
POSTPOSTPOST
ECO/NORMALECO/NORMALECO/NORMAL
AMPAMPAMP
CHANNEL 2CHANNEL 2CHANNEL 2
PHANTOM POWER
AUXAUXAUX
FX REMOTEFX REMOTEFX REMOTE
TIP - REVERBTIP - REVERB
TIP - REVERB
RING - CHORUSRING - CHORUS
RING - CHORUS
SHAPESHAPESHAPE
EQEQEQ
FXFXFX
LOUDSPEAKER
13
Page 14

FCC COMPLIANCY STATEMENT
This device complies with Part 15 of the FCC rules.
Operation is subject to the following two conditions:
1) This device may not cause harmful interference
2) This device must accept any interference received, that may cause undesired operation.
Warning: Changes or modification to the equipment not approved by Laney can void the user's authority to use the equipment.
Note: This equipment has been tested and found to comply with the limits for Class B digital device, pursuant to Part 15 of the FCC
Rules. These limits are designed to provide reasonable protection against harmful interference in a residential installation. This
equipment generates, uses and can radiate radio frequency energy and if not installed and used in accordance with the instructions,
may cause harmful interference to radio communications. However, there is no guarantee that interference will not occur in a
particular installation. If this equipment does cause harmful interference to radio or television reception, which can be determined by
turning the equipment off and on, the user is encouraged to try and correct the interference by one or more of the following
measures.
!Reorient or relocate the receiving antenna.
!Increase the separation between the equipment and receiver.
!Connect the equipment into an outlet on a circuit different from that to which the receiver is connected.
!Consult the dealer or an experienced radio/TV technician for help.
This product conforms to the requirements of the following European Regulations, Directives & Rules:
CE Mark (93/68/EEC), Low Voltage (2014/35/EU), EMC (2014/30/EU),
RoHS (EU2011/65/EU), ErP (2009/125/EU).
In order to reduce environmental damage, at the end of its useful life, this product must not be disposed of along with normal
household waste to landfill sites. It must be taken to an approved recycling centre according to the recommendations of the WEEE
(Waste Electrical and Electronic Equipment) directive applicable in your country.
--------------------------------------------------------------------------------
---------------------------------------------------------------------------------
---------------------------------------------------------------------------------
14
Page 15

A
30W RMS
1 x 8” Custom Designed full range Dual Cone Driver
CH1 - Combi Balanced XLR Supports 15V Phantom Power
(Mic/Line) Unbalanced 6.3mm jack Impedance - 10M Ohm/47pF
CH2 - Combi Balanced XLR Supports 15V Phantom Power
(Mic/Line) Unbalanced 6.3mm jack Impedance - 10M Ohm/47pF
Bass: ±12dB at 100Hz, Lo Shelving
Middle: ±12dB at 600Hz, Peaking
Treble: ±12dB at 10KHz, Hi Shelving
Shape: 3 Band Preshape EQ
FX Channel1: Reverb: Adjustable amount
Chorus: Adjustable amount
Reverb: Adjustable amount
Chorus: Adjustable amount
Anti-Feedback control 12 Position notch filter
Phase
Balanced XLR with source switch and GND lift
3.5mm Stereo jack
Headphones: 3.5mm Stereo jack
(Speaker mutes when headphones are connected)
Power: 2.5mm DC inlet for 12V/3A supply
Battery holder for either 4*18650 lithium ion cells or 8*AA
Pole cup: For use with a standard 35mm pole stand (not includeed)
347*265*242 (H*W*D)
8.7
7.2
Optional Extras: 4*18650 batteries and high quality charger - Laney part number: BP-18650
Size (mm):
Unit Weight (Kg):
Aux In:
D.I. Out:
Packed W eight (Kg):
FX Channel2:
Output Power Rating:
Inputs:
Loudspeakers:
Other:
EQ:
FrescoFrescoFresco
ACOUSTIC
In the interest of continued development, Laney reserves the right to amend product specification without prior notification.
Male XLR
6.35mm Mono Jack
6.35mm Stereo Jack
3.5mm Stereo Jack
Female XLR
SPECIFICATIONS
1 GROUND
2 HOT
3 COLD
Line In, FX Send/Return
TIP
REVERB REMOTE
RING
CHORUS REMOTE
SLEEVE
GROUND
TIP
LEFT
RING
RIGHT
SLEEVE
GROUND
Aux In, Phones
1 GROUND
2 HOT
3 COLD
Mic
Remote
D.I. Out
15
Page 16

Model number:
Serial number:
Place of purchase:
Date of purchase:
Please complete for future reference.
Revision 2.00
 Loading...