

Page 1

Defender
Electrical Reference Library
JLR 12 61 10_1E
Published by Land Rover
© Land Rover 2007
While every effort is made to ensure accuracy, design changes to the vehicle
may be made in the period between the completion of this publication and the
introduction of vehicles. All rights reserved. No part of this publication may be
reproduced, stored in a retrieval system or transmitted in any form, electronic,
mechanical, recording or other means without prior written permission from Land
Rover.
Page 2
USING THIS PUBLICATION
HEALTH AND SAFETY
Always follow health and safety guidelines, specifically the Electrical Precautions detailed in the Workshop
Manual.
Important
The information provided in this publication is for use only by competent, qualified auto-electricians. Good
product knowledge is assumed, as well as the ability to access and use recommended test equipment and
other reference material provided.
Test equipment and other reference material
The information in this publication should be used in conjunction with the recommended test equipment; refer
to Workshop Manual. Other reference material includes: Electrical Circuit Diagrams, Technical Service
Bulletins (TSB) and the Workshop Manual.
Battery disconnection and reconnection
It is imperative that any information relating to battery disconnection and reconnection is followed; refer to the
appropriate sections in the Workshop Manual.
Fault diagnosis
Always use the recommended test equipment and test procedures for correct and reliable fault diagnosis;
refer to the appropriate sections in the Workshop Manual.
NOTE: Before starting electrical checks on the vehicle, ensure that relevant mechanical functions
operate satisfactorily; refer to the appropriate section of the Workshop Manual.
Abbreviations and acronyms
Abbreviation Description
APP Accelerator pedal position
ABS Anti-lock braking system
ACCM Auxiliary climate control module
AFS Adaptive front lighting system
A Ampere
ATCM Automatic temperature control module
AVI Audio video input
BBUS Battery backed-up sounder
BJB Battery junction box
CAN Controller area network
cav Cavity
CBC Corner brake control
Page 3
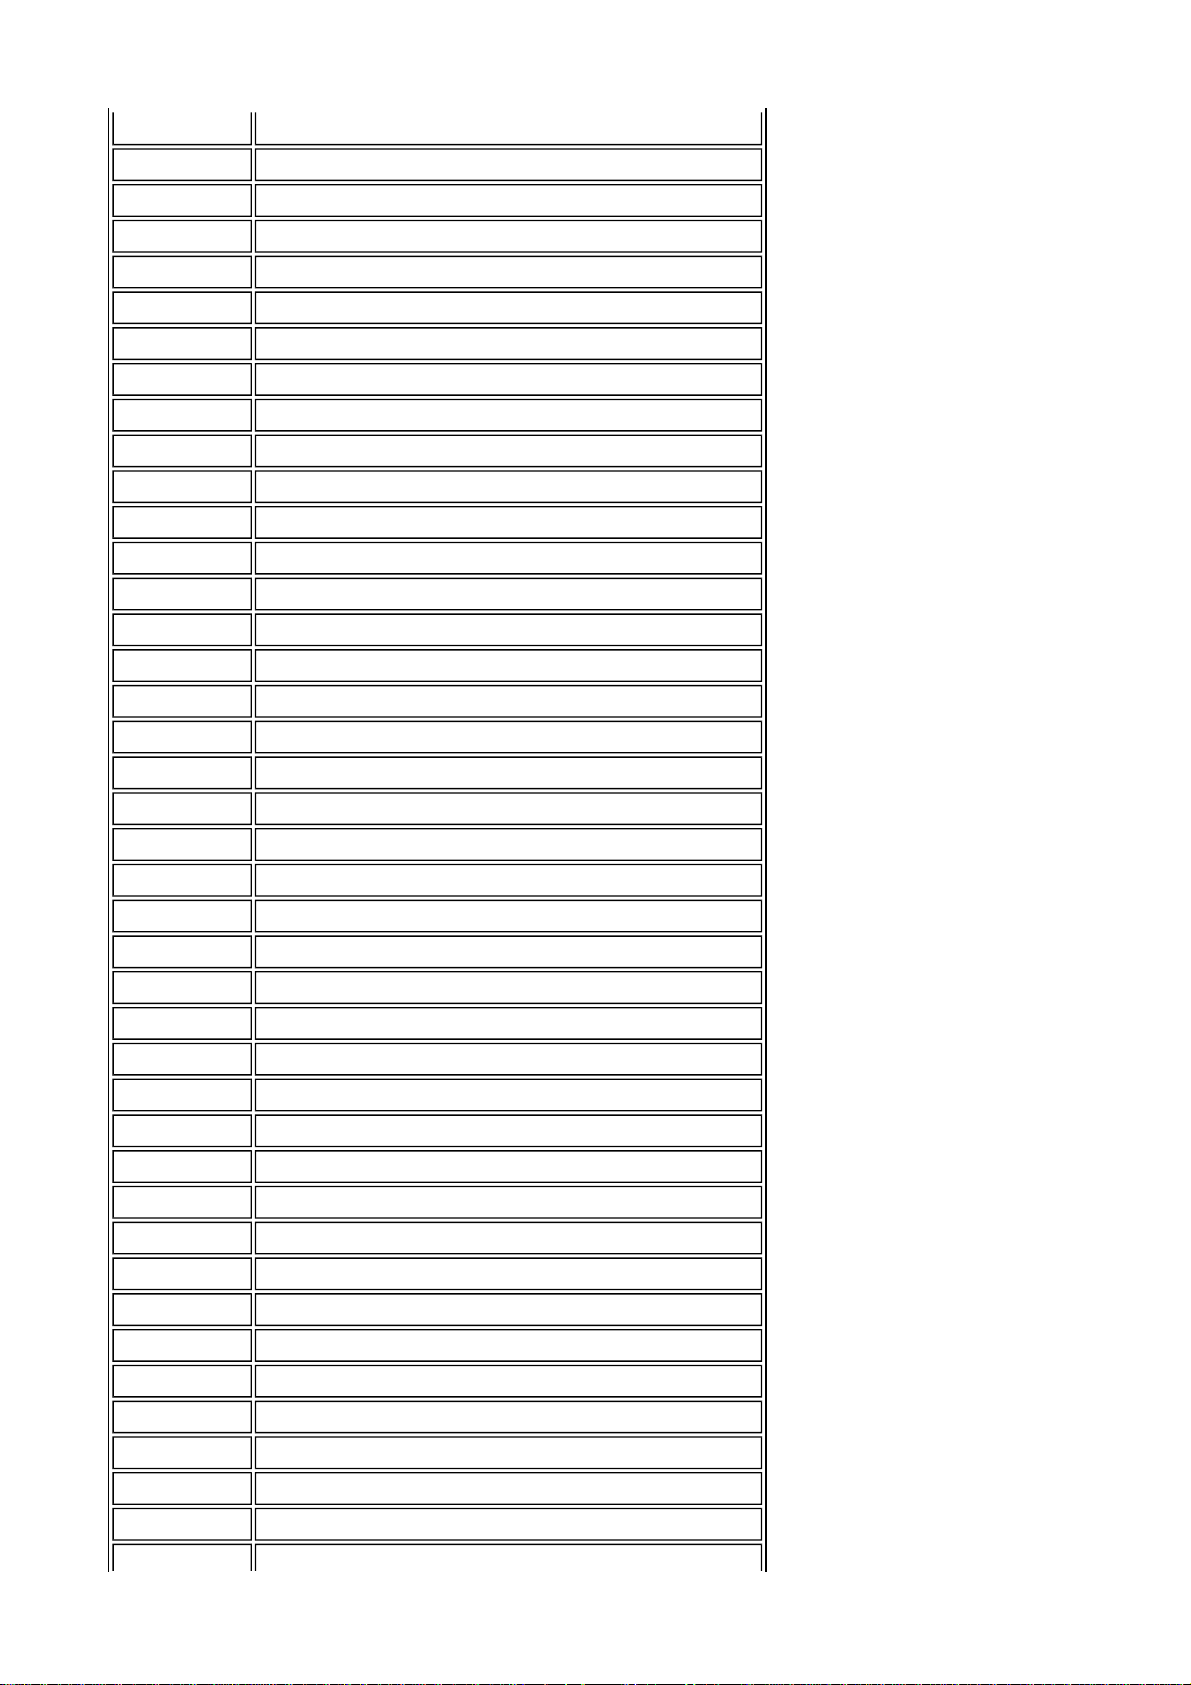
Cct Circuit
col Colour
CSA Cross sectional area
CJB Central junction box
CLS Central locking system
CO Carbon monoxide
D Drive
DAR Drive away release
Destn Destination
DC Direct current
DSC Dynamic stability control
DTC Diagnostic trouble code
EBA Emergency brake assist
EBD Electronic brake-force distribution
ECM Engine control module
ECT Engine coolant temperature
ECU Electronic control unit
EDC Engine drag-torque control
EMS Engine management system
ETC Electronic traction control
FET Field effect transistor
FFBH Fuel fired booster heater
HDC Hill descent control
HLD High level definition
IHU Integrated head unit
in Inches
kHz Kilohertz
km/h Kilometers per hour
LCD Liquid crystal display
LED Light emitting diode
LF Low frequency
LH Left hand
LHD Left hand drive
LIN Local interconnect network
MIL Malfunction indicator lamp
mm Millimeters
MOST Media orientated system transport
mph Miles per hour
ms Milliseconds
M/S Manual/sport
Page 4
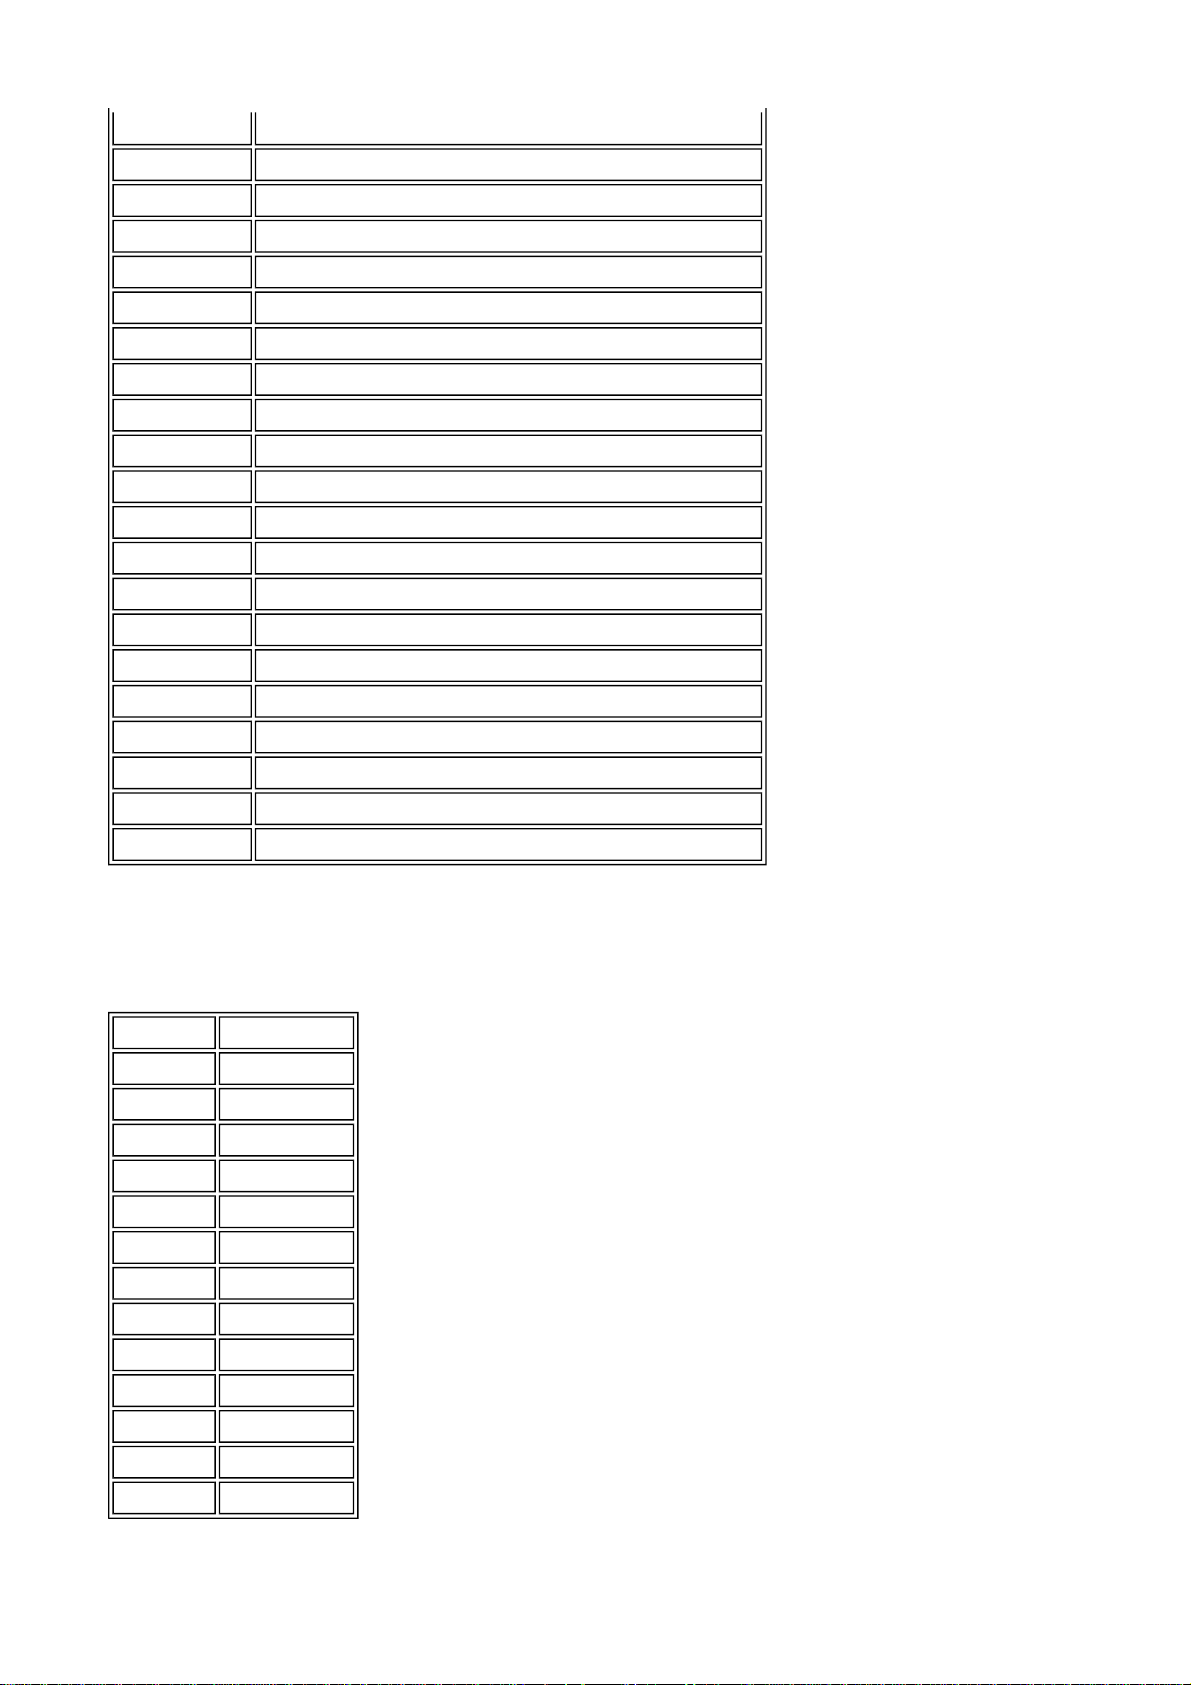
Neutral
NAS North American specification
NOx Nitrogen oxide
NTC Negative temperature co-efficient
P Park
PWM Pulse width modulation
R Reverse
RF Radio frequency
RH Right hand
RHD Right hand drive
RSC Roll stability control
SDARS Satellite digital audio radio service
SPE Single point entry
SRS Supplemental restraint system
TCM Transmission control module
TMC Traffic message channel
TPMS Tire pressure monitoring system
TV Television
UK United Kingdom
V Volt
VICS Vehicle information and communication system
Wire colour codes
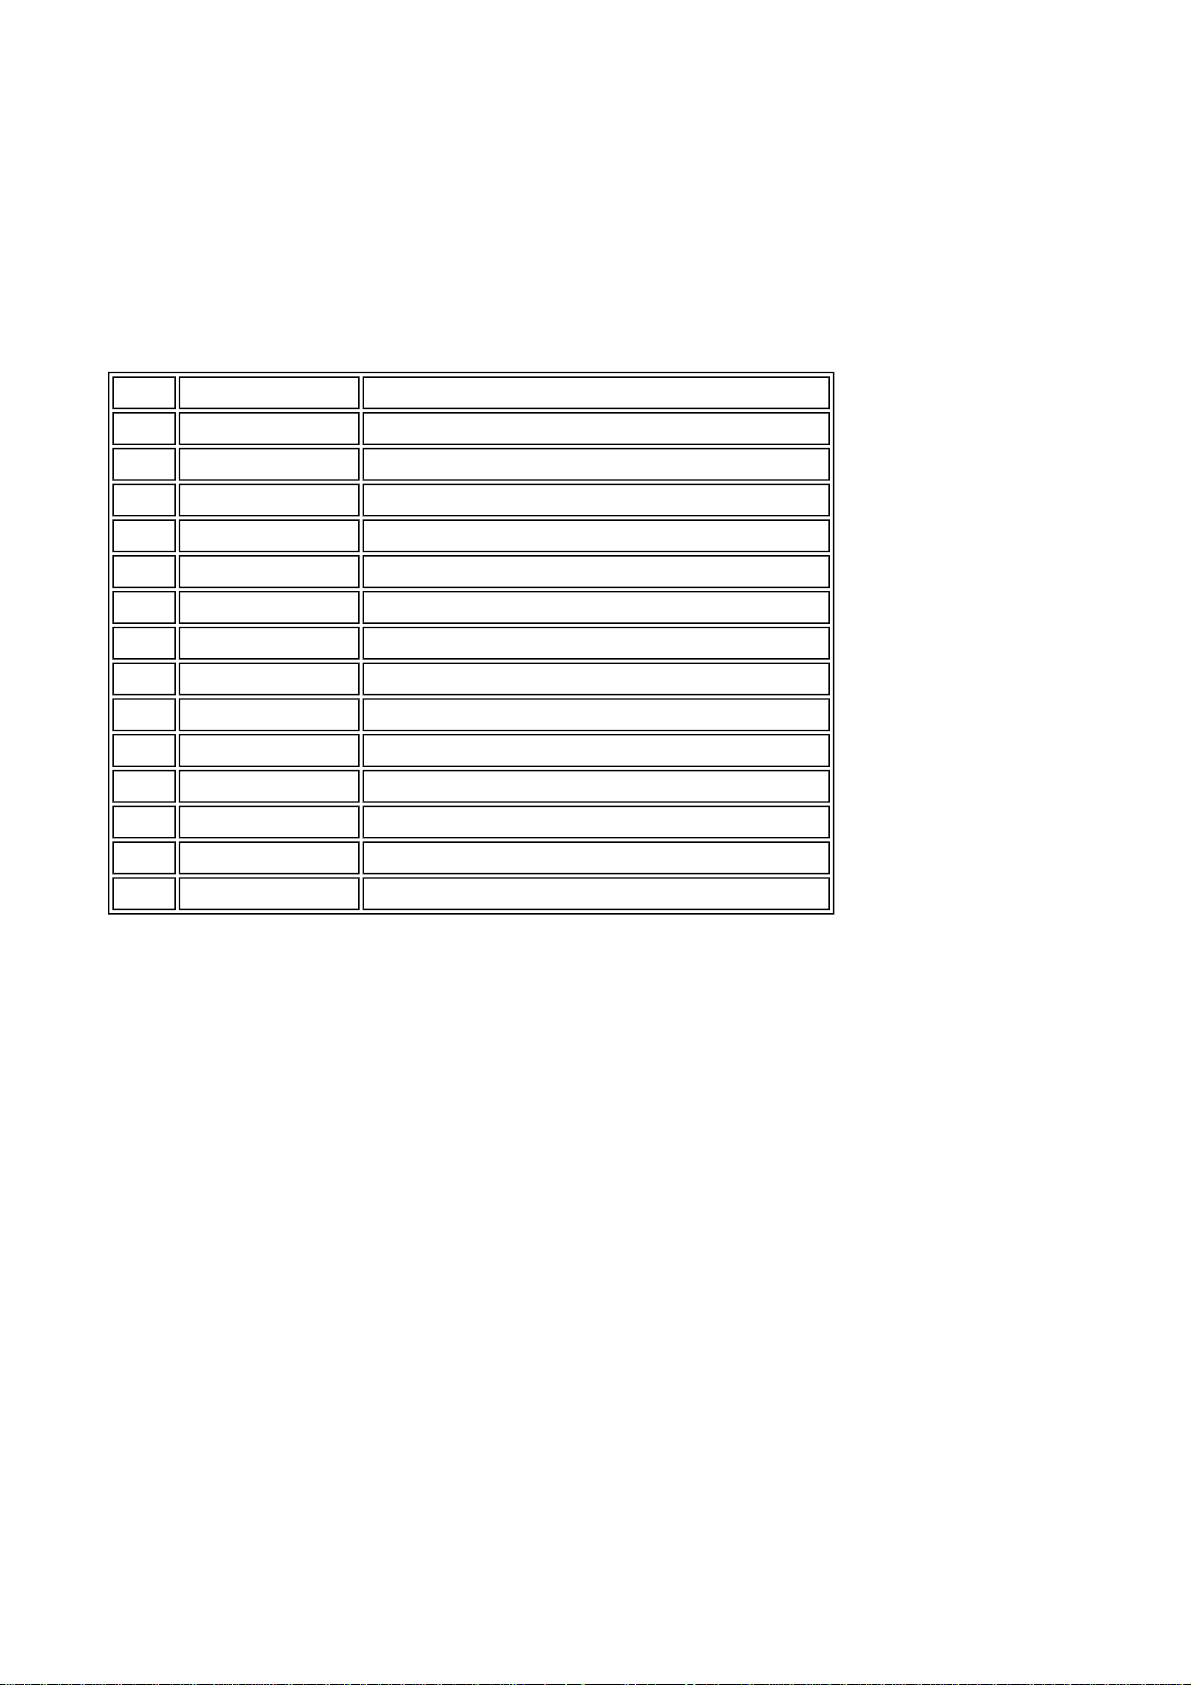
The following list contains wire colour codes used on the vehicle harnesses.
Code Colour
BK or B Black
GN or G Green
PK or K Pink
LG Light green
BN or N Brown
OG or O Orange
VT or P Purple
RD or R Red
GY or S Grey (Slate)
T Transparent
BU or U Blue
WH or W White
YE or Y Yellow
Page 5
Connector number suffix
y
To provide more accurate connector information, in some instances, a suffix has been added to the connector
that identifies the vehicle harness derivative; refer to the Connector number suffix table below.
Note: The suffix does not always appear on the circuit. Take care to us e the correct circuits
appropriate to the vehicle under scrutiny.
Connector number suffix table
Code Derivative Detail
A PV6 Gasoline V6
B PV8NA Gasoline V8 naturally aspirated
C DV6 or DV6EU3 Diesel V6 (EU3 compliant)
D PV8SC Gasoline V8 super charged
E DV8 Diesel V8
F D4 Diesel (in-line 4)
G D6 Diesel (in-line 6)
H DV6EU4L Diesel V6 (EU4 compliant, left-hand drive)
J DV6EU4R Diesel V6 (EU4 compliant, right-hand drive)
K DV8R Diesel V8 (right-hand drive)
L LHD Left-hand drive
P PETROL Gasoline
Q DIESEL Diesel
R RHD Right-hand drive
Connector details
A page is dedicated to each connector, with the information presented in a standard format. Connector
information comprises:
z Connector Number – The assigned number, prefixed 'C'.
z Description – Usually derived from the component to which the connection is made.
z Location – Used in conjunction with the photo graph to determine the location of the connector.
Note: References to the LH or RH side given in this document are made when viewing the
vehicle from the rear.
z Photograph – Shows the location of the subject connector. In most cases the photograph will indicate
the amount of trim removal necessary to reveal the connector. For convenience, some photographs
identify more than one connector.
z Face View – An outline of the connector housing, viewed from the front, showing pin numbers (if
applicable).
z Part No. – The part number as it appears on the harness drawing (if applicable).
z Colour – If applicable, the colour of the connector housing is shown. NATURAL is used to describe
connectors with a clear/translucent plastic finish.
z Gender – If applicable, identifies the gend er of the connector pins (NOT the housing) as Male or
Female. Generally, connectors mating directly into a component have Female pins.
z Type – Generic connector group.
z No. of Ways – Identifies the number of cavities within the connector.
z Service Repair Kits (where applicable) – Gives details of all harness rep air kits applicable to the
connector. If a connector has different t
pes of cavity, more than one service repair kit will be required.
Page 6
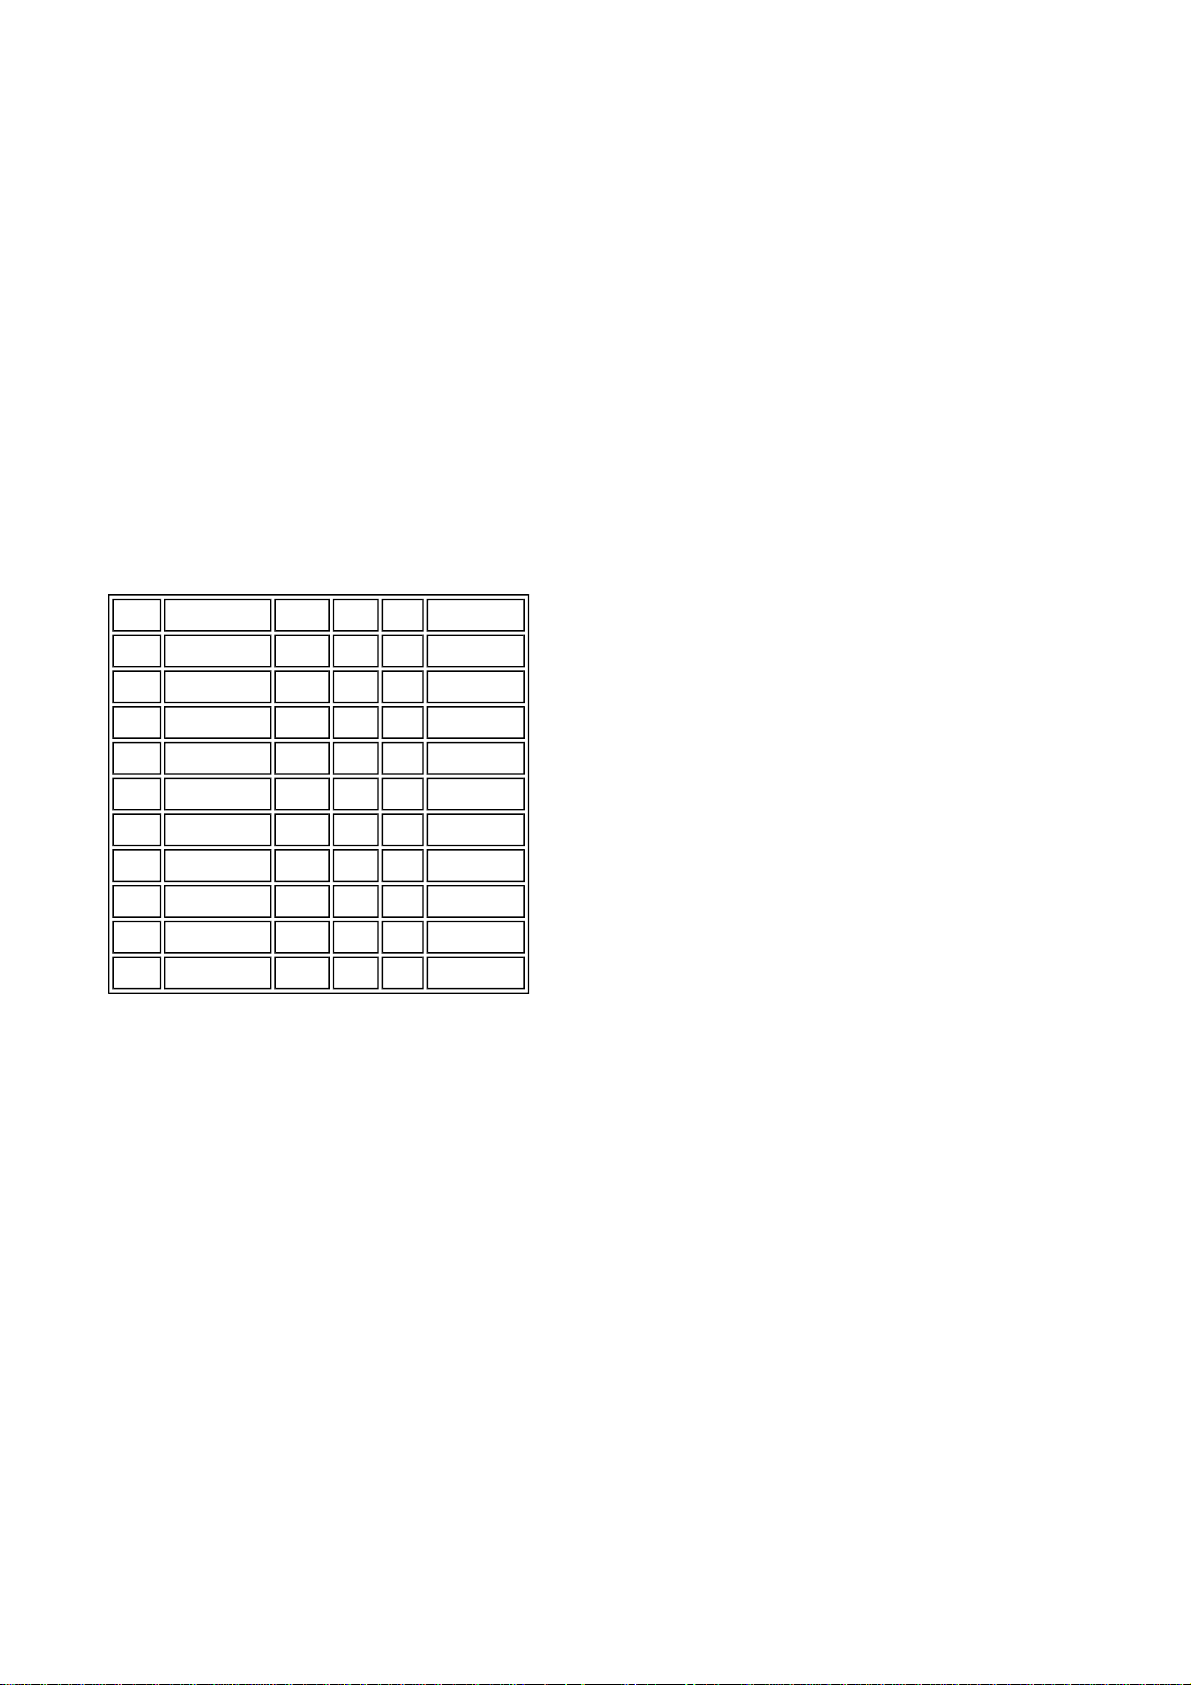
z Wire Chart (Pin-out table)
–
1. Cav: The connector pin (cavity) number.
NOTE: Wires may not be fitted to all cavities.
2. Terminal: Part number of the pin.
NOTE: Some wires do not have terminals, for example: antennae.
3. CSA: The cross sectional area of the wire in mm².
4. Col: The colour of wire populating the connector pin.
5. Cct: Identifies the model or option which uses the wire. 'ALL' means applicable to all models in the
range fitted with the feature or system in question. In instances where different models, features or
systems require different colour wires to be fitted in a cavity, each instance of the cavity is included in
the pin-out table.
6. Destn: The destination of the wire.
Sample wire chart – 6 pin connector
A six column table, giving details of each wire within the connector:
Cav Terminal CSA Col Cct Destn
1 AFU3728 4.50 N 2 C0571-3
1 AFU3728 4.50 N 6 C0571-5
2 AFU3725 3.00 NW 6 C0588-6
2 AFU3725 3.00 NW 2 C0588-2
3 AFU3728 4.50 NR 2 C0571-3
3 AFU3728 4.50 NR 6 C0571-3
4 AFU3725 3.00 WR 6 C0588-4
4 AFU3725 3.00 WR 2 C0588-4
6 AFU3725 2.50 SU 6 C0588-6
6 AFU3725 2.50 SU 2 C0588-3
Page 7

HARNESS REPAIRS
Introduction
CAUTION: The harness must be replaced when the damage is attributed to excessive current flow or
where there is evidence of over-heating.
Never attempt to repair the following:
z Any connector terminal.
z Any Media Orientated System Transport (MOST) network harnesses.
z Supplemental Restraint System (SRS) firing circuits.
z Link lead assemblies, which are unique to safety critical areas such as ABS and thermocouple circuits;
a typical example is the ABS wheel speed sensor with moulded connector.
z Any wires with a cross sectional area (CSA) greater than 6.0mm.
z Screened cables and leads.
If damage occurs to any of the above areas, an overlay harness must be used. These are available through
the normal parts ordering process.
Repair Kit
z Crimping tool.
z Wire cutter/stripper.
z Heat-shrink sleeving.
z Wire colour identification rings.
z Splice connectors.
z Pre-terminated leads (connector pins with 90mm wire 'pig tails').
z Connector housings.
z Connector pin extractor tools.
In order to carry out a repair, a suitable hot-air gun and heat resistant blanket will also be required (these can
be sourced locally).
Part Harnesses
In addition to the items included in the harness repair kits, part harnesses are also available to effect repairs
on the vehicle. These part harnesses can be viewed via 'Microcat' and are available through the normal parts
ordering process.
Repair Guidelines
The Harness Repair Kit includes an illustrated instruction booklet, however the following additional repair
guidelines must be followed:
Twisted Pairs
Twisted pairs of wires (CAN bus, ABS wiring, etc.) can be repaired as required. When repairing a twisted pair
of wires do not unwind the existing wires any more than necessary. Before completing the repair, replicate as
closely as possible the original twisting pattern on any new wiring.
Splice Connectors
It is undesirable to make more than five repair joints on the wiring to any harness connector, where more
repairs are required at the same connecto r, the harness should be replaced.
Page 8
Whenever a repair is required, the position of the splice connectors must be staggered. This keeps the bulk of
the repaired area to a minimum, ensuring all trim can be refitted correctly after the repair has been effected.
Replacement Connectors
If a connector is damaged and needs replacing, use the tools contained in the Ha rness Repair Kit to relocate
the wires into the replacement connector. Only relocate one wire at a time, ensuring it is fitted to the correct
cavity in the new connector.
Gold Connector Pins
A number of vehicle connectors are fitted with gold plated pins. Do not replace gold connector pins with tin
connector pins as this will lead to early failure of the electrical contact.
Repair Methods
CAUTION: Before commencing a repair, disconnect the vehicle battery and wait one minute to allow
the SRS and Satellite Navigation systems time to de-energise.
The following process should be used when carrying out a repair:
NOTE: Before commencing a repair, refer to the appropriate 'Service Repair Kit' table (see example in
Table 1 below) for details of the correct tools and replacement components. The 'Service Repair Kit'
table (where appropriate) can be found beneath the 'Connector Details' in the Electrical Reference
Library (ERL).
YPL101910 0.75 C SA
Cavities 1-9, 11-15
VDK500010 Instruction, repair kit 1
VDK500070 Instruction, extract tool 1
VDK500080 Instruction, extract tool 1
YMI000870 Pre-terminated lead 1
YPQ000100 Identification rings (small) 1
YRV000040 Splice (red, CSA; 0.25-1.6) 1
YRW000390 Wire cutter/stripper 1
YRW500010 Applicator 1
YRW500060 Extract tool 1
YRW500070 Extract tool 1
The following process should be used when carrying out a repair:
1. Using the wire cutter/stripper, cut the wire to be repaired and strip the required amount of insulation
from the wire.
2. Slide an appropriately sized heat shrink sleeve over the bare end wire for later use.
3. Remove the damaged connector pin from the connector housing using the appropriate extraction tools.
4. Select the correct connector pin, pre-terminated lead and fit the appropriate wire colour identification
rings.
5. Select the correct size of splice connector from the kit.
CAUTION: The crimping tool jaws perform two different crimps simultaneously: one crimps the
wire insulation; one crimps the bare wire. Ensure the splice connector is placed correctly in the
tool or the wire will be insufficiently crimped and a poor electrical contact may result.
6. The crimping tool contains three sets of jaws. The jaw colours correspond to the splice connector
Page 9

colour. Select the correct jaw and crimp the splice connector to the harness bare-end wire.
y
7. Using the tool, crimp the pre-terminated lead to the splice connector.
CAUTION: Place the heat resistant blanket in a suitable position to avoid heat damage to
adjacent components and trim.
CAUTION: Do not overheat the repair as degradation and subsequent failure of the connection
may result.
8. Slide the previously fitted heat shrink sleeve into position over the splice connector. Using the hot-air
gun to the manufacturer's guidelines, apply heat evenly to the heat shrink sleeve until it is tightly shrunk
around the splice connector.
9. Connect the repaired wire to the connector housing.
10. Repeat steps 1 to 9 for an
further damaged wires.
Page 10

FIBRE OPTICS
General
The fibre optic system installed uses Media Oriented Systems Transport (MOST), which is a multimedia
network, optimized for automotive applications. Its design allows it to provide a low-overhead and low-cost
interface for the simplest of devices, such as microphones and speakers. More intelligent devices can
automatically determine the features and functions provided by all other devices on the network and establish
sophisticated control mechanisms without distracting the driver.
Under normal installation conditions the system is robust and failures should not oc cur. However, since the
optical fibres convey data using infra-red light, it is vital the passage of light down the fibre is unobstructed.
Obstruction of infra-red light can be caused by:
z Contamination of the fibre ends.
z Damage to the fibre ends.
z Bending, kinking or damaging the cable.
NOTE: Fibres damaged by kinking or exposure of the optical core due to abrasion must be replaced.
Handling
Take special care to avoid damage or contamination when handling or working in the vicinity of fibre optic
cables and connectors.
NOTE: Damage or contamination includes scratches to the cable ends and pollution caused by dust,
dirt, oil or moisture.
CAUTION: When handling fibre optic cables cleanliness is of paramount importance. The fibre ends
should not be touched even with clean bare hands as the natural oils deposited from the skin may
penetrate the fibre or may cause dirt to adhere to the fibre end.
System malfunctions and unnecessary warranty claims can be minimised by following these guidelines:
z After disconnection of any cables, carefully install appropriate dust caps to prote ct the ma ting faces of
the connectors from damage or contamination.
z Avoid introducing tight bends (less than 30mm radius) or kinks into the fibre optic cable during service
or repair. Tight bends or kinks could impair operation, cause immediate system failure, or future system
failure.
z Avoid excessive force, strain or stress on the fibres and connectors, especially permanent stress after
reinstallation.
Page 11
TABLE OF CIRCUIT OPTION CODES
The following table contains a list of circuit (Cct) reference numbers against a descriptio n of the applicable
model or option. This information should be used in conjunction with the connector pin-out tables to determine
the wire configuration of the vehicle under test.
Cct Model or Option
1 ABS
2 ABS + TRACTION CONTROL
3 2 DOOR
4 3 DOOR
5 4 DOOR
6 4/5 DOOR
7 5 DOOR
8
9 ABS LH
10 ABS RH
11 WINDOW LIFT DOORS
14 AIRCON
14L AIRCON
14R AIRCON
22 ANTI-THEFT ALARM
22L ANTI-THEFT ALARM
HEAD/SIDE LAMPS +
HEADLAMP LEVEL
22R ANTI-THEFT ALARM
95L WIPERS & WASHERS
95R WIPERS & WASHERS
HEADLAMP LEVEL
Page 12
107 (MANUAL)
107L
107R
109R HEATED FRONT SCREEN
109L HEATED FRONT SCREEN
139L LHD VEHICLES
192 REAR SPEAKERS
200R RHD VEHICLES
247L WINDOW LIFT
247R WINDOW LIFT
HEADLAMP LEVEL
(MANUAL)
HEADLAMP LEVEL
(MANUAL)
248 WINDOW LIFT FRONT
254
254R
254L
499 LEGACY ALL CCT
765R DIM/DIP
766 COLD CLIMATE PACK
766R COLD CLIMATE PACK
766L COLD CLIMATE PACK
ENGINE MANAGEMENT
DIESEL
ENGINE MANAGEMENT
DIESEL
ENGINE MANAGEMENT
DIESEL
767L CENTRAL DOOR LOCKING
767R CENTRAL DOOR LOCKING
768L
ALARM/CENTRAL DOOR
Page 13
LOCKING
768R
769 RADIO
769R RADIO
769L RADIO
770 90 PUMA ENGINE
771 110 PUMA ENGINE
772 130 PUMA ENGINE
ALARM/CENTRAL DOOR
LOCKING
Page 14
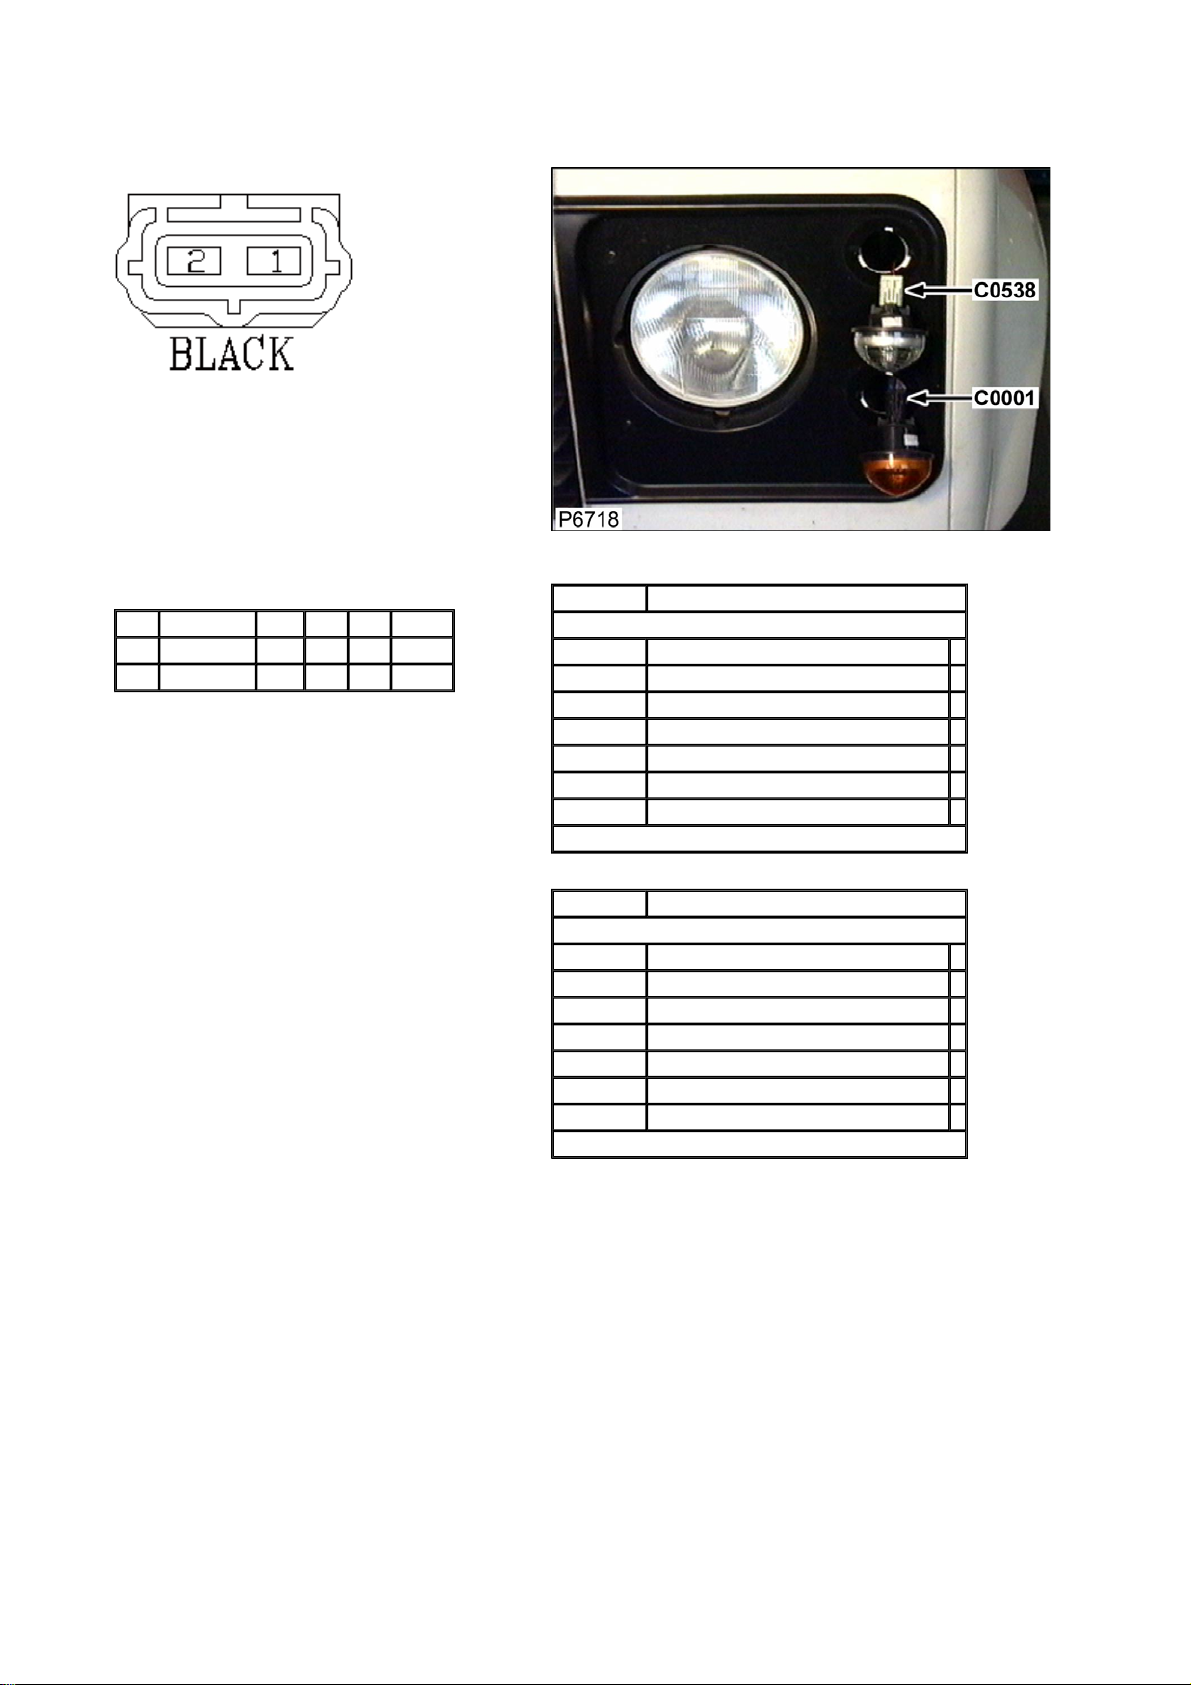
Connector: C0001 Description: Turn signal indicator/ hazard warning lamp-Front LH
Location: Front corner of engine compartment - LH side
Part No.: YPC10070
Colour: BLACK
Cavities: 2WY
Harness: WING LH HARNESS
Wire Chart
CAV TERMINAL CSA COL CCT DESTN
1 YPL10062 0.5D B ALL CTAP
2 AFU3802 0.75D GR ALL C1265
Service Repair Kits
CSA 0.70- 2.00 CSA
Cavities: 2
VDK500010 SRK ITEM GENERAL 1
YMI000320 SRK ITEM ECONOSEAL FAMILY 2.0CSA 1
YPQ000110 SRK ITEM 1
YQD000210 SRK ITEM R/B 1
YRV000050 SRK ITEM PIDG BLUE 1
YRW000390 SRK ITEM 1
YRW500010 SRK ITEM 1
VUB001680
CSA 0.20- 0.50 CSA
Cavities: 1
VDK500010 SRK ITEM GENERAL 1
YMI000330 SRK ITEM ECONOSEAL FAMILY 0.5CSA 1
YPQ000100 SRK ITEM 1
YQD000210 SRK ITEM R/B 1
YRV000040 SRK ITEM PIDG RED 1
YRW000390 SRK ITEM 1
YRW500010 SRK ITEM 1
VUB001690
Page 15
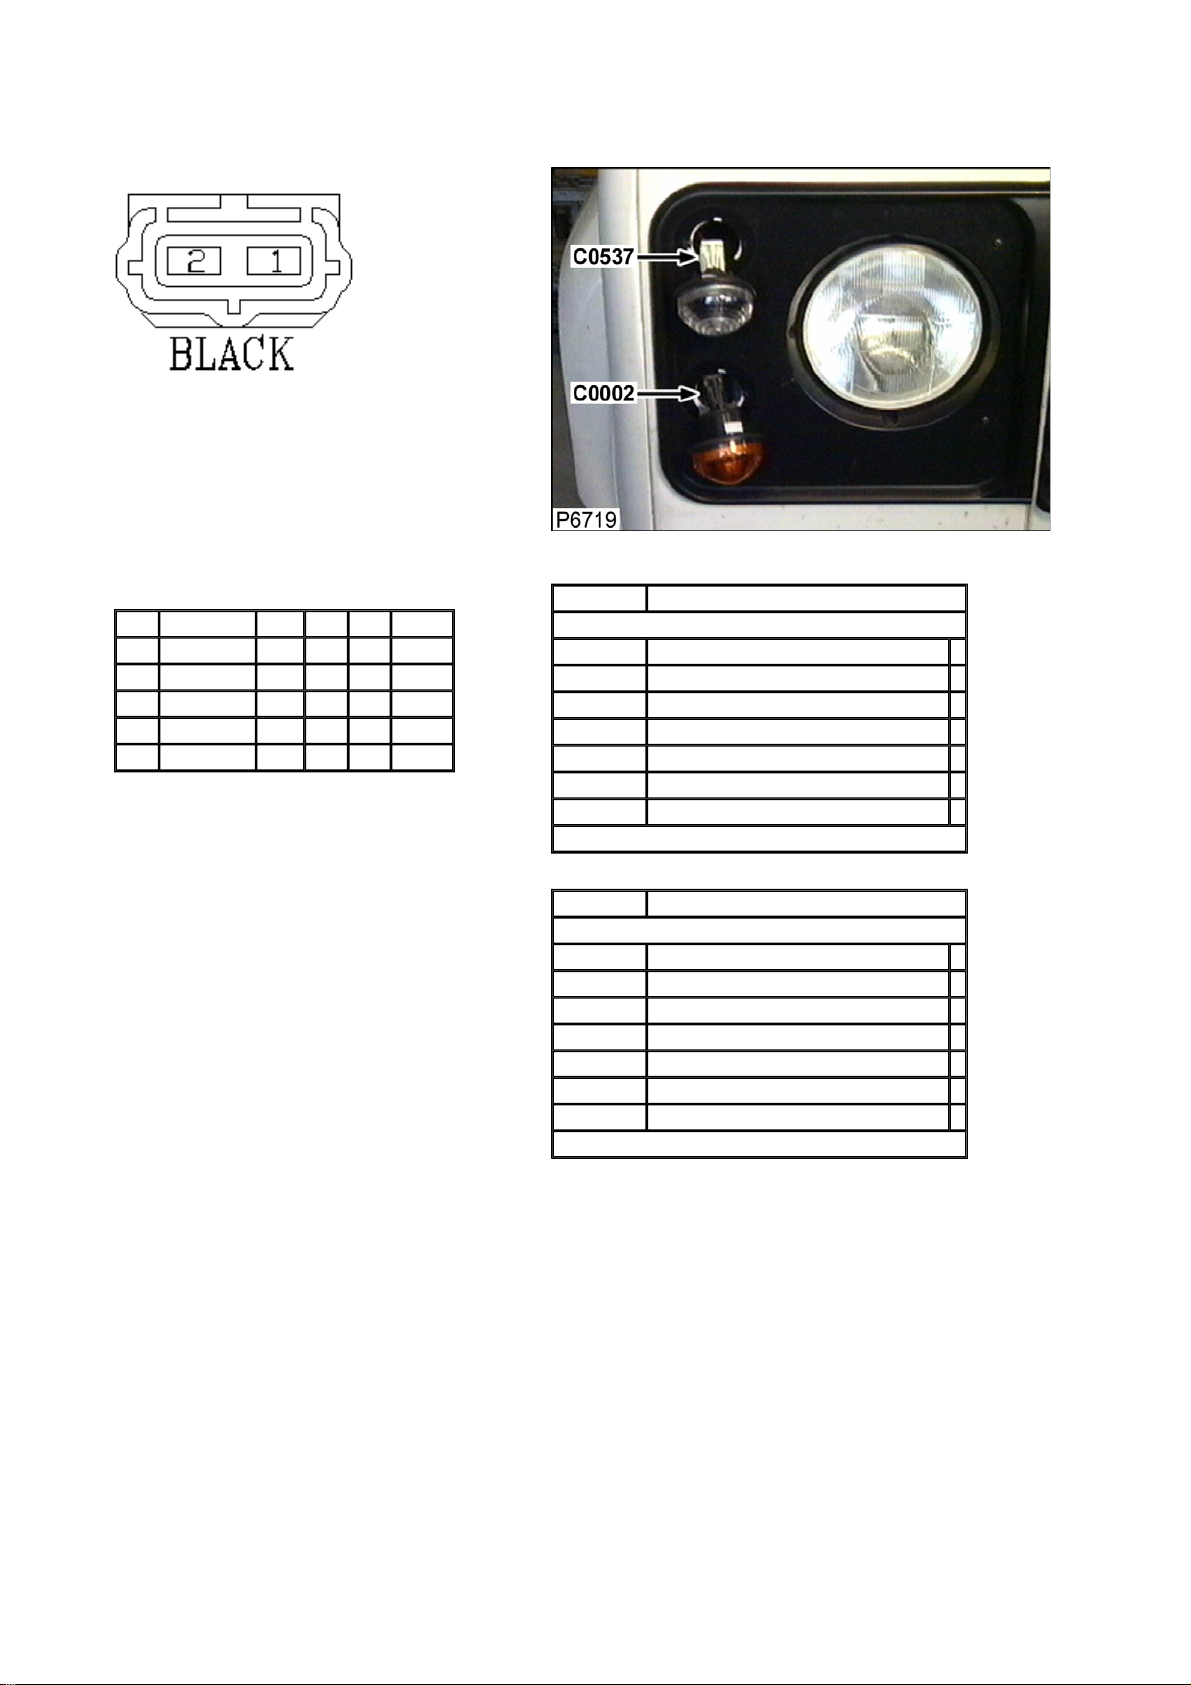
Connector: C0002 Description: Turn signal indicator/ hazard warning lamp-Front RH
Location: Front corner of engine compartment - RH side
Part No.: YPC10070
Colour: BLACK
Cavities: 2WY
Harness: WING RH HARNESS
Wire Chart
CAV TERMINAL CSA COL CCT DESTN
1 AFU3802 1.0D B 1 CTAP
1 AFU3802 1.0D B 2 CTAP
1 YPL10062 0.5D B 3 CTAP
1 AFU3802 1.0D B 5 CTAP
2 AFU3802 0.75D GW ALL C1267
Service Repair Kits
CSA 0.70- 2.00 CSA
Cavities: 1,2
VDK500010 SRK ITEM GENERAL 1
YMI000320 SRK ITEM ECONOSEAL FAMILY 2.0CSA 1
YPQ000110 SRK ITEM 1
YQD000210 SRK ITEM R/B 1
YRV000050 SRK ITEM PIDG BLUE 1
YRW000390 SRK ITEM 1
YRW500010 SRK ITEM 1
VUB001680
CSA 0.20- 0.50 CSA
Cavities: 1
VDK500010 SRK ITEM GENERAL 1
YMI000330 SRK ITEM ECONOSEAL FAMILY 0.5CSA 1
YPQ000100 SRK ITEM 1
YQD000210 SRK ITEM R/B 1
YRV000040 SRK ITEM PIDG RED 1
YRW000390 SRK ITEM 1
YRW500010 SRK ITEM 1
VUB001690
Page 16
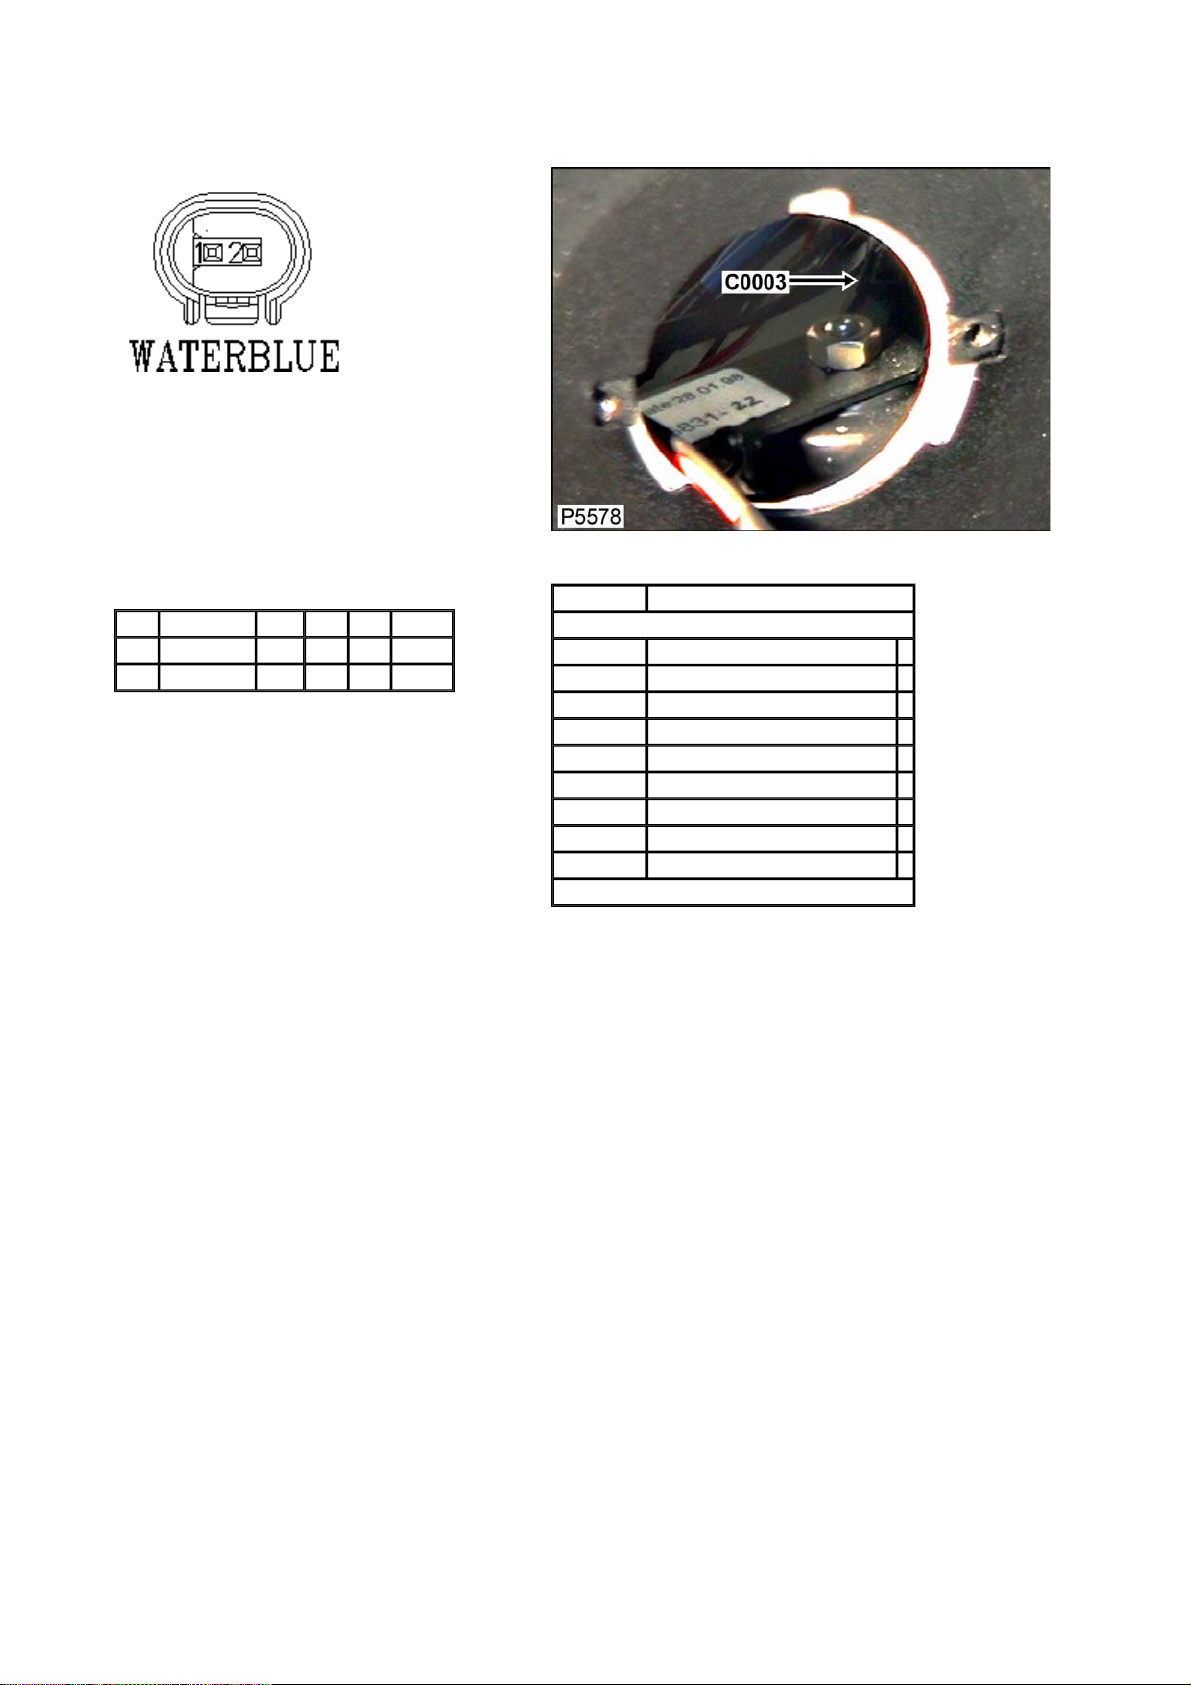
Connector: C0003 Description: Horn-LH
Location: Behind LH headlamp
Part No.: YPC110600
Colour:
Cavities:
Harness: WING LH HARNESS
Wire Chart
CAV TERMINAL CSA COL CCT DESTN
1 YPL101510 0.75D B 2 C0013
2 YPL101510 0.75D PB 2 C1265
Service Repair Kits
CSA 0.75- 0.75 CSA
Cavities: 1,2
VDK500010 SRK ITEM GENERAL 1
VDK500070 SRK ITEM MQ EXTRACT TOOL 1
VDK500080 SRK ITEM MPQ EXTRACT TOOL 1
YMI000950 SRK ITEM MQS FAMILY 0.75CSA 1
YPQ000100 SRK ITEM 1
YQD000210 SRK ITEM R/B 1
YRV000040 SRK ITEM PIDG RED 1
YRW000390 SRK ITEM 1
YRW500010 SRK ITEM 1
VUB500150
Page 17
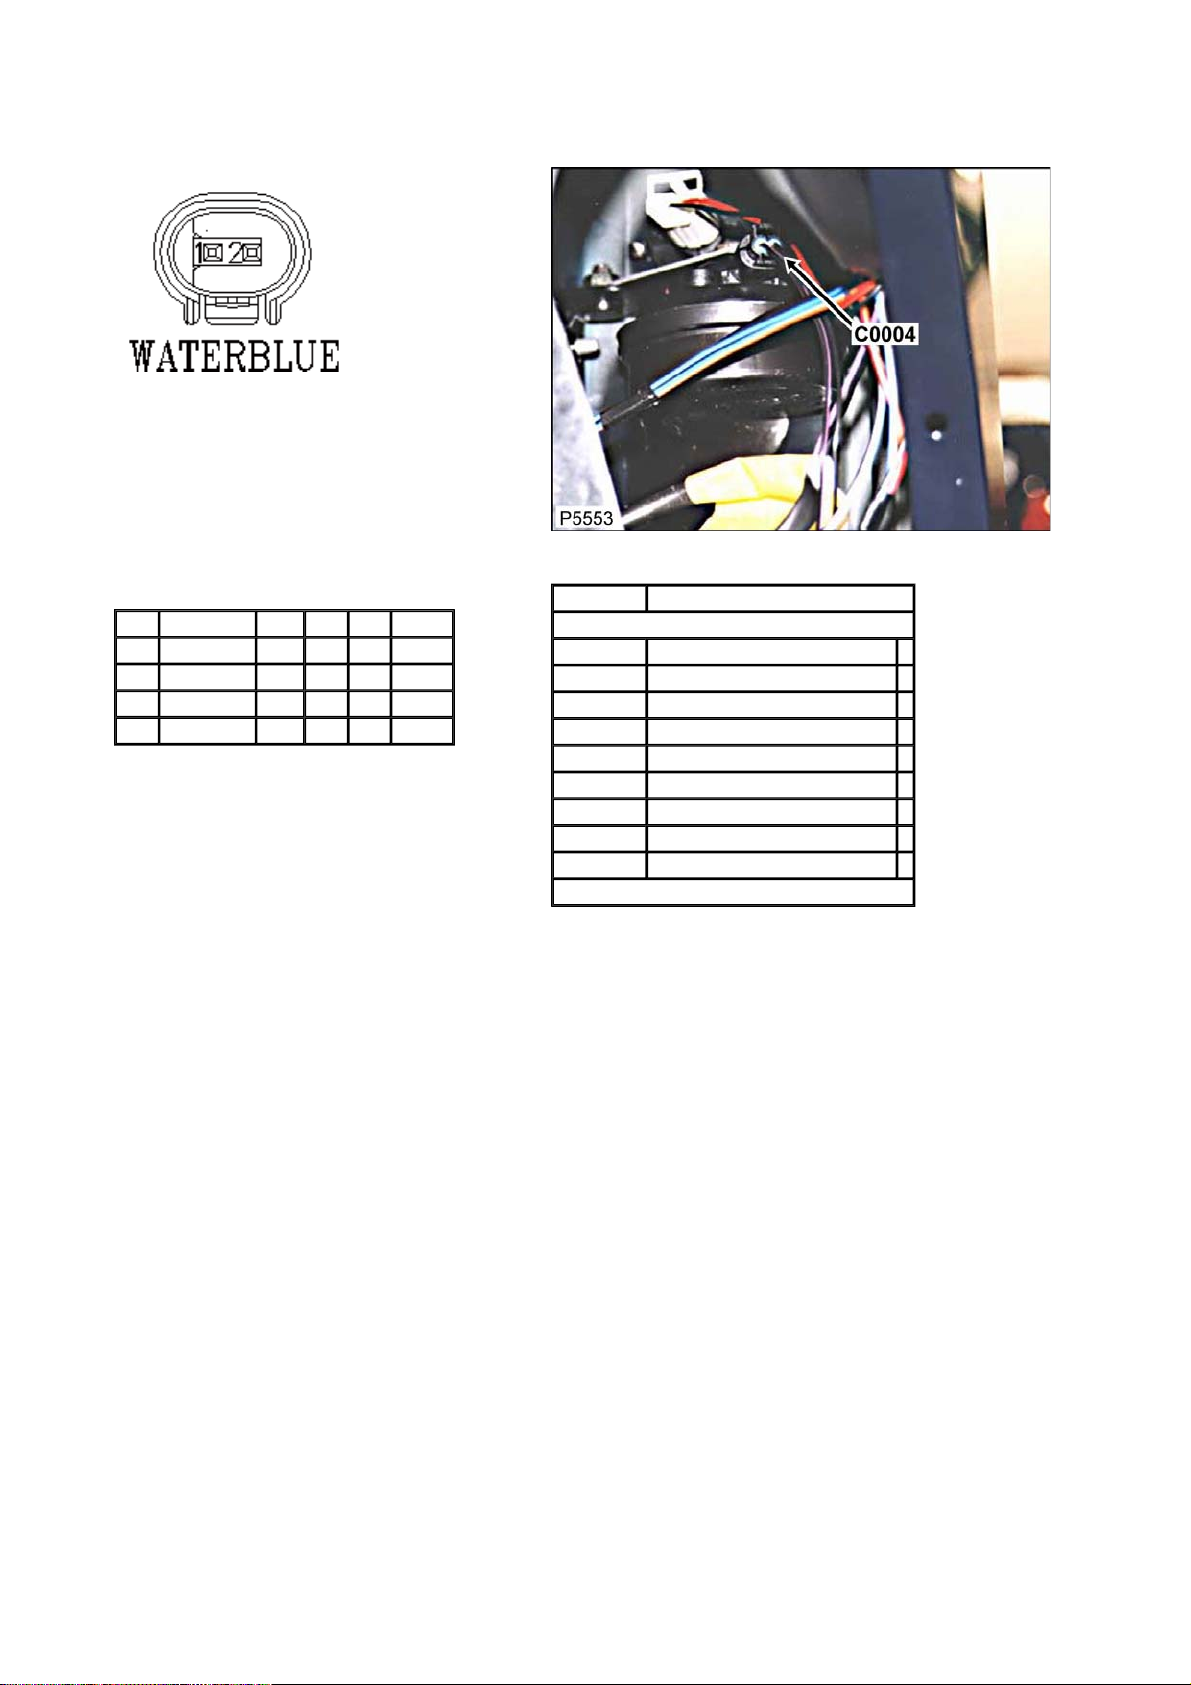
Connector: C0004 Description: Horn-RH
Location: Behind RH head lamp
Part No.: YPC110600
Colour:
Cavities:
Harness: WING RH HARNESS
Wire Chart
CAV TERMINAL CSA COL CCT DESTN
1 YPL101510 0.75D B 1 C0012
1 YPL101510 0.75D B 2 C0012
1 YPL101510 0.75D B 5 C0012
2 YPL101510 0.75D PB 4 C1267
Service Repair Kits
CSA 0.75- 0.75 CSA
Cavities: 1,2
VDK500010 SRK ITEM GENERAL 1
VDK500070 SRK ITEM MQ EXTRACT TOOL 1
VDK500080 SRK ITEM MPQ EXTRACT TOOL 1
YMI000950 SRK ITEM MQS FAMILY 0.75CSA 1
YPQ000100 SRK ITEM 1
YQD000210 SRK ITEM R/B 1
YRV000040 SRK ITEM PIDG RED 1
YRW000390 SRK ITEM 1
YRW500010 SRK ITEM 1
VUB500150
Page 18
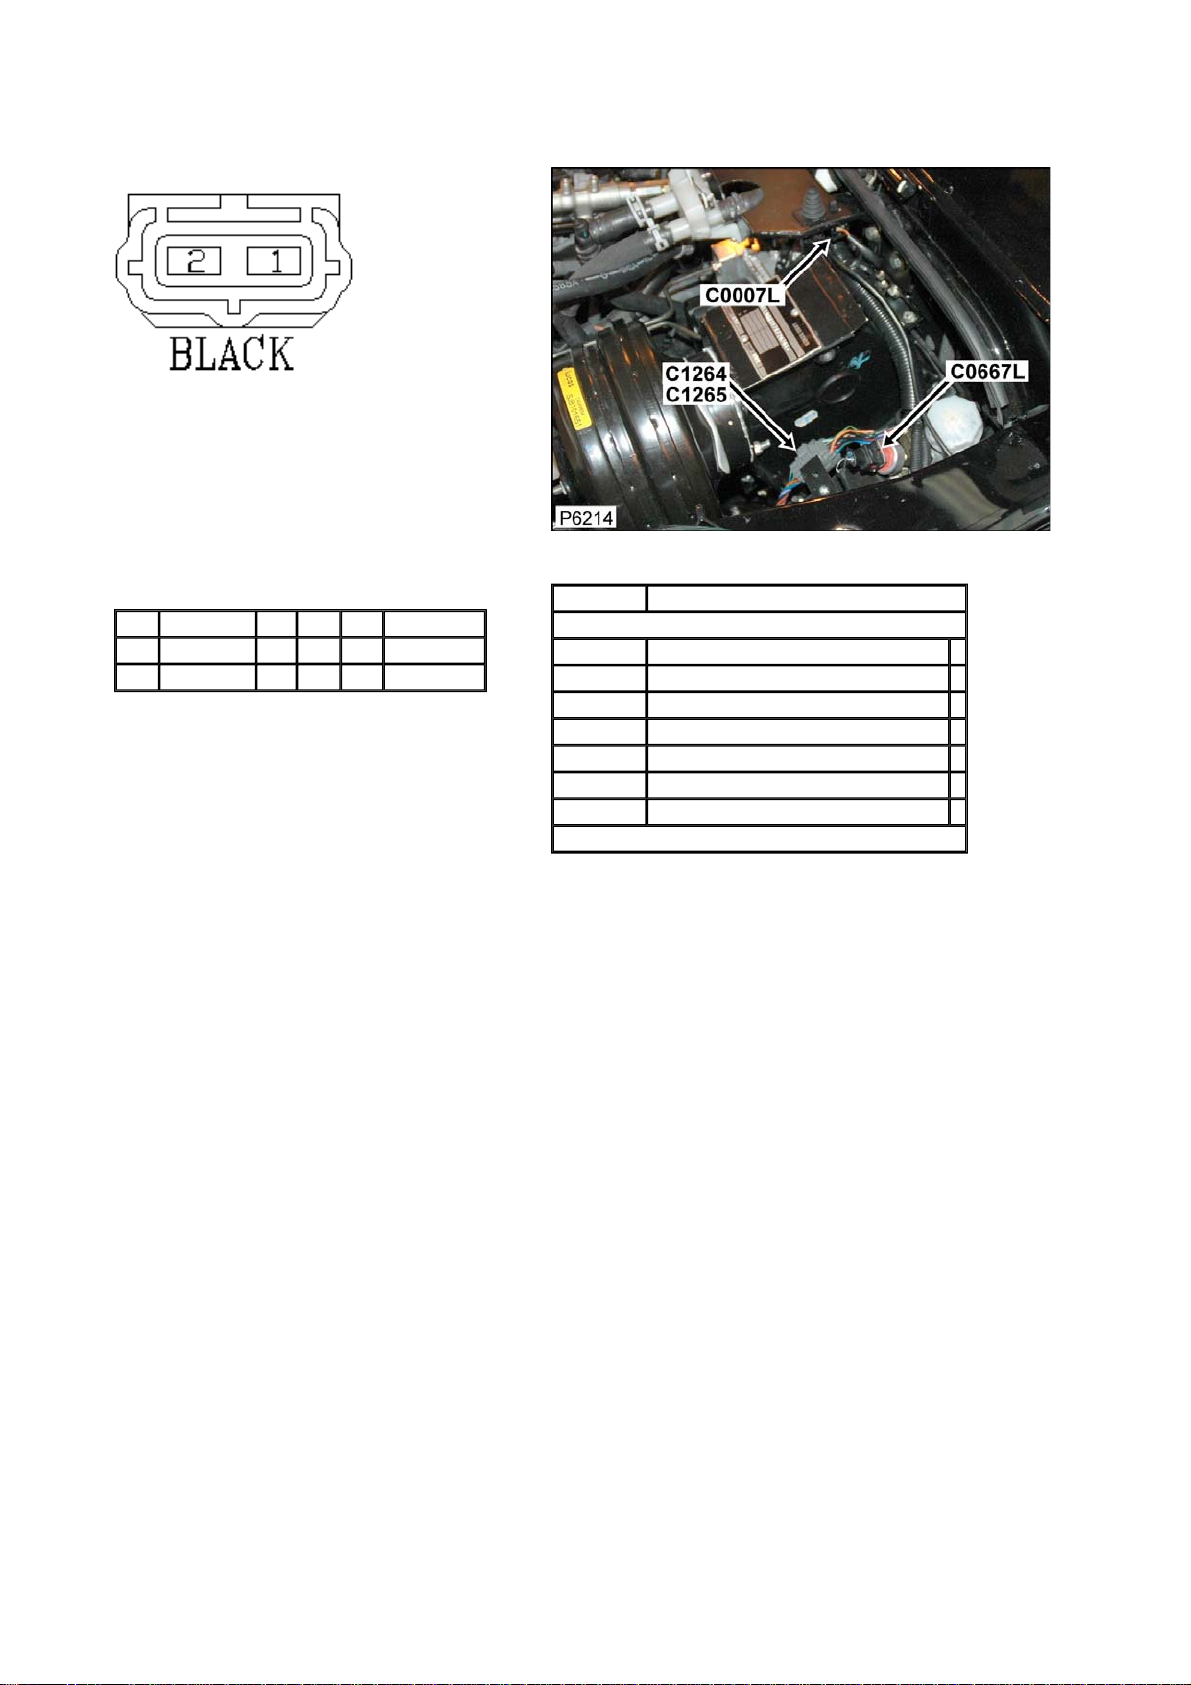
Connector: C0007L Description: Switch-Bonnet
Location: Rear LH side of engine compartment
Part No.: YPC10070
Colour: BLACK
Cavities: 2WY
Harness: MAIN LH + RH HARNESS
Wire Chart
CAV TERMINAL CSA COL CCT DESTN
1 YPL10062 0.5D B 22L S/JOINT SJ13
2 YPL10062 0.5D OU 22L C0061L
Service Repair Kits
CSA 0.20- 0.50 CSA
Cavities: 1,2
VDK500010 SRK ITEM GENERAL 1
YMI000330 SRK ITEM ECONOSEAL FAMILY 0.5CSA 1
YPQ000100 SRK ITEM 1
YQD000210 SRK ITEM R/B 1
YRV000040 SRK ITEM PIDG RED 1
YRW000390 SRK ITEM 1
YRW500010 SRK ITEM 1
VUB001690
Page 19
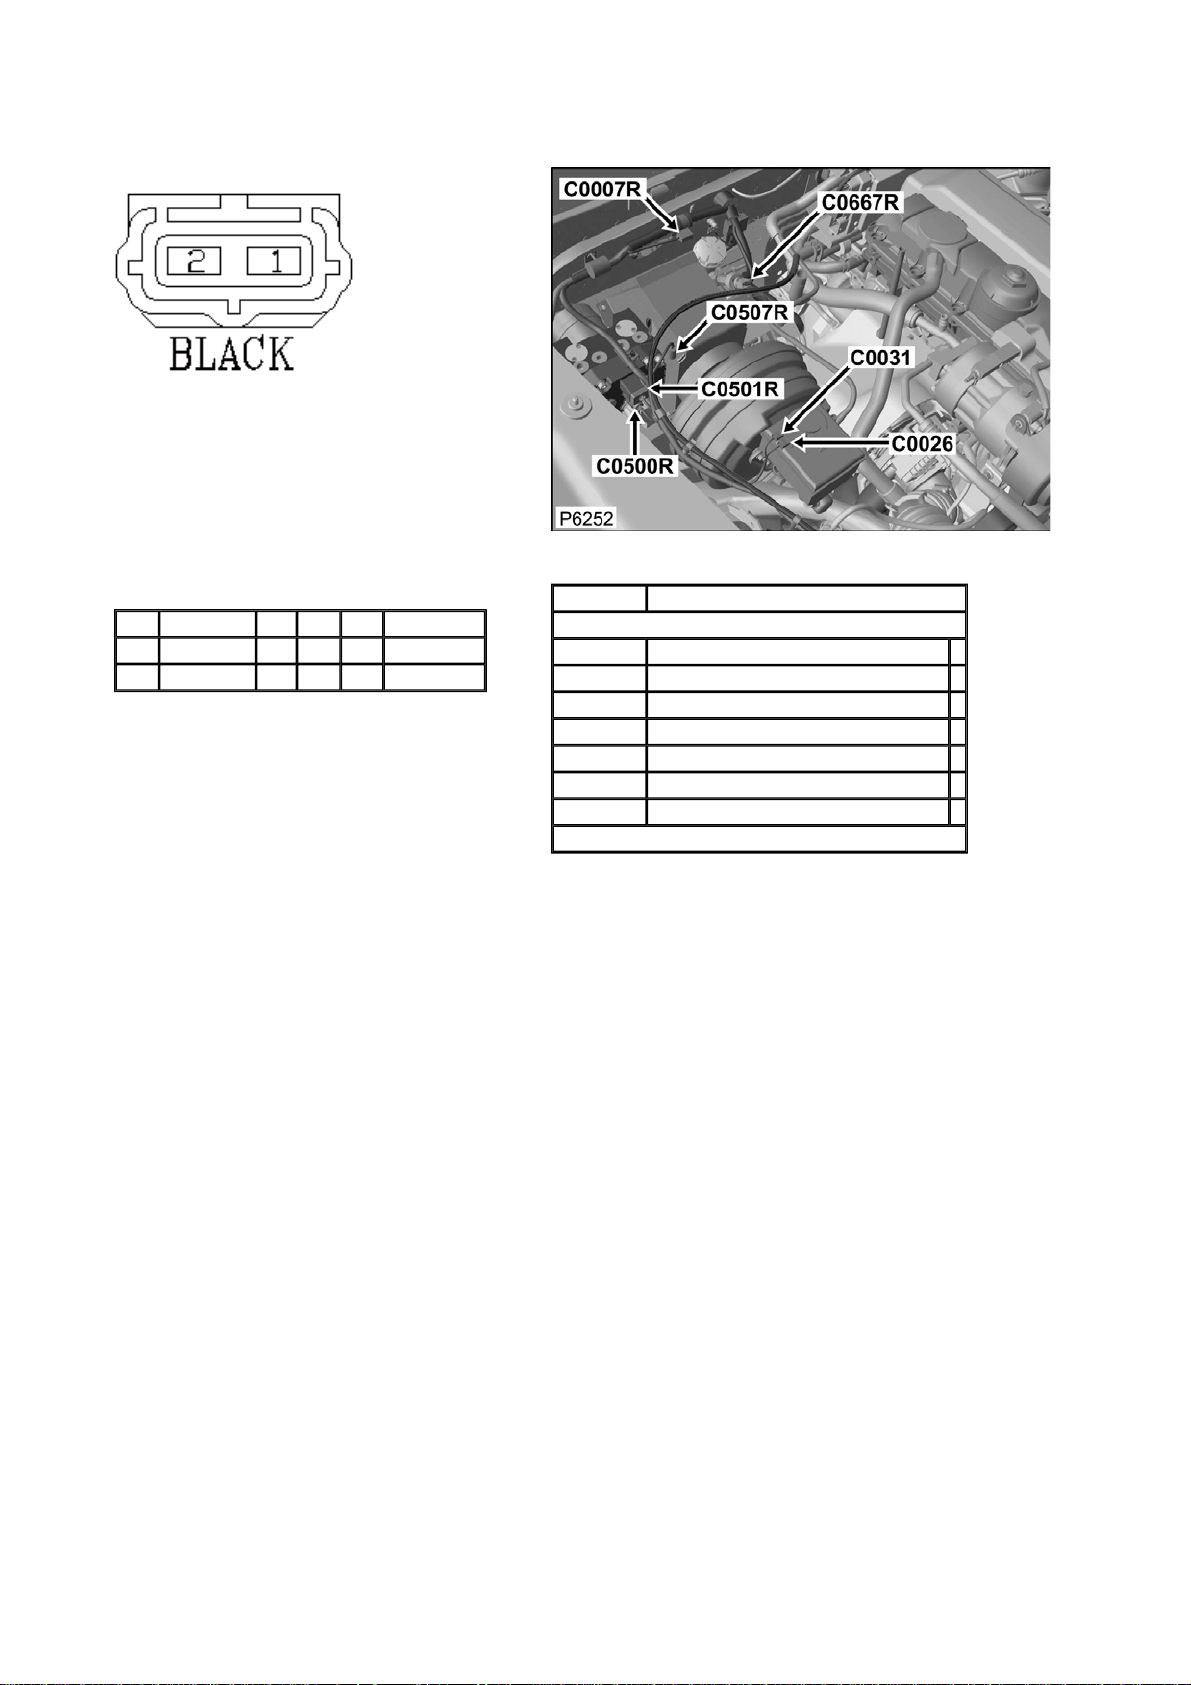
Connector: C0007R Description: Switch-Bonnet
Location: Rear RH side of engine compartment
Part No.: YPC10070
Colour: BLACK
Cavities: 2WY
Harness: MAIN LH + RH HARNESS
Wire Chart
CAV TERMINAL CSA COL CCT DESTN
1 YPL10062 0.5D B 22R S/JOINT SJ13
2 YPL10062 0.5D OU 22R C0061R
Service Repair Kits
CSA 0.20- 0.50 CSA
Cavities: 1,2
VDK500010 SRK ITEM GENERAL 1
YMI000330 SRK ITEM ECONOSEAL FAMILY 0.5CSA 1
YPQ000100 SRK ITEM 1
YQD000210 SRK ITEM R/B 1
YRV000040 SRK ITEM PIDG RED 1
YRW000390 SRK ITEM 1
YRW500010 SRK ITEM 1
VUB001690
Page 20
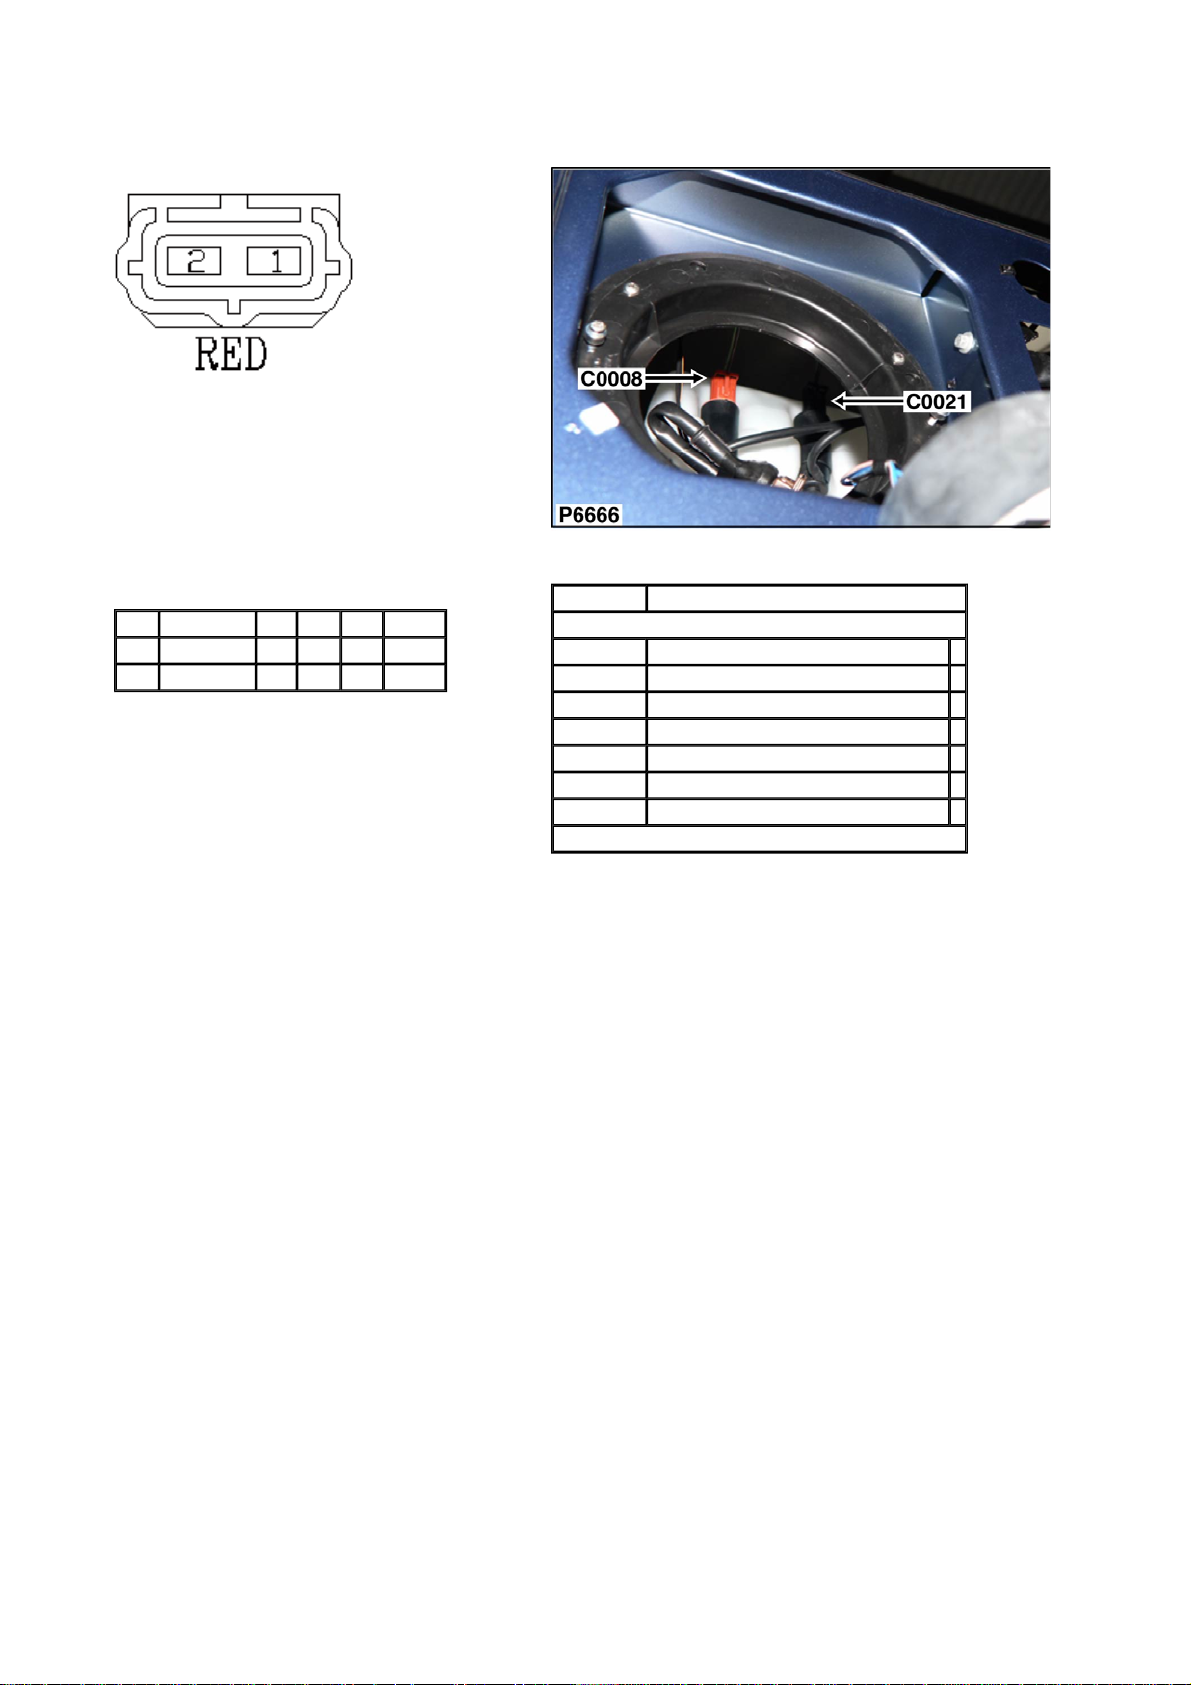
Connector: C0008 Description: Pump-Washer-Windscreen
Location: Behind LH headlamp
Part No.: YPC10131
Colour: RED
Cavities: 2WY
Harness: WING LH HARNESS
Wire Chart
CAV TERMINAL CSA COL CCT DESTN
1 YPL10062 0.5D B ALL CTAP
2 YPL10062 0.5D LGB ALL C1265
Service Repair Kits
CSA 0.20- 0.50 CSA
Cavities: 1,2
VDK500010 SRK ITEM GENERAL 1
YMI000330 SRK ITEM ECONOSEAL FAMILY 0.5CSA 1
YPQ000100 SRK ITEM 1
YQD000210 SRK ITEM R/B 1
YRV000040 SRK ITEM PIDG RED 1
YRW000390 SRK ITEM 1
YRW500010 SRK ITEM 1
VUB001690
Page 21
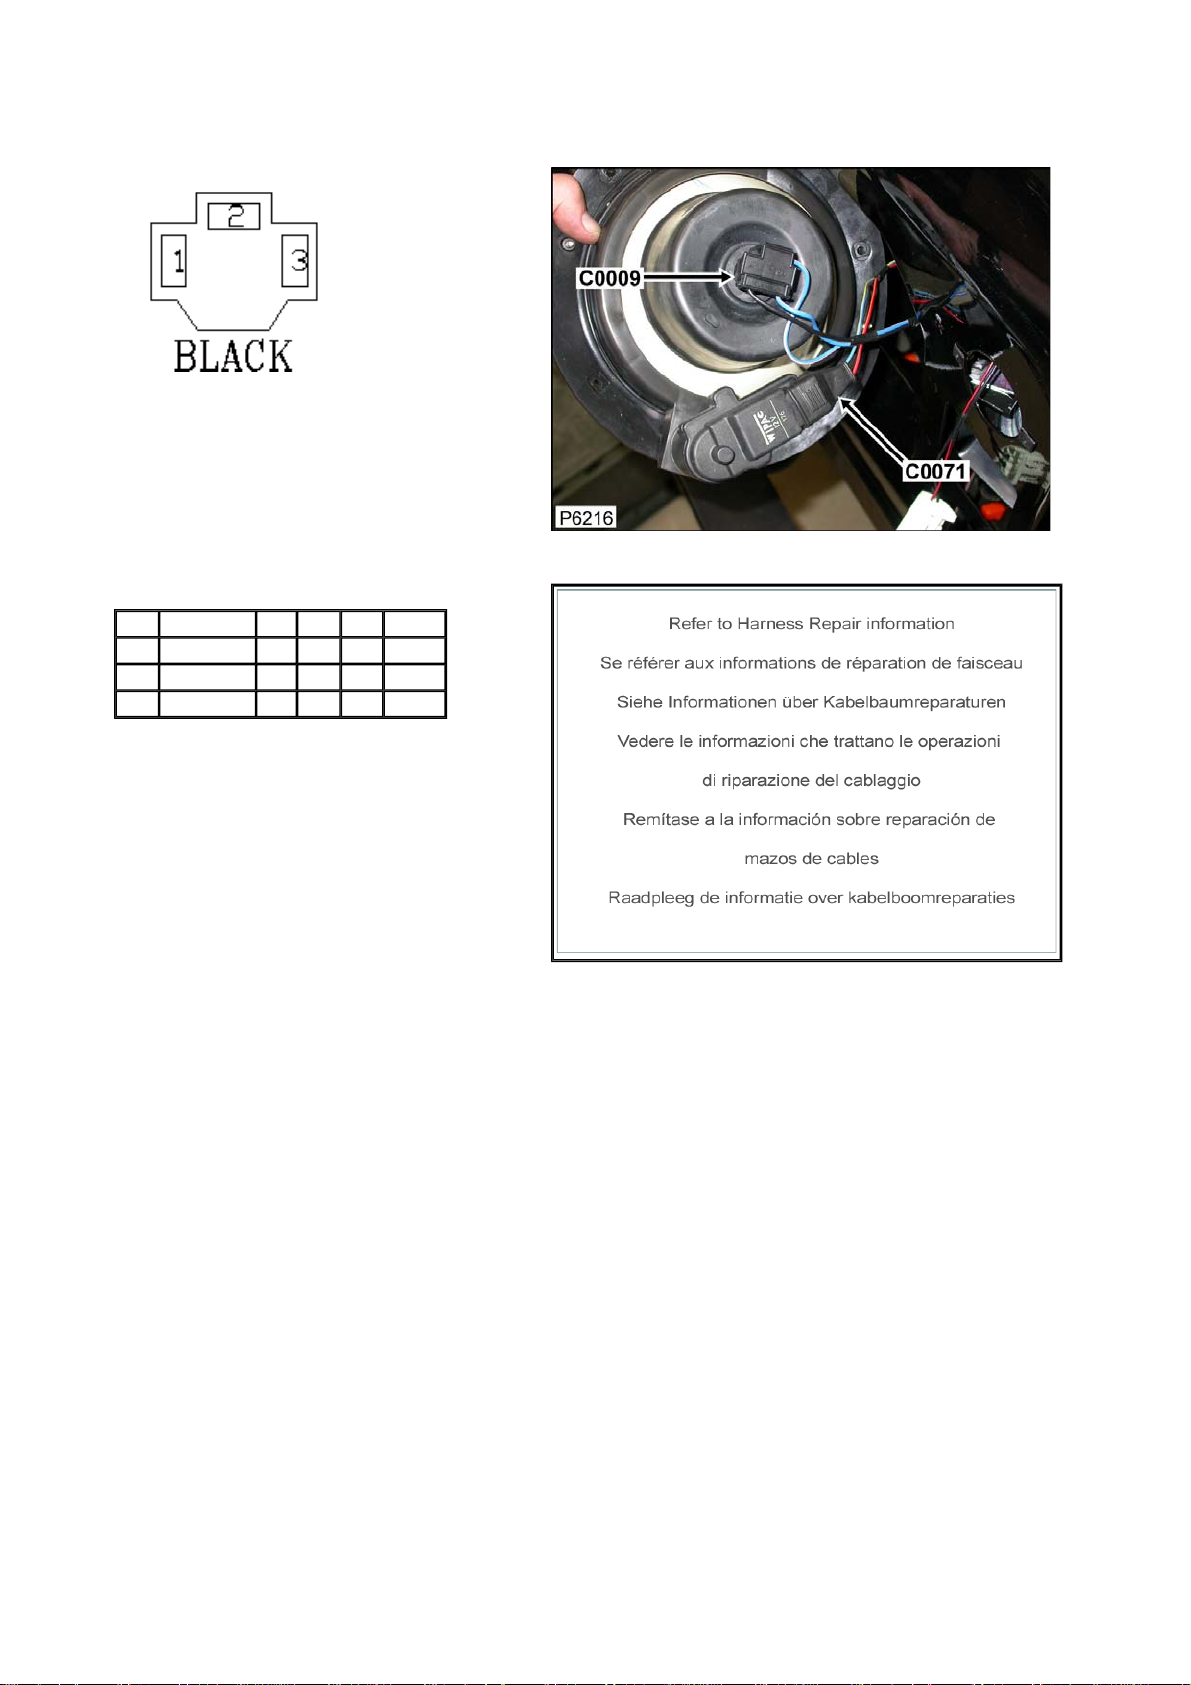
Connector: C0009 Description: Headlamp-LH
Location: Behind LH headlamp
Part No.: AFU3113
Colour: BLACK
Cavities: 3WY
Harness: WING LH HARNESS
Wire Chart
CAV TERMINAL CSA COL CCT DESTN
1 AFU3344 1.5D US ALL C1265
2 AFU3344 1.5D UK ALL C1265
3 AFU3344 1.5D B ALL C1265
Service Repair Kits
Page 22
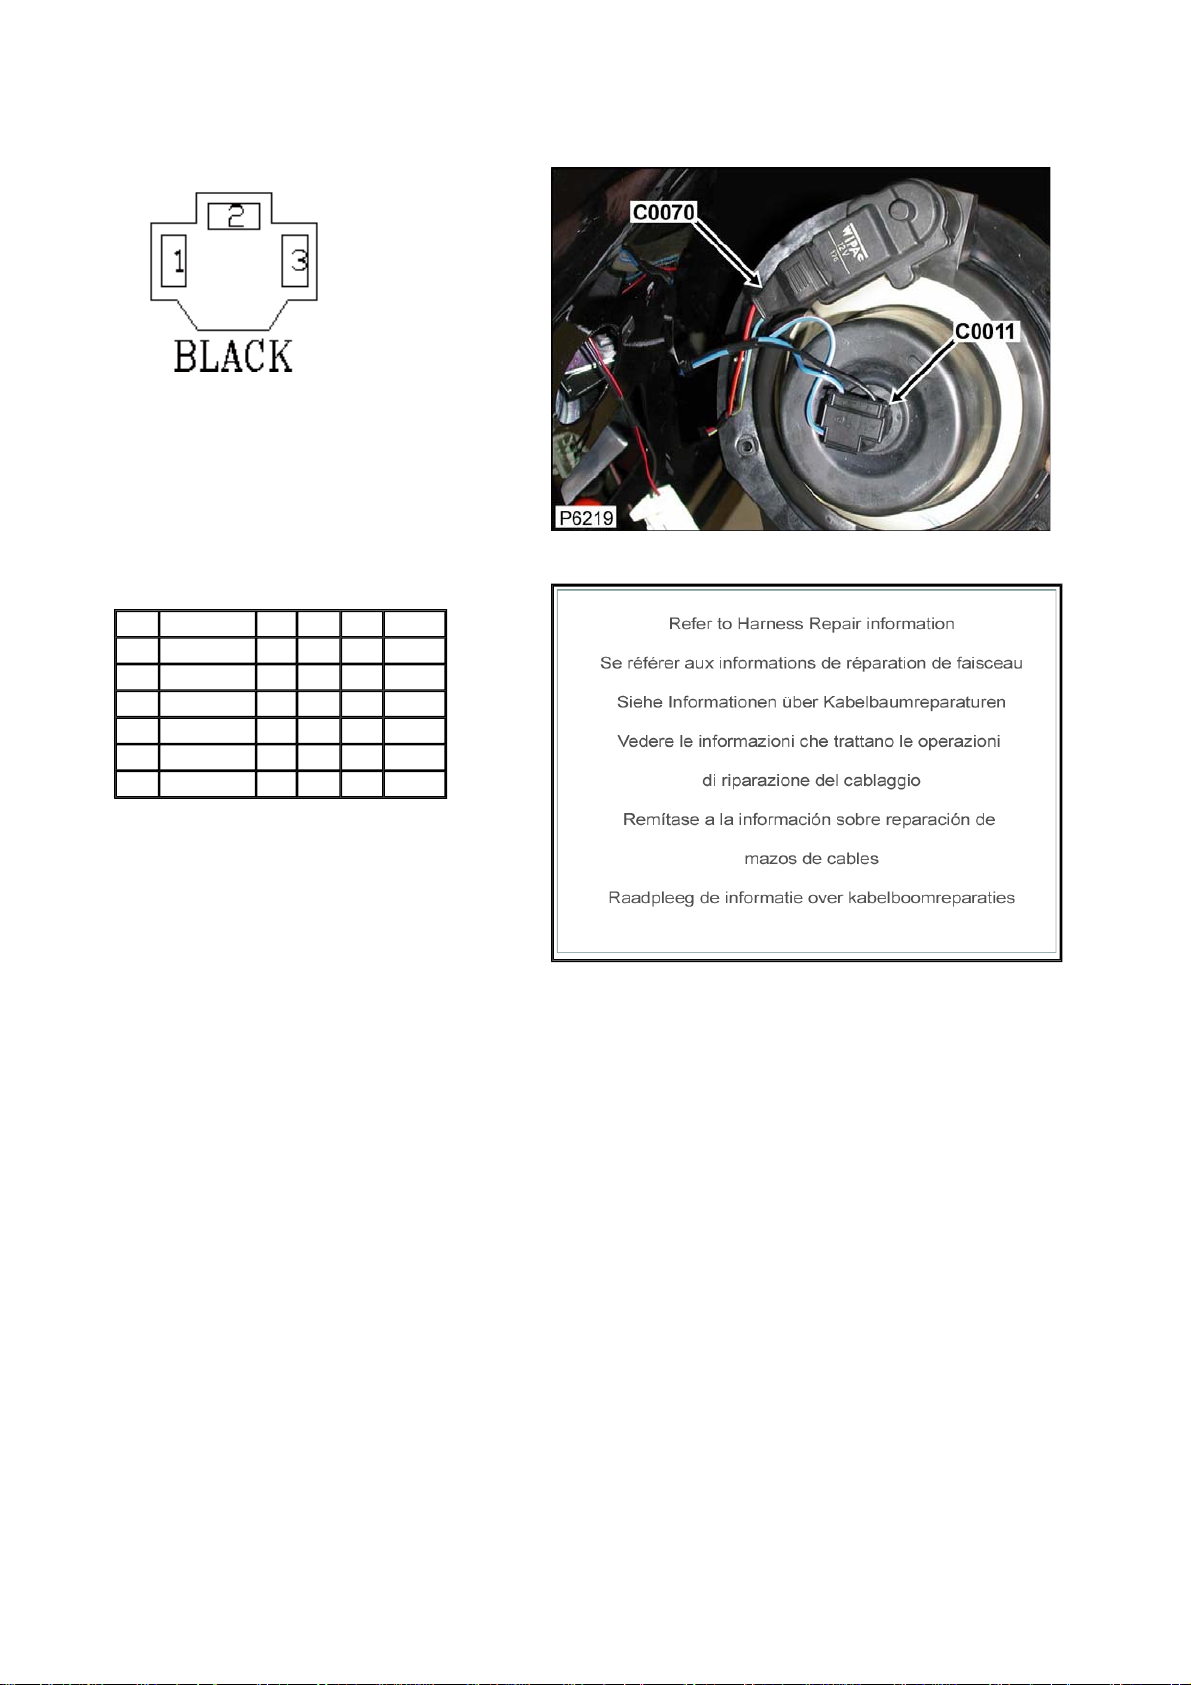
Connector: C0011 Description: Headlamp-RH
Location: Behind RH head lamp
Part No.: AFU3113
Colour: BLACK
Cavities: 3WY
Harness: WING RH HARNESS
Wire Chart
CAV TERMINAL CSA COL CCT DESTN
1 AFU3344 1.5D UO ALL C1267
2 AFU3344 1.5D UB ALL C1267
3 AFU3344 1.5D B 1 C1267
3 AFU3344 1.5D B 2 C1267
3 AFU3344 1.5D B 3 C1267
3 AFU3344 1.5D B 5 C1267
Service Repair Kits
Page 23
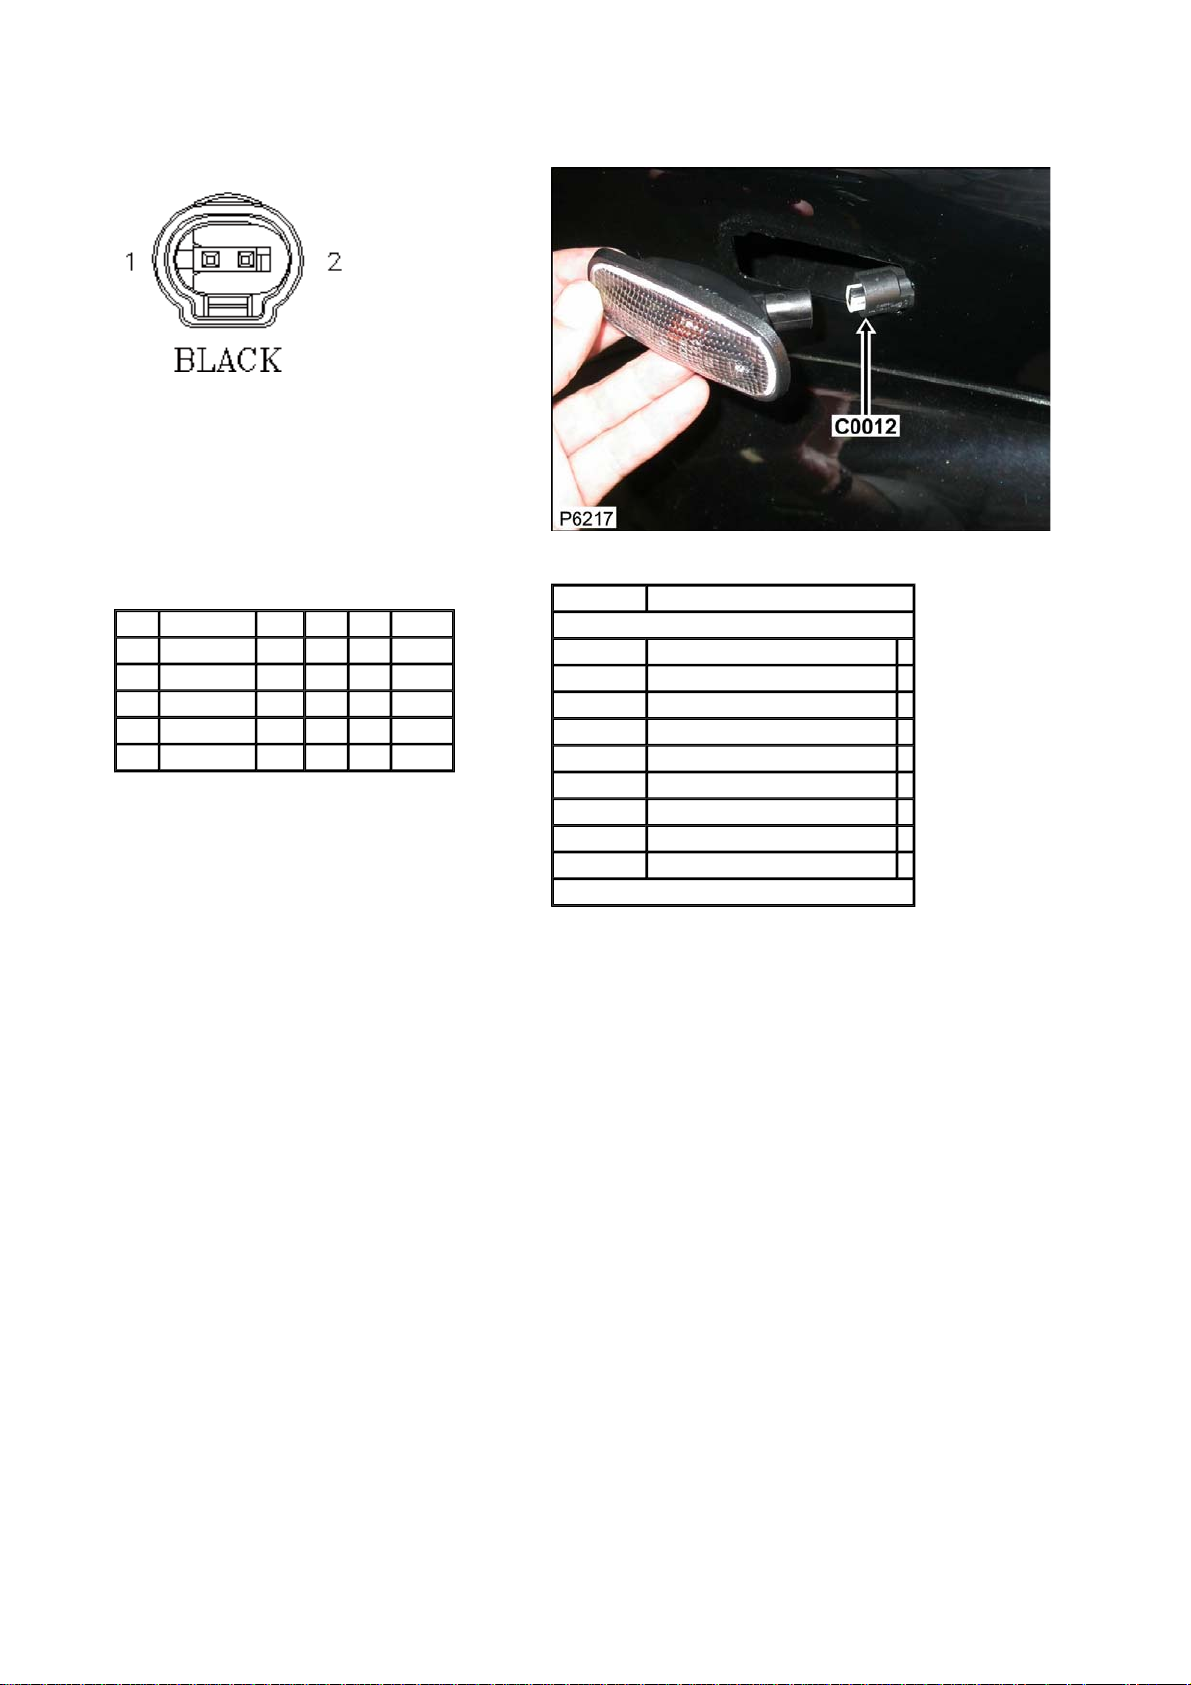
Connector: C0012 Description: Lamp-Side repeater-Front-RH
Location: On the side of the front fender
Part No.: YPC116820
Colour:
Cavities:
Harness: WING RH HARNESS
Wire Chart
CAV TERMINAL CSA COL CCT DESTN
1 YPL101510 0.75D GW ALL CTAP
2 YPL101510 0.75D B 1 C0004
2 YPL101510 0.75D B 2 C0004
2 YPL101500 0.5D B 3 CTAP
2 YPL101510 0.75D B 5 C0004
Service Repair Kits
CSA 0.75- 0.75 CSA
Cavities: 1,2
VDK500010 SRK ITEM GENERAL 1
VDK500070 SRK ITEM MQ EXTRACT TOOL 1
VDK500080 SRK ITEM MPQ EXTRACT TOOL 1
YMI000950 SRK ITEM MQS FAMILY 0.75CSA 1
YPQ000100 SRK ITEM 1
YQD000210 SRK ITEM R/B 1
YRV000040 SRK ITEM PIDG RED 1
YRW000390 SRK ITEM 1
YRW500010 SRK ITEM 1
VUB500150
Page 24
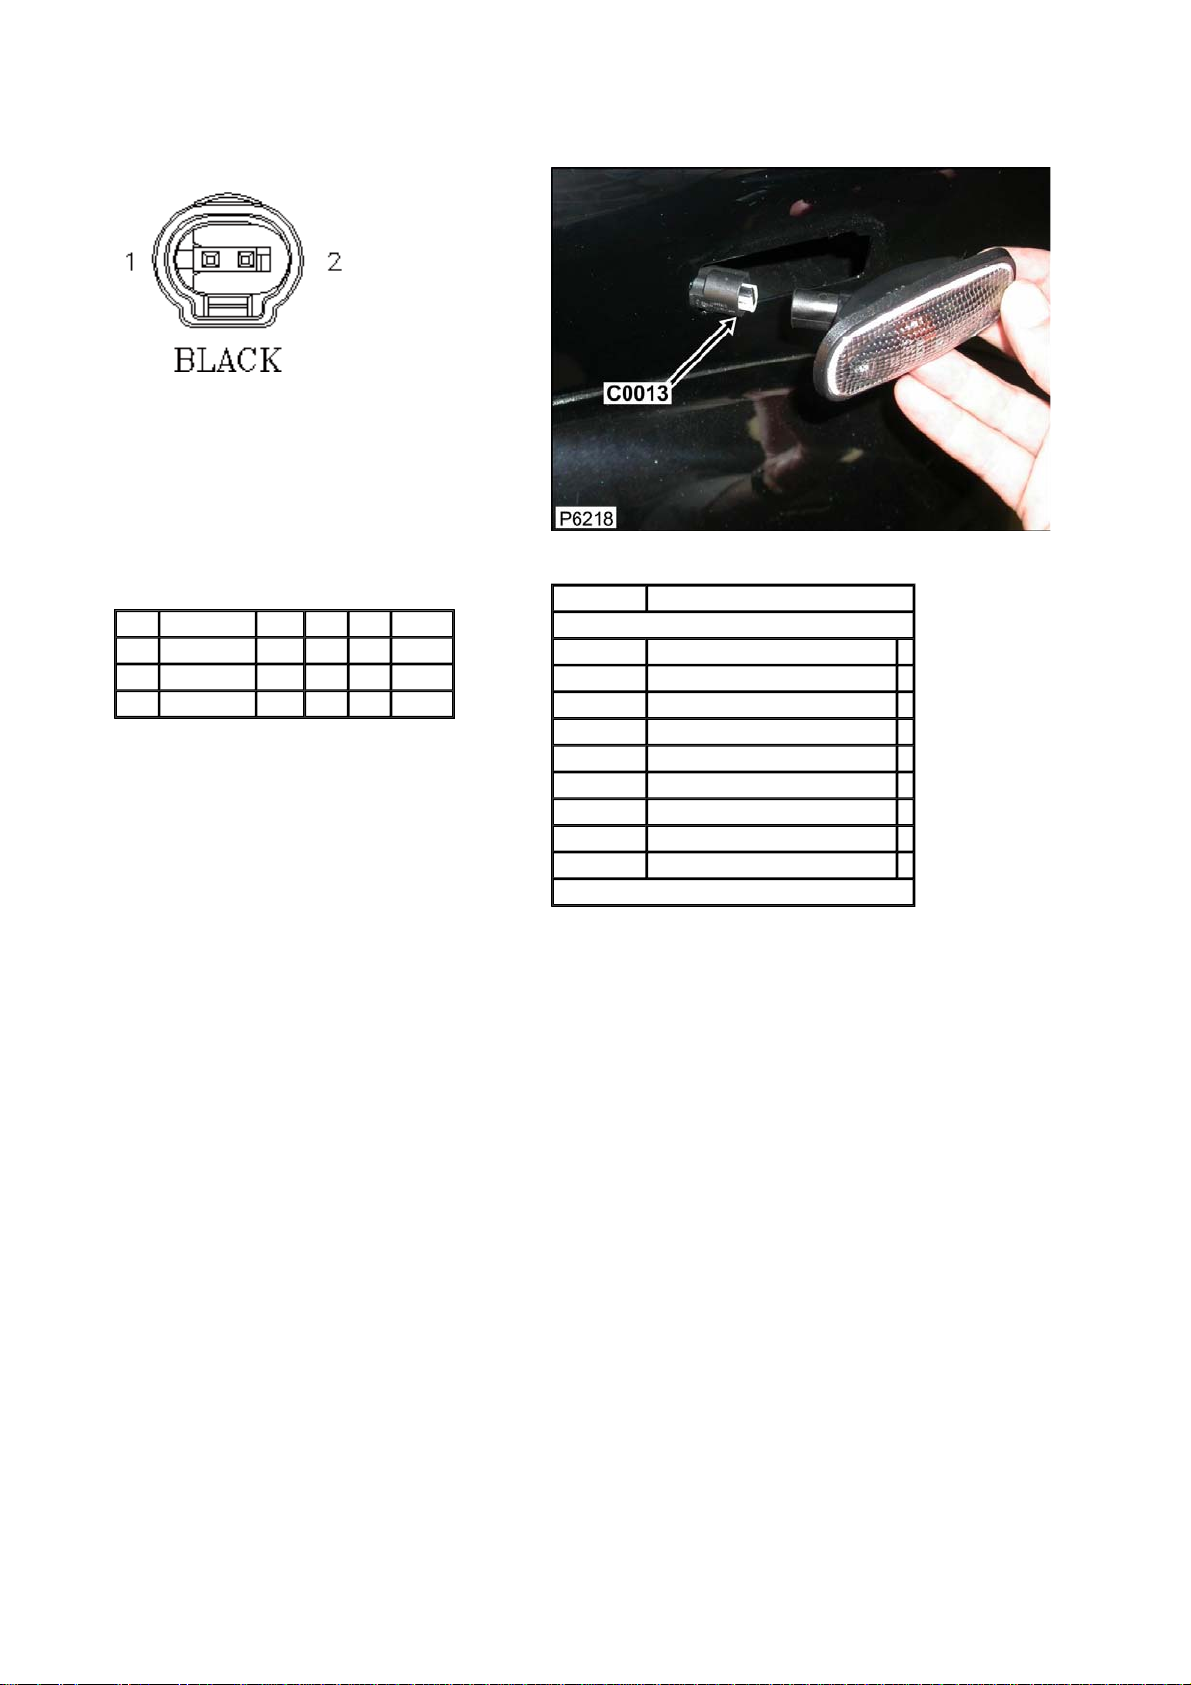
Connector: C0013 Description: Lamp-Side repeater-Front-LH
Location: On the side of the front fender
Part No.: YPC116820
Colour:
Cavities:
Harness: WING LH HARNESS
Wire Chart
CAV TERMINAL CSA COL CCT DESTN
1 YPL101510 0.75D GR ALL CTAP
2 YPL101510 0.75D B 2 C0003
2 YPL101510 0.75D B 3 C1873
Service Repair Kits
CSA 0.75- 0.75 CSA
Cavities: 1,2
VDK500010 SRK ITEM GENERAL 1
VDK500070 SRK ITEM MQ EXTRACT TOOL 1
VDK500080 SRK ITEM MPQ EXTRACT TOOL 1
YMI000950 SRK ITEM MQS FAMILY 0.75CSA 1
YPQ000100 SRK ITEM 1
YQD000210 SRK ITEM R/B 1
YRV000040 SRK ITEM PIDG RED 1
YRW000390 SRK ITEM 1
YRW500010 SRK ITEM 1
VUB500150
Page 25
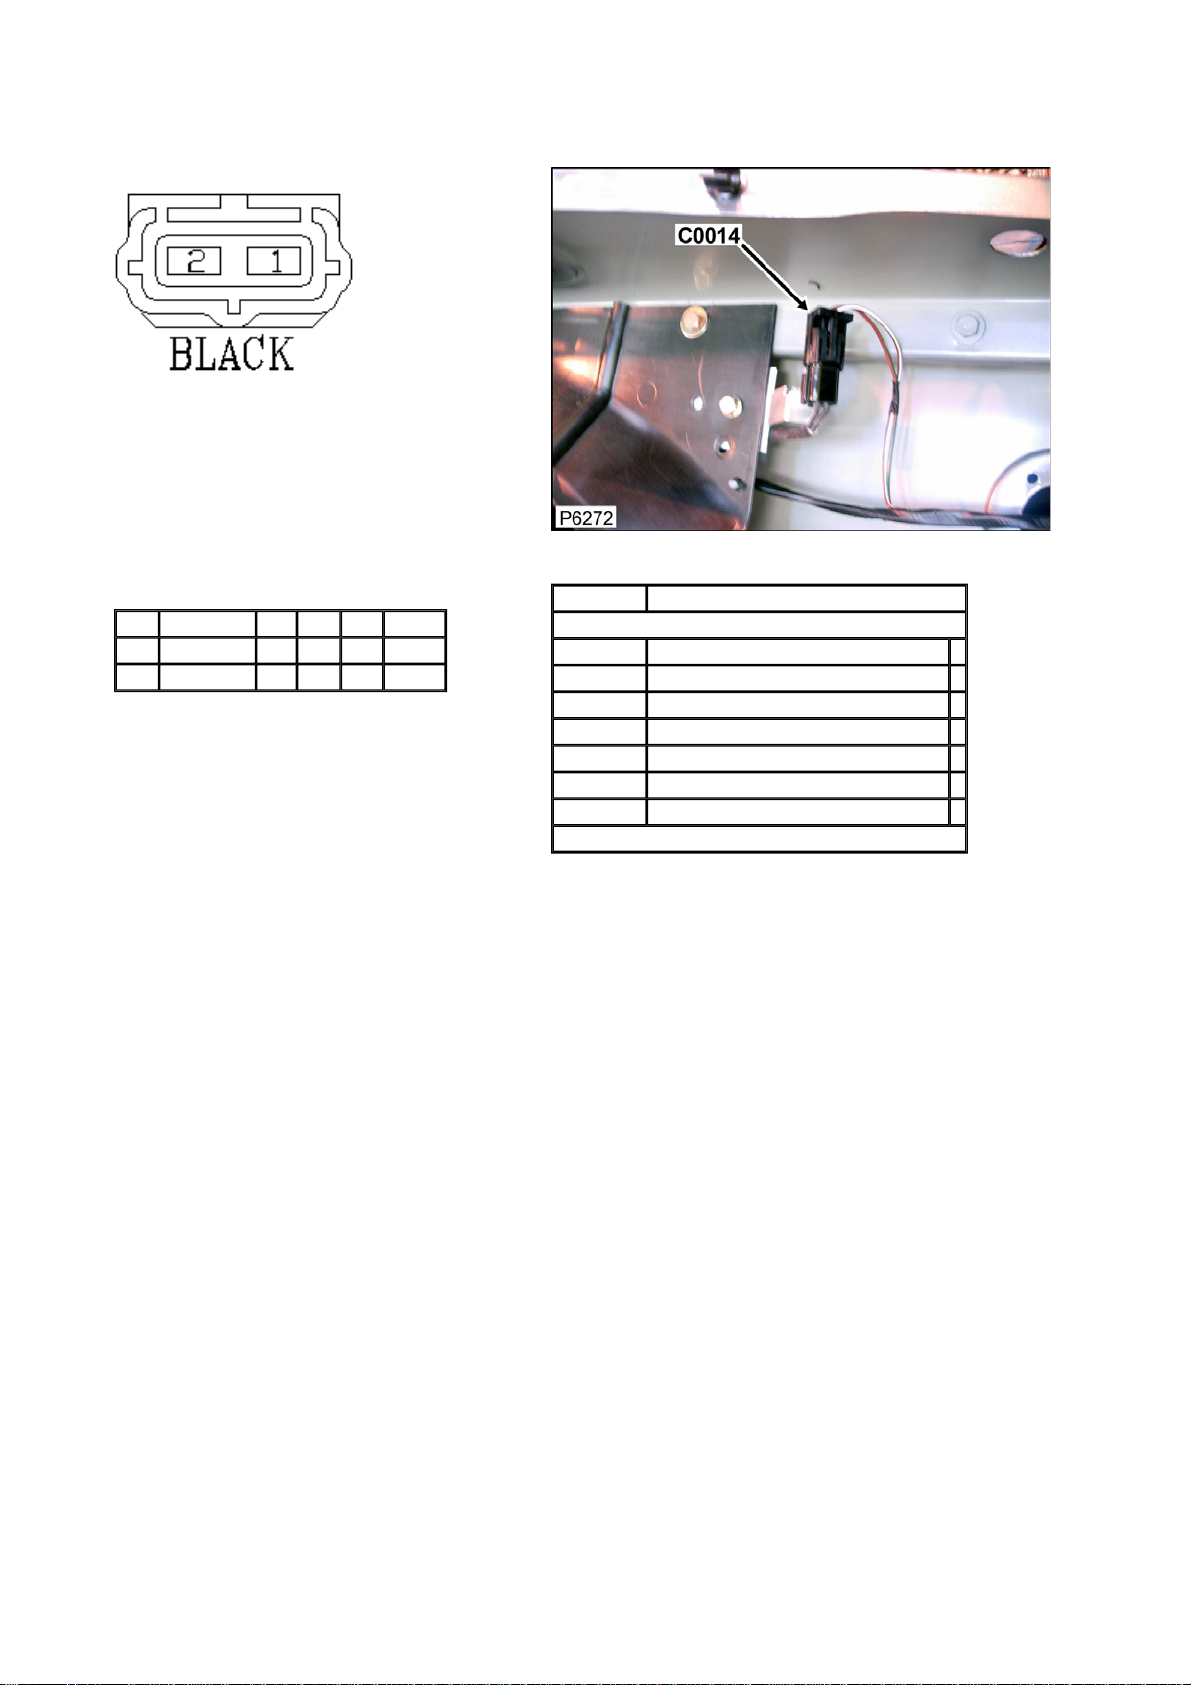
Connector: C0014 Description: Resistor-Dim dip
Location: Under hood, RH inner fender
Part No.: YPC10070
Colour: BLACK
Cavities: 2WY
Harness: WING RH HARNESS
Wire Chart
CAV TERMINAL CSA COL CCT DESTN
1 AFU3802 1.5D NW 6 C1267
2 AFU3802 1.5D NG 6 C1267
Service Repair Kits
CSA 0.70- 2.00 CSA
Cavities: 1,2
VDK500010 SRK ITEM GENERAL 1
YMI000320 SRK ITEM ECONOSEAL FAMILY 2.0CSA 1
YPQ000110 SRK ITEM 1
YQD000210 SRK ITEM R/B 1
YRV000050 SRK ITEM PIDG BLUE 1
YRW000390 SRK ITEM 1
YRW500010 SRK ITEM 1
VUB001680
Page 26
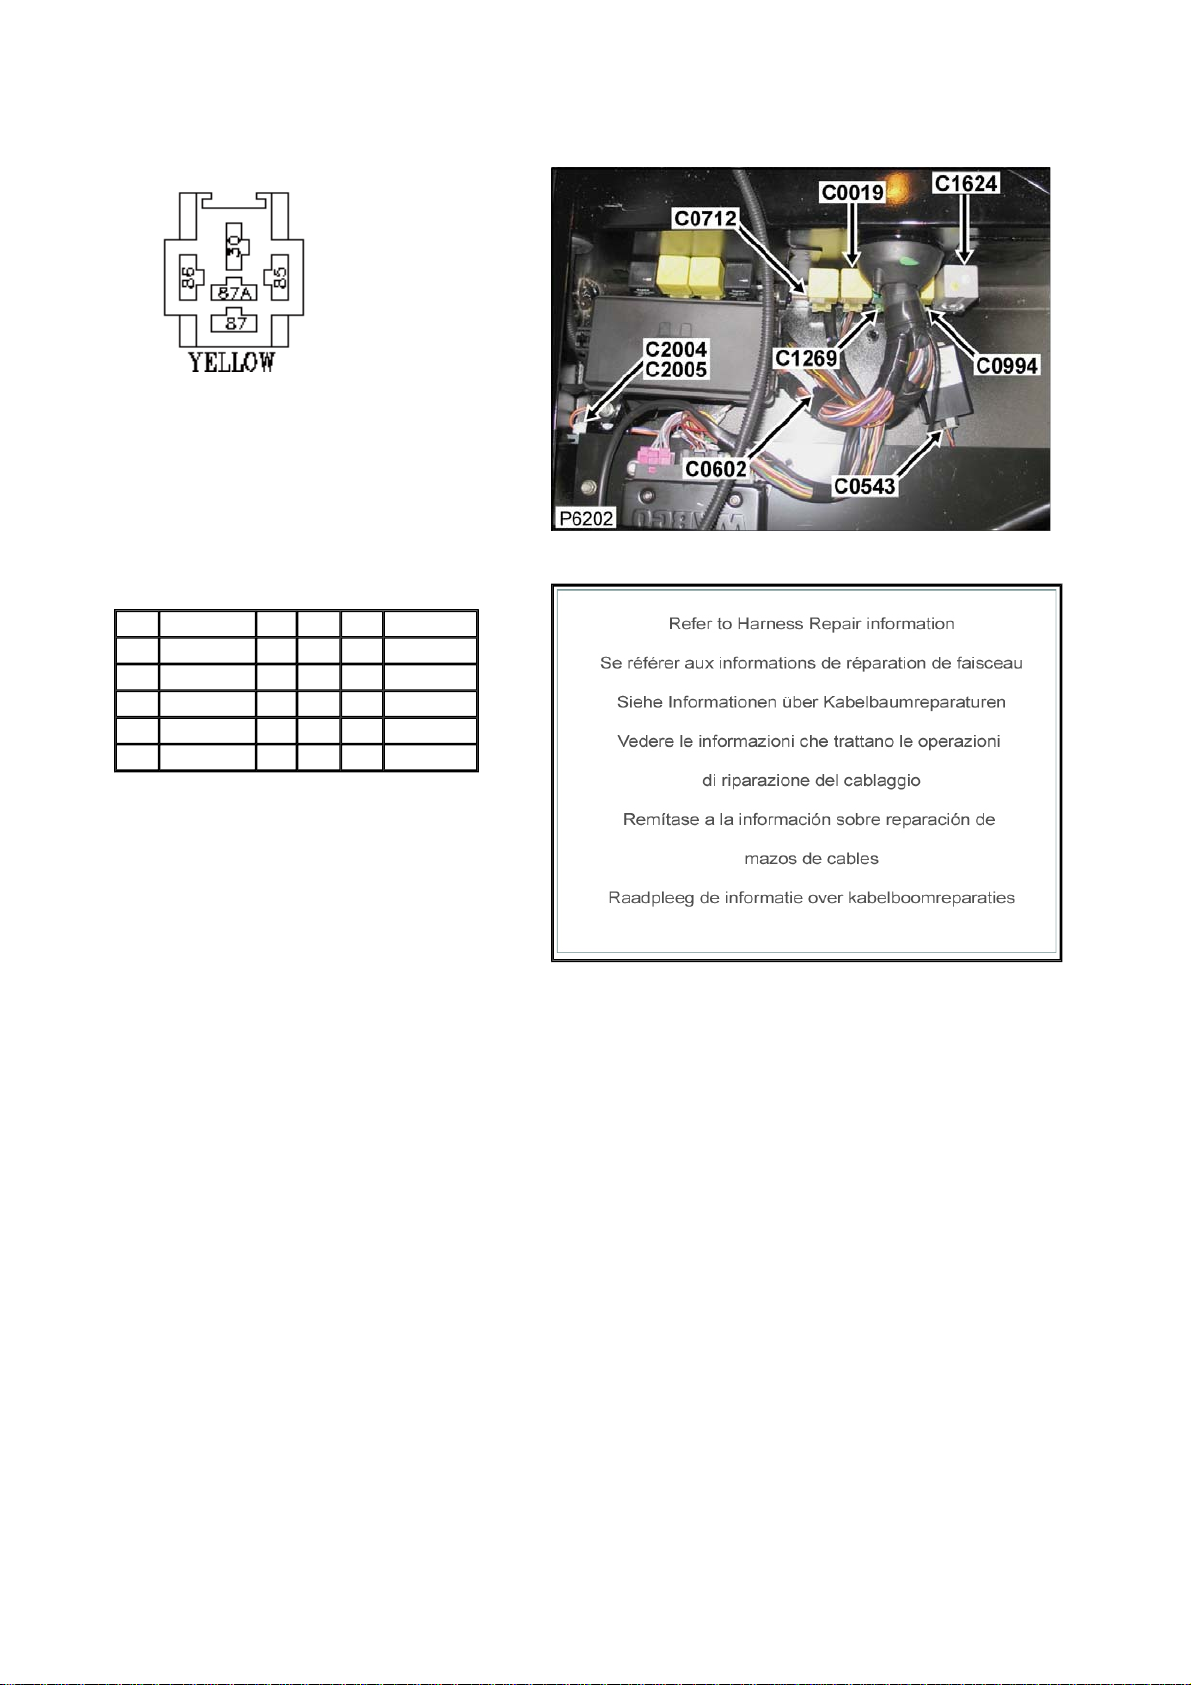
Connector: C0019 Description: Relay-Cooling-fan
Location: Beneath RH Front seat
Part No.: AFU3271
Colour: YELLOW
Cavities: 5WY
Harness: MAIN LH + RH HARNESS
Wire Chart
CAV TERMINAL CSA COL CCT DESTN
30 YPL10045 2.5D NS 14L C0583L
30 YPL10045 2.5D NS 14R C0583R
85 AFU3120 2.0D NO 14 S/JOINT SJ1
86 AFU3119 0.5D UB 14 C0872
87 AFU3120 2.0D BN 14 C0280
Service Repair Kits
Page 27
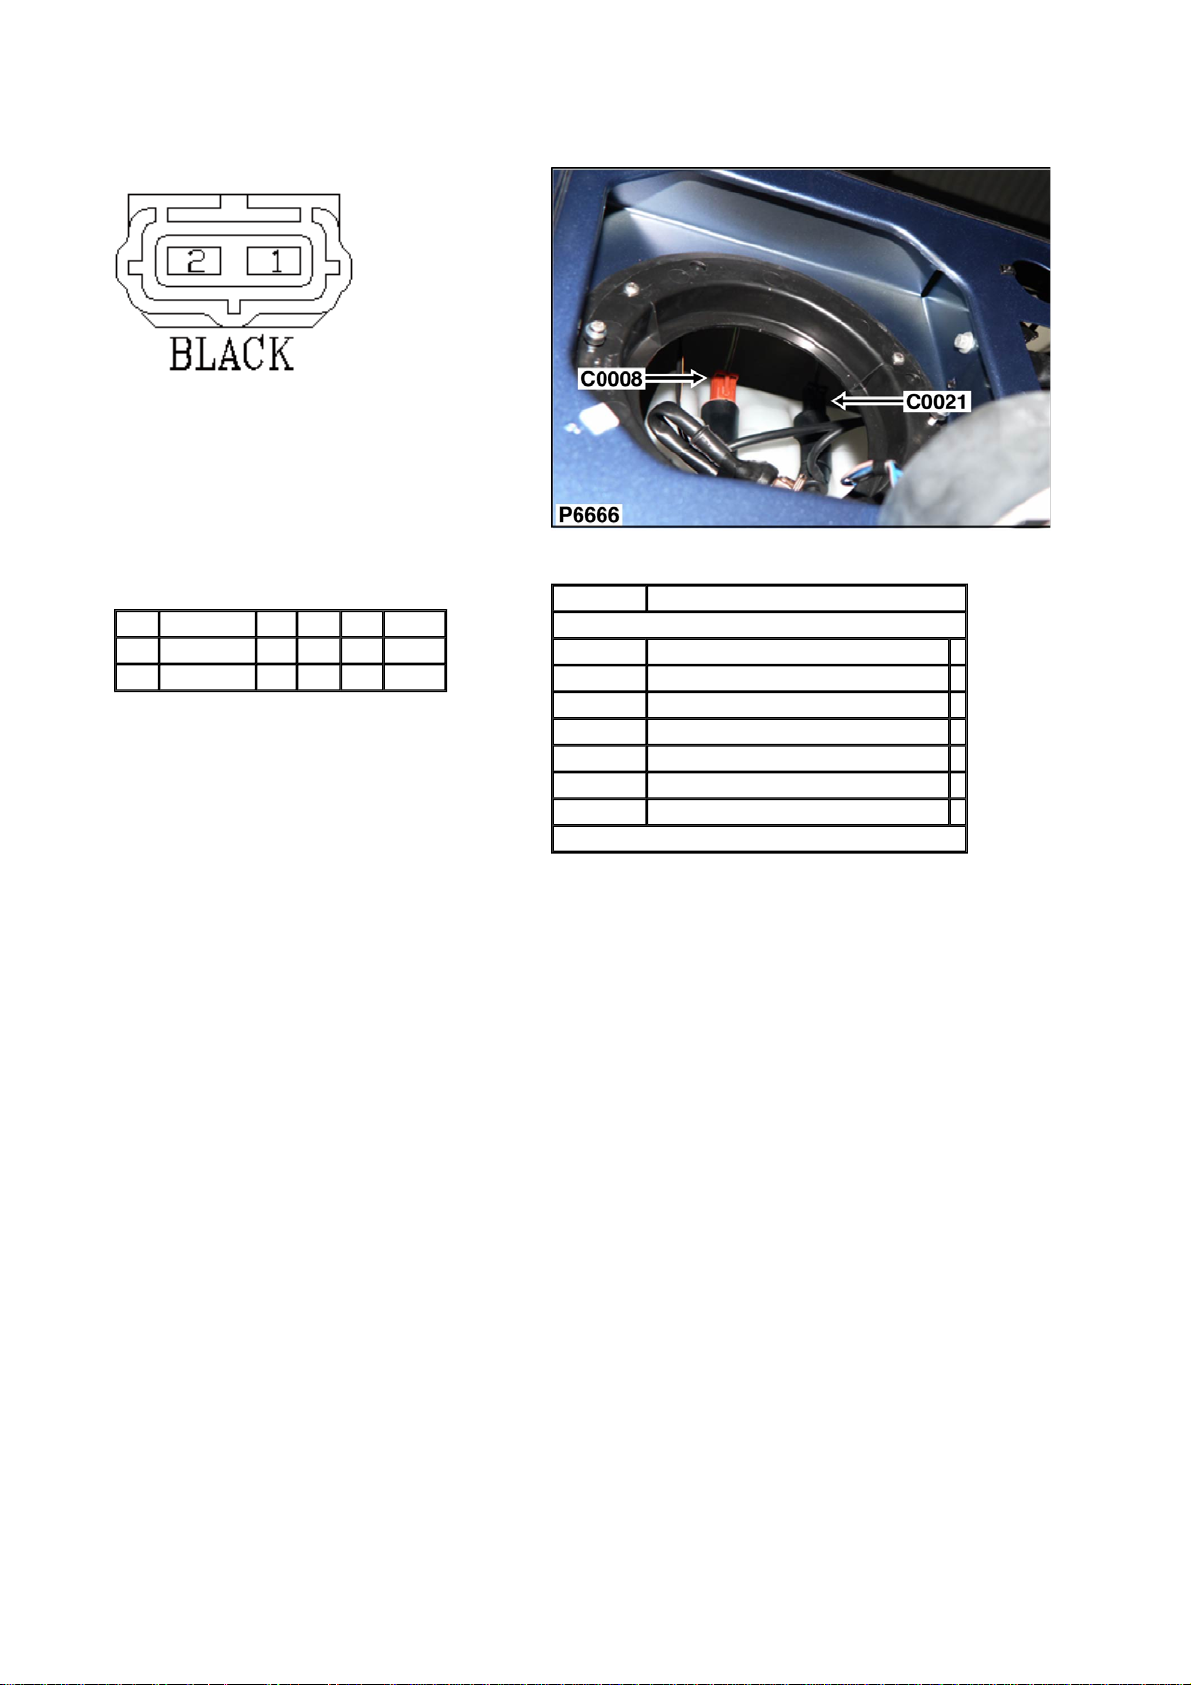
Connector: C0021 Description: Pump-Washer-Rear screen
Location: Behind LH headlamp
Part No.: YPC10070
Colour: BLACK
Cavities: 2WY
Harness: WING LH HARNESS
Wire Chart
CAV TERMINAL CSA COL CCT DESTN
1 YPL10062 0.5D B ALL CTAP
2 YPL10062 0.5D BLG ALL C1265
Service Repair Kits
CSA 0.20- 0.50 CSA
Cavities: 1,2
VDK500010 SRK ITEM GENERAL 1
YMI000330 SRK ITEM ECONOSEAL FAMILY 0.5CSA 1
YPQ000100 SRK ITEM 1
YQD000210 SRK ITEM R/B 1
YRV000040 SRK ITEM PIDG RED 1
YRW000390 SRK ITEM 1
YRW500010 SRK ITEM 1
VUB001690
Page 28
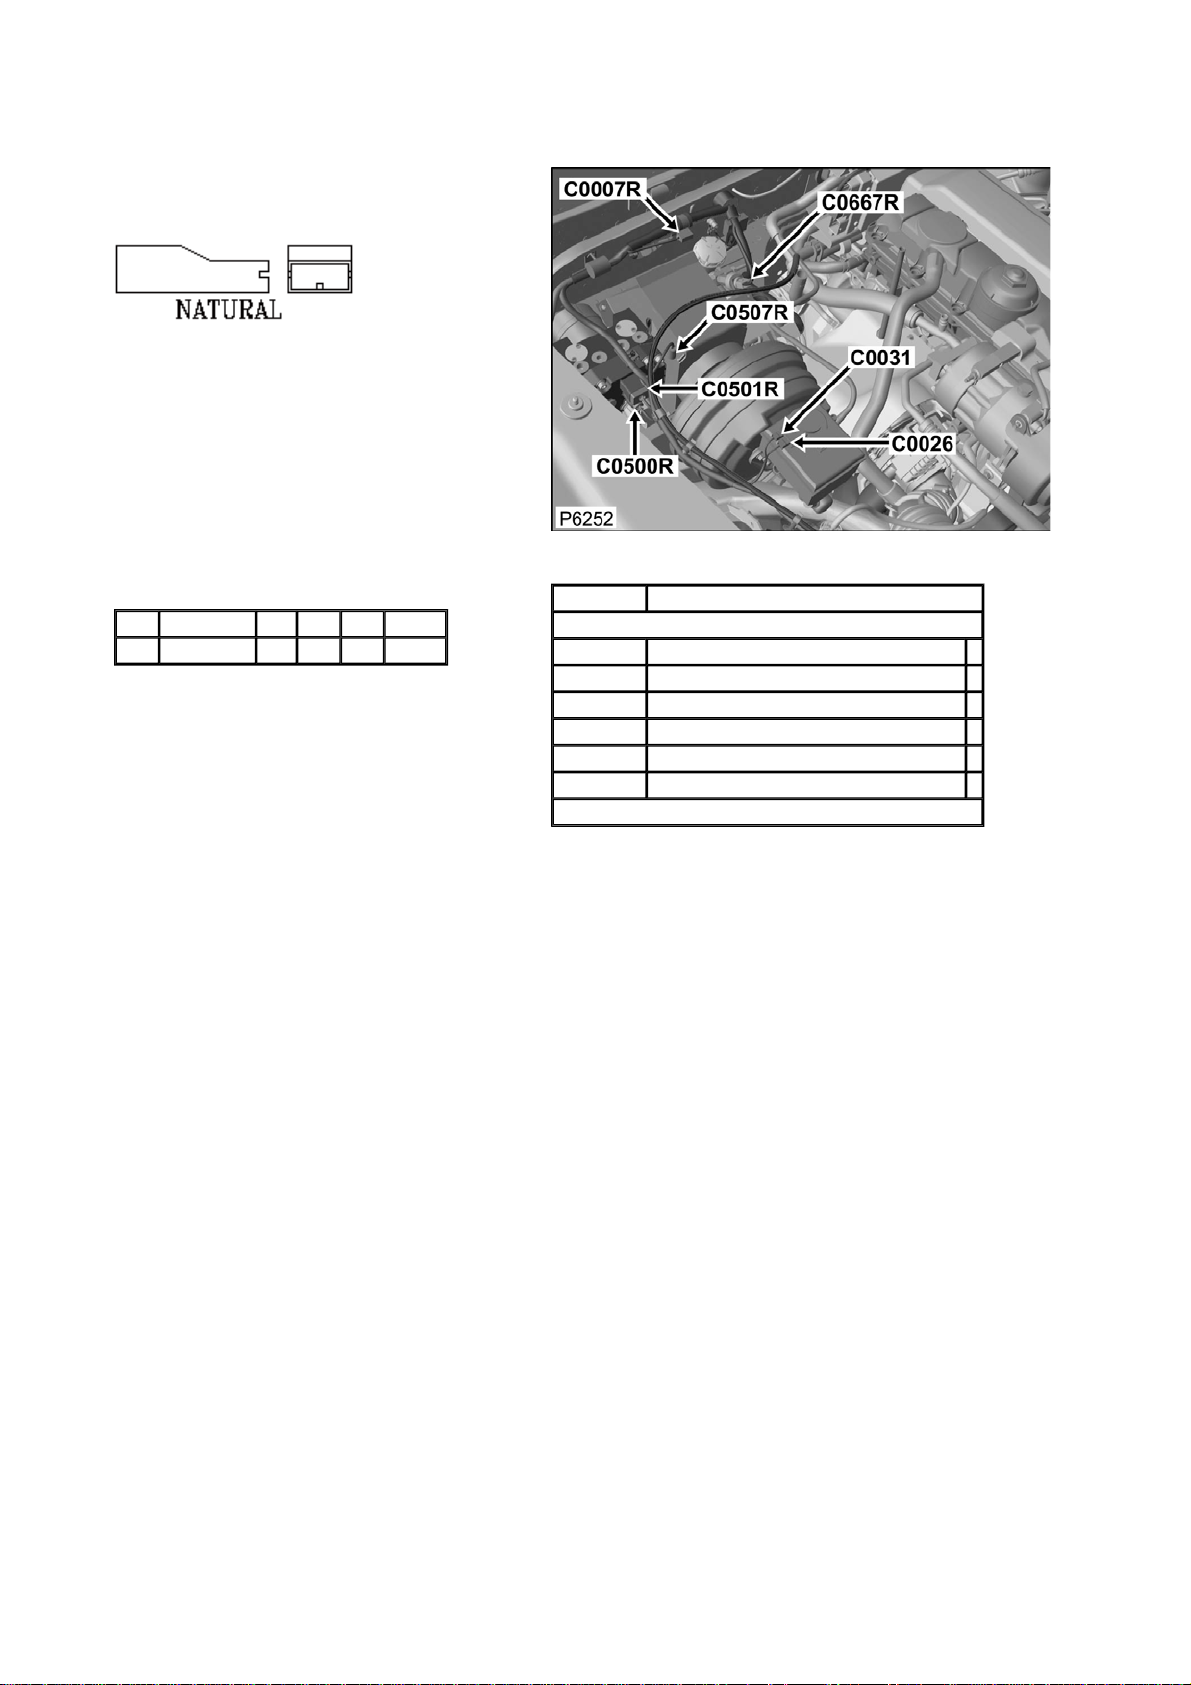
Connector: C0026 Description: Switch-Brake-fluid level
Location: Rear RH side of engine compartment
Part No.: ADU8339
Colour: NATURAL
Cavities: 1WY
Harness: MAIN LH + RH HARNESS
Wire Chart
CAV TERMINAL CSA COL CCT DESTN
1 AFU3262 0.5D BW 200R C0288
Service Repair Kits
CSA 0.30- 0.81 CSA
Cavities: 1
YMI000210 SRK ITEM 250 POSI-LOCK FAMILY 1.0CSA 1
YPQ000100 SRK ITEM 1
YQD000210 SRK ITEM R/B 1
YRV000040 SRK ITEM PIDG RED 1
YRW000390 SRK ITEM 1
YRW500010 SRK ITEM 1
VUB001560
Page 29
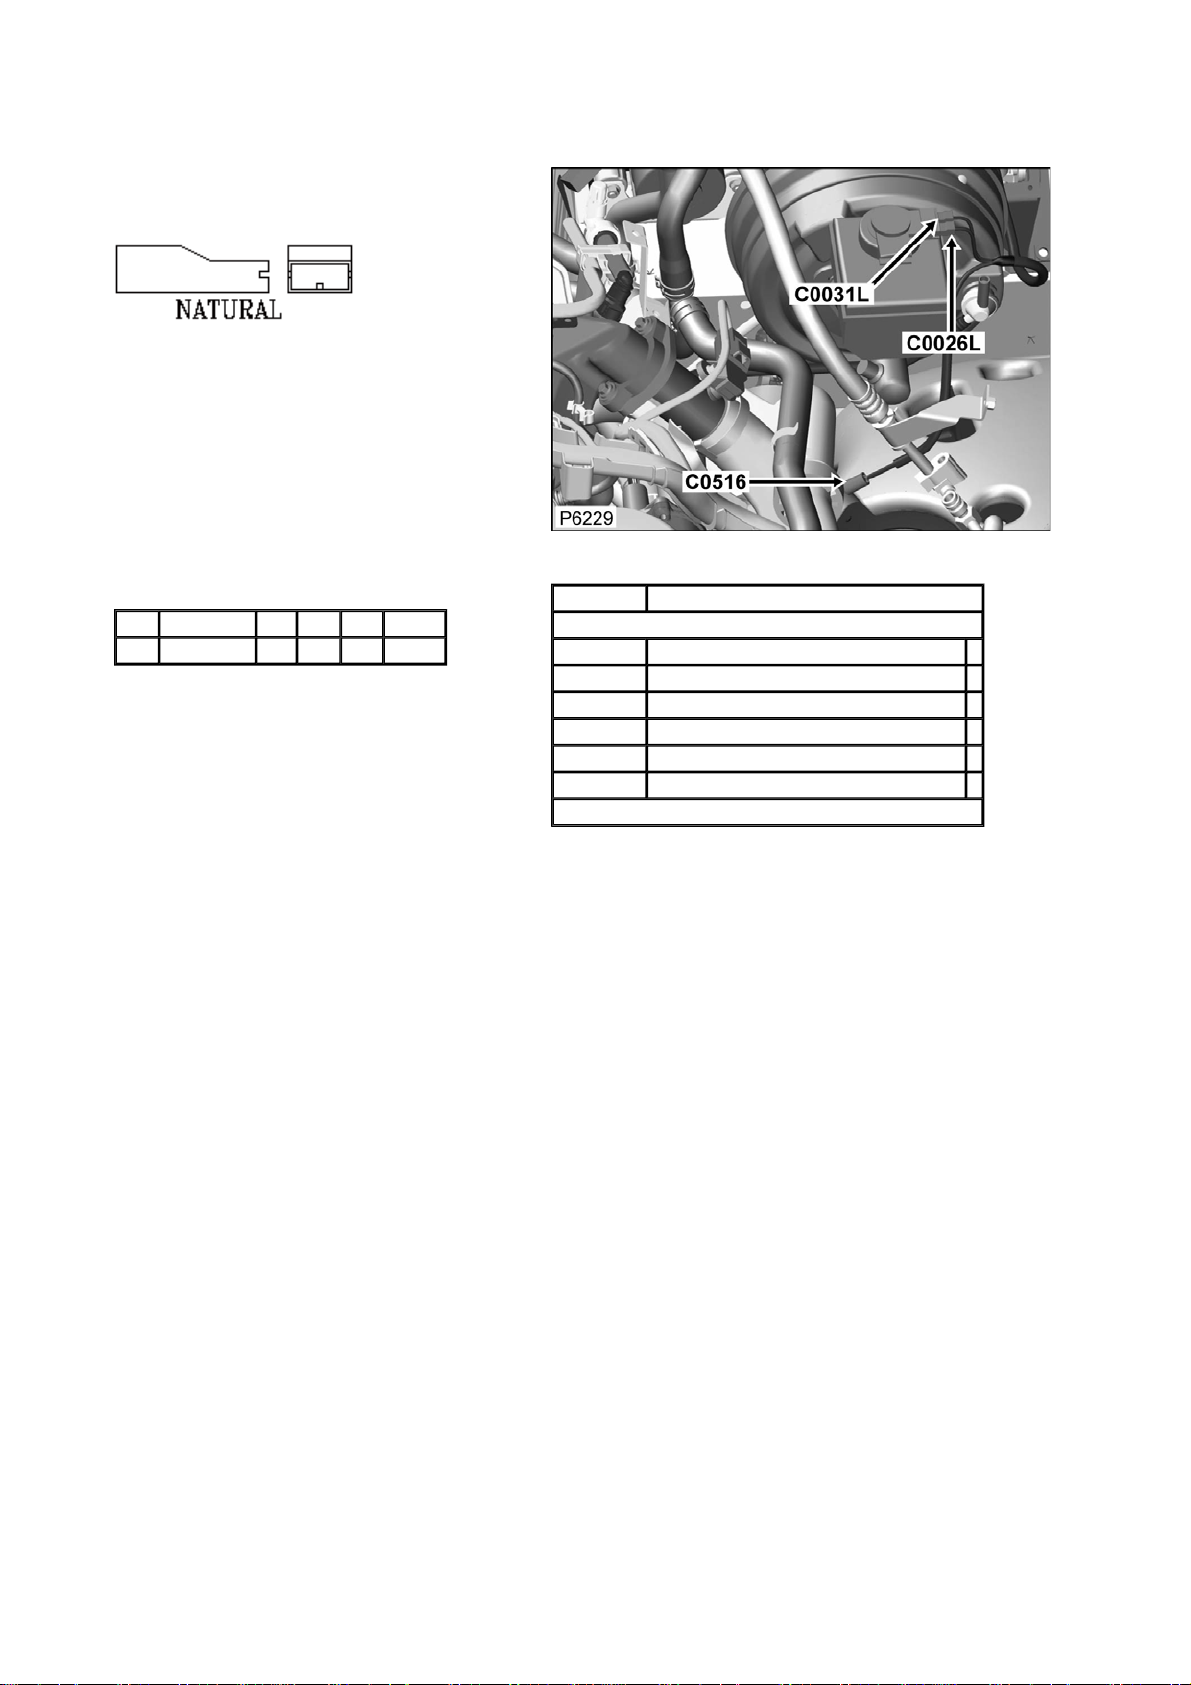
Connector: C0026L Description: Switch-Brake-fluid level
Location: Rear LH side of engine compartment
Part No.: ADU8339
Colour: NATURAL
Cavities: 1WY
Harness: MAIN LH + RH HARNESS
Wire Chart
CAV TERMINAL CSA COL CCT DESTN
1 AFU3262 0.5D BW 139L C0288
Service Repair Kits
CSA 0.30- 0.81 CSA
Cavities: 1
YMI000210 SRK ITEM 250 POSI-LOCK FAMILY 1.0CSA 1
YPQ000100 SRK ITEM 1
YQD000210 SRK ITEM R/B 1
YRV000040 SRK ITEM PIDG RED 1
YRW000390 SRK ITEM 1
YRW500010 SRK ITEM 1
VUB001560
Page 30
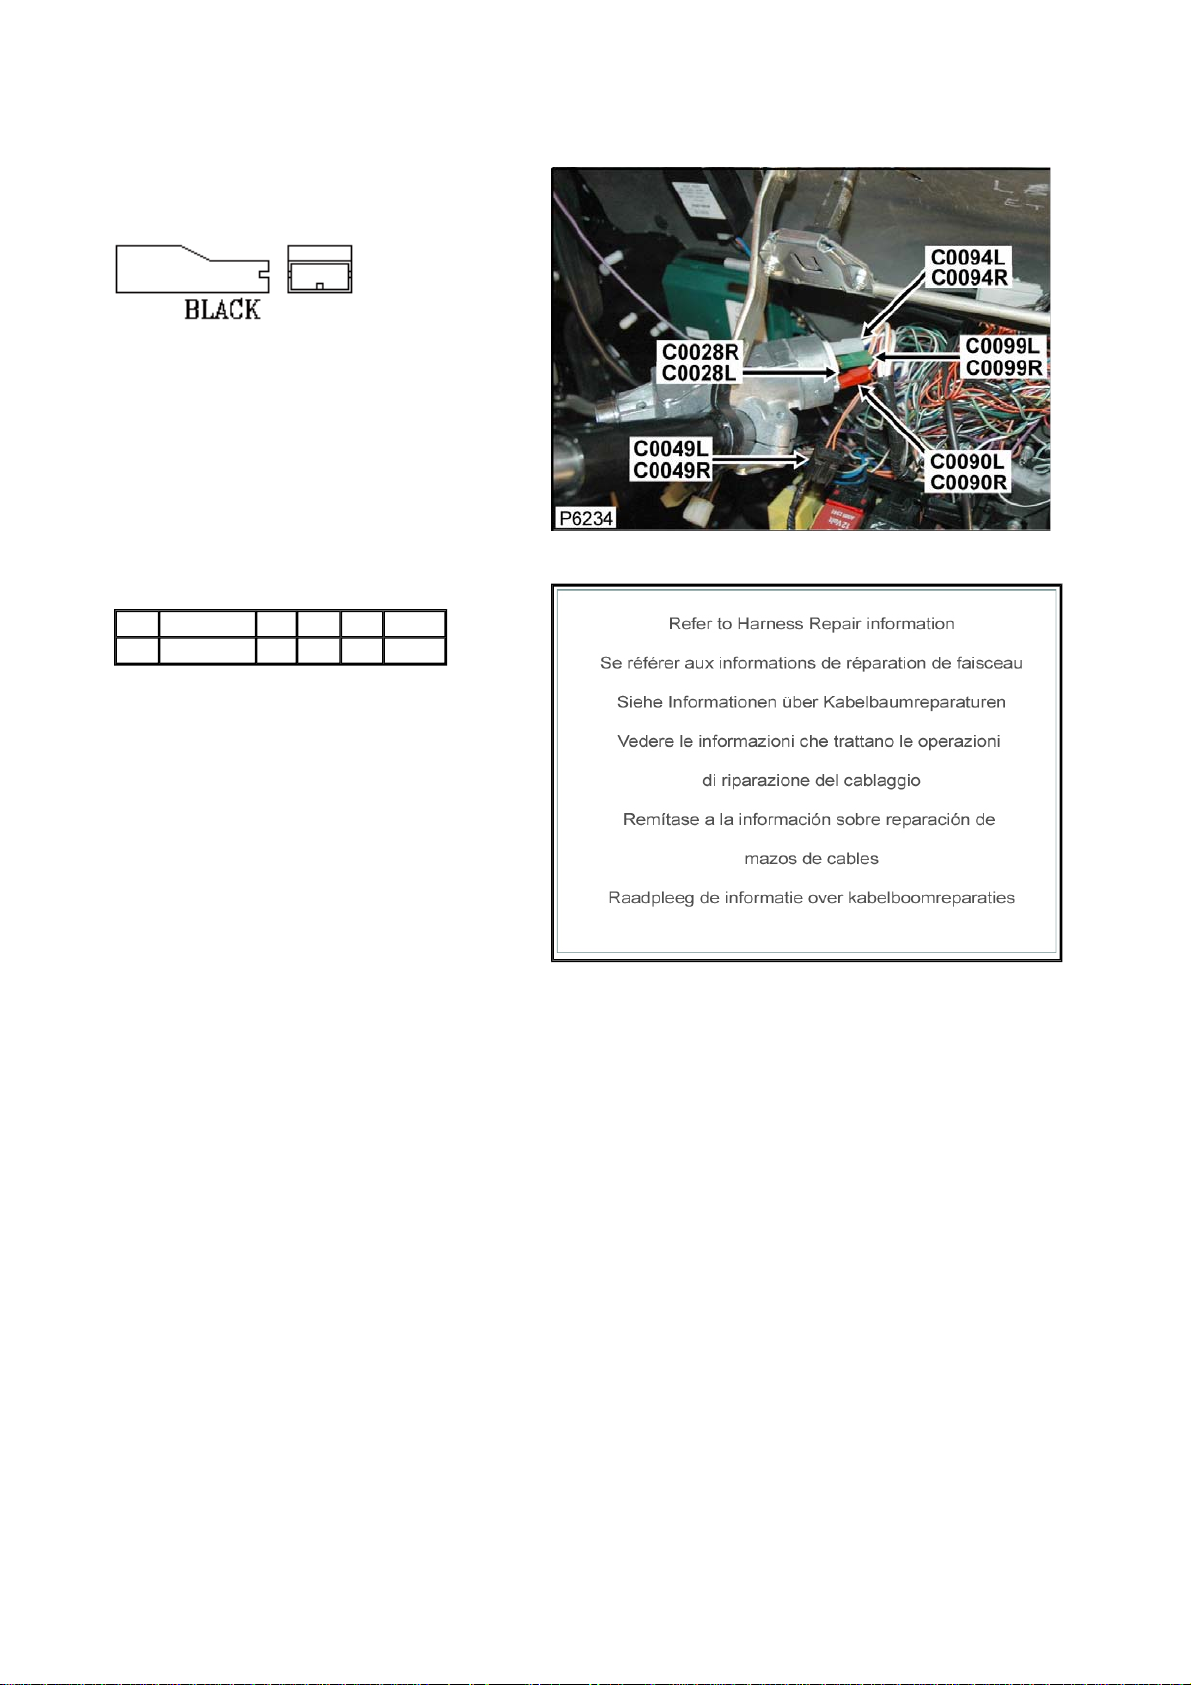
Connector: C0028L Description: Switch-Ignition
Location: Behind steering column cowl
Part No.: AAU1010
Colour:
Cavities:
Harness: MAIN LH + RH HARNESS
Wire Chart
CAV TERMINAL CSA COL CCT DESTN
1 ADU9568 4.0D NW 139L C0570
Service Repair Kits
Page 31
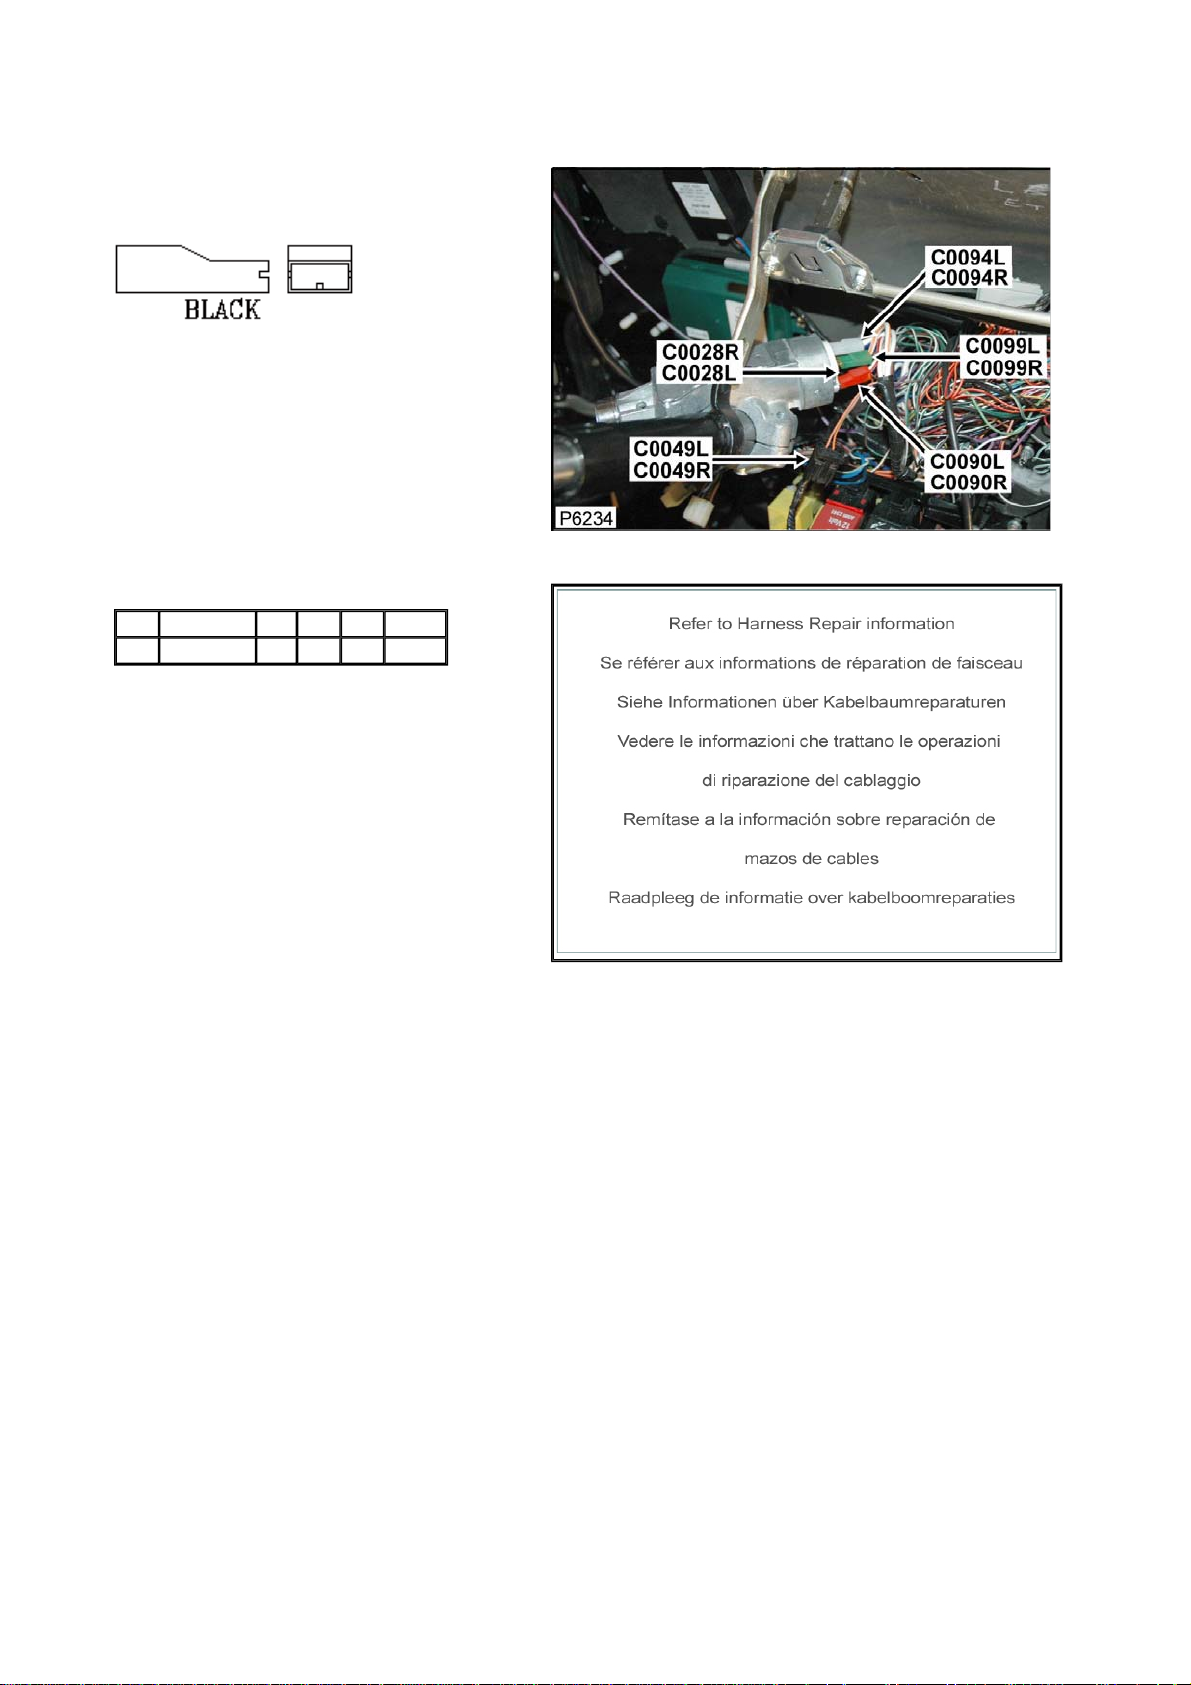
Connector: C0028R Description: Switch-Ignition
Location: Behind steering column cowl
Part No.: AAU1010
Colour:
Cavities:
Harness: MAIN LH + RH HARNESS
Wire Chart
CAV TERMINAL CSA COL CCT DESTN
1 ADU9568 4.0D NW 200R C0570
Service Repair Kits
Page 32
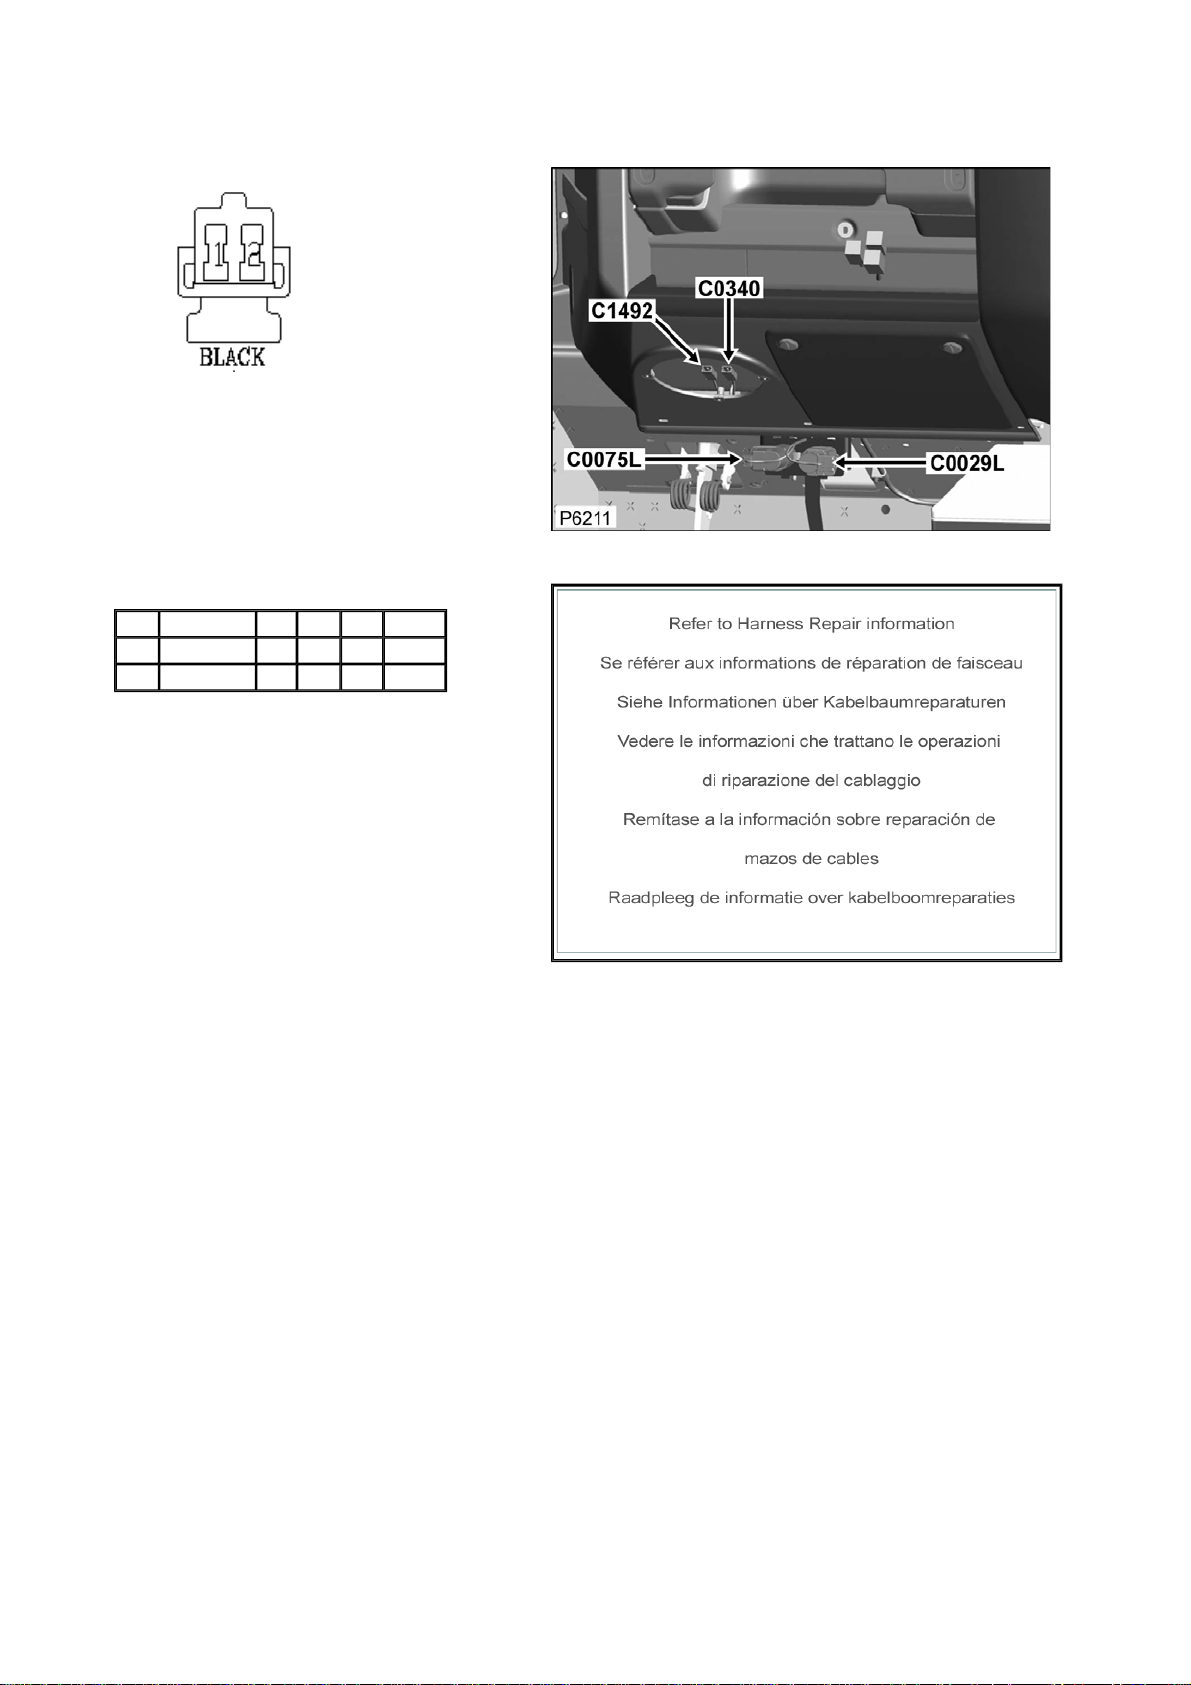
Connector: C0029L Description: Stop lamp switch
Location: Driver footwell
Part No.: YPC10225
Colour: BLACK
Cavities: 2WY
Harness: MAIN LH + RH HARNESS
Wire Chart
CAV TERMINAL CSA COL CCT DESTN
1 YPL10036 0.5D GO 139L CTAP
2 YPL10036 0.5D BR 139L C0872
Service Repair Kits
Page 33
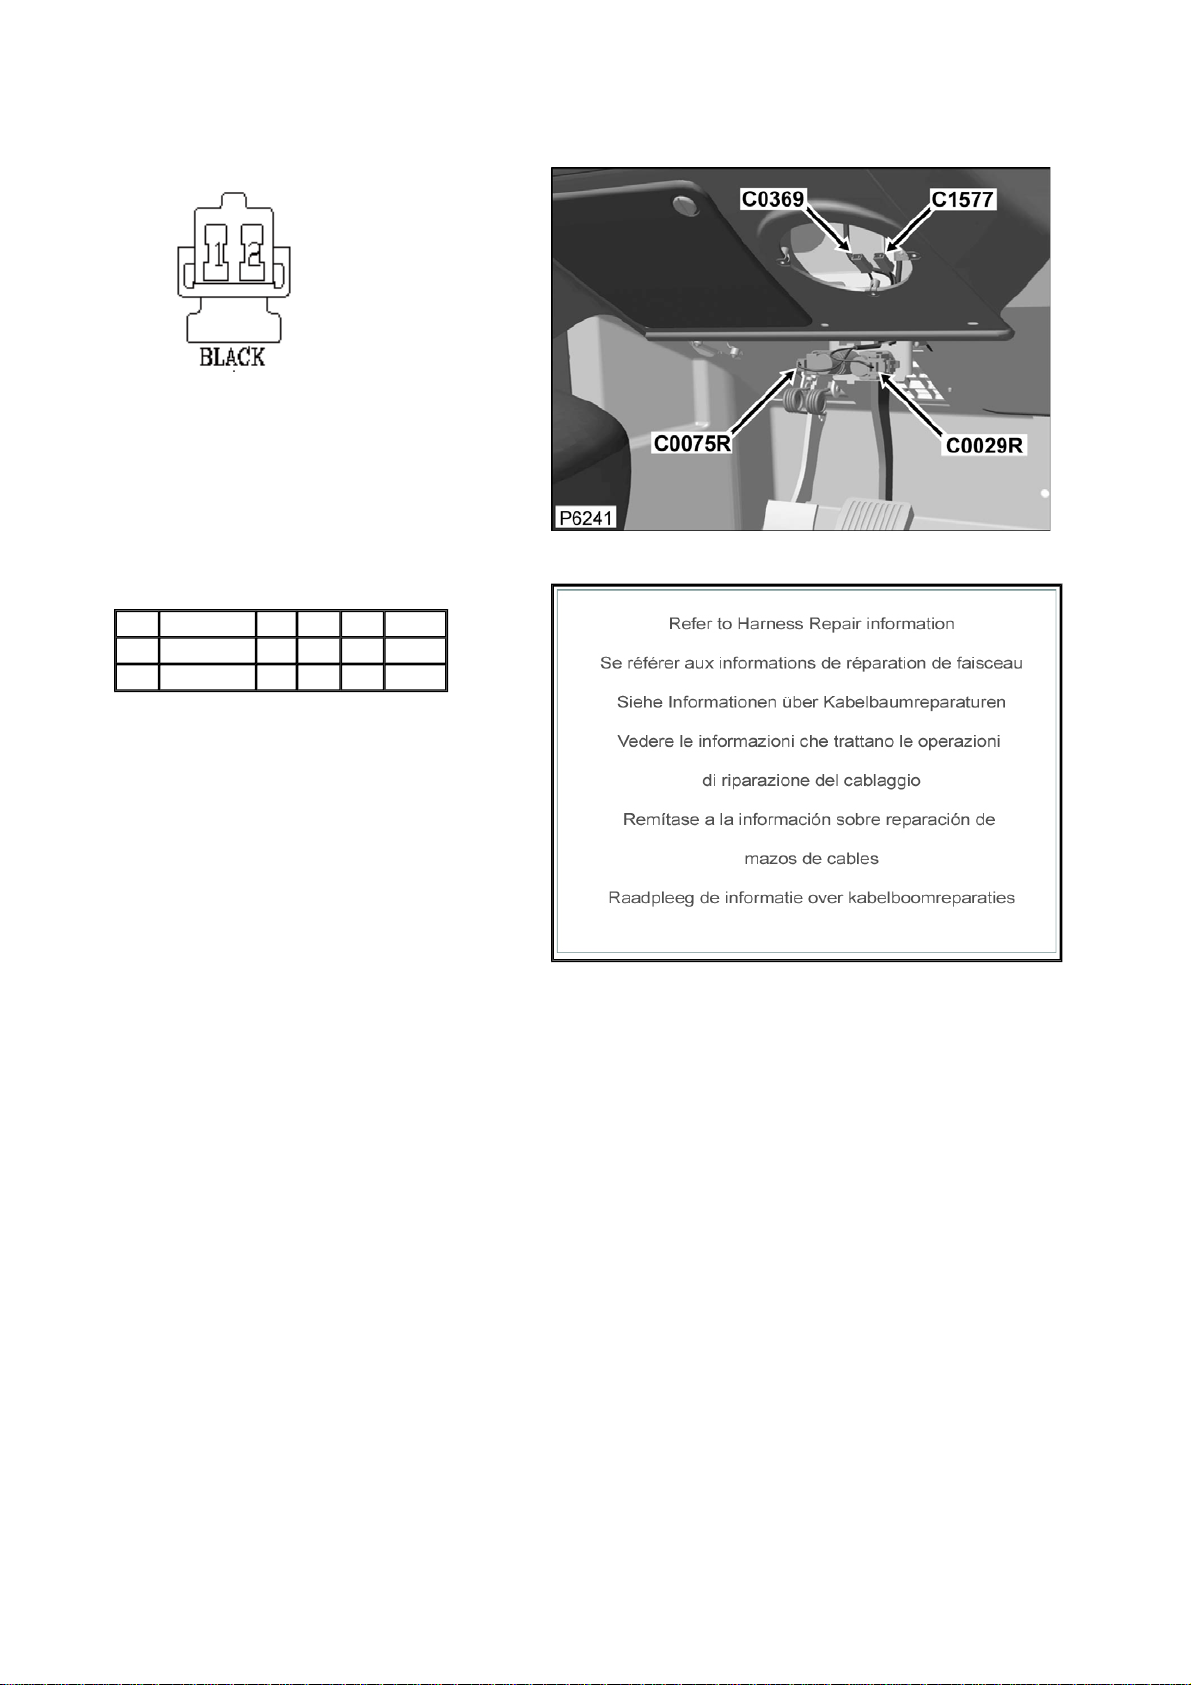
Connector: C0029R Description: Stop lamp switch
Location: Driver footwell
Part No.: YPC10225
Colour: BLACK
Cavities: 2WY
Harness: MAIN LH + RH HARNESS
Wire Chart
CAV TERMINAL CSA COL CCT DESTN
1 YPL10036 0.5D GO 200R CTAP
2 YPL10036 0.5D BR 200R C0872
Service Repair Kits
Page 34
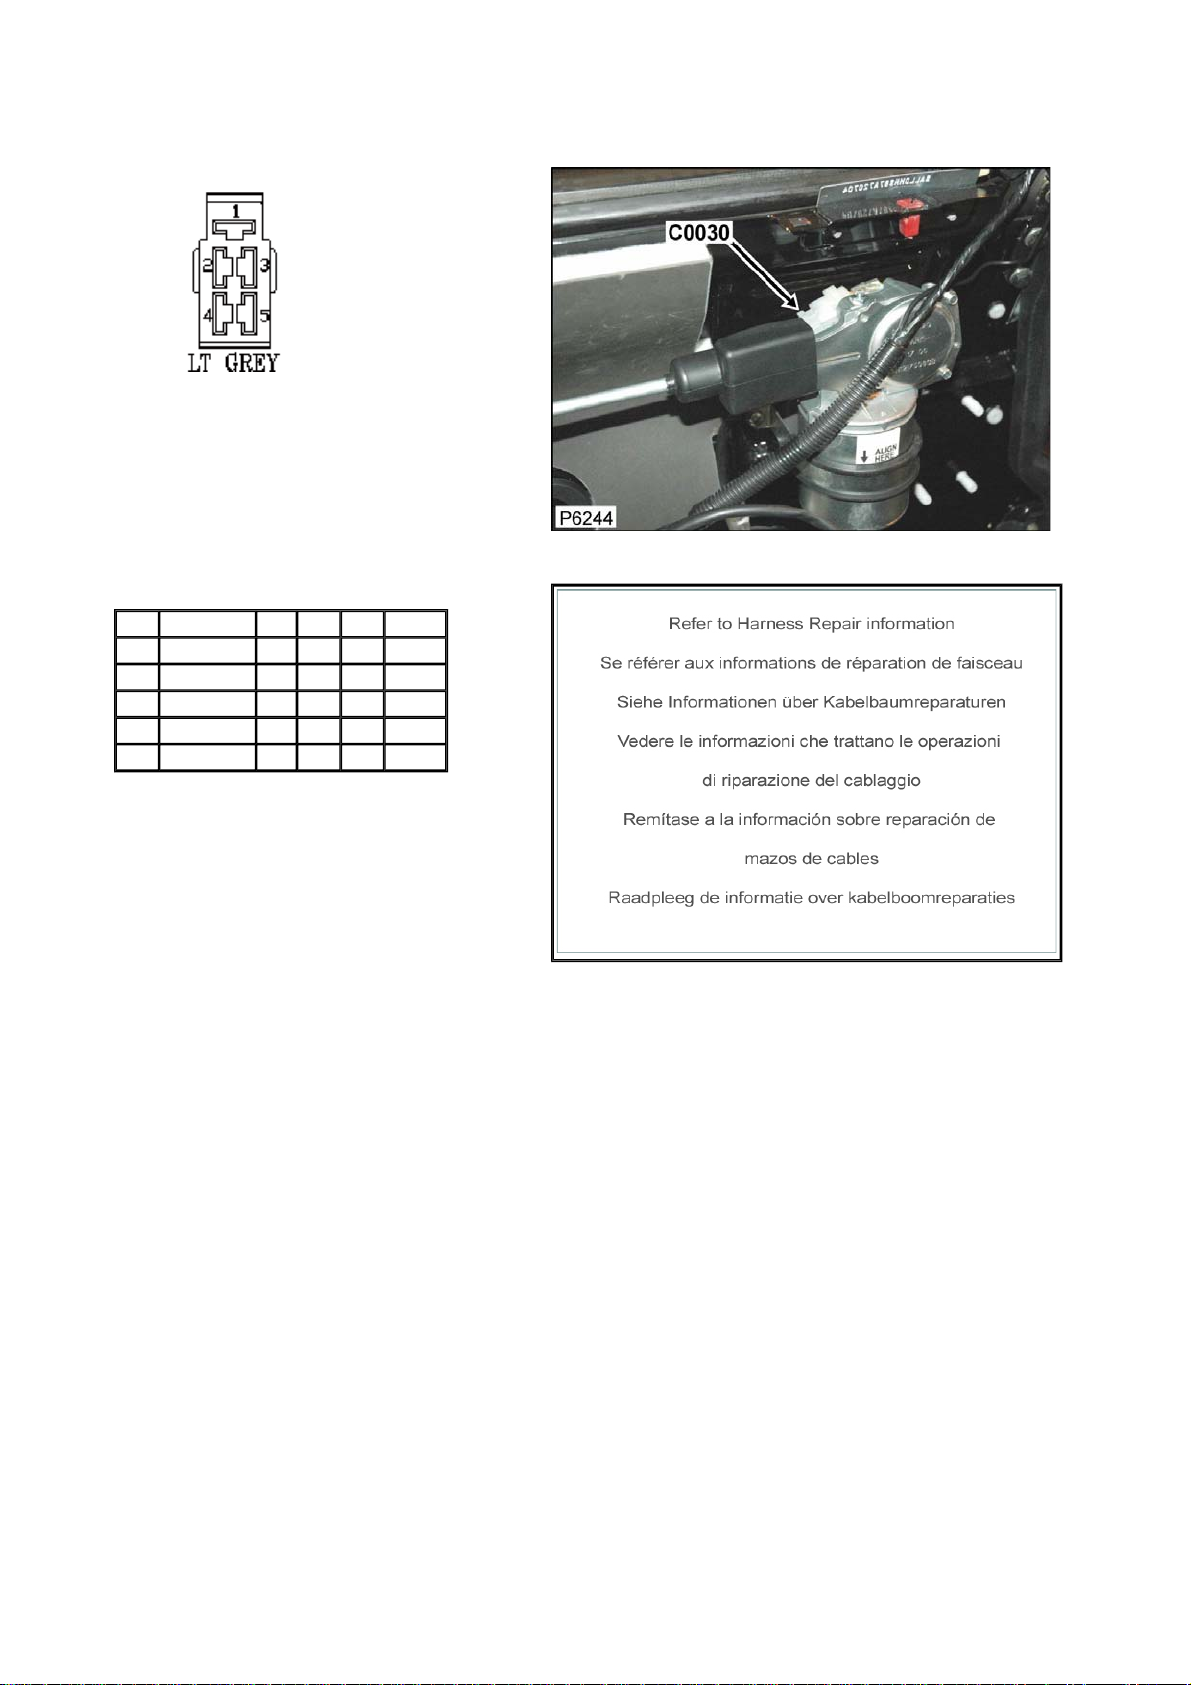
Connector: C0030 Description: Motor-Wiper-Windscreen
Location: Behind RH side of dash
Part No.: 13H4576
Colour: LIGHT GREY
Cavities: 5WY
Harness: MAIN LH + RH HARNESS
Wire Chart
CAV TERMINAL CSA COL CCT DESTN
1 YPL101300 1.0D B 200R C0289
2 YPL101300 1.0D NLG 200R C0303R
3 YPL101300 1.0D ULG 200R C0278
4 YPL101300 1.0D WG 200R C0580R
5 YPL101300 1.0D RLG 200R C0278
Service Repair Kits
Page 35
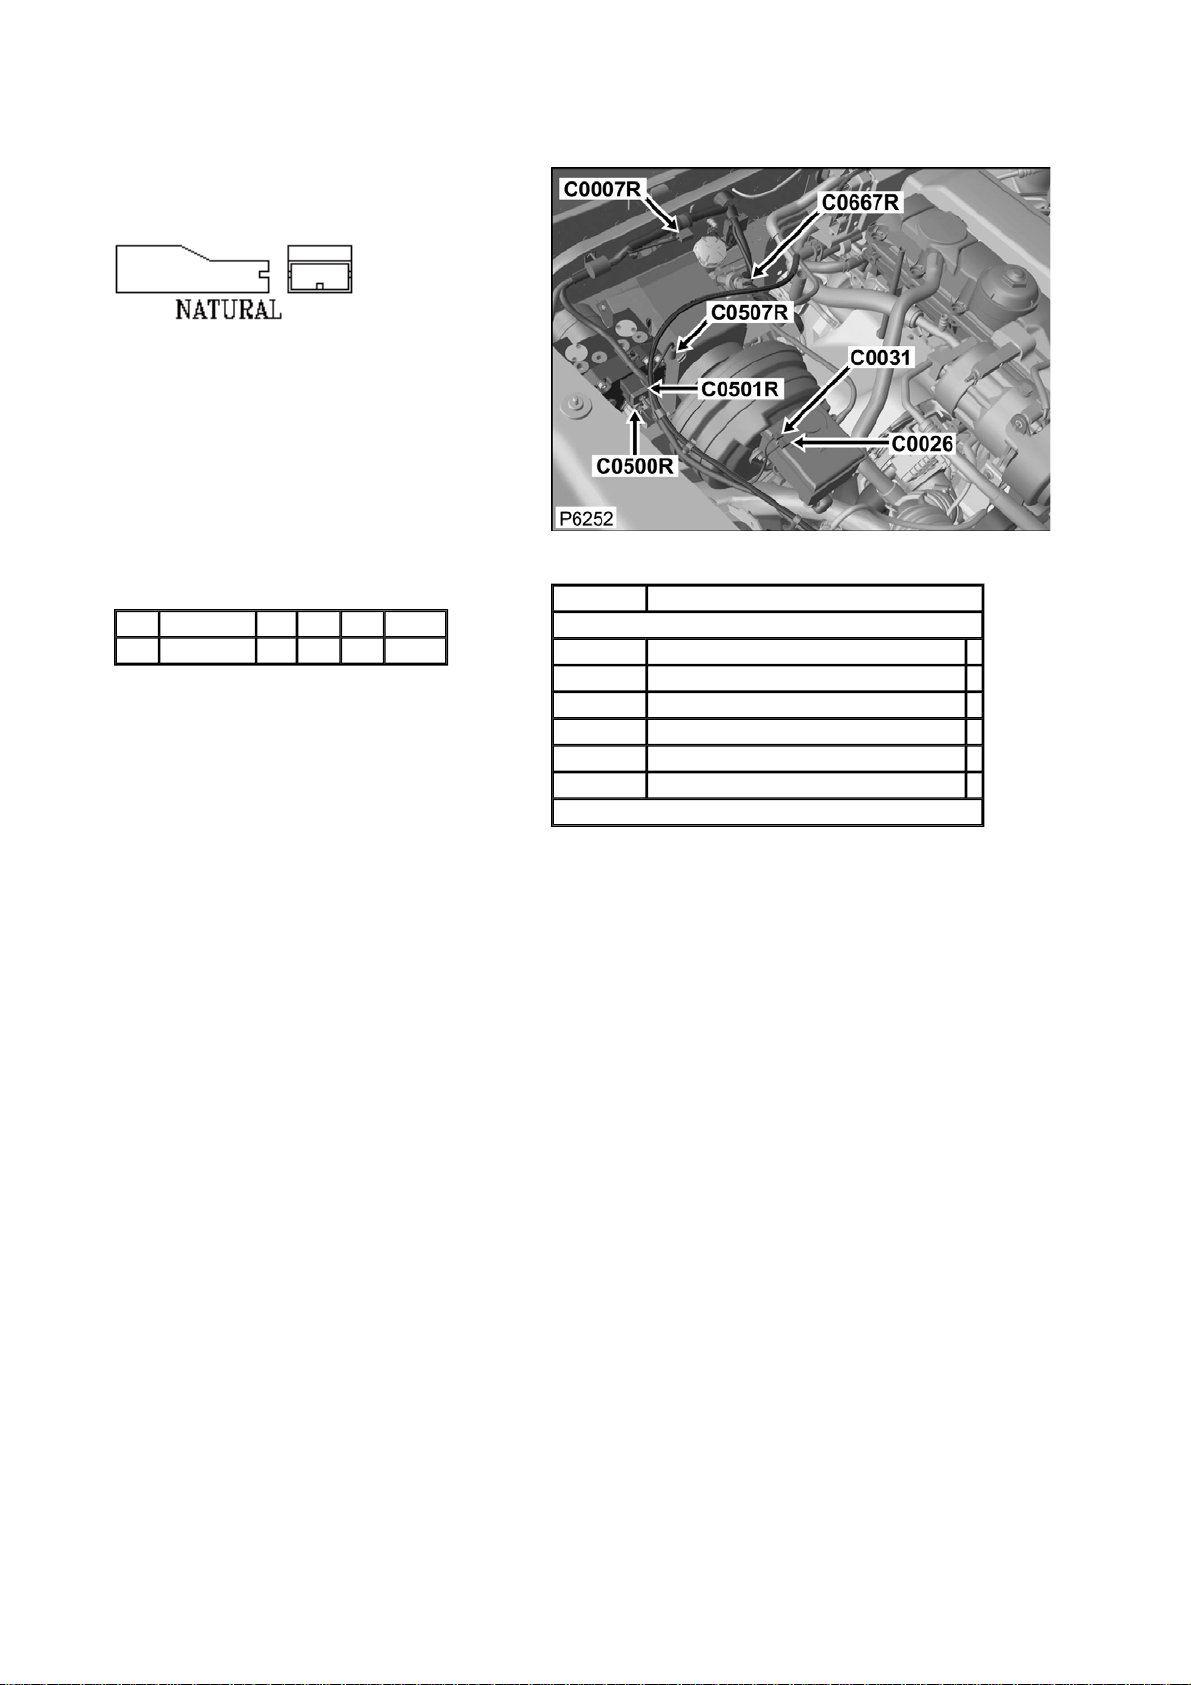
Connector: C0031 Description: Switch-Brake-fluid level
Location: Rear RH side of engine compartment
Part No.: ADU8339
Colour: NATURAL
Cavities: 1WY
Harness: MAIN LH + RH HARNESS
Wire Chart
CAV TERMINAL CSA COL CCT DESTN
1 AFU3262 0.5D B 200R C0289
Service Repair Kits
CSA 0.30- 0.81 CSA
Cavities: 1
YMI000210 SRK ITEM 250 POSI-LOCK FAMILY 1.0CSA 1
YPQ000100 SRK ITEM 1
YQD000210 SRK ITEM R/B 1
YRV000040 SRK ITEM PIDG RED 1
YRW000390 SRK ITEM 1
YRW500010 SRK ITEM 1
VUB001560
Page 36
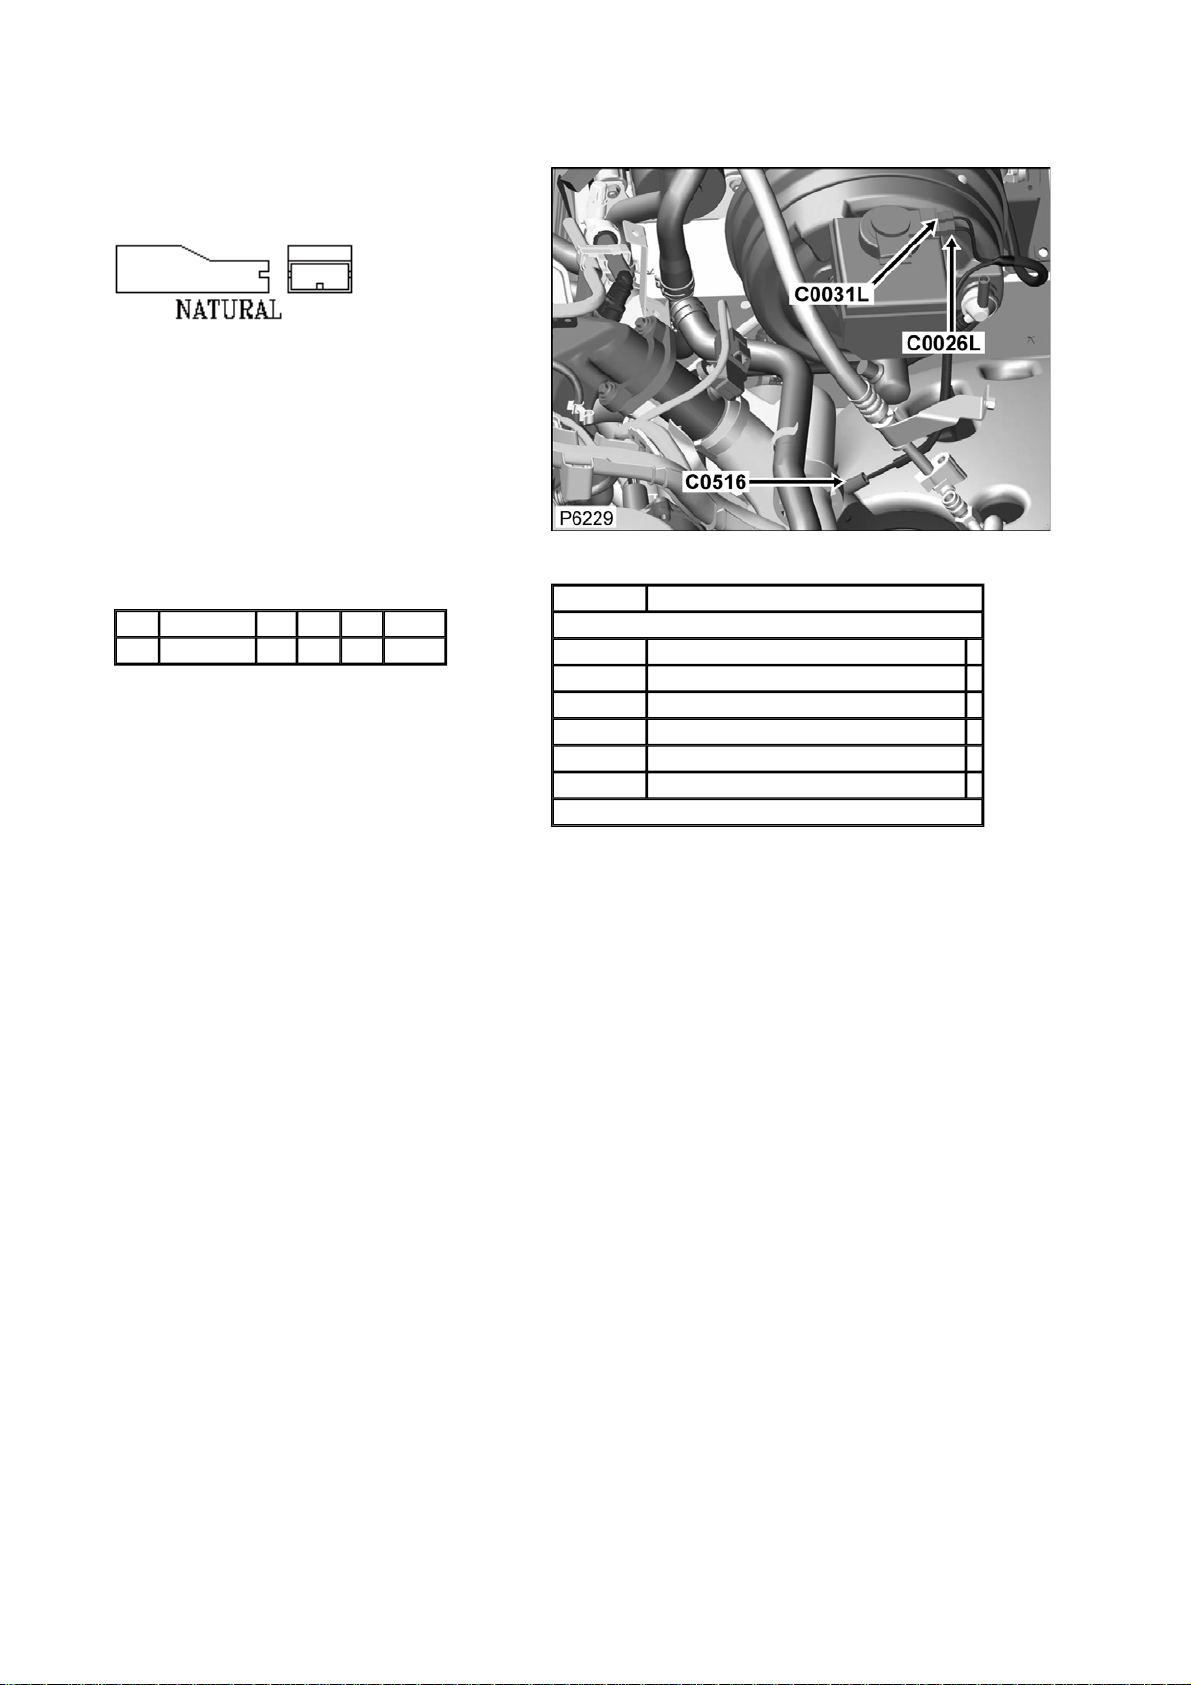
Connector: C0031L Description: Switch-Brake-fluid level
Location: Rear LH side of engine compartment
Part No.: ADU8339
Colour: NATURAL
Cavities: 1WY
Harness: MAIN LH + RH HARNESS
Wire Chart
CAV TERMINAL CSA COL CCT DESTN
1 AFU3262 0.5D B 139L C0289
Service Repair Kits
CSA 0.30- 0.81 CSA
Cavities: 1
YMI000210 SRK ITEM 250 POSI-LOCK FAMILY 1.0CSA 1
YPQ000100 SRK ITEM 1
YQD000210 SRK ITEM R/B 1
YRV000040 SRK ITEM PIDG RED 1
YRW000390 SRK ITEM 1
YRW500010 SRK ITEM 1
VUB001560
Page 37
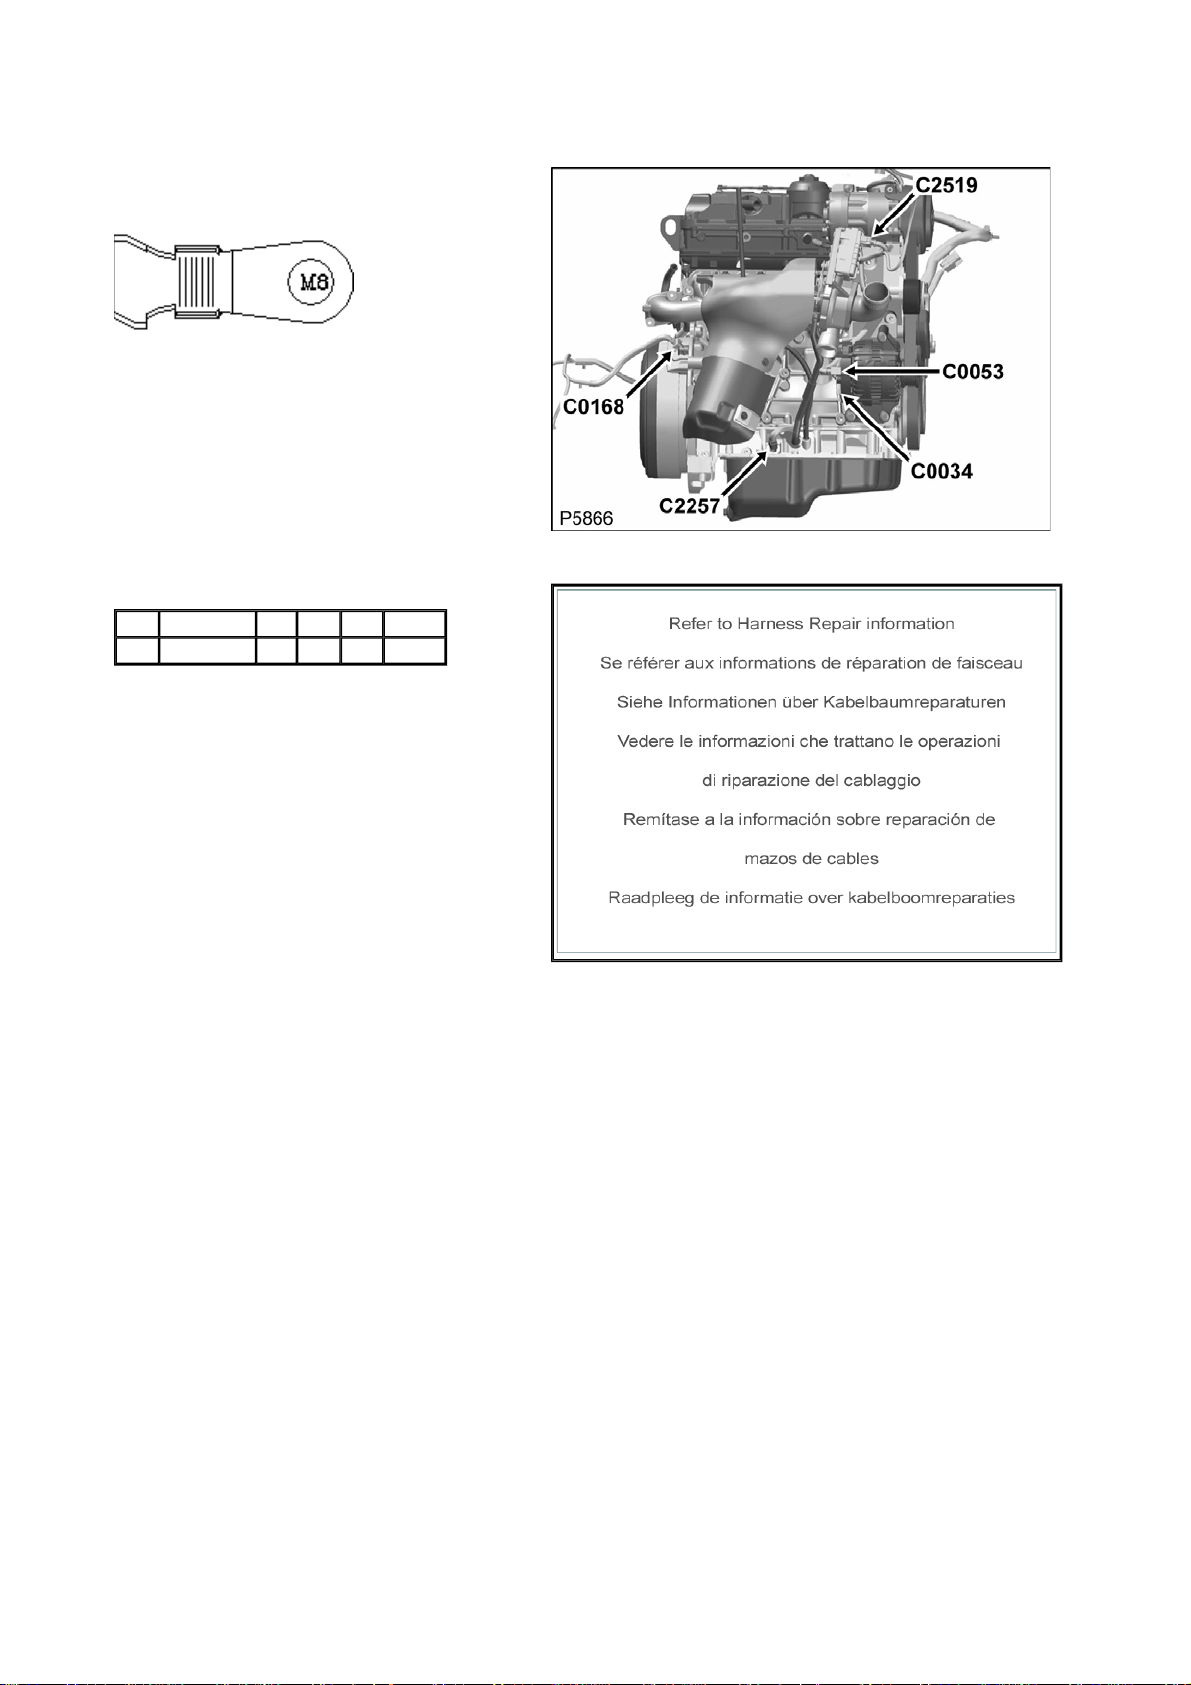
Connector: C0034 Description: Generator
Location: RH side of engine
Part No.: YPG900850
Colour: TIN PLATED
Cavities: 1WY
Harness: ENGINE DIESEL PUMA HARNESS
Wire Chart
CAV TERMINAL CSA COL CCT DESTN
1 - 25.0 R 254 C0178
Service Repair Kits
Page 38
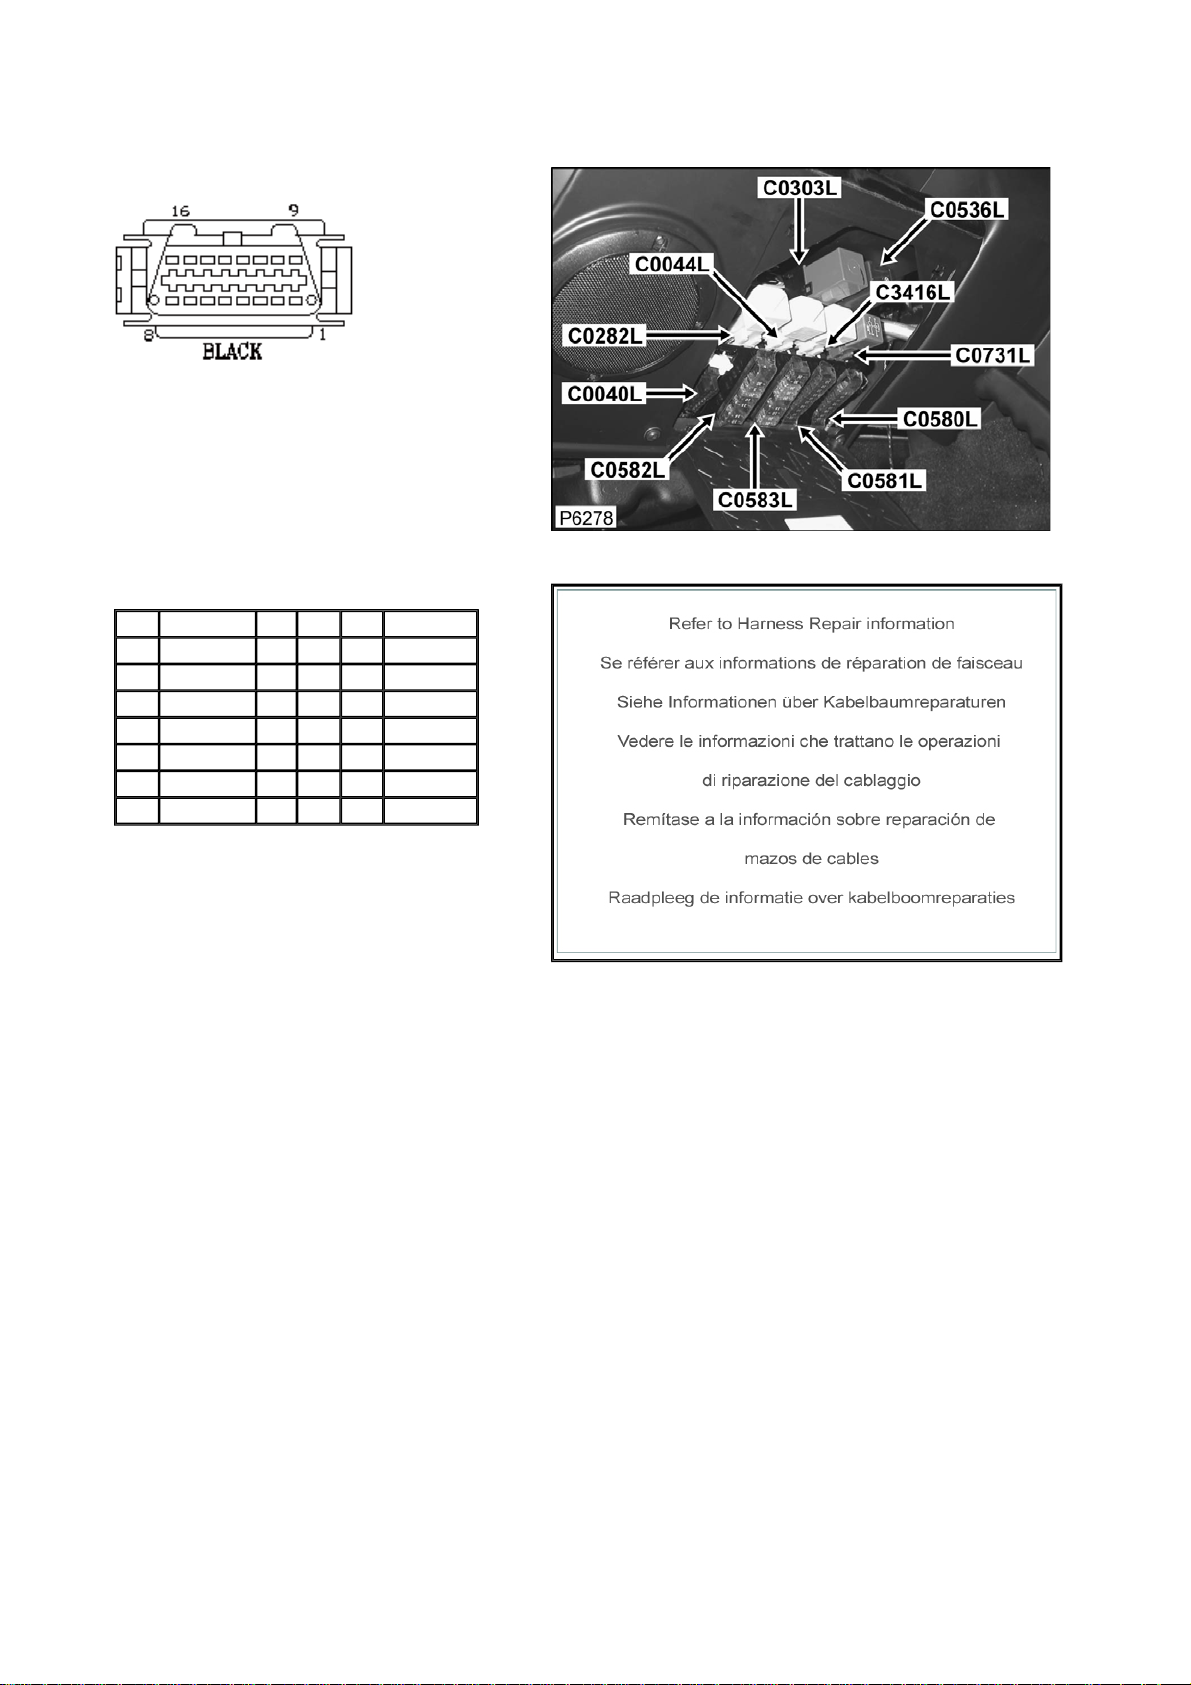
Connector: C0040L Description: Diagnostic socket
Location: Underside of steering column
Part No.: YPC107920
Colour: BLACK
Cavities: 16WY
Harness: MAIN LH + RH HARNESS
Wire Chart
CAV TERMINAL CSA COL CCT DESTN
4 YPL10108 0.5D B 107L CTAP
5 YPL10108 0.5D B 107L C0288
6 YPL10108 0.5D UB 139L S/JOINT SJ6
7 YPL10108 0.5D K 9 C0504
8 YPL10108 0.5D OLG 22L C0061L
14 YPL10108 0.5D GB 139L S/JOINT SJ5
16 YPL10108 0.5D PN 22L C0287
Service Repair Kits
Page 39
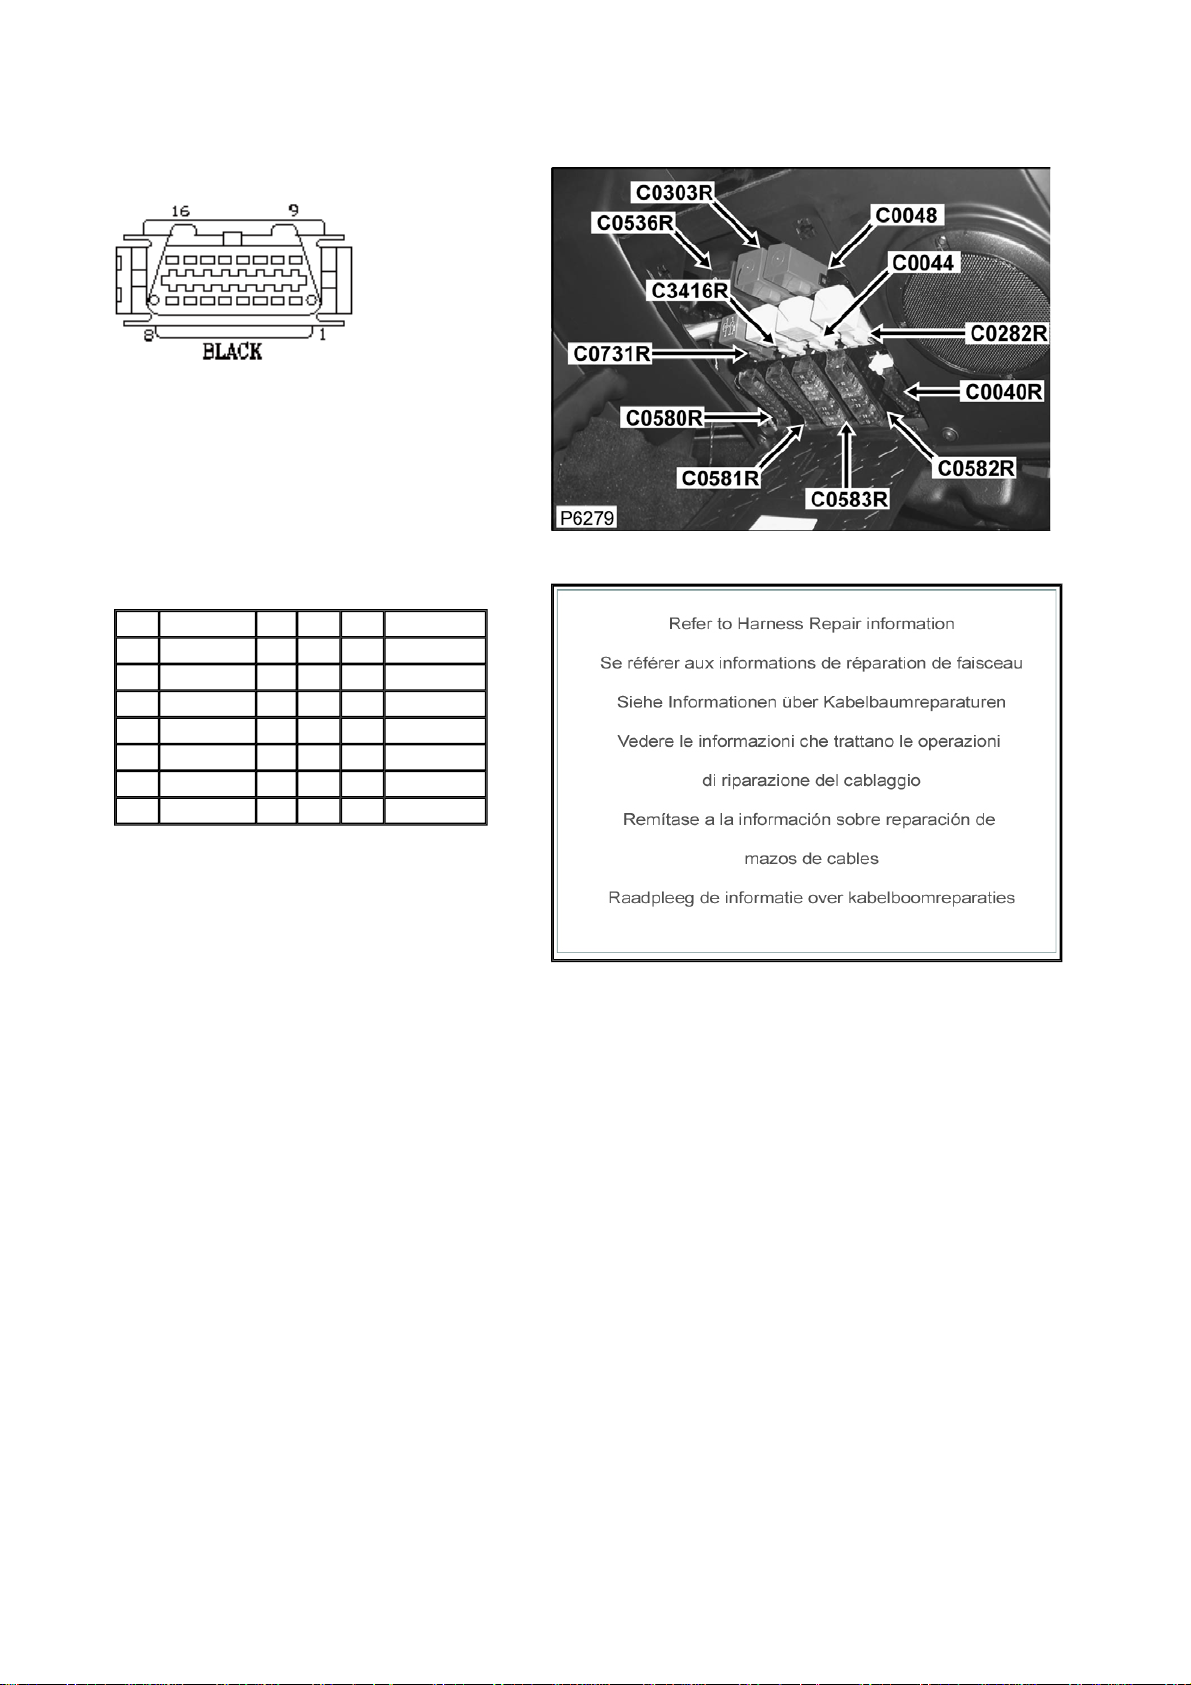
Connector: C0040R Description: Diagnostic socket
Location: Underside of steering column
Part No.: YPC107920
Colour: BLACK
Cavities: 16WY
Harness: MAIN LH + RH HARNESS
Wire Chart
CAV TERMINAL CSA COL CCT DESTN
4 YPL10108 0.5D B 107R CTAP
5 YPL10108 0.5D B 107R C0288
6 YPL10108 0.5D UB 200R S/JOINT SJ9
7 YPL10108 0.5D K 10 C0504
8 YPL10108 0.5D OLG 22R C0061R
14 YPL10108 0.5D GB 200R S/JOINT SJ10
16 YPL10108 0.5D PN 22R C0287
Service Repair Kits
Page 40
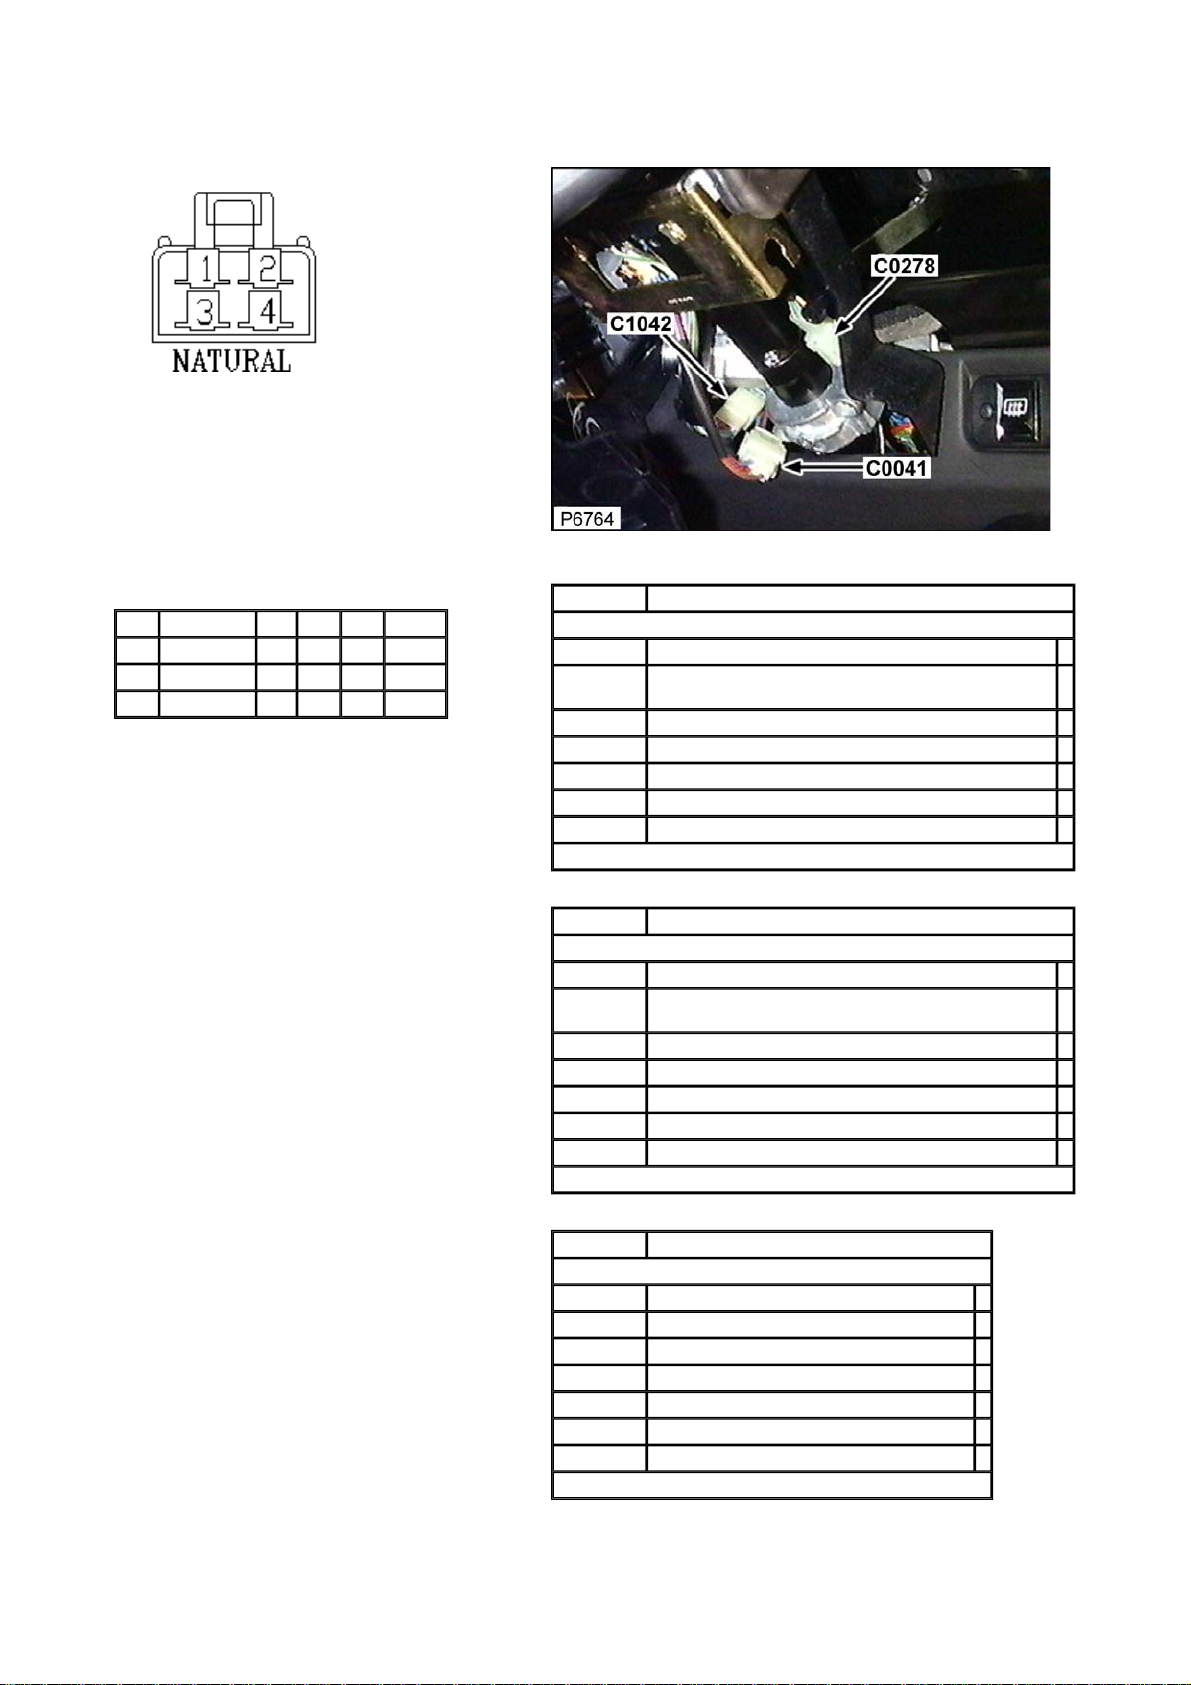
Connector: C0041 Description: Lighting control switch
Location: Underside of steering column
Part No.: AFU3855
Colour: NATURAL
Cavities: 4WY
Harness: MAIN LH + RH HARNESS
Wire Chart
CAV TERMINAL CSA COL CCT DESTN
1 AFU3725 3.0D NU 254R C0571
2 AFU3567 1.5D R 200R C0581R
4 AFU3725 2.5D U 200R C0282R
Service Repair Kits
CSA 1.75- 3.00 CSA
Cavities: 1,4
VDK500010 SRK ITEM GENERAL 1
YMI000420
YPQ000120 SRK ITEM 1
YQD000220 SRK ITEM Y 1
YRV000060 SRK ITEM PIDG YELLOW 1
YRW000390 SRK ITEM 1
YRW500010 SRK ITEM 1
CSA 1.75- 3.00 CSA
Cavities: 1,4
VDK500010 SRK ITEM GENERAL 1
YMI000430
YPQ000110 SRK ITEM 1
YQD000210 SRK ITEM R/B 1
YRV000050 SRK ITEM PIDG BLUE 1
YRW000390 SRK ITEM 1
YRW500010 SRK ITEM 1
CSA 0.75- 1.50 CSA
Cavities: 2
VDK500010 SRK ITEM GENERAL 1
YMI000410 SRK ITEM ETN250 FAMILY 1.5CSA SEALED 1
YPQ000100 SRK ITEM 1
YQD000210 SRK ITEM R/B 1
YRV000040 SRK ITEM PIDG RED 1
YRW000390 SRK ITEM 1
YRW500010 SRK ITEM 1
SRK ITEM ETN250/HM250/250 SEALED FAMILY
3.0CSA
VUB001780
SRK ITEM ETN250/HM250/250 SEALED FAMILY
2.5CSA
VUB001790
VUB001770
1
1
Page 41
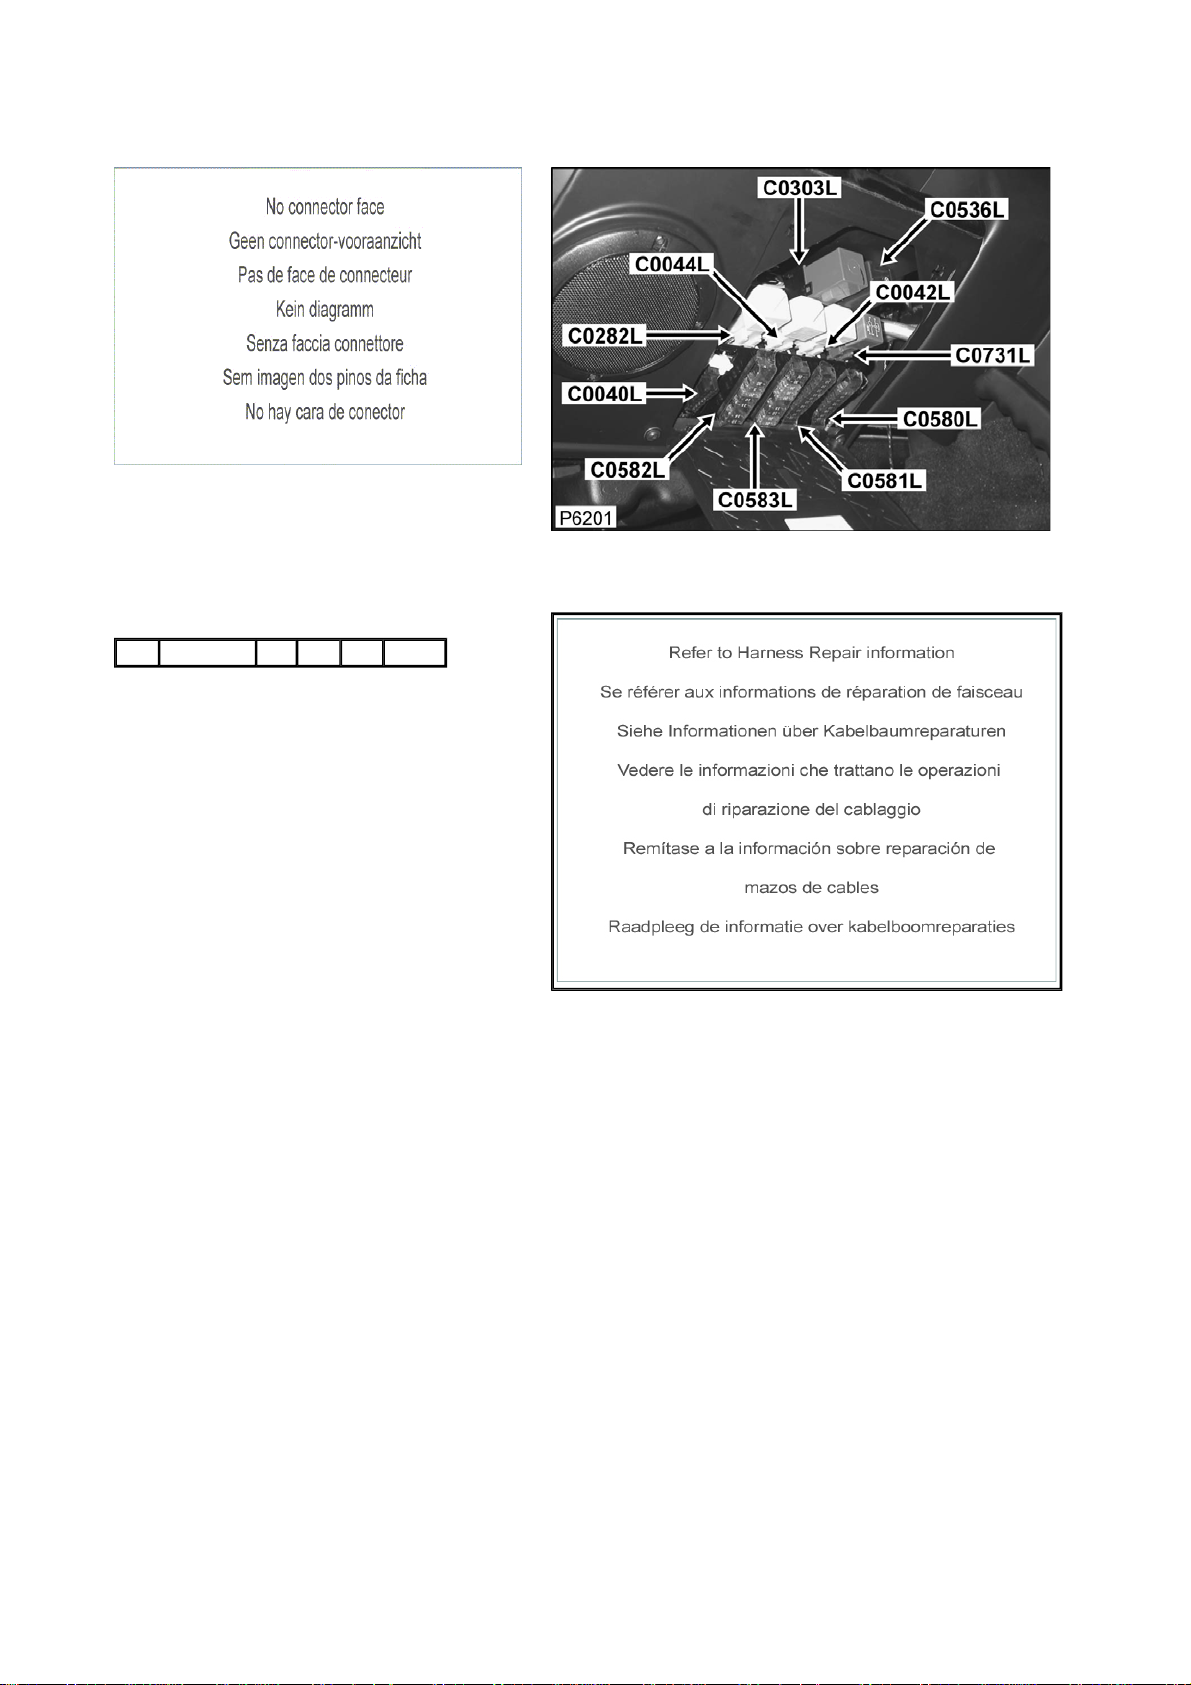
Connector: C0042L Description: Relay-Window-lift
Location: Underside of steering column
Part No.:
Colour:
Cavities:
Harness: MAIN LH + RH HARNESS
Service Repair Kits
Wire Chart
CAV TERMINAL CSA COL CCT DESTN
Page 42
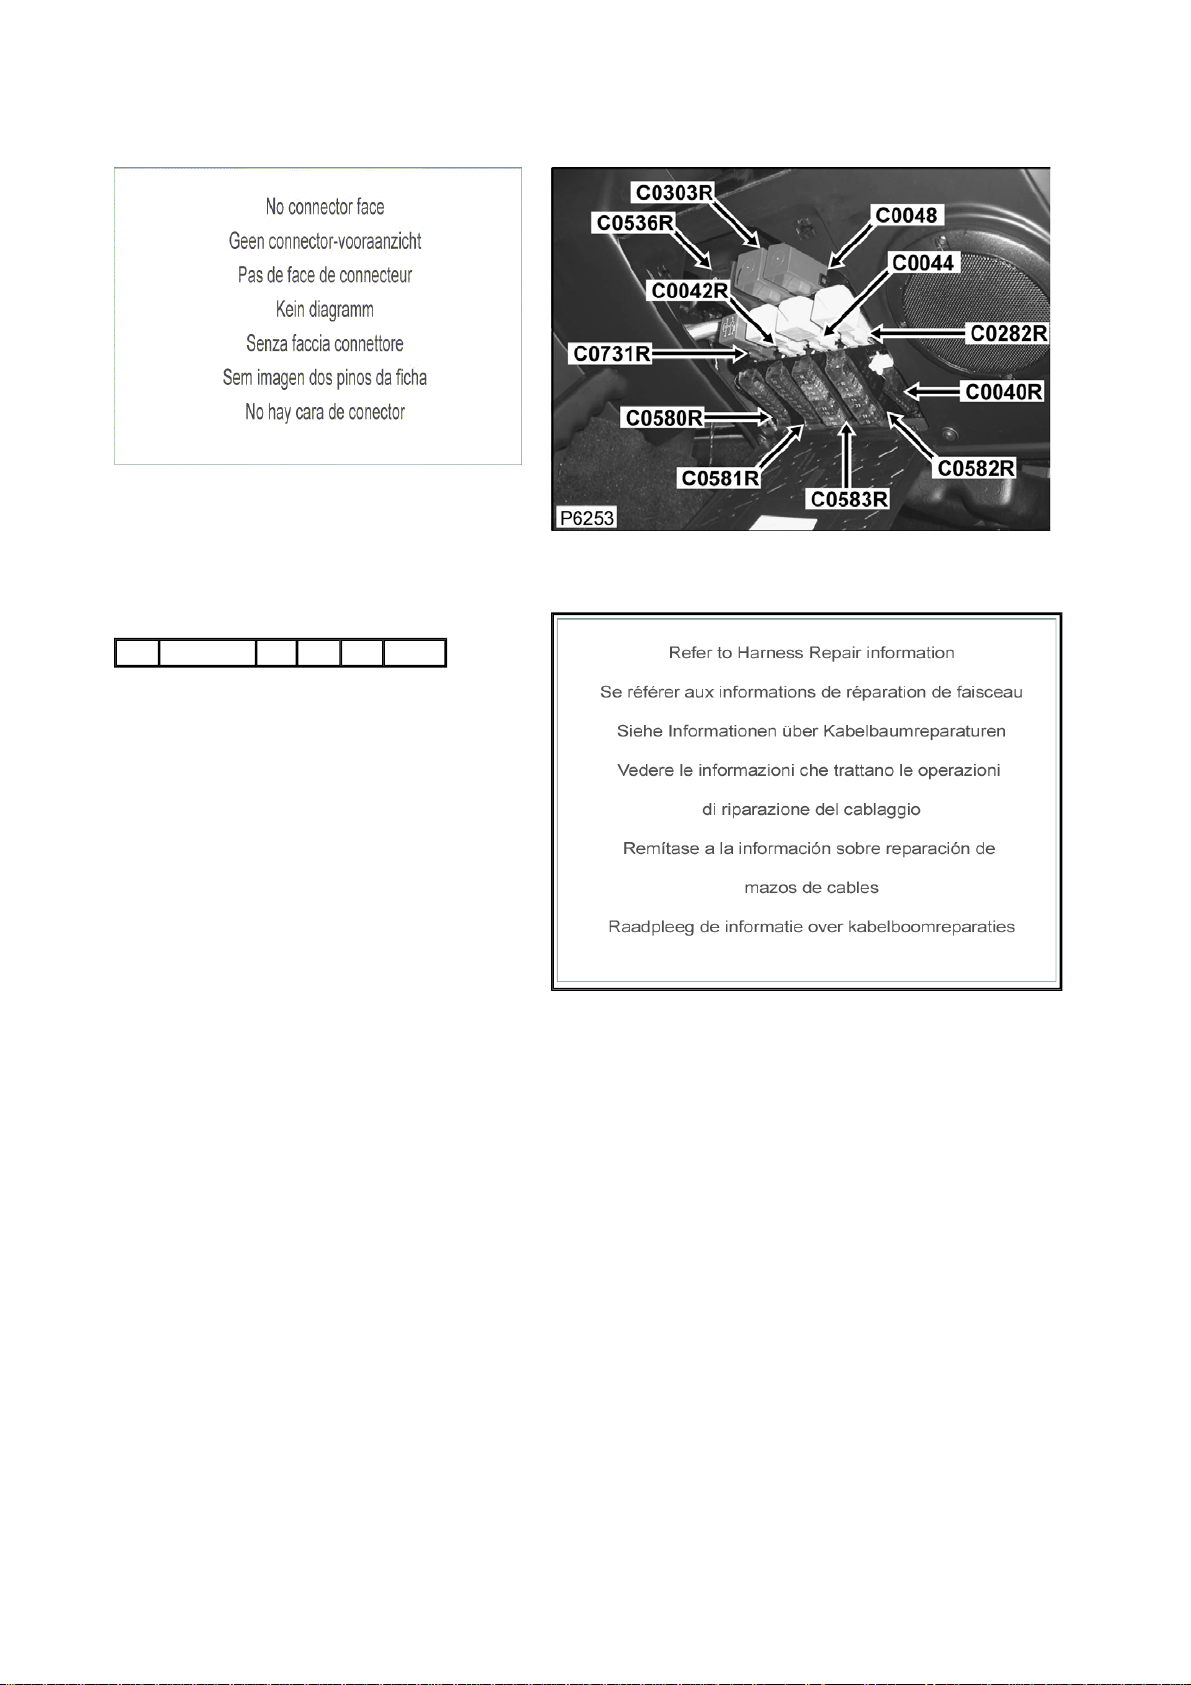
Connector: C0042R Description: Relay-Window-lift
Location: Underside of steering column
Part No.:
Colour:
Cavities:
Harness: MAIN LH + RH HARNESS
Service Repair Kits
Wire Chart
CAV TERMINAL CSA COL CCT DESTN
Page 43
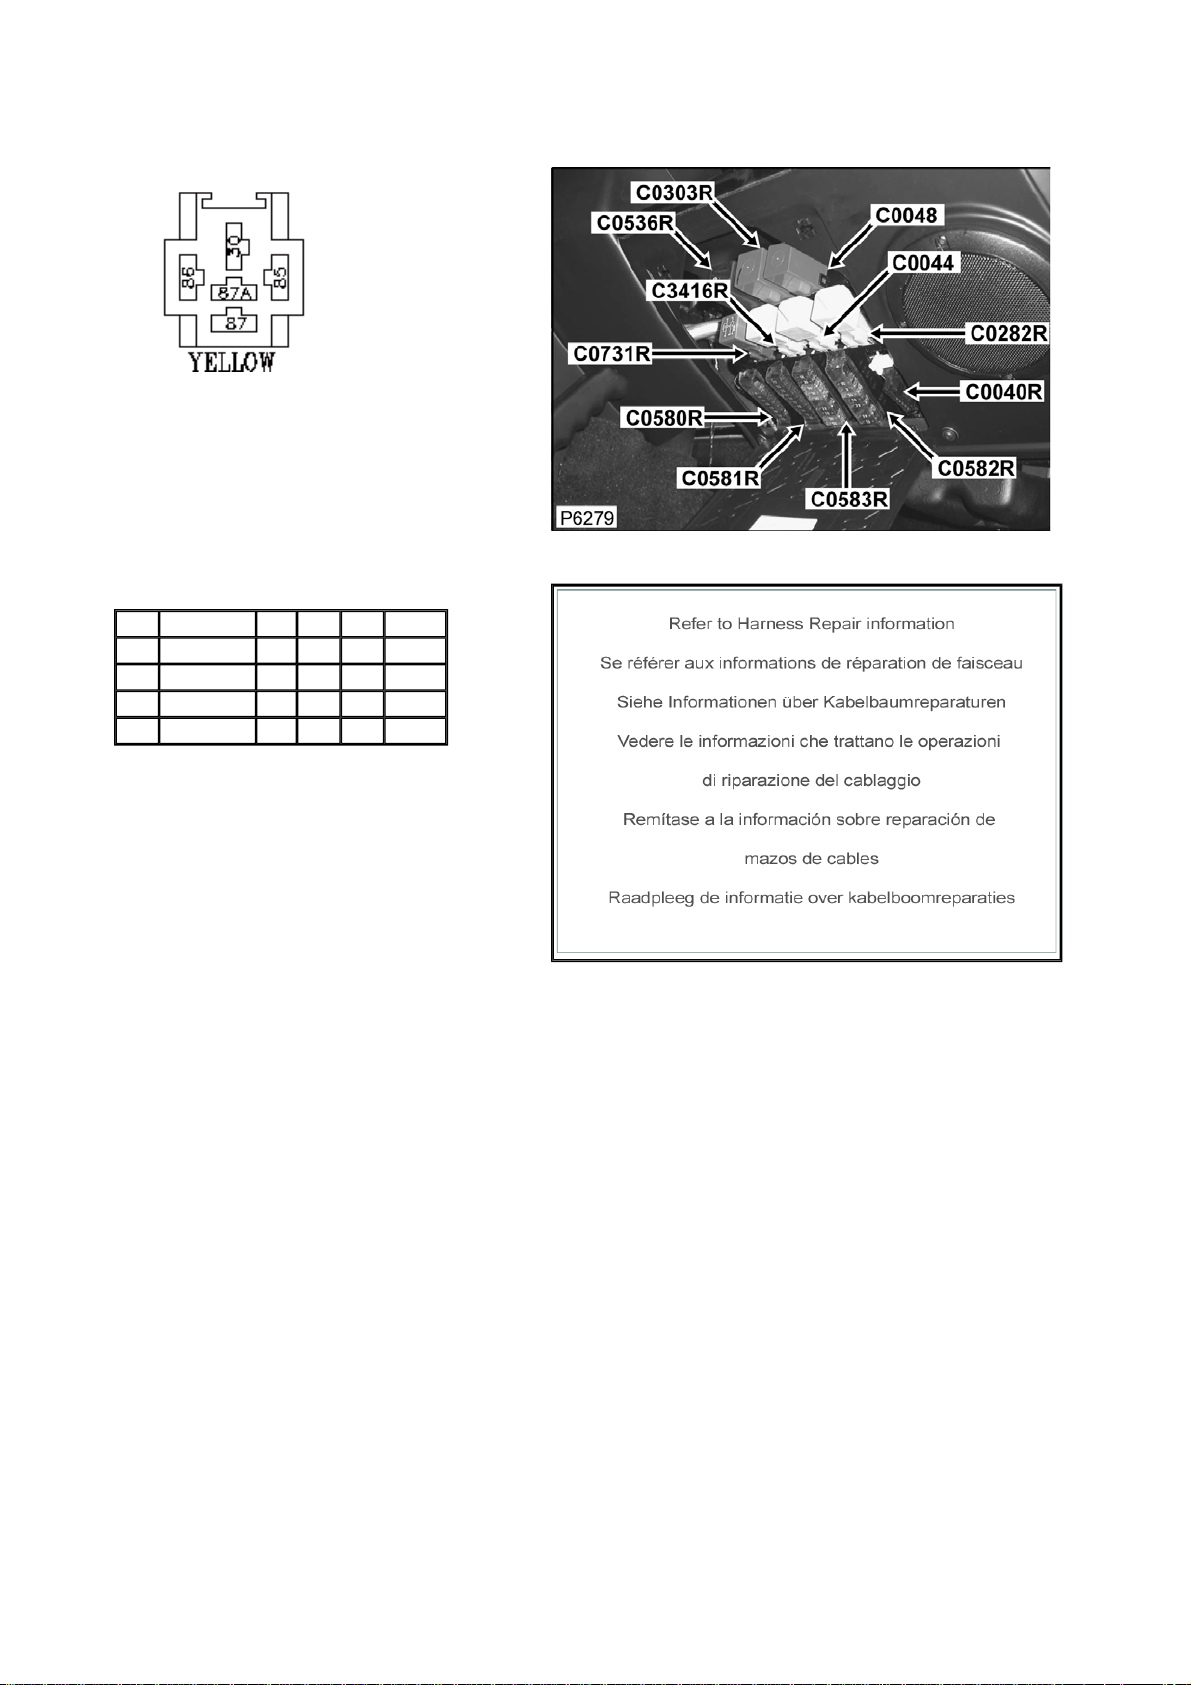
Connector: C0044 Description: Relay-Heated-rear screen
Location: Underside of steering column
Part No.: AFU3271
Colour: YELLOW
Cavities: 5WY
Harness: MAIN LH + RH HARNESS
Wire Chart
CAV TERMINAL CSA COL CCT DESTN
30 AFU3120 1.5D WB 200R C0376
85 AFU3120 1.0D B 200R C0550
86 AFU3119 0.5D WB 200R C0285
87 AFU3120 1.5D NO 200R C0583R
Service Repair Kits
Page 44
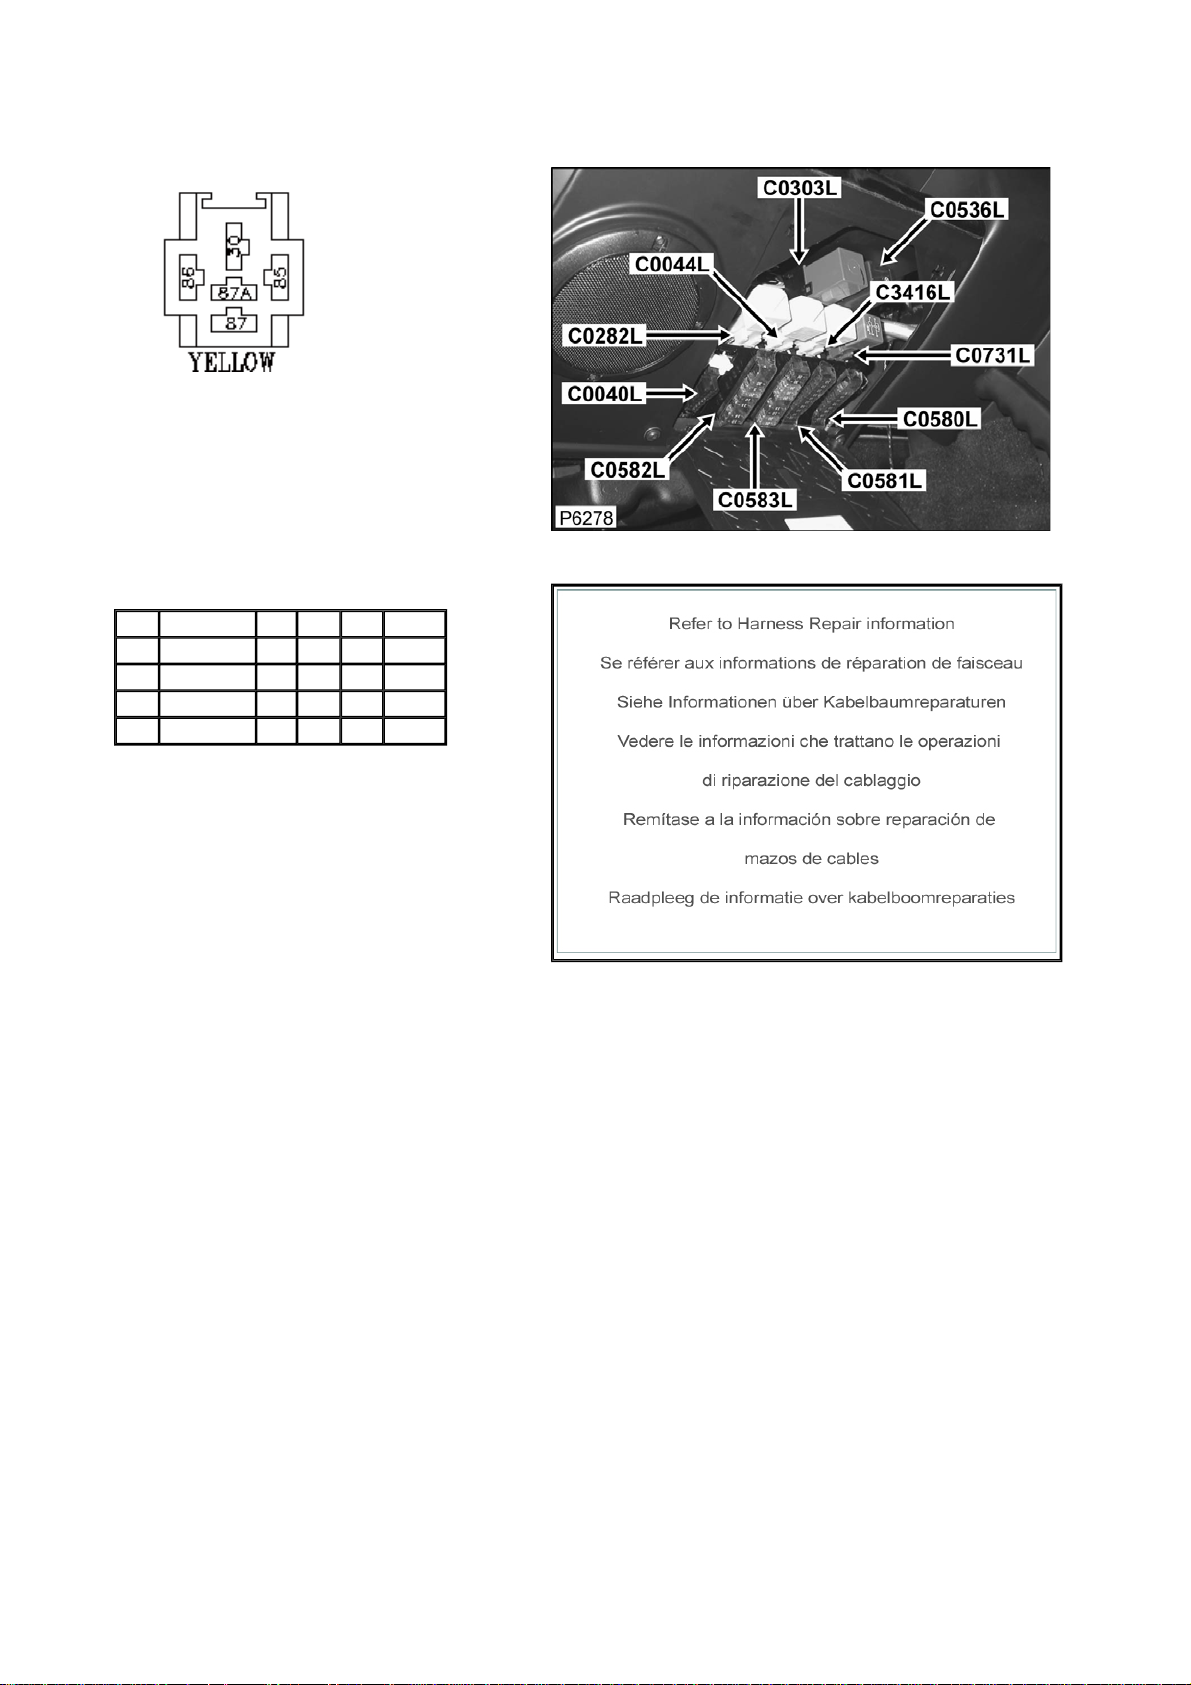
Connector: C0044L Description: Relay-Heated-rear screen
Location: Underside of steering column
Part No.: AFU3271
Colour: YELLOW
Cavities: 5WY
Harness: MAIN LH + RH HARNESS
Wire Chart
CAV TERMINAL CSA COL CCT DESTN
30 AFU3120 1.5D WB 139L C0376
85 AFU3120 1.0D B 139L C0550
86 AFU3119 0.5D WB 139L C0285
87 AFU3120 1.5D NO 139L C0583L
Service Repair Kits
Page 45
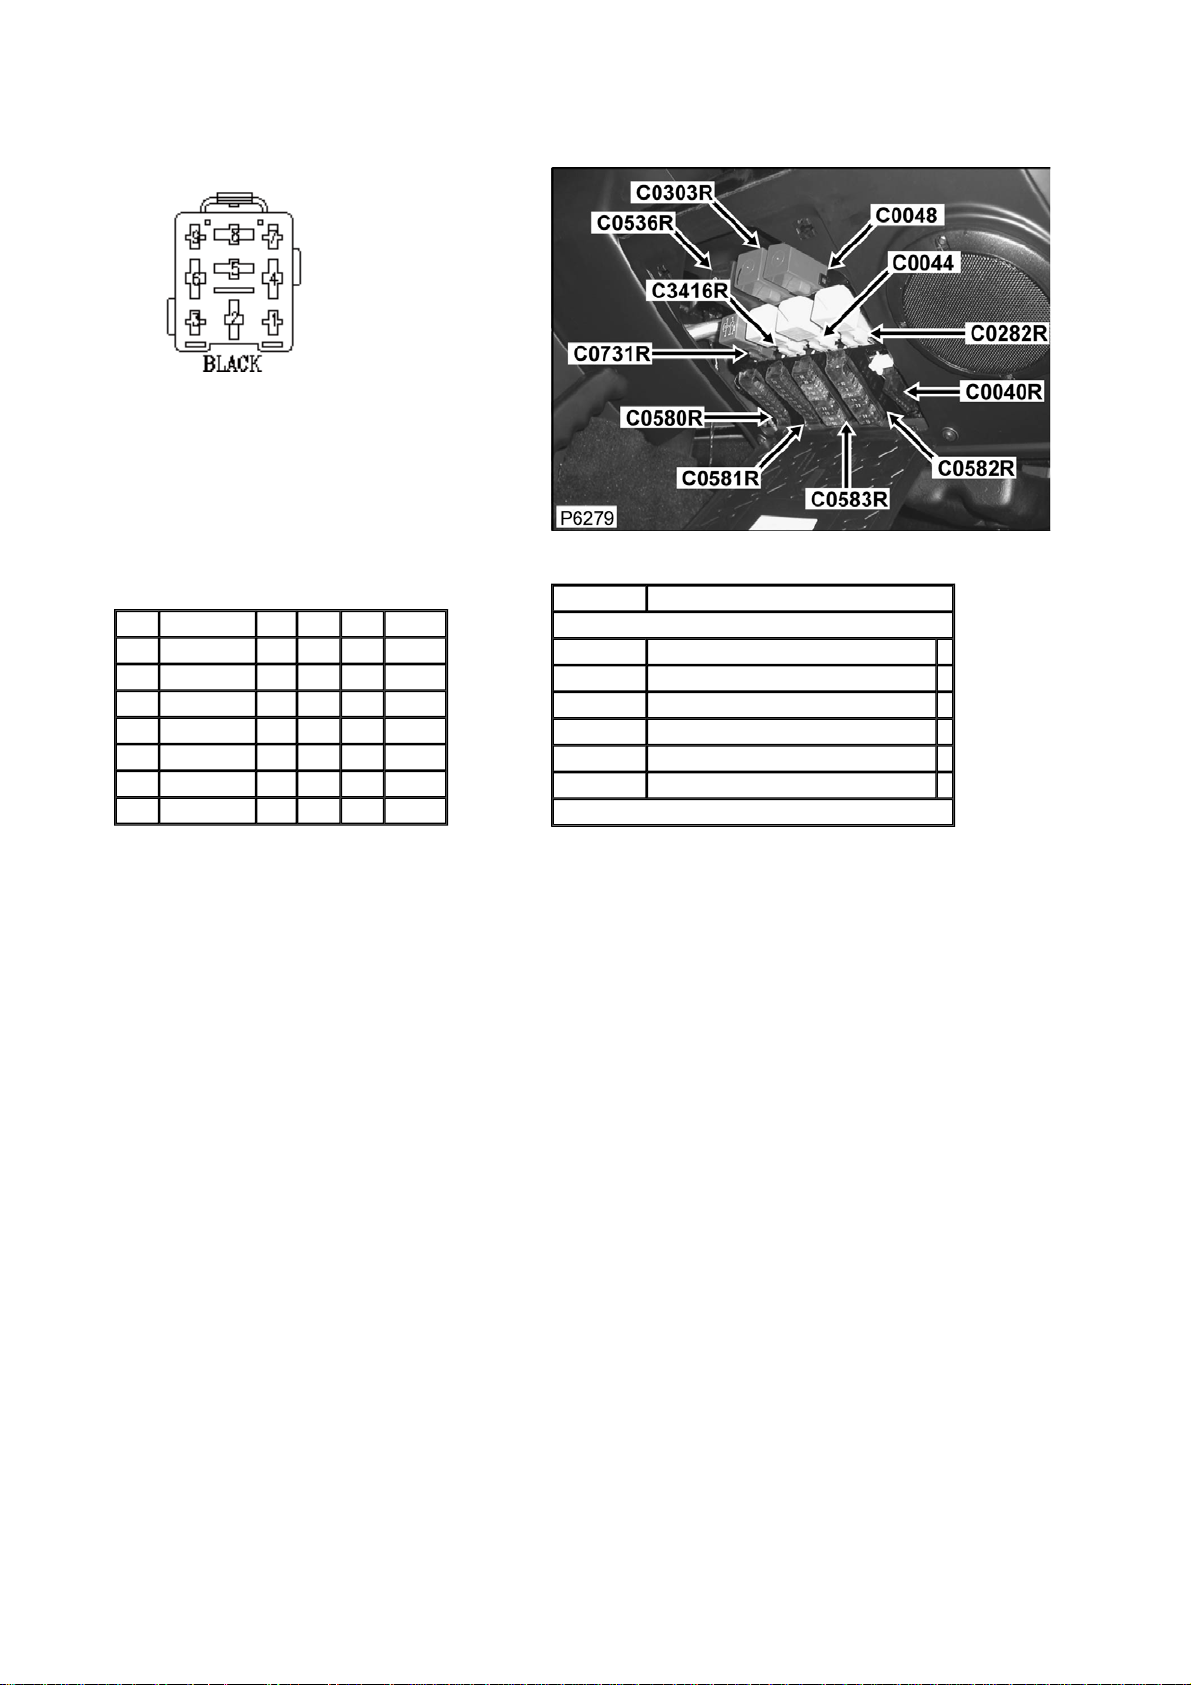
Connector: C0048 Description: Relay-Dim-dip
Location: Underside of steering column
Part No.: YPP10001
Colour: BLACK
Cavities: 9WY
Harness: MAIN LH + RH HARNESS
Wire Chart
CAV TERMINAL CSA COL CCT DESTN
1 ADU8153 0.5D WG 765R CTAP
2 AFU3173 1.5D UR 765R C0581R
4 AFU3173 1.5D NG 765R C1266
5 AFU3173 2.0D U 765R CTAP
6 AFU3228 1.0D B 200R C0289
7 ADU8153 0.5D RO 765R C0286
8 AFU3173 1.5D UR 765R C1042
Service Repair Kits
CSA 0.50- 1.00 CSA
Cavities: 6
YMI000180 SRK ITEM 250 LUCAR FAMILY 1.0CSA 1
YPQ000100 SRK ITEM 1
YQD000210 SRK ITEM R/B 1
YRV000040 SRK ITEM PIDG RED 1
YRW000390 SRK ITEM 1
YRW500010 SRK ITEM 1
VUB001530
Page 46
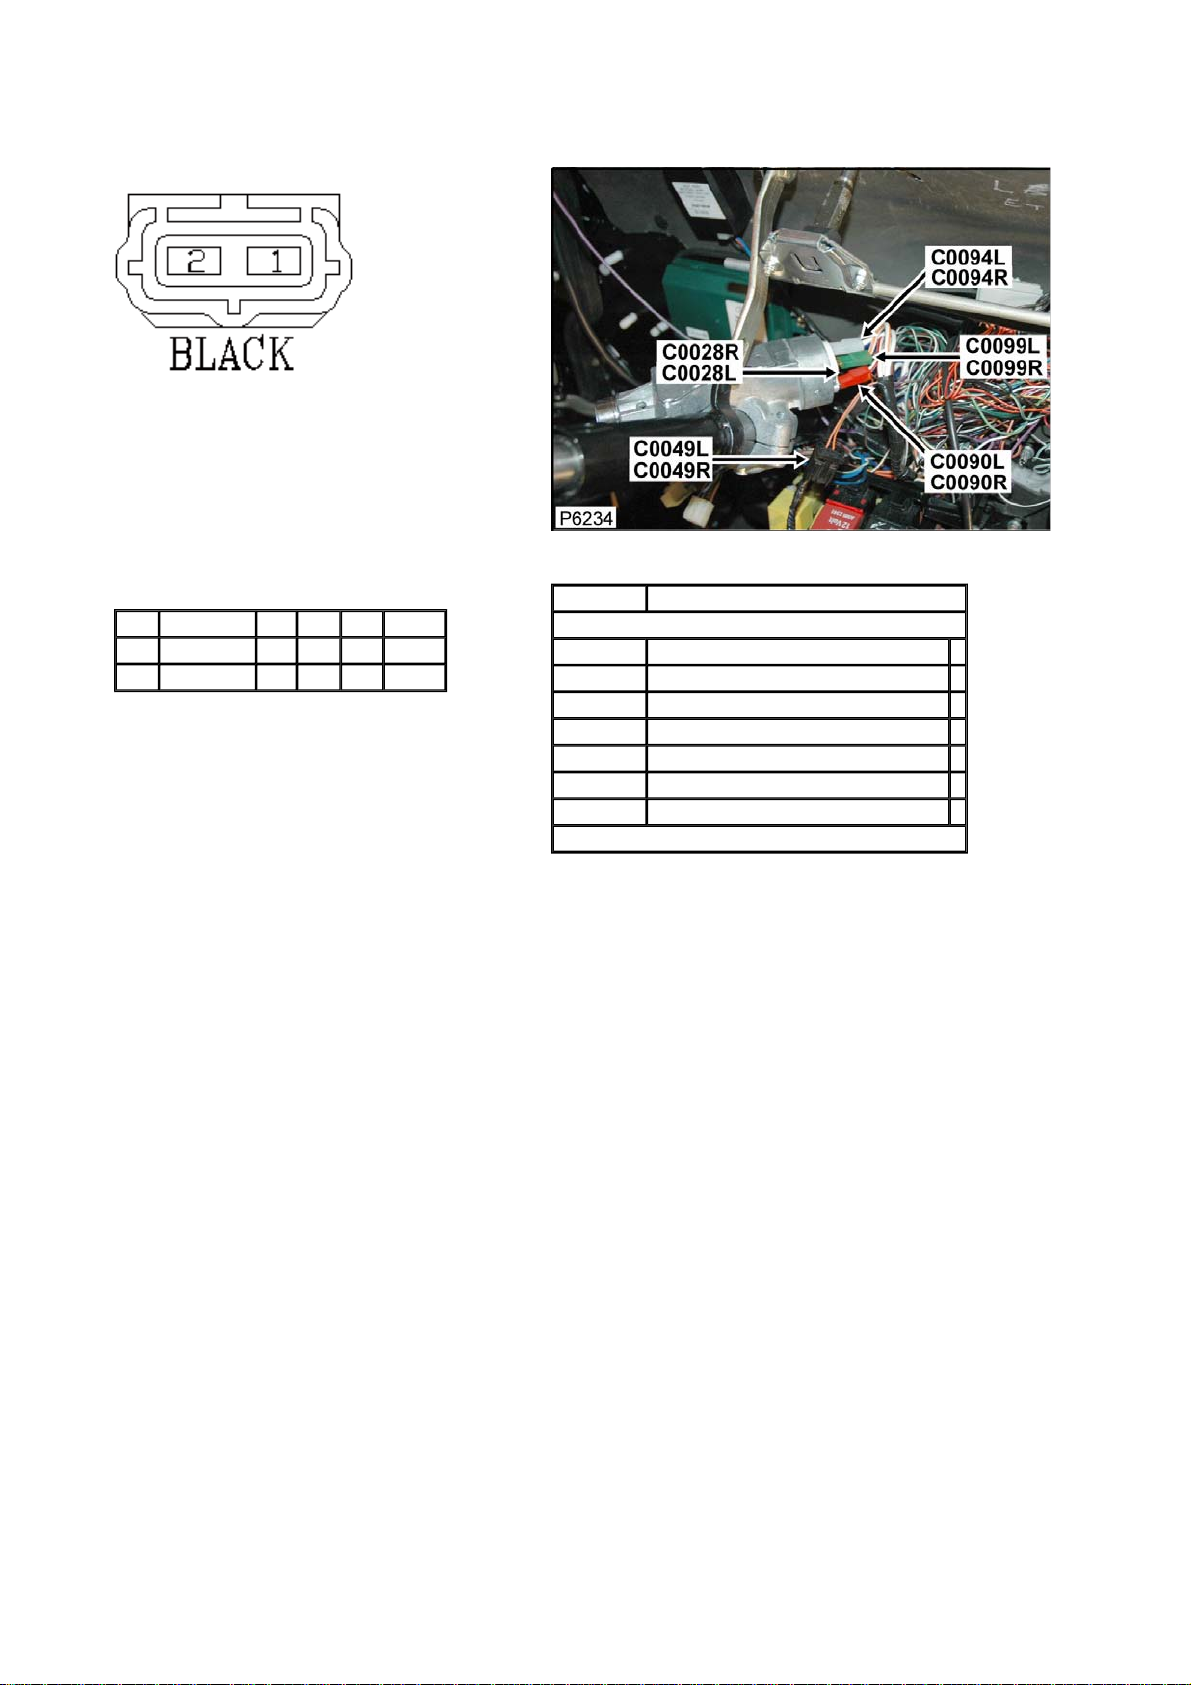
Connector: C0049L Description: Transponder coil
Location: Behind steering column cowl - RH side
Part No.: YPC10069
Colour: BLACK
Cavities: 2WY
Harness: MAIN LH + RH HARNESS
Wire Chart
CAV TERMINAL CSA COL CCT DESTN
1 YPL10062 0.5D OG 22L C0057L
2 YPL10062 0.5D OP 22L C0057L
Service Repair Kits
CSA 0.20- 0.50 CSA
Cavities: 1,2
VDK500010 SRK ITEM GENERAL 1
YMI000330 SRK ITEM ECONOSEAL FAMILY 0.5CSA 1
YPQ000100 SRK ITEM 1
YQD000210 SRK ITEM R/B 1
YRV000040 SRK ITEM PIDG RED 1
YRW000390 SRK ITEM 1
YRW500010 SRK ITEM 1
VUB001690
Page 47
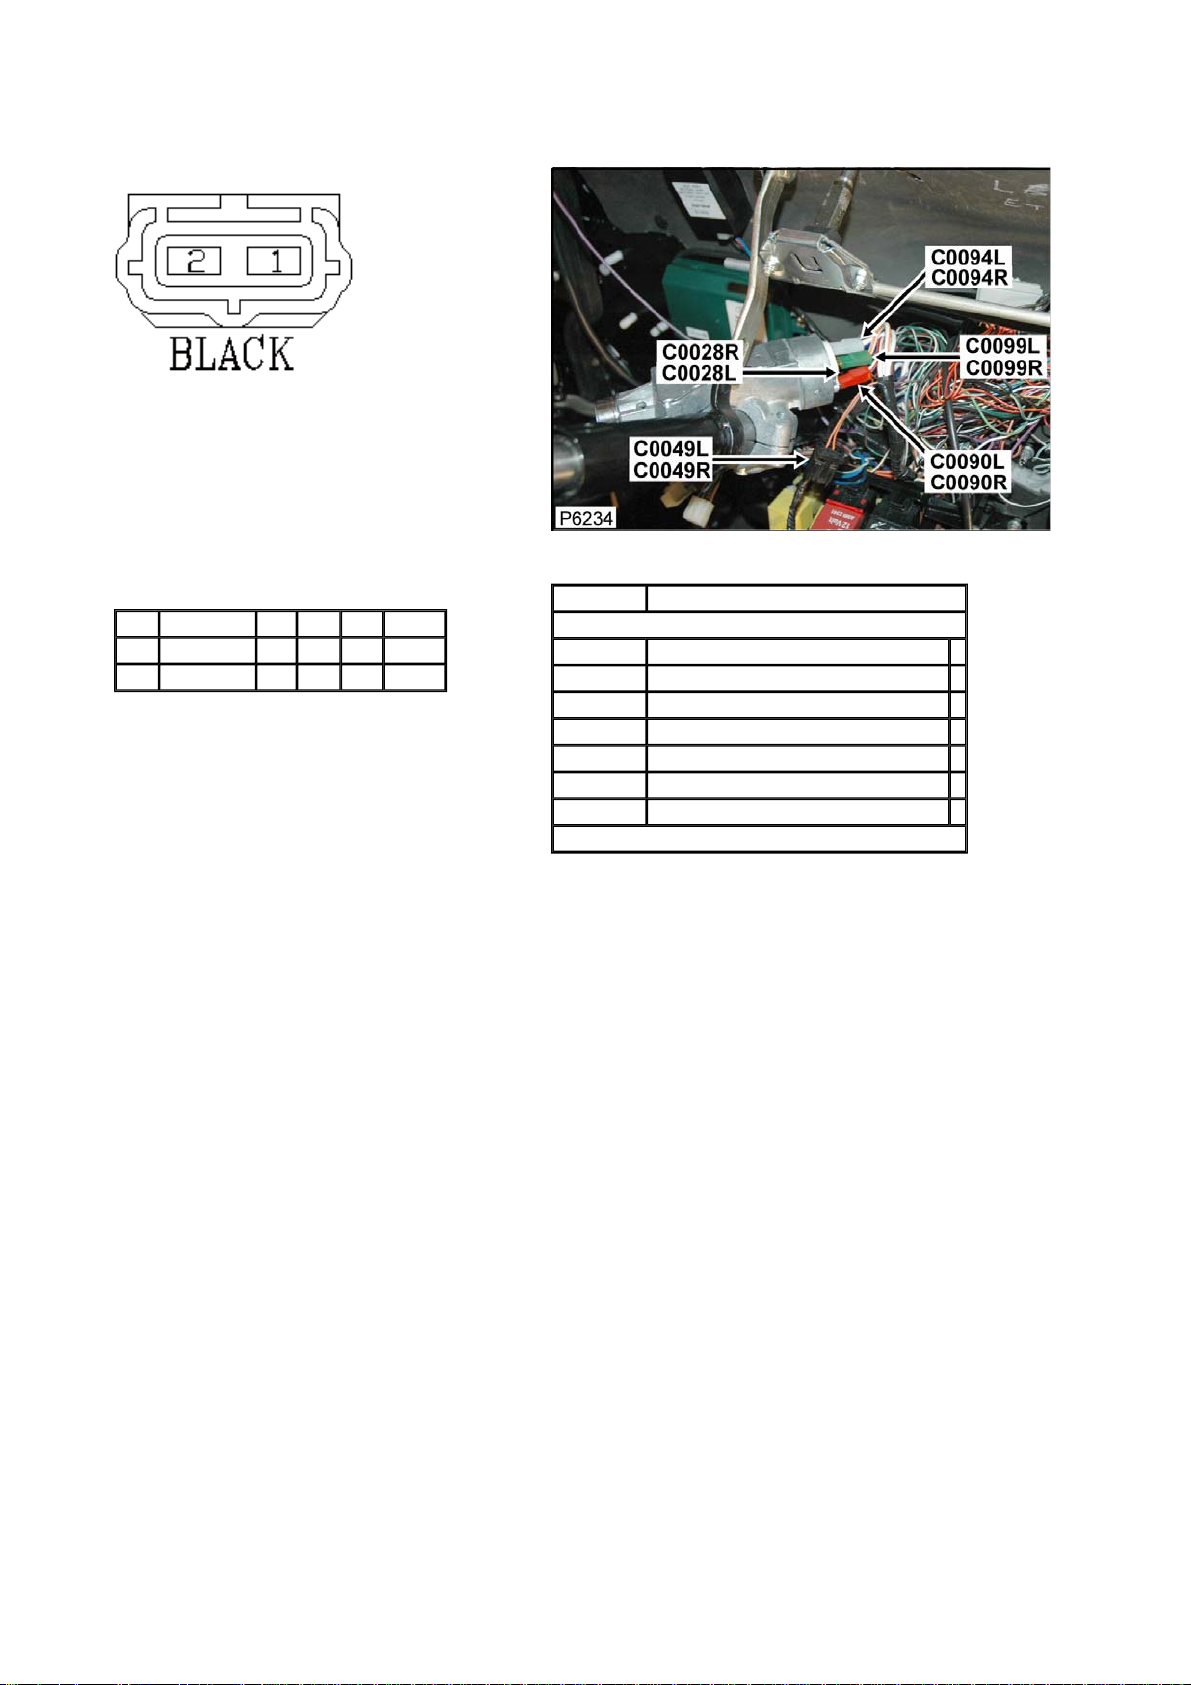
Connector: C0049R Description: Transponder coil
Location: Behind steering column cowl - RH side
Part No.: YPC10069
Colour: BLACK
Cavities: 2WY
Harness: MAIN LH + RH HARNESS
Wire Chart
CAV TERMINAL CSA COL CCT DESTN
1 YPL10062 0.5D OG 22R C0057R
2 YPL10062 0.5D OP 22R C0057R
Service Repair Kits
CSA 0.20- 0.50 CSA
Cavities: 1,2
VDK500010 SRK ITEM GENERAL 1
YMI000330 SRK ITEM ECONOSEAL FAMILY 0.5CSA 1
YPQ000100 SRK ITEM 1
YQD000210 SRK ITEM R/B 1
YRV000040 SRK ITEM PIDG RED 1
YRW000390 SRK ITEM 1
YRW500010 SRK ITEM 1
VUB001690
Page 48
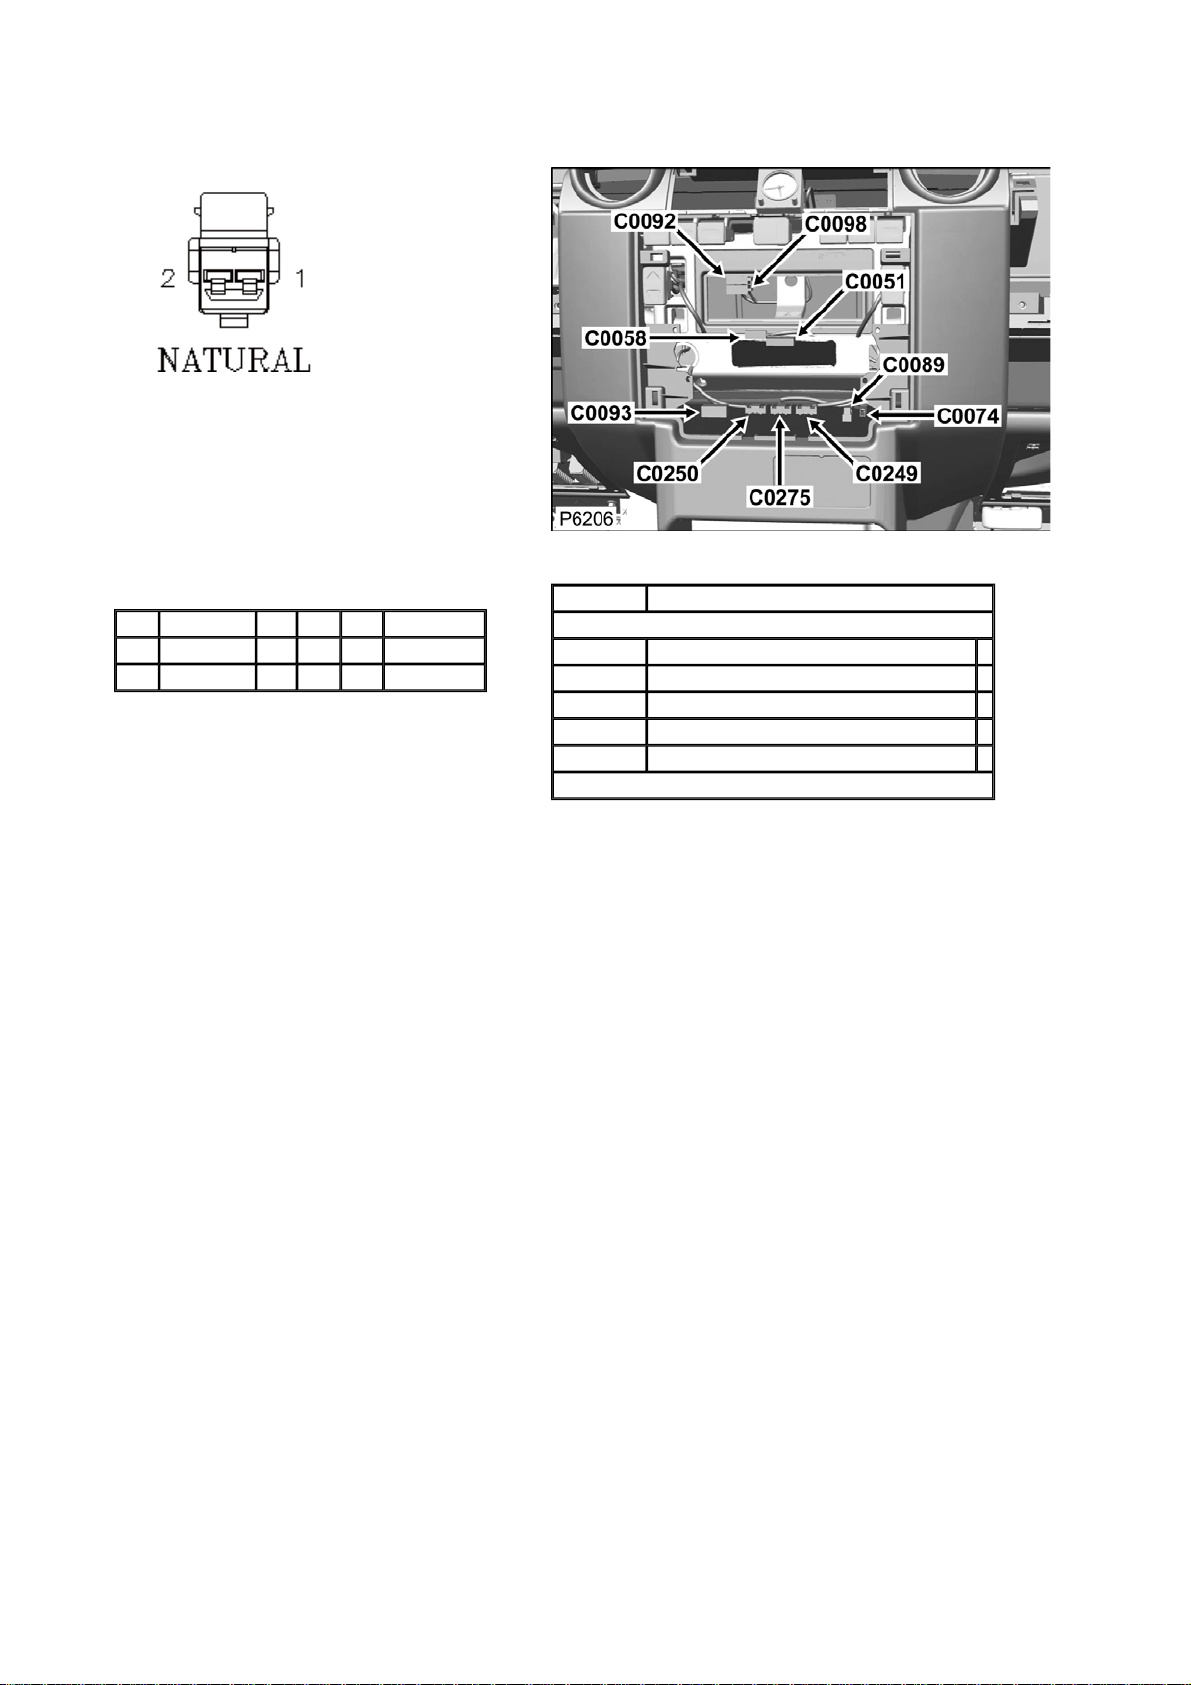
Connector: C0051 Description: Switch-Blower motor
Location: Instrument panel-centre
Part No.: YPC802860
Colour: NATURAL
Cavities: 2WY
Harness: MAIN LH + RH HARNESS
Wire Chart
CAV TERMINAL CSA COL CCT DESTN
1 AFU3752 0.5D B 499 S/JOINT SJ13
2 AFU3752 0.5D RO 499 C0098
Service Repair Kits
CSA 0.30- 0.51 CSA
Cavities: 1,2
YMI000650 SRK ITEM MULTILOCK 070 FAMILY 1.5CSA 1
YPQ000100 SRK ITEM 1
YQD000210 SRK ITEM R/B 1
YRV000040 SRK ITEM PIDG RED 1
YRW500010 SRK ITEM 1
VUB002010
Page 49
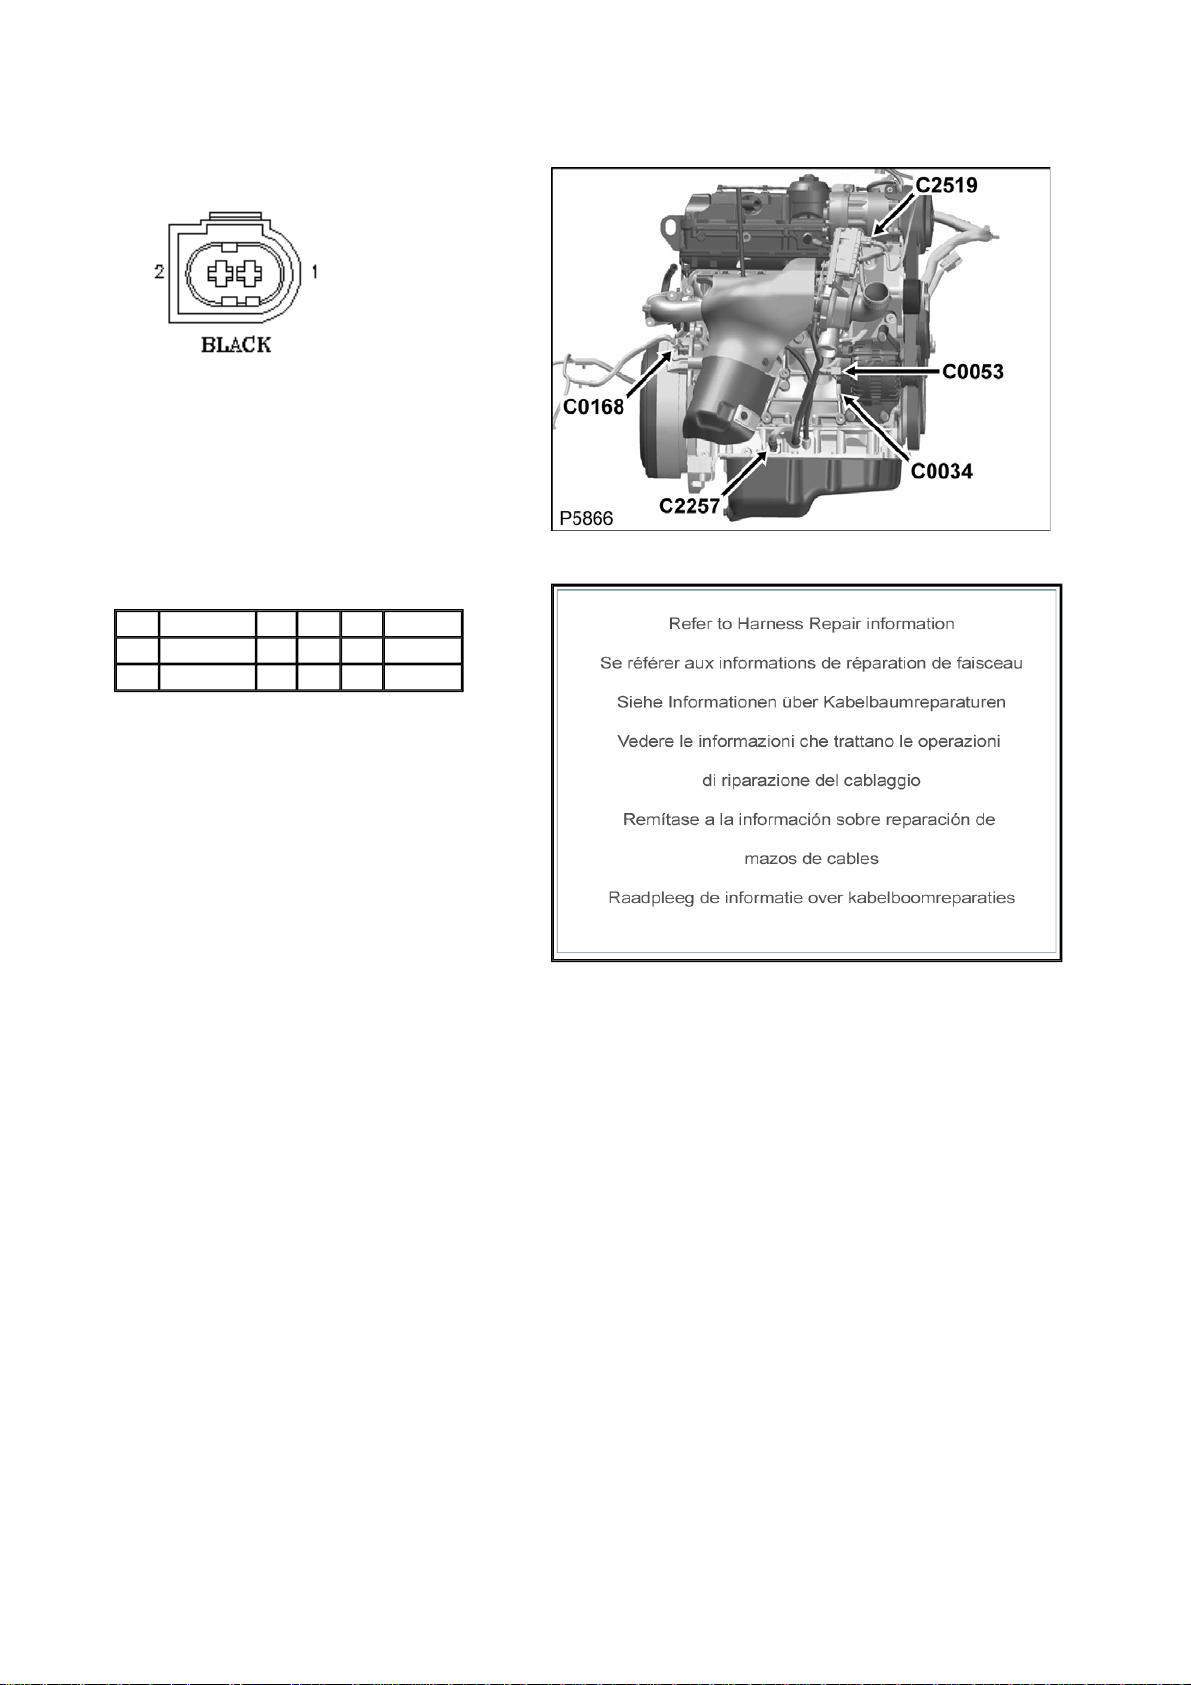
Connector: C0053 Description: Generator
Location: RH side of engine
Part No.: YPC911170
Colour: BLACK
Cavities: 2WY
Harness: ENGINE DIESEL PUMA HARNESS
Wire Chart
CAV TERMINAL CSA COL CCT DESTN
1 YPL10099 0.75 G 254 S/JOINT 1
2 YPL10099 0.5 PW 254 C2518
Service Repair Kits
Page 50
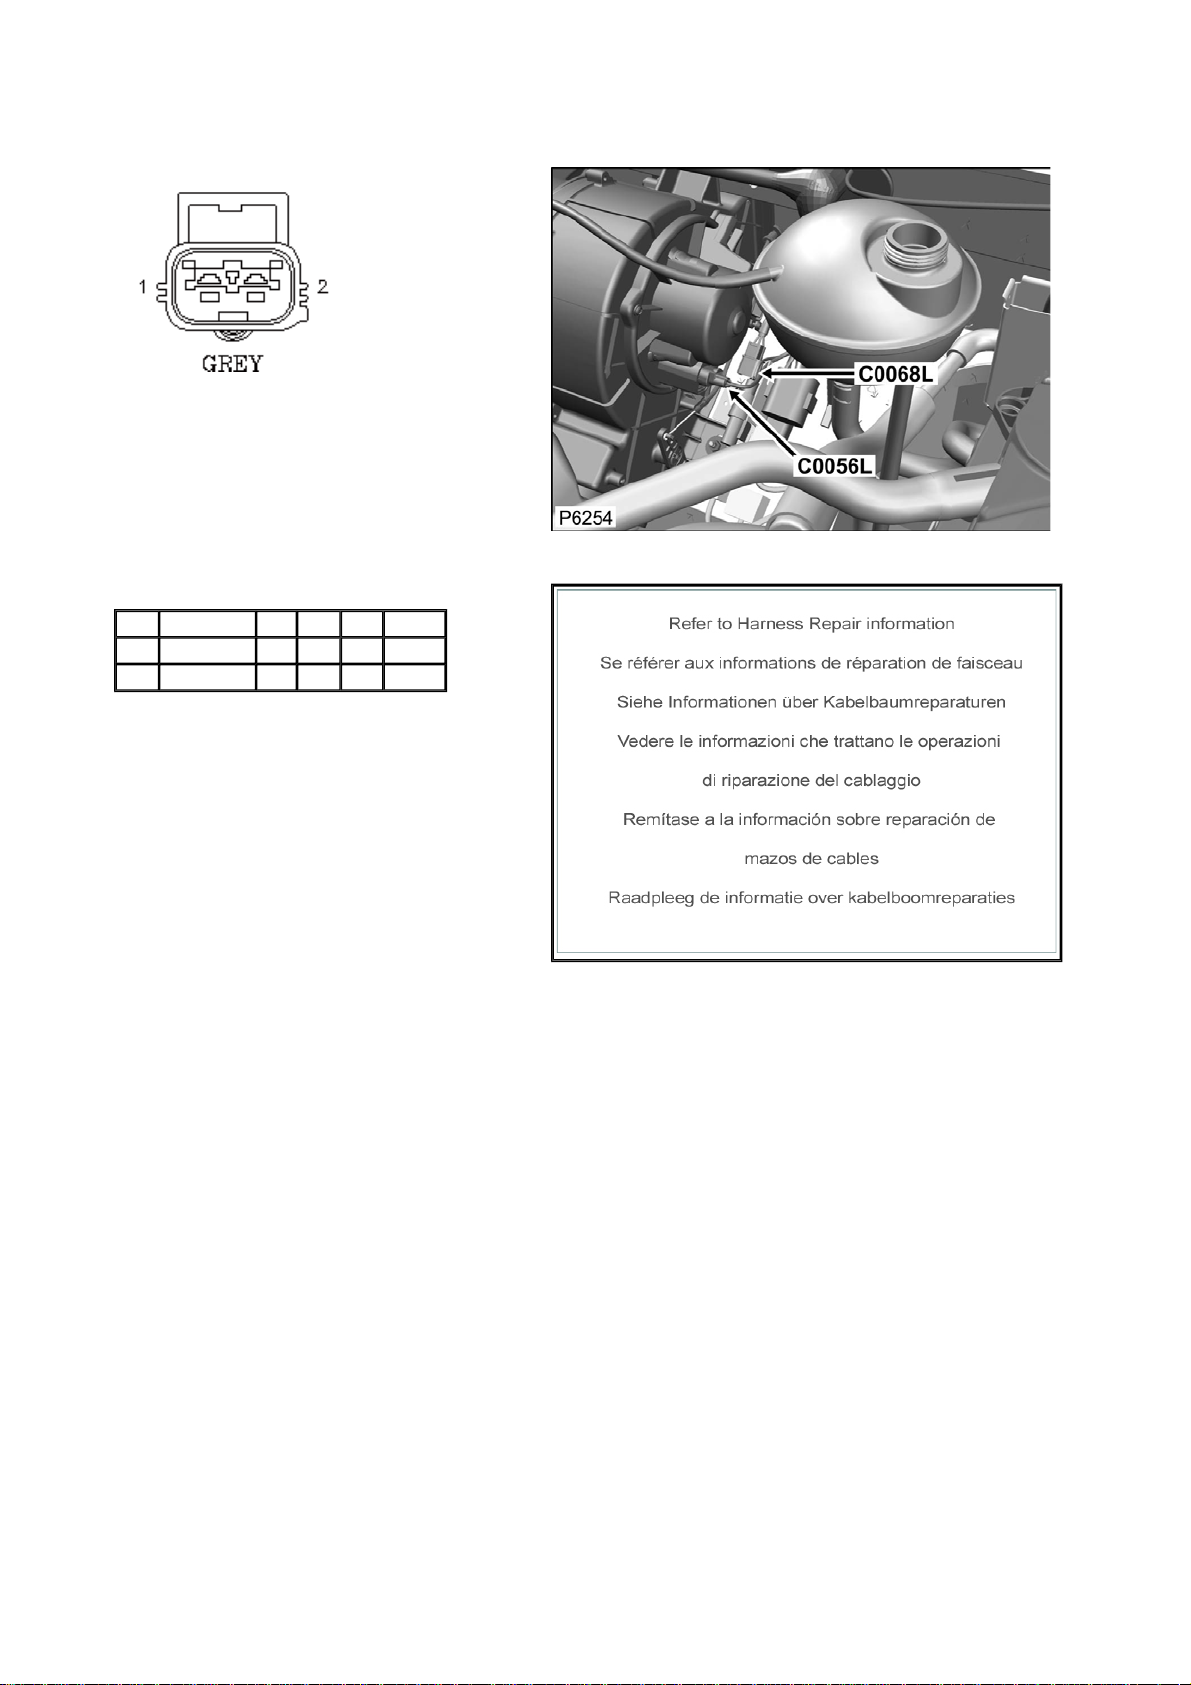
Connector: C0056L Description: Motor-Blower-Front
Location: Rear RH side of engine compartment
Part No.: YPC900890
Colour:
Cavities:
Harness: MAIN LH + RH HARNESS
Wire Chart
CAV TERMINAL CSA COL CCT DESTN
1 YPJ900040 2.5D NR 139L C0058
2 YPJ900040 2.5D O 139L C0582L
Service Repair Kits
Page 51
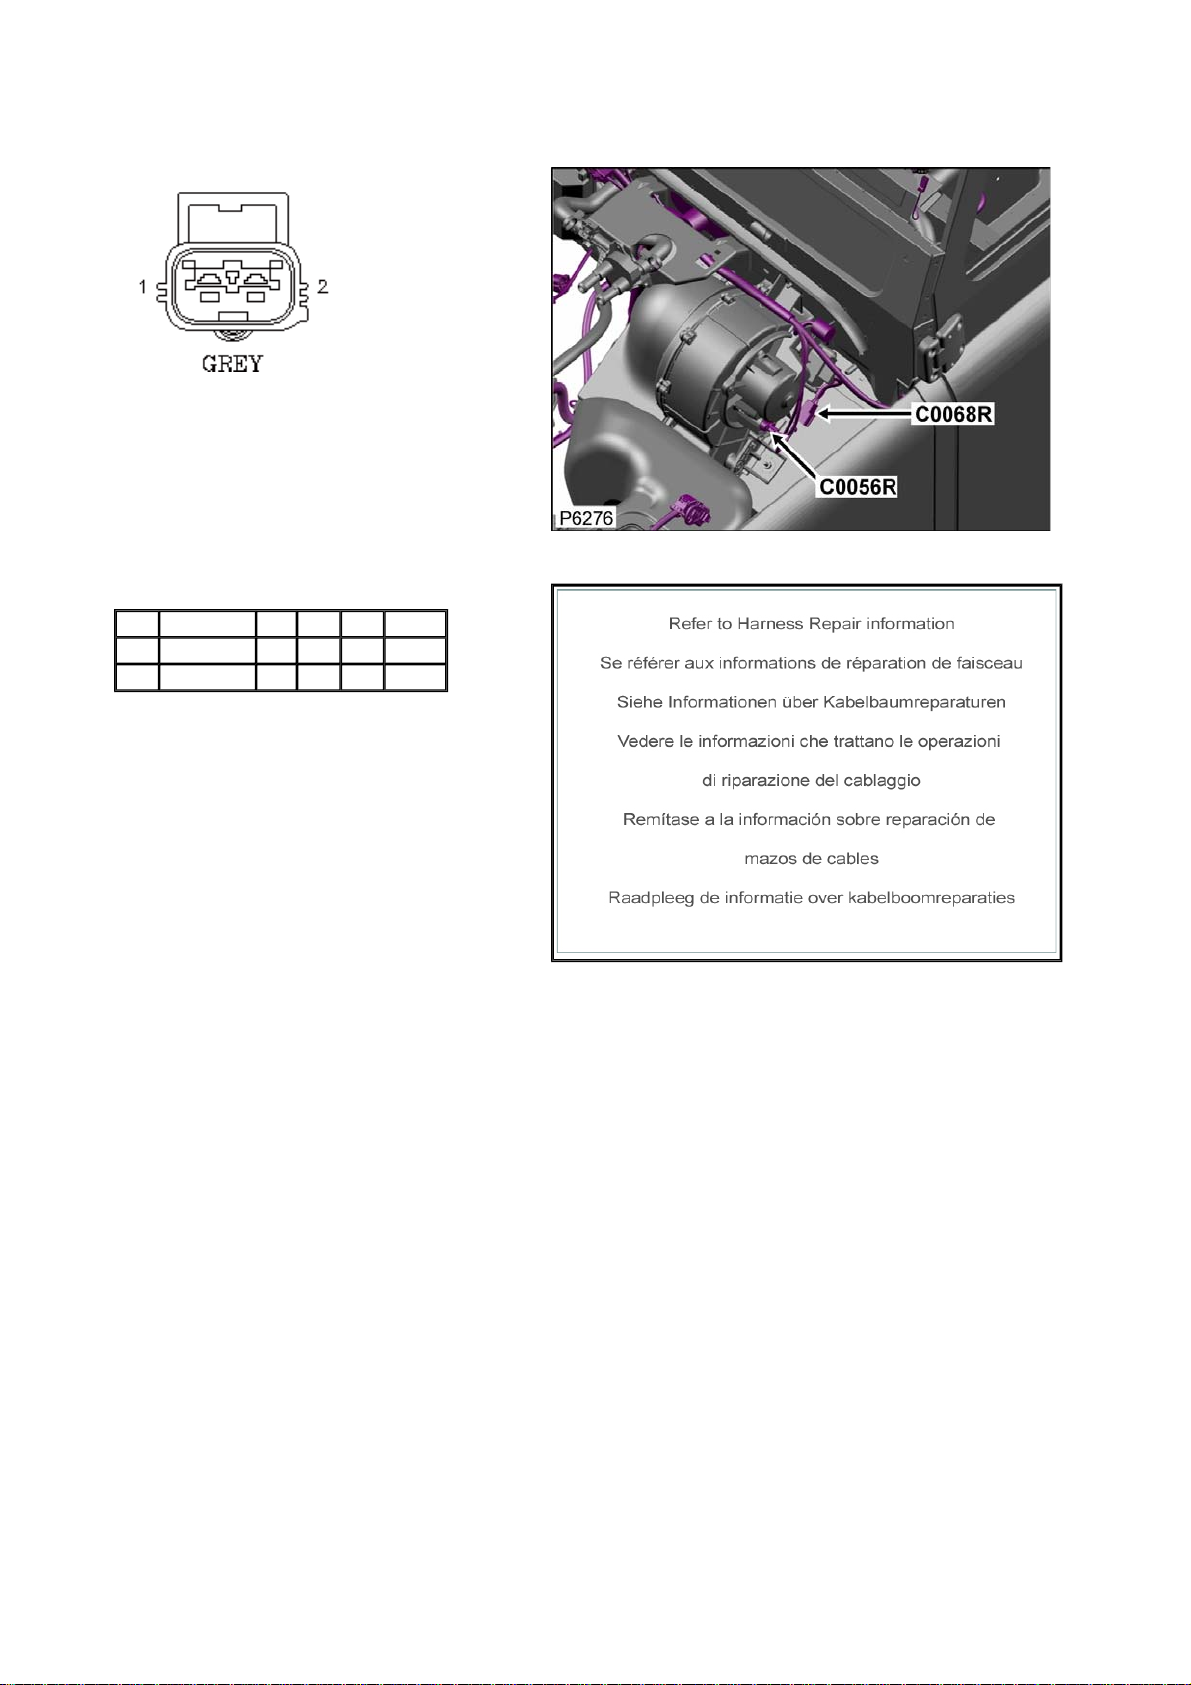
Connector: C0056R Description: Motor-Blower-Front
Location: Rear LH side of engine compartment
Part No.: YPC900890
Colour:
Cavities:
Harness: MAIN LH + RH HARNESS
Wire Chart
CAV TERMINAL CSA COL CCT DESTN
1 YPJ900040 2.5D NR 200R C0058
2 YPJ900040 2.5D O 200R C0582R
Service Repair Kits
Page 52
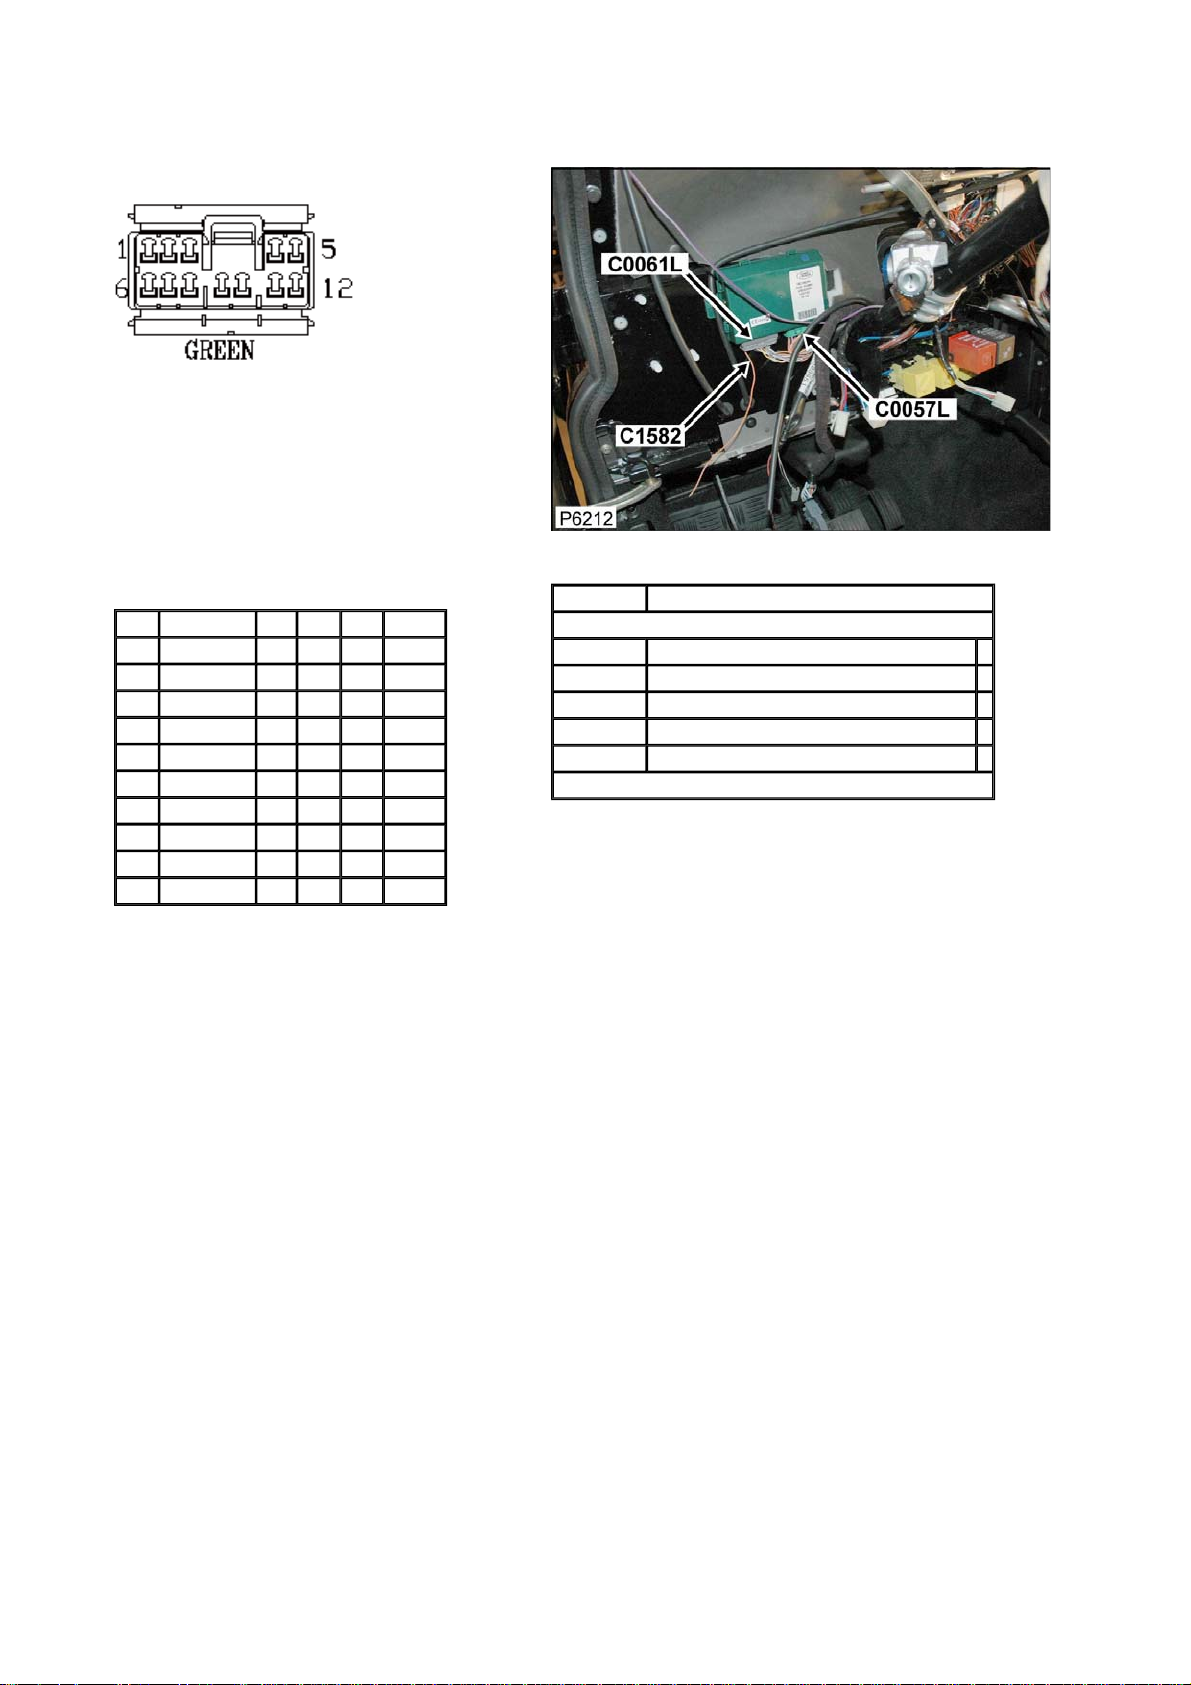
Connector: C0057L Description: ECU-Alarm
Location: Behind LH side of dash
Part No.: YPC10531
Colour: GREEN
Cavities: 12WY
Harness: MAIN LH + RH HARNESS
Wire Chart
CAV TERMINAL CSA COL CCT DESTN
1 AFU3752 0.5D GW 139L C0287
2 AFU3753 1.0D O 767L C0488
3 AFU3753 1.0D K 767L C0488
4 AFU3752 0.5D K 22L C1040L
5 AFU3752 0.5D OW 22L C0286
6 AFU3752 0.5D GR 22L C0287
7 AFU3752 0.5D OG 22L C0049L
8 AFU3753 1.0D PN 768L C0288
11 AFU3753 1.0D B 768L C0289
12 AFU3752 0.5D OP 22L C0049L
Service Repair Kits
CSA 0.75- 1.50 CSA
Cavities: 1-8,11,12
YMI000650 SRK ITEM MULTILOCK 070 FAMILY 1.5CSA 1
YPQ000100 SRK ITEM 1
YQD000210 SRK ITEM R/B 1
YRV000040 SRK ITEM PIDG RED 1
YRW500010 SRK ITEM 1
VUB002010
Page 53
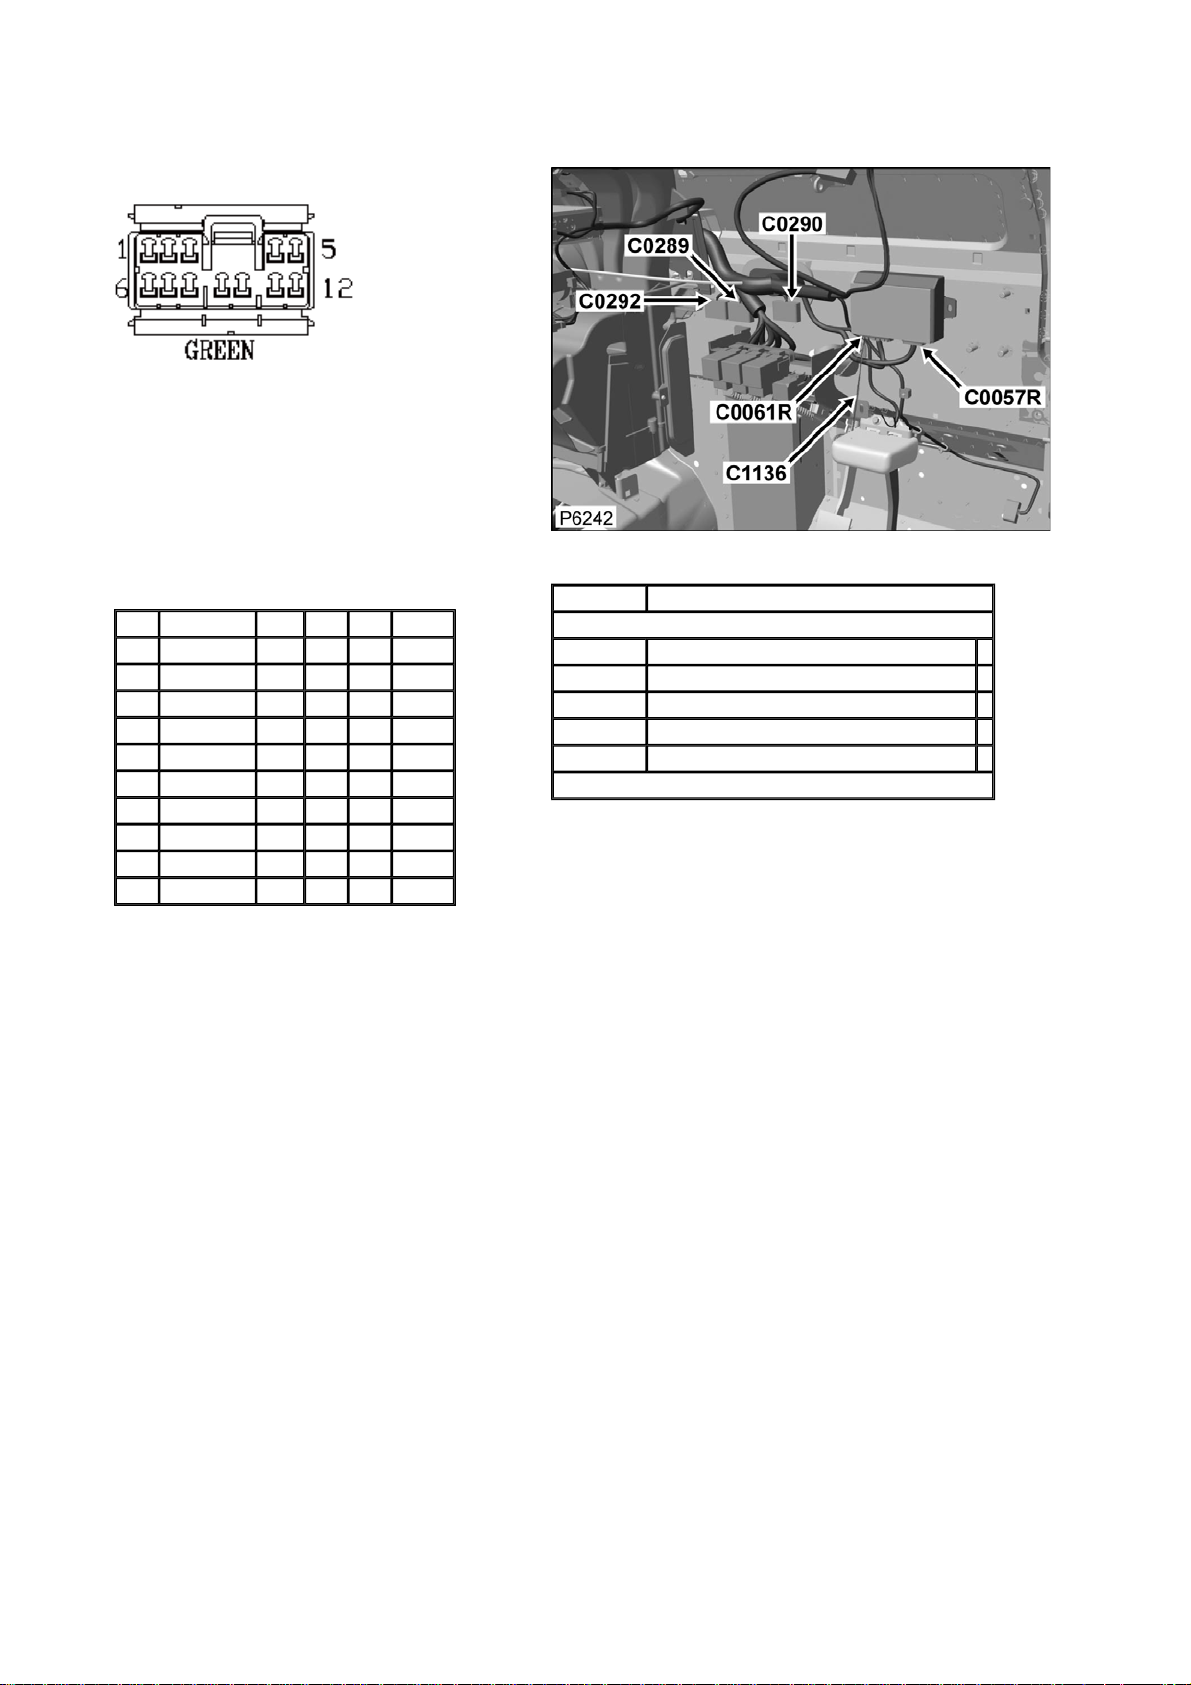
Connector: C0057R Description: ECU-Alarm
Location: Behind RH side of dash
Part No.: YPC10531
Colour: GREEN
Cavities: 12WY
Harness: MAIN LH + RH HARNESS
Wire Chart
CAV TERMINAL CSA COL CCT DESTN
1 AFU3752 0.5D GW 22R C0287
2 AFU3753 0.75D O 767R C0461
3 AFU3753 0.75D K 767R C0461
4 AFU3752 0.5D K 22R C1040R
5 AFU3752 0.5D OW 22R C0286
6 AFU3752 0.5D GR 22R C0287
7 AFU3752 0.5D OG 22R C0049R
8 AFU3753 1.0D PN 768R C0288
11 AFU3753 1.0D B 768R C0289
12 AFU3752 0.5D OP 22R C0049R
Service Repair Kits
CSA 0.75- 1.50 CSA
Cavities: 1-8,11,12
YMI000650 SRK ITEM MULTILOCK 070 FAMILY 1.5CSA 1
YPQ000100 SRK ITEM 1
YQD000210 SRK ITEM R/B 1
YRV000040 SRK ITEM PIDG RED 1
YRW500010 SRK ITEM 1
VUB002010
Page 54
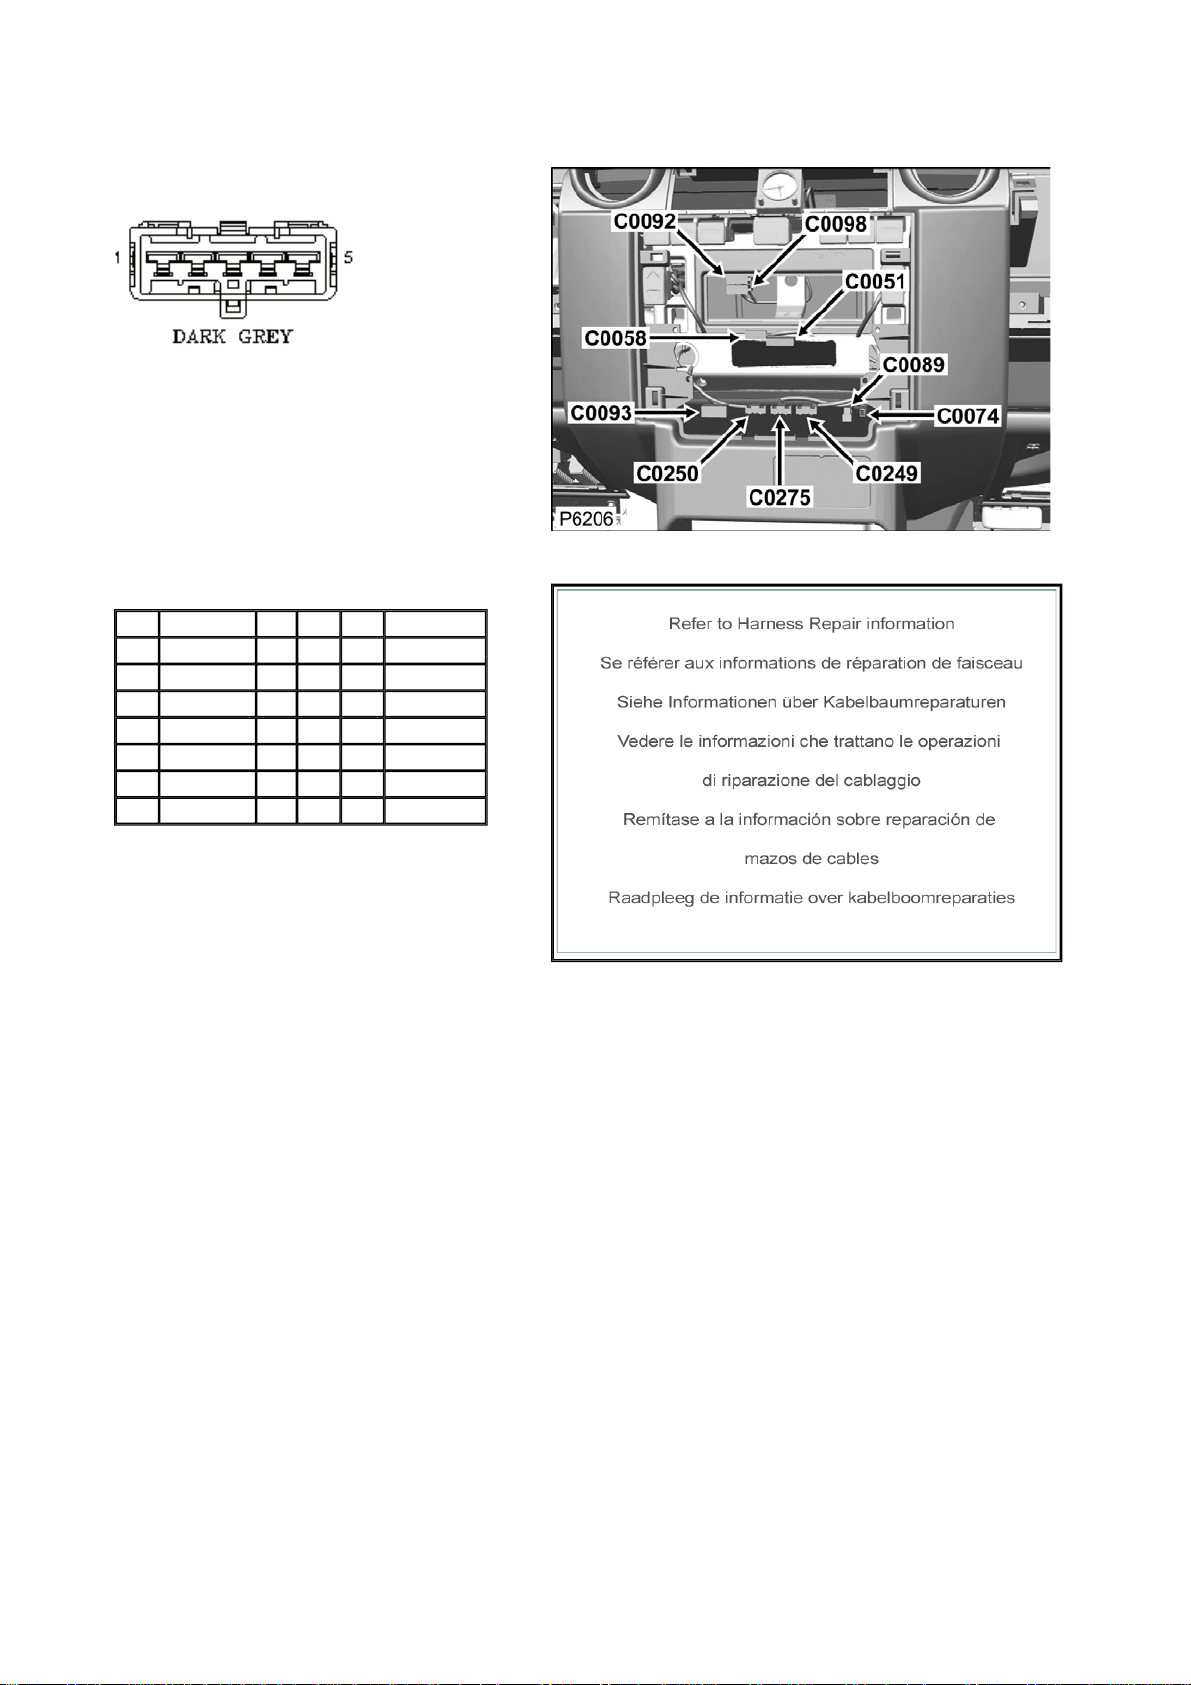
Connector: C0058 Description: Switch-Blower motor
Location: Instrument panel-centre
Part No.: YPC802720
Colour: DARK GREY
Cavities: 5WY
Harness: MAIN LH + RH HARNESS
Wire Chart
CAV TERMINAL CSA COL CCT DESTN
1 YPL801750 2.0D B 499 S/JOINT SJ13
2 YPL801740 1.0D U 139L C0068L
2 YPL801740 1.0D U 200R C0068R
4 YPL801750 1.5D BN 139L C0068L
4 YPL801750 1.5D BN 200R C0068R
5 YPL801750 2.5D NR 139L C0056L
5 YPL801750 2.5D NR 200R C0056R
Service Repair Kits
Page 55
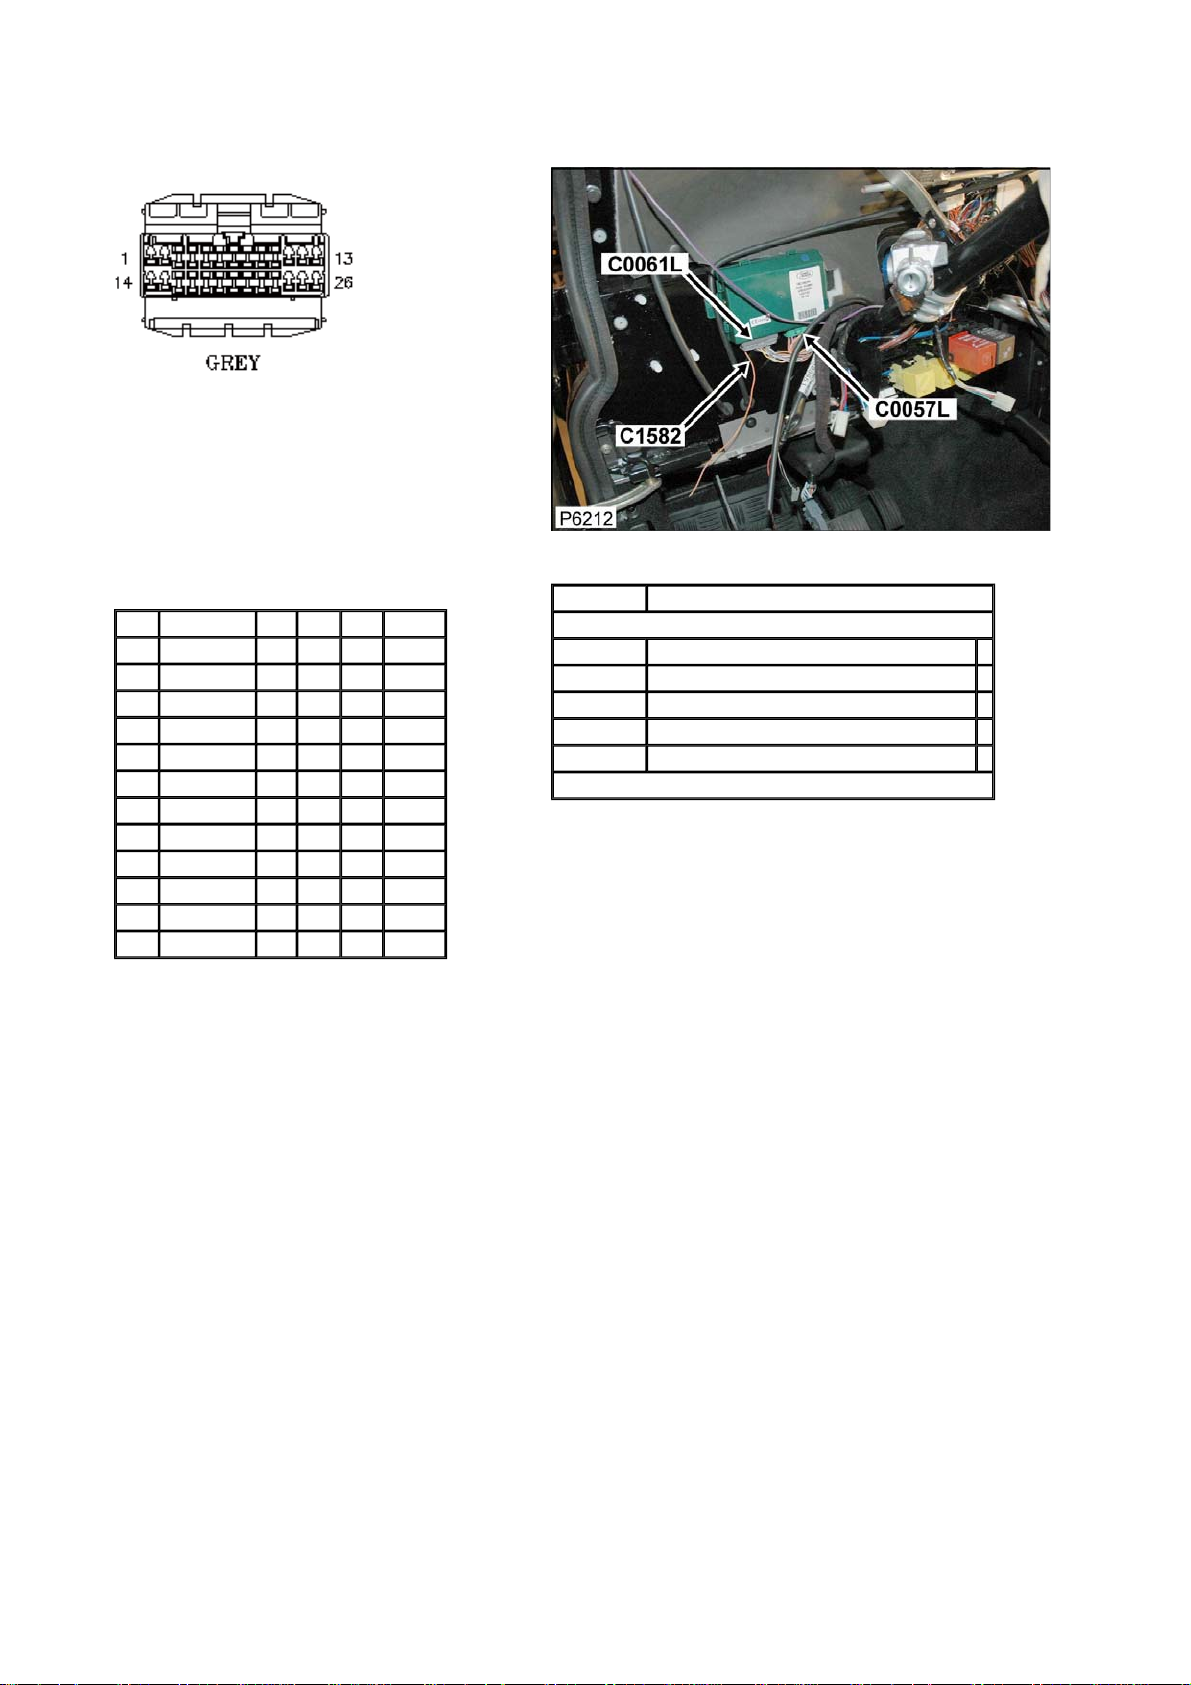
Connector: C0061L Description: ECU-Alarm
Location: Behind LH side of dash
Part No.: YPC110050
Colour: GREY
Cavities: 26WY
Harness: MAIN LH + RH HARNESS
Wire Chart
CAV TERMINAL CSA COL CCT DESTN
1 AFU3752 0.5D PW 22L C0488
3 YPL10036 0.5D WB 22L C0488
5 YPL10036 0.5D SW 22L C0266
7 YPL10036 0.5D YK 767L C0459
9 YPL10036 0.5D OU 22L C0007L
10 YPL10036 0.5D WG 768L C0285
14 AFU3752 0.5D LGS 254L C1040L
16 YPL10036 0.5D PU 22L C0488
17 YPL10036 0.5D OLG 22L C0040L
20 YPL10036 0.5D BN 22L C0488
25 AFU3753 1.5D PN 768L C0574
26 AFU3752 0.5D OS 22L C1582
Service Repair Kits
CSA 0.30- 0.51 CSA
Cavities: 1,14,25,26
YMI000650 SRK ITEM MULTILOCK 070 FAMILY 1.5CSA 1
YPQ000100 SRK ITEM 1
YQD000210 SRK ITEM R/B 1
YRV000040 SRK ITEM PIDG RED 1
YRW500010 SRK ITEM 1
VUB002010
Page 56
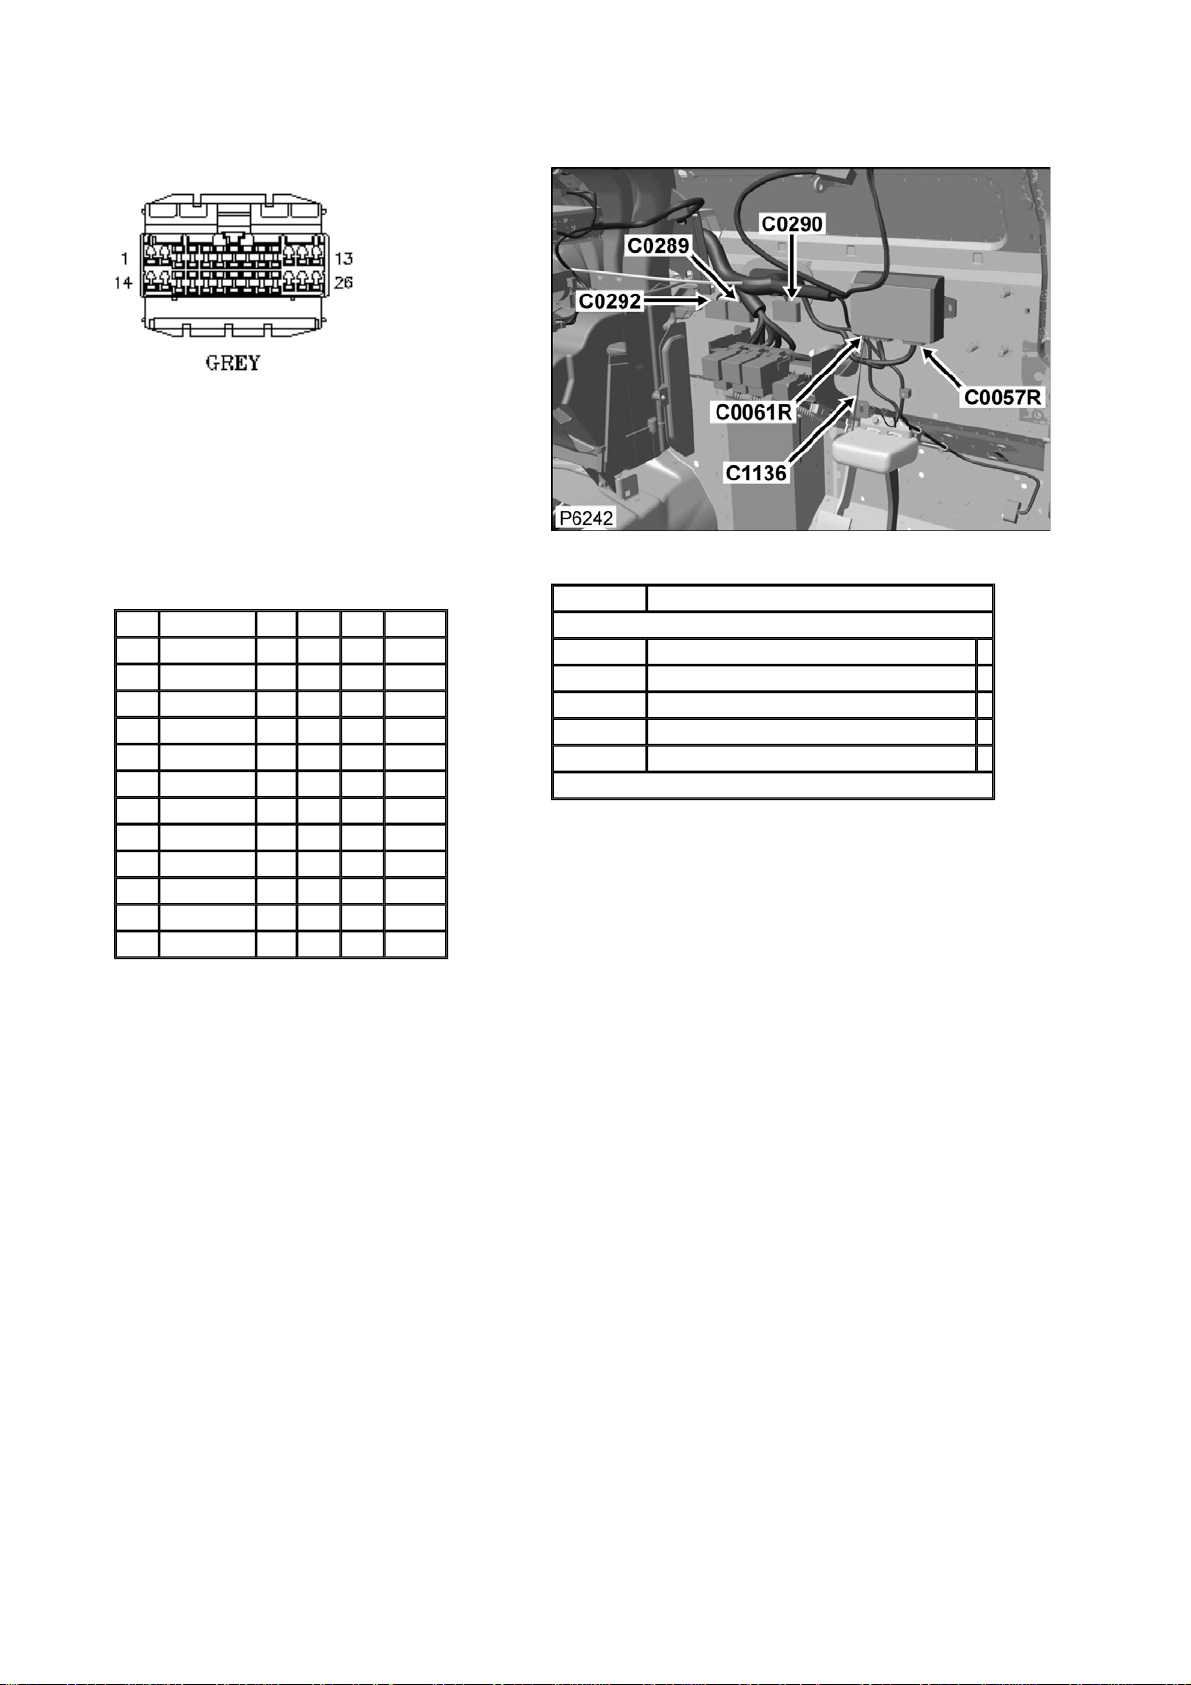
Connector: C0061R Description: ECU-Alarm
Location: Behind RH side of dash
Part No.: YPC110050
Colour: GREY
Cavities: 26WY
Harness: MAIN LH + RH HARNESS
Wire Chart
CAV TERMINAL CSA COL CCT DESTN
1 AFU3752 0.5D PW 22R C0488
3 YPL10036 0.5D WB 22R C0488
5 YPL10036 0.5D SW 22R C2007
7 YPL10036 0.5D YK 767R C0460
9 YPL10036 0.5D OU 22R C0007R
10 YPL10036 0.5D WG 768R C0285
14 AFU3752 0.5D LGS 254R C1040R
16 YPL10036 0.5D PU 22R C2004
17 YPL10036 0.5D OLG 22R C0040R
20 YPL10036 0.5D BN 22R C0488
25 AFU3753 1.5D PN 768R C0574
26 AFU3752 0.5D OS 22R C1136
Service Repair Kits
CSA 0.75- 1.50 CSA
Cavities: 1,14,25,26
YMI000650 SRK ITEM MULTILOCK 070 FAMILY 1.5CSA 1
YPQ000100 SRK ITEM 1
YQD000210 SRK ITEM R/B 1
YRV000040 SRK ITEM PIDG RED 1
YRW500010 SRK ITEM 1
VUB002010
Page 57
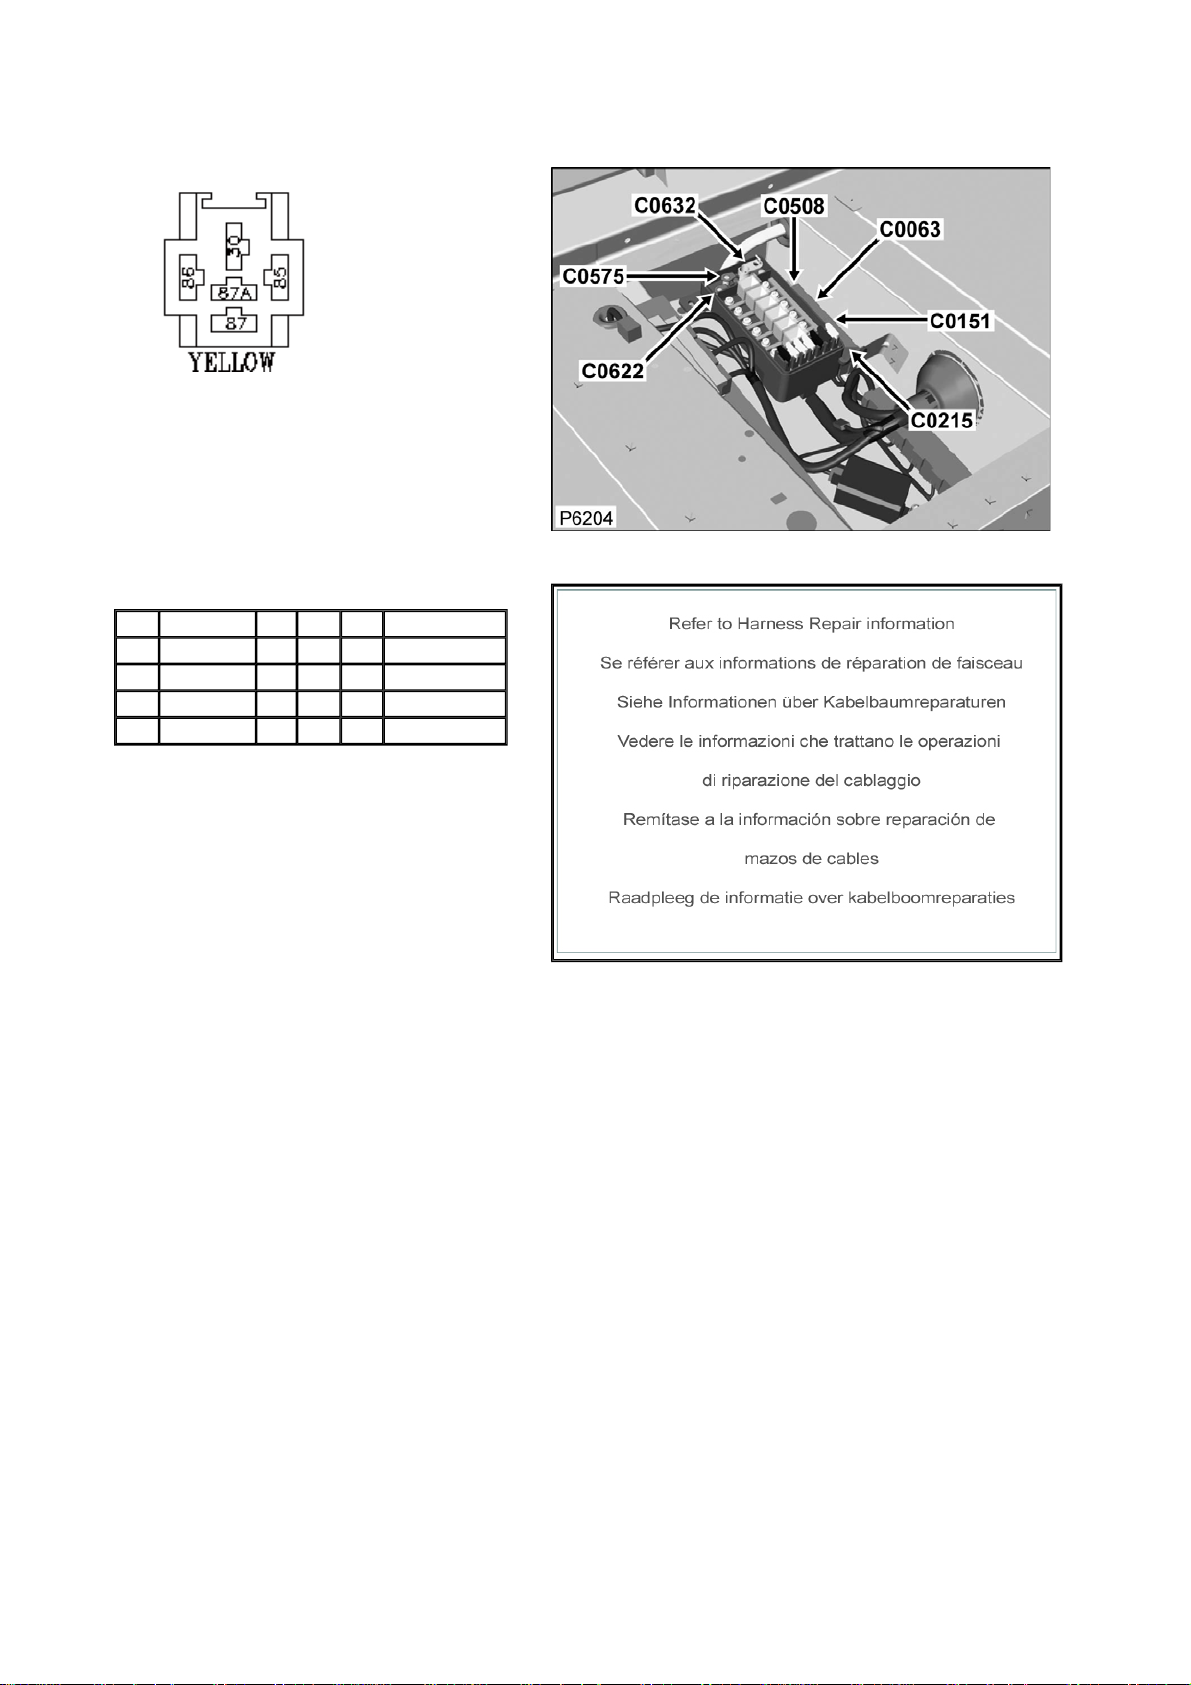
Connector: C0063 Description: Relay-main
Location: Beneath RH Front seat
Part No.: AFU3271
Colour: YELLOW
Cavities: 5WY
Harness: MAIN LH + RH HARNESS
Wire Chart
CAV TERMINAL CSA COL CCT DESTN
30 AFU3120 1.5D NLG 499 S/JOINT SJ8
85 AFU3120 1.5D NLG 499 S/JOINT SJ8
86 AFU3119 0.5D UR 499 C0872
87 YPL10045 2.5D NO 499 S/JOINT SJ1 (M)
Service Repair Kits
Page 58
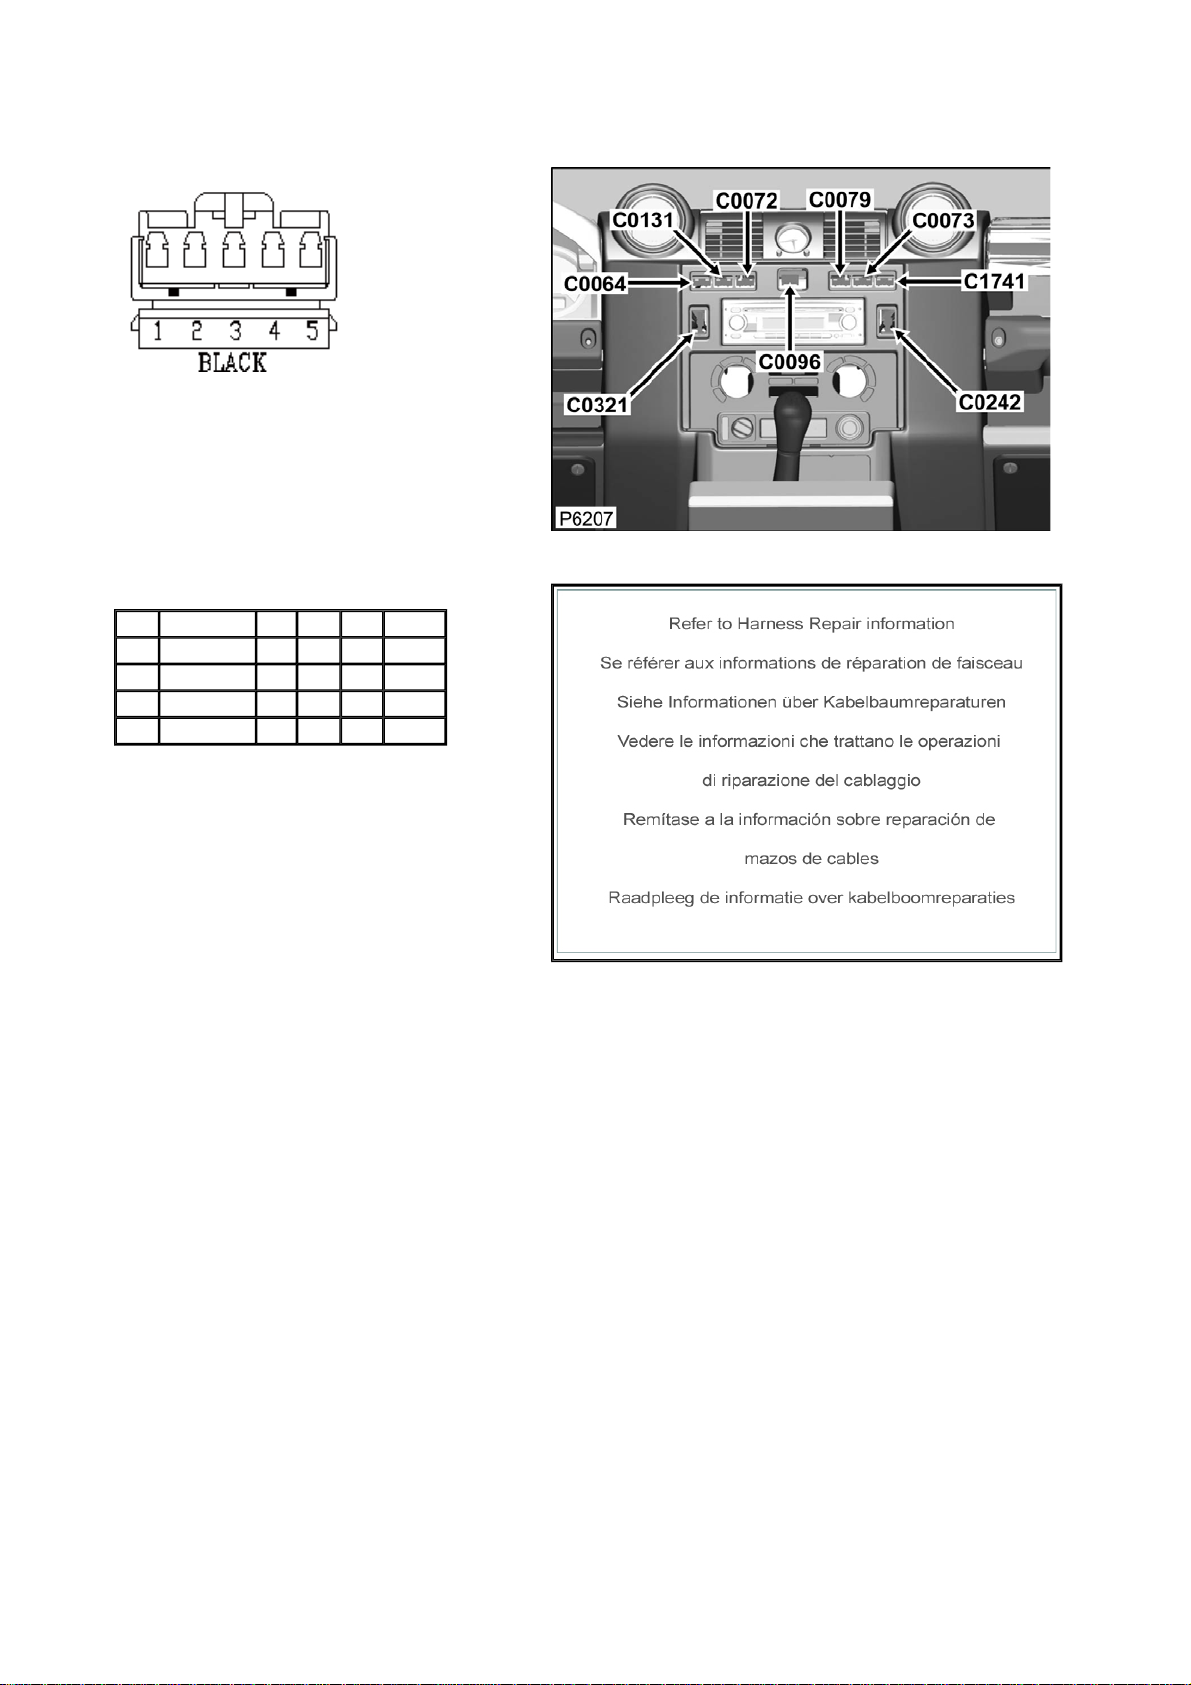
Connector: C0064 Description: Switch-Fog guard-lamp-Rear
Location: Instrument panel-centre
Part No.: YPC10523
Colour: BLACK
Cavities: 5WY
Harness: MAIN LH + RH HARNESS
Wire Chart
CAV TERMINAL CSA COL CCT DESTN
1 AFU3752 0.5D BS 139L C0543
2 AFU3752 0.5D RO 139L C0286
4 AFU3752 0.5D B 139L C0289
5 AFU3752 0.5D RY 139L C1040L
Service Repair Kits
Page 59
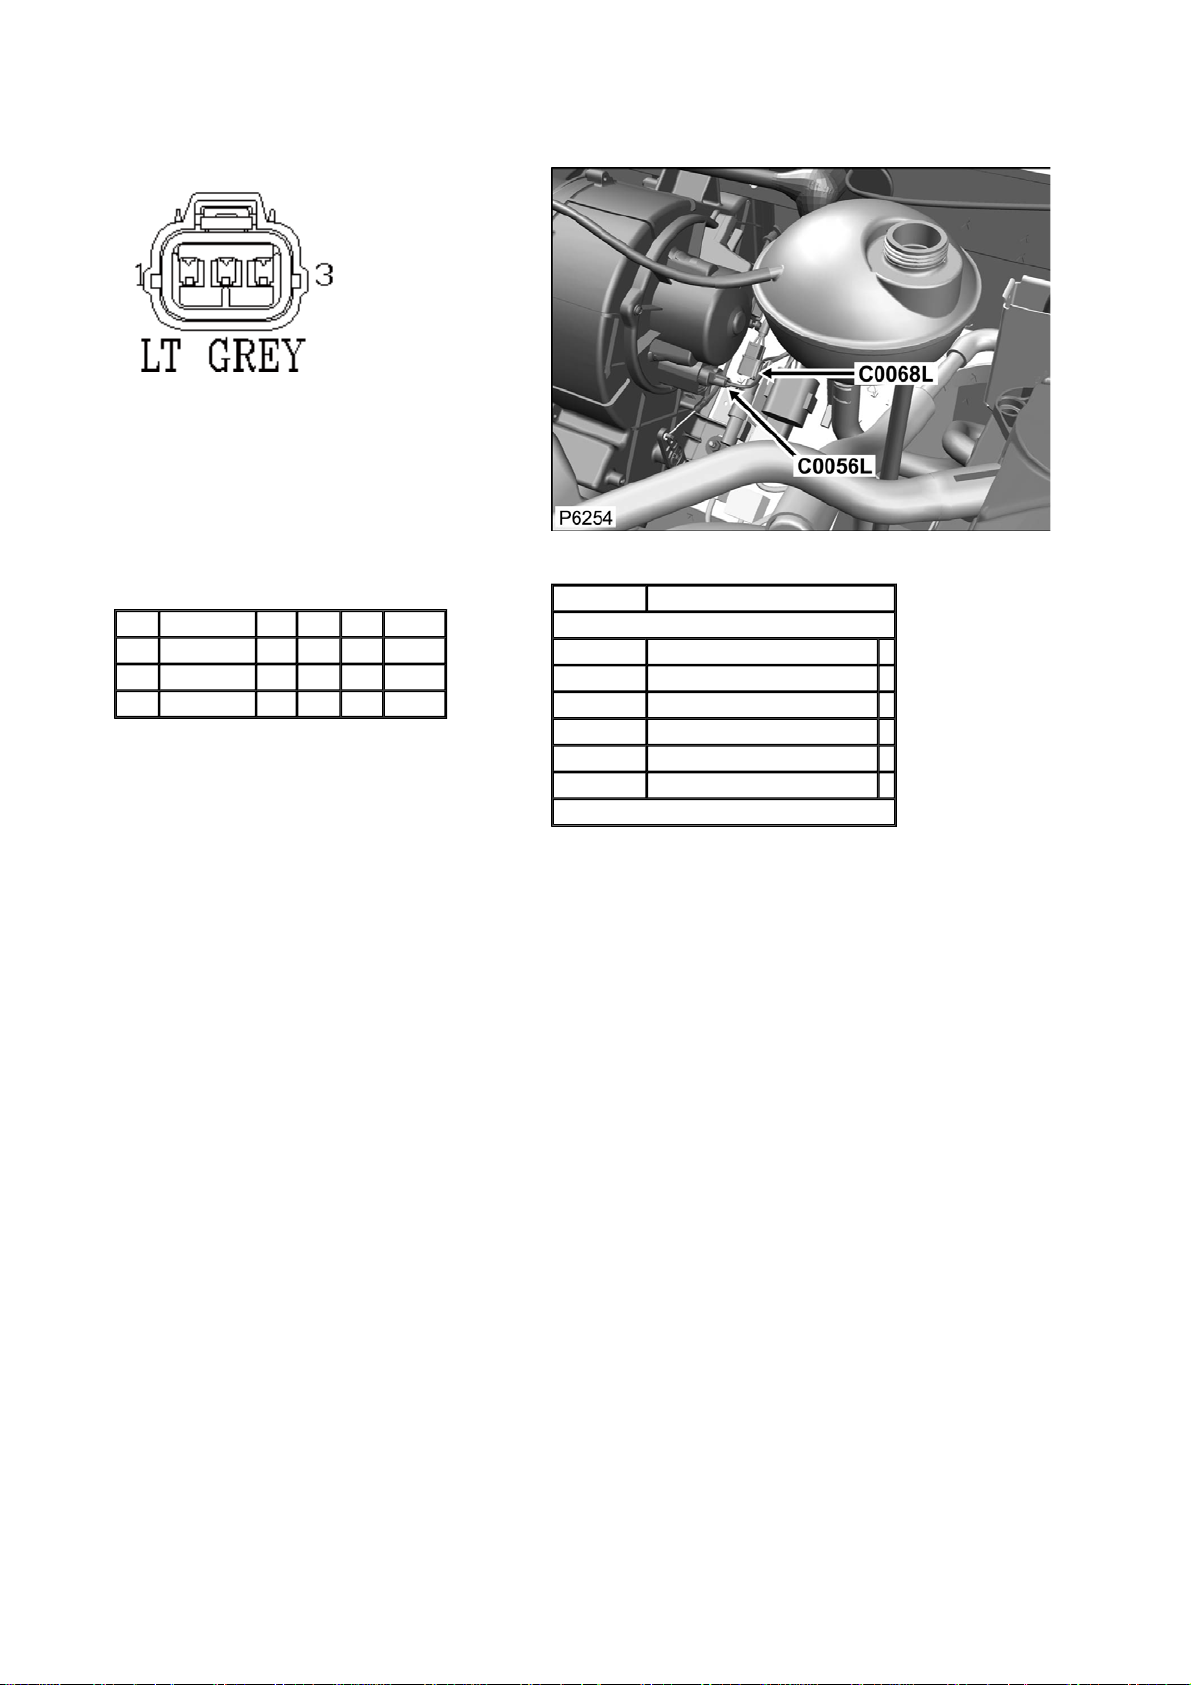
Connector: C0068L Description: Resistor pack
Location: Rear RH side of engine compartment
Part No.: YPC10181
Colour: LIGHT GREY
Cavities: 3WY
Harness: MAIN LH + RH HARNESS
Wire Chart
CAV TERMINAL CSA COL CCT DESTN
1 DBP8548 1.0D U 139L C0058
2 YPL10027 1.5D BN 139L C0058
3 YPL10027 1.5D NR 139L CTAP
Service Repair Kits
CSA 0.30- 1.25 CSA
Cavities: 1
YMI000010 SRK ITEM 090 FAMILY 1.5CSA 1
YPQ000100 SRK ITEM 1
YQD000210 SRK ITEM R/B 1
YRV000040 SRK ITEM PIDG RED 1
YRW000390 SRK ITEM 1
YRW500010 SRK ITEM 1
VUB001120
Page 60
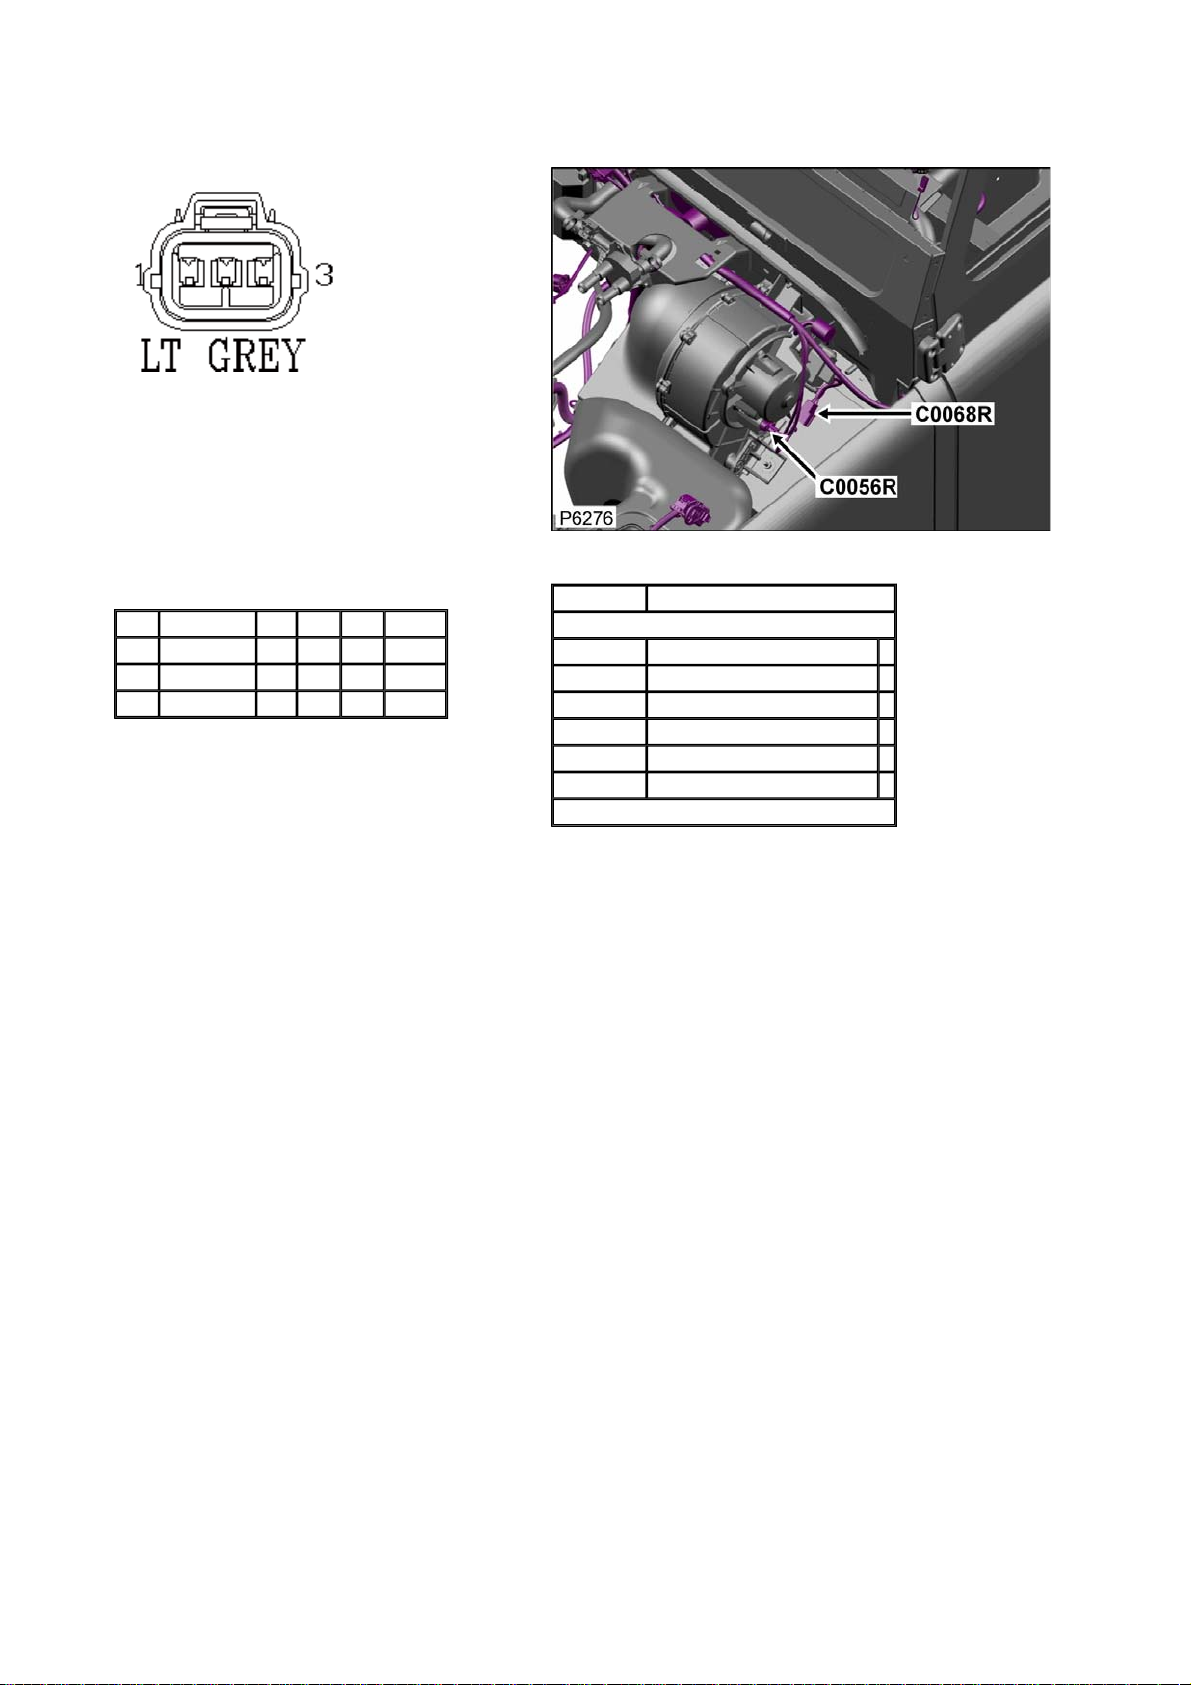
Connector: C0068R Description: Resistor pack
Location: Rear LH side of engine compartment
Part No.: YPC10181
Colour: LIGHT GREY
Cavities: 3WY
Harness: MAIN LH + RH HARNESS
Wire Chart
CAV TERMINAL CSA COL CCT DESTN
1 DBP8548 1.0D U 200R C0058
2 YPL10027 1.5D BN 200R C0058
3 YPL10027 1.5D NR 200R CTAP
Service Repair Kits
CSA 0.30- 1.25 CSA
Cavities: 1
YMI000010 SRK ITEM 090 FAMILY 1.5CSA 1
YPQ000100 SRK ITEM 1
YQD000210 SRK ITEM R/B 1
YRV000040 SRK ITEM PIDG RED 1
YRW000390 SRK ITEM 1
YRW500010 SRK ITEM 1
VUB001120
Page 61
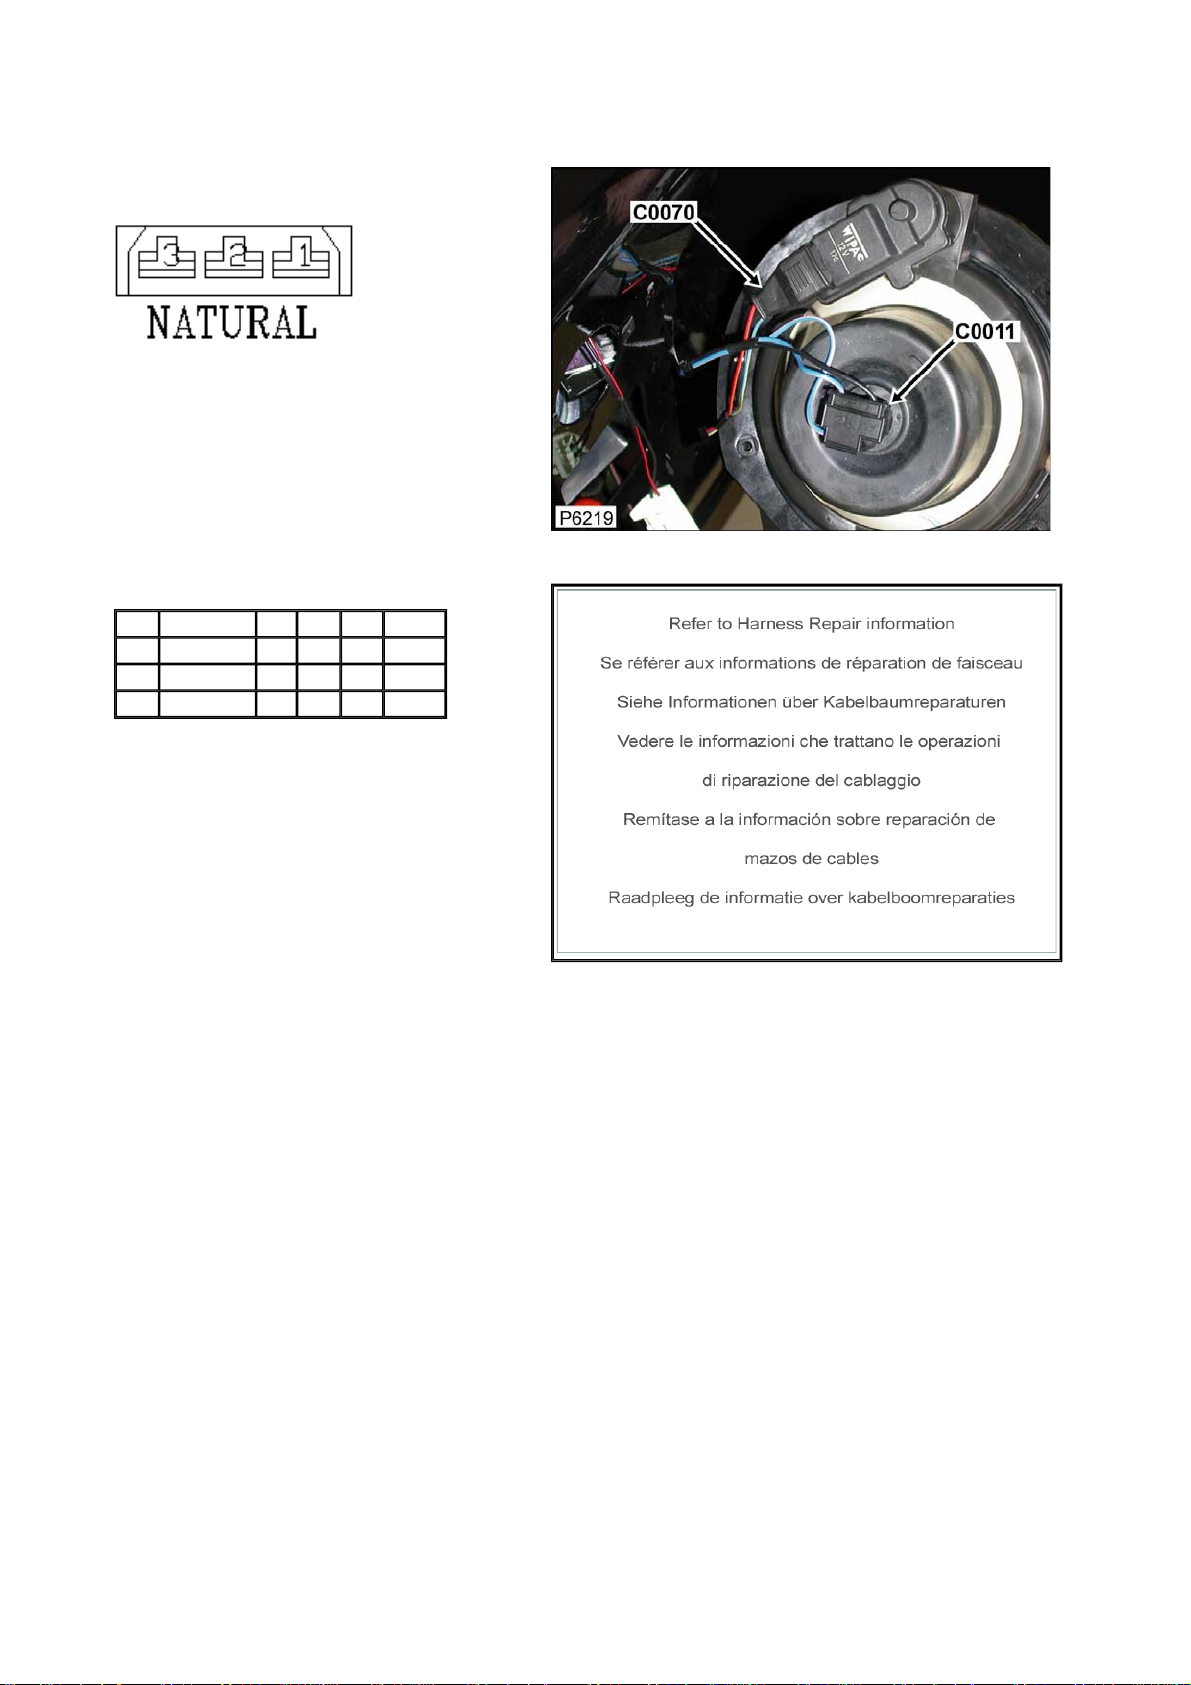
Connector: C0070 Description: Motor-Headlamp-levelling-RH
Location: Behind RH head lamp
Part No.: YPC10426
Colour: NATURAL
Cavities: 3WY
Harness: WING RH HARNESS
Wire Chart
CAV TERMINAL CSA COL CCT DESTN
1 YPL10073 0.5D UY 1 C1267
2 YPL10073 0.5D B 1 CTAP
3 YPL10073 0.5D RO 1 C1267
Service Repair Kits
Page 62
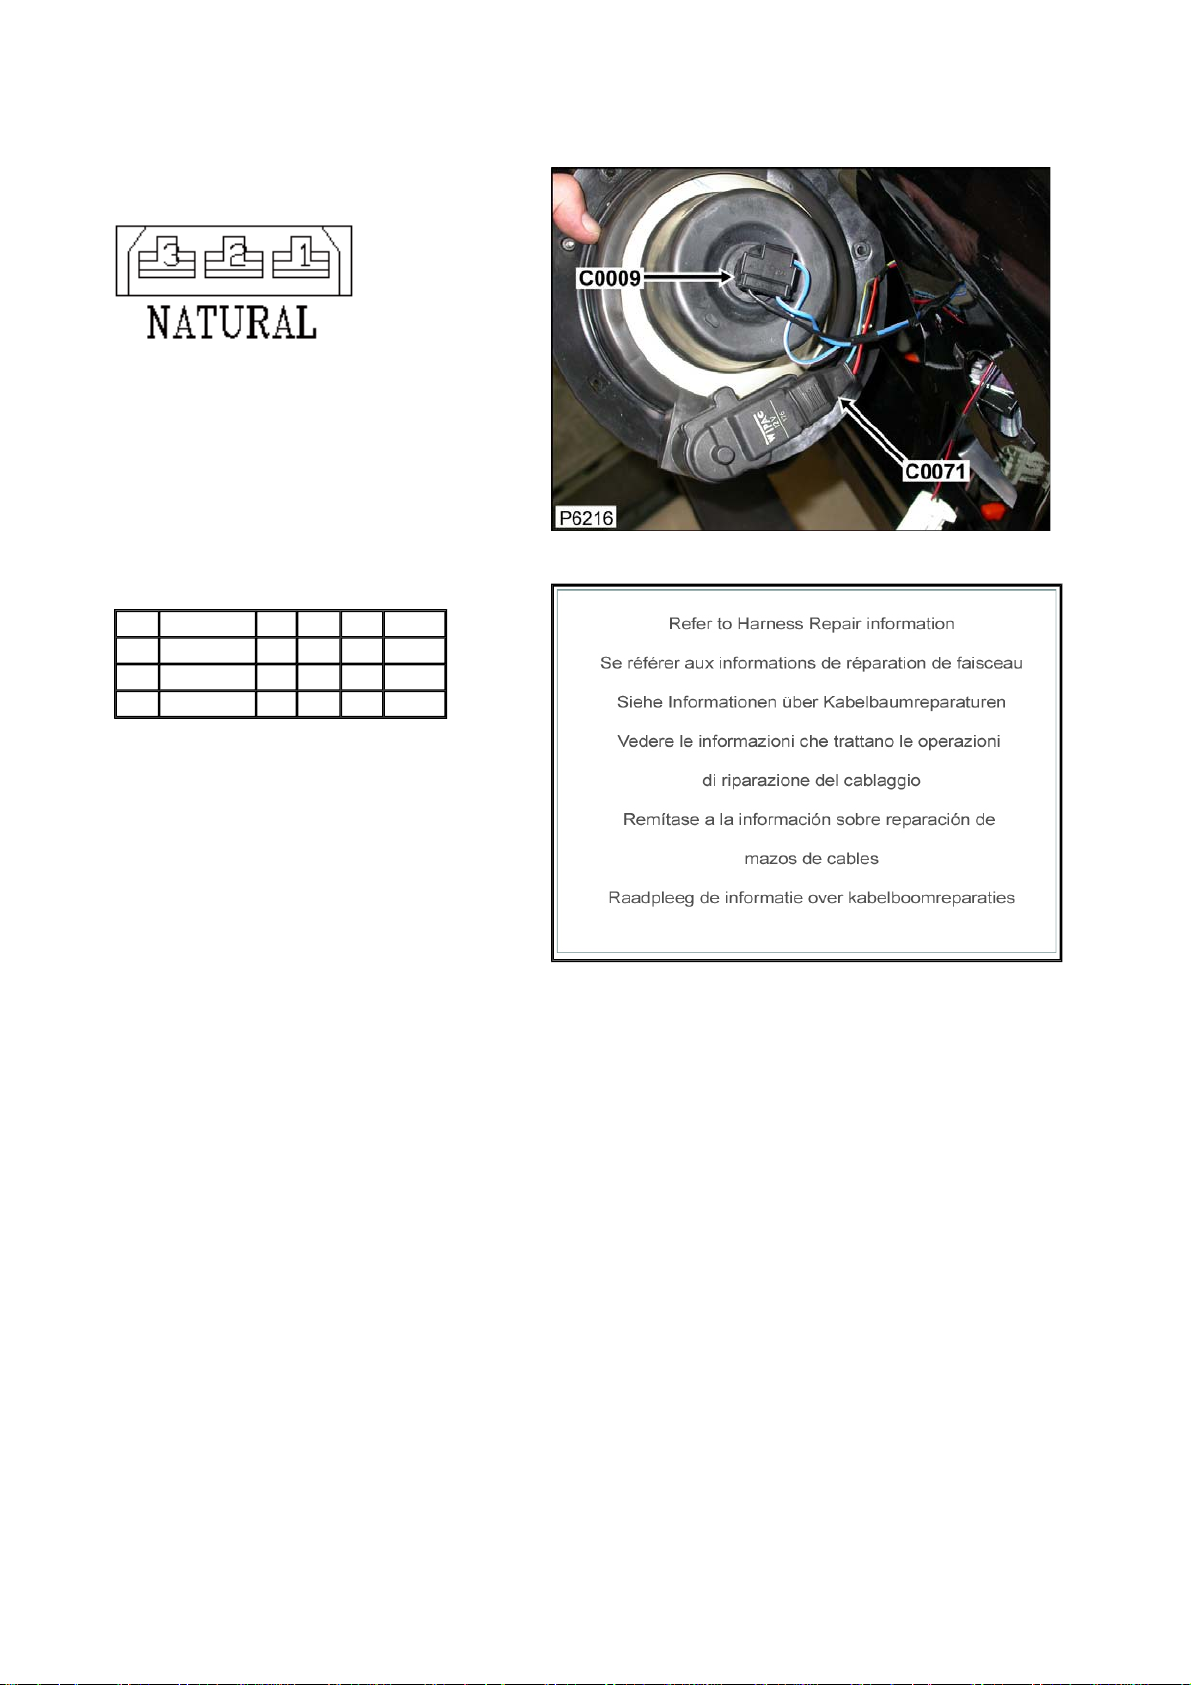
Connector: C0071 Description: Motor-Headlamp-levelling-LH
Location: Behind LH headlamp
Part No.: YPC10426
Colour: NATURAL
Cavities: 3WY
Harness: WING LH HARNESS
Wire Chart
CAV TERMINAL CSA COL CCT DESTN
1 YPL10073 0.5D UY 1 C1265
2 YPL10073 0.5D B 1 CTAP
3 YPL10073 0.5D RO 1 C1265
Service Repair Kits
Page 63
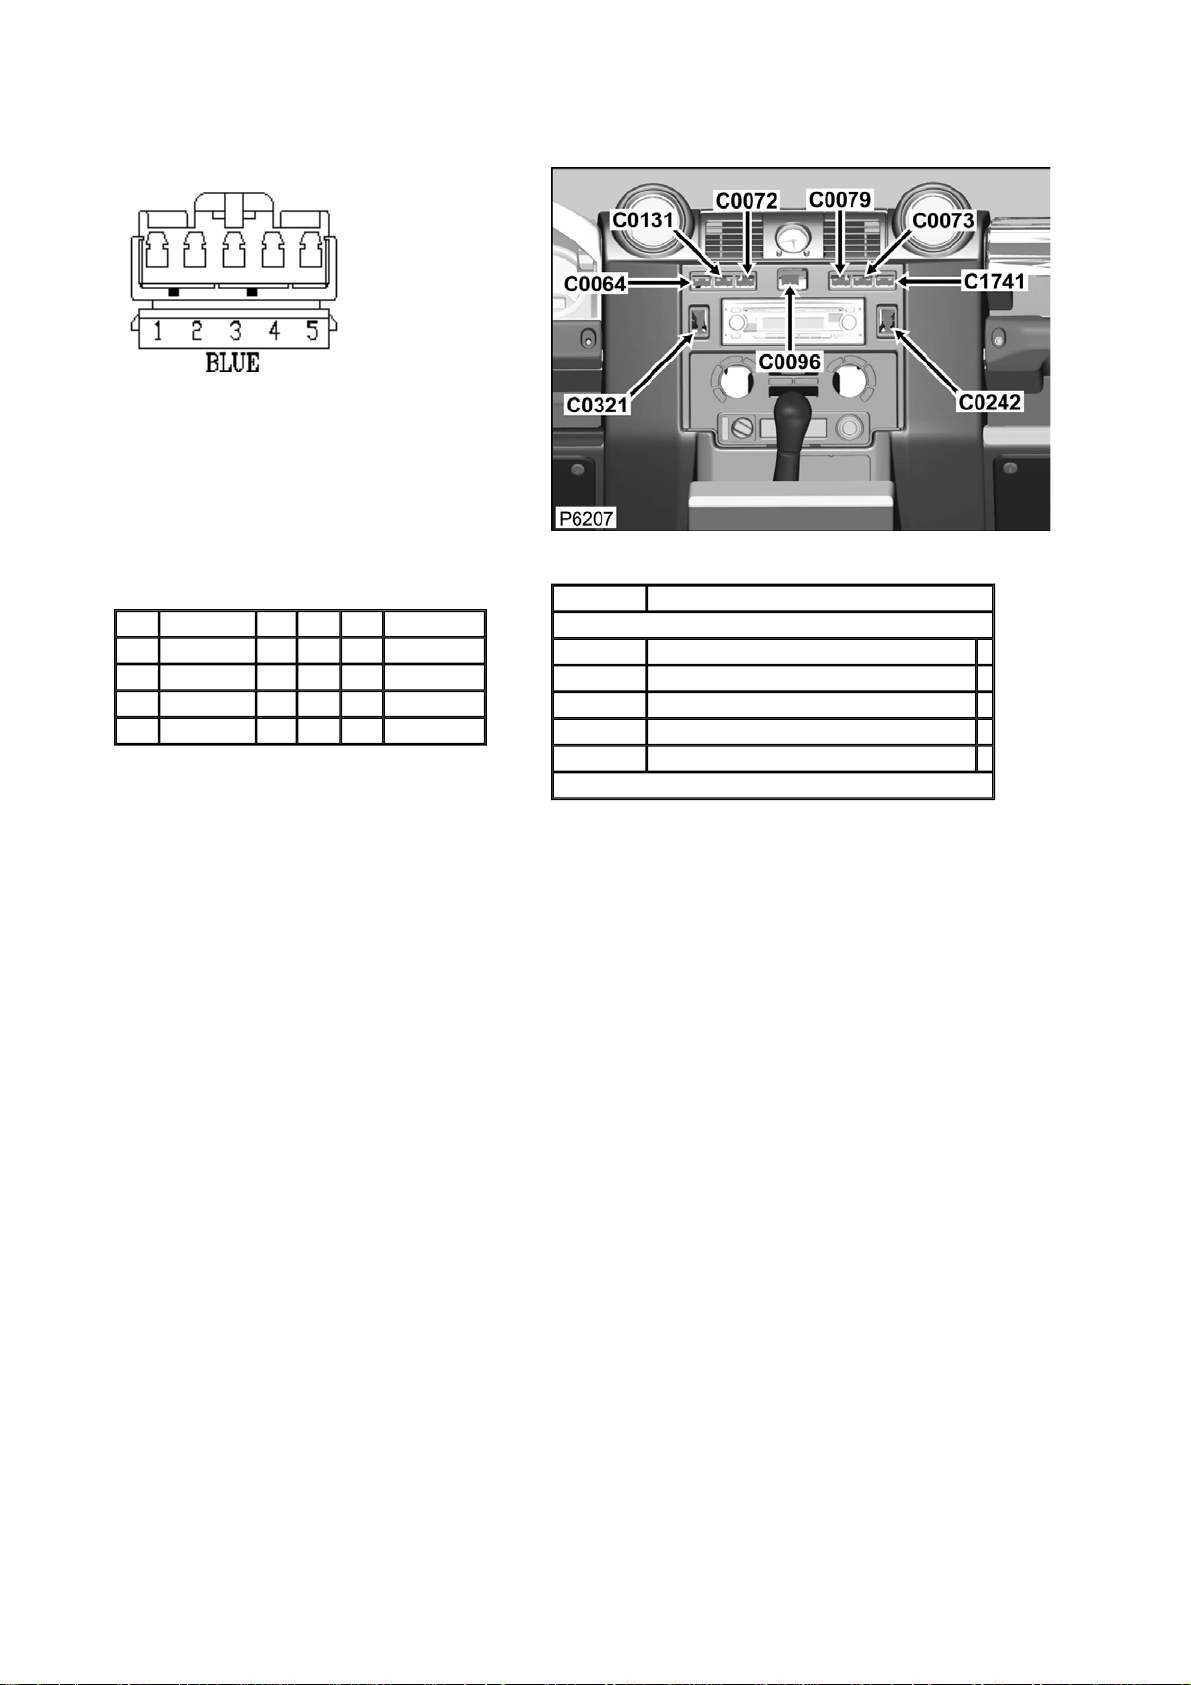
Connector: C0072 Description: Switch-Heated-rear screen
Location: Instrument panel-centre
Part No.: YPC10525
Colour: BLUE
Cavities: 5WY
Harness: MAIN LH + RH HARNESS
Wire Chart
CAV TERMINAL CSA COL CCT DESTN
1 AFU3752 0.5D WG 499 C0285
2 AFU3752 0.5D RO 499 C0079
4 AFU3752 0.5D WB 499 C0285
5 AFU3752 0.5D B 499 S/JOINT SJ13
Service Repair Kits
CSA 0.30- 0.51 CSA
Cavities: 1,2,4,5
YMI000650 SRK ITEM MULTILOCK 070 FAMILY 1.5CSA 1
YPQ000100 SRK ITEM 1
YQD000210 SRK ITEM R/B 1
YRV000040 SRK ITEM PIDG RED 1
YRW500010 SRK ITEM 1
VUB002010
Page 64
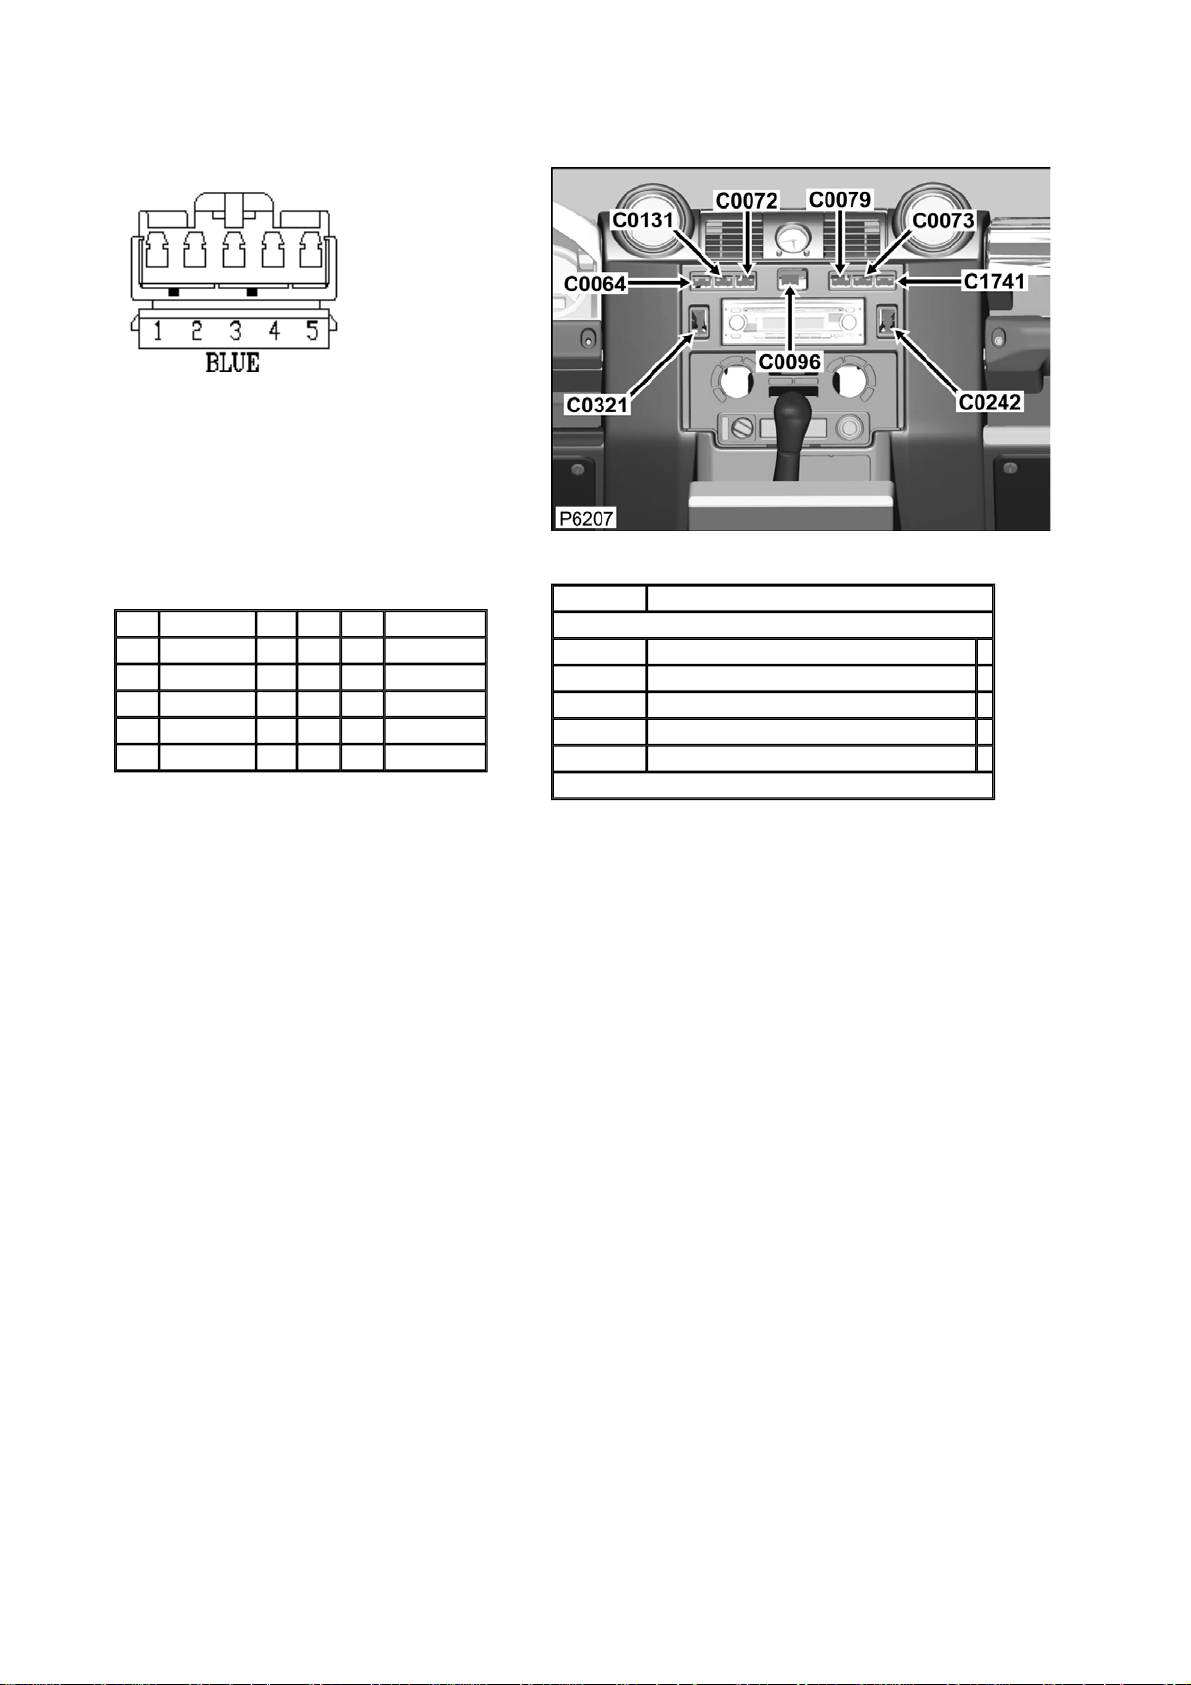
Connector: C0073 Description: Switch-Washer-Rear screen
Location: Instrument panel-centre
Part No.: YPC10525
Colour: BLUE
Cavities: 5WY
Harness: MAIN LH + RH HARNESS
Wire Chart
CAV TERMINAL CSA COL CCT DESTN
1 AFU3752 0.5D WG 200R CTAP
1 AFU3752 0.5D WG 139L CTAP
2 AFU3752 0.5D B 499 S/JOINT SJ13
4 AFU3752 0.5D BLG 499 C1264
5 AFU3752 0.5D RO 499 C0096
Service Repair Kits
CSA 0.30- 0.51 CSA
Cavities: 1,2,4,5
YMI000650 SRK ITEM MULTILOCK 070 FAMILY 1.5CSA 1
YPQ000100 SRK ITEM 1
YQD000210 SRK ITEM R/B 1
YRV000040 SRK ITEM PIDG RED 1
YRW500010 SRK ITEM 1
VUB002010
Page 65
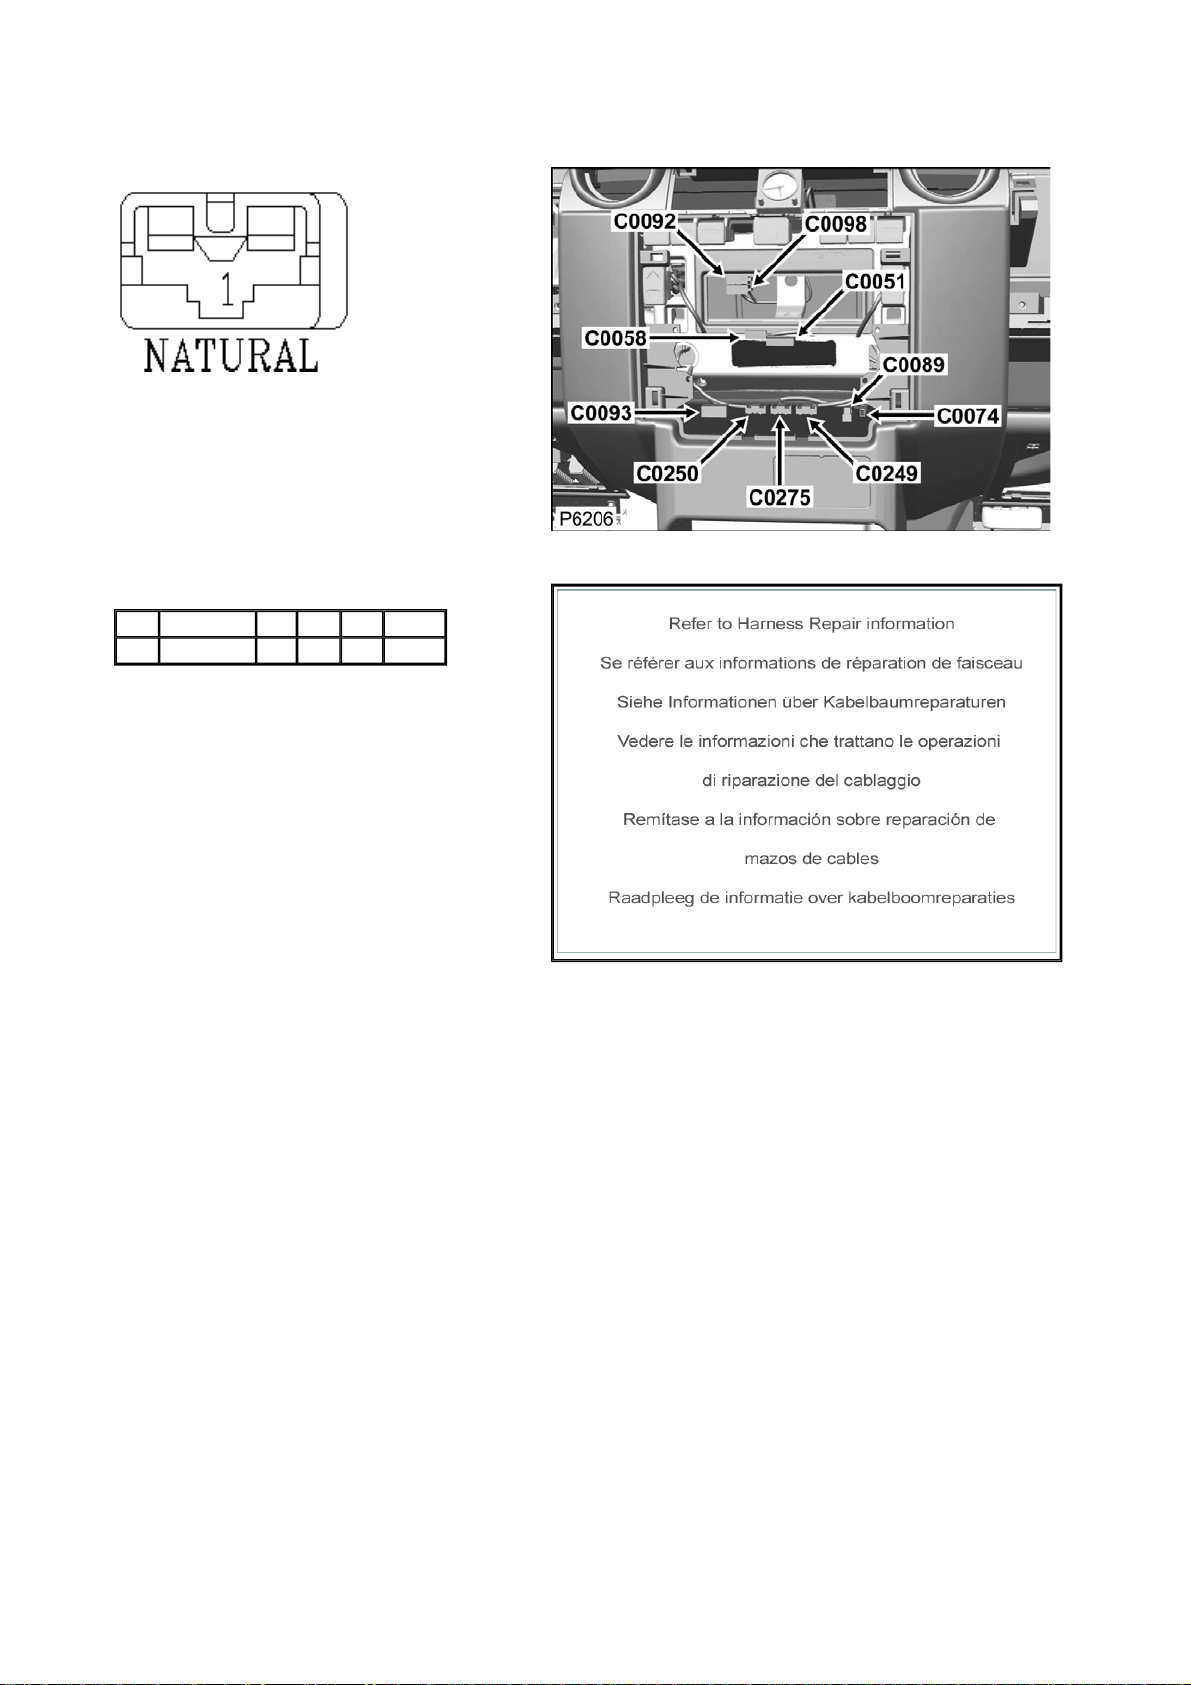
Connector: C0074 Description: Cigar lighter-Front
Location: Instrument panel-centre
Part No.: AFU4521
Colour: NATURAL
Cavities: 1WY
Harness: MAIN LH + RH HARNESS
Wire Chart
CAV TERMINAL CSA COL CCT DESTN
1 AFU4522 0.5D RO 499 C0286
Service Repair Kits
Page 66
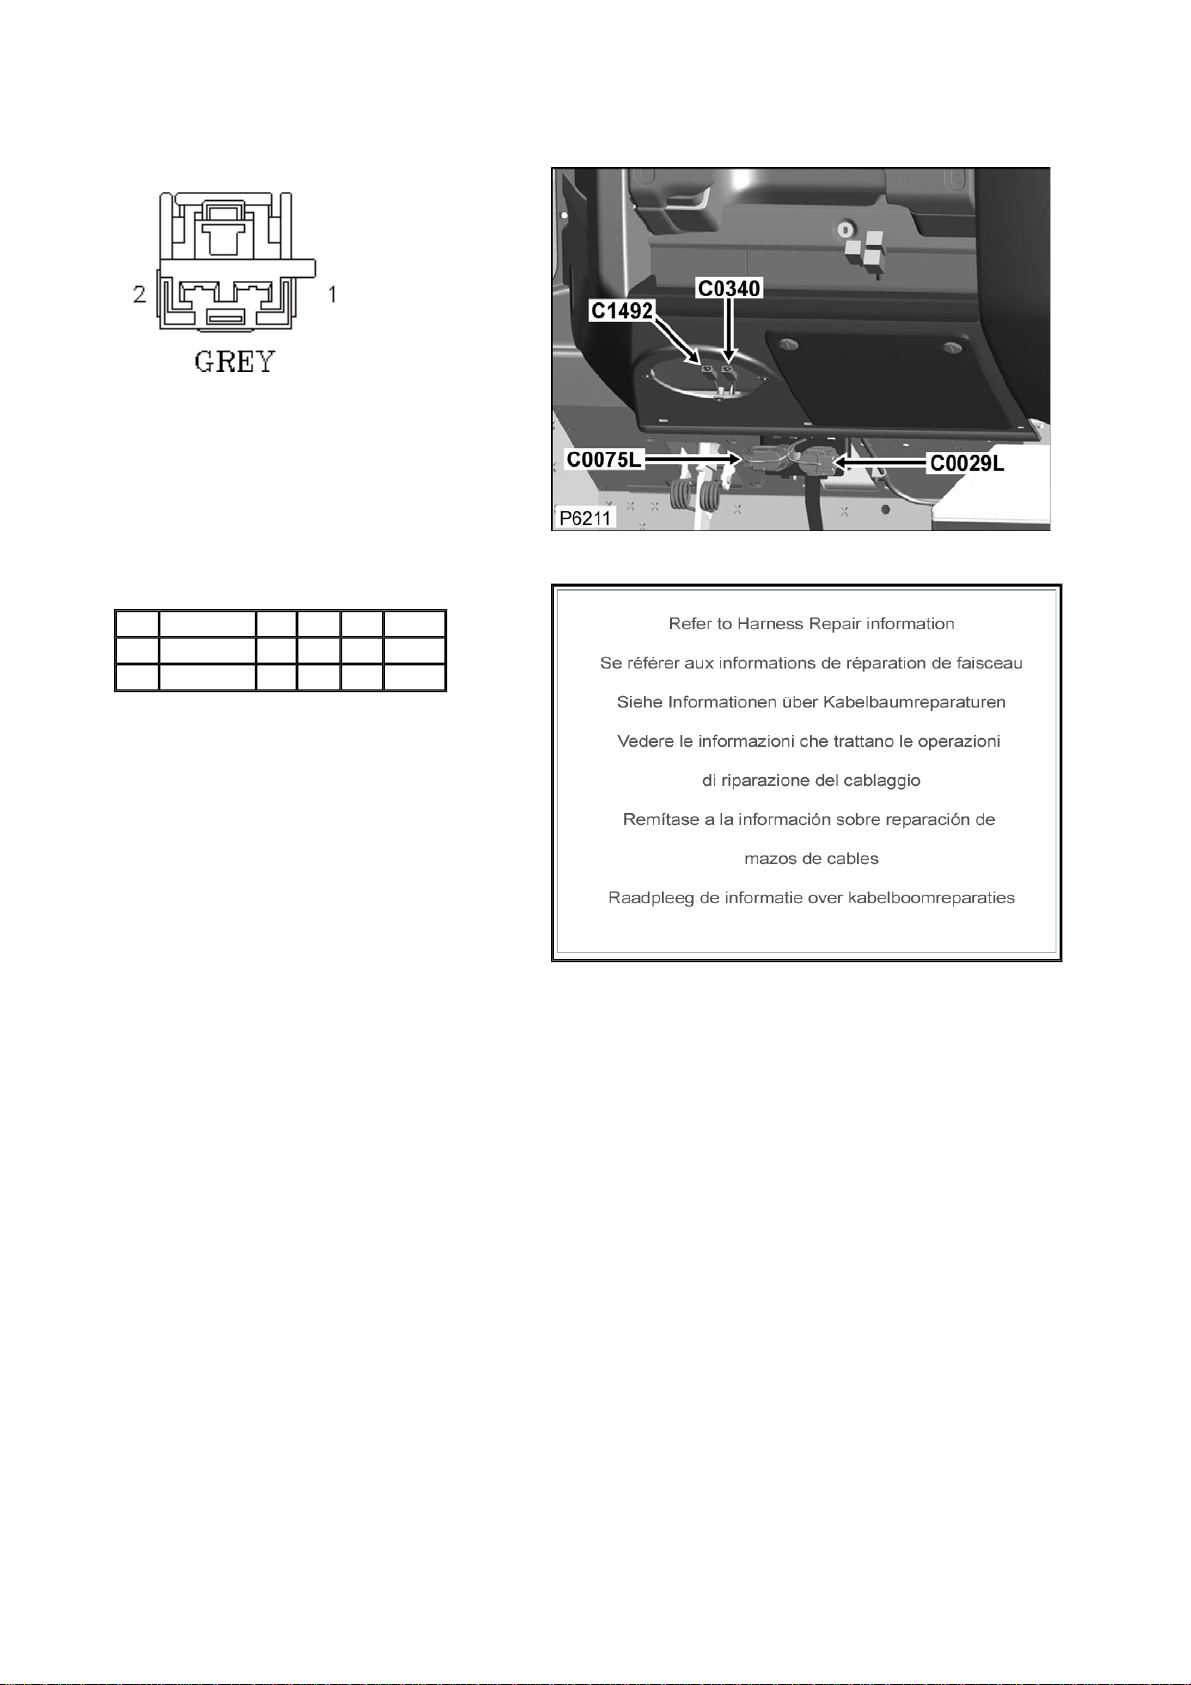
Connector: C0075L Description: Stop lamp switch
Location: Driver footwell
Part No.: YPC901010
Colour:
Cavities:
Harness: MAIN LH + RH HARNESS
Wire Chart
CAV TERMINAL CSA COL CCT DESTN
1 YPL500450 1.5D GO 139L C0580L
2 YPL500450 1.5D GP 139L C0288
Service Repair Kits
Page 67
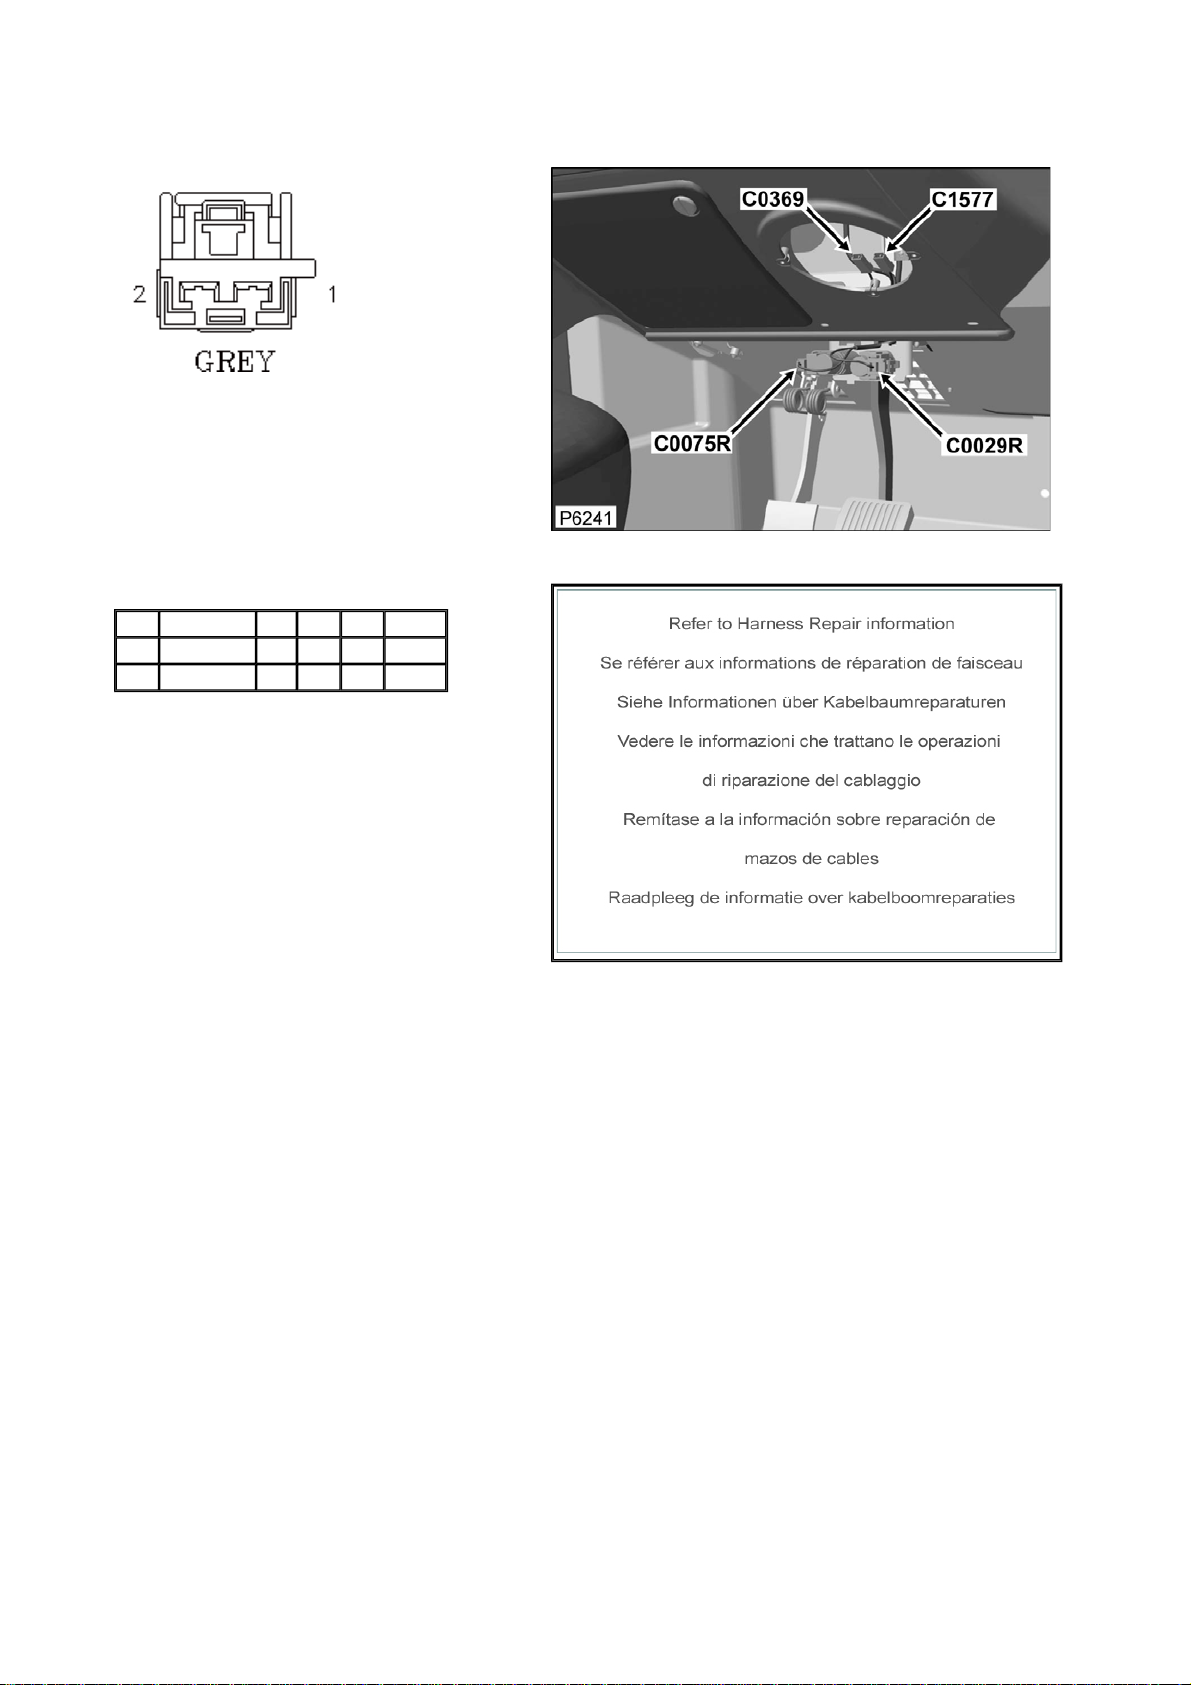
Connector: C0075R Description: Stop lamp switch
Location: Driver footwell
Part No.: YPC901010
Colour:
Cavities:
Harness: MAIN LH + RH HARNESS
Wire Chart
CAV TERMINAL CSA COL CCT DESTN
1 YPL500450 1.5D GO 200R C0580R
2 YPL500450 1.5D GP 200R C0288
Service Repair Kits
Page 68
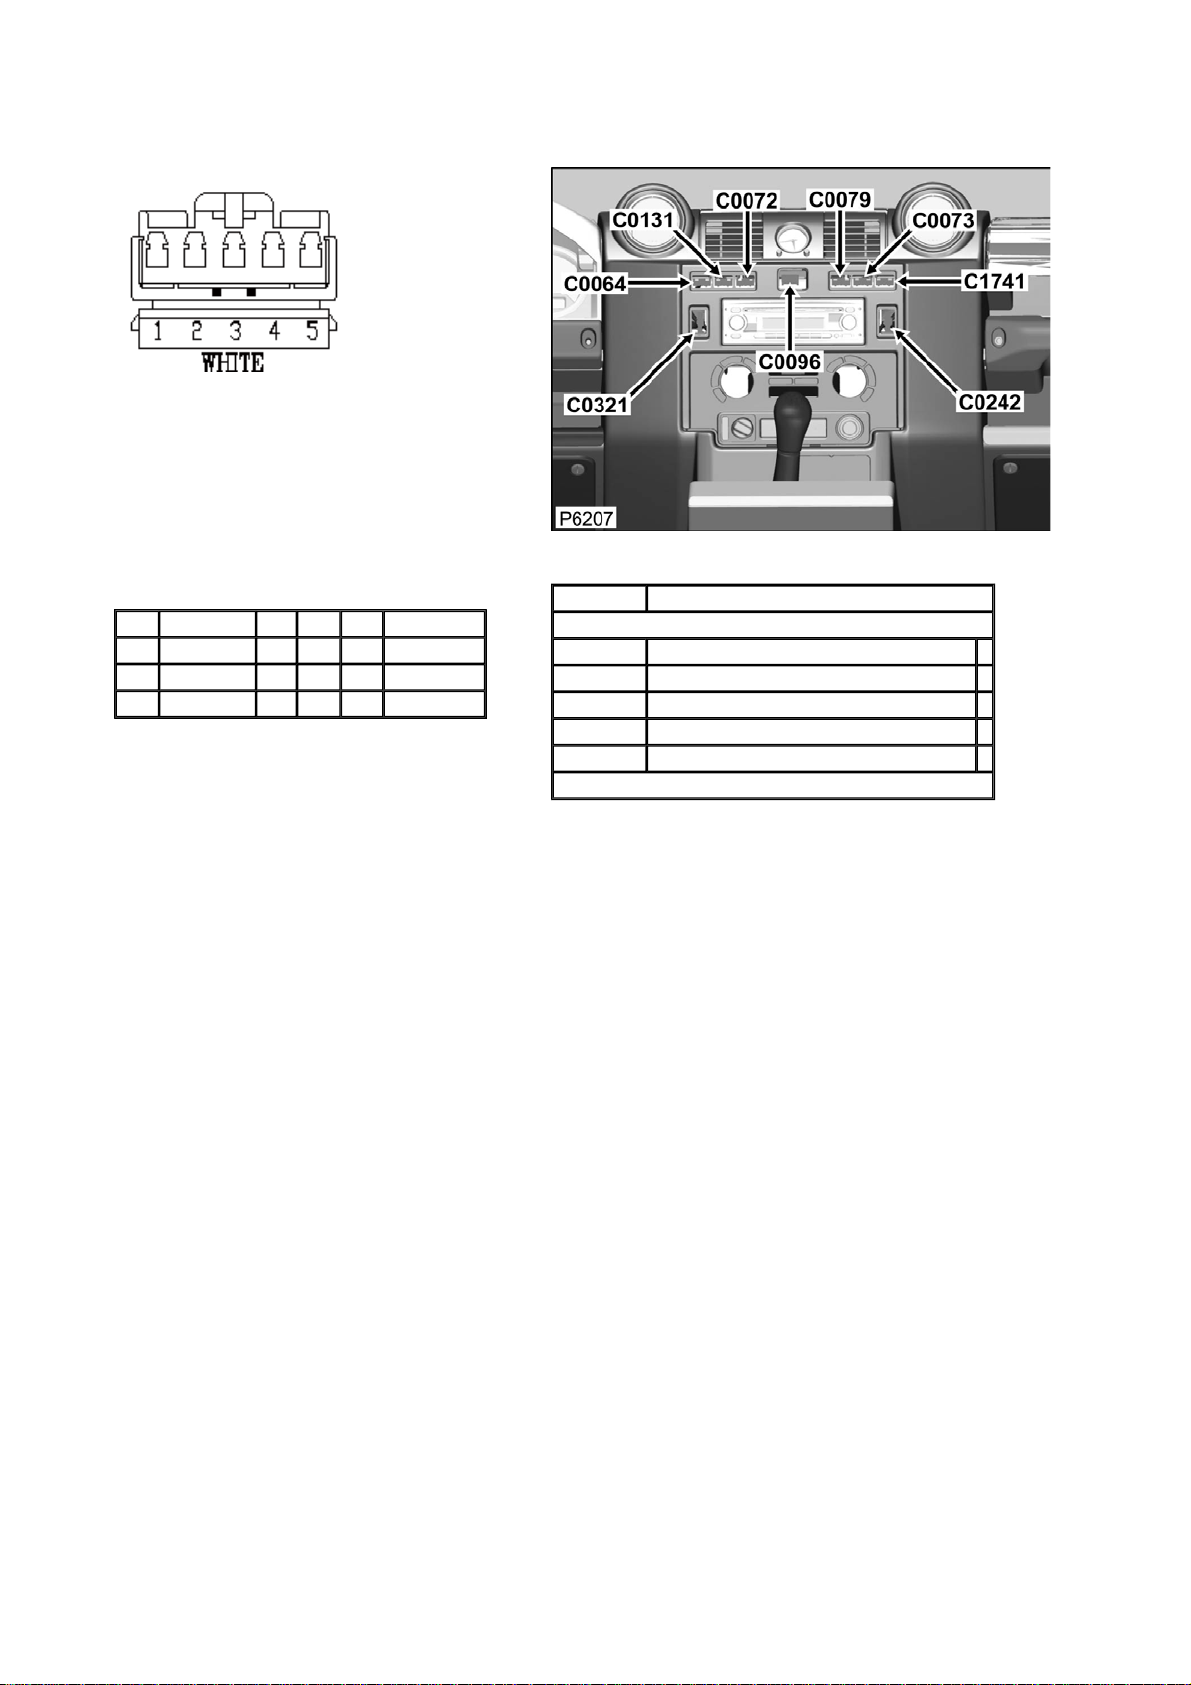
Connector: C0079 Description: Switch-Wiper-Rear
Location: Instrument panel-centre
Part No.: YPC10524
Colour: WHITE
Cavities: 5WY
Harness: MAIN LH + RH HARNESS
Wire Chart
CAV TERMINAL CSA COL CCT DESTN
1 AFU3752 0.5D BG 499 C0376
2 AFU3752 0.5D RO 499 C0072
4 AFU3752 0.5D B 499 S/JOINT SJ13
Service Repair Kits
CSA 0.30- 0.51 CSA
Cavities: 1,2,4
YMI000650 SRK ITEM MULTILOCK 070 FAMILY 1.5CSA 1
YPQ000100 SRK ITEM 1
YQD000210 SRK ITEM R/B 1
YRV000040 SRK ITEM PIDG RED 1
YRW500010 SRK ITEM 1
VUB002010
Page 69
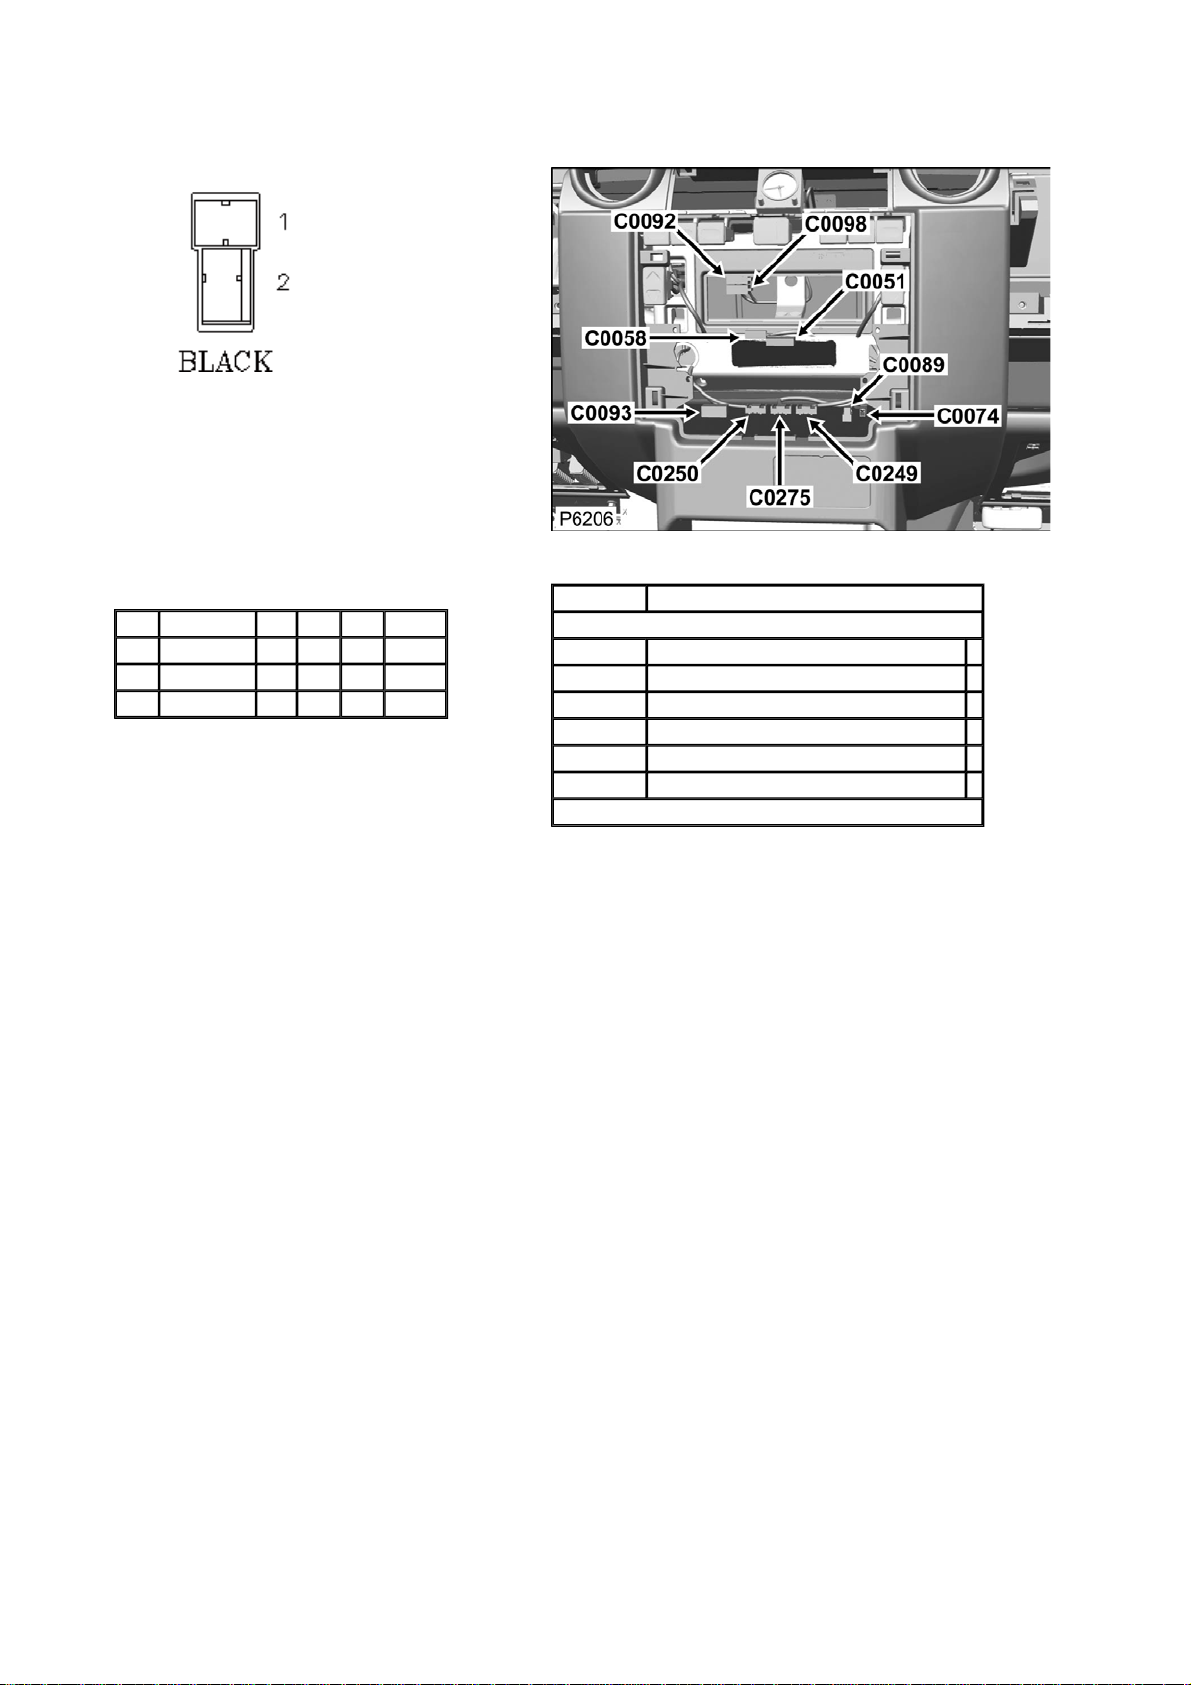
Connector: C0089 Description: Cigar lighter-Front
Location: Instrument panel-centre
Part No.: AFU3199
Colour:
Cavities:
Harness: MAIN LH + RH HARNESS
Wire Chart
CAV TERMINAL CSA COL CCT DESTN
1 ADU9566 1.0D B 499 C0289
2 ADU9566 1.0D PG 200R C0582R
2 ADU9566 1.0D PG 139L C0582L
Service Repair Kits
CSA 0.70- 2.00 CSA
Cavities: 1,2
VDK500010 SRK ITEM GENERAL 1
YMI000190 SRK ITEM 250 POSI-LOCK FAMILY 2.5CSA 1
YPQ000110 SRK ITEM 1
YRV000050 SRK ITEM PIDG BLUE 1
YRW000390 SRK ITEM 1
YRW500010 SRK ITEM 1
VUB001540
Page 70
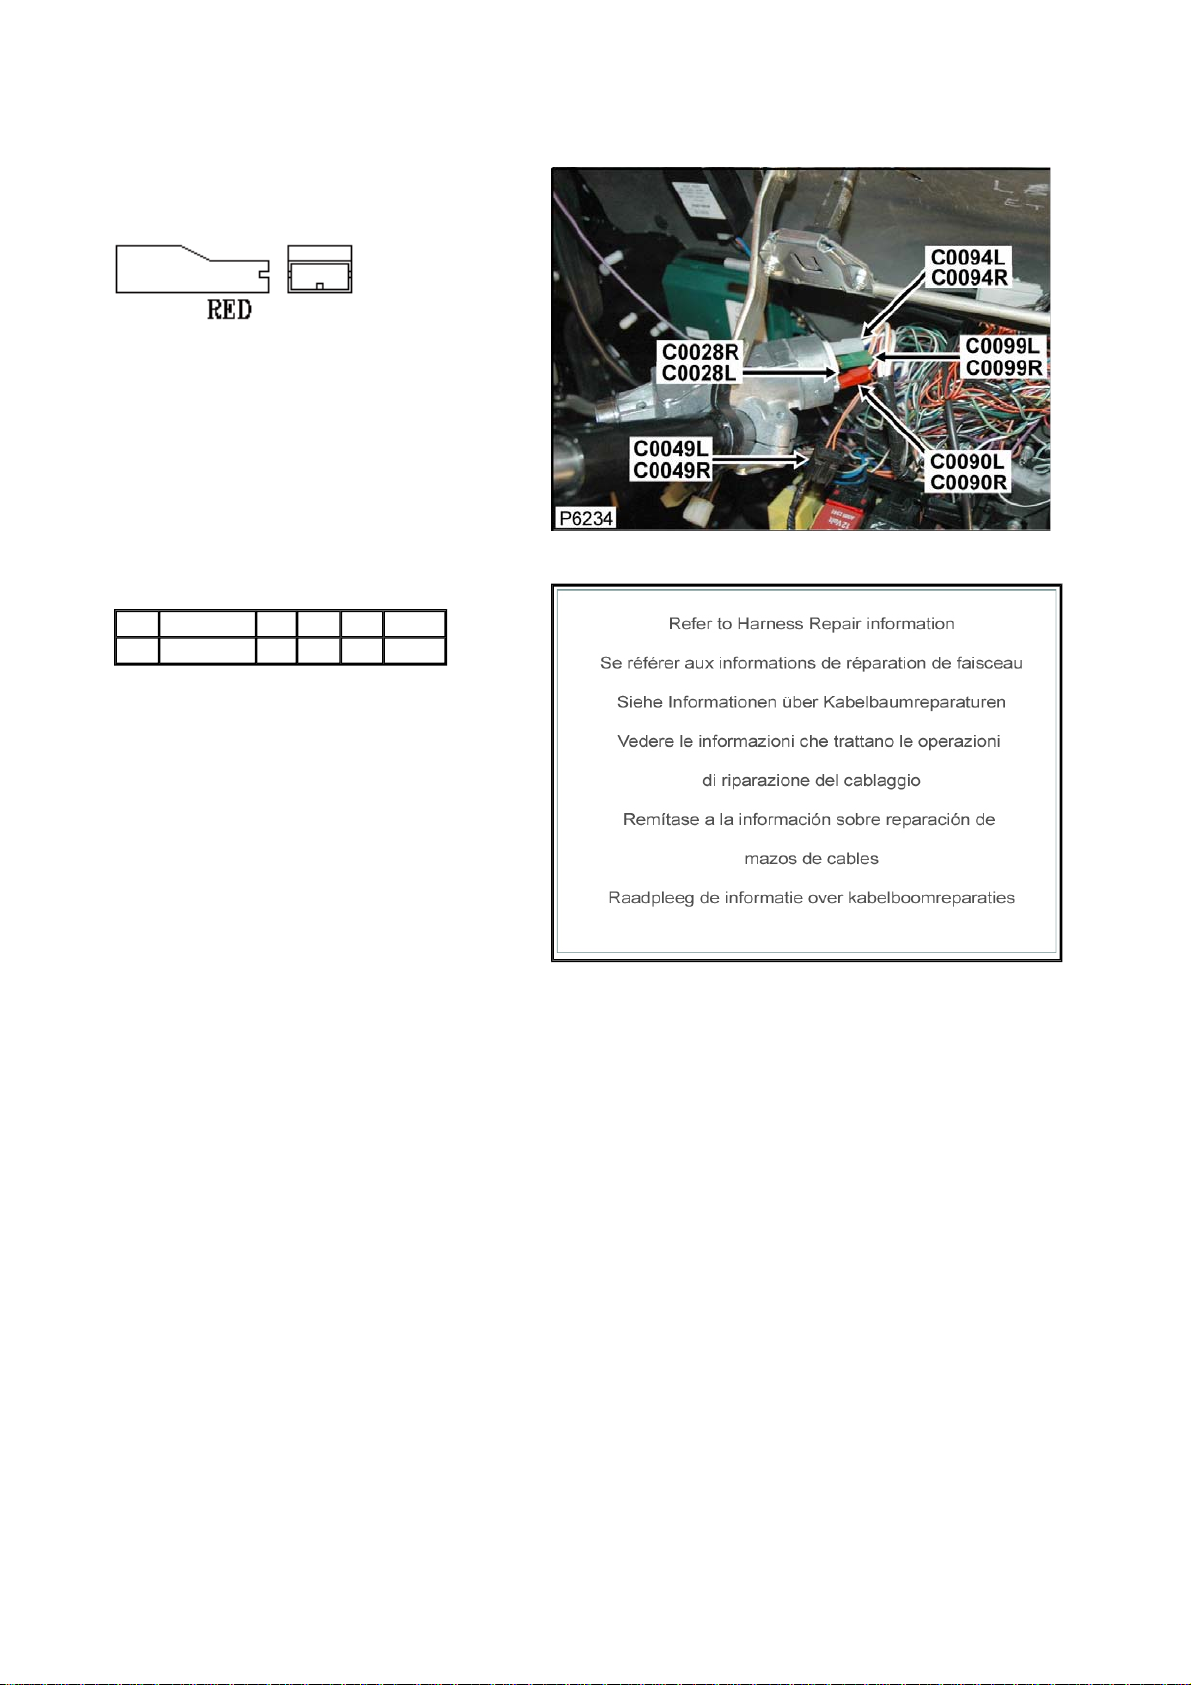
Connector: C0090L Description: Switch-Ignition
Location: Behind steering column cowl - RH side
Part No.: YPC10245
Colour: RED
Cavities: 1WY
Harness: MAIN LH + RH HARNESS
Wire Chart
CAV TERMINAL CSA COL CCT DESTN
1 ADU9568 4.0D WR 139L C0151
Service Repair Kits
Page 71
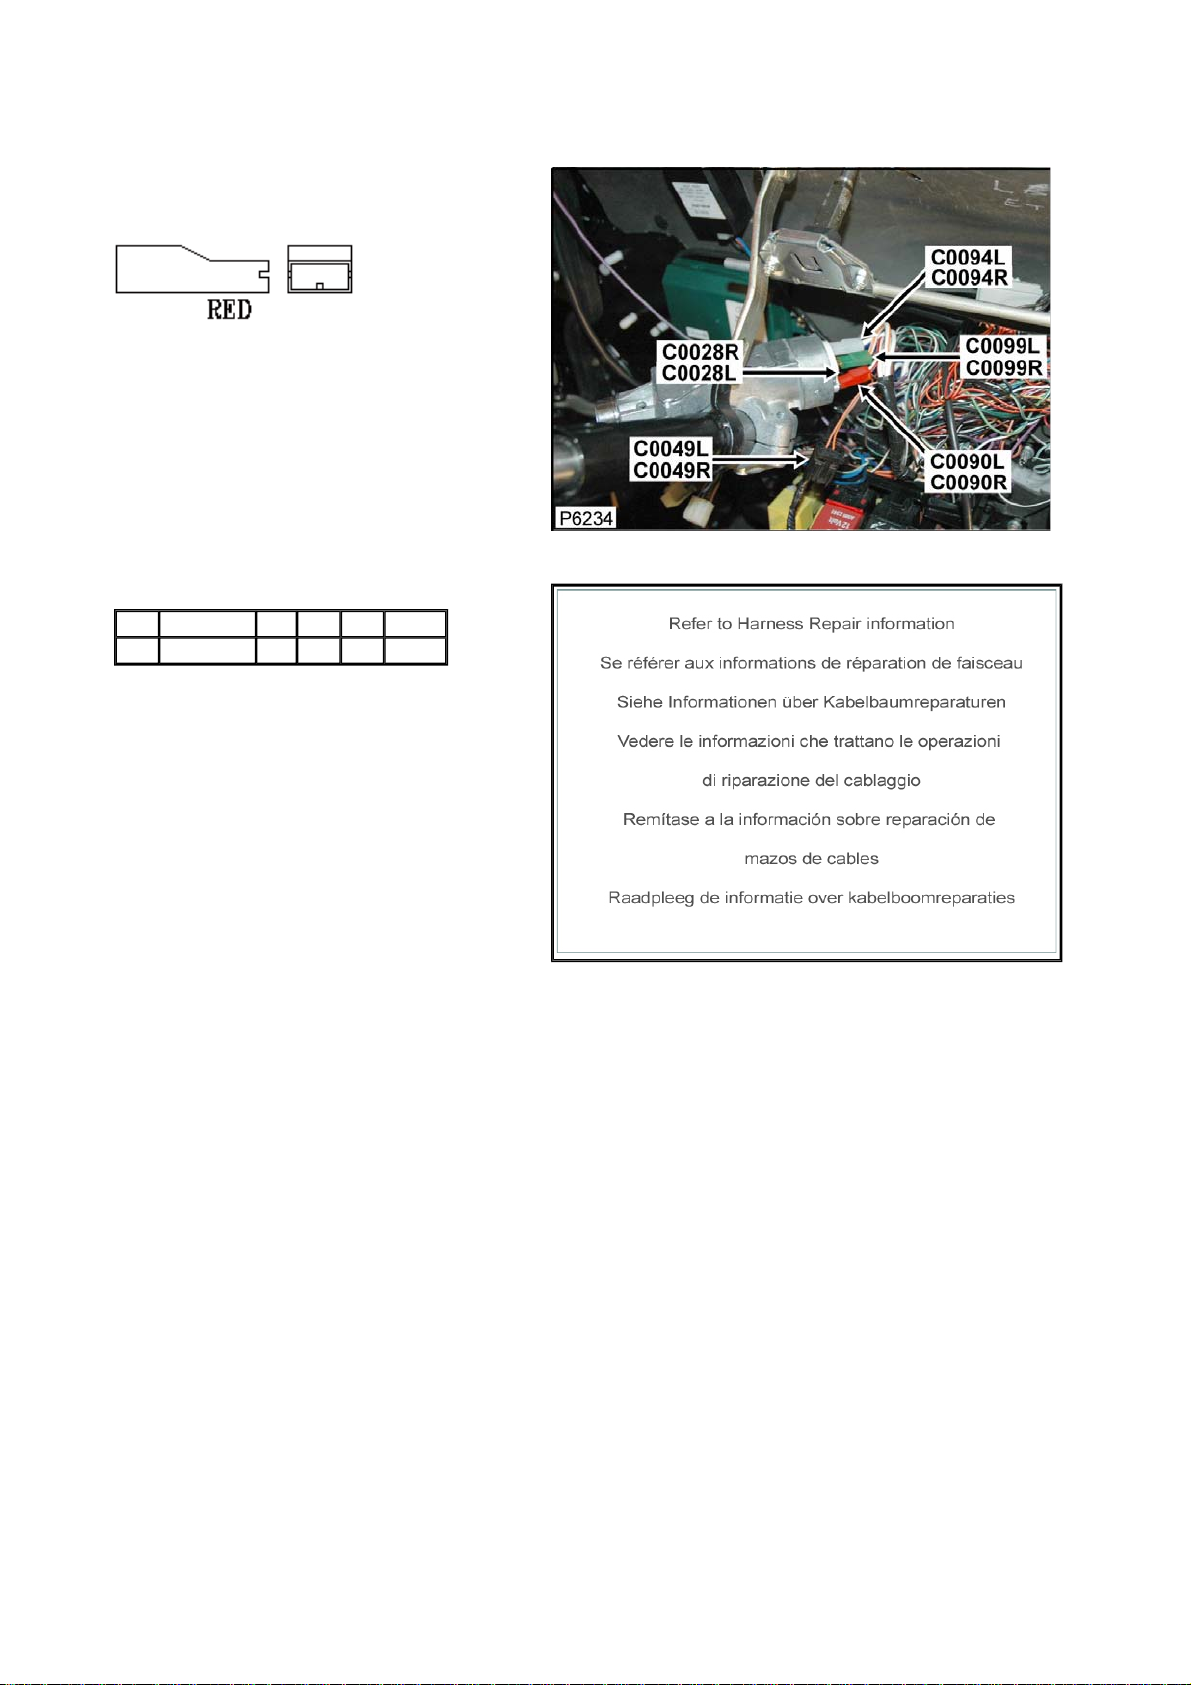
Connector: C0090R Description: Switch-Ignition
Location: Behind steering column cowl - RH side
Part No.: YPC10245
Colour: RED
Cavities: 1WY
Harness: MAIN LH + RH HARNESS
Wire Chart
CAV TERMINAL CSA COL CCT DESTN
1 ADU9568 4.0D WR 200R C0151
Service Repair Kits
Page 72
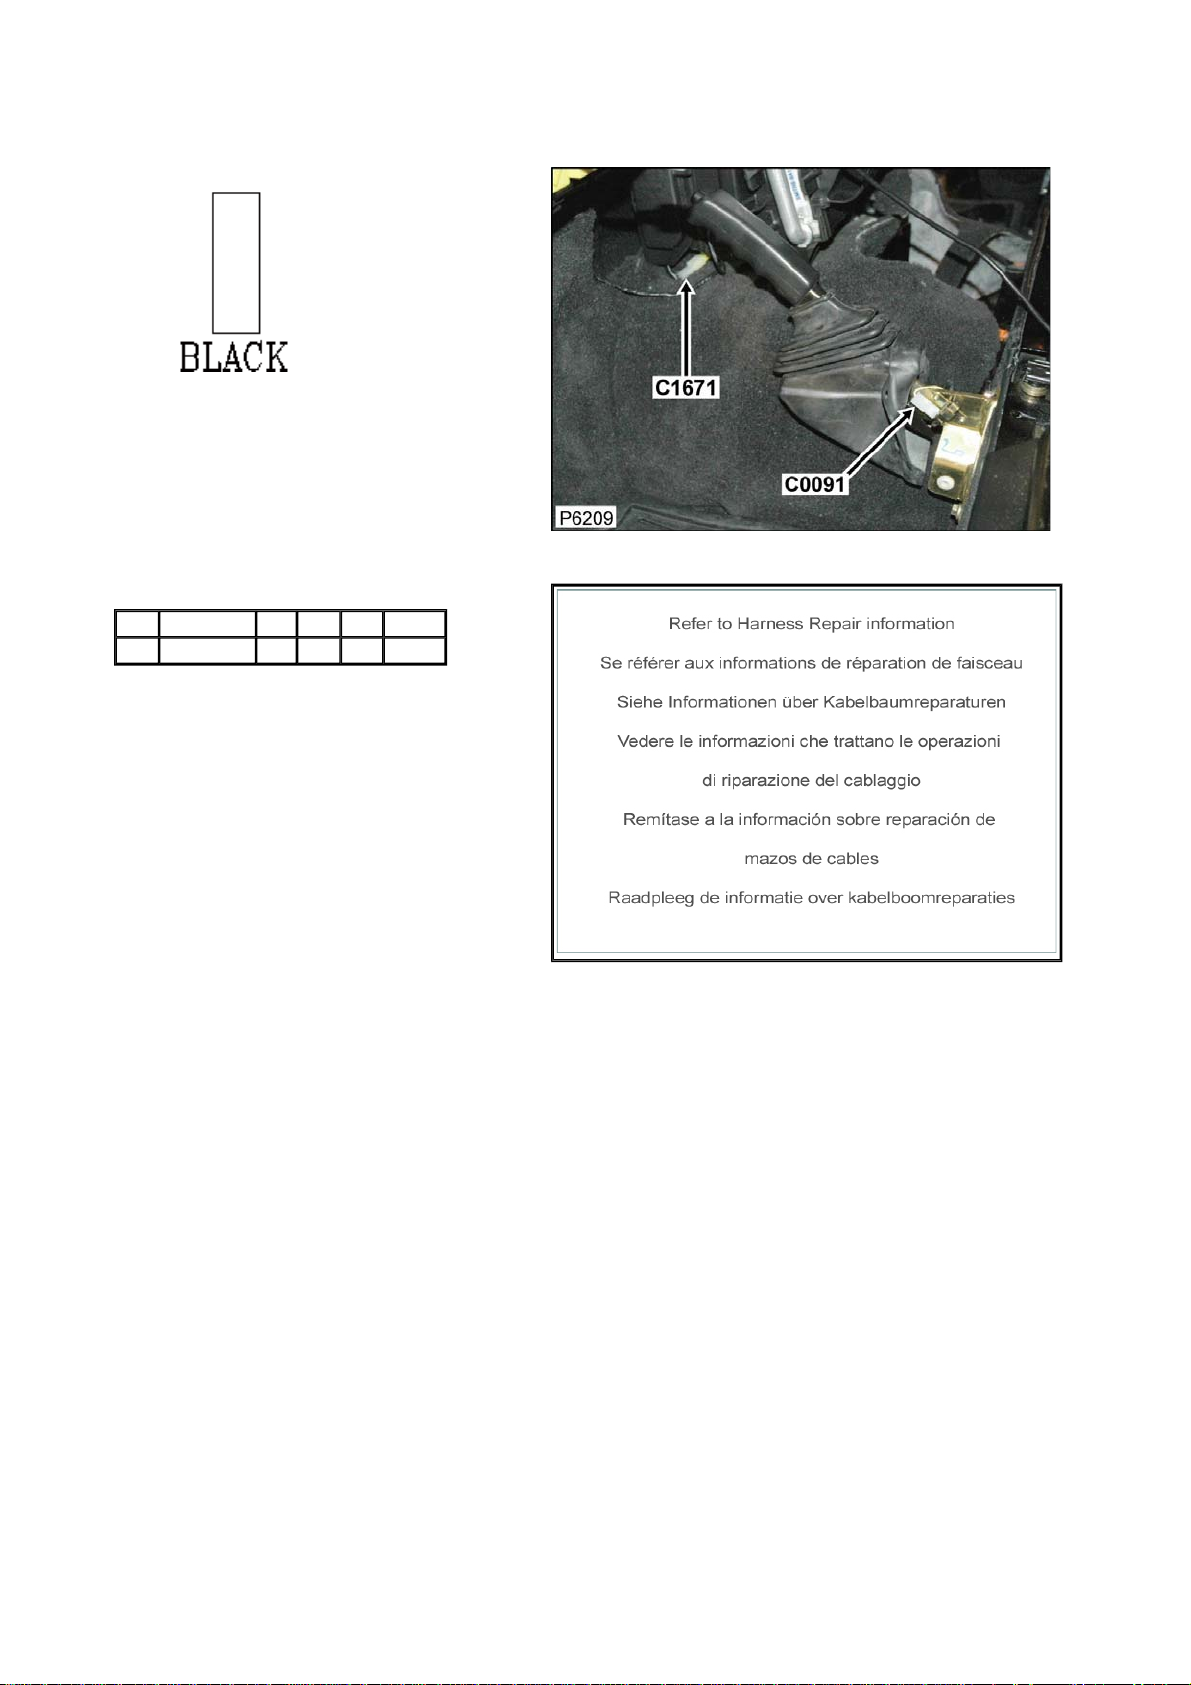
Connector: C0091 Description: Switch-Handbrake
Location: Base of handbrake lever
Part No.: 13H5155
Colour: BLACK
Cavities: 1WY
Harness: MAIN LH + RH HARNESS
Wire Chart
CAV TERMINAL CSA COL CCT DESTN
1 YPE10019 0.5D WY 499 C0288
Service Repair Kits
Page 73
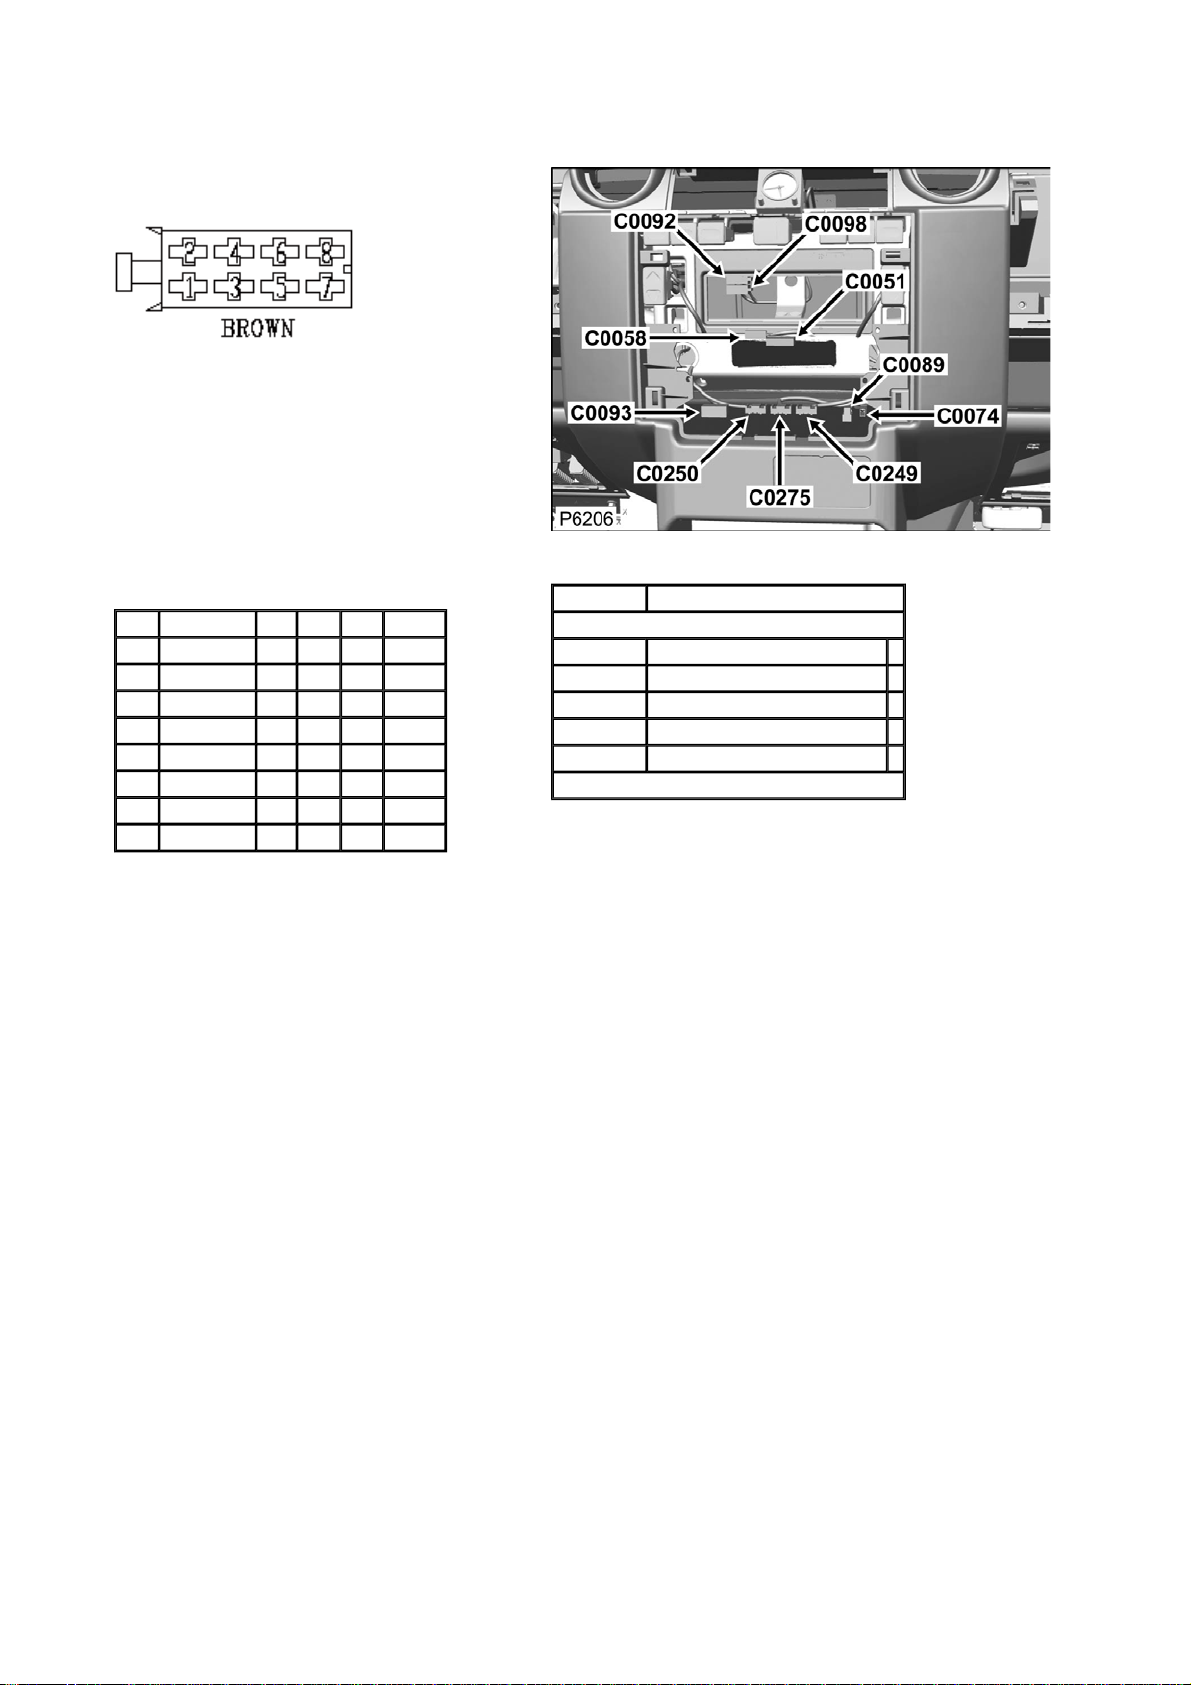
Connector: C0092 Description: Radio/cassette-player
Location: Instrument panel-centre
Part No.: YPC10191
Colour: BROWN
Cavities: 8WY
Harness: MAIN LH + RH HARNESS
Wire Chart
CAV TERMINAL CSA COL CCT DESTN
1 ALU1033 0.5D BG 192 C0379
2 ALU1033 0.5D BU 192 C0379
3 ALU1033 0.5D BK 769 C1577
4 ALU1033 0.5D BR 769 C0369
5 ALU1033 0.5D BW 769 C0340
6 ALU1033 0.5D BN 769 C1492
7 ALU1033 0.5D BY 192 C0379
8 ALU1033 0.5D BO 192 C0379
Service Repair Kits
CSA 0.50- 1.50 CSA
Cavities: 1,2-8
VDK500010 SRK ITEM GENERAL 1
YMI500060 SRK ITEM JPT FAMILY 0.75CSA 1
YPQ000100 SRK ITEM 1
YRV000040 SRK ITEM PIDG RED 1
YRW500010 SRK ITEM 1
VUB500570
Page 74
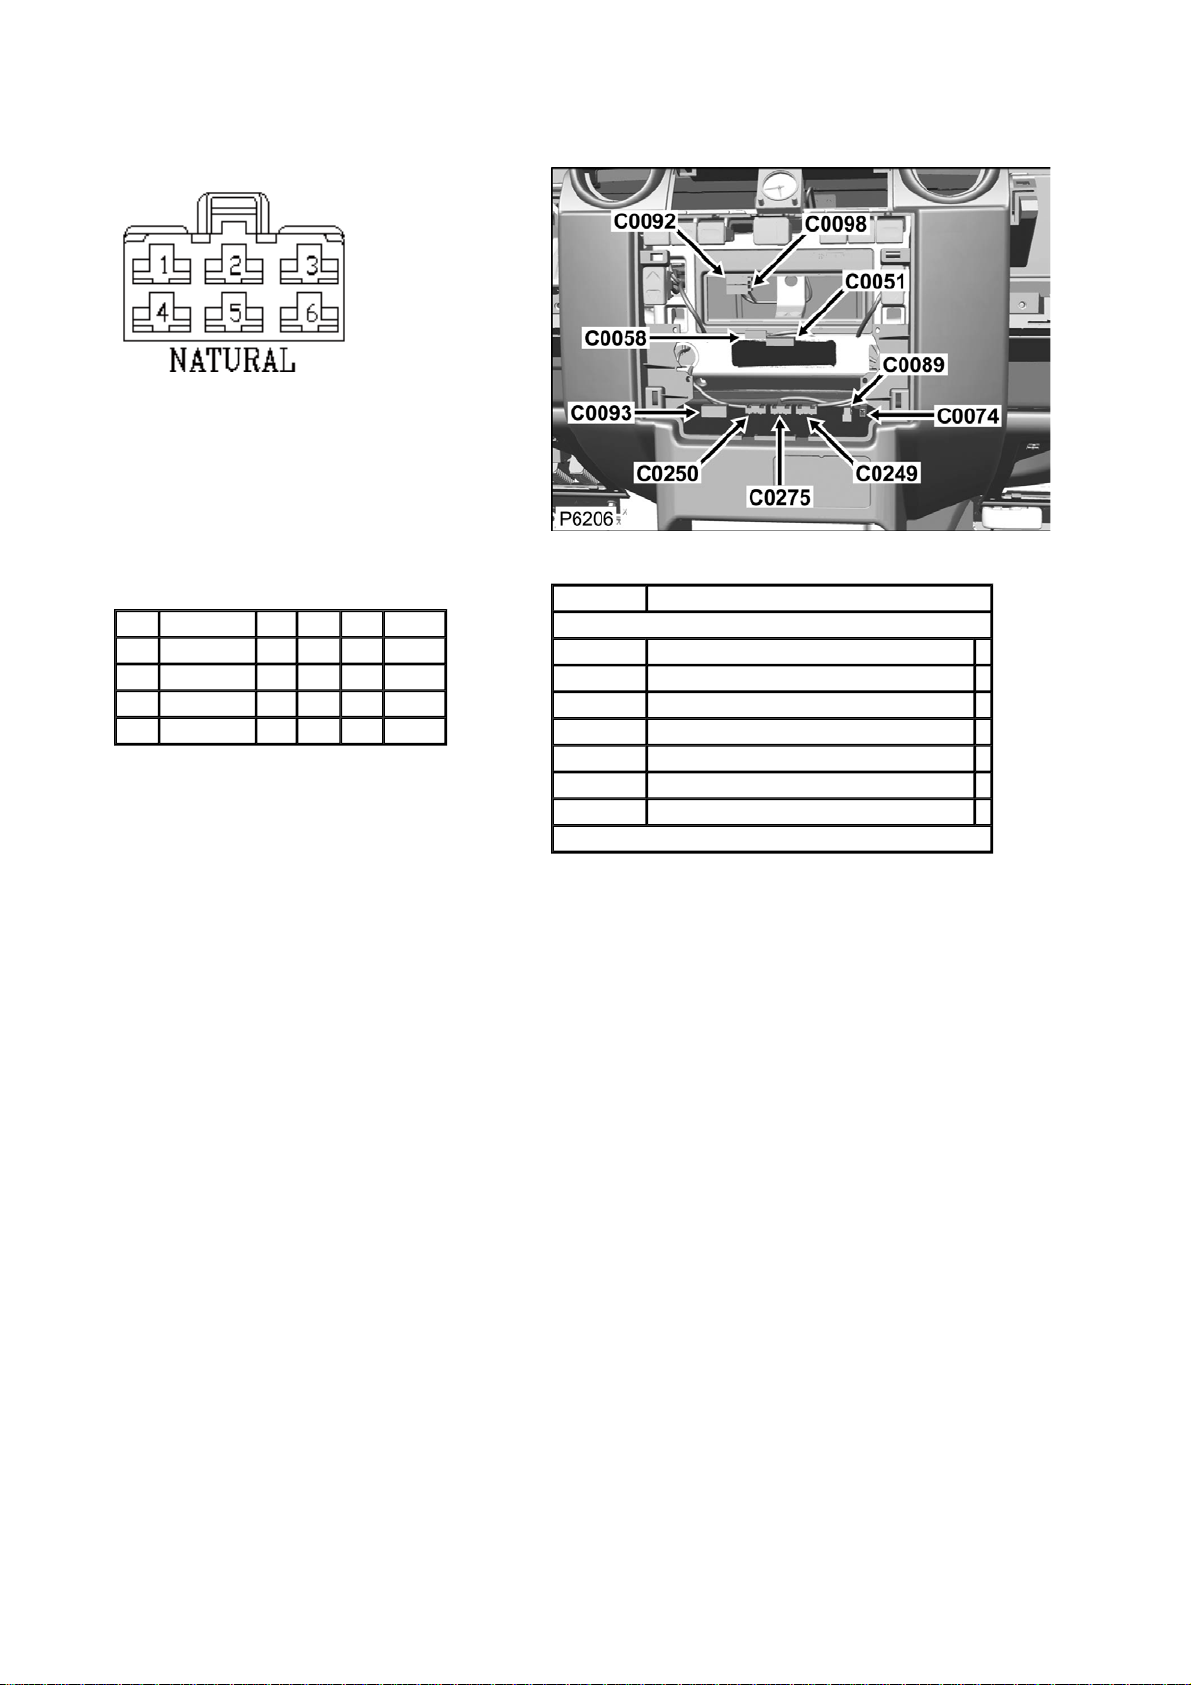
Connector: C0093 Description: Switch-Headlamp-levelling
Location: Instrument panel-centre
Part No.: YPC10004
Colour: NATURAL
Cavities: 6WY
Harness: MAIN LH + RH HARNESS
Wire Chart
CAV TERMINAL CSA COL CCT DESTN
2 AFU3567 1.0D UY 107 C1264
3 AFU3726 0.5D B 107 C0289
4 AFU3726 0.5D RO 107 C0286
5 AFU3726 0.5D RO 107 C0286
Service Repair Kits
CSA 0.30- 0.50 CSA
Cavities: 2,3-5
VDK500010 SRK ITEM GENERAL 1
YMI000410 SRK ITEM ETN250 FAMILY 1.5CSA SEALED 1
YPQ000100 SRK ITEM 1
YQD000210 SRK ITEM R/B 1
YRV000040 SRK ITEM PIDG RED 1
YRW000390 SRK ITEM 1
YRW500010 SRK ITEM 1
VUB001770
Page 75
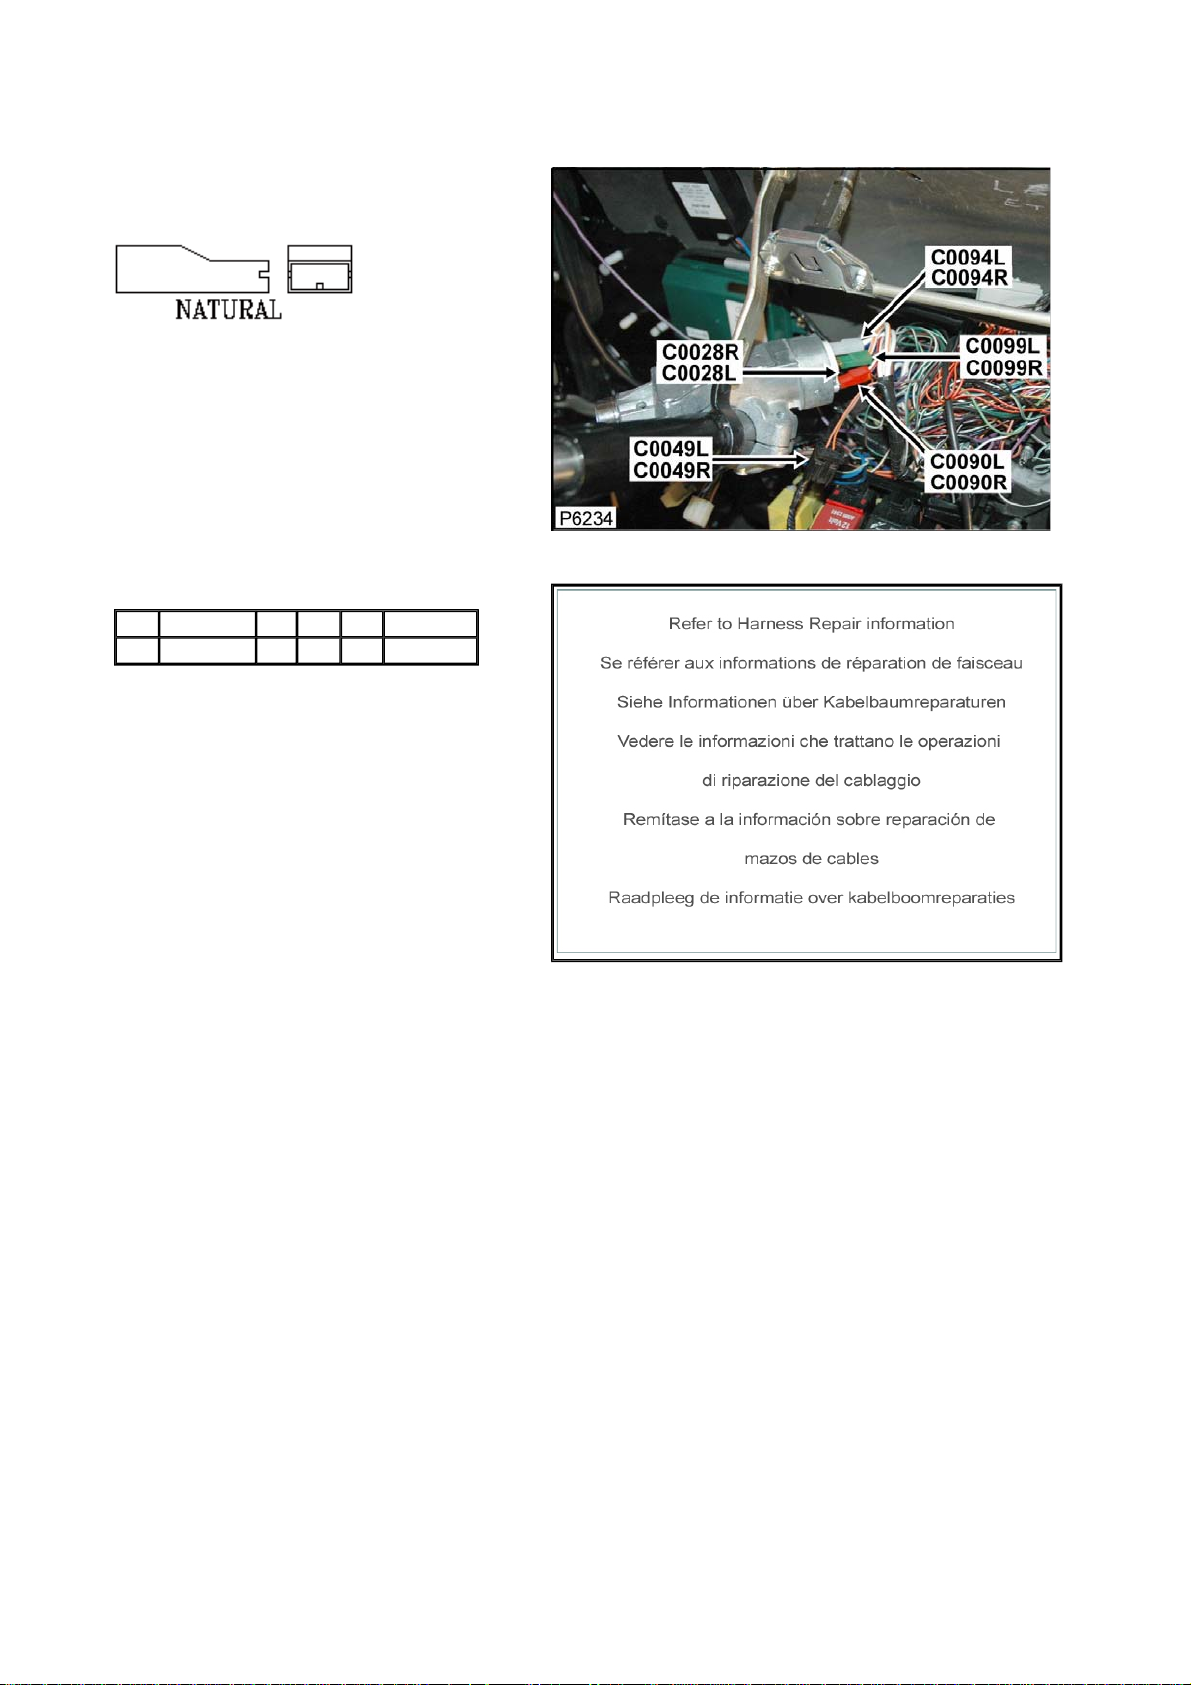
Connector: C0094L Description: Switch-Ignition
Location: Behind steering column cowl - RH side
Part No.: ADU8339
Colour: NATURAL
Cavities: 1WY
Harness: MAIN LH + RH HARNESS
Wire Chart
CAV TERMINAL CSA COL CCT DESTN
1 ADU9568 4.0D W 139L S/JOINT SJ3
Service Repair Kits
Page 76
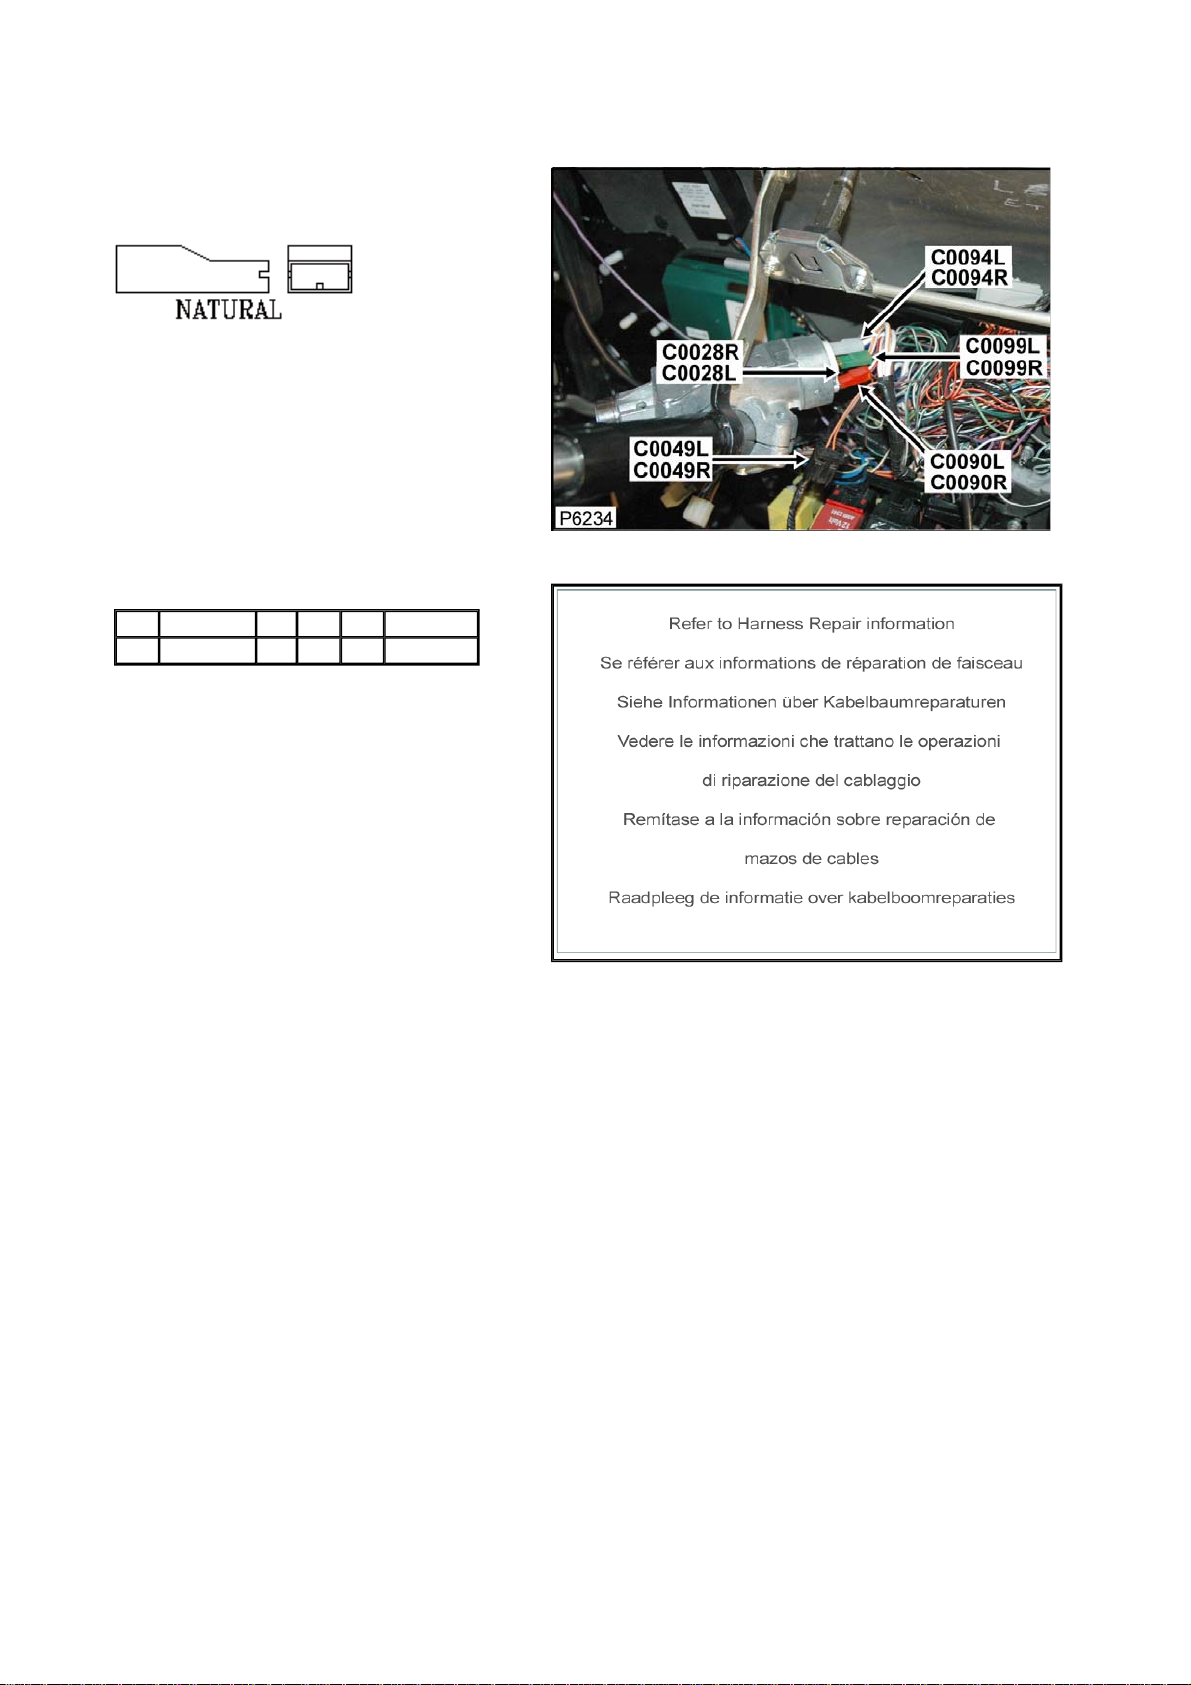
Connector: C0094R Description: Switch-Ignition
Location: Behind steering column cowl - RH side
Part No.: ADU8339
Colour: NATURAL
Cavities: 1WY
Harness: MAIN LH + RH HARNESS
Wire Chart
CAV TERMINAL CSA COL CCT DESTN
1 ADU9568 4.0D W 200R S/JOINT SJ4
Service Repair Kits
Page 77
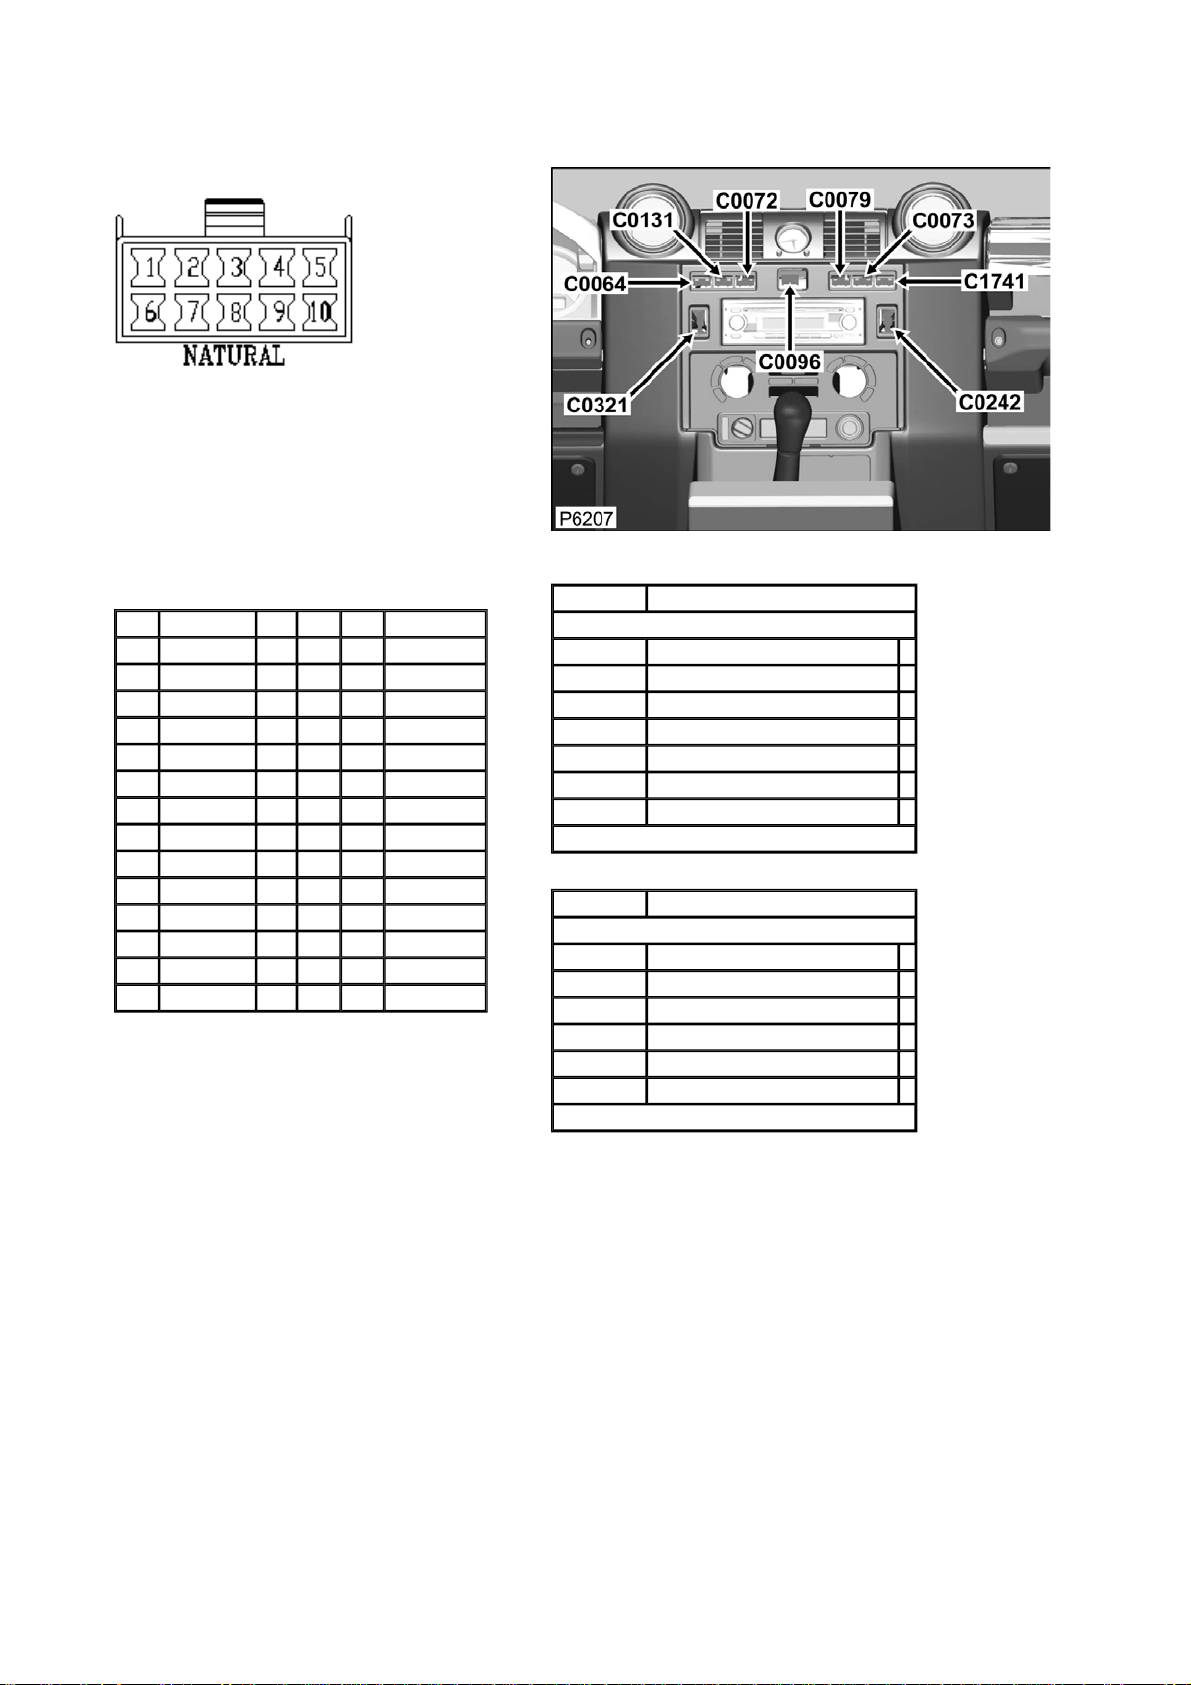
Connector: C0096 Description: Switch-Hazard-warning
Location: Instrument panel-centre
Part No.: AFU3731
Colour: NATURAL
Cavities: 10WY
Harness: MAIN LH + RH HARNESS
Wire Chart
CAV TERMINAL CSA COL CCT DESTN
1 AFU3560 1.0D WG 139L C0581L
1 AFU3560 1.0D WG 200R C0581R
2 AFU3560 1.0D PN 139L C0583L
2 AFU3560 1.0D PN 200R C0583R
3 YPL10002 1.5D LG 139L C0536L
3 YPL10002 1.5D LG 200R C0536R
4 AFU3572 0.5D RO 499 C0073
5 AFU3572 0.5D B 499 S/JOINT SJ13
6 YPL10002 1.5D LGN 200R C1042
6 YPL10002 1.5D LGN 139L CTAP
7 AFU3560 1.0D GR 499 C0287
8 AFU3572 0.5D BR 200R C1040R
8 AFU3572 0.5D BR 139L C1040L
9 AFU3560 1.0D GW 499 C0287
Service Repair Kits
CSA 1.50- 2.00 CSA
Cavities: 3,6
VDK500010 SRK ITEM GENERAL 1
YMI000310 SRK ITEM DS090 FAMILY 2.0CSA 1
YPQ000110 SRK ITEM 1
YQD000210 SRK ITEM R/B 1
YRV000050 SRK ITEM PIDG BLUE 1
YRW000390 SRK ITEM 1
YRW500010 SRK ITEM 1
VUB001670
CSA 0.20- 0.50 CSA
Cavities: 1,2,4,5,7-9
YMI000280 SRK ITEM DS090 FAMILY 1.5CSA 1
YPQ000100 SRK ITEM 1
YQD000210 SRK ITEM R/B 1
YRV000040 SRK ITEM PIDG RED 1
YRW000390 SRK ITEM 1
YRW500010 SRK ITEM 1
VUB001640
Page 78
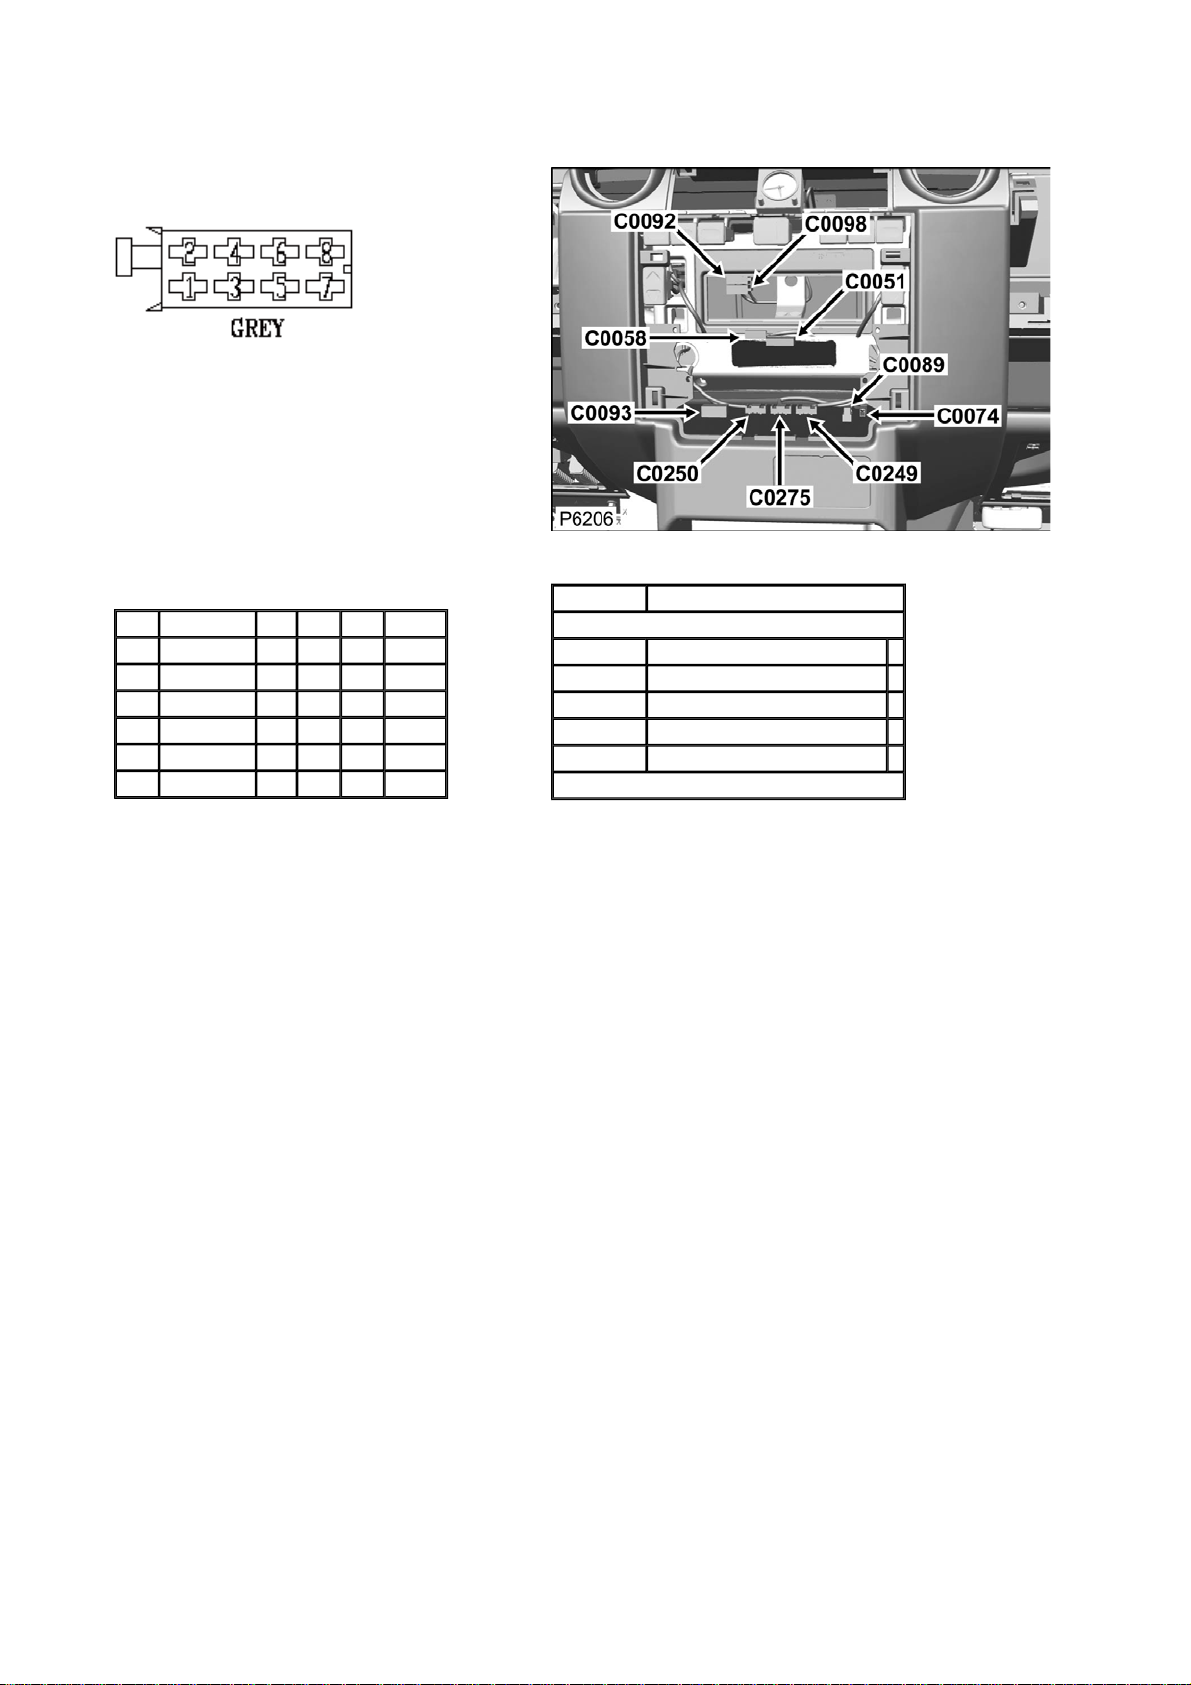
Connector: C0098 Description: Radio/cassette-player
Location: Instrument panel-centre
Part No.: YPC10190
Colour: GREY
Cavities: 8WY
Harness: MAIN LH + RH HARNESS
Wire Chart
CAV TERMINAL CSA COL CCT DESTN
4 ALU1033 0.5D PN 769R C0583R
4 ALU1033 0.5D PN 769L C0583L
6 ALU1033 0.5D RO 499 C0051
7 ALU1033 0.5D WO 769L C0582L
7 ALU1033 0.5D WO 769R C0582R
8 AFU3415 1.0D B 499 C0361
Service Repair Kits
CSA 0.50- 1.50 CSA
Cavities: 4,6,7
VDK500010 SRK ITEM GENERAL 1
YMI500060 SRK ITEM JPT FAMILY 0.75CSA 1
YPQ000100 SRK ITEM 1
YRV000040 SRK ITEM PIDG RED 1
YRW500010 SRK ITEM 1
VUB500570
Page 79
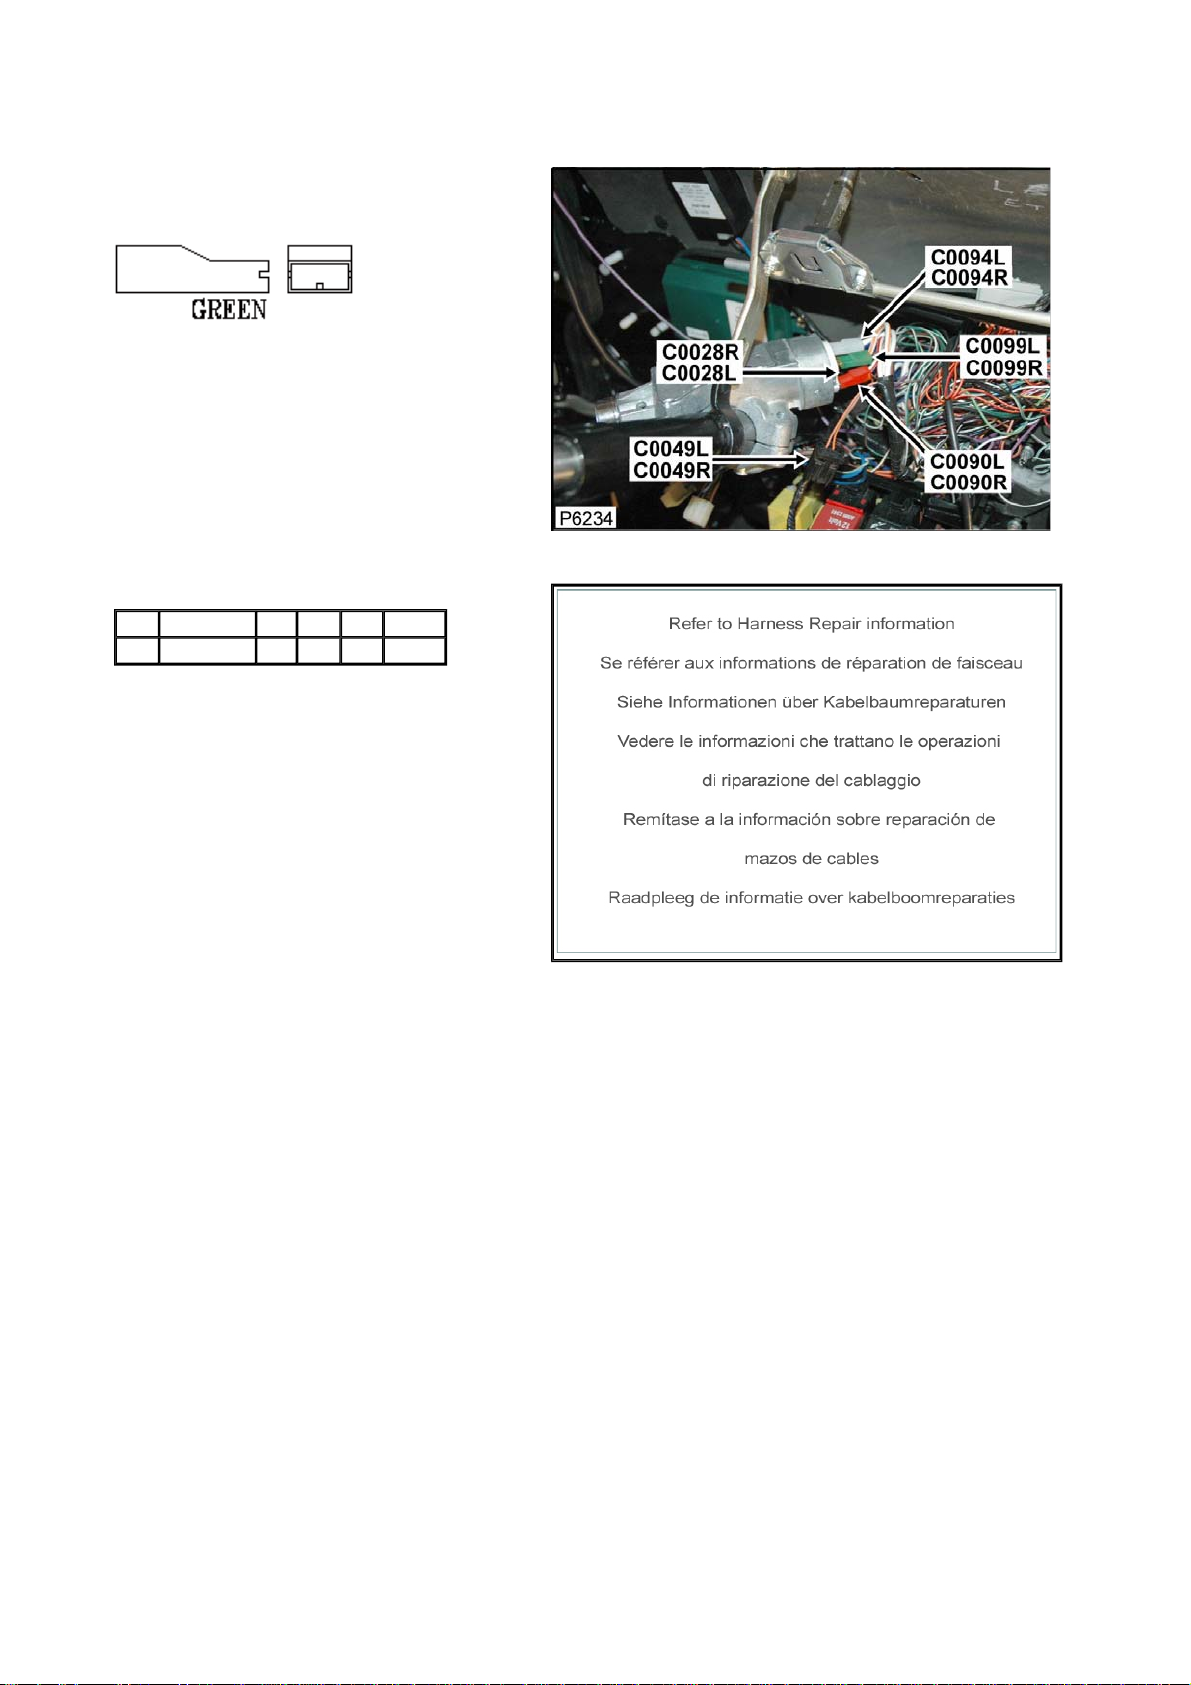
Connector: C0099L Description: Switch-Ignition
Location: Behind steering column cowl - RH side
Part No.: YPC115690
Colour: GREEN
Cavities: 1WY
Harness: MAIN LH + RH HARNESS
Wire Chart
CAV TERMINAL CSA COL CCT DESTN
1 ADU9568 4.0D WO 139L C0582L
Service Repair Kits
Page 80
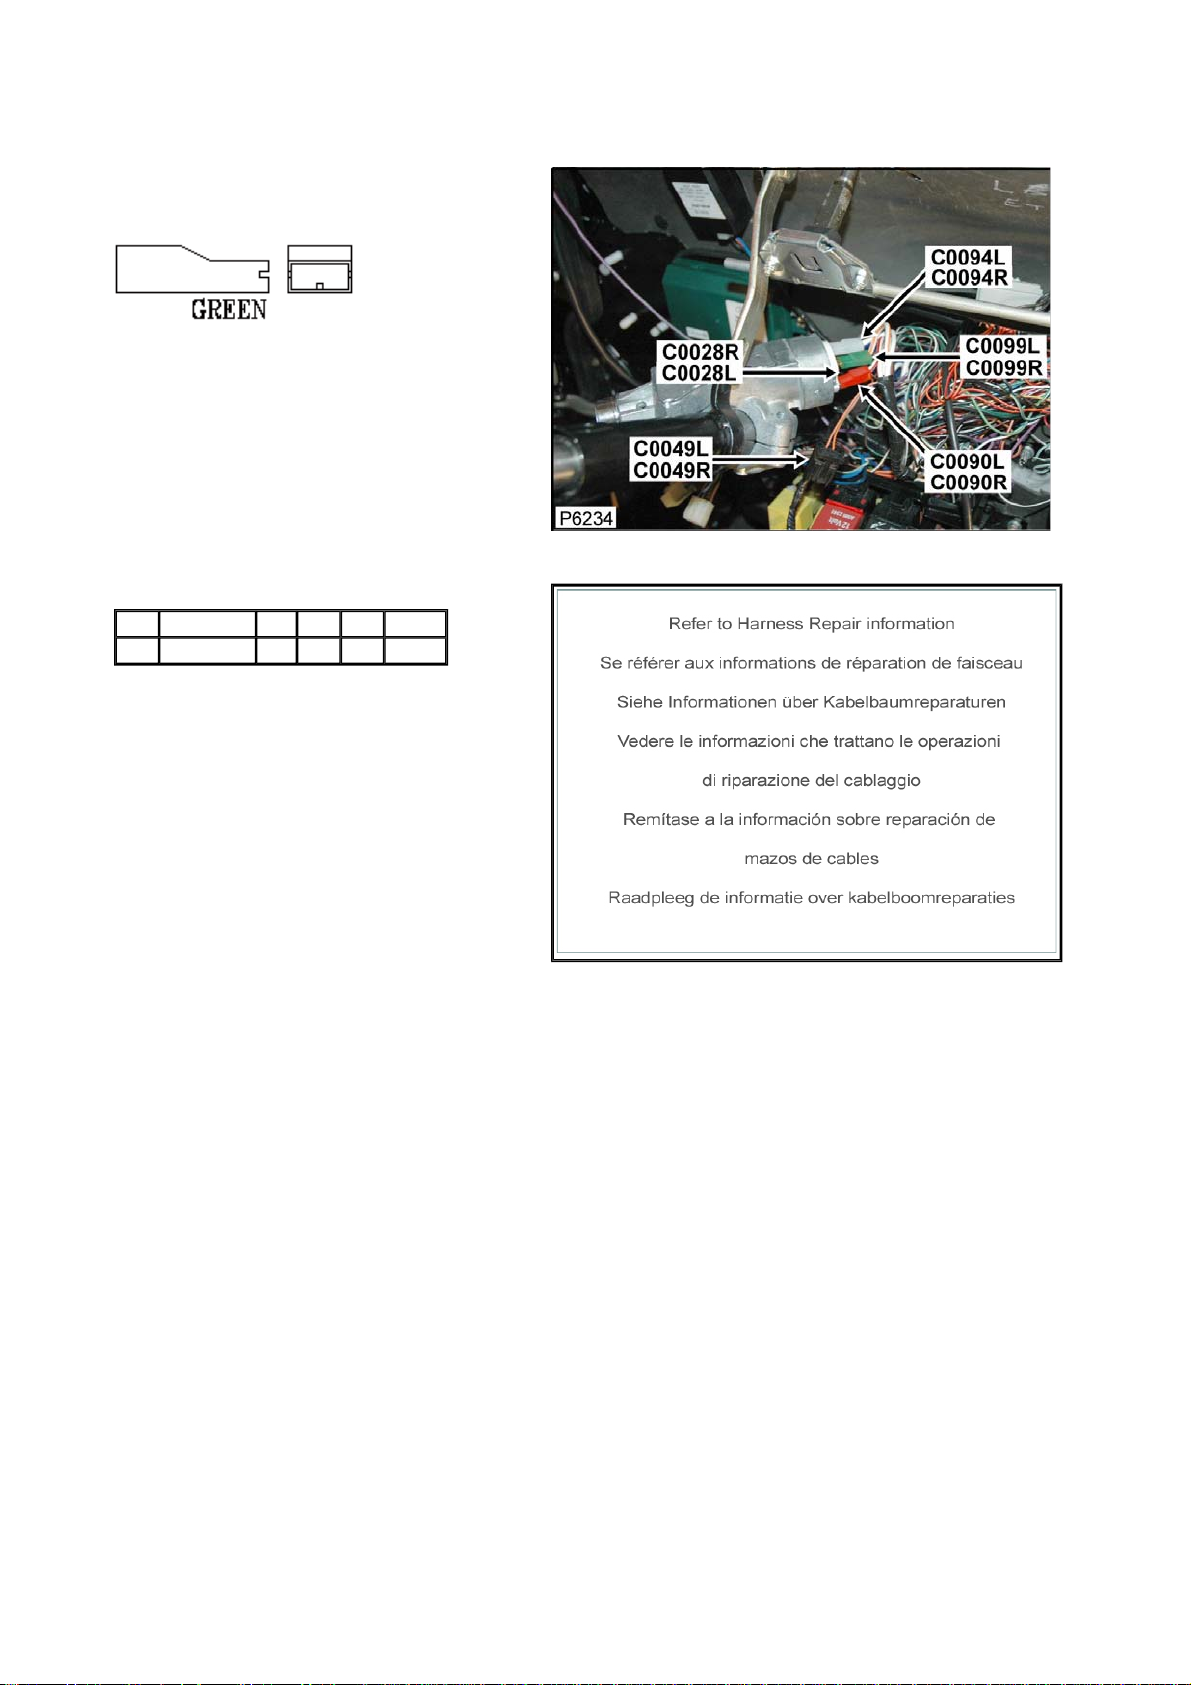
Connector: C0099R Description: Switch-Ignition
Location: Behind steering column cowl - RH side
Part No.: YPC115690
Colour: GREEN
Cavities: 1WY
Harness: MAIN LH + RH HARNESS
Wire Chart
CAV TERMINAL CSA COL CCT DESTN
1 ADU9568 4.0D WO 200R C0582R
Service Repair Kits
Page 81
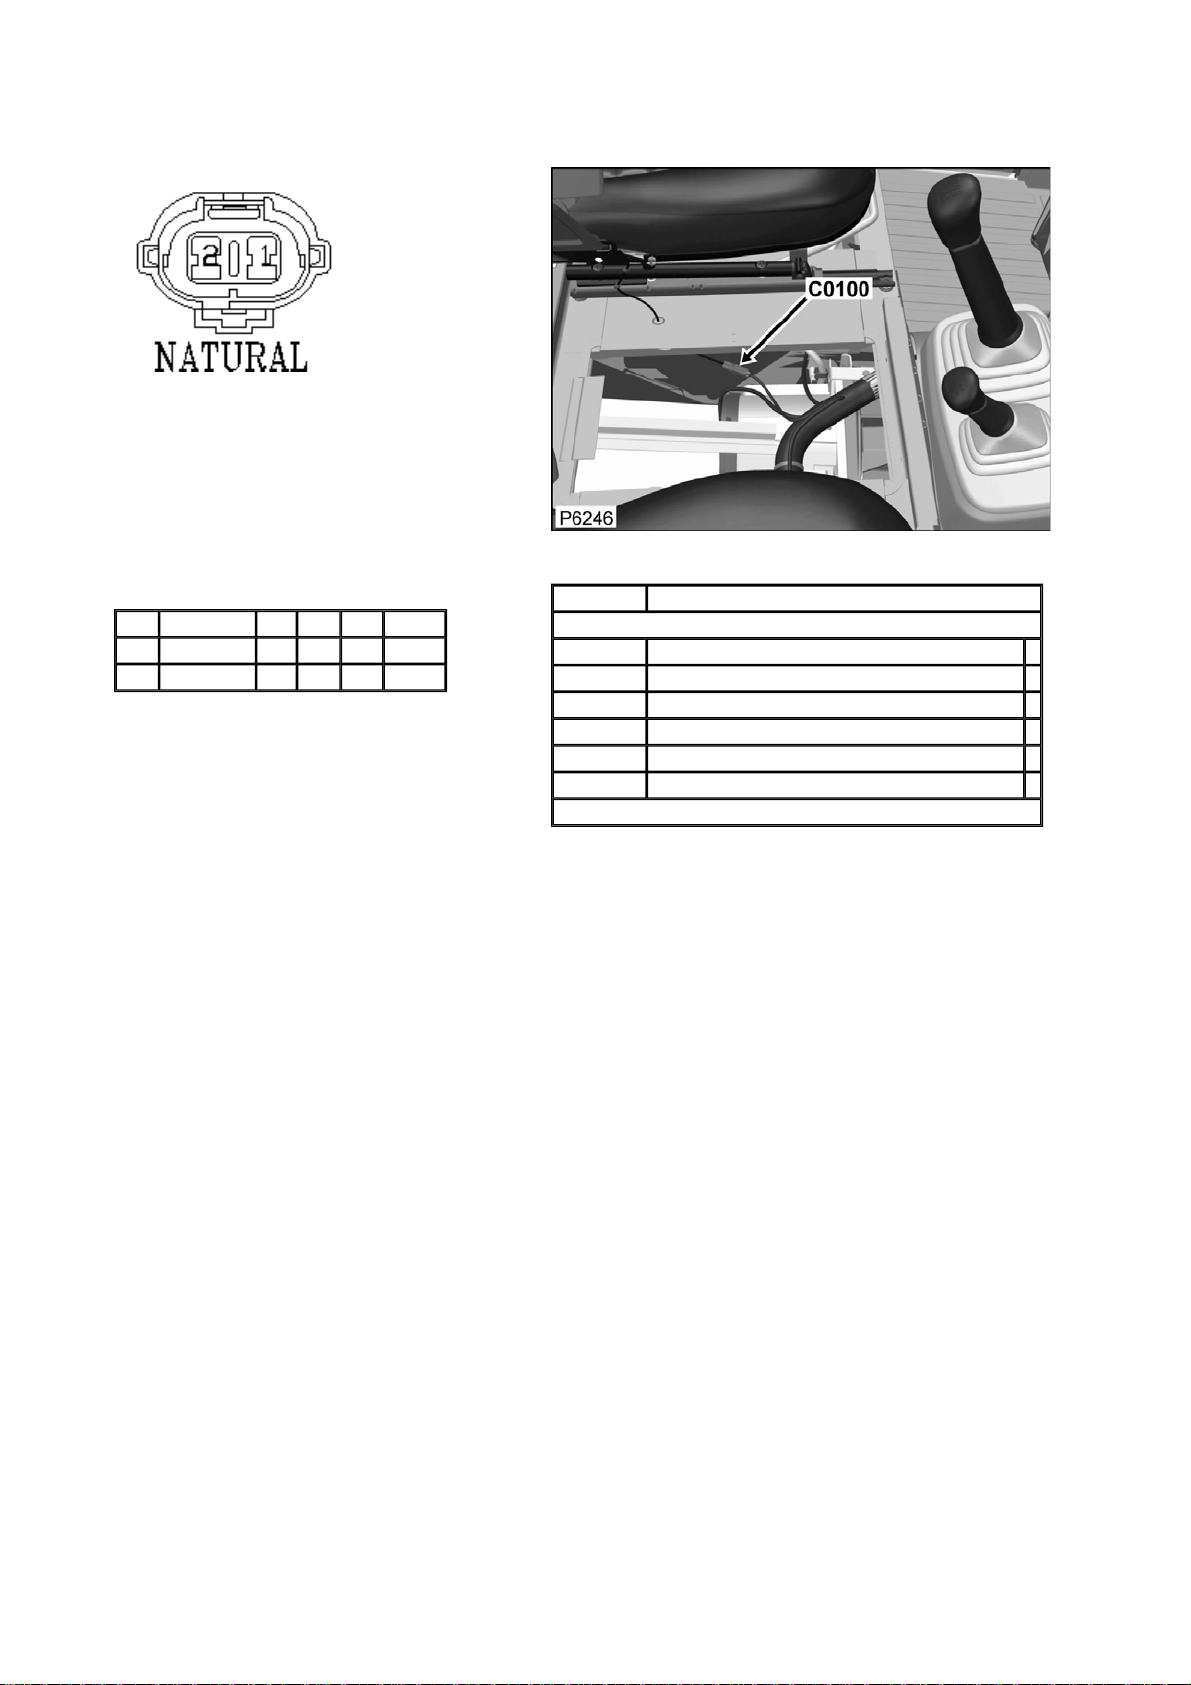
Connector: C0100 Description: Switch-Buckle-Driver
Location: Beneath center of vehicle
Part No.: AFU3584
Colour: NATURAL
Cavities: 2WY
Harness: MAIN LH + RH HARNESS
Wire Chart
CAV TERMINAL CSA COL CCT DESTN
1 DBP8550 0.5D WP 139L C1040L
2 DBP8550 0.5D B 139L C0289
Service Repair Kits
CSA 0.30- 1.25 CSA
Cavities: 1,2
VDK500010 SRK ITEM GENERAL 1
YMI500070 SRK ITEM HW090/HM090 SEALED FAMILY 1.0CSA 1
YPQ000100 SRK ITEM 1
YRV000040 SRK ITEM PIDG RED 1
YRW000390 SRK ITEM 1
YRW500010 SRK ITEM 1
VUB500580
Page 82
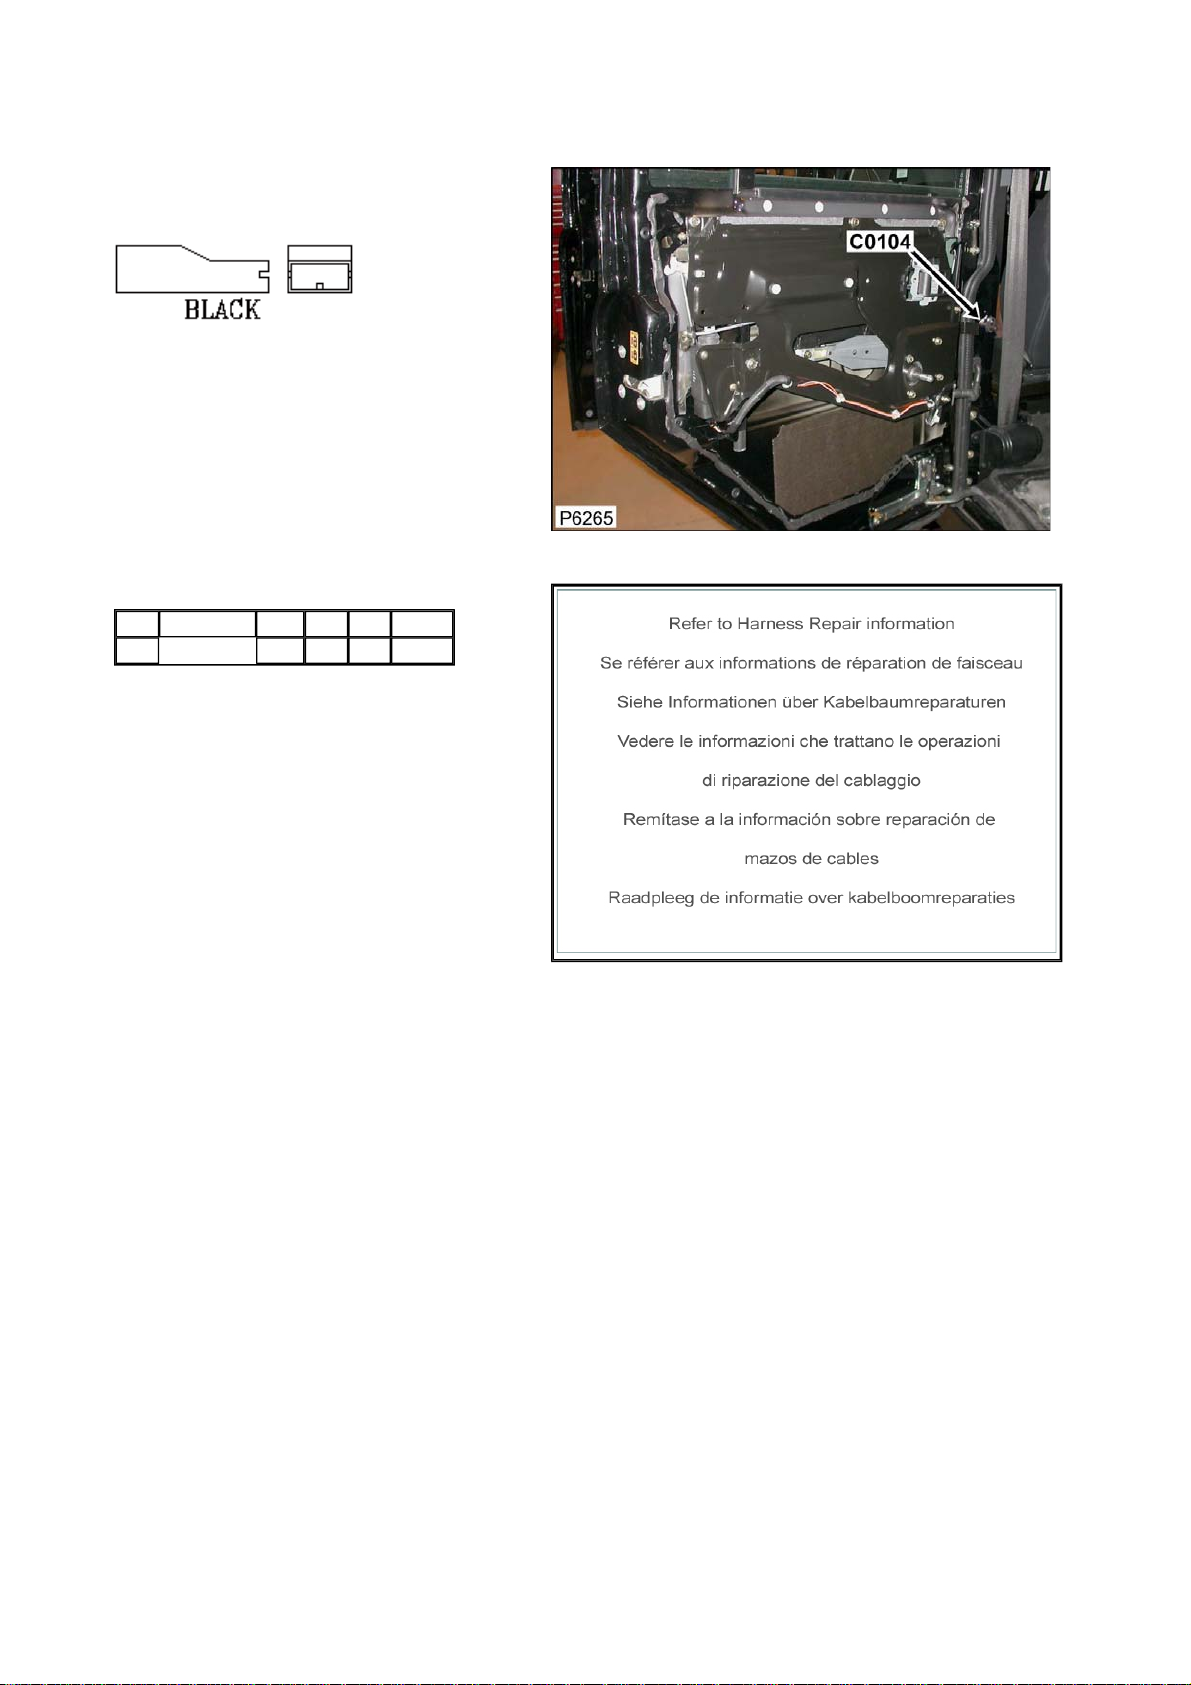
Connector: C0104 Description: Switch-Door-Rear-LH
Location: In LH 'B' post
Part No.: AAU1010
Colour:
Cavities:
Harness: REAR DOOR LINK HARNESS
Wire Chart
CAV TERMINAL CSA COL CCT DESTN
1 0.75D PU ALL CTAP
Service Repair Kits
Page 83
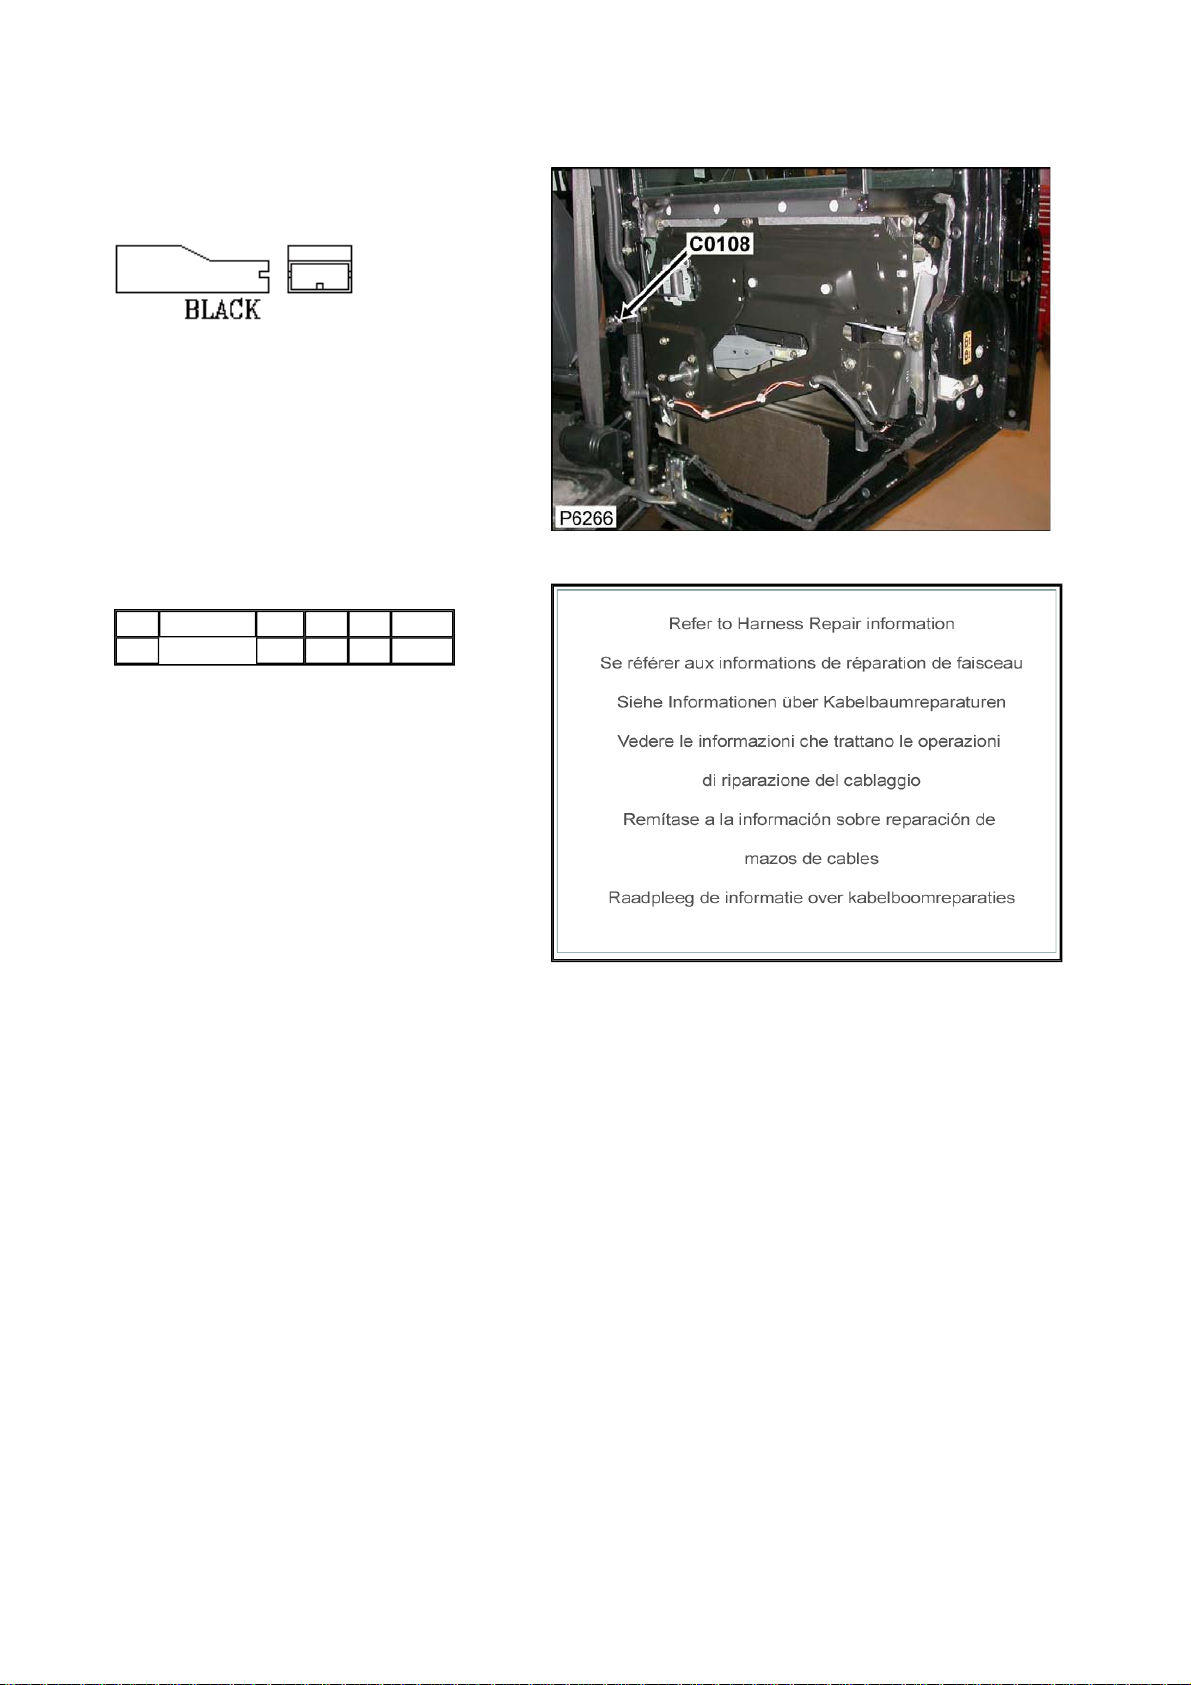
Connector: C0108 Description: Switch-Door-Rear-RH
Location: In RH 'B' post
Part No.: AAU1010
Colour:
Cavities:
Harness: REAR DOOR LINK HARNESS
Wire Chart
CAV TERMINAL CSA COL CCT DESTN
1 0.75D PU ALL CTAP
Service Repair Kits
Page 84
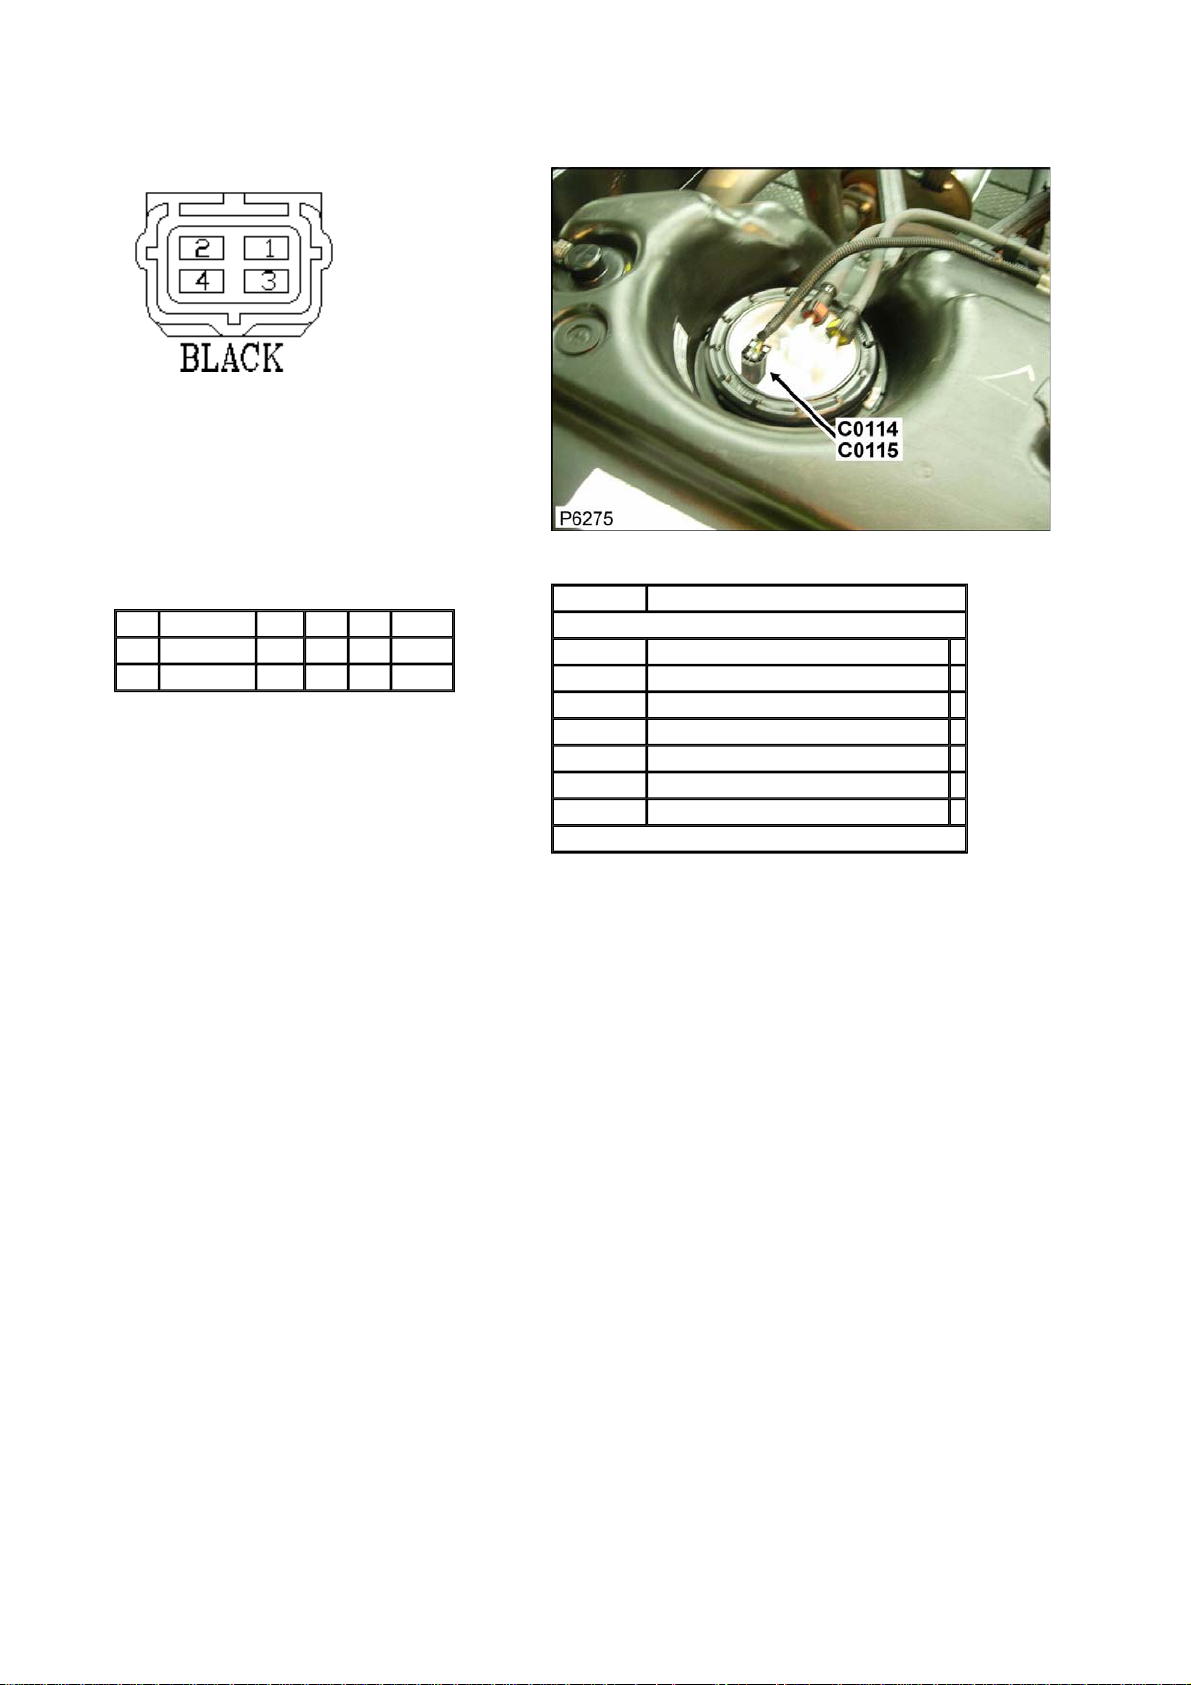
Connector: C0114 Description: Unit-Fuel Tank
Location: Beneath rear of vehicle RH side
Part No.: YPC10066
Colour: BLACK
Cavities: 4WY
Harness: CHASSIS HARNESS
Wire Chart
CAV TERMINAL CSA COL CCT DESTN
1 AFU3802 0.75D GO 770 C0390
2 AFU3802 0.75D YP 770 C0390
Service Repair Kits
CSA 0.70- 2.00 CSA
Cavities: 1,2
VDK500010 SRK ITEM GENERAL 1
YMI000320 SRK ITEM ECONOSEAL FAMILY 2.0CSA 1
YPQ000110 SRK ITEM 1
YQD000210 SRK ITEM R/B 1
YRV000050 SRK ITEM PIDG BLUE 1
YRW000390 SRK ITEM 1
YRW500010 SRK ITEM 1
VUB001680
Page 85
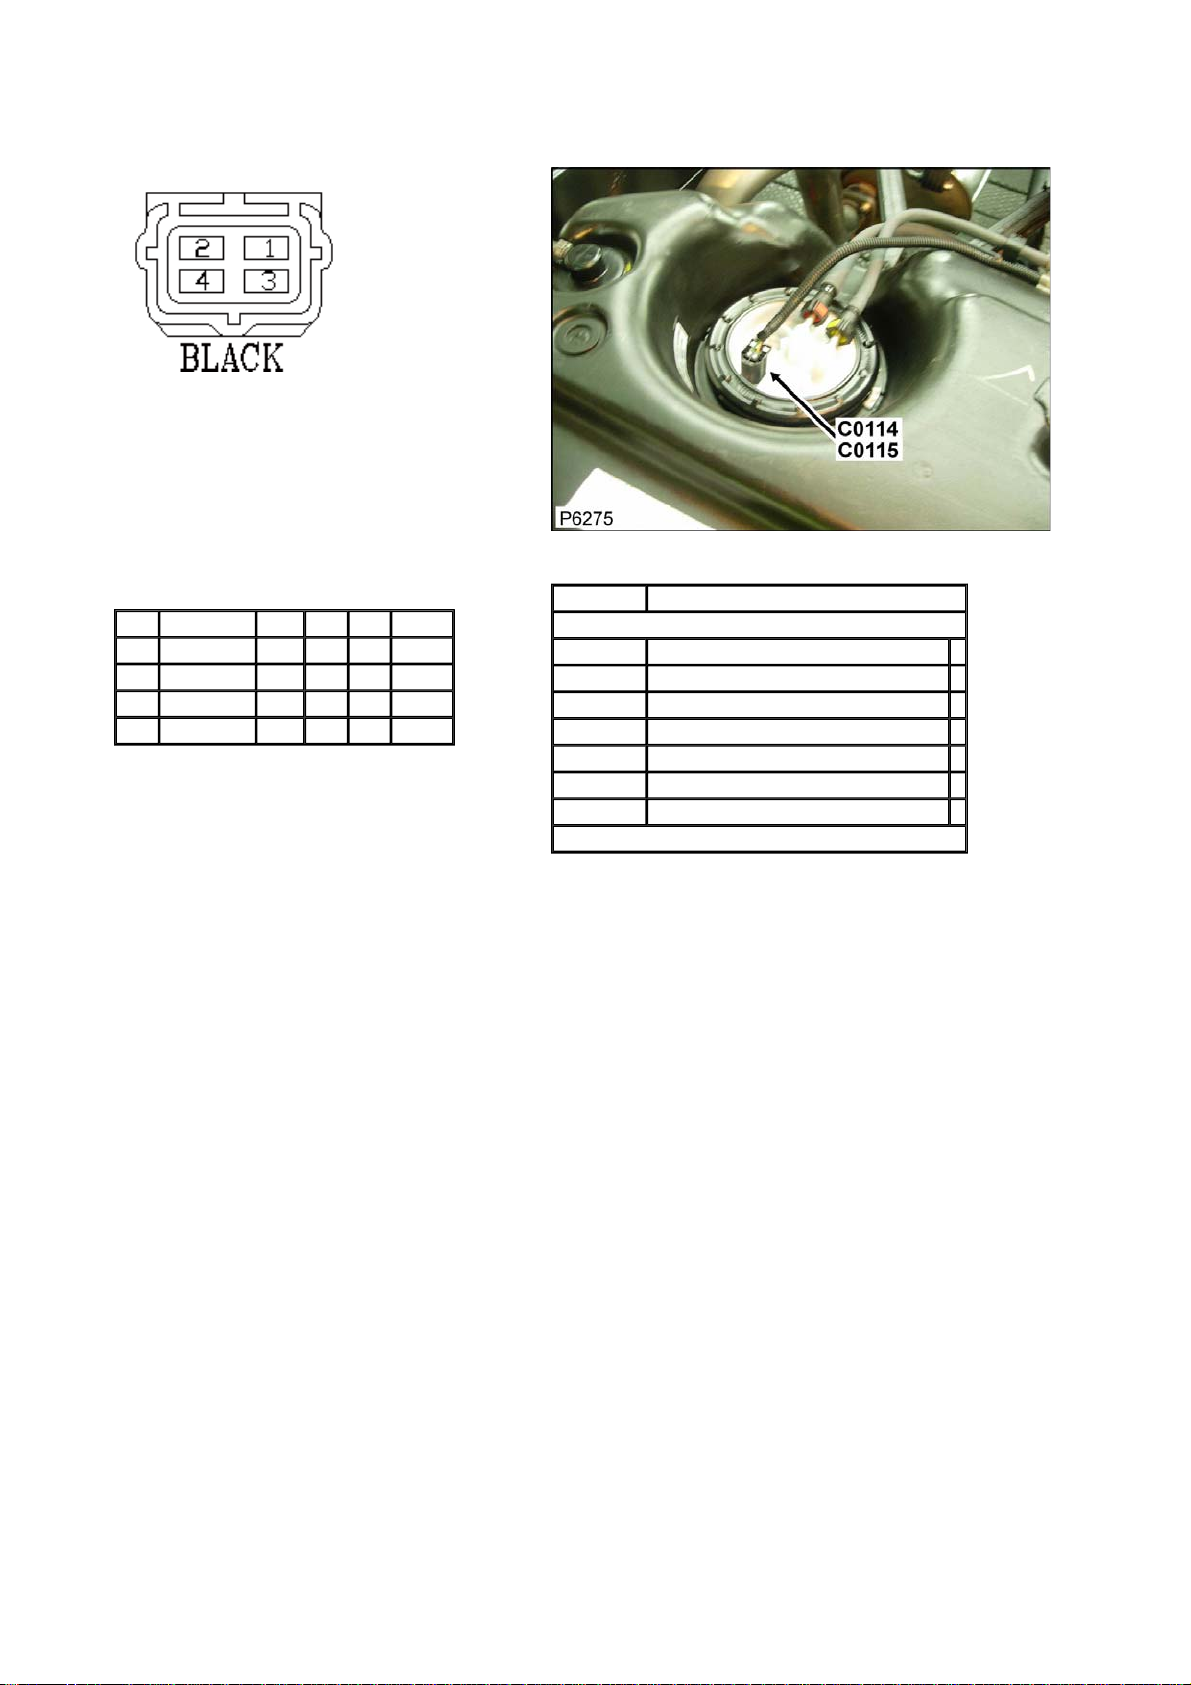
Connector: C0115 Description: Unit-Fuel Tank
Location: Beneath rear of vehicle RH side
Part No.: YPC10066
Colour: BLACK
Cavities: 4WY
Harness: CHASSIS HARNESS
Wire Chart
CAV TERMINAL CSA COL CCT DESTN
1 AFU3802 0.75D GO 772 C1763
1 AFU3802 0.75D GO 771 C1759
2 AFU3802 0.75D YP 772 C1763
2 AFU3802 0.75D YP 771 C1759
Service Repair Kits
CSA 0.70- 2.00 CSA
Cavities: 1,2
VDK500010 SRK ITEM GENERAL 1
YMI000320 SRK ITEM ECONOSEAL FAMILY 2.0CSA 1
YPQ000110 SRK ITEM 1
YQD000210 SRK ITEM R/B 1
YRV000050 SRK ITEM PIDG BLUE 1
YRW000390 SRK ITEM 1
YRW500010 SRK ITEM 1
VUB001680
Page 86
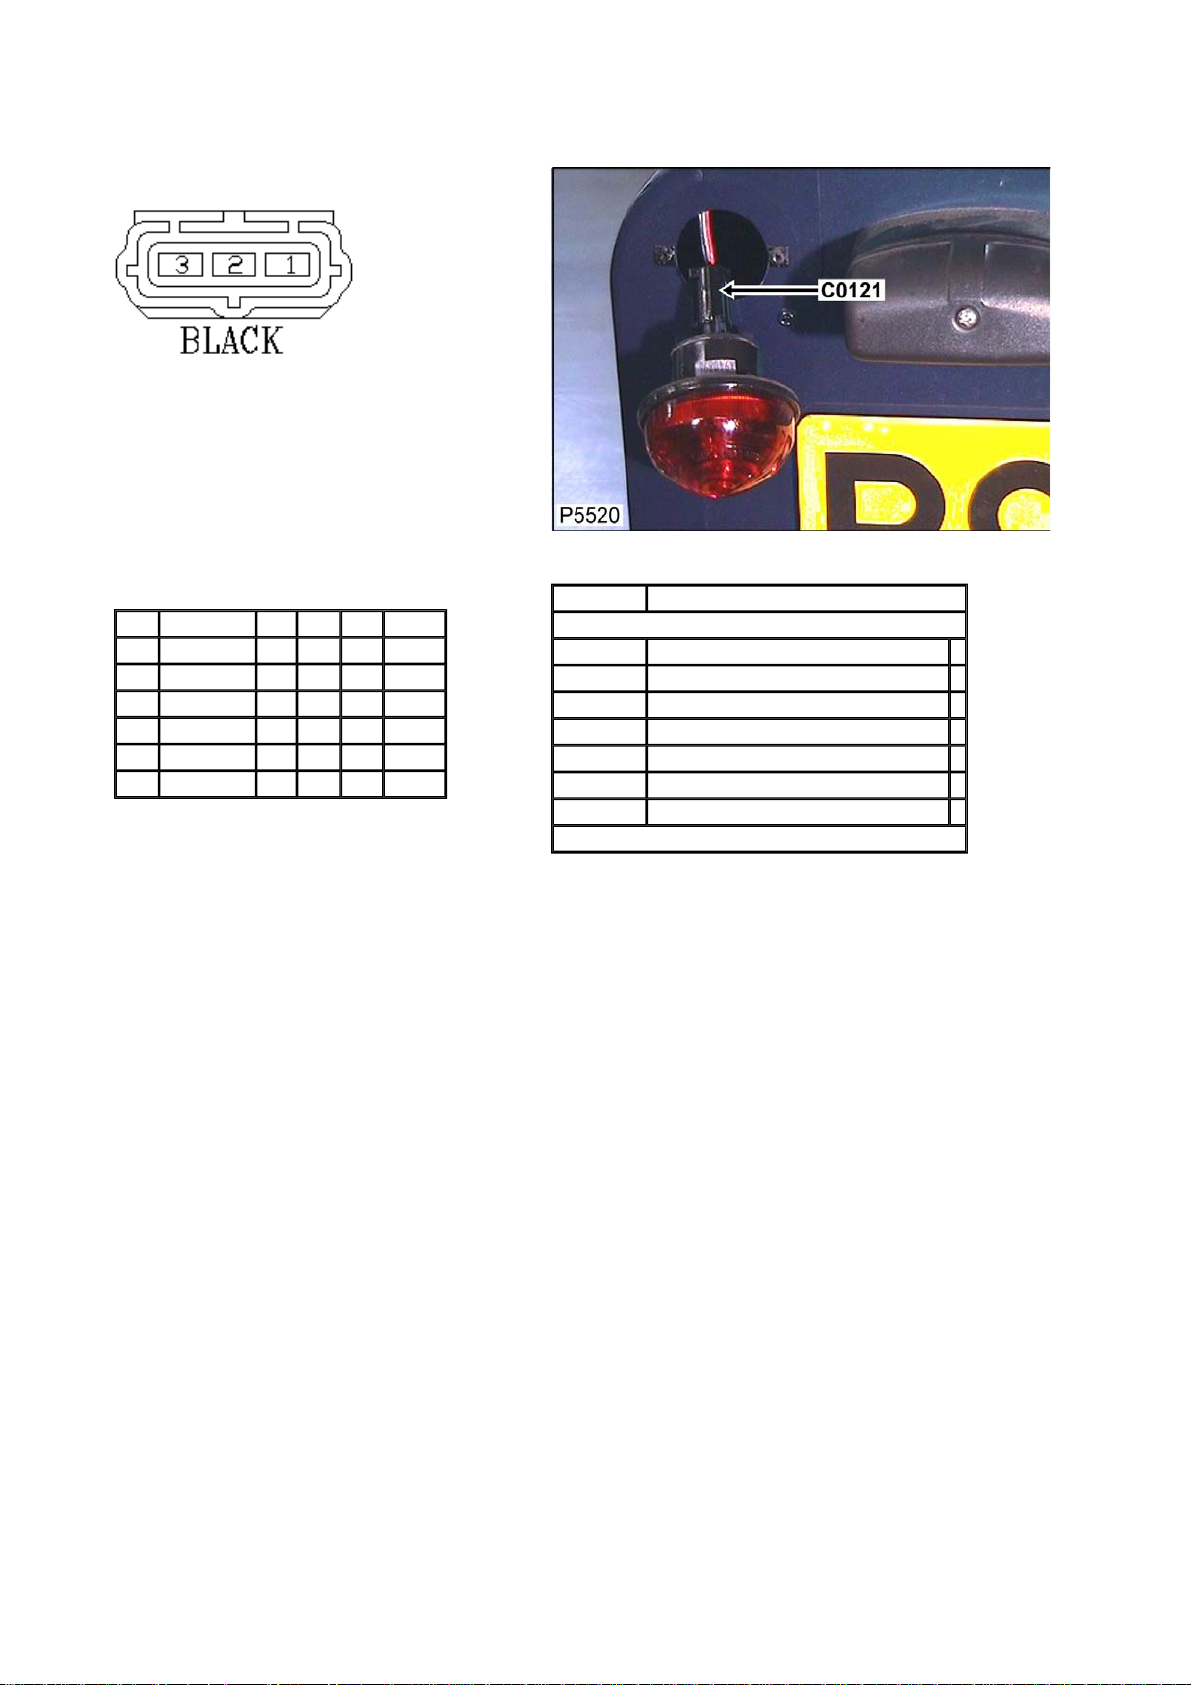
Connector: C0121 Description: Tail lamp unit-LH
Location: LH 'D' post
Part No.: YPC10068
Colour: BLACK
Cavities: 3WY
Harness: CHASSIS HARNESS
Wire Chart
CAV TERMINAL CSA COL CCT DESTN
1 AFU3802 1.5D B 771 C0928
1 AFU3802 1.5D B 770 C0928
2 AFU3802 1.5D GP 771 CTAP
2 AFU3802 1.5D GP 770 CTAP
3 AFU3802 1.5D RB 771 CTAP
3 AFU3802 1.5D RB 770 CTAP
Service Repair Kits
CSA 0.70- 2.00 CSA
Cavities: 1,2,3
VDK500010 SRK ITEM GENERAL 1
YMI000320 SRK ITEM ECONOSEAL FAMILY 2.0CSA 1
YPQ000110 SRK ITEM 1
YQD000210 SRK ITEM R/B 1
YRV000050 SRK ITEM PIDG BLUE 1
YRW000390 SRK ITEM 1
YRW500010 SRK ITEM 1
VUB001680
Page 87
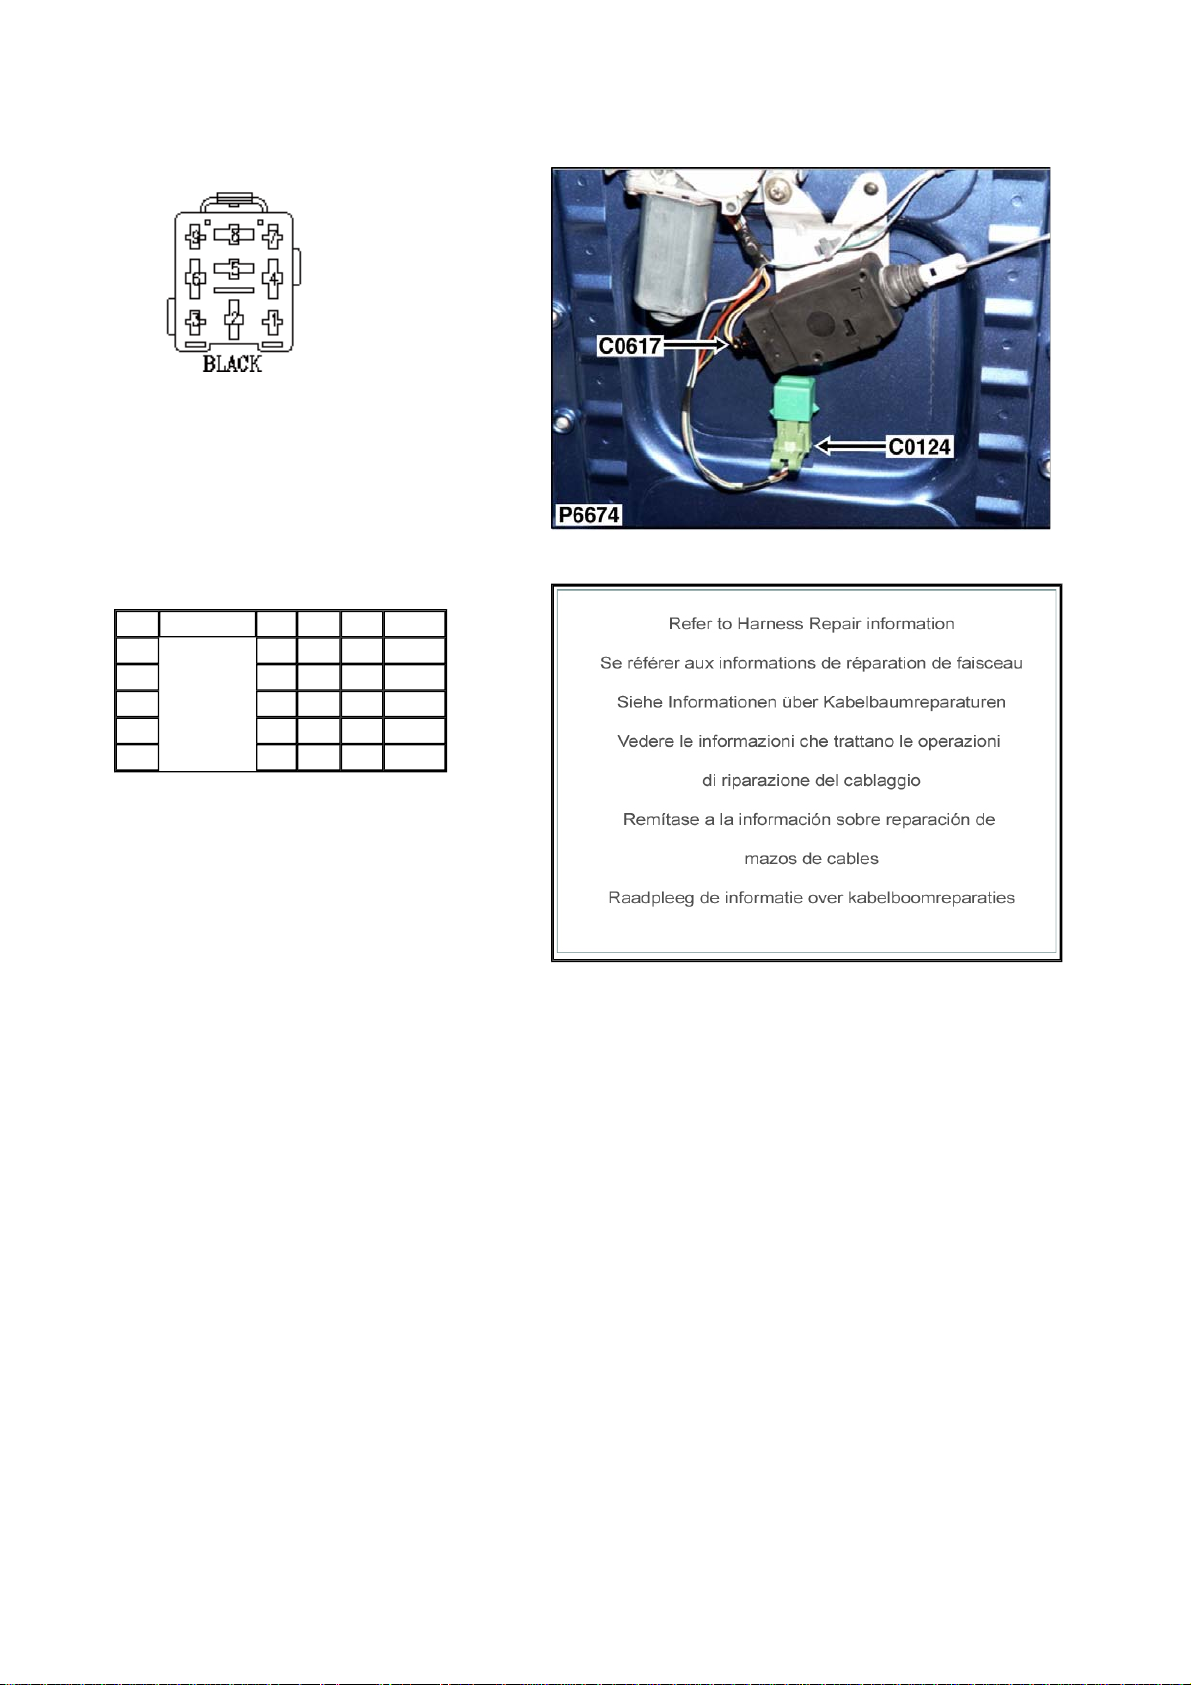
Connector: C0124 Description: Relay-Rear-wiper
Location: Center of taildoor, behind trim panel
Part No.: YPP10001
Colour: BLACK
Cavities: 9WY
Harness: TAILDOOR HARNESS
Wire Chart
CAV TERMINAL CSA COL CCT DESTN
2 1.0D RLG 2 C0388
4 1.0D BG 2 C1102
5 1.0D NLG 2 C1105
6 1.0D WG 2 C1105
8 1.0D WG 2 C1102
Service Repair Kits
Page 88
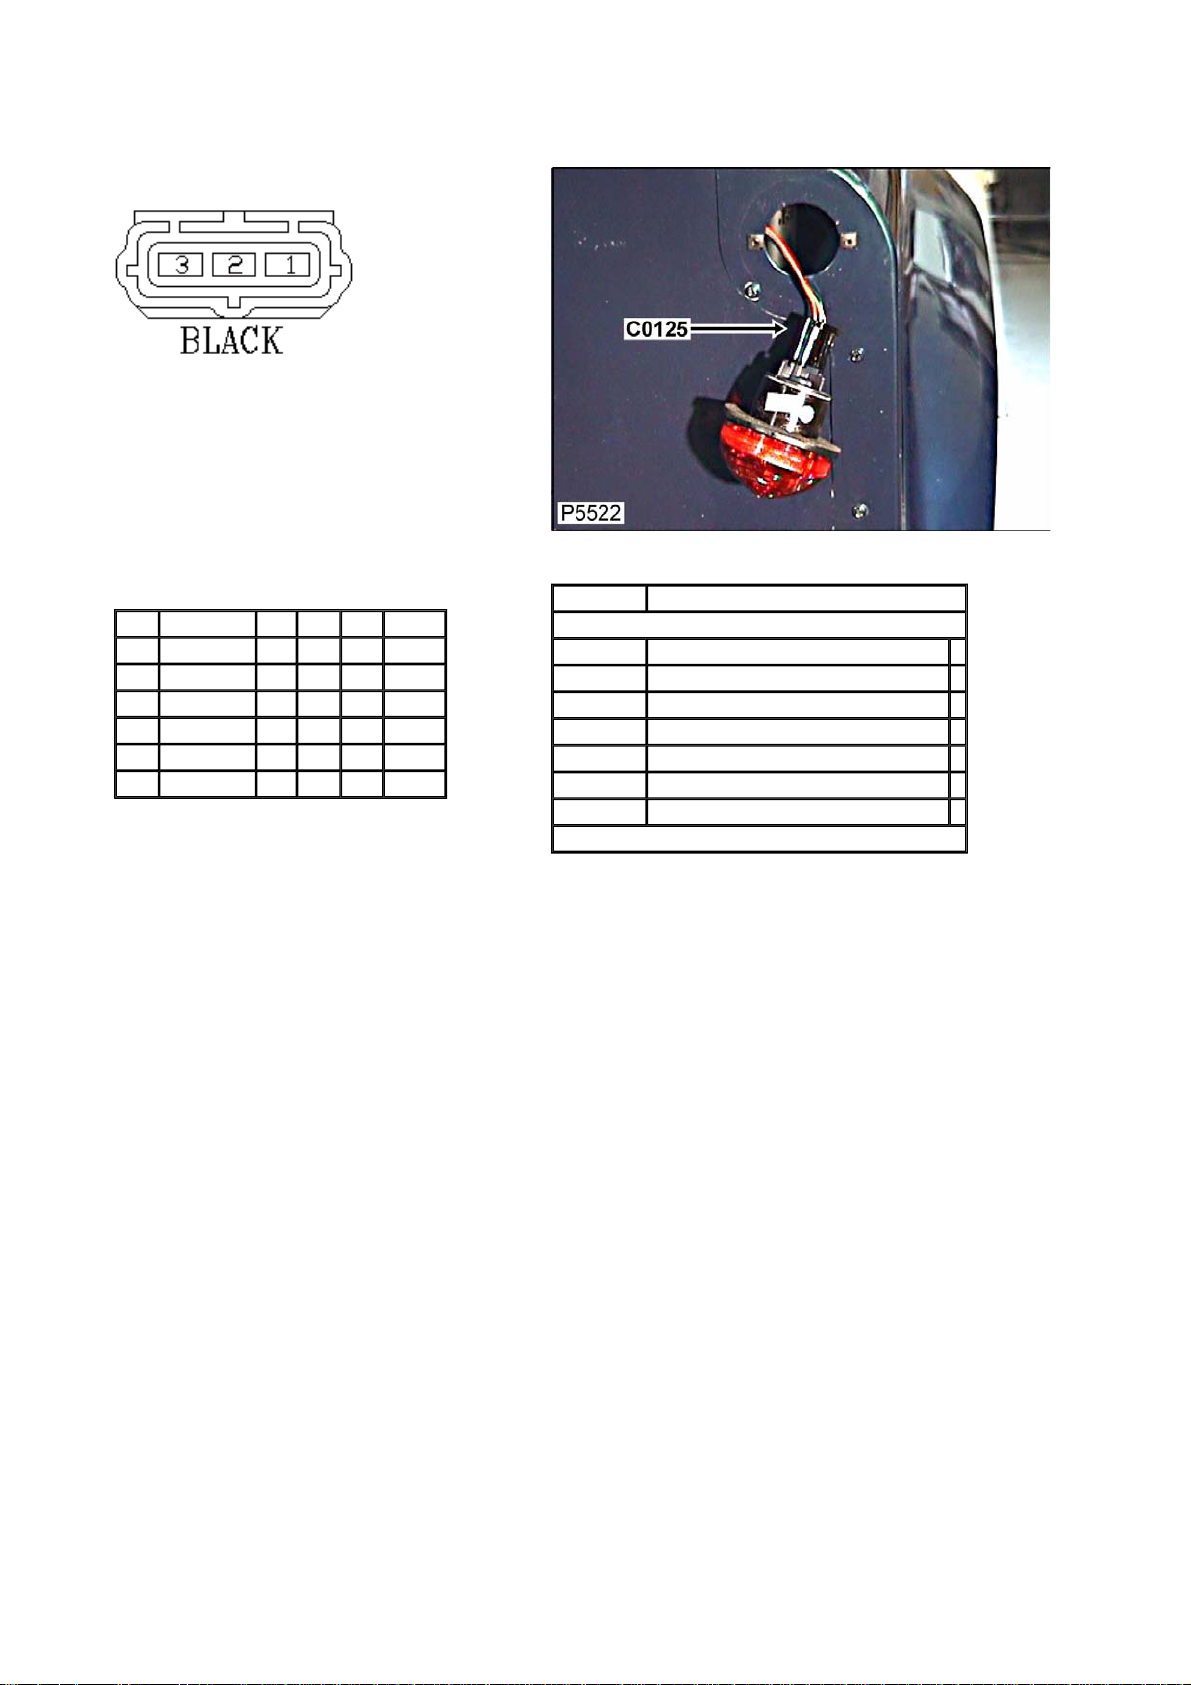
Connector: C0125 Description: Tail lamp unit-RH
Location: RH 'D' post
Part No.: YPC10068
Colour: BLACK
Cavities: 3WY
Harness: CHASSIS HARNESS
Wire Chart
CAV TERMINAL CSA COL CCT DESTN
1 AFU3802 1.5D B 771 C2119
1 AFU3802 1.5D B 770 C2119
2 AFU3802 1.5D GP 770 CTAP
2 AFU3802 1.5D GP 771 CTAP
3 AFU3802 1.5D RO 771 CTAP
3 AFU3802 1.5D RO 770 CTAP
Service Repair Kits
CSA 0.70- 2.00 CSA
Cavities: 1,2,3
VDK500010 SRK ITEM GENERAL 1
YMI000320 SRK ITEM ECONOSEAL FAMILY 2.0CSA 1
YPQ000110 SRK ITEM 1
YQD000210 SRK ITEM R/B 1
YRV000050 SRK ITEM PIDG BLUE 1
YRW000390 SRK ITEM 1
YRW500010 SRK ITEM 1
VUB001680
Page 89
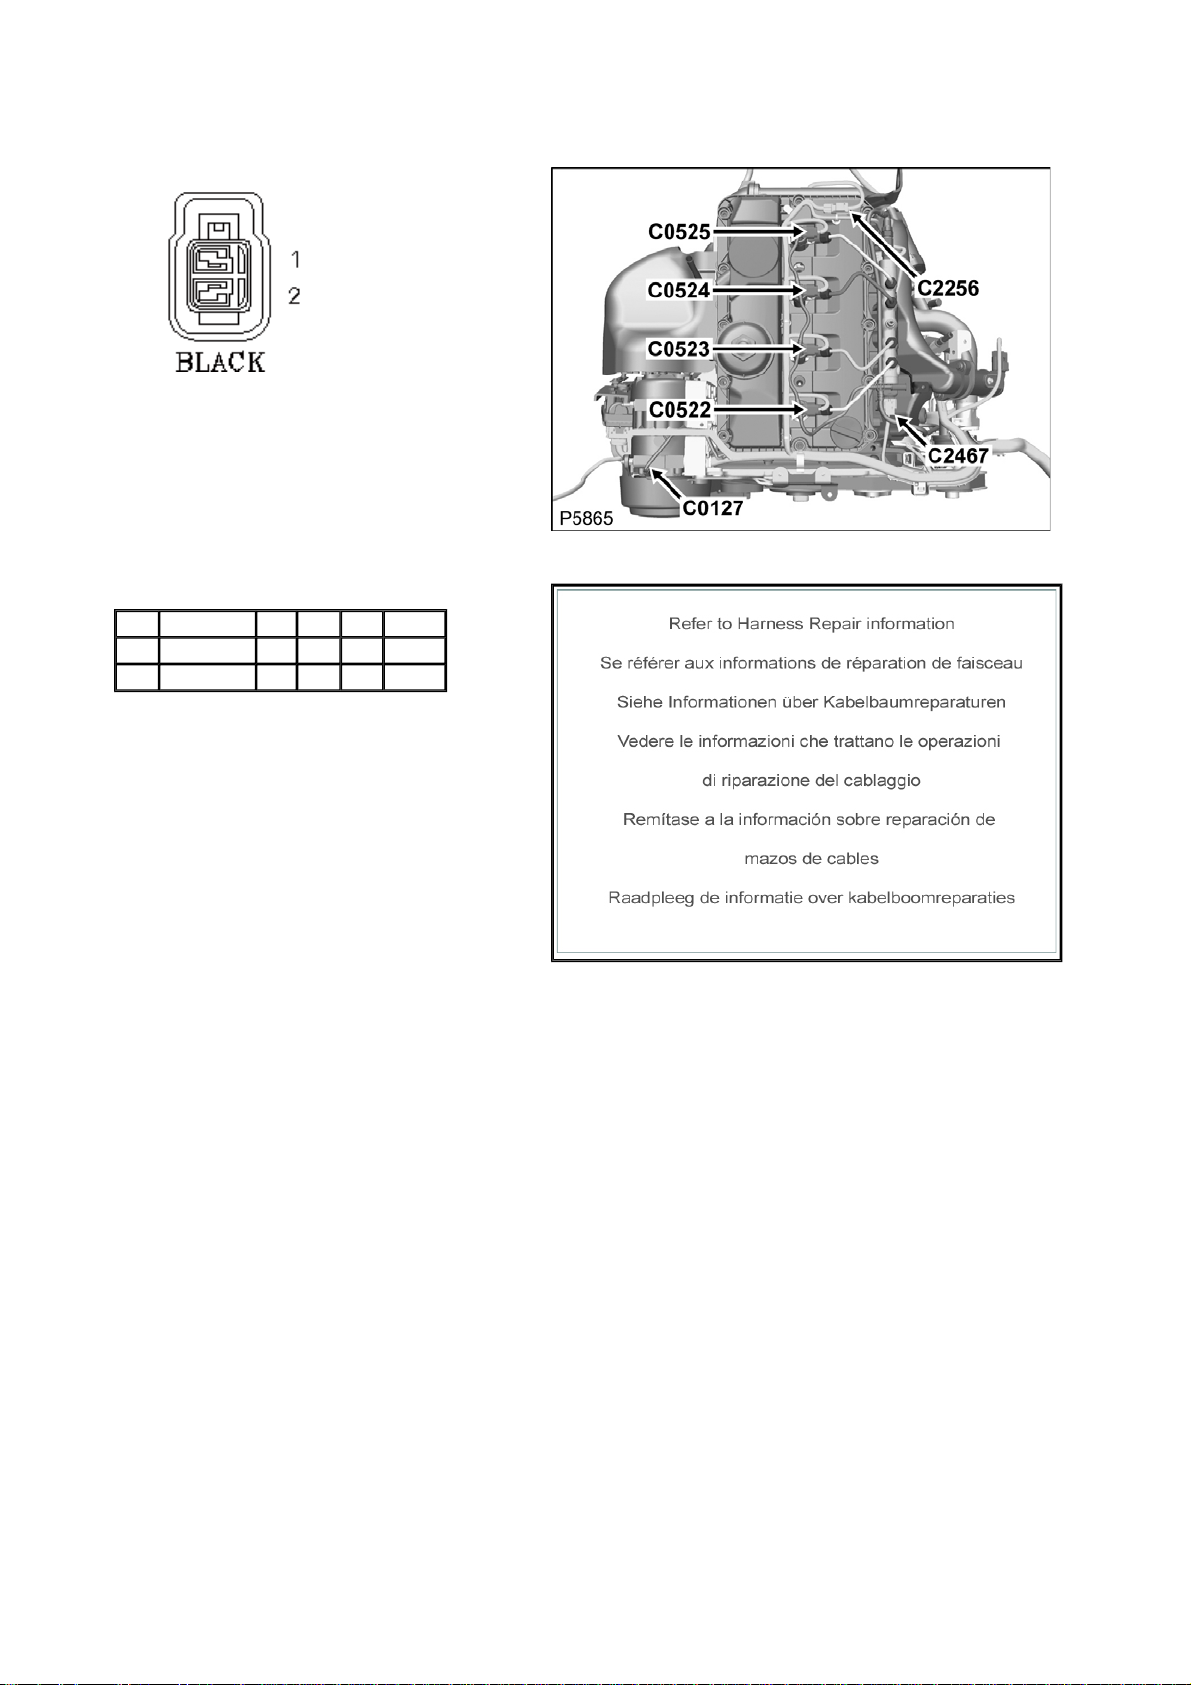
Connector: C0127 Description: Clutch-Compressor-Air conditioning (A/C)
Location: Top of engine - RH side
Part No.: YPC500750
Colour:
Cavities:
Harness: ENGINE DIESEL PUMA HARNESS
Wire Chart
CAV TERMINAL CSA COL CCT DESTN
1 YPL500410 1.0 UN 254 C0162
2 YPL500410 1.0 BG 254 C0162
Service Repair Kits
Page 90
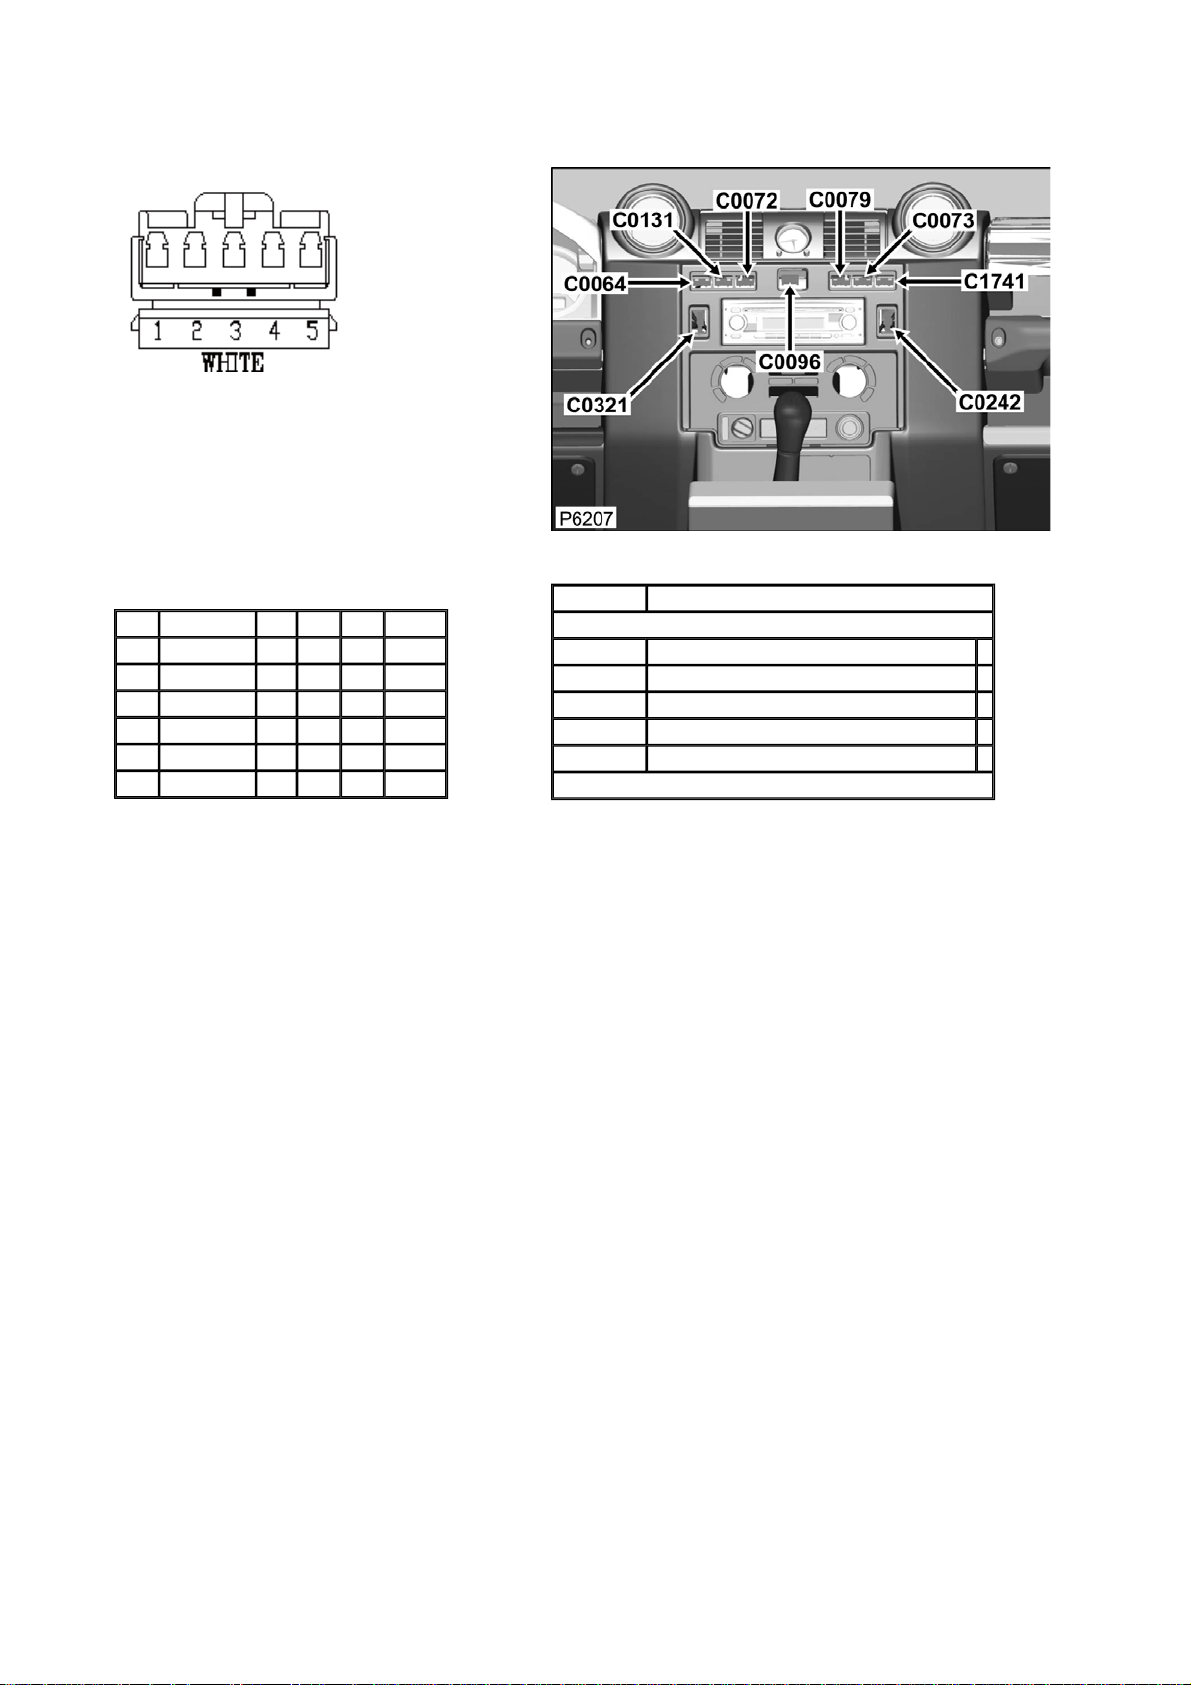
Connector: C0131 Description: Switch-Heated-front screen
Location: Instrument panel-centre
Part No.: YPC10524
Colour: WHITE
Cavities: 5WY
Harness: MAIN LH + RH HARNESS
Wire Chart
CAV TERMINAL CSA COL CCT DESTN
1 AFU3752 0.5D KO 109R C1624
1 AFU3752 0.5D KO 109L C1624
2 AFU3752 0.5D RO 766 CTAP
4 AFU3752 0.5D B 766 CTAP
5 AFU3752 0.5D PS 766R CTAP
5 AFU3752 0.5D PS 766L CTAP
Service Repair Kits
CSA 0.30- 0.51 CSA
Cavities: 1,2,4,5
YMI000650 SRK ITEM MULTILOCK 070 FAMILY 1.5CSA 1
YPQ000100 SRK ITEM 1
YQD000210 SRK ITEM R/B 1
YRV000040 SRK ITEM PIDG RED 1
YRW500010 SRK ITEM 1
VUB002010
Page 91
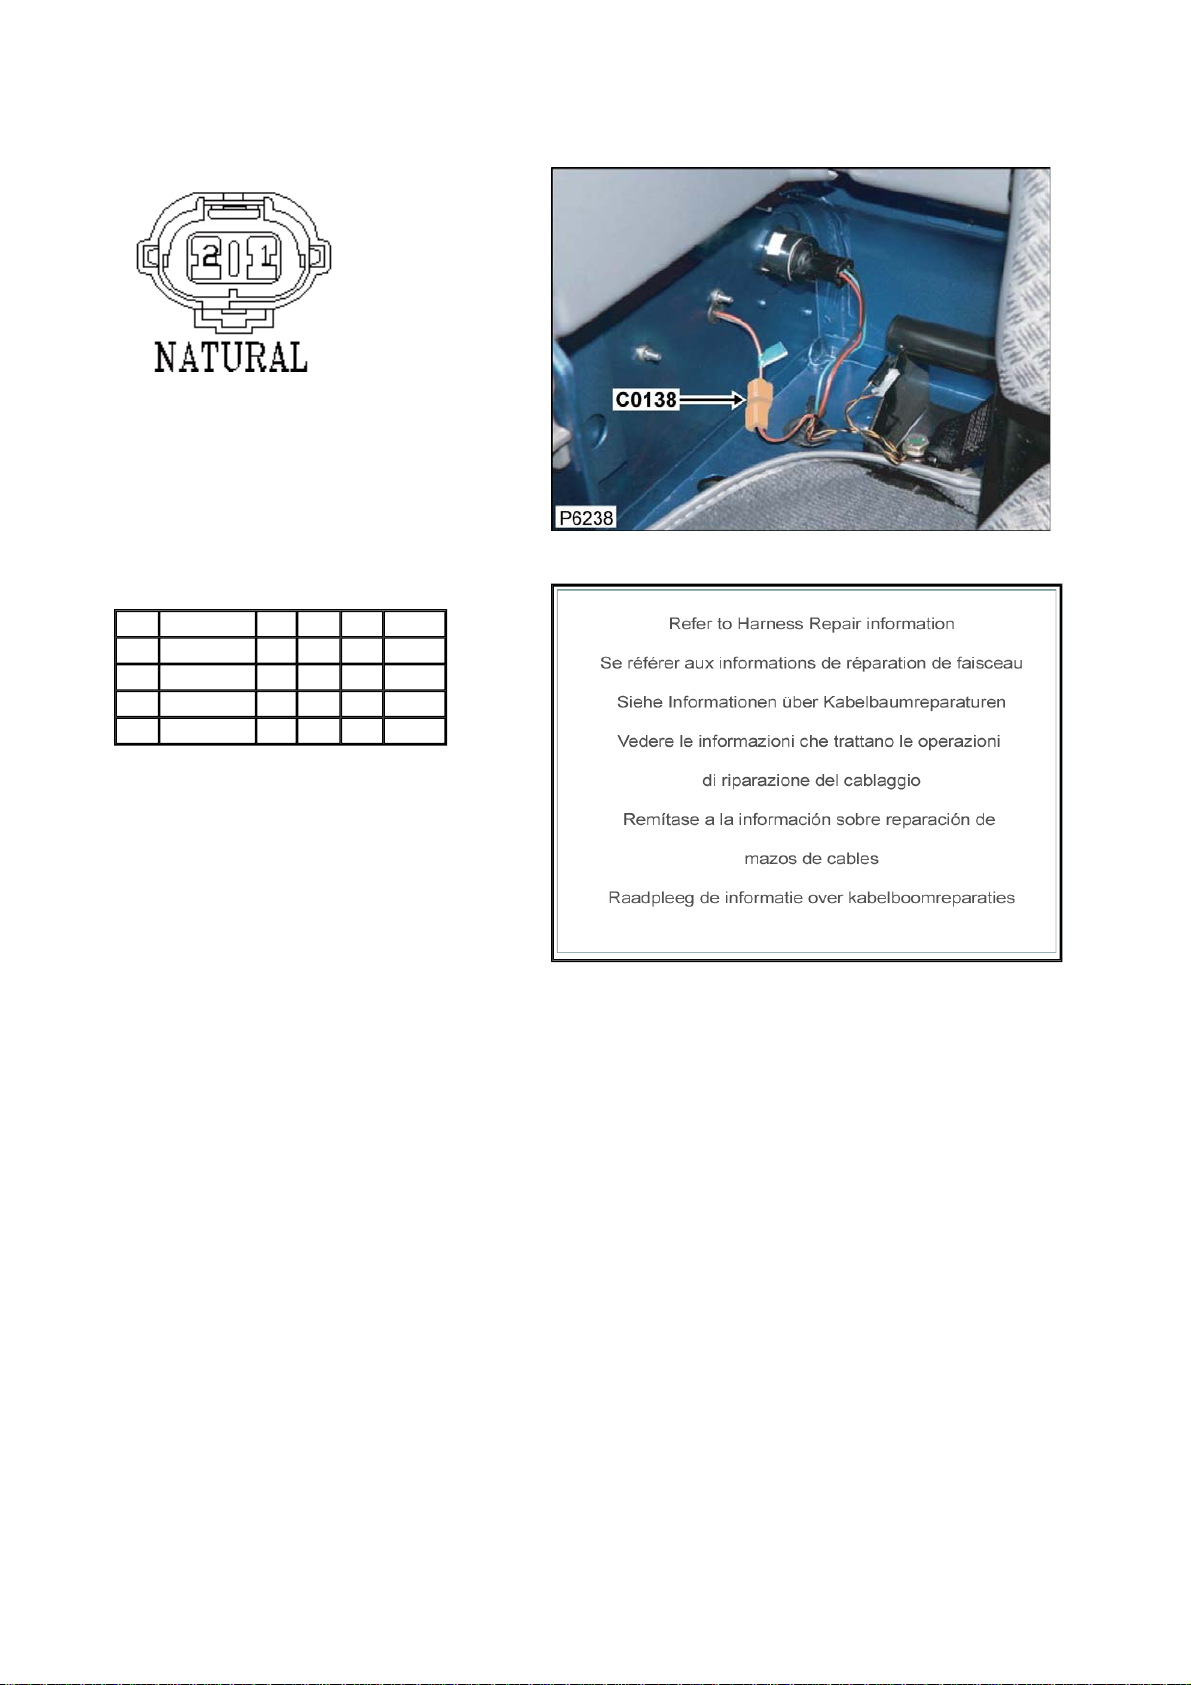
Connector: C0138 Description: License plate lamp
Location: LH 'D' post
Part No.: AFU3584
Colour: NATURAL
Cavities: 2WY
Harness: CHASSIS HARNESS
Wire Chart
CAV TERMINAL CSA COL CCT DESTN
1 YPJ10008 1.5D RB 771 CTAP
1 YPJ10008 1.5D RB 770 CTAP
2 YPJ10008 1.5D B 771 C2122
2 YPJ10008 1.5D B 770 C2122
Service Repair Kits
Page 92
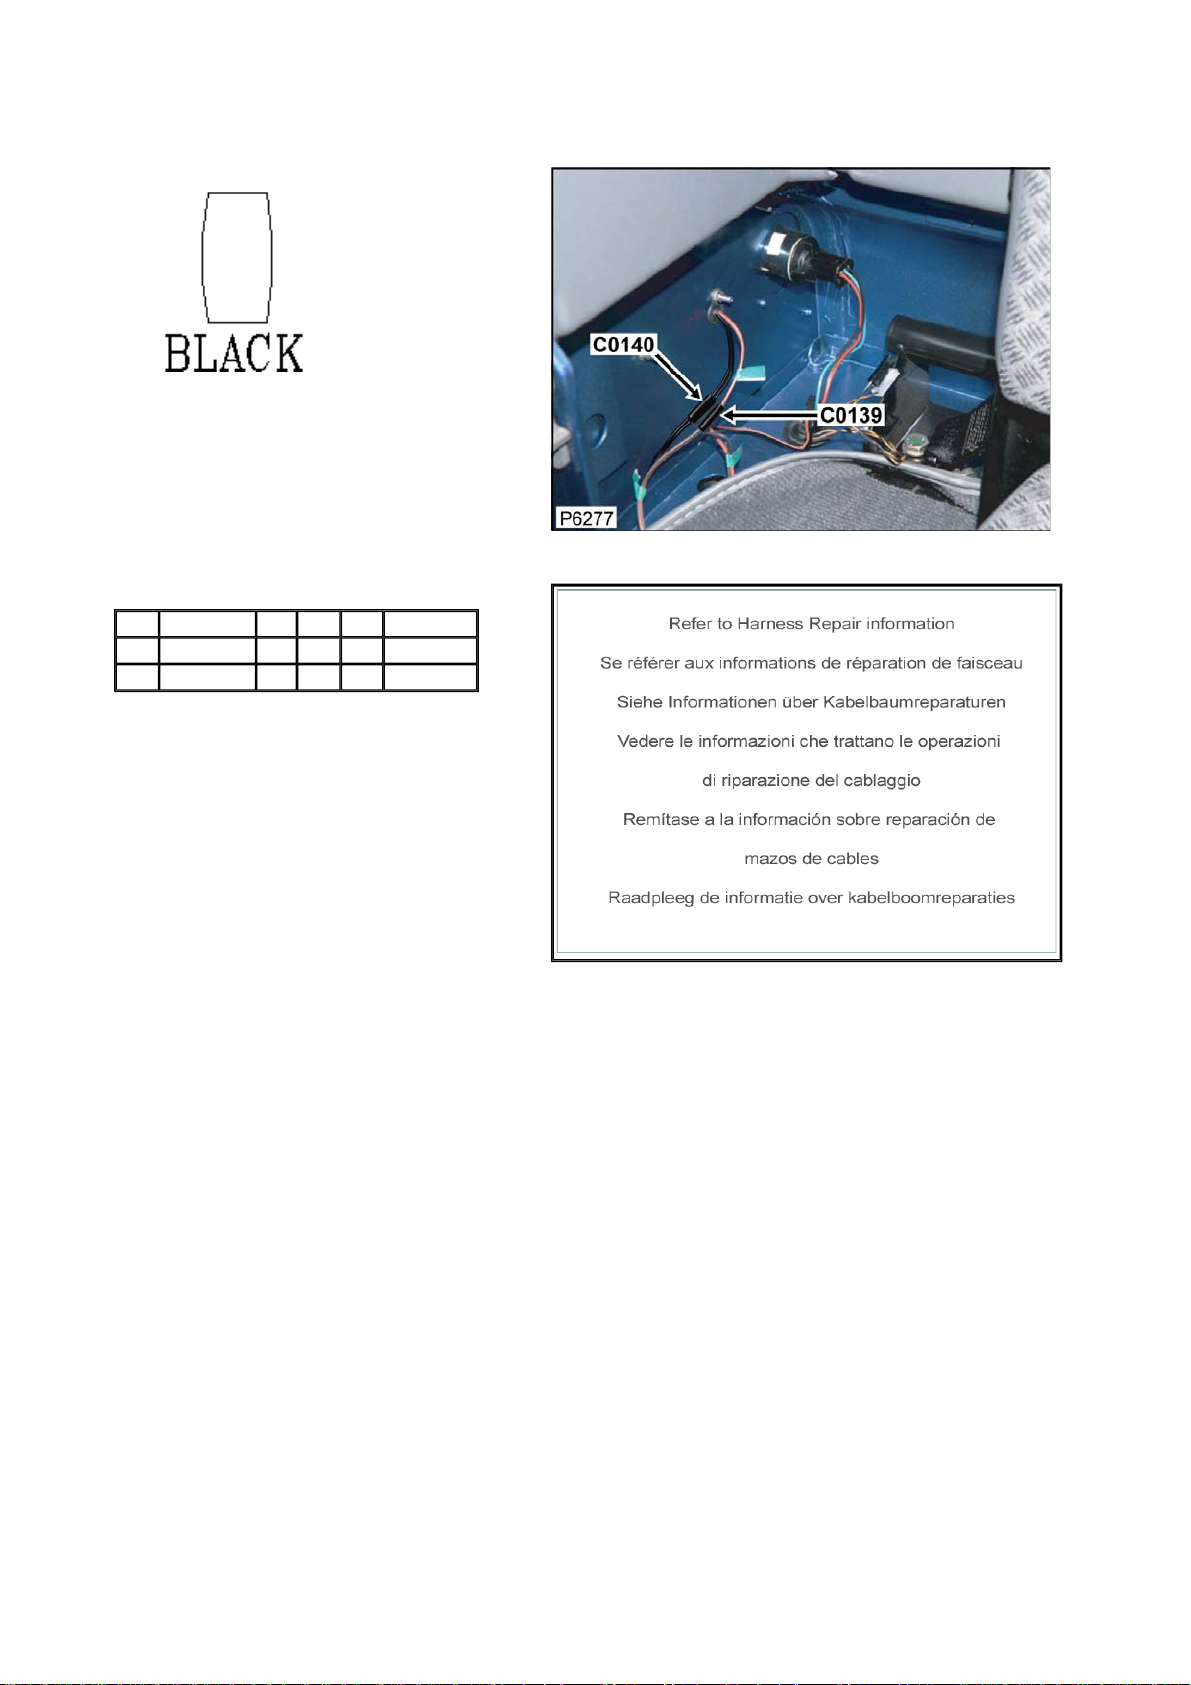
Connector: C0139 Description: License plate lamp
Location: LH 'D' post
Part No.: YPQ10010
Colour: BLACK
Cavities: 2WY
Harness: CHASSIS HARNESS
Wire Chart
CAV TERMINAL CSA COL CCT DESTN
1 YPS10003 1.0D B 772 S/JOINT SJ1
2 YPS10005 1.5D B 772 C2121
Service Repair Kits
Page 93
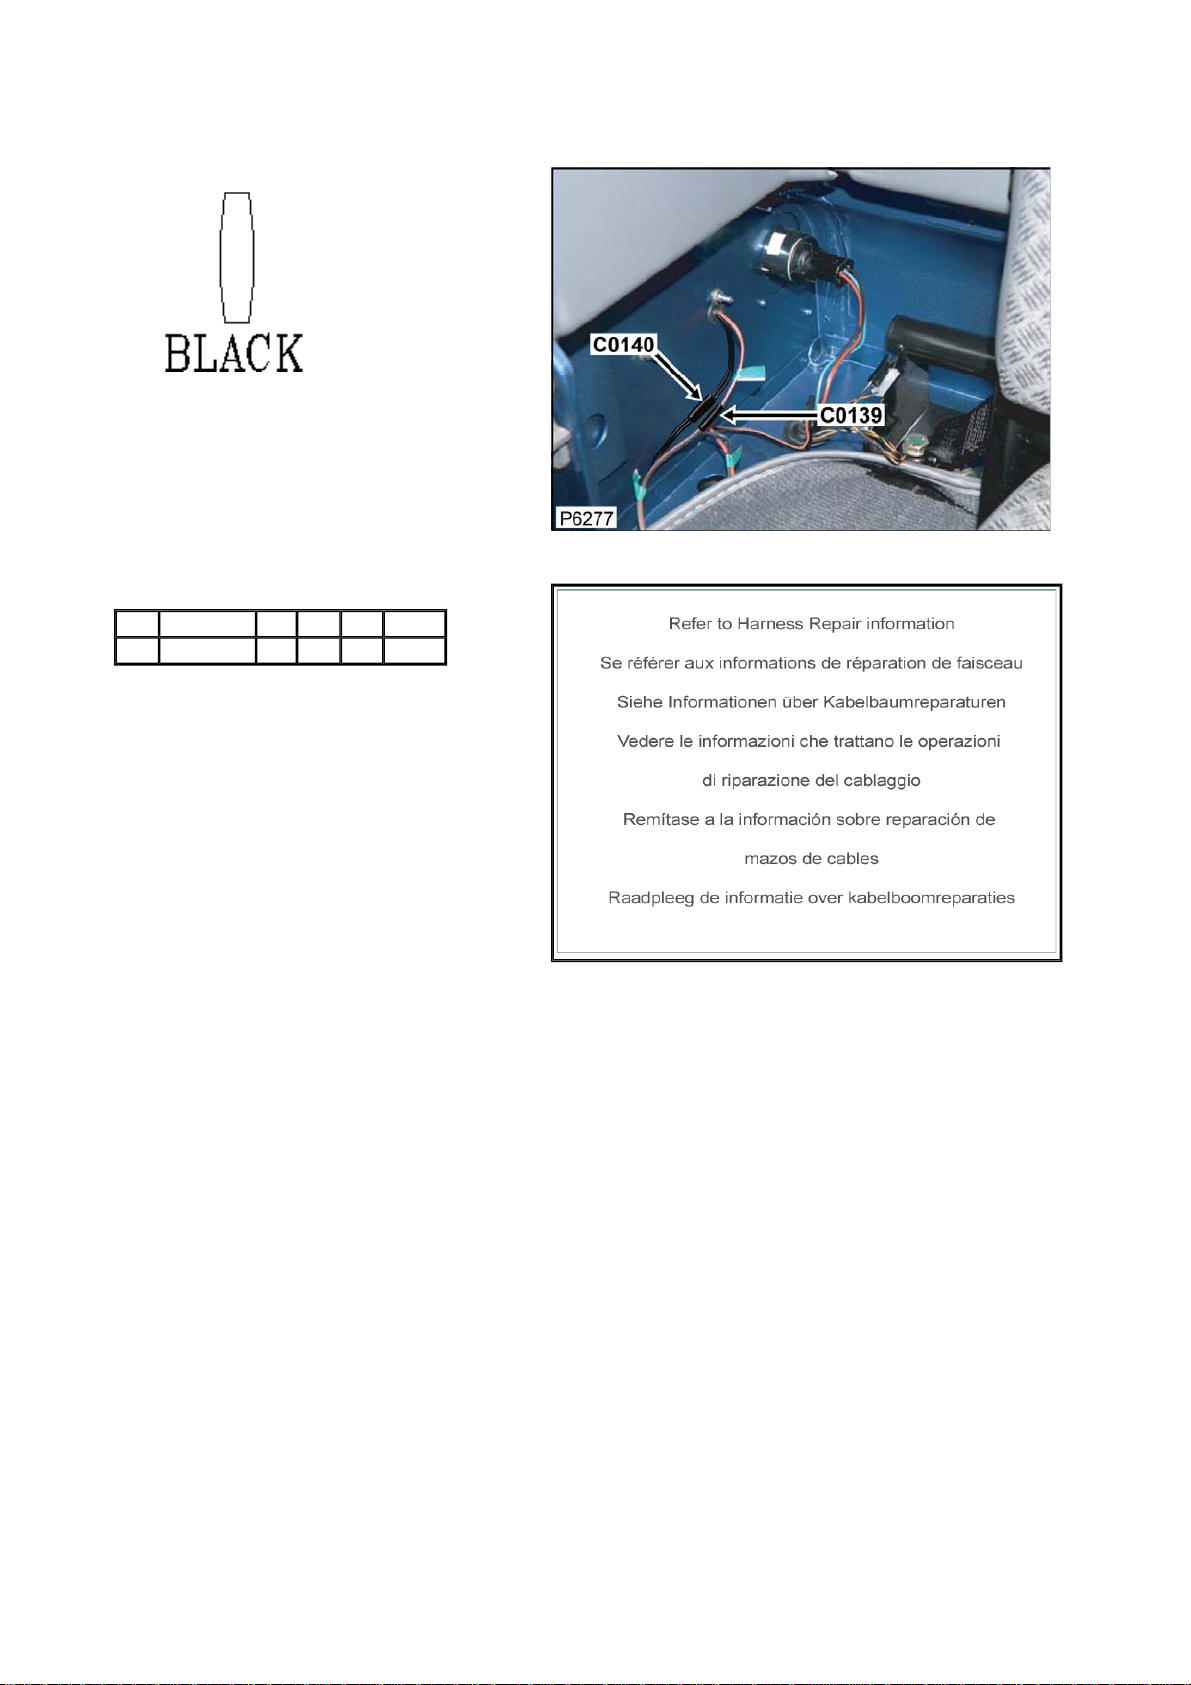
Connector: C0140 Description: License plate lamp
Location: LH 'D' post
Part No.: YPQ10008
Colour: BLACK
Cavities: 1WY
Harness: CHASSIS HARNESS
Wire Chart
CAV TERMINAL CSA COL CCT DESTN
1 YPS10005 1.5D RB 772 C1305
Service Repair Kits
Page 94
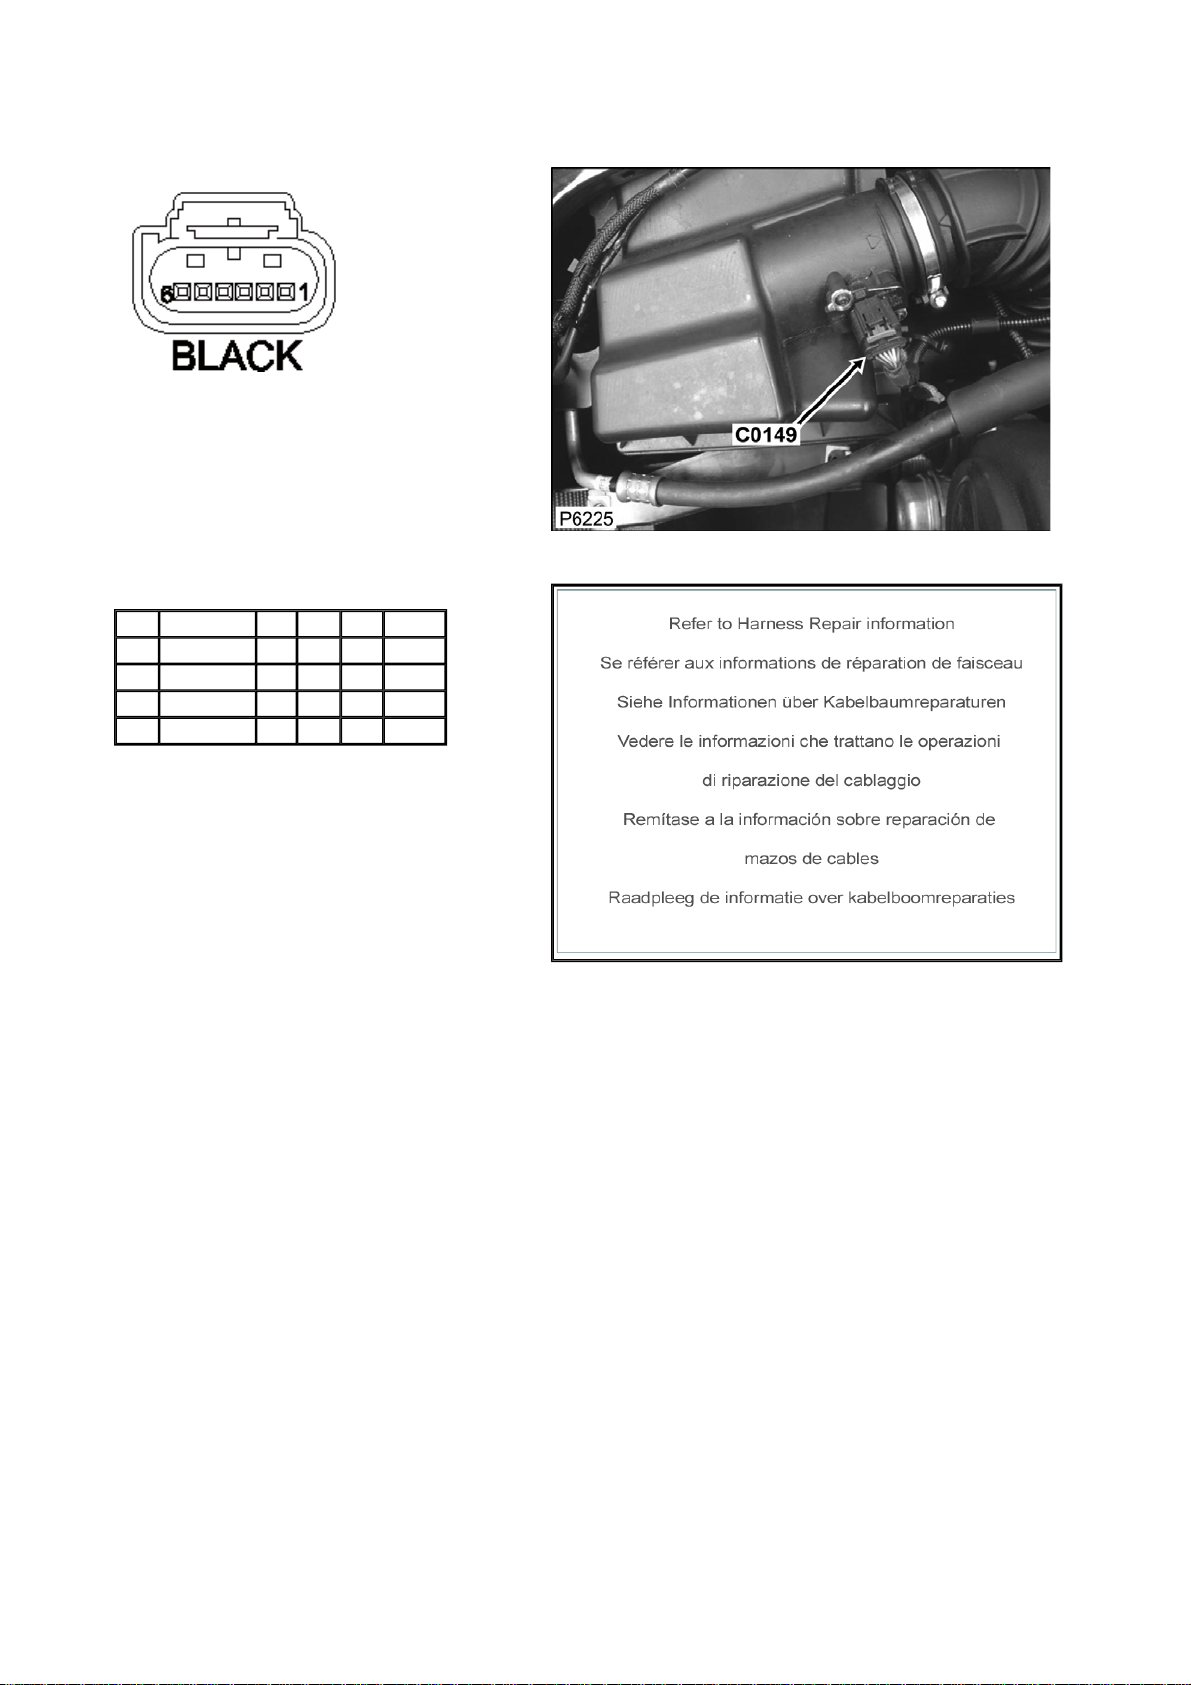
Connector: C0149 Description: Sensor-Mass air-flow (MAF)
Location: RH side of engine compartment
Part No.: YPH900370
Colour:
Cavities:
Harness: ENGINE DIESEL PUMA HARNESS
Wire Chart
CAV TERMINAL CSA COL CCT DESTN
2 YPL500360 0.5 PS 254 C2518
3 YPL500360 0.5 SP 254 C0162
4 YPL500360 0.5 U 254 C2518
5 YPL500360 0.5 YP 254 C2518
Service Repair Kits
Page 95
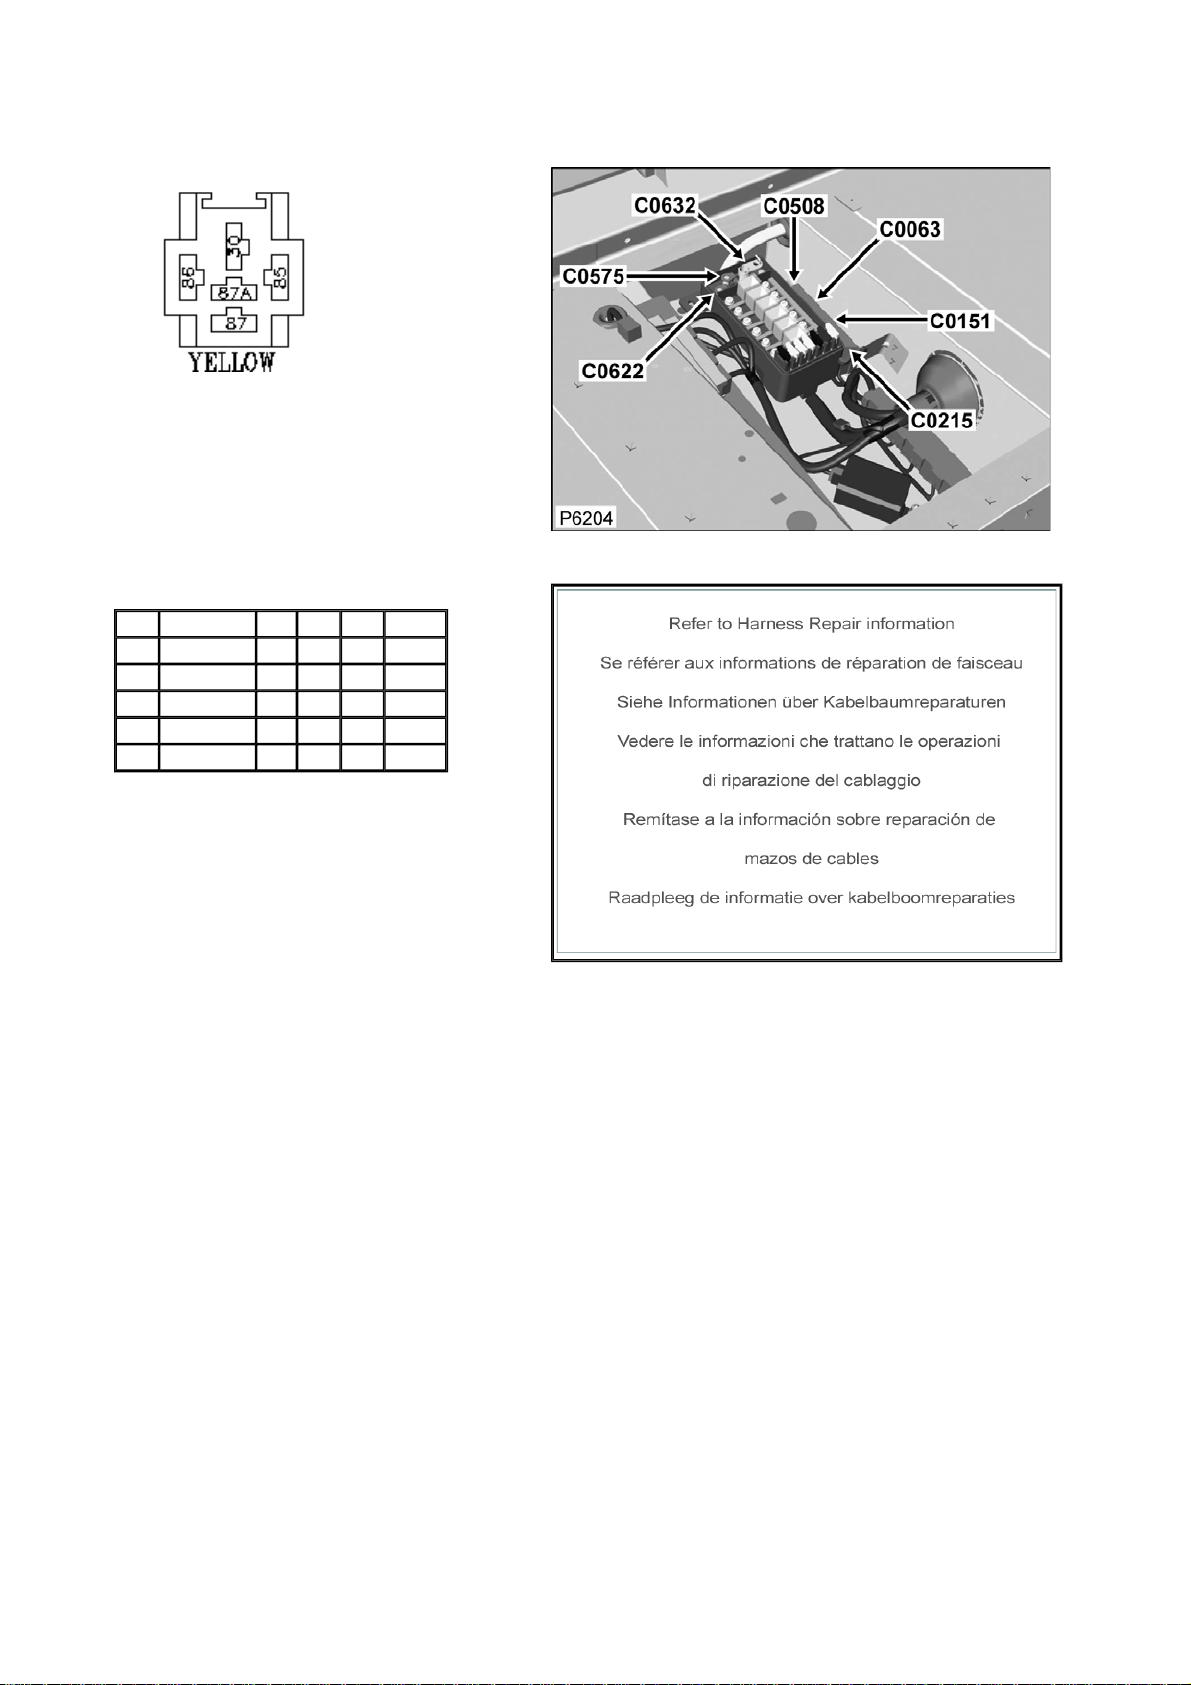
Connector: C0151 Description: Relay-Starter
Location: Beneath RH Front seat
Part No.: AFU3271
Colour: YELLOW
Cavities: 5WY
Harness: MAIN LH + RH HARNESS
Wire Chart
CAV TERMINAL CSA COL CCT DESTN
30 YPL10081 4.0D NS 499 C1217
85 AFU3120 1.0D BO 499 C0872
86 YPL10081 4.0D WR 200R C0090R
86 YPL10081 4.0D WR 139L C0090L
87 YPL10045 2.5D NR 499 C0448
Service Repair Kits
Page 96
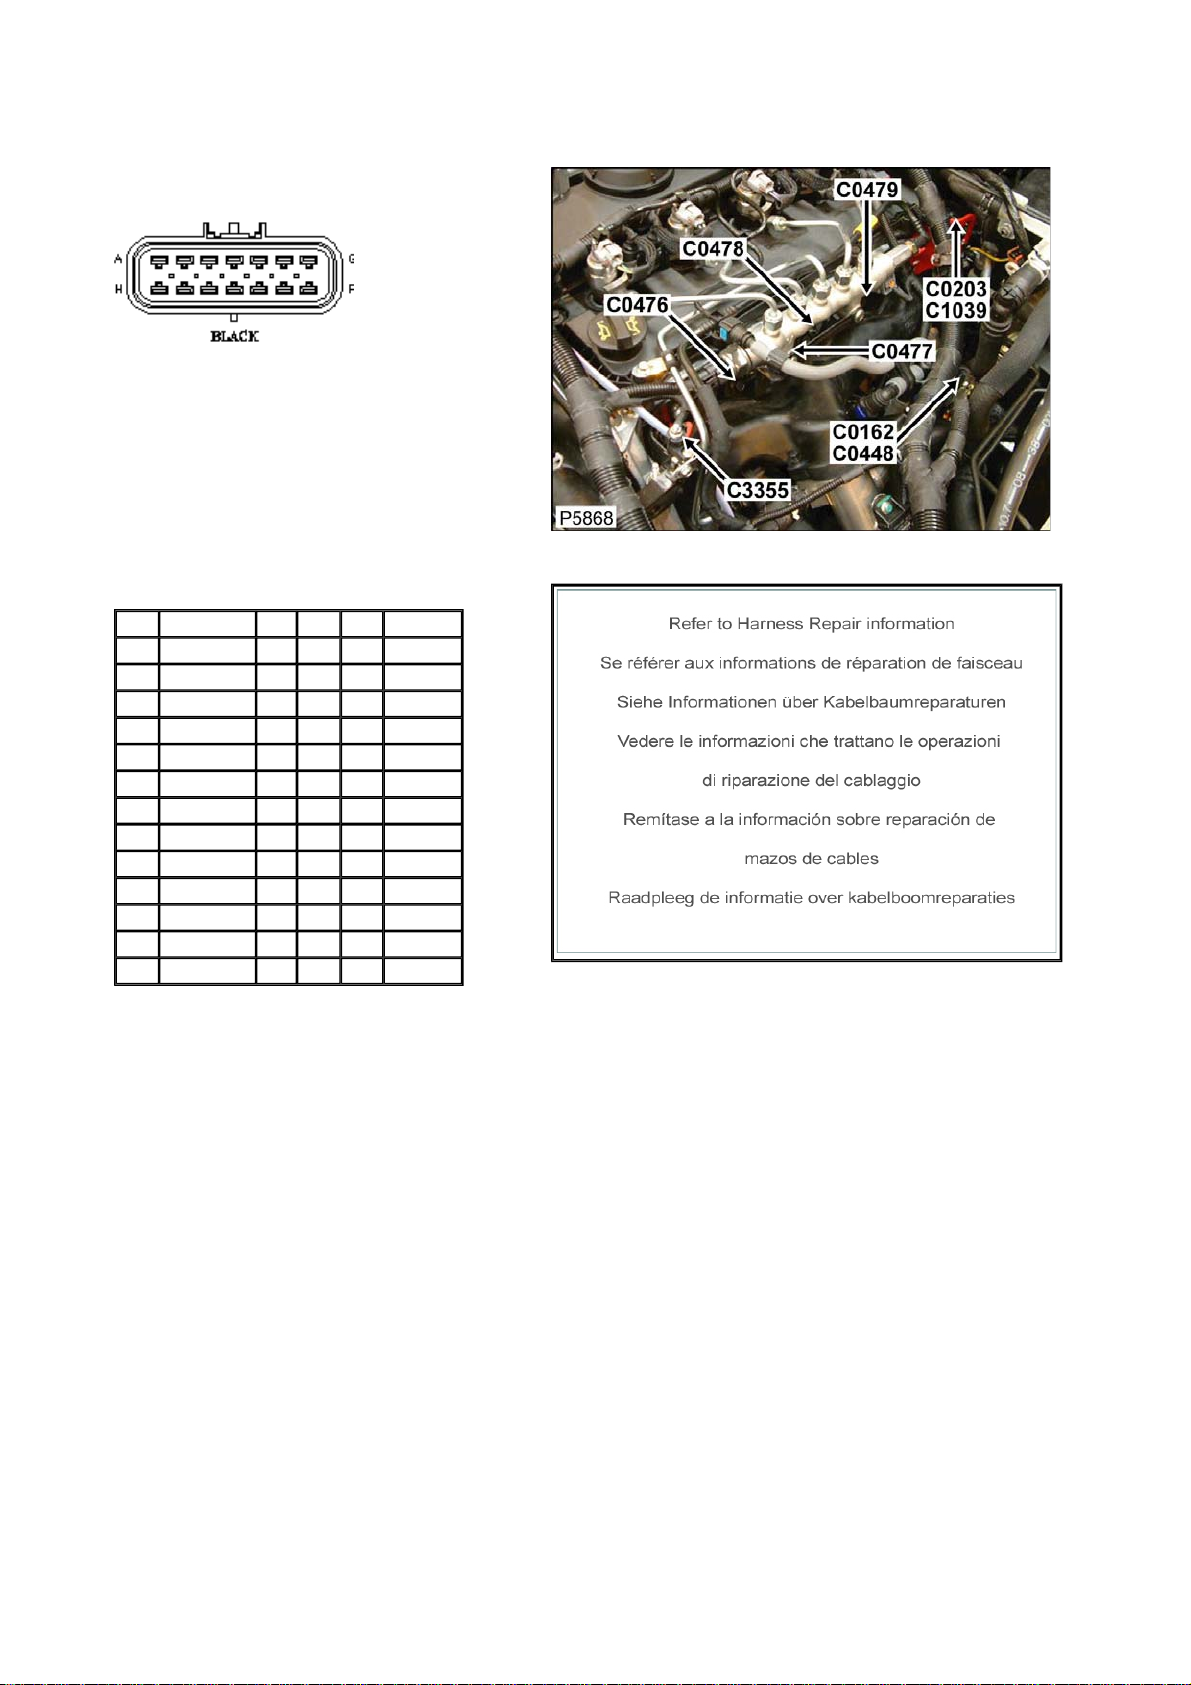
Connector: C0162 Description: Engine harness to main harness
Location: LH side of engine compartment
Part No.: YPC911100
Colour: BLACK
Cavities: 14WY
Harness: ENGINE DIESEL PUMA HARNESS
Wire Chart
CAV TERMINAL CSA COL CCT DESTN
G YPJ901130 1.0 BG 254 C0127
A YPJ901130 0.75 BY 254 C0411
B YPJ901130 0.75 BY 254 C2518
D YPJ901130 0.75 B 254 C0195
M YPJ901030 2.5 NG 254 C0179
C YPJ901030 1.5 UW 254 C0411
J YPJ901030 1.5 UW 254 C2518
H YPJ901120 0.5 SP 254 C0149
K YPJ901120 0.5 UO 254 C0195
F YPJ901130 0.75 R 254 C0163
L YPJ901130 1.0 UN 254 C0127
N YPJ901130 0.75 G 254 S/JOINT 1
E YPJ901130 0.75 OS 254 C0163
Service Repair Kits
Page 97
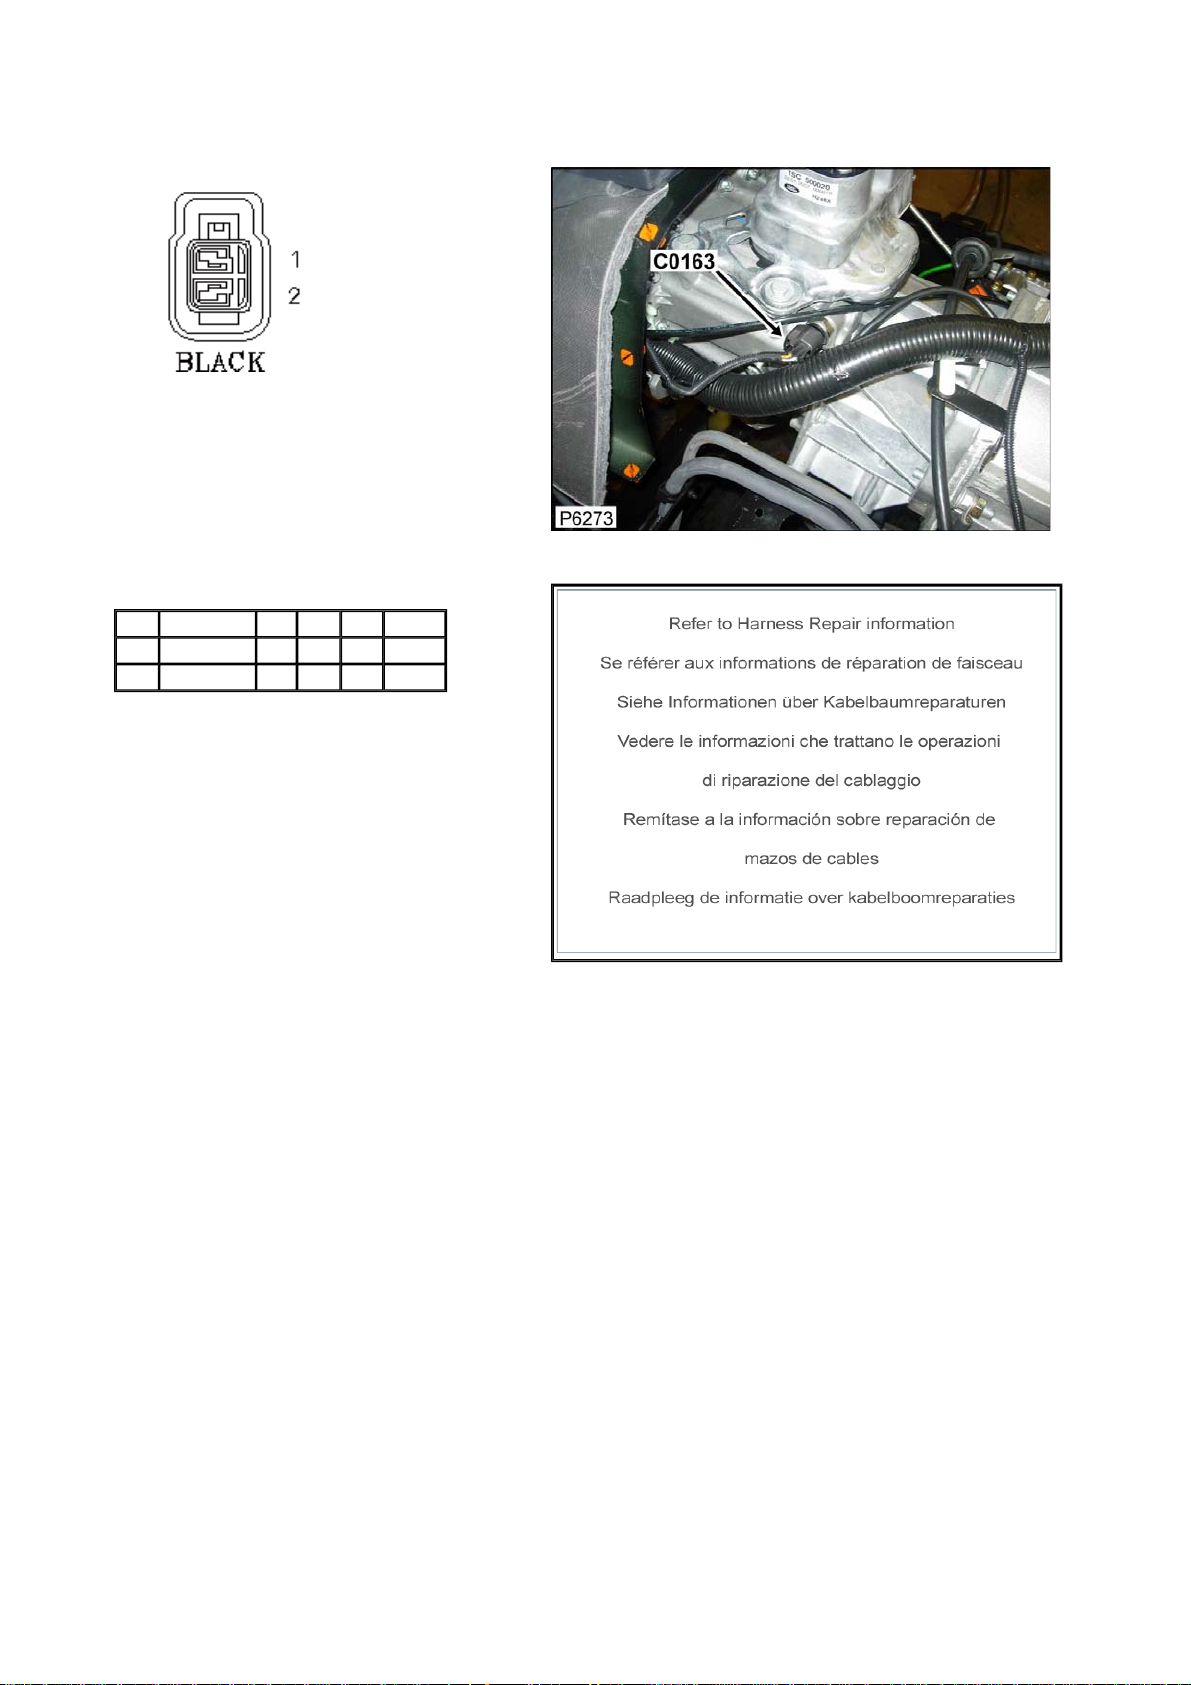
Connector: C0163 Description: Switch-Reverse-lamp
Location: LH side of gearbox
Part No.: YPC500750
Colour:
Cavities:
Harness: ENGINE DIESEL PUMA HARNESS
Wire Chart
CAV TERMINAL CSA COL CCT DESTN
1 YPL500410 0.75 OS 254 C0162
2 YPL500410 0.75 R 254 C0162
Service Repair Kits
Page 98
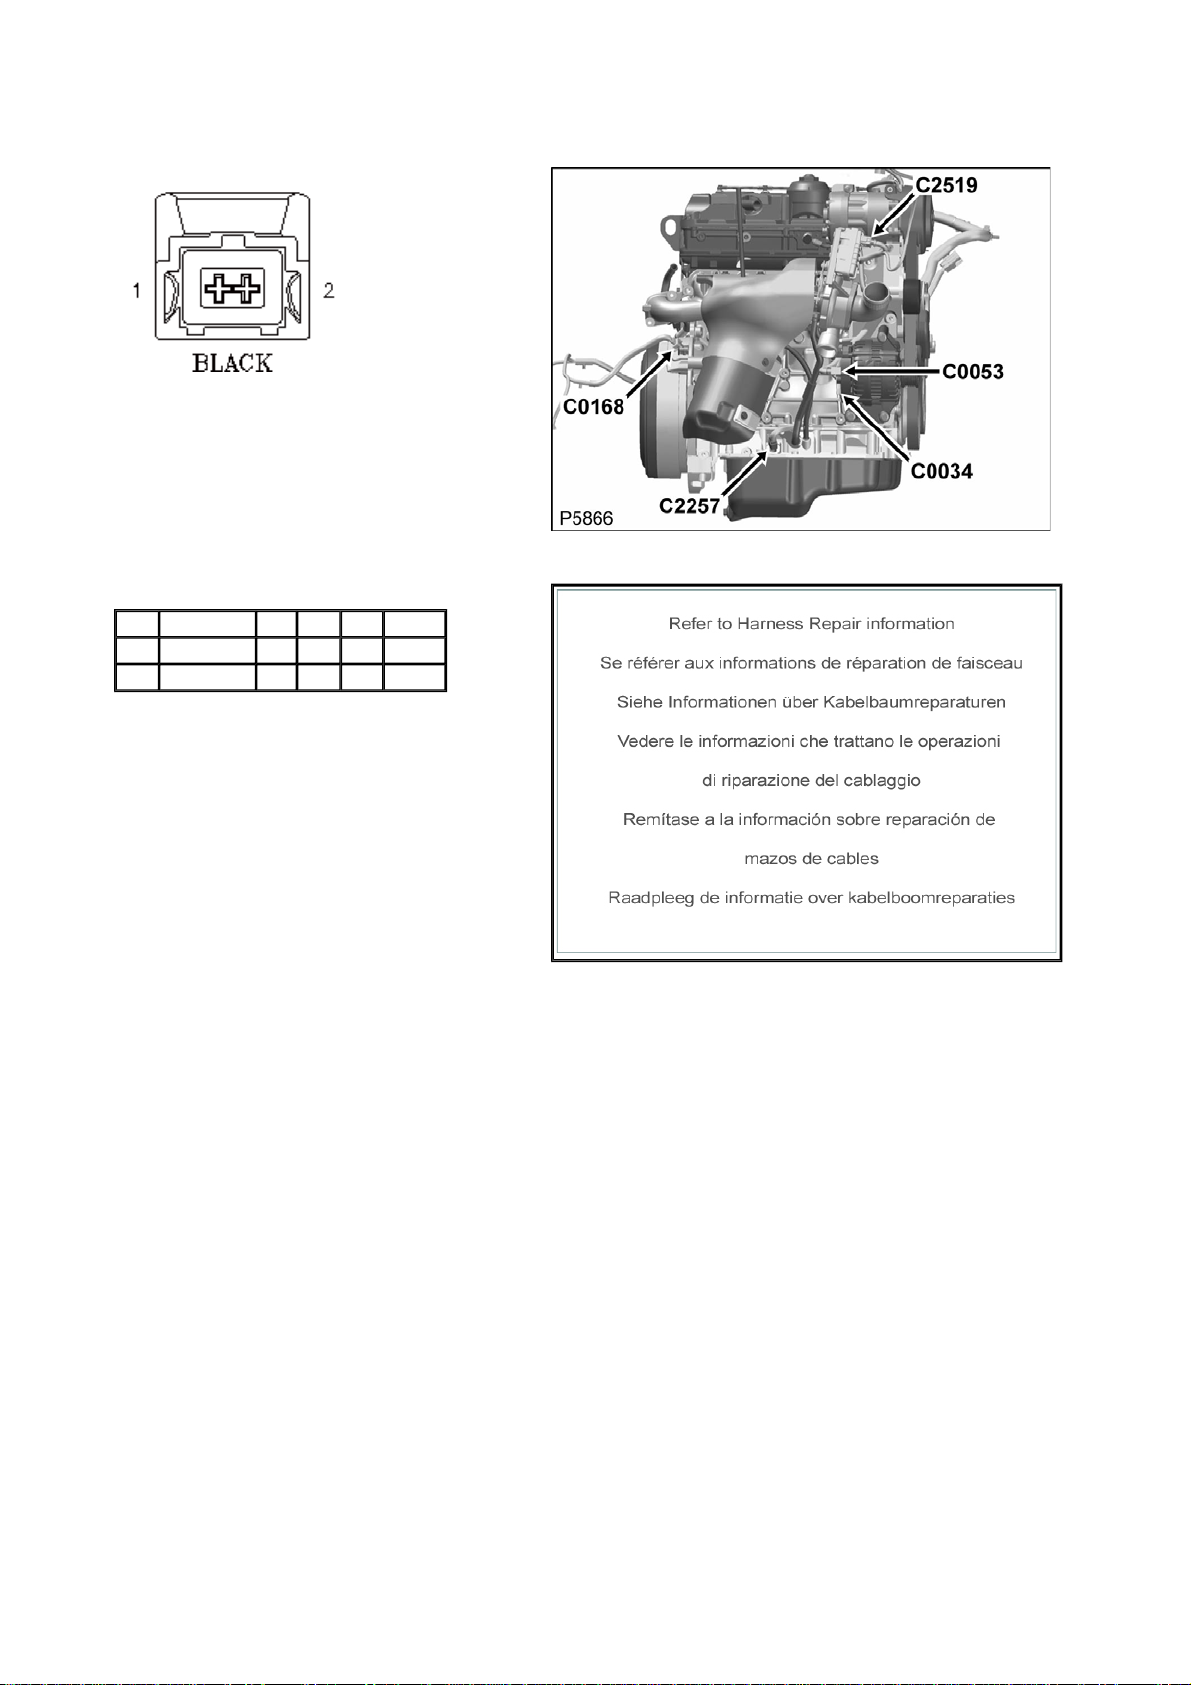
Connector: C0168 Description: Sensor-Crankshaft-position (CKP)
Location: RH side of engine
Part No.: YPC909150
Colour: BLACK
Cavities: 2WY
Harness: ENGINE DIESEL PUMA HARNESS
Wire Chart
CAV TERMINAL CSA COL CCT DESTN
1 YPL901890 0.5 YP 254 C0411
2 YPL901890 0.5 GN 254 C0411
Service Repair Kits
Page 99
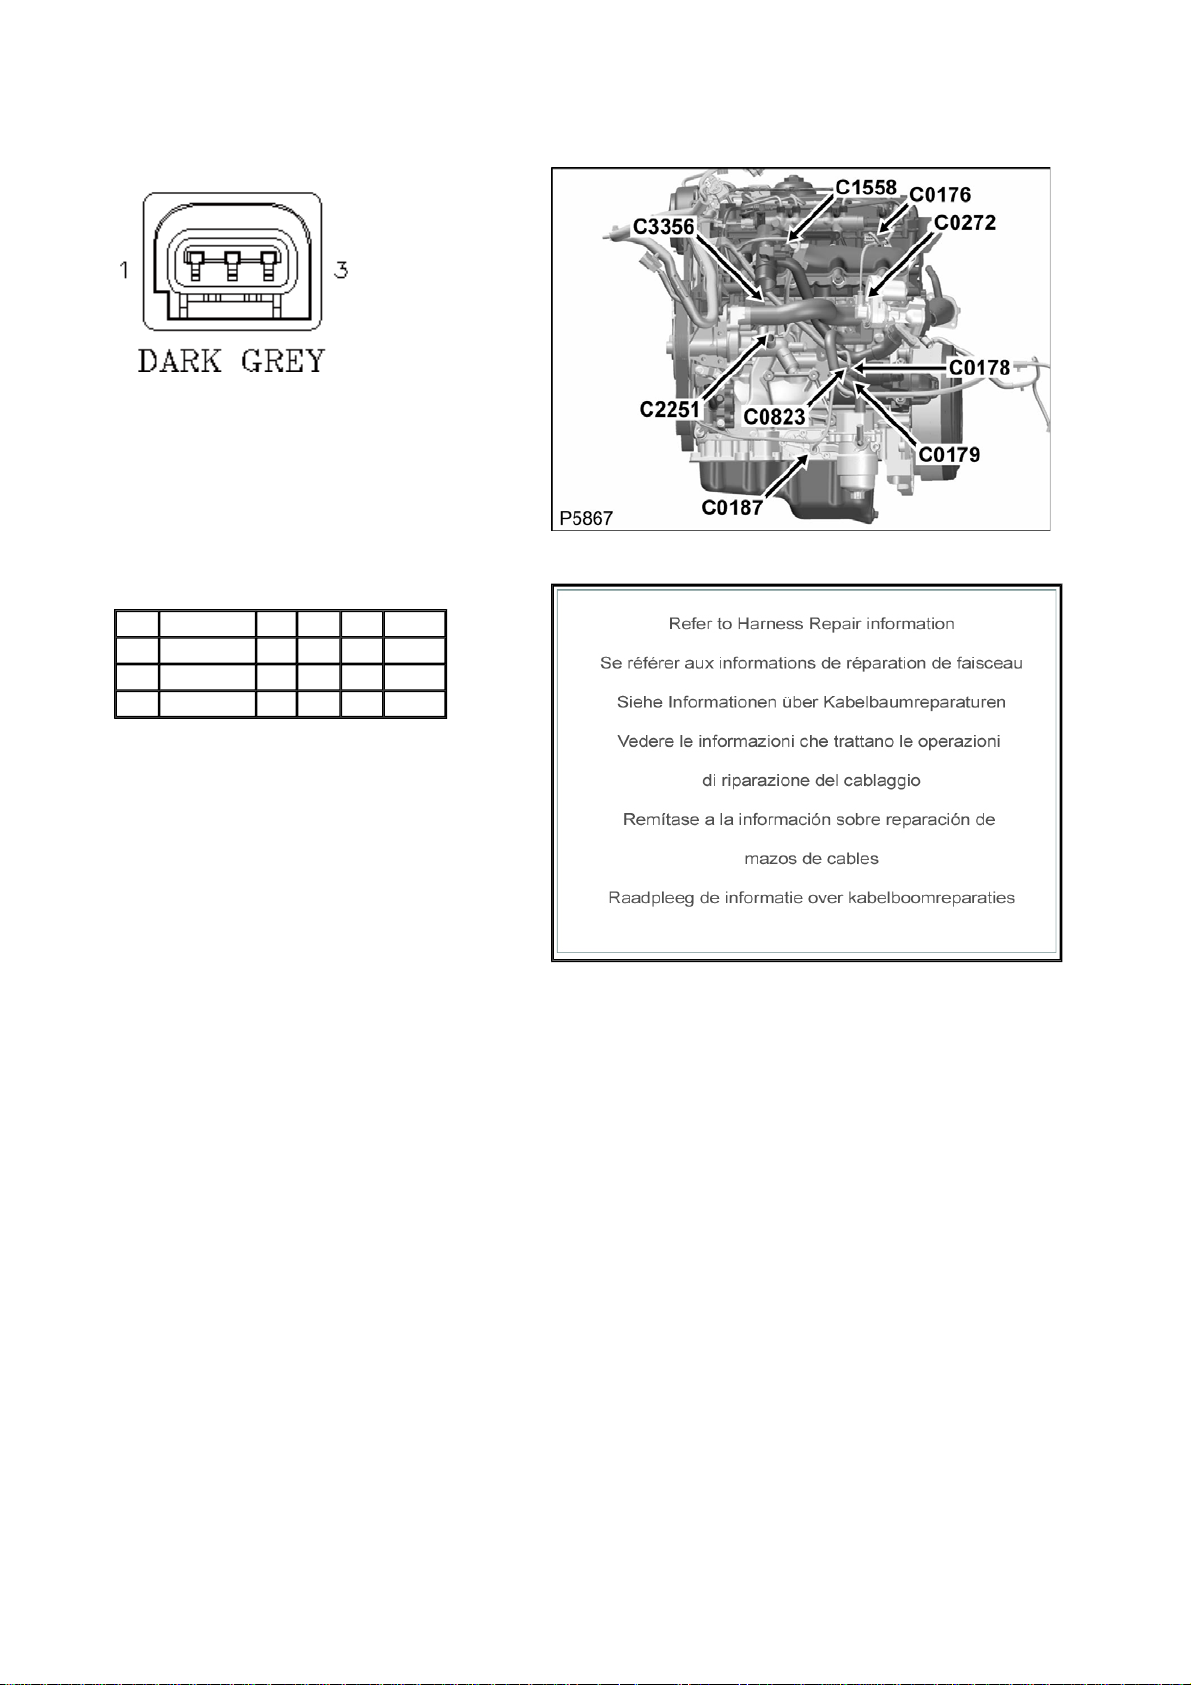
Connector: C0176 Description: Sensor-Camshaft-position (CMP)
Location: LH side of engine
Part No.: YPC903430
Colour:
Cavities:
Harness: ENGINE DIESEL PUMA HARNESS
Wire Chart
CAV TERMINAL CSA COL CCT DESTN
1 YPL500410 0.75 OG 254 C2518
2 YPL500410 0.75 ON 254 C2518
3 YPL500560 0.5 NU 254 C2518
Service Repair Kits
Page 100
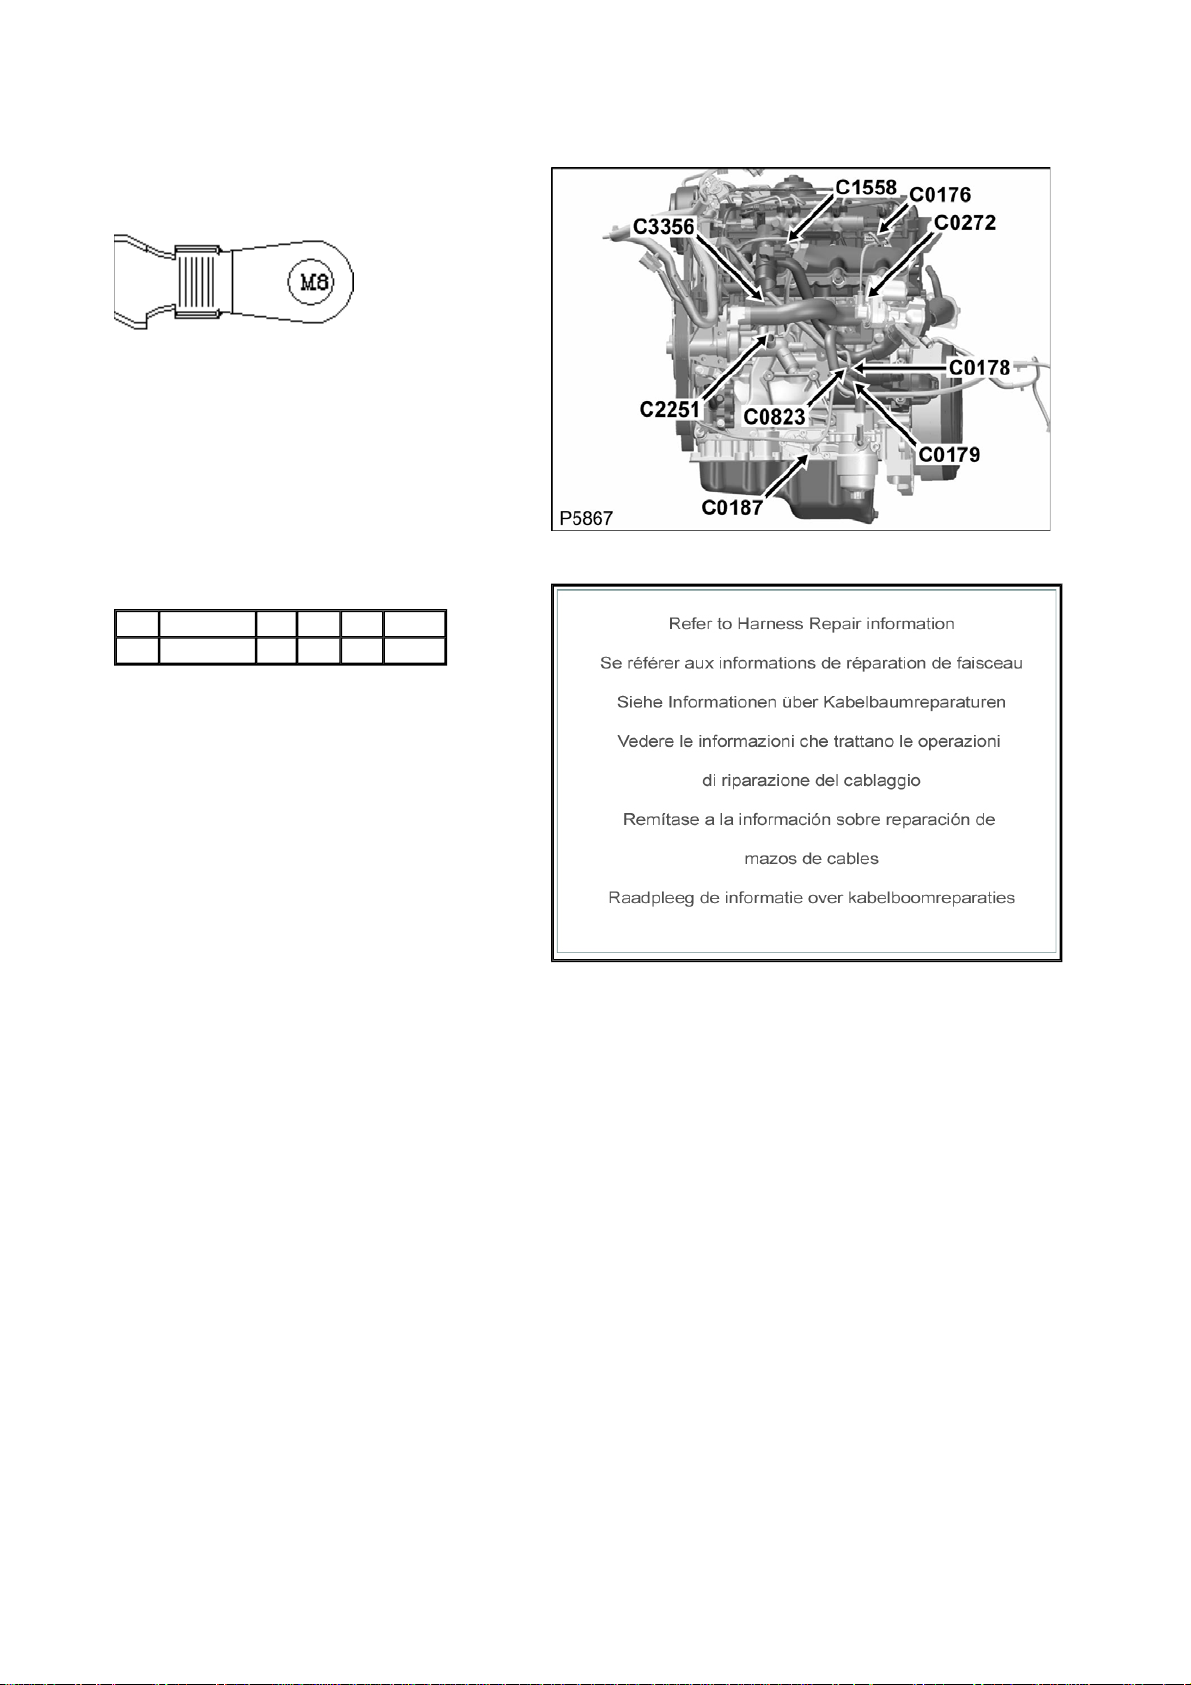
Connector: C0178 Description: Starter motor
Location: LH side of engine
Part No.: YPG900850
Colour: TIN PLATED
Cavities: 1WY
Harness: ENGINE DIESEL PUMA HARNESS
Wire Chart
CAV TERMINAL CSA COL CCT DESTN
1 - 25.0 R 254 C0034
Service Repair Kits
 Loading...