

Landmann 74600 User Manual [de]
Adresse / Address / Adresse / Indirizzo / Cím /
74600 / 10-10 / #023-2011cd
Adres/ Adress / Adresse / Adresse / Osoite
k
Germany Landmann GmbH & Co. Handels-KG
t
United Kingdom LANDMANN® Ltd.
p
France Veuillez vous adresser au bureau allemand.
C
Italiy La preghiamo di rivolgersi all’ucio tedesco.
H
Hungary Landmann Hungária Kft.
Poland Landmann® Polska Sp.z.o.o.
U
Sweden Landmann® Skandinavia AB
N
Norway Landmann® Norge AS
l
Denmark Landmann® Danmark A/S
q
Finland Landmann® Finland OY
Am Binnenfeld 3-5, D-27711 Osterholz-Scharmbeck, Deutschland
Tel. **49 - 47 91 - 30 8 - 59 oder 78, Fax **49 - 47 91 - 30 8 - 36
Mo-Do 8:00 bis 16:45 Uhr, Fr 8:00 bis 15:30 Uhr
e-mail: ohz@landmann.de, internet: www.landmann.com
Unit 6 Blackstone Road, Stukeley Meadows Huntingdon, PE29 6EF · United Kingdom
Helpline **44 - 01480 421720,
Sales Oce fax: **44 - 01480 458876
Monday to Thursday 9am to 5pm, Friday, 9am to 4pm.
e-mail: enquiries@landmann.co.uk, internet: www.landmann.co.uk
Almáskert u. 4., H-2220 Vecsés
Tel. **36 - 29 - 55 50 70, Fax **36 - 29 - 35 49 32
Hétfő-Csütörtök 8:00 - 15:30, Péntek 8:00 - 14:00
e-mail: infohun@landmann. de, www.landmann.hu
ul. Kuziennicza 13b, 59-400 Jawor, Polska
Tel. **48 - 76 - 8 70 24 61, Fax **48 - 76 - 8 70 23 88
Poniedziałek - czwartek od 8:00 do 16:45, piątek od 8:00 do 15:30
e-mail: landmann@landmann.pl, internet: www.landmann.pl
Storgatan 70, S-568 32 Skillingaryd, Sverige
Tel. **46 - 3 70 - 69 35 80, Fax **46 - 3 70 - 4 95 80
Måndag-Fredag, 08.00 - 16.00
e-mail: landmann@landmann.se, internet: www.landmann.se
Sandstuveien 60 A, N-1184 Oslo, Norway
Tel. **47 - 23 - 16 50 10, Fax **47 - 23 - 16 50 11
Mandag-Fredag 08:00 - 16:00
e-mail: landmann@landmann.no, internet: www.landmann.no
Hvidsværmervej 147, C/O BasicCon Scandinavia A/S, DK-2610 Rødovre, Danmark
Tel. **45 - 59 44 74 14, Fax **45 - 59 44 74 41
Mandag-Torsdag: 8.00 - 16.00, Fredag 8.00 - 15.00
e-mail: info@basiccon.com, internet: www.landmann.dk
Laulakuja 4, PL. 1, SF-00421 Helsinki, Finland
Tel. **358 - 9 - 47 70 93 - 0, Fax **358 - 9 - 47 70 93 50
Maanantai-Perjantai 8:30 - 16:30
e-mail: landmann@landmann., internet: www.landmann.
k
Montage- und Betriebsanleitung
t
Assembly Instruction
p
Instructions de montage
C
Istruzioni di montaggio
H
Összeszerelési és üzemeltetési útmutató
Instrukcja montażu i obsługi
U
Monterings- och bruksanvisning
N
Monterings- og bruksanvisning
l
Monterings- og brugsanvisning
q
Kokoamis- ja käyttöohjeet
Technische Änderungen vorbehalten. Für Druckfehler wird nicht gehaftet. u Technical details are subject to change. We do not take any responsibility for misprints. u Sous
réserve de modications techniques. Nous ne nous porterons pas responsables des erreurs d’impression.
di eventuali errori di stampa.
Nie odpowiadamy za błędy w druku.
tar forbehold om trykkfeil.
u
A műszaki változtatások jogát fenntartjuk. Az esetleges nyomtatási hibákért nem vállalunk felelősséget. u Zmiany techniczne zastrzeżone.
u
Vi förbehåller oss rätten till tekniska förändringar. Feltryck ligger utanför vårt ansvar.
u
Der tages forbehold for tekniske ændringer samt trykfejl. u Pidätämme itsellämme oikeuden teknisiin muutoksiin ja painovirheisiin.
u
Con riserva di modiche tecniche. Non ci si assume la responsabilità
u
Tekniske endringer kan forekomme. Vi
74600

Inhaltsverzeichnis / Contents / Sommaire / Indice / Tartalomjegyzék /
Spis treści / Innehåll / Deleliste / Indholdsfortegnelse / Sisällysluettelo
Gewährleistung / Warranty / Garantie / Garanzia / Jótállás /
Gwarancja / Garanti / Garanti / Garanti /Takuu
N M
L
A
B
C
D1
D2
E
F
G
H
I
J
K
k
"Rundgrill" Montage- und Betriebsanleitung ................................................................................3
t
"Round grill" Instructions for tting and use ..................................................................................7
s
« Barbecue rond » Instructions de montage et mode d'emploi .....................................................11
C
"Barbecue a sfera" Istruzioni per il montaggio e per l'uso ............................................................15
H
"Golyógrill" Összeszerelési és üzemeltetési útmutató ...................................................................19
"Grill okrągły" Instrukcja montażu i obsługi .................................................................................23
U
"Rundgrill" Monterings- och driftsanvisning ................................................................................27
N
"Rundgrill" Monterings- og bruksveiledning ................................................................................31
l
"Rundgrill" Montage- og betjeningsvejledning ...........................................................................35
q
"Pyöreä grilli" Kokoamis- ja käyttöohjeet .....................................................................................39
k
Gewährleistung
Wir übernehmen die Gewährleistung für den Grill für die Dauer
von zwei Jahren ab Kaufdatum. Die Gewährleistung umfasst
Verarbeitungsmängel und fehlerhafte Teile; sie erstreckt sich
auf den Ersatz dieser Teile. Kosten für Fracht, Montage, Ersatz
verschlissener Teile und sonstiges sind nicht Bestandteil der
Gewährleistung. Sie erlischt bei falscher Handhabung und
wenn eigenmächtige Veränderungen, gleich welcher Art, am
Grill vorgenommen wurden.
t
Warranty
We grant a warranty for the barbecue grill for the duration of
two years, star ting with the date of purchase, please provide
proof of purchase. The warranty includes manufacturing
deciencies and defective parts; it extends to the replacement
of these parts. Expenses for shipping, installation, replacement
of worn parts and other cost are not covered by the warranty.
The warranty lapses in case of mishandling and if any kind of
unauthorized use.
p
Garantie
Nous accordons une garantie de deux années à partir de
la date d‘achat pour le barbecue. La garantie englobe les
vices de nition et les pièces défectueuses, elle s’étend au
remplacement de ces pièces. Les frais de fret, de montage et
autres ne font pas partie de cette garantie. Elle sera annulée
en cas de manipulation incorrecte et si des modications de
quelque type soient-elles, ont été exécutées arbitrairement
sur l‘appareil.
C
Garanzia
Ci assumiamo la garanzia del grill per un periodo di due anni
a partire dalla data di acquisto. La garanzia copre difetti
di fabbricazione e componenti difettosi e si estende alla
sostituzione degli stessi. Non rientrano nelle prestazioni di
garanzia le spese di spedizione, di montaggio, di sostituzione
di componenti usurati e quant’altro non previsto. La garanzia
si estingue in caso di uso improprio e se sull‘apparecchio si
eseguono delle modiche arbitrarie di qualsiasi tipo.
H
Jótállás
A vásárlás idõpontjától számítva a grillkészülékre 2 év garanciát
adunk. A jótállás az esetleges gyártási hibákra és hibás
alkatrészekre vonatkozik, és az érintett elemek kicserélésére
korlátozódik. A szállítási, szerelési, a meghibásodott alkatrészek
kicserélésével kapcsolatos és egyéb költségek megtérítése
nem tartozik a jótállás keretébe. Helytelen kezelés, valamint a
készüléken eszközölt bárminemû önkényes változtatás esetén
megszûnik a jótállás.
Gwarancja
Udzielamy gwarancji na grill na okres dwóch lat od daty
zakupu. Gwarancja obejmuje wady produkcyjne i materiałowe
oraz zapewnia wymianę uszkodzonych części. Koszty
transportu, montażu i wymiany zużytych części oraz inne
świadczenia nie są objęte niniejszą gwarancją. Nieprawidłowa
obsługa i wszelkie samowolne modykacje grilla prowadzą do
wygaśnięcia gwarancji.
U
Garanti
Garanti för denna grill gäller 2 år fr.o.m inköpsdatum och
omfattar endast produktionsfel och saknade delar som ersätts.
Kostnader för frakter, montering, normal slitage och felaktig
hantering omfattas ej av garantin. Garantin gäller inte heller
vid egen modiering eller annan ändring av grillen. Garantin
gäller endast mot uppvisande av kvitto.
N
Garanti
Garanti for griller gjelder i 2 år fra kjøpsdato, og dekker kun
produksjonsfeil og manglende deler som erstattes. Kostnader
for frakt, montering, normal slitasje og feilaktig håndtering /
bruk, dekkes ikke av garantien. Garantien gjelder heller ikke
ved ombygging eller annen forandring av grillen.
Forøvrig gjelder norsk kjøpslov.
l
Garanti
Vi yder garanti for grillen i en periode på 2 år efter købsdato.
Garantien omfatter produktionsfejl og fejlbehæftede dele og
omfatter udskiftning af sådanne dele. Garantien omfatter ikke
omkostninger for fragt, montage, udskiftning af slidte dele
og lignende. Garantien bortfalder ved forkert anvendelse,
eller hvis der uden forudgående aftale foretages ændringer af
grillen uanset art.
q
Takuu
Tällä grillillä on 2 vuoden takuu ostopäivästä lähtien ja koskee
tuotantovirheitä tai puuttuvia osia, jotka korvataan.Takuu
ei kata kuljetus-, kokoamis- ja muita kuluja, eikä myöskään
ulkoisista vaurioista, grillin väärästä käytöstä, varomattomasta
käsittelystä tai epätäydellisestä asennuksesta tai kokoamisesta
johtuvia vikoja. Takuun voimassaoloaika tulee todentaa
esittämällä ostokuitti.
k
"Rundgrill"
Montage- und Betriebsanleitung
Vorwort
Bevor Sie den hochwertigen GRILLCHEF Grill in
Betrieb nehmen, lesen Sie bitte diese Montage- und
Betriebsanleitung sorgfältig durch.
Sie werden schnell feststellen:
Aufbau und Handhabung sind leicht und einfach.
Bestimmungsgemäße Verwendung
Der Grill darf ausschließlich nur für die Zubereitung
von grillbaren Speisen eingesetzt werden. Es müssen
dabei alle Vorgaben dieser Anleitung eingehalten
werden.
Nur für den privaten Gebrauch!
Sicherer Betrieb des Grillgerätes
Vor Erstgebrauch sollte der Grill ca. 30 Minuten
mit Brennsto (Holzkohle bzw. Briketts)
aufgeheizt werden.
Allgemeine Sicherheitshinweise
WARNUNG vor Verbrennung!
➱ Der Grill muss während des Betriebes auf einem stabilem und festem Untergrund stehen, da er sonst
umkippen kann.
➱ ACHTUNG! Dieses Grillgerät wird sehr heiß und darf während des Betriebes nicht bewegt werden!
➱ Tragen Sie beim Grillen Grillhandschuhe oder benutzen Sie eine Grillzange .
➱ Lassen Sie den Grill vor dem Reinigen völlig abkühlen.
➱ VORSICHT! Zum Anzünden oder Wiederanzünden keinen Spiritus oder Benzin verwenden!
➱ VORSICHT! Nur Anzündhilfen entsprechend der Europäischen Norm für Anzündhilfen (EN 1860-3)
verwenden!
➱ Verwenden Sie niemals Wasser zum Löschen der Holzkohle.
WARNUNG vor Erstickung!
➱ Nicht in geschlossenen Räumen benutzen!
GEFAHR für Kinder und Haustiere!
➱ Lassen Sie den heißen Grill nie unbeaufsichtigt.
➱ ACHTUNG! Kinder und Haustiere fernhalten!.
GRILLCHEF
3
Allgemeine Hinweise zur erfolgreichen
Montage
Lesen Sie bitte die Montageanleitung sorgfältig durch
und befolgen Sie die Sicherheitshinweise. Nehmen
Sie sich ausreichend Zeit für den Zusammenbau.
Schaen Sie zuvor eine ebene Arbeitsäche von etwa
zwei bis drei Quadratmetern. Entnehmen Sie das
Gerät der Verpackung! Legen Sie sich die Teile und das
benötigte Werkzeug in Grinähe bereit.
Beachten Sie bitte: Ziehen Sie erst nach Beendigung
der Montage alle Schraubverbindungen fest an.
Ansonsten kann es zu unerwünschten Spannungen
kommen.
Einzelteilliste
A: Warmhalterost 1
B: Grillrost 1
C: Gri für Grillrost 2
D: (1) Windschutz, links 1
(2) Windschutz, rechts 1
E: Feuerschüssel 1
F: Fahrgri 1
G: Stativverstärker 4
H: Standstativ 2
I: Radstativ 2
J: Ablagetisch 1
K: Standstativkappe (bereits vormontiert) 2
L: Rad 2
M: Radachse 1
N: Radstativkappe 2
(bereits vormontiert)
Montage vorbereiten
Überprüfen Sie bitte anhand der nachstehenden Liste
und Zeichnung die Vollständigkeit der Einzelteile.
Legen Sie die Teile und das benötigte Werkzeug zum
Zusammenbau bereit.
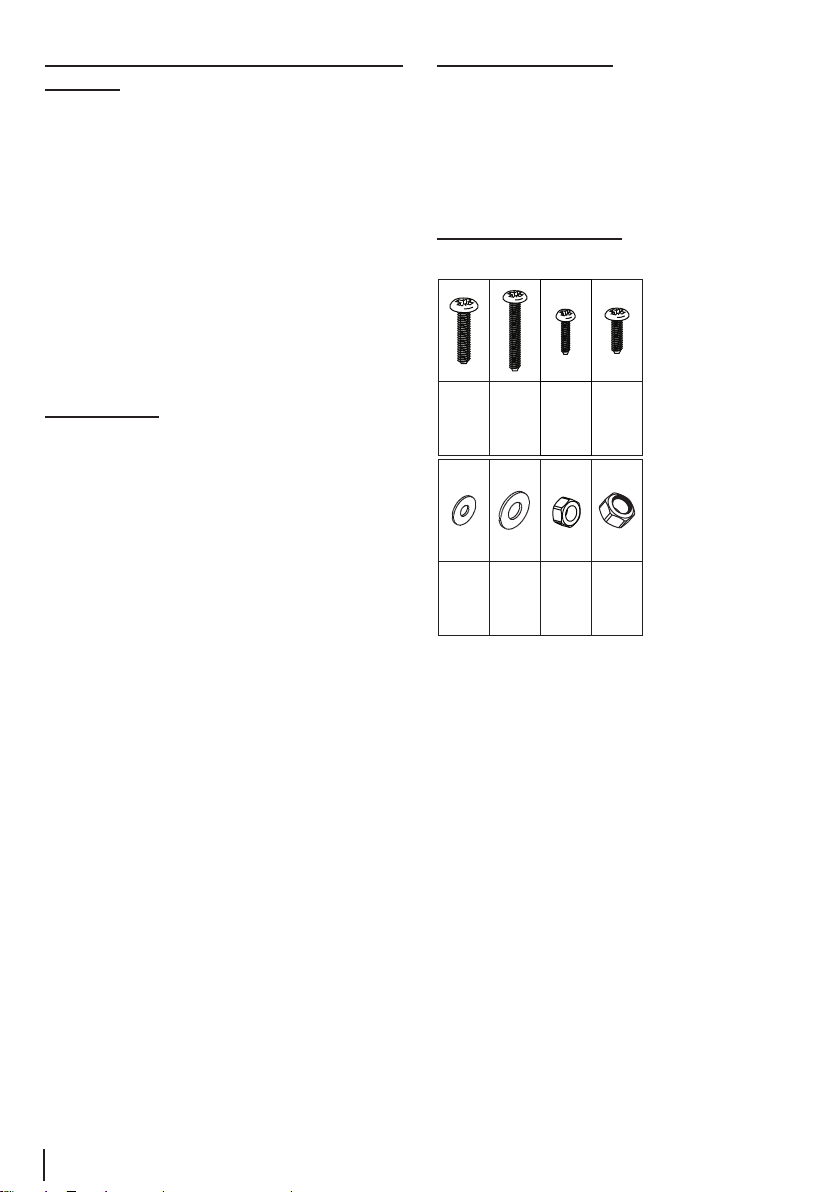
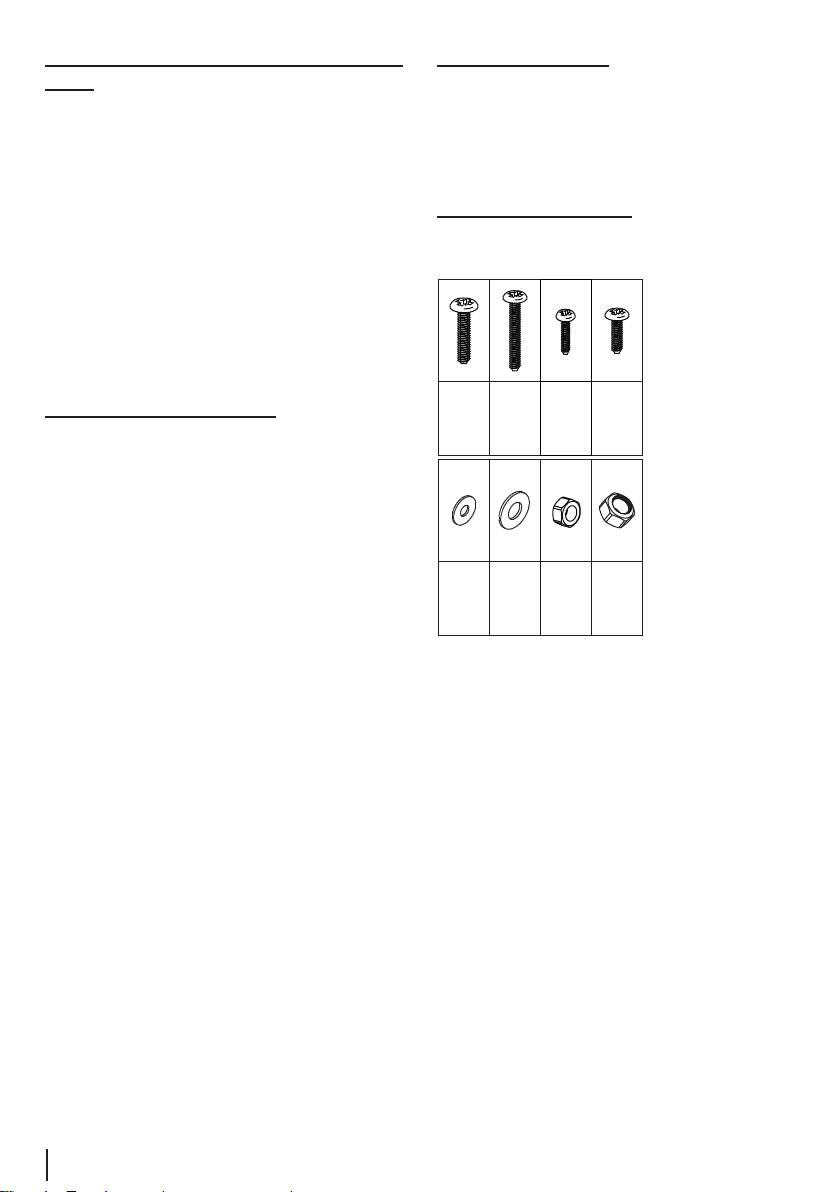
Verbindungselemente
(auch vormontierte verbindungselemente sind mit aufgeführt!)
M5x30
M6x25
4x
4x
Ø6x4xØ6xØ204xM5
M5x12
4x
12xM62x
M5x10
4x
GRILLCHEF
4
Montage durchführen
VORSICHT!
Die Schraubenköpfe sollten zu Ihrer Sicherheit
immer nach außen zeigen, da es sonst zu
Verletzungen kommt.
Ziehen Sie erst nach Beendigung der Montage
alle Schraubverbindungen fest an, sonst kommt
es zu unerwünschten Material-Spannungen.
1. Schrauben Sie die Stative (H & I) mit den
Stativverstärkern (G) mittels M6x25 Schrauben
und Unterlegscheiben Ø6xØ20 an die
Feuerschüssel (E) fest. Achten Sie auf korrekte
Positionierung der Stative (H & I) gemäß
Zeichnung.
2. Befestigen Sie den Ablagetisch (J) mittels
M5x30 Schrauben und Muttern M5 zwischen
den Stativen (H & I).
3. Führen Sie die Achse (M) durch die
Radstativkappen (N). Schieben Sie die Räder
(L) auf die Enden der Achse (M) und xieren Sie
diese mittels Stoppmuttern M6.
4. Schrauben Sie den Fahrgri (F) mittels
M5x12 Schrauben, Unterlegscheiben Ø6
und Muttern M5 an die Feuerschüssel (E).
Achtung: Unterlegscheiben Ø6 von der
Innenseite der Feuerschüssel (E) montieren.
5. Montieren Sie die Windschutz-Teile (D1 & D2)
mittels M5x10 Schrauben und Muttern M5 an
der Feuerschüssel (E).
6. Klemmen Sie die Grie (C) für den Grillrost in
die Vorrichtungen des Grillrostes (B).
7. Setzten Sie den Grillrost (B) in die gewünschte
Position des Windschutzes (D1 & D2) ein.
Hängen Sie den Warmhalterost (A) auf den
Windschutz (D1 & D2).
WARNUNG!
Der Grill muss während des Betriebes auf einem
stabilem und festem Untergrund stehen, da er
sonst umkippen kann.
Hinweise zum sicheren Betrieb des
Grillgerätes
Der Grill muß während des Betriebes stabil auf festem
Untergrund stehen.
Nicht in geschlossenen Räumen benutzen, oder
auf überdachten Flächen.
Verwenden Sie nur ungefährliche Anzündmittel (wie
z.B. LANDMANN-Feststoanzünder).
Der Brennstobehälter hat ein Fassungsvermögen
von ca. 2 kg.
Vor Erstgebrauch sollte der Grill ca. 30 Minuten mit
Brennsto (Holzkohle bzw. Briketts) aufgeheizt
werden.
GRILLCHEF
5

Anzünden des Brennstoes
Reinigung / Pege
WARNUNG vor Verbrennung!
Beim Anzünden mit Benzin oder Spiritus kann
es durch Verpuungen zu unkontrollierbaren
Hitzeentwicklungen kommen. Benutzen Sie
nur ungefährliche Verbrennungsmaterialien,
wie z.B. Feststoanzünder. Der Grill muss
während des Betriebes stabil auf festem
Untergrund stehen.
1. Verwenden Sie Qualitätserzeugnisse von
LANDMANN, wie LANDMANNHolzkohle, LANDMANN-Briketts und
LANDMANN-Feststoanzünder.
2. Schichten Sie einen Teil der Holzkohle bzw.
Briketts in der Feuerschüssel (E) auf.
3. Zünden Sie ein bis zwei Feststoanzünder mit
einem Streichholz an. Legen Sie diese auf die
vorhandene Schicht Holzkohle bzw. Briketts.
4. Lassen Sie die Feststoanzünder 2 bis 4 Minuten
brennen. Füllen Sie danach die Feuerschüssel
(E) langsam mit Holzkohle bzw. Briketts.
5. Grillgut erst auegen, wenn der Brennsto mit
einer Ascheschicht bedeckt ist! Der optimale
Glutzustand ist erreicht. Verteilen Sie das
Brenngut, mit einem geeigneten MetallWerkzeug, gleichmäßig in der Feuerschüssel
(E).
6. Hängen Sie den eingefetteten Grillrost ein und
beginnen Sie mit dem Grillen.
WARNUNG vor Verbrennung!
Lassen Sie den Grill vor dem Reinigen völlig
abkühlen. Benutzen Sie niemals Wasser, um
den heißen Grill abzuschrecken. Es kommt
sonst zu Verbrennungen und Verbrühungen.
Zur Erhaltung des schönen Aussehens ist natürlich
eine gelegentliche Reinigung erforderlich. Verwenden
Sie kein Scheuermittel.
1. Für die normale Reinigung reicht ein Spültuch
und Wasser mit einem handelsüblichen
Spülmittel.
2. Sind die emaillierten Teile stärker beschmutzt,
verwenden Sie einen handelsüblichen
Emailreiniger (Backofenreiniger). Beachten
Sie die Anweisung des Herstellers des
anzuwendenden Mittels.
3. Reinigen Sie den Grillrost mit Spülmittel und
einem rostfreiem Putzkissen.
Umwelthinweise & Entsorgungsmaßnahmen
Achten Sie auf Sauberkeit beim Umgang mit dem Grill
und bei der Entsorgung von Reststoen. Entsorgen Sie
den Restabfall grundsätzlich nur in dafür vorgesehene
Gefäße aus Metall bzw. nichtbrennbaren Materialien.
Es gelten die örtlichen Bestimmungen für die
Entsorgung.
GRILLCHEF
6
t
"Round grill"
Instructions for tting and use
Foreword
Please read this assembly and operation manual
carefully before you start using your high-quality
GRILLCHEF barbecue.
You will quickly determine:
The assembly and operation processes are simple and
straightforward.
Correct utilisation
The barbeque may only be used for preparing suitable
foods. All requirements of this assembly and operation
manual must be complied with.
For private use only!
Safe operation of the barbecue
Before using the barbecue for the rst time,
it should be heated with fuel (charcoal or
briquette) for approximately 30 minutes.
General Safety Precautions
WARNING - risk of burning!
➱ The barbecue must be positioned on a stable and secure surface when it is in use, otherwise it may tip
over.
➱ WARNING! This barbecue becomes very hot and should not be moved while it is being used!
➱ Wear barbecue mitts or use barbecue tongs when barbecuing .
➱ Allow the barbecue to cool down completely before cleaning it.
➱ CAUTION! Do not use spirit or petrol to light or re-light the re!
➱ CAUTION! Only use relighters that correspond to the European Standard for relighters (EN 1860-3)!
➱ Never use water to extinguish the charcoal.
WARNING - risk of suocation!
➱ Do not use indoors!
DANGER to children and pets!
➱ Never leave the hot barbecue unattended.
➱ WARNING! Keep children and pets at a safe distance!
GRILLCHEF
7

General information for successful assembly
Preparing assembly
Please read the assembly instructions carefully and
follow the safety precautions. Allow sucient time
for assembly. Before starting assembly, clear a at
area measuring approximately two to three square
metres. Remove the appliance from the packaging!
Lay out all of the parts and any necessary tools so that
they are within easy reach.
Please note: Only tighten all of the screw connections
rmly when you have nished assembly. Otherwise
this can result in unwanted tension.
Parts List
A: Warming rack 1
B: Cooking grill 1
C: Handle for grill 2
D: (1) Wind guard, left 1
(2) Wind guard, right 1
E: Fire bowl 1
F: Handle 1
G: Leg support 4
H: Leg 2
I: Wheel leg 2
J: Base shelf 1
K: Leg stand cap (pre-tted) 2
L: Wheel 2
M: Wheel axis 1
N: Wheel leg cap (pre-tted) 2
Please check to make sure that all of the components
have been supplied using the following list and
drawing. Lay out all of the parts and any necessary
tools so that they are ready for assembly.
Connecting elements
(pre-assembled connecting elements are also included in the itemisation!)
M5x30
M6x25
4x
4x
Ø6x4xØ6xØ204xM5
M5x12
4x
12xM62x
M5x10
4x
GRILLCHEF
8

Assembly procedure
CAUTION!
For your safety the screw heads should always
point outwards, otherwise there is a risk of
injury.
Only tighten all of the screw connections rmly
when you have nished assembly otherwise
undesired material stress may result.
1. Screw the legs (H & I) with the leg supports
(G) to the re bowl (E) using M6x25 screws
and Ø6xØ20 discs. Ensure that the legs (H & I) is
positioned as shown in the drawing.
2. Secure the base shelf (J) between the legs (H &
I) using M5x30 screws and M5 nuts.
3. Guide the axle (M) through the wheel leg caps
(N). Push the wheels onto the ends of the axle
(M) and x these in place with M6 lock nuts.
4. Screw the handle (F) to the re bowl (E) with
M5x12 screws, Ø6 discs and M5 nuts. Caution:
t the Ø6 discs from the inside of the re bowl
(E).
5. Fit the wind guard parts (D1 & D2) to the re
bowl (E) using M5 x M10 screws and M5 nuts.
6. Fit the handles (C) for the grill into the slots in
the grill (B).
7. Insert the grill (B) into the selected position in
the wind guard (D1 & D2). Fit the warming rack
(A) onto the wind guard (D1 & D2).
WARNING!
The barbecue must be positioned on a stable
and secure surface when it is in use, otherwise
it may tip over.
Information for safe operation of the
barbecue
The barbecue must be positioned on a stable and
secure surface when it is in use.
Do not use in enclosed areas or on covered areas.
Only use safe lighting materials (such as
LANDMANN solid relighters).
The fuel container has a capacity of approximately
2 kg.
Before using the barbecue for the rst time, it should
be heated with fuel (charcoal or briquette) for
approximately 30 minutes.
GRILLCHEF
9

Igniting the fuel
Cleaning / Care
WARNING - risk of burning!
When petrol or white spirits are ignited
uncontrollable heat can develop as a result
of deagration. You should therefore only
use harmless fuel, such as relighters. The
barbecue must be positioned on a stable and
secure surface when it is in use.
1. Use quality products from LANDMANN,
such as LANDMANN charcoal,
LANDMANN briquettes and
LANDMANN solid relighters.
2. Stack some of the charcoal or briquettes in the
re bowl (E).
3. Ignite one or two solid relighters using a long
match. Place these relighters on top of the
layer of charcoal or briquettes.
4. Allow the solid relighters to burn for 2 to 4
minutes. Then ll the re bowl (E) slowly with
charcoal or briquettes.
5. Only start to cook the food when the fuel is
coated with a layer of ash! This indicates that
the optimal grilling condition has been reached.
Distribute the fuel evenly in the re bowl (E)
using a suitable metal tool.
6. Insert the greased grill and then you can start
barbecuing.
WARNING - risk of burning!
Allow the barbecue to cool down completely
before cleaning it. Never use water to quench
the hot barbecue. This could result in burning
or scalding.
Occasional cleaning is necessary to preserve the
beautiful appearance of the barbecue. Do not use any
scouring agents.
1. A rinsing cloth and some water with a
commercial detergent is sucient for the
normal cleaning process.
2. If the enamelled parts are heavily soiled,
use a commercial enamel cleaning agent
(oven cleaner). Observe the manufacturer's
instructions for the cleaning agent being used.
3. Clean the grill using some washing-up liquid
and a rust proof cleaning pad.
Environmental Protection & Disposal
Pay attention to cleanliness when using the barbecue
and dispose of waste in a clean and safe manner. As
a general rule, only dispose of waste in designated
metal or non-ammable containers.
Observe the local waste disposal regulations.
GRILLCHEF
10
s
« Barbecue rond »
Instructions de montage et mode d'emploi
Avant-propos
Avant de monter et de mettre en service le barbecue
de grande qualité GRILLCHEF, commencer par
lire avec attention les instructions de montage et de
service.
Vous constaterez rapidement :
Le montage et le fonctionnement sont faciles et
simples.
Utilisation conforme
N'utiliser le barbecue que pour la préparation
d'aliments prévus pour le barbecue. Il est impératif
de respecter toutes les instructions de la présente
notice.
Uniquement pour l'utilisation privée !
Utilisation sûre du barbecue
Avant la première utilisation, chauer le grill
pendant env. 30 minutes avec du combustible
(charbon de bois ou briquettes).
Consignes de sécurité générales
RISQUE de brûlures !
➱ Lors de son utilisation, le barbecue doit être sur une surface stable et solide, sinon il pourrait basculer.
➱ ATTENTION ! Ce barbecue devient brûlant ; il est interdit de le déplacer lors de son utilisation !
➱ Porter des gants ou utiliser une pince à barbecue pendant la cuisson.
➱ Laisser le barbecue refroidir complètement avant de le nettoyer.
➱ PRUDENCE ! Pour allumer ou rallumer, ne jamais utiliser d'alcool ou d'essence !
➱ PRUDENCE ! Utiliser exclusivement des produits d'allumage conformes à la norme européenne (EN
1860-3) !
➱ Ne jamais utiliser d'eau pour éteindre du charbon de bois.
RISQUE d'étouement !
➱ Ne pas utiliser dans des pièces fermées !
DANGER pour enfants et animaux domestiques !
➱ Ne pas laisser un barbecue brûlant sans surveillance.
➱ ATTENTION ! Maintenir les enfants et les animaux domestiques à l'écart !
GRILLCHEF
11
Consignes générales pour un montage
réussi
Veuillez lire avec attention les instructions de
montage et respecter les consignes de sécurité.
Réserver susamment de temps à l'assemblage.
Prévoir auparavant une surface de travail plane de
deux à trois m². Retirer l'appareil de l'emballage !
Déposer les pièces et les outils nécessaires à portée
de main.
Attention : ce n'est qu'une fois le montage terminé
que vous serrerez les vissages fermement. Dans le
cas contraire, des tensions indésirables pourraient se
produire.
LISTE DES PIECES DETACHEES
A: Grille de maintien au chaud 1
B: Gril 1
C: Poignée pour le gril 2
D: (1) Coupe-vent, gauche 1
(2) Coupe-vent, droit 1
E: Foyer 1
F: Poignée 1
G: Renforts du pied 4
H: Pieds xes 2
I: Pied à roue 2
J: Tablette 1
K: Embout du pied xe (prémonté) 2
L: Roue 2
M: Essieu 1
N: Embouts du pied à roue 2
(déjà prémontés)
Préparer le montage
Vérier l'intégralité des pièces à l'aide de la liste et
du schéma ci-dessous. Préparer les pièces et les outils
nécessaires à l'assemblage.
Eléments d'assemblage
(Les éLéments de Liaison prémontés sont égaLement mentionnés)
M5x30
M6x25
4x
4x
Ø6x4xØ6xØ204xM5
M5x12
4x
12xM62x
M5x10
4x
GRILLCHEF
12

Réaliser le montage
ATTENTION !
Pour votre sécurité, les têtes des vis doivent
toujours se trouver du côté extérieur ; dans le
cas contraire, il y a risque de blessures.
Une fois le montage terminé, vous serrerez les
vissages fermement ; si vous le faites avant, il y
a risque de tensions du matériel.
1. Visser les pieds (H & l) et les renforts (G) à l'aide
de vis M6x25 et de rondelles Ø 6x Ø 20 au foyer
(E). Veiller à donner une position correcte aux
pieds (H & I) conformément au schéma.
2. Fixer la tablette (J) à l'aide des vis M5x30 et des
écrous M5 entre les pieds (H & I).
3. Introduire l'essieu (M) par les embouts des
pieds à roues (N). Glisser les roues (L) sur les
extrémités de l'essieu (M) et les xer à l'aide
des écrous bloquants M6.
4. Visser la poignée (F) à l'aide des vis M5x12, des
écrous M5 et des rondelles Ø 6 sur le foyer (E).
Attention : monter les rondelles Ø6 de l'intérieur
du foyer (E).
5. Monter les éléments du coupe-vent (D1 & D2)
sur le foyer (E), à l'aide de vis M5x10 et d'écrous
M5.
6. Fixer les poignées (C) du gril dans les dispositifs
du gril (B).
7. Placer le gril (B) dans la position souhaitée du
coupe-vent (D1 & D2). Suspendre la grille de
maintien au chaud (A) sur le coupe-vent (D1
&D2).
AVERTISSEMENT !
Lors de son utilisation, le barbecue doit être sur
une surface stable et solide, sinon il pourrait
basculer.
Consignes pour une mise en service sûre de
votre barbecue :
L’appareil doit se trouver en position horizontale,
stable sur une surface solide pendant l’emploi, car il
pourrait sinon se renverser.
Ne pas utiliser dans des pièces fermées et dans des
endroits couverts.
Utiliser uniquement des allumeurs sans risque
(allumeur solide LANDMANN par ex.).
Le récipient à combustible a une capacité de 2 kg
env.
Avant la première utilisation, chauer le grill pendant
env. 30 minutes avec du combustible (charbon de bois
ou briquettes).
GRILLCHEF
13
 Loading...