

Page 1
PART NUMBER 72070
Crafting the World’s Finest Treadmills
Executive Trainer
Owner’s Manual
Page 2
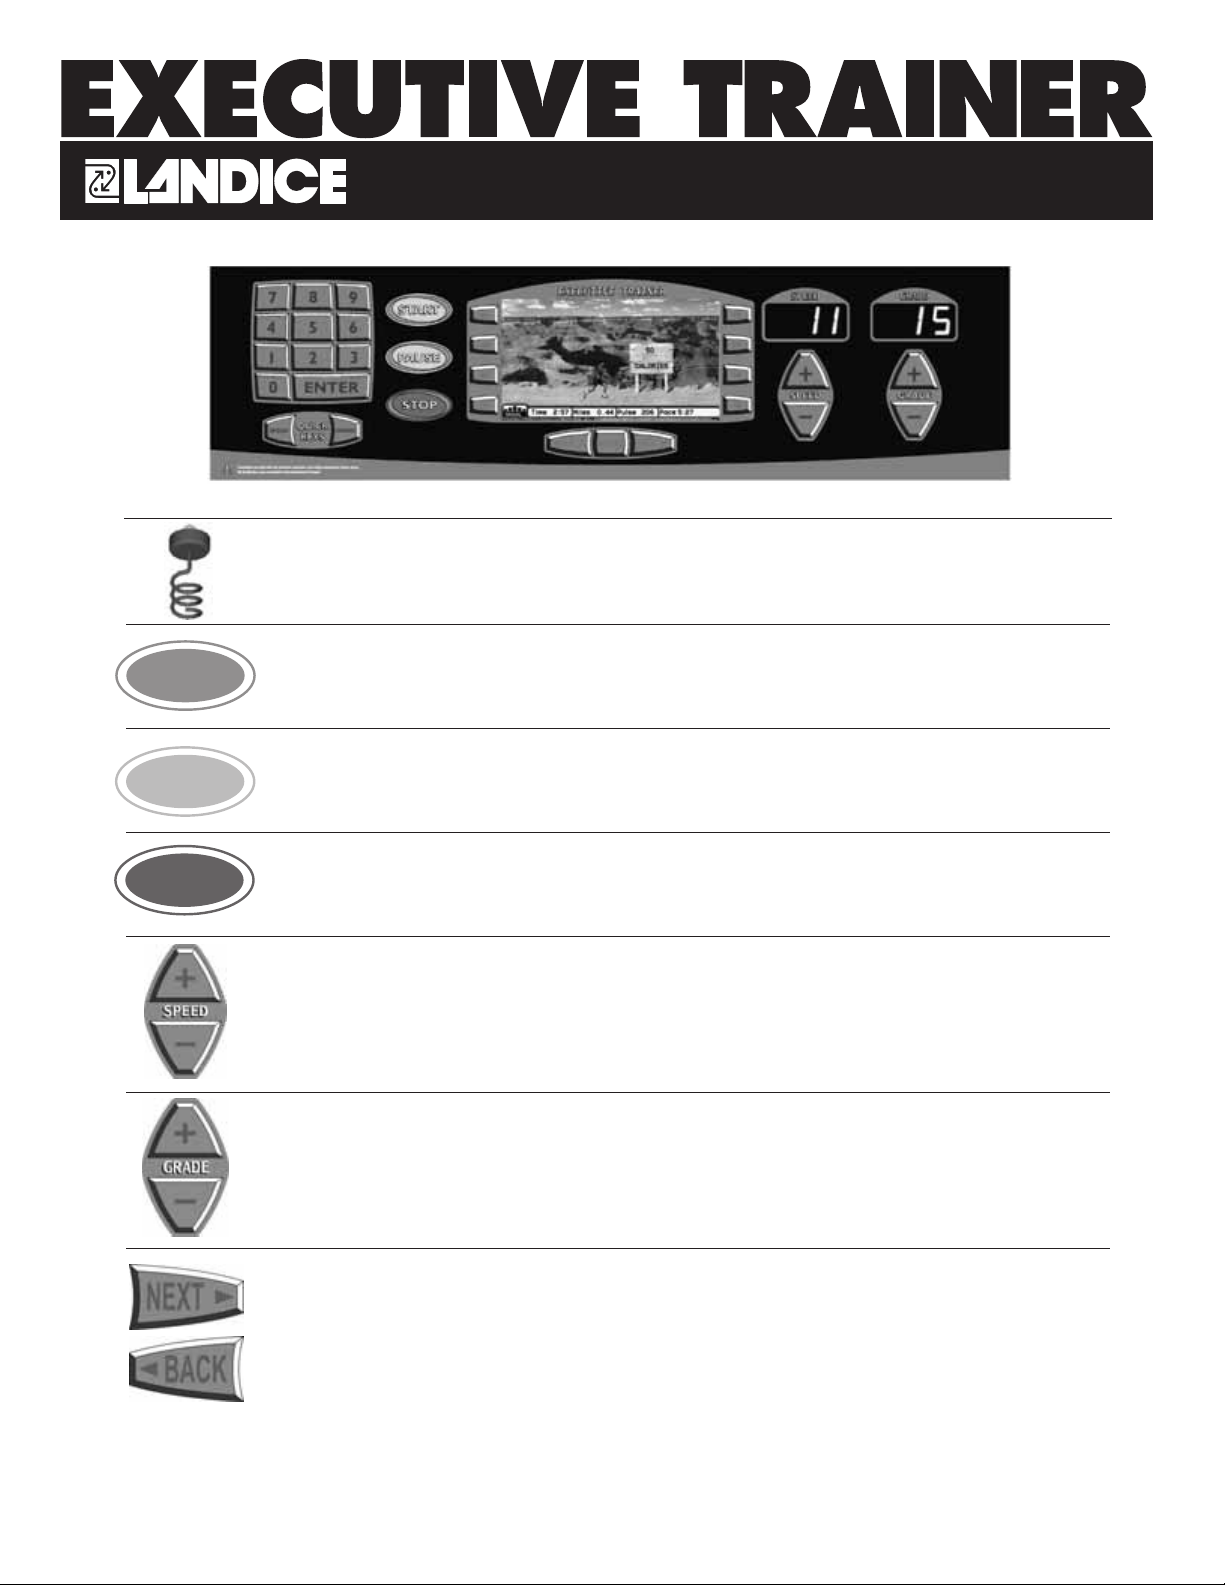
Before you start the treadmill:
The red Safety Key must be magnetically connected to the front of the display panel.
During operation, removing the Safety Key will cause the treadbelt to stop until it’s replaced.
To start the treadmill:
Pressing START powers up the treadmill and all displays will light. The treadbelt will begin moving at
0.5 mph (0.8 km/h).
To pause the treadmill:
Pressing PAUSE will cause the treadbelt to stop, but all statistical information will be preserved. Press
either START to resume or QUICK SPEED to a desired speed (see using the QUICK KEYS).
To turn off the treadmill:
Pressing STOP stops the treadbelt. The treadmill will shut off and all current statistical information
will be cleared.
To change speed:
Hold speed “+” key down to increase speed. Holding speed “+” key depressed for longer than
2 seconds causes the speed to increase at a faster rate.
Hold speed “-” key down to decrease speed. Holding speed “-” key depressed for longer than
2 seconds causes the speed to decrease at a faster rate.
To change grade:
Hold grade “+” key down to increase elevation. Release the button when the display indicates the
desired elevation setting.
Hold grade “-” key down to decrease elevation. Release the button when the display indicates the
desired elevation setting.
To view different display screens during your workout:
Press NEXT/BACK at any time to choose the display screen that best suits your workout.
START
START
PAU S E
PAUSE
STOP
STOP
Quick User's Guide
Quick User's Guide
Page 3

i
Important Safety Instructions
[1] If you are suffering from any illness, condition, or disability which affects your ability to run, walk or exercise, do not
use this product without consulting your doctor first.
[2] If you are suffering from any illness, condition, or disability which affects your ability to run, walk or exercise, do not
use this product without supervision present. Failure to do so can result in serious injury should you fall while the
treadbelt is moving.
[3] Failure to leave ample clearance around the treadmill could result in the user becoming trapped between the treadmill
and a wall, resulting in burns or other serious injury from the moving treadbelt.
Allow a minimum clearance of 18 inches on each side of the treadmill.
Allow a minimum clearance of 4 feet at the rear of the treadmill.
[4] Never stand on the treadbelt when starting the treadmill. A sudden start could cause you to lose your balance. Always
stand with one foot on each side rail until the belt starts moving.
[5] Always wear the emergency stop safety strap securely around your wrist while exercising. Failure to do so can result in
severe injuries should you accidentally fall while exercising.
[6] Test the emergency stop safety key on a regular basis by pulling on the cord and ensuring that the treadbelt comes to a
complete stop.
[7] Always remove the safety key from the treadmill when you are through exercising, especially if children are present.
This will prevent them from accidentally starting the treadmill.
[8] Be sure to familiarize yourself with this manual. Look it over carefully. Be sure you understand the control panel
operation before using the treadmill.
When using an electrical appliance, basic precautions should always be followed.
Read all instructions before using.
DANGER: Always unplug the treadmill before cleaning or removing the motor cover. To reduce the risk of electric shock
in the event of an electrical storm, always unplug the treadmill from the electrical outlet immediately after using.
WARNING: Failure to observe the following operating instructions can result in serious injury!
SAVE THESE INSTRUCTIONS
Page 4

ii
Important Safety Instructions
[1] An appliance should never be left unattended when plugged in. Unplug from outlet when not in use.
[2] Close supervision is necessary when this unit is used by or near children or disabled persons.
[3] Use this treadmill only for its intended use as described in this manual.
[4] Never operate this treadmill if it has a damaged cord or plug, if it is not working properly, or if it has been
damaged. Call your selling dealer immediately for examination and repair.
[5] Keep the power cord away from heated surfaces. Be sure the line cord has plenty of slack and does not get
pinched underneath the treadmill when it elevates and de-elevates.
[6] Never operate the treadmill with the motor cover air openings blocked. Keep the air openings free of lint,
hair, and dust.
[7] Never drop or insert any object into any opening. Be sure no objects are near or underneath the moving treadbelt
when you are using the treadmill.
[8] Do not use outdoors.
[9] Do not operate where aerosol (spray) products are being used or where oxygen is being administered.
[10] Connect this appliance to a properly grounded dedicated outlet only.
[11] To disconnect, press the STOP button, remove the Safety Key, and unplug the unit from the wall outlet.
GROUNDING INSTRUCTIONS
This product must be grounded. If it should malfunction or break down, grounding provides a path of least resistance for
electric current to reduce risk of electric shock. This product is equipped with a cord that has an equipment grounding
conductor and a grounding plug. The plug must be plugged into an outlet that is properly installed and grounded in
accordance with all local codes and ordinances.
120 VOLT TREADMILLS
Treadmills marked 120 VAC are intended for use in a nominal 120-volt circuit with a grounding plug. Make sure the product
is connected to an outlet having the same configuration as the plug. No adapter should be used with this product.
200 - 250 VOLT TREADMILLS
Treadmills marked 200-250 VAC are intended for use on a circuit having a nominal rating more than 120V and are factoryequipped with a specific cord and plug to permit connection to a proper electric circuit. Make sure the product is connected
to an outlet having the same configuration as the plug. No adapter should be used with this product. If the product must be
reconnected for use on a different type of electric circuit, qualified service personnel should make the reconnection.
DANGER: Improper connection of the equipment-grounding connector can result in a risk of electric shock. Check with
a qualified electrician or serviceman if you are in doubt as to whether the product is properly grounded. Do not modify
the plug provided with the product. If it will not fit in the outlet, have a proper outlet installed by a qualified electrician.
WARNING: To reduce the risk of electric shock or injury to persons:
Page 5

Table of Contents
Basics
Introduction. . . . . . . . . . . . . . . . . . . . . . . . . . . . . . . . . . . . . . . . . . . . . . . . . . . . . . . . . . . . . . . . . . . . . . . . . . . . . . . . . . . . . . . . . . . . . . . 1
Assembly Instructions. . . . . . . . . . . . . . . . . . . . . . . . . . . . . . . . . . . . . . . . . . . . . . . . . . . . . . . . . . . . . . . . . . . . . . . . . . . . . . . . . . . . . . . 2
Basic Control Panel Operations. . . . . . . . . . . . . . . . . . . . . . . . . . . . . . . . . . . . . . . . . . . . . . . . . . . . . . . . . . . . . . . . . . . . . . . . . . . . . . . 4
Features. . . . . . . . . . . . . . . . . . . . . . . . . . . . . . . . . . . . . . . . . . . . . . . . . . . . . . . . . . . . . . . . . . . . . . . . . . . . . . . . . . . . . . . . . . . . . . . . . . . 5
Getting Started. . . . . . . . . . . . . . . . . . . . . . . . . . . . . . . . . . . . . . . . . . . . . . . . . . . . . . . . . . . . . . . . . . . . . . . . . . . . . . . . . . . . . . . . . . . . . 6
Manual Mode
Motivational Screens. . . . . . . . . . . . . . . . . . . . . . . . . . . . . . . . . . . . . . . . . . . . . . . . . . . . . . . . . . . . . . . . . . . . . . . . . . . . . . . . . . . . . . . . 7
Numeric Keypad . . . . . . . . . . . . . . . . . . . . . . . . . . . . . . . . . . . . . . . . . . . . . . . . . . . . . . . . . . . . . . . . . . . . . . . . . . . . . . . . . . . . . . . . . . . 8
Built-In Programs
Overview . . . . . . . . . . . . . . . . . . . . . . . . . . . . . . . . . . . . . . . . . . . . . . . . . . . . . . . . . . . . . . . . . . . . . . . . . . . . . . . . . . . . . . . . . . . . . . . . . 9
Running Built-In Programs . . . . . . . . . . . . . . . . . . . . . . . . . . . . . . . . . . . . . . . . . . . . . . . . . . . . . . . . . . . . . . . . . . . . . . . . . . . . . . . . . 10
User Programs . . . . . . . . . . . . . . . . . . . . . . . . . . . . . . . . . . . . . . . . . . . . . . . . . . . . . . . . . . . . . . . . . . . . . . . . . . . . . . . . . . . . . . . . . . . . 11
HRC Programs . . . . . . . . . . . . . . . . . . . . . . . . . . . . . . . . . . . . . . . . . . . . . . . . . . . . . . . . . . . . . . . . . . . . . . . . . . . . . . . . . . . . . . . . . . . 12
User HRC Programs . . . . . . . . . . . . . . . . . . . . . . . . . . . . . . . . . . . . . . . . . . . . . . . . . . . . . . . . . . . . . . . . . . . . . . . . . . . . . . . . . . . . . . . 13
Specialty Programs
Specific Goal Programs. . . . . . . . . . . . . . . . . . . . . . . . . . . . . . . . . . . . . . . . . . . . . . . . . . . . . . . . . . . . . . . . . . . . . . . . . . . . . . . . . . . . . 14
Race Mode . . . . . . . . . . . . . . . . . . . . . . . . . . . . . . . . . . . . . . . . . . . . . . . . . . . . . . . . . . . . . . . . . . . . . . . . . . . . . . . . . . . . . . . . . . . . . . . 15
Fitness Tests/ Protocols
Overview . . . . . . . . . . . . . . . . . . . . . . . . . . . . . . . . . . . . . . . . . . . . . . . . . . . . . . . . . . . . . . . . . . . . . . . . . . . . . . . . . . . . . . . . . . . . . . . . 16
Taking a Fitness Test . . . . . . . . . . . . . . . . . . . . . . . . . . . . . . . . . . . . . . . . . . . . . . . . . . . . . . . . . . . . . . . . . . . . . . . . . . . . . . . . . . . . . . . 17
Taking a Fitness Protocol . . . . . . . . . . . . . . . . . . . . . . . . . . . . . . . . . . . . . . . . . . . . . . . . . . . . . . . . . . . . . . . . . . . . . . . . . . . . . . . . . . . 18
Client Mode
Creating a Client . . . . . . . . . . . . . . . . . . . . . . . . . . . . . . . . . . . . . . . . . . . . . . . . . . . . . . . . . . . . . . . . . . . . . . . . . . . . . . . . . . . . . . . . . . 19
Fitness Calendar . . . . . . . . . . . . . . . . . . . . . . . . . . . . . . . . . . . . . . . . . . . . . . . . . . . . . . . . . . . . . . . . . . . . . . . . . . . . . . . . . . . . . . . . . . 20
Setup
System Settings . . . . . . . . . . . . . . . . . . . . . . . . . . . . . . . . . . . . . . . . . . . . . . . . . . . . . . . . . . . . . . . . . . . . . . . . . . . . . . . . . . . . . . . . . . . 21
Self-Diagnostics . . . . . . . . . . . . . . . . . . . . . . . . . . . . . . . . . . . . . . . . . . . . . . . . . . . . . . . . . . . . . . . . . . . . . . . . . . . . . . . . . . . . . . . . . . . 22
Heart Rate Monitoring
Overview . . . . . . . . . . . . . . . . . . . . . . . . . . . . . . . . . . . . . . . . . . . . . . . . . . . . . . . . . . . . . . . . . . . . . . . . . . . . . . . . . . . . . . . . . . . . . . . . 23
My Target Heart Rate Zone . . . . . . . . . . . . . . . . . . . . . . . . . . . . . . . . . . . . . . . . . . . . . . . . . . . . . . . . . . . . . . . . . . . . . . . . . . . . . . . . . 24
Heart Monitors (Wireless and AccuTrack) . . . . . . . . . . . . . . . . . . . . . . . . . . . . . . . . . . . . . . . . . . . . . . . . . . . . . . . . . . . . . . . . . . . . . 25
Getting The Most Out of Your Workouts
Should You Walk or Run? . . . . . . . . . . . . . . . . . . . . . . . . . . . . . . . . . . . . . . . . . . . . . . . . . . . . . . . . . . . . . . . . . . . . . . . . . . . . . . . . . . . 27
Optimizing Your Workouts . . . . . . . . . . . . . . . . . . . . . . . . . . . . . . . . . . . . . . . . . . . . . . . . . . . . . . . . . . . . . . . . . . . . . . . . . . . . . . . . . 28
Maintenance
Maintenance. . . . . . . . . . . . . . . . . . . . . . . . . . . . . . . . . . . . . . . . . . . . . . . . . . . . . . . . . . . . . . . . . . . . . . . . . . . . . . . . . . . . . . . . . . . . . . 29
Appendices
Appendix A: Medrail Installation . . . . . . . . . . . . . . . . . . . . . . . . . . . . . . . . . . . . . . . . . . . . . . . . . . . . . . . . . . . . . . . . . . . . . . . . . . . . 30
Page 6

1
Introduction
Congratulations! You’ve made a very smart investment! Your Executive Trainer treadmill is a high-quality fitness tool that
will give you years and years of fitness benefits.
One of the great things about the Executive Trainer is its diversity of applications. It’s terrific for just starting out on a
walking program or easy jog. In the case of a veteran runner, it’s the exact prescription needed for precision interval training
to lower your 10K time.
Regardless of the application, unpleasant weather is not an obstacle. Cold, windy, wet days will never discourage you again,
nor will the heat and humidity of the summer months. If you’re the type of person that likes to do two things at once, now
you can watch your favorite program on TV or keep an eye on your kids and take care of your health at the same time.
Did you know that your treadmill is an excellent stair-climbing simulator? Stair climbing has become a popular exercise
today. Your treadmill, when elevated, is a very good climber with more safety and comfort than a dedicated stair climber!
Your treadmill was a smart purchase, but you already knew that, so let’s move on and get started.
INSTRUCTION MANUAL
Be sure to familiarize yourself with this manual. Look it over carefully. Be sure you understand the control panel operation
before using the treadmill.
WARRANTY INFORMATION
Fill out your warranty registration card and mail it in today. Landice backs your treadmill with a strong warranty.
For the factory to respond to any problems you may have, we need your warranty information on file. Do it today.
Landice will send you a complimentary Landice T-shirt upon receipt of your warranty registration card.
SELECTING A LOCATION
Install your treadmill in a climate controlled room.
Allow a minimum clearance of 18 inches on each side of the treadmill.
Allow a minimum clearance of 4 feet at the rear of the treadmill.
Failure to leave ample clearance at the rear of the treadmill could result in the user becoming trapped between the treadmill
and the wall should the user accidentally trip and fall while exercising.
Be sure the line cord has plenty of slack and does not get pinched underneath the treadmill when the treadmill elevates up
and down. Make sure the treadmill is plugged into a dedicated line.
BEFORE YOU BEGIN
Following are some things you should do before you start to exercise on your treadmill:
Page 7

2
Assembly Instructions
• On L7 treadmills it is necessary
to remove the bolts which hold
the treadmill to the pallet.
• Start by removing the top bolts.
• Lay the treadmill on the ground,
and then remove the bottom
bolts by placing the treadmill on
your toolbox.
• With the bolts removed, the
treadmill will be free to move
around in the box.
• Remove the metal strapping
around the box.
• Using a razor blade knife, cut the
box just above the bottom row
of brass staples along all sides
of the box.
•
DO NOT cut through the
center of the box, as you could
damage the treadmill.
• Remove the box and discard.
• The treadmill components
are held together with plastic
strapping.
• Carefully cut and remove the
strapping. Remove the treadmill
upright and accessory boxes
from the treadmill. Lift the
treadmill off the pallet.
• Carefully remove the upright
side cover from the upright
assembly.
• Slide the upright down onto the
8-side frame bolts.
• Tighten bolts with a 7/16”
extended socket.
• The handrail mounting bolts
have been threaded into the rails
for shipping. Remove them.
• Attach both handrails by first
hand-starting the bolts through
the upright and then using a
1/2” socket. Leave about 1/8”
of slack.
(DO NOT TIGHTEN FLUSH TO
SURFACE).
• After mounting both handrails,
gently lower the curved crossbar
into position between them.
• Each end of the crossbar
should cover the two smaller
access holes that are cut into
the handrails.
• Leave contact heart rate
connection harness hanging
for now.
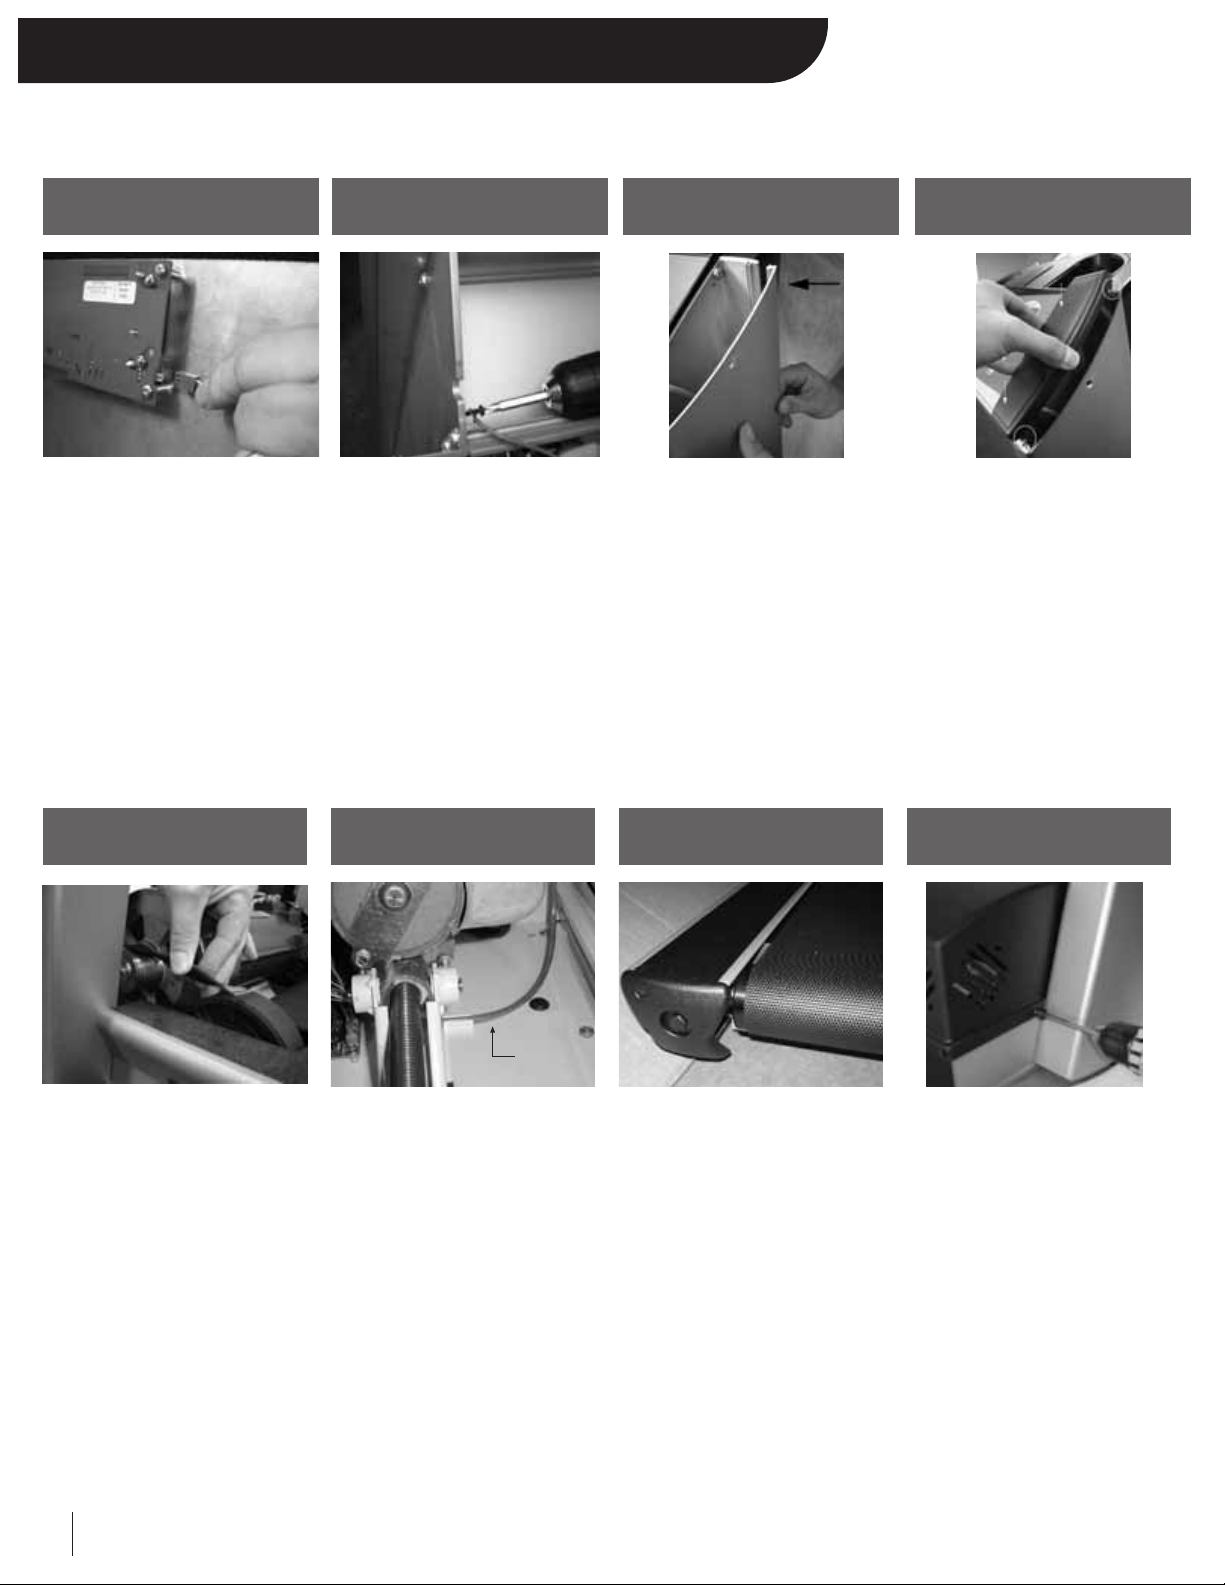
STEP 1:
Unbolt treadmill from pallet
STEP 2:
Cut the box off the pallet
STEP 3:
Unstrap the treadmill
STEP 4:
Secure upright to frame
STEP 5: Prepare to install hand
rails (Med Rails: the word
handrails refers to the 4”
clamps for steps 5-8)
STEP 6:
Place crossbar
• Using an extended 1/2” socket,
carefully guide the 2 inch bolt
with lock washer into the big
access hole in the side of the
handrail.
• Once the bolt reaches the
crossbar, tighten it.
• Repeat this step with the other
handrail.
STEP 7:
Secure crossbar
• Press the dome plugs into the
large access holes on the side of
the handrails.
• Finish tightening the handrail
bolts from STEP 5.
• Note: Med Rails go to Appendix
A on page 30.
STEP 8:
Secure hand rail
Page 8
3
Assembly Instructions
• Feed the contact heart rate
harness through the access hole
in the inside of the left upright
(insert strain relief provided).
Feed harness up into the
control panel.
• Pull back the membrane and
connect harness to white 3-pin
connector on side of display
board.
• Unscrew the unused screw on
the top of the upright where the
contact harness enters the control panel.
• Feed the screw through the
green grounding wire eyelet and
rescrew it back into place.
• Put the membrane back into
place.
• Carefully align the upright cover
to upright. Working from top to
bottom, snap the upright cover
into place.
• Check the tension on the drive
belt by placing the drive belt
between your thumb and
forefinger and twisting.
• The proper twist is 45˚. If the
belt needs to be adjusted use a
7/16” socket and turn the bolt
underneath the motor pan
attached to the motor’s
hook screw.
STEP 9:
Connect contact bar
STEP 10:
Ground contact bar
STEP 11: Snap upright covers
into place
STEP 13:
Check drive belt tension
• Press the plastic end cap into
the upright carefully fitting the
plastic pins into the small bosses
in the aluminum.
• Align the upright cover beneath
the end cap and install the
Phillips head screw.
• Tighten the Phillips head
screw until side cover aligns
with endcap
(Do not over-tighten).
STEP 12:
Install upright end cap
HOME TREADMILL:
• Route the wire harness
underneath the elevation motor
and secure with harness restraint
clip provided. Plug connector
into circuit board until it snaps
into place.
COMMERCIAL TREADMILL:
• Route the wire harness behind
the elevation motor and secure
with harness restraint clip
provided. Plug connector
into circuit board until it snaps
into place.
STEP 14:
Route the wire harness
• The treadbelt is tracked and
tensioned via the take-up
screws located at the back of the
treadmill.
• Check the tension of the
treadbelt. At proper tension you
should be able to place your
hand between the belt and deck
and reach the center of the
treadmill. If you cannot reach
the center, the belt is too tight
and must be loosened. If your
hand reaches past the center the
belt is too loose and must be
tightened.
STEP 15
Adjust the treadbelt
• Remove the black motor cover
screws in the side of the frame.
Place motor cover onto
treadmill.
• Attach motor cover with Phillips
head screws provided. Place
rubber spacer between cover and
frame.
• Plug treadmill into a dedicated
15A outlet. Walk on treadmill at
approximately 2.5 mph for 20 to
45 minutes to properly walk in
lubricant.
STEP 16:
Install motor cover
harness
Page 9
4
Basic Control Panel Operations
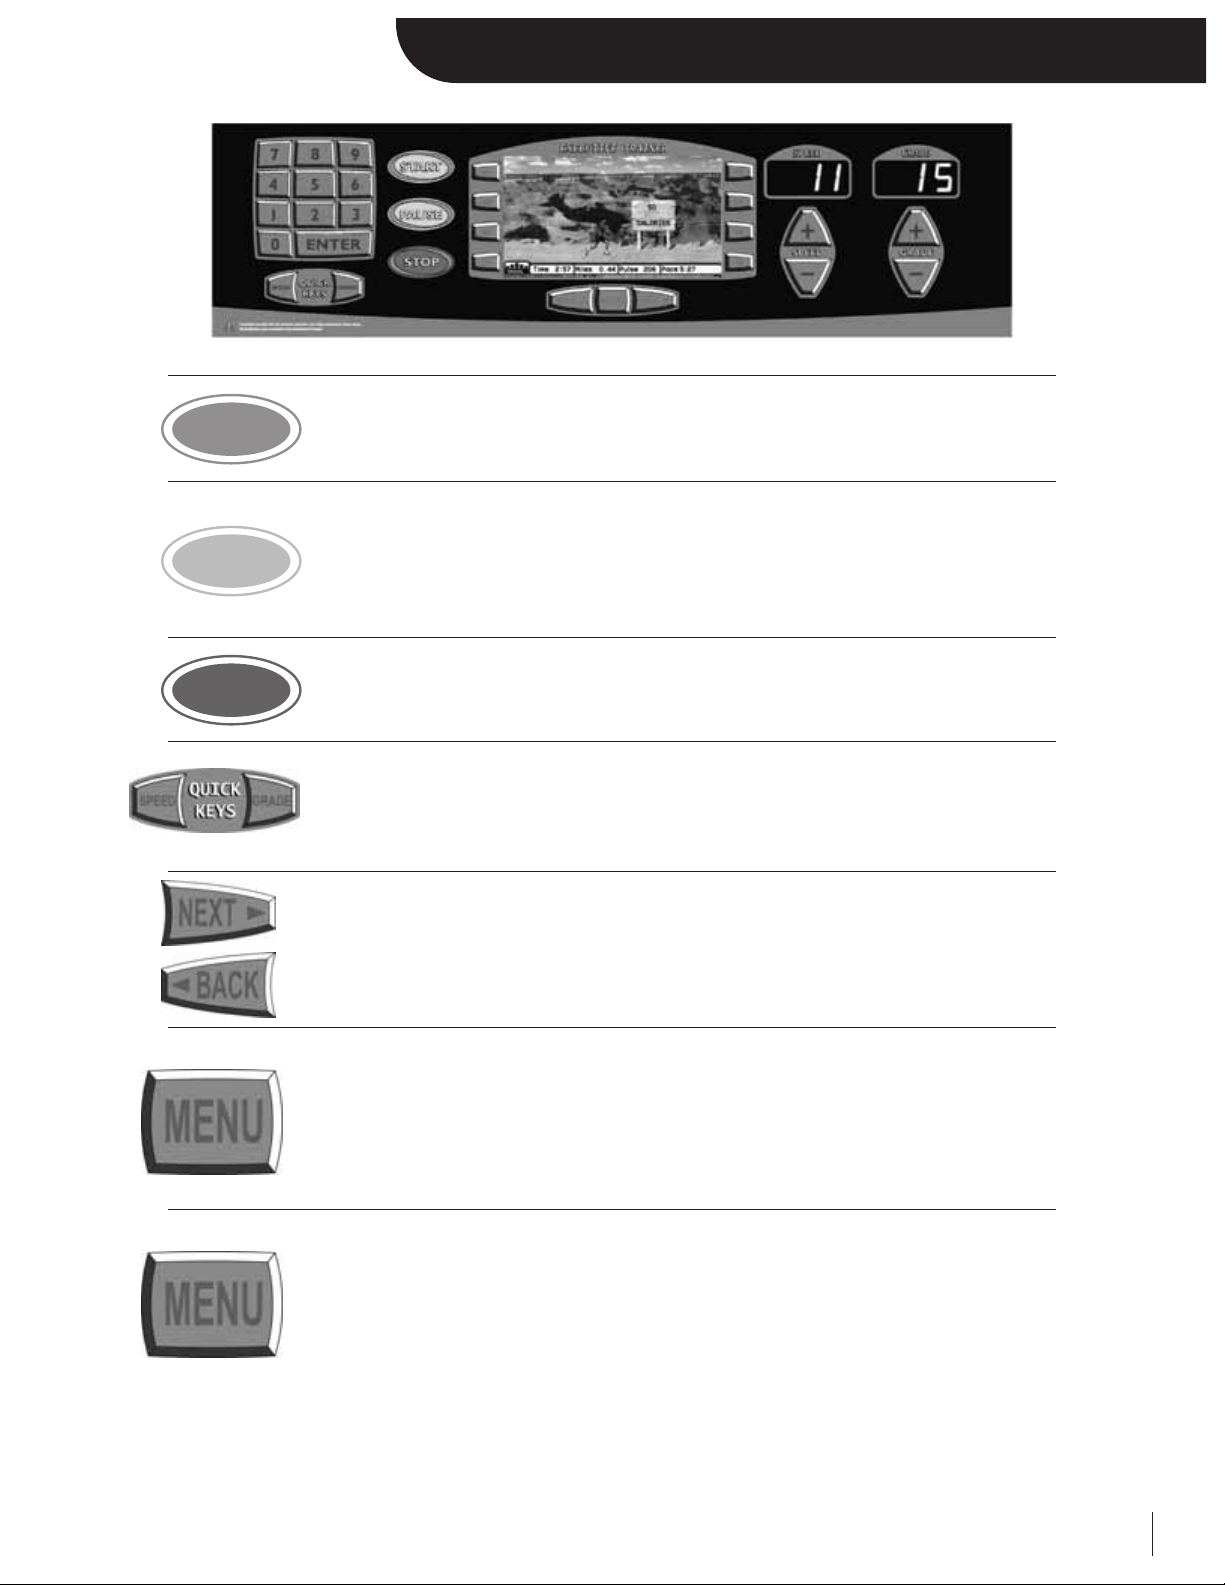
Press START to power up treadmill. All the displays will light and the treadbelt will
begin moving at 0.5 mph (0.8 km/hr in metric mode).
Press PAUSE to place the treadmill in pause mode. The treadbelt will stop, but all
statistical information will be preserved. Press either START to resume at 0.5 mph or
QUICK SPEED to a desired speed. When in programs, resuming from the pause mode
will return the treadmill to the last actual speed and position in the program.
Press STOP to stop the treadbelt from moving. The displays will shut off the treadmill
and all current statistical information will be cleared.
Press QUICK SPEED or QUICK GRADE to achieve instant speed or grade change.
Enter the desired value using the numeric keypad or the center “+/-” keys. Example: for
5.0 mph, press QUICK SPEED, “5”, “0”, ENTER.
Press NEXT or BACK to rotate through the selectable motivational screens. In program
setups, use them to navigate in and out of screens.
Press Menu at any time to return to the main menu.
To run a program:
1. Press the Menu button
2. Select PROGRAMS to view available programs
3. Choose a program that best suits your desired workout
4. Configure the program setup using the designated keys and the numeric keypad
5. Press START to begin
START
START
PAU S E
PAUSE
STOP
STOP
Page 10
5
Features
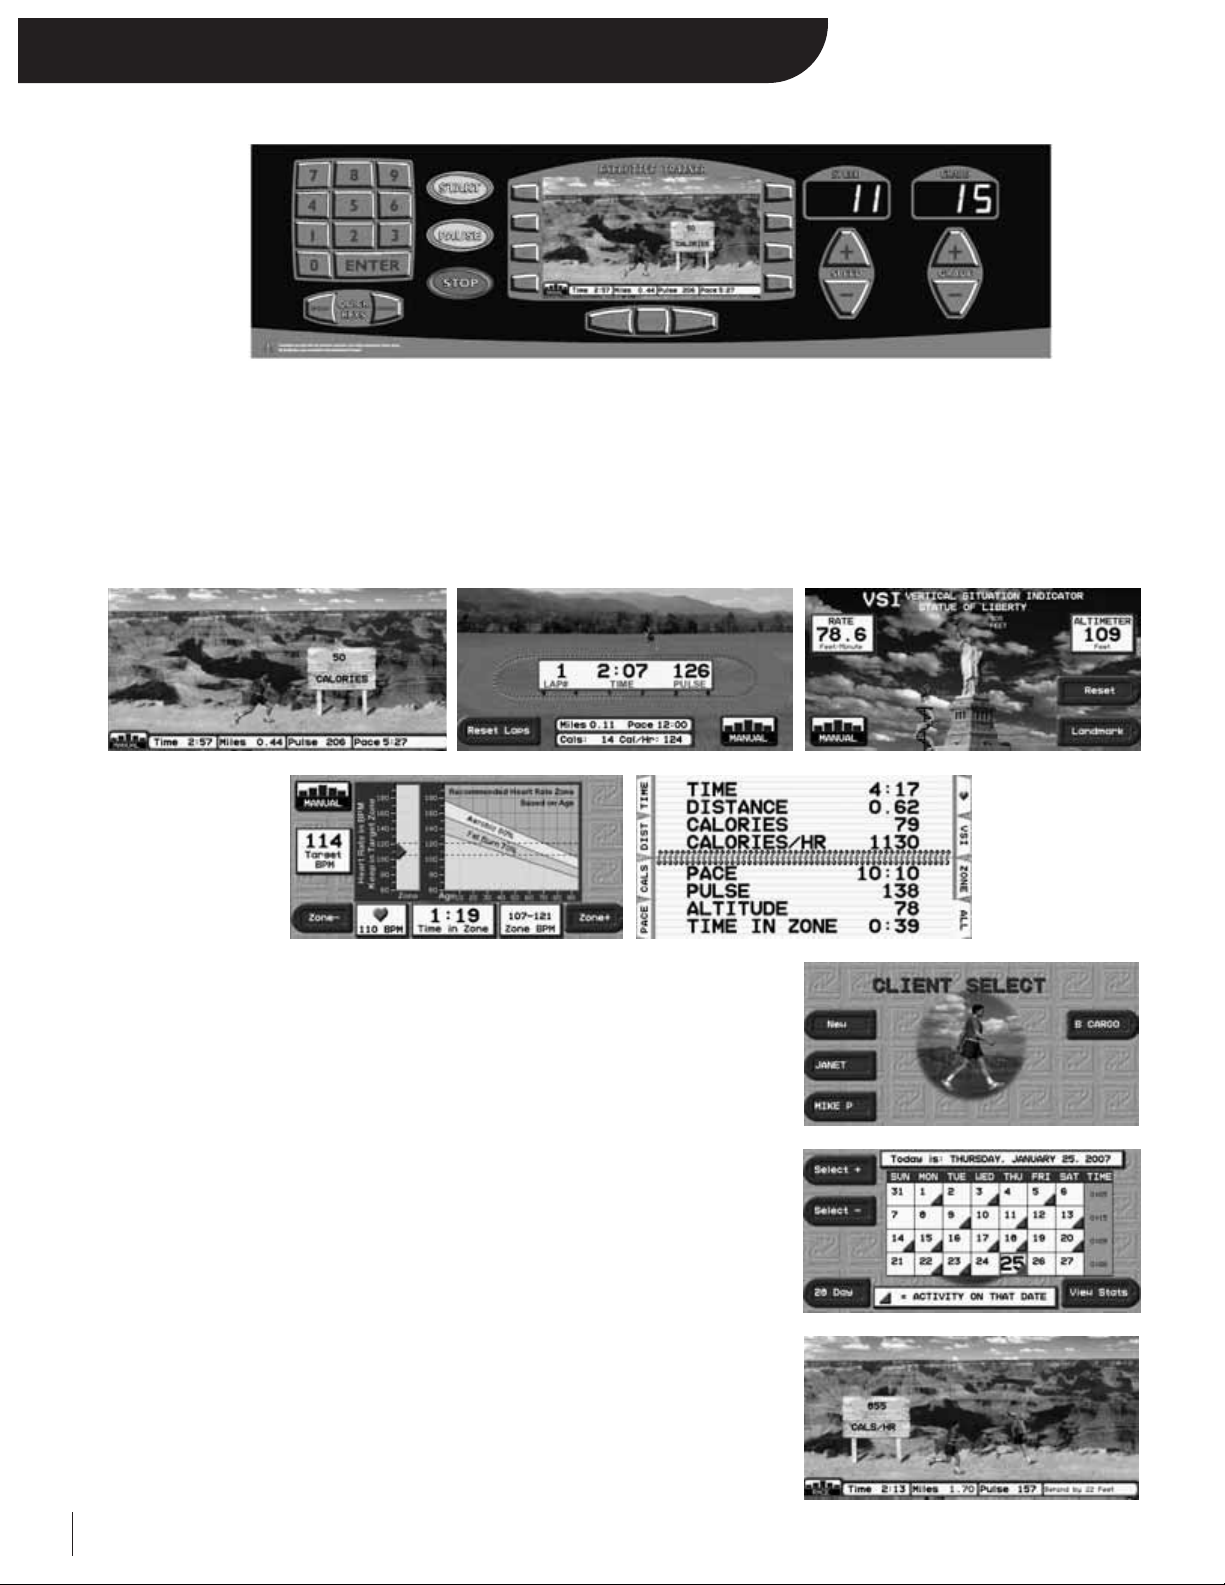
The Executive Trainer treadmill combines a versatile liquid crystal display (LCD) with a variety of program options to
achieve your fitness goals.
SELECTABLE SCREENS
At any point during your workout, the Executive Trainer allows you to view one of its 5 motivational screens. Each of
these screens help you visualize your workout in a unique way while providing statistical information for up-to-thesecond updates.
USER CUSTOMIZATION
The Executive Trainer stores up to five individual clients. Users can store personal
information (gender, weight, target pulse, etc…) and treadmill limits (max speed
and grade) to ensure efficient, safe, and effective workouts every time.
AUTOMATED WORKOUT CALENDAR
The Executive Trainer records all user activity over the last 30 days. Clients can
access their calendar and review previous workouts. For further analysis, they can
also view a personal 30-Day Progress Report.
UNIQUE PROGRAMMING
• 5 Built-in programs and 5 User Programs (100% fully customizable)
• 4 Heart Rate Control Programs: 2 Built-In and 2 User
• 6 Fitness Tests/Protocols – Balke, Firefighter ARMY, NAVY, USMC,
and USAF
• Specific Goal Programs: designed around a workout’s goal (distance,
time, or calories)
• Race Mode: Beat your best 1/
2 Mile, 1 Mile, 2 Mile, 5K, or 10K time in a
head to head race against a virtual pacer.
Page 11
6
Getting Started
Make sure you have read and understand this owner’s manual. Now you are ready to begin.
Start by straddling the treadbelt with one foot on each traction strip. Once the treadbelt begins moving you can start walking
on the treadbelt.
Press the button.
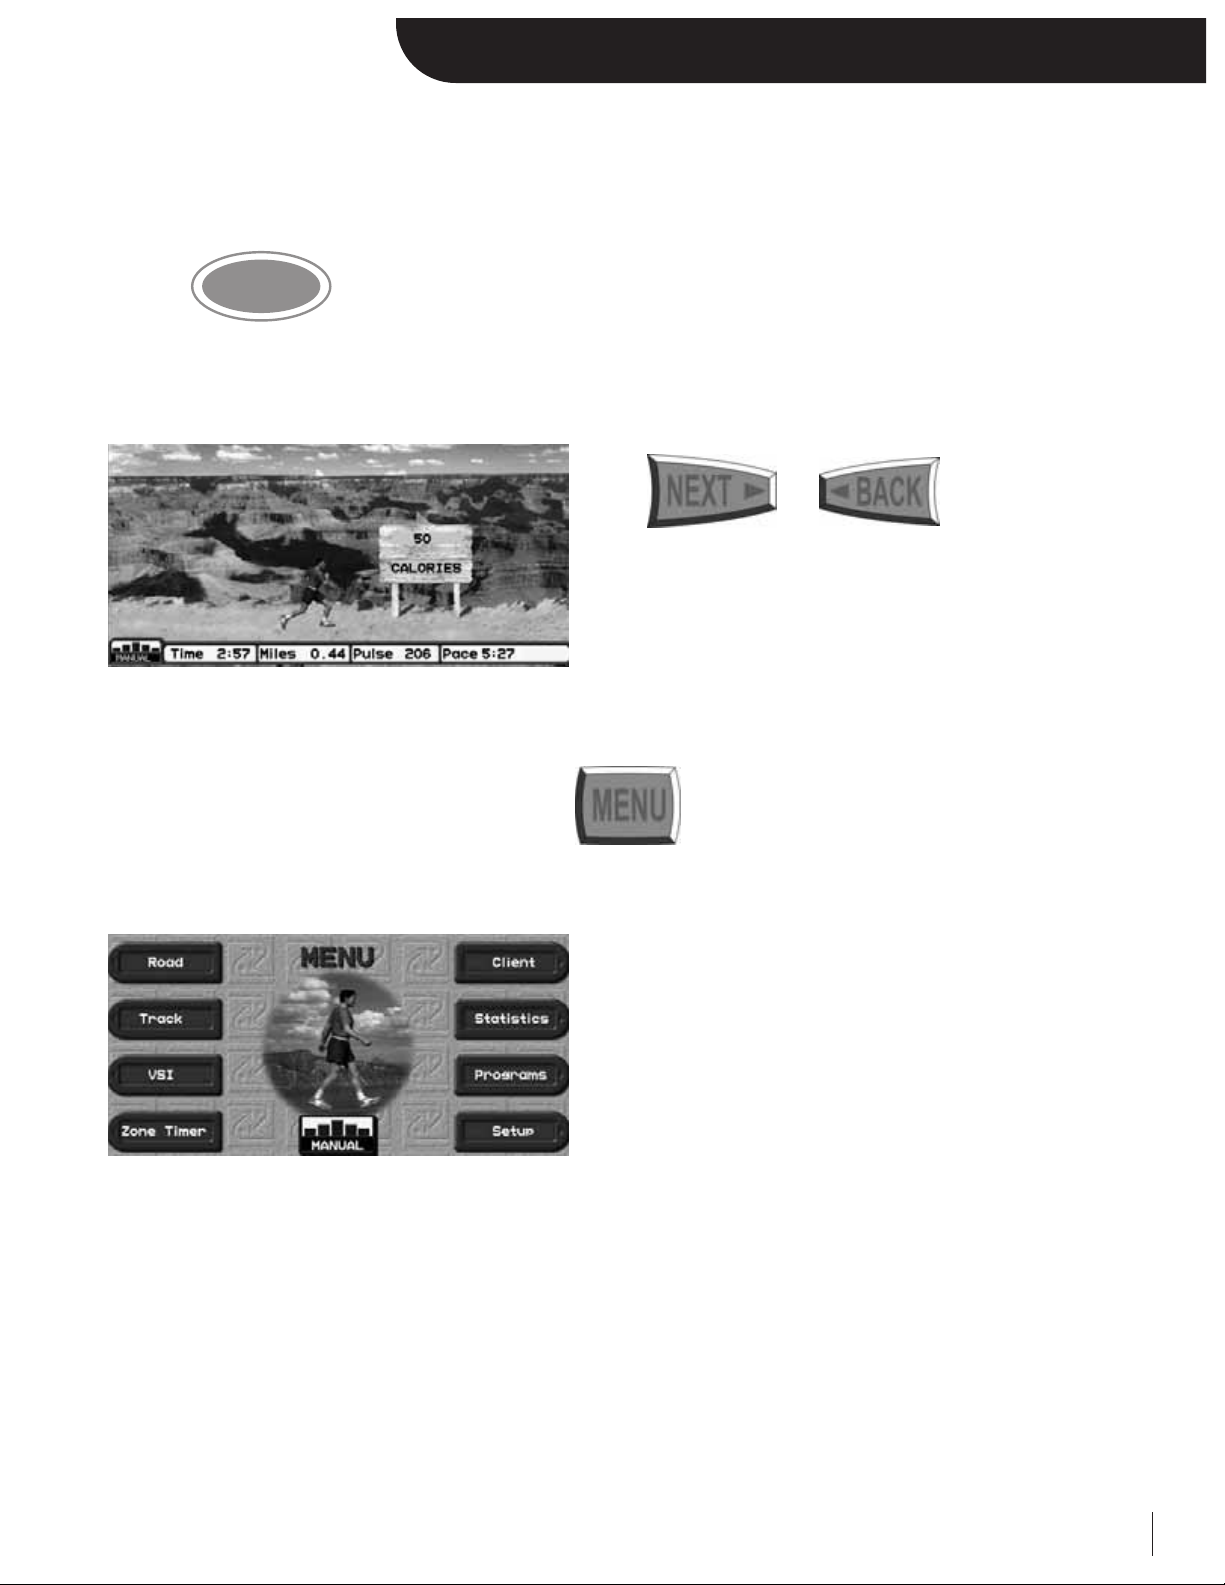
After three seconds the treadbelt will start moving at 0.5 mph and the center display one of your 5 motivational screens, the
Road Screen.
Press or to view any
of the other motivational screens.
You are now in Manual Mode, where you control the speed and elevation at your discretion.
You can access all of your treadmill’s options by pressing at any time.
START
START
Page 12
7
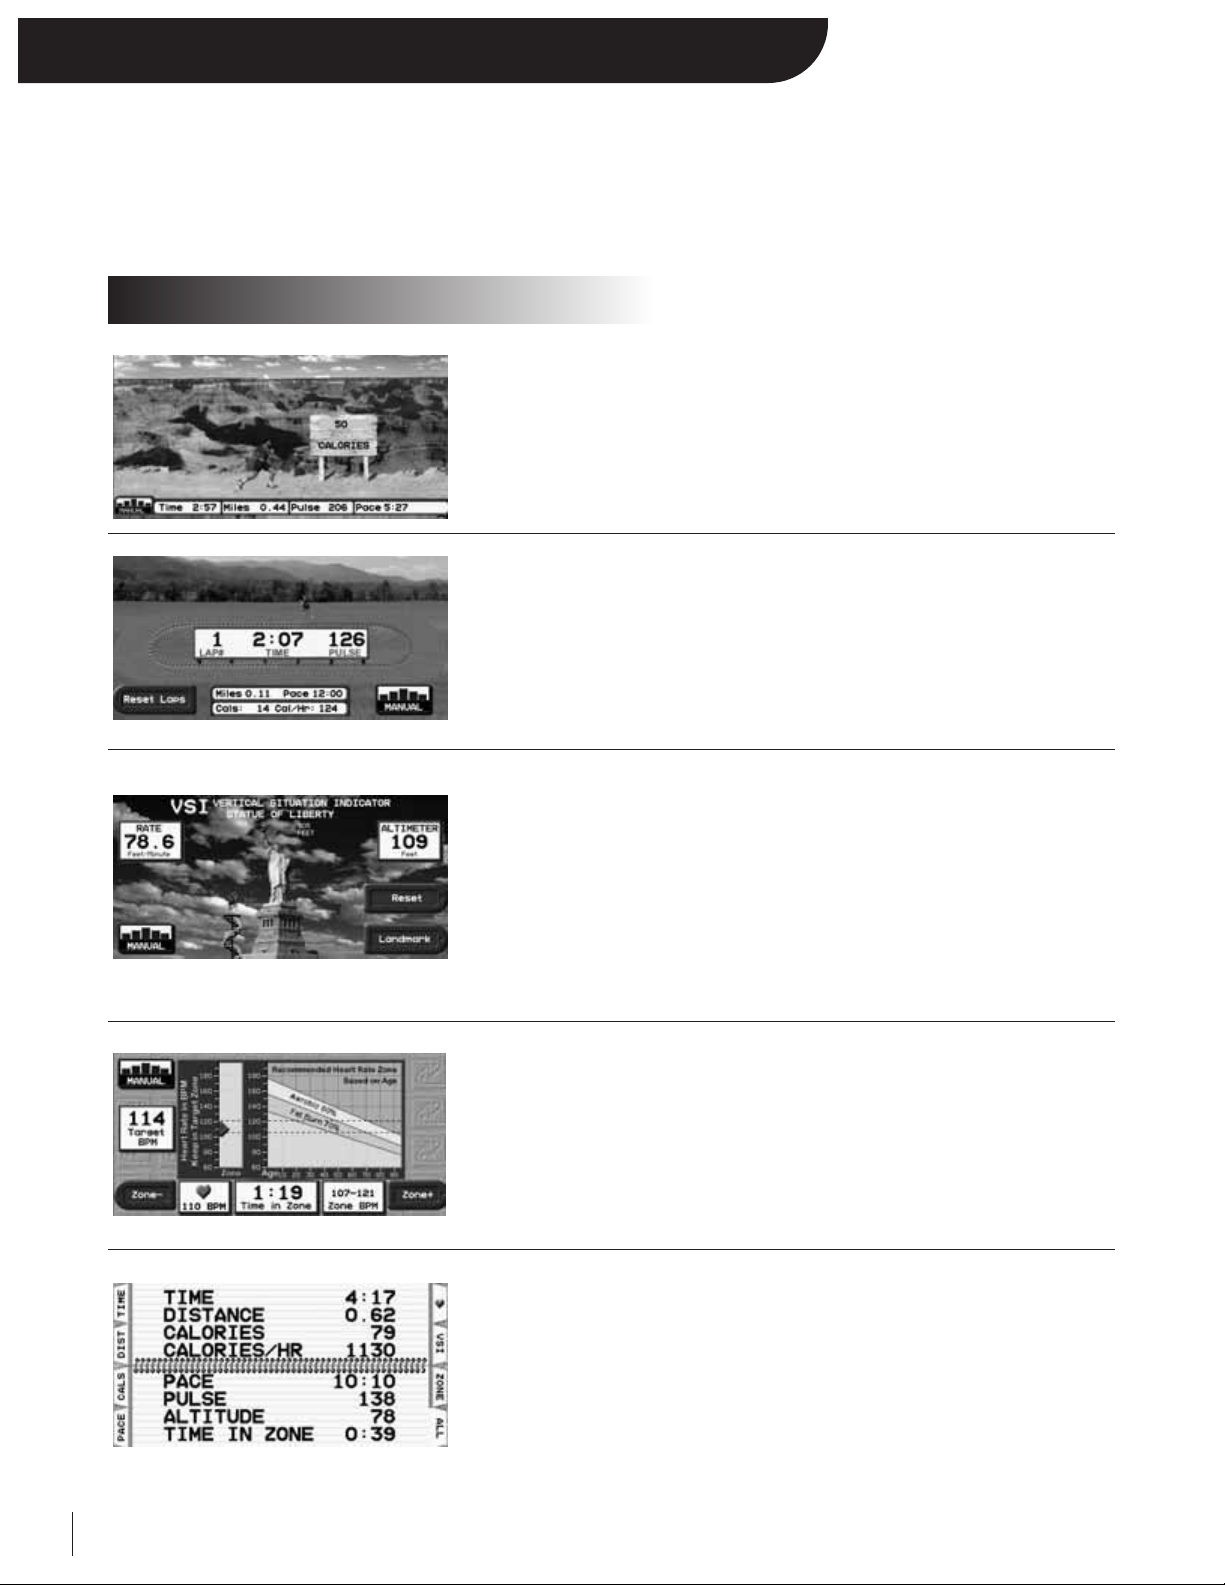
Upon start up, the treadmill defaults to Manual Mode. In Manual Mode, you and only you can change the speed and
elevation as well as view one of the 5 motivational screens.
Press NEXT or BACK to rotate through the selectable motivational screens.
• Displayed Statistics:
Time, Distance, Heart Rate, Pace
• Scrolling Statistics:
Calories per hour, Altitude Climbed, Climbing Rate, Zone Timer,
Pace, and Calories
• Displayed Statistics:
Time, Lap Counter, Distance, Pace, Pulse, Calories, and Calories per hour
• 1/
4 Mile Track:
A virtual runner displays progress around a
/
4 mile track
• Displayed Statistics:
Altimeter and Climbing Rate
• Climbing Progress:
A virtual runner displays climbing progress up a famous landmark
• Selectable Landmark:
Press the designated “LANDMARK” key to scroll though different famous
landmarks of various heights
• Reset:
Press the designated “RESET” key to reset your accumulated altitude
• Displayed Statistics:
Time in Heart Rate Zone, Heart Rate, Target Heart Rate and Age vs.
Zone Graph, Target Heart Rate, and Heart Rate Zone
• Heart Zone Shift:
Press the designated “ZONE –” and “ZONE +” to decrease and increase your
heart rate zone
• Displayed Statistics:
Time, Distance, Calories, Calories per hour, Pace, Heart Rate, Time in Zone,
Accumulated Altitude and Climb Rate
• Selectable Statistics:
Press the designated statistic keys to view a featured statistic or “All” to view
all at once.
Manual Mode
Motivational Screens
Page 13
8
Using the Numeric Keypad
The Executive Trainer is equipped with a numeric keypad, which serves multiple functions to make the treadmill easier to
control. It can be used to change speed and elevation, enter user settings, and configure programs.
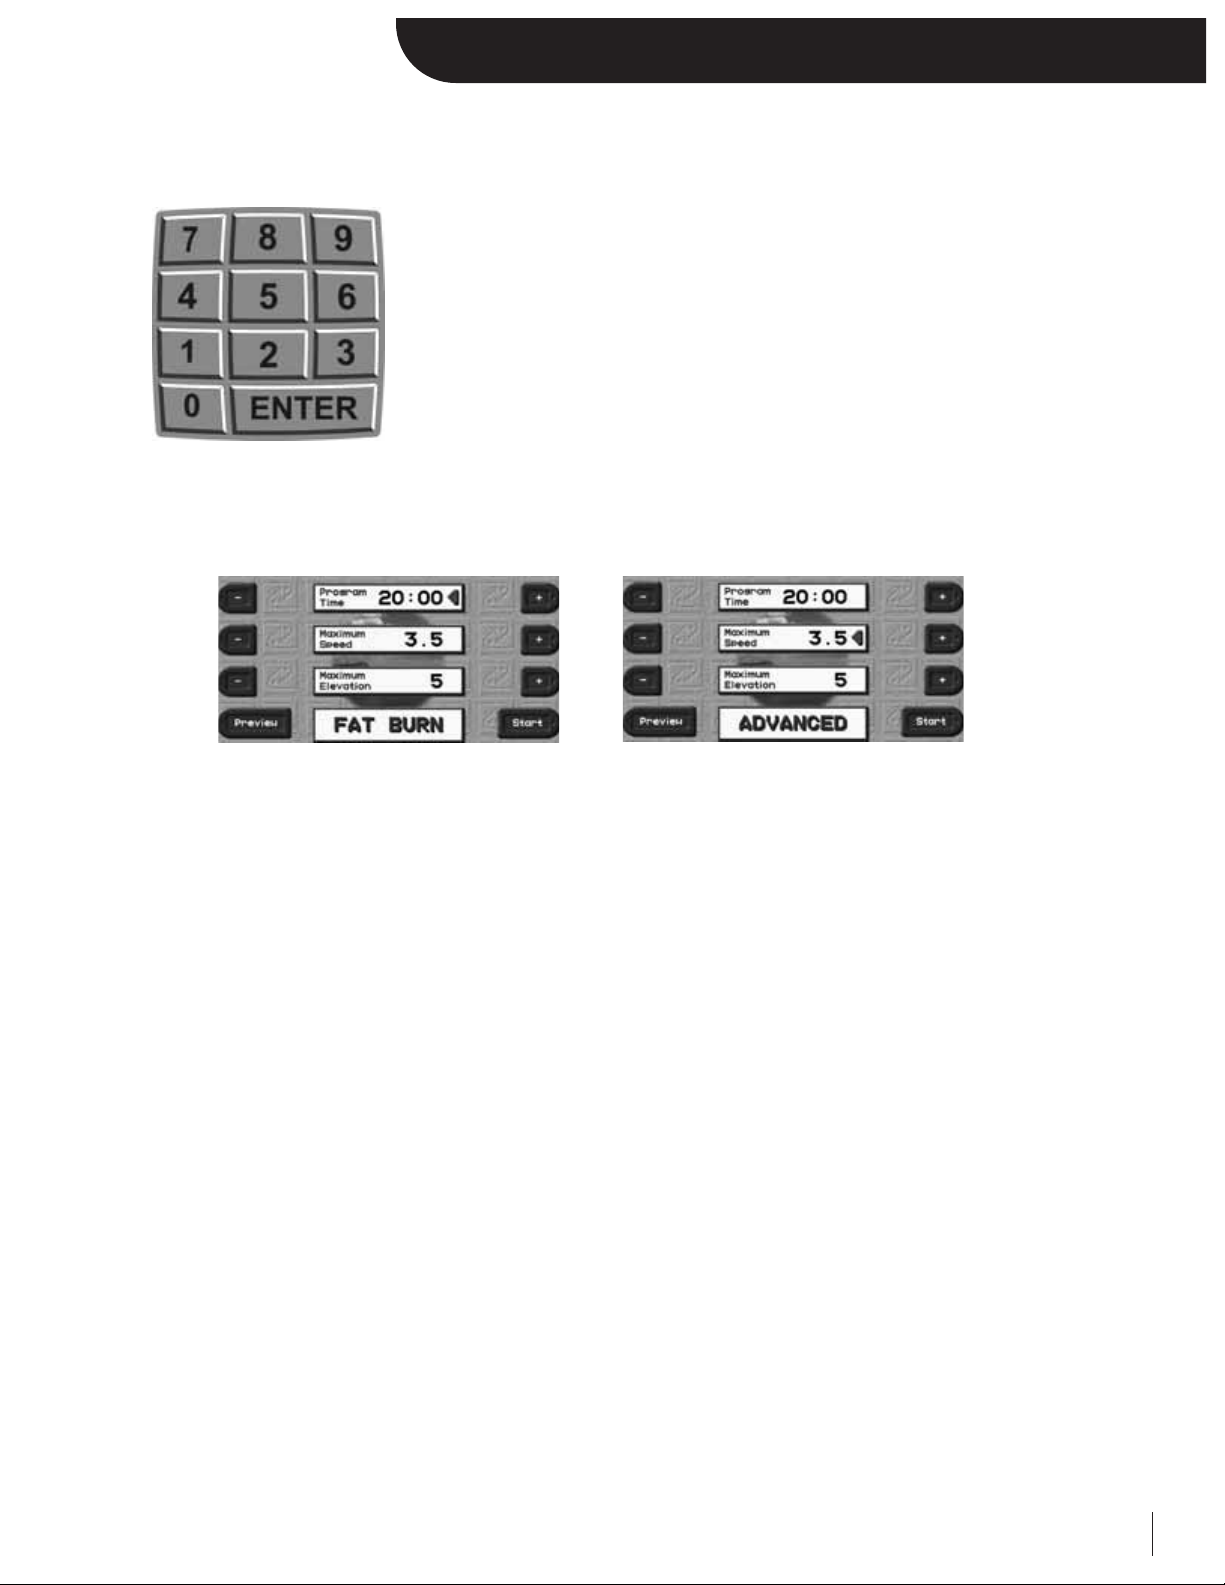
Whenever you are prompted with a numeric entry, you have the option of using the designated “+/-” keys or the numeric
keypad. If there are multiple numeric prompts displayed at once, look for the red triangle. The numeric keypad will only
modify the line that has the red triangle. To activate another line, simply press ENTER or use the designated “+/-” keys to
activate another prompt.
When to use the numeric keypad:
QUICK SPEED / QUICK GRADE
The QUICK SPEED and QUICK GRADE buttons below the keypad allow you to go directly to a target speed or elevation
without having to hold down the Speed/Grade “+/-” keys. Simply press QUICK SPEED or QUICK GRADE, then enter the
desired value using the keypad.
PROGRAM CONFIGURATION
In program setup you will be asked different information based on that particular program’s parameters. This information
can be dialed in using the “+/-” keys, or the numeric keypad.
• In the 5 Built-in programs, the keypad can be used to enter the program’s maximum time, speed, and elevation.
• In the Specific Goal Programs, the keypad can be used to enter a variety of different information. Time Goal:
Time, Distance Goal: Distance, Calorie Goal: Calories.
• In the 5 User programs, the keypad can be used to enter the program’s maximum time. It can also be used to
set the speed and elevation for each individual segment. This will be explained in more detail under the USER
PROGRAM section of this manual.
• In the Heart Rate Control (HRC) programs, the keypad can be used to enter the program’s maximum speed,
target heart rate, and program time.
• In the User Heart Rate Control programs, the keypad can be used to enter the program’s maximum speed,
program time, and the target heart rate for each individual segment. This will be explained in more detail
under the HEART RATE sections of this manual.
• In the fitness tests/protocols, the keypad can be used to enter your age.
Page 14
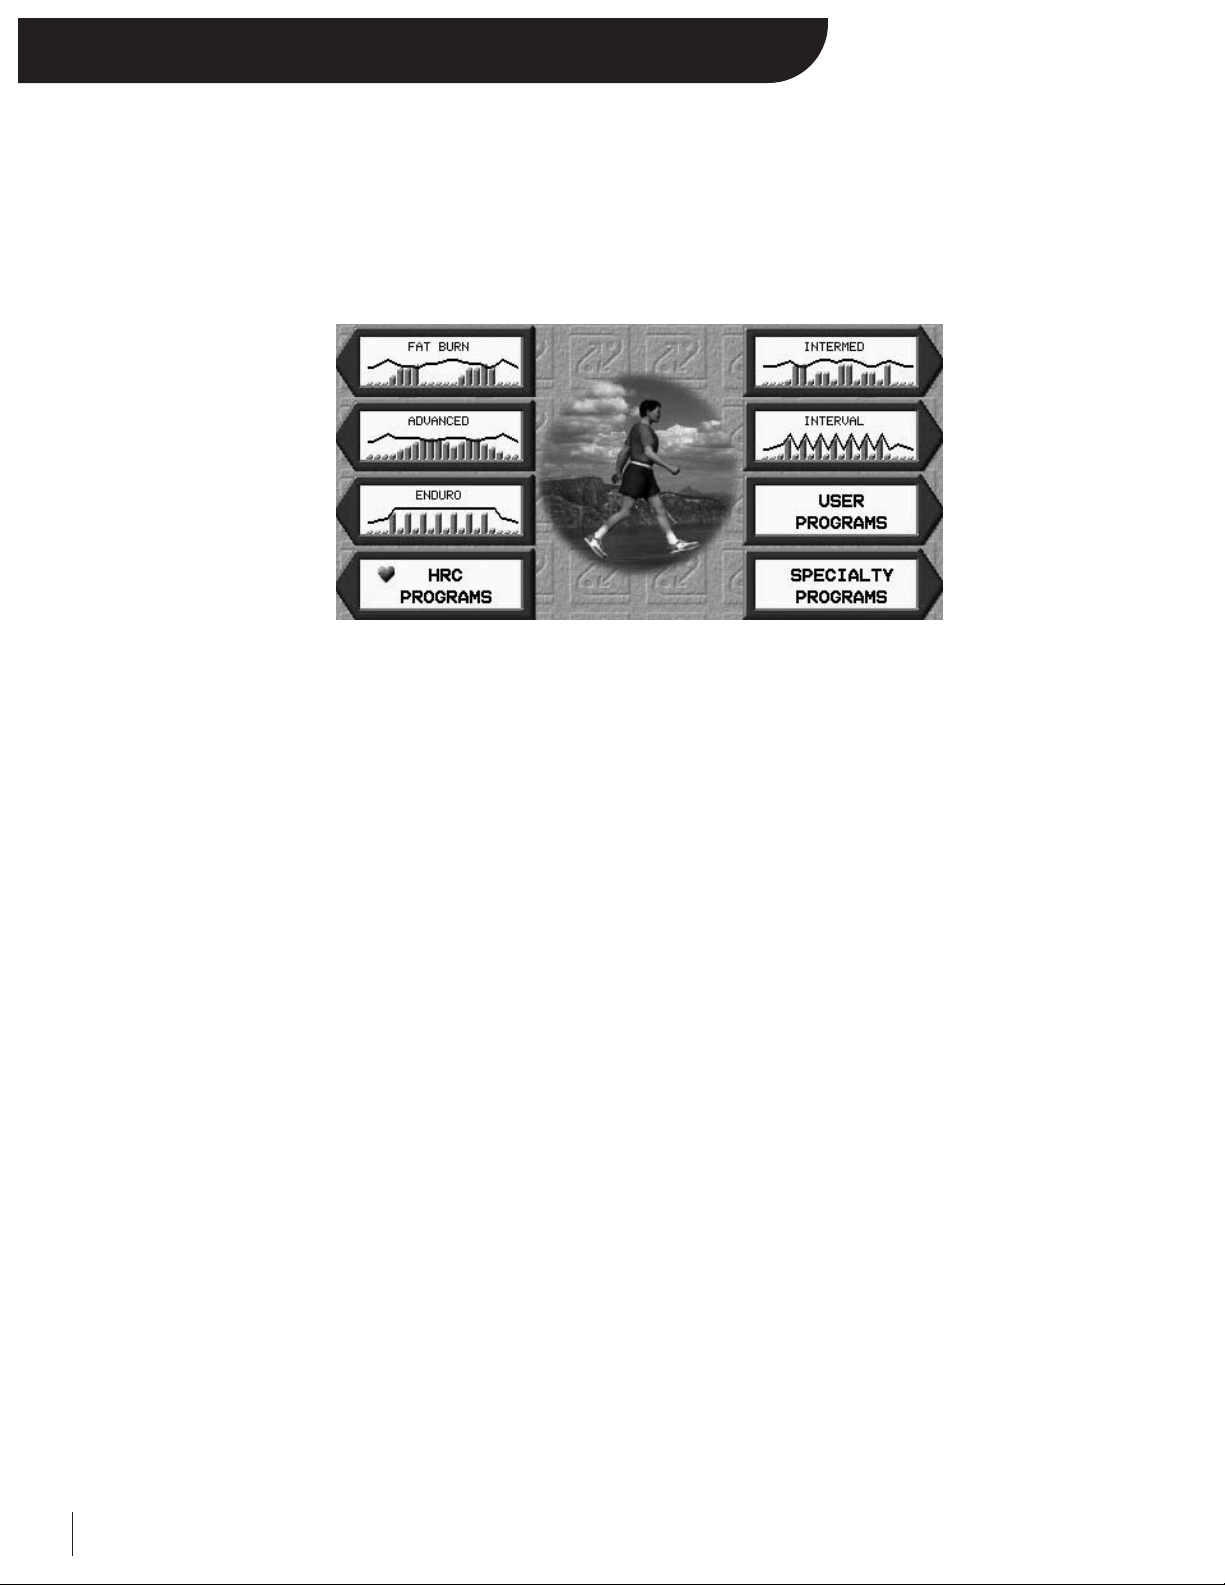
9
Built-in Programs
Programs have been added to the Executive Trainer so you can add some variety to your workouts. You can choose from
one of 5 built-in programs, which will run you through a pre-selected speed and elevation curve. When choosing a program
you select a maximum speed, maximum elevation and a time from 10 to 99 minutes. Once set, the treadmill will not go
above the maximum number unless you manually override it. Each program is divided into 20 segments of equal time,
beginning with 3 warm-up segments and ending with 2 cool-down segments. For example, a 40-minute program will
contain 20 two-minute segments.
The following figures represent the 5 built-in programs in the Executive Trainer.
FAT BURN
The Fat Burn program features two elevation peaks matched to an inverse speed curve. The overall goal of this program is to
elevate your heart rate, maintain the elevated heart rate for most of the workout, then gradually bring your heart rate down
via the last three cool down segments.
INTERMEDIATE
The Intermediate program features five elevation peaks matched to a challenging speed curve. The overall goal of this
program is to vary your heart rate by elevating and lowering it several times, providing you with a challenging
cardiovascular workout.
ADVANCED
The Advanced program features high elevations combined with top speeds for an all-out workout. The overall goal of this
program is to raise your heart rate with both speed and elevation for an advanced cardiovascular workout.
INTERVALS
The Intervals program features high speeds and elevations alternating with low speeds and elevations. The overall goal of
this program is to vary your workout load, taking you from peak level to recovery eight times throughout your workout.
ENDURO
The Enduro program features a max speed run, mated with max elevation. The overall goal of this program is to raise your
heart rate with both speed and elevation for the ultimate cardiovascular workout.
Page 15
10
Running Built-in Programs
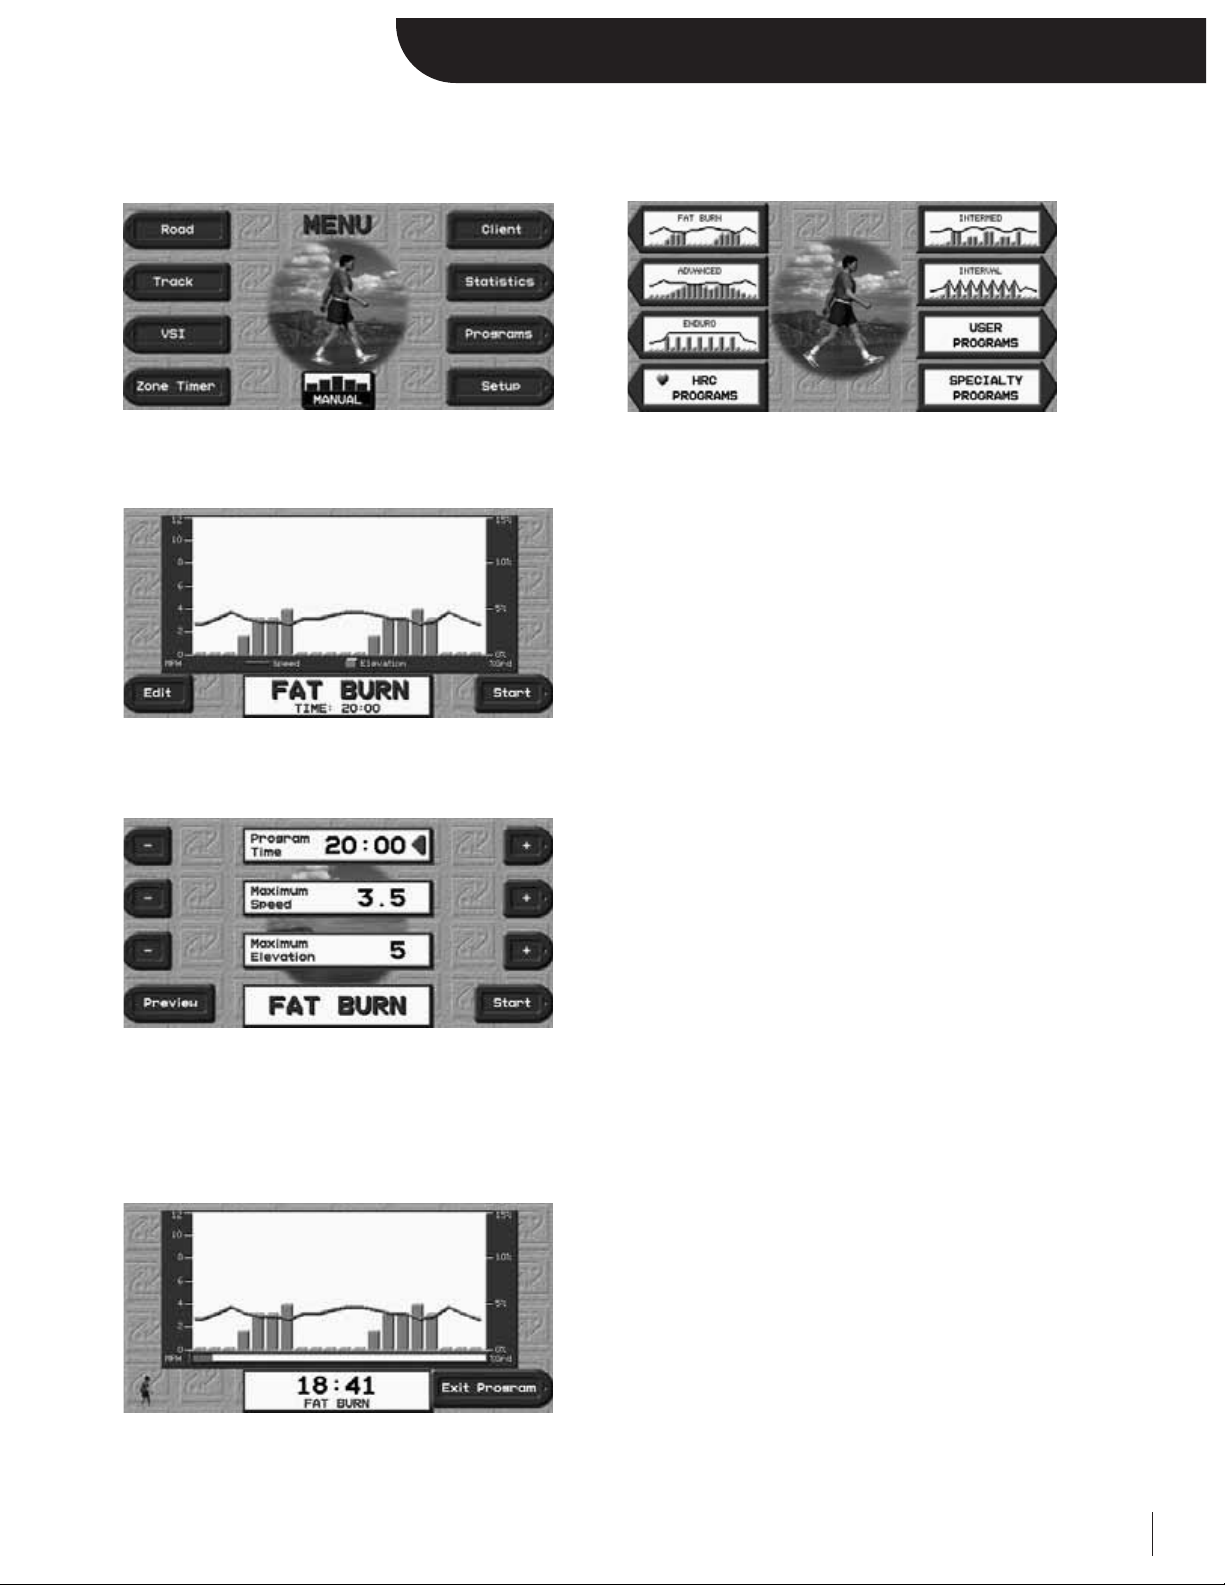
From the Menu screen, select PROGRAMS to view all programming options.
Once you select the built-in program that best suits your need, you will be prompted with a Program Preview screen.
The program preview is a graphical representation of the program
you have selected which displays:
• Maximum Speed and Elevation
• Minimum Speed and Elevation
• Program Time
You have the option to START if you are happy with the program’s parameters or EDIT them to your liking.
This screen allows you to customize the program’s parameters.
Use the designated “+/-” keys or the numeric keypad to adjust the
Program Time, Maximum Speed, and Maximum Elevation.
Once you are content with your modifications, you have the option to START or PREVIEW your changes in the Program
Preview before starting.
As soon as you start the program, the Program Progress Screen becomes available as one of the selectable displays. You can
press NEXT or BACK to view the other motivational screens.
Features:
• Progress Bar
• Total Time Remaining
• Designated “Exit Program” key
Once the program is complete or you choose to prematurely terminate it by selecting the featured “Exit Program” key, the
treadmill will automatically default back into Manual Mode.
Page 16
11
User Programs
The Executive Trainer has storage capacity for five User Programs, which you can create and change. The treadmill will
remember these programs even if you unplug it from the wall. The five User Programs will be pre-loaded as 20-minute,
20-segment programs.
A User Program looks and runs exactly the same as a Built-In Program. The primary difference between Built-In
Programs and User Programs is customization. Unlike the Built-in Programs, User Programs allow you to manually edit
individual segments.
To Edit a User Program:
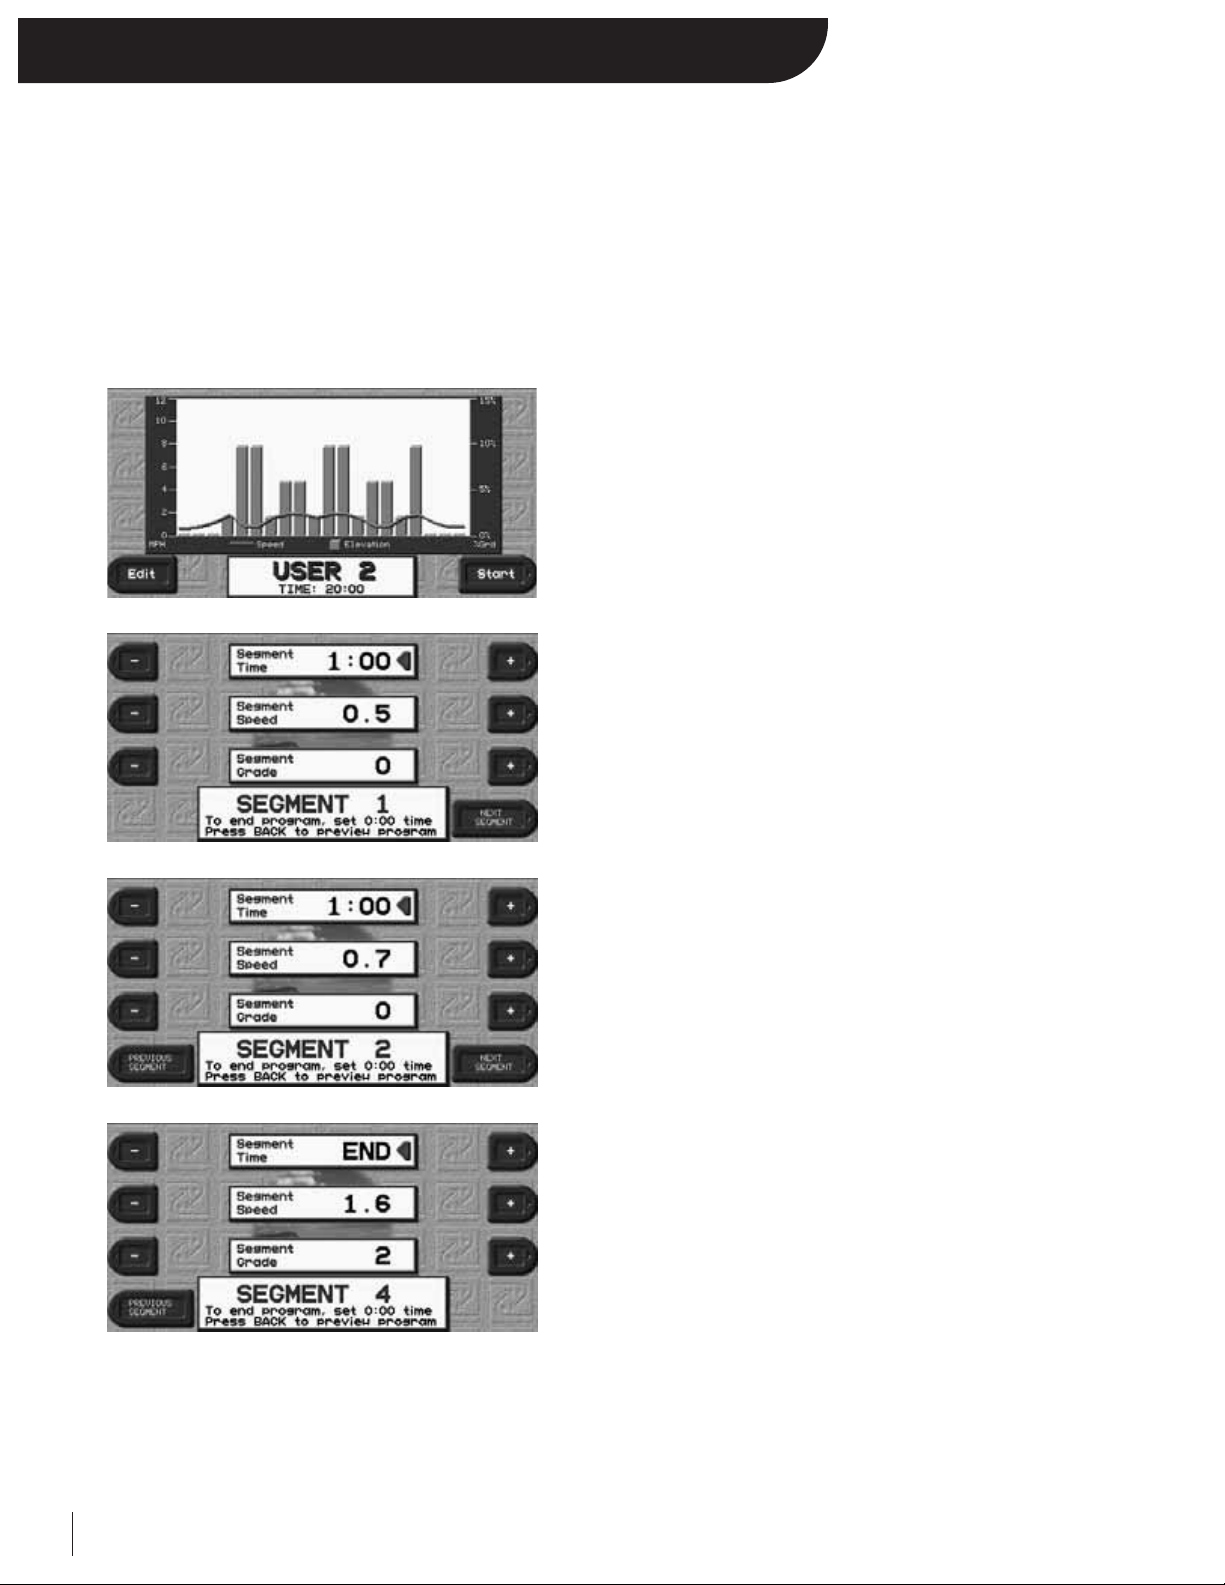
Press Menu -> Programs -> USER PROGRAMS
After selecting the User Program you want to edit, you will enter the
Program Preview Screen. Select EDIT to enter EDIT MODE.
When you first enter EDIT MODE, you default to a detailed view of
the 1st segment of the User Program.
Using the designated “+/-” keys or the numeric keypad, you can
modify the 1st segment’s length, speed, and grade.
Press NEXT SEGMENT to view the 2nd segment in detail.
To view other segments, use the designated “NEXT/PREVIOUS
SEGMENT” keys to navigate through the entire 20-segment program.
When you finish modifying your User Program, press BACK to
preview your modified program.
EXAMPLE:
If you want to modify your user program to be less than a
20-segment program (1-19), follow these steps.
To make a 3 Segment User Program:
1. After modifying segments 1, 2, and 3 to your liking, advance to
Segment 4.
2. Now that you are in Segment 4, set the Segment Time to 0:00.
Notice that it reads END and that the designated “NEXT
SEGMENT” key has disappeared.
3. Press BACK to preview your 3-Segment User Program and press
START to begin.
When you have completed editing your User Program, press START to view the Program Preview with the updated changes
that you have made.
If you are content with your changes, press START to begin the User Program. Your newly modified User Program will be
permanently stored in Executive Trainer’s memory even if the treadmill is unplugged.
Page 17
12
HRC (Heart Rate Control) Programs
The Executive Trainer is equipped with both Contact Heart Rate and Wireless Heart Rate (transmitter strap). Heart Rate
Control programs require the use one of them.
The Executive Trainer has the ability not only to display your heart rate, but also to automatically vary the speed and
elevation based upon your heart rate via its Heart Rate Control (HRC) programs. HRC training allows you to maximize
your workout performance while minimizing your workout time.
There are 2 different 20-segment heart rate control programs: HRC and Interval HRC
To Run an HRC program:
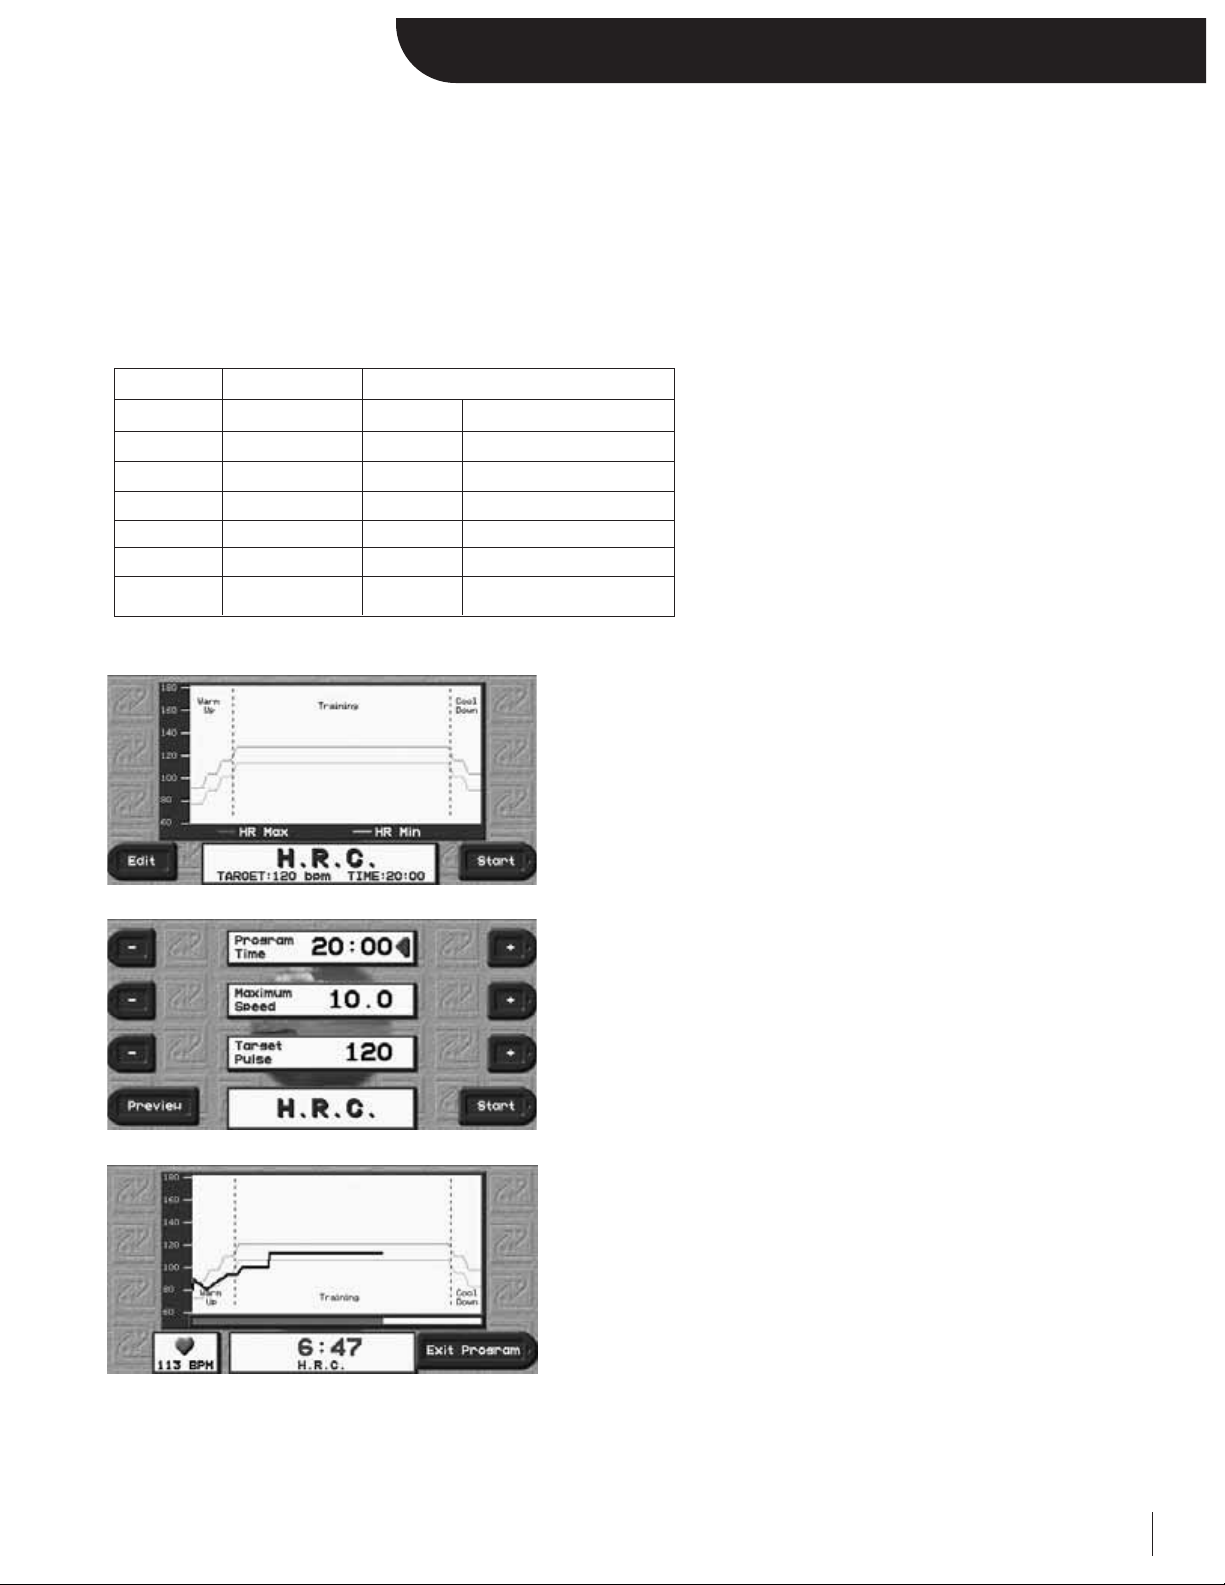
Press MENU->Programs->HRC PROGRAMS to display the HRC
Programs Selection Screen. Select HRC or Interval HRC.
If the default HRC Program displayed in the program preview suits
your needs, press START to begin. If you would like to modify it,
press EDIT instead.
This screen allows you to customize the program’s parameters.
Use the designated “+/-” keys or the numeric keypad to adjust the
Program Time, Maximum Speed, and Target Pulse.
Once you are content with your modifications, press START to begin
or PREVIEW to view the Program Preview with the updated changes
you have made.
As soon as you start the program, the Program Progress Screen
becomes available as one of the motivational screens. You can press
NEXT or BACK to view the other motivational screens.
The Program Progress Screen displays program time and heart rate.
Your heart rate (black line) will slowly graph itself during the
program attempting to stay between the Max Heart Rate (red dashed
line) and the Min Heart Rate (green dashed line).
Once the program is complete or you choose to prematurely terminate it by selecting the designated “Exit Program”key,the
treadmill will automatically default back into Manual Mode.
• HRC keeps the user’s heart rate at the target
heart rate for the duration of the workout.
• Interval HRC targets different heart rates.
It alternates between the target and 80% of
the target.
Segment
1
2
3
4-18
19
20
Stage
War m up
War m up
War m up
Training
Cool Down
Cool Down
HRC
70
80
90
100
90
80
% of Target Heart Rate
Interval HRC
70
80
90
Alternating 100 & 80
90
80
Page 18
13
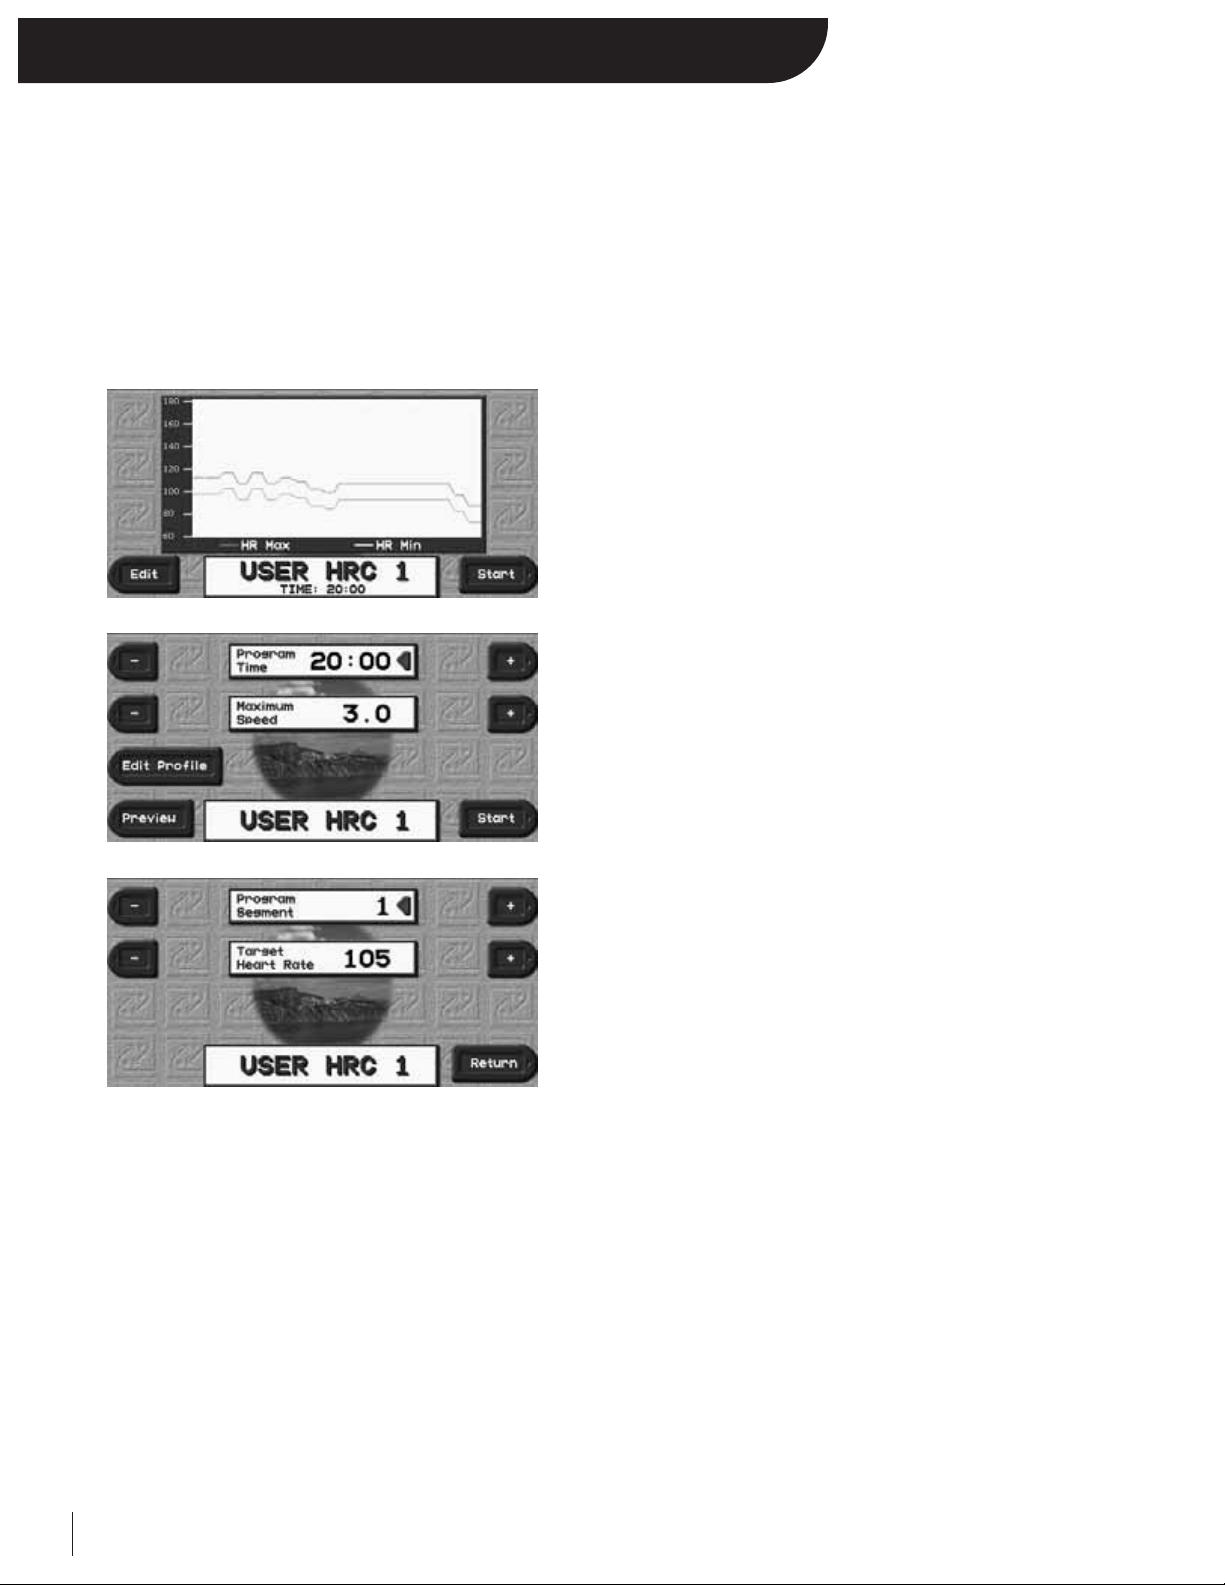
User HRC Programs
The Executive Trainer has storage capacity for 2 User HRC Programs, which you can create and change. The treadmill will
remember these programs even if you unplug it from the wall. The 2 User HRC Programs will be pre-loaded as 20-minute
programs.
A User HRC Program looks and runs exactly the same as a standard HRC Program. The primary difference between HRC
Programs and User HRC Programs is customization. Unlike the HRC Programs, User HRC Programs allow you to manually
edit individual segments.
To Edit a User HRC Program:
MENU->Programs->HRC PROGRAMS
After selecting the User HRC Program you want to edit, you
will enter the Program Preview Screen. Press EDIT to enter
EDIT MODE.
Use the designated “+/-” keys or the numeric keypad to adjust the
Program Time or Maximum Speed.
If you want to adjust the targeted heart rate from segment to segment
throughout the program, press Edit Profile.
When you first enter the HRC Profile Edit Screen, you default to a
detailed view of the 1st segment of the 20 segment program.
To adjust the Target Heart Rate, use the designated “+/-” keys or the
numeric keypad.
To change segments, use the designated “+/-” keys of the numeric
keypad.
Press Return to exit the Profile Edit Screen.
Press Preview to see the program preview of your updated changes or Start to begin your program.
Your newly modified User HRC Program will be permanently stored in the Executive Trainer’s memory even if the treadmill
is unplugged.
Page 19
14
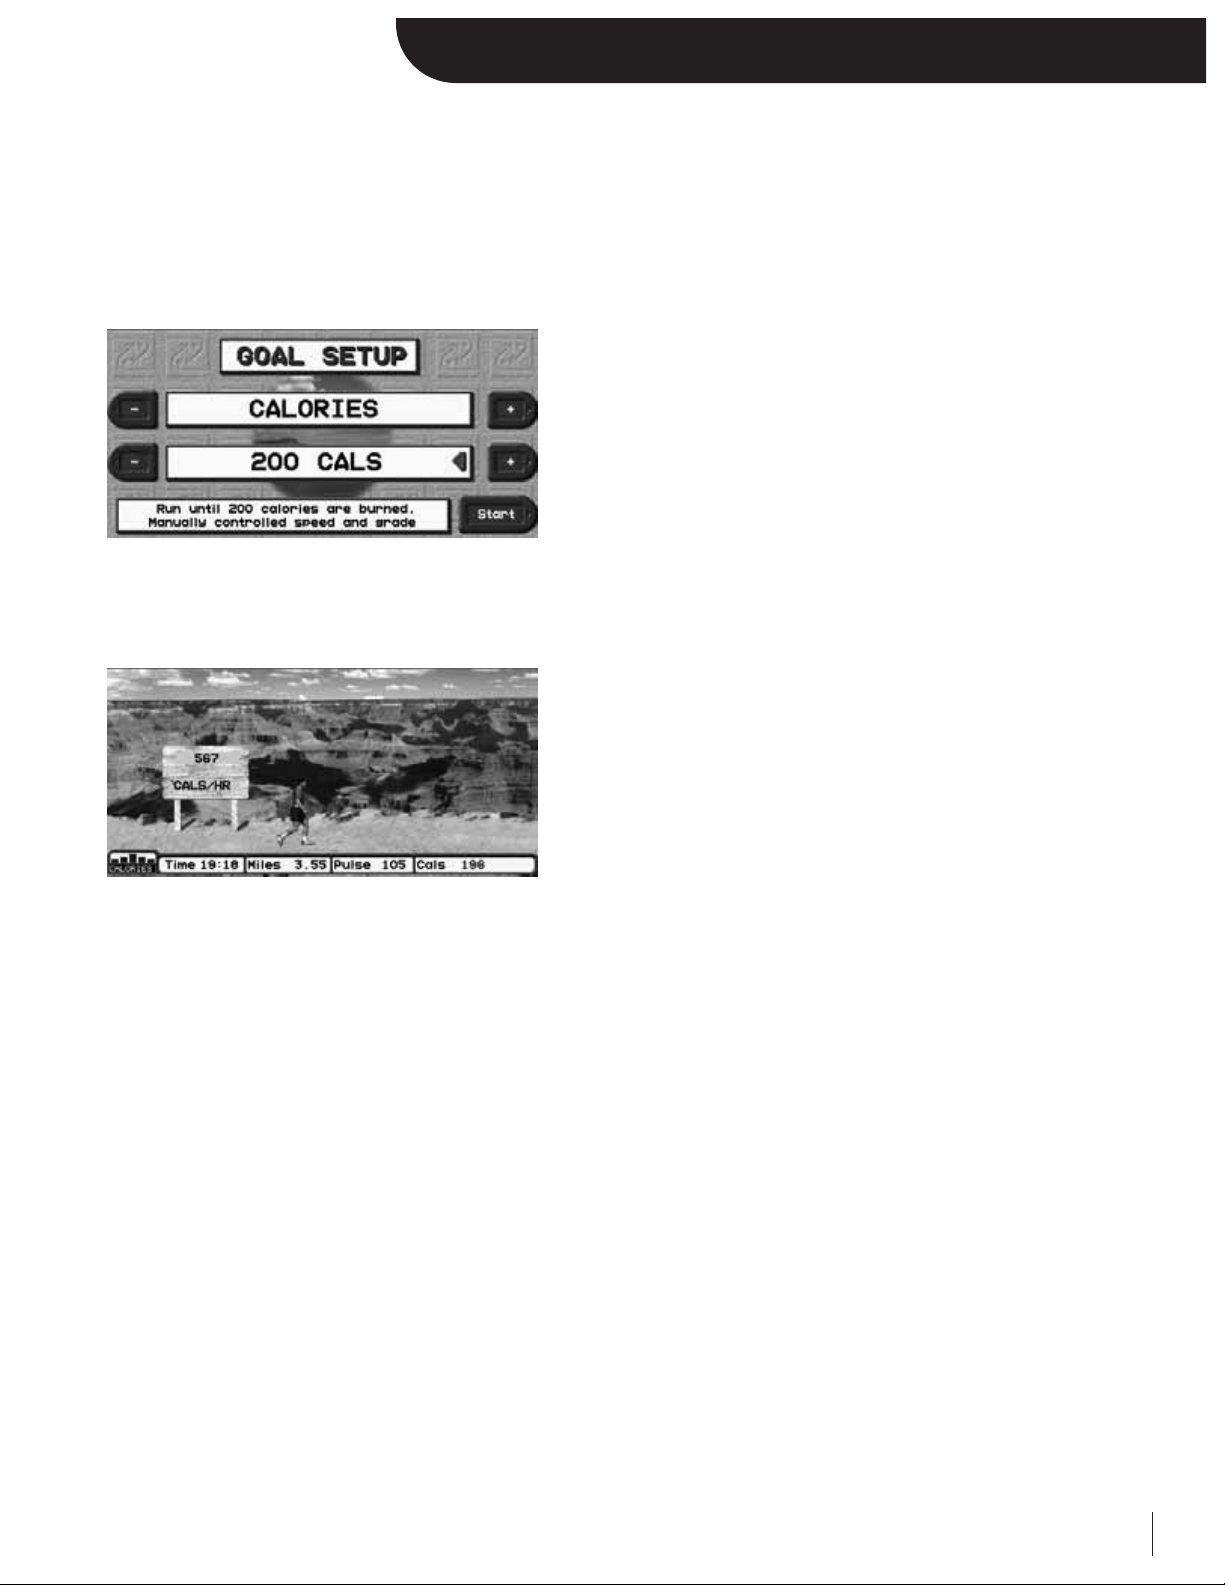
Specific Goal Programs
These specialty programs have been designed to monitor and achieve a specific goal you may have every time you get on
your Executive Trainer. Whether you want to go for a 3-mile run, burn 1,000 calories, or simply exercise for 15 minutes, the
goal progress will be updated automatically as you progress through your workout. During these programs you will retain
full manual control.
Using Specific Goal Programs:
Press Menu -> Programs -> Specialty Programs-> Specific Goal to
view the Specific Goal Setup Screen. Use the top designated “+/-”
keys to select your workout’s goal: TIME, DISTANCE, or CALORIES.
After selecting your goal, define its parameter using the bottom
designated “+/-” keys or the numeric keypad:
Time: 10-99 Minutes
Distance: 0.1-99.9 Miles
Calories: 10-9999 Calories
Press Start to begin.
As soon as you begin, you’ll notice that goal progress will be
displayed in the different motivational screens. The goal statistic
displayed in red font will update instantaneously any speed/grade
changes you make and count down to zero until you reach your goal.
Once the program is complete, or you choose to prematurely
terminate it by selecting the designated “Exit Program”key,the
treadmill will automatically default back into Manual Mode.
Page 20
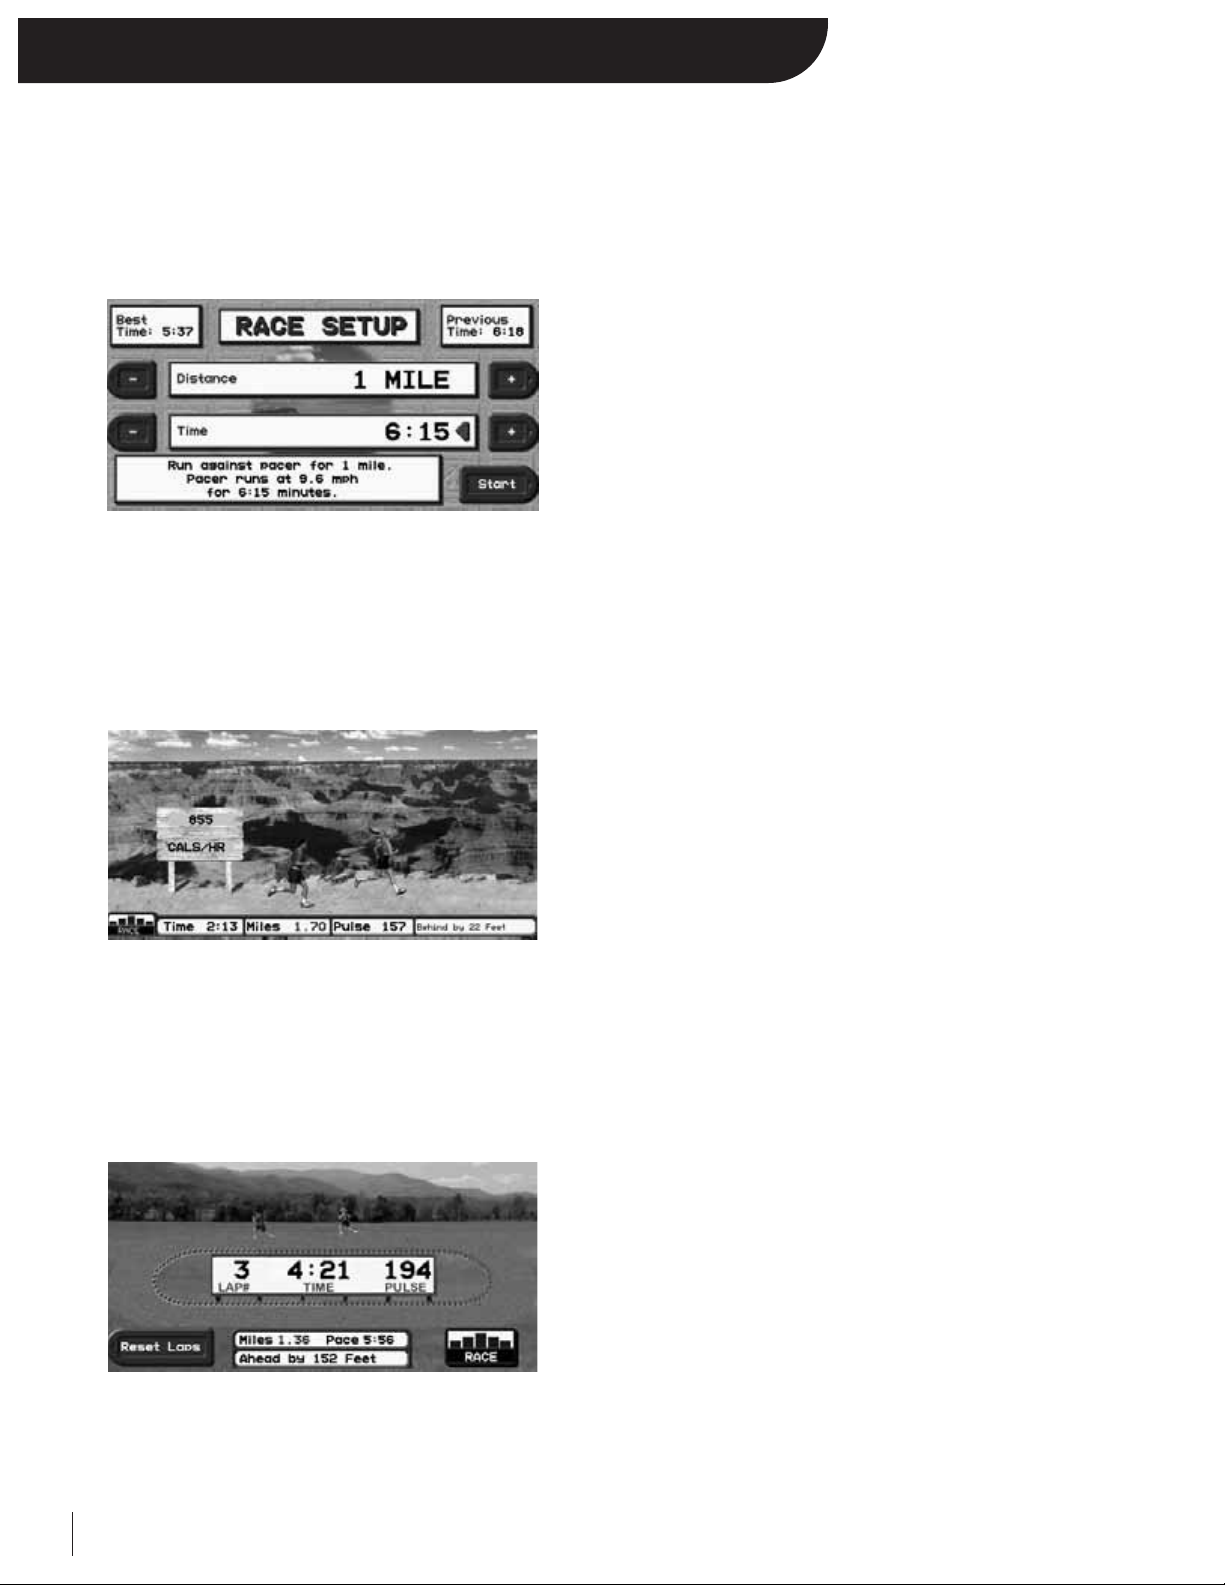
Race mode is a unique feature exclusive to the Landice Executive Trainer. Race is a manually controlled distance based
program that monitors your progress versus a virtual pacer. The virtual pacer can be your previous/best-recorded time or
manually dialed in during set up. There are five different preset race distances:1/
2 Mile, 1 Mile, 2 Mile, 5 K, and 10 K.
To run a Race:
Press Menu -> Programs -> Specialty Programs-> Race to enter the
Race Setup screen.
Use the designated “+/-” keys to select your desired distance:1/
2 Mile,
1 Mile, 2 Mile, 5K, or 10K.
After selecting your distance, use the designated “+/-” keys or the
numeric keypad to dial in your pacer’s speed.
Notice that your personal best and previous times for this distance
are posted at the top the setup screen.
Press START to begin the race.
As soon as you begin, you will default to the Road Screen. During
the Race, the Road Screen will display both you and the pacer (the
pacer is always the opposite gender).
The pacer will finish the race distance exactly at the time you selected
in setup. Since you are in manual speed control throughout the race,
you control your own finish time.
Your runner will always remain centered in the Road Screen. If the
pacer is to the right of you, he/she is winning. If the pacer is to the
left of you, you are winning.
The statistics at the bottom also display the up-to-the-second
distance between both runners.
The Track Screen also displays both of your positions on the track
and updates the distance ahead/behind statistic.
15
Race Mode
Page 21

16
Fitness Tests/ Protocols Overview
The Executive Trainer includes 2 fitness tests and 4 fitness protocols. Based on your specific age, gender, and performance
they calculate your fitness level. The Balke and the Firefighter Fitness Tests are heart rate controlled.
• Balke Fitness Test (HRC: must use Accutrack or Wireless Chest Strap)
Test Parameters
• Maximum Speed: 4.4 mph (5 mph with an L9), controlled by treadmill
• Maximum Grade: 15% (12% with an L9), controlled by treadmill
• Maximum Heart Rate: 80% of Maximum Heart Rate (see Heart Rate Monitoring)
Description
• It’s a heart rate controlled, walking pace, variable incline fitness test. The test increases in difficulty in an
effort to raise your heart rate to a target. Upon reaching your target heart rate, the test will terminate and
calculate a fitness assessment based on your performance (VO2Max Score).
• Firefighter (Gerkin) Fitness Test (HRC: must use Wireless Chest Strap)
Test Parameters
• Maximum Speed: 7 mph,
• Maximum Grade: 15% (12% with an L9), controlled by treadmill
• Maximum Heart Rate: 85% of Maximum Heart Rate (see Heart Rate Monitoring)
Description
• It’s a heart rate controlled, variable speed and incline fitness test. The test increases in difficulty in an
effort to raise your heart rate to a target. Upon reaching your target heart rate, the test will terminate and
calculate a fitness level based on your performance (VO2 Max Score).
What is VO2Max?
A person’s fitness level can be measured by the amount of oxygen his or her body can consume while exercising at maximum
capacity. VO2Max is a measurement of the maximum amount of oxygen in milliliters an individual can use in one minute
per kilogram of body weight. For years, only fitness trainers and doctors had access to this intricate fitness calculation.
Fortunately, the Executive Trainer not only takes care of all the complex VO2Max calculations, but also gives you a simple
evaluation anyone can understand.
Scores may vary due to different line voltages, component tolerances, and individual’s affinity towards each test’s parameters.
For a more accurate VO2Max calculation, take the average of the two scores (Balke and Firefighter Fitness Test).
• Fitness Protocols:
NAVY 11/
2-Mile Test, Army 2-Mile Test, Air Force 2-Mile Test, Marine Core 3-Mile Test
Test Parameters
• Maximum Speed: At user’s discretion
• Maximum Grade: Deactivated and set at 0%
• Maximum Heart Rate: Not part of test
Description
• These are manually controlled, flat ground, complete as fast as you can run. Upon completion you will
receive an assessment score (0-100) or superlative.
Page 22
17
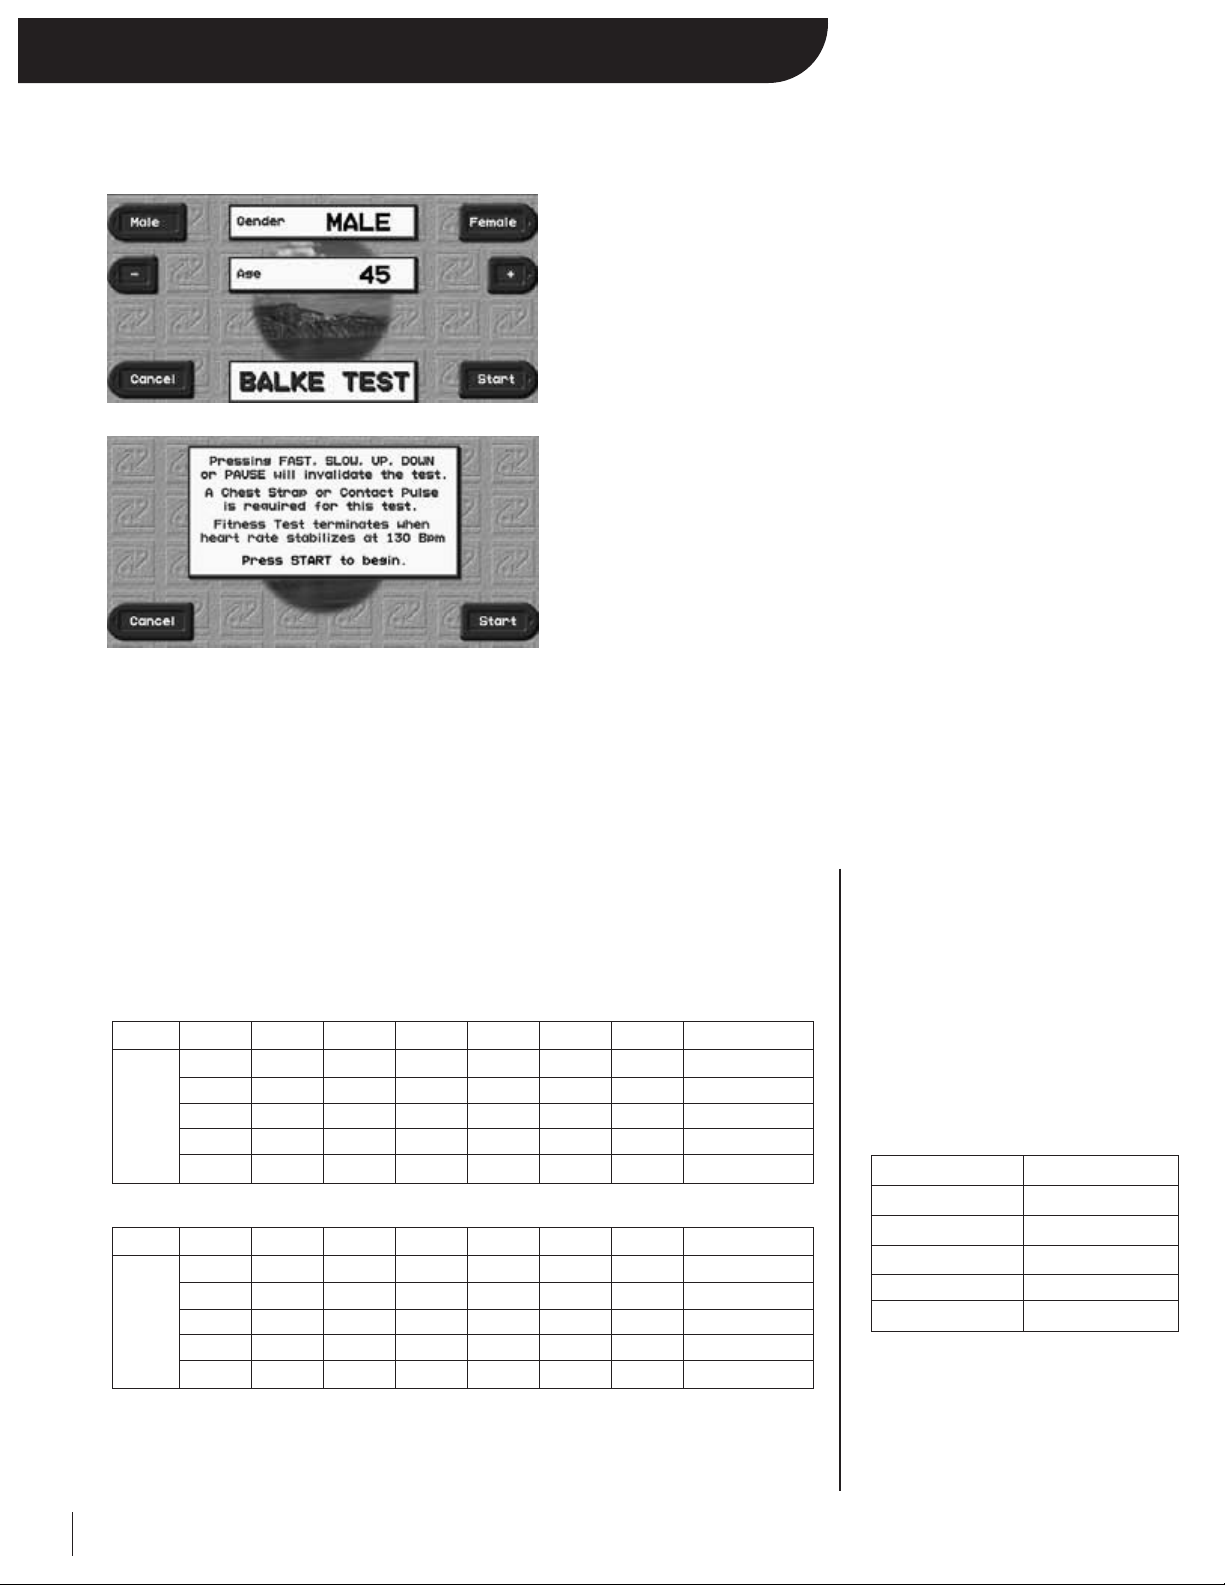
Taking a Fitness Test
To take a Fitness Test:
From the Menu Screen, select Programs -> Specialty Programs. In the
Specialty Programs screen, you can select one of the 2 fitness tests that the
Executive Trainer has to offer. Remember, both of these tests are heart rate
controlled.
Upon selecting the fitness test of your choice, you will advance to the fitness
test set up screen. Use the designated “+/-” keys or the numeric keypad to
adjust your age and gender. Press Continue.
***Note: Before pressing start, you will be prompted with the heart rate that
the fitness test will target. This heart rate calculation is derived from statistical
heart rate capacity averages (see Heart Rate Monitoring). If you are
uncomfortable with the target heart rate displayed or feel discomfort at any
point during the fitness test, stop the test***
Press START to begin the test.
You must hold on to the contact heart rate crossbar or wear you heart rate transmitter strap during the entire test. If the treadmill
loses a heart rate signal for more than 30 seconds, the test will be invalidated and terminated.
The HRC fitness tests are fully automated and will increase in difficulty from segment to segment until the user achieves the target
heart rate (Balke - 80% of Max HR; Firefighter – 85% of Max HR). Once you reach the target pulse, a countdown will begin to ensure
that your pulse has indeed stabilized at the target. Any keystrokes during the test other than BACK, MENU,or NEXT will invalidate
and terminate the test.
Balke Fitness Test:
Upon completion, you will receive a VO2Max score and fitness assessment based on
your performance versus your demographics.
Firefighter Fitness Test:
Upon completion, you will receive a
VO2 Max score and fitness assessment
based on your performance versus the
general population.
Men/ Women
AGE <20
>65
57-65
47-56
37-46
<37
20-29
>62
54-62
44-53
35-43
<35
30-39
>58
50-58
40-49
32-39
<32
40-49
>54
46-54
37-45
28-36
<28
50-59
>52
44-52
35-43
26-34
<26
60-69
>50
42-50
32-41
24-31
<24
>69
>48
40-48
30-39
22-29
<22
VO
2
Max
Men
RATING
SUPERIOR
EXCELLENT
GOOD
AVERAGE
LOW
AGE <20
>62
54-62
42-53
34-41
<34
20-29
>58
50-58
39-49
32-38
<32
30-39
>54
46-54
35-45
29-34
<29
40-49
>51
43-51
32-42
25-31
<25
50-59
>47
39-47
29-38
22-28
<22
60-69
>44
36-44
25-35
19-24
<19
>69
>42
34-42
23-33
15-22
<15
VO
2
Max
Wo m e n
RATING
SUPERIOR
EXCELLENT
GOOD
AVERAGE
LOW
VO
2
Max
>59
50-58
40-49
32-39
<32
RATING
SUPERIOR
EXCELLENT
GOOD
AVERAGE
LOW
Page 23
18
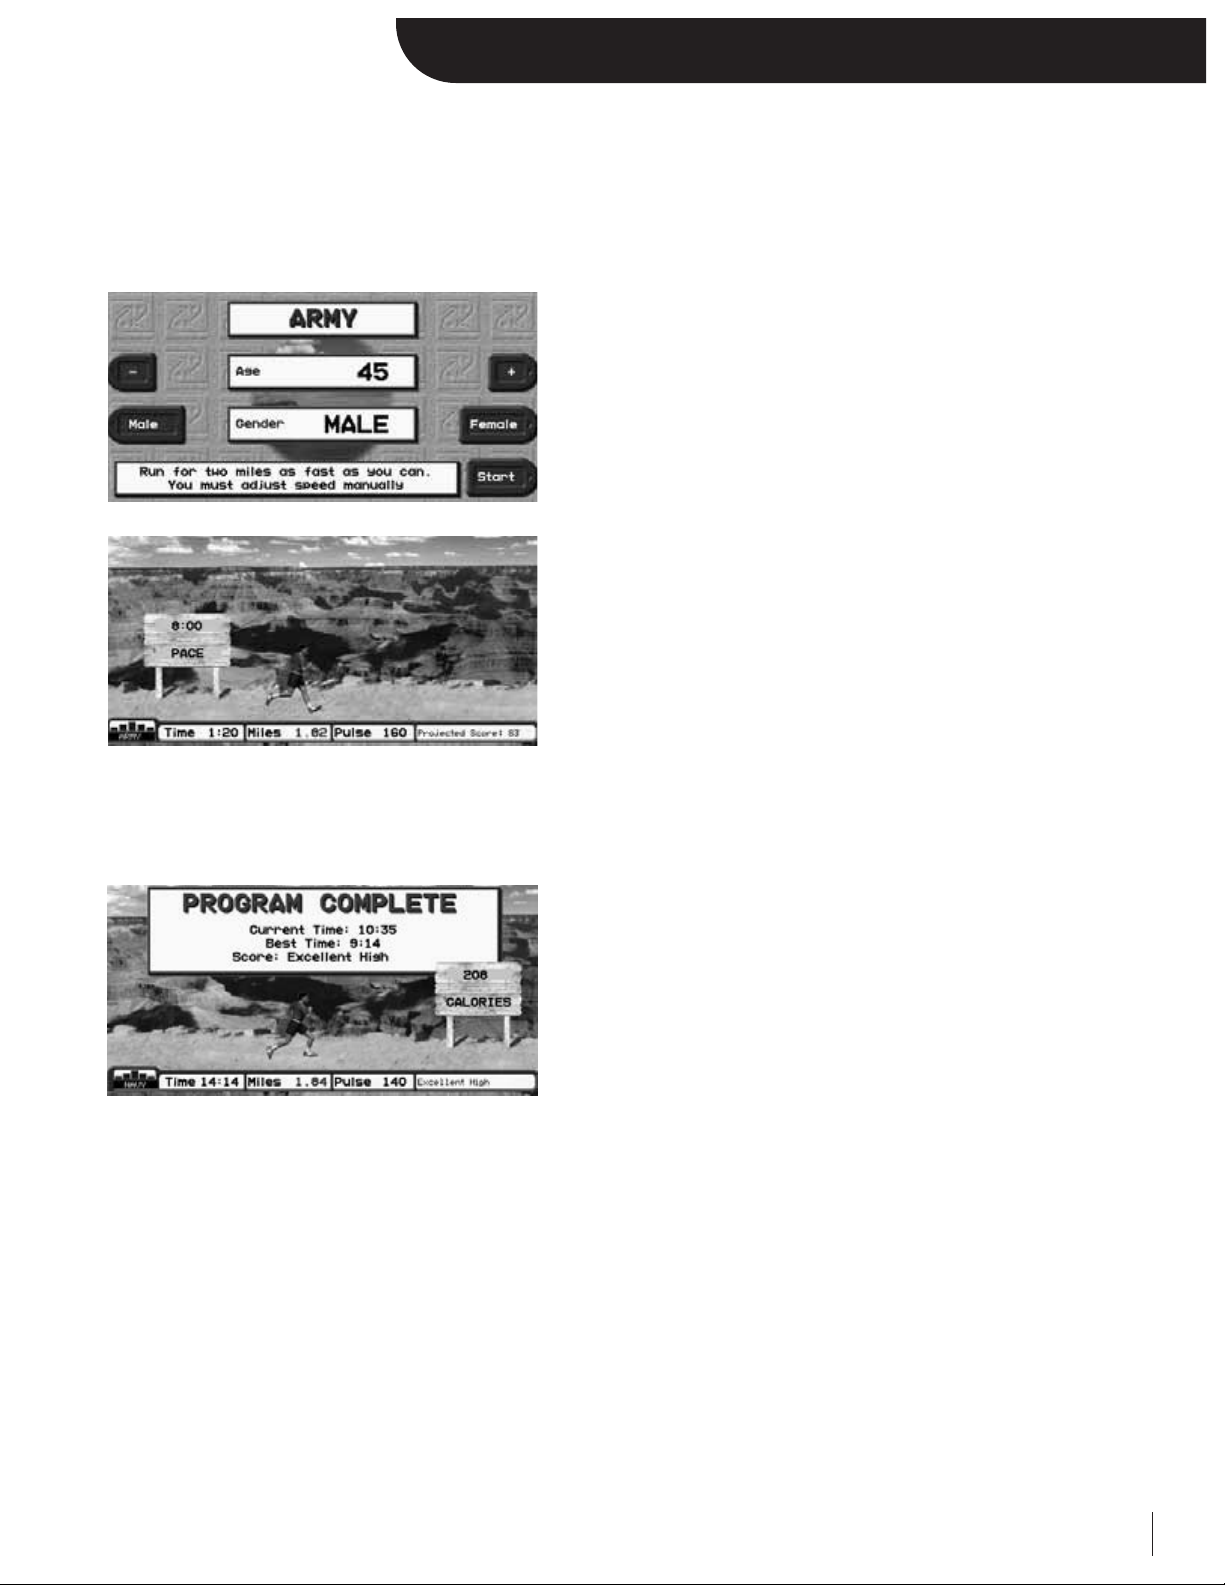
Taking a Fitness Protocol
To take a Fitness Protocol:
From the Menu Screen, select Programs -> Specialty Programs. In the Specialty Programs screen, you can select one of the
4 fitness protocols that the Executive Trainer has to offer. These tests are not heart rate controlled.
Upon selecting the fitness protocol of your choice, you will be
prompted to the fitness test set up screen. Use the designated “+/-”
keys or the numeric keypad to adjust your age and gender.
***Note: If you feel discomfort at any point during the fitness test,
stop the test***
Press START to begin the test.
During the protocol, you will retain manual speed control. You’ll also
notice that the Road and Track screens have an added statistic,
projected score. Projected score is the score you would receive if
you were to complete the rest of the protocol at your current pace.
Upon completion, you will receive a fitness assessment based on your performance versus your demographics (0-100).
The Navy Test uses a verbal assessment.
Page 24
19
Client Mode – Creating a Client
Client Mode allows five different users to personalize the treadmill settings to their liking. Once a user sets up a client,
programming will automatically scale to preset restrictions. Fitness tests/protocols will remember best and last scores, and
all other treadmill activity will be automatically recorded in a personal fitness calendar.
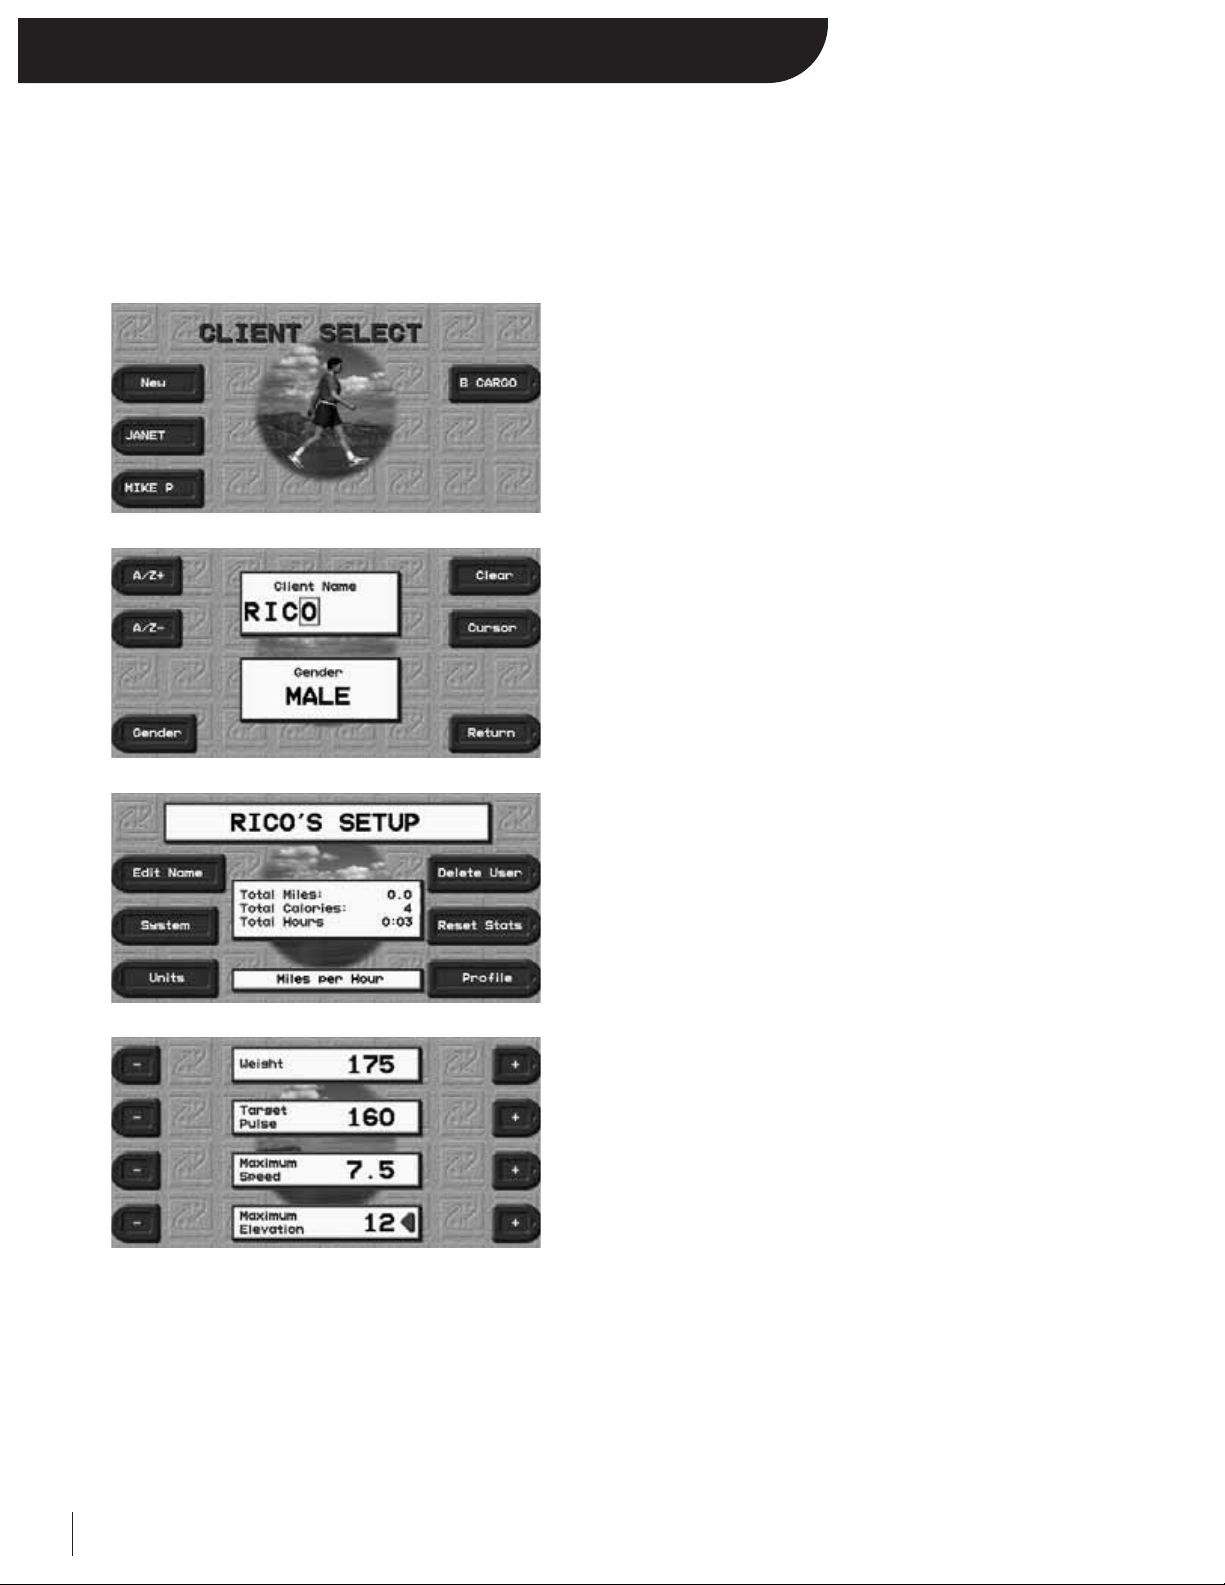
To create a client:
Press MENU and select the designated “Client” key. You are now in
the Client Select Screen. Press the designated “New” key to create a
new client.
Note: This will also be your Login Page after you have created your
client.
You are now in the Name Edit Screen. Use the designated “A/Z+”,
“A/Z-”, “Cursor”, and “Clear” keys to adjust your client’s name.
Toggle to your client’s gender by using the designated bottom
“Gender”key.
Press Return when you have finished.
You are now in the Client Setup Screen. This screen allows you to
delete the user, reset your stats, and select the system’s units (miles vs.
kilometers). You can also access the Edit Name, System Menu, and
your Fitness Profile Screen.
Press Profile to enter the Fitness Profile Screen.
Use the designated “+/-” keys or the numeric keypad to adjust your
Weight, Target Pulse, Maximum Speed, and Maximum Elevation.
The values that you select as your Fitness Profile will be the default
values for all programs to expedite setup time. However, you can
adjust and/or manually override these values during setup or while
running the program.
Press Menu when you have correctly adjusted all the values.
You have successfully created your own personal client. Notice that the Menu Screen now displays your client name across
the top. This is an indication that you are in Client Mode.
Whenever you turn on the machine, it will default to manual default settings. To log on as your client, in the Menu Screen
select the designated “Client” key and select your designated client.
Note: If you haven’t set the correct time and date on your Executive Trainer, it’s highly recommended after creating a client
that you do it now, so that all of your activity is logged accurately (see System Settings).
Page 25
Client Mode - Fitness Calendar
20
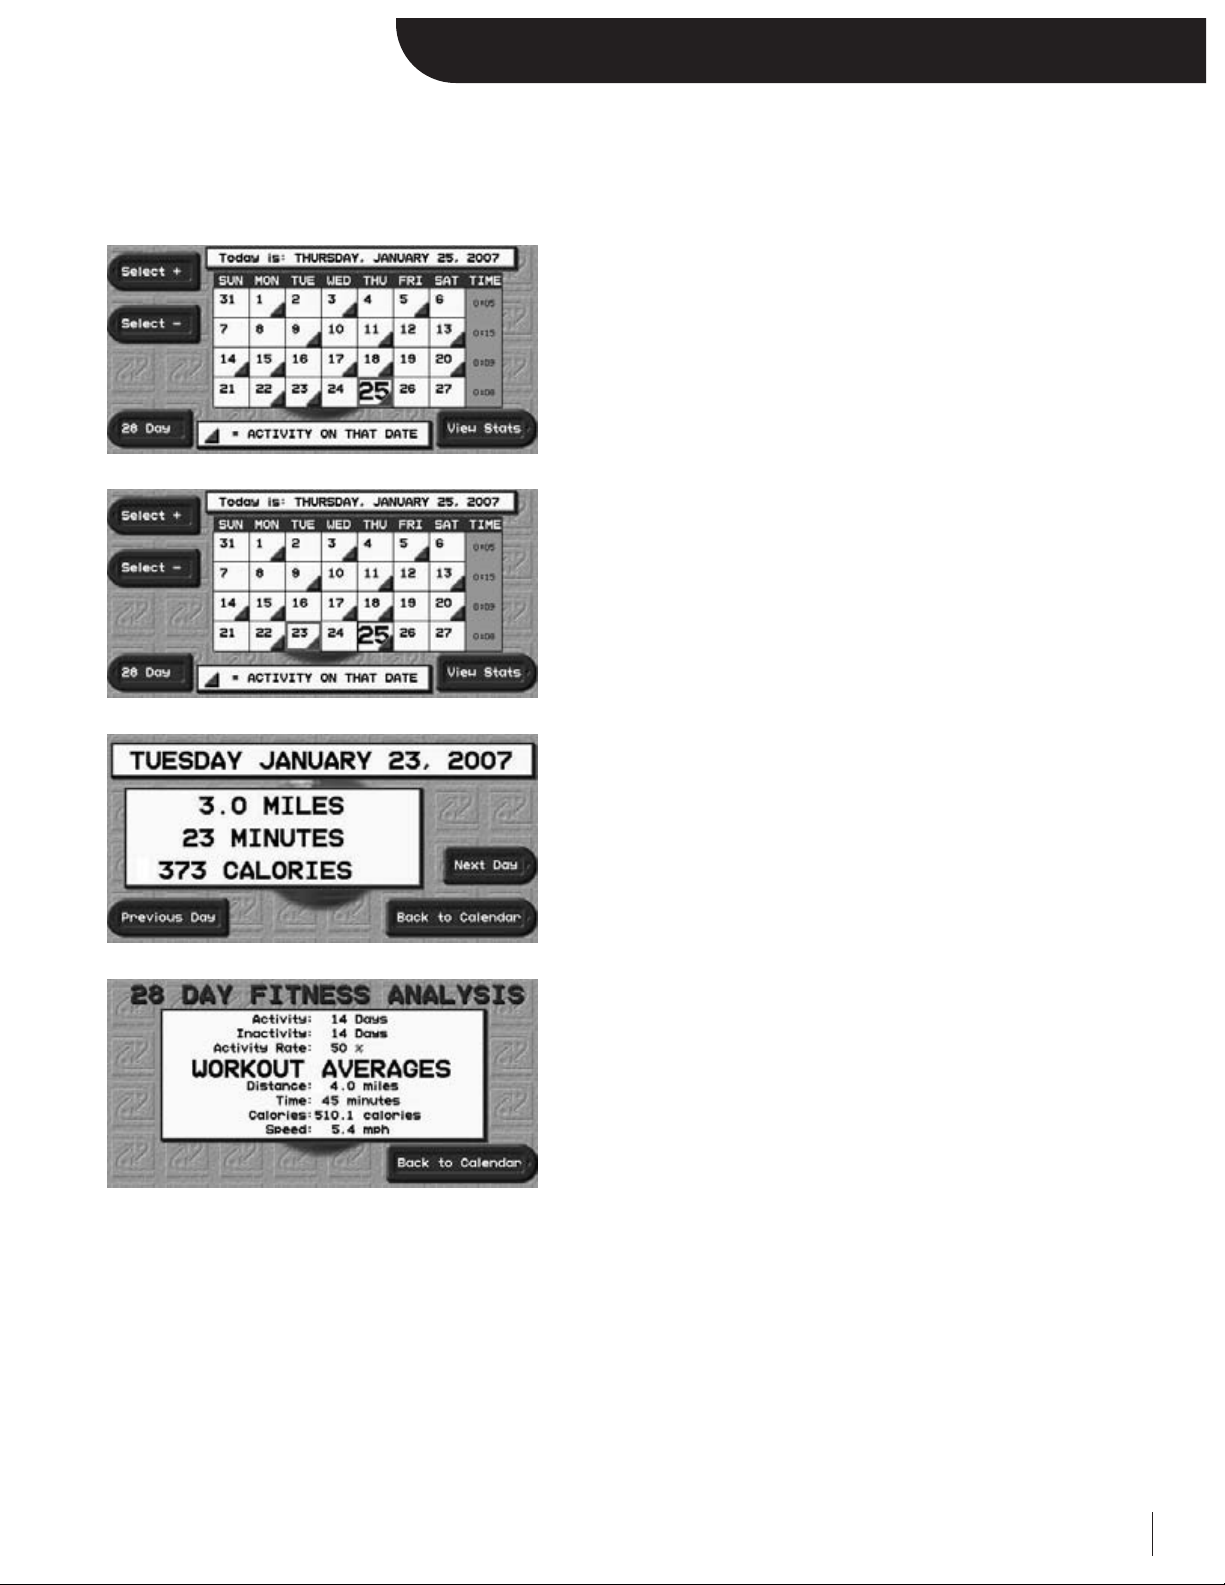
Client Mode offers a fitness calendar that monitors all client treadmill usage over the past four weeks.
To view the Fitness Calendar:
After logging on as a client, from the Menu Screen press the
designated “Calendar” key. You are now in your personal Fitness
Calendar Screen.
• The red triangle means that you worked out on your Executive
Trainer on that particular day.
• Today’s date is listed at the top of the screen and highlighted in the
calendar in bigger/bold font.
Note: If the current day at the top of the screen is incorrect, see
System Setup to adjust to the correct date.
Use the designated “Select +” and “Select –” to move the red square
from day to day.
Move the red square over any date that you want to view
in detail.
Press the designated “View Stats”key.
You can now see your workout in detail for that particular day.
You can move from day to day in this detailed view by pressing the
designated “Previous Day” and “Next Day”keys.
Press Back to Calendar to return to the fitness calendar.
To see your 28 Day Fitness Analysis, press the designated
“28 Day”key.
The 28 Day Fitness Analysis summarizes all of your treadmill activity
over the last 4 weeks.
Press Back to Calendar to return to your fitness calendar.
Page 26
21
System Settings
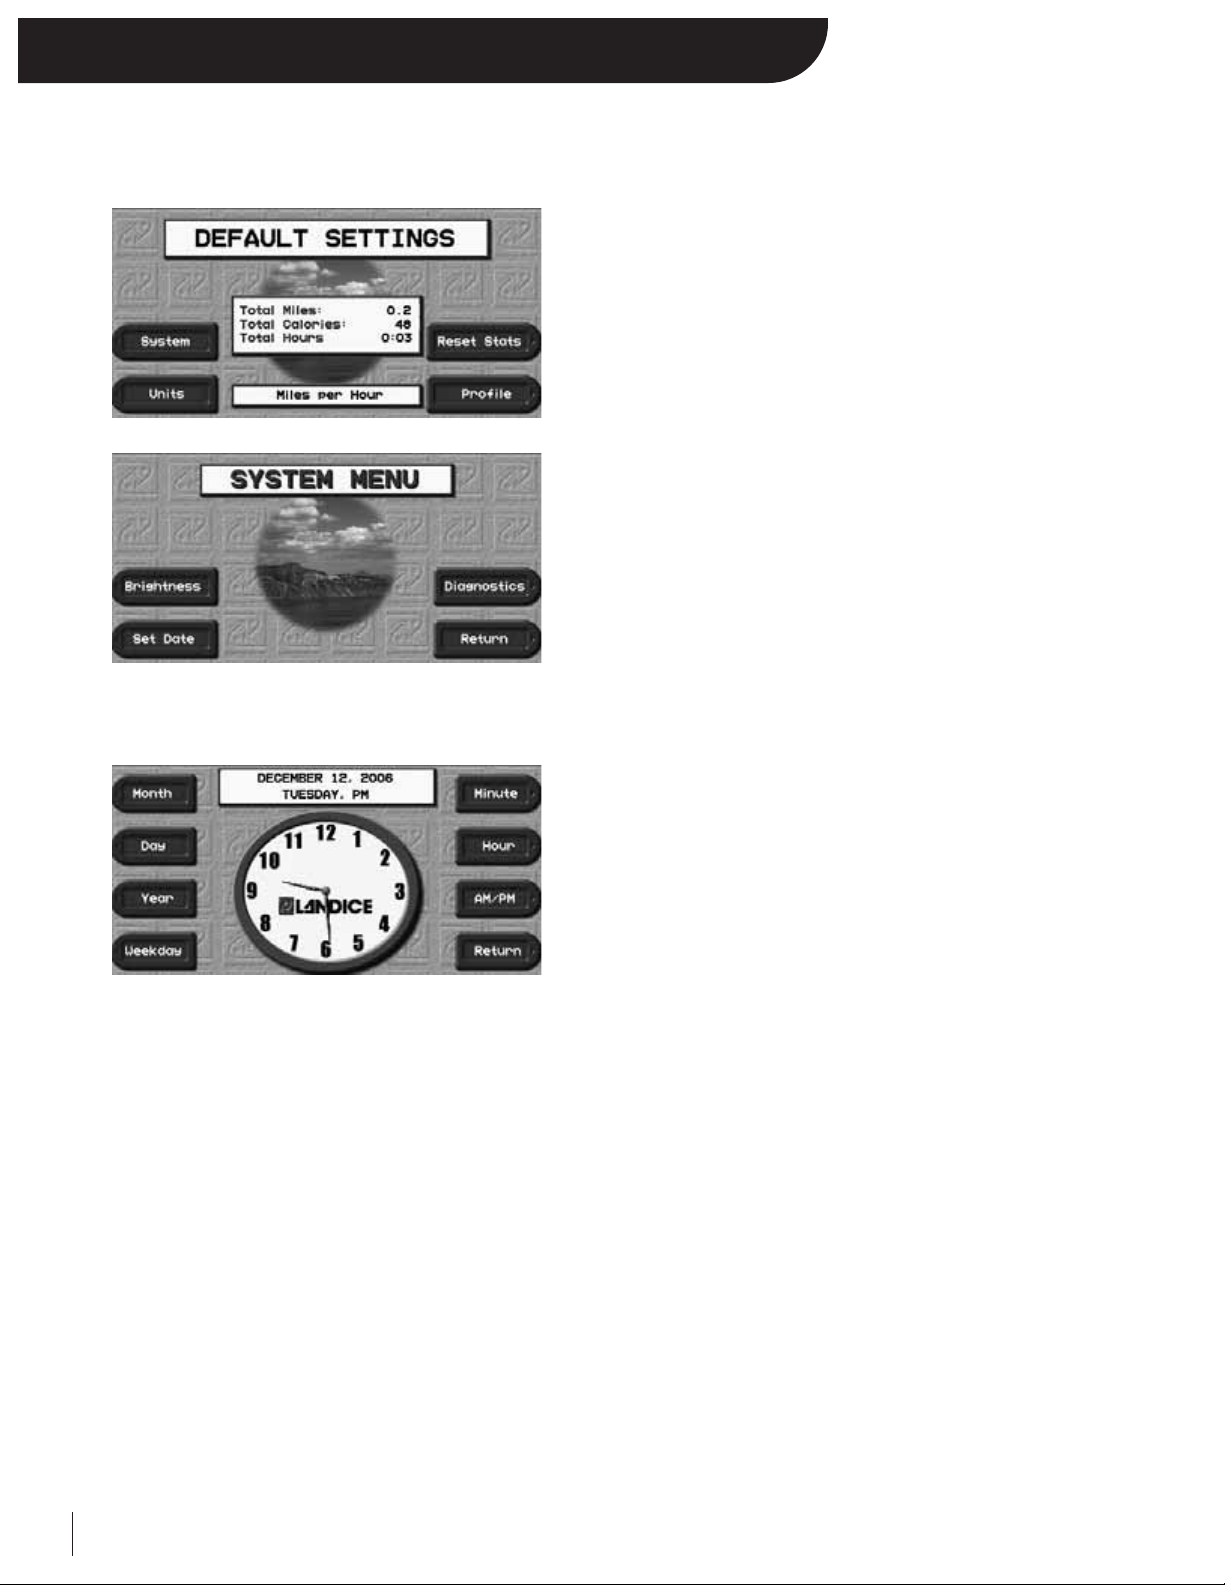
You can enter the system settings at any time from the Menu Screen by pressing Setup.
In the Setup Screen, you can toggle between Miles and Kilometers by
pressing the designated “Units”key.
Press the designated “System” key to view the System Menu Screen.
In the System Menu, you have access to Brightness Setup, Time/Date
Setup, and Diagnostics.
To set the Time and Date, select the designated “Set Date”key.
In the Time Setup Screen, use any of the necessary designated keys to
correctly set the time and date.
Once set, the Executive Trainer will maintain the current time and
date even when you turn it off.
However, unplugging the treadmill will deactivate the internal
clock/calendar. Next time you reconnect your treadmill, your clock
and calendar will reset back to the time and date before you
unplugged it.
Press the designated RETURN key to return to the system menu.
Page 27
22
Self-Diagnostics
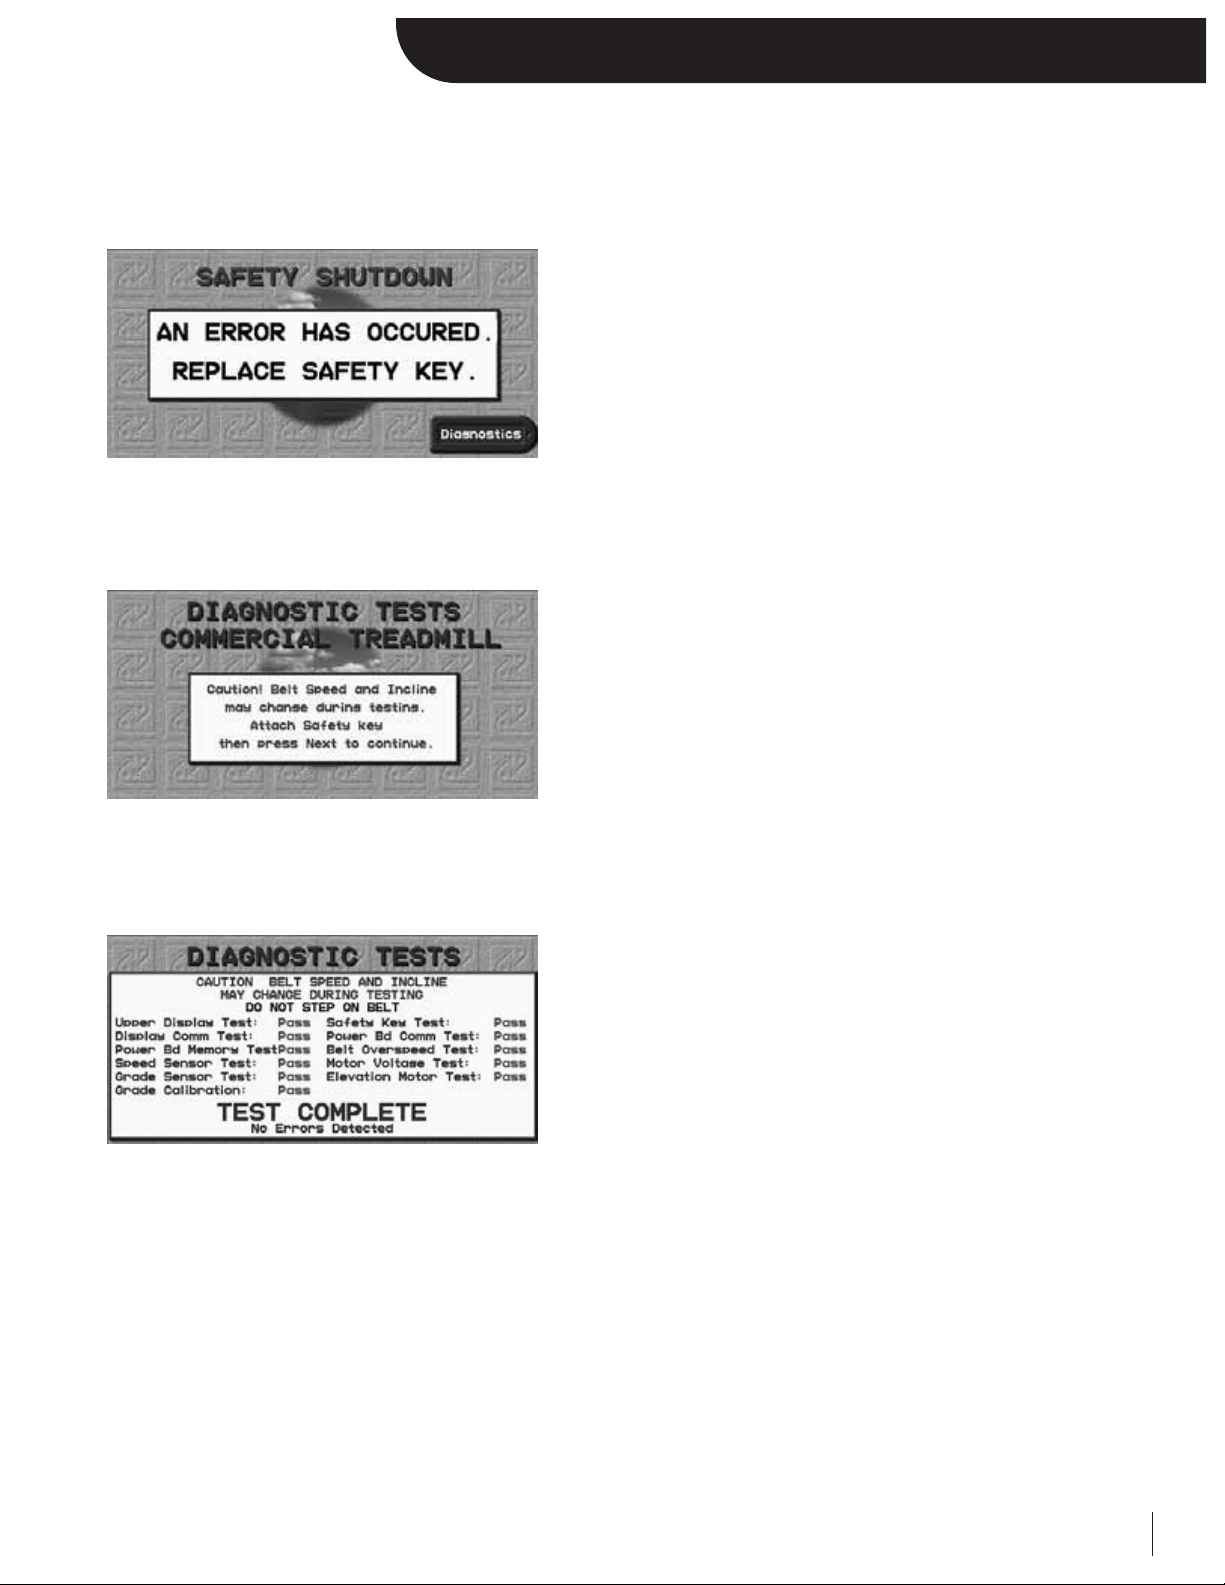
The Executive Trainer is equipped with onboard self-diagnostics. If the treadmill experiences any errors during operation,
the treadmill will display the error message and the option to further investigate by commencing the treadmill’s selfdiagnostics software.
When you choose the option to enter diagnostics you will be prompted with a warning screen. After reading it, straddle the
treadmill by stepping on the traction strips on the sides of the running surface and press NEXT to continue.
The treadmill will now systematically test all of the individual components of the treadmill. During some of its tests, it will
prompt you with simple “Yes or No” questions to assist with the diagnosis.
Once the Self-Diagnostics has completed all of the tests, it will read
one of the two messages along the bottom: “No Errors Detected”, or
“Error Detected, Contact Service Provider.” For more information
contact your selling dealer.
Note: You can also manually initiate the self-diagnostics. From the Menu Screen press Setup -> System -> Diagnostics.
Page 28
23
Heart Rate Monitoring
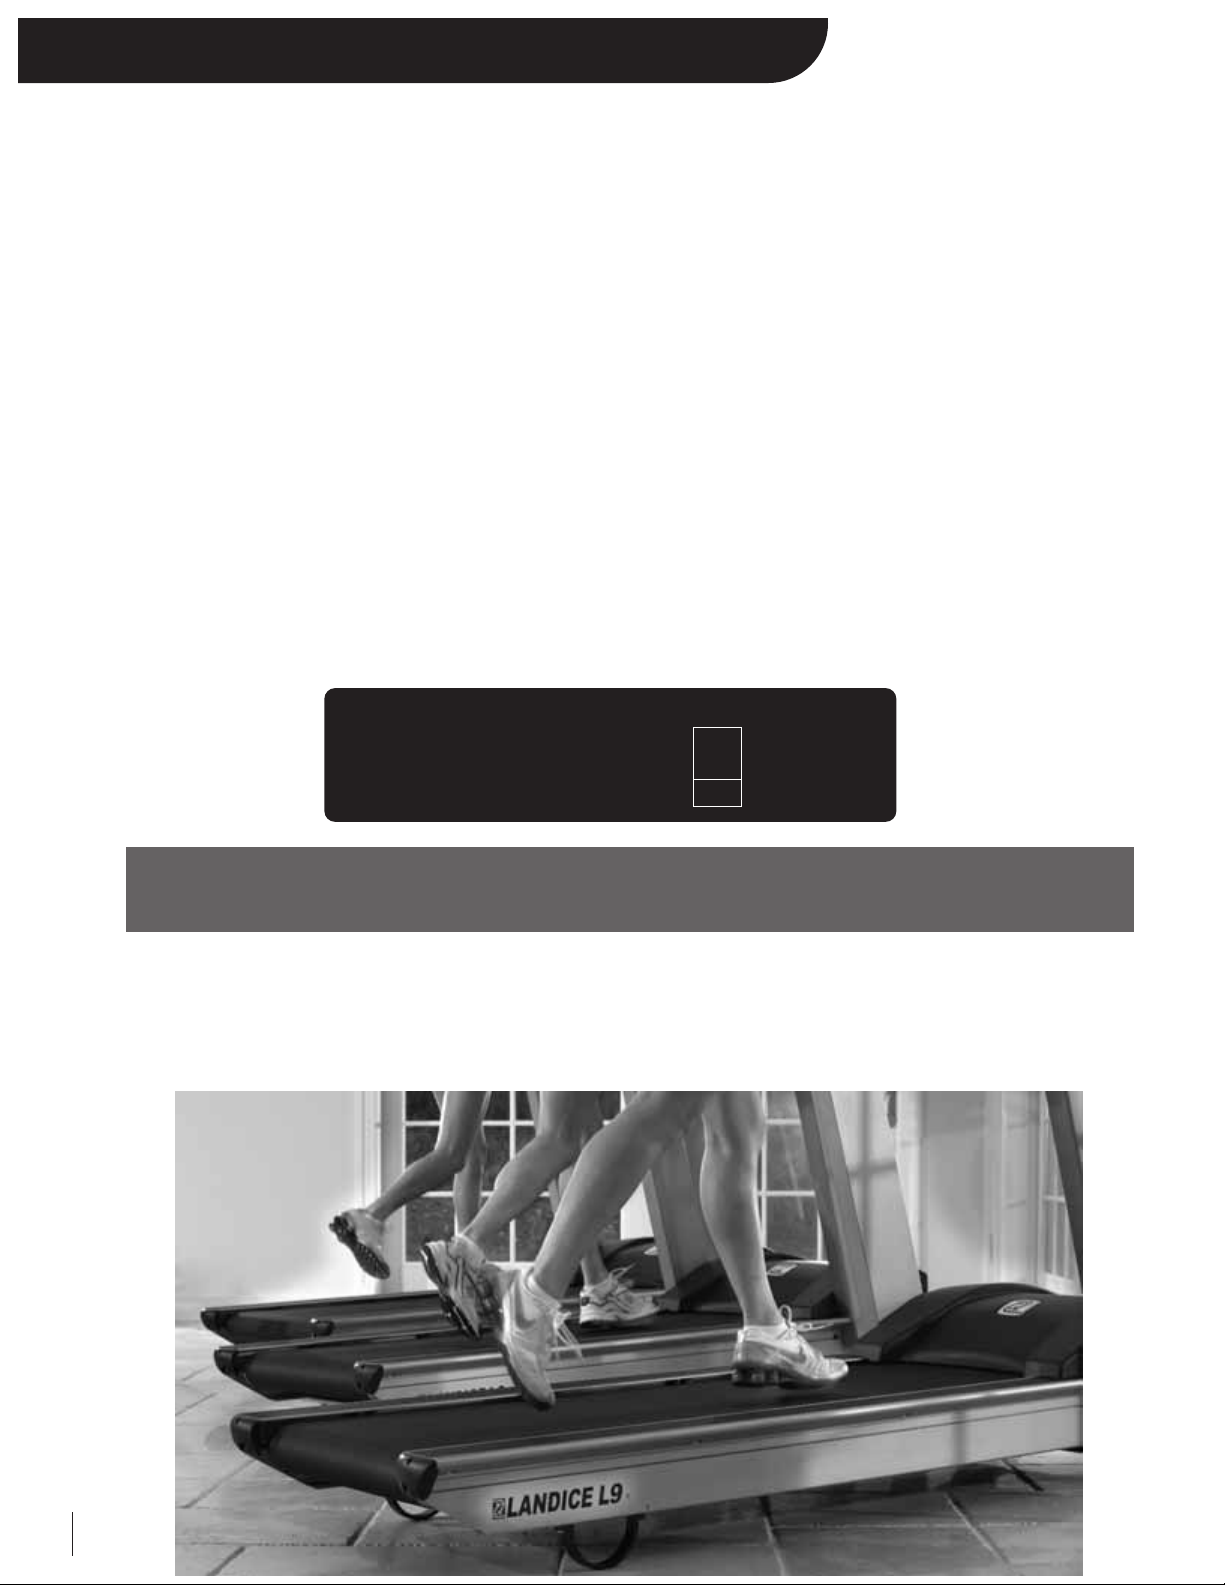
The Executive Trainer treadmill comes standard with a wireless heart rate monitoring device and a contact heart rate crossbar (see AccuTrack Heart Rate Monitoring System) to give you feedback on how your body is affected by your workout. We
will take a look at a few basic concepts of heart rate monitoring so you can better understand how it all works and how to
maximize its use to allow you to reach the fitness level you desire.
What is exercise intensity?
Exercise intensity is simply a measure of how hard you are working at a given time during exercise. The American College of
Sports Medicine (ACSM), the world’s leading medical and scientific authority on sports medicine and fitness, recommends
that every individual involved in an exercise program know how hard his/her body is working during exercise.
Your heart provides key information for determining how intensely you are working during exercise. Your heart rate (how
many times your heart beats per minute) is really an efficiency rating for your entire body. The number of times your heart
beats during each minute of exercise is a measurement of the intensity of the exercise. If your heart rate is low, exercise
intensity is low; if your heart rate is high, your exercise intensity is high.
What is maximum heart rate?
Maximum Heart Rate (MHR) is the maximum attainable heart rate your body can reach before total exhaustion. True
maximum heart rate is measured during a fatigue or “stress” test. This test must be done in a clinical setting and is not
practical or accessible for most people. Fortunately, your maximum heart rate can be established with a high degree of
accuracy using the following simple formula:
Estimated Maximum Heart Rate
185 beats per minute is the estimated maximum number of times John’s heart can beat before his body would fatigue or
“max out.” This number is extremely helpful because it tells us the absolute highest exercise intensity John can handle before
his body wears out. The ACSM says that during exercise, John should keep his heart rate below his maximum so that he will
not become exhausted and have to quit. In fact, the ACSM gives John a specific percentage range of his maximum heart rate
to exercise in, known as his Target Heart Rate Zone (THRZ).
WARNING: The use of this formula assumes no underlying heart or respiratory disease or other condition,
which could be adversely affected by exercise. Consult your doctor before using this chart!!!
If John is 35 years old, what is his estimated maximum heart rate?
220
-35
John’s Estimated Maximum Heart Rate = 185
Page 29

Heart Rate Monitoring
24
Your heart is the most important muscle in your body and, like all muscles, must be exercised regularly to remain strong
and efficient. According to fitness experts, exercise is more effective when you work out in a specific heart rate range or
zone. This is referred to as your Target Heart Rate Zone (THRZ) and is reflected by the number of beats per minute
your heart pumps. This zone can vary greatly depending on your age, fitness level and various other factors. If your
heart rate is too low during exercise, your body reaps little or no benefit. This means you’re not likely to see the
results you want, like weight loss or increased endurance. If your heart rate is too high during exercise, you may tire
too quickly and become frustrated, or even run the risk of injury. In this case, you’re likely to quit exercising because it’s
simply too difficult.
Monitoring exercise intensity helps you to stay at a level of exercise that allows you to accomplish your goals.
In fact, the American College of Sports Medicine recommends that, in order to get the most benefit from your
cardiovascular exercise, you should work within your Target Heart Rate Zone for at least 20 to 60 minutes per
workout, 3 to 5 times per week. Knowing your exercise intensity (heart rate) will allow you to work at the right
level of exercise to accomplish this.
Your Target Heart Rate Zone represents the minimum and maximum number of times your heart should beat in one
minute of exercise. The American College if Sports Medicine (ACSM) recommends that all individuals should work
within a Target Heart Rate Zone of 60% to 85% of Maximum Heart Rate. This means that your heart rate during
exercise should not fall below 60% or rise above 85% of your maximum heart rate. Let’s look at John from our earlier
example. John is 35 years old, so his estimated maximum heart rate is 220 minus 35, or 185 beats per minute (bpm).
The ACSM says that John should exercise between 60% and 85% of 185 beats per minute to stay in his THRZ. Let’s
determine John’s THRZ:
111-157 beats per minute is the range or zone John will want to keep his heart rate in during exercise in order to achieve
his goals. If John is a beginning exerciser, he’ll want to stay at the low end of his THRZ. If John is a more advanced
exerciser, he may want to work at the higher end of his THRZ to challenge himself more.
Different Intensity Levels within a Target Heart Rate Zone
Beginner: 60% of MHR
Weight Loss: 75% of MHR
Aerobic: 85% of MHR
A monitor consists of two parts: a transmitter and a receiver. The Executive Trainer comes equipped with 2 transmitter
options (the wireless chest strap or the contact heart rate bar). Each times your heart beats, the electrodes detect
the beat and send the information to the receiver on the treadmill. Your current heart rate (bpm) is visible on the
treadmill’s display.
Why should I monitor exercise intensity?
How do I determine my Target Heart Rate Zone (THRZ)?
What is a heart monitor?
John’s Estimated Maximum Heart Rate = 185 bpm
Lower Target Limit 185 bpm (mhr) x 0.6 = 111 bpm
Upper Target Limit185 bpm (mhr) x 0.85 = 157 bpm
John’s Target Heart Rate Zone = 111 - 157 bpm
Page 30
25
Heart rate monitors and motivation
KEEP YOU SAFE
Exercising too hard can put you at risk for injury. A heart rate monitor reminds you of the safe and effective heart rate
intensity at which you should exercise and warns you when your workouts go too far.
KEEP YOU IN YOUR ZONE
If you want to reach your exercise goals, it’s important to stay in your THRZ during workouts. A heart rate monitor is your
constant reminder of the intensity and quality of each workout session.
SAVE YOU TIME
Our heart rate monitor is wireless and easy to use, so you can view valuable heart rate information at any time during exercise
without interrupting or stopping your workout.
GIVE YOU ACCURATE FEEDBACK
Our heart rate monitor is more accurate so you know exactly what your level of exercise intensity is during workouts.
Pulsemeters have a high margin for error. Manual pulse measurements during exercise can result in errors as high as plus or
minus 15 beats per minute, with the risk of potential error increasing as heart rate increases.
The Executive Trainer includes two separate heart rate monitoring systems: The wireless heart rate chest strap transmitter and
the AccuTrack Contact Heart Rate.
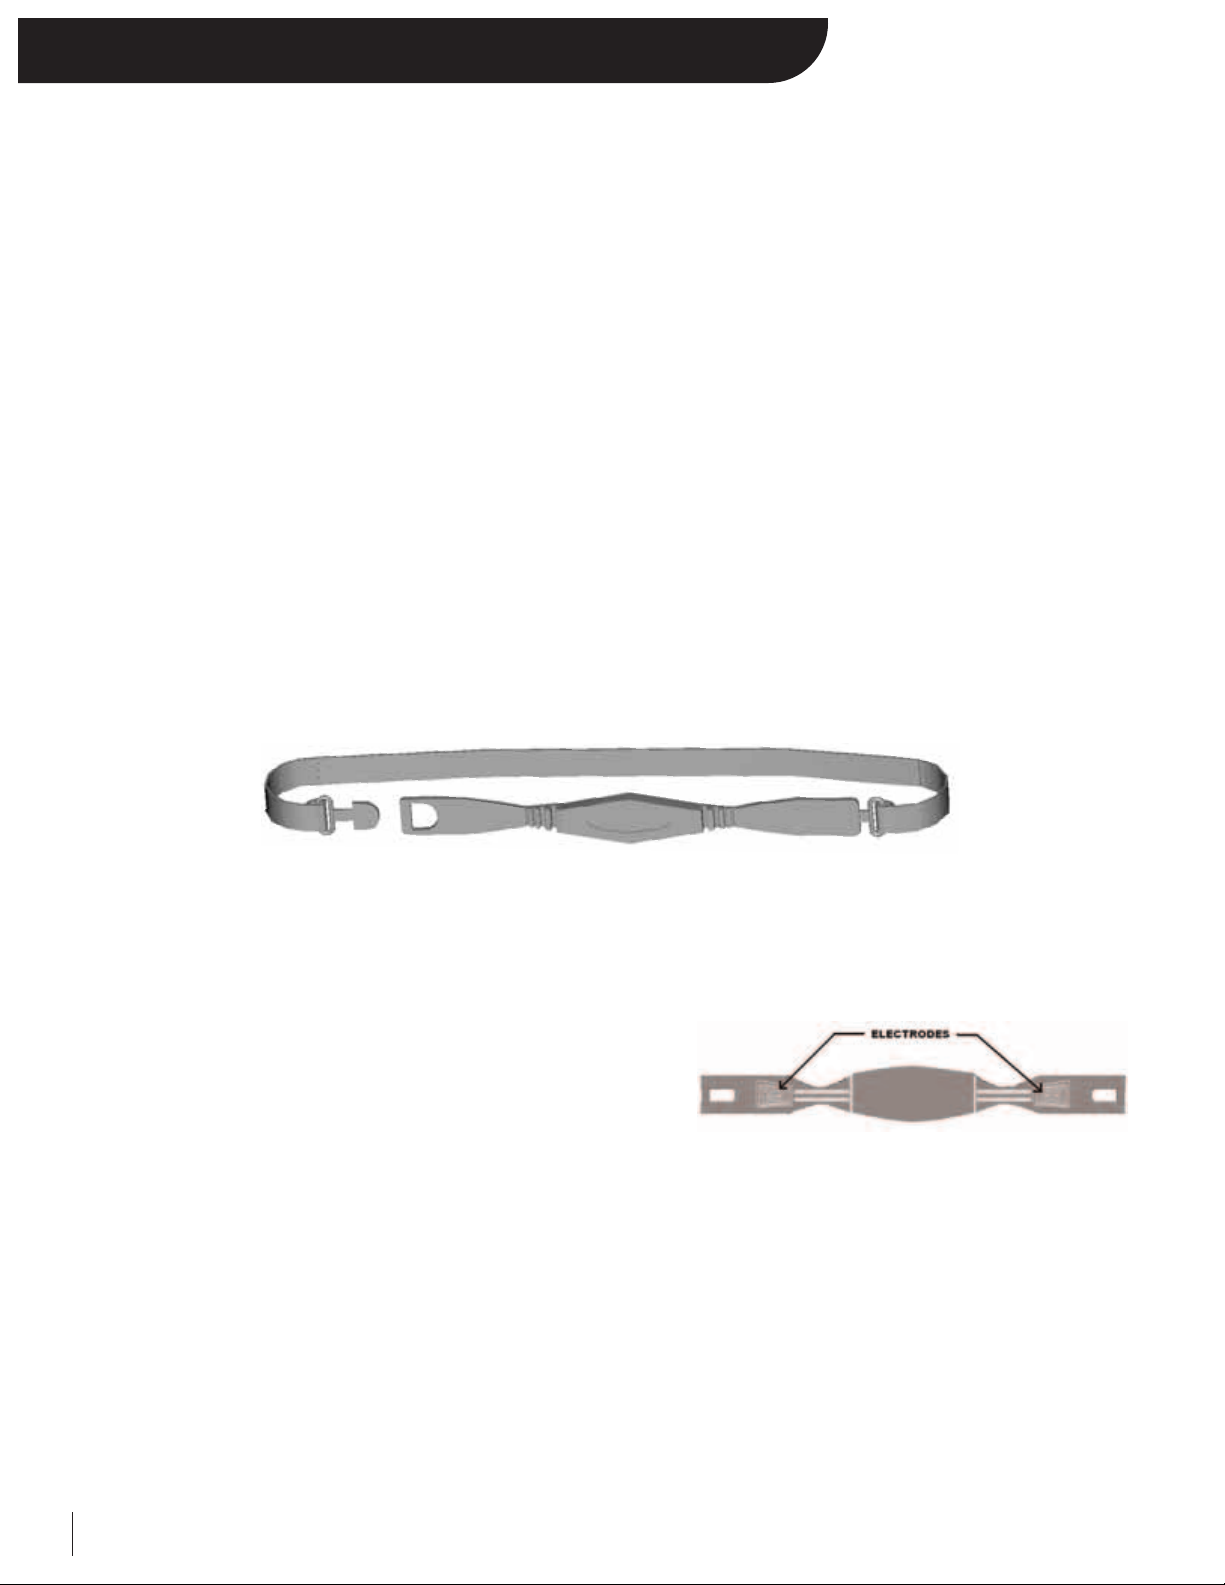
Wireless Heart Rate Chest Strap Transmitter (shown below)
To use the Wireless Chest Strap follow these steps:
Secure the Chest Strap
Center the transmitter on the chest as high under the pectoral muscles (breasts) as possible. Tighten the strap so that the belt is
as tight as possible without being uncomfortable.
Apply Cardio Gel to the Electrodes
A tube of Landice Cardio Gel was shipped with your Executive Trainer
treadmill. Pull the belt away from your chest and apply a small dab to
each electrode. This will ensure a strong electrical contact between the
transmitter and your chest.
The Heart Rate Transmitter works best against bare skin. Since sweat (saltwater) is an electrical conductor, the transmitter will
work over a T-shirt if the shirt is wet with sweat. If you are having trouble getting an accurate pulse reading, try wearing the
belt against bare skin.
CARE AND MAINTENANCE
The transmitter activates when the belt is properly wetted. In order to conserve battery life, wipe the electrodes dry when not
in use. Clean monthly with mild soap and water and wipe dry. Do not use abrasives in cleaning, as they can cause permanent
damage to the electrodes. Do not bend or stretch the electrode strips, especially when storing the belt transmitter.
Heart Rate Monitors
Page 31

26
AccuTrack Contact Heart Rate Monitoring System™
The AccuTrack Contact Heart Rate Monitoring System™ can be used in place of the wireless chest strap to perform any of
the following functions:
• Monitor your Time in Zone
• Control HRC programs
• Help you maintain your Target Pulse
1. Use the NEXT button to switch to any screen that shows Pulse (see above).
2. Grab on to the pulse grips.
3. As soon as you put your hands on the grips the pulse will flash. This indicates that the system has
been activated.
4. Pulse will “beat” briefly and then display your heart rate. Your heart rate will be continuously monitored while your
hands remain on the grips.
NOTE: If you are wearing the wireless chest strap, the AccuTrack system will override the wireless signal while your hands
are on the bar. Once you release the AccuTrack bar, the treadmill will then default back to the wireless chest strap signal.
The HRC programs will continue to make speed and elevation adjustments to keep you at your target heart rate while your
hands remain on the grips. If you remove your hands the HRC programs will not make any speed or elevation changes until
you place your hands on the grips again.
The AccuTrack system is designed to be used at walking speeds. A natural running motion involves using your arms to
maintain balance. Since contact heart rate systems require your arms to remain stationary, we recommend using the system
only at speeds of less than approximately 4 mph (6.4 km/h) or the fastest speed at which you are comfortable walking.
Page 32

Getting the Most Out of Your Workouts
This depends on several things such as body weight, fitness goals, and what you like to do. Walking is the safest, most
compatible form of exercise for most people. If you’re just starting out, are new to exercise, or participate in aerobic activities
less than three times per week, we recommend that you walk. On the other hand, if you’re an experienced runner, stick with
your program — use your treadmill the way you want.
Here are some considerations to keep in mind:
[1] If you’re interested in weight control, walking can burn as many calories as a moderate running pace. To get a very
small increase in caloric expenditure, you have to run fast and, for most people, the extra effort isn’t worth it.
[2] Your chance of losing weight successfully is far greater with walking. Walking increases your daily caloric expenditure,
raises your metabolism and is easier to stick with than running.
[3] Heavy users should always walk until they’ve shed some extra pounds and are closer to their desired body weight.
Extra weight means extra stress on joints and muscles, which in turn means residual muscle soreness.
[4] If you’re concerned about getting a “tough” workout and don’t think walking is adequate, try walking up a hill!
You can get just as much cardiovascular intensity (heart rate and breathing response) from walking as you can from
running. Don’t fool yourself with preconceived notions about walking — you can sweat just as much by walking
as by running.
Take it easy! Walk. Lose weight in comfort. Avoid being sore and discouraged. After you’ve reached your target weight,
reevaluate. If you like walking and want to stick with it, terrific. On the other hand, if some running is appealing, try it out and
see what it’s like. Just remember that walking will get you fit and keep you fit.
27
Should you walk or run?
Page 33

Getting the Most Out of Your Workouts
28
FREQUENCY OF EXERCISE
Walkers: Walk 3-6 times a week; 20-60 minutes per day.
Runners: Run 3-5 times a week; 20-60 minutes per day.
DURATION OF EXERCISE
Walkers: Walk every day.
Runners: Run three to five times per week.
DURING YOUR WORKOUT
• Stay in the middle portion of the treadbelt.
• Monitor your breathing. Can you carry on a normal conversation or are you out of breath? If you
use the heart rate method of monitoring intensity, are you within the heart rate zone?
• Change the speed and incline as needed to stay within the breathing and heart rate criteria.
AFTER YOUR WORKOUT
• Drink a large glass of water (you’ll recover faster).
• Congratulate yourself for completing the workout.
• Do some light stretching exercises.
• Record that you completed the workout on your calendar.
KEEPING TRACK OF PROGRESS
• Keep a calendar that shows scheduled and actual workouts.
• Record every workout you complete.
• Compare planned with actual workouts completed. Aim for 90% completion. If you’re averaging
less than 90%, reevaluate your schedule and examine why you’re missing 10% of your workouts
(and the extra benefits from those missing workouts).
CALORIE COMPUTATIONS
• Calories and calories/hour are calculated using the formulas developed by the ACSM. There are
two different equations. One is for walking and one for running. The ACSM uses the walking
equation for speeds less than or equal to 3.7 mph. The running equations are used for speeds in
excess of 3.8 mph.
• The computations are based on a 150-pound person, which is a close enough estimate for most
people. If you wish the equations to be more precise, you may enter your weight into the treadmill
(see Getting Started).
Page 34

Treadmill Maintenance
29
TRACKING
The treadbelt is tracked by means of the two 9/16” hex head bolts at the back end of the treadmill. Tightening (clockwise)
the adjustment bolt on the side of the machine that the belt has moved towards and loosening the bolt on the opposite side
an equal amount, will cause the belt to move towards the center. Adjustments should be made with the treadmill running
and in 1/4-turn increments. Allow at least 30 seconds for the belt to stabilize between each adjustment. Run the belt at high
speed (6-8 mph). To insure proper belt tracking and alignment, the treadmill must be placed on a stable and level surface.
A yellow warning label will show at the rear of the treadmill when the treadbelt is not tracked correctly (L8 and L9 only).
TREADBELT TENSIONING (pre-set from factory, but may need adjustment during installation)
Need for tension is indicated by uneven belt speed and may be sensed by sudden stopping of the treadbelt when your foot
comes down on the belt. To check belt tension, run treadmill at 1 mph. Then, walk on machine. If belt does not feel like it
is slipping/hesitating, then belt is tensioned correctly. If belt slips/hesitates, then it is not fully tensioned. The same hex head
bolts used for tracking also tension the treadbelt. To tighten the treadbelt, turn both bolts clockwise exactly the same
amount a 1/4-turn at a time. Failure to turn them equally will affect belt tracking. DO NOT OVER-TIGHTEN.Continue
checking for treadbelt slipping. Once treadbelt is fully tensioned, speed up treadmill to 5 mph. Then, while jogging lightly,
check for any sudden slipping/hesitating of the treadbelt. Repeat treadbelt tensioning instructions if required.
MOTOR DRIVE BELT TENSIONING (pre-set from factory)
The drive belt is tensioned by a nut located under the motor pan. This nut is screwed to a hook, which is attached to the
motor bracket. By turning the nut clockwise, you will tighten the nut pulling down the motor bracket, which will tighten the
drive belt.DD
O NO
O NO
T O
T O
VER
VER
-TIGHTEN
-TIGHTEN. If you over-tighten this belt you will snap the motor shaft. To measure the ten-
sion, twist the drive belt between the motor and the drive roller. The ideal tension will allow you to twist the drive belt 45˚.
If you can twist the belt past 45˚, it is too loose. If you cannot twist the belt to at least 45˚, it is too tight.
TREADMILL LUBRICATION & CLEANING
It is recommended that you vacuum around and underneath the treadmill on a monthly basis. Your treadmill will last
longer and look better if you wipe the sweat off the unit after each workout.
Lubrication is not required on residential treadmills. In institutional settings Landice recommends lubricating the underside
of the treadbelt with Landice SlipCoat on a monthly basis (see SLIPCOAT APPLICATION INSTRUCTIONS sheet in
Lubrication Kit Box).
MOTOR BRUSHES
Motor brushes should be checked every six months on institutional treadmills and after six years on home units.
Service Check-List
• Tension and track treadbelt
• Lubricate belt and vacuum treadmill
• Check drive belt tension
• Check motor brushes
DANGER: Lethal voltages and moving parts capable of causing serious injury are exposed when the drive
housing cover is removed. Under no circumstances should the motor cover be removed except by a
Landice factory-authorized technician.
WARNING: Moving parts can cause serious damage.
Be sure to unplug treadmill before placing hands underneath the treadbelt!!!
Page 35
Appendix A: Medrail Installation
30
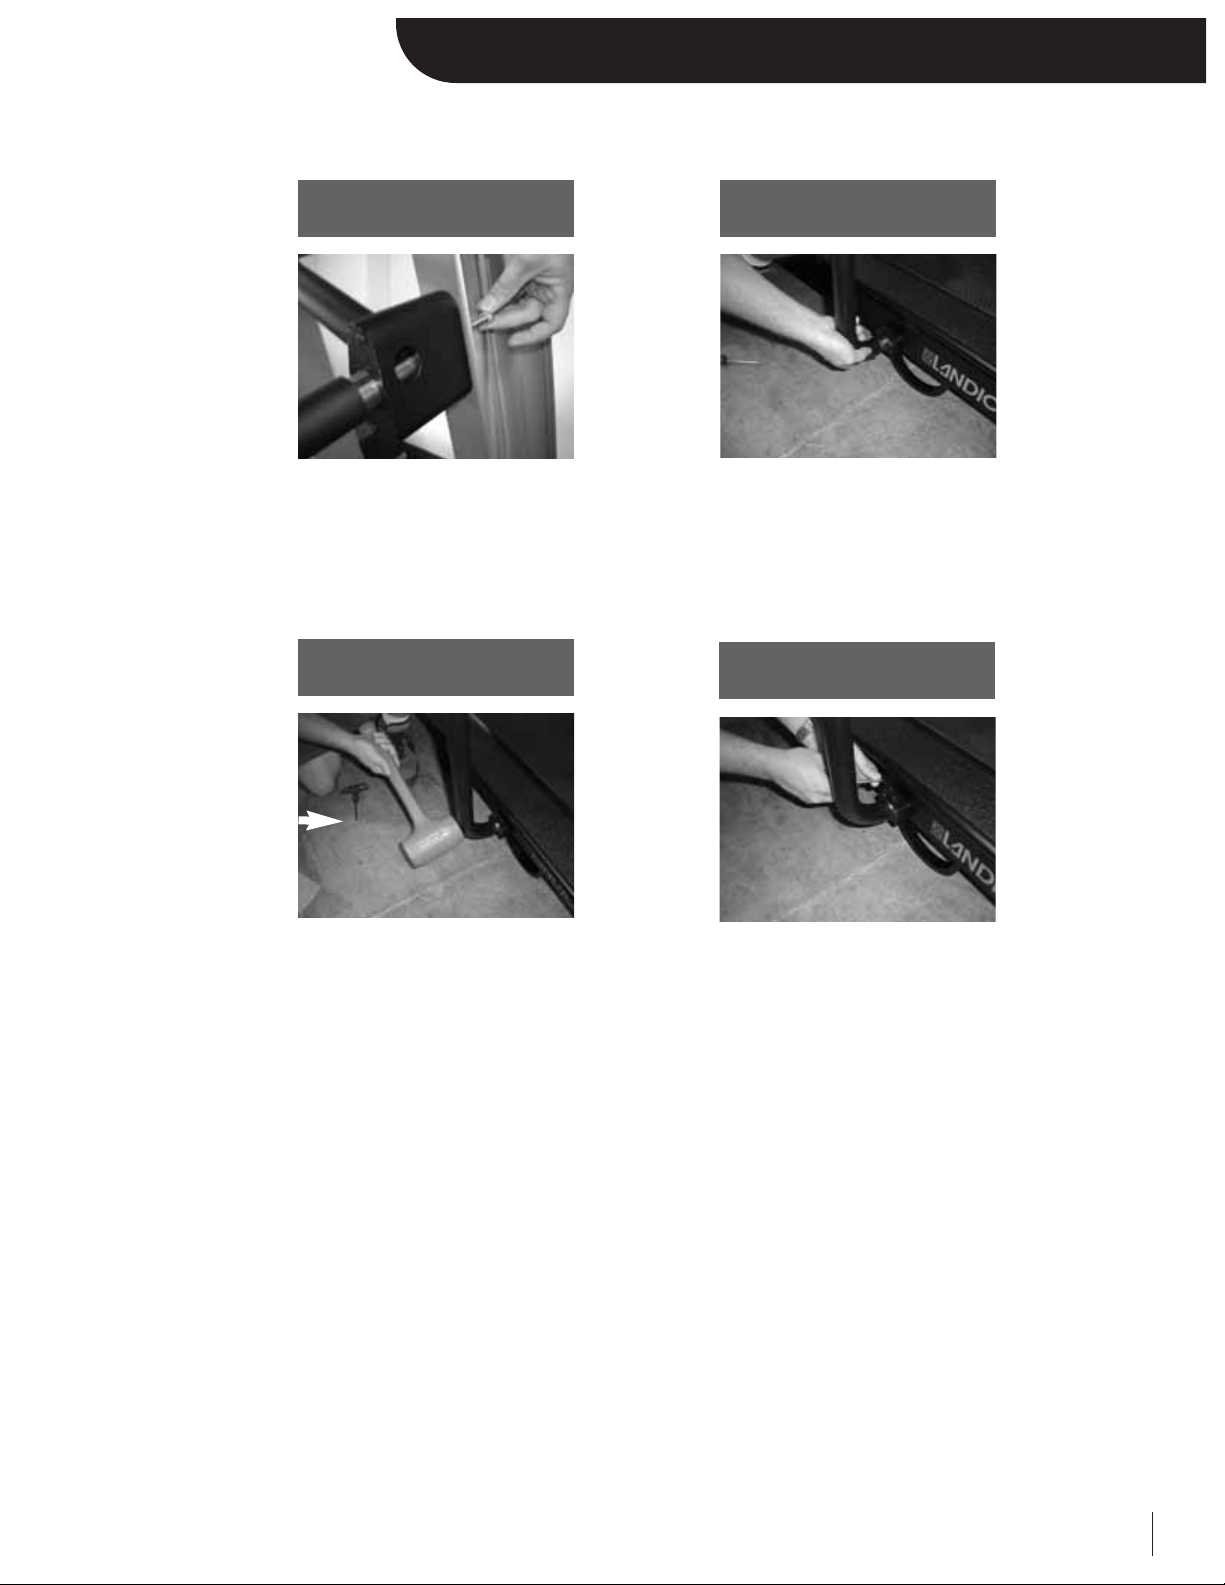
Insert the side rail into the upper
rail clamp and tighten the bolt
using a 1/2” socket.
(Do not over-tighten.)
Use a soft mallet to firmly set the
rails inside the clamp.
Use a 3/16” allen wrench to tighten
the rail clamp bolts.
(Return to Step 9 in Assembly
Instructions).
STEP 1 STEP 2
STEP 3
STEP 4
Fit the side rail to the bottom
rail clamp.
Page 36
Crafting the World’s Finest Treadmills
111 Canfield Avenue, Randolph, NJ 07869 · 1-800-LANDICE · Tel. 973-927-9010 · Fax 973-927-0630 · www.landice.com
 Loading...