


Installation Guide
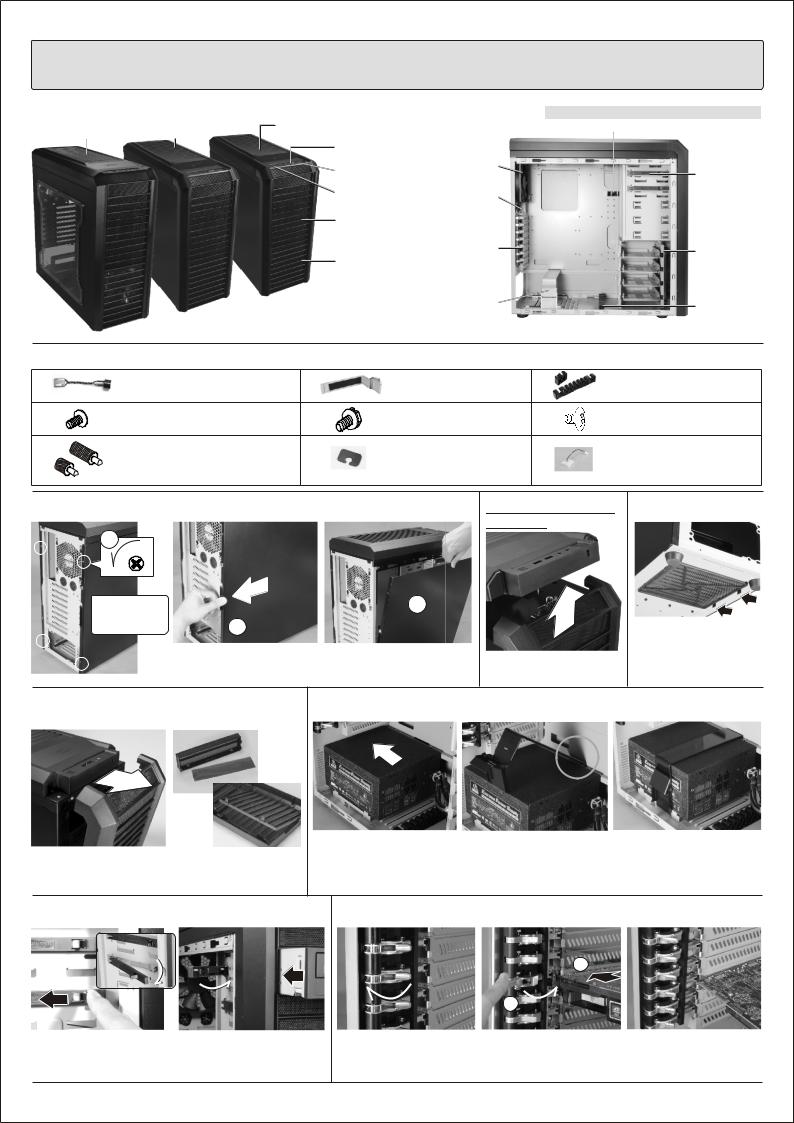
Case components
140mm blue LED fan x 2 140mm fan x 2
PC-K60
PC-K62
Please visit www.lancoolpc.com for FRANCE / GERMANY / SPAIN user's manual
Veuillez visiter www.lancoolpc.com pour le manuel d’installation en FRANÇAIS/ALLEMAND/ESPAGNOL. Visite el sitio Web www.lancoolpc.com para obtener el manual del usuario en FRANCÉS ALEMÁN Y ESPAÑOL Besuchen Sie bitte www.lancoolpc.com für die französische/ deutsche/ spanische Gebrauchsanleitung
|
|
* PC-K62 / 60 / 58 and C-02 are not compatible |
|
Top 140mm fan x2 (Optional) |
|
Clamp |
|
ports |
|
|
|
|
120mm fan |
|
Patented |
|
Liquid-cooling |
|
tool-less 5.25” |
|
system tube |
|
device |
|
vents rubber |
|
mounting |
|
cover |
|
|
bezel |
Patented |
|
|
140mm fan |
tool-less PCI |
|
Patented |
add-on card |
|
tool-less |
|
|
holder |
|
HDD cage |
PC-K58 |
Patented |
|
|
|
tool-less PSU |
|
Clamp |
|
mounting |
|
|
|
bracket |
|
|
Hardware list
Buzzer(1)
Thumb screw: Short(6) / long(3) for motherboard mounting
Screw(2)
for rotate the HDD cage 90 degree
Bracket(1) |
1 |
for power supply mounting |
for cable management |
|
|
Screw(4) |
Screw(12) |
for power supply mounting |
for 5.25", 2.5" mounting |
|
|
Rubber pad(16) |
3Pin to 4pin fan power |
for HDD module |
convector (1) |
|
|
Side panels installation
1
the |
3 |
|
2 |
|
|
Slide panel backward of the |
Romove the side panel. |
Pull the top panel to |
case, to release the side panel. |
|
remove it. |
Removable air filter
By press the plastic handles to release the air filter air filter is washable.
Removable air filter PSU installation
Pull the front panel toward |
There are air filters |
Place the PSU on the stand, |
Place the PSU bracket into |
|
and push again the |
according slot as shown. |
|||
yourself. |
inside 5.25" bezel, |
|||
rear panel. |
|
|||
|
and front panel. |
|
||
|
|
|
Lock the PSU bracket to secure the PSU.
*For transportation, please use the screws to secure the PSU
ODD installation |
PCI Add-on card installation |
1
2 
Press plastic handle to |
Push the CD-ROM into the |
Open the aluminum latch to |
Push the card into the |
Finish. |
release the mounting |
ODD module, |
remove the PCI slot bracket |
PCI slot, close the aluminum |
|
bracket. |
close the bracket. |
|
latch to secure the card. |
|
C50.K5800.11E-1

Hard disk installation
Put anti-vibration rubbur pad for reduce noise level.
Open the plastic brackets on HDD cage.
Insert the HDD into
the HDD cage
Close the plastic brackets to secure.
(Open the plastic bracket to release the HDD from HDD cage)
Remove HDD cage (HDD cage can be rotate 90 degree)
Close the gate to secure the HDD cage.
Slide the HDD cage into the
Secure the
HDD rack.
2.5” HDD to
HDD cage with screws.
Loose three screws to release the tool-less HDD cage .
Loose thumb screw to release the gate.
Rotate the HDD cage 90 degree to specific mounting point
Secure the HDD cage with screw as hown above
Cable clamp installation
Insert the gate to the HDD cage, secure it with the thumb screw. |
Insert the cable clamp into |
Use cable clamp to tidy up |
|
specific mounting point |
the cables. |
||
|
*Remove clamp, use tweezers to release the cable clamp
!
!
Note: For area where hard
!
to reach use the long thumb screw
Secure the stand-off on the M/B tray which match with the M/B fix points, place the M/B on the stand-off fasten with the thumb screws to secure.
Front panel cable installation guide
GROUND |
WHITE |
POWER SW |
|
PWR |
GRAY |
||
|
|||
GROUND |
WHITE |
|
|
RESET SW |
|||
Reset |
BLUE |
||
|
|||
PLED- |
WHITE |
|
|
POWER |
|||
|
NC |
LED |
|
PLED+ |
GREEN |
||
|
|||
IDE_LEDWHITE |
H.D.D LED |
||
IDE_LED+ |
ORANGE |
||
|
|||
|
|||
Speaker |
BLACK |
|
|
|
NC |
SPEAKER |
|
|
NC |
||
+5V |
|
||
RED |
|
||
|
|||
I/O port installation
AC 97AUDIO
Optional accessories from Lian Li
EX-332N EX-H34 TR-5 BZ-U02B CR-36
C50.K5800.11E-2
Please visit www.lancoolpc.com for FRANCE / GERMANY / SPAIN user's manual
Veuillez visiter www.lancoolpc.com pour le manuel d’installation en FRANÇAIS/ALLEMAND/ESPAGNOL. Guide d'installation Visite el sitio Web www.lancoolpc.com para obtener el manual del usuario en FRANCÉS ALEMÁN Y ESPAÑOL
Besuchen Sie bitte www.lancoolpc.com für die französische/ deutsche/ spanische Gebrauchsanleitung
Composants du boîtier |
|
|
|
*PC-K62 / 60 / 58 et C-20 ne sont pas compatibles |
|
Ventilateur à DEL bleue |
Ventilateur de |
Ventilateur supérieur |
|
|
Pince |
de 140 mm x2 |
140 mm x 2 |
de 140 mm x2 (en option) |
|
|
|
|
|
|
|||
|
|
Port Multimédia |
|
|
|
|
|
Interrupteur |
|
Ventilateur 120mm |
Montage sans |
|
|
d'alimentation |
Couvercle en |
||
|
|
outil breveté du |
|||
|
|
Bouton de |
|
caoutchouc des |
|
|
|
|
dispositif 5,25" |
||
|
|
réinitialisation |
évents du tube |
||
|
|
|
|||
|
|
Lunette de |
|
du système de |
|
|
|
|
refroidissement |
|
|
|
|
montage 5,25" |
à eau |
Module à |
|
|
|
|
|
Support de carte |
|
|
|
Ventilateur |
|
PCI breveté |
montage sans |
|
|
|
additionnel à |
outil et breveté |
|
|
|
140mm |
|
montage sans outil |
du lecteur de |
|
|
PC-K58 |
|
Support de |
disque dur |
|
|
|
|
||
|
|
|
montage sans |
Pince |
|
|
PC-K60 |
|
|
||
|
|
|
outil breveté du |
|
|
PC-K62 |
|
|
PSU |
|
|
|
|
|
|
||
Liste du matériel |
|
|
|
|
* Les quantités supplémentaires correspondent |
|
|
|
|
aux pièces de rechange. |
|
Fil du vibrateur (1) |
|
Support (1) pour l'installation |
Pince (1) pour gestion du |
||
|
de l'alimentation |
câblage |
|||
|
|
|
|||
Screw(2) |
|
Vis (4) pour l'installation de |
Vis (12) pour l'installation |
||
for rotate the HDD cage 90 degree |
l'alimentation |
5,25", 2,5" |
|||
Vis à serrage à main (6) pour |
|
Coussin en caoutchouc (16) |
Convecteur d'alimentation |
||
l'installation de la carte mère |
|
||||
|
pour le module lecteur de |
||||
Vis à serrage à main (3) pour |
|
disque dur |
3-à-4 broches (1) |
||
l'installation de la carte mère |
|
|
|
|
|
Installation des panneaux latéraux |
Déposez le panneau |
|
supérieur |
1
Retirez les vis |
3 |
|
de serrage à |
2 |
|
main |
|
|
|
Pour libérer le panneau latéral, Déposez le panneau latéral. |
Tirez le panneau supérieur |
|
faites glisser le panneau à |
|
|
pour le retirer. |
|
|
l'arrière du boîtier. |
|
|
|
Filtre à air amovible
Appuyez sur les poignées en plastique pour libérer le filtre à air. Ce dernier peut être lavé.
Retirez le panneau |
Filtre à air amovible Installation du PSU |
avant |
|
Tirez le panneau avant vers vous.
La lunette de 5,25" et le panneau avant comportent les filtres à air.
Placez le PSU sur le support et poussez-le contre le panneau arrière.
Placez le support du PSU dans la fente, comme illustré.
Verrouillez le support du PSU pour le maintenir en place.
*Utilisez les vis pour sécuriser le PSU en cas de transport.
Installation de l'ODD |
Installation de la carte PCI additionnelle |
1
2 
Appuyez sur la poignée en |
Poussez le CD-ROM dans le |
Libérez le support de |
Poussez la carte dans le |
C'est terminé. |
plastique pour libérer le |
module ODD. Fermez le |
montage. |
logement PCI et fermez le |
|
support de montage. |
support. |
|
support. |
|
C50.K5800.11F-1
 Loading...