

Page 1
www.lancerbeverage.com
PRESTO BEER CHILLER
Installation, Operation &
Service Manual
Page 2

PRESTO BEER CHILLER MANUAL
www.lancerbeverage.com Page 2 of 15
Hoshizaki Lancer reserve the right to change specifications without notice. Part No: 68000022
Images are for illustration purposes only as product may vary. No 044-2 – 19 November 2015
Page 3

PRESTO BEER CHILLER MANUAL
www.lancerbeverage.com Page 3 of 15
Hoshizaki Lancer reserve the right to change specifications without notice. Part No: 68000022
Images are for illustration purposes only as product may vary. No 044-2 – 19 November 2015
Table of contents
1. Introduction ........................................................................................................................... 4
2. The Company ........................................................................................................................ 4
3. Our Products ........................................................................................................................ 4
4. Product Details ..................................................................................................................... 5
4.1 Product Features .......................................................................................................... 5
4.2 Specifications ................................................................................................................ 5
4.3 Models .......................................................................................................................... 5
4.4 Options .......................................................................................................................... 5
5. Chiller Safety Information ................................................................................................... 6
5.1 Safety Instructions ........................................................................................................ 6
5.2 Recognise Safety Alert Symbols .................................................................................. 6
5.3 Operating ...................................................................................................................... 6
5.4 Service & Maintenance ................................................................................................ 6
6. Installation ............................................................................................................................. 7
6.1 Receiving ...................................................................................................................... 7
6.2 Unpacking ..................................................................................................................... 7
6.3 Selecting a Location ..................................................................................................... 7
6.4 Preassembly of the Chiller .......................................................................................... 7
6.5 Setup and Operation .................................................................................................... 8
7. Scheduled Maintenance .................................................................................................... 10
7.1 Daily ............................................................................................................................ 10
7.2 Weekly ........................................................................................................................ 10
8. Cleaning and Sanitation. ................................................................................................... 10
9. Troubleshooting ................................................................................................................. 11
10. Assembly Parts List ........................................................................................................... 12
11. Certificate of Warranty ....................................................................................................... 14
12. Manufacturer’s Checklist .................................................................................................. 15
Page 4

PRESTO BEER CHILLER MANUAL
www.lancerbeverage.com Page 4 of 15
Hoshizaki Lancer reserve the right to change specifications without notice. Part No: 68000022
Images are for illustration purposes only as product may vary. No 044-2 – 19 November 2015
1. Introduction
Thank you for purchasing this quality Lancer product. All Lancer products are constructed using the highest
quality materials and components. They are designed to the highest possible standards, therefore offering our
customers endless hours of optimum performance.
2. The Company
Hoshizaki Lancer is a wholly owned subsidiary of Lancer Corporation, a world leader in the supply of Beverage
Dispensing Equipment based in San Antonio, Texas. Lancer has manufacturing bases and distribution networks
in 97 countries. Lancer is in turn ultimately owned by Hoshizaki Electric Co Ltd of Nagoya, Japan. Hoshizaki is a
global leader in food service equipment.
Hoshizaki Lancer’s head office and manufacturing base is located in Adelaide (SA), with branch offices and
warehousing facilities in Sydney (NSW), Melbourne (VIC), Brisbane (QLD), Perth (WA) and Auckland (New
Zealand).
3. Our Products
Lancer specialises in the design, engineering, manufacture, and marketing of beverage dispensing equipment in
two core categories:
Soft Drink Equipment
Mechanically cooled and ice cooled soft drink dispensers, frozen beverage dispensers, dispensing valves,
carbonators and an extensive line of beverage dispensing parts and accessories.
Beer Equipment
Hoshizaki Lancer manufactures and markets beer dispensing and chilling equipment, and related accessories.
Products include founts, chillers, chillerplates, drip trays, taps, handles, beer line cleaning equipment and an
extensive line of beverage dispensing parts and accessories.
Page 5
PRESTO BEER CHILLER MANUAL
www.lancerbeverage.com Page 5 of 15
Hoshizaki Lancer reserve the right to change specifications without notice. Part No: 68000022
Images are for illustration purposes only as product may vary. No 044-2 – 19 November 2015
4. Product Details
4.1 Product Features
The Lancer Presto Beer Disperser is an ice-cooled, semi-portable unit designed to chill and dispense
draught beer when connected to ambient temperature kegs.
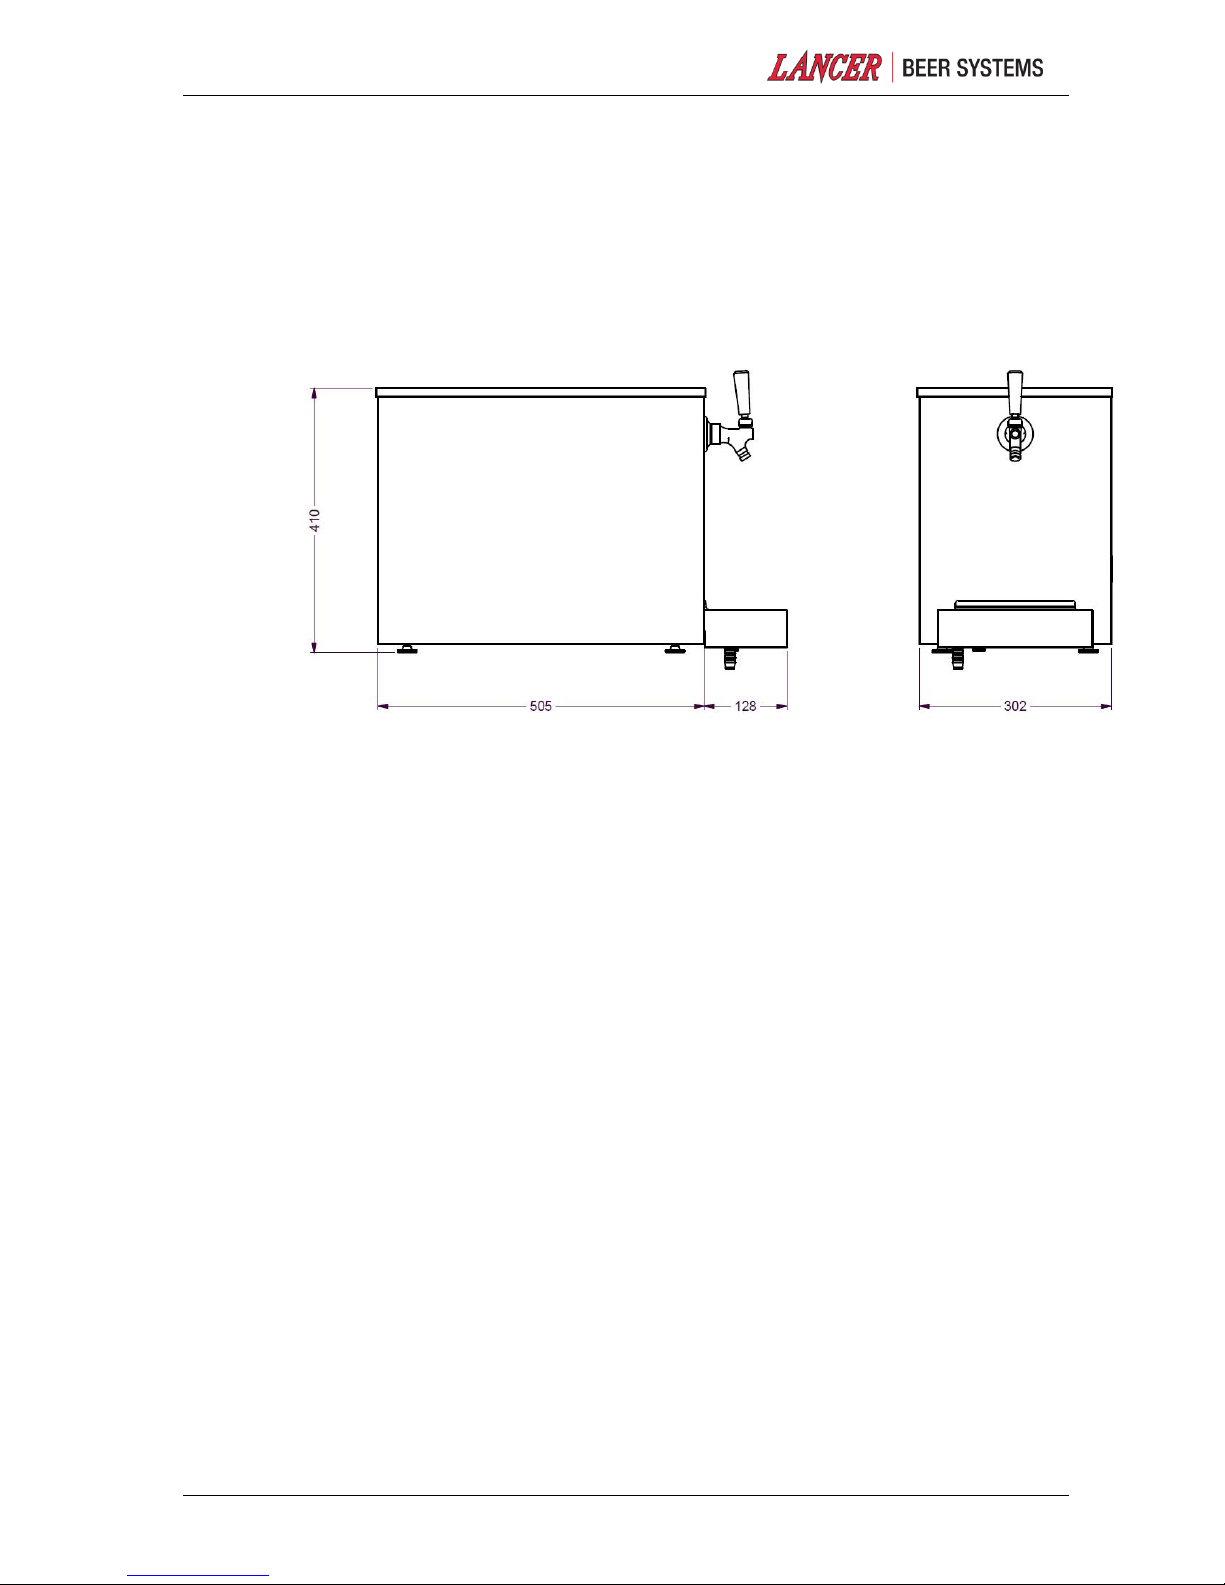
4.2 Specifications
Dimensions
Width 302 mm
Depth 633 mm (With drip tray)
Height with legs 410 mm
Ice Capacity 8 kg
Ambient Temperature 2 - 30°C
Rated Beer Lines Pressure 400 kPa (60 psi)
Weight
Shipping 25.0 kg
Empty 22.7 kg
Operating 30.7 kg
Construction Stainless Steel
4.3 Models
31000481 Presto Beer Cooler 1W with Disposable CO2 Cylinder + Regulator. No Coupler
31000483 Presto Beer Cooler 1W with Bottle Mount Regulator, Type AB Coupler + Cleanout Bottle
31000484 Presto Beer Cooler 1W with Bottle Mount Regulator, Type D Coupler + Cleanout Bottle
31000880 Beer Dispenser PL40 (Beer chiller w/ drip tray – no tap or install kit)
4.4 Options
Keg Couplers: 5L Cleanout Bottles:
87700010 Type D 35000039 Type D
35502593 Type AB 35600051 Type AB
35000037 Type S 35000001 Type S
Page 6

PRESTO BEER CHILLER MANUAL
www.lancerbeverage.com Page 6 of 15
Hoshizaki Lancer reserve the right to change specifications without notice. Part No: 68000022
Images are for illustration purposes only as product may vary. No 044-2 – 19 November 2015
5. Chiller Safety Information
5.1 Safety Instructions
For your personal safety, and that of others working around you please read, understand, and follow
thoroughly all safety instructions included in this manual and on the Chiller.
Review all applicable OSH (Occupational Safety & Health) regulations.
Review all applicable Beverage Dispensing Gas Standards
Learn how to operate the Chiller and use the controls properly.
Do not allow untrained personnel to operate the machine.
Ensure that the Chiller is maintained according to service manual instructions.
Do not allow any unauthorised modifications to the machine.
5.2 Recognise Safety Alert Symbols
The safety alert symbol precedes Warning and Caution notes throughout this manual. To prevent
personal injury or damage to the machine these alerts must be strictly adhered too.
Warning
Alerts to a potentially hazardous situation that if not avoided
CAN result in death, serious injury.
Caution
Alerts to a potentially hazardous situation that if not avoided
MAY result in injury or equipment damage.
5.3 Operating
Caution
This appliance is not intended for use by persons (including
children) with reduced physical, sensory or mental capabilities,
or lack of experience and knowledge, unless they have been
given supervision or instruction concerning use of the
appliance by a person responsible for their safety. Children
should be supervised to ensure that they do not play with the
appliance.
5.4 Service & Maintenance
Caution
Installation of the chiller and service work should only be
performed by fully trained & certified technicians.
Warning
ALL PLUMBING MUST CONFORM TO LOCAL AND NATIONAL
CODES.
Page 7

PRESTO BEER CHILLER MANUAL
www.lancerbeverage.com Page 7 of 15
Hoshizaki Lancer reserve the right to change specifications without notice. Part No: 68000022
Images are for illustration purposes only as product may vary. No 044-2 – 19 November 2015
6. Installation
Warning
To avoid personal injury or damage, do not attempt to lift a
Chiller without help. Use of a mechanical lift is recommended.
6.1 Receiving
Each unit is completely tested under operating conditions and thoroughly inspected before shipment. At
time of shipment, the carrier accepts the unit and any claim for damage(s) must be made with the carrier.
Upon receiving units from the delivering carrier, carefully inspect shipping crate for visible indication(s) of
damage. If damage exists, have carrier note damage on bill of landing and file a claim with the carrier.
6.2 Unpacking
Caution
The use of gloves is recommended to protect hands from
potential injury from sharp edges. The Chiller must always be
handled in a vertical position.
Carefully unpack the Lancer Presto Chiller from the shipping carton. Inspect unit for concealed damage
and if evident, notify delivering carrier and file a claim against the carrier.
6.3 Selecting a Location
Caution
The Chiller is not suitable for use in subfreezing temperatures.
To prevent damage, drain unit when air temperature is below
zero.
The Chiller should be located on a firm, level surface able to support 30 kg operating weight.
The appliance is only to be installed in location where its use and maintenance is restricted to
trained personnel.
Ensure there is sufficient clearance to fill the ice well from the top.
6.4 Preassembly of the Chiller
Open lid and remove hardware.
Assemble feet, tap, tap seal, handle
and elbows as shown right.
Leave drip tray off for now.
Taps and the drip tray can be stored
inside the unit when transporting and
storing.
Page 8

PRESTO BEER CHILLER MANUAL
www.lancerbeverage.com Page 8 of 15
Hoshizaki Lancer reserve the right to change specifications without notice. Part No: 68000022
Images are for illustration purposes only as product may vary. No 044-2 – 19 November 2015
6.5 Setup and Operation
Page 9

PRESTO BEER CHILLER MANUAL
www.lancerbeverage.com Page 9 of 15
Hoshizaki Lancer reserve the right to change specifications without notice. Part No: 68000022
Images are for illustration purposes only as product may vary. No 044-2 – 19 November 2015
Warning
The Presto Beer Chiller uses a CO2 (Carbon Dioxide) supply.
CO2 is a heavier than air, colourless, non-combustible gas with
a faintly pungent odour. Personnel exposed to high
concentrations of CO2 gas will experience tremors, which are
followed rapidly by loss of consciousness and suffocation. If a
CO2 gas leak is suspected, immediately ventilate the
contaminated area before attempting to repair the leak.
An Onsite CO2 Risk Assessment must be completed at the time
of installation to ensure compliance with AS 5034.
Place chiller on countertop with drain and beer elbows overhanging the edge.
Connect 3m beer line to INLET elbow. DO NOT CUT THE BEER LINE AS THE LENGTH IS
CRITICAL IN CONTROLLING BEER FLOW.
Connect drain tube to DRAIN elbow and route to a suitable container or tundish. Ensure there are
no bends or kinks in the drain tube that would trap water.
Replace drip tray and cup rest.
Fill the ice well with ice now to allow the unit to chill down while finishing the connections. It can
take up to 20 minutes for the chiller to stabilise with ice in it.
Assemble beer coupler fittings as shown. Ensure tubing is fully seated in elbow.
Place coupler on keg but do not engage at this time.
Attach gas line to CO2 regulator and keg coupler. Use only Food Grade CO2.
Attach disposable CO2 cylinder, if used, and place in holder as shown.
Route the relief vent to a well ventilated area as required by AS 5034.
Set the CO2 regulator pressure. Check with the brewery or use the following table as a guideline.
Beer Keg Temperature
Gas Pressure
10oC
150 – 200 kPa (22 - 29 Psig)
20oC
220 – 250 kPa (32 - 36 Psig)
30oC
320 – 350 kPa (46 - 51 Psig)
Engage keg by pushing down on the coupler handle.
Ensure there are no gas leaks by performing a thorough leak check of the system and rectifying
any discrepancies before continuing.
To dispense beer open and close the tap with a quick, full movement of the tap handle.
From time to time it may be necessary to agitate the ice in the well to maintain chilled beverage
temperatures.
Caution
Free standing CO2 cylinders may be used but they MUST be
restrained from falling over with a suitable restraining device as
defined in AS 4332. Should the valve become accidentally
damaged or broken off, a CO2 cylinder can cause serious
personnel injury or even death.
Caution
Do not exceed rated keg pressure .
Page 10

PRESTO BEER CHILLER MANUAL
www.lancerbeverage.com Page 10 of 15
Hoshizaki Lancer reserve the right to change specifications without notice. Part No: 68000022
Images are for illustration purposes only as product may vary. No 044-2 – 19 November 2015
7. Scheduled Maintenance
The following Chiller routine maintenance should be performed at the intervals listed.
7.1 Daily
Good food hygiene practices should be a part of the daily routine – spills wiped up, empty
containers disposed of, and equipment kept neat and orderly.
Lift handle to disengage, but do not remove, keg coupler to prevent over carbonation at the end of
the trading day.
Wash drip tray and cup rest.
7.2 Weekly
As per brewery instructions, ensure weekly sanitisation of the whole beer system is carried out,
including keg couplers, beer lines, chiller coils and taps.
Wash out the ice well with warm soapy water and rinse with clear water.
8. Cleaning and Sanitation.
Warning
Most commercial beer line chemicals are classified as
hazardous if ingested or when in contact with the skin or eyes.
Take proper precautions when handling and wear protective
clothing and goggles. Read and understand the handling
procedures for the chemicals used for your system.
Hoshizaki Lancer provides both concentrate and premixed beer line
cleaning solutions. Contact us for details. The instructions below are for
general applications considering the brewery may offer alternative
cleaners.
A 5L cleanout tank is available from Hoshizaki Lancer. Before
opening vent the tank by pulling the relief valve ring.
Prepare 5L of sanitizer following the supplier’s instructions.
Place a bucket under the tap.
Connect the keg coupler to the cleanout tank.
Open the tap and allow product to pour until cleaning fluid comes out of the
tap. Close tap.
Let stand. Follow the instructions that came with the cleaner.
At the end of the soak period, dispense some cleaner through the beer line
then wash tap with the brush supplied. Continue running the cleaner through
the chiller operating the tap on-off-on to remove buildup.
Disconnect keg coupler. Vent cleanout tank. Rinse thoroughly and fill with potable water.
Reconnect keg coupler and purge chiller with water until clear of any cleaning chemical.
Connect to keg. Open tap until product is dispensed.
Page 11

PRESTO BEER CHILLER MANUAL
www.lancerbeverage.com Page 11 of 15
Hoshizaki Lancer reserve the right to change specifications without notice. Part No: 68000022
Images are for illustration purposes only as product may vary. No 044-2 – 19 November 2015
9. Troubleshooting
TROUBLE
CAUSE
REMEDY
Excessive Foaming
Gas pressure too low for beer keg
temperature. Bubbles are in the
beer tubing (breakout).
Low ice in ice well.
Flow too fast through tap.
Kinked beer line or line run near
heat source.
Agitated keg – possibly from
replacement.
Keg too warm.
Beer out of date.
Unit not cleaned or sanitised.
Increase gas pressure slightly until
beer line clears up.
Replenish ice.
Check beer line has not been
shortened or cut. Replace if required.
Check routing and correct as required.
Allow keg to settle before continuing.
If keg has been allowed to sit in sun /
outdoor summer storage, etc then
other means must be made available
to store kegs in a cooler location.
Replace with fresh keg.
Clean and sanitise thoroughly.
Low Carbonation.
Dirty glasses.
Non-food grade CO2.
Unit not cleaned or sanitized.
Wash glasses with commercial
detergents approved for beer use.
Replace with food grade CO2.
Clean and sanitise thoroughly.
Product too warm
Warm chiller just filled with ice.
Flow rate too high.
Ice bridging in the ice well.
Allow chiller to stabilise with a full ice
well for 20 minutes before continuing.
Check beer line has not been cut or
shortened. Replace if required.
Agitate ice.
Page 12

PRESTO BEER CHILLER MANUAL
www.lancerbeverage.com Page 12 of 15
Hoshizaki Lancer reserve the right to change specifications without notice. Part No: 68000022
Images are for illustration purposes only as product may vary. No 044-2 – 19 November 2015
10. Assembly Parts List
Page 13

PRESTO BEER CHILLER MANUAL
www.lancerbeverage.com Page 13 of 15
Hoshizaki Lancer reserve the right to change specifications without notice. Part No: 68000022
Images are for illustration purposes only as product may vary. No 044-2 – 19 November 2015
ITEM
PART NUMBER
DESCRIPTION
QTY
1
31000880
BEER DISPENSER FLASH
1
1a
92001008
DRIP TRAY
1
1b
92001009
CUP REST
1
1c
48000016
FEET LEVEL PRESTO BEER
4
1d
48000015
LID PRESTO BEER
1
2
33000050
TAP BEER UNIVERSAL HILIGHT
1
3
33000003
HANDLE TAPERED THREADED
1
5
79158171
ELBOW PUSH 5/16SS X 5/16SF
1
6
79145565
TAP COUPLING GASKET
1
7
81000040
TUBE CVT 12.5 ID X 1.5 WALL
1.5 M
8
81000111
TUBE BLUE GAS 3/8 X1/4
1.0M
9
81000594
TUBE FLOGUARD 4MM X 8MM
3.0 M
10
37000202
BRACKET DISPOSABLE CO2 CYLINDER
1
11
35502593
KEG COUPLER TYPE AB
1
87700010
KEG COUPLER TYPE D
1
35000037
KEG COUPLER TYPE S
1
12
87778987
ADAPTOR FEMALE 5/16JG X 5/8BSP
2
13
79155583
STEM ELBOW 5/16 X 5/16
1
15
79152788
STEM TUBE TO HOSE 5/16 X 1/4
1
16
37000203
REG ASSY DISP CYL (INCLUDES ITEM 10)
1
87000137
REGULATOR ASSEMBLY BOTTLE MOUNT
1
17
79120799
CLAMP STEPLESS S/S 113
2
18
35600051
CLEANING BOTTLE 5LT TYPE AB
1
35000039
CLEANING BOTTLE 5LT TYPE D
1
35000001
CLEANING BOTTLE 5LT TYPE S
1
19
33000090
TAP BRUSH SANITARY PLUG
1
21
47000200
CO2 CYLINDER DISPOSABLE 850GR
6
Page 14

PRESTO BEER CHILLER MANUAL
www.lancerbeverage.com Page 14 of 15
Hoshizaki Lancer reserve the right to change specifications without notice. Part No: 68000022
Images are for illustration purposes only as product may vary. No 044-2 – 19 November 2015
11. Certificate of Warranty
It is the policy of Hoshizaki to provide to its current customers, warranty for all equipment supplied and
installation work performed within a specified period.
Parts and Equipment
Lancer provides a warranty period of twelve (12) months from the date of original invoice for all manufactured
parts. Repair or replace of defective parts will be at the sole discretion of Lancer.
Changeover parts will be invoiced to the customer at the customers normal purchase cost and upon return of
the warranty item and validation of the claim, the invoice will be credited.
Installations
Lancer provides a warranty period of twelve (12) months from the date of final invoice for workmanship after the
completion of any installation work, provided the parts and labour are completed by Lancer or its subcontractor.
Labour
Lancer will not normally cover any labour costs associated with a warranty claim. Subject to the approval of the
Divisional Sales Manager, Lancer may choose to reimburse the customer for some or all labour costs
associated with a warranty claim. Any claim for labour costs must be authorized by Lancer prior to the work
being undertaken.
Exclusions
Lancer will not accept any liability or cost associated with any consequential losses (such as loss of syrup or
beer), loss of profit or damage to property as a result of faulty product.
Warranty shall not apply:
a) If in the opinion of Lancer, the equipment has been used in a situation the equipment has not been
designed for;
b) If in the opinion of Lancer, the equipment has been subject to abuse, negligence or accident;
c) If connected to improper, inadequate or faulty power, water or drainage service or operated using incorrect,
insufficient or contaminated lubricants, coolants, refrigerants or additives;
d) Where the product is installed, maintained or operated otherwise than in accordance with the instructions
supplied by Lancer;
e) Where the product has been damaged by foreign objects;
f) Where the product has been serviced, repaired, altered or moved otherwise than by Lancer or its nominees
or using other than Lancer approved replacement parts.
To obtain full details of your warranty and approved service agency, please contact your dealer / supplier, or
your local Hoshizaki Lancer office.
Hoshizaki Lancer – Head Office
Tel: +61 8 8268 1388
Fax: +61 8 8268 1978
Page 15

PRESTO BEER CHILLER MANUAL
www.lancerbeverage.com Page 15 of 15
Hoshizaki Lancer reserve the right to change specifications without notice. Part No: 68000022
Images are for illustration purposes only as product may vary. No 044-2 – 19 November 2015
12. Manufacturer’s Checklist
Checked by ................................................................................. Date .............................................................
All parts from work order included.
Gas line assembled correctly.
Panel work fitted and secure.
Customer asset No.
W/O ....................................................................
Affix label here
 Loading...