

Page 1
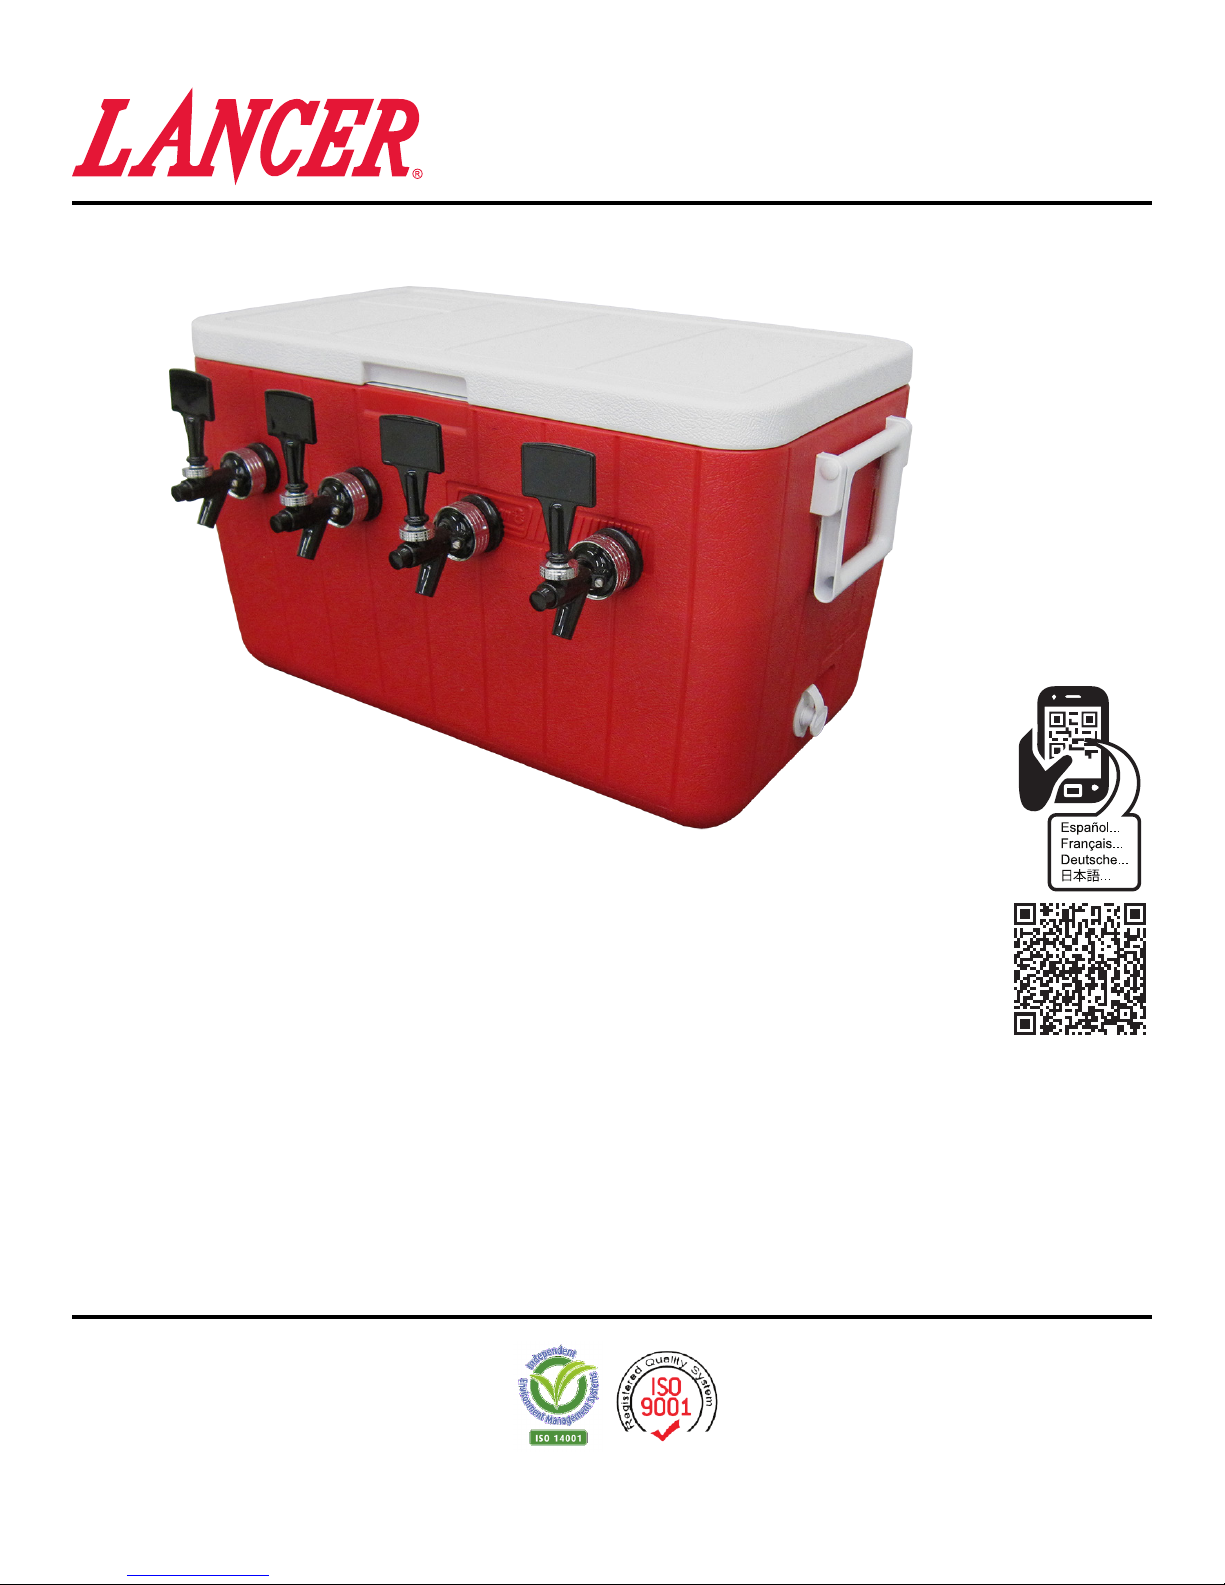
Pre-Mix Cooler
Installation & Operation Manual
Please refer to the Lancer Corp website (lancercorp.com) for information relating to Lancer Installation/Operation
Manuals, Installation Guides, Instruction Sheets, and Technical Bulletins or for your convenience, scan this QR code
with a mobile device (app required) for immediate access to other Technical Documents and alternative translations
(if available) pertaining to this unit.
ABOUT THIS MANUAL
This booklet is an integral and essential part of the product and
should be handed over to the operator after the installation and
preserved for any further consultation that may be necessary.
Please read carefully the guidelines and warnings contained
herein as they are intended to provide the user with essential
information for the continued safe use and maintenance of the
product. In addition, it provides GUIDANCE ONLY to the user on
the correct services and site location of the unit.
The installation and relocation, if necessary, of this product must be carried out by qualied personnel with
up-to-date safety and hygiene knowledge and practical experience, in accordance with current regulations.
Lancer Corporation
6655 Lancer Blvd.
San Antonio, Texas 78219
800-729-1500
BEFORE GETTING STARTED
Each unit is tested under operating conditions and is thoroughly
inspected before shipment. At the time of shipment, the carrier
accepts responsibility for the unit. Upon receiving the unit,
carefully inspect the carton for visible damage. If damage exists,
have the carrier note the damage on the freight bill and le a
claim with carrier. Responsibility for damage to the dispenser lies
with the carrier.
Technical Support/Warranty
800-729-1550
custserv@lancercorp.com
lancercorp.com
PN: 28-0979
“Lancer” is the registered trademark of Lancer © 2016 by Lancer, all rights reserved.
Page 2
IMPORTANT SAFETY INSTRUCTIONS
READ ALL SAFETY INSTRUCTIONS BEFORE USING THIS UNIT.
This manual contains important safety information and all applicable safety precautions must be observed. To reduce
the risk of re, damage to the equipment, or personal injury when using this unit all instuctions/warnings on the product
being used must be followed:
! CAUTION
Text following the Caution signal indicates a hazardous situation, which if not avoided, could result in death or serious
injury. Be sure to read the Caution statements before proceeding with the installation.
! ATTENTION
Text following the Attention signal addresses a situation that if not followed could potentially damage the equipment.
Be sure to read the Attention statements before proceeding
NOTE
TextfollowingtheNotesignalprovidesyouwithinformationthatmayhelpyoumoreeectivelyperformthe
installation procedures within this manual. Disregarding information will not cause damage or injury, however it may
limit the performance of the dispenser.
! Intended Use
• This appliance should not be used by children or inrm persons without supervision.
• This appliance is not intended for use by persons (including children) with reduced physical, sensory
or mental capabilities, or lack of experience and knowledge, unless they have been given supervision or instruction concerning use of the appliance by a person responsible for their safety.
• This appliance can be used by children aged from 8 years and above and persons with reduced
physical, sensory or mental capabilities or lack of experience and knowledge if they have been given
supervision or instruction concerning use of the appliance in a safe way and understand the hazards
involved.
• Cleaning and user maintenance shall not be performed by children without supervision.
• This unit is not a toy and children should be advised not to play with the appliance.
• The min/max ambient operating temperature for the dispenser is 40°F to 105°F (4°C to 41°C).
• Do not operate unit below minimum ambient operation conditions.
• Should freezing occur, cease operation of the unit and contact authorized service technician.
• The maximum tilt for safe operation is 5°.
• This appliance must be installed and serviced by a professional.
2
Page 3
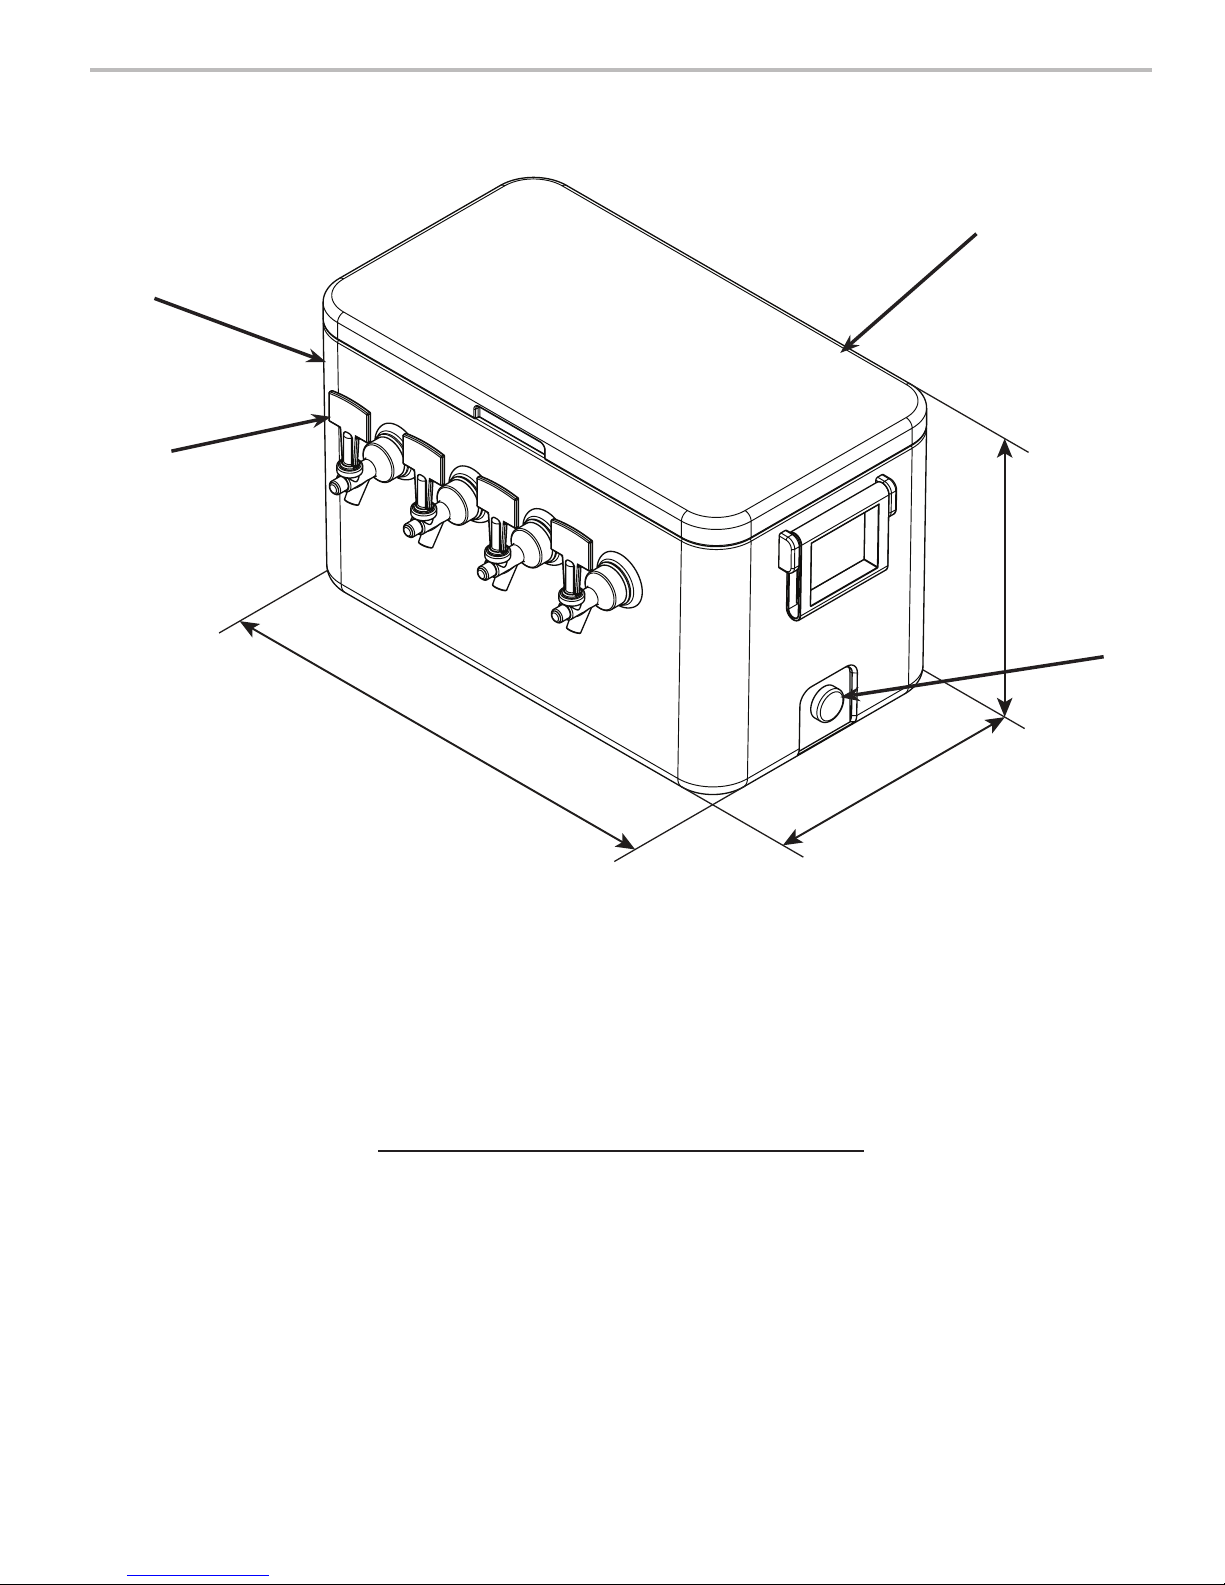
SPECIFICATIONS AND FEATURES
B
A
C
14.0 in
D
25.5 in
DIMENSIONS
Width: 25.5 inches (648 mm)
Depth: 13.25 inches (336.5 mm)
Height: 14.0 inches (356 mm)
FITTINGS
Pre-Mix Syrup Inlets: 1/4 inch barb
This unit emits a sound pressure level below 70 dB
13.25 in
WEIGHT
Shipping: 40 lbs (18.14 kg)
Empty: 35 lbs (15.88 kg)
With Ice: 85 lbs (38.56 kg)
ICE
Capacity: 50 lbs (22.68 kg)
A. Ice Bin
B. Ice Bin Lid
C. Valve
D. Drain Spout
3
Page 4

INSTALLATION & OPERATION
Installation of Unit
1. Cut band and remove shipping container.
2. Remove packaging from outside of the unit and all pictures from inside the ice bin then place the unit in
the designated location.
! ATTENTION
DO NOT remove internal packaging until unit has been placed in designated location.
NOTE
Inspectunitforconcealeddamage.Ifevident,notifydeliveringcarrierandleaclaimagainstthesame.
3. The selected location should be able to support the weight of the unit with the ice after counter cut out is
made (if applicable).
4. Connecting lines run to the back of the unit and can extend down through a counter cutout (if applicable).
5. Select a level and accessible location away from direct sunlight or overhead lighting for the pre-mix syrup
containers.
6. Route appropriate tubing from the designated pre-mix syrup container location to the syrup inlets at the
back of the unit. Connect tubing to inlets using Oetiker pliers and appropriate ttings.
7. Clean and sanitize the ice bin. (See Cleaning and Sanitizing section on the next page for instructions)
8. Fill the unit with ice then close the lid.
! CAUTION
The ice used in this unit may not be potable and should not be ingested. Do not eat, chew, suck, swallow,
or put into drinks. The ice used in this unit is intended solely for the refrigeration purposes of the product.
9. Install pre-mix beverage supply according to manufacturer’s instructions and specications.
10. Activate each valve to purge air from the syrup lines.
NOTE
For optimal drink performance drain excess water from ice bin using the drain spout on the side of the
unit.Rellwithiceperiodically.
Front of Unit Back of Unit
A. Syrup Line 1
B. Syrup Line 2
C. Syrup Line 3
D. Syrup Line 4
A
D
B C
C B
D A
4
Page 5

CLEANING AND SANITIZING
General Information
• Lancer equipment (new or reconditioned) is shipped from the factory cleaned and sanitized in
accordance with the instructions in this section. The operator of the equipment must provide continuous
maintenance as required by this manual and/or state and local health department guidelines to ensure
proper operation and sanitation requirements are maintained.
NOTE
ThecleaningproceduresprovidedhereinpertaintotheLancerequipmentidentiedbythismanual.If
other equipment is being cleaned, follow the guidelines established by the manufacturer for that
equipment.
• Cleaning should be accomplished only by trained personnel. Sanitary gloves are to be used during
cleaning operations. Applicable safety precautions must be observed. Instruction warnings on the product
being used must be followed.
! ATTENTION
• Use sanitary gloves when cleaning the unit and observe all applicable safety precautions.
• DO NOT use a water jet to clean or sanitize the unit.
• DO NOT use strong bleaches or detergents; These can discolor and corrode various materials.
• DO NOT use metal scrapers, sharp objects, steel wool, scouring pads, abrasives, or solvents on the
dispenser.
• DO NOT use hot water above 140° F (60° C). This can damage the dispenser.
• Insure all sanitizing solution is removed from the system.
Cleaning and Sanitizing Solutions
Cleaning Solution
Mix a mild, non-abrasive detergent (e.g. Sodium Laureth Sulfate, dish soap) with clean, potable water at
a temperature of 90°F to 110°F (32°C to 43°C). The mixture ratio is one ounce of cleaner to two gallons of
water. Prepare a minimum of ve gallons of cleaning solution. Do not use abrasive cleaners such as bleach
or other solvents because they can cause permanent damage to the unit. Ensure rinsing is thorough, using
clean, potable water at a temperature of 90°F to 110°F. Extende lengths of product lines may require
additional cleaning solution.
Sanitizing Solution
Prepare the sanitizing solution in accordance with the manufacturer’s written recommendations and safety guidelines. The solution must provide 100 parts per million (PPM) chlorine (e.g. Sodium Hypochlorite or
bleach) and a minimum of ve gallons of sanitizing solution should be prepared.
5
Page 6

Daily Cleaning and Maintenance
1. Using the cleaning solution and a clean cloth, clean Ice Bin Lid and all exterior surfaces.
2. Clean exterior of dispensing valves.
3. For optimal drink performance drain excess water from ice bin using the drain spout on the side of the
unit. Rell with ice periodically.
4. Wipe clean all splash areas using a damp cloth soaked in cleaning solution.
Ice Bin Cleaning - Monthly
1. Open Ice Bin lid and remove all ice in bin.
2. Drain any excess water using the drain spout on the side of the unit.
3. Using cleaning solution and a clean cloth or soft brush, clean all sides of Ice Bin and the surfaces of the
cold plate.
4. Repeat Step 3 for all exterior surfaces of the unit.
5. Using hot, potable water, thoroughly rinse away the cleaning solution.
6. Fill the unit with ice and close the lid.
Cleaning and Sanitizing Product Lines - Monthly
1. Disconnect product lines from pre-mix containers.
2. Fill product lines with warm water to ush out any product remaining in the lines.
3. Prepare Cleaning Solution described on previous page.
4. Fill product lines with cleaning solution then let stand for ten (10) minutes.
5. Flush out cleaning solution from the product lines using clean, warm water.
6. Prepare Sanitizing Solution described above.
7. Fill product lines with sanitizing solution then let stand for ten (10) minutes.
8. Reconnect product lines to pre-mix containers and draw drinks to ush sanitizing solution from the
product lines.
9. Taste the drink to verify that there is no o-taste. If o-taste is found, ush product lines again.
! CAUTION
Following sanitization, rinse with end-use product until there is no aftertaste. Do not use a fresh water
rinse. Residual sanitizing solution left in the system creates a health hazard.
6
Page 7

Cleaning and Sanitizing Valves - Monthly
1. Disconnect product lines from pre-mix containers.
2. Remove product from tubing by purging with carbon dioxide.
3. Remove the valve head assembly by turning the connecting nut clockwise to loosen from mounting
sleeve.
4. Remove the plastic valve piston from the valve shank.
5. Using the cleaning solution and a clean cloth, clean the valve head assembly and valve piston and rinse
with warm, potable water.
6. Using the sanitizing solution and a clean cloth, sanitize the valve head assembly and valve piston and
set aside to air dry.
7. Using a clean cloth or small brush, clean and sanitize the inside of the valve shank and let air dry.
8. Reinstall compensator piston and valve head assembly to mounting sleeve and reconnect product lines
to pre-mix containers.
9. Draw drinks to ush sanitizing solution left in valve. Taste the drink to verify that there is no o-taste. If
o-taste is found, ush product lines again.
! CAUTION
Following sanitization, rinse with end-use product until there is no aftertaste. Do not use a fresh water
rinse. Residual sanitizing solution left in the system creates a health hazard.
F
D
B
E
C
A
A. Valve Head Assembly
B. Valve Piston
C. Valve Shank
D. Connecting Nut
E. Valve Body
F. Elbow
Dispenser Disposal
To prevent possible harm to the environment from improper disposal, recycle the unit
by locating an authorized recycler or contact the retailer where the product was purchased.
Comply with local regulations regarding disposal of the refrigerant and insulation.
7
Page 8

Lancer Corp.
800-729-1500
Technical Support/Warranty: 800-729-1550
custserv@lancercorp.com
lancercorp.com
 Loading...