

Page 1
BLENDPOINT SMOOTHIE DISPENSER
PN: 28-0938
Operation Manual
Lancer Corporation
6655 Lancer Blvd.
San Antonio, Texas 78219
800-729-1500
“Lancer” is the registered trademark of Lancer © 2014 by Lancer, all rights reserved.
BID-1
Technical Support/Warranty
800-729-1550
custserv@lancercorp.com
lancercorp.com
Page 2

TABLE OF CONTENTS
ABOUT THIS MANUAL
This booklet is an integral and essential part of the product and
should be handed over to the operator after the installation and
preserved for any further consultation that may be necessary.
Please read carefully the guidelines and warnings contained
herein as they are intended to provide the user with essential
information for the continued safe use and maintenance of the
product. In addition, it provides GUIDANCE ONLY to the user
on the correct services and site location of the unit.
The installation and relocation, if necessary, of this product must be carried out by qualied personnel with
up-to-date safety and hygiene knowledge and practical experience, in accordance with current regulations.
IMPORTANT SAFETY INSTRUCTIONS..........................3
Intended Use..............................................................3
Power Warning...........................................................3
Automatic Agitation.....................................................3
Water Notice...............................................................3
SPECIFICATIONS AND FEATURES...............................4
PRE-INSTALLATION CHECKLIST...................................5
INSTALLATION.................................................................6
Unpacking Dispenser..................................................6
Dispenser Installation..............................................6-7
START-UP AND CALIBRATION......................................7
Unit Start and Touch Screen Calibration....................7
Water Calibration........................................................8
Ice Calibration..........................................................8-9
Product Calibration.....................................................9
BASIC OPERATIONS.....................................................10
Loading Ice...............................................................10
Making Drinks...........................................................10
BEFORE GETTING STARTED
Each unit is tested under operating conditions and is thoroughly
inspected before shipment. At the time of shipment, the
carrier accepts responsibility for the unit. Upon receiving the
unit, carefully inspect the carton for visible damage. If
damage exists, have the carrier note the damage on the freight
bill and le a claim with carrier. Responsibility for damage to the
dispenser lies with the carrier.
Manual Controls...................................................10-11
Replace Empty Product.......................................11-12
CLEANING AND SANITIZING.......................................12
General Information..................................................12
Cleaning and Sanitizing Solutions............................13
After Every Use........................................................13
Daily Cleaning..........................................................13
Weekly Cleaning..................................................13-15
Every Six Months......................................................16
TROUBLESHOOTING...............................................16-17
ILLUSTRATIONS AND PART LISTINGS.......................18
Main Unit Assembly 1...............................................18
Main Unit Assembly 2...............................................19
Ice Hopper Assembly................................................20
Condensor Fan Assembly.........................................20
Pump Cube Assembly...............................................21
Wiring Diagram.........................................................22
DISPENSER DISPOSAL................................................23
READ ALL SAFETY INSTRUCTIONS BEFORE USING THIS UNIT.
This manual contains important safety information and all applicable safety precautions must be observed. To reduce
the risk of re, electric shock, damage to the equipment or personal injury when using this unit all instuctions/warnings
on the product being used must be followed:
! WARNING
Text following the Warning signal indicates a
hazardous situation, which if not avoided, will result
in death or serious injury. Be sure to read all Warning
statements before proceeding with the installation.
! CAUTION
Text following the Caution signal indicates a
hazardous situation, which if not avoided, could result
in death or serious injury. Be sure to read the Caution
statements before proceeding with the installation
2
SAFETY NOTICES
! ATTENTION
Text following the Attention signal addresses a
situation that if not followed could potentially damage
the equipment. Be sure to read the Attention
statements before proceeding
NOTE
Text following the Note signal provides you with
information that may help you more effectively perform
the installation procedures within this manual.
Disregarding information will not cause damage or
injury, however it may limit the performance of the
dispenser.
Page 3

IMPORTANT SAFETY INSTRUCTIONS
! Intended Use F Power
• The dispenser is for indoor use only
• This appliance is intended to be used in commercial
applications such as restaurants or similar.
• This appliance should not be used by children or
inrm persons without supervision.
• This appliance is not intended for use by persons
(including children) with reduced physical, sensory
or mental capabilities, or lack of experience and
knowledge, unless they have been given supervision
or instruction concerning use of the appliance by a
person responsible for their safety.
• This appliance can be used by children aged from 8
years and above and persons with reduced physical,
sensory or mental capabilities or lack of experience
and knowledge if they have been given supervision or
instruction concerning use of the appliance in a safe
way and understand the hazards involved.
• Cleaning and user maintenance shall not be
performed by children without supervision.
• This unit is not a toy and children should be advised
not to play with the appliance.
• The min/max ambient operating temperature for the
dispenser is 40°F to 75°F (4°C to 24°C).
• Do not operate unit below minimum ambient operation
conditions.
• Should freezing occur, cease operation of the unit and
contact authorized service technician.
• The maximum tilt for safe operation is 5°.
• This appliance must be installed and serviced by a
professional.
! Automatic Agitation
• Units equipped with an automatic agitation system and
will activate unexpectedly.
• Avoid contact with moving parts.
• WARNING: Keep ngers, hair, hands, and clothing away
from all moving parts. Keep utensils away from drive
socket, ice augers, and blender blades during operation.
• CAUTION: Metal utensils will damage blades and auger.
• WARNING: Never place a jar into the drive socket if the
blender motor is operating.
• WARNING: Do not rock the blender jar while it is
operating.
• Keep the blender jar straight up until the operation is
complete.
• Unplug the dispenser during servicing, cleaning, and
sanitizing.
• WARNING: To avoid personal injury, do not attempt
to lift the dispenser without assistance. For heavier
dispensers, use a mechanical lift.
• Follow all local electrical codes when making
connections.
• Check the dispenser serial number plate for
correct electrical requirements of unit. DO NOT plug
into a wall electrical outlet unless the current shown
on the serial number plate agrees with local current
available.
• Each dispenser must have a separate electrical
circuit.
• DO NOT use extension cords with this unit.
• DO NOT ‘gang’ together with other electrical devices
on the same outlet.
• WARNING: Always disconnect electrical power to the
unit to prevent personal injury before attempting any
internal maintenance.
• The resettable breaker switch should not be used as
a substitute for unplugging the dispenser from the
power source to service the unit.
• Only qualied personnel should service internal
components of electrical control housing.
• WARNING: Make sure that all water lines are tight and
units are dry before making any electrical connections
• If this dispenser is installed in an area that is
susceptible to ±10% variation of the nominal line
voltage, consider installing a surge protector or similar
protection device.
! Water Notice
• Provide an adequate, potable water supply. Water
pipe connections and xtures directly connected to
a potable water supply must be sized, installed, and
maintained according to federal, state, and local
codes.
• The water supply line must be at least a 3/8 inches
(9.525 mm) pipe with a minimym of 25 PSI (0.172
MPA) line pressure, but not exceeding a maximum of
50 PSI (0.345 MPA). Water pressure exceeding 50
PSI (0.345 MPA) must be reduced to 50 PSI (0.345
MPA).
• Use a lter in the water line to avoid equipment
damage and beverage off-taste. Check the water lter
periodically, as required by local conditions.
• CAUTION: The water supply must be protected by
means of an air gap, a backow prevention device
(located upstream of the CO2 injection system)
or another approved method to comply with NSF
standards. A leaking inlet water check valve will
allow carbonated water to ow back through the pump
when it is shut off and contaminate the water supply.
• CAUTION: Ensure the backow prevention device
complies with ASSE and local standards. It is the
responsibility of the installer to ensure compliance.
3
Page 4
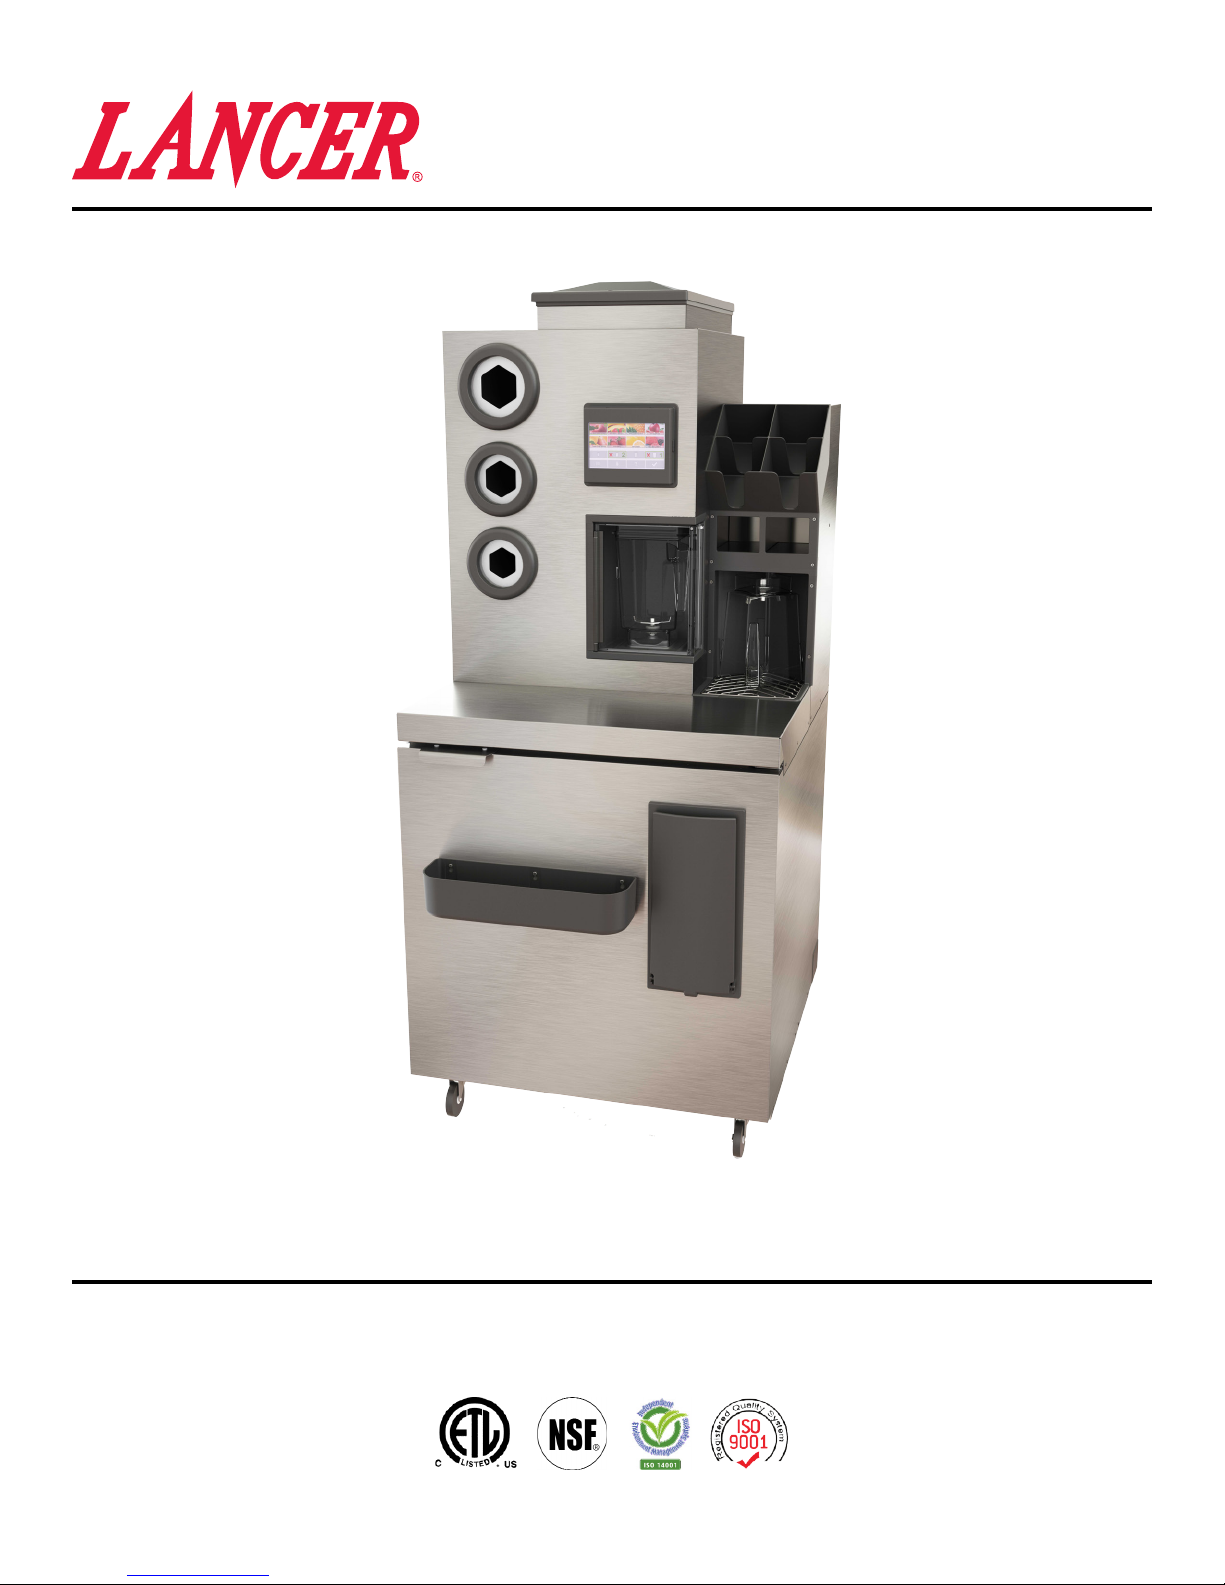
SPECIFICATIONS AND FEATURES
C
D
D
C
B
A
A. Blender Jar
B. Blend Station
C. Touch Screen
D. Ice Bin
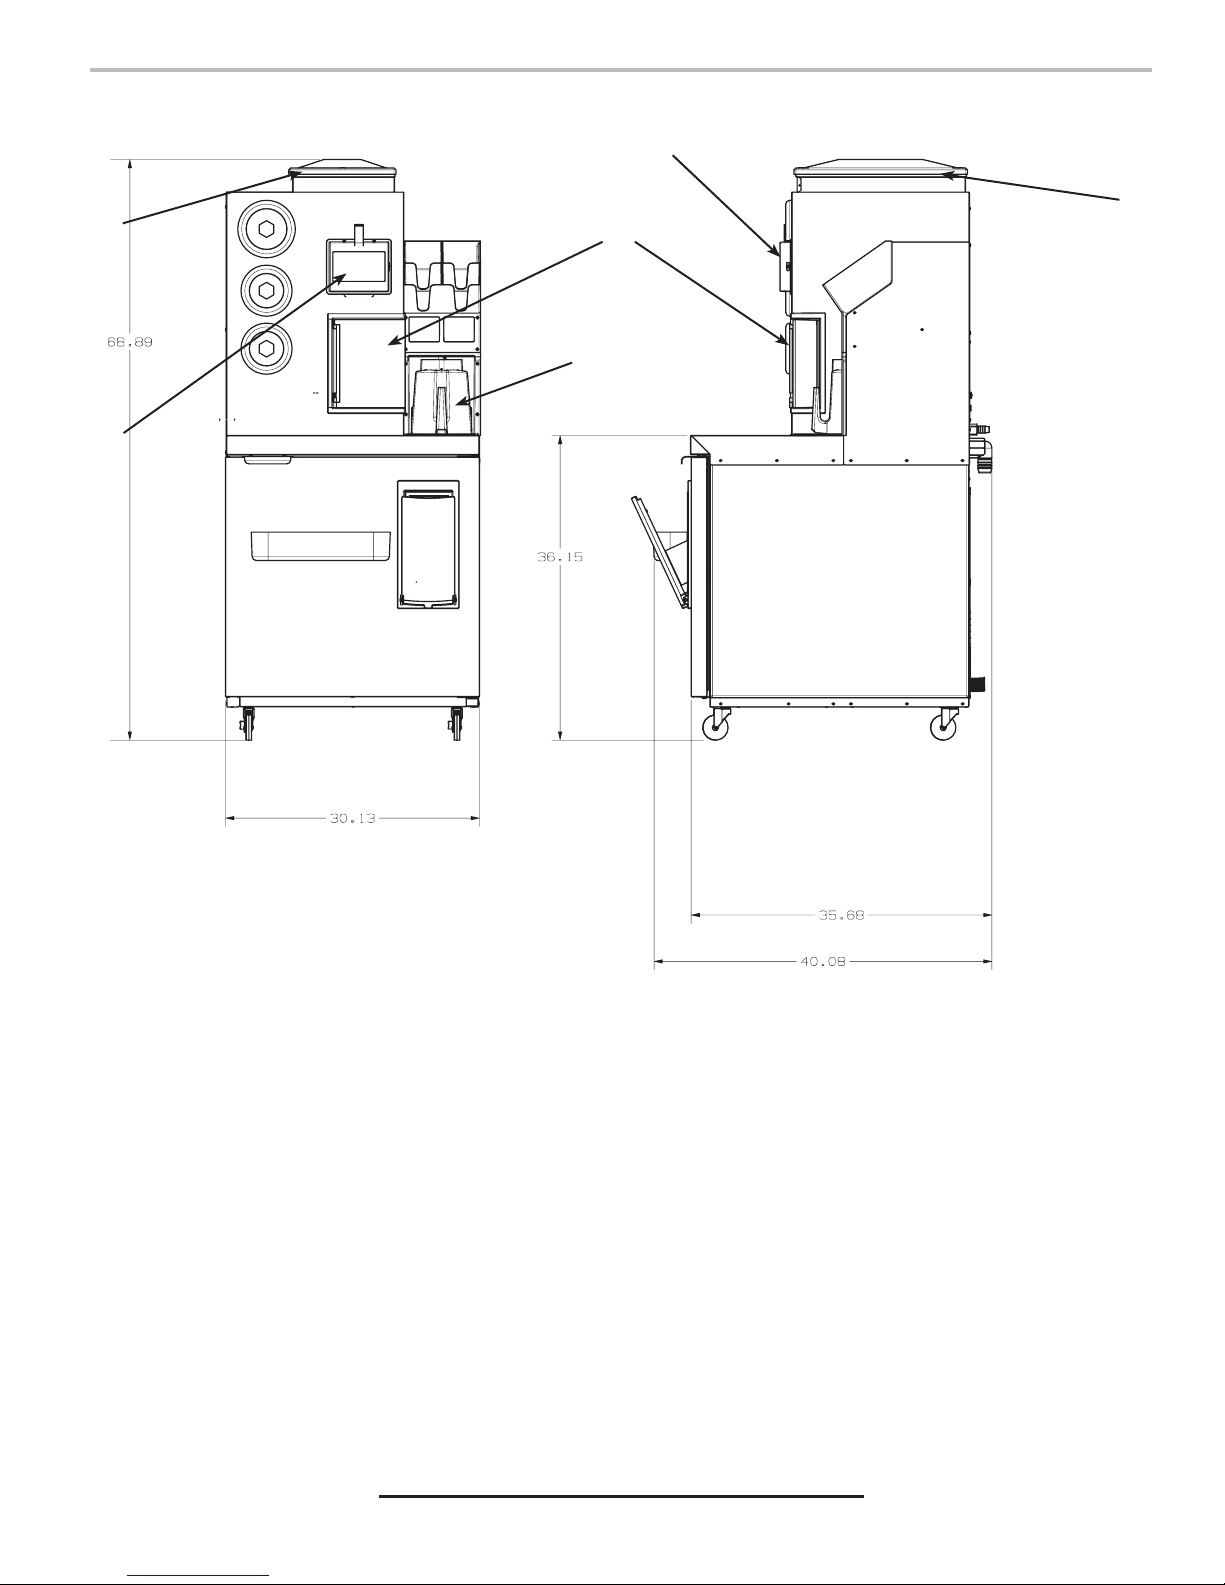
DIMENSIONS
Width: 30 inches (762 mm)
Depth: 33-37 inches (838.2-939.8 mm)
Height: 66 inches (1,676 mm)
WEIGHT
Without Ice: 380 lbs (172.37 kg)
With Ice: 410 lbs (185.98 kg)
Shipping: 400 lbs (181.44 kg)
BLENDING
Capacity: 2 lbs (0.907 kg)
ELECTRICAL
115 VAC / 60 Hz / 20 Amps
This unit emits a sound pressure level below 70 dB
4
PLAIN WATER SUPPLY
Min Flowing Pressure: 30 PSIG (0.207 MPA)
Max Flowing Pressure: 90 PSIG (0.621 MPA)
FITTINGS
Water for Rinser: 3/8 inch barb
Plain Water Inlet: 3/8 inch barb
Brand Product Inlets: 3/8 inch barb
Drain: 1 inch (25.4 mm) PVC
PRODUCT
8 x 2 Gallon Bags
Page 5
PRE-INSTALLATION CHECKLIST
TOOLS REQUIRED:
Oetiker Pliers
Tubing Cutters
Wrench
Phillips Screwdriver
BEFORE INSTALLATION:
Do you have enough space to
install the dispenser?
Is dispenser located away from
direct sunlight or overhead
lighting?
Read This Manual
POST MIX ACCESSORIES:
Beverage Tubing
Oetiker Clamp Fittings
CONSIDER LOCATION OF THE
FOLLOWING BEFORE THE INSTALL:
Water Supply Lines
Drain
Electrical Outlet
Heating and Air Conditioning
Ducts
This manual was developed by Lancer Corporation as a reference guide for the owner/operator and
installer of this dispenser. Please read this manual before installation and operation of this
dispenser. Please see pages 16-17 for troubleshooting or service assistance. If the service cannot
be corrected please call your Service Agent or Lancer Customer Service. Always have your model
and serial number available when you call.
5
Page 6
Unpacking the Dispenser
INSTALLATION
1. Cut package banding strap and remove.
2. Open the box and remove the accessory kit and loose
parts.
3. Remove top board, corner inserts and lift outer carton to
remove, if included.
NOTE
Inspect unit for concealed damage. If evident, notify
deliveringcarrierandleaclaimagainstthesame.
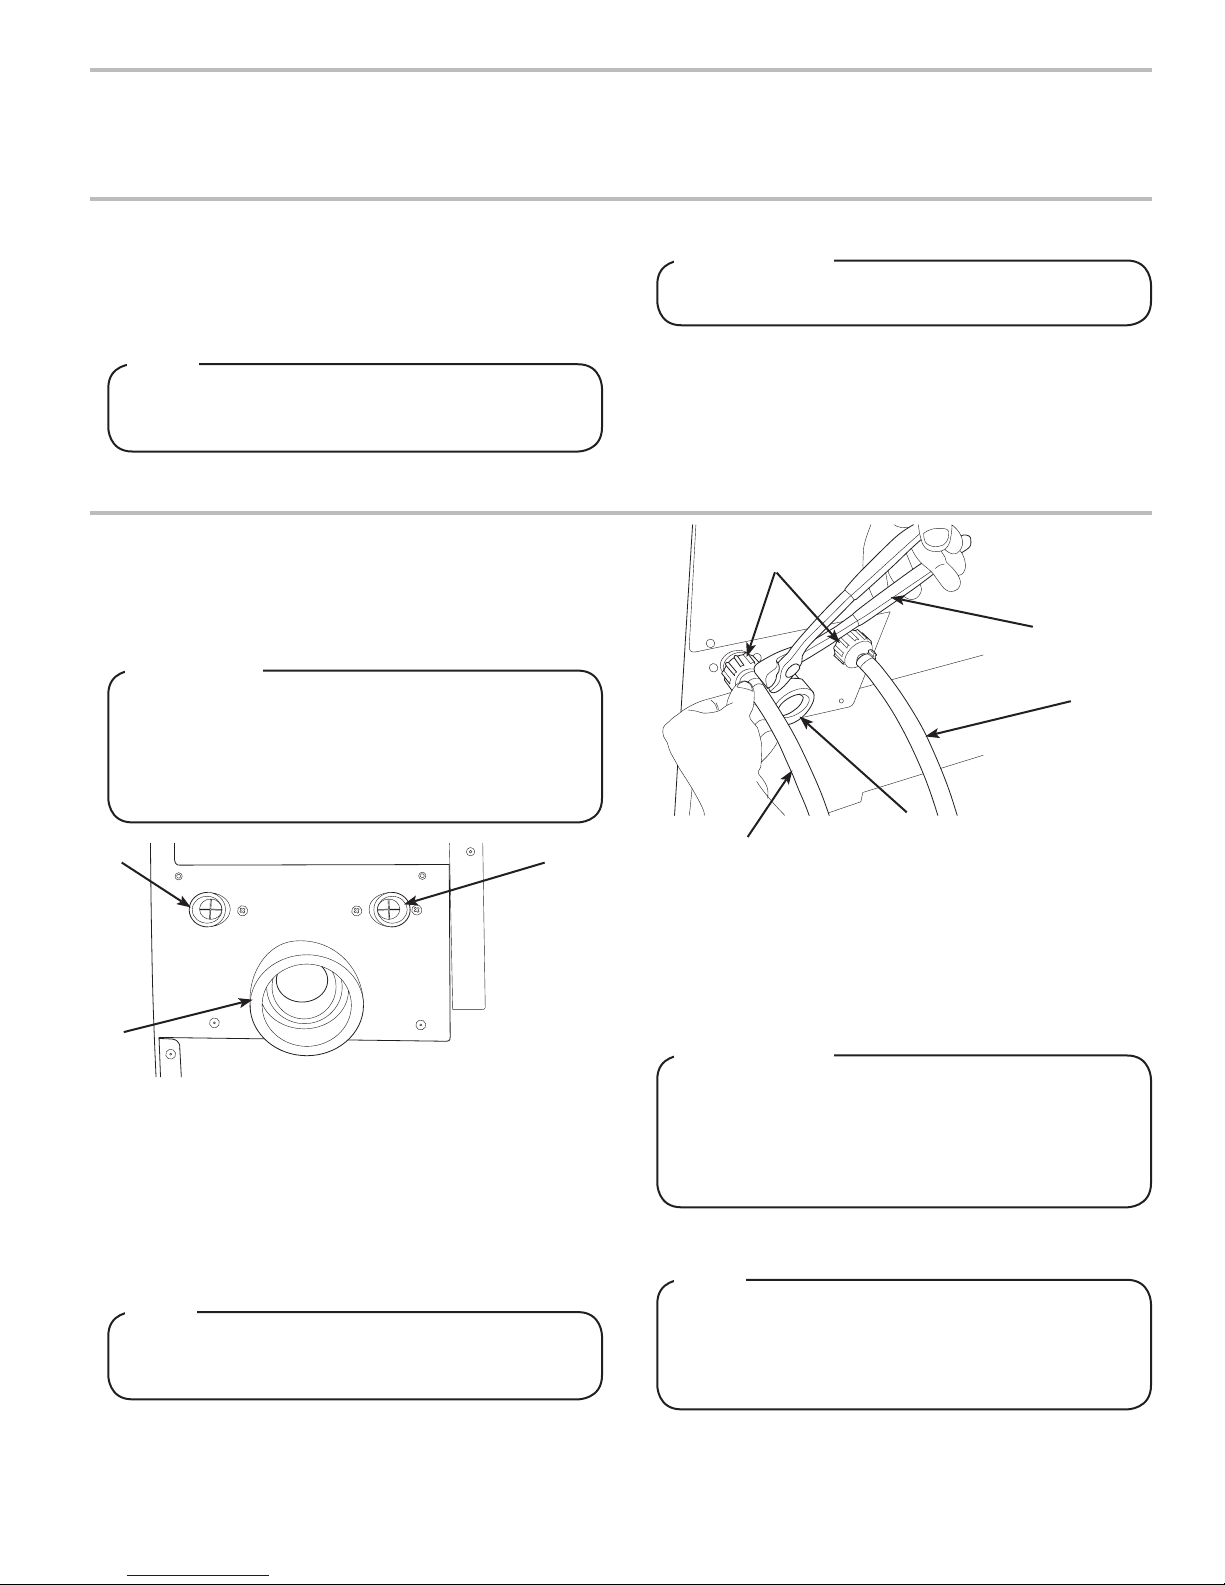
Dispenser Installation
1. Connect the two (2) 3/4 inch garden hose ttings supplied
with the unit to the cold/drink water inlet and the hot/rinse
water inlet.
2. Route appropriate tubing from the water source to the cold/
drink water inlet on the back of the unit.
! CAUTION
DO NOT reuse beverage tubing, installer should
provide new beverage tubing that meets IEC Standard
61770.Lancerbeveragetubingkitsareavailablefor
purchase. Contact your Sales Representative or
Lancer Customer Service for more information.
A
C
A. Hot/Rinse Water Inlet
B. Cold/Drink Water Inlet
C. Drain Inlet
3. Turn on water source and ush water supply line
thoroughly.
4. Using tubing Cutters, cut the cold drink water line and install
an in-line watet lter with a ow rate of at least 1 gallon
(3.78 liters) per minute.
5. Route appropriate tubing from the hot water rinse tting to
hot water source and connect tubing to inlet.
NOTE
Leave 12 inches (305 mm) of extra tubing below the
counter for servicing and moving the dispenser
B
4. If leg kit has been provided, assemble legs by tilting unit.
! ATTENTION
DO NOT LAY UNIT ON ITS SIDE OR BACK
E
D
B
A. Hot/Rinse Line
B. Cold/Drink Line
C
A
6. Turn on water supply and check for leaks.
7. Locate the 1 inch (25.4 mm) PVC bulkhead tting on the
rear of portion of the unit.
8. Loosen the nut on the drain tting and install the 1.0 inch
(25.4 mm) O.D. smooth wall tubing drain pipe and retighten
the nut to seal against the tube.
C. Drain Inlet
D. Oetiker Pliers
E. Garden Hose Fitting
! ATTENTION
Drainttingmustbeinstalledwithadequatebackow
protection and any other necessary equipment to
comply with federal, state or local codes. It is
recommended that rigid or reinforced tubing is used
for installation.
9. Locate the product line inlets in the refrigerated portion of
the unit.
NOTE
Eachlineislabeled“1-8”foridenticationpurposes.
These labels correspond to the pump numbers as
found on the front of the pump cube and as used
duringsystem/drinkprogramming.
6
Page 7
?
HOME
48°F
10. Connect the product bags to the corresponding, desired
pump/drink locations using the pre-installed quick connect
quarter turn fasteners.
! ATTENTION
Trays should be used with compatible products. The
use of other products can harm the pumps and other
components of the unit.
START-UP AND CALIBRATION
Unit Start and Touch Screen Calibration
11. Make sure product bags are fully inserted into their
protective tray and the front stopper is fully engaged with
the front of the tray.
1. Locate unit power cord.
! WARNING
DO NOT operate with a damaged power cord or plug.
If the power cord or plug is damaged they must be
replaced by the manufacturer or its authorized service
agent in order to prevent any hazard. DO NOT let the
powercordhangovertheedgeoftheworksurface.
2. Connect unit power cord to a grounded electrical outlet.
! WARNING
The dispenser must be properly electrically grounded
toavoidseriousinjuryorfatalelectricalshock.The
power cord has a three-prong grounded plug. If a
three-hole grounded electrical outlet is not available,
use an approved method to ground the unit. Follow
alllocalelectricalcodeswhenmakingconnections.
Each dispenser must have a separate electrical circuit.
Do not use extension cords. Do not connect multiple
electrical devices on the same outlet.
3. BlendPoint will begin to boot up and the touch screen will
show a countdown to initiate screen calibration. Press
and hold anywhere on thescreen before the countdown
commences to initiate the touch screen calibration.
4. Follow instruction on the screen to calibrate the touch
screen. Once Calibration is complete it will take you to the
home screen.
NOTE
Prior to loading product, allow unit to reach thermal
equillibrium by allowing unit to cycle for no less than
four (4) hours once start-up has commenced.
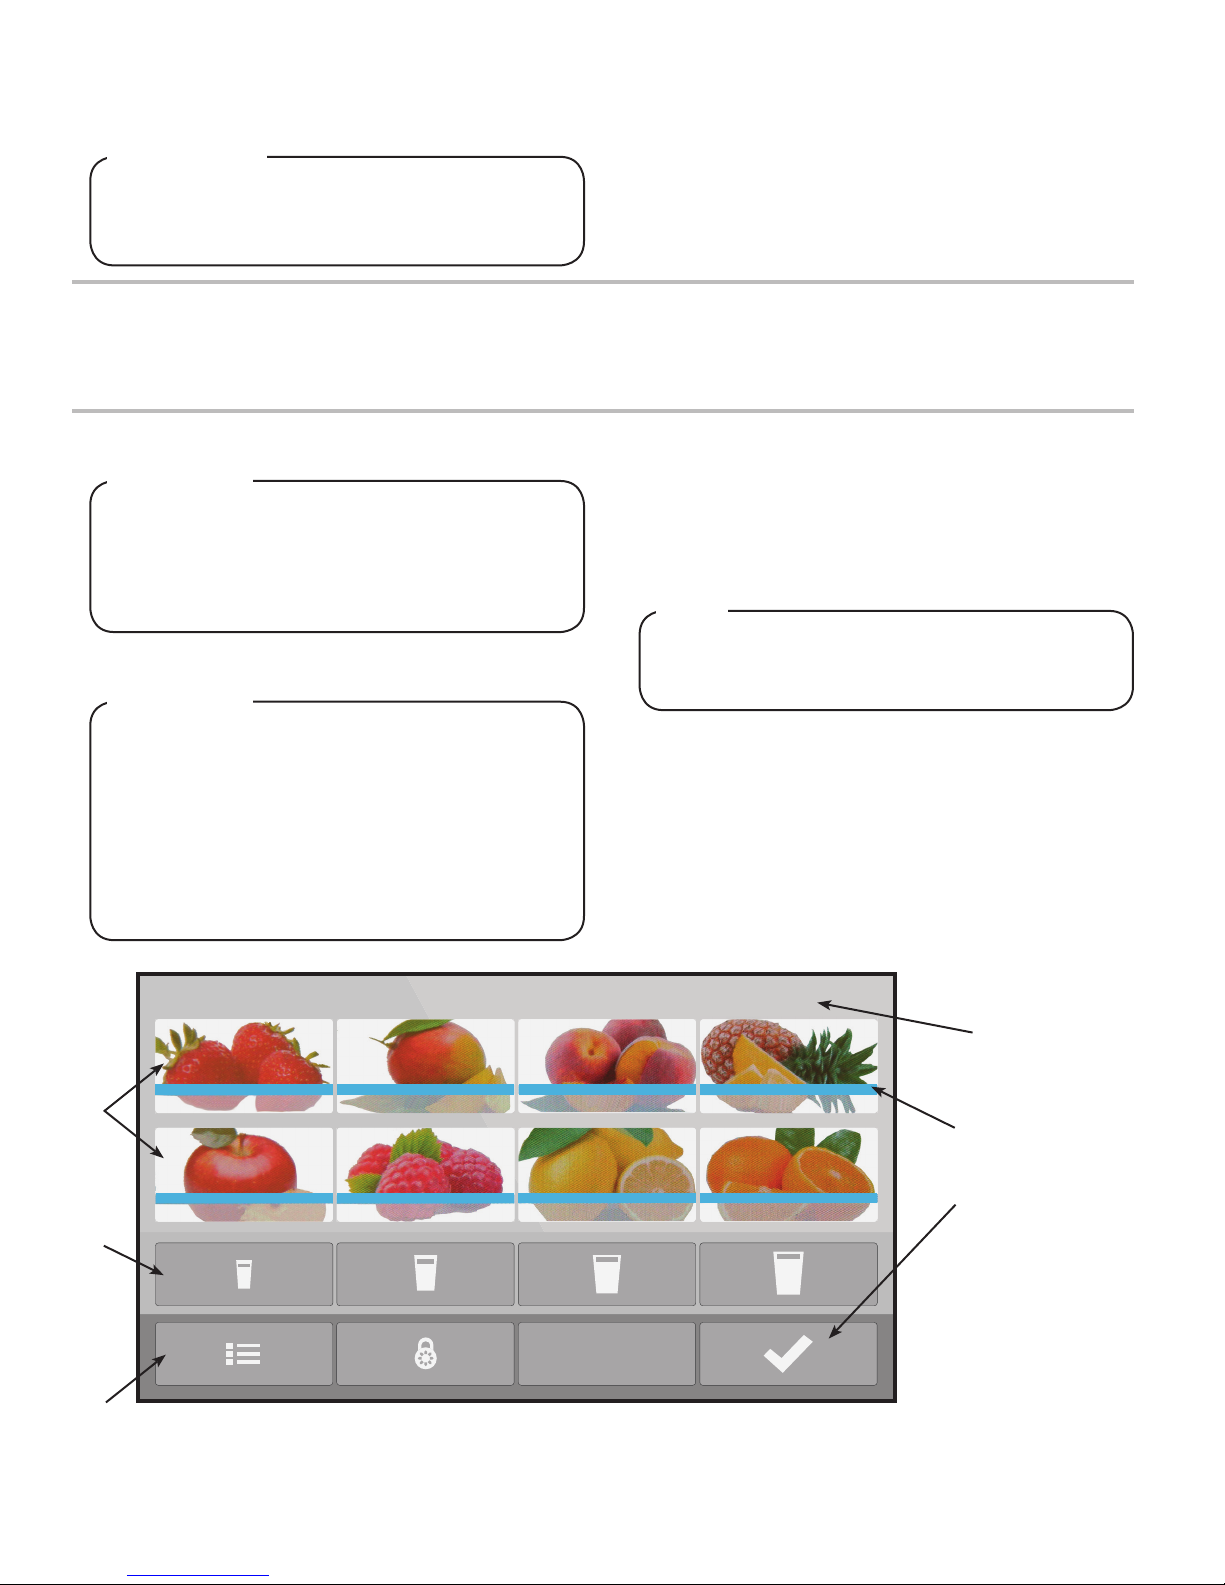
A
B
C
E
F
G
A. Flavors
B. Drink Sizes Bar
C. Main Menu
D. Secure Screen
E. Cabinet Temperature
F. Inventory Bar
G. Start Drink
7
Page 8
CALIBRATE ICE
Place empty jar in machine and press next to start calibration...
BackHome
Next
Main Menu
Water Calibration
MENU
Replace
Inventory
Fault History
Cleaning
About
BackHome
Calibrate
Product
Manual
Controls
Machine
Lockout
CALIBRATE
Calibrate
BackHome
Product
Calibrate
Water
Calibrate
Ice
Main Menu
CALIBRATE
Calibrate
BackHome
Product
Calibrate
Water
Calibrate
Ice
Main Menu
CALIBRATE WATER
Place empty jar in machine and press next to start calibration...
BackHome
Next
Main Menu
CALIBRATE WATER
Enter volume water in jar
Volume
0.0
1
4
7
0
89
56
23
ounces
BackHome
Main Menu
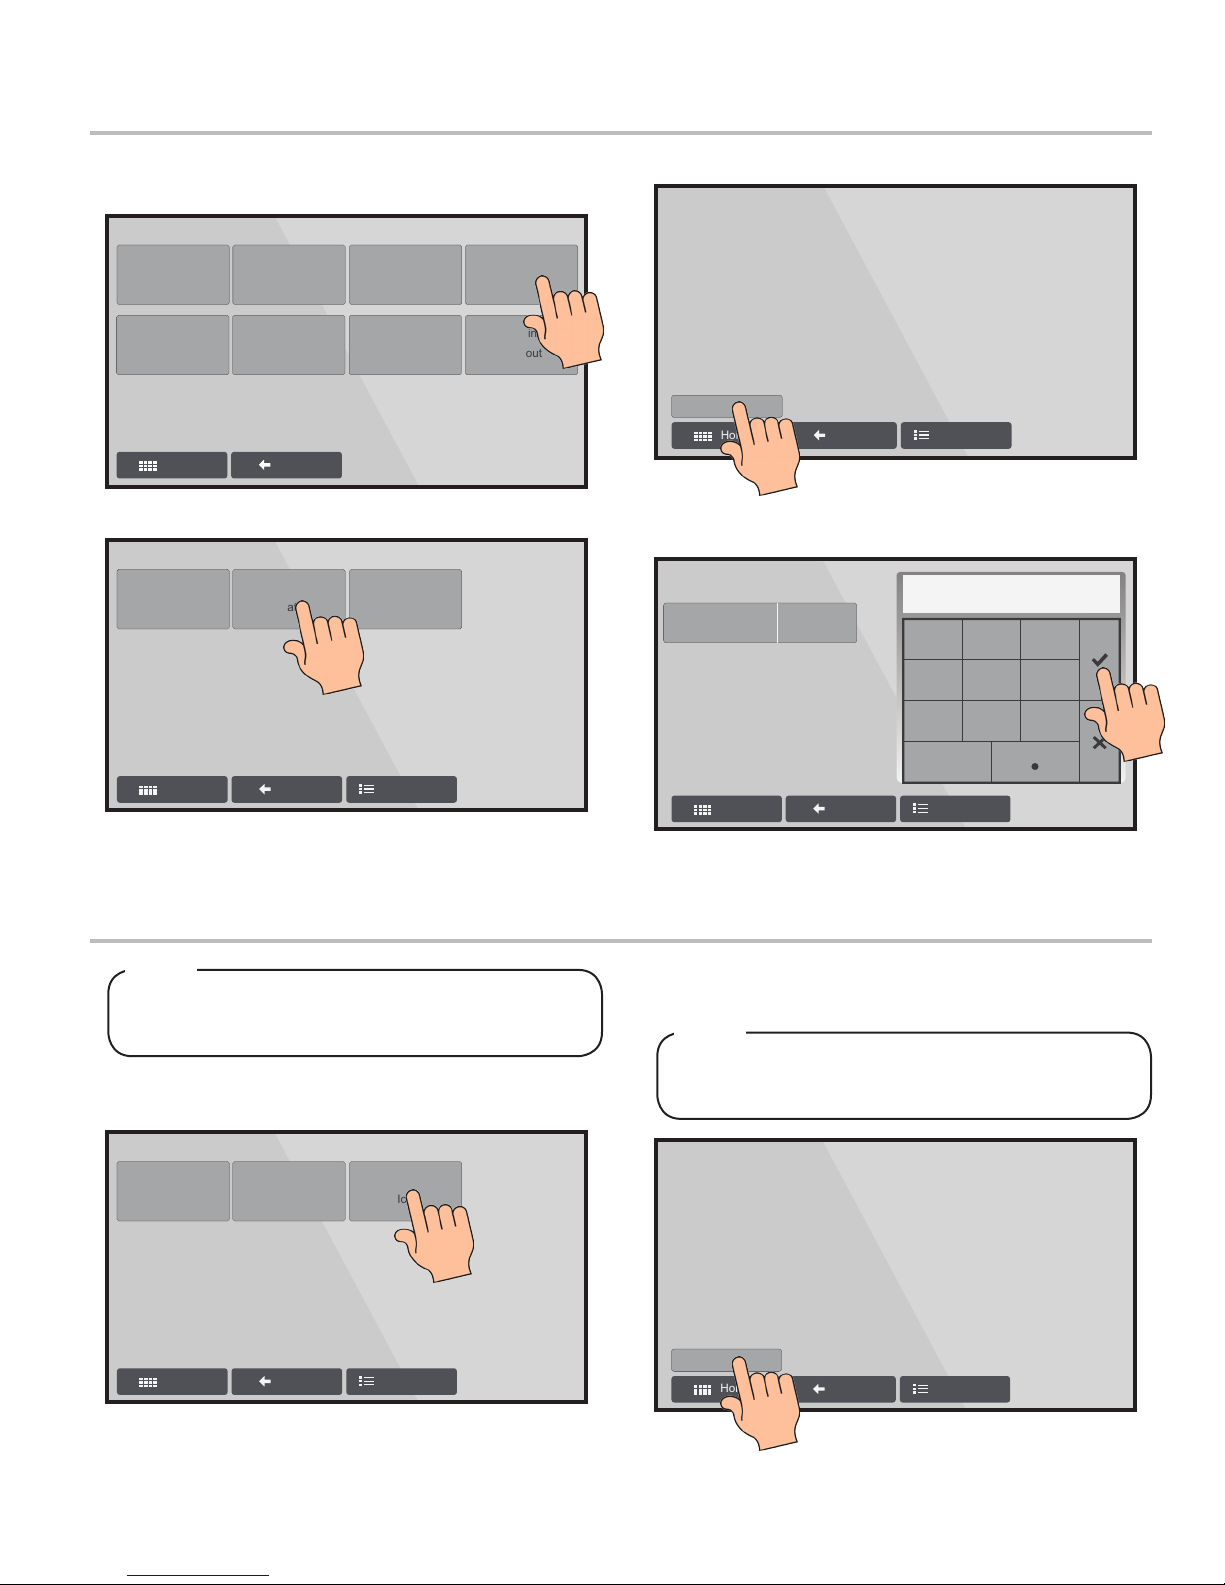
1. From the Home Screen, press the Main Menu button.
2. Press Calibrate.
3. Press Calibrate Water.
4. Place an empty Jar in the Blend Station and press Next.
5. Once completed record how many ounces of water were
dispensed by typing amount on keypad and pressing √.
Ice Calibration
NOTE
Water must be calibrated before calibration of the ice,
otherwise the unit will not calibrate the ice properly.
1. From the Calibrate Screen in the Main Menu, press
Calibrate Ice.
6. Empty Jar and replace in blend station.
2. Make sure there is an empty Jar in the Blend Station, then
press Next.
NOTE
Water and ice will be dispensed, this is necessary to
perform an accurate calibration.
8
Page 9

CALIBRATE PRODUCT 1
Enter volume product in jar
Volume
0.0
1
4
7
0
89
56
23
ounces
BackHome
Main Menu
CALIBRATE PRODUCT 1
Place empty jar in machine and press next to start calibration...
BackHome
Next
Main Menu
CALIBRATE PRODUCT
Product 2Product 1
Product 6Product 5
Product 3
Product 7 Product 8
BackHome
Product 4
Main Menu
CALIBRATE ICE
Enter volume water and ice in jar
Volume
0.0
1
4
7
0
89
56
23
ounces
BackHome
Main Menu
CALIBRATE
Calibrate
BackHome
Product
Calibrate
Water
Calibrate
Ice
Main Menu
3. Once completed, record how many ounces of ice and water
were dispensed by typing amount on the keypad and press
√.
Product Calibration
4. Empty Jar and replace in blend station.
1. From the Calibrate Screen in the Main Menu, press
Calibrate Product.
2. Make sure there is an empty jar in the Blend Station, then
press Product 1.
3. Press Next.
4. Once completed, record how many ounces of product was
dispensed by typing amount on keypad and press √.
5. Repeat Steps 2-4 with the remaining product numbers (2-8)
by pressing Calibrate Next Product.
NOTE
Empty jar before conducting calibration on the next
product line. If there is product remaining in the jar
from the ast calibration then the next product line
calibration will be inaccurate.
6. Empty Jar and replace in blend station.
9
Page 10

48°F
MANUAL CONTROLS
Product 2Product 1
Product 6Product 5
Product 3
Product 7Product 8
WaterIce Blender
BackHome
Product 4
Main Menu
Loading Ice
?
HOME
48°F
1
MENU
Replace
Inventory
Fault History
Cleaning
About
BackHome
Calibrate
Product
Manual
Controls
Machine
Lockout
BASIC OPERATIONS
1. Remove the black ice hopper lid from atop the unit
NOTE
Water and ice will be dispensed, this is necessary to
perform an accurate calibration.
2. Carefully pour up to 24 lbs (10.87 kg) of ice into the ice
hopper. Ensure that the ice covers both augers to provide
for the most consistent ice dispenser.
Making Drinks
1. Place an empty blender jar in the Blend Station with the
blender lid in place.
2. Select Flavor from the Home screen.
3. Select the size and Quantity.
3. Place the lid back on the top of the unit to re-enable the unit
to function.
4. If you are lling an empty ice hopper you should prime the
system by putting a blender jar in the blend station and
press the Ice button on the Manual Controls menu (See
Manual Controls Section below).
NOTE
You can dispense multiple quantities of the same size
orofdifferentsizesaslongasthenishedproduct
size does not exceed 36 ounces.
4. Press √.
5. The unit will automatically dispense ice, product, and water,
and then blend.
Manual Controls
1. From the Home screen, press the Main Menu button.
2. Press the “Manual Controls” button, from here you can
manually dispense ice, water, and product and blend as
desired.
10
Dispense Product Only:
• Press and hold the desired product number (1-8).
• The unit will dispense the product selected until you release
the button.
• The maximum time that the product number button will
dispense is 25 seconds. This feature allows you to prime
your product lines easily with little waste.
Page 11

MENU
Replace
Inventory
Fault History
Cleaning
About
BackHome
Calibrate
Product
Manual
Controls
Machine
Lockout
48°F
MANUAL CONTROLS
Product 2Product 1
Product 6Product 5
Product 3
Product 7Product 8
WaterIce Blender
BackHome
Product 4
Main Menu
48°F
MANUAL CONTROLS
Product 2Product 1
Product 6Product 5
Product 3
Product 7Product 8
WaterIce Blender
BackHome
Product 4
Main Menu
Dispense Ice Only:
INVENTORY
BackHome
Save
Product 1 2.0 gal.
Initial
Volume%Remaining
2.0 gal.
2.0 gal.
2.0 gal.
Reset
Reset
Reset
Reset
99%
100%
100%
100%
Product 2
Main Menu
Product 3
Product 4
Product 1 2.0 gal.
Initial
Volume%Remaining
2.0 gal.
2.0 gal.
2.0 gal.
Reset
Reset
Reset
Reset
99%
100%
100%
100%
Product 2
Product 3
Product 4
NOTE: % remaining is an estimation.
Actual volume remaining may vary.
Dispense Water Only:
• Place an empty jar in the blend station and press and hold
the Ice button to dispense the desired amount of ice.
• The ice will dispense as long as the Ice button is held down
or up to 25 seconds.
• Use this feature when you’re lling an empty ice hopper to
prime the system.
Replace Empty Product
NOTE
There are a couple different methods to determine
how much product is remaining in a product bag, so
before replacing an empty product follow these initial
steps.
1. From the Home Screen, locate the blue inventory bar
through each of the avor buttons. This inventory bar
deterines how much product of that particular avor
remains in their corresponding product bags.
• By pressing and holding the Water button you can dispense
cold water only as desired.
• The maximum amount of time the feature will run is 25
seconds.
Run Blender Only:
• Press and hold the Blender button to manually blend
product as desired.
• The unit will run until the Blender button is released or for
25 seconds.
3. From here, you can determine the remaining percentage of
each product in their corresponding product bags simply by
looking at the “% Remaining” bar for each product.
NOTE
When product bags are replaced “% Remaining”
numbers should automatically return to “100%”
NOTE
Inventory bar is an estimation of the remaining
product. Remaining volume may vary.
2. From the Main Menu press the Inventory button.
4. After determining product in need of replacement, open the
refrigerated portion of the unit.
5. Unhook the product line from the desired product bag.
6. Remove and replace the empty product bag with the new,
full product bag.
11
Page 12

7. Once new product bag is connected, go back to the Main
MENU
Replace
Inventory
Fault History
Cleaning
About
BackHome
Calibrate
Product
Manual
Controls
Machine
Lockout
REPLACE PRODUCT
Product 2Product 1
Product 6Product 5
Product 3
Product 7 Product 8
BackHome
Product 4
Main Menu
Replace bag then press product button.
Menu screen and press the Replace Product button.
CLEANING AND SANITIZING
8. From here you can prime the product pump line simply by
pressing the number of the product line that you have just
replaced.
NOTE
MakesurethereisanemptyJarintheBlendStation
before priming the product pump lines.
9. Repeat Steps 4-9 for any other empty product bags there
may be.
General Information
! ATTENTION
DO NOTattempttoperformrepairs.Neverremovethesideorbackpanelsontheunit.Theunitdoesnotcontain
adjustable or customer servicable parts. The manufacturer or an authorized agent must perform all interior service
and adjustments. Removing panels or attempting to perform repairs without authorization will void the warranty.
• Lancer equipment (new or reconditioned) is shipped from the factory cleaned and sanitized in accordance with NSF guidelines.
The operator of the equipment must provide continuous maintenance as required by this manual and/or state and local health
department guidelines to ensure proper operation and sanitation requirements are maintained.
NOTE
ThecleaningproceduresprovidedhereinpertaintotheLancerequipmentidentiedbythismanual.Ifother
equipment is being cleaned, follow the guidelines established by the manufacturer for that equipment.
• Cleaning should be accomplished only by trained personnel. Sanitary gloves are to be used during cleaning operations.
Applicable safety precautions must be observed. Instruction warnings on the product being used must be followed.
! ATTENTION
NOTE
• Use sanitary gloves when cleaning the unit and observe all applicable safety precautions.
• DO NOT use a water jet to clean or sanitize the unit.
• DO NOT disconnect water lines when cleaning and sanitizing syrup lines, to avoid contamination.
• DO NOT use strong bleaches or detergents; These can discolor and corrode various materials.
• DO NOT use metal scrapers, sharp objects, steel wool, scouring pads, abrasives, or solvents on the dispenser.
• DO NOT use hot water above 140° F (60° C). This can damage the dispenser.
• DO NOT spill sanitizing solution on any circuit boards. Insure all sanitizing solution is removed from the system.
12
Page 13

Cleaning and Sanitizing Solutions
Cleaning Solution
Mix a mild, non-abrasive detergent (e.g. Sodium Laureth
Sulfate, dish soap) with clean, potable water at a temperature
of 90°F to 110°F (32°C to 43°C). The mixture ratio is one
ounce of cleaner to two gallons of water. Prepare a minimum of
ve gallons of cleaning solution. Do not use abrasive
cleaners or solvents because they can cause permanent
damage to the unit. Ensure rinsing is thorough, using clean,
potable water at a temperature of 90°F to 110°F. Extended
lengths of product lines may require additional cleaning solution.
After Every Use
1. Rinse out the blender jar.
2. Make sure blender station has been wiped down if there is
any spillage.
3. Make sure blender door has been wiped down if there is
any spillage.
4. Remove rinse station grate.
5. Wipe down rinse station for any remaining product.
Daily Cleaning
Sanitizing Solution
Prepare sanitizing solutions in accordance with the
manufacturer’s written recommendations and safety guidelines.
The solution must provide 100 parts per million (PPM) chlorine
(e.g. Sodium Hypochlorite or bleach). A minimum of ve
gallons of sanitizing solution should be prepared. Any sanitizing
solution may be used as long as it is prepared in accordance
with the manufacturer’s written recommendations and safety
guidelines, and provides 100 parts per million (PPM) chlorine.
6. Wipe down counter around blend station and rinse station.
NOTE
Alwayskeepanemptyjaronblendermotorwhenthe
unit is not in use. This helps any melt water that is not
captured by the ice hopper drain from splashing onto
the blender motor itself.
1. Wash jars with smooth cloth or sponge using cleaning
solution.
! ATTENTION
DO NOT immerse the jars for longer than necessary in
any type of liquid.
2. Rinse the jar and sanitize using appropriate sanitizing
solution.
3. Hold the jar by the handle and give three (3) or more sharp
downward shakes to remove all liquid from around the shaft
area.
4. Place the jar upside down on the grate in the rinse station
to dry.
Weekly Cleaning
Blender Jar:
1. Remove jar from blend station.
2. Fill jar with hot water and sanitizing solution.
3. Stir and let stand for ve (5) minutes then empty.
5. Remove the splash guard from the blend station.
6. Wash the splash guard with a smooth cloth or sponge
using cleaning solution, rinse, and sanitize using
appropriate sanitizing solution.
7. Wipe down exterior of the unit including counter space,
interior of the blend station, door, and rinse station with a
damp rag.
8. Wash nozzle ports, located in the interior of the blend
station with a damp clean rag.
9. Run hot sanitizer solution through rinse station drain to
sanitize drain tube.
10. Replace splash guard.
4. Hold the jar by the handle and give three (3) or more sharp
downward shakes to remove all water from around the shaft
area.
5. Place the jar upside down on the grate in the rinse station
to dry.
13
Page 14

CLEAN PRODUCT LINES
Place cleaning jar on blender, disconnect hoses from
bags and place hoses in a bucket of warm water.
1/10
BackHome
Main Menu
Start
CLEANING
BackHome
Main Menu
Clean
Product Lines
Clean Ice
Hopper
Blend Station:
MENU
Replace
Inventory
Fault History
Cleaning
About
BackHome
Calibrate
Product
Manual
Controls
Machine
Lockout
Product Lines:
1. Remove blender jar and splash guard. Empty jar if needed.
2. Using cleaning solution, wipe down all surfaces of the blend
station, including the blend station door. Excess water will
drain through drain opening located at the back of the unit.
3. Use clear, hot water to rinse blend station. Avoid getting
excess water on the motor.
4. Using sanitizing solution, spray solution on all surfaces of
the blend station including the nozzle ports located on the
upper portion where splash guard is located and wipe with
a clean rag.
5. Using the brush provided, clean and sanitize ice chute
located on the upper surface of the blend station. Slide
brush all the way through the ice chute to the other side
making sure to cover all interior surfaces.
6. Clean and sanitize splash guard.
7. Replace splash guard, blender jar.
Ice Hopper:
1. Place empty jar in the blend station and turn OFF the
power.
2. Manually remove and discard as much ice as possible from
the ice hopper.
3. Turn ON the power.
4. In the Manual Controls section found on the Main Menu,
press and hold the Ice button to discharge all remaining ice
in the hopper (See Manual Controls Section, page 10).
5. Empty jar and replace in the blend station.
6. Turn OFF power
7. Fill another jar with cleaning solution and apply to ice
hopper.
8. Make sure to apply cleaning solution to all interior surfaces
of the ice hopper, both of the augers, the crusher plate, and
the three (3) plastic bushings. Empty jar in Blend Station
and replace.
9. Wipe down all surfaces of the ice hopper with a clean,
damp rag.
10. Fill another jar with warm water and run over all surfaces
of the ice hopper until there is no cleaning solution present,
watch the water level in the jar to ensure it does not
overow. Empty jar as needed.
11. F i l l a n o t h e r j a r w i t h s a n i t i z i n g s o l u t i o n a n d a p p l y t o a l l
interior surfaces of the ice hopper including both of the
augers, the crusher plate, and the three (3) plastic
bushings.
12. Wipe down all surfaces of the ice hopper with a clean,
damp rag soaked with sanitizing solution.
1. Disconnect all product lines from their corresponding
product bags.
2. Remove all product bags and trays.
3. From the “Home Screen” press the Main Menu button.
4. Press Cleaning.
5. Press Clean Product Lines.
6. Place an empty jar into the Blend Station.
7. Place ends of product hoses into a bucket of warm water
then press Start.
NOTE
For further Ice Hopper cleaning instructions see
Cleaning section found on the Main Menu
14
Page 15

CLEAN PRODUCT LINES
Remove hoses from bucket, then reconnect hoses to product bags.
Press next to prime hoses with product.
8/10
BackHome
Main Menu
Next
CLEAN PRODUCT LINES
Prepare bucket of sanitizer, place end of hoses in bucket,
press next when ready.
6/10
BackHome
Main Menu
Next
CLEAN PRODUCT LINES
Prepare bucket of cleaner, place end of hoses in bucket,
press next when ready.
4/10
BackHome
Main Menu
Next
CLEAN PRODUCT LINES
Once hoses are disconnected from product bag, use spray bottle
filled with sanitizer, to clean connections on product bag.
2/10
BackHome
Main Menu
Next
8. Using a soft cloth or sponge, clean the product line
connections on all of the product bags with sanitizing
solution, then press Next.
NOTE
Theunitwillbeginushingwarmwaterthroughthe
product lines. Each pump will run for one whole cycle
(approximately 25 seconds) to ensure lines are
completelyushedofanyremainingproduct.
9. Empty and replace jar in Blend Station, if needed.
10. Place ends of product hoses into a bucket of cleaning
solution then press Next.
13. Place ends of product hoses into a bucket of sanitizing
solution then press Next.
NOTE
Theunitwillbegintolltheproductlineswith
sanitizing solution. Each pump will run for one whole
cycle (approximately 25 seconds) to ensure lines are
completelylledwithsanitizingsolution.
14. Let sanitizing solution sit in lines for ten (10) minutes before
continuing.
15. Empty and replace jar in Blend Station, if needed.
16. Replace product bags and trays.
17. Reconnect product hoses to their corresponding product
bags then press Next.
NOTE
Theunitwillbegintolltheproductlineswith
cleaning solution. Each pump will run for one whole
cycle (approximately 25 seconds) to ensure lines are
completelyushedofanyremainingproduct.
11. Let cleaning solution sit in lines for ten (10) minutes before
continuing.
12. Empty and replace jar in Blend Station, if needed.
NOTE
Theunitwillbegintolltheproductlineswiththe
original product. Each pump will run for one whole
cycle (approximately 25 seconds) to ensure sanitizing
solutioniscompletelyushedfromthesystem.
! CAUTION
Following sanitization, rinse with end-use product
until there is no aftertaste. Do not use a fresh water
rinse. This is a nsf requirement. Residual sanitizing
solution left in the system creates a health hazard.
18. Taste each product to verify there is no off-taste.
19. If off-taste is found, ush the product system again by using
the Manual Controls option, (See Manual Controls Section,
page 10).
20. Press and hold each product number for one whole cycle
(approximately 25 seconds) to ensure off-taste does not
occur.
15
Page 16

Every Six Months
1. Remove the external drain hose from the back of the unit.
2. Slowly pour sanitizing solution down the tube. It is not
necessary to rinse the drain hose.
TROUBLESHOOTING
TROUBLE CAUSE REMEDY
Machine won’t run. • Power Cord not plugged in.
• Switch on back of unit is not ON.
• Circuit breaker button in rear has been
tripped.
Blender stopped working. • Circuit breaker button in rear has been
tripped.
Ice stopped dispensing or ice
auger not turning.
• No ice in the hopper.
• Obstructions present in the ice hopper or
ice chute.
• Ice hopper lid not properly closed.
• Check the power cord to be sure it is
plugged into a live, grounded circuit.
• Check that the switch on the back of the
unit is on.
• Press the breaker button back in to reset
it. (This unit utilizes a 13 AMP circuit
breaker).
• Press the breaker button back in to reset
it. (This unit utilizes a 13 AMP circuit
breaker).
• Ensure there is ice in the hopper, if not
rell hopper.
• Check for obstuctions (foriegn objects) and
blockage in the ice hopper and its chute
and remove
• Replace the ice hopper lid or make sure it
is rmly in place to activate the lid sensor
switch.
Ice dispenses when not in use. • Timed “ice buster” being activated. • If the machine dispenses ice by itself for
about two seconds every hour or so, this
is caused by our timed “ice buster” being
automatically activated. Your machine
is programmed to activate the ice auger
every 30 minutes and dispense ice for six
(6) seconds when the unit is on, but not in
use.
Drinks too runny. • No ice in the hopper.
• Ice hopper lid not properly closed.
Drinks too thick or cavitation in
blender.
• Product bags are empty.
• Water supply is OFF or blocked.
• Water, product, and ice amounts are not
programmed correctly.
• Cavitation is caused when the liquid and
ice mixture in the blender jar is too thick
and an air pocket is created around the
spinning blender blade.
• Ensure there is ice in the hopper, if not
rell hopper.
• Replace the ice hopper lid or make sure it
is rmly in place to activate the lid sensor
switch.
• Ensure product bags are not empty and if
so then replenish accordingly.
• Ensure water supply is ON if not then
switch on. If water line is blocked then
clear obstruction.
• See Section 4 above to reprogram your
ingredients correctly.
• Be sure to put in enough products to
produce a good avor then adjust the
• water to ice ratio until the blender does not
cavitate when you make your drink.
16
Page 17

TROUBLE CAUSE REMEDY
Little or no avor in drinks. • Product bags are empty.
• Product hoses are kinked.
Too much avor in drinks. • More than one pump is turning at one time.
• A pump is turning that was not requested.
• A single pump is turning as long as the ice
is dispensing.
Ice chunks in drinks. • Blend time in the program for that product
is off.
• Cavitation is caused when the liquid and
ice mixture in the blender jar is too thick
and an air pocket is created around the
spinning blender blade.
Water won’t dispense. • Water supply is OFF or blocked.
• Water supply line is kinked.
• Ensure product bags are not empty and if
so then replenish accordingly.
• Unkink product hoses
(Contact the manufacturer if pumps do not turn)
• Check the programming for any of these
conditions and if any are present then
contact the manufacturer.
• See Section 4 above to reprogram the
blend time correctly.
• Be sure to put in enough products to pro-
duce a good avor then adjust the water to
ice ratio until the blender does not cavitate
when you make your drink.
• Ensure water supply is ON if not then
switch on. If water line is blocked then
clear obstruction.
• Unkink water supply line.
(If neither problems exist contact manufacturer)
Product bag is leaking. • Product bag is torn or ripped. • Replace the bag.
Lid light in on. • Ice hopper lid is malfunctioning • Replace ice hopper lid.
(If replacing the lid does not clear the light
contact your manufacturer for further help)
Low ice indicator. • Ice level in ice hopper not high enough • Add ice to the ice hopper to a level above
the photo-electric eyes which are located
inside the ice hopper on each side.
• (If the light does not go off then contact
your manufacturer for further help)
17
Page 18

ILLUSTRATIONS AND PART LISTINGS
Main Unit Assembly 1
1
2
3
6
15
Item Part No. Description
1 05-3226 Lid, Ice Dispenser, Gemini
2 82-4715 Ice Hopper, BDI - 409, Gemini
3 82-4720 Splash Cover, Blend Station, Smoothie
4 82-4654 Product Jar, Blendtec, Smoothie
5 82-4747 Alcove Door Assy, Blend Station, Gemini
6 04-1032 SCR, 8 - 32 x .375”, Flathead
7 82-4656 Blender Motor, Blendtec, Smoothie
8 82-4677 Bezel Assy, Blend Station, Gemini
9 82-4733 Grate, Rinse Station, Gemini
10 05-3209 Door, Whipcrm Door, Front, Gemini
11 82-4739 Flow Sensor, Right, Blendtec, Gemini
12 91-0206 Fan, Axial, 115/60, Smoothie (x4)
13 05-3217 Cap, Vinyl, Black Caplug, 1Wx1H .06 gap
14 82-4651 Tray, Bagged Product, Smoothie (x8)
15 82-4711 Flow Sensor, Left, Blendtec, Gemini
18
4
5
7
8
9
10
11
12
13
14
Page 19

Main Unit Assembly 2
1
2
3
4
Item Part No. Description
1 82-4660 Board, Electronics, Smoothie
2 82-4723 Valve Water, Blend Station, Gemini
3 82-4724 Valve Water, Rinse Station, Gemini
4 04-0585 Filter, Air, LIV
19
Page 20

Ice Hopper Assembly
Item Part No. Description
1 82-4820 Motor, Ice Hopper, Gemini
Condenser Assembly
Item Part No. Description
1 91-0007 Motor, Fan, 115/60, 9W
2 07-0389 Fan Blade, OJ SL, 500
1
1
2
20
Page 21

Pump Cube Assembly
4
3
5
1
2
Item Part No. Description
1 05-3331 Elbow, .5 barb x .375 barb, 90 Deg., Gemini
2 05-3332 Elbow, .375 barb x .375 barb, 90 Deg., Pump Cube, Gemini
3 07-0438 Clamp, STPLS, Oetiker, 21/32 (17mm)
4 49-0344 Hose, Pump Cube, .375 ID x .137W, Gemini
5 01-2985 Cotton Pin, Pump Cube, Gemini
6 82-4818 Clutch, Pump Cube, Gemini
6
21
Page 22

WIRING DIAGRAM PN 06-3418/01
22
Page 23

Dispenser Disposal
To prevent possible harm to the environment from improper disposal, recycle the unit
by locating an authorized recycler or contact the retailer where the product was purchased.
Comply with local regulations regarding disposal of the refrigerant and insulation.
23
Page 24

Lancer Corp.
800-729-1500
Technical Support/Warranty: 800-729-1550
custserv@lancercorp.com
lancercorp.com
 Loading...