

Lanaform Baby Camera Instruction Manual


INSTRUCTION MANUAL
We thank you for buying the LANAFORM® Baby Camera. Ideal to keep an eye on your baby, this cordless infrared camera
will allow you to hear and to watch your child day and night. The Baby Camera is a useful instrument for you and your baby
in the course of the first months of his existence.
PLEASE READ ALL THE INSTRUCTIONS BEFORE USING YOUR BABY CAMERA, ESPECIALLY THESE FEW
FUNDAMENTAL SAFETY INSTRUCTIONS :
Make sure the voltage of the electricity grid corresponds to the one of the apparatus. •
See to it that the camera and the cable of the adaptor are always out of baby’s reach.•
Never connect or disconnect the plug from the power point with wet hands.•
Always put the Baby Camera on a hard, flat and horizontal surface, keep it away from heat sources like stoves, radiators, etc. •
Do not use this apparatus in a room where aerosols (sprays) are being used or in a room where oxygen is administered.•
Do not use this apparatus under a cover or under a pillow. excessive heat may cause fire, electrocution or burns.•
Do not use this apparatus in the proximity of wet zones like the bathtub, the sink, etc. •
Condition of functioning: from -10°C to 40°C; with a humidity of 85%RH.•
Condition of storage: from -20°C to 60°C; with a humidity of 85%RH.•
In order to avoid risks of electrocution, do not open the camera unit nor the surveillance unit (apart from the battery •
compartment).
EN
The adaptors and batteries may warm up a little during functioning. This is perfectly normal.•
The cables of the power adaptor must be laid away from the passageway.•
Use only the power adaptors supplied. To avoid overheating do not use an extension cord.•
Do not roll the cable around the apparatus.•
Do not move this apparatus by its supply cable.•
If the supply cable is damaged, it needs to be replaced by a special or similar cable available at your supplier’s or at his •
after-sales service.
Be sure to turn off and unplug the apparatus after each use.•
Do not use in any case a camera other than the one from the make of Lanaform.•
When you use the Baby Camera, you use public waves. The sounds and the images may be broadcasted to other •
receivers. The conversations, even the ones coming from rooms that are close to the camera unit, can also be
broadcasted. To protect your privacy, always unplug the camera unit when you are not using it.
This apparatus is not intended to be used by persons, including children, whose physical, sensory or mental capacities •
are limited, or persons without experience or knowledge, unless they have the advantage of, by mediation of a person
responsible of their security, a supervision or preceding instructions regarding the use of the apparatus. It is convenient
to keep an eye on the children to make sure they don’t play with the apparatus.
Exclusively use the Baby Camera according to the purpose it is made for and as described in this manual.•
ADDITIONAL INFORMATION
The sound- and picture quality is affected by the use of microwave ovens, as well as by the use of other cordless •
systems, such as Bluetooth, local cordless networks, …
The Baby Camera is a product based on the Radio Frequency (RF). That means that its functioning can be disturbed •
by the same type of interference as the mobile phones, portable radios as well as any other product based on the
radiofrequency.
Baby Camera
3

EN
The Baby Camera is not limited to your baby’s room. You can use it all over your house. Consequently, if a person in your •
neighbourhood also possesses a Baby Camera on the same channel, this person will be able to hear and see your baby.
Safety of wave radios: when turned on, the Baby Camera emits and receives radio waves. The Baby Camera is in •
conformity with the corresponding standards.
1. LIST OF COMPONENTS SUPPLIED
1) Camera 2,4 GHz cordless
2) Receiver 2,4 GHz cordless
3) Headphones
4) Adaptor for camera
5) Adaptor for receiver
2. COMPONENTS
2-1. Structure of the camera
1) Aerial
2) Infrared indicators
3) Lens
4) Alimentation On/Off
5) Alarm button « Alarm »
6) Acquisition button « Learning »
7) Power supply plug
8) Channel button
9) Lid for the battery compartment
2-2. Structure of the receiver
1) Aerial
2) Lid for the battery compartment
3) Headphones
4) Power supply plug
5) TFT-LCD
6) Channel indicator
7) Standby button
8) Channel button
9) Stop button for the alarm
10) Speaker
11) Adjustable volume button
12) Power On/Off
4

3. INSTALLATION
3-1. Installation of the camera
1. Installation of the base of the camera
1. Never put the camera unit inside the bed or the baby’s playpen
2. Put the camera at least 1 metre away from your baby.
3. The unit can be fixed to the wall or placed on a stable and flat surface, like a sideboard or a tabletop. For wall
mounting, please refer to our following schemes
4. Connect the camera to the adaptor, and then put the power button in position ON.
5. Make the round head of the camera swivel in an angle that allows practising surveillance.
EN
Remark:
a. This camera can also use batteries as a source of supply. Please put 4 AA batteries (not supplied) in the compartment
located at the back of the camera and see to it that you respect their polarity.
b. Average data of constant functioning while using batteries :
5 hours (infrared OFF)
3 hours (infrared ON).
2. Configuration of the acquisition of data on the camera
In order to avoid the possible interferences intervening at the time you are using the camera,
Push the acquisition button « Learning ». Move the acquisition button at the back of the camera from OFF to ON, then
hold the stop button (for the alarm) «
screen.
There is not need to change the channel to avoid the interferences.
The range of the apparatus (without obstacles) is about 100 metres.
However, this range may be reduced to +/- 30 metres depending on the environment of the place of application
(the walls, ceilings,).
» of the receiver pushed in for 3 seconds. A clear image will appear on the
3. Configuration of the alarm of the camera
The camera has a function to detect sound.
The volume of the sound alarm is adjustable.
Baby Camera
5

EN
Configuration of the alarm for the detection of sound:•
In order to configure the sound alarm, put the alarm button on « VOX ». The system then goes into sound alarm mode,
which will allow it to detect sounds from 65 dB and to set off the alarm.
In case of the detection of a sound the alarm rings out during 2 minutes until the stop button for the alarm «
» is
activated. You will then have to wait 35 seconds before the system goes into the sound alarm mode again.
If the stop button for the alarm is not pushed within 2 minutes, the sound alarm will stop automatically after this period
of time and the system will once again put itself into the sound alarm mode.
Configuration of the alarm OFF:•
The alarm is not activated when the alarm button is in position OFF.
3-2. Installation of the receiver
1. Connect the receiver to the adaptor, and then put the power button in position ON.
2. Adjust the volume control to the desired level.
3. Configure the receiver on the same channel as the camera by pushing the channel button «
»; the images appear
on the screen.
a. The original channel for the receiver is defined to correspond with the one of the camera.
b. A single camera is offered with this set. Nevertheless the receiver takes on up to 4 cameras working
simultaneously. If 2, 3 or 4 cameras are functioning, keep the channel button «
» pressed in for about
3 seconds to enter the automatic navigation mode and the system will alternate between the actual channels in
reason of 6 seconds each.
If you wish to have an extra camera at your disposal, please contact your retailer.
c. The monitoring screen turns black in the absence of a signal or interference.
Remark:
c. This camera can also use batteries as a source of supply. Please put 4 AA batteries (not supplied) in the compartment
located at the back of the camera and see to it that you respect their polarity.
d. Average data of constant functioning while using batteries :
5 hours (infrared OFF)
3 hours (infrared ON).
6
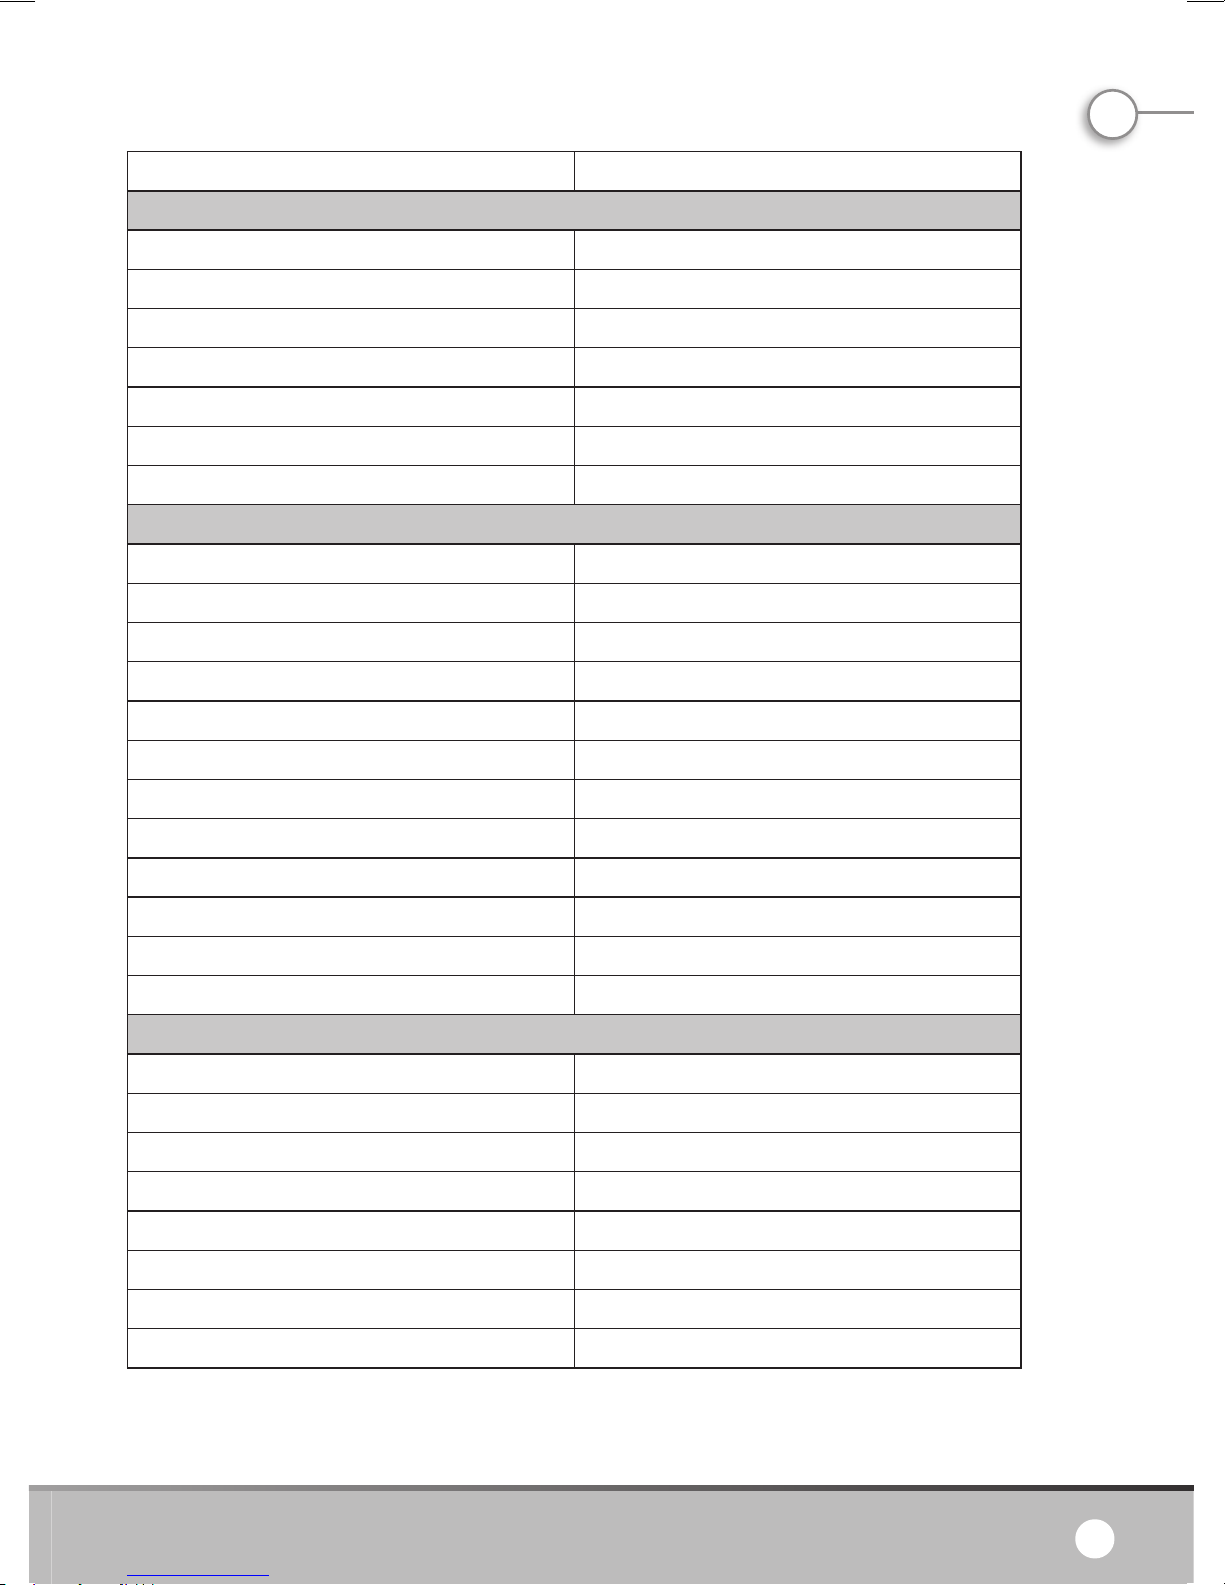
4. CHARACTERISTICS
Element Value
GENERAL
Frequency of transmission ISM 2 400~2 483 MHz
Power of transmission 10 maw/CE ; 2 maw/FCC
Effective range without obstruction* 100 m
Spectre of diffusion FHSS
Mode of modulation GFSK
Functioning temperature -10 °C ~ +40 °C/+14 °F ~ +104 °F
Functioning humidity ≤85 %
CAMERA
Type of imaging sensor CMOS
Total number of pixels of the images NTSC : 720 x 480 pixels ; PAL : 720 x 576 pixels
Minimal exposure 0 Lux (infrared ON)
EN
Distance of night vision 5 m
Angle of vision 55°
Time limit of battery function 5 hours
Image resolution 320 x 240 to 10 I/s
Sensibility of the sound detection >65 dB
Consumption of electricity (max.) 280 mA
Power supply CC + 8 V
Dimensions (l x P x H) 86 x 48 x 135 mm
Weight (approx.) 146 g
RECEIVER
Type of screen LCD 2,36“ TFT-LCD
Real pixels 480 x 234
Sensibility of reception ≤-85 dBm
Consumption of electricity (max.) 200 mA
Time limit of battery function 5 hours
Power supply CC +8 V
Dimensions (l x P x H) 86 x 54 x 143 mm
Weight (approx.) 130 g
* The real transmission range is liable to vary in function of the weather, the location, the interferences and the
construction of the building.
Baby Camera
7

EN
LIMITED GUARANTEE
LANAFORM® guarantees that the product is free from any material or manufacturing defect for a period of two years as
from the date of purchase, except as stipulated herebelow.
The guarantee on this LANAFORM® product does not cover damage caused by inappropriate or misuse, accident,
attachment of any unauthorized accessory, any modification made to the product or any circumstance of any kind beyond
the control of LANAFORM®.
LANAFORM® cannot be held liable for indirect, consequential or special damage of any kind.
All implicit guarantees of the aptitude of the product are limited to two years as from the initial date of purchase.
On reception, LANAFORM® will repair or replace your appliance as appropriate and will return it to you. This guarantee
must be carried out by LANAFORM® Service Centre. Any maintenance of this product entrusted to anyone other than the
LANAFORM® Service Center voids this guarantee.
8

FR
MANUEL D’INSTRUCTION
Nous vous remercions d’avoir acheté la Baby Camera de LANAFORM®. Idéale pour surveiller votre bébé, cette caméra sans
fil, et infrarouge vous permettra d’entendre, ainsi que de voir votre enfant, de jour comme de nuit. La Baby Camera est un
accessoire utile pour vous et votre bébé au cours des premiers mois de son existence.
VEUILLEZ LIRE TOUTES LES INSTRUCTIONS AVANT D’UTILISER VOTRE BABY CAMERA, EN PARTICULIER CES
QUELQUES CONSIGNES DE SECURITE FONDAMENTALES :
Vérifiez que le voltage de votre réseau correspond à celui de l’appareil. •
Veillez à ce que l’unité caméra et le câble de l’adaptateur soient toujours hors de portée du bébé.•
Ne branchez, ni ne débranchez la fiche avec des mains mouillées.•
Placez toujours la Baby Camera sur une surface dure, plane et horizontale, éloignez-la des sources de chaleur telles que •
les poêles, radiateurs, etc.
N’utilisez pas cet appareil dans une pièce où des produits aérosols (sprays) sont employés ou dans une pièce où de •
l’oxygène est administré.
N’utilisez pas cet appareil sous une couverture ou sous un oreiller. Une chaleur excessive peut provoquer un incendie, •
une électrocution ou des brûlures.
N’utilisez pas l’appareil à proximité de zones humides, comme la baignoire, l’évier, etc. •
Condition de fonctionnement : de -10°C à 40°C; avec une humidité de 85%RH.•
Condition de rangement : de -20°C à 60°C; avec une humidité de 85%RH.•
Pour éviter les risques d’électrocution, n’ouvrez pas l’unité caméra ni l’unité de surveillance (sauf les compartiments de piles).•
Les adaptateurs et les piles peuvent chauffer légèrement durant le fonctionnement. Ceci est parfaitement normal.•
Les cordons d’adaptateur secteur doivent être installés hors des voies de passage.•
Utilisez seulement les adaptateurs secteur fournis. Pour éviter les surchauffes, n’utilisez pas de rallonge.•
N’enroulez pas le cordon autour de l’appareil.•
Ne transportez pas cet appareil par son cordon d’alimentation.•
Si le cordon d’alimentation est endommagé, il doit être remplacé par un cordon spécial ou similaire disponible auprès •
du fournisseur ou de son service après-vente.
Veillez à éteindre et à débrancher l’appareil après chaque utilisation.•
N’utilisez en aucun cas une caméra autre que celle de la marque Lanaform.•
Lorsque vous utilisez la Baby Camera, vous utilisez les ondes publiques. Le son et les images peuvent être diffusés vers •
d’autres récepteurs. Les conversations, même à partir de pièces proches de l’unité caméra, peuvent aussi être diffusées.
Pour protéger votre intimité, débranchez toujours l’unité caméra lorsque vous ne vous en servez pas.
Cet appareil n’est pas prévu pour être utilisé par des personnes, y compris les enfants, dont les capacités physiques, •
sensorielles ou mentales sont réduites, ou des personnes dénuées d’expérience ou de connaissance, sauf si elles ont pu
bénéficier, par l’intermédiaire d’une personne responsable de leur sécurité, d’une surveillance ou d’instructions préalables
concernant l’utilisation de l’appareil. Il convient de surveiller les enfants pour s’assurer qu’ils ne jouent pas avec l’appareil.
Utilisez exclusivement la Baby Camera suivant l’usage qui lui est destiné et qui est décrit dans ce manuel.•
INFORMATIONS SUPPLEMENTAIRES
La qualité du son et de l’image est affectée par l’utilisation des fours à micro-ondes, ainsi que par l’utilisation d’autres •
systèmes sans fil, tels que Bluetooth, réseaux locaux sans fil, …
La Baby Camera est un produit basé sur la radiofréquence (RF). Cela signifie que son fonctionnement peut être gêné par •
le même type d’interférence que les GSM, les radios portables ainsi que tout autre produit basé sur la radiofréquence.
Baby Camera
9

FR
La Baby Camera n’est pas limité à la chambre de votre bébé. Vous pouvez l’utiliser dans toute votre maison. Par •
conséquent, si une personne de votre voisinage possède également une Baby Camera sur le même canal, cette personne
pourra également entendre et voir votre bébé.
Sécurité des ondes radio : lorsqu’il est allumé, la Baby Camera émet et reçoit des ondes radio. La Baby Camera est •
conforme aux normes correspondantes.
1.LISTE DES ÉLÉMENTS FOURNIS
1) Caméra 2,4 Ghz sans fil
2) Récepteur 2,4 Ghz sans fil
3) Écouteur
4) Adaptateur pour caméra
5) Adaptateur pour récepteur
2.COMPOSANTS
2-1. Structure de la caméra
1) Antenne
2) Voyants infrarouges
3) Lentille
4) Alimentation On/Off
5) Bouton d’alarme « Alarm »
6) Bouton d’acquisition « Learning »
7) Prise d’alimentation
8) Bouton de canal
9) Couvercle du logement à piles
2-2. Structure du récepteur
1) Antenne
2) Couvercle du logement à piles
3) Écouteur
4) Prise d’alimentation
5) TFT-LCD
6) Indicateur de canal
7) Bouton de veille
8) Bouton de canal
9) Bouton d’arrêt de l’alarme
10) Haut-parleur
11) Bouton de volume réglable
12) Alimentation On/Off
10

FR
3.INSTALLATION
3-1. Installation de la caméra
1. Installation de base de la caméra
1. Ne placez jamais l’unité caméra dans le lit ou le parc du bébé.
2. Placez la caméra à au moins 1 mètre de distance de votre bébé.
3. L’unité peut être fixée au mur ou placée sur une surface stable et plate, telle qu’un buffet ou un dessus de table. Pour la
fixation murale, veuillez-vous référer aux schémas suivants.
4. Raccordez la caméra à l’adaptateur, puis placez le bouton d’alimentation en position ON.
5. Faites pivoter la tête arrondie de la caméra à un angle permettant d’exercer une surveillance.
Remarque :
a. Cette caméra peut également utiliser des piles en tant que source d’alimentation. Veuillez placer 4 piles AA (non-
fournies) dans le logement situé à l’arrière de la caméra en veillant à respecter leur polarité.
b. Données moyennes de fonctionnement en continu avec l’utilisation de piles :
5 heures (infrarouge OFF)
3 heures (infrarouge ON).
2. Configuration de l’acquisition des données sur la caméra
Pour éviter les éventuelles interférences intervenant lors de l’utilisation, appuyez sur le bouton d’acquisition « Learning ».
Déplacez le bouton d’acquisition à l’arrière de la caméra de OFF vers ON, puis maintenez le bouton d’arrêt (de l’alarme)
«
» du récepteur enfoncé pendant 3 secondes. Une image nette apparaît à l’écran.
Il n’y a aucun besoin de changer de canal pour éviter les interférences.
La portée de l’appareil (sans obstacles) est d’environ 100 mètres.
Toutefois, cette portée peut être réduite à +/- 30 mètres suivant l’environnement du lieu d’utilisation (les murs, plafonds,
…).
3. Configuration de l’alarme de la caméra
La caméra est dotée d’une fonction de détection du son.
Le volume de l’alarme sonore est réglable.
Baby Camera
11

FR
Configuration de l’alarme de détection sonore :•
Pour configurer l’alarme sonore, positionnez le bouton d’alarme sur « VOX ». Le système entre alors en mode d’alarme
sonore, ce qui lui permet de détecter les sons à partir de 65 dB et de déclencher l’alarme.
En cas de détection d’un son, l’alarme retentit pendant 2 minutes jusqu’à ce que le bouton d’arrêt de l’alarme «
» soit
activé. Il faut ensuite attendre 35 secondes avant que le système entre de nouveau en mode d’alarme sonore.
Si le bouton d’arrêt de l’alarme n’est pas pressé dans les 2 minutes, l’alarme sonore s’arrêtera automatiquement après ce
laps de temps et le système se mettra de nouveau en mode d’alarme sonore.
Configuration de l’alarme OFF :•
L’alarme est désactivée lorsque le bouton d’alarme est en position OFF.
3-2. Installation du récepteur
1. Raccordez le récepteur à l’adaptateur, puis placez le bouton d’alimentation en position ON.
2. Réglez le contrôle du volume sur le niveau souhaité.
3. Configurez le récepteur sur le même canal que la caméra en appuyant sur le bouton de canal «
» ; les images
apparaissent à l’écran.
a. Le canal d’origine du récepteur est défini de manière à correspondre à celui de la caméra.
b. Une seule caméra est proposée dans ce set. Néanmoins, le récepteur prend en charge jusqu’à 4 caméras
fonctionnant simultanément. Si 2, 3 ou 4 caméras sont en cours de fonctionnement, maintenez le bouton de
canal «
» enfoncé pendant environ 3 secondes pour entrer en mode de navigation automatique et le système
alternera entre les canaux actuels à raison de 6 secondes chacun.
Si vous souhaitez disposer d’une caméra supplémentaire, veuillez-vous adresser à votre revendeur.
c. L’écran de contrôle devient noir en l’absence de signal ou d’interférence.
Remarque :
a. Ce récepteur peut également fonctionner avec des piles. Veuillez placer 4 piles AA (non-fournies) dans le logement
situé à l’arrière du récepteur en veillant à respecter leur polarité.
b. Données moyennes de fonctionnement en continu avec l’utilisation de piles :
5 heures (infrarouge OFF)
3 heures (infrarouge ON).
12

4. CARACTÉRISTIQUES
Élément Valeur
GÉNÉRAL
Fréquence de transmission ISM 2 400~2 483 MHz
Puissance de transmission 10 mW/CE ; 2 mW/FCC
Plage effective sans obstruction* 100 m
Spectre de diffusion FHSS
Mode de modulation GFSK
Température de fonctionnement -10 °C ~ +40 °C/+14 °F ~ +104 °F
Humidité de fonctionnement ≤85 %
CAMÉRA
Type de capteur d’imagerie CMOS
Nombre total de pixels des images NTSC : 720 x 480 pixels ; PAL : 720 x 576 pixels
Illumination minimale 0 Lux (infrarouge ON)
FR
Distance de vision nocturne 5 m
Angle de vision 55°
Délai de fonctionnement des piles 5 heures
Résolution d’image 320 x 240 à 10 i/s
Sensibilité de la détection sonore >65 dB
Consommation de courant (max.) 280 mA
Alimentation électrique CC + 8 V
Dimensions (l x P x H) 86 x 48 x 135 mm
Poids (approx.) 146 g
RÉCEPTEUR
Type d’écran LCD 2,36“ TFT-LCD
Pixels effectifs 480 x 234
Sensibilité de la réception ≤-85 dBm
Consommation de courant (max.) 200 mA
Délai de fonctionnement des piles 5 heures
Alimentation électrique CC +8 V
Dimensions (l x P x H) 86 x 54 x 143 mm
Poids (approx.) 130 g
* La plage de transmission réelle est susceptible de varier en fonction de la météo, de l’emplacement, des interférences
et de la construction de l’immeuble.
Baby Camera
13

FR
GARANTIE LIMITÉE
LANAFORM® garantit que ce produit est exempt de tout vice de matériau et de fabrication pour une période de deux
années à compter de sa date d’achat, à l’exception des précisions ci-dessous.
La garantie sur ce produit LANAFORM® ne couvre pas les dommages causés à la suite de toute utilisation abusive ou de
tout mauvais usage, accident, fixation de tout accessoire non autorisé, modification apportée au produit ou de toute autre
condition, de quelle que nature que ce soit, échappant au contrôle de LANAFORM®.
LANAFORM® ne sera pas tenue pour responsable de tout type de dommage accessoire, consécutif ou spécial.
Toutes les garanties implicites d’aptitude du produit sont limitées à une période de deux années à compter de la date
d’achat initiale.
Dès réception, LANAFORM® réparera ou remplacera, suivant le cas, votre appareil et vous le renverra. La garantie n’est
effectuée que par le biais du Centre Service de LANAFORM®. Toute activité d’entretien de ce produit confiée à toute
personne autre que le Centre Service de LANAFORM® annule la présente garantie.
14

INSTRUCTIEHANDLEIDING
Wij danken u voor uw aanschaf van de LANAFORM® Baby Camera. Met deze draadloze infrarood camera, die ideaal is om
uw baby in de gaten te houden, kunt u uw kind dag en nacht horen en zien. De Baby Camera is een handig apparaat voor
u en uw baby, zeker in de eerste maanden van uw baby’s leven.
LEES ALLE INSTRUCTIES AANDACHTIG DOOR VOORDAT U UW BABY CAMERA GEBRUIKT, MET NAME deze
ESSENTIELE VEILIGHEIDSINSTRUCTIES:
Zorg ervoor dat de spanning van het elektriciteitsnet overeenkomst met de spanning van het apparaat. •
Zorg ervoor dat de camera en de kabel van de adapter altijd buiten bereik van de baby zijn.•
Steek de stekker nooit met natte handen in het stopcontact en haal deze er ook nooit uit met natte handen.•
Plaats de Baby Camera altijd op een harde, vlakke en horizontale ondergrond en plaats het uit de buurt van •
warmtebronnen zoals gasfornuizen, verwarmingen, etc.
Gebruik dit apparaat niet in een kamer waar aërosol (sprays) gebruikt worden of in een kamer waar zuurstof toegediend wordt.•
Gebruik dit apparaat niet onder een deken of kussen. Overmatige hitte kan leiden tot brand, elektrocutie of brandwonden.•
Gebruik dit apparaat niet in de buurt van natte zones zoals een bad, een aanrecht, etc. •
Werkingsvoorwaarden: van -10°C tot 40°C; met een vochtigheid van 85%RV.•
Opslagvoorwaarden: van -20°C tot 60°C; met een vochtigheid van 85%RV.•
Open om risico op elektrocutie te voorkomen de camera-unit of de bewakingsunit niet (met uitzondering van het •
batterijcompartiment).
De adapters en batterijen kunnen warm worden tijdens gebruik. Dit is normaal.•
Leg de kabels van de stroomadapters niet in de doorgang.•
Gebruik alleen de bijgeleverde stroomadapter. Gebruik om oververhitting te voorkomen geen verlengsnoer.•
Rol de kabel niet om het apparaat heen.•
DU
Trek niet aan de stroomkabel van het apparaat.•
Als de stroomkabel beschadigd is, moet deze vervangen worden door een speciale of soortgelijke kabel die beschikbaar •
is bij uw leverancier of bij de klantenservice.
Zet het apparaat na elk gebruik uit en haal de stekker uit het stopcontact.•
Gebruik in geen geval een andere camera dan die van het merk Lanaform.•
Wanneer u de Baby Camera gebruikt, gebruikt u publieke golven. De geluiden en de beelden kunnen uitgezonden •
worden op andere ontvangers. De gesprekken, zelfs die vanuit kamers die in de buurt zijn van de camera-unit, kunnen
ook uitgezonden worden. Haal om uw privacy te beschermen altijd de stekker van de camera-unit uit het stopcontact
wanneer u deze niet gebruikt.
Dit apparaat is niet bedoeld voor gebruik door personen, inclusief kinderen, met beperkte fysieke, zintuiglijke of •
geestelijke capaciteiten, of door personen zonder ervaring of kennis, tenzij zij onder toezicht staan van een persoon
die verantwoordelijk is voor hun veiligheid, of instructies hebben gekregen over het gebruik van het apparaat. Het is
verstandig om kinderen in de gaten te houden om er zeker van te zijn dat zij niet met het apparaat spelen.
Gebruik de Baby Camera alleen waar deze voor gemaakt is en zoals beschreven in deze handleiding.•
EXTRA INFORMATIE
De geluids- en beeldkwaliteit wordt beïnvloed door het gebruik van magnetrons en door het gebruik van andere •
draadloze systemen zoals Bluetooth, plaatselijke draadloze netwerken,…
De Baby Camera is een product dat gebaseerd is op de radiofrequentie (RF). Dit betekent dat de werking verstoort kan •
Baby Camera
15

DU
worden door hetzelfde soort storing als mobiele telefoons, draagbare radio’s en andere producten die gebaseerd zijn op
de radiofrequentie.
Het gebruik van de Baby Camera is niet beperkt tot uw baby’s kamer. U kunt het apparaat in uw hele huis gebruiken. •
Dientengevolge, als iemand in uw buurt ook een Baby Camera heeft op hetzelfde kanaal, dan zal deze persoon uw baby
kunnen zien en horen.
Veiligheid van radiogolven: wanneer de Baby Camera aanstaat, zendt en ontvangt deze radiogolven. De Baby Camera is •
in conformiteit met de betreffende standaarden.
1. LIJST VAN BIJGELEVERDE ONDERDELEN
1) Camera 2,4 Ghz draadloos
2) Ontvanger 2,4 Ghz draadloos
3) Koptelefoon
4) Adapter voor camera
5) Adapter voor ontvanger
2. ONDERDELEN
2-1. Structuur van de camera
1) Antenne
2) Infrarood indicators
3) Lens
4) Stroom Aan/Uit
5) Alarmknop « Alarm »
6) Opnameknop « Leren »
7) Voedingsstekker
8) Kanaalknop
9) Deksel van batterijcompartiment
2-2. Structuur van de ontvanger
1) Antenne
2) Deksel van batterijcompartiment
3) Koptelefoon
4) Voedingsstekker
5) TFT-LCD
6) Kanaalindicator
7) Stand-by button
8) Kanaalknop
9) Stopknop voor het alarm
10) Luidspreker
11) Verstelbare volumeknop
12) Stroom Aan/Uit
16

3. INSTALLATIE
3-1. Installatie van de camera
1. Installatie van de basis van de camera
1. Plaats de camera-unit nooit in het bed of in de box van de baby.
2. Plaats de camera ten minste 1 meter van uw baby af.
3. De unit kan vastgemaakt worden aan de muur of op een stabiele, vlakke ondergrond zoals een dressoir of een tafel.
Raadpleeg voor plaatsing op de muur de volgende schema’s
4. Verbindt de camera aan de adapter en zet de stroomknop dan op AAN.
5. Draai de ronde kop van de camera en plaats deze zo dat toezicht mogelijk is.
Opmerking :
a. Deze camera kan ook gebruikt worden op batterijen. Plaats 4 AA batterijen (niet bijgeleverd) in het compartiment aan
de achterkant van de camera en let hierbij op de polariteit van de batterijen.
b. Gemiddeld werkingsduur met gebruik van batterijen:
DU
5 uur (infrarood UIT)
3 uur (infrarood AAN).
2. Configuratie van de vastlegging van gegevens op de camera
Druk om eventuele storingen te voorkomen tijdens uw gebruik van de camera op de opnameknop « Leren ». Zet de
opnameknop aan de achterkant van de camera op AAN en houdt daarna de stopknop (voor het alarm) «
ontvanger drie seconden ingedrukt. Een helder beeld zal op het scherm verschijnen.
Het kanaal hoeft niet veranderd te worden om storingen te voorkomen.
Het bereik van het apparaat is (zonder obstakels) ongeveer 100 meter.
Dit bereikt kan echter verminderd worden naar +/- 30 meter, afhankelijk van de omgeving waarin het apparaat gebruikt
wordt (muren, plafonds,…).
3. Configuratie van het alarm van de camera
De camera heeft een functie waarmee geluid gedetecteerd wordt.
Het volume van het geluidsalarm kan aangepast worden.
Configuratie van het alarm voor het detecteren van geluid: •
Zet om het geluidalarm te configureren de alarmknop op « VOX ». Het systeem staat dan in geluidalarmmodus waarin het
» van de
Baby Camera
17

geluiden vanaf 65 dB zal detecteren en het alarm af zal laten gaat.
In het geval dat een geluid gedetecteerd wordt, zal het alarm 2 minuten lang afgaan totdat de stopknop voor het alarm
«
» ingedrukt wordt. U moet dan 35 seconden wachten voordat de alarmmodus weer aangaat.
Als de stopknop voor het alarm niet binnen 2 minuten ingedrukt wordt, zal het geluidalarm automatisch stoppen na deze
periode en zal het systeem weer naar geluidalarmmodus gaan.
Configuratie van alarm UIT:•
DU
Het alarm is niet geactiveerd wanneer de alarmknop in de UIT-positie staat.
3-2. Installatie van de ontvanger
1. Verbindt de ontvanger aan de adapter en zet de stoomknop dan op AAN.
2. Zet het volume op het gewenste niveau.
3. Zet de ontvanger op hetzelfde kanaal als de camera door op de kanaalknop «
» te drukken; de beelden verschijnen
op het scherm.
a. Het standaardkanaal voor de ontvanger is ingesteld om overeen te komen met het kanaal van de camera.
b. Er wordt bij deze set één camera geleverd. Er kunnen echter maximaal vier camera’s aangesloten worden op de
ontvanger die tegelijkertijd kunnen werken. Houd als er 2, 3 of 4 camera’s in werking zijn de kanaalknop
«
» ongeveer drie seconden ingedrukt om naar de automatische navigatiemodus te gaan en het systeem zal
dan afwisselen tussen de werkelijke kanalen voor zes seconden per kanaal.
Neem als u een extra camera wilt hebben contact op met uw verkoper.
c. Het scherm wordt zwart als er geen signaal of een storing is.
Opmerking :
c. Deze camera kan ook gebruikt worden op batterijen. Plaats 4 AA batterijen (niet bijgeleverd) in het compartiment aan
de achterkant van de camera en let hierbij op de polariteit van de batterijen.
d. Gemiddeld werkingsduur met gebruik van batterijen:
5 uur (infrarood UIT)
3 uur (infrarood AAN).
18

4. KENMERKEN
Element Waarde
ALGEMEEN
Frequentie van uitzending ISM 2 400~2 483 MHz
Vermogen van uitzending 10 mW/CE ; 2 mW/FCC
Effectief bereik zonder obstakels* 100 m
Spectrum van diffusie FHSS
Modulatiemethode GFSK
Werkingstemperatuur -10 °C ~ +40 °C/+14 °F ~ +104 °F
Werkingsvochtigheid ≤85 %
CAMERA
Soort beeldvormingsensor CMOS
Totaal aantal pixels van de beelden NTSC : 720 x 480 pixels ;PAL : 720 x 576 pixels
Minimale belichting 0 Lux (infrarood AAN)
DU
Afstand nachtvisie 5 m
Zichthoek 55°
Tijdsduur batterijfunctie 5 uur
Beeldresolutie 320 x 240 à 10 i/s
Gevoeligheid van geluidsdetectie >65 dB
Elektriciteitsverbruik (max.) 280 mA
Voeding CC + 8 V
Afmetingen (L x H x H) 86 x 48 x 135 mm
Gewicht (ong.) 146 g
ONTVANGER
Soort LCD-scherm 2,36“ TFT-LCD
Effectieve pixels 480 x 234
Gevoeligheid van ontvangst ≤-85 dBm
Elektriciteitsverbruik (max.) 200 mA
Tijdsduur batterijfunctie 5 uur
Voeding CC +8 V
Afmetingen (L x B x H) 86 x 54 x 143 mm
Gewicht (ong.) 130 g
* Het echte transmissiebereik zal verschillen afhankelijk van het weer, de locatie, de storingen en de bouw van het
gebouw.
Baby Camera
19

DU
BEPERKTE GARANTIE
LANAFORM® garandeert dit product tegen gebrekkige onderdelen en fabricagefouten. Het toestel geniet een garantie
van twee jaar vanaf de aankoopdatum, met uitzondering van de onderstaande voorwaarden.
De garantie op dit LANAFORM®-product dekt geen schade veroorzaakt door een slecht of verkeerd gebruik van het
toestel, een ongeluk, het toevoegen van niet-toegestane accessoires, het aanpassen van het product of om het even
welke andere omstandigheid waarvoor LANAFORM® niet aansprakelijk kan worden gesteld.
LANAFORM® kan niet aansprakelijk worden gesteld voor het vergoeden van gevolgschade, onrechtstreekse schade of
specifieke schade.
Alle impliciete geschiktheidsgaranties zijn beperkt tot een periode van twee jaar, te rekenen vanaf de oorspronkelijke
aankoopdatum.
Na ontvangst zal LANAFORM® uw toestel herstellen of desgevallend vervangen en het u terugsturen. De garantie
wordt slechts uitgevoerd via het Servicecentrum van LANAFORM®. Elke onderhoudsactiviteit op dit product die wordt
toevertrouwd aan een andere persoon dan iemand van het Servicecentrum van LANAFORM® doet deze garantie
vervallen.
20

MANUAL DE INSTRUCCIONES
Agrademos la compra de Baby Camera LANAFORM®. Ideal para mantener vigilado a su bebé, esta cámara inalámbrica
infrarroja le permitirá oír y ver a su hijo de día y de noche. Baby camera es un instrumento útil para usted y su bebé durante
los primeros meses de vida.
SÍRVASE LEER TODAS LAS INSTRUCCIONES ANTES DE UTILIZAR BABY CAMERA, EN ESPECIAL LAS SIGUIENTES
INSTRUCCIONES FUNDAMENTALES DE SEGURIDAD :
Asegúrese de que el voltaje de la red eléctrica se corresponda con la del artefacto. •
Verifique que la cámara y el cable del adaptador estén siempre fuera del alcance del bebé.•
Nunca enchufe o desenchufe el tomacorriente con las manos mojadas.•
Siempre coloque Baby Camera en una superficie horizontal y plana y manténgala alejada de fuentes de calor como •
estufas, radiadores, etc.
No utilice este artefacto en un ambiente donde se esté empleando aerosol (sprays) o en un lugar donde se administre oxígeno.•
No utilice este artefacto debajo de un cobertor o una almohada. El calor excesivo puede provocar incendio, electrocución •
o quemaduras.
No utilice el artefacto cerca de zonas húmedas como la bañera, pileta, etc.•
Condición de funcionamiento: de -10°C a 40°C; con una humedad de 85%RH.•
Condición de almacenamiento: de -20°C a 60°C; con una humedad de 85%RH.•
A fin de evitar todo riesgo de electrocución, no abra la unidad de la cámara ni la unidad de vigilancia (más allá del •
compartimiento de la batería).
Los adaptadores y las baterías pueden calentarse un poquito durante el funcionamiento. Es perfectamente normal.•
Los cables del adaptador de energía deben quedar apartados de lugar de tránsito .•
Utilice sólo los adaptadores de energía suministrados. A fin de evitar el sobrecalentamiento, no utilice un alargador.•
No enrolle el cable alrededor del artefacto.•
No mueva el artefacto tirando del cable de alimentación.•
Si el cable de alimentación resulta dañado, debe reemplazarse por uno especial o similar disponible en la tienda del •
proveedor o en el servicio de posventa.
SP
Asegúrese de apagar y desenchufar el artefacto luego de cada uso.•
No utilice cámara alguna que no sea la de Lanaform.•
Cuando utiliza Baby Camera, utiliza ondas públicas. Los sonidos y las imágenes pueden emitirse a otros receptores. Las •
conversaciones, incluso las que provengan de otras habitaciones cercanas a la unidad de la cámara, pueden emitirse. A
fin de proteger su privacidad, siempre desenchufe la unidad de cámara cuando no la esté utilizando.
Este artefacto no está diseñado para que lo utilice personas, incluso niños, cuyas capacidades mentales, físicas o •
sensoriales se encuentren restringidas o personas sin experiencia o conocimiento salvo que tengan la ventaja, mediante
la intervención de una persona responsable de la seguridad, de supervisión o instrucciones previas relativas al uso del
artefacto. Se aconseja vigilar a los niños a fin de asegurarse que no jueguen con el artefacto.
Utilice exclusivamente Baby Camera para el objeto para el cual ha sido diseñado y según se ha descripto en este manual.•
INFORMACIÓN ADICIONAL
La calidad de la imagen y del sonido resulta afectada por el uso de hornos microondas, sistemas inalámbricos como •
Bluetooth y redes locales inalámbricas,...
Baby Camera
21

Baby camera es un producto en base a Radio Frecuencia (RF). Significa que su funcionamiento puede resultar afectado •
por el mismo tipo de interferencia que los teléfonos celulares, radios portátiles y cualquier otro producto que se base en
radio frecuencia.
Baby Camera no se restringe a la habitación del bebé. Puede utilizarla en toda la casa. En consecuencia, si una persona •
del vecindario también posee un Baby Camera en el mismo canal, esta persona podrá ver y escuchar a su bebé.
Seguridad de onda radioeléctrica: Cuando se enciende, Baby Camera emite y recibe ondas radioeléctricas. Baby Camera •
concuerda con los estándares correspondientes.
SP
1. LISTA DE COMPONENTES SUMINISTRADOS
1) Cámara inalámbrica de 2,4 Ghz
2) Cámara inalámbrica de 2,4 Ghz
3) Auriculares
4) Adaptador para cámara
5) Adaptador para el receptor
2. COMPONENTES
2-1. Estructura de la cámara
1) Aéreo
2) Indicadores infrarrojos
3) Lentes
4) Alimentación Encendido/Apagado
5) Botón de alarma « Alarma »
6) Botón de adquisición « aprendizaje »
7) Enchufe del toma corriente
8) Botón canal
9) Tapa para el compartimiento de la batería
2-2. Estructura del receptor
1) Aéreo
2) Tapa para el compartimiento de la batería
3) Auriculares
4) Enchufe del toma corriente
5) TFT-LCD
6) Indicador de canal
7) Botón stand-by
8) Botón canal
9 )Botón detener para la alarma
10) Parlante
11) Botón de volumen ajustable
12) Energía Encendido/Apagado
22

3. INSTALACIÓN
3-1. Instalación de la batería.
1. Instalación de la base de la cámara
1. Nunca coloque la unidad de la cámara dentro de la cama o del corralito del bebé.
2. Coloque la cámara al menos a un metro de distancia de su bebé.
3. La unidad puede fijarse a la pared o colocarse en una superficie plana y estable como una mesa o aparador. Para
colocarlo en la pared, sírvase consultar los esquemas siguientes.
4. Conecte la cámara al adaptador, luego encienda el botón de ENCENDIDO.
5. Haga girar la cabeza esférica de la cámara en un ángulo que le permita vigilar.
Observación:
a. Esta cámara también puede utilizar baterías como fuente de energía. Utilice 4 baterías AA (no incluidas) en el
compartimiento indicado de la parte trasera de la cámara y verifique que cumple con la polaridad.
b. Datos promedios de funcionamiento constante mientras utiliza las baterías.
5 horas (infrarrojo APAGADO).
3 horas (infrarrojo PRENDIDO).
SP
2. Configuración de la adquisición de los datos en la cámara
Con el objeto de evitar interferencias cuando utilice la cámara,
presione el botón « aprendizaje ». Mueva el botón adquisición de la parte trasera de la cámara de APAGADO a PRENDIDO ;
luego, mantenga presionado el botón detener (para la alarma) «
imagen nítida en la pantalla.
No es necesario cambiar el canal para evitar las interferencias.
El alcance del artefacto (sin obstáculos) es de 100 metros.
Sin embargo, el alcance puede reducirse en más o menos de 30 metros dependiendo del ámbito del lugar de aplicación
(paredes, techos, ...).
3. Configuración de la alarma de la cámara
La cámara tiene una función para detectar sonido.
El volumen del sonido de la alarma es ajustable.
Configuración de la alarma para la detección de sonido:•
Con el objeto de configurar la alarma de sonido, ponga el botón alarma en « VOZ ». El sistema luego pasa a modo alarma
» del receptor durante 3 segundos. Aparecerá una
Baby Camera
23

con sonido lo que permitirá detectar sonidos de 65 dB y encender la alarma.
SP
En caso de detección de un sonido, suena la alarma durante 2 minutos hasta que se activa el botón detener «
» de la
alarma. Luego, deberá esperar 35 segundos antes que el sistema regrese al modo alarma con sonido.
Si el botón detener no se presiona dentro de los 2 minutos, la alarma se detendrá de manera automática luego de este
plazo y el sistema una vez más regresará al modo alarma con sonido.
Configuración del APAGADO de la alarma: •
La alarma no se activa cuando el botón detener se encuentra en posición APAGADO.
3-2. Instalación del receptor
1. Conecte el receptor al adaptador, luego encienda el botón de ENCENDIDO.
2. Ajuste el control de volumen según el nivel deseado.
3. Configure el receptor al mismo nivel que la cámara moviendo el botón canal «
» ; las imágenes aparecen en la
pantalla.
a. El canal original para el receptor se define de modo tal de corresponderse con el de la cámara.
b. Una sólo cámara se presenta con este juego. Sin embargo, el receptor emplea hasta 4 cámaras que trabajan de
manera simultánea. Si 2, 3, 4 cámaras están en funcionamiento, mantenga presionado el botón canal
«
» durante 3 segundos para ingresar el modo navegación automática y el sistema alternará entre los canales
existentes cada 6 segundos.
Si desea tener una cámara adicional a su disposición, sírvase contactar a su vendedor minorista.
c. La pantalla de monitoreo se vuelve de color negra con la ausencia de señal o interferencia.
Observación:
c. Esta cámara también puede utilizar baterías como fuente de energía. Utilice 4 baterías AA (no incluidas) en el
compartimiento indicado de la parte trasera de la cámara y verifique que cumpla con la polaridad.
d. Datos promedios de funcionamiento constante mientras utiliza las baterías.
5 horas (infrarrojo APAGADO).
3 horas (infrarrojo PRENDIDO).
24
 Loading...