

Lanaform Aqua Pleasure User Manual


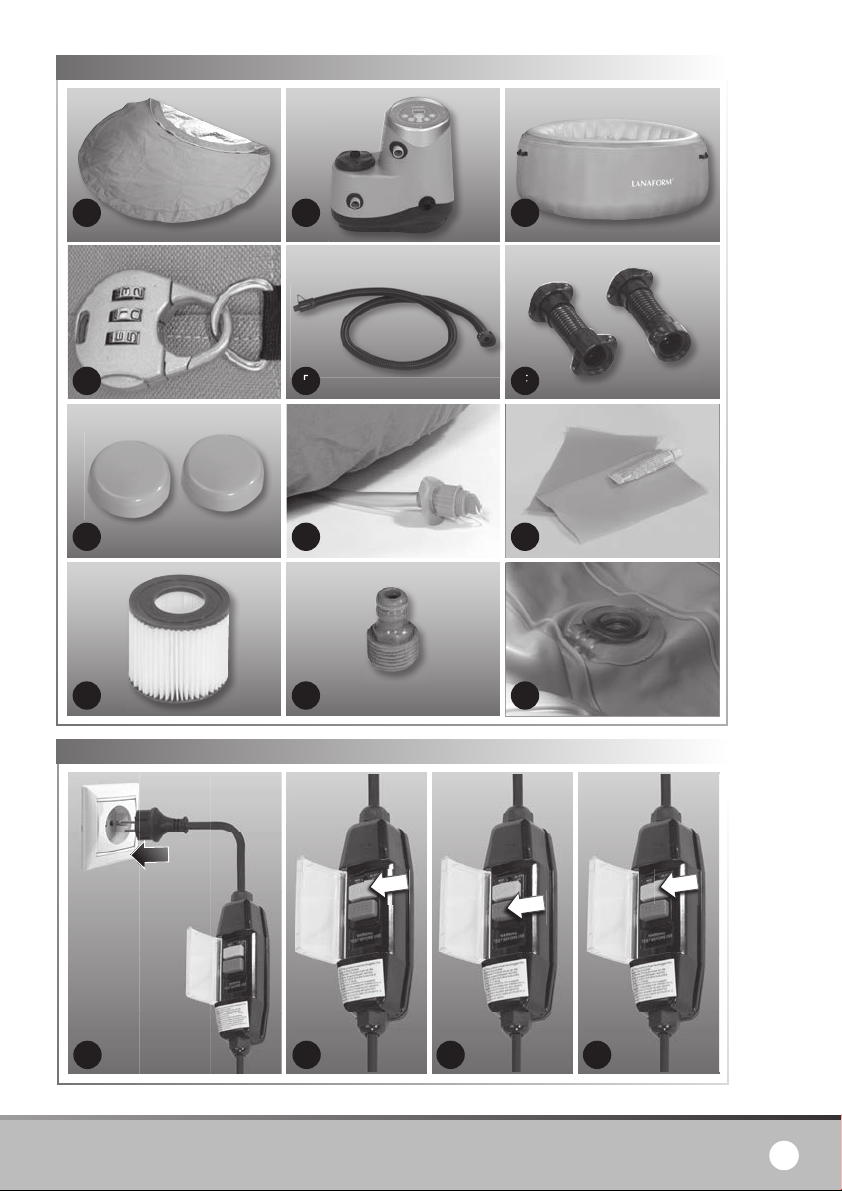
Diagram 1 • Schema 1 • Abb. 1 • Grafički prikaz 1 • Slika 1
A B C
D E F
G
J
Diagram 2 • Schema 2 • Abb. 2 • Grafički prikaz 2 • Slika 2
1 2 3 4
H
K
B
I
L
Aqua Pleasure
3
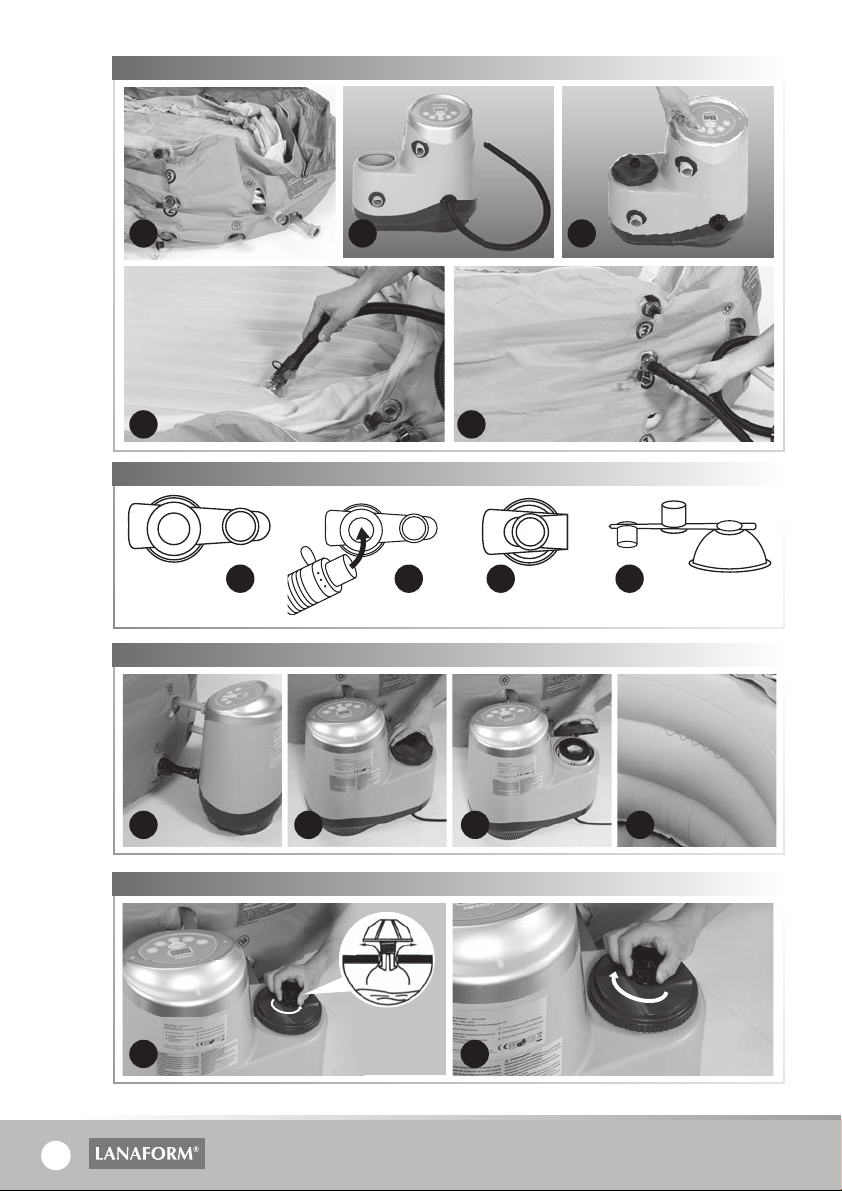
Diagram 3 • Schema 3 • Abb. 3 • Grafički prikaz 3 • Slika 3
A B C
D1 D2
Diagram 4 • Schema 4 • Abb. 4 • Grafički prikaz 4 • Slika 4
A B C D
Diagram 5 • Schema 5 • Abb. 5 • Grafički prikaz 5 • Slika 5
A1 B2B1 C
Diagram 6 • Schema 6 • Abb. 6 • Grafički prikaz 6 • Slika 6
1 2
4

Diagram 7 • Schema 7 • Abb. 7 • Grafički prikaz 7 • Slika 7
D
E
A
BC
Diagram 8 • Schema 8 • Abb. 8 • Grafički prikaz 8 • Slika 8
A B C
D E
F
Diagram 9 • Schema 9 • Abb. 9 • Grafički prikaz 9 • Slika 9
1 2 3
Aqua Pleasure
5

EN
Thank you for your interest in the LANAFORM Aqua Pleasure®. This spa bath will allow you to enjoy the benefits of
hydrotherapy both inside and outside your home. With its 88 hydrojets and a water temperature of up to 40° Celsius, you
can enjoy a soothing and relaxing massage at any time of day. The benefits of the warm water, together with the feeling
of weightlessness and the gentle combination of the water jets and air pressure, will reduce your stress and fatigue in
minutes, all while easing your muscles and joints. Thanks to these 3 features, you will leave your spa bath feeling calm
and relaxed.
PLEASE READ ALL THE INSTRUCTIONS BEFORE USING YOUR SPA BATH, PARTICULARLY
THE ESSENTIAL SAFETY INFORMATION:
Please always follow the basic security precautions below when installing and using this electrical equipment:
RISK OF ELECTRIC SHOCK
• The spa bath is protected by a differential circuit breaker set to a residual operating current not exceeding 30 mA. This
device must be tested before each use.
• If the power cord is damaged, it must be replaced with an identical cord available from your supplier or their post-sales
service.
• To reduce the risk of electrocution, do not use an extension cable to connect the unit to the power supply.
• No part of the equipment (filtration pump etc.) must be placed over the bath during use.
• Live components, except those with a very low voltage not exceeding 12V, should not be within reach of persons inside
the spa bath appliances on the ground must always be connected by a fixed cable; elec trical components must be
placed or fixed in a manner which prevents them from falling into the bath.
• The spa bath must be positioned at a distance of not less than 3.5 m from the connection to the power supply.
• Domestic electrical installations must conform to the standard NFC 15-100 criteria (specific to France).
• To avoid all risk of electrocution, do not use the spa bath outside when it is raining.
• The spa bath must not be operated by children under the age of 14.
• Do not allow children in or near to the spa bath without the super vision of a responsible adult. Keep the spa bath
covered and locked when not in use. Refer to the instructions provided for the locking cover.
• Do not bury the cable. Position the cable in such a way as to minimise the risk of access to lawn mowers, chainsaws or
other equipment.
• To avoid any damage to the spa bath, keep pets away from it.
• Always remove the protective cover of the spa bath before engaging the massage function.
• Never switch on or use the spa bath if there is any chance that the water may be frozen.
• Install the spa bath at least 1.5 metres from any metal surface.
• Never start up the spa bath if the suction guards are broken or missing. Never replace a suction device yourself. Instead,
ask your supplier or their post-sales service team to inspect and repair the equipment.
• Never use other electrical equipment when in your spa or if you are wet. Never place any electrical device, such as a
lamp, telephone, radio or television, within 1.5 metres of your spa bath.
HEALTH PRECAUTIONS
• This device is not intended to be used by persons (including children) with physical, sensory or mental disability, or
by persons lacking appropriate experience or knowledge, unless they are super vised or have been given instruction
concerning the use of the device by a person responsible for their safety. Children must be supervised to ensure that
they do not play with the device.
• Danger of drowning: do not allow children near the spa bath without supervision. To avoid accidents, ensure that
children can never use the tub unsuper vised.
6

• Excessive water temperatures can pose a risk of foetal damage in pregnant women. Pregnant women should always
take medical advice before using a spa bath.
• The water in a spa bath should never exceed 40°C. Temperatures between 38°C (100°F) and 40°C (104°F) are considered
safe for a healthy adult. Lower temperatures are recommended for young children, and for extended use exceeding ten
minutes.
• Before entering a spa bath, the user should check the water temperature with an accurate thermometer.
• The use of drugs, alcohol, or medication before or during spa bath use may lead to loss of consciousness with the risk of
drowning.
• Persons suffering from obesity or with a medical history of heart disease, low or high blood pressure, circulatory system
problems, or diabetes should consult a physician before using the spa bath.
• Persons taking medication should consult a doctor before using the spa bath, as some medication may induce
drowsiness leading to risk of drowning, or may affect heart rate, blood pressure, and circulation.
• Never pour water hotter than 40°C directly into the bath.
• Only use the spa bath when an appropriate person is available to come to your assistance if necessary.
• Persons suffering from infections or injuries should not use the spa bath without consulting a physician beforehand.
• If you feel faint or drowsy, get out of the spa bath and consult a physician immediately.
WARNING:
The use of alcohol, drugs, and medication can greatly increase the risk of fatal hyperthermia. Hyperthermia occurs
when the internal temperature of the body reaches a level above normal, which is 37°C (98.6°F). The symptoms
of hyperthermia include a raised body temperature, dizziness, lethargy, drowsiness and fainting. Other effects of
hyperthermia include: failure to perceive heat, failure to recognize the need to exit the spa bath, unawareness of
impending hazard, foetal damage in pregnant women, loss of consciousness resulting in a danger of drowning.
ADDITIONAL ADVICE
• The spa bath should not be used when the water is at a temperature below 10°C (50°F).
• Do not use a spa bath immediately following strenuous exercise.
• To avoid injury, take care when entering and exiting the spa bath.
• To avoid damaging the pump, never operate the spa bath without water.
• Prolonged immersion in a spa bath may be injurious to your health. We recommend that you use the spa for no more
than 10 minutes per session.
• Never add water to the chemicals; always add the chemical products to water, to avoid chemical reactions which could
cause strong fumes or dangerous vapours.
Note : refer to the section on water care which gives advice on adding chemicals to the water in the spa bath.
EN
PRODUCT SPECIFICATIONS
Seating capacity 4 persons (2 adults and 2 children)
Water capacity (100%) 800L
External diameter 192 cm
Internal diameter 140 cm
Height 73 cm
Electrical power 220-240V, 50 Hz
Heating element 1940W (to a water temperature of 15°)
Aqua Pleasure
7

EN
Air jets 500W
Power cable 4.5 m
Filter pump AC 12V/60W
2300L/H
Heat rate +/- 2°C/Hr (+/- 4°F/Hr)
Maximum temperature 40°C (104°F)
Weight when full 828 kg
INSTALLATION INSTRUCTIONS
Description of components (diagram 1) :
A: PVC safety cover
B: Pump
C: Spa bath
D: Safety lock
E: Inflation hose
F: Hose connector
G: Water inlet and outlet adaptors
H: Drainage outlet hose
I: Repair kit
J: Filter
K: Drainage adaptor
L: Drainage valve
LOCATION OF INSTALLATION SITE
Due to the combined weight of the spa bath, the water, and the users, it is extremely important that the tub be installed
on a smooth, level surface, able to support the weight evenly. If the spa bath is positioned on a surface which does not
meet these criteria, any damage caused will not be covered by the warranty. It is the responsibility of the spa bath owner
to ensure the suitability of the site at all times.
A. INDOOR INSTALLATION
To install your spa bath indoors, please adhere to the specific requirements below:
• The surface must be able to support the weight of the spa bath and its contents.
• Pay particular attention to the floor underneath the spa bath. Select a surface which will not be damaged or stained.
• The surface must be level and not slippery.
• Proper drainage is essential for all interior installation. If you are constructing a new room for your spa bath, a floor
drain is recommended.
• A spa bath naturally produces humidity. Consider the effects of air moisture on any wood, paper etc in the proposed
location. To minimise these effects, ensure that a means of ventilation is available in the area chosen. An architect can
advise you whether additional ventilation is required.
NOTE: Do not position the spa bath on carpet or any other material which could be damaged by moisture.
8

B. EXTERIOR INSTALLATION
• Wherever you choose to install the spa bath, it must be positioned on a solid surface. If installing the spa bath outdoors,
ensure that there are no sharp objects which could damage it, and that the area is level and stable. Prevent dirt and
debris from collecting in your spa bath by placing a mat beside it on which to wipe your feet before entering. You might
also consider placing a small basin of water nearby, in which bathers can rinse their feet before getting into the tub.
• When filling, emptying or using the spa bath, there is the chance of water spillage. The tub should therefore be installed
near a ground drain.
• Do not allow the surface of the spa bath to be exposed to direct sunlight for long periods.
C. CHECKING THE CIRCUIT BREAKER
NOTE: Before each use of your spa bath, it is essential to test the RCD circuit breaker supplied. It is also important to
ensure that the device is set to a residual current not exceeding 30mA.
1. Insert the circuit breaker plug into the power socket. (diagram 2.1.)
2. First press the “Reset” button. Check that the indicator light is red. (diagram 2.2)
3. Next press the “Test” button. The indicator light should go off. (diagram 2.3.)
4. Press the “Reset” button again. The indicator light should be red. (diagram 2.4.)
If all the above steps go smoothly, the spa bath is ready for use and the LCD screen will light up.
D. ASSEMBLY
1. Spread out the spa bath and cover, checking that the holes are lined up (diagram 3.A.).
2. Connect one end of the inflator hose (diagram 1.E.) to the black pump adaptor (diagram 3.B.).
3. Check the RCD circuit breaker plug as described in point C and then press the massage button to activate the pump
(diagram 3.C).
4. First inflate the bottom chamber of the spa bath and then the main air chambers, starting with chamber 1 and
finishing with 3 (diagrams 3.D.1. & 3.D.2.). It is advisable to only inflate the main chambers to 80% capacity at
first, to allow you to adjust the shape and check that all the adaptors are correctly positioned, before completing the
inflation.
EN
WARNING: Only use the pump provided to inflate the spa bath. Do not use high pressure pumps, which could burst
the tub and cause damage or injury.
How to use the main chamber valves
- Open the first valve cover, insert the end of the inflation hose and inflate the chamber (diagrams 4.A. and 4.B.).
- When the chamber is fully inflated, replace the valve cover (diagram 4.C.).
- To deflate, simply pull back the valve cover fully (diagram 4.D.).
WARNING: Ensure that the pump is fully disconnected from the power supply before connecting it to the spa bath.
5. Connect the pump to the spa bath (diagram 5.A.1.).
Attach the different pump adaptors to the bath adaptors, ensuring that the colours at the ends correspond. Connect
each of the two black hose connectors to the black ends of the pump and the spa bath. Check that the joints are secure
and tighten the adaptors manually to ensure a good fit.
6. Place the filter in the housing provided. To do this, open the cover at the top of the pump (diagram 5.B.1; 5.B.2) by
turning it anticlockwise. Put the filter in place and close the cover.
7. Fill the spa bath using a garden hose, ensuring that the level of water reaches the marker on the inner wall of the spa
bath (diagram 5.C.).
Aqua Pleasure
9

EN
8. Place the safety cover (diagram 1.A.) on the spa bath and attach it using the zip closure. A padlock is supplied with
the unit to secure the tub.
How to change the padlock combination
- The default combination is 000.
- Press the black button while selec ting your own code using the number wheels.
WARNING: The protective cover is not a substitute for adult supervision; children should always be supervised
around the spa bath.
OPERATION OF THE PUMP
BLEEDING THE PUMP VALVE
WARNING: The operation of your spa bath may be affected if you do not follow the instructions below. Never run the
pump without water. Any resulting damage will not be covered by the warranty.
NOTE : To ensure proper operation of the device, it is essential to bleed the pump filter before each use to release the air
inside it.
1. Open the air release valve at the top of the pump by turning the knob anticlockwise. For maximum ventilation, give
two full turns of the pump valve. More than two full turns may detach the pump valve (diagram 6.1.).
NOTE: if the knob does become detached, simply replace it and turn it clockwise to reposition the air release valve.
2. Once the pump valve is open, water will begin to flow round the pump, releasing the air in the system. This process will
take about 1 minute, depending on the amount of water in the spa bath and in the pump.
3. Close the valve by turning it clockwise.
4. Once the pump valve is cleared of trapped air, wipe up any excess water from the pump.
CONTROL PANEL
(Diagram 7)
When lit up, the LED control panel shows the current water temperature automatically.
7.A. Hydro jet massage button: use this button to activate the massage system, which shuts off automatically after
30 minutes. When the spa bath is in massage mode, the filter is turned off. Also the massage function cannot be
activated at the same time as the water heater.
7.B. Water filter button: this button turns the water filter pump on and off. The light above the water filter button glows
blue when the pump is activated.
7.C. Water heater button: use this button to activate the water heater. The pump heats the bath until the water
temperature is 1°C higher than the temperature level set. The heating system will restart when the temperature falls
2°C below the set level. The button indicator flashes when the heater is activated. The heating system can increase
the temperature quickly, by approximately 1.5 to 2°C (3-4°F) per hour.
NOTE : when the heating system is on, the filter system stops automatically. This is normal.
When the heating system is turned off, the filter system turns on again. Again, this is normal.
7.D. Temperature mode (°C/°F): The temperature can be displayed in both Fahrenheit and Celsius. To switch from one to
the other, press this button.
7.E&7.F. Raising and lowering the water temperature: the indicator lights flash when the raise/lower temperature button
is pressed. While they are flashing, you can select the desired temperature. When the buttons are held down, the
values rise or fall rapidly. The new temperature setting will remain displayed for 5 seconds.
NOTE: the default temperature setting is 40°C (104°F) on first start-up. It can be adjusted from 20°C (68°F) to
40°C (104°F).
10

The control panel setting can be locked. To do this, hold down the buttons for increasing and decreasing the temperature
simultaneously for three seconds. To unlock the control panel, repeat this process.
DRAINAGE
To empty the spa bath, follow the instructions below:
1. Turn off all the bath functions and disengage the pump.
2. Connect the drainage adaptor (diagram 1.K.) supplied with the spa bath, by screwing it into the drainage outlet hose
(diagrams 1.H and 8.A.).
3. Connect the other end of the drainage adaptor to a garden hose (not supplied) using a clip available from any specialist
supplier.
4. Open the drainage valve at the base of the bath to empty the water (diagram 8.B.).
5. Gently tilt the spa bath using the handles, to allow any remaining water to drain out.
6. Remove the filter and empty the water from the pump, ensuring that it has been fully unplugged beforehand. We also
recommend that you unscrew the drainage valve on the pump (diagram 8.C.) and empty it of water.
7. Then plug in the pump and use the massage function to dry the inside of the pump as illustrated in diagrams 8.D.
and 8.E.
8. Finally, dry the spa bath and the pump.
CLEANING AND MAINTENANCE
CLEANING
During use, residue from detergents and chemical products (pH, chlorine, etc.) will gradually accumulate in the spa bath.
To clean the tub, use soap and water, and then rinse. For water maintenance, consult the directions described in the
relevant section.
NOTE: Do not use abrasive cleaners or hard brushes to clean the spa bath.
EN
STORAGE
Before storing the unit, check that there is no water left in the tub or in the pump in order to extend its lifetime. Ensure
that the tub is clean and dry, as well as the filter pump and various hoses. Remove the pump cover and take out the filter
cartridge. You are advised to store the spa bath in its original packaging in a warm, dry place.
NOTE: plastic can become brittle and susceptible to cracking if exposed to sub-zero temperatures. Freezing can seriously
damage the bath. Damage caused by inappropriate winter storage may invalidate your warranty.
REPAIR OF THE SPA BATH
If the surface of the spa bath is damaged, use the repair kit provided. Dry the area to be repaired; apply the glue supplied
in the kit to the repair patch, and affix it to the damaged area. Smooth the surface to remove any air bubbles.
FILTER MAINTENANCE
WARNING: Ensure that the pump is fully unplugged before undertaking maintenance, to avoid risk of injury or
electrocution.
1. To prevent water draining from the pump, place the two adaptors (diagram 1.G.) onto the two connectors on the
inner wall of the spa bath. This will prevent water from escaping during cleaning or replacement of the filter cartridge.
2. Clear the air from the pump by unscrewing the bleed valve at the top of the pump as described above (diagram 6).
Aqua Pleasure
11

EN
3. Remove the filter by pulling it from the pump housing.
4. The filter cartridge can be rinsed off with a garden hose and re-used. However, if the filter cartridge is still dirty and
discoloured, it should be replaced. It is advisable to replace the filter every two weeks if the unit is in regular use.
5. Insert the clean cartridge into the centre of the pump housing.
6. Check that the seal of the pump cap is securely positioned at the edge of the housing.
7. Replace the pump cap.
8. Position and secure the safety cap by turning it clockwise.
9. Remove the two adaptors from the inside of the tub. This will allow the water to flow out of the pump.
10. Plug the pump in again and open the valve to bleed out the air.
11. Restart the pump following the procedure described above.
12. Test the circuit breaker again before starting up the spa bath.
WATER MAINTENANCE
Poor water quality can be highly detrimental to health. It is therefore important to keep the water in your spa bath clean.
We recommend that you follow the instructions below to treat the water in your bath:
1. Clear any debris from the water surface (leaves, insects, etc.) before each session. Cover the spa bath with the
protective top cover when not in use.
2. Filter the water regularly to remove any bacteria. The filter cartridge should be cleaned daily, and replaced every two
weeks, depending on the frequency of use.
3. We recommend that you change the water in the spa bath if the water quality deteriorates to avoid risks from bacteria.
The frequency of this may vary from 3 to 30 days, depending on how often the tub is used and the level of cleaning
and maintenance.
4. To avoid the development of bacteria in your spa bath, and to ensure the water is of a good quality, pool cleaning
products should be used in addition to the filter pump water treatment. Contact your local pool supplier for further
advice about water maintenance kits for your spa bath. Carefully follow the manufacturer’s instructions regarding the
use of chemical products.
Check the water quality of your spa bath after each use. Any damage to the tub caused by incorrect use of chemical
products or poor water maintenance will not be covered by the warranty.
We therefore recommend that you:
- Maintain the water at a pH level between 7.2 and 7.6. If the pH is below 7.2, the water is acidic and corrosion may occur.
If the pH is higher than 7.6, the water is alkaline, and there is a risk of calcium deposits, the water may become cloudy
and algae may develop.
WARNING: In addition to the above, an incorrect pH may cause irritation of the skin and eyes, an unpleasant odour
and a rapid fall in the chlorine level.
- The ideal level of alkalinity depends on a number of factors including the type of water treatment used, and the
hardness of the water used to fill the tub (tap water). We recommend an alkalinity level of between 80 and 120 ppm
(parts per million).
- The water in the spa bath must generally contain a chlorine level of 3 to 5 ppm to ensure effective disinfectant action.
Obtain a kit to test the chemical balance of the water before each use of your spa bath. A chemical imbalance may
damage your tub or the pump.
TROUBLESHOOTING
LANAFORM® strives to supply the highest standard of products on the market. However, should a problem arise, do not
hesitate to contact us or your authorised dealer. The table below gives some useful tips to help you identify and resolve
12
the most common problems.
If any trouble arises in everyday use, please consult the following table:
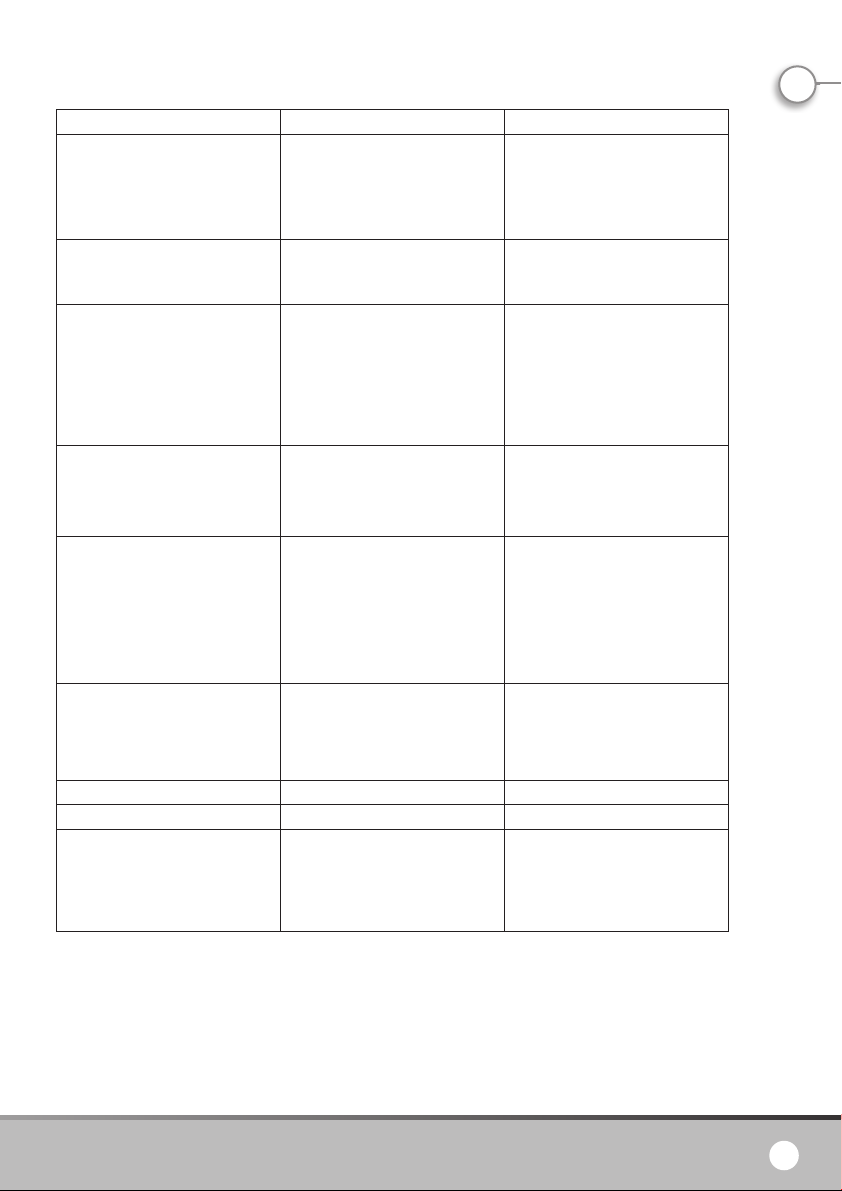
PROBLEM PROBABLE CAUSE SOLUTION
The LCD screen displays the message
“High water temperature indicator”
or “Low water temperature indicator”
and the heating system is not working
correctly.
The LCD screen displays the message
“High water temperature indicator”
and none of the functions will start.
The water pressure is not strong
enough to activate the heating
system.
The pump is not working Power failure
The heating system is not working
properly
The massage function is not working The pump is overheated
The water in the spa bath is above
45°C (113°F) or below 2°C (36°F)
The water in the spa bath is above
50°C (122°F)
The inlet and outlet valves on the
inside of the tub wall are obstructed
The filter is dirty
The water level is too low
The bleed valve has not been opened
before starting up the spa bath
The RCD circuit breaker is damaged
Temperature set too low
Filter cartridge is dirty
Inflatable protection cover is wrongly
positioned
Incorrect water level
The automatic 30 minute pump
shutdown has activated
EN
Turn off the spa bath, unplug the
pump and check that the water
temperature is between 2°C and 44°C
(36°F and 111°F)
Ask a qualified electrician to reset the
thermostat (see below).
Clear the inlet and outlet valves on
the inside of the tub wall
Clean the filter
Add water up to the indicated level
Bleed the air from the pump as
previously indicated
Check the power supply
Ask a qualified electrician to check the
device or its connection and/or your
power supply
Set the temperature to a higher level
Clean/change the filter cartridge
Re position the inflatable protection
cover
Adjust the quantity of water to the
level indicated
Unplug the pump. Once the pump
has cooled down, plug it back in and
press the massage button to start the
massage function
The filter function is not working Filter cartridge is dirty Clean/change the filter cartridge
Water is leaking out The spa bath has a rip or hole Use the repair kit
The water is cloudy Inadequate filter time
Filter cartridge is dirty
Inadequate water treatment
Increase the filter time
Clean/change the filter cartridge
Refer to the chemical manufacturer’s
instructions
RESETTING THE THERMOSTAT
The thermostat must be reset by a qualified electrician, by following the steps below:
1. Turn off the spa bath and insert the inlet and outlet adaptors on the inside wall of the tub.
2. Unplug the pump, disconnect the hoses and turn over the pump (diagram 9.A).
3. Into the cavity marked “Reset”, inser t a sharp point (not supplied) no more than 0.9 cm in diameter but at least 10 cm
long (diagrams 9.B. and 9.C.).
Aqua Pleasure
13

EN
4. Press gently until a low signal can be heard. The pump is now reset.
5. Connect the pump to the spa bath as explained above. Remove the adaptors from the inside wall of the tub and the
RCD can be plugged in again.
ADVICE REGARDING THE DISPOSAL OF WASTE
• All the packaging is composed of materials that pose no hazard for the environment and which can be disposed of at
your local sorting centre to be used as secondary raw materials. The cardboard may be disposed of in a paper recycling
bin. The packaging film must be taken to your local sorting and recycling centre.
• When you have finished using the device, please dispose of it in an environmentally friendly way and in accordance with
the law.
LIMITED WARRANTY
LANAFORM® guarantees this product against any material or manufacturing defect for a period of two years from the
date of purchase, except in the circumstances described below.
The LANAFORM® guarantee does not cover damage caused as a result of normal wear to this product. In addition, the
guarantee covering this LANAFORM® product does not cover damage caused by abusive or inappropriate or incorrect use,
accidents, the use of unauthorized accessories, changes made to the product or any other circumstance, of whatever sort,
that is outside LANAFORM®’s control.
LANAFORM® may not be held liable for any type of circumstantial, indirect or specific damage.
All implicit guarantees relating to the suitability of the product are limited to a period of two years from the initial date of
purchase as long as a copy of the proof of purchase can be supplied.
On receipt, LANAFORM® will repair or replace your appliance at its discretion and will return it to you. The guarantee
is only valid through LANAFORM®’s Service Centre®. Any attempt to maintain this product by a person other than
LANAFORM®’s Service Centre will render this guarantee void.
14

Nous vous remercions de l’intérêt que vous portez à l’Aqua Pleasure de LANAFORM ®. Ce bain à remous vous permettra
de profiter d’un moment de détente que ce soit à l’extérieur ou à l’intérieur de votre habitation. Grâce à ses 88 hydrojets
et une température d’eau pouvant atteindre 40°Celsius, vous profiterez d’un massage relaxant et apaisant quelque soit le
moment de la journée. Les bienfaits de la température de l’eau conjugués à l’impression d’apesanteur et à la combinaison
harmonieuse des jets d’eau et d’air sous pression, permettront à la fatigue et au stress de diminuer en quelques minutes
tout en favorisant le relâchement des muscles et des articulations. Grâce à ces 3 ingrédients, vous sortirez de votre bain à
remous détendu et relaxé.
VEUILLEZ LIRE TOUTES LES INSTRUCTIONS AVANT D’UTILISER VOTRE BAIN A REMOUS,
EN PARTICULIER CES QUELQUES CONSIGNES DE SECURITE FONDAMENTALES :
Veillez à toujours respecter les précautions de sécurité de base suivantes concernant l’installation et l’utilisation de cet
équipement électrique :
RISQUE D’ÉLECTROCUTION
• Le bain à remous est protégé par un dispositif différentiel de maximum 30 mA. Ce dispositif doit être testé avant chaque
utilisation.
• Si le cordon d’alimentation est endommagé, il doit être remplacé par un cordon similaire disponible auprès du
fournisseur ou de son ser vice après-vente.
• Pour réduire les risques d’électrocution, n’utilisez pas de rallonge pour brancher l’unité à l’alimentation électrique.
• Aucune par tie de l’appareil (pompe de filtration,…) ne doit se trouver au-dessus du bain en cours d’utilisation.
• Les composants avec des pièces sous tension, sauf celles dotées d’un voltage de sécurité très faible ne dépassant pas
les 12V, ne doivent pas être accessibles aux personnes se trouvant dans le bain à remous ; les appareils mis à la terre
doivent toujours être branchés à un câblage fixe ; les pièces comportant des composants électriques, doivent être
situées ou fixées de manière à ne pas pouvoir tomber dans le bain.
• Une distance de 3.5m entre le bain à remous et la connexion au circuit d’alimentation électrique doit être respectée.
• Les installations électriques domestiques doivent répondre aux critères de la norme NFC 15-100 (uniquement pour la
France).
• Pour éviter tout risque d’électrocution, n’utilisez pas le bain à remous à l’extérieur en cas de pluie.
• L’utilisation du bain à remous est interdite aux enfants âgés de moins de 14 ans.
• Ne laissez pas les enfants dans ou à proximité d’un bain à remous sans surveillance d’un adulte responsable. Laissez
le bain à remous couvert et verrouillé lorsqu’il n’est pas utilisé. Consultez les instructions relatives au verrouillage de la
couverture consignées avec celle-ci.
• N’enterrez pas le cordon. Placez le cordon de manière à minimiser les risques encourus par le passage de tondeuses,
tronçonneuses et autres équipements.
• Afin d’éviter tout dommage au bain à remous, ne laissez pas les animaux s’approcher de celui-ci.
• Retirez tout d’abord la couverture de protection du bain à remous avant d’enclencher la fonction de massage.
• N’allumez et n’utilisez en aucun cas le bain à remous s’il y a un risque que l’eau soit gelée.
• Installez le bain à remous à au moins 1,5 mètres de toute surface en métal.
• Ne mettez jamais le bain à remous en marche si les dispositifs d’aspiration sont cassés ou absents. Ne remplacez jamais
un dispositif d’aspiration vous-même. Faites alors examiner et réparer l’appareil auprès du fournisseur ou de son ser vice
après-vente.
• N’utilisez jamais d’autre appareil électrique si votre bain à remous ou si votre corps est humide. Ne placez jamais
d’appareil électrique tel qu’une lampe, un téléphone, une radio ou une télévision à moins de 1,5 mètre de distance du
bain à remous.
FR
Aqua Pleasure
15

FR
PRECAUTIONS RELATIVES A LA SANTE
• Cet appareil n’est pas prévu pour être utilisé par des personnes (y compris les enfants) dont les capacités physiques,
sensorielles ou mentales sont réduites, ou des personnes dénuées d’expérience ou de connaissance, sauf si elles ont
pu bénéficier, par l’intermédiaire d’une personne responsable de leur sécurité, d’une surveillance ou d’instructions
préalables concernant l’utilisation de l’appareil. Il convient de surveiller les enfants pour s’assurer qu’ils ne jouent pas
avec l’appareil.
• Danger de noyade : ne laissez pas d’enfant s’approcher du bain à remous seul. Pour éviter les accidents, assurez-vous que
les enfants ne puissent jamais utiliser le bain à remous sans surveillance.
• Les températures d’eau excessives sont susceptibles de présenter un risque important pour le fœtus chez les femmes
enceintes. Les femmes enceintes doivent toujours consulter leur médecin avant tout emploi du bain à remous.
• L’eau d’un bain à remous ne doit jamais dépasser les 40°C. Une température tolérable pour un adulte en bonne santé
est comprise entre 38°C (100°F) et 40°C (104°F). Une température moindre est recommandée pour les jeunes enfants et
lorsque le bain à remous est utilisé pendant plus de dix minutes.
• Avant d’entrer dans un bain à remous, veillez à mesurer la température de l’eau avec un thermomètre précis.
• La consommation d’alcool, de drogue ou de médicament avant ou pendant l’utilisation d’un bain à remous peut faire
perdre connaissance et engendreR donc un risque de noyade.
• Les personnes souffrant d’obésité ou qui ont, dans leurs antécédents médicaux, des problèmes cardiaques, des
problèmes d’hypertension ou d’hypotension, des problèmes de l’appareil circulatoire ou qui sont diabétiques, doivent
consulter un médecin avant d’utiliser le bain à remous.
• Les personnes sous traitement doivent consulter un médecin avant d’utiliser un bain à remous car cer tains médicaments
peuvent engendrer un risque de noyade ou encore avoir des effets sur le rythme cardiaque, la pression artérielle et la
circulation du sang.
• Ne versez jamais d’eau à plus de 40°C directement dans la piscine.
• N’utilisez pas le bain à remous sans la présence d’une personne apte et capable de vous venir en aide.
• Les personnes souffrant d’infection ou de blessure ne devraient pas utiliser le bain à remous. Il est conseillé de consulter
son médecin au préalable.
•
Sortez immédiatement du bain à remous et consultez immédiatement un médecin en cas de malaise ou d’endormissement.
AVERTISSEMENT :
La consommation d’alcool, de drogue ou de médicament augmente considérablement les risques d’hyperthermie fatale.
L’hyperthermie a lieu lorsque la température interne du corps atteint plusieurs degrés au dessus de sa température
normale qui est à 37° (98,6°F). Parmi les symptômes de l’hyperthermie ? on retrouve l’augmentation de la température
interne du corps, les vertiges, la léthargie, la somnolence et les évanouissements. Parmi les effets de l’hyperthermie ?
on retrouve également l’incapacité de sentir la chaleur, l’incapacité de discerner le besoin de sortir du bain à remous ;
l’inconscience des dangers ; des dommages au fœtus pour les femmes enceintes ; une per te de connaissance compor tant
un risque de noyade.
RECOMMENDATIONS SUPPLEMENTAIRES
• Le bain à remous ne doit pas être utilisé lorsque l’eau est à une température inférieure à 10°C (50°F).
• N’utilisez pas le bain à remous tout de suite après un exercice physique épuisant.
• Pour éviter des accidents, il faut être prudent en entrant ou en sortant d’un bain à remous.
• Pour éviter d’endommager la pompe, le bain à remous ne doit jamais fonctionner sans eau.
• L’immersion prolongée dans un bain à remous peut être mauvais pour votre santé. Nous vous recommandons de ne pas
utiliser le bain à remous plus de 10 minutes par séance.
16

• N’ajoutez jamais l’eau aux produits chimiques, mais ajoutez toujours les produits chimiques à l’eau pour éviter de
grosses fumées ou des réactions violentes susceptibles de provoquer des évaporations dangereuses.
Remarque : rapportez-vous aux consignes d’entretien de l’eau en ce qui concerne l’ajout de produits chimiques à l’eau
du bain à remous.
CARACTERISTIQUES TECHNIQUES
Capacité 4 personnes (2 adultes et 2 enfants)
Contenance en eau (100%) 800L
Diamètre externe 192 cm
Diamètre interne 140 cm
Hauteur 73 cm
Puissance électrique 220-240V, 50 Hz
Elément chauffant 1940W (à une température d’eau de 15°)
Soufflerie 500W
Câble d’alimentation 4.5 m
Elément de filtration AC 12V/60W
2300L/H
Taux de chaleur +/- 2°C/Hr (+/- 4°F/Hr)
Température maximum 40°C (104°F)
Poids plein 828 kg
CONSIGNES D’INSTALLATION
Description des composants (schéma 1) :
A : Couverture supérieure en PVC
B : Pompe
C : Bain à remous
D : Cadenas de sécurité
E : Tuyau de gonflage
F : Tuyau de connexion
G : Adaptateurs d’entrée et de sortie d’eau
H : Tuyau d’évacuation d’eau
I : Kit de réparation
J : Filtre
K : Adaptateur de drainage
L : Valve de drainage
FR
CARACTERISTIQUES DU SITE D’INSTALLATION
En raison de l’accumulation du poids du bain à remous, de l’eau et des utilisateurs, il est extrêmement important que la
base sur laquelle est installé le bassin soit lisse, à niveau et en mesure de supporter de manière uniforme ce poids. Si le
bain à remous est positionné sur une surface ne répondant pas à ces critères, tout dommage provoqué par l’instabilité
du sol ne sera pas couvert par la garantie. C’est le propriétaire du bain à remous qui est responsable de s’assurer de
l’intégrité du site à tout moment.
Aqua Pleasure
17

FR
A. INSTALLATION A L’INTERIEUR
Respectez les critères spécifiques suivants si vous installez le bain à remous à l’intérieur :
• Le sol doit être en mesure de soutenir la contenance du bain à remous.
• Portez une attention par ticulière au plancher sous le bain à remous. Choisissez un plancher qui ne puisse être
endommagé ou taché.
• Le sol ne doit pas être glissant et doit être à niveau.
• Un drainage approprié est indispensable pour toute installation à l’intérieur. Si vous construisez une nouvelle pièce pour
le bain à remous, il est recommandé d’y prévoir un siphon au sol.
• Le bain à remous produit naturellement de l’humidité. Déterminez les effets de la moisissure de l’air sur le bois, le
papier, etc. du lieu préposé. Pour minimiser ces effets, prévoyez un maximum de ventilation dans la zone choisie. Un
architecte peut vous aider à définir si une ventilation supplémentaire est nécessaire.
REMARQUE : n’installez pas le bain à remous sur de la moquette ou toute autre matière pouvant être endommagée par
la moisissure.
B. INSTALLATION A L’EXTERIEUR
Peu importe où vous installez le bain à remous, il est important de le faire sur une fondation solide. Si vous installez le
bain à remous à l’extérieur, assurez-vous qu’il n’y ait pas d’objets pointus susceptibles de l’endommager et que l’endroit
soit à niveau pour qu’il soit bien stable. Empêchez également les saletés et les contaminants de s’accumuler dans votre
bain à remous en plaçant un tapis à l’entrée de celui-ci pour pouvoir vous essuyer les pieds avant d’y pénétrer. Vous
pouvez également envisager de garder une petite bassine d’eau à proximité dans laquelle les baigneurs pourront se rincer
les pieds avant d’entrer dans le bain à remous.
• En le remplissant, le vidant ou l’utilisant, l’eau risque de sortir du bain à remous. Celui-ci devra donc être installé près
d’un siphon au sol.
• Ne laissez pas la surface du bain à remous exposée directement aux rayons du soleil pendant une période trop longue.
C. VERIFICATION DE LA PRISE RCD
REMARQUE : Avant toute utilisation du bain à remous, il est impératif de tester la prise RCD fourni avec l’appareil. Il est
également impératif de vérifier que le disjoncteur utilise un système de courant résiduel ne dépassant pas les 30mA.
1. Insérez le disjoncteur différentiel dans la prise de courant. (schéma 2.1.)
2. Appuyez tout d’abord sur le bouton « Reset ». Vérifiez que le témoin lumineux soit rouge. (schéma 2.2)
3. Appuyez ensuite sur le bouton « Test ». Le témoin lumineux doit être éteint. (schéma 2.3.)
4. Appuyez de nouveau sur le bouton « Reset ». Le témoin doit être rouge. (schéma 2.4.)
Si l’ensemble des étapes ci-dessus se déroulent normalement, le bain à remous est maintenant prêt à être utilisé et
l’écran LCD est allumé.
D. MONTAGE
1. Étalez le bain à remous et la couverture en vous assurant que les ouvertures se situent les unes en face des autres
(schéma 3.A.).
2. Branchez une extrémité du tuyau de gonflage (schéma 1.E.) à l’adaptateur noir de la pompe (schéma 3.B.).
3. Vérifiez le fonctionnement de la prise RCD comme décrit au point C et appuyez ensuite sur la touche de massage pour
activer la pompe (schéma 3.C).
4. Gonflez tout d’abord la chambre située à la base du bain à remous et ensuite les chambres d’air principales en
commençant par la chambre 1 pour terminer par la 3. (schéma 3.D.1. & 3.D.2.). Il est conseillé de gonfler la chambre
18

principale dans un premier temps à 80% afin de pouvoir ajuster la structure et de s’assurer que tous les adaptateurs
soient placés correctement. Vous pouvez ensuite terminer de gonfler la structure.
ATTENTION : Utilisez uniquement la pompe fournie avec le bain à remous pour gonfler les chambres. N’utilisez pas
des pompes à haute pression. Cela pourrait faire éclater le bain à remous et causer des dommages ou lésions corporels.
Comment utiliser la valve des chambres principales ?
- Ouvrez le premier bouchon de la valve, insérez l’extrémité du tuyau de gonflage et gonflez la chambre (schéma 4.A.
et 4.B.).
- Une fois que le gonflage de la chambre est terminé, placez le bouchon de la valve (schéma 4.C.).
- Pour dégonfler, il suffit de retirer l’entièreté du capuchon de la valve. (schéma 4.D.).
ATTENTION : Assurez-vous que la pompe soit bien débranchée du circuit d’alimentation avant de la relier au bain à
remous.
5. Connectez la pompe au bain à remous (schéma 5.A.1.).
Fixez les différents adaptateurs de la pompe aux adaptateurs du bain à remous en s’assurant que les couleurs présentes
aux extrémités correspondent. Connectez également l’un des deux tuyaux de connexion noir (schéma 1.F.) aux
extrémités noires de la pompe et du bain à remous. Assurez-vous que les joints soient bien en place et serrez les
adaptateurs manuellement jusqu’à ce qu’ils soient bien ajustés.
6. Placez le filtre dans le logement prévu à cet effet. Pour ce faire, ouvrez le couvercle situé au dessus de la pompe
(schéma 5.B.1 ; 5.B.2) en tournant dans le sens contraire des aiguilles d’une montre. Placez le filtre et refermez le
couvercle.
7. Remplissez le bain à remous à l’aide d’un tuyau d’arrosage en vous assurant que le niveau d’eau atteigne le repère situé
sur la paroi intérieure du bain à remous (schéma 5.C.).
8. Placez la couverture supérieure (schéma 1.A.) sur le bain à remous et attachez celle-ci à l’aide de la tirette de
fermeture. Un cadenas (schéma 1.D.) est fourni avec l’appareil afin de sécuriser l’accès au bain à remous.
Comment changer la combinaison du cadenas ?
- La combinaison de départ est 000.
- Appuyez sur le bouton noir tout en sélectionnant votre nouveau code à l’aide des roulettes.
ATTENTION : La couverture de protection ne peut remplacer la surveillance d’un adulte ; les enfants ne doivent
jamais approcher le bain à remous sans surveillance.
FR
FONCTIONNEMENT DE LA POMPE
VIDER LA SOUPAPE DE PURGE
ATTENTION : Si vous ne suivez pas les instructions suivantes, le bon fonctionnement de votre bain à remous pourrait
être altéré. Ne faites jamais tourner la pompe à sec. Les dommages qui en découleraient ne seraient pas couverts par la
garantie.
REMARQUE : Afin de garantir un bon fonctionnement de l’appareil, il est primordial de purger la pompe de filtration
avant chaque utilisation afin de libérer l’air contenu à l’intérieur de celle-ci.
1. Ouvrez la soupape de purge qui se trouve en haut de la pompe en tournant le bouton dans le sens contraire des
aiguilles d’une montre. Pour un maximum de ventilation, faites faire deux tours complets de la soupape de purge.
Au-delà de deux tours, la soupape risque de se détacher de la pompe (schéma 6.1.).
REMARQUE : si le bouton se déloge, il suffit de le replacer et de le tourner dans le sens horaire pour repositionner la
soupape de purge.
2. Une fois la soupape de purge ouverte, l’eau commencera à s’écouler dans la pompe en libérant l’air du système. Ce
processus pendra environ 1 minute selon la quantité d’eau dans le bain à remous et la pompe.
Aqua Pleasure
19

FR
3. Refermez ensuite la soupape en la tournant dans le sens des aiguilles d’une montre.
4. Une fois la soupape de purge d’air fermée, essuyez tout excès d’eau en provenance de la pompe.
PANNEAU DE CONTRÔLE
(Schéma 7)
Une fois allumé, le panneau de contrôle LED affiche la température actuelle de l’eau de manière automatique.
7.A. Touche de massage hydrojet : Utilisez cette touche pour activer le système de massage équipé d’un système d’arrêt
automatique après 30 minutes. Lorsque le bain à remous est en mode de massage, la filtration s’arrête. De même, il
n’est pas possible d’activer la fonction de massage et de chauffage de l’eau du bain à remous de manière simultanée.
7.B. Touche filtration de l’eau : Cette touche permet de démarrer et d’éteindre la pompe de filtration. Le témoin au-dessus
de la touche de filtration de l’eau s’allume en bleu lorsqu’elle est activée.
7.C. Touche de chauffage de l’eau : Utilisez cette touche pour activer le système de chauffe. La pompe chauffe le bain
à remous jusqu’à ce que la température courante de l’eau atteigne 1°C de plus que la température programmée.
Le système de chauffe redémarrera une fois que la température aura baissé de 2°C par rapport à la température
programmée. Lorsque le témoin de la touche de chauffe clignote, le système de chauffe est activé. Le système de
chauffe rapide est en mesure d’augmenter la température d’environ 1,5 à 2°C (3-4°F) par heure.
REMARQUE : lorsque le système de chauffe est activé, le système de filtration démarre automatiquement. C’est
normal.
Après avoir éteint le système de chauffe, le système de filtration fonctionne toujours. C’est normal.
7.D. Mode température (°C/°F) : La température peut être affichée aussi bien en Fahrenheit qu’en Celsius. Pour passer de
l’un à l’autre, appuyez sur cette touche.
7.E&7.F. Augmentation et diminution de la température de l’eau : Les témoins clignotent lorsque l’on appuie sur la touche
d’augmentation ou de diminution de la température. Lorsqu’elles clignotent, vous pouvez saisir la température
désirée. Si vous maintenez ces touches enfoncées, les valeurs augmenteront ou diminueront rapidement. La
nouvelle température programmée restera affichée pendant 5 secondes.
REMARQUE : la température programmée par défaut est de 40°C (104°F) à la première mise en route. Elle peut
être réglée de 20°C (68°F) à 40°C (104°F).
Il est possible de bloquer le panneau de contrôle. Pour ce faire, appuyez simultanément sur les touches d’augmentation
et de diminution de la température pendant trois secondes. Pour débloquer le panneau de contrôle, répétez l’opération.
DRAINAGE
Afin de vider l’eau du bain à remous, veuillez suivre les instructions suivantes :
1. Eteignez toutes les fonctions du bain à remous et débranchez la pompe.
2. Connectez l’adaptateur de drainage (schéma 1.K.) fourni avec le bain à remous et vissez-le avec le tuyau d’évacuation
d’eau (schéma 1.H et 8.A.).
3. Connectez l’autre extrémité de l’adaptateur de drainage à un tuyau de jardinage (non fourni) au moyen d’un clips
fourni dans toute surface de vente spécialisée.
4. Ouvrez la valve de drainage située sur la base du bain à remous pour évacuer l’eau. (schéma 8.B.)
5. Penchez légèrement le bain à remous à l’aide des poignées afin de vider toute l’eau.
6. Enlevez le filtre et videz l’eau de la pompe en vous assurant que celle-ci soit bien être débranchée au préalable. Nous
recommandons également de dévisser la valve de drainage située sous la pompe (schéma 8.C.) et de vider l’eau
contenue à l’intérieur.
7. Branchez ensuite la pompe et utilisez la fonction de massage pour sécher l’intérieur de la pompe comme illustré sur le
schéma 8.D. et 8.E.
20
 Loading...