Lamptron FC5 V3 Manual

Lamptron FC5V3 instruction manual
Thank you for choosing Lamptron. The Lamptron FC5 V3 controller is optimized for air-cooled systems but it can be used also for liquid cooling.
The following are the most worthy of your attention FC5 V3 features:
 New wide screen with 16 bright colors: you can choose the backlight among 16 colors simply pressing the first knob on the left.
 6 independent channels: 6 knobs allow the direct control of the 6 channels and the relative information is constantly displayed on the screen as speed, voltage and temperature.
 30 W per channel: every channel handles up to 30 W.
 Start boost: the FC5V3 provide an initial 12 V in all the channels in order to make the fans work even if set at the minimum working voltage.
 Alarm function: the alarm function is programmable directly from the interface.
 Sleeved cables: all the wires are wrapped with black high texture
“snakeskin” sleeving.
 Cool PCB: as all the recent Lamptron products, the FC5V3 features a black PCB for the electronic circuit.
We recommend that you read the following detailed description of the FC5 V3 usage before putting it into use; the instructions will introduce the new interface and the actions for the configuration of all parameters.
INSTALLATION:
SPECIFICATIONS:
Dimension |
148.5mm * 42.5mm * 63mm |
LCD Dimension |
136mm * 19mm(wide screen) |
Power Output |
Up to 30 watts per channel |
Control Channel |
6 Channels |
Color Available |
Black Anodized/Silver |
DC Input |
+ 12V(Standard “D” Connector |
DC Output |
0V - 12V DC |
Connectors |
6pcs 3pin connectors |
Installation location:
For the FC5V3 drive installation you will need the screws that are included in the bundle of the product. The FC5V3 can be easily installed in the 5.25-inch bay of your PC case. Please, consider setting a good cable management in order to avoid problems.
CONNECTIONS:
TEMP4 |
TEMP3 |
|
|
|
|
|
|
TEMP5 |
TEMP2 |
|
|
|
|
|
|
TEMP6 |
TEMP1 |
HSBOOT1 OUT6 |
OUT5 |
OUT4 |
OUT3 |
OUT2 |
OUT1 |
|
|
|
|
|
OUT6 |
OUT5 |
OUT4 |
OUT3 |
OUT2 |
OUT1 |
|
|
|
|
|
HSBOOT1 |
|
|
|
|
P1 |
TEMP6 |
TEMP5 |
TEMP4 |
TEMP3 |
TEMP2 |
TEMP1 |
|
|
|
|
|
FC5 V3
Instructions:
1. P1: Connect the power supply.
Tip: Be sure to use at least 18AWG wiring specifications.
2.Out1 Out6: channel 1 to channel 6 output interface for the connected load fan. The six interfaces are standard with KF2510
3pin interfaces.
Tip: You can also smooth insertion KF2510 4pin connector.
3.TEMP1 ~ TEMP6: are respectively connected to the P1 ~ P6 corresponding to the temperature sensitive.
Tip: Please put the corresponding output channel and the corresponding temperature sense connection; to manually adjust the voltage output according to the corresponding channel number of temperature sensing.
4.HSBOOT1: this jumper enables the start boost function in order to make the fans run also at minimum working voltage.
If the mini-jumper cap is connected, the fans will be start boost mode during the booting phase.
OPERATION:
10
11
1 |
2 |
3 |
4 |
5 |
9 |
8 |
7 |
6 |
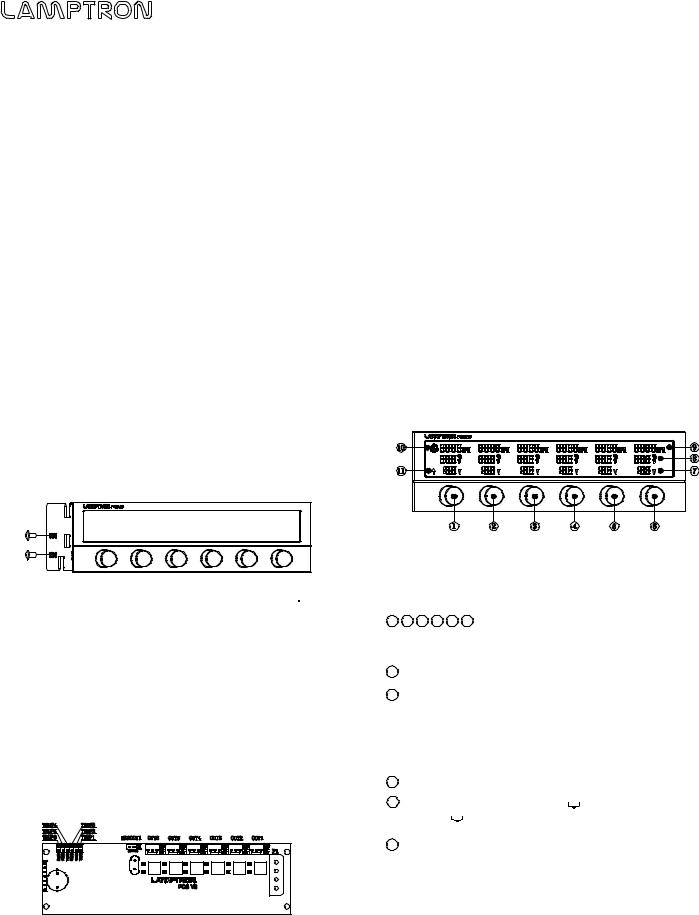
When the power is switched on, the controller will perform a boot animation showing a demo of the 16 available colors. The 16 display colors will be displayed for the user selection. The factory default color is green.
1 2 3 4 5 6 Depicted in the image represent the 6 independent output channels; display shows the corresponding speed, temperature, voltage and other data for each channel;
7Represents voltage (V);
8Indicates the temperature, in Fahrenheit degrees (°F) and Celsius degrees (°C) two units of selection; the default parameter is set in
Celsius (°C).
Pressing the channel potentiometer longer than 2 seconds, the temperature unit allows switching between (°C) and (°F);
9Represents speed(RPM);
10Refers to alarm option Divided into:  on behalf of the 6-channel full alarm,
  on behalf of the channel 1 to channel 4 alarm, and icons do not appear on behalf of the police; Three-way display.
11Start boost mode.
 Loading...