

Page 1
pH W aterproof Testr 1
5-0008
HOLD
CON
CAL
ON
OFF
pHTestr 1
WATERPROOF
LaMotte Company • PO Box 329 • Chestertown • Maryland • 21620
800-344-3100 • 410-778-3100 • Fax 410-778-6394
www.lamotte.com
© 1999 LaMotte Company • Printed in USA • 12/02 • Code 65-0008
Page 2

Specifications
Range: –1.0 to 15.0 pH extended range
Resolution: 0.1 pH
Accuracy: ±0.2 pH
Operating Temperature: 0 to 50 °C, 32 to 122 °C
Battery/Life: Three 1.5V Eveready A76BP/24 hours
or equivalent
Size (meter only): 6.5" X 1.5"
Weight (meter only): 3.25 oz (90 g)
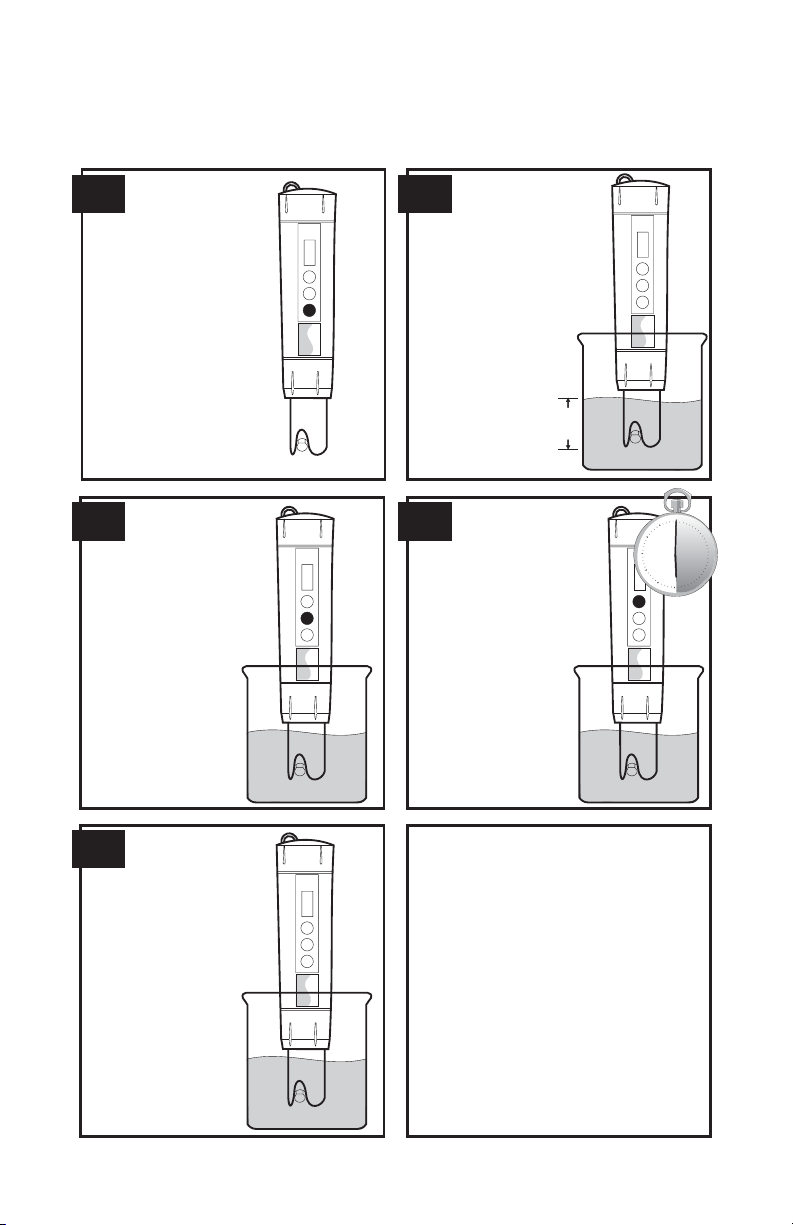
Before First Use
1. 2.
Remove the cap from the
bottom of the Testr to
expose the electrode bulb
and reference junction.
Do not be alarmed
if white crystals are
present in the cap
or electrode
assembly . They will
dissolve during the
pre-soak.
CON
HOLD
CAL
ON
OFF
pHTestr1
WATERPROOF
Soak the electrode in
about 1" of electrode
storage solution, pH 4
bufferortapwaterfor
at least 30 minutes.
If the electrode
dries out
between uses,
recondition it by
following this
soaking
procedure.
pHTestr1
30
CON
HOLD
CAL
ON
OFF
WATERPROOF
1"
2
Page 3
Calibration
Calibration should be done regularly, typically every day that the Testr is used.
1. 2.
Dip1/2"to1"ofthe
Turn the Testr on
by pressing the
ON/OFF button.
CON
HOLD
CAL
ON
OFF
pHTestr1
WATERPROOF
electrode into a pH 7.0
buffer for general purpose
use, into a pH 4.0 buffer
solution if testing acidic
solutions, or a pH 10.0
buffer if testing
alkaline (or basic)
CON
HOLD
CAL
ON
OFF
pHTestr1
WATERPROOF
solutions. If testing
solutions close to
7.0, use the 7.0
buffer for
1/2"
to 1"
calibration.
3. 4.
Press the CAL button
to enter the Calibrate
(CA) mode.
The display will
flash "CA" and
then a pH value
close to the buffer
value will flash
repeatedly .
CON
HOLD
CAL
ON
OFF
pHTestr1
WATERPROOF
After about 30 seconds,
press the HOLD/CON
button to confirm the
calibration.
"CON" will
appear on the
display . It will
then switch back
toapHreadingof
the buffer.
CON
HOLD
CAL
ON
OFF
pHTestr1
WATERPROOF
30
5.
Rinse the
electrode with
deionized water
or tap water.
No further calibration is needed if
all measurements are expected to
CON
HOLD
CAL
ON
OFF
be between pH 6 and pH 8 for
general purpose use. Perform the
calibration using pH 4.0 buffer if
readings below pH 6 are expected.
pHTestr1
WATERPROOF
Perform the calibration using pH
10.0 buffer if readings above pH 8
are expected.
3
Page 4

pH Testing
1. 2.
Remove the cap
from the Testr.
CON
HOLD
CAL
ON
OFF
Press the On/Off
button to turn
the Testr on.
CON
HOLD
CAL
ON
OFF
pHTestr1
WATERPROOF
3. 4.
Dip1/2"to1"ofthe
electrode into the
solution.
1/2"
to 1"
5.
Record the pH.
Or press the
HOLD/CON
button to freeze
the reading. Press
the HOLD/CON
button again to
release the
reading.
CON
HOLD
CAL
ON
OFF
pHTestr1
WATERPROOF
5.1
CON
HOLD
CAL
ON
OFF
pHTestr1
WATERPROOF
Stir once with the
probe and let the
reading stabilize.
6.
Press the ON/OFF
button to turn the
Testr off.
If a button is not
pushed for 8.5
minutes, the meter
will automatically
shut off.
pHTestr1
WATERPROOF
CON
HOLD
CAL
ON
OFF
pHTestr1
WATERPROOF
CON
HOLD
CAL
ON
OFF
pHTestr1
WATERPROOF
4
Page 5

Maintenance
1. 2.
Rinse the electrode
with deionized
waterortapwater
after each
measurement.
CON
HOLD
CAL
ON
OFF
pHTestr1
WATERPROOF
In aggressive chemicals, dirty, or
viscous solutions, and solutions with
heavy metals or proteins, take
readings quickly and rinse the
electrode immediately after use.
3. 4.
Periodic soaking in
warm pH 4 buffer
will help remove
any contaminants
that will ruin the
electrode.
CON
HOLD
CAL
ON
OFF
pHTestr1
WATERPROOF
Keep a small piece of paper or
sponge, moistened with tap water
or pH 4 buffer, in the Testr cap to
keep the probe moist during
storage.
5.
Electrode life will be shortened
when a Testr is used in applications
where the electrode is exposed to
materials that will contaminate the
electrode reference junction.
5
Page 6

Changing the Batteries
The battery compartment is located under the cap with the lanyard loop.
1. 2.
Firmly grip the cap
and the Testr body
with dry hands.
Slowly twist the cap
counter-clockwise.
The cap must be
tight to ensure a
watertight seal so it
will require some
effort to loosen it.
CON
HOLD
CAL
ON
OFF
pHTestr1
WATERPROOF
Remove
the old
batteries by
pulling up
the cloth
tab.
+-+-+
3. 4.
Reposition cloth tab and insert new
batteries. Note polarity. Tuck in the
cloth tab.
-
+-+-+
Replace the cap.
Tighten until the
black O-ring is
completely hidden
under the cap and
the lanyard loop is
lined up with the
face plate.
-
CON
HOLD
CAL
ON
OFF
pHTestr1
WATERPROOF
6
Page 7

Electrode Replacement
Replace the electrode module when the Testr fails to calibrate, gives fluctuating
readings in buffers, shows error messages “E2" or ”OR", and the procedures in the
maintenance section fail to resolve the problem.
1. 2.
Place the rubber gripper band
overthecollaroftheTestr.
Firmly grip the rubber gripper
band and the ribbed collar of
the Testr with dry hands.
pHTestr1
ON
HOLD
CAL
OFF
WATERPROOF
CON
3. 4.
Slowly twist counter-clockwise to
loosen the collar.
pHTestr1
ON
HOLD
CAL
OFF
WATERPROOF
CON
5.
Pull the electrode module
straight out from the bottom
of the Testr.
pHTestr1
ON
HOLD
CAL
OFF
WATERPROOF
CON
Unscrew the ribbed electrode
module collar and remove it. Save
the collar and the O-ring.
6.
Align the four tabs on the new
electrode module to match the
four slots on the Testr.
pHTestr1
ON
OFF
WATERPROOF
small o-ring (hidden)
pHTestr1
WATERPROOF
pHTestr1
ON
OFF
WATERPROOF
HOLD
CAL
CON
ON
HOLD
CAL
OFF
CON
HOLD
CAL
CON
7
Page 8

Electrode Replacement
Note: For older models with only
two slots, break off the two small
tabs using needle-nosed pliers.
7. 8.
Put the smaller O-ring all the way
into the ribbed collar.
Self-Diagnostic Messages
6.
Gently push the electrode module
into the bottom of the Testr to
fully seat it in position.
pHTestr1
ON
HOLD
CAL
OFF
WATERPROOF
Push the collar on over the module.
Thread it into place by firmly twisting
it clockwise until the larger O-ring
that is near the faceplate disappears
under the ribbed electrode module
collar.
pHTestr1
WATERPROOF
CON
ON
HOLD
CAL
OFF
CON
ER1 Batteries are low and need replacing
ER2 Wrong or bad buffer value (out of range) or the electrode is
failing. Check buffers or replace electrode.
OR Over range signal from voltage in a solution, the electrode is
not contacting the solution, or the electrode is failing. Check
solution or replace electrode.
Accessories
Replacement probe 5-0009
Buffers (4, 7, 10) 2866, 2881, 2896
Mini buffer tablets (4, 7, 10) 3983, 3984, 3985
8
 Loading...