

Page 1
TRACER
POCKETESTER
TCl
TOTAL CHLORINE
ä
CODE 1740
Page 2

WARNING! This set contains chemicals
that may be harmful if misused. Read
cautions on individual containers
carefully. Not to be used by children
except under adult supervision
Page 3

TRACER
TOTAL CHLORINE POCKETESTER
CODE 1740
TABLE OF CONTENTS
Introduction .............................. 4
Specifications ............................. 5
Contents ............................... 5
Parts & Accessories .......................... 5
Meter Description
Front Panel Description ..................... 6
TRACER Display ........................ 6
Basic Operation
Powering the TRACER ..................... 7
Electrode Recognition ...................... 7
Automatic Calibration...................... 7
Changing the Display Temperature Units............ 7
Effects of Temperature ...................... 7
Testing
Conditioning the Electrode ................... 8
Measurement ........................... 8
Storing Readings ......................... 8
Recalling Stored Readings .................... 9
For Best Accuracy ........................ 9
Offset Adjustment ........................10
Validation Procedure
Required Materials ........................10
Preparation of 1 ppm Standard .................10
Procedure............................. 10
Notes ...............................11
Maintenance
Storage ............................. 12
Battery Replacement ...................... 12
Cleaning the Electrode ..................... 12
Replacing the Electrode .................... 13
TM
Page 4

TABLE OF CONTENTS (con't)
Troubleshooting ........................... 14
Expanding Your TRACER ......................15
Warranty ............................... 15
INTRODUCTION
Congratulations on your purchase of the TRACER Total Chlorine
PockeTester. The TRACER is a revolutionary, first of its kind
measurement device that offers direct reading of Total Chlorine from
0.01 to 10.00 ppm. The TRACER is easy to use and maintain, and offers
high accuracy, automatic calibration, with fast response and simultaneous
Chlorine and Temperature displays and a 15-reading memory storage.
Careful use and maintenance will provide years of reliable service.
The TRACER testing procedure complies with the electrode method
described in EPA 40 CFR Part 136.3, Table 1B (1994) and Standard
Methods for the Examination of Wastewater, 18th Ed., 4500-Cl I, p 4-65,
which requires that potassium iodide and a buffer be added to the sample
before testing.
4
Page 5

SPECIFICATIONS
Display Multifunction display with bar graph
Operating conditions
32 to 122°F(0to50°C) and < 80% RH
Chlorine range 0.01 to 10.00 ppm (Total Chlorine)
Chlorine accuracy 0.5 to 5.00 ppm; ± (10% reading + 0.01 ppm)
5.00 to 10.00 ppm; ± (15% reading + 0.05
ppm)
Temperature
23 to 194°F(-5to90°C)
measurement range
Temperature range for
32 to 122°F (0 to 50°C)
Chlorine
Temperature resolution
Temperature accuracy
0.1° up to 99.9°, then 1°
± 1.8°F(1°C) from 23 to 122°F(-5to50°C)
± 5.4°F(3°C) from 122 to 194°F (50 to
90°C)
Measurement storage 15 readings can be stored and recalled
Low battery indicator ‘BAT’ appears on the display
Power Four CR 2032 button batteries
Auto power off After 10 minutes of inactivity
CONTENTS
Total Chlorine TRACER PockeTester Kit,
Code 1740
0-10.00 ppm Range
Includes:
Sample Cup w/cap
=
Tablet Crusher Code 0175
TRACER TCL Tablets (100) Code 7044A-J
=
Not sold individually. See below.
PARTS & ACCESSORIES
Total Chlorine Replacement Electrode Code 1732
Weighted Stand w/Sample Cups (5) Code 1746
Sample Cups w/caps (24) Code 1745
5
Page 6

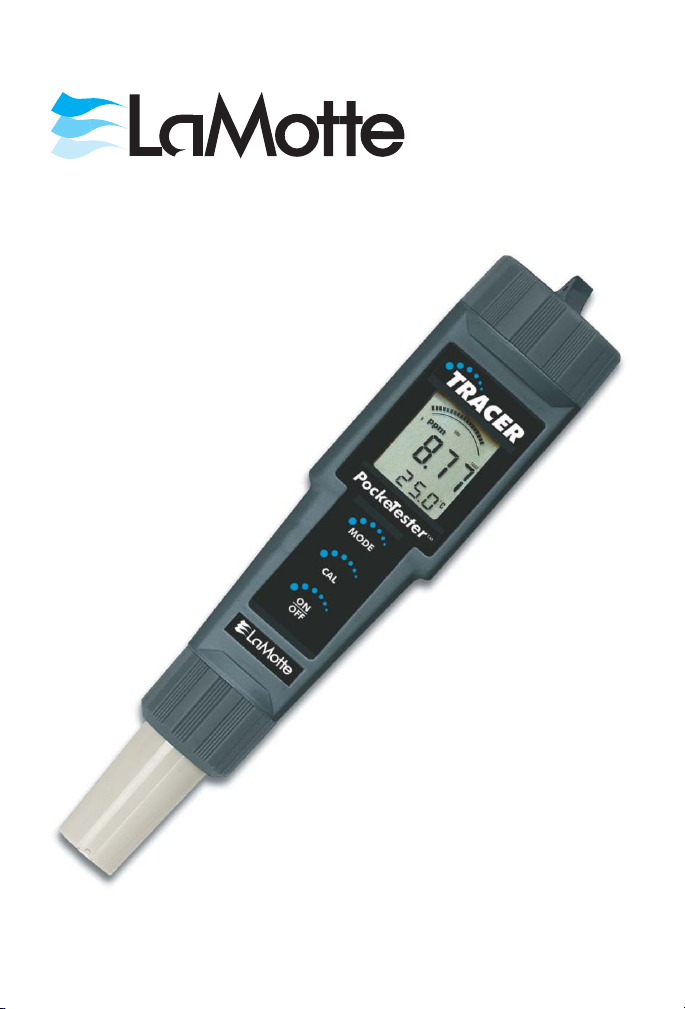
METER DESCRIPTION
Front Panel Description
1. Battery compartment
2. Display
3. MODE/HOLD button-store data
4. CAL/RECALL button-change temperature
units and recall data
5. ON/OFF button
6. Electrode Collar
7. Electrode
(Note: The Electrode cap is not shown)
TRACER Display
1. Bar graph reading
2. Measurement reading
3. BAT (low battery) and
HOLD (data hold) indicators
4. Temperature display
5. Bar graph scale designations
6. Units of measure
6
Page 7

BASIC OPERATION
Powering the TRACER
If the batteries are weak, the BAT indicator will appear on the display.
Press the ON/OFF key to turn the TRACER on or off. The auto power off
feature will shut the TRACER off automatically after 10 minutes of
inactivity.
Electrode Recognition
When the TRACER is turned on, it will recognize the type of electrode
that is connected and will display the appropriate unit of measure.
Automatic Calibration
NOTE: The automatic calibration process calibrates internal circuitry for
drift. This does not calibrate the electrode.
The TRACER should not be immersed in a solution until after the unit is
turned on. When the TRACER is turned on, it will automatically self
calibrate and the
SELF and CAL icons will be displayed. These icons will
disappear after the self calibration is complete. The main display and bar
graph will then read the Total Chlorine concentration in ppm units. The
bar graph will read 0 ppm (far left), 5 ppm (center), and 10 ppm (far
right). The unit of measure for the lower temperature display will be °C
or °F as selected. The readings on the display will flash until they have
stabilized.
Changing the Displayed Temperature Units
Press and hold the CAL/RECALL button for approximately 3 seconds.
The°Cor°F icon will change first and temperature readings will change
only after the button has been released.
Low Battery Indicator
The “BAT” indicator will be displayed when the batteries become weak.
Refer to the Maintenance Section for battery replacement information.
7
Page 8

TESTING
Conditioning the Electrode
The TRACER electrode comes in a factory cleaned condition. If the
meter is new or has been in storage for an extended period of time, at
least two tests should be performed to condition the electrode. The
electrode will perform best when in continuous use. Gently wipe the
electrode surface with a paper towel between uses.
Measurement
1. Fill a sample cup with exactly 20 ml of the sample water.
NOTE: Turbidity of the solution has no effect on the reading.
2. Add one TRACER TCL Tablet (7044A).
3. Use the tablet crusher (0175) to crush the tablet.
4. Cap and shake vigorously for 20-30 seconds. The tablet should be
completely disintegrated.
5. Turn the TRACER on. Wait 3 seconds for self-calibration.
Immediately immerse in the sample.
6. Stir the sample with the TRACER for 10 seconds. Stop stirring. The
sample and the electrode must remain still and stable during the
entire measurement.
7. The display will flash while readings are changing rapidly. The result
should be read when the display stabilizes. The reading will be held and
the HOLD annunciator will come on after 120 seconds.
8. Remove the TRACER from the sample. Turn the unit off. Replace
electrode cap.
NOTE: If a series of subsequent measurements is to be carried out,
briefly rinse the electrode with water (deionized, if available) and
shake off. Gently wipe the electrode surface with a paper towel
between uses.
9. The TRACER must be turned off and on again between samples.
Storing Readings
1. When the display is steady and not flashing, press the MODE/HOLD
button to store the data. The storage location number, the stored
reading and HOLD will be displayed. Press MODE/HOLD to return
to the current reading.
2. Only one reading can be stored during the 120 second measurement
cycle.
3. After fifteen readings are stored, the sixteenth stored reading will
over-write the first stored reading.
8
Page 9

Recalling Stored Readings
NOTE: The HOLD symbol should not be displayed. If it is, exit the
HOLD function by pressing the MODE button.
1. Press the CAL/RECALL button and then press the MODE/HOLD
button immediately after
CAL is displayed; the location number (1
through 15) will flash.
2. The last stored reading taken will be displayed first. To advance
through the stored readings, press the MODE/HOLD button. The
location number is displayed first, followed by the reading stored in
that location.
3. To exit the storage mode, press the CAL/RECALL button and the
meter will return to normal operation.
4. If the batteries are removed, all stored readings will be lost.
For Best Accuracy
1. Remove TRACER from sample when power is off. Even though
power is off, leaving TRACER in solution can shorten unit life.
2. Wash sample cups and caps and rinse completely before use.
3. If measuring solutions with large differences in chlorine
concentration, for example, 0.1 ppm and 5.0 ppm, use a separate
sample cup for each concentration.
4. Discard the sample cup when it becomes stained.
5. The process requires an acidic solution. The reagent tablet provides
sufficient buffering capacity to deal with alkalinity, calculated as
calcium carbonate, up to and in excess of 500 ppm. This will cover all
common water samples.
6. When the electrode is new or after dry storage, chlorine
measurements should be repeated at least twice until a repeatable
reading is obtained.
7. Gently wipe the electrode surface with a paper towel between uses.
8. When measuring a lower chlorine concentration after a higher
concentration, the meter will temporarily give slightly elevated
readings.
9. All oxidizing species that interfere with other chlorine methods, such
as manganese, iodine and bromine will interfere. Silver and mercuric
ions over 20 ppm will also interfere.
10. Do not touch the tablets. It can contaminate them.
11. Do not touch the sensor surface.
9
Page 10

Total Chlorine Tracer Offset Adjustment Procedure
1. Obtain a sample with a known concentration of total chlorine.
2. Follow the Chlorine Measurement procedure on page 8.
3. Wait for the display to read HOLD. This may take approximately 2
minutes.
4. Press the MODE/HOLD button for approximately 5 seconds until
"C_O" appears at the bottom of the display.
5. IMMEDIATELY press the MODE/HOLD button repeatedly to
increase the value or press the CAL/RECALL button repeatedly to
decrease the value on the display until it matches the known
concentration of the sample.
6. Once the value is adjusted, IMMEDIATELY press the ON/OFF
button to save the adjusted value to memory. "SA" will appear on the
display.
7. Turn the meter off and proceed with the Chlorine Measurement
procedure.
VALIDATION PROCEDURE
Perform this procedure or an appropriate calibration procedure when
TRACER is used for compliance monitoring or before the first use after
replacing the Total Chlorine TRACER electrode.
Required Materials and Chemicals
1 Analytical Balance, Readability 0.0005g
5 g Chloramine-T trihydrate, Analytical grade, 98%
1 Pipet, or Pipettor with disposable plastic tips, 1 mL
3 Volumetric flasks, 100 mL
2 Amber glass bottles, 100 mL
1 Sample cup (included in kit)
5 TRACER TCl Tablets (included in kit)
Deionized or distilled water
Preparation of 1ppm Standard Solution
1. Fill a 100 mL volumetric flask approximately half full with deionized
water. Weigh and add exactly 4.050 g Chloramine-T trihydrate.
Dissolve. Dilute to the 100 mL line with deionized water. Cap and
mix. This standard is 10,000 ppm.
2. Pipet exactly 1.00 mL of the 10,000 ppm standard into another 100
mL volumetric flask. Dilute to the 100 mL line with deionized water.
Cap and mix. This standard is 100 ppm.
10
Page 11

3. Pipet exactly 1.00 mL of the 100 ppm solution into a third 100 mL
volumetric flask. Dilute to the 100 mL line with deionized water. Cap
and mix. This standard is 1 ppm.
4. Add 5 TRACER TCl Tablets (7044A) to the flask of 1 ppm standard
from Step 3. Cap and mix until the tablets disintegrate. The tablets
contain a small amount of insoluble material and will not dissolve
completely. This standard is 1 ppm Converted Chlorine.
Procedure
1. Mix the 1 ppm Converted Chlorine standard.
2. Fill a sample cup with 20 ml of newly prepared 1 ppm Converted
Chlorine standard. Tightly cap the standard immediately after use.
3. Turn the TRACER on. Wait 3 seconds for auto-calibration (circuit’s
not electrode). Immediately immerse in the standard.
4. Stir the standard with the TRACER for 10 seconds. Stop stirring. The
standard and the TRACER must remain still and stable during
measurement.
5. The display will flash while readings are changing rapidly. The result
should be read when the display stabilizes. The reading will be held
and the HOLD annunciator will come on after 120 seconds.
6. Remove the TRACER from the standard. Rinse in deionized water
and shake dry.
7. Repeat steps2-6three more times on the same sample cup of
standard.
8. After the fourth time, press and hold the CAL key. While continuing
to hold the CAL key, press the MODE key. Immediately release both
keys. The main display should flash
If
1.00 is not displayed, keep the electrode in standard and press the
CAL key again until
keys again simultaneously. Immediately release both keys.
9.
After approximately 5 to 7 seconds the display will briefly flash
Rinse the TRACER in deionized water and shake dry.
Notes
1. The 1 ppm Converted Chlorine standard should be at room
temperature (23 ±2°C) during the validation procedure.
2. The 10,000 ppm Standard Solution can be stored for up to one year in
a tightly sealed, amber, glass bottle.
3. The 10 ppm Standard Solution can be stored for up thirty days in a
tightly sealed, amber, glass bottle.
4. The 1 ppm Converted Chlorine Standard is stable for up to
approximately 30 minutes. Discard the standard after use.
CAL is displayed, then press the CAL and MODE
1.00.
END.
11
Page 12

MAINTENANCE
Storage
When not in use, the TRACER should be stored dry with the electrode
cap in place. Cover the connector with the clear cover whenever the
electrode is removed from the meter body.
Battery Replacement
Battery Replacement
1. Twist off the battery compartment cap.
2. Hold the battery housing in place with one finger. Remove the
battery carrier by pulling on the small tabs.
3. Replace the four CR2032 batteries. Observe polarity.
4. Replace the battery compartment cap.
Cleaning the Electrode
The TRACER Chlorine Electrode arrives in a factory-cleaned condition
and is ready to be used. The electrode will perform better and yield more
stable readings after the first few tests. Firmly wipe the electrode surface
with a clean, dry paper towel before and after use to remove any
compounds that may have formed. Rinse the electrode in deionized water
to clean it. When not in use, the TRACER should be stored with the
electrode cap in place.
12
Page 13

Replacing the Electrode
The TRACER is shipped with an electrode attached. If the electrode
needs to be replaced or changed, follow these steps.
1. Press the ON/OFF button to turn the meter off.
2. To remove an electrode, unscrew and completely remove the
electrode collar. Turn the collar counter-clockwise.
3. Gently rock the electrode from side to side, pulling it downwards,
until it disconnects from the meter.
4. To attach an electrode, align the slots and carefully plug the electrode
into the meter socket.
5. Firmly tighten the electrode collar to create a seal with the rubber
gasket between the electrode and the meter. Do not over tighten.
6. Cover the connector end of the removed electrode with the small
clear plastic cap.
13.12
Page 14

TROUBLESHOOTING
Problem Check Action
Power on but no
display
Batteries Insert batteries
Verify correct polarity
Replace
Unstable reading Electrode Immerse probe more deeply in sample
Remove air bubbles caught under
electrode
Clean electrode
Replace electrode
Slow response Electrode Clean electrode
Unexpected low
Tablet Confirm tablet has been added
results
Unexpected high
Tablet Dissolve tablet completely
results
Display frozen HOLD
function
Button
press
Press MODE/HOLD or turn meter
off. Restart.
Remove batteries (stored data will be
lost)
EXPANDING YOUR TRACER
Interchangeable electrodes are available to convert the Total Chlorine
TRACER to a pH TRACER or an ORP TRACER.
Remember to ask for instructions and appropriate reagent or buffer
tablets when ordering pH or ORP electrodes.
pH TRACER Electrode, 0.00-14.00 pH Code 1733
The pH TRACER Electrode is used with pH 4.0, 7.0
and 10.0 buffers. Order using the following codes:
pH 4.0 Mini Buffer Tablets (100)
pH 7.0 Mini Buffer Tablets (100)
pH 10.0 Mini Buffer Tablets (100)
Code 3983A-J
Code 3984A-J
Code 3985A-J
14
Page 15

ORP TRACER Electrode,±999 mV Code 1734
The ORP TRACER Electrode (code1734) requires
an initial soaking in a pH 4.0 buffer solution. Order
pH 4.0 Mini Buffer Tablets/100 pack (Code 3893-A-J).
WARRANTY
The TRACER PockeTester is specifically calibrated for use with the
TRACER TC1 Tablets (Code7044A). Use with other reagent systems
will void the warranty and may damage the meter.
This Instrument is guaranteed to be free from defects in material and
workmanship for a period of one (1) year from the original purchase date.
The probe is guaranteed to be free from defects in material and
workmanship for a period of six (6) months from the original purchase
date. In the event that a defect is found during the warranty time frame,
LaMotte Company agrees that it will be repaired or replaced without
charge except for the transportation costs. This guarantee does not cover
batteries.
This product can not be returned without a return authorization number
from LaMotte Company. For warranty support or a Return Authorization
Number, contact LaMotte Company at 1-800-344-3100 or
tech@lamotte.com.
Limitations
This guarantee is void under the following circumstances:
• Damage due to operator negligence, misuse, accident or improper
application.
• Damage or alterations from attempted repairs by an unauthorized
(non-LaMotte) service.
• Damage due to improper power source, AC adapter or battery.
• Damage caused by acts of God or natural disaster.
• Damage occurred while in transit with a shipping carrier.
LaMotte Company will service and repair out-of-warranty products at a
nominal charge.
15
Page 16

LaMOTTE COMPANY
Helping People Solve Analytical Challenges
PO Box 329 • Chestertown • Maryland • 21620 • USA
800-344-3100 • 410-778-3100 (Outside U.S.A.) • Fax 410-778-6394
Visit us on the web at www.lamotte.com
®
1740-MN · 04.08
 Loading...