

Page 1
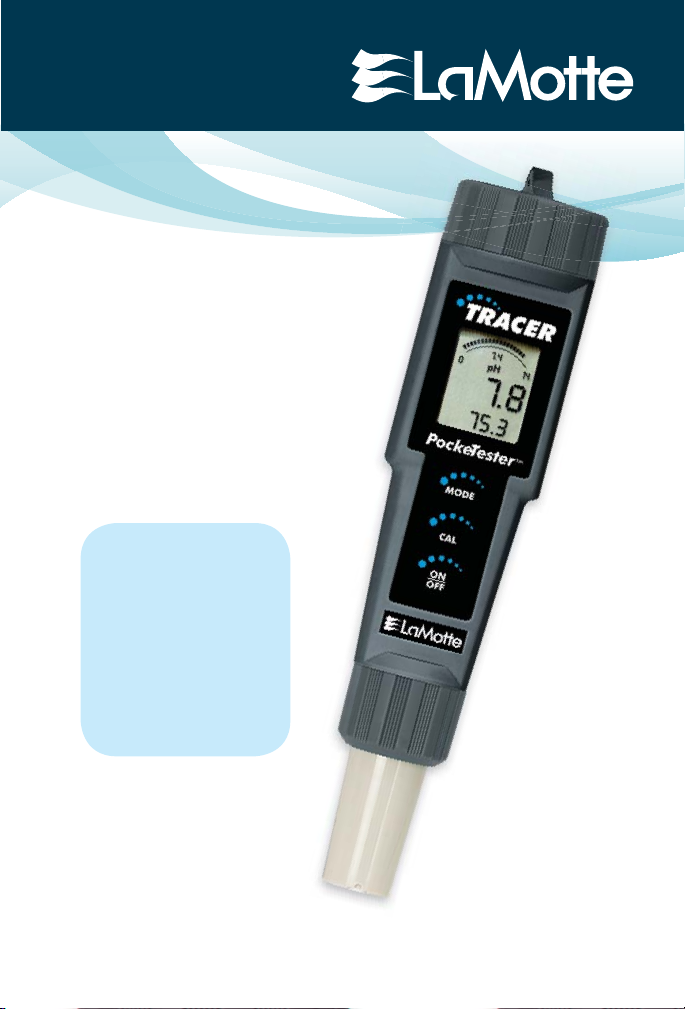
TRACER
POCKETESTER
Do Not allow
pH sensor to dry out.
• Store Upright
• Before fi rst use, tap
meter against palm
to move electrolyte
to tip.
See pages 8 and 11.
TM
pH
1741
Page 2

WARNING! This set contains chemicals
that may be harmful if misued. Read
cautions on individual containers
carefully. Not to be used by children
except under adult supervision.
Page 3

TRACER
pH POCKETESTER
TM
CODE 1741
Introduction .................................................................................4
Specifi cations .............................................................................4
Parts & Accessories ...................................................................5
Contents ......................................................................................5
Meter Description
Front Panel Description ............................................................... 6
TRACER Display ..........................................................................6
Basic Operation
Powering the TRACER ................................................................. 7
Electrode Recognition ................................................................. 7
Automatic Calibration
Changing the Display Temperature Units ...................................7
Data Hold .....................................................................................7
Display Messages
CAL Reminder ............................................................................. 7
RENEW ......................................................................................... 8
pH Testing
Overview....................................................................................... 8
pH Display ....................................................................................8
Getting Started ............................................................................. 8
Preparation of Buffers .................................................................. 9
pH Calibration .............................................................................. 9
pH Measurement ........................................................................ 10
Storing Readings ........................................................................ 10
Recalling Stored Readings ......................................................... 10
Maintenance
Storage ........................................................................................ 11
Battery Replacement ..................................................................11
Cleaning & Conditioning the Electrode ..................................... 11
Replacing the Electrode ........................................................... 12
Troubleshooting .......................................................................... 13
Expand Your TRACER ................................................................14
Warranty .....................................................................................15
Page 4

INTRODUCTION
Congratulations on your purchase of the TRACER pH PockeTester. The
TRACER is a revolutionary, fi rst of its kind measurement device that offers
direct reading of pH from 0.01 to 14.00 pH. The advantages of the TRACER
to the user include ease of use and maintenance, high accuracy, automatic
calibration, and fast response. The TRACER offers simultaneous pH and
Temperature displays and a 15-reading memory storage. Careful use and
maintenance will provide years of reliable service.
SPECIFICATIONS
Display Multifunction LCD with Bar graph
Operating Conditions 32 to 122°F (0 to 50°C) and < 80% RH
pH Range & Accuracy 0.01 to 14.00/±0.01 pH typical
Temperature Comp Automatic from 32 to 194°F (0 to 90°C)
Temperature Range 23 to 194°F (–5 to 90°C)
Temperature Resolution
Temperature Accuracy ±1.8°F/1°C [from 23 to 122°F (–5 to 50°C)]
Measurement storage 15 tagged (numbered) readings
Power Four CR2032 button batteries (see Page 6)
Low battery indication ‘BAT’ appears on the LCD
Auto power off After 10 minutes of inactivity
Dimensions 1.4 x 6.8 x 1.6” (35.6 x 172.7 x 40.6 mm),
0.1° up to 99.9, then 1° thereafter
±5.4°F/3°C [from 122 to 194°F (50 to 90°C)]
3.85 oz (110g)
4
Page 5

PARTS & ACCESSORIES
pH Replacement Electrode Code 1733
Weighted Stand w/Sample Cups (5) Code 1746
Sample Cups w/caps (24) Code 1745-24
pH 4.01 Mini Buffer Tablets (100) Code 3983A-J
pH 7.01 Mini Buffer Tablets (100) Code 3984A-J
pH 10.0 Mini Buffer Tablets (100) Code 3985A-J
CONTENTS
pH TRACER PockeTester Kit, 0.00-14.00 pH Range Code 1741
Includes:
Sample Cup w/cap *
Tablet Crusher Code 0175
Buffer Tablets, pH 4.0, 7.0, & 10.0 *
*Not sold in this quantity. See Parts & Accessories.
5
Page 6

METER DESCRIPTION
Front Panel Description
1. Battery compartment cap
2. LCD Display
3. MODE/HOLD button
4. CAL/RECALL button
5. ON/OFF button
6. Electrode Collar
7. Electrode
(Note: The Electrode cap is not shown)
TRACER DISPLAY
1. Bar graph reading
2. Measurement reading
3.
BAT (low battery) and
HOLD (data hold) indicators
4. Temperature display
5. Bar graph scale designations
6. Units of measure
7. Calibration indicators
8.
RENEW and CAL indicators
6
Page 7

BASIC OPERATION
Powering the TRACER
If the batteries are weak, the
ON/OFF button to turn the TRACER on or off. The auto power off feature will
shut the TRACER off automatically after 10 minutes of inactivity.
Electrode Recognition
When the TRACER is turned on, it will recognize the type of electrode that is
connected and will display the appropriate unit of measure. An electrode must
be attached before turning the meter on.
Automatic Calibration
When the TRACER is turned on, it will enter the Automatic Calibration mode.
BAT indicator will appear on the display. Press the
SELF and CAL will appear while calibration is in progress. After the calibration
is completed, the
display and the bar graph will read in pH units. The readings will fl ash on the
display until they have stabilized.
Changing the Displayed Temperature Units
Press and hold the CAL/RECALL button for approximately 3 seconds. The
°F icon will change fi rst and the numerical temperature value will change
or
only after the button is released.
NOTE: If the CAL/RECALL button is accidentally accessed
on the display. If this occurs, turn the meter off and then turn the meter on and
begin again.
Data Hold
Press the MODE/HOLD button to freeze the current reading. The
icon will appear along with the held reading. The held reading will be stored in
the next 15-reading storage location. Press the MODE/HOLD button to return
to normal operation.
SELF and CAL display icons will extinguish and both the main
°C
CAL will appear
HOLD display
DISPLAY MESSAGES
CAL Reminder
When the TRACER is turned on for the 15th time, without recalibration the
CAL icon will appear on the display indicating the the TRACER may require
calibration. Some applications may require recalibration of the electrode
sooner than others. The
pH electrode is recalibrated.
CAL display is a reminder and will turn off when the
7
Page 8

RENEW
A fl ashing “RENEW” warning indicates that the probe may be nearing the end
of its useful life. If cleaning or recalibration does not cause the
disappear, replace the electrode (see optional accessories). The
appears when the output of the pH electrode fails a diagnostic test.
Renew icon to
Renew display
pH TESTING
Overview
pH is a unit of measure (ranging from 0 to 14 pH) indicating the degree of
acidity or alkalinity of a solution. pH tests are the most commonly performed
measurements in water analysis, using the negative log of the hydrogen ion
activity of a solution which is an indicator of acidity or alkalinity. Solutions
with a pH of less than 7 are considered acidic, solutions with a pH of higher
than 7 are known as bases, and solutions with a pH of exactly 7 are considered
neutral.
The pH scale is logarithmic, so, for example, if Sample A is 1 pH less than
Sample B, this means that sample A is 10 times more acidic than Sample B.
A difference of 1 pH represents a ten-fold increase or decrease in acidity.
pH Display
When the electrode is placed in a solution, the main display and bar graph
will indicate the pH reading while the lower display will read temperature.
Readings fl ash until they have stabilized. The bar graph is ‘center zero’, i.e. at
pH 7 there is no display. As the pH rises, the bar will move from the center to
the right. If the pH drops, the bar will move from the center to the left.
Getting Started
1. Remove the cap from the bottom of the TRACER to expose the electrode
glass surface and reference junction.
2. Before fi rst use or after storage, soak the electrode (with cap removed) in
a pH 4 buffer or tap water for 10 minutes.
3. Before fi rst use, hold the meter by the top battery compartment and
swiftly tap the back of the meter downward into your palm (not a hard
surface). This assures that the internal electrolyte solution moves to the
very tip of the electrode. The electrolyte should fi ll the circular junction
window at the tip of the electrode.
4. White KCl crystals may be present in the cap. These crystals will dissolve
in the soak or they can be rinsed off with tap water.
5. Always calibrate close to the expected measurement value.
8
Page 9

Preparation of Buffers
1. Fill a sample cup with 20 mL of distilled or deionized water.
2. Add one buffer tablet:
pH 4.0 Code 3983A
pH 7.0 Code 3984A
pH 10.0 Code 3985A
3. Use the tablet crusher (0175) to crush the tablet. Stir until the tablet has
disintegrated.
NOTE: Buffers should be prepared fresh daily.
pH Calibration
The TRACER can be calibrated at 1, 2 or 3 points. For the most accurate
results with a two point calibration, calibrate the TRACER with a pH 7 buffer
fi rst, then calibrate with either a pH 4 or pH 10 buffer whichever is closest
to the pH value of the sample to be tested. When performing a three point
calibration, calibrate with the pH 7 buffer fi rst, followed with the pH 4 buffer
and then the pH 10 buffer.
1. Place the electrode into a buffer solution (4, 7, or 10 pH) and press the
CAL/RECALL button. Typically, pH 7 is calibrated fi rst, then 4 or 10,
depending on the measurement range. If readings are going to be made
over the entire range, calibrate with 4, 7 and 10 buffers.
2. The TRACER will automatically recognize the solution and calibrate
itself to that value. The circled number on the display will match the pH
of the buffer. Note that if the buffer is more than 1 pH unit off from the
4, 7, or 10 pH buffer, the TRACER will assume an error and abort the
calibration.
3. During calibration, the pH reading will fl ash on the main display.
4. When calibration is complete, the TRACER will automatically display
CAL and END will be displayed.
END and return to the pH measurement mode.
5. Rinse the electrode with distilled water.
6. The appropriate circled indicator (4, 7, or 10) will appear on the display
when a calibration has been completed. The calibration will be stored
until a new calibration is performed.
7. For a two- or three-point calibration, repeat Steps 1-5.
8. The meter should be calibrated before each use to obtain the most
accurate results.
9
Page 10

9. Always turn the meter off and then on before calibrating to allow suffi cient
time to complete the calibrations during one power cycle. If the meter
auto powers off during calibration the calibrations remain valid, but new
calibrations will turn the circled indicators off.
pH Measurement
1. Place the electrode in the test sample.
2. Record the pH after the reading becomes stable and the display stops
fl ashing.
The main display will indicate the pH in numeric units from 0.00 to
14.00. The bar graph will also display the pH value. The center of the
bar graph is 7.00. As the pH increases, the bar graph will move from the
center to the right. If the pH is less than 7.00, the bar graph will move
from the center to the left.
3. Press the ON/OFF button to turn the meter off. Rinse the electrode with
distilled water. Replace cap
pH Measurement of Soil
1. Place a 1:1 ratio of soil and distilled water in a small beaker. For most
analyses, 20 grams of soil and 20 grams distilled water are suffi cient.
2. Wait 15 minutes. Stir occasionally with a stirring rod.
3. Stir the sample. Immediately place the electrode in the sample.
4. Wait until the display stabilizes. Record the pH.
5. Rinse the electrode in distilled water. Replace cap.
NOTE: The fl at surface electrode will allow for readings directly from the soil
if there is enough moisture present in the soil.
Storing Readings
1. After the reading is made press
the MODE/HOLD button to store
the
current reading The storage
location number will be displayed
followed by the reading being
stored.
2. Press the MODE/HOLD button to return to normal operation.
pH
4
10.04
4
H
T
78.6
HOLD
°F
10
Page 11

3. Repeat step 1 to store the next reading.
4. If an attempt is made to store more
than 15 readings, the stored readings (starting with the fi rst reading)
will be overwritten.
Recalling Stored Readings
NOTE: First ensure that the
HOLD function by pressing the MODE/HOLD button.
1. Press the CAL/RECALL button once and then press the MODE button
immediately after
will fl ash. If the CAL mode is accidentally accessed (display fl ashing),
press the CAL/RECALL button again to exit.
2. The last stored reading taken will be displayed fi rst. To advance through
the stored readings, press the MODE/HOLD button. The location number
is displayed fi rst, followed by the reading stored in that location.
3. To exit the recall mode, press the CAL/RECALL button and the TRACER
will return to normal operation. If the batteries are removed, any stored
readings and user calibrations will be discarded.
HOLD symbol is not displayed. If it is, exit the
CAL is displayed; the location number (1 through 15)
MAINTENANCE
Care/Storage of Electrode
4. Always rinse the electrode in tap, distilled or deionized water between
measurements to avoid cross-contamination of the samples. Double rinsing
is recommended when high accuracy is required.
5. To preserve electrode life keep the sponge in the protective cap soaked
with a pH 4 buffer. Cap TRACER when not in use. Store vertically.
Do Not allow sensor to dry out.
6. Do not touch the electrodes. Touching the surface of the electrodes
damage and reduce the life of the electrodes.
7. Salt deposits may build up in the storage cap and should periodically be
rinsed away. These deposits could affect measurements at low conductivity.
may
11
Page 12

Battery Replacement
1. Twist off the battery compartment cap.
2. Hold the battery housing in place with one fi nger. Remove the battery
carrier by pulling on the small tabs.
3. Replace the four CR2032 batteries.
Observe polarity.
4. Replace the battery compartment cap.
NOTE: If the batteries are removed, stored data and user calibrations will
be cleared. A new user calibration will be required. Factory calibrations
will be retained.
Cleaning and Conditioning the Electrode
The TRACER will arrive in a factory-cleaned condition and is ready to be
used. A separate preconditioning method is not required.
Surface Cleaning – Only in case of visible surface contamination or if readings
should become erratic, use a disposable laboratory towel wetted with ethanol
or isopropyl alcohol and gently rub the surface, until no more residue is
visible.
Replacing the Electrode
The TRACER is shipped with an electrode attached. Electrode life is limited
and is dependant on the frequency of use and care, among other factors. If the
electrode needs to be replaced, follow these steps for removing and connecting
electrodes.
1. Turn meter off.
2. To remove the electrode, turn the collar counter-clockwise and remove it.
3. Gently rock the electrode from side to side, pulling it downwards, until it
disconnects from the meter.
4. To attach an electrode, carefully plug the electrode into the meter socket.
Note that the electrode connector is keyed to ensure a proper connection.
5. Tighten the electrode collar fi rmly enough to make a good seal. A rubber
gasket will seal the electrode with the meter.
12
Page 13

TROUBLESHOOTING
Problem Cause Action
Power on
but no display
Unstable
readings
Slow response
time or reading
drift
Dry bulb Dehydrated membrane,
Static charge Wiping electrode Rinse electrode in 7.0 buffer and
Same readings
in different
buffers and
samples
Batteries Insert batteries
Batteries Verify correct polarity
Batteries Replace batteries
Electrode Immerse electrode more deeply
Electrode Condition electrode before fi rst
Electrode Remove air bubbles caught
Electrode Clean electrode
Electrode Replace electrode
Clogged junction Soak in 4.07M Potassium
Strong alkaline
measurement
Deteriorated gel layer Replace electrode
Protein coating on
electrode surface
Oil, paint, dyes,
suspended solids on
electrode
long term storage
without wetting
Cracked or broken
electrode
in sample
use
under electrode
Chloride (KCl) at 60°C for 30
minutes
Soak in 0.1M Hydrochloric acid
(HCl) overnight
Soak in 1g Pepsin dissolved in 10
mL of 0.1M HCl for 30 minutes
or as needed
Rinse electrode alternately with
materials solvent then a buffer
7.00
Soak electrode tip in wetting cap
fi lled with 1 mL 7.00 buffer for
24-48 hours
blot. Do not wipe electrode
Replace electrode. Use bulb
guard. Avoid plunging electrode
into bottom of container and stir
bars.
13
Page 14

Problem Cause Action
Erratic LCD
display
Unexpected
readings
Display frozen HOLD function Press MODE/HOLD or turn
Steady “-1 ”
display
Samples have low ionic
strength (lack salt);
e.g. distilled, deionized,
boiled, lake water (high
pressure)
Buffers Calibrate with fresh buffers
Buffers Calibrate with buffers that
Button response Remove batteries press ON/OFF
Wait Reading not stable yet
For each 50 mL of sample add
1 drop (50 mL) of saturated
Potassium Chloride (KCl). No
alteration in pH will occur by
inert KCl.
bracket sample pH
meter off
button for 3 seconds. Reinsert
batteries (stored data will be
lost)
EXPAND YOUR TRACER
Interchangeable electrodes are available to convert the pH TRACER to a Total
Chlorine TRACER or an ORP TRACER.
Remember to ask for instructions and appropriate reagents or buffer tablets
when ordering the Total Chlorine or ORP electrodes.
Total Chlorine TRACER Electrode,
0.0-10.0 ppm
The Total Chlorine TRACER
Electrode (Code 1732) requires the
use of TRACER TCL Tablets. Order
Code 7044-J (100 pack).
ORP TRACER Electrode, ±999 mV
The ORP TRACER Electrode (Code
1734) requires an initial soaking in a
pH 4.0 buffer solution. Order pH 4.0
Mini Buffer Tablets/100 pack (Code
3893-J).
Code 1732
Code 1734
14
Page 15

WARRANTY
LaMotte Company warrants this instrument to be free of defects in parts and
a
workmanship for 1 year from the date of shipment and warrants this probe to
be free of defects in parts and workmanship for 6 months from the date of
shipment. If it should become necessary to return the instrument for service
during or beyond the warranty period, contact our Technical Service Department
at 1-800-344-3100 or tech@lamotte.com for a return authorization number or
visit www.lamotte.com for troubleshooting help. The sender is responsible for
shipping charges, freight, insurance and proper packaging to prevent damage in
transit. This warranty does not apply to defects resulting from action of the
user such as misuse, improper wiring, operation outside of specifi cation, improper
maintenance or repair, or unauthorized modifi cation. LaMotte Company
specifi cally disclaims any implied warranties or merchantability or fi tness for
a specifi c purpose and will not be liable for any direct, indirect, incidental or
consequential damages. LaMotte Company’s total liability is limited to repair or
replacement of the product. The warranty set forth above is inclusive and no
other warranty, whether written or oral, is expressed or implied.
To register your meter with the LaMotte Service Department, go to www.lamotte.com
and choose SUPPORT on the top navigation bar.
Page 16

LaMOTTE COMPANY
Helping People Solve Analytical Challenges
PO Box 329 • Chestertown • Maryland • 21620 • USA
800-344-3100 • 410-778-3100 (Outside USA.) • Fax 410-778-6394
Visit us on the web at www.lamotte.com
1741-MN 5/13
 Loading...