

Page 1

Brew your best batch EVERY time!
PLUS
Water Analysis Kit
for Home Brewers
Code 7188-01
TM
Page 2

Scan for direct access to LaMotte Brewlab web page.
For further tips and information, go to instructions/tips tab.
NOTE: Samples should be at room temperature for all tests.
WARNING! This set contains chemicals
that may be harmful if misused. Read
cautions on individual containers
carefully. Not to be used by children
except under adult supervision
*WARNING: Reagents with an * are potential health hazards. To view
or print
a Material Safety Data Sheet (MSDS) for these reagents go to
www.lamotte.com.
To order individual reagents or test kit components, use the
specifi ed
code numbers.
Page 3

PLUS
TM
Welcome to the BrewLab
TM
—
the easy-to-use and economical test kit for
home and craft brewers. Endorsed by worldrenowned brewing author and consultant,
John Palmer, the BrewLab Water Analysis Kit
enables brewers to effectively measure and
adjust the minerals in brewing water to improve
beer fl avor and yield. The Brewlab Plus
TM
also
includes a high quality, waterproof, digital pH
meter for measuring the resulting mash, wort,
and beer pH
.
BrewLabTM, the only test kit a brewer needs
to take control of their brewing water.
Helping People Solve Analytical Challenges
Chestertown • Maryland • 21620 • USA
800-344-3100 • 410-778-3100 (Outside USA)
Visit us on the web at www.lamotte.com
67188-01 • 2/14
Page 4
HARDNESS TESTS (as CaCO3)
QUANTITY CONTENTS CODE
15 mL
50 Calcium Hardness Indicator Tablets T-5250-H
15 mL *Hardness Reagent #5 *4483-E
100 Hardness Reagent #6 Tablets 4484-J
60 mL Hardness Reagent #7
1 Test Tube, w/cap 4488
1 Pipet, 0.5 mL, plastic 0353
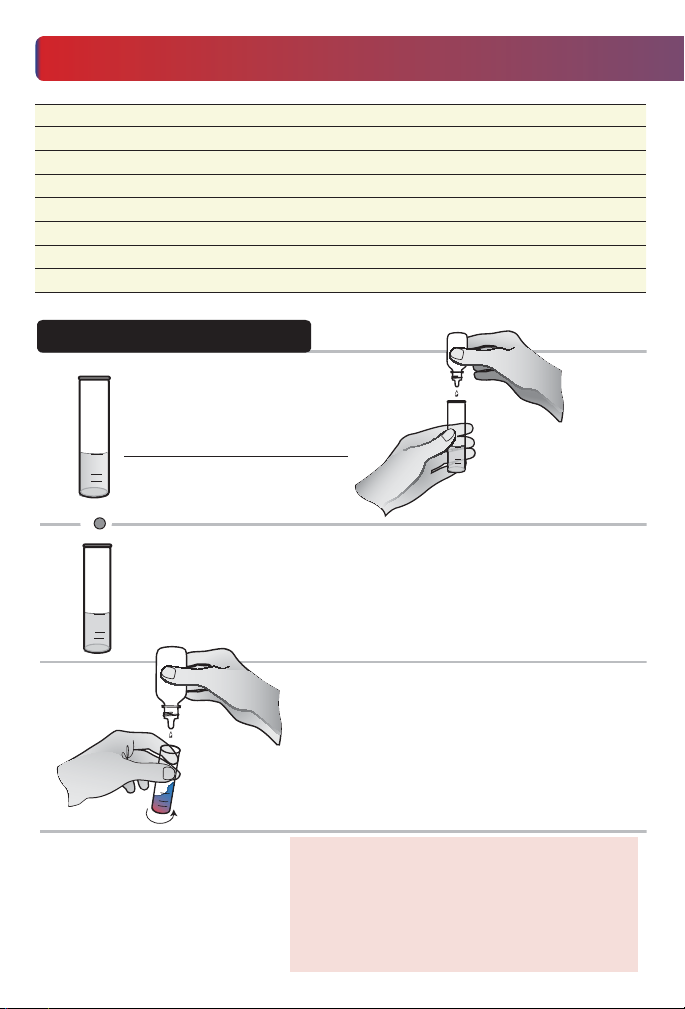
TOTAL HARDNESS
*Sodium Hydroxide Reagent w/Metal Inhibitors
*4259-E
4487WT-H
12
Fill tube (4488) to the line with
sample water.
Line
Upper 1 drop = 10 ppm
Lower 1 drop = 20 ppm
3
Add 1 Hardness
Reagent #6 Tablet
(4484) and swirl to
dissolve tablet.
5
Equivalence
(ppm per drop)
Hold the Hardness Reagent #7 (4487WT)
4 6
Sample will turn Red if Hardness
is present.
If sample is
is 0 ppm.
vertically to add one drop at a time
Add 5 drops of
*Hardness Reagent
#5 (4483) and swirl
to mix.
Proceed to next step.
Blue, Total Hardness
(swirling and counting after each drop)
until color
to Blue
changes completely
from Red
and remains for 30 seconds
.
Brush and rinse tube promptly after testing.
6
Multiply number of drops:
Upper line multiply x 10
Lower line multiply x 20
Record as TOTAL
Hardness (CaCO
ppm)
3
If the total hardness is greater than 500 ppm,
use
the 0.5 mL pipet (0353) to transfer
0.5 mL of the water sample to the test tube
(4488). Fill tube to 10 ppm line with distilled
water. Follow Steps 2 through 5. Multiply the
number of drops by 172.
Page 5

CALCIUM HARDNESS
12
Fill tube (4488) to line
with water sample.
Line
Upper 1 drop = 10 ppm
Lower 1 drop = 20 ppm
Equivalence
(ppm per drop)
Add 6 drops of
*Sodium
Hydroxide
Reagent (4259)
and swirl to mix.
3
Add 1 Calcium
Hardness
4
Indicator Tablet (T-5250)
and swirl to
dissolve tablet.
6
Sample will turn
Red if
Hardness is present.
Proceed to next step.
If sample is Blue, Calcium
Hardness is 0 ppm.
5
Hold the Hardness Reagent #7 (4487WT)
vertically to add one drop at a time
(swirling and counting after each drop)
until color
to Blue
changes completely
from Red
and remains for 30 seconds
.
Brush and rinse tube promptly after testing.
6
Multiply number of drops:
Upper line multiply x 10
Lower line multiply x 20
Record as ppm CALCIUM
Hardness
(CaCO3 ppm).
If the calcium hardness is greater than 500 ppm,
use
the 0.5 mL pipet (0353) to transfer 1.0 mL
(two measures) of the water sample to the
test tube (4488). Fill tube to 10 ppm
distilled water. Follow Steps 2 through
5. Multiply the
number of drops by 86.
line with
To convert to calcium
+2
(Ca
) multiply the test
result by 0.4.
MAGNESIUM HARDNESS
TOTAL Hardness value____minus CALCIUM Hardness value ____=
MAGNESIUM
To convert to magnesium (Mg
Hardness (CaCO3 ppm)
+2
) multiply the test result by 0.24.
Page 6
CHLORIDE TEST
QUANTITY CONTENTS CODE
15 mL *Chloride Reagent A *4069-E
30 mL *Silver Nitrate, 0.171N *3824WT-G
1 Test Tube, 5-10-25 mL, plastic, w/cap 0715
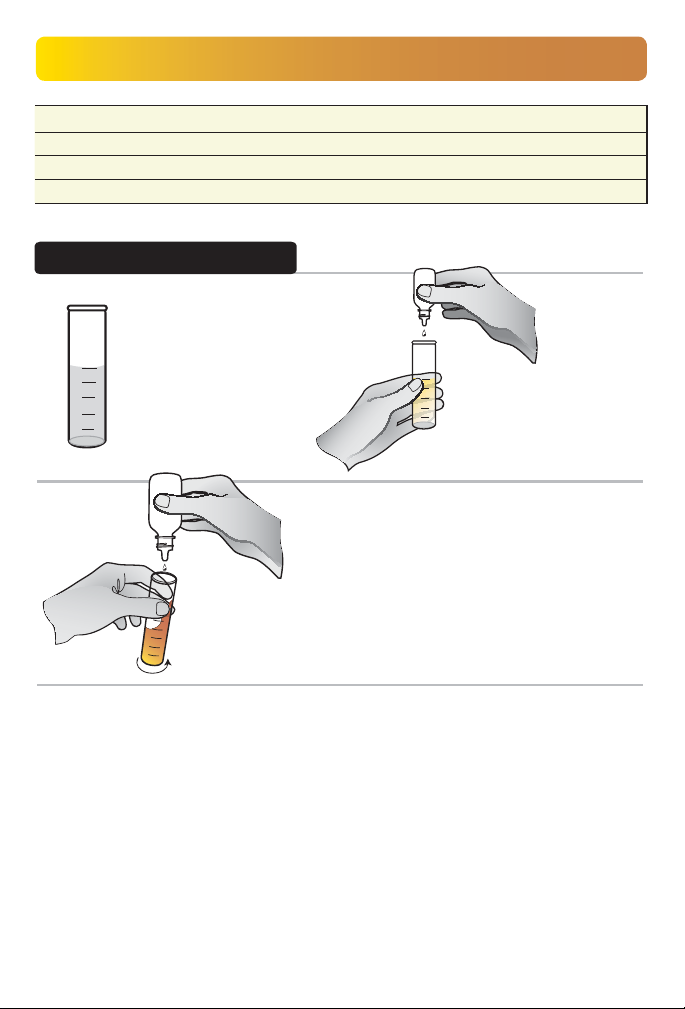
CHLORIDE
12
Fill tube (0715) to the line
with sample water.
Sample
Size
25 mL 1 drop = 10 ppm
10 mL 1 drop = 25 ppm
Equivalence
(ppm per drop)
3
Add 5 drops of Chloride
Reagent A (4069) and
swirl to mix. Solution will
turn
Yellow.
3
Hold the *Silver Nitrate, 0.171N (3824WT)
until color changes completely from Yellow to
Orange-brown and remains for 30 seconds.
Brush and rinse tube promptly after testing.
Multiply number of drops:
4
25 mL multiply x 10
10 mL multiply x 25
Record as ppm Chloride.
Brush and rinse tube promptly after testing.
4 6
vertically to add one drop at a time
(swirling and counting after each drop),
Page 7
SULFATE TEST
QUANTITY CONTENTS CODE
50 *Sulfate Turb Tablets *6456-H
1 Test Tube, 5-10-25 mL, plastic, w/cap 0715
1 Sulfate Color Chart 7188-01-CC
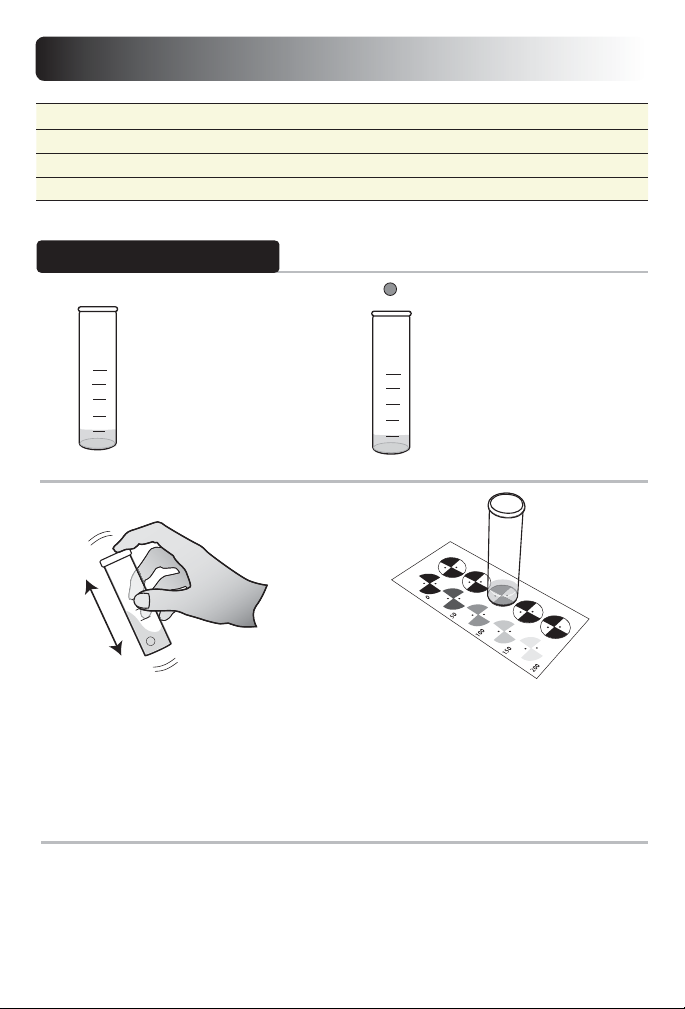
SULFATE
12
Fill test tube (0715)
to 5 mL line with
sample water.
3
Cap and shake until
tablet disintegrates.
Remove the cap.
If the sample is more turbid than the 200 ppm target, fi ll a clean
5
tube to the 5 mL line with sample. Fill to the 10 mL line with distilled
water. Mix. Repeat the test with 5 mL of this diluted sample.
Multiply the result by 2.
Thoroughly brush and rinse tubes immediately after each use.
4 6
Immediately place the bottom of
the tube on a black TARGET on
the color chart. Look down through
the tube at the target under the
tube.
target to the GRAY scale on the left
to
determine the RESULT in ppm.
Add 1 *Sulfate
Turb Tablet (6456).
Compare the grayness of the
Page 8

ALKALINITY TEST (as CaCO3)
QUANTITY CONTENTS CODE
15 mL Total Alkalinity Indicator 2786-E
30 mL *Sulfuric Acid, 0.12N *7748WT-G
1 Test Tube, 5-10-25 mL, plastic, w/cap 0715
TOTAL ALKALINITY
1
3
4
Fill tube (0715) to the line
with sample water.
Sample
Size
25 mL 1 drop = 10 ppm
10 mL 1 drop = 25 ppm
Equivalence
(ppm per drop)
4 6
Hold the *Sulfuric Acid, 0.12N (7748WT)
(swirling and counting after each drop), until
color
remains for 30 seconds
Brush and rinse tube promptly after testing.
Multiply number of drops:
25 mL multiply x 10
10 mL multiply x 25
Record as ppm Total Alkalinity (CaCO3 ppm).
vertically to add one drop at a time
changes completely from Green to Red and
RESIDUAL ALKALINITY
2
Add 3 drops of Total
Alkalinity Indicator
(2786) and swirl
to mix. Solution
turn
Green.
.
Rinse tube promptly after testing.
To convert to bicarbonate (HCO3)
multiply the test result by
3
will
1.2
Residual Alkalinity =
Total Alkalinity - [Calcium Hardness + (Magnesium Hardness X 0.5)]
All values are as ppm
CaCO
3
3.5
Page 9

SODIUM (by calculation)
Since water has a neutral charge, the total number of negatively charged
anions must equal the total number of positively charged cations. Six ions
typically make up 98% of the total ions so the sodium concentration can be
estimated by testing for the fi ve other ions.
Negative Ions
Chloride (ppm) + Sulfate (ppm) + Alkalinity (ppm as CaCO3)= A
35 48 50
Positive Ions
Total Hardness (ppm as CaCO3)= B
50
Sodium (ppm) = (A – B) X 23
NOTE: The Total Hardness result incorporates two ions - calcium hardness
and magnesium hardness.
Page 10

pH
QUANTITY CONTENTS CODE
1 pH Tracer PockeTester 1741
10 pH 7.0 Mini Buffer Tablets 3894A
10 pH 4.0 Mini Buffer Tablets 3983A
Before First Use or After Storage
1. Hold meter by top battery compartment. Swiftly tap back of meter
downward into palm - not a hard surface - to move electrolyte into
electrode tip.
2. Remove cap. Soak electrode in pH 4.0 buffer or tap water for 10 minutes.
pH
Sample should be below 122 °F (50 °C). Let cool if necessary.
NOTE: The purpose of ATC in this meter is to maintain electrode calibration
across the capability range of 32-194 °F (0-90 °C). It is recommended that
wort samples be cooled to room temperature (68 °F/20 °C) before testing.
This allows better comparison of measurements at different temperatures
due to the natural change in wort pH due to changes in temperature, and
improves electrode life.
1. Remove cap. Press ON/OFF to turn meter on.
2. Dip sensor in sample water.
3. Record pH after reading becomes stable and display stops fl ashing.
4. Press MODE to hold reading and store reading in memory
5. Press ON/OFF to shut meter off.
6. Store in pH 4.0 buffer. Store upright.
Daily Calibration Procedure
1. Fill tube (0715) to 20 mL line with distilled water. Pour into small container.
Add pH 7.0 Mini Buffer Tablet (3984A). Stir until tablet disintegrates.
2. Remove cap. Press ON/OFF to turn the meter on.
3. Dip sensor in buffer.
4. Press CAL. END will be displayed and the circled 7 indicator will be
displayed.
5. Repeat Steps 1–4 with pH 4 Mini Buffer Tablet (3983A). Save pH 4 Buffer
to use as storage solution. Tester is calibrated.
Page 11

Do Not allow pH sensor to dry out.
¬ Store Upright
¬ Before fi rst use, tap meter against
palm to move electrolyte to tip.
Maintenance
1. Rinse sensor with clean water immediately after each use.
2. Do not allow sensor to dry out. Store tester with cap on. Moisten sponge
in cap with
3. If surface contamination is visible or readings become erratic, wet disposable
towel with ethanol or isopropyl alcohol and gently rub surface of sensor
until no more residue is visible.
Notes:
1. White crystals may form around cap and should periodically be rinsed
off. These deposits could affect measurements at low conductivity.
2. Tester automatically shuts off after 8.5 minutes of non-use.
3. For testing samples at high pH, tester can be calibrated with pH 7.0 Mini
Buffer Tablets (3984A) and pH 10.0 Mini Buffer Tablets.
Separately).
4. The tester requires 4 X CR2032 batteries. Removing the batteries will
clear stored data and user calibrations. The factory calibration will be
retained.
5. For more information see the pH Tracer Manual (included).
pH 4.0 buffer. Store upright. Do not store in deionized water.
(3985A) (Sold
Plug your test results into the
Brewing Water Adjustment Calculator
at www.lamotte.com/brewlab
to brew your best batch!
Page 12

Brewing
Resources
To use John Palmer’s Brewing Water
Adjustment Calculator, and for further tips
and information, go to
brewlab
How To:
How to Brew by John Palmer
(Brewers Publications, 2006)
The home brewing process laid out, step by step.
Excerpts available at
Water - A Comprehensive Guide for Brewers
by John Palmer and Colin Kaminski
(Brewers Publications, 2013) - Water use and adjustment
in the brewery from beginning to end.
Organizations:
American Homebrewers Association - An organization
supporting home brewers
http://www.homebrewersassociation.org
Brewers Association - The association for brewers’ world wide
http://www.brewersassociation.org
American Society of Brewing Chemists - Experts in the
chemistry of brewing
http://www.asbcnet.org
and select the instructions/tips tab.
www.lamotte.com/
http://www.howtobrew.com
Events:
Craft Brewers Conference - An annual event for the craft
brewing industry
http://www.craftbrewersconference.org
National Homebrewers Conference - A conference dedicated
to the home brew enthusiast
http://www.ahaconference.org
 Loading...