

Page 1
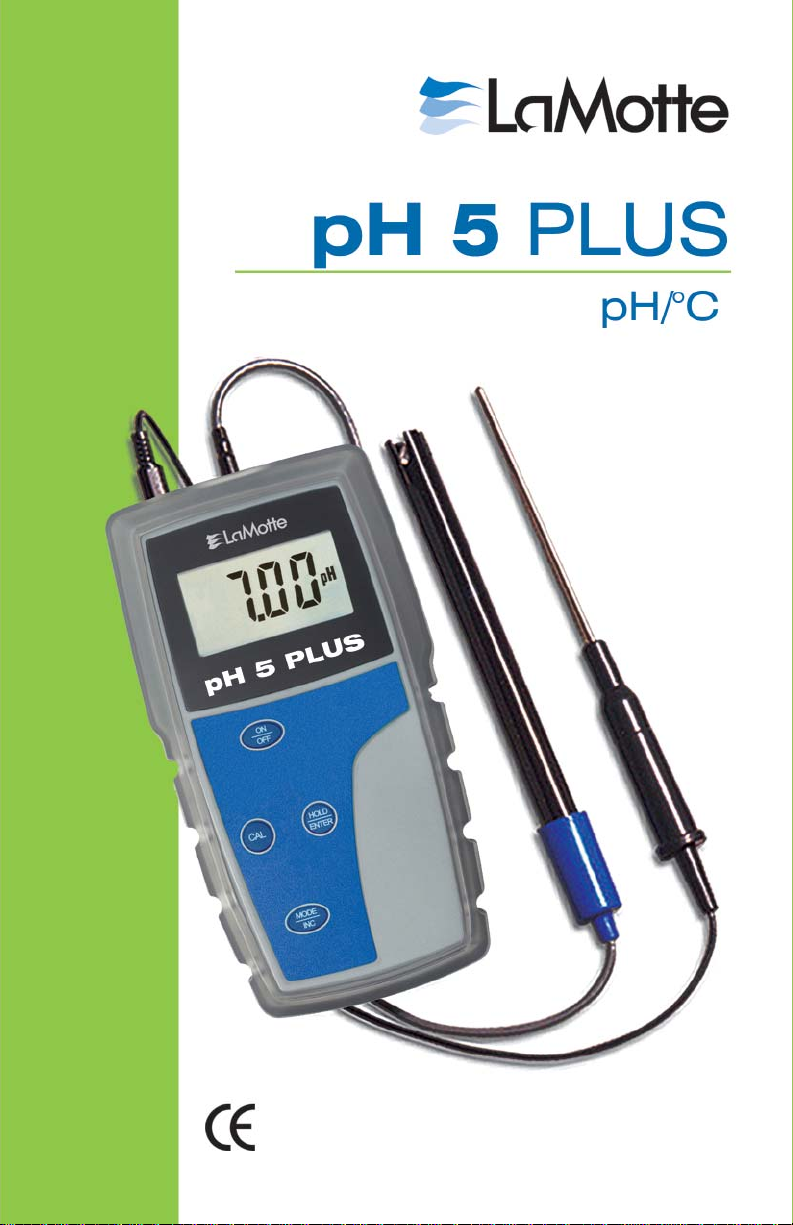
1
Page 2

Page 3

PREFACE
This manual serves to explain the use of the pH 5 PLUS meter.
This manual functions in two ways: fi rst as a step by step guide to
operating the meter; second, as a handy reference guide.
This manual is written to cover as many anticipated applications of
the meter as possible. If there are questions about the use of this meter
contact the LaMotte Tech Service Department.
LaMotte Company will not accept any responsibility for damage or
malfunction to the meter caused by improper use of the instrument.
The information presented in this manual is subject to change without
notice as improvements are made, and does not represent a commitment
on the part of LaMotte Company.
WARNING! This set contains chemicals that
may be harmful if misused. Read cautions on
individual containers carefully. Not to be used by
children except under adult supervision.
3
Page 4

TABLE OF CONTENTS
1. INTRODUCTION 5
2. GETTING STARTED 6
2.1 Description of Keypad Functions 7
2.2 Description of LCD Annunciators 7
2.3 Inserting & Removing the Rubber Boot/Stand 8
2.4 Inserting New Batteries 8
2.5 Battery Replacement 8
2.6 Connecting the Electrode and Temperature Sensor 9
2.7 Conditioning the pH Electrode 9
2.8 Switching the Meter On 10
3. CALIBRATION 10
3.1 pH Calibration 10
3.1.1 pH Calibration Procedure 11
3.1.2 Changing the pH Buffer Group 12
3.1.3 Resetting User Calibrated Values 13
3.2 Temperature Calibration 13
3.2.1 With Temperature Probe 13
3.2.2 Without Temperature Probe (no ATC) 14
4. MEASUREMENT 15
4.1 Taking Measurements 15
4.2 Holding a Reading 15
4.3 Releasing a Held Reading 15
5. ELECTRODE CARE AND MAINTENANCE 16
6. TROUBLESHOOTING 16
7. SPECIFICATIONS 17
8. REPLACEMENT PARTS AND ACCESSORIES 18
9. WARRANTY 18
10. RETURN OF ITEMS 19
4
Page 5

1. INTRODUCTION
The pH 5 PLUS microprocessor-based handheld meter is economical and
easy to use. It has a large custom LCD (Liquid Crystal Display) for clear
and easy reading. The pH 5 PLUS measures pH and temperature (°C).
Meters include 4 alkaline “AAA” batteries, a rubber boot /stand,
instruction manual, and warranty card. Please refer to Section 8
Replacement Parts and Accessories for information on additional
accessories and calibration solutions.
5
Page 6
2. GETTING STARTED
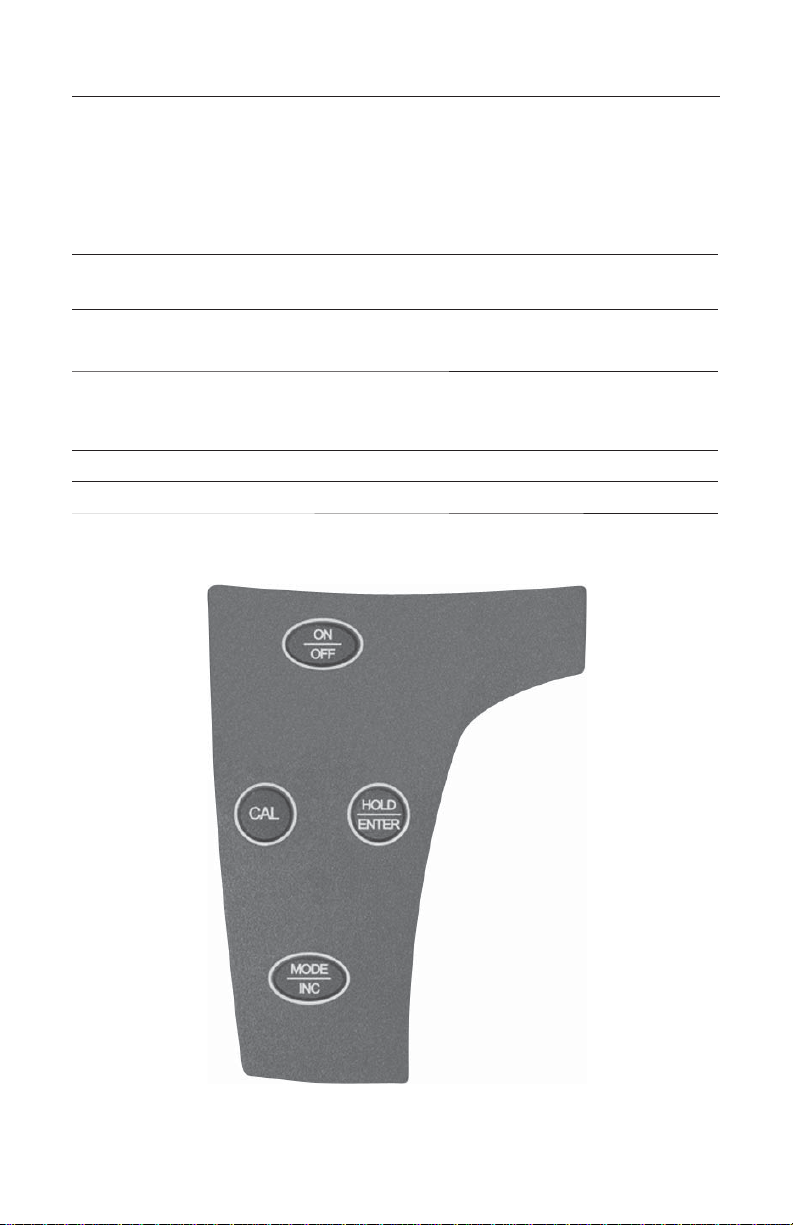
2.1 Description of Keypad Functions
The pH 5 PLUS has four keys on the splash-proof keypad: ON/OFF,
HOLD/ENTER, CAL and MODE/INC.
ON/OFF
MODE/INC
CAL
HOLD
ENTER
Powers meter on and off. Meter starts up in the mode that
was last used.
Increments values during temperature calibration mode.
Allows calibration for pH or Temperature, or to abort
calibration and return to measure without confi rming a
value.
Freezes the measured reading for easy viewing.
Confi rms calibration value.
6
Page 7

2.2 Description of LCD Annunciators
The large custom LCD consists of 3½-digit segments which uses
annunciators for pH or °C (Temperature). Other annunciators include
“HO” (when HOLD function is activated) and “LO” (low battery
condition).
2.3 Inserting & Removing the Rubber Boot/Stand
1. To remove the meter from the rubber boot, push out the bottom
edge of the meter until it is completely out of the boot. Ensure
that the probe cables are not connected. See Figure 1.
2. To insert the meter into the rubber boot, slide in the top of the
meter before pushing the bottom edge of the meter down to set it
into position. Lift up the stand at the back of the meter for bench
top applications. Figure 2.
Figure 1 Figure 2
7
Page 8

2.4 Inserting New Batteries
The battery compartment is found at the back of the instrument. To open
the battery compartment, push the cover in the direction of the arrow
and lift up. Note the polarity of the batteries before inserting them into
position. After the batteries have been replaced, reposition the cover and
press down until it locks.
2.5 Battery Replacement
The “LO” annunciator on the LCD alerts when battery power is running
low.
Caution: Power off the meter before changing battery.
8
Page 9

2.6 Connecting the Electrode and Temperature Sensor
To connect the probe to the meter, align the BNC connector slots with
the posts of the meter socket and rotate the connector clockwise until
it locks. Do not force the connector. To remove the probe, rotate the
connector in a counter-clockwise direction until it unlocks, and slide the
connector off the socket.
BNC connector
pH probe
2.5 mm mini phono
jack for
temperature sensor
Insert the mini phono jack of the temperature sensor into the socket on
the meter. Unplug the phono jack when not in use or when measuring pH
without temperature compensation.
2.7 Conditioning the pH Electrode
For best results condition the pH probe before the fi rst use, or if it has
not been used for a long time, by soaking it in pH 4 buffer solution for at
least 1 hour. Rinse before use.
9
Page 10

2.8 Switching the Meter On
1. Press the ON/OFF key. All LCD segments will display
momentarily as the meter performs a self-diagnostic test. The
meter will display “- - -“ if the meter has not been calibrated or if
the meter has been reset.
2. Press the MODE key to choose the desired measurement mode.
3. If a temperature probe is not connected, either 25.0°C (factory
default) or the last calibrated temperature value will be
displayed. If a temperature probe is connected, the current
measured temperature will be displayed.
4. “Or” (Over range) indicates the reading exceeds the maximum
measurement range.
“Ur” (Under range) indicates the reading is under the minimum
measurement range (see Section 7 Specifi cations).
3. CALIBRATION
3.1 pH Calibration
The meter is capable of calibrating up to 3 pH values using USA or NIST
(nSt) pH buffer standards or 2 pH values with Low Ionic (Pb) pH buffer
standard. All new calibration values will automatically override existing
data.
USA group 4.01, 7.00, 10.01
NIST group 4.01, 6.86, 9.18
Pb group 4.10, 6.97
For the best results perform at least a 2-point calibration at room
temperature (25 °C) using standard buffers. Begin with pH 7.00 (USA
group), pH 6.86 (NIST group) or pH 6.97 (Pb group).
10
Page 11

For a 1-point calibration, the calibration should be performed with a pH
buffer value closest to the expected sample value being measured.
The meter has automatic buffer recognition that identifi es the correct pH
buffer values during the calibration. The meter will accept calibration
values that are within ±1.0 pH units of the expected value, otherwise
the DISPLAY will fl ash “Er1” and the value will not be accepted. Press
CAL to abort the calibration and return to the measurement mode.
Always use new pH buffer solutions for calibration. Do not reuse
buffer solutions that may be contaminated and affect the calibration
and accuracy of the measurements. Promptly seal containers and store
solutions in a dark, dry, cool environment.
Before use, remove the plastic protective cap on the pH probe and
condition the glass bulb by soaking it in tap water or pH buffer
(preferably pH 4) for 1-2 hours. This will hydrate the glass bulb if the
probe is too dry or if it has not been used recently. Always rinse the
probe with clean water before and after each calibration or sample
measurement to avoid cross-contamination. For details refer to Section 5
on Probe Care and Maintenance.
3.1.1 pH Calibration Procedure
1. Pour a known pH buffer calibration standard solution, e.g. pH
7.00, into a clean, dry container. Turn on the meter and select the
pH mode by pressing the MODE key.
2. Dip the pH probe and temperature probe into the solution. Stir
gently and wait for the reading to stabilize (approximately 30
seconds depending on the probe condition).
3. Press CAL to enter the pH calibration mode. “CA” will be
displayed momentarily before the display will fl ash the current
un-calibrated reading.
4. To abort or cancel the calibration without accepting the new
value, press the CAL key. The meter will automatically revert to
the pH measurement mode.
11
Page 12

5. Allow the reading to stabilize. Press the ENTER key to confi rm
the calibration. “CO” will be displayed momentarily before
reverting to the pH measurement mode.
6. For the greatest accuracy, perform a multiple-point calibration.
Repeat step 1 with additional pH buffer calibration standard
solutions.
3.1.2 Changing the pH Buffer Group
The meter can be calibrated with pH standards of USA, NIST (nSt) or
Low Ionic (Pb) pH buffer groups. The factory default is the USA buffer
group. To abort the buffer group selection, press CAL to revert to the pH
measurement mode.
1. Press and hold MODE while switching the meter on using the
ON/OFF key. The display will show “bUF” blinking.
2. Press the ENTER key to begin the buffer group selection mode.
Use the MODE key to toggle between USA, NIST or Pb as
shown below.
Press the ENTER key to confi rm the selection. The meter will
automatically revert to the pH measurement mode. The meter will save
the selected group indefi nitely until it is changed.
12
Page 13

3.1.3 Resetting User Calibrated Values
The calibrated pH values can be reset to the factory default using the
procedure below. The temperature offset will not be reset using this
procedure. To abort the reset, press CAL to revert to the measurement
mode.
1. Press and hold CAL while switching the meter on using the ON/
OFF key. The DISPLAY will show “rSt” blinking.
2. Press the ENTER key to confi rm. The meter will automatically
clear all stored pH calibrations and revert to the measurement
mode.
3.2 Temperature Calibration
3.2.1 With Temperature Probe
The temperature probe supplied with the meter is factory calibrated. Over
time, the temperature calibration may drift and require recalibration. If
the temperature probe is replaced the meter should be recalibrated.
1. Connect the temperature probe to the meter. Press the MODE
key until the “°C” annunciator appears on the DISPLAY.
2. Compare the displayed value to a NIST certifi ed thermometer or
other thermometer known to be accurate. For the most accurate
results, place both the probe and thermometer in a constant
temperature bath.
3. Press the CAL key to enter the temperature calibration mode.
The DISPLAY will show “CA” momentarily and the displayed
reading will fl ash.
13
Page 14

4. Press INC key until the display shows the desired temperature.
The meter will allow an adjustable maximum value of ±5 °C
from the factory default.
5. To cancel or abort this operation, press the CAL key. To confi rm
the calibration, press the ENTER key. A new value will be
stored in the meter non-volatile memory. The meter will display
“CO” momentarily, and then revert to the measurement mode.
3.2.2 Without Temperature Probe (no ATC)
If a temperature probe is not used, the meter will compensate the pH
response based on a temperature value that has been manually set or at
the factory default of 25.0 °C.
1. Press the MODE key until “°C” shows on the DISPLAY.
2. Compare the displayed value to a NIST certifi ed thermometer or
thermometer that is known to be accurate (dipped into a constant
temperature bath).
3. Press the CAL key to enter the temperature calibration mode.
The DISPLAY will show “CA” momentarily and the displayed
reading will fl ash. Note that the displayed value should be either
25.0 °C or the last set temperature value.
4. Press the INC key until the displays shows the desired
temperature. The value can be set from 0 to 100 °C.
5. To cancel or abort this operation, press the CAL key. To confi rm
the calibration, press the ENTER key. A new value will be
stored in the meter non-volatile memory. The DISPLAY will
display “CO” momentarily, and the meter will revert to the
measurement mode.
14
Page 15

4. MEASUREMENT
4.1 Taking Measurements
1. Before measurement, rinse the pH probe and temperature probe
with clean water to remove any impurities.
2. Power on the meter using the ON/OFF key. Press the MODE
key to select the desired mode of operation (pH or Temperature).
3. Dip the probes in the aqueous test sample. Stir gently with the
probes and wait for the reading to stabilize. Note the reading.
Freeze the displayed if desired—for details refer to Section 4.2
Holding a Reading.
4. Rinse the probes with clean water before taking the next reading
or storing the meter.
4.2 Holding a Reading
To freeze or hold the displayed reading, press the HOLD key once. The
DISPLAY will display the ”HO” annunciator to indicate the HOLD
function is activated.
4.3 Releasing a Held Reading
Press the HOLD key once again to deactivate the HOLD function
or to release the frozen reading. The meter will revert to the current
measurement mode, and the “HO” annunciator will disappear from the
DISPLAY.
15
Page 16

5. ELECTRODE CARE AND MAINTENANCE
For best results, store the pH probe bulb wet. Store the pH glass bulb
in pH probe storage solution. NEVER use deionized water for storage.
Wash probes with clean water after each use.
pH probes are susceptible to contamination and dirt. Clean them as
needed using mild detergent and warm water. Blot the probe gently with
soft tissue paper to dry. Avoid excessive rubbing of the glass membrane
and avoid touching it with the fi ngers. Recalibrate after cleaning.
6. TROUBLESHOOTING
Problem Cause Solution
No display Batteries not in place. a) Insert batteries.
b) Re-insert batteries in correct
polarity.
“LO” displays
in the LCD
Unstable
reading
Not able to
calibrate
Er1
Er3
Er5
Oe
uE
Low battery Replace batteries.
a) Electrode not deep
enough in sample
b) Dirty electrode.
c) Broken electrode
a) Display freezes
b) Faulty electrode
c) Inaccurate buffer
Buffer value out of tolerance Use new calibration solution and
ISE slope not within the
specifi ed tolerance
Upon exit of calibration mode,
a 1-point calibration was
attempted with a pH buffer
other than 7.00 or 6.86
Over range: reading exceeds
maximum value
Under range: reading
exceeds minimum value
a) Place electrode deeper in
sample.
b)
Clean electrode and recalibrate.
c) Replace electrode.
a) Release reading by pressing
HOLD.
b) Replace electrode.
c)
Replace expired buffer solutions.
recalibrate. Ensure correct pH
buffer group was selected.
Recalibrate
Repeat pH calibration using one
or more points which include
either 7.00 (USA) or 6.86 (NIST)
standards.
Ensure that the value being
measured is within the range of
the selected mode. Confi rm that
electrode(s) are connected and
working properly.
16
Page 17

7. SPECIFICATIONS
pH Range 0.00 to 14.00 pH
Resolution 0.01 pH
Accuracy ±0.01 pH
pH Slope Range 80 to 120%
No. of Calibration Pts 1 to 3 points (push-button)
Buffer Options pH 4.01, 7.00, 10.01 (USA)
pH 4.01, 6.86, 9.18 (NIST)
pH 4.10, 6.97 (Pb)
Temperature Range 0.0 to 100.0 oC
Resolution 0.1 °C
Accuracy ±0.5 °C
Temperature Comp. Automatic / Manual (0 to 100 °C)
Features
Auto-Buffer Recognition Yes
Hold Function “HO”
Auto Shut Off After 17 minutes
Low Battery Indication “LO”
Display Single Custom LCD
Operating Temperature 0 to 50 °C
Power Requirements 4 x “AAA” Alkaline Batteries
Battery Life 500 hours
Meter Dim./Weight 15.7 x 8.5 x 4.2 cm / 255 g
17
Page 18

8. REPLACEMENT PARTS AND ACCESSORIES
Item Description Code
pH Probe 1904
Temperature Probe 1909
AC Adapter, 110 mV 1726-110
AC Adapter, 220 mV 1754
Buffer, pH 4.01, 120 mL 2866-J
Buffer, pH 7.00, 120 mL 2881-J
Buffer, pH10.00, 120 mL 2896-J
Mini Buffer Tablets, pH 4.0, 50 tablets 3983A-H
Mini Buffer Tablets, pH 7.0, 50 tablets 3984A-H
Mini Buffer Tablets, pH 10.0, 50 tablets 3985A-H
9. WARRANTY
LaMotte Company warrants this instrument to be free of defects in parts
and workmanship for 3 years from the date of shipment and the probe
to be free of defects in parts and workmanship for 6 months from the
date of shipment. If it should become necessary to return the instrument
for service during or beyond the warranty period, contact our Technical
Service Department at 1-800-344-3100 or tech@lamotte.com for a return
authorization number or visit www.lamotte.com for troubleshooting
help. The sender is responsible for shipping charges, freight, insurance
and proper packaging to prevent damage in transit. This warranty
does not apply to defects resulting from action of the user such as
misuse, improper wiring, operation outside of specifi cation, improper
maintenance or repair, or unauthorized modifi cation. LaMotte Company
specifi cally disclaims any implied warranties or merchantability or
fi tness for a specifi c purpose and will not be liable for any direct,
indirect, incidental or consequential damages. LaMotte Company’s total
liability is limited to repair or replacement of the product. The warranty
set forth above is inclusive and no other warranty, whether written or
oral, is expressed or implied.
18
Page 19

10. RETURN OF ITEMS
Should it be necessary to return the meter for repair or servicing,
pack the meter carefully in a suitable container with adequate packing
material. A return authorization number must be obtained from LaMotte
Company by calling 800-344-3100 (US only) or 410-778-3100, faxing
410-778-6394, or emailing tech@lamotte.com. Often a problem can be
resolved over the phone or by email. If a return of the meter is necessary,
attach a letter with the return authorization number, meter serial number,
a brief description of problem and contact information including phone
and FAX numbers to the shipping carton. This information will enable
the service department to make the required
19
Page 20

PO Box 329 • Chestertown • MD • 21620
800-344-3100 • 410-778-3100 • f 410-778-6394
www.lamotte.com
626094-33 3.14
 Loading...