


High-end Dashboard Camera with GPS
Tracking and Speed Camera Detection
LAMAX C9
EN USER MANUAL
DE BEDIENUNGSANLEITUNG
CZ UŽIVATELSKÁ PŘÍRUČKA
SK UŽÍVATEĽSKÁ PRÍRUČKA
PL INSTRUKCJA OBSŁUGI
HU HASZNÁLATI ÚTMUTATÓ
LT NAUDOJIMO INSTRUKCIJA
SLO UPORABNIŠKI PRIROČNIK
HR PRIRUČNIK ZA KORISNIKA
High-end Dashboard Camera with GPS
Tracking and Speed Camera Detection
LAMAX C9
EN USER MANUAL
- 2 -
Introduction
Thank you for purchasing the LAMAX C9 dashcam. Wherever you go, you now have a reliable
travel companion for your car journeys. The high-quality shots it delivers will not only serve as
evidence for your insurance company or the police, but also provide great footage from your
holidays.
1. Pack Contents
– LAMAX C9 dashcam
– Suction cup mount with GPS module
– Car charger
– MicroSD-USB adapter
– USB cable
– Manual and Safety Instructions
– Camera travel bag
– Microber cloth
– Other printed materials (stickers, Facebook card, registration card)
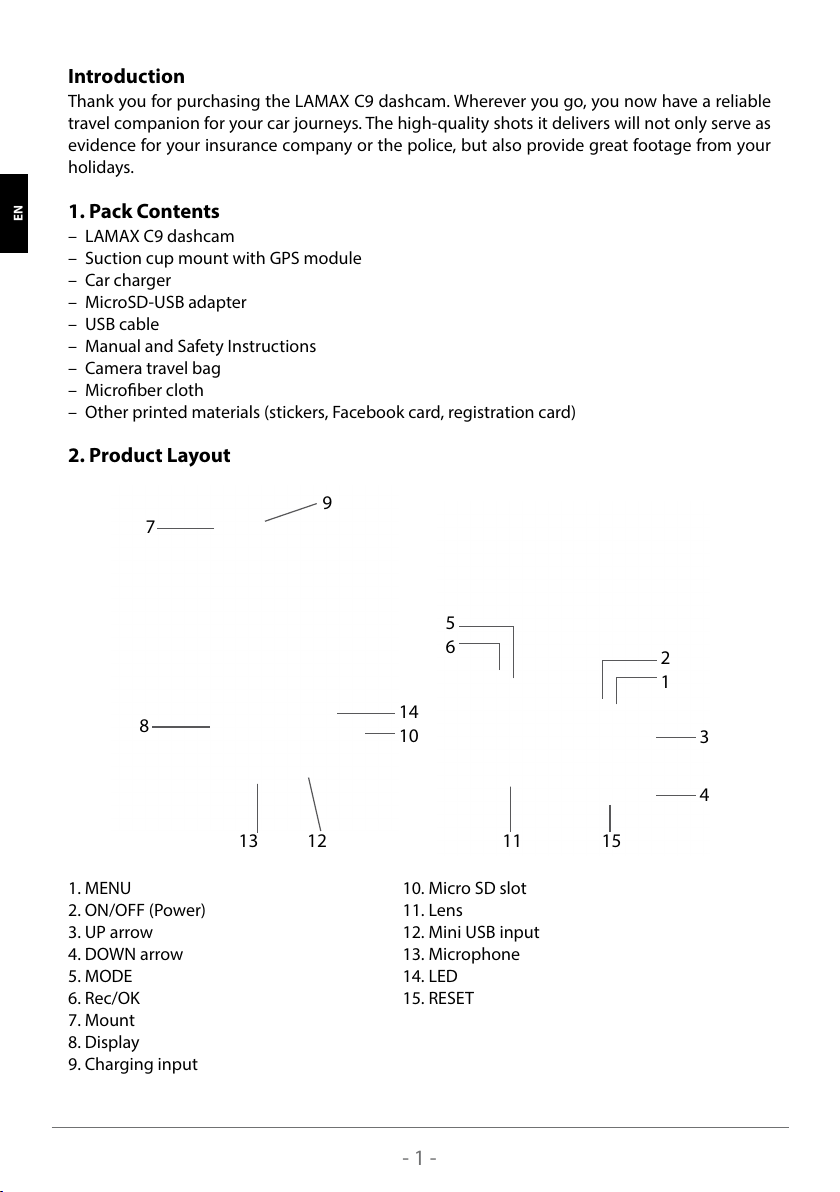
2. Product Layout
9
7
5
6
8
14
10
2
1
3
HR SLO LT HU PL SK CZ DE EN
1. MENU
2. ON/OFF (Power)
3. UP arrow
4. DOWN arrow
5. MODE
6. Rec/OK
7. Mount
8. Display
9. Charging input
4
13 1112 15
10. Micro SD slot
11. Lens
12. Mini USB input
13. Microphone
14. LED
15. RESET
- 1 -
3. Installing the Device
1) Guide the power cable around the windscreen to the car cigarette lighter so as not to
obstruct the driver’s view and fasten it securely. To achieve the optimal shot, attach the
device between the glass and the rear-view mirror.
2) Do not install the device in a position which obstructs the driver’s view or that may distract.
3) Some vehicles do not cut power to the cigarette lighter when the engine is o. In this case,
unplug the cable from the cigarette lighter before exiting the vehicle.
4) When using the device for the rst time, the battery may be low. If you cannot switch on the
device due to low power, manually connect the external power cable to charge the battery.
5) Use only a high-quality microSD card of class 10 or higher. For optimal recording use, we re-
commend using cards with a capacity of at least 8GB up to a maximum of 64GB. If this is the
rst use of the card, we recommend formatting it rst..
Important Notice:
- For proper operation the LAMAX C9 and GPS module, the power cable must be plugged di-
rectly into the micro USB port of the GPS holder (not into the micro USB port on the camera).
- To ensure the camera functions properly, it must be plugged securely into the holder (the
camera must be snapped into the holder and be fully inserted). When removing the camera,
it is necessary to press the safety lock at the front of the holder and then carefully pull the
camera out. If the camera is not fully attached to the GPS module, there may be disruptions to
the power supply or GPS operation.
4. Using the LAMAX C9 Dashcam
1) Inserting a MicroSD Card
Insert or remove the microSD card when the camera is switched o and not connected to a
computer or power supply.
2) Charging
a) Camera can be powered by both a USB cable or a car charger plugged directly into the car
cigarette lighter.
b) Camera is designed to be powered continuously. Integrated battery cannot be removed or
replaced.
3) Turning the Camera On and O
a) Turn the camera on by pressing the ON/OFF button.
b) Camera automatically turns on when connected to the power supply.
c) Turn the camera o by pressing and holding the ON/OFF button for 3-5 seconds.
d) Camera automatically turns o when disconnected from the power supply.
4) Switching Modes and Menu Navigation
a) Tap the MODE button to toggle between modes: video mode (live view) » photo mode »
video gallery/photo gallery » entry lock.
b) The camera menu is divided into three parts: database menu » basic camera settings »
advanced settings. Navigate between these parts using the UP and DOWN arrows. To enter
the menu press the MENU button. In each individual section of the menu, move vertically
using the UP and DOWN arrows and press OK to conrm the selection.
c) Video / photo settings can only be accessed from the appropriate mode. This means you can
only access video settings from video mode and photo settings from photo mode.
EN DE CZ SK PL HU LT SLO HR
- 2 -
d) Press the MENU button to return to the previous screen.
5) Recording / Taking Photos / Viewing the Gallery
a) To begin recording, press the OK button. Press again to stop recording. Camera must be in
video recording mode.
b) Auto-record – the auto-record function is always on. Auto-recording begins when the camera
is turned on. If the car’s power supply is ignition dependant, the camera turns on and begins
recording after car ignition.
c) Auto-stop record and shutdown – the camera automatically stops recording and turns o
when the power is interrupted, i.e. when the engine is turned o. In some cars, the cigarette
lighter is continuously powered. In this case, be sure to unplug the power cable from the
cigarette lighter.
d) Press the OK button to take a photo. The camera must be in photo mode.
e) When you switch to gallery mode, a list of recorded videos and photos is displayed. Use the
UP and DOWN arrows to move between individual recordings and photos. To start and stop
a recording, press the OK button.
6) Deleting Entries Directly on the Camera
Deleting individual entries can be done directly on the camera – this can be done in the gallery.
Select the le you want to delete. Press the MENU button and two options are given: “Delete
this entry” or “Delete all entries”. Select the option using the arrow keys and conrm with the OK
button. Use the arrow keys to select “Yes” or “No” and conrm again with OK.
7) Connecting to a PC
The camera can be connected to a PC using the included mini USB cable. Once connected, the
camera acts as a plug‘n‘play device.
8) GPS Player
LAMAX C9 camera oers you smart and useful software. On a single screen it allows you to view
your footage, the route on map, the speed chart and the g-forces obtained from the came-
ra’s internal G-sensor. Download the GPS player installation le at www.lamax-electronics.com,
under LAMAX C9 » Download
9) Voice alert
The GPS module is a LAMAX C9 add-on which stores the current map database containing
information on places where to exercise caution. The module includes a database of speed
cameras and intersections throughout Europe.
The camera‘s voice guidance alerts you when you are speeding or when approaching xed
HR SLO LT HU PL SK CZ DE EN
or sectional speed cameras. The default voice alerts are in English, but this can be switched
to Czech, German or Polish. You can nd them, together with installation instructions, at
www.lamax-electronics.com under LAMAX C9 » Download
- 3 -

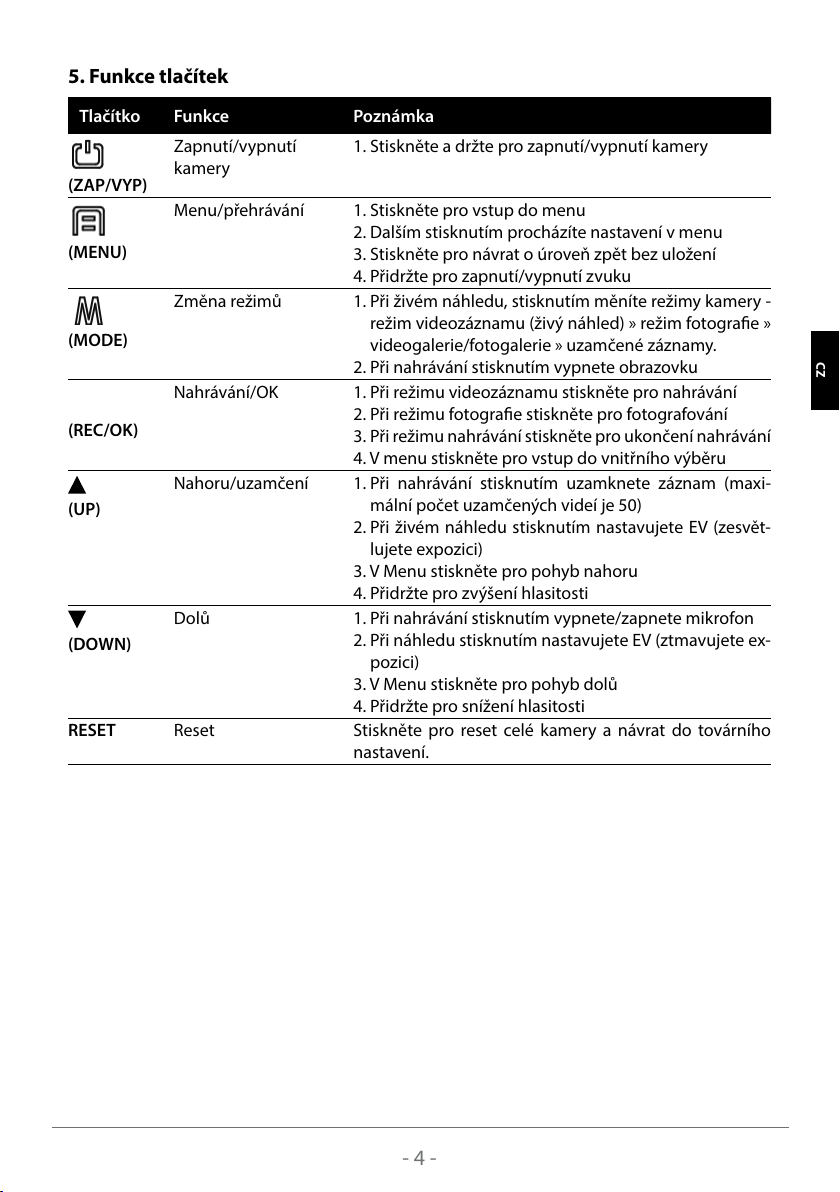
5. Button Functions
Key Function Note
Turn Camera
On/O
ON/OFF
Menu/Playback 1. Press to enter the menu
(MENU)
Change Mode 1. In live view, press to change camera modes - video
(MODE)
Record/OK 1. In video mode, press to record
(REC/OK)
Up/Lock 1. Whilst recording, press to lock the recording (lock up
(UP)
Down 1. Press to turn the microphone on/o
(DOWN)
RESET Reset Press to reset the camera and restore factory settings
1. Press and hold to turn the camera on/o
2. Press again to scroll through menu settings
3. Press to go back without saving
4. Hold to mute/unmute audio
mode (live view) » photo mode » video/photo gallery
» entry lock.
2. Whilst recording, press to turn screen o
2. In photo mode, press to take photo
3. In recording mode, press to end recording
4. In the menu, press to select
to 50 videos)
2. In live view, press to set the EV (to lighten exposure)
3. In the menu, press to move up
4. Hold to increase volume
2. In live view, press to set the EV (to darken exposure)
3. In the menu, press to move down
4. Hold down to decrease volume
EN DE CZ SK PL HU LT SLO HR
- 4 -

6. Key to Icons
1
2 3 4 5 6 7 8
10
13
14
1 Recording (if icon is not displayed, camera is not recording)
2
3
4
5
×
6
×
7
8
9
10
HR SLO LT HU PL SK CZ DE EN
11
12
13
14
15
WDR
Video recording time
Recording is locked
Motion detection is on
GPS active × no GPS signal
Microphone on / o
Memory card storage status
Used space= 0
Icon
Power indicator / battery status (if device not powered)
Video resolution
Direction of travel (compass)
WDR (Wide Dynamic Range)
= image captured with a wide dynamic range
Current speed
Date
Current volume (hold UP/DOWN arrows to display)
Current time
0<Used
space≤1/3
1/3<Used
space≤2/3
16:9
9
11
12
15
2/3<Used
space≤1
- 5 -
7. Menu
Database Menu
Basic Settings
Main Menu Submenu Note
Speed limit O
10 - 140 km/h
Database On
O
GPS On
O
Resolution 2560×1080 30FPS
2304×1296 30FPS
1920×1080 30FPS
Default: O
You will be notied when exceeding the set value.
Default: On
Device works with the speed camera database. If there
is a speed camera near you, the device alerts you with
sound and on the display. You cannot be notied when
GPS is o.
Default: On
GPS tracks position, speed and time. The route and
position can be displayed on Google Maps. When turned
o, the speed and direction of travel are not displayed.
Default: 1920×1080 30FPS
1080P is suitable for normal recording. Higher reso-
lutions take up more storage space on the SD card.
1280×720 60FPS
1280×720 30FPS
Quality Very High
High
Normal
WDR On
O
Date On
O
Loop
Recording
1 min
2 min
3 min
5 min
Default: Very High
Allows video to be compressed directly on the memory
card with minimal loss of quality. The default setting
is: Very high – it shoots at full lossless quality. Lower
settings result in a slightly lower quality but also reduces
the data volume by half.
Default: On
WDR stands for Wide Dynamic Range and adjusts the
contrast balance of given shots. This feature enhances
the quality of shots in locations with unbalanced light
where there is contrast between light and shade.
Default: On
Displays the date and time on the screen and the recor-
ded image.
Default: 1 minute
Uninterrupted loop recording. Automatically records
over the oldest le when memory full. No interruption
in video.
O
EN DE CZ SK PL HU LT SLO HR
- 6 -

Shock Sensor
(G-Sensor)
Sensitivity 1
Sensitivity 2
Sensitivity 3
Sensitivity 4
Default: Sensitivity 4
G-sensor when enabled, automatically locks the video
being currently recorded in the event of a collision. This
prevents it from being overwritten.
Sensitivity 5
Sensitivity 6
Sensitivity 7
O
Motion
Detection
Audio
Recording
Rest
Schedule
Basic Settings
On
O
On
O
O
1 hour
2 hours
Default: O
When motion detection is enabled, the camera automa-
tically starts recording when it detects motion in the lens
eld of view. The camera stops recording shortly after
the motion stops.
Default: On
Mutes or unmutes the audio when shooting video.
Useful if you want to keep your calls private.
Default: 2 hours
This feature recommends you to stop and take a rest
after the pre-set time.
3 hours
4 hours
GPS Route On
O
LDWS
Calibration
LDWS 20
40
60
80
Default: On
When the mode is o, GPS recording is o.
Accurate LDWS calibration is required for proper opera-
tion. Without this, the warning system will not function
properly.
Default: O
LDWS stands for Lane Departure Warning System. The
feature is activated at your chosen speed. Suitable for
long journeys.
100
O
Image
Size
4M (16:9)
9M (16:9)
Default: 13M (16:9)
13M (16:9)
Quality Very High
HR SLO LT HU PL SK CZ DE EN
Mode
Date On
Settings in Photo
High
Normal
O
Default: Very High
Settings aect the overall quality and size of the captu-
red images.
Default: On
Displays date and time on the screen and image.
- 7 -
Date / Time DD / MM / YYYY
h/m
Mains
Frequency
Metering Mode
(exposure
metering)
Screen
Saver
50 Hz
60 Hz
Average
Centre
Spot
Constant light
15 secs
1 min
3 mins
5 mins
Power O
Delay
O
5 Seconds
15 Seconds
30 Seconds
Sounds On
O
Plate
Stamp
Speed
Stamp
Advanced Settings
Speed
O
Inset Text
On
O
KMH / MPH
Unit
Time
GMT-12
Zone
Image
Rotation
On
O
Language English, Deutsch,
Česky, Slovensky,
Polski, Magyar,
Lietuvių, P,
Français, Svenska,
Nederlands
Format Yes
No
Default
setting
Yes
No
Firmware
–
GMT+12
Sets the date and time.
Default: 50 Hz
Sets the frequency according to the grid frequency (on
the European continent the grid runs at a frequency of
50Hz, in America and Asia it is 60 Hz).
Default: Centre
Sets the exposure area of the camera focus.
Default: Constant light
Sets the display to automatically turn o after a period
of inactivity.
Default: O
Allows you to set the delay time between disconnecting
the power and the camera shutting down. This feature
is suitable, for example, for cars with a startstop system.
Default: On
Sets audible alerts whilst driving.
Default: O
Option to paste text information into video recording.
Default: On
Option to paste speed information into video recording.
Default: KMH
Kilometers per hour / miles per hour
Default: +1
Sets the time zone.
Default: O
Option to rotate image 180 degrees.
Default: English
Default: No
Default: Yes
EN DE CZ SK PL HU LT SLO HR
- 8 -
8. LDWS and Calibration
After attaching the camera to the mount, select “LDWS Calibration” in the basic settings and
follow the instructions in the image below:
Note: Accurate LDWS calibration is required for proper function of this feature. Without this,
the warning system will not work correctly.
9. LED and Function
Indicator Meaning
Blue Light
Red Light
Remains on Charging
Switches o Charging complete
Remains on Camera not recording
Blinks at 1 second intervals Recording
HR SLO LT HU PL SK CZ DE EN
- 9 -
10. Technical Parameters
Video resolution 2560×1080 30FPS, 2304×1296 30FPS,
1920×1080 30FPS, 1280×720 60FPS, 1280×720 30FPS
Angle of View 150°
Screen Size 2.7 inch, 16:9
Memory Type Micro SD Class 10, max 64 GB
Video Format MP4
Time Stamp YES
GPS YES
G-sensor YES
Connectivity USB
System MS Windows / MAC OS
Input Voltage 5 V
Frequency 50 Hz / 60 Hz
Battery Capacity 150 mAh
Operating Humidity ≤93%RH (40°C)
Operating Temperature -5°C ~ 40°C
Note: Specications may change with the replacement of some device parts or software
updates. Please be aware that some countries of the European Union have specic laws on
dashcam recording. Therefore, we recommend that you inform yourself about the local law
before any trip abroad, ideally through local auto clubs. The camera can be used as evidence,
even when dealing with a police ocer. Again, we recommend that you read the legal
regulations in each country. Please note that such material may also be used against the author
of the recording. The LAMAX Electronics trademark is not responsible for the illegal use of
cameras or material captured by these cameras.
EN DE CZ SK PL HU LT SLO HR
Manufacturer
elem6 s.r.o., Braškovská 308/15, 16100 Prague 6
www.lamax-electronics.com
Misprints and changes in the manual are reserved.
- 10 -

- 11 -
High-End Dashcam mit einem
GPS-Tracker und Radarerkennung
LAMAX C9
DE BEDIENUNGSANLEITUNG
- 1 -

Einleitung
Vielen Dank, dass Sie sich für die Autokamera LAMAX C9 entschieden haben. Damit haben
Sie einen zuverlässigen Begleiter für unterwegs gefunden. Schützen Sie nicht nur sich selbst,
sondern auch Ihr Auto. Scharfe Aufnahmen in hoher Qualität können Sie als Beweise für die
Versicherungsgesellschaft oder Polizei, sowie als eine Erinnerung an Ihren Urlaub verwenden.
1. Packungsinhalt
– Autokamera LAMAX C9
– Saugnapfhalterung mit einem GPS-Modul
– Auto-Ladegerät
– MicroSD-USB Adapter
– USB kabel
– Bedienungsanleitung und Sicherheitshinweise
– Schutzbeutel
– Mikrofasersto
– Sonstiges (Aufkleber, Facebook-Karte, Registrierkarte)
2. Produktenwurf
9
7
5
6
8
14
10
2
1
3
HR SLO LT HU PL SK CZ DE EN
1. MENU-Taste
2. EIN/AUS
3. Aufwärtspfeil
4. Abwärtspfeil
5. MODUS
6. Rec/OK-Taste
7. Halterung
8. Display
9. Ladeanschluss
4
13 1112 15
10. MicroSD-Slot
11. Objektiv
12. Mini-USB-Schnittstelle
13. Mikrofon
14. LED-Licht
15. RESET-Taste
- 1 -
3. Produktinstallation
1) Das Ladekabel die Windschutzscheibe entlang so legen und an den Zigarettenanzünder
anschließen, dass es das Sichtfeld des Fahrers nicht behindert. Das Kabel sicher befestigen.
Das Gerät zwischen dem Glas und dem Rückspiegel befestigen. So ist der optimale
Blickwinkel gewährleistet.
2) Das Gerät so positionieren, dass es den Fahrer nicht ablenkt und sein Sichtfeld nicht
einschränkt .
3) Bei einigen Fahrzeugen wird das Laden über den Zigarettenanzünder nicht unterbrochen,
nachdem der Motor abgestellt wurde. In diesem Fall das Ladekabel abstecken, bevor das
Fahrzeug verlassen wird.
4) Falls das Gerät zum ersten Mal benutzt wird, kann der Akku wenig Ladung haben. Wenn
das Gerät aus diesem Grund nicht eingeschaltet werden kann, muss das Ladekabel manuell
angeschlossen werden und der Akku zuerst geladen werden.
5) Nur Marken-MicroSD-Karten der 10. und höheren Klasse benutzen. Um die Aufnahmelänge
optimal zu nutzen, wird empfohlen, Karten mit einer Kapazität von mindestens 8GB und
maximal 64GB zu benutzen. Falls die Karte zum ersten Mal eingesetzt wird, sollte sie zuerst
mithilfe des Geräts formatiert werden.
Wichtige Benachrichtigung:
- Für dass richtige Funktionieren der Autokamera LAMAX C9 und den GPS Modul ist es nötig
den Kabel und das Ladegerät direkt mit dem USB Port im GPS Halter zu verbinden. (Auf keinen
Fall in das USB Port der Kamera reinstecken).
- Für dass richtige Funktionieren muss die Kamera mit dem Halter korrekt verbunden sein (Bei
der Montage müssen Sie die Kamera in den Halter richtig fest rein-klicken damit die bis zum
Ende drinne ist). Bei dem Auspacken der Kamera ist es nötig den Sicherheitsknopf, der sich
an der Vorderseite bendet, zu drücken und erst dann die Kamera vorsichtig herausschieben.
Falls die Kamera nicht richtig mit dem GPS Modul verbunden ist kann es bis zu Ausfällen der
Einspeisung kommen oder die Kamera wird Probleme mit dem Funktionieren haben.
EN DE CZ SK PL HU LT SLO HR
4. Bedienung der Autokamera LAMAX C9
1) MicroSD-Karte einlegen
Die MicroSD-Karte kann in den Steckplatz eingelegt / aus dem Steckplatz entnommen werden,
wenn die Kamera abgeschaltet und nicht an den Computer angeschlossen ist, oder gerade
geladen wird.
2) Stromversorgung
a) Die Kamera kann an die Stromversorgungsquelle sowohl mithilfe eines USB-Kabels für den
Computer, als auch mithilfe des Zigarettenanzünders direkt im Fahrzeug angeschlossen
werden.
b) Die Kamera ist für permanente Stromversorgung bestimmt. Der eingebaute Akku kann nicht
entnommen oder umgetauscht werden.
3) Kamera ein- und ausschalten
a) Die Kamera wird durchs Drücken der EIN/AUS-Taste eingeschaltet.
b) Die Kamera wird automatisch eingeschaltet, sobald sie an die Stromversorgung an-
geschlossen wird.
c) Die Kamera wird durchs Drücken und Halten der EIN/AUS-Taste für 3-5s ausgeschaltet.
- 2 -
d) Die Kamera wird automatisch ausgeschaltet, sobald die Stromversorgung unterbrochen
wird.
4) Modi umschalten und Orientierung im Menü
a) Durch kurzes Drücken der MODE-Taste können Sie folgende Kameramodi umschalten: Auf-
nahmemodus (Live-View) » Fotomodus » Videogalerie/Fotogalerie » gesperrte Aufnahmen.
b) Das Kameramenü besteht aus drei einzelnen Teilen: Datenbank-Menü » Grundeinstellungen
» erweiterte Einstellungen. Unter den einzelnen Teilen kann man sich mithilfe der Pfeile
„aufwärts“/ „abwärts“ orientieren. Durch die MENU-Taste wird das Menü geönet. In
jedem einzelnen Menü-Teil kann man sich vertikal mithilfe der Pfeile „aufwärts“/ „abwärts“
orientieren, zur Bestätigung der Auswahl dient die OK-Taste.
c) Der Menü-Teil Video-/Fotoeinstellungen kann nur aus dem entsprechenden Modus geönet
werden. Das heißt, die Videoeinstellungen kann man also nur im Aufnahmemodus önen,
die Fotoeinstellungen kann man nur im Fotomodus önen.
d) Um eine Ebene zurück zu gehen, drückt man die MENU-Taste.
5) Videos Aufnehmen / Fotos machen / Galerie ansehen
a) Durchs Drücken der OK-Taste wird das Aufnehmen gestartet. Mit dieser Taste kann das
Aufnehmen auch beendet werden. Die Kamera muss dabei im Videoaufnahmemodus sein.
b) Automatisches Aufnehmen – diese Funktion ist dauerhaft an. Automatisches Aufnehmen
wird gestartet sobald die Kamera an die Stromversorgung angeschlossen wird. Falls
die Stromversorgung von dem Starter des Fahrzeuges abhängig ist, wird die Kamera
eingeschaltet und das Aufnehmen gestartet, sobald das Auto gestartet wird.
c) Automatisches Beenden von Aufnehmen und Ausschalten – die Kamera hört automatisch
auf aufzunehmen und schaltet sich aus, wenn die Stromversorgung unterbrochen wird,
d.h. wenn der Motor abgestellt wird. Bei einigen Fahrzeugen wird der Zigarettenanzünder
dauerhaft geladen. In diesem Fall muss das Ladekabel aus dem Zigarettenanzünder
entnommen werden.
d) Fotos werden durchs Drücken der OK-Taste gemacht. Die Kamera muss dazu im Fotomodus
sein.
e) Nachdem der Galeriemodus gewählt wird, wird eine Liste von aufgenommenen Videos und
Fotos angezeigt. Zur Orientierung unter den einzelnen Fotos und Videos dienen die Pfeile
„aufwärts“ / „abwärts“. Mithilfe der OK-Taste wird die Videoaufnahme gestartet und gestoppt.
6) Aufgenommenes Material direkt in der Kamera löschen
Die einzelnen aufgenommenen Fotos/Videos können direkt in der Kamera (in der Galerie)
gelöscht werden. Wählen Sie die Datei aus, die Sie löschen möchten. Drücken Sie die MENU-
HR SLO LT HU PL SK CZ DE EN
Taste, dann werden zwei Möglichkeiten angezeigt: „Diese Aufnahme löschen“ oder „Alle
Aufnahmen Löschen“. Wählen Sie mithilfe der Pfeile die gewünschte Option und bestätigen Sie
mit der OK-Taste. Mithilfe der selben Tasten (Pfeile) wählen Sie „ja“ oder „nein“ und bestätigen
Sie wieder mit der OK-Taste.
7) An den Computer anschließen
Die Kamera kann mithilfe des Mini-USB-Kabels an den Computer angeschlossen werden, das
Teil vom Zubehör ist. Nach dem Anschließen verhält sich die Kamera wie ein plug’n’play-Gerät.
8) Software-Player – GPS Player
Autokamera LAMAX C9 bietet die Möglichkeit, schlaue und nützliche Software applikationen zu
nutzen. Dank dieser Applikationen haben Sie die Möglichkeit, auf einem Monitor das erstellte
- 3 -
Video, sowie die auf abgebildeten Routen, Geschwindigkeit und die Angabe des G-Sensors zu
verfolgen. Die Installationsdatei können Sie hier herunterladen: www.lamax-electronics.com
» LAMAX C9
9) Die Meldungen auf Deutsch
Ein Teil des Autokameras ist ein GPS Modul und eine aktuelle Datenbank von Landkarten, die
Sie auf veschiedene Orte wo es benötigt wird, aufmerksam macht. Die Sprachanweisungen
der Kamera warnt Sie auf die Geschwindigkeitsüberschreitung oder auf die stationäre
oder andere Radaranlagen. Die Sprachanweisungen sind auf Englisch, aber wenn Sie
wollen, können Sie sie auf Deutsch einstellen. Sie nden die Einstellung auf der Webseite
www.lamax-electronics.com, unter dem LAMAX C9 » Download
5. Funktionen der Tasten
Taste Funktion Anmerkung
Kamera Ein/Aus 1. Drücken und halten, um die Kamera ein-/auszuschalten
(EIN/AUS)
Menu/Wiedergabe 1. Drücken, um das Menü zu önen
2. Weiter drücken, um sich in den Menüeinstellungen zu
(MENU)
Modi umschalten 1. Beim Live-View: durchs Drücken die Kameramodi umschal-
(MODE)
Aufnehmen/OK 1. Im Videoaufnahmemodus: drücken, um Aufnehmen zu star-
(REC/OK)
Aufwärts/sperren 1. Beim Aufnehmen: drücken, um die Aufnahme zu sperren.
(UP)
Abwärts 1. Beim Aufnehmen: drücken, um das Mikrofon ein-/aus-
(DOWN)
RESET Zurücksetzen Drücken, um die ganze Kamera zurückzusetzen und die
orientieren
3. Drücken, um eine Ebene zurück zu gehen
4. Halten, um den Ton ein-/auszuschalten
ten – Videoaufnahmemodus (Live-View) » Fotomodus » Vi-
deogalerie/Fotogalerie » gesperrte Aufnahmen
2. Beim Aufnehmen: Durchs Drücken den Bildschirm
ausschalten
ten
2. Im Fotomodus: drücken, um Fotos zu machen
3. Im Aufnahmemodus: drücken, um Aufnehmen zu beenden
4. Im Menü: drücken, um die Innenauswahl zu önen
(die maximale Anzahl von gesperrten Videos ist 50)
2. Beim Live-View: drücken, um das Lichtwert ein-zustellen
(Belichtung heller machen)
3. Für die Orientation aufwärts im Menü
4. Halten, um die Lautstärke zu erhöhen
zuschalten
2. Beim Live-View: drücken, um das Lichtwert ein-zustellen
(Belichtung dunkler machen)
3. Für die Orientation abwärts im Menü
4. Halten, um die Lautstärke zu reduzieren
Werkeinstellungen wieder herzustellen
EN DE CZ SK PL HU LT SLO HR
- 4 -

6. Erklärungen der Symbole
1
2 3 4 5 6 7 8
10
16:9
9
11
12
13
15
14
1
2
3
4
5
×
6
×
7
Aufnehmen
(wenn das Symbol nicht leuchtet, nimmt die Kamera nicht auf)
Aufnahmelänge
Das Symbol stellt das Sperren der aktuellen Aufnahme dar
Bewegungserkennung ein/Aus
GPS aktiv × GPS ohne Empfang
Mikrofon ein/aus
Speicherkarteanzeiger und Status
Verwendeter
Speicherplatz
= 0
Ikone
0<Verwendeter
Speicher-
platz≤1/3
1/3<Verwen-
deter eicher-
platz≤2/3
2/3<Verwendeter
Speicherplatz≤1
8
9
HR SLO LT HU PL SK CZ DE EN
10
WDR
11
12
13
14
15
Ladeanzeiger / Akkustandanzeiger (wenn das Gerät nicht geladen wird)
Videoauösung
Fahrtrichtung gemäß den Himmelrichtungen (Kompass)
WDR (Wide Dynamic Range) = Bild im großen Dynamikbereich aufnehmen
Aktuelle Geschwindigkeit
Datum
Aktuelle Lautstärke
(wird durchs Drücken der Tasten AUFWÄRTS/ABWÄRTS angezeigt)
Aktuelle Uhrzeit
- 5 -
7. Menü
Datenbank-Menü
Grundeinstellungen
Hauptmenü Untermenü Anmerkung
Tempolimit Aus
10 - 140 km/h
Datenbank An
Aus
GPS An
Aus
Auösung 2560×1080 30FPS
2304×1296 30FPS
1920×1080 30FPS
1280×720 60FPS
Standardeinstellungen: Aus
Wenn der eingestellte Wert überschritten wird, werden
Sie darauf hingewiesen.
Standardeinstellungen: An
Die Autokamera arbeitet mit einer Datenbank der
Radarerkennung. Falls ein Geschwindigkeitsradar in der
Nähe ist, werden Sie von dem Gerät auf dem Bildschirm
sowie mit einem Ton gewarnt. Wenn das GPS aus ist,
werden Sie nicht gewarnt.
Standardeinstellungen: An
GPS-Tracker für die Aufzeichnung der Strecke, Position,
Geschwindigkeit und Zeit. Es ist möglich, die Strecke
und die Position in Google Maps zu übertragen. Beim
Ausschalten werden die Geschwindigkeit und die Fahr-
trichtung nicht mehr auf dem Display angezeigt.
Standardeinstellunge: 1920×1080 30FPS
1080P stellt geeignete Einstellungen für gewöhnliche
Aufnahmen dar. Höhere Auösungen nehmen mehr
Platz auf der SD-Karte ein.
1280×720 30FPS
Qualität Sehr hoch
Hoch
Normal
WDR An
Aus
Datum An
Aus
Standardeinstellungen: Sehr hoch
Es ist möglich, das Video direkt auf der Speicherkarte
bei geringerem Qualitätsverlust zu komprimieren. Die
Standardeinstellungen sind: Sehr hoch – die Videos
werden in voller Qualität und ohne Verlust aufge-
nommen. Die zweite Option – Hoch – macht Videos von
leicht schlechterer Qualität, aber gleichzeitig senkt dies
das Datenvolumen auf die Hälfte.
Standardeinstellungen: An
Die Abkürzung WDR steht für Wide Dynamic Range,
d.h. die Funktion, die die Kontraste bei den Aufnahmen
ausgleicht. Diese Funktion erhöht die Aufnahmequa-
lität bei Orten, wo das Licht nicht ausgewogen ist – es
kommt hier zu einem Kontrast vom Licht und Schatten.
Die Abkürzung WDR steht für Wide Dynamic Range,
d.h. die Funktion, die die Kontraste bei den Aufnahmen
ausgleicht. Diese Funktion erhöht die Aufnahmequa-
lität bei Orten, wo das Licht nicht ausgewogen ist – es
kommt hier zu einem Kontrast vom Licht und Schatten.
Standardeinstellungen: An
Datum- und Zeitanzeige auf dem Display und in der
Aufnahme.
EN DE CZ SK PL HU LT SLO HR
- 6 -

Zeitschleife
(Loop Record)
Erschütterung
ssensor
(G-Sensor)
1 Minute
2 Minuten
3 Minuten
5 Minuten
Aus
Empndlichkeit 1
Empndlichkeit 2
Empndlichkeit 3
Empndlichkeit 4
Standardeinstellungen: 1 Minute
Ununterbrochenes Aufnehmen in Schleifen. Die ers-
te Datei wird automatisch überschrieben, sobald der
Speicher voll wird. Das Video wird damit nicht unter-
brochen.
Standardeinstellungen: Empndlichkeit 4
Der aktivierte G-Sensor sperrt im Falle eines Unfalls
automatisch die aktuelle Aufnahme und schützt sie so
gegen Überschreiben.
Empndlichkeit 5
Empndlichkeit 6
Empndlichkeit 7
Au
Bewegungs-
erkennung
Tonaufnahme An
Ruhezeitplan Aus
Grundeinstellungen
An
Aus
Aus
1 Stunde
2 Stunden
Standardeinstellungen: Aus
Wenn die Bewegungserkennung an ist, beginnt die Au-
tokamera automatisch aufzunehmen, sobald sie eine
Bewegung in ihrem Sichtfeld erkennt. Wenn die Bewe-
gung vorbei ist, wird die Aufnahme beendet.
Standardeinstellungen: An
Es ist möglich, den Ton beim Aufnehmen von Videos
ein- und auszuschalten. Diese Funktion eignet sich,
wenn Sie z.B. nicht möchten, dass Ihre privaten Gesprä-
che aufgezeichnet werden.
Standardeinstellungen: 2 Stunden
Das Gerät empehlt Ihnen nach der verlaufenen Zeit,
anzuhalten und sich auszuruhen.
3 Stunden
4 Stunden
GPS-Strecke An
Aus
LDWS-
Kalibrierung
LDWS 20
40
HR SLO LT HU PL SK CZ DE EN
60
80
100
Aus
Aufnahme-
größe
4M (16:9)
9M (16:9)
Standardeinstellungen: An
Wenn der Modus aus ist, zeichnet das GPS keine Strecke
auf.
Eine genaue LDWS-Kalibrierung ist nötig, damit der
Spurhalteassistent richtig funktionieren kann, ohne
diesen Mechanismus wird dieses Schutzsystem nicht
richtig funktionieren
Standardeinstellungen: Aus
Der Spurhalteassistent (LDWS, Lane Departure War-
ning System) ist ein Warnsystem, das den Fahrer vor
dem Verlassen einer Fahrspur warnt. Dieses System
funktioniert bei der Geschwindigkeit, die Sie sich selbst
wählen. Er ist für längere Fahrten geeignet.
Standardeinstellungen: 13M (16:9)
13M (16:9)
Qualität Sehr hoch
Datum An
Einstellungen
im Fotomodus
Hoch
Normal
Aus
Standardeinstellungen: Sehr hoch
Die Einstelllungen beeinussen die gesamte Qualität
der erstellten Aufnahmen und ihre Größe.
Standardeinstellungen: An
Datum- und Zeitanzeige auf dem Display und auf dem
Foto.
- 7 -
Datum / Zeit DD / MM / RRRR
h/m
Frequenz
unterdrücken
Belichtung
messen
50 Hz
60 Hz
Durchmesser
Zentral
Punkt
Bildschirm-
schoner
Aus
15 Sekunden
1 Minute
3 Minuten
5 Minuten
Verzögerung Aus
5 Sekunden
15 Sekunden
30 Sekunden
Töne An
Aus
Textzeichen Aus
Textzeichen
hinzufügen
Weitere Einstellungen
Geschwindig-
keitsanzeigeAnAus
Tachometer KMH / MPH
Zeitzone GMT-12
Bild drehen An
Aus
Sprache English, Deutsch,
Česky, Slovensky,
Polski, Magyar,
Lietuvių, P,
Français, Svenska,
Nederlands
Formatieren Ja
Nein
Zurücksetzen Ja
Nein
Verzion Firmware
–
GMT+12
Datum- und Zeiteinstellungen
Standardeinstellungen: 50 Hz
Es ist möglich, die Frequenz im Einklang mit der Lei-
tungsnetzfrequenz zu wählen (auf dem europäischen
Kontinent gibt es im Netz Strom mit einer Frequenz von
50 Hz, in Amerika und im Teil Asiens ist es 60 Hz).
Standardeinstellungen: Zentral (Mitte)
Belichtungseinstellungen
Standardeinstellungen: Aus
Automatisches Ausschalten des Displays bei Inaktivität
einstellen.
Standardeinstellungen: Aus
Ermöglicht die sofortige Abschaltung nach dem Tre-
nnen der Kamera von der Stromversorgung. Diese
Funktion eignet sich beispielsweise für Fahrzeuge mit
Start / Stopp-Gerät.
Standardeinstellungen: An
Tonbenachrichtigung während der Fahrt einstellen
Standardeinstellungen: Aus
Es ist möglich, eine Textinformation in die Videoaufna-
hme hinzuzufügen.
Standardeinstellungen: An
Standardeinstellungen: KMH
Standardeinstellungen: +1
Zeitzone einstellen
Standardeinstellungen: Aus
Dies ermöglicht es, das Bild um 180 Grad zu drehen.
Standardeinstellungen: Englisch
Standardeinstellungen: Nein
Standardeinstellungen: Ja
EN DE CZ SK PL HU LT SLO HR
- 8 -
8. LDWS und Kalibrierung
Nachdem Sie die Autokamera in der Halterung befestigen, wählen Sie im Menü der
Grundeinstellungen » “LDWS-Kalibrierung” und folgen Sie die Hinweise auf dem Bild unten:
Anmerkung: Eine genaue LDWS-Kalibrierung ist nötig, damit das Schutzsystem bestmöglich
funktionieren kann.
9. Anmerkung
Anzeiger Bedeutung
Blaues Licht
Rotes Licht
Leuchtet ständig Auaden
Leuchtet nicht mehr Auaden abgeschlossen
Leuchtet ständig Die Autokamera nimmt nicht auf
Blickt im 1-Sekunden-Interval Video aufnehmen
HR SLO LT HU PL SK CZ DE EN
- 9 - - 10 -
10. Technische Parameter
Videoauösung 2560×1080 30FPS, 2304×1296 30FPS,
1920×1080 30FPS, 1280×720 60FPS, 1280×720 30FPS
Blickwinkel 150°
Bildschirmgröße 2,7 Zoll, 16:9
Speichertyp Micro SD Class 10, max 64 GB
Videoformat MP4
Zeitzeichnen JA
GPS JA
G-Sensor JA
Konnektivität USB
System MS Windows / MAC OS
Eingangsspannung 5 V
Frequenz 50 Hz / 60 Hz
Akkukapazität 150 mAh
Betriebsfeuchtigkeit ≤93%RH (40°C)
Betriebstemperatur -5°C ~ 40°C
Anmerkung: Die technischen Parameter können durch Umtausch eines Geräteteils oder eine
Software-Aktualisierung geändert werden. Achtung, einige EU-Länder haben spezische
Gesetze, die das Aufnehmen mithilfe einer Autokamera regulieren. Es wird also empfohlen,
sich vor jeder Reise ins Ausland über die nationalen Regeln zu informieren, im Idealfall bei
dortigen Automobilclubs. Die Autokamera kann in vielen Ländern als Beweismaterial
verwendet werden, und das sogar bei der Polizei. Auch hier empfehlen wir, die Regeln in den
einzelnen Ländern zu beachten. Wir weisen darauf hin, dass derartiges Material auch gegen
den Urheber verwendet werden kann. Die Marke LAMAX Electronics haftet weder für die
gesetzeswidrige Verwendung der Kamera noch für die gesetzeswidrige Verwendung des
mithilfe dieser Kamera erzeugten Filmmaterials.
EN DE CZ SK PL HU LT SLO HR
Hersteller
elem6, s.r.o., Braškovská 308/15, 16100 Prag 6
www.lamax-electronics.com
Druckfehler und Änderungen in der Betriebsanleitung sind vorbehalten.
- 10 -

- 11 -
High-end autokamera s GPS lokátorem
a detektorem rychlostních radarů
LAMAX C9
CZ UŽIVATELSKÁ PŘÍRUČKA
- 1 -
Úvod
Děkujeme Vám, že jste si zakoupili autokameru LAMAX C9. Získali jste tak spolehlivého společ-
níka na cesty Vaším automobilem. Chraňte sebe i svůj automobil. Kvalitní ostré záběry můžete
použít nejen jako důkazy pro pojišťovnu či policii, ale také do svých videí z dovolené.
1. Obsah balení
– Autokamera LAMAX C9
– Přísavný držák na sklo s GPS modulem
– Autonabíječka
– MicroSD-USB adaptér
– USB kabel
– Manuál a bezpečnostní instrukce
– Látkový pytlík pro přenos kamery
– Ubrousek z mikrovlákna
– Další tiskoviny (samolepky, Facebook karta, registrační karta)
2. Nákres produktu
9
7
5
6
8
14
10
2
1
3
HR SLO LT HU PL SK CZ DE EN
1. MENU
2. ZAP/VYP (Power)
3. Tlačítko NAHORU
4. Tlačítko DOLU
5. MODE
6. Rec/OK
7. Držák
8. Displej
9. Vstup pro nabíjení
4
13 1112 15
10. Slot na Micro SD
11. Objektiv
12. Rozhraní mini USB
13. Mikrofon
14. LED dioda
15. RESET
- 1 -
3. Instalace produktu
1) Kabel napájení do autozapalovače veďte okolo předního skla tak, aby nepřekážel řidiči ve
výhledu a bezpečně ho upevněte. Zařízení připevněte mezi sklo a zpětné zrcátko. Dosáhnete
tak optimálního záběru.
2) Zařízení neinstalujte do pozice, která by řidičovi bránila ve výhledu nebo ho rozptylovala
3) Některá vozidla nepřeruší napájení do zapalovače ani po vypnutí motoru. V takovém případě
před opuštěním vozu vyjměte kabel z autozapalovače.
4) Pokud používáte zařízení poprvé, baterie může být málo nabitá. Jestliže nelze zařízení spustit
z důvodů nízké energie, připojte ručně kabel externího napájení a proveďte nabití baterie.
5) Používejte značkové micro SD karty třídy 10 a vyšší. Pro optimální využití délky záznamu
doporučujeme používat karty o kapacitě alespoň 8 GB, maximálně však 64 GB. V případě prv-
ního použití paměťové karty ji doporučujeme naformátovat.
Důležité upozornění:
- Pro správné fungování autokamery LAMAX C9 a GPS modulu je nutné, aby kabel s napájením
vedl přímo do mikro USB portu v GPS držáku (nikoliv do mikro USB portu v kameře).
- Pro zajištění správné funkce musí být kamera do držáku řádně zapojená (při montáži musí
kamera do držáku zacvaknout a být tak zasunuta na doraz). Při vyndávání kamery je nutné
zmáčknout pojistku v přední části držáku a teprve poté kameru opatrně vysunout. Pokud ne-
bude kamera plně připevněna k GPS modulu, může docházet k výpadkům napájení či GPS
fungování.
4. Používání autokamery LAMAX C9
1) Vložení Micro SD karty
Micro SD kartu vkládejte a vyjímejte ze slotu pro micro SD kartu, když je kamera vypnutá a není
připojená k počítači nebo napájení
2) Napájení
a) Kameru můžete připojit ke zdroji jak pomocí USB kabelu do počítače, tak pomocí autozapa-
lovače přímo ve voze.
b) Kamera je určena k trvalému napájení. Integrovanou baterii nelze vyjmout ani vyměnit.
3) Zapnutí a vypnutí kamery
a) Kameru zapnete stisknutím tlačítka ZAP/VYP.
b) Kamera se automaticky zapne po připojení do napájení.
c) Kameru vypnete stisknutím a podržením tlačítka ZAP/VYP po dobu 3-5 sekund.
d) Kamera se automaticky vypne po odpojení z napájení.
4) Přepínání režimů a pohyb v menu
a) Postupným krátkým stisknutím tlačítka „MODE“ můžete přepínat mezi režimy: režim video-
záznamu (živý náhled) » režim fotograe » videogalerie/fotogalerie » uzamčené záznamy.
b) Menu kamery se skládá ze tří samostatných částí: Menu databáze » základní nastavení ka-
mery » pokročilé nastavení. Mezi jednotlivými částmi se pohybujete pomocí šipek „NAHO-
RU“ a „DOLŮ“. Pro vstup do menu slouží tlačítko „MENU“. V každé jednotlivé části menu se
následně pohybujete vertikálně pomocí šipek „NAHORU“ a „DOLŮ“, přičemž k potvrzování
voleb slouží tlačítko „OK“.
EN DE CZ SK PL HU LT SLO HR
- 2 -
c) Do samostatné části menu nastavení videa/nastavení fotograe je možné vstoupit pouze
z příslušného režimu. Tedy do nastavení videa je možné vstoupit pouze z režimu videozá-
znam. Do nastavení fotograe je možné vstoupit pouze z režimu fotoaparát.
d) K návratu o úroveň zpět slouží tlačítko „MENU“.
5) Nahrávání / focení / prohlížení galerie
a) Nahrávání záznamu na kameru započne po stisknutí tlačítka „OK“. Jeho opětovným stisknu-
tím nahrávání ukončíte. Kamera se musí nacházet v režimu videozáznam.
b) Automatické nahrávání – funkce automatického nahrávání je trvale zapnuta. Automatické
nahrávání se spustí po zapojení kamery do napájení. V případě automobilu s napájením
závislým na startéru, se kamera zapne a spustí nahrávání po nastartování.
c) Automatické ukončení nahrávání a vypnutí – kamera automaticky přestane nahrávat a vypne
se po přerušení napájení, tedy vypnutí motoru. Některé automobily mají zapalovač trvale
napájen. V tomto případě nezapomeňte vyjmout napájecí kabel ze zapalovače.
d) Fotograe se pořizují stisknutím tlačítka „OK“. Kamera se musí nacházet v režimu fotograe.
e) Po přepnutí do režimu galerie se zobrazí seznam nahraných videí a pořízených fotograí. Pro
pohyb mezi jednotlivými nahrávkami a snímky slouží šipky „NAHORU“ a „DOLŮ“. Pro spuštění
a vypnutí záznamu slouží tlačítko „OK“.
6) Mazání pořízeného materiálu přímo v kameře
Smazání jednotlivého materiálu přímo v kameře – lze provést v galerii. Vyberte soubor, který
chcete smazat. Stiskněte tlačítko „MENU“ a máte na výběr dvě možnosti: „Smaž tento záznam“
nebo „Smazání všech záznamů“. Vyberte možnost pomocí šipek „NAHORU“ a „DOLŮ“ a poté
potvrďte tlačítkem „OK“ a stejnými tlačítky (šipky) zvolte mezi volbou „ano“ a „ne“ a potvrďte
opět tlačítkem „OK“.
7) Připojení k PC
Kameru lze připojit k PC pomocí mini USB kabelu, který je součástí příslušenství. Po připojení se
kamera chová jako zařízení plug’n‘play.
8) Softwarový přehrávač - GPS player
Autokamera LAMAX C9 nabízí možnost využití chytré a užitečné softwarové aplikace, díky
které máte možnost sledovat na jedné obrazovce pořizované video, zobrazení trasy na ma-
pách, graf rychlosti a záznam pohybu gravitace, který je získán díky internímu G-senzoru
kamery. Instalační soubor k tomuto přehrávači si můžete stáhnout na webových stránkách
www.lamax-electronics.com, pod záložkou LAMAX C9 » Ke stažení
9) Hlasová upozornění v českém jazyce
HR SLO LT HU PL SK CZ DE EN
Součástí autokamery LAMAX C9 je GPS modul a aktuální mapová databáze, díky které Vás
kamera upozorní na místa, kde je třeba dbát zvýšené pozornosti. Hlasové pokyny kame-
ry neopomenou upozornit na překročení povolené rychlosti nebo na blížící se stacionární či
úsekové radary. Výchozí hlasová upozornění jsou v anglickém jazyce, pokud budete chtít, mů-
žete je nahradit českými. Naleznete je, spolu s instrukcemi k instalaci, na webových stránkách
www.lamax-electronics.com, pod záložkou LAMAX C9 » Ke stažení
- 3 -
5. Funkce tlačítek
Tlačítko Funkce Poznámka
Zapnutí/vypnutí
kamery
(ZAP/VYP)
Menu/přehrávání 1. Stiskněte pro vstup do menu
(MENU)
Změna režimů 1. Při živém náhledu, stisknutím měníte režimy kamery -
(MODE)
Nahrávání/OK 1. Při režimu videozáznamu stiskněte pro nahrávání
(REC/OK)
Nahoru/uzamčení 1. Při nahrávání stisknutím uzamknete záznam (maxi-
(UP)
Dolů 1. Při nahrávání stisknutím vypnete/zapnete mikrofon
(DOWN)
RESET Reset Stiskněte pro reset celé kamery a návrat do továrního
1. Stiskněte a držte pro zapnutí/vypnutí kamery
2. Dalším stisknutím procházíte nastavení v menu
3. Stiskněte pro návrat o úroveň zpět bez uložení
4. Přidržte pro zapnutí/vypnutí zvuku
režim videozáznamu (živý náhled) » režim fotograe »
videogalerie/fotogalerie » uzamčené záznamy.
2. Při nahrávání stisknutím vypnete obrazovku
2. Při režimu fotograe stiskněte pro fotografování
3. Při režimu nahrávání stiskněte pro ukončení nahrávání
4. V menu stiskněte pro vstup do vnitřního výběru
mální počet uzamčených videí je 50)
2. Při živém náhledu stisknutím nastavujete EV (zesvět-
lujete expozici)
3. V Menu stiskněte pro pohyb nahoru
4. Přidržte pro zvýšení hlasitosti
2. Při náhledu stisknutím nastavujete EV (ztmavujete ex-
pozici)
3. V Menu stiskněte pro pohyb dolů
4. Přidržte pro snížení hlasitosti
nastavení.
EN DE CZ SK PL HU LT SLO HR
- 4 -

6. Vysvětlivky k ikonám
1
2 3 4 5 6 7 8
10
13
14
1 Nahrávání (pokud ikona nesvítí, kamera nenahrává)
2
3
4
5
×
6
×
7
8
9
10
HR SLO LT HU PL SK CZ DE EN
11
12
13
14
15
WDR
Čas nahrávaného videa (záznamu)
Ikona znázorňující uzamčení daného záznamu
Detekce pohybu zapnuta/vypnuta
GPS aktivní × GPS mimo signál
Mikrofon zapnut/vypnut
Indikátor paměťové karty a status
Paměti využito
= 0
Ikona
Indikátor napájení / stavu baterie (pokud není zařízení napájeno)
Rozlišení videa
Směr jízdy podle světových stran (kompas)
WDR (Wide Dynamic Range)
= snímání obrazu v širokém dynamickém rozsahu
Aktuální rychlost
Datum
Aktuální hlasitost (zobrazí se podržením tlačítek NAHORU/DOLŮ)
Aktuální čas
0<Paměti
využito≤1/3
16:9
1/3<Paměti
využito≤2/3
9
11
12
15
2/3<Paměti
využito≤1
- 5 -

7. Menu
Menu databáze
Základní nastavení
Hlavní menu Podmenu Poznámka
Rychlostní
limit
Databáze Zapnuto
GPS Zapnuto
Rozlišení 2560×1080 30FPS
Vypnuto
10–140 km/h
Vypnuto
Vypnuto
2304×1296 30FPS
1920×1080 30FPS
Výchozí nastavení: Vypnuto
Při překročení nastavené hodnoty budete upozorněni.
Výchozí nastavení: Zapnuto
Pracuje s databází detektoru rychlostních radarů. Pokud
je nablízku rychlostní kamera, zařízení Vás bude varovat
zvukem i na obrazovce. Při vypnutí GPS nebudete upo-
zorňováni.
Výchozí nastavení: Zapnuto
GPS lokátor pro zaznamenání dráhy, pozice, rychlos-
ti a času. Možnost přehrání dráhy a pozice na Goo-
gle Maps. Při vypnutí se přestane zobrazovat rychlost
a směr jízdy na displeji.
Výchozí nastavení: 1920×1080 30FPS
1080P je vhodné nastavení pro běžné nahrávání. Vyšší
rozlišení zabírá více místa na SD kartě.
1280×720 60FPS
1280×720 30FPS
Kvalita Velmi vysoká
Vysoká
Běžná
WDR Zapnuto
Vypnuto
Datum Zapnuto
Vypnuto
Cyklický
záznam
1 minuta
2 minuty
3 minuty
5 minut
Výchozí nastavení: Velmi vysoká
Umožňuje komprimaci videa již přímo na paměťovou
kartu při minimální ztrátě kvality.
Při nastavení kvality na „Velmi vysoká“ natáčí kame-
ra v plné kvalitě a bezeztrátově. Další nižší nastavení
v mírně snížené kvalitě, ale zároveň snižuje objem dat
na polovinu.
Výchozí nastavení: Zapnuto
Zkratka WDR označuje Wide Dynamic Range, tedy funk-
ci pro rovnováhu kontrastu daných záběrů. Tato funkce
zvyšuje kvalitu záběrů u světelně nevyvážených míst,
kde dochází ke kontrastu světla se stínem.
Výchozí nastavení: Zapnuto
Zobrazení datumu a času na displeji a v natočeném zá-
znamu.
Výchozí nastavení: 1 minuta
Nepřerušené nahrávání do smyčky. Automatický pře-
pis prvního souboru, jakmile se zaplní paměť. Nedojde
k přerušení videa.
Vypnuto
EN DE CZ SK PL HU LT SLO HR
- 6 -

Senzor otřesů
(G-senzor)
Citlivost 1 - vysoká
Citlivost 2
Citlivost 3
Citlivost 4
Citlivost 5
Výchozí nastavení: Citlivost 4
Aktivovaný G-senzor v případě nárazu automaticky
uzamkne aktuálně nahrávaný záznam a uchrání ho tak
proti přepsání.
Citlivost 1 je nejvyšší, zatímco 7 je nejnižší.
Citlivost 6
Citlivost 7 - nízká
Vypnuto
Detekce
pohybu
Záznam
zvuku
Plán
odpočinku
Základní nastavení
Vypnuto
Zapnuto
Zapnuto
Vypnuto
Vypnuto
1 hodina
2 hodiny
3 hodiny
Výchozí nastavení: Vypnuto
Při zapnuté detekci pohybu kamera začne automaticky
nahrávat v momentě, kdy zaznamená pohyb v zorném
poli objektivu. Kamera ukončí nahrávání krátce poté, co
pohyb ustane.
Výchozí nastavení: Zapnuto
Umožňuje vypnout či zapnout zvuk při nahrávání videa.
Vhodné například pokud chcete zachovat soukromí Va-
šich hovorů.
Výchozí nastavení: 2 hodiny
Zařízení Vám po uplynulé době doporučí zastavit a od-
počinout si.
4 hodiny
GPS
trasa
LDWS
kalibrace
LDWS 20
Zapnuto
Vypnuto
40
60
80
100
Výchozí nastavení: Zapnuto
Vypnutý režim znamená vypnuté GPS zaznamenávání.
Přesná kalibrace LDWS je nutná pro správné fungová-
ní, bez toho tento ochranný systém nebude fungovat
korektně.
Výchozí nastavení: Vypnuto
LDWS (Lane Departure Warning System) je systém va-
rování při opuštění jízdního pruhu. Tento systém je ak-
tivní od rychlosti, kterou si zvolíte. Vhodný při delších
cestách.
Vypnuto
Velikost
snímku
4M (16:9)
9M (16:9)
Výchozí nastavení: 13M (16:9)
13M (16:9)
HR SLO LT HU PL SK CZ DE EN
Kvalita Velmi vysoká
fotografování
Datum Zapnuto
Nastavení při režimu
Vysoká
Běžná
Vypnuto
Výchozí nastavení: Velmi vysoká
Nastavení ovlivňuje celkovou kvalitu pořízených snímků
a jejich velikost.
Výchozí nastavení: Zapnuto
Zobrazení datumu a času na displeji a na fotograi.
- 7 -

Datum / čas DD / MM / RRRR
h/m
Potlačení
kmitání
50 Hz
60 Hz
(frekvence)
Metrika
(měření
expozice)
Spořič
obrazovky
Průměr
Centr.
Bod
Vypnuto
15 sekund
1 minuta
3 minuty
5 minut
Zpožděné
vypnutí
Vypnuto
5 sekund
15 sekund
30 sekund
Zvuky Zapnuto
Vypnuto
Pokročilé nastavení
Tex tov á
značka
Zobrazení
rychlosti
Vypnuto
Vložit text. zn.
Zapnuto
Vypnuto
Rychlost KMH / MPH
Časová
GMT-12 – GMT+12
zóna
Otočení
obrazu
Zapnuto
Vypnuto
Jazyk English, Deutsch,
Česky, Slovensky,
Polski, Magyar,
Lietuvių, P,
Français, Svenska,
Nederlands
Formátovat Ano
Ne
Tovární
nastavení
Ano
Ne
Verze
Firmware
Nastavení datumu a času
Výchozí nastavení: 50 Hz
Umožňuje vybrat frekvenci v souladu s frekvencí roz-
vodné sítě (na Evropském kontinentu je veden v síti
proud o frekvenci 50 Hz, v Americe a části Asie je to pak
60 Hz).
Výchozí nastavení: Centrální (středový)
Nastavení expoziční oblasti zaměření kamery
Výchozí nastavení: Vypnuto
Nastavení automatického vypnutí displeje v případě
nečinnosti.
Výchozí nastavení: Vypnuto
Umožňuje odložit okamžité vypnutí po vypojení kamery
z napájení. Tato funkce je vhodná například u automo-
bilů se zařízením start/stop.
Výchozí nastavení: Zapnuto
Nastavení zvukového upozornění během jízdy.
Výchozí nastavení: Vypnuto
Možnost vložení textové informace do záznamu videa.
Výchozí nastavení: Zapnuto
Možnost zapnutí / vypnutí zobrazení rychlosti do zázna-
mu videa.
Výchozí nastavení: KMH
Výchozí nastavení: +1
Nastavení časové zóny.
Výchozí nastavení: Vypnuto
Možnost otočení obrazu o 180 stupňů.
Výchozí nastavení: Angličtina
Výchozí nastavení: Ne
Výchozí nastavení: Ano
EN DE CZ SK PL HU LT SLO HR
- 8 -

8. LDWS a kalibrace
Po připevnění kamery do držáku vyberte v Základním nastavení menu » “LDWS kalibrace”
a pokračujte podle instrukcí na obrázku níže:
Poznámka: Přesná kalibrace LDWS je nutná pro správné fungování, bez toho tento ochranný
systém nebude fungovat korektně.
9. LED-dioda a funkce
Ukazatel Význam
Modré světlo
Červené světlo
Stále svítí Nabíjení
Zhasnutí Ukončení nabíjení
Stále svítí Autokamera nenahrává záznam
Bliká v interval 1 sekundy Nahrávání záznamu
HR SLO LT HU PL SK CZ DE EN
- 9 -

10. Technické parametry
Rozlišení videa 2560×1080 30FPS, 2304×1296 30FPS,
1920×1080 30FPS, 1280×720 60FPS, 1280×720 30FPS
Úhel záběru 150°
Velikost obrazovky 2,7 palců, 16:9
Typ paměti Micro SD Class 10, max 64 GB
Formát videa MP4
Časová značka ANO
GPS ANO
G-sensor ANO
Konektivita USB
Systém MS Windows / MAC OS
Vstupní napětí 5 V
Frekvence 50 Hz / 60 Hz
Kapacita baterie 150 mAh
Provozní vlhkost ≤93%RH (40°C)
Provozní teplota -5°C ~ 40°C
Poznámka: Specikace se může změnit výměnou některé části zařízení nebo aktualizací
softwaru. Pozor, některé země Evropské unie mají specické zákony ohledně nahrávání
autokamerou. Proto doporučujeme se před každou cestou do zahraničí informovat o místní
zákonné úpravě, ideálně u lokálních automotoklubů. Kameru lze použít jako důkazní materiál,
a to dokonce i při jednání s příslušníkem policie. Opět doporučujeme nastudovat zákonnou
úpravu v jednotlivých zemích. Upozorňujeme, že takovýto materiál je též možné použít i proti
autorovi takového záznamu. Značka LAMAX Electronics není zodpovědná za nezákonné
použití kamer ani materiálu těmito kamerami pořízeným.
EN DE CZ SK PL HU LT SLO HR
Výrobce
elem6, s.r.o., Braškovská 308/15, 16100 Praha 6
www.lamax-electronics.com
Tiskové chyby a změny v manuálu jsou vyhrazeny.
- 10 -

- 11 -

High-end autokamera s GPS lokátorom
a detektorom rýchlostných radarov
LAMAX C9
SK UŽÍVATEĽSKÁ PRÍRUČKA
- 1 -

Úvod
Ďakujeme Vám, že ste si zakúpili autokameru LAMAX C9. Získali ste tak spoľahlivého spoločníka
na cesty Vašim automobilom. Chráňte seba aj svoj automobil. Kvalitné a ostré zábery môžete
použiť nielen ako dôkazy pre poisťovňu či políciu, ale takisto do svojich videí z dovolenky.
1. Obsah balenia
– Autokamera LAMAX C9
– Prísavný držiak na sklo s GPS modulom
– Autonabíjačka
– MicroSD-USB adaptér
– USB kábel
– Manuál a Bezpečnostné inštrukcie
– Látkové vrecko pre prenos kamery
– Utierka z mikrovlákna
– Ďalšie tlačoviny (samolepky, Facebook karta, registračná karta)
2. Nákres produktu
9
7
5
6
8
14
10
2
1
3
HR SLO LT HU PL SK CZ DE EN
1. MENU
2. ZAP/VYP (Power)
3. Šípka HORE
4. Šípka DOLE
5. MODE
6. Rec/OK
7. Držiak
8. Displej
9. Vstup pre nabíjanie
4
13 1112 15
10. Slot na Micro SD
11. Objektív
12. Rozhranie mini USB
13. Mikrofón
14. LED dióda
15. RESET
- 1 -

3. Inštalácia produktu
1) Kábel napájania do autozapaľovača veďte okolo predného skla tak, aby neprekážal vodičovi
vo výhľade a bezpečne ho upevnite. Zariadenie pripevnite medzi sklo a spätné zrkadielko.
Dosiahnete tak optimálny záber.
2) Zariadenie neinštalujte do pozície, ktorá by vodičovi bránila vo výhľade alebo ho rozptyľo-
vala.
3) Niektoré vozidlá neprerušia napájanie do zapaľovača ani po vypnutí motoru. V takom prípa-
de pred opustením vozidla vyberte kábel z autozapaľovača.
4) Pokiaľ používate zariadenie po prvýkrát, batéria môže byť nedostatočne nabitá. Pokiaľ nie je
možné zariadenie spustiť z dôvodu nízkej energie, pripojte ručne kábel externého napájania
a nabite tak batériu.
5) Používajte značkové micro SD karty triedy 10 a vyššie. Pre optimálne využitie dĺžky
záznamu odporúčame používať karty o kapacite aspoň 8GB, maximálne však 64 GB. V prípade
prvého použitia pamäťovej karty, odporúčame ju naformátovať.
Dôležité upozornenia:
- Pre správne fungovanie autokamery LAMAX C9 a GPS modulu je nutné, aby kábel s napájaním
viedol priamo do micro USB portu v GPS držiaku (nie do micro USB portu v kamere).
- Pre zaistenie správnej funkcie musí byť kamera do držiaka riadne zapojená (pri montáži musí
kamera do držiaka zacvaknúť a byť tak zasunutá na doraz). Pri vyberaní kamery je nutné stlačiť
poistku v prednej časti držiaku a až potom kameru opatrne vysunúť. Pokiaľ nebude kamera
plne pripevnená k GPS modulu, môže dochádzať k výpadkom napájania alebo fungovania
GPS.
4. Používanie autokamery LAMAX C9
1) Vloženie Micro SD karty
Micro SD kartu môžete vložiť a vybrať zo slotu pre micro SD kartu, keď je kamera vypnutá a nie
je pripojená k počítaču alebo napájaniu.
2) Napájanie
a) Kameru môžete pripojiť k zdroju pomocou USB kábla do počítača, tak pomocou auto-zapaľo-
vača priamo vo voze.
b) Kamera je určená k trvalému napájaniu. Integrovanú batériu nie je možné vybrať ani vyme-
niť.
3) Zapnutie a vypnutie kamery
a) Kameru zapnete stlačením tlačidla ZAP/VYP.
b) Kamera sa automaticky zapne po pripojení do napájania.
c) Kameru vypnite stlačením a podržaním tlačidla ZAP/VYP po dobu 3-5 sekúnd.
d) Kamera sa automaticky vypne po odpojení z napájania..
4) Prepínanie režimov a pohyb v menu
a) Postupným krátkym stlačením tlačidla „MODE“ môžete prepínať medzi režimami: režim vi-
deozáznamu (živý náhľad) » režim fotograe » video-galéria/foto-galéria » uzamknuté zá-
znamy.
b) Menu kamery sa skladá z troch samostatných častí: Menu databázy » základné nastavenie
kamery » pokročilé nastavenia. Medzi jednotlivými časťami sa pohybujete pomocou šípok
EN DE CZ SK PL HU LT SLO HR
- 2 -

„HORE“ a „DOLE“. Pre vstup do menu slúži tlačidlo „MENU“. V každej jednotlivej časti menu sa
následne pohybujete vertikálne pomocou šípiek „HORE“ a „DOLE“, pričom k potvrdzovaniu
voľby slúži tlačidlo „OK“.
c) Do samostatnej časti menu nastavení videa/nastavení fotograe je možné vstúpiť len z prí-
slušného režimu. Teda do nastavenia videa je možné vstúpiť len z režimu videozáznam. Do
nastavení fotograe je možné vstúpiť len z režimu fotoaparát.
d) K návratu o úroveň späť slúži tlačidlo „MENU“.
5) Nahrávanie / fotenie / prehliadanie galérie
a) Nahrávanie záznamu na kameru započne po stlačení tlačidla „OK“. Jeho opätovným stlače-
ním nahrávanie ukončíte. Kamera sa musí nachádzať v režime videozáznam.
b) Automatické nahrávanie – funkcia automatického nahrávania je trvalo zapnutá. Automatické
nahrávanie sa spustí po zapojení kamery do napájania. V prípade automobilu s napájaním
závislým na štartéri, sa kamera zapne a spustí nahrávanie po naštartovaní.
c) Automatické ukončenie nahrávania a vypnutie – kamera automaticky prestane nahrávať
a v ypne sa po prerušení napájania, teda vypnutí motoru. Niektoré automobily majú zapaľovač
trvalo napájaný. V tomto prípade nezabudnite vybrať napájací kábel zo zapaľovača.
d) Fotograe sa zhotovujú stlačením tlačidla „OK“. Kamera sa musí nachádzať v režime fotogra-
e.
e) Po prepnutí do režimu galérie sa zobrazí zoznam nahraných videí a zhotovených fotograí.
Pre pohyb medzi jednotlivými nahrávkami a snímkami slúžia šípky „HORE“ a „DOLU“. Pre
spustenie a vypnutie záznamu slúži tlačidlo „OK“.
6) Mazanie zhotoveného materiálu priamo v kamere
Zmazanie jednotlivého materiálu priamo v kamere – možno vykonať v galérii. Vyberte súbor,
ktorý chcete zmazať. Stlačte tlačidlo „MENU“ a uvidíte na výber dve možnosti: „Zmaž tento zá-
znam“ nebo „Zmazanie všetkých záznamov“. Vyberte možnosť pomocou šípok „HORE“ a „DOLE“
a potom potvrďte tlačidlom „OK“ a rovnakými tlačidlami (šípky) zvoľte medzi voľbou „áno“
a „nie“ a potvrďte opäť tlačidlom „OK“.
7) Pripojenie k PC
Kameru možno pripojiť k PC pomocou mini USB káblu, ktorý je súčasťou príslušenstva. Po
pripojení sa kamera chová ako zariadenie plug’n‘play.
8) Softvérový prehrávač – GPS Player
Autokamera LAMAX C9 ponúka možnosť využiť šikovnú a užitočnú softwarovú aplikáciu.
Vďaka nej máte možnosť sledovať na jednej obrazovke zaznamenávané video, zobrazenie
HR SLO LT HU PL SK CZ DE EN
trasy na mapách, graf rýchlosti a záznam o pohybe gravitácie, ktorý je získaný vďaka internému
G-senzoru kamery. Inštalačný súbor k tomuto prehrávaču si môžete stiahnuť na webových
stránkach www.lamax-electronics.com, pod záložkou LAMAX C9 » Na stiahnutie
9) Hlasová upozornenia v českom jazyku
Súčasťou autokamery LAMAX C9 je GPS modul a aktuálne mapové databázy, vďaka ktorým
Vás kamera upozorní na miesta, kde je potrebné dbať na zvýšenú pozornosť. Hlasové
pokyny kamery nezabudnú upozorniť na prekročenie povolenej rýchlosti alebo na blížiace
sa stacionárne či úsekové radary. Predvolené hlasová upozornenia sú v anglickom jazyku, ak
budete chcieť, môžete ich nahradiť českými. Nájdete ich, spolu s inštrukciami na inštaláciu, na
webových stránkach www.lamax-electronics.com, pod záložkou LAMAX C9 » Na stiahnutie
- 3 -

5. Funkcie tlačidiel
Tlačidlo Funkcia Poznámka
Zapnutie /
vypnutie kamery
(ZAP/VYP)
Menu/prehrávanie 1. Stlačte pre vstup do menu
(MENU)
Zmena režimov 1. Pri živom náhľade, stlačením meníte režimy kamery -
(MODE)
Nahrávanie/OK 1. Pri režime videozáznamu stlačte pre nahrávanie
(REC/OK)
Hore/uzamknutie 1. Pri nahrávaní stlačením uzamknite záznam (maximál-
(UP)
Dole 1. Pri nahrávaní stlačením vypnete/ zapnete mikrofón
(DOWN)
RESET Reset Stlačte pre reset celej kamery a návrat do továrenského
1. Stlačte a držte pre zapnutie/ vypnutie kamery
2. Ďalším stlačením prechádzate nastavenie v menu
3. Stlačte pre návrat o úroveň späť bez uloženia
4. Pridržte pre zapnutie/ vypnutie zvuku
režim videozáznamu (živý náhľad) » režim fotograe »
video-galéria/ foto-galéria » uzamknuté záznamy.
2. Pri nahrávaní stlačením vypnete obrazovku
2. Pri režime fotograe stlačte pre fotografovanie
3. Pri režime nahrávania stlačte pre ukončenie nahráva-
nia
4. V menu stlačte pre vstup do vnútorného výberu
ny počet uzamknutých videí je 50)
2. Pri živom náhľade stlačením nastavujete EV (zosvetle-
nie expozíciu)
3. V Menu stlačte pre pohyb nahor
4. Pridržte pre zvýšenie hlasitosti
2. Pri náhľade stlačením nastavujete EV (stmavujete
expozíciu)
3. V Menu stlačte pre pohyb dole
4. Pridržte pre zníženie hlasitosti
nastavenia
EN DE CZ SK PL HU LT SLO HR
- 4 -

6. Vysvetlivky k ikonám
1
2 3 4 5 6 7 8
10
13
14
1 Nahrávanie (pokiaľ ikona nesvieti, kamera nenahráva)
2
3
4
5
×
6
×
7
8
9
10
HR SLO LT HU PL SK CZ DE EN
11
12
13
14
15
WDR
Čas nahrávaného videa (záznamu)
Ikona znázorňujúca uzamknutie daného záznamu
Detekcia pohybu zapnutá/ vypnutá
GPS aktívne × GPS mimo signál
Mikrofón zapnúť/ vypnúť
Indikátor pamäťovej karty a status
Využitie pamäte
= 0
Ikona
Indikátor napájania / stavu batérie (pokiaľ nie je zariadenie napájané)
Rozlíšenie videa
Smer jazdy podľa svetových strán (kompas)
WDR (Wide Dynamic Range)
= snímanie obrazu v širokom dynamickom rozsahu
Aktuálna rýchlosť
Dátum
Aktuálna hlasitosť (zobrazí sa podržaním tlačidiel HORE/DOLU)
Aktuálny čas
0<Využitie
pamäte≤1/3
16:9
1/3<Využitie
pamäte≤2/3
9
11
12
15
2/3<Využitie
pamäte≤1
- 5 -

7. Menu
Menu databáze
Základné nastavenia
Hlavné menu Podmenu Poznámka
Rýchlostný
limit
Databáza Zapnuté
GPS Zapnuté
Rozlíšenie 2560×1080 30FPS
Vypnuté
10 - 140 km/h
Vypnuté
Vypnuté
2304×1296 30FPS
1920×1080 30FPS
Počiatočné nastavenie: Vypnuté
Pri prekročení nastavenej hodnoty budete upozornený.
Počiatočné nastavenie: Zapnuté
Pracuje s databázou detektoru rýchlostných radarov.
Ak je nablízku rýchlostná kamera, zariadenie Vás bude
varovať zvukom aj na obrazovke. Pri vypnutí GPS nebu-
dete upozorňovaní.
Počiatočné nastavenie: Zapnuté
GPS lokátor pre zaznamenanie dráhy, pozície, rých-
losti a času. Možnosť prehrávania dráhy a pozície na
Google Maps. Pri vypnutí sa prestane zobrazovať rých-
losť a smer jazdy na displeji.
Počiatočné nastavenie: 1920×1080 30FPS
1080P je vhodné nastavenie pre bežné nahrávanie.
Vyššie rozlíšenie zaberá viac miesta na SD karte.
1280×720 60FPS
1280×720 30FPS
Kvalita Veľmi vysoká
Vysoká
Bežná
WDR Zapnuté
Vypnuté
Dátum Zapnuté
Vypnuté
Cyklický
záznam
1 minúta
2 minúty
3 minúty
5 minút
Počiatočné nastavenie: Zapnuté
Skratka WDR označuje Wide Dynamic Range, teda
funkciu pre rovnováhu kontrastu daných záberov.
Táto funkcia zvyšuje kvalitu záberov pri svetelne
nevyvážených miestach, kde dochádza ku kontrastu
svetla s tieňom.
Výchozí nastavení: Zapnuto
Zkratka WDR označuje Wide Dynamic Range, tedy
funkci pro rovnováhu kontrastu daných záběrů. Tato
funkce zvyšuje kvalitu záběrů u světelně nevyvážených
míst, kde dochází ke kontrastu světla se stínem.
Počiatočné nastavenie: Zapnuté
Zobrazenie dátumu a času na displeji a v nakrútenom
zázname.
Počiatočné nastavenie: 1 minúta
Neprerušené nahrávanie v slučke. Automatický prepis
prvého súboru, akonáhle sa zaplní pamäť. Nedôjde
k prerušeniu videa.
Vypnuté
EN DE CZ SK PL HU LT SLO HR
- 6 -

Senzor otrasov
(G-senzor)
Citlivosť 1
Citlivosť 2
Citlivosť 3
Citlivosť 4
Počiatočné nastavenie: Citlivosť 4
Aktivovaný G-senzor v prípade nárazu automaticky
uzamkne aktuálne nahrávaný záznam a ochráni ho tak
proti prepísaniu.
Citlivosť 5
Citlivosť 6
Citlivosť 7
Vypnuté
Detekcia
pohybu
Záznam
zvuku
Plán
odpočinku
Základné nastavenia
Vypnuté
Zapnuté
Zapnuté
Vypnuté
Vypnuté
1 hodina
2 hodiny
3 hodiny
Počiatočné nastavenie: Vypnuté
Pri zapnutej detekcii pohybu kamera začne automatic-
ky nahrávať v momente, kedy zaznamená pohyb v zor-
nom poli objektívu. Kamera ukončí nahrávanie krátko
potom, čo pohyb ustane.
Počiatočné nastavenie: Zapnuté
Umožňuje vypnúť, či zapnúť zvuk pri nahrávaní videa.
Vhodné napríklad pokiaľ chcete zachovať súkromie
Vašich hovorov.
Počiatočné nastavenie: 2 hodiny
Zariadenie Vám po uplynulej dobe odporučí zastaviť
a odpočinúť si.
4 hodiny
GPS
trasa
LDWS
kalibrácia
LDWS 20
Zapnuté
Vypnuté
40
60
80
100
Počiatočné nastavenie: Zapnuté
Vypnutý režim znamená vypnuté GPS zaznamenáva-
nie.
Presná kalibrácia LDWS je nutná pre správne fungova-
nie, bez toho tento ochranný systém nebude fungovať
korektne.
Počiatočné nastavenie: Vypnuté
LDWS (Lane Departure Warning System) je systém va-
rovania pri opustení jazdného pruhu. Tento systém je
aktívny od rýchlosti, ktorú si zvolíte. Vhodný pri dlhších
cestách.
Vypnuté
Veľkosť
snímku
4M (16:9)
9M (16:9)
Počiatočné nastavenie: 13M (16:9)
13M (16:9)
HR SLO LT HU PL SK CZ DE EN
Kvalita Veľmi vysoká
pri režime
Nastavenie
fotografovanie
Dátum Zapnuté
Vysoká
Bežná
Vypnuté
Počiatočné nastavenie: Veľmi vysoká
Nastavenie ovplyvňuje celkovú kvalitu zhotovených sní-
mok a ich veľkosť.
Počiatočné nastavenie: Zapnuté
Zobrazenie dátumu a času na displeji a na fotograi.
- 7 -

Dátum / čas DD / MM / RRRR
h/m
Potlačenie
kmitania
50 Hz
60 Hz
(frekvencie)
Metrika
(meranie
expozície)
Šetrič
obrazovky
Priemer
Centr.
Bod
Vypnuté
15 sekúnd
1 minúta
3 minúty
5 minút
Oneskorené
vyp.
Vypnuté
5 sekúnd
15 sekúnd
30 sekúnd
Zvuky Zapnuté
Vypnuté
Pokročilé nastavenia
Tex tov á
značka
Rýchlosť
do z.
Vypnuté
Vložiť text. zn.
Zapnuté
Vypnuté
Rýchlosť KMH / MPH
Časová
GMT-12
zóna
Otočenie
obrazu
Zapnuté
Vypnuté
Jazyk English, Deutsch,
Česky, Slovensky,
Polski, Magyar,
Lietuvių, P,
Français, Svenska,
Nederlands
Formátovanie Áno
Nie
Zresetovať Áno
Nie
Verze
Firmware
–
GMT+12
Nastavenie dátumu a času.
Počiatočné nastavenie: 50 Hz
Umožňuje vybrať frekvenciu v súlade s frekvenciou
rozvodnej siete (na európskom kontinente je vedený
v sieti prúd o frekvencii 50 Hz, v Amerike a časti Ázie je
to potom 60 Hz).
Počiatočné nastavenie: Centrálne (stredový)
Nastavenie expozičnej oblasti zamerania kamery.
Počiatočné nastavenie: Vypnuté
Nastavenie automatického vypnutia displeja v prípade
nečinnosti.
Počiatočné nastavenie: Vypnuté
Umožňuje odložiť okamžité vypnutie po vypojení ka-
mery z napájania. Táto funkcia je vhodná napríklad pri
automobiloch so zariadením štart/stop.
Počiatočné nastavenie: Zapnuté
Nastavenie zvukového upozornenia behom jazdy.
Počiatočné nastavenie: Vypnuté
Možnosť vloženia textovej informácie do záznamu
videa.
Počiatočné nastavenie: Zapnuté
Možnosť zapnutia / vypnutia zobrazenia rýchlosti do
záznamu videa
Počiatočné nastavenie: KMH
Počiatočné nastavenie: +1
Nastavenie časovej zóny.
Počiatočné nastavenie: Vypnuté
Možnosť otočenia obrazu o 180 stupňov.
Počiatočné nastavenie: Angličtina
Počiatočné nastavenie: Nie
Počiatočné nastavenie: Áno
EN DE CZ SK PL HU LT SLO HR
- 8 -

8. LDWS a kalibrácia
Po pripevnení kamery do držiaku vyberte v základnom nastavení menu » “LDWS kalibrácia”
a pokračujte podľa inštrukcií na obrázku nižšie:
Poznámka: Presná kalibrácia LDWS je nutná pre správne fungovanie, bez toho tento ochranný
systém nebude fungovať korektne.
9. LED-dióda a funkcie
Ukazovateľ Význam
Modré svetlo
Červené svetlo
Stále svieti Nabíjanie
Zhasnutie Ukončenie nabíjania
Stále svieti Autokamera nenahráva záznam
Bliká v intervale 1 sekundy Nahrávanie záznamu
HR SLO LT HU PL SK CZ DE EN
- 9 -

10. Technické parametre
Rozlíšenie videa 2560×1080 30FPS, 2304×1296 30FPS,
1920×1080 30FPS, 1280×720 60FPS, 1280×720 30FPS
Uhol záberu 150°
Veľkosť obrazovky 2,7 palcov, 16:9
Typ pamäte Micro SD Class 10, max 64 GB
Formát videa MP4
Časová značka ÁNO
GPS ÁNO
G-sensor ÁNO
Konektivita USB
Systém MS Windows / MAC OS
Vstupné napätie 5 V
Frekvencia 50 Hz / 60 Hz
Kapacita batérie 150 mAh
Prevádzková vlhkosť ≤93%RH (40°C)
Prevádzková teplota -5°C ~ 40°C
Poznámka: Špecikácia sa môže zmeniť výmenou niektorej časti zariadenia alebo aktualizá-
ciou softvéru. Pozor, niektoré zeme Európskej únie majú špecické zákony ohľadne nahrávania
autokamerou. Preto odporúčame sa pred každou cestou do zahraničia informovať o miestnej
zákonnej úprave, ideálne u lokálnych automotoklubov. Kameru možno použiť ako dôkazový
materiál, a to dokonca aj pri jednaní s príslušníkom polície. Opäť odporúčame naštudovať
zákonnú úpravu v jednotlivých krajinách. Upozorňujeme, že takýto materiál je tiež možné
použiť aj proti autorovi takéhoto záznamu. Značka LAMAX Electronics nie je zodpovedná za
nezákonné použitie kamier ani materiálu zhotoveného týmito kamerami.
EN DE CZ SK PL HU LT SLO HR
Výrobca
elem6, s.r.o., Braškovská 308/15, 16100 Praha 6
www.lamax-electronics.com
Tlačové chyby a zmeny v manuáli sú vyhradené.
- 10 -

- 11 -

Kamera samochodowa high-end
z lokalizatorem GPS i detekcją
radarów prędkości
LAMAX C9
PL INSTRUKCJA OBSŁUGI
- 1 -

Wstęp
Dziękujemy, że zdecydowaliście się na zakup kamery samochodowej LAMAX C9. Dzięki temu
zyskaliście niezawodnego towarzysza podróży samochodem. Chroń siebie i swoje auto. Ostre
ujęcia wysokiej jakości możesz wykorzystać nie tylko jako dowód, który możesz okazać ubez-
pieczalni albo policji, ale też do zarejestrowania swoich przygód urlopowych.
1. Zawartość zestawu
– Kamera samochodowa LAMAX C9
– Mocowanie do szyby na przyssawkę z modułem GPS
– Ładowarka
– MicroSD-USB adapter
– Kabel USB
– Instrukcja obsługi oraz informacje dotyczące bezpieczeństwa
– Materiałowe etui do przenoszenia kamery
– Ściereczka z mikrobry
– Pozostałe materiały drukowane (naklejki, karta Facebook, karta rejestracyjna)
2. Zarys produktu
9
7
5
6
8
14
10
2
1
3
HR SLO LT HU PL SK CZ DE EN
1. MENU
2. WŁ/WYŁ (Power)
3. Strzałka W GÓRĘ
4. Strzałka W DÓŁ
5. MODE
6. Rec/OK
7. Mocowanie
8. Ekran
9. Wejście na zasilanie
4
13 1112 15
10. Wejście na Micro SD
11. Obiektyw
12. Interfejs mini USB
13. Mikrofon
14. Dioda LED
15. RESET
- 1 - - 2 -

3. Instalacja produktu
1) Kabel zasilania do zapalniczki samochodowej poprowadź wokoł przedniej szyby w taki
sposób, aby nie zakłócał dobrej widoczności z punktu widzenia kierowcy, a następnie
bezpiecznie go przymocuj. Urządzenie zamontuj między szybą a lusterkiem wstecznym.
Dzięki temu osiągniesz optymalny widok.
2) Nie montuj urządzenia w pozycji, która przesłaniałaby kierowcy widok albo go rozpraszała.
3) W niektórych samochodach zasilanie zapalniczki samochodowej nie zostaje przerwane wraz
z wyłączeniem silnika. W takim przypadku przed opuszczeniem samochodu wyjmij kabel z
gniazdka zapalniczki.
4) Jeżeli korzystasz z urządzenia po raz pierwszy, bateria może być słabo naładowana. Jeśli
uruchomienie urządzenia nie jest możliwe z powodu niskiego stanu naładowania baterii,
podłącz ręcznie kabel zasilania i w ten sposób naładuj baterię.
5) Zalecamy wykorzystywanie markowych kart SD klasy 10 i wyższych. W celu optymalnego
wykorzystania długości nagrania polecamy używanie kart o pojemności co najmniej 8 GB,
maksymalnie do 64 GB. W przypadku pierwszego wykorzystania karty pamięci, należy ją
najpierw sformatować.
Ważne informacje:
- Aby kamera samochodowa LAMAX C9 i moduł GPS funkcjonowały prawidłowo, kabel zasila-
jący należy poprowadzić bezpośrednio do wejścia mikro USB w uchwycie GPS (nie do wejścia
mikro USB w kamerze).
- Aby zapewnić działanie wszystkich funkcji, kamera musi być prawidłowo podłączona do mo-
cowania (podczas montażu kamerę należy umieścić w uchwycie i do końca wsunąć). Podczas
wyjmowania kamery należy wcisnąć zabezpieczenie w przedniej części uchwytu, a dopiero
wtedy ostrożnie wyjąć kamerę. Jeżeli kamera nie będzie prawidłowo przymocowana do mo-
dułu GPS, może dochodzić do przerw w zasilaniu lub działaniu GPS.
EN DE CZ SK PL HU LT SLO HR
4. Użytkowanie kamery samochodowej LAMAX C9
1) Włożenie karty Micro SD
Włóż lub usuń kartę micro SD z wejścia na kartę pamięci tylko wtedy, kiedy kamera jest wyłąc-
zona oraz nie jest połączona z komputerem kablem zasilania.
2) Zasilanie
a) Kamera może być zasilana przy użyciu kabla USB podłączonego do komputera lub przy
użyciu zapalniczki samochodowej bezpośrednio w samochodzie.
b) Kamera jest przeznaczona do trwałego zasilania. Wbudowanej baterii nie można wyjmować
ani wymienić.
3) Włączanie i wyłączanie kamery
a) Kamerę włączysz poprzez wciśnięcie przycisku WŁ/WYŁ.
b) Kamera włączy się automatycznie po podłączeniu do zasilania.
c) Kamerę wyłączysz wciskając i przytrzymując przycisk WŁ/WYŁ przez około 3-5 sekund.
d) Kamera wyłączy się automatycznie po odłączeniu od zasilania.
4) Przełączanie trybów i poruszanie się w menu
a) Wciskając raz po razie przycisk „MODE“ możesz się przełączać między trybami: tryb nagrywa-
nia wideo (podgląd na żywo) » tryb fotograi » galeria wideo/galeria foto » zabezpieczone
nagrania.
- 2 -

b) Menu kamery składa się z trzech niezależnych części: Menu bazy danych » podstawowe usta-
wienia kamery » ustawienia zaawansowane. Między poszczególnymi częściami możesz się
przemieszczać za pomocą strzałek „W GÓRĘ“ i „W DÓŁ“. Do wejścia do menu służy przycisk
„MENU“. W każdej poszczególnej części menu możesz się następnie przemieszczać wertykal
nie za pomocą strzałek „W GÓRĘ“ i „W DÓŁ“. Do potwierdzania wyboru służy przycisk „OK“.
c) Do samodzielnej części menu ustawienia wideo/ustawienia fotograi możesz przejść jedynie
z odpowiedniego trybu. Do ustawień wideo możesz więc przejść jedynie z trybu nagrywania
wideo. Do ustawień fotograi możesz przejść jedynie z trybu aparatu fotogracznego.
d) Aby powrócić o jeden poziom wstecz, należy wykorzystać przycisk „MENU“.
5) Nagrywanie / fotografowanie / przeglądanie galerii
a) Nagrywanie na kamerze rozpocznie się po wciśnięciu przycisku „OK“. Jego ponowne wciś-
nięcie spowoduje ukończenie nagrywania. Kamera musi się znajdować w trybie nagrywania
wideo.
b) Nagrywanie automatyczne – funkcja automatycznego nagrywania jest uruchomiona na
stałe. Automatyczne nagrywanie uruchomi się po podłączeniu kamery do źródła zasilania. W
przypadku samochodu o zasilaniu zależnym od zapłonu, kamera włączy się i zacznie nagry-
wać po uruchomieniu silnika.
c) Automatyczne ukończenie nagrywania i wyłączenie – kamera automatycznie przestanie na-
grywać i wyłączy się po zatrzymaniu zasilania, a więc po wyłączeniu silnika. W niektórych sa-
mochodach gniazdko zapalniczki jest trwale zasilane. W podobnym przypadku nie zapomnij
wyjąć kabel zasilania z zapalniczki.
d) Fotograe wykonuje się poprzez wciśnięcie przycisku „OK“. Kamera musi się znajdować w
trybie fotograi.
e) Po przełączeniu do trybu galerii wyświetli się lista powstałych nagrań i wykonanych fotograi.
Aby przemieszczać się między poszczególnymi nagraniami i zdjęciami, należy wykorzystać
strzałki „W GÓRĘ“ i „W DÓŁ“. Do odtwarzania i zatrzymywania nagrania służy przycisk „OK“.
6) Usuwanie zapisanego materiału bezpośrednio w kamerze
Usuwanie poszczególnych plików bezpośrednio w kamerze – możliwe w galerii. Wybierz plik,
który chcesz usunąć. Wciśnij przycisk „MENU“, a następnie dokonaj wyboru między dwiema
opcjami: „Usuń ten plik“ albo „Usuń wszystkie pliki“. Za pomocą strzałek „W GÓRĘ“ i „W DÓŁ“
wybierz pożądaną opcję, a następnie potwierdź ją przyciskiem „OK“. Tymi samymi przyciskami
(strzałkami) wybierz między opcją „tak“ lub „nie“ i ponownie potwierdź przyciskiem „OK“.
7) Podłączanie do PC
Kamerę można podłączyć do PC za pomocą kabla mini USB, który jest jednym z akcesoriów
HR SLO LT HU PL SK CZ DE EN
wchodzących w skład zestawu podstawowego. Po podłączeniu kamera zachowuje się jak
urządzenie plug’n‘play.
8) Odtwarzacz software – GPS Player
Rejestrator jazdy LAMAX C9 oferuje możliwość skorzystania z inteligentnej i praktycznej
aplikacji oprogramowania. Dzięki niej możesz na jednym ekranie wyświetlać jednocześnie:
nagrywane wideo, obraz trasy na mapach, wykres prędkości i rejestr zmian grawitacyjnych
rejestrowanych przez czujnik G-sensor. Pobierz plik instalacyjny odtwarzacza GPS pod adresem
www.lamax-electronics.com, pod LAMAX C9 » pobierz
9) Powiadomienia głosowe w języku polskim
LAMAX C9 wyposażony jest w moduł GPS z aktualną bazą fotoradarów, dzięki której zostaniesz
-
- 3 -

powiadomiony o miejscu, w którym powinieneś zachować szczególną ostrożność. Komunikaty
głosowe powiadomią o przekroczeniu limitu prędkości lub o zbliżaniu się do fotoradaru.
Domyślmy językiem komunikatów głosowych jest język angielski, który w dowolnym
momencie możesz przełączyć na język polski. Wszystkie niezbędne informacje, instrukcje oraz
manuale znajdziesz na ocjalnej stronie internetowej www.lamax-electronics.com w zakładce
LAMAX C9 » pobierz
5. Funkcje przycisków
Przycisk Funkcja Uwagi
Włączanie /
(WŁ/WYŁ)
(MENU)
(TRYB)
(REC/OK)
(W GÓRĘ)
(W DÓŁ)
RESET Reset Wciśnij, aby zresetować całą kamerę i powrócic do usta-
wyłączanie kamery
Menu/
odtwarzanie
Zmiana trybów 1. Przy podglądzie na żywo, wciskając możesz zmieniać
Nagrywanie/OK 1. Wciskając w trybie wideo rozpoczniesz nagrywanie
W górę/
zabezpieczanie
W dół 1. Wciskając podczas nagrywania wyłączysz/włączysz
1. Wciśnij i przytrzymaj, aby włączyć/wyłączyć kamerę
1. Wciśnij, aby przejść do menu
2. Wciskając ponownie, przejdziesz do ustawień w menu
3. Wciśnij, aby powrócić o poziom wstecz bez zapisywa-
nia
4. Przytrzymując, aby włączyć/wyłączyć dźwięk
tryby kamery - tryb nagrywania wideo (podgląd na
żywo) » tryb fotograi » galeria wideo/galeria foto »
zabezpieczone nagrania
2. Wciskając podczas nagrywania, wyłączysz ekran
2. Wciskając w trybie fotograi będziesz fotografować
3. Wciskając w trybie nagrywania ukończysz nagrywanie
4. Wciśnij w menu, aby przejść do menu wewnętrznego
1. Wciskając podczas nagrywania zabezpieczysz zapis
(maksymalna liczba zabezpieczonych nagrań to 50)
2. Wciskając w podglądzie na żywo ustawisz EV (rozświ-
etlisz ekspozycję)
3. Wciskając w Menu przejdziesz w górę
4. Przytrzymując zwiększysz głośność
mikrofon
2. Wciskając w podglądzie ustawisz EV (przyciemnisz
ekspozycję)
3. Wciskając w Menu przejdziesz w dół
4. Przytrzymując obniżysz głośność
wień fabrycznych
EN DE CZ SK PL HU LT SLO HR
- 4 -

6. Objaśnienia dotyczące ikon
1
2 3 4 5 6 7 8
10
13
14
1 Nagrywanie (jeżeli ikona nie świeci, kamera nie nagrywa)
2
3
4
5
×
6
×
7
8
9
10
HR SLO LT HU PL SK CZ DE EN
WDR
11
12
13
14
15
Czas powstającego nagrania (zapisu)
Ikona przedstawiająca zabezpieczenie danego pliku
Detekcja ruchu włączona/wyłączona
GPS aktywny × GPS poza sygnałem
Mikrofon włączony/wyłączony
Wskaźnik karty pamięci i status
Wykorzystanie
pamięci
= 0
Ikona
Wskaźnik zasilania / stanu baterii (jeżeli urządzenie nie jest zasilane)
Rozdzielczość wideo
Kierunek jazdy według stron świata (kompas)
WDR (WideDynamicRange)
= rejestrowanie obrazu w szerokim zasięgu dynamicznym
Aktualna prędkość
Data
Aktualna głośność
(wyświetli się po przytrzymaniu przycisków W GÓRĘ/W DÓŁ)
Aktualna godzina
0<Wykor-
zystanie
pamięci≤1/3
16:9
1/3<Wykor-
zystanie
pamięci≤2/3
9
11
12
15
2/3<Wykor-
zystanie
pamięci≤1
- 5 -

7. Menu
Menu bazy danych
Ustawienia podstawowe
Menu główne Podmenu Uwagi
Limit
prędkości
Baza danych Włączona
GPS Włączona
Rozdzielczość 2560×1080 30FPS
Wyłączone
10 - 140 km/h
Wyłączona
Wyłączona
2304×1296 30FPS
1920×1080 30FPS
1280×720 60FPS
Ustawienia domyślne: Wyłączone
W przypadku przekroczenia ustawionej wartości zosta-
niesz ostrzeżony.
Ustawienia domyślne: Włączone
Współpracuje z bazą danych detektora radarów pręd-
kości. Jeżeli w pobliżu znajdzie się radar, urządzenie os-
trzeże cię o tym poprzez sygnał dźwiękowy i komunikat
na ekranie. Przy wyłączonym GPS nie będziesz otrzymy-
wać tych informacji.
Ustawienia domyślne: Włączone
Lokalizator GPS w celu rejestrowania przebiegu trasy,
pozycji, prędkości i czasu. Opcja odtworzenia trasy
i pozycji na Google Maps. Po wyłączeniu prędkość i
kierunek jazdy przestanie się wyświetlać na ekranie.
Ustawienia domyślne: 1920×1080 30FPS
1080P to ustawienie odpowiednie do zwykłego na-
grywania. Nagrania w większej rozdzielczości zajmują
więcej miejsca na karcie SD.
1280×720 30FPS
Jakość Bardzo wysoka
Wysoka
Normalna
WDR Włączona
Wyłączona
Data Włączona
Wyłączona
Nagrywanie
w pętli
1 minuta
2 minuty
3 minuty
5 minut
Ustawienia domyślne: Bardzo wysoka
Umożliwia kompresję wideo bezpośrednio na kartę pa-
mięci przy minimalnej utracie jakości. Wyjściowe usta-
wienie: Bardzo wysoka – nagrywa bezstratnie w najle-
pszej jakości. Pozostałe ustawienia sprawiają, że jakość
jest nieco niższa, ale jednocześnie objętość danych zos-
taje zmniejszona o połowę.
Ustawienia domyślne: Włączone
Skrót WDR oznacza WideDynamicRange, funkcję rów-
noważącą kontrasty danych ujęć. Funkcja ta podnosi
jakość ujęć w miejscach, w których światło i cień są
niewyważone.
Ustawienia domyślne: Włączone
Wyświetlanie daty i godziny na ekranie i na otrzyma-
nym zapisie.
Ustawienia domyślne: 1 minuta
Nieprzerwane nagrywanie w pętli. Automatyczne za-
stąpienie pierwszego pliku, jak tylko pamięć zostanie
zapełniona. Nie dojdzie do przerwania płynności wideo.
Wyłączone
EN DE CZ SK PL HU LT SLO HR
- 6 -

Czujnik
wstrząsów
(G-sensor)
Czułość 1
Czułość 2
Czułość 3
Czułość 4
Ustawienia domyślne: Czułość 4
Aktywowany G-sensor w razie uderzenia automatycz-
nie zabezpieczy aktualnie powstające nagranie, a tym
samym zabezpieczy je przed zastąpieniem.
Czułość 5
Czułość 6
Czułość 7
Wyłączone
Detekcja
ruchu
Zapis
dźwięku
Planowanie
odpoczynku
Ustawienia podstawowe
Wyłączona
Włączona
Włączona
Wyłączona
Wyłączone
1 godzina
2 godziny
3 godziny
Ustawienia domyślne: Wyłączone
Przy włączonej detekcji ruchu kamera zacznie
automatycznie nagrywać w momencie, kiedy
zarejestruje poruszenie w polu widzenia obiektywu.
Kamera ukończy nagrywanie tuż po tym, kiedy
poruszenie ustąpi.
Ustawienia domyślne: Włączone
Umożliwia wyłączanie i włączanie dźwięku podczas
tworzenia nagrania. Odpowiednie na przykład w
sytuacjach, kiedy chcesz zachować prywatność Twoich
rozmów.
Ustawienia domyślne: 2 godziny
Po upłynięciu określonego czasu urządzenie zaleci Ci
zatrzymanie się i odpoczynek
4 godziny
Trasa GPS Włączona
Wyłączona
Kalibracja
LDWS
LDWS 20
40
60
80
100
Ustawienia domyślne: Włączone
Wyłączony tryb oznacza wyłączone nagrywanie GPS.
Dokładna kalibracja LDWS jest niezbędna do właściwe-
go funkcjonowania, bez niej system ochronny nie będ-
zie właściwie działać.
Ustawienia domyślne: Bardzo wysoka
LDWS (Lane Departure Warning System) to systém
ostrzegania w przypadku przekroczenia pasa ruchu.
System jest aktywny od prędkości, którą wybierzesz.
Idealnie sprawdza się w dłuższych trasach.
Wyłączona
Rozmiar
zdjęcia
HR SLO LT HU PL SK CZ DE EN
Jakość Bardzo wysoka
fotografowania
Data Włączona
Ustawienia w trybie
4M (16:9)
9M (16:9)
13M (16:9)
Wysoka
Normalna
Wyłączona
Ustawienia domyślne: 13M (16:9)
Ustawienia domyślne: Bardzo wysoka
Ustawienie wpływa na całkowitą jakość wykonanych
zdjęć i ich rozmiar.
Ustawienia domyślne: Włączone
Wyświetlanie daty i godziny na ekranie i na fotograi
- 7 -

Data / godzina DD / MM / RRRR
g/m
Tłumienie
drgań
50 Hz
60 Hz
(częstotliwość)
Pomiar
ekspozycji
Średnia
Centrum
Punkt
Wygaszacz
ekranu
Wyłączone
15 sekund
1 minuta
3 minuty
5 minut
Opóźnione
wył.
Wyłączone
5 sekundy
15 sekund
30 sekund
Dźwięki Włączona
Wyłączona
Wyświetlanie
tekstu
Wyłączone
Wklej tekst do
nagrania
Ustawienia zaawansowane
Prędkość
w nagraniu
Włączona
Wyłączona
Prędkość KMH / MPH
Strefa czasowa GMT-12
Obracanie
obrazu
Włączona
Wyłączona
Język English, Deutsch,
Česky, Slovensky,
Polski, Magyar,
Lietuvių, P,
Français, Svenska,
Nederlands
Formatowanie Tak
Nie
Zresetuj Tak
Nie
Firmware
–
GMT+12
Ustawienia daty i godziny.
Ustawienia domyślne: 50 Hz
Umożliwia wybór częstotliwości zgodnie z częstotliwoś-
cią sieci (na kontynencie europejskim w sieci prowadzo-
ny jest prąd o częstotliwości 50 Hz, w Ameryce i w części
Azji jest to 60 Hz)
Ustawienia domyślne: Centrum (środkowy)
Ustawienia obszaru ekspozycji - skierowanie kamery.
Ustawienia domyślne: Wyłączone
Ustawienie automatycznego wyłączania ekranu w pr-
zypadku niepodejmowania działań.
Ustawienia domyślne: Wyłączone
Możliwość ustawienia opóźnionego wyłączania po
odłączeniu kamery od zasilania. Ta funkcja jest idealna
na przykład w przypadku wykorzystywania w samo-
chodach z osprzętem start/stop.
Ustawienia domyślne: Włączone
Ustawienie dźwiękowego ostrzeżenia podczas jazdy.
Ustawienia domyślne: Wyłączone
Możliwość zamieszczenia informacji tekstowej w na-
graniu wideo.
Ustawienia domyślne: Włączone
Możliwość włączenia / wyłączenia wyświetlania pręd-
kości w nagraniu wideo
Ustawienia domyślne: KMH
Ustawienia domyślne: +1
Ustawienia strefy czasowej
Ustawienia domyślne: Wyłączone
Możliwość obracania obrazu o 180 stopni.
Ustawienia domyślne: Angielski
Ustawienia domyślne: Nie
Ustawienia domyślne: Tak
EN DE CZ SK PL HU LT SLO HR
- 8 -

8. LDWS i kalibracja
Po umieszczeniu kamery w mocowaniu w Ustawieniach podstawowych wybierz MENU »
“LDWS kalibracja”, a następnie postępuj zgodnie z instrukcjami znajdującymi się na poniższym
obrazku:
Uwagi: Dokładna kalibracja LDWS jest konieczna do prawidłowego funkcjonowania, bez niej
system ochronny nie będzie działać właściwie.
9. Dioda LED i funkcje
Wskaźnik Znaczenie
Niebieskie
światło
Czerwone
światło
Ciągle świeci Ładowanie
Zgaśnięcie Ukończenie ładowania
Ciągle świeci
Miga w odstępach 1 sekundy Tworzenie nagrania
Kamera samochodowa nie tworzy
nagrania
HR SLO LT HU PL SK CZ DE EN
- 9 -

10. Parametry techniczne
Rozdzielczość wideo 2560×1080 30FPS, 2304×1296 30FPS,
1920×1080 30FPS, 1280×720 60FPS, 1280×720 30FPS
Kąt widzenia 150°
Rozmiar wyświetlacza 2,7 cali, 16:9
Rodzaj pamięci Micro SD Class 10, maks. 64 GB
Format wideo MP4
Wyświetlanie czasu TAK
GPS TAK
G-sensor TAK
Łączliwość USB
System MS Windows / MAC OS
Napięcie wejściowe 5 V
Częstotliwość 50 Hz / 60 Hz
Pojemność baterii 150 mAh
Wilgotność pracy ≤93%RH (40°C)
Temperatura pracy -5°C ~ 40°C
Uwagi: Specykacja może ulec zmianie poprzez wymianę któregoś z elementów urządzenia
lub aktualizację oprogramowania. Należy pamiętać, że niektóre kraje Unii Europejskiej mają
określone przepisy dotyczące możliwości nagrywania kamerą samochodową. Dlatego
zalecamy, abyś przed podróżą zagraniczną sprawdził, co na ten temat mówi lokalne prawo
- najlepiej w lokalnych klubach samochodowych. Kamerę można wykorzystać jako materiał
dowodowy, nawet w kontakcie z funkcjonariuszem policji. Raz jeszcze zalecamy zapoznanie
się z regulacjami prawnymi, ktore obowiązują w danym kraju. Zarejestrowany materiał ktoś
może wykorzystać również przeciw właścicielowi nagrania. Marka LAMAX Electronics nie jest
w żaden sposób odpowiedzialna za nielegalne wykorzystywanie kamer ani zarejestrowanych
przez nie materiałów.
EN DE CZ SK PL HU LT SLO HR
Producent
elem6, s.r.o., Braškovská 308/15, 16100 Praha 6
www.lamax-electronics.com
Błędy w druku oraz zmiany w instrukcji obsługi zastrzeżone.
- 10 -

- 11 -

Csúcsminőségű autós kamera GPS
nyomkövetéssel és sebességmérő
radar- érzékelővel
LAMAX C9
HU HASZNÁLATI ÚTMUTATÓ
- 1 -

Bevezetés
Köszönjük, hogy a LAMAX C9 autós kamera mellett döntött. Bárhová is utazik, ezentúl
megbízható útitársa lesz vezetés közben. A kamera által készített kiváló minőségű felvételek
nem csak bizonyítékként szolgálnak majd a biztosító vagy a rendőrség számára, hanem akár
emlékként is az utazásokból.
1. A csomag tartalma
– LAMAX C9 autós kamera
– Tapadókorong-tartó GPS modullal
– Autó töltő
– MicroSD-USB adapter
– USB kábel
– Kézikönyv és biztonsági útmutató
– Hordtáska
– Mikroszálas szövet
– Egyéb nyomtatott anyagok (matricák, Facebook kártya, regisztrációs kártya)
2. A kamera felépítése
9
7
5
6
8
14
10
2
1
3
HR SLO LT HU PL SK CZ DE EN
1. Menü
2. „BE/KI” gomb
3. „FEL” nyíl
4. „LE” nyíl
5. ÜZEMMÓD
6. Felvevő gomb
7. Tartó
8. Kijelző
9. Töltési bemenet
4
13 1112 15
10. Micro SD rekesz
11. Objektív
12. Mini USB bemenet
13. Mikrofon
14. LED dióda
15. Alaphelyzetbe állítás (RESET)
- 1 -

3. A készülék beszerelése
1) Vezesse a tápkábelt a szélvédő körül az autó szivargyújtójához, úgy, hogy az ne akadályozza a
vezető nézetét, majd rögzítse biztonságosan. Az optimális felvétel érdekében csatlakoztassa
a készüléket az üveg és a visszapillantó tükör közé.
2) Ne szerelje a készüléket olyan helyre, ahol akadályozza a vezető nézetét, vagy ahol elvonja a
gyelmet vezetés közben.
3) Egyes járművekben a szivargyújtó áramellátása nem szakad meg a motor leállítása után.
Ebben az esetben mindig húzza ki a kábelt a szivargyújtóból, mielőtt kiszáll a járműből.
4) Az eszköz első használatakor előfordulhat, hogy az akkumulátor le lesz merülve. Ha nem
tudja bekapcsolni a készüléket alacsony áramellátás miatt, csatlakoztassa a külső tápkábelt
az akkumulátor feltöltéséhez.
5) Kizárólag jó minőségű mikro SD kártyát (10-es vagy magasabb osztályút) használjon. Az opti-
mális felvétel érdekében javasoljuk, hogy minimum 8 GB, legfeljebb 64 GB kapacitású kártyát
használjon. Javasoljuk, hogy a legelső használat előtt formázza a kártyát.
Fontos megjegyzés:
- A Lamax C9 és GPS modul megfelelő működéséhez a tápellátás vezetékét közvetlenül a GPS
-tartó USB portjába dugja be (ne a kamera USB portjába)
- A kamera megfelelő működéséhez erősen rögzíteni kell azt a kamera tartóhoz (a helyére kell
teljesen kattania). Amikor a kamerát eltávolítja, nyomja meg a biztonsági zárat a tartón, és
óvatosan húzza ki a kamerát a tartóból. Amennyiben a kamera nincs megfelelően a helyén, az
a tápellátásban, vagy GPS működésben gondot okozhat.
4. A LAMAX C9 autós kamera használata
1) A MicroSD kártya behelyezése
A micro SD kártya behelyezése, ill. kivétele előtt mindig kapcsolja ki a kamerát és győződjön
meg, hogy nincs számítógéphez vagy tápegységhez csatlakoztatva.
2) Feltöltés
a) A kamera feltölthető a számítógépről USB kábellel, vagy egy közvetlenül az autó szivargyúj-
tójához csatlakoztatott autós töltő segítségével.
b) A kamerát megszakítás nélkül töltse fel. Az integrált akkumulátort nem lehet eltávolítani
vagy kicserélni.
3) A kamera be- és kikapcsolása
a) Kapcsolja be a kamerát a „BE / KI” gomb megnyomásával.
b) A kamera automatikusan bekapcsol, ha a tápegységhez csatlakoztatjuk.
c) A kamera kikapcsolásához tartsa lenyomva az „BE / KI” gombot 3-5 másodpercig.
d) A kamera automatikusan kikapcsol, ha lekapcsoljuk a tápegységről.
4) Üzemmód váltás és navigáció a menüben
a) Érintse meg az „ÜZEMMÓD” (MODE) gombot az üzemmódok közötti váltáshoz: video üzem-
mód (élő nézet)» fotó üzemmód» videó album / fotóalbum» zárolt videofelvételek
b) A kamera menüje három részből áll: adatbázis menü» alapbeállítások» speciális beállítások.
A menüben a „FEL” és „LE” nyilak segítségével navigálhat. A menübe való belépéshez nyomja
meg a „MENÜ” gombot. A menüpontok között navigáljon a „FEL” és „LE” nyilak lenyomásával,
majd nyomja meg az OK gombot a kiválasztás megerősítéséhez.
EN DE CZ SK PL HU LT SLO HR
- 2 -

c) A videó / fotó beállítások csak a megfelelő üzemmódból érhetők el. Ez azt jelenti, hogy a
videó beállítások csak a videó üzemmódban, a fényképbeállítások pedig csak a fotó üzem-
módban jeleníthetők meg.
d) Nyomja meg a „MENÜ” gombot az előző képernyőhöz való visszatéréshez..
5) Videofelvétel / Fénykép készítése / Galéria megtekintése
a) A videofelvétel elindításához nyomja meg az „OK” gombot. Az „OK” gomb ismételt lenyomás-
ával a felvétel befejeződik. Mindehhez a fényképezőgépnek videófelvétel-üzemmódban kell
lennie.
b) Automatikus videofelvétel - az automatikus felvétel-funkció mindig aktív. A kamera bekapc-
solásakor a videofelvétel automatikusan elkezdődik. Ha az autó áramellátása a motor bekap-
csolása után kezdődik csak el, a kamera is csak a motor beindítása után kapcsol be és kezdi
el automatikusan a video felvételt.
c) A videofelvétel automatikus leállítása és a kamera kikapcsolása - a kamera automatikusan
leállítja a videofelvételt és kikapcsol, amint az áramellátás megszakad, például amikor a motor
leáll. Egyes autóknál a szivargyújtó áramellátása a motor kikapcsolása után sem szakad meg.
Ebben az esetben feltétlenül húzza ki a kamera tápkábelét a szivargyújtóból.
d) Fénykép készítéséhez nyomja meg az „OK” gombot. Ehhez a fényképezőgépnek fénykép-
üzemmódban kell lennie.
e) Az „album” üzemmód kiválasztásakor megjelenik a rögzített videók és fényképek listája. A
videofelvételek és fényképek közötti böngészéshez használja a „FEL” és „LE” nyilakat. A felvétel
elindításához, ill. leállításához nyomja meg az „OK” gombot.
6) Adatok törlése a kameráról
Az adatok közvetlenül a kamerán is törölhetők, mégpedig az album menüben. Válassza ki a
törölni kívánt fájlt. Nyomja meg a „MENÜ” gombot. Két lehetőség jelenik meg: „Törli ezt a
bejegyzést“ és „Minden bejegyzés törlése“. A nyílbillentyűkkel válassza ki a kívánt műveletet,
majd hagyja jóvá az „OK” gombbal. A nyílbillentyűkkel válassza ki az „Igen“ vagy a „Nem“
lehetőséget, majd hagyja jóvá az „OK” gombbal.
7) Csatlakoztatás a számítógéphez
A kamerát a mellékelt mini USB kábellel csatlakoztathatjuk a számítógéphez. A csatlakoztatás
után a kamera plug‘n‘play eszközként működik.
8) Szoftveres lejátszó – GPS Player
LAMAX C9 autós kamera egy okos és rendkívül hasznos szoftveralkalmazást kínál. Segítségével
egy képernyőn jelenítheti meg az aktuális felvételt, az útvonalat a térképen, a sebesség
HR SLO LT HU PL SK CZ DE EN
grakonját és a gravitációs terhelést, amit a kamera belső G-szenzora rögzít. A GPS telepítő
fájlt megtalálja a www.lamax-electronics.com oldalon, a LAMAX C9 terméknél, a letöltések
menüben
- 3 -

5. Nyomógomb funkciók
Key Funkció Megjegyzés
A kamera be/
kikapcsolása
(ON/OFF)
Menü/
Visszajátszás
(MENU)
Üzemmód váltás 1. Élő nézet üzemmódban a gomb lenyomásával a
(MODE)
Felvétel/OK 1. Videofelvétel üzemmódban nyomja meg a gombot a
(REC/OK)
Fel/Zárolás 1. Felvétel közben nyomja meg a gombot a felvétel záro-
(UP)
Le 1. Nyomja meg a gombot a mikrofon be- vagy kikapc-
(DOWN)
RESET Alaphelyzetbe
állítás
1. Nyomja meg és tartsa lenyomva a kamera be- / kikap-
csolásához
1. Nyomja meg a gombot a menübe való belépéshez
2. Nyomja meg ismét a gombot a beállítások közötti
tallózáshoz
3. Nyomja meg a gombot, hogy visszatérjen az előző
menüponthoz, mentés nélkül
4. Tartsa lenyomva a némítás ki/bekapcsolásához
kamera üzemmódot vált – video üzemmód (élő
nézet)» fénykép üzemmód» videó / fotóalbum» zárolt
felvételek
2. Felvétel közben a gomb lenyomásával a kijelző kikap-
csol
felvételhez
2. Fotó üzemmódban nyomja meg a gombot a felvé-
telhez
3. Videofelvétel üzemmódban nyomja meg a gombot a
felvétel leállításához.
4. A menüben nyomja meg a gombot a kiválasztáshoz
lásához (legfeljebb 50 videót képes zárolni).
2. Élő nézetben a gomb lenyomásával beállíthatja az
EV-t (világosítja az expozíciót)
3. A menüben a gomb lenyomásával felfele navigálhat
4. Tartsa lenyomva a hangerő növeléséhez
solásához
2. Élő nézetben a gomb lenyomásával beállíthatja az
EV-t (sötétíti expozíciót)
3. A menüben a gomb lenyomásával lefele navigálhat
4. Tartsa lenyomva a hangerő csökkentéséhez
Nyomja meg a gombot az eszköz alaphelyzetbe állításá-
hoz, ill. a gyári beállítások visszaállításához
EN DE CZ SK PL HU LT SLO HR
- 4 -

6. Ikon magyarázat
1
2 3 4 5 6 7 8
10
16:9
13
14
1 Felvétel (ha az ikon nem jelenik meg, a kamera nem készít felvételt)
2
3
4
5
×
6
×
7
8
9
10
HR SLO LT HU PL SK CZ DE EN
WDR
11
12
13
14
15
Videofelvétel időtartama
Jelzi, hogy a felvétel zárolva van
A mozgásérzékelés aktív / inaktív
GPS aktív × nincs GPS jel
A mikrofon be van kapcsolva / ki van kapcsolva
Memóriakártya tárhelyének állapota
Használt
memória= 0
Ikon
Áramellátás-jelző / az akkumulátor állapota
(ha nincs bekapcsolva a készülék)
Video felbontás
Utazás iránya (iránytű)
WDR (Széles dinamikatartomány)
= széles dinamikatartományban rögzített kép
Pillanatnyi sebesség
Dátum
Pillanatnyi hangerő (tartsa lenyomva a FEL / LE nyilat a megjelenítéshez)
Pillanatnyi idő
0<Használt
memória≤1/3
1/3<Használt
memória≤2/3
9
11
12
15
2/3<Használt
memória≤1
- 5 -

7. Menu
Adatbázis menü
Alap-beállítások
Főmenü Almenü Megjegyzés
Sebességhatár Kikapcsolva
10 - 140 km/h
Adatbázis Bekapcsolva
Kikapcsolva
GPS Bekapcsolva
Kikapcsolva
Felbontás 2560×1080 30FPS
2304×1296 30FPS
1920×1080 30FPS
1280×720 60FPS
Alapértelmezett: Kikapcsolva
A beállított sebesség túllépésekor a kamera jelezni fog.
Alapértelmezett: Bekapcsolva
Az eszköz kapcsolódik a sebességmérő kamerák
adatbázishoz. Ha sebességmérő kamerát érzékel a
közelben, akkor a készülék hangjelzéssel valamint a
kijelzőn gyelmeztet. A készülék nem jelez, ha a GPS ki
van kapcsolva.
Alapértelmezett: Bekapcsolva
A GPS nyomon követi a jármű útvonalát, helyzetét,
sebességét és az időt. Az útvonal és a jármű helyzete
megjeleníthető a Google térképen. Ha a GPS ki van
kapcsolva, a jármű sebessége és az útirány nem jelenik
meg.
Alapértelmezett: 1920×1080 30FPS
1080P normál felvételre alkalmas. A nagyobb felbon-
tású felvételek nagyobb tárhelyet foglalnak el az SD
-kártyán.
1280×720 30FPS
Minőség Kiváló
Jó
Szokványos
WDR Bekapcsolva
Kikapcsolva
Dátum Bekapcsolva
Kikapcsolva
Folytonos
felvétel
1 perc
2 perc
3 perc
5 perc
Kikapcsolva
Alapértelmezett: Kiváló
Lehetővé teszi a videó tömörítését közvetlenül a me-
móriakártyán, minimális minőségcsökkenéssel. Ala-
pértelmezett a beállítás: Kiváló –Kifogástalan minő-
ségű videofelvételt készít. Az alacsonyabb beállítások
valamivel alacsonyabb minőséget eredményeznek,
ugyanakkor felére csökkentik az adatmennyiséget.
Alapértelmezett: Bekapcsolva
A WDR széles dinamikatartományt jelent és beállítja a
kiválasztott felvételek kontrasztegyensúlyát. Ez a funkció
növeli a felvételek minőségét kiegyensúlyozatlan
fényben, azaz abban az esetben, ha fény és az árnyék
között nagy a kontraszt.
Alapértelmezett: Bekapcsolva
Megjeleníti a dátumot és az időpontot a képernyőn, ill.
a rögzített képen.
Alapértelmezett: 1 perc
Folytonos felvétel, megszakítás nélkül. Automatikusan
felülírja a legrégebbi fájlt, amint a memória megtelt, így
az éppen folyamatban lévő video felvétel nem szakad
meg.
EN DE CZ SK PL HU LT SLO HR
- 6 -

Ütésérzékelés
(G-szenzor)
Érzékenység 1
Érzékenység 2
Érzékenység 3
Érzékenység 4
Érzékenység 5
Alapértelmezett: Érzékenység 4
A G-szenzor, amennyiben aktiváljuk, automatikusan
lezárja az ütközéskor rögzített videót, így megakadá-
lyozza, hogy a későbbi automatikus videofelvételek azt
felülírják.
Érzékenység 6
Érzékenység 7
Kikapcsolva
Mozgásér-
zékelés
Hangfelvétel Bekapcsolva
Pihenés
ütemezése
Alap-beállítások
Bekapcsolva
Kikapcsolva
Kikapcsolva
Kikapcsolva
1 óra
2 óra
3 óra
Alapértelmezett: Kikapcsolva
Ha a mozgásérzékelés engedélyezve van, a kamera au-
tomatikusan elkezdi a felvételt, amint mozgást észlel az
objektív látómezejében. A kamera röviddel a mozgás
leállása után leállítja a felvételt.
Alapértelmezett: Bekapcsolva
Videó felvétel készítése közben elnémítja vagy bekapc-
solja a hangot. Hasznos, ha nem szeretné, hogy a tele-
fonbeszélgetéseit mások is hallják.
Alapértelmezett: 2 óra
Ez a funkció gyelmeztet, hogy mikor tartsunk pihenőt,
a megadott beállítás alapján.
4 óra
GPS
útvonal
LDWS
kalibráció
LDWS 20
Bekapcsolva
Kikapcsolva
40
60
80
Alapértelmezett: Bekapcsolva
Ha a GPS üzemmód ki van kapcsolva, az eszköz nem
készít GPS-felvételt.
A sáv elhagyására gyelmeztető rendszert (LDWS) pon-
tosan be kell állítani. Enélkül a gyelmeztető rendszer
nem fog megfelelően működni.
Alapértelmezett: Kikapcsolva
A sáv elhagyására gyelmeztető rendszer (LDWS). Ez a
funkció az Ön által választott sebesség elérésekor akti-
válódik. Alkalmas hosszú utakra.
100
Kikapcsolva
Képméret 4M (16:9)
Alapértelmezett: 13MP (16:9)
9M (16:9)
13M (16:9)
HR SLO LT HU PL SK CZ DE EN
Minőség Kiváló
Dátum Bekapcsolva
üzemmódban
Beállítások a Fotó
Jó
Szokványos
Kikapcsolva
Alapértelmezett: Kiváló
A beállítások befolyásolják a rögzített képek minőségét
és méretét.
Alapértelmezett: Bekapcsolva
Megjeleníti a dátumot és az időt a képernyőn, ill. a rö-
gzített képen.
- 7 -

Dátum/ Idő NN / HH / ÉÉ
h/m
Rezgéscsillapító 50 Hz
60 Hz
Mérési
üzemmód
(expozíció
Átlagos
Középre
Helyi
mérése)
Képernyővédő Kikapcsolva
15 másodperc
1 perc
3 perc
5 perc
Kikapcsolás k. Kikapcsolva
5 mp
15 mp
30 mp
Hangjelzések Bekapcsolva
Kikapcsolva
Szöveg-felület Kikapcsolva
Inset Text
Sebesség
mutató
Speciális beállítások
Bekapcsolva
Kikapcsolva
Sebesség KMH / MPH
Időzóna GMT-12
Képforgatás Bekapcsolva
Kikapcsolva
Nyelv English, Deutsch,
Česky, Slovensky,
Polski, Magyar,
Lietuvių, P,
Français, Svenska,
Nederlands
Formázás Igen
Nem
Alapértelme-
zések
Igen
Nem
beállítása
Verzió eltrinex.cz
–
GMT+12
Beállítja a dátumot és az időt.
Alapértelmezett: 50 Hz
Beállítja a frekvenciát a hálózat frekvenciája szerint
(az európai kontinensen a hálózat 50 Hz frekvencián
működik, Amerikában és Ázsiában pedig 60 Hz
frekvencián).
Alapértelmezett: Középre
Beállítja a kamera fókuszának expozíciós tartományát.
Alapértelmezett: Kikapcsolva
Ha ez a funkció aktív, kijelző automatikusan kikapcsol,
amikor a kamera nincs működésben.
Alapértelmezett: Kikapcsolva
Késleltetett kikapcsolás lehetővé teszi, hogy a kamera
ne álljon le az áramellátás megszűnésével egyidőben.
Startstop rendszerű autóknál javasolt.
Alapértelmezett: Bekapcsolva
A kamera hangjelzéseket ad vezetés közben.
Alapértelmezett: Kikapcsolva
Lehetővé teszi szöveg hozzáadását a videofelvételhez.
Alapértelmezett: Bekapcsolva
Lehetővé teszi a sebesség megjelenítését / elrejtését a
videofelvételen.
Alapértelmezett: KMH
Alapértelmezett: +1
Beállítja az időzónát
Alapértelmezett: Kikapcsolva
Lehetővé teszi a képek 180 fokkal való elforgatását.
Alapértelmezett: angol
Alapértelmezett: Nem
Alapértelmezett: Igen
EN DE CZ SK PL HU LT SLO HR
- 8 -

8. LDWS kalibráció
Miután csatlakoztatta a kamerát a tartóhoz, válassza az „LDWS kalibráció“ lehetőséget az
alapbeállításokban, és kövesse az alábbi képen látható utasításokat:
Megjegyzés: A funkció megfelelő működéséhez elengedhetetlen az LDWS pontos kalibrá-
ciója. Ennek hiányában a gyelmeztető rendszer nem fog megfelelően működni.
9. A LED dióda funkciói
LED dióda Jelentése
Kék fény
Vörös fény
Folyamatosan világít Töltődik
Kikapcsol A töltés befejeződött
Folyamatosan világít A kamera nem készít felvételt
1 másodpercenként villog A kamera felvételt készít
HR SLO LT HU PL SK CZ DE EN
- 9 -

10. Műszaki paraméterek
Video felbontás 2560×1080 30FPS, 2304×1296 30FPS,
1920×1080 30FPS, 1280×720 60FPS, 1280×720 30FPS
Látószög 150°
Kijelző mérete 2,7 inch, 16:9
Memória típusa Micro SD Class 10, max 64 GB
Video formátum MP4
Időbélyeg IGEN
GPS IGEN
G-szenzor IGEN
Kapcsolat USB
Operációs rendszer MS Windows / MAC OS
Bemeneti feszültség 5 V
Frekvencia 50 Hz / 60 Hz
Akkumulátor kapacitása 150 mAh
Működési páratartalom ≤93%RH (40°C)
Működési hőmérsékleti intervallum -5°C ~ 40°C
Megjegyzés: A specikációk egyes alkatrészek cseréjével vagy szoftverfrissítések során
változhatnak. Kérjük, vegye gyelembe, hogy az Európai Unió néhány országában speciális
törvények vannak az autóskamerával készítet videofelvételekre vonatkozóan. Ezért
javasoljuk, hogy külföldi utazása előtt tájékozódjon a helyi törvényekről, például a helyi autós
klubokon keresztül. A kamera bizonyítékként is használható, akár egy rendőrségi eljárás
során is. Ismételten javasoljuk, hogy utazása előtt olvassa el az illető ország ide vonatkozó
jogszabályát. Felhívjuk továbbá gyelmét, hogy egy-egy videofelvétel a felvétel készítője
ellen is felhasználható. A LAMAX Electronics védjegy nem felelős a kamerák vagy az ezek által
rögzített videofelvételek illegális használatáért.
EN DE CZ SK PL HU LT SLO HR
Gyártó
elem6, s.r.o., Braškovská 308/15, 16100 Praha 6
www.lamax-electronics.com
A nyomdai elírások mitt tévedés joga fenntartva.
- 10 -

- 11 -

Automobilinis registratorius high-end su
GPS rodikliu ir greičio matuoklių detekcija
LAMAX C9
LT NAUDOJIMO INSTRUKCIJA
- 1 -

Įžanga
Dėkojame, kad įsigijote automobilinį registratorių LAMAX C9. Turite dabar naują kelionių
kompanioną, kuriuo galite visada pasikliauti. Saugokite save ir savo automobilį. Aukštos
kokybės, aštrūs vaizdai gali būti naudojami ne tik kaip įrodymai, kuriuos galite parodyti
draudimo bendrovei ar policijai, bet ir užsiregistruoti savo atostogų nuotykius.
1. Rinkinio turinys
– LAMAX C9 automobilinis registratorius
– Tvirtinimas prie stiklo su siurbtuku su GPS moduliu
– Automobilinis įkroviklis
– MicroSD-USB adapteris
– USB laidas
– Naudojimo instrukcija bei informacija susijusi su saugumu
– Medžiaginis dėklas registratoriaus nešiojimui
– Mikropluošto audinys
– Kitos spausdintos medžiagos (lipdukai, Facebook kortelė, registracijos lapas)
2. Produkto aprašymas
9
7
5
6
8
14
10
2
1
3
HR SLO LT HU PL SK CZ DE EN
1. MENIU
2. ĮJ./IŠJ. (Power)
3. Rodyklė AUKŠTYN
4. Rodyklė ŽEMYN
5. MODE
6. Rec/OK
7. Tvirtinimas
8. Ekranas
9. Maitinimo lizdas
4
13 1112 15
10. Micro SD lizdas
11. Objektyvas
12. Mini USB sąsaja
13. Mikrofonas
14. LED diodas
15. RESET
- 1 -

3. Produkto instaliacija
1) Maitinimo kabelį iki automobilinio lizdo nuveskite aplink priekinį stiklą taip, kad neribotų
vairuotojui matomumo, o po to pritvirtinkite. Įrenginį pritvirtinkite tarp stiklo ir galinio
vaizdo veidrodžio. Tokiu būdu turėsite geriausį kadrą.
2) Neinstaliuokite įrenginio pozicijoje, kuri galėtų trukdyti vairuotojui arba ribotų matomumą.
3) Kai kuriuose automobiliuose lizdas visą laiką maitinamas. Tokiu atveju prieš išeinant iš auto-
mobilio įsitikinkite ar įrenginio kabelis išimtas iš lizdo.
4) Jei naudojate įrenginį pirmą kartą, baterija gali būti išsikrovus. Jei negalima įjungti įrenginio
dėl silpno baterijos pakrovimo, prijunkite rankiniu būdu maitinimo kabelį ir taip pakraukite
bateriją.
5) Naudokite originalias SD 10 ar didesnes atminties korteles. Siekiant optimaliai išnaudoti
įrašymo ilgį rekomenduojame mažiausiai 8 GB, o maksimaliai 64 GB talpos atminties korteles.
Pirmą kartą naudojant kortelę reikia ją suformatuoti.
Svarbios informacijos:
- Kad LAMAX C9 automobilinis registratorius ir GPS modulis veiktų teisingai, maitinimo kabelis
turėtų būti nukreiptas tiesiai į mikro USB įvestį GPS laikiklyje (ne į mikro USB įvestį kameroje).
- Siekiant užtikrinti, kad visos funkcijos veiktų, kamera turi būti tinkamai prijungta prie laikiklio
(kamera turi būti dedamas į laikiklį ir visiškai į jį įstumta). Išimdami kamerą, paspauskite lai-
kiklio priekinėje dalyje esantį ksatorių ir tik tada atsargiai išimkite kamerą. Jei kamera nėra
tinkamai prijungta prie GPS modulio, gali būti sutrikdytas maitinimas ar GPS veikimas.
4. LAMAX C9 registratoriaus naudojimas
1) Micro SD kortelės įdėjimas
Dėkite arba išimkite micro SD kortelę iš kortelės atminties lizdo tik tada, kai registratorius yra
išjungtas bei kai nėra prijungtas prie kabelio maitinimo kabeliu.
2) Maitinimas
a) Registratorius gali būti prijungtas su USB kabeliu prie kompiuterio arba panaudojus auto-
mobilio lizdą.
b) Registratorius suprojektuotas taip, kad būtu pastoviai maitinamas. Nėra galimybės išimti
arba pakeisti integruotos baterijos.
3) Registratoriaus įjungimas ir išjungimas
a) Registratorių galima išjungti mygtuku IŠ./ĮJ.
b) Pajungus maitinimo šaltinį registratorius įsijungs automatiškai.
c) Norint išjungti registratorių spauskite ir palaikykite mygtuką IŠ./ĮJ. per 3-5 sek.
d) Atjungus maitinimo šaltinį registratorius išsijungs automatiškai.
4) Režimų perjungimas ir judėjimas meniu
a) Kelis paspaudus MODE mygtuką, galite perjungti režimus: video įrašymo (galima stebėti
gyvai) » nuotraukų režimas » video galerija / foto galerija » apsaugoti įrašai.
b) Registratoriaus meniu sudaro trys dalys: Duomenų bazės meniu » pagrindiniai registratoriaus
nustatymai » išplėstiniai nustatymai. Tarp paskirų dalių galite judėti panaudojus rodykles
„AUKŠTYN“ ir „ŽEMYN“. Įėjimui į meniu naudojamas mygtukas „MENIU“. Kiekvienoje dalyje
po to galite judėti vertikaliai panaudojus rodykles „AUKŠTYN“ ir „ŽEMYN“. Pasirinkimo
patvirtinimui naudojamas mygtukas „OK“.
EN DE CZ SK PL HU LT SLO HR
- 2 -

c) Į atskirą meniu dalį - video nustatymai / nuotraukų nustatymai - galima perkelti tik iš
atitinkamo režimo. Į video nustatymus galite pereiti tik iš vaizdo įrašymo režimo. Į nuotraukų
nustatymus galite pereiti tik iš fotoaparato režimo.
d) Norėdami grįžti vieną lygį aukščiau paspauskite mygtuką „MENIU“.
5) Įrašymas / fotografavimas / galerijos peržiūrėjimas
a) Įrašymas registratoriuje prasidės po „OK“ mygtuko paspaudimo. Dar kartą paspaudus
užbaigsite įrašymą. Registratorius turi būti video įrašymo režime.
b) Automatinis įrašymas – automatinio įrašymo funkcija yra pastoviai aktyvi. Automatinis
įrašymas prasidės kai registratorius prisijungs prie maitinimo šaltinio. Kai tik pradės veiks
automobilis, įsijungs registratorius ir pradės įrašinėti.
c) Automatinis įrašymo pradėjimas/užbaigimas - registratorius automatiškai sustabdys įrašymą
ir išjungus variklį ir maitinimo sustabdymo. Kai kuriuose automobiliuose lizdas visą laiką
maitinamas. Tokiu atveju prieš išeinant iš automobilio įsitikinkite ar įrenginio kabelis išimtas
iš lizdo.
d) Nuotraukas galima atlikti paspaudus mygtuką „OK“. Registratorius turi būti fotografavimo
režime.
e) Perjungus į galerijos režimą bus rodomas įrašų ir nuotraukų sąrašas. Norint judėti tarp paskirų
įrašų ir nuotraukų, riekia panaudoti rodykles „AUKŠTYN“ ir „ŽEMYN“. Norint pradėti arba
užbaigti žiūrėjimą paspauskite mygtuką OK.
6) Failų šalinimas betarpiškai registratoriuje
Failų šalinimas betarpiškai registratoriuje – galimas iš galerijos lygio. Pasirinkite failą, kurį norite
pašalinti. Paspauskite mygtuką „MENIU“, o po to pasirinkite vieną iš galimybių: „Pašalinti šį failą“
arba „Pašalinti visus failus“. Su rodyklėmis „AUKŠTYN“ ir „ŽEMYN“ pasirinkite norimą šalinimo
būdą ir patvirtinkite mygtuku „OK“. Tais pačiais mygtukais (rodyklėmis) pasirinkite „taip“ arba
„ne“ ir vėl paspauskite mygtuką „OK“.
7) Prijungimas prie PC
Registratorius gali būti prijungtas prie kompiuterio mini USB kabeliu, kuris yra vienu iš
pagrindinio rinkinio elementu. Prijungus registratorius veikia kaip plug’n‘play įrenginys.
8) Grotuvo programinė įranga – GPS Player
Vairavimo registratorius LAMAX C9 teikia galimybę pasinaudoti praktiška ir inteligentiška
programine įranga. Jos dėka galima viename ekrane vienu metu: įrašinėti vaizdo įrašus,
žiūrėti maršrutų vaizdą žemėlapiuose ir registruoti gravitacinius pakitimus, kuriuos registruoja
G-jutiklis.
HR SLO LT HU PL SK CZ DE EN
- 3 -

5. Mygtukų funkcijos
Mygtukas
(ĮJ./IŠJ)
(MENU)
(REŽIMAS)
(REC/OK)
(AUKŠTYN)
(ŽEMYN)
RESET Reset Paspauskite, norint atkurti registratoriaus nustatymus
Funkcija Pastabos
Registratoriaus
įjungimas / išjungimas
Meniu /
atkūrimas
Režimų keitimas 1. Naudodami tiesioginį vaizdą paspausdami galite keisti
Įrašymas/OK 1. Spaudžiant video režime pradėsite įrašymą
Aukštyn /
apsaugojimas
Žemyn 1. Paspaudus įrašymo metu, mikrofonas bus išjungtas /
1. Paspauskite ir laikykite nuspaudę, jei norite įjungti /
išjungti registratorių
1. Paspauskite, jei norite pereiti į meniu.
2. Paspauskite pakartotinai, pereisite į meniu nustaty-
mus
3. Paspauskite, jei norite grįžti lygį aukščiau be išsaugo-
jimo
4. Paspauskite ir palaikykite, jei norite įjungti / išjungti
garsą
fotoaparato režimus - video įrašymo režimas (tiesiogi-
nis vaizdas) » fotografavimo režimas » video/foto gale-
rija » apsaugoti įrašai
2. Spaudžiant įrašymo metu, išjungsite ekraną
2. Spaudžiant fotografavimo režime pradėsite fotogra-
favimą
3. Spaudžiant video režime pabaigsite įrašymą
4. Paspauskite meniu, norėdami pereiti į vidinį meniu
1. Paspaudus įrašymo metu, apsaugosite įrašą (maksi-
malus saugomų įrašų skaičius yra 50)
2. Paspaudę tiesioginiame rodinyje, nustatysite EV (pa-
šviesinsite ekspoziciją)
3. Spaudžiant Meniu pereisite aukštyn.
4. Palaikant padidinsite garsumą
įjungtas
2. Paspaudę rodinyje, nustatysite EV (patamsinsite
ekspoziciją)
3. Spaudžiant Meniu pereisite aukštyn
4. Palaikant padidinsite garsumą
arba grįžti į gamyklinius nustatymus
EN DE CZ SK PL HU LT SLO HR
- 4 -

6. Piktogramų paaiškinimas
1
2 3 4 5 6 7 8
10
13
14
1 Įrašymas (jei piktograma nešviečia, registratorius neįrašinėja)
2
3
4
5
×
6
×
7
8
9
10
HR SLO LT HU PL SK CZ DE EN
WDR
11
12
13
14
15
Besikuriančio įrašo laikas
Piktograma rodanti duoto failo apsaugojimą
Judesio detekcija įjungta / išjungta
Aktyvus GPS × GPS už signalo
Mikrofonas įjungtas / išjungtas
Atminties kortelės indikatorius ir būsena
Naudojama
atmintis = 0
Ikona
Maitinimo / akumuliatoriaus būsenos
(jei prietaisas negauna maitinimo) indikatorius
Video rezoliucija
Kelionės kryptis pagal pasaulio puses (kompasas)
WDR (WideDynamicRange)
= vaizdo įrašymas plačiu dinaminiu diapazonu
Dabartinis greitis
Data
Dabartinis garsumas
(bus rodomas laikydami paspaudus mygtukus aukštyn/ žemyn)
Dabartinis laikas
0<Naudojama
atmintis≤1/3
1/3<Naudojama
atmintis≤2/3
16:9
9
11
12
15
2/3<Naudojama
atmintis≤1
- 5 -

7. Meniu
Duomenų bazės meniu
Pagrindiniai nustatymai
Pagrindinis
meniu
Submeniu Pastabos
Greičio limitas Išjungta
10 - 140 Km/h
Duomenų
bazė
Įjungta
Išjungta
GPS Įjungta
Išjungta
Rezoliucija 2560×1080 30FPS
2304×1296 30FPS
1920×1080 30FPS
1280×720 60FPS
1280×720 30FPS
Kokybė Labai aukšta
Aukšta
Normali
WDR Įjungta
Išjungta
Data Įjungta
Išjungta
Įrašymas
kilpoje
1 minutė
2 minutės
3 minutės
5 minutės
Išjungta
Numatomi nustatymai: Išjungta
Jei viršysite nustatytą vertę, būsite įspėti.
Numatomi nustatymai: Įjungta
Bendradarbiauja su greitmačių detektoriaus duomenų
baze. Jei greitmatis yra netoliese, prietaisas apie tai
įspės garsiniu siganlu ir ekrane rodoma žinute. Kai GPS
išjungtas, jūs negausite šios informacijos.
Numatomi nustatymai: Įjungta
GPS lokatorius maršruto, padėties, greičio ir laiko
įrašymui. Galimybė atkurti maršrutą ir vietą Google
žemėlapiuose. Išjungus, greitis ir kryptis nebus rodoma
ekrane.
Numatomi nustatymai: 1920×1080 30FPS
1080P nustatymas tinka įprastam įrašymui. Didesnės
rezoliucijos įrašai užima daugiau vietos SD kortelėje.
Numatomi nustatymai: Labai aukšta
Leidžia suspausti vaizdo įrašą tiesiogiai atminties
kortelėje su minimaliu kokybės praradimu.
Pradiniai nustatymai: Labai aukšta - įrašo be praradimo,
aukščiausioje kokybėje. Kiti nustatymai daro kokybę
šiek tiek žemesnę, tačiau tuo pat metu duomenų kiekis
sumažėja perpus.
Numatomi nustatymai: Įjungta
Santrumpa WDR reiškia WideDynamicRange, funkcija,
kuri subalansuoja nurodytų kadrų kontrastus. Ši
funkcija padidina nuotraukų kokybę tose vietose, kur
šviesa ir šešėlis yra nesubalansuoti.
Numatomi nustatymai: Įjungta
Įrašo datos ir laiko rodymas ekrane ir įraše.
Numatomi nustatymai: 1 minutė
Nenutraukiamas įrašymas kilpoje. Automatinis pirmojo
failo pakeitimas iš karto, kai atmintis užpildyta. Vaizdo
srautas nebus pertrauktas.
EN DE CZ SK PL HU LT SLO HR
- 6 -

Smūgių jutiklis|
(G-jutiklis)
1 jautrumas.
2 jautrumas
3 jautrumas
4 jautrumas
Numatomi nustatymai: 4 jautrumas
Įjungus G-jutiklį - smūgio atveju bus automatiškai
apsaugotas šiuo metu sukurtas įrašas, taigi apsaugos jį
nuo pakeitimo.
5 jautrumas
6 jautrumas
7 jautrumas.
Išjungta
Judesio
detekcija
Garso
įrašymas
Poilsio
planavimas
Pagrindiniai nustatymai
Išjungta
Įjungta
Įjungta
Išjungta
Išjungta
1 valanda
2 valandos
3 valandos
Numatomi nustatymai: Išjungta
Judesio detekcija prie įjungtos judesio detekcijos
registratorius pradeda automatiškai įrašinėti, kai
aptiks judesį objektyvo diapazone. Registratorius baigs
įrašymą iškart po judesio sustojimo.
Numatomi nustatymai: Įjungta
Leidžia įjungti ir išjungti garsą įrašo kūrimo metu.
Tinka, pavyzdžiui, situacijose, kai norite išsaugoti savo
pokalbių privatumą.
Numatomi nustatymai: 2 valandos
Praėjus nurodytam laikui, prietaisas rekomenduos jums
sustoti ir pailsėti.
4 valandos
GPS
maršrutas
LDWS
kalibravimas
LDWS 20
Įjungta
Išjungta
40
60
80
100
Numatomi nustatymai: Įjungta
Tikslus LDWS kalibravimas yra būtinas tinkamam
veikimui, be to apsauginė sistema tinkamai neveiks.
Numatomi nustatymai: Išjungtas
LDWS (Lane Departure Warning System) tai įspėjimo
sistema, jei perkertama eismo juosta. Sistema aktyvi
nuo greičio, kokį pasirinkite Tai praverčia ilgesniuose
maršrutuose.
Išjungta
Nuotraukos
dydis
4M (16:9)
9M (16:9)
Numatomi nustatymai: 13M (16:9)
13M (16:9)
Kokybė Labai aukšta
HR SLO LT HU PL SK CZ DE EN
režime
Nustatymai
fotografavimo
Data Įjungta
Aukšta
Normali
Išjungta
Numatomi nustatymai: Labai aukšta
Nustatymas veikia bendrą vaizdo įrašų kokybę ir jų dydį.
Numatomi nustatymai: Įjungta
Įrašo datos ir laiko rodymas ekrane ir nuotraukoje.
- 7 -

Data / valanda DD / MM / MMMM
Vibracijų
slopinimas
(dažnis)
Ekspozicijos
matavimas
Ekrano
užsklanda
Atidėtas išj. Išjungta
Garsai Įjungta
Teksto
rodymas
Greitis įraše Įjungta
Išplėstiniai nustatymai
Greitis KMH / MPH
Laiko zona GMT-12
Vaizdo
pasukimas
Kalba English, Deutsch,
Formatavimas Taip
Atstatyti Taip
v/m
50 Hz
60 Hz
Vidutinis
Centras
Taškas
Išjungta
15 sekundžių
1 minutė
3 minutės
5 minutės
5 sekundés
15 sekundés
30 sekundés
Išjungta
Išjungta
Įdėti tekstą į įrašą
Išjungta
Įjungta
Išjungta
Česky, Slovensky,
Polski, Magyar,
Lietuvių, P,
Français, Svenska,
Nederlands
Ne
Ne
–
GMT+12
Datos ir valandos nustatymai.
Numatomi nustatymai: 50 Hz
Dažnis leidžia pasirinkti dažnį pagal elektros tinklo
dažnį (Europos žemyne tinkle vedama 50 Hz elektra,
Amerikoje ir dalyje Azijos - 60 Hz).
Numatomi nustatymai: Centras (vidurinis)
Ekspozicijos srities nustatymai - registratoriaus orienta-
cija.
Numatomi nustatymai: Išjungta
Numatomi nustatymai: Išjungta
Galima nustatyti atidėtą išjungimą po registratoriaus
atjungimo iš maitinimo. Ši funkcija yra ideali pavy-
zdžiui, kai naudojame automobilį su įranga start/stop.
Numatomi nustatymai: Įjungta
Numatomi nustatymai: Išjungta
Numatomi nustatymai: Įjungta
Galimybė įjungti / išjungti greitį video įraše.
Numatomi nustatymai: KMH
Numatomi nustatymai: +1
Laiko zonos nustatymas.
Numatomi nustatymai: Išjungta
Vaizdą galima pasukti 180 laipsnių.
Numatomi nustatymai: Anglų
Numatomi nustatymai: Ne
Numatomi nustatymai: Taip
EN DE CZ SK PL HU LT SLO HR
- 8 -

8. LDWS ir kalibravimas
Įdėjus registratorių laikiklyje Pagrindiniuose nustatymuose pasirinkite MENIU » „LDWS
kalibravimas“, o po to vykdykite žemiau pateiktame paveikslėlyje pateiktas instrukcijas:
Pastabos: Tikslus LDWS kalibravimas yra būtinas tinkamam veikimui, be to apsauginė sistema
tinkamai neveiks.
9. LED diodas ir funkcijos
Rodiklis Reikšmė
Mėlyna šviesa
Raudona šviesa
Nuolat šviečia Pakrovimas
Užgesimas Įkrovimo pabaigimas
Nuolat šviečia Automobilinis registratorius nekuria įrašo
Mirksi kas 1 sekundę Įrašymo kūrimas
HR SLO LT HU PL SK CZ DE EN
- 9 -

10. Techniniai parametrai
Video rezoliucija 2560×1080 30FPS, 2304×1296 30FPS,
1920×1080 30FPS, 1280×720 60FPS, 1280×720 30FPS
Matomumo kampas 150°
Ekrano dydis 2,7 colio, 16:9
Atminties tipas Micro SD Class 10, maks. 64 GB
Video formatas MP4
Laiko rodymas TAIP
GPS TAIP
G-jutiklis TAIP
Sujungimas USB
Sistema MS Windows / MAC OS
Įvesties įtampa 5 V
Dažnis 50 Hz / 60 Hz
Baterijos talpa 150 mAh
Darbo drėgmė ≤93%RH (40°C)
Darbo temperatūra -5°C ~ 40°C
Pastabos: Specikacija gali būti keičiama dėl kažkurio elemento iškeitimo arba programinės
įrangos atnaujinimo. Reikia atsiminti, kai kurios Europos Sąjungos valstybės turi detalius
įstatymus susijusius su automobiliniais registratoriais. Todėl prieš kiekvieną kelionę į
užsienį rekomenduojame susipažinti su vietinę teisę - geriausiai užklausti vietiniuose
automobilių klubuose. Registratorių galima naudoti norint turėti įrodymą policijai. Dar kartą
rekomenduojame susipažinti su paskirų valstybių teisę. Įspėjame, kad tokia medžiaga gali
būti panaudota prieš jos autorių. LAMAX Electronics neatsako už registratoriaus ir jo sukurtos
medžiagos naudojimą nesilaikant teisės įstatų.
EN DE CZ SK PL HU LT SLO HR
Gamintojas
elem6, s.r.o., Braškovská 308/15, 16100 Praha 6
www.lamax-electronics.com
Spausdinimo klaidos ir pokyčiai naudojimo instrukcijoje saugomos.
- 10 -

- 11 -

Vrhunska avtokamera z GPS lokatorjem in
detektorjem radarjev za merjenje hitrosti
LAMAX C9
SLO UPORABNIŠKI PRIROČNIK
- 1 -

Uvod
Zahvaljujemo se vam za nakup avtokamere LAMAX C9 – zagotovili ste si zanesljivega sopotnika
na poteh z vašim avtomobilom. Zaščitite sebe in svoj avtomobil. Kakovostne ostre posnetke
lahko uporabite kot dokazno gradivo za zavarovalnico ali policijo, lahko pa jih vključite tudi
v svoje videospomine z dopusta.
1. Vsebin pakiranja
– Avtokamera LAMAX C9
– Vakuumski nosilec za pritrditev na steklo z GPS modulom
– Avtomobilski polnilec
– Adapter MicroSD-USB
– USB kabel
– Priročnik za uporabo in Varnostni napotki
– Vrečka iz blaga za prenos kamere
– Mikrovlakna krpo
– Drugi materiali (nalepke, podatki za Facebook, podatki za registracijo izdelka)
2. Prikaz izdelka
9
7
5
6
8
14
10
2
1
3
HR SLO LT HU PL SK CZ DE EN
1. MENI
2. VKL/IZKL (Power)
3. Gumb GOR
4. Gumb DOL
5. MODE
6. Rec/OK
7. Držalo
8. Prikazovalnik
9. Vhod za napajanje
4
13 1112 15
10. Reža za Micro SD
11. Objektiv
12. Vhod mini USB
13. Mikrofon
14. LED dioda
15. RESET
- 1 -

3. Namestitev izdelka
1) Napajalni kabel za vtičnico vžigalnika v avtomobilu napeljite okoli vetrobranskega stekla
tako, da ne bo oviral pogleda voznika in ga varno pritrdite. Napravo pritrdite med steklo in
vzvratno ogledalo. Tako boste dosegli optimalno zajemanje.
2) Naprave ne nameščajte v položaj, v katerem bi vozniku ovirala pogled ali ga razpršila.
3) Nekatera vozila ne prekinejo napajanja vtičnice vžigalnika v avtomobilu niti po izklopu mo-
torja. V takšnem primeru preden zapustite vozilo, kabel vedno iztaknite iz vtičnice.
4) Pri prvi uporabi naprave je lahko baterija zelo malo napolnjena. Če naprave ne morete za-
gnati zaradi nizke energije, ročno priklopite kabel zunanjega napajanja in baterijo napolnite.
5) Uporabljajte micro SD kartice priznanih proizvajalcev razreda 10 in višjih. Za optimalen izko-
ristek dolžine posnetka priporočamo uporabo kartic s kapaciteto vsaj 8 GB, največ pa 64 GB.
Če spominsko kartico uporabljate prvič, priporočamo, da jo najprej formatirate.
Pomemba opozorila:
- Za pravilno delovanje avtokamere LAMAX C9 in GPS modula mora biti napajalni kabel vklopl-
jen neposredno v mikro USB vhod v GPS nosilcu (in ne v mikro USB vhod v kameri).
- Za zagotovitev pravilnega delovanja mora biti kamera v nosilec pravilno nameščena (pri na-
meščanju se mora kamera v nosilec zatakniti s klikom tako, da je do konca vstavljena). Pri
snemanju kamere je potrebno stisniti varovalo v sprednjem delu nosilca in šele nato kamero
previdno iztakniti. Če kamera ni dobro pritrjena na GPS modul, lahko pride do izpadov napa-
janja ali delovanja GPS.
4. Uporaba avtokamere LAMAX C9
1) Vstavitev SD kartice
Micro SD kartico vedno vstavljajte v režo za micro SD kartice ali jo iz nje odstranjujte, ko je ka-
mera izklopljena in ni priključena na računalnik ali napajanje
2) Napajanje
a) Kamero lahko priključite na vir preko USB kabla na računalnik ali preko vtičnice vžigalnika v
avtomobilu neposredno v vozilu.
b) Kamera je namenjena trajnemu napajanju. Vgrajene baterije iz naprave ni mogoče odstraniti
niti zamenjati.
3) Vklop in izklop kamere
a) Kamero vklopite s pritiskom na gumb VKL/IZKL.
b) Kamera se samodejno vklopi po priklopu na napajanje.
c) Kamero izklopite tako, da pritisnete in zadržite gumb VKL/IZKL za 3–5 sekund.
d) Kamera se samodejno izklopi, ko jo odklopite iz napajanja.
4) Preklapljanje med načini in premikanje po meniju
a) S postopnimi kratkimi pritiski na gumb »MODE« lahko preklapljate med načini: način video-
kamere (posnetek v živo) » način fotoaparata » videogalerija/fotogalerija » zaklenjeni pos-
netki.
b) Meni kamere sestavljajo trije samostojni sklopi: Meni podatkovne baze » osnovne nastavitve
kamere » napredne nastavitve. Med posameznimi sklopi se premikajte s pomočjo puščic
»GOR« in »DOL«. Za vstop v meni uporabite gumb »MENI«. Znotraj posameznega sklopa me-
EN DE CZ SK PL HU LT SLO HR
- 2 -

nija se nato pomikajte navpično s pomočjo puščic »GOR« in »DOL«, pri čemer za potrditev
izbire uporabite gumb »OK«.
c) V samostojna dela menija nastavitve videokamere/nastavitve fotoaparata je mogoče vstopiti
le iz ustreznega načina. Torej, v nastavitve videokamere je mogoče vstopiti le iz načina video-
kamere. V nastavitve fotoaparata je mogoče vstopiti le iz načina fotoaparata.
d) Za vrnitev za eno stopnjo nazaj stisnite gumb »MENI«.
5) Snemanje / slikanje / ogled fotograj
a) Snemanje posnetkov s kamero začnite s pritiskom na gumb »OK«. S ponovim pritiskom na ta
gumb snemanje zaključite. Kamera mora biti v načinu videokamere.
b) Avtomatsko snemanje - funkcija avtomatskega snemanja je stalno vklopljena. Avtomatsko
snemanje se zažene po priklopu kamere na napajanje. Če napajanje deluje le, ko je avtomo-
bil vžgan, se bo kamera vklopila in začela snemati po vžigu avtomobila.
c) Avtomatski zaključek snemanja in izklop - kamera avtomatsko zaključi snemanje in se izklopi
po prekinitvi napajanja, torej po izklopu motorja. V nekaterih avtomobilih se napajanje vtič-
nice vžigalnika nikoli ne prekine. V takšnem primeru napajalnega kabla ne pozabite iztakniti
iz vtičnice.
d) Fotograjo zajamete s pritiskom na gumb »OK«. Kamera mora biti v načinu fotoaparata.
e) Po preklopu v način galerije se prikaže seznam posnetih videov in zajetih fotograj. Za pomi-
kanje med posameznimi posnetki in slikami uporabite puščici »GOR« in »DOL«. Za predvajan-
je posnetka in izhod iz njega uporabite gumb »OK«.
6) Brisanje posnetega materiala neposredno v kameri
Brisanje posameznih materialov neposredno v kameri je mogoče izvesti v galeriji. Izberite da-
toteko, ki jo želite izbrisati. Pritisnite na gumb »MENI« in na izbiro boste imeli dve možnosti:
»Izbriši ta posnetek« ali »Izbriši vse posnetke«. Izberite možnost s pomočjo puščic »GOR« in
»DOL« in nato potrdite z gumbom »OK«, z istima gumboma (puščici) izberite med možnostma
»da« in »ne« ter znova potrdite z gumbom »OK«.
7) Priključitev na PC
Kamero je mogoče priključiti na PC s pomočjo mini USB kabla, ki je priložen v pakiranju. Po
priključitvi bo kamera delovala kot naprava plug‘n‘play.
8) Program za predvajanje - GPS player
Avtokamera LAMAX C9 omogoča uporabo pametne in uporabne aplikacije, s pomočjo katere
lahko na enem zaslonu spremljate snemani video, prikaz tras na zemljevidih, graf hitrosti in
zapis gibanja gravitacije, ki ga zagotavlja vgrajeni G-senzor kamere. Namestitveno datoteko
HR SLO LT HU PL SK CZ DE EN
tega predvajalnika lahko prenesete s spletnih strani www.lamax-electronics.com, pod zavih-
kom
LAMAX C9 » Za prenos
- 3 -

5. Funkcije gumbov
Gumb Funkcija Opomba
Vklop/izklop kamere 1. Stisnite in zadržite za vklop/izklop kamere
(VKL/IZKL)
Meni/predvajanje 1. Pritisnite za vstop v meni
2. Z nadaljnjim pritiskanjem se pomikate po meniju
(MENU)
Sprememba načina 1. Pri posnetku v živo s pritiskom spremenite način ka-
(MODE)
Snemanje/OK 1. V načinu videokamere pritisnite za snemanje
(REC/OK)
Navzgor/zaklepanje 1. Pri snemanju s pritiskom zaklenete posnetek (najvišje
(GOR)
Navzdol 1. Med snemanjem s pritiskom izklopite/vklopite mikro-
(DOL)
RESET Reset Stisnite za reset celotne kamere in povrnitev na tovarni-
3. Pritisnite, da se vrnete za eno raven nazaj brez shran-
jevanja
4. Zadržite za izklop/vklop zvoka
mere - način videokamere (posnetek v živo) » način
fotoaparata » videogalerija/fotogalerija » zaklenjeni
posnetki
2. Med snemanjem s pritiskom na gumb izklopite zaslon
2. V načinu fotoaparata pritisnite za fotograranje
3. V načinu snemanja stisnite za konec snemanja
4. V meniju stisnite za vstop v podizbire
število zaklenjenih videov je 50)
2. Pri posnetku v živo s pritiskom nastavite EV (osvetlitev
ekspozicije)
3. V Meniju pritisnite za premik navzgor
4. Zadržite za zvišanje glasnosti
fon
2. Pri posnetku v živo s pritiskom nastavite EV (potemni-
tev ekspozicije)
3. V Meniju pritisnite za premik navzdol
4. Zadržite za znižanje glasnosti
ške nastavitve.
EN DE CZ SK PL HU LT SLO HR
- 4 -

6. Pojasnitve ikon
1
2 3 4 5 6 7 8
10
13
14
1 Snemanje (če ikona ne sveti, kamera ne snema)
2
3
4
5
×
6
×
7
8
9
10
HR SLO LT HU PL SK CZ DE EN
WDR
11
12
13
14
15
Trajanje snemanega videa (posnetka)
Ikona, ki ponazarja zaklenitev danega posnetka
Zaznavanje gibanja vklopljeno/izklopljeno
GPS aktiven x GPS nima signala
Mikrofon vklopljen/izklopljen
Indikator spominske kartice in stanje
Zasedenost
pomnilnika = 0
Ikona
Indikator napajanja / stanja baterije
(če naprava ni priklopljena na napajanje)
Ločljivost videa
Smer vožnje glede na smeri neba (kompas)
WDR (Wide Dynamic Range)
= snemanje slike s širokim dinamičnim razponom
Trenutna hitrost
Datum
Trenutna glasnost (se prikaže po zadržanju gumba GOR/DOL)
Trenutni čas
0<Zasedenost
pomnilnika≤1/3
16:9
1/3<Zasedenost
pomnilnika≤2/3
9
11
12
15
2/3<Zasedenost
pomnilnika≤1
- 5 -

7. Meni
Meni podatkovne baze
Osnovne nastavitve
Glavni meni Podmeni Opomba
Omejitev
hitrosti
Podatkovna
baza
GPS Vklopljeno
Ločljivost 2560×1080 30FPS
Izklopljeno
10 - 140 km/h
Vklopljeno
Izklopljeno
Izklopljeno
2304×1296 30FPS
1920×1080 30FPS
Privzeta nastavitev: Izklopljeno
Ob prekoračitvi nastavljene vrednosti boste opozorje-
ni.
Privzeta nastavitev: Vklopljeno
Dela s podatkovno bazo detektorja radarjev za mer-
jenje hitrosti. Če je v bližini hitrostna kamera, boste
opozorjeni z zvočnim signalom in prikazom na zaslo-
nu. Če je GPS izklopljen, opozorila ne delujejo.
Privzeta nastavitev: Vklopljeno
GPS lokator za spremljanje poti, pozicije, hitrosti in
časa. Možnost predvajanja poti in pozicije na Google
Maps. Če je izklopljen, na zaslonu nista več prikazani
hitrost in smer vožnje.
Privzeta nastavitev: 1920x1080 30FPS
1080P je primerna nastavitev za vsakdanje snemanje.
Višja ločljivost zasede več prostora na SD kartici.
1280×720 60FPS
1280×720 30FPS
Kakovost Zelo visoka
Visoka
Normalna
WDR Vklopljeno
Izklopljeno
Datum Vklopljeno
Izklopljeno
Snemanje
v zanki
1 minuta
2 minuti
3 minute
5 minut
Privzeta nastavitev: Zelo visoka
Omogoča kompresijo videa že neposredno na spo-
minsko kartico pri minimalni izgubi kakovosti.
Pri nastavitvi kakovosti na »Zelo visoka« kamera sne-
ma v polni kakovosti in brez izgub. Pri ostalih nižjih
nastavitvah snema v nekoliko slabši kakovost, hkrati
pa se na polovico zniža tudi obseg podatkov.
Privzeta nastavitev: Vklopljeno
Kratica WDR predstavlja Wide Dynamic Range, torej
funkcijo za uravnoteženje kontrastov danih posnet-
kov. Ta funkcija zvišuje kakovost posnetkov na svet-
lobno razgibanih mestih, na katerih je velik kontrast
med svetlobo in sencami.
Privzeta nastavitev: Vklopljeno
Prikaz datuma in časa na zaslonu na posnetem ma-
terialu.
Privzeta nastavitev: 1 minuta
Neprekinjeno snemanje v zanki. Samodejni prepis
prve datoteke takoj, ko je zapolnjen pomnilni prostor.
Ne pride do prekinitve snemanja.
Izklopljeno
EN DE CZ SK PL HU LT SLO HR
- 6 -

Senzor
tresljajev
(G-senzor)
Občutljivost 1 – visok a
Občutljivost 2
Občutljivost 3
Občutljivost 4
Občutljivost 5
Privzeta nastavitev: Občutljivost 4
Aktiviran G-senzor v primeru trka samodejno zaklene
trenutno sneman material in ga zaščiti pred prepiso-
vanjem.
Občutljivost 1 je najvišja, občutljivost 7 pa najnižja.
Občutljivost 6
Občutljivost 7 – nizka
Izklopljeno
Zaznavanje
gibanja
Zajemanje
zvoka
Načrtovanje
počitka
Osnovne nastavitve
Izklopljeno
Vklopljeno
Vklopljeno
Izklopljeno
Izklopljeno
1 ura
2 uri
3 ure
Privzeta nastavitev: Izklopljeno
Ko je zaznavanje gibanja vklopljeno, kamera začne
samodejno snemati takoj, ko zazna gibanje v vidnem
polju objektiva. Kamera konča s snemanjem takoj, ko
gibanje preneha.
Privzeta nastavitev: Vklopljeno
Omogoča izklop ali vklop zvoka pri snemanju videa.
Primerno na primer, če želite ohraniti zasebnost svojih
klicev.
Privzeta nastavitev: 2 uri
Naprava vam bo po preteku tega časa priporočila, da
ustavite in si odpočijete.
4 ure
GPS
trasa
Kalibracija
LDWS
LDWS 20
Vklopljeno
Izklopljeno
40
60
80
100
Privzeta nastavitev: Vklopljeno
Izklopljeno pomeni, da je izklopljeno GPS snemanje.
Natančna kalibracija LDWS je nujna za pravilno de-
lovanje. Brez tega ta varnostni sistem ne bo pravilno
deloval.
Privzeta nastavitev: Izklopljeno
LDWS (Lane Departure Warning System) je sistem zaš-
čite pri zapuščanju voznega pasu. Ta sistem se aktivira
pri hitrosti, ki jo nastavite. Prav bo prišel predvsem na
daljših poteh.
Izklopljeno
Velikost
fotograje
4M (16:9)
9M (16:9)
Privzeta nastavitev: 13M (16:9)
13M (16:9)
HR SLO LT HU PL SK CZ DE EN
Kakovost Zelo visoka
fotoaparata
Datum Vklopljeno
Nastavitve v načinu
Visoka
Normalna
Izklopljeno
Privzeta nastavitev: Zelo visoka
Nastavitev vpliva na celostno kakovost zajetih posnet-
kov in njihovo velikost.
Privzeta nastavitev: Vklopljeno
Prikaz datuma in časa na zaslonu in na fotograji.
- 7 -

Datum / čas DD / MM / LLLL
h/m
Dušenje
nihanj
50 Hz
60 Hz
(frekvence)
Metrika
(merjenje
izpostavitve)
Ohranjevalnik
zaslona
Premer
Centr.
Točka
Izklopljeno
15 sekund
1 minuta
3 minute
5 minut
Izklop
z zamikom
Izklopljeno
5 sekund
15 sekund
30 sekund
Zvoki Vklopljeno
Izklopljeno
Besedilna
oznaka
Izklopljeno
Vstavi bes. ozn.
Prikaz hitrosti Vklopljeno
Napredne nastavitve
Izklopljeno
Hitrosti KMH / MPH
Časovni pas GMT-12 – GMT+12
Vrtenje slike Vklopljeno
Izklopljeno
Jezik English, Deutsch,
Česky, Slovensky,
Polski, Magyar,
Lietuvių, P,
Français, Svenska,
Nederlands
Formatiranje Da
Ne
Tovarniške
nastavitev
Da
Ne
Različica
Firmware
Nastavitev datuma in časa
Privzeta nastavitev: 50 Hz
Omogoča izbiro frekvence skladno s frekvenco elek-
tričnega omrežja (v Evropi električno omrežje uporabl-
ja frekvenco 50 Hz, v Ameriki in delu Azije pa 60 Hz).
Privzeta nastavitev: Centralna (sredinska)
Nastavitev območja ekspozicije ostrenja kamere.
Privzeta nastavitev: Izklopljeno
Nastavitev samodejnega izklopa zaslona v primeru
nedejavnosti.
Privzeta nastavitev: Izklopljeno
Omogoča zakasnitev takojšnjega izklopa po odklopu
kamere iz napajanja. Ta funkcija je priročna na primer
pri avtomobilih s sistemom start/stop.
Privzeta nastavitev: Vklopljeno
Nastavitev zvokovnih opozoril med vožnjo.
Privzeta nastavitev: Izklopljeno
Možnost vstavitve besedilne informacije v videopos-
netek.
Privzeta nastavitev: Vklopljeno
Možnost vklopa/izklopa prikaza hitrosti na videopos-
netku.
Privzeta nastavitev: KMH
Privzeta nastavitev: +1
Nastavitev časovnega pasu.
Privzeta nastavitev: Izklopljeno
Možnost vrtenja slike za 180 stopinj.
Privzeta nastavitev: Angleščina
Privzeta nastavitev: Ne
Privzeta nastavitev: Da
EN DE CZ SK PL HU LT SLO HR
- 8 -

8. LDWS in kalibracija
Po pritrditvi kamere na nosilec izberite v Osnovnih nastavitvah meni »Kalibracija LDWS« in sle-
dite navodilom na sliki spodaj:
S pritiskanjem na gumba GOR/DOL nastavite
vijolično linijo na nivo obzorja in pritisnite OK.
S pritiskanjem na gumba GOR/DOL nastavite
rdečo linijo na nivo pokrova motorja in stisnite OK.
Opomba: Natančna kalibracija LDWS je nujna za pravilno delovanje; brez tega varnostni sistem
ne bo pravilno deloval.
9. LED dioda in funkcije
Stanje Pomen
Modra luč
Rdeča luč
Neprekinjeno sveti Polnjenje
Preneha svetiti Konec polnjenja
Neprekinjeno sveti Avtokamera ne snema
Utripa v intervalu 1 sekunde Snemanje videa
HR SLO LT HU PL SK CZ DE EN
- 9 -

10. Tehnični parametri
Ločljivost videa 2560×1080 30FPS, 2304×1296 30FPS,
1920×1080 30FPS, 1280×720 60FPS, 1280×720 30FPS
Snemalni kot 150°
Velikost zaslona 2,7-inčni, 16:9
Vrsta pomnilnikov Micro SD Class 10, maks 64 GB
Format videa MP4
Časovna oznaka DA
GPS DA
G-senzor DA
Povezljivost USB
Sistem MS Windows / MAC OS
Vhodna napetost 5 V
Frekvenca 50 Hz / 60 Hz
Kapaciteta baterije 150 mAh
Delovna vlaga ≤93%RH (40°C)
Delovna temperatura -5°C ~ 40°C
Opomba: Specikacije se lahko spremenijo po menjavi katerega od sestavnih delov naprave
ali posodobitvi programske opreme. Pozor: nekatere države Evropske unije imajo specične
zakone glede snemanja z avtokamero, zato priporočamo, da se pred vsako potjo v tujino
seznanite z lokalno zakonodajo, najbolje pri lokalnih avto-moto zvezah. Kamero lahko
uporabljate kot dokazno gradivo, nenazadnje tudi pri urejanju zadev s predstavnikom
policije. Ponovno priporočamo, da se seznanite z lokalno zakonodajo v posameznih državah.
Opozarjamo, da je tovrstni material mogoče uporabiti tudi proti avtorju takšnega posnetka.
Znamka LAMAX Electronics ne odgovarja za nezakonito uporabo kamer niti materiala,
posnetega s temi kamerami.
EN DE CZ SK PL HU LT SLO HR
Proizvajalec
elem6, s.r.o., Braškovská 308/15, 16100 Praha 6, Češka republika
www.lamax-electronics.com
Navodila lahko vsebujejo tiskarske napake, zato si pridržujemo pravice do sprememb.
- 10 -

- 11 -

High-end auto kamera s GPS lokatorom i
detektorom radara za mjerenje brzine vožnje
LAMAX C9
HR PRIRUČNIK ZA KORISNIKA
- 1 -

Uvod
Zahvaljujemo Vam se na kupnji našeg proizvoda auto kamere LAMAX C9. Dobili ste pouzdanog
pomoćnika za putovanja vašim vozilom. Čuvajte sebe i svoj automobil. Kvalitetne i oštre slike
mogu vam poslužiti kao dokazi za zavod za osiguranje ili policiju kao i za slikanje na odmoru.
1. Sadržaj pakiranja
– Auto kamera LAMAX C9
– Vakumski nosač za pričvršćenje na staklo, s GPS modulom
– Punjac za auto
– MicroSD-USB adapter
– USB kabel
– Priručnik i upute za sigurnu upotrebu
– Futrola od tkanine za prenošenje kamere
– Tkanina od mikrobra
– Drugi tiskani materijali (samoljepljive etikete, Facebook karta, registracijska kartica)
2. Nacrt produkta
9
7
5
6
8
14
10
2
1
3
HR SLO LT HU PL SK CZ DE EN
1. MENI
2. UKLJ/ISKLJ (Power)
3. Gumb GORE
4. Gumb DOLE
5. MODE
6. Rec/OK
7. Držač
8. Zaslon
9. Ulaz za punjenje
4
13 1112 15
10. Slot za Micro SD
11. Objektiv
12. Sučelje mini USB
13. Mikrofon
14. LED dioda
15. RESET
- 1 -

3. Namještanje proizvoda
1) Kabel za napajanje s priključkom na auto upaljač treba voditi duž vjetrobranskog stakla tako
da ne ometa pogled vozača tijekom vožnje, i mora biti dobro pričvršćen. Uređaj pričvrstite
između stakla i retrovizora. Tako ćete postići optimalnu kvalitetu slike.
2) Uređaj ne smije biti smješten na mjestu na kojem bi ometao pogled vozača ili njegovu po-
zornost tijekom vožnje.
3) U nekim vozilima ne dolazi do prekida napajanja preko auto upaljača niti nakon isključenja
motora. U takvom slučaju izvadite kabel iz auto upaljača prije izlaska iz vozila.
4) Prilikom prve uporabe uređaja baterija može biti ispražnjena. Ako se uređaj ne može uključiti
zbog niske razine baterije, priključite ručno kabel za eksterno napajanje i napunite bateriju.
5) Koristite originalne mikro SD karticu klase 10 ili više klase. Za optimalno iskorištenje duljine
preporučljivo je koristiti kartice kapaciteta od najmanje 8 GB, a najviše 64 GB. U slučaju prve
upotrebe preporučljivo je formatirati memorijsku karticu.
Važno upozorenje:
- Za pravilno funkcioniranje auto-kamere LAMAX C9 i GPS modula neophodno je da kabel za
napajanje bude priključen izravno u mikro USB port u GPS nosaču (ne u mikro USB port u
kameri).
- Radi pravilnog funkcioniranja kamera mora biti pravilno priključena u nosač (prilikom ugrad-
nje kamera mora biti utisnuta u nosač skroz do kraja}. Prilikom vađenja kamere neophodno je
pritisnuti osigurač u prednjem dijelu nosača, i tek zatim oprezno izvući kameru. Ako kamera
nije dobro pričvršćena na GPS modul, može dolaziti do prekida napajanja ili GPS funkcije.
4. Uporaba auto kamere LAMAX C9
1) Ubacivanje Micro SD kartice
Mikro SD kartica se može ubacivati i vaditi iz slota za mikro SD karticu samo ako je kamera
isključena i ako nije priključena na računalo ili na napajanje.
2) Napajanje
a) Kameru možete priključiti na izvor napajanja priključenje USB kabela u računalo ili preko
auto upaljača u vozilu.
b) Kamera je namijenjena za trajno punjenje. Ugrađena baterija se ne može izvaditi niti zami-
jeniti.
3) Uključenje i isključenje kamere
a) Kameru uključite pritiskanjem gumba UKLJ./ISKLJ.
b) Kamera se automatski uključuje nakon priključivanja na električni krug.
c) Kameru isključite pritiskom i držanjem tipke ON/OFF tijekom 3 - 5 sekundi.
d) Kamera se automatski gasi nakon odspajanja od izvora napajanja.
4) Prebacivanje režima i kretanje u izborniku
a) Postepenim kratkim pritiskanjem tipke „MODE“ možete birati sljedeće režime: režim video-
zapisa (live prikaz} » režim fotograja » video-galerija/slike » zaključani zapisi.
b) Izbornik kamere se sastoji od tri pojedina dijela: Izbornik baze podataka » osnovne postavke
kamere » napredne postavke. Za kretanje između pojedinih opcija koristite strelice „GORE“ i
„DOLJE“. Za pristup izborniku pritisnite tipku „IZBORNIK“. Za vertikalno kretanje unutar svake
EN DE CZ SK PL HU LT SLO HR
- 2 -
 Loading...