


- 1 -
LAMAX ACTION X6 Action Camera
Waterproof up to 30 m
Full HD video 1920 x 1080
12 MP camera
WiFi

- 2 -
Safety precautions
1. Do not drop the camera or subject it to any powerful physical shock that may cause
mechanical damage.
2. Do not place the camera near objects that generate magnetic elds, such as magnets
or electric motors or near objects that emit strong radio waves, such as antenna.
Powerful magnetic elds or radio waves may cause damage to the camera or corrupt
the captured video and audio recordings.
3. Do not expose the unit to high temperatures or direct sunlight.
4. Use only a high-quality Micro SD card. Cards produced by unveried manufacturers are
not guaranteed to function properly.
5. Do not place the Micro SD card near a magnetic eld or in a place with static electricity
as this may cause the loss of data.
6. If the device overheats, emits smoke or a suspicious odour, immediately disconnect the
device from the power supply.
7. Whilst charging the camera, keep it out of reach of children as the power cable may
cause electric shock or asphyxiation.
8. Store camera in a cool, dry and dust-free environment.
Introduction
Congratulations on purchasing the LAMAX ACTION X6 camera. It is a high-quality,
multifunctional product, highly resistant to extreme weather conditions. With the LAMAX
ACTION X6 action camera you can capture video with audio in Full HD, take photos and
immediately display the recordings on the LCD display. This rugged, weather-resistant
camera is ideal for scuba diving, cycling and other means of transport, winter sports, all
outdoor activities and wherever a high-quality recording is required in harsh weather
conditions.

- 3 -
The LAMAX ACTION X6 Action Camera has the following features:
- Compact design.
- Comes supplied with a protective waterproof housing able to withstand depths of up
to 30 m enabling you to capture stunning underwater shots or your favourite water
sports.
- Includes an integrated LCD display for immediate playback of your recordings.
- Can shoot video or take photographs whilst charging (except when charging via a PC).
- Shoots Full HD video 1920 x 1080.
- Up to 12 MP photos.
- Wide-angle lens with a range up to 170°.
- Wide choice of video and photo resolutions.
- Multiple photography modes.
- Option to manually set photo and video exposure.
- Wide range of supplied accessories allows you to shoot video anytime and anywhere.
- Can be used as a dashcam.
- Can be used as a webcam.
- Supports Micro SDHC cards up to 32 GB.
- USB and HDMI connectivity.
- Integrated WiFi allows connection to wireless devices.
- Intuitive to use and easy to connect to a PC or smartphone.
- User-friendly software.

- 4 -
Camera from the front right
Camera Parts:
1
Shutter / Conrm
2
Power / Mode
3
Action indicator (red)
4
HDMI port
5
Lens
6
USB port
7
Micro SD card slot
8
Microphone
1
Camera from the back right
Camera Parts:
1
Operation indicator (red)
2
Charging indicator (blue)
3
LCD display
4
Down / WiFi
5
Up / Gallery
6
Speaker
7
4
5
2
6
3
8
3
5
4
6
1
2

- 5 -
Camera from below
Camera parts:
1
Battery cover
2
Battery cover lock
Camera in waterproof housing
from front left
Case parts:
1
Down / WiFi
2
Up / Gallery
3
Shutter / Conrm
4
Power / Mode
5
Waterproof case door lock
6
Lens
1
2
6
4
3
2
1
5

- 6 -
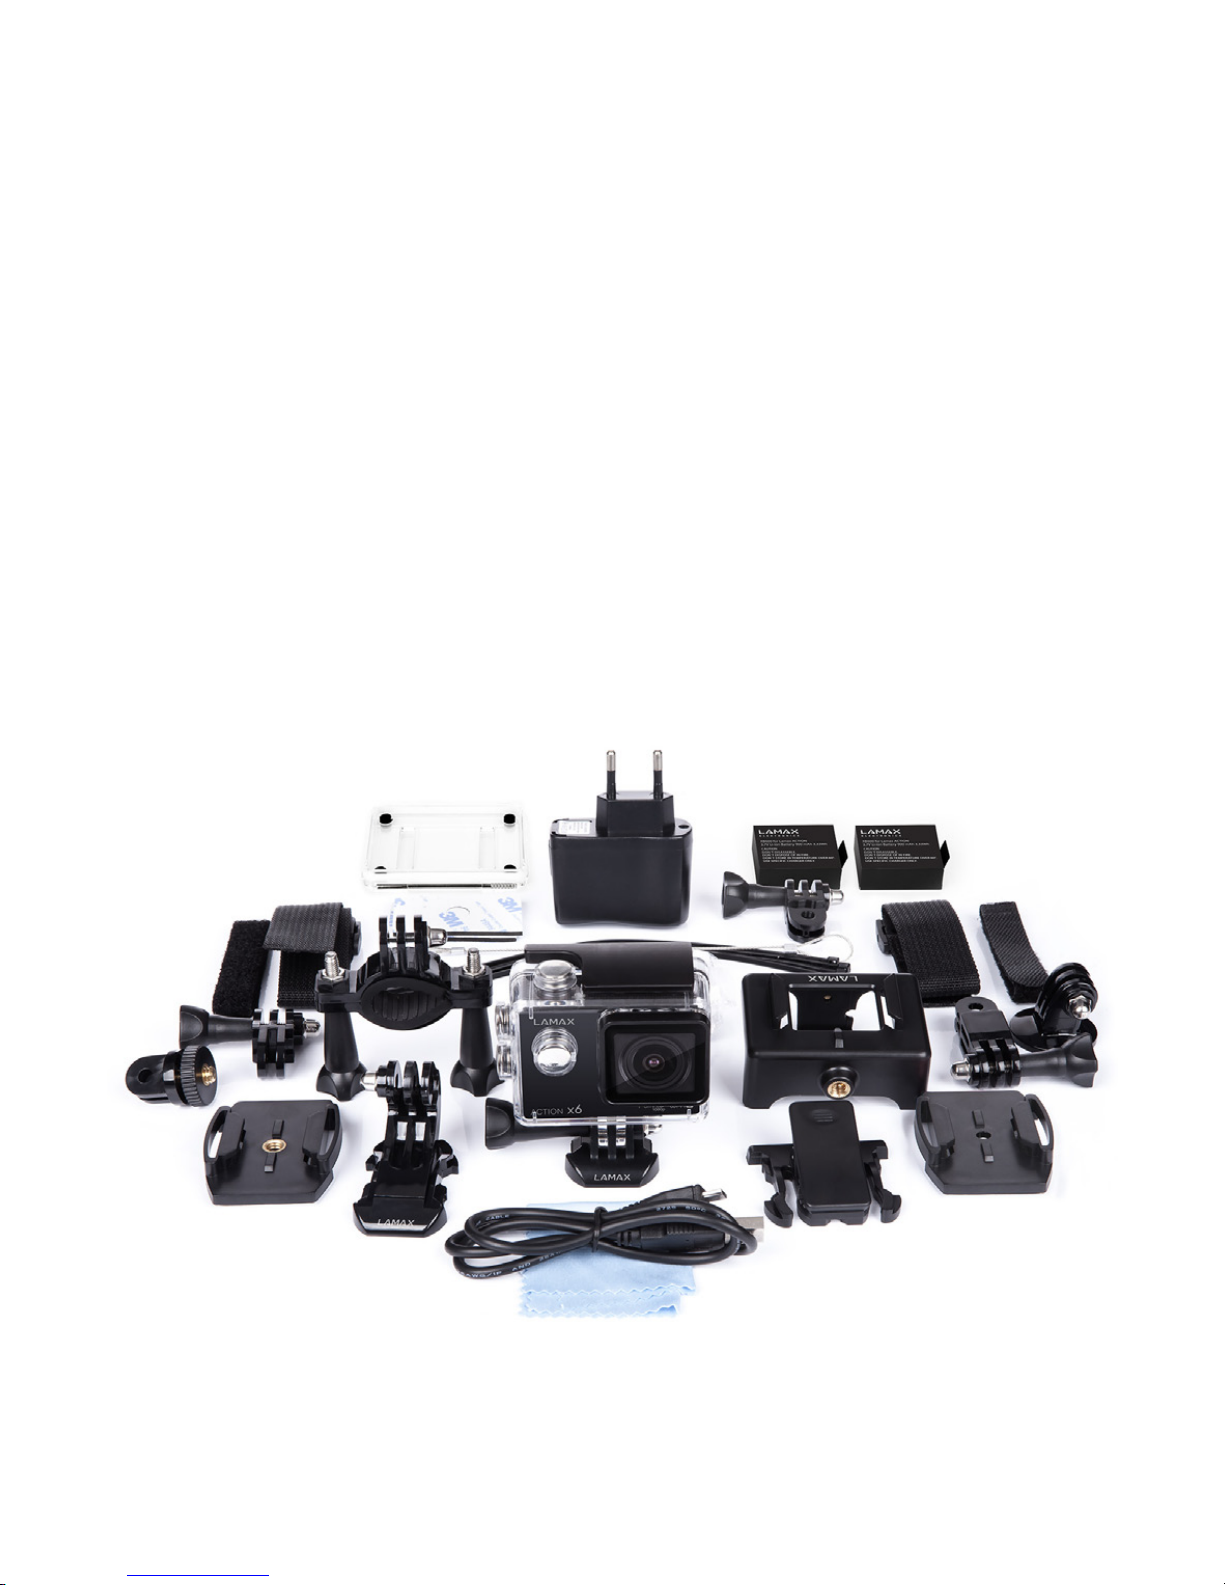
Waterproof case
Pole mount
Frame for use without waterproof case
J mount
Charger
Fast plug-in
Quick clip mount
Self-adhesive mount, straight (2pcs)
3-axis connector (3 parts)
Tripod adapter
Accessories
Tripod screw adapter
Universal straps with hook and loop fastener
3M replacement pads
USB cable
Li-ion battery (2 pcs)
Replacement door
Cable ties
Wire rope sling
Microbre cloth
User manual

- 7 -
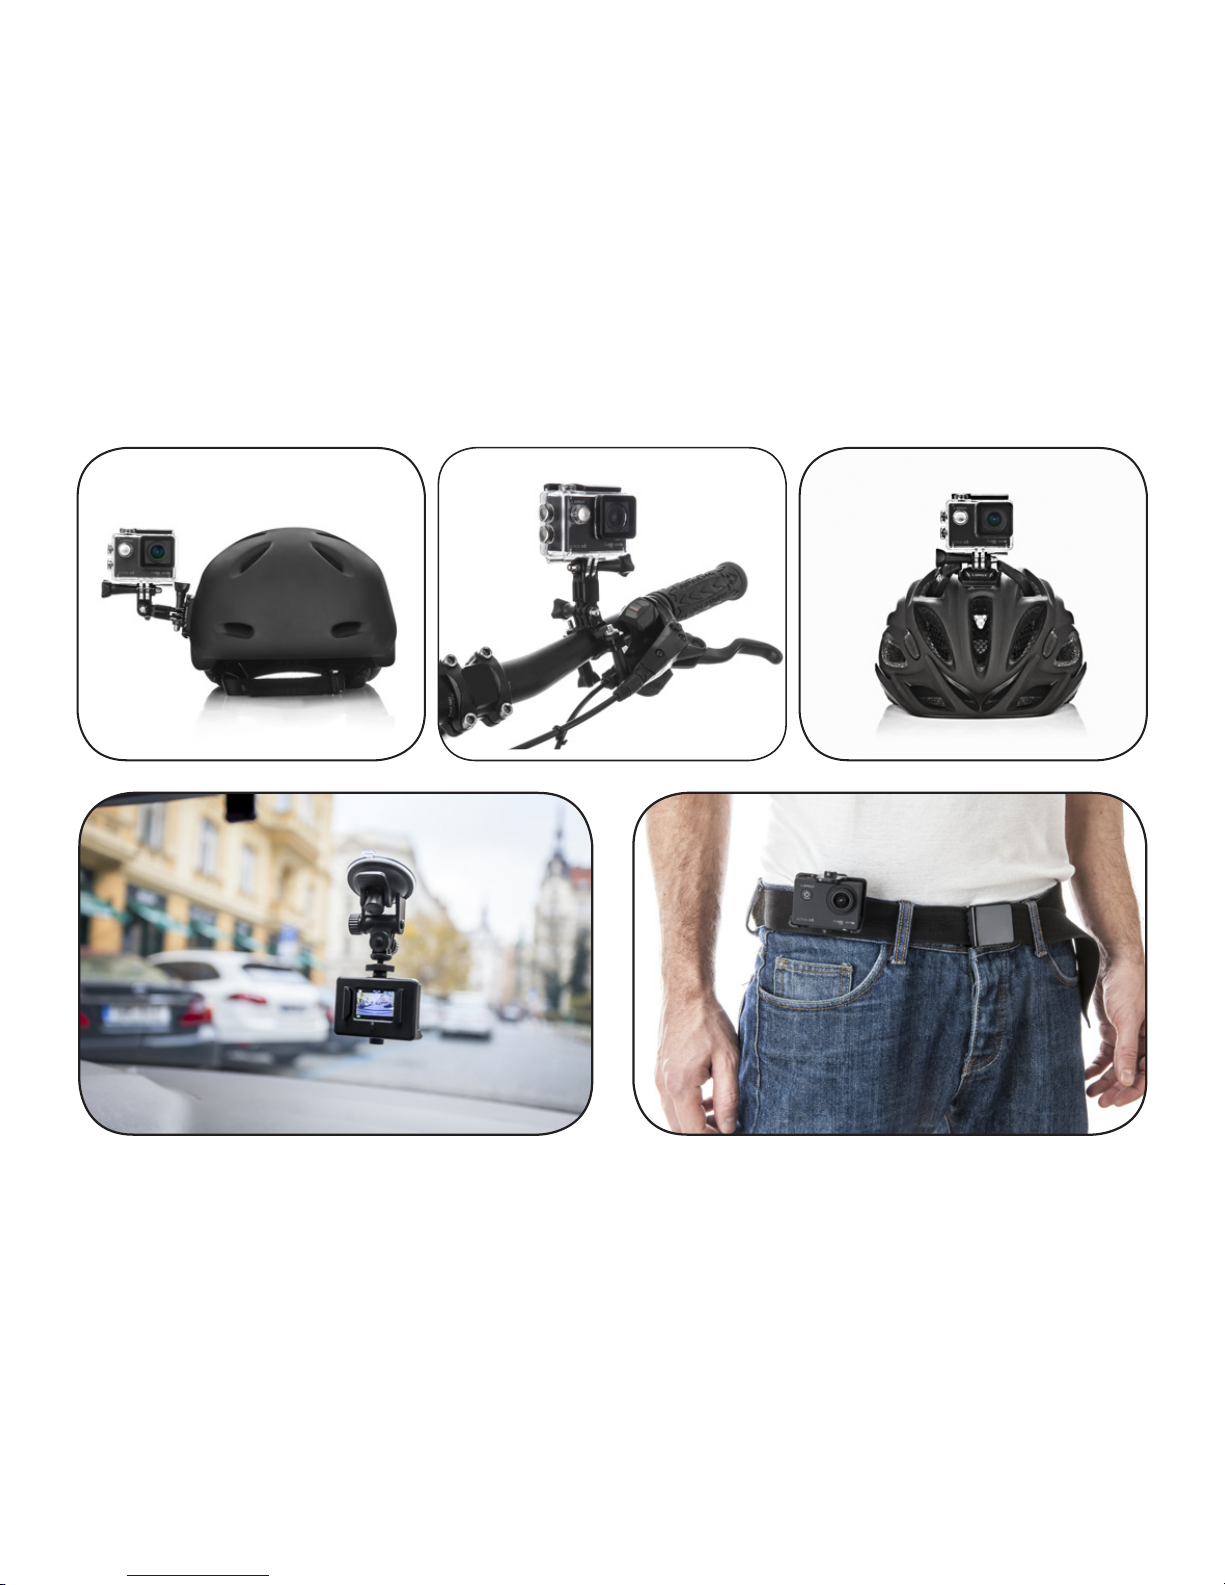
Camera assembly

- 8 -
Using the LAMAX ACTION X6 camera
1. Inserting the Micro SD card
The Micro SD card can be inserted into or removed from the SD card slot when the
camera is o and not connected to a computer.
Note: Use only a high-quality Micro SDHC cards. Cards produced by unveried
manufacturers are not guaranteed to function properly.
2. Installing the battery
a. Press down on the battery cover lock and remove the battery cover.
b. Insert the battery (connector end rst) into the compartment so that the connectors
are on the correct side.
c. Reattach the battery cover and secure it with the lock.
3. Charging
a. The camera can be charged by connecting it to a computer or using the AC adapter.
b. In the car you can charge the camera using the car charger plugged into the
cigarette lighter.
c. Whilst charging it is still possible to take pictures or shoot video (except when being
charged via PC).
d. The camera can also be charged whilst switched o.
4. Turning the camera ON and OFF
a. To turn the camera ON press the “Power” button.
b. To turn the camera OFF press and hold the “Power” button for 3-5 seconds.
5. Switching modes
Pressing the “Mode” button allows you to switch between modes: Video / Single shot /
Burst / Self-timer (time-lapse) / Menu. The mode icon appears at the top of the screen.

- 9 -
6. Shooting video and taking photos
a. Shooting video
Set the camera mode to Video and press the “Shutter” button. A recording animation
appears and starts to count down the recording time. To stop recording press “Shutter”
button. The status bar displays the video camera icon and status information.
b. Taking photos in various modes
- Single shot: Set the camera to “Single shot” mode and press the “Shutter” button.
This will take a photo. You can immediately take another photo by pressing “Shutter”
button again.
- Burst: Set the camera to “Burst” mode and press the “Shutter” button. This will take 3
photos in 1 second. Once completed, it is possible to perform further actions.
- Self-timer: Set the camera to “Self-timer (time-lapse)” mode and press “Shutter”
button. Once pressed it will begin counting down the time that you have set for the
self-timer (setting “photo interval”). Once completed, it is possible to perform further
actions.
- Time-lapse: Set the camera to “Self-timer (time-lapse)” mode and press the “Shutter”
button. Once pressed it will begin to take photos at the set interval (setting “photo
interval”). The setting “time-lapse” must be turned ON for the camera to take photos
repeatedly. To stop taking photos press the “Shutter” button again.
7. Viewing camera media
a. Access the gallery by pressing the “Gallery” button. Using “Down” select whether
you want to view videos or photos and conrm your selection by pressing “Conrm”.
You can browse the gallery by using the “Up” and “Down” buttons. To exit the gallery
press “Mode” and then “Gallery”.
b. Connect the camera to a computer via USB.
c. Remove the Micro SD card and insert it into a card reader.
d. Connect via WiFi to a device equipped with a WiFi receiver.

- 10 -
8. Setting up the device
Go to settings by pressing the “Mode” button. Conrm entry into the settings menu
by pressing “Conrm”.
a. Video resolution: Choose 1920 x 1080 at 30 fps or 1280 x 720 at 60 fps.
b. Loop recording: Turn loop recording ON or OFF. When switched ON, this function
enables continuous recording, meaning that once the SD card is full it will
automatically begin overwriting the oldest unlocked recordings.
c. Date stamp: Enable or disable the date and time of the recording.
d. Exposure: Set exposure in the range of -2 - +2 at intervals of 1/3.
e. Photo resolution: Can be set at 12 MP - 4000 x 3000, 8 MP - 3264 x 2448,
5 MP – 2560 x 1920 or 2 MP - 1920 x 1080.
f. Burst: When pressing the “Shutter” in this mode the camera takes 3 shots in 1 second.
g. Photo interval: Set the interval between photos (2, 3, 5, 10, 20, 30, 60 s).
h. Time-lapse camera: Enable and disable time-lapse camera mode. If it is disabled the
“Self-timer (time-lapse)” mode will function as a self-timer (i.e. it will take a photo
after the time set in the “photo interval” settings). If it is enabled it will begin to
repeatedly take photos at the selected interval. To stop taking photos press
“Shutter”.
i. Network frequency: Select a frequency in accordance with the grid frequency (on
the European continent the network stream is kept at a frequency of 50 Hz, in the
Americas and parts of Asia it is 60 Hz).
j. Language: Set the language on the device.
k. Date and time: Set the date and time on the device. You can also change the format
of the data displayed.
l. Sounds: Disable shutter and button sounds, select the welcome tune and select the
sound volume.
m. Display rotate: Rotate the image display by 180°.

- 11 -
n. LCD OFF: Auto power OFF the display when idle for 1, 3 or 5 min.
o. Auto power OFF: Auto power OFF the device when idle for 1, 3 or 5 min.
p. Format: Format the Micro SD card.
q. Factory settings: Restore the device to factory settings. Once conrmed this cannot
be undone.
r. Version: Display the rmware version of the device.
9. WiFi connection
The camera can be connected via WiFi to your computer or mobile device running
Android or iOS by following these instructions:
a. Install iSmart DV onto your computer or mobile device (the app can be found on
Google Play for Android devices or in the App Store for iOS devices).
b. Turn on the camera and activate WiFi by pressing “WiFi” button.
c. Activate WiFi on your mobile device. The camera WiFi connection is listed under
“LAMAX ACTION X6”. The password for the connection is 1234567890.
d. Once connected, you can use the application to control the camera or browse the
recorded data.
10. Additional camera functions
a. Take a photo whilst recording video: While shooting video, you can simply take
a photo at any time by pressing the “Up” button.
b. Speed Dial mode: Holding the “Shutter” for 2 seconds displays the dierent modes.
Navigate to the desired mode using the “Up” and “Down” keys and press “Conrm”
to select.

- 12 -
LAMAX ACTION X6 Action Camera parameters
LCD 1.5 inch LTPS
Lens
A+++ HD wide-angle lens with a range up to 170°
Languages
Czech, English, German, French, Italian, Russian, Spanish,
Chinese Traditional, Chinese Simplied, Japanese,
Portuguese, Polish, Indonesian, Korean
Video resolution 1920 x 1080 at 30 fps, 1280x720 at 60 fps
Video format MOV
Photo format JPG
Video codec H.264
Photo resolution options
12 MP – 4000x 3000, 8 MP – 3264 x 2448,
5 MP – 2560 x 1920, 2 MP – 1920 x 1080
Photo modes
Single shot / Burst (3/s) / Self-timer (2, 3, 5, 10, 20, 30, 60 s) /
Time-lapse (2, 3, 5, 10, 20, 30, 60 s)
Network frequency 50 Hz / 60 Hz
USB devices Micro USB 2.0
Storage compatibility Micro SDHC up to 32 GB
Connectivity WiFi, Micro USB 2.0, HDMI
Battery Capacity 900 mAh
Battery life Full HD video 1080p / cca. 90 minutes
Charging time cca. 3 hours
Compatible operating
systems
Windows XP / Vista / 7 / 8
MacOS
Camera dimensions 59 x 41 x 24,5 mm
Weight 63 g
Note: These specications are subject to change in the event that parts of the camera have been
replaced or the device software has been updated.

- 13 -
Other information
1) For households: This marking indicates that this product should not be disposed with other
household wastes throughout the EU. To prevent possible harm to the environment or human
health from uncontrolled waste disposal, recycle it responsibly to promote the sustainable
reuse of material resources. To return your used device, please use the return and collection
systems or contact the retailer where the product was purchased. They can take this product for
environmental safe recycling. In case of incorrect disposal of this kind of wastes user can be ned
according to national laws. User information for disposal of electric and electronic devices in
countries outside the EU: The symbol stated above (crossed recycle bin) is valid only in countries
in European Union. For correct disposal of electric and electronic devices ask your city hall or
distributor of these devices. Everything is expressed by the symbol of crossed recycle bin on
product, cover or printed materials.
2) You can determine a warranty service at the place of purchase. In case of technical problems or
queries contact your dealer who will inform you about the following procedure. Follow the rules
for work with electric devices. User is not allowed to disassembly the device neither replace any
of its components. To reduce the risk of electric shock, do not remove or open the cover. In case
of incorrect setup and plug in of device you will expose yourself risk of electric shock.
Declaration of Conformity:
Hereby, MagiCam HD SOLUTIONS s.r.o., declares that all LAMAX products are in compliance with
the essential requirements and other relevant provisions of Directive 2004/108/EC. Products
are intended for sale without any restriction in Germany, Czech Republic, Slovak Republic,
Poland, Hungary and other EU countries. Products are covered for two years warranty, unless
otherwise stated. You can download the Declaration of Conformity from the website: www.
lamax-electronics.com.
Exclusive importer of LAMAX product in EU:
MagiCam HD SOLUTIONS s.r.o., Braškovská 308/15, 161 00 Praha 6
http://www.lamax-electronics.com.


- 1 -
Akční kamera LAMAX ACTION X6
Vodotěsná do 30 m
Full HD videozáznam 1920 x 1080
Fotograe vrozlišení 12 Mpx
WiFi

- 2 -
Bezpečnostní opatření
1. Kameru nevystavujte nárazům, zabraňte pádu na zem a dalším možnostem vzniku
mechanického poškození.
2. Kameru nedávejte do blízkosti objektů vytvářejících silné magnetické pole, jako
například magnety nebo elektromotory. Kameru také nedávejte do blízkosti objektů
vysílajících silné rádiové vlny, jako například antény. Silné magnetické pole, nebo
rádiové vlny mohou způsobit poškození kamery, nebo poškození pořízených
obrazových a zvukových záznamů.
3. Nevystavujte kameru působení vysokých teplot a přímého slunečního záření.
4. Používejte pouze značkové Micro SD karty. Karty neznačkových výrobců nezaručují
správné chování datového úložiště.
5. Neumísťujte Micro SD karty do blízkosti magnetického pole, nebo do míst vzniku silné
statické elektřiny. Zabráníte tím ztrátě uložených dat.
6. V případě, že dojde při nabíjení k přehřátí zařízení, tvoření kouře, nebo podezřelého
zápachu, zařízení ihned odpojte a přerušte nabíjení.
7. Během nabíjení kameru uchovávejte mimo dosah dětí. Napájecí kabel by mohl
způsobit úraz elektrickým proudem nebo dušení dítěte.
8. Kameru uchovávejte na chladném, suchém a bezprašném místě.
Úvod
Gratulujeme Vám k zakoupení videokamery LAMAX ACTION X6. Jedná se o značkový,
multifunkční produkt, který je velmi odolný proti povětrnostním vlivům. Sakční kamerou
LAMAX ACTION X6 můžete pořizovat ozvučené záznamy ve Full HD rozlišení, fotografovat
a pořízené záznamy ihned zobrazovat na LCD displeji. Odolnost kamery ji činí ideální pro
použití při potápění, jízdě na kole a dalších dopravních prostředcích, zimních sportech,
veškerých outdoorových aktivitách, a všude tam, kde je vyžadován kvalitní záznam
vnáročných povětrnostních podmínkách.

- 3 -
Akční kamera LAMAX ACTION X6 má tyto vlastnosti:
- Kompaktní rozměry.
- Je dodávána s ochranným voděvzdorným pouzdrem, se kterým se můžete potápět
do hloubky až 30 m, a máte tak možnost zachytit úžasné podmořské záběry, nebo
například záznam některého zVašich oblíbených vodních sportů.
- Obsahuje integrovaný LCD displej, na kterém si ihned můžete přehrát právě pořízený
záznam.
- Lze nahrávat video nebo pořizovat fotograe v průběhu nabíjení (nelze v případě
nabíjení prostřednictvím PC).
- Natáčí Full HD video 1920 x 1080.
- Pořizuje fotograe rozlišení až 12 Mpx.
- Čočka sširokým úhlem záběru až 170°.
- Možnost volby rozlišení videa i fotograe.
- Výběr režimů pořizování fotograí.
- Možnost nastavit expozici fotograí i videa.
- Velké množství dodávaného příslušenství, díky kterému budete moci nahrávat videa
kdykoliv a kdekoliv.
- Možnost využití jako černé skříňky vautomobilu.
- Možnost využití jako webkamery.
- Podpora Micro SDHC karet do velikosti až 32 GB.
- USB a HDMI konektivita.
- Integrované WiFi pro propojení sbezdrátovými zařízeními.
- Intuitivní používání, snadné propojení sPC, nebo chytrým mobilním zařízením.
- Uživatelsky příjemná softwarová aplikace.

- 4 -
7
4
6
8
5
2
3
3
5
4
1
2
Obrázek kamery pohled čelně zprava
Názvy odkazů na části kamery:
1
Spoušť / Potvrdit
2
Zap./Vyp. / Změna režimu
3
Kontrolka akce (červená)
4
HDMI port
5
Čočka objektivu
6
USB port
7
Slot pro Micro SD kartu
8
Mikrofon
1
Obrázek kamery zezadu zprava
Názvy odkazů na části kamery:
1
Kontrolka provozu (červená)
2
Kontrolka nabíjení (modrá)
3
LCD displej
4
Dolů / WiFi
5
Nahoru / Galerie
6
Reproduktor
6

- 5 -
Obrázek kamery ve vodotěsném
pouzdra zepředu zleva
Názvy odkazů na části kamery:
1
Dolů / WiFi
2
Nahoru / Galerie
3
Spoušť / Potvrdit
4
Zap. / Vyp. / Změna režimu
5
Zámek dvířek vodotěsného pouzdra
6
Čočka objektivu
6
4
3
2
1
5
1
2
Obrázek kamery zespodu
Názvy odkazů na části kamery:
1
Kryt baterie
2
Zámek krytu baterie

- 6 -
Obrázky příslušenství
Vodotěsné pouzdro
Držák na trubku
Rám pro použití bez vodotěsného pouzdra
J mount
Nabíječka
Fast plug-in
Quick clip mount
Samolepící držák rovný (2 ks)
3-axis connector (3 části)
Adaptér na stativ
Stativová redukce
Univerzální pásky se suchým zipem
Náhradní 3M podložky (2 ks)
USB kabel
Li-ion baterie (2 ks)
Náhradní dvířka
Stahovací pásky
Ocelové lanko
Utěrka z mikrovlákna
Uživatelská příručka

- 7 -
Obrázky demonstrace způsobů montáže

Používání akční kamery LAMAX ACTION X6
1. Vložení Micro SD karty
Micro SD kartu můžete vložit a vyjmout ze slotu pro SD kartu, když je kamera vypnutá
a není připojená k počítači.
Poznámka: Používejte pouze značkové Micro SDHC karty. Karty neznačkových výrobců
nezaručují správné chování datového úložiště.
2. Instalace baterie
a. Zatlačte na zámek baterie a odejměte kryt baterie.
b. Baterii vložte do otvoru konektory napřed tak, aby byly na správné straně.
c. Přiložte kryt baterie a zajistěte ho zámkem.
3. Nabíjení
a. Kameru můžete nabíjet jak připojením kpočítači, tak pomocí síťového adaptéru.
b. Vautomobilu můžete kameru nabíjet pomocí adaptéru do zapalovače.
c. V průběhu nabíjení můžete pořizovat video záznamy nebo fotografovat (nelze
vpřípadě nabíjení prostřednictvím PC).
d. Kameru můžete nabíjet také vypnutou.
4. Zapnutí a vypnutí kamery
a. Kameru zapnete stisknutím tlačítka „Zap./Vyp.“.
b. Kameru vypnete stisknutím a podržením tlačítka „Zap./Vyp.“ po dobu 3 – 5 sekund.
5. Přepínání režimů
Tlačítkem „Změna režimu“ můžete přepínat mezi režimy: nahrávání video záznamu /
jednotlivé fotograe / série fotograí / samospoušť (časosběrné fotograe) / menu.
Symbol režimu se zobrazuje vhorní části displeje.
6. Natáčení videa, pořizování fotograí
a. Nahrávání videa
Přepněte kameru do režimu „nahrávání video záznamu“. Stiskněte tlačítko „Spoušť”.
V levém horním rohu se zobrazí animace nahrávání a začne se odpočítávat doba

záznamu.
Pro ukončení natáčení stiskněte opět tlačítko „Spoušť”. Ve stavovém řádku se
zobrazí ikonka video kamery a stavové informace.
b. Pořizování fotograí vjednotlivých režimech
- samostatná fotograe: Přepněte kameru do režimu „jednotlivé fotograe“. Stiskněte
tlačítko „Spoušť“. Tím dojde kpořízení fotograe. Můžete ihned pořídit další fotograi
stisknutím tlačítka „Spoušť“.
- Série fotograí: Přepněte kameru do režimu „série fotograí“. Stiskněte tlačítko
„Spoušť“. Dojde kpořízení 3 fotograí během 1 sekundy. Po jejich pořízení je možné
provádět další akce.
- Samospoušť: Přepněte kameru do režimu „samospoušť (časosběrné fotograe)“.
Stiskněte tlačítko „Spoušť”. Po stisknutí se začne odpočítávat Vámi nastavený čas
samospouště (nastavení „interval fotograí“). Po pořízení snímku je možné provádět
další akce.
- Časosběrné fotograe: Přepněte kameru do režimu „samospoušť (časosběrné
fotograe)“. Stiskněte tlačítko „Spoušť“. Po stisknutí se začnou pořizovat fotograe ve
zvoleném intervalu (nastavení „interval fotograí“). Aby kamera pořizovala fotograe
neustále, musí být zapnuta funkce „časosběrné foto“. Pořizování fotograí ukončíte
opětovným stisknutím tlačítka „Spoušť“.
7. Prohlížení pořízených záznamů
a. Do galerie se dostanete stisknutím tlačítka „Galerie“. Šipkou „Dolů“ vyberete, jestli
chcete prohlížet videa nebo fotograe, a svoji volbu potvrdíte tlačítkem „Potvrdit“.
Galerii můžete procházet tlačítky „Nahoru” a „Dolů“. Z galerie můžete odejít
stisknutím tlačítka „Změna režimu“ a poté „Galerie“.
b. Připojením kamery kpočítači pomocí USB kabelu.
c. Vyjmutím Micro SD karty a vložením do čtečky karet.
d. Připojením pomocí WiFi k zařízení vybaveném WiFi přijímačem snainstalovanou
softwarovou aplikací.

- 10 -
8. Nastavení přístroje
Do nastavení přejdete stisknutím tlačítka „Změna režimu“. Vstup do nastavení kamery
potvrdíte stisknutím tlačítka „Potvrdit“.
a. Rozlišení videa: možno zvolit 1920 x 1080 30 fps a 1280x 720 60 fps.
b. Cyklické natáčení: Umožňuje vypnout, resp. zapnout, cyklické natáčení. Při
zapnutém cyklickém natáčení začne kamera vpřípadě, že dojde místo na SD kartě,
automaticky přepisovat nejstarší záznamy.
c. Datum ve videu: Umožňuje zapnout, resp. vypnout, zobrazení data a času vzáznamu.
d. Expozice: Nastavení expozice záznamu vrozmezí -2 - +2 po krocích velikosti 1/3.
e. Rozlišení foto: Možno zvolit 12 Mpx – 4000 x 3000, 8 Mpx – 3264 x 2448,
5 Mpx – 2560 x 1920, 2 Mpx – 1920 x 1080.
f. Série fotograí: Kamera v tomto režimu pořídí 3 fotograe během 1 sekundy na
jedno stisknutí spouště.
g. Interval fotograí: Umožňuje nastavit interval pořizování fotograí (2, 3, 5, 10, 20,
30, 60 s).
h. Časosběrné foto: Umožňuje zapnout, resp. vypnout, režim časosběrné fotograe.
Vpřípadě, že je volba vypnutá, funguje režim „samospoušť (časosběrné fotograe)“
jako samospoušť, tzn. pořídí fotograi po čase nastaveném v menu „interval
fotograí“. Vpřípadě, že je volba zapnutá, začne pořizovat fotograe ve zvoleném
intervalu. Pořizování fotograí zastavíte stisknutím tlačítka „Spoušť“.
i. Frekvence sítě: Umožňuje vybrat frekvenci vsouladu sfrekvencí rozvodné sítě (na
Evropském kontinentu je veden vsíti proud o frekvenci 50 Hz, vAmerice a části Asie
je to pak 60 Hz).
j. Jazyk: Výběr jazyka zařízení.
k. Datum a čas: Nastavení data a času přístroje. Můžete si zvolit také formát
zobrazovaného data.
l. Zvuky: Umožňuje zapnout, resp. vypnout, zvuk spouště a tlačítek, vybrat uvítací

- 11 -
melodii, a zvolit hlasitost zvuků.
m. Otočit obraz: Umožňuje otočit natáčený obraz o 180°.
n. Vypnutí LCD: Nastavení automatického vypnutí displeje vpřípadě nečinnosti (Vyp.,
1, 3 nebo 5 min).
o. Automatické vypnutí: Nastavení automatického vypnutí přístroje v případě
nečinnosti (Vyp., 1, 3 nebo 5 min).
p. Formátovat: Možnost formátovat Micro SD kartu.
q. Tovární nastavení: Potvrzením této položky uvedete přístroj do továrního nastavení.
Potvrzení této volby nelze vrátit zpět.
r. Verze: Zobrazí verzi rmware přístroje.
9. WiFi připojení
Kameru je možné připojit pomocí WiFi k počítači nebo k mobilním zařízením
soperačním systémem Android nebo IOS následováním těchto instrukcí:
a. Na počítač nebo mobilní zařízení nainstalujte aplikaci iSmart DV (aplikaci můžete
pod tímto označením nalézt na Google Play u zařízení se systémem Android, nebo
na APP Store u zařízení se systémem IOS).
b. Zapněte kameru a poté aktivujte WiFi stisknutím tlačítka „WiFi“.
c. Aktivujte WiFi na mobilním zařízení. WiFi připojení kamery naleznete vseznamu pod
označením „LAMAX ACTION X6“. Heslo pro připojení je 1234567890.
d. Po připojení můžete kameru pomocí aplikace ovládat, nebo prohlížet pořízené
záznamy.
10. Další funkce kamery
a. Pořízení fotograe vprůběhu nahrávání videa: Vprůběhu natáčení videa můžete
kdykoliv jednoduše pořídit fotograi stisknutím tlačítka „Nahoru“.
b. Rychlá volba režimu: Přidržení tlačítka „Spoušť“ po dobu 2 sekund zobrazí tabulku
režimů. Požadovaný režim vyberete tlačítky „Nahoru“ a „Dolů“ a potvrdíte tlačítkem
„Potvrdit“.

- 12 -
Parametry akční kamery LAMAX ACTION X6
LCD 1,5 palce
Čočka
A+++ HD širokoúhlá čočka se záběrem až 170°
Jazyky menu
Čeština, angličtina, němčina, francouzština,
italština, ruština, španělština, čínština tradiční,
čínština zjednodušená, japonština, portugalština,
polština, indonéština, korejština
Možnosti rozlišení videozáznamu 1920 x 1080 30 fps, 1280 x 720 60 fps
Formát videa MOV
Formát fotograí JPG
Kodek videa H.264
Možnosti rozlišení fotograí
12 Mpx – 4000 x 3000, 8 Mpx – 3264 x 2448,
5 Mpx – 2560 x 1920, 2 Mpx – 1920 x 1080
Režimy pořizování fotograe
Jednotlivé / série fotograí (3/s) / samospoušť
(2, 3, 5, 10, 20, 30, 60 s) / časosběrné (2, 3, 5, 10,
20, 30, 60 s)
Frekvence sítě 50 Hz / 60 Hz
USB zařízení Micro USB 2.0
Kompatibilita úložiště Micro SDHC až 32 GB
Konektivita WiFi, Micro USB 2.0, HDMI
Kapacita baterie 900 mAh
Výdrž baterie Full HD videozáznam 1080p / cca 90 minut
Čas do plného nabití Cca 3 hodiny
Kompatibilita soperačními
systémy
Windows XP / Vista / 7 / 8
MacOS
Rozměry kamery 59 x 41 x 24,5 mm
Hmotnost 63 g
Poznámka: Specikace se může změnit výměnou některé části kamery, nebo aktualizací
softwaru zařízení.

- 13 -
Další informace
1) Pro domácnosti: Uvedený symbol (přeškrtnutý koš) na výrobku nebo v průvodní dokumentaci
znamená, že použité elektrické nebo elektronické výrobky nesmí být likvidovány společně s komunálním
odpadem. Za účelem správné likvidace výrobku jej odevzdejte na určených sběrných místech, kde
budou přijata zdarma. Správnou likvidací tohoto produktu pomůžete zachovat cenné přírodní zdroje
a napomáháte prevenci potenciálních negativních dopadů na životní prostředí a lidské zdraví, což by
mohly být důsledky nesprávné likvidace odpadů. Další podrobnosti si vyžádejte od místního úřadu
nebo nejbližšího sběrného místa. Při nesprávné likvidaci tohoto druhu odpadu mohou být v souladu
s národními předpisy uděleny pokuty. Informace pro uživatele k likvidaci elektrických a elektronických
zařízení (remní a podnikové použití): Pro správnou likvidaci elektrických a elektronických zařízení
si vyžádejte podrobné informace u Vašeho prodejce nebo dodavatele. Informace pro uživatele
k likvidaci elektrických a elektronických zařízení v ostatních zemích mimo Evropskou unii: Výše uvedený
symbol (přeškrtnutý koš) je platný pouze v zemích Evropské unie. Pro správnou likvidaci elektrických
a elektronických zařízení si vyžádejte podrobné informace u Vašich úřadů nebo prodejce zařízení. Vše
vyjadřuje symbol přeškrtnutého kontejneru na výrobku, obalu nebo tištěných materiálech.
2) Záruční opravy zařízení uplatňujte u svého prodejce. V případě technických problémů a dotazů
kontaktujte svého prodejce, který Vás bude informovat o dalším postupu. Dodržujte pravidla pro práci
s elektrickými zařízeními. Uživatel není oprávněn rozebírat zařízení ani vyměňovat žádnou jeho součást.
Při otevření nebo odstranění krytů hrozí riziko úrazu elektrickým proudem. Při nesprávném sestavení
zařízení a jeho opětovném zapojení se rovněž vystavujete riziku úrazu elektrickým proudem.
Prohlášení o shodě:
Společnost MagiCam HD SOLUTIONS s.r.o. tímto prohlašuje, že všechna zařízení LAMAX jsou
ve shodě se základními požadavky a dalšími příslušnými ustanoveními směrnice 2004/108/EC.
Produkty jsou určeny pro prodej bez omezení v Německu, České republice, Slovensku, Polsku,
Maďarsku a v dalších členských zemích EU. Záruční lhůta je na produkty 24 měsíců, pokud není
stanovena jinak. Prohlášení o shodě lze stáhnout z webu www.lamax-electronics.com.
Výhradní dovozce produktů LAMAX do EU:
MagiCam HD SOLUTIONS s.r.o., Braškovská 308/15, 16100 Praha 6
http://www.lamax-electronics.com


- 1 -
Akčná kamera LAMAX ACTION X6
Vodotesná do 30 m
Full HD videozáznam 1920 x 1080
Fotograe vrozlíšení 12 Mpx
WiFi

- 2 -
Bezpečnostné opatrenia
1. Kameru nevystavujte nárazom, zabráňte pádu a ďalším možnostiam vzniku
mechanického poškodenia.
2. Kameru nedávajte do blízkosti objektov vytvárajúcich silné magnetické pole, ako
napríklad magnety alebo elektromotory. Kameru taktiež nedávajte do blízkosti
objektov vysielajúcich silné rádiové vlny, ako napríklad antény. Silné magnetické pole
alebo rádiové vlny môžu spôsobiť poškodenie kamery alebo poškodenie nasnímaných
obrazových azvukových záznamov.
3. Nevystavujte kameru pôsobeniu vysokých teplôt apriameho slnečného žiarenia.
4. Používajte len značkové Micro SD karty. Karty neznačkových výrobcov nezaručujú
korektné správanie dátového úložiska.
5. Neumiestňujte Micro SD karty do blízkosti magnetického poľa alebo do miest vzniku
silnej statickej elektriny. Zabránite tým strate uložených dát.
6. Vprípade, že dôjde pri nabíjaní kprehriatiu zariadenia, tvorbe dymu alebo podozrivému
zápachu, zariadenie ihneď odpojte aprerušte nabíjanie.
7. Počas nabíjania kameru uchovávajte mimo dosah detí. Napájací kábel by mohol
spôsobiť úraz elektrickým prúdom alebo udusenie dieťaťa.
8. Kameru uchovávajte na chladnom, suchom abezprašnom mieste.
Úvod
Gratulujeme Vám k zakúpeniu videokamery LAMAX ACTION X6. Jedná sa o značkový
multifunkčný produkt, ktorý je veľmi odolný proti poveternostným vplyvom. Sakčnou
kamerou LAMAX ACTION X6 môžete vytvárať ozvučené záznamy vo Full HD rozlíšení,
fotografovať avytvorené záznamy ihneď zobrazovať na LCD displeji. Odolnosť kamery
ju robí ideálnou pre použitie pri potápaní, jazde na bicykli a ďalších dopravných
prostriedkoch, pri zimných športoch, všetkých outdoorových aktivitách, ako ochranu
domova, avšade tam, kde je vyžadovaný kvalitný záznam vnáročných poveternostných
podmienkach.

- 3 -
Akčná kamera LAMAX ACTION X6 má tieto vlastnosti:
- Kompaktné rozmery.
- Je dodávaná sochranným vodovzdorným puzdrom, sktorým sa môžete potápať do
hĺbky až 30 metrov amáte tak možnosť zachytiť úžasné podmorské zábery alebo
napríklad záznam niektorého zVašich obľúbených vodných športov.
- Obsahuje integrovaný LCD displej, na ktorom si ihneď môžete prehrať práve
nasnímané záznamy.
- Máte možnosť nahrávať video alebo snímať fotograe vpriebehu nabíjania (nie však
vprípade nabíjania prostredníctvom PC).
- Nahráva video až vo Full HD 1920 x 1080 rozlíšení.
- Zhotovuje až 12 Mpx fotograe.
- Šošovka soširokým uhlom záberu až 170°.
- Možnosť voľby rozlíšenia videa i fotograe.
- Výber režimov snímaných fotograí.
- Možnosť nastaviť expozíciu fotograí i videa.
- Veľké množstvo dodávaného príslušenstva, vďaka ktorému budete môcť nahrávať
videá kedykoľvek akdekoľvek.
- Možnosť využitia kamery ako čiernej skrinky vautomobile.
- Možnosť využitia ako webkamery.
- Podpora Micro SDHC kariet s maximálnou veľkosťou až 32 GB.
- USB a HDMI konektivita.
- Integrované WiFi pre prepojenie sbezdrôtovými zariadeniami.
- Intuitívne používanie, jednoduché prepojenie sPC alebo inteligentnými zariadeniami.
- Používateľsky príjemná softwarová aplikácia.

- 4 -
Obrázok kamery – pohľad čelne
sprava
Názvy odkazov na časti kamery:
1
Spúšť / Potvrdiť
2
Zap. / Vyp. / Zmena režimu
3
Kontrolka akcie (červená)
4
HDMI port
5
Šošovka objektívu
6
USB port
7
Slot pre Micro SD kartu
8
Mikrofón
1
7
4
5
2
6
3
8
3
5
4
6
1
2
Obrázok kamery - zozadu sprava
Názvy odkazov na časti kamery:
1
Kontrolka prevádzky (červená)
2
Kontrolka nabíjania (modrá)
3
LCD displej
4
Dole / WiFi
5
Hore / Galéria
6
Reproduktor

- 5 -
Obrázok kamery vo vodotesnom
puzdre spredu zľava
Názvy odkazov na časti kamery:
1
Dole / WiFi
2
Horu / Galéria
3
Spúšť / Potvrdiť
4
Zap. / Vyp. / Zmena režimu
5
Zámok dvierok
vodotesného puzdra
6
Šošovka objektívu
6
4
3
2
1
5
1
2
Obrázok kamery zospodu
Názvy odkazov na časti kamery:
1
Kryt batérie
2
Zámok krytu batérie

- 6 -
Obrázky príslušenstva
Vodotesné púzdro
Držiak na trúbku
Rám pre použitie bez vodotesného púzdra
J mount
Nabíjačka
Fast plug-in
Quick clip mount
Samolepiaci držiak rovný (2 ks)
3-axis connector (3 časti)
Adaptér na statív
Statívová redukcia
Univerzálne pásky so suchým zipsom
Náhradné 3M podložky (2 ks)
USB kábel
Li-ion batérie (2 ks)
Náhradné dvierka
Sťahovacie pásky
Oceľové lanko
Utierka z mikrovlákna
Používateľská príručka

- 7 -
Obrázky demonštrácie spôsobu montáže

- 8 -
Používanie akčnej kamery LAMAX ACTION X6
1. Vloženie Micro SD karty
Micro SD kartu môžete vložiť avyňať zo slotu pre SD kartu, keď je kamera vypnutá anie
je pripojená kpočítaču.
Poznámka: Používajte len značkové Micro SDHC karty. Karty neznačkových výrobcov
nezaručujú správne správanie dátového úložiska.
2. Inštalácia batérie
a. Zatlačte na zámok batérie aodnímte kryt batérie.
b. Batériu vložte do otvoru konektormi napred tak, aby boli na správnej strane.
c. Priložte kryt batérie azaistite ho zámkom.
3. Nabíjanie
a. Kameru môžete nabíjať pripojením kpočítaču i pomocou sieťového adaptéra.
b. Vautomobile môžete kameru nabíjať pomocou adaptéra do zapaľovača.
c. . Vpriebehu nabíjania môžete nahrávať video záznamy alebo fotografovať (nie však
vprípade nabíjania prostredníctvom PC).
d. Kameru môžete nabíjať taktiež vypnutú.
4. Zapnutie avypnutie kamery
a. Kameru zapnite stlačením tlačidla „Zap. / Vyp.“.
b. Kameru vypnite stlačením apodržaním tlačidla „Zap. / Vyp.“ po dobu 3 - 5 sekúnd.
5. Prepínanie režimov
Tlačidlom „Zmena režimu“ môžete prepínať medzi režimami: nahrávanie
videozáznamu / jednotlivé fotograe / série fotograí / samospúšť (časozberné
fotograe) / menu. Symbol režimu sa zobrazuje vhornej časti displeja.
6. Nahrávanie videa, snímanie fotograí
a. Nahrávanie videa
Prepnite kameru do režimu „nahrávanie video záznamu“. Stlačte tlačidlo „Spúšť“.
Vľavom hornom rohu sa zobrazí animácia nahrávania azačne sa odpočítavať

- 9 -
doba záznamu. Pre ukončenie nahrávania stlačte opäť tlačidlo „Spúšť“. V stavovom
riadku sa zobrazí ikonka videokamery astavové informácie.
b. Snímanie fotograí vjednotlivých režimoch
- Samostatná fotograa: Prepnite kameru do režimu „jednotlivé fotograe“. Stlačte
tlačidlo „Spúšť“. Tým sa uloží fotograa. Môžete ihneď vytvoriť ďalšiu fotograu
stlačením tlačidla „Spúšť“.
- Série fotograí: Prepnite kameru do režimu „série fotograí“. Stlačte tlačidlo „Spúšť“.
Dôjde k nasnímaniu 3 fotograí behom 1 sekundy. Po ich nasnímaní je možné
vykonávať ďalšie akcie.
- Samospúšť: Prepnite kameru do režimu „samospúšť (časozberné fotograe)“. Stlačte
tlačidlo „Spúšť“. Po stlačení sa začne odpočítavať Vami nastavený čas samospúšte
(nastavenie „interval fotograí“). Po vytvorení snímky je možné vykonávať ďalšie
akcie.
- Časozberné fotograe: Prepnite kameru do režimu „samospúšť (časozberné
fotograe)“. Stlačte tlačidlo „Spúšť“. Po stlačení sa začnú snímať fotograe v zvolenom
intervale (nastavenie „interval fotograí“). Aby kamera snímala fotograe neustále,
musí byť zapnutá funkcia „časozberné foto“. Snímanie fotograí ukončíte opätovným
stlačením tlačidla „Spúšť“.
7. Prehliadanie vytvorených záznamov
a. Do galérie sa dostanete stlačením tlačidla „Galéria“. Šípkou „Dole“ vyberiete,
či chcete prehliadať videá alebo fotograe, a svoju voľbu potvrdíte tlačidlom
„Potvrdiť“. Galériu môžete prechádzať tlačidlom „Hore“ a „Dole“. Galériu môžete
opustiť stlačením tlačidla „Zmena režimu“ a potom „Galéria“.
b. Pripojením kamery kpočítaču pomocou USB kábla.
c. Vyňatím Micro SD karty avložením do čítačky kariet.
d. Pripojením pomocou WiFi k zariadeniu vybavenému WiFi prijímačom
snainštalovanou softwarovou aplikáciou.

- 10 -
8. Nastavenie prístroja
Do nastavenia prejdete stlačením tlačidla „Zmena režimu“. Vstup do nastavenia kamery
potvrdíte stlačením tlačidla „Potvrdiť“.
a. Rozlíšenie videa: Možno zvoliť 1920 x 1080 30 fps a 1280 x 720 60 fps.
b. Cyklické nahrávanie: Umožňuje vypnúť, resp. zapnúť, cyklické nahrávanie. Pri
zapnutom cyklickom nahrávaní začne kamera v prípade, že dôjde miesto na SD
karte, automaticky prepisovať najstaršie záznamy.
c. Dátum vo videu: Umožňuje zapnúť, resp. vypnúť, zobrazenie dátumu a času
vzázname.
d.
Expozícia: Nastavenie expozície záznamu vrozmedzí -2 až +2 po úsekoch veľkosti 1/3.
e. Rozlíšenie foto: Možno zvoliť 12 Mpx – 4000 x 3000, 8 Mpx – 3264 x 2448,
5 Mpx – 2560 x 1920, 2 Mpx – 1920 x 1080
f. Série fotograí: Kamera vtomto režime nasníma 3 fotograe počas 1 sekundy na
jedno stlačenie spúšte.
g. Interval fotograí: Umožňuje nastaviť interval snímania fotograí (2, 3, 5, 10, 20,
30, 60 s).
h. Časozberné foto: Umožňuje zapnúť, resp. vypnúť, režim časozbernej fotograe.
Vprípade, že je voľba vypnutá, funguje režim „samospúšť (časozberné fotograe)“
ako samospúšť, tzn. nasníma fotograu po čase nastavenom v menu „interval
fotograí“. V prípade, že je voľba zapnutá, začne snímať fotograe v zvolenom
intervale. Snímanie fotograí zastavíte stlačením tlačidla „Spúšť“.
i. Frekvencia siete: Umožňuje vybrať frekvenciu vsúlade sfrekvenciou rozvodnej siete
(na Európskom kontinente je vedený v sieti prúd sfrekvenciou 50 Hz, v Amerike
ačasti Ázie je to 60 Hz).
j. Jazyk: Výber jazyka zariadenia.
k. Dátum ačas: Nastavenie dátumu ačasu prístroja. Môžete si zvoliť taktiež formát
zobrazovaného dátumu.

- 11 -
l. Zvuky: Umožňuje zapnúť, resp. vypnúť, zvuk spúšte a tlačidiel, vybrať uvítaciu
melódiu a zvoliť hlasitosť zvukov.
m. Otočiť displej: Umožňuje otočiť obraz displeja o 180
o.
n. Vypnutie LCD: Nastavenie automatického vypnutia displeja v prípade nečinnosti
(Vyp., 1, 3 alebo 5 min).
o. Automatické vypnutie: Nastavenie automatického vypnutia prístroja v prípade
nečinnosti (Vyp., 1, 3 alebo 5 min).
p. Formátovať: Možnosť formátovať Micro SD kartu.
q. Továrenské nastavenie: Potvrdením tejto položky uvediete prístroj do továrenského
nastavenia. Potvrdenie tejto voľby nie je možné vrátiť späť.
r. Verzia: Zobrazenie verzie rmware prístroja.
9. WiFi pripojenie
Kameru je možné pripojiť pomocou WiFi kpočítaču alebo kmobilným zariadeniam
soperačným systémom Android alebo iOS nasledovaním týchto inštrukcií:
a. Na počítač alebo mobilné zariadenie nainštalujte aplikáciu iSmart DV (aplikáciu
môžete pod týmto označením nájsť na Google Play pri zariadeniach so systémom
Android alebo na APP Store pri zariadeniach so systémom iOS).
b. Zapnite kameru a aktivujte WiFi stlačením tlačidla „WiFi“.
c. Aktivujte WiFi na mobilnom zariadení. WiFi pripojenie kamery nájdete vzozname
pod označením „LAMAX ACTION X6“. Heslo pre pripojenie je 1234567890
d. Po pripojení môžete kameru pomocou aplikácie ovládať alebo prehliadať vytvorené
záznamy.
10. Ďalšie funkcie kamery
a. Zhotovenie fotograe v priebehu nahrávania videa: V priebehu natáčania videa
môžete kedykoľvek jednoducho zhotoviť fotograu stlačením tlačidla “Hore”.
b. Rýchla voľba režimu: Pridržaní tlačidla “Spúšť” po dobu 2 sekúnd zobrazí tabuľku
režimov. Požadovaný režim vyberiete tlačidlami “Hore” a “Dole” a potvrdíte
tlačidlom “Potvrdiť”.

- 12 -
Parametre akčnej kamery LAMAX ACTION X6
LCD 1,5 palca LTPS
Šošovka
A+++ HD širokouhlá šošovka so záberom až 170°
Jazyky menu
Čeština, angličtina, nemčina, francúzština, taliančina,
ruština, španielčina, čínština tradičná, čínština
zjednodušená, japončina, portugalčina, poľština,
indonézština, kórejčina
Možnosti rozlíšenia
videozáznamu
1920 x 1080 30 fps, 1280 x 720 60 fps
Formát videa .MOV
Formát fotograí .JPG
Kódek videa H.264
Možnosti rozlíšenia fotograí
12 Mpx – 4000 x 3000, 8 Mpx – 3264 x 2448,
5 Mpx – 2560 x 1920, 2 Mpx – 1920 x 1080
Režimy snímania fotograí
Jednotlivé / série fotograí (3/s) / samospúšť (2, 3, 5, 10,
20, 30, 60 s) / časozberné (2, 3, 5, 10, 20, 30, 60 s)
Frekvencia siete 50 Hz / 60 Hz
USB zariadenie Micro USB 2.0
Kompatibilita úložiska Micro SDHC až 32 GB
Konektivita WiFi, Micro USB 2.0, HDMI
Kapacita batérie 900 mAh
Výdrž batérie Full HD videozáznam 1080p / cca 90 minút
Čas do plného nabitia Cca 3 hodiny
Kompatibilita soperačnými
systémami
Windows XP / Vista / 7 / 8
MacOS
Rozmery kamery 559 x 41 x 24,5 mm
Hmotnosť 63 g
Poznámka: Špecikácie sa môžu zmeniť výmenou niektorých častí kamery alebo aktualizáciou
softwaru zariadenia.

- 13 -
Ďalšie informácie
1) Pre domácnosti: Uvedený symbol (preškrtnutý kôš) na výrobku alebo v priloženej dokumentácií
znamená, že použité elektrické alebo elektronické výrobky nesmú byť likvidované spoločne
s komunálnym odpadom. Za účelom správnej likvidácie výrobku ho odovzdajte na určených zberných
miestach, kde budú prijaté zdarma. Správnou likvidáciou tohto produktu pomôžete zachovať cenné
prírodné zdroje a napomáhate k prevencií potenciálnych negatívnych dopadov na životné prostredie
a ľudské zdravie, čo by mohli byť dôsledky nesprávnej likvidácie odpadov. Ďalšie podrobnosti si
vyžiadajte od miestneho úradu alebo najbližšieho zberného miesta. Pri nesprávnej likvidácií tohto
druhu odpadu môžu byť v súlade s národnými predpismi udelené pokuty. Informácie pre používateľov
o likvidácií elektrických a elektronických zariadení (remné a podnikové použitie): Pre správnu
likvidáciu elektrických a elektronických zariadení si vyžiadajte podrobné informácie pri Vašom
predajcovi alebo dodávateľovi. Informácie pre používateľov o likvidácií elektrických a elektronických
zariadení v ostatných krajinách mimo Európsku úniu: Vyššie uvedený symbol (preškrtnutý kôš) je
platný len v krajinách Európskej únie. Pre správnu likvidáciu elektrických a elektronických zariadení si
vyžiadajte podrobné informácie na Vašich úradoch alebo pri predajcovi zariadenia. Všetko vyjadruje
symbol preškrtnutého kontajneru na výrobku, obalu alebo tlačených materiáloch.
2) Záručné opravy zariadenia uplatňujte pri svojom predajcovi. V prípade technických problémov
a otázok, kontaktujte svojho predajcu, ktorý Vás bude informovať o ďalšom postupe. Dodržujte pravidlá
pre prácu s elektrickými zariadeniami. Používateľ nie je oprávnený rozoberať zariadenie ani vymieňať
žiadnu jeho súčasť. Pri otvorení alebo odstránení krytu hrozí riziko úrazu elektrickým prúdom. Pri
nesprávnom zostavení zariadenia a jeho opätovnom zapojení sa rovnako vystavujete riziku úrazu
elektrickým prúdom.
Vyhlásenie o zhode
Spoločnosť MagiCam HD SOLUTIONS s.r.o. týmto prehlasuje, že všetky zariadenia LAMAX sú v zhode
so základnými požiadavkami a ďalšími príslušnými ustanoveniami smernice 2004/108/EC. Produkty
sú určené na predaj bez obmedzenia v Nemecku, Českej republike, Slovensku, Poľsku, Maďarsku
a v ďalších členských krajinách EÚ. Záručná lehota je na výrobky 24 mesiacov, pokiaľ nie je stanovená
inak. Vyhlásenie o zhode možno stiahnuť z webu www.lamax-electronics.com.
Výhradný dovozca produktov LAMAX do EU:
MagiCam HD SOLUTIONS s.r.o., Braškovská 308/15, 161 00 Praha 6
http://www.lamax-electronics.com.

- 1 -
Kamera sportowa LAMAX ACTION X6
Wodoszczelna do 30 m
Nagrywanie wideo Full HD 1920x1080
Fotograe w rozdzielczości 12 Mpx
WiFi

- 2 -
Środki ostrożności
1. Nie narażaj kamery na uderzenia, chroń przed upadkiem i innymi możliwościami powstania
uszkodzeń mechanicznych.
2. Nie umieszczaj kamery w bliskości obiektów wytwarzających silne pole magnetyczne, jak np.
magnesy czy silniki elektryczne. Nie umieszczaj kamery w otoczeniu obiektów wysyłających
silne fale radiowe, jak np. anteny. Silne pole magnetyczne lub fale radiowe mogą spowodować
uszkodzenie kamery lub uszkodzenie zapisów wizualnych oraz dźwiękowych wykonanych
kamerą.
3. Nie wystawiaj kamery na oddziaływanie wysokich temperatur ani bezpośredniego światła
słonecznego.
4. Używaj jedynie markowych kart Micro SD. Karty niemarkowych producentów nie mogą
zapewnić właściwego funkcjonowania miejsca zapisu danych.
5. Nie umieszczaj karty Micro SD w bliskości pola magnetycznego ani miejsc powstawania silnej
elektryczności statycznej. Zapobiegniesz tym samym utracie zapisanych danych.
6. W przypadku, kiedy podczas ładowania dojdzie do przegrzania urządzenia, powstania dymu
lub podejrzanego zapachu, natychmiast przerwij ładowanie poprzez odłączenie urządzenia.
7. Podczas ładowania przechowuj kamerę poza zasięgiem dzieci. Kabel zasilania może
spowodować porażenie prądem elektrycznym lub duszenie dziecka.
8. Kamerę przechowuj w chłodnym, suchym i odpornym na kurz miejscu.
Wstęp
Gratulujemy zakupu kamery wideo LAMAX ACTION X6. Jest to markowy, wielofunkcyjny
produkt, który jest wyjątkowo odporny na wpływ warunków pogodowych. Zkamerą sportową
LAMAX ACTION X6 możesz wykonywać udźwiękowione nagrania w rozdzielczości Full HD, robić
zdjęcia, a wykonane zapisy wyświetlać bezpośrednio na ekranie LCD od razu po ich wykonaniu.
Odporność kamery sprawia, że jest ona idealna do wykorzystania podczas nurkowania, jazdy
na rowerze i innych środkach transportu, przy sportach zimowych, wszelkich aktywnościach na
świeżym powietrzu, a także w roli ochrony twojego domu i wszędzie tam, gdzie potrzebujesz
wysokiej jakości nagrania w trudnych warunkach pogodowych.

- 3 -
Kamera sportowa LAMAX ACTION X6 posiada następujące właściwości:
- Kompaktowy rozmiar.
- Oferowana w zestawie zochronną wodoszczelną obudową, zktórą możesz nurkować
do głębokości aż 30 m, dzięki czemu masz możliwość uchwycenia wspaniałych
podwodnych ujęć lub udokumentowania twojego ulubionego sportu wodnego.
- Zawiera zintegrowany ekran LCD, na którym możesz odtworzyć nagranie od razu po
jego powstaniu.
- Możesz nagrywać wideo lub robić zdjęcia w trakcie ładowania (niemożliwe w
przypadku zasilania za pomocą PC).
- Nagrywa wideo w rozdzielczości Full HD 1920x1080.
- Fotograę w trybie 12 Mpx.
- Soczewka zszerokim kątem widzenia aż 170°.
- Możliwość wyboru rozdzielczości wideo i foto.
- Możliwość wyboru trybu wykonywania fotograi.
- Możliwość ustawień ekspozycji fotograi i wideo.
- Duża ilość dołączonych akcesoriów, dzięki którym możesz nagrywać wideo
kiedykolwiek i gdziekolwiek.
- Możliwość wykorzystania jako czarnej skrzynki w samochodzie.
- Możliwość wykorzystania w funkcji kamery internetowej.
- Obsługa kart Micro SDHC aż do 32 GB.
- Możliwość podłączenia przez USB oraz HDMI.
- Zintegrowane WiFi w celu nawiązania połączenia zbezprzewodowymi urządzeniami.
- Intuicyjna obsługa, łatwe połączenie zPC oraz urządzeniami przenośnymi.
- Przyjazna aplikacja software.

- 4 -
Obrazek kamery widok
frontalny zprawej
Nazwy odnośników do elementów
kamery:
1
Wyzwalacz / Potwierdź
2
Wł./Wył. / Zmiana trybu
3
Kontrolka akcji (czerwona)
4
Wejście HDMI
5
Soczewka obiektywu
6
Wejście USB
7
Wejście na kartę Micro SD
8
Mikrofon
Obrazek kamery widok
ztyłu zprawej
Nazwy odnośników do elementów
kamery:
1
Kontrolka pracy (czerwona)
2
Kontrolka ładowania (niebieska)
3
Ekran LCD
4
W dół / WiFi
5
W górę / Galeria
6
Głośnik
7
4
5
2
6
3
8
3
5
4
6
1
2
1

- 5 -
Obrazek kamery w wodoszczelnej
obudowie frontalnie zlewej
Nazwy odnośników do elementów kamery:
1
W dół / WiFi
2
W górę / Galeria
3
Wyzwalacz/ Potwierdź
4
Wł./Wył. / Zmiana trybu
5
Zabezpieczenie klapki
wodoszczelnej obudowy
6
Soczewka obiektywu
6
4
3
2
1
5
1
2
Obrazek kamery zdołu
Nazwy odnośników
do elementów kamery:
1
Klapka baterii
2
Zabezpieczenie klapki baterii

- 6 -
Obrazki akcesoriów
Obudowa wodoszczelna
Mocowanie na rurkę
Rama do wykorzystania bez
obudowy wodoszczelnej
J mount
Ładowarka
Fast plug-in
Quick clip mount
Samoprzylepne mocowanie płaskie (2 szt)
3-axis connector (3 części)
Adapter na statyw
Redukcja statywowa
Uniwersalne paski z rzepem
Zapasowe samoprzylepne podkładki 3M (2 szt)
Kabel USB
Bateria litowo - jonowa (2 szt)
Zapasowa klapka
Paski ściągające
Stalowa linka
Szmatka z mikrowłókna
Instrukcja obsługi
- 7 -
Obrazki pokazujące sposób montażu

- 8 -
Używanie kamery sportowej LAMAX ACTION X6
1. Włożenie karty Micro SD
Kartę micro SD możesz włożyć i wyjąć z wejścia na kartę SD, kiedy kamera jest
wyłączona i nie jest podłączona do komputera.
Uwaga: Używaj tylko markowych kart Micro SDHC. Karty niemarkowych producentów
nie zapewniają prawidłowego funkcjonowania miejsca zapisu danych.
2. Instalacja baterii
a. Przyciśnij zamknięcie baterii i odłącz klapkę baterii.
b. Baterię włóż do otworu tak, aby konektory były umieszczone zwłaściwej strony.
c. Włóż pokrywkę baterii i zabezpiecz ją zapadką.
3. Ładowanie
a. Kamerę można ładować zarówno poprzez podłączenie do komputera jak i za
pomocą ładowarki sieciowej.
b. W samochodzie można ładować kamerę za pomocą adapteru do zapalniczki
samochodowej.
c. Podczas ładowania możesz nagrywać wideo lub wykonywać zdjęcia (nie dotyczy
ładowania za pomocą komputera).
d. Kamerę można ładować również wtedy kiedy jest wyłączona.
4. Włączanie i wyłącznie kamery
a. Kamerę włączysz wciskając przycisk „Wł./Wył.“.
b. Kamerę wyłączysz wciskając i przytrzymując przez ok. 3 – 5 s przycisk „Wł./Wył.“.
5. Zmiana trybu
Za pomocą przycisku „Zmiana trybu“ możesz dokonywać wyboru między trybami:
nagrywanie wideo / wykonywanie zdjęć / galeria / menu. Symbol trybu pojawia się w
górnej części wyświetlacza.
6. Nagrywanie wideo/wykonywanie zdjęć
a. Nagrywanie wideo
Przełącz kamerę do trybu „nagrywanie wideo“. Naciśnij przycisk „Wyzwalacz“. W lewym

- 9 -
górnym rogu pojawi się animacja nagrywania, a kamera zacznie odliczać czas nagrywania.
Aby zakończyć nagrywanie, ponownie naciśnij przycisk „Wyzwalacz“. Na pasku stanu
pojawi się ikonka kamery wideo oraz status kamery.
b. Wykonywanie zdjęć w poszczególnych trybach.
- Pojedyncze zdjęcie: Przełącz kamerę na tryb „Pojedyncze zdjęcie“. Wciśnij przycisk
„Wyzwalacz/Potwierdź“. W ten sposób wykonasz zdjęcie. Możesz od razu wykonać
kolejne zdjęcia wciskając przycisk „Wyzwalacz“.
- Zdjęcia seryjne: Przełącz kamerę na tryb „Zdjęcia seryjne“. Wciśnij przycisk „Wyzwalacz“.
Tym samym wykonasz trzy zdjęcia w ciągu 1 sekundy. Po ich wykonaniu możesz
wykonywać dalsze czynności.
- Samowyzwalacz: Przełącz kamerę na tryb „Samowyzwalacz (timelapse)“. Wciśnij
przycisk „Wyzwalacz“. Po wciśnięciu kamera zacznie odliczać nastawiony przez ciebie
czas samowyzwalacza (ustawienia „interwał fotograi“). Po wykonaniu zdjęcia możesz
wykonywać dalsze czynności.
- Timelapse: Przełącz kamerę na tryb „Samowyzwalacz (timelapse)“. Wciśnij przycisk
„Wyzwalacz“. Po wciśnięciu kamera zacznie odliczać nastawiony przez ciebie czas
samowyzwalacza (ustawienia „interwał fotograi“). Aby kamera wykonywała fotograe
bez przerwy, musi być ustawiona funkcja „timelapse“. Wykonywanie fotograi możesz
zakończyć, ponownie wciskając przycisk „Wyzwalacz“.
7. Przeglądanie wykonanych zapisów
a. Aby przejść do galerii, wciśnij przycisk „Galeria“. Strzałką „W dół“ wybierz, czy chcesz
przeglądać pliki wideo czy zdjęcia, a następnie potwierdź swój wybór przyciskiem
„Potwierdź“. Galerię możesz przeglądać, używając przycisków „W górę“ oraz „W dół“.
Aby opuścić galerię, wciśnij przycisk „Zmiana trybu“, a następnie „Galeria“.
b. Poprzez podłączenie kamery do komputera za pomocą kabla USB.
c. Poprzez wyjęcie karty Micro SD i umieszczenie jej w czytniku kart.
d. Za pomocą WiFi poprzez połącznie się zurządzeniem wyposażonym w odbiornik WiFi
zzainstalowaną aplikacją software.

- 10 -
8. Ustawienia urządzenia
W ustawienia można wejść wciskając przycisk „Zmiana trybu“. Wejście do ustawień
kamery potwierdź wciskając przycisk „Potwierdź“.
a. Rozdzielczość video: Możliwość wyboru 1920 x 1080 30 fps i 1280 x 720 60 fps.
b. Nagrywanie w pętli: Umożliwia wyłączenie lub włączenie nagrywania w pętli. Jeżeli
opcja jest włączona, w przypadku zapełnienia miejsca na karcie SD kamera zacznie
zastępować najstarsze pliki nowymi.
c. Data w nagraniu: Umożliwia włączenie i wyłączenie informacji o dacie i godzinie na
nagraniu.
d. Ekspozycja: Ustawienie ekspozycji nagrania w granicach 2 - +2 w odstępach wielkości 1/3.
e. Rozdzielczość foto: Możliwość wyboru 12 Mpx – 4000 x 3000, 8 Mpx – 3264 x 2448,
5 Mpx – 2560 x 1920, 2 Mpx – 1920 x 1080.
f. Zdjęcia seryjne: W tym trybie kamera wykona 3 zdjęcia w ciągu 1 s jednym wciśnięciem
wyzwalacza.
g. Interwał fotograi: Umożliwia ustawienie interwału wykonywania fotograi (2, 3, 5,
10, 20, 30, 60 s).
h. Timelapse: Umożliwia wyłączenie i wyłączenie trybu timelapse. Jeżeli opcja jest
wyłączona, tryb „samowyzwalacz (timelapse)“ funkcjonuje jako samowyzwalacz, tzn.
wykona zdjęcie po określonym czasie ustawionym w menu „interwał fotograi“. Jeżeli
opcja jest włączona, kamera będzie wykonywać fotograe w określonym interwale.
Wykonywanie fotograi możesz zatrzymać wciskając przycisk „Wyzwalacz“.
i. Częstotliwość sieci: Umożliwia wybór częstotliwości zgodnie zlokalną czestotliwością
prądu (W Europie jest rozprowadzany prąd o częstotliwości 50 Hz, w Ameryce i części
Azji o częstotliwości 60 Hz).
j. Język: Wybór języka urządzenia.
k. Data i czas: Ustawienia daty i godziny urządzenia. Możesz wybrać również format
wyświetlanej daty.

- 11 -
l. Dźwięki: Umożliwie włączenie i wyłączenie dźwięku wyzwalacza i przycisków, wybór
melodii powitalnej oraz wybór głośności dźwięku.
m. Obracanie obrazu: Umożliwia obrócenie obrazu wyświetlacza o 180
o.
n. Wyłączenie LCD: Ustawienie automatycznego wyłączenia ekranu w przypadku
bezczynności (Wył. / 1 / 3 / 5 min).
o. Automatycznie wyłączenie: Ustawienie automatycznego wyłączenia urządzenia
w przypadku bezczynności (Wył. / 1 / 3 / 5 min).
p. Formatuj: Możliwość sformatowania karty Micro SD.
q. Ustawienia fabryczne: Wybierając tę funkcję przywrócisz ustawienia fabryczne. Po
potwierdzeniu wyboru nie można wrócić do poprzednich ustawień.
r. Wersja: Wyświetla wersję rmware’u urządzenia.
9. Połączenie WiFi
Kamerę można podłączyć za pomocą WiFi do komputera lub urządzeń przenośnych
zsystemem operacyjnym Android lub IOS stosując się do poniższych instrukcji:
a. Na komputerze lub urządzeniu przenośnym zainstaluj aplikację Na počítač iSmart
DV (aplikację możesz znaleźć pod tą nazwą na Google Play w urządzeniu zsystemem
Android lub na APP Store w urządzeniu zsystemem IOS).
b. Włącz kamerę, a następnie aktywuj WiFi wciskając przycisk „WiFi“.
c. Aktywuj WiFi na urządzeniu przenośnym. Połączenie WiFi kamery znajdziesz w spisie
pod nazwą „LAMAX ACTION X6“. Hasło połączenia to 1234567890.
d. Po podłączeniu możesz za pomocą aplikacji sterować kamerą lub przeglądać pliki.
10. Pozostałe funkcje kamery
a. Wykonywanie fotograi w trakcie nagrywania wideo: Podczas nagrywania wideo możesz
w dowolnym momencie z łatwością wykonać zdjęcie klikając na przycisk „W górę“.
b. Szybkie przełączanie trybu: Wciśnięcie przycisku „Wyzwalacz“ i przytrzymanie go
przez 2s spowoduje wyświetlenie listy trybów. Pożądany tryb możesz wybrać klikając
na przyciski „W górę“ lub „W dół“, a następnie potwierdzając swój wybór przyciskiem
„Potwierdź“.

- 12 -
Parametry kamery sportowej LAMAX ACTION X6
LCD 1,5 cala
Obiektyw A+++ szerokokątna soczewka HD zkątem do 170
o
Języki menu
Czeski, angielski, niemiecki, francuski, włoski, rosyjski,
hiszpański, chiński tradycyjny, chiński uproszczony,
japoński, portugalski, polski, indonezyjski, koreański
Opcje rozdzielczości wideo 1920 x 1080 30 fps, 1280 x 720 60 fps
Format wideo MOV
Format foto JPG
Kodek wideo H.264
Opcje rozdzielczości foto
12 Mpx – 4000 x 3000, 8 Mpx – 3264 x 2448,
5 Mpx – 2560 x 1920, 2 Mpx – 1920 x 1080
Tryby wykonywania fotograi
Pojedyncze / Zdjęcia seryjne (3 / s) / Samowyzwalacz (2,
3, 5, 10, 20, 30, 60 s) / Timelapse (2, 3, 5, 10, 20, 30, 60 s)
Częstotliwość sieci 50 Hz / 60 Hz
Urządzenie USB Micro USB 2.0
Kompatybilność pamięci Micro SDHC až 32 GB
Możliwość podłączania WiFi, Micro USB 2.0, HDMI
Pojemność baterii 900 mAh
Wytrzymałość baterii Full HD 1080p / około 90 minut
Czas ładowania Około 3 godziny
Kompatybilność
zsystemami operacyjnymi
Windows XP / Vista / 7 / 8
Mac OS
Wymiary kamery 59 x 41 x 24,5 mm
Waga 63 g
Uwaga: Specykacje mogą ulec zmianie w przypadku wymiany niektórych elementów kamery
lub aktualizacji software’u urządzenia.

- 13 -
Pozostałe informacje
1) Symbol przekreślonego kontenera zamieszczony na produkcie lub w dokumentacji towarzyszącej oznacza,
że po zakończeniu eksploatacji nie należy pozbywać się urządzenia elektrycznego lub elektronicznego
wraz z odpadami komunalnymi. Produkt należy dostarczyć do odpowiedniego punktu zbiórki urządzeń
elektrycznych i elektronicznych przeznaczonych do recyklingu w celu jego właściwej utylizacji. W miejscu
zbiórki produkt zostanie przyjęty bezpłatnie. Dzięki prawidłowej utylizacji tego produktu pomagasz
zachować cenne zasoby naturalne oraz przeciwdziałasz potencjalnemu negatywnemu wpływowi na
środowisko oraz ludzkie zdrowie, co może być skutkiem niewłaściwej utylizacji odpadów. Aby uzyskać
więcej informacji, prosimy o kontakt z lokalnymi władzami lub w najbliższym punkcie zbiórki. Pozbywanie
się odpadów tego rodzaju w nieprawidłowy sposób jest zagrożone karą przewidzianą w odpowiednich
przepisach państwowych. Informacja dla użytkowników, dotycząca utylizacji sprzętu elektrycznego
i elektronicznego (w przypadku zastosowania w przedsiębiorstwach i rmach): Szczegółowych informacje na
temat prawidłowej utylizacji sprzętu elektrycznego i elektronicznego, możesz uzyskać u swojego sprzedawcy
lub dostawcy. Informacja dla użytkowników dotyczącza utylizacji sprzętu elektrycznego i elektronicznego
w państwach spoza Unii Europejskiej: Powyższy symbol (przekreślonego kontenera) obowiązuje wyłącznie
w Unii Europejskiej. Szczegółowe informacje na temat prawidłowej utylizacji sprzętu elektrycznego i
elektronicznego możesz uzyskać w swoim urzędzie lub u sprzedawcy urządzenia. Wszystko zostało określone
za pomocą symbolu przekreślonego kontenera na produkcie, opakowaniu lub w dokumentacji towarzyszącej.
2) Roszczenia gwarancyjne dotyczące urządzeń składaj w miescu zakupu. W przypadku problemów
technicznych lub pytań, skontaktuj się ze sprzedawcą, który poinformuje cię o dalszym postepowaniu.
Należy dotrzymywać zasady pracy z urządzeniami elektrycznymi, a zasilający przewód elektryczny podłączać
tylko do odpowiednich gniazdek elektrycznych. Użytkownik nie jest upoważniony do demontowania
urządzenia ani wymiany jakiejkolwiek jego części. Przy otwarciu lub usunięciu osłon grozi niebezpieczeństwo
porażenia prądem elektrycznym. Niewłaściwy montaż urządzenia i jego ponowne połączenie może również
spowodować porażenie prądem elektrycznym.
Deklaracja zgodności:
Spółka MagiCam HD SOLUTIONS s.r.o. niniejszym oświadcza, że wszystkie urządzenia LAMAX są zgodne
z podstawowymi wymaganiami i pozostałymi odpowiednimi regulacjami Dyrektywy 2004/108/EC.
Produkty są przeznaczone do sprzedaży w Niemczech, Republice Czeskiej, na Słowacji, w Polsce, na
Węgrzech oraz w dalszych krajach UE. Okres gwarancyjny na produkty to 24 miesiące, jeżeli nie zostało
ustalone inaczej. Deklarację zgodności można pobrac ze strony internetowej www.lamax-electronics.com.
Wyłączny dystrybutor produktów LAMAX w EU:
MagiCam HD SOLUTIONS s.r.o., Braškovská 308/15, 161 00 Praha 6
http://www.lamax-electronics.com.


- 1 -
LAMAX ACTION X6 akció kamera
Vízálló 30 m-ig
Full HD videó 1920 x 1080
12 MP kamera
WiFi

- 2 -
Biztonsági gyelmeztetés
1. A készülék érzékeny eszköz, kérjük, óvja a leejtéstől és ütődésektől.
2. Kérjük, ne tegye ki a készüléket erős elektromágnesességnek ill. rádióhullámoknak.
Ezek a készülék meghibásodását vagy az elkészült felvételek megsérülését
okozhatják.
3. Ne tegye ki a készüléket szélsőségesen magas vagy alacsony hőmérsékletnek, valamint
tűző napsugárzásnak.
4. Kérjük, márkás Micro SD memóriakártyát használjon a készülékkel. “Noname”
memóriakártyákkal az eszköz működése esetleg nem lesz megfelelő.
5. Óvja a Micro SD kártyát mágnesességtől, mivel az a kártyán tárolt adatok sérülését
okozhatja.
6. Amennyiben a készülék töltése közben azt tapasztalja, hogy az eszköz túlmelegszik,
esetleg füstöt vagy kellemetlen szagot bocsát ki, azonnal válassza le az elektromos
hálózatról a tűzesetek megelőzése érdekében!
7. Ne hagyja a készüléket kisgyermekek számára elérhető helyen különös tekintettel
a töltés ill. számítógépes adatcsere folyamatára, ahol a töltéshez / fájlmásoláshoz
használt USB kábel sérülést vagy áramütést okozhat).
8. A készüléket hűvös, száraz és pormentes helyen tárolja.
Előszó
Köszönjük, hogy a LAMAX ACTION X6 kamerát választotta. Ez egy magas minőségű
multifunkciós termék, mely ellenáll az extrém időjárási körülményeknek. A LAMAX
ACTION X6 akció kamerával Full HD videó készíthető hangfelvétellel, valamint fényképek
és a felvételek azonnal visszanézhetők az LCD kijelzőn. Ez a strapabíró, vízálló kamera
ideális búvárkodáshoz, kerékpározáshoz, téli sportokhoz, minden kültéri aktivitáshoz
ahol magas minőségű felvételre van szükség durva időjárási körülmények között.

- 3 -
The LAMAX ACTION X6 akció kamera főbb tulajdonságok:
- Kompakt design.
- 30 méter mélységig vízálló kameraház, amely lehetővé teszi a vízben, víz közelében
zajló sportok lmezését.
- Beépített LCD kijelző a könnyű kezelhetőséghez és az elkészült anyagok
visszajátszásához.
- Felvételkészítés töltés közben is (kivéve PC-ről való töltés).
- Full HD videó felvétel 1920 x 1080.
- Akár 12 MP-es fotók.
- Széles látószögű lencse 170°.
- Több féle videó és fénykép felbontás.
- Többféle fotókészítési mód: egyszerű fénykép, sorozatfelvétel, time-lapse felvétel
- Expozició manuálisan is állítható.
- Kiegészítők széles skálája.
- Autós kameraként is használható.
- Web kameraként is használható.
- Micro SD kártya támogatás 32 GB-ig.
- USB és micro HDMI csatlakozó.
- Beépített Wi-Fi, okostelefonos alkalmazással távvezérelhető, a kamera képe
megjeleníthető.
- Egyszerű használat és könnyű csatlakozás PC-hez, okostelefonhoz.

- 4 -
Kamera szemből
Kamera részei:
1
Felvétel / OK
2
Bekapcsolás / Mód
3
Felvétel jelző (piros)
4
HDMI port
5
Lencs
6
USB port
7
Micro SD kártya hely
8
Mikrofon
Kamera hátulról
Kamera részei:
1
Működés jelző (piros)
2
Töltés jelző (kék)
3
LCD kijelző
4
Le / WiFi
5
Fel / Galéria
6
Hangszóró
7
4
5
2
6
3
8
3
5
4
6
1
2
1

- 5 -
Kamera alulról
Kamera részei:
1
Akku fedél
2
Akku fedél zár
Kamera vízálló házban
Tok részei:
1
Le / WiFi
2
Fel / Galéria
3
Felvétel / OK
4
Bekapcsolás / Mód
5
Vízálló tok zár
6
Lencs
6
4
3
2
1
5
1
2
- 6 -
Kiegészítők
Vízálló ház
Biciklis tartó
Kamera keret
Gyors csat J alakú
Töltő
Gyors csat
Csíptetős tartó
Öntapadós tartó (2 db)
3-tengelyű adapter (3 részes)
Tripod állvány adapter
Tripod csavaros rögzítő
Tépőzáras rögzítők
3M kétoldalú ragasztócsík (2 db)
USB kábel
Li-ion akku (2 db)
Tartalék ház fedél
Gyorskötöző
Drótkötél
Mikroszálas kendő
Használati útmutató

- 7 -
Szerelhetik a kamerát

- 8 -
LAMAX ACTION X6 kamera használata
1. Micro SD kártya behelyezése
A Micro SDHC kártya behelyezése vagy eltávolítása a kamera kikapcsolt állapotában
ajánlott, illetve amikor nincs csatlakoztatva számítógéphez.
Megjegyzés: Kérjük, márkás memóriakártyát válasszon.
2. Akku behelyezése
a. Nyissa ki az akkumulátortartó fedelét.
b. Helyezze az akkumulátort a készülékbe (a behelyezésnél ügyeljen a helyes
polaritásra!).
c. Helyezze vissza az akkumulátortartó fedelét.
3. Töltés
a. A készülék akkumulátorának töltéséhez csatlakoztassa a kamerát számítógépéhez
vagy használja a mellékelt hálózati töltőt.
b. A készülék gépjárműben való töltéséhez használjon megfelelő szivargyújtós töltőt.
c. A készülék töltés közben is képes videó vagy fénykép rögzítésére (kivéve PC-ről
töltés esetén).
d. A kamera kikapcsolt állapotban is tölthető.
4. A kamera be- és kikapcsolása
a. Bekapcsoláshoz nyomja meg a “Bekapcsolás” gombot.
b. Kikapcsoláshoz nyomja meg a “Bekapcsolás” gombot 3-5 másodpercig.
5. Üzemmódok
Az üzemmódok (Videó / Fényképezés / Sorozatfelvétel / Időzített (time-lapse) /
Beállítások) között választáshoz röviden nyomja meg a bekapcsoló gombot. Az
üzemmód ikonja a kijelző tetején jelenik meg.

- 9 -
6. Felvétel készítés (videó, fotó)
a. Videó rögzítés Videó rögzítés
Válassza a Videó módot és nyomja meg a “Felvétel” gombot. A felvétel elindul, melyet az
ikon is jelez és elindulnak a számlálok. Leállításhoz nyomja meg újra a “Felvétel” gombot.
b. Fotó készítése a különböző módokban
- Fényképezés: Válassza a Fényképezés módot és nyomja meg a “Felvétel” gombot. Ezzel
elkészül a fénykép. A “Felvétel” gomb újbóli megnyomásával további képek készíthetők.
- Sorozatfelvétel: Válassza a Sorozatfelvétel módot és nyomja meg a ”Felvétel” gombot.
A kamera 3 képet készít 1 másodperc alatt. A “Felvétel” gomb újbóli megnyomásával
további sorozatképek készíthetők.
- Időzített: Válassza az Időzített módot és nyomja meg a “Felvétel” gombot. A kamera
visszaszámol az előre beállított időről (Beállítások ’Photo Interval’) és elkészít egy képet,
majd a következőt, egészen a “Felvétel” gomb újabb megnyomásáig.
- Time -lapse: Válass za a Time- lapse módot és nyomja meg a “Felvétel” gombot. A kamera
az előre beállított időközönként (Beállítások “Photo Interval”) képet készít egészen
a “Felvétel” gomb újabb megnyomásáig. Ehhez a működéshez a beállításokban
a “time-lapse camera” módot be kell kapcsolni (ON).
7. Felvételek megtekintése
a. A galéria a “Felvétel” gombbal érhető el. Videók és Fényképek között a “Le” gombbal
lehet váltani. Az egyes felvételek között a “Fel” és “Le” gombokkal lehet válogatni.
Visszalépés a “Mód” gombbal. Kilépés a “Galéria” gombbal.
b. Csatlakoztassa a kamerát számítógéphez az USB kábellel.
c. Vegye ki a Micro SD kártyát és helyezze egy kártya olvasóba.
d. Csatlakozzon WiFi-n arra alkalmas okostelefonhoz.

- 10 -
8. Beállítások
Válassza a “Videó módot” és nyomja meg a “OK “gombot.
a. Videó felbontás: 1920 x 1080 / 30 fps vagy 1280 x 720 / 60 fps.
b. Végtelenített felvétel: ON (Be) és OFF (Ki). Ha be van kapcsolva és az SD kártya megtelik,
a készülék törli a legrégebbi felvételt és folytatja a rögzítést.
c. Dátum jelzés: A felvételen megjeleníthető az idő és dátum.
d. Expozíció: -2 és +2 között állítható 1/3-os lépésben.
e. Fotó felbontás: 12 MP – 4000 x 3000, 8 MP – 3264 x 2448, 5 MP – 2560 x 1920,
2 MP – 1920 x 1080
f. Sorozatfelvétel: 3 kép készítése 1 másodperc alatt
g. Fotó intervallum: Képek készítése közötti idő (2, 3, 5, 10, 20, 30, 60 s).
h. Time-lapse: ’ON’ állapotban Time-lapse módban működik a kamera, ’OFF’ állapotban
Időzített fényképezés módban.
i. Hálózat frekvencia: Európában 50 Hz, Amerika/Ázsia 60 Hz.
j. Nyelv: A készülék nyelvének beállítása.
k. Dátum és idő: Dátum és idő beállítása. Léptetés Felvétel / Ok gomb. Kilépés Bekapcsolás
/ Mód / Menü gomb.
l. Hangok: Felvétel indítás és gombok hangjának be / ki kapcsolása, bekapcsolási hang
és hangerő beállítása.
m. Kijelző forgatás: a kamera képét 180o fokban elfordítja.
n. LCD kikapcs: A kijelző automatikus kikapcsolása 1, 3 vagy 5 perc után.
o. Auto kikapcs: A kamera automatikus kikapcsolása 1, 3 vagy 5 perc után.
p. Formázás: A Micro SD kártya formázása (törlése).
q. Gyári Beállítások: A készülék gyári beállításainak visszaállítása.
r. Verzió: A kamera szoftver verziója.

- 11 -
9. WiFi csatlakozás
A készülék beépített Wi-Fi-jét használva Android vagy iOS rendszerű okostelefonokról
is vezérelhető a kamera. A kapcsolódás lépései az alábbiak:
a. Telepítsük az iSmart DV alkalmazást az okostelefonra. Az alkalmazás ingyenesen
letölthető a Google Play (android) és az App Store (iOS készülékek) áruházakból.
b. Kapcsolja be a kamerát, majd nyomja meg az oldalán található “Wi-Fi“ gombot a Wi-Fi
bekapcsolásához. A bekapcsolt Wi-Fi-t a kijelzőn megjelenő Wi-Fi ikon jelzi.
c. Nyissa meg okostelefonján a Wi-Fi hálózatok listáját, és keresse meg a készülék
Wi-Fi hálózatát (alapértelmezett neve: LAMAX ACTION X6). Jelszó a csatlakozáshoz:
1234567890.
d. Csatlakozás után az alkalmazásból vezérelhető a kamera és az elkészült felvételeket is
megtekinthetjük.
10. További kamera funkciók
a. Fotó készítés Videó közben: Videó felvétel közben a “FEL“ gomb megnyomásával
bármikor készíthetünk képet is.
b. Gyors menü elérés: A “Felvétel” gombot 2 másodpercig nyomva tartva előjön a teljes
menü. A “FEL” és “LE“ gombokkal tallózhatunk, kiválasztani a “Felvétel” gombbal.

- 12 -
LAMAX ACTION X6 akció kamera paraméterek
LCD 1.5 inch
Lencse
A+++ HD 170°–os széles látószögű
Nyelvek
Czech, English, German, French, Italian, Russian, Spanish,
Chinese Traditional, Chinese Simplied, Japanese,
Portuguese, Polish, Indonesian, Korean
Videó felbontás 1920 x 1080 / 30 fps, 1280 x 720 / 60 fps
Videó formátum MOV
Fotó formátum JPG
Videó tömörítés H.264
Fotó felbontás
12 MP – 4000 x 3000, 8 MP – 3264 x 2448,
5 MP – 2560 x 1920, 2 MP – 1920 x 1080
Fotó módok
Fényképezés / Sorozatfelvétel (3 / s) / Időzítő (2, 3, 5, 10,
20, 30, 60 s) / Time-lapse (2, 3, 5, 10, 20, 30, 60 s)
Hálózati frekvencia 50 Hz / 60 Hz
USB csatlakozó Micro USB 2.0
Tárolás Micro SDHC
Csatlakozás WiFi, Micro USB 2.0, HDMI
Akkumulátor 900 mAh
Rögzítési idő egy töltéssel Full HD videó 1080p / kb. 90 perc
Töltési idő kb. 3 óra
Támogatott operációs
rendszerek
Windows XP / Vista / 7 / 8
Mac OS
Kamera méretek 59 x 41 x 24,5 mm
Súly 63 g
Megjegyzés: A készülék tulajdonságai és műszaki jellemzői előzetes gyelmeztetés nélkül
változhatnak folyamatos termékfejlesztés eredményeként vagy rmware frissítést követően.

- 13 -
További tájékoztatás
1) Háztartások részére: A terméken vagy kísérő dokumentációban lévő jelölés (áthúzott kuka) azt
jelenti, hogy az elektromos vagy elektronikus terméket az életciklusa végén külön gyűjtőbe kell
kidobni, nem szabad a háztartási hulladékba rakni. A termék megfelelő likvidálásával segíti megőrizni
az értékes természeti forrásokat és segíti megelőzni az esetleges negatív hatásokat a környezetre
és emberi egészségre, amit a hulladék nem megfelelő likvidálása okozhatna. További részletekért
forduljon a helyi hatóságokhoz vagy a legközelebbi gyűjtőhelyre. A termék nem megfelelő
likvidálása miatt a nemzeti törvények értelmében bírság is kiszabható. Tájékoztató az elektromos
vagy elektronikus termékek likvidálásával kapcsolatban az Európai Közösségen kívüli államokban élő
felhasználók részére: A terméken látható jelölés (áthúzott kuka) csupán az Európai tagállamokban
érvényes. Az elektromos és elektronikus termékek megfelelő likvidálásával kapcsolatban kérjen
részletes tájékoztatást a helyi hatóságoktól vagy a termék értékesítőjétől. Mindent kifejez az áthúzott
kuka jelölése a terméken, csomagoláson vagy nyomtatott dokumentumokon.
2) A berendezés garanciális javítás igényét érvényesítse a forgalmazónál. Műszaki problémák és
kérdések esetén lépjen kapcsolatba az értékesítővel, aki tájékoztatja Önt a további lépésekről. Tartsa
be az elektromos berendezésekre vonatkozó előírásokat. A felhasználó nem jogosult a berendezés
szétszerelésére sem bármely részének cseréjére. Amennyiben a borítást felnyitja vagy eltávolítja,
az áramütés veszélyének teszi ki magát. A berendezés nem megfelelő összerakása és ismételt
csatlakoztatása esetén is áramütés veszélyének teszi ki magát.
Megfelelőségi nyilatkozat:
A MagiCam HD SOLUTIONS s.r.o. cég ezennel kijelenti, hogy minden LAMAX termék megfelel
a vonatkozó alapvető követelményeknek és a 2004/108/EC irányelv egyéb előírásainak.
A termékeket Németország, Cseh Köztársaság, Szlovákia, Lengyelország, Magyarország és az
európai piacokra korlátozás nélkül szánjuk. A termékre 24 hónap jótállást nyújtunk, amennyiben
nincs másképp határozva. A Megfelelőségi nyilatkozat letölthető a www. lamax-electronics.com
oldalról.
LAMAX termékek exkluzív importöre az EU-ban:
MagiCam HD SOLUTIONS s.r.o., Braškovská 308/15, 161 00 Praha 6
http://www.lamax-electronics.com.

OUTDOOR WIFI CAMERA
Scan QR code for
smart phone app
Download from
Google Play
Download from
Apple App Store
Scan QR code for
smart phone app
Download from
Google Play
Scan QR code for smart phone app
 Loading...