

Page 1
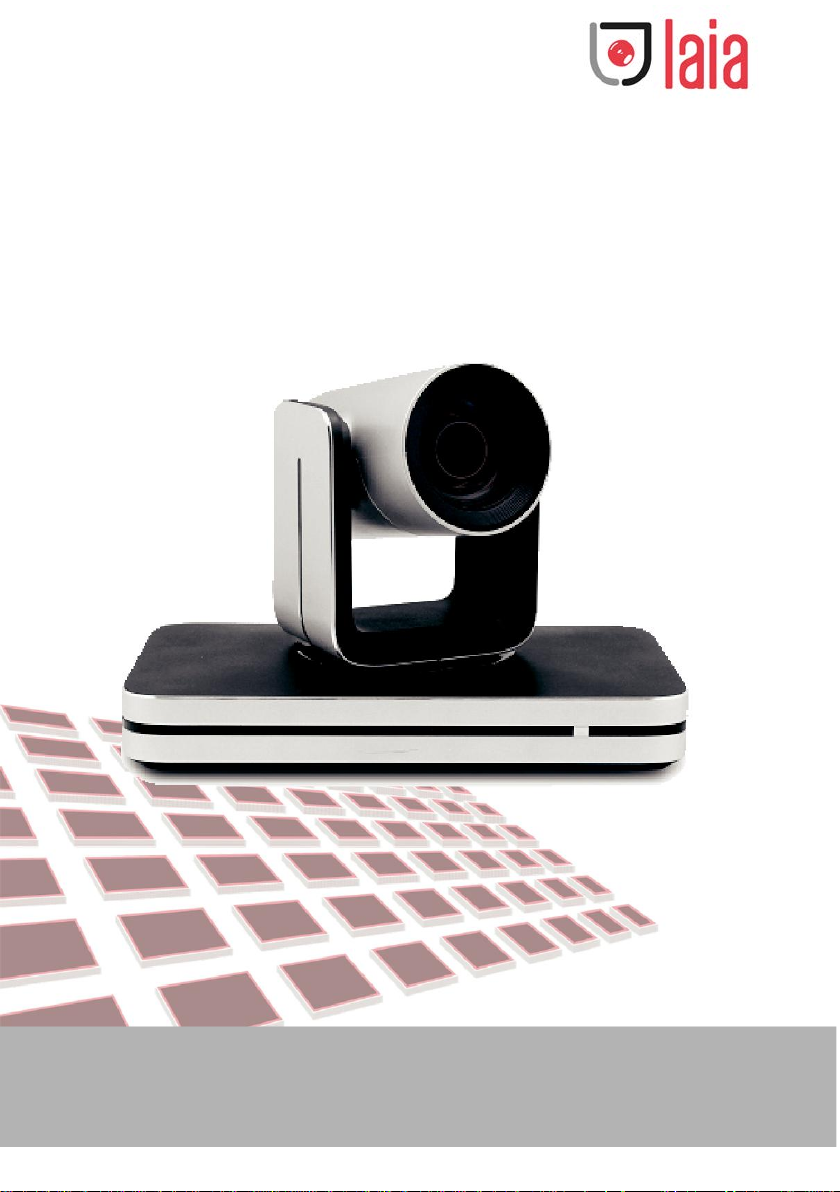
TP 200 WIN
User Guide
Page 2

Attention
Please read the user manual careful and follow the installations carefully
when using this equipment. Keep this manual for reference. Before
connecting the power plug of this device to the external power, please
confirm the power voltage value. The voltage is DC19V .
Please use the camera in suitable temperature and humidity. The
temperature of is 0°C to +40°C and temperature is <90%. Prevent foreign
matter from entering the device and do not spill corrosive liquids on the
device to prevent danger.
During transportation, storage and installation, it should be protected from
heavy pressure, severe vibration and immersion, causing damage to the
product.
Please do not disassemble the devices without authorization. The relevant
work should be done by qualified repair person.
Please use a soft, dry cloth to clean the camera. In case of stubborn dirt,
wipe it with a mild detergent. Do not use strong or abrasive cleaner to avoid
scratching the device casing and lens, affecting image quality
.
This is A class A product which may cause radio interference in the living
environment. In this case, users may be required to take practical
measures against interference.
Page 3

Content
1 PACKING LIST 2
2 PRODUCT INTRODUCTION 3
PRODUCT APPEARANCE - IN TER FAC ES 3
EATURES 4
F
3 CONNECTION INSTRUCTIONS. 6
4 USE THE REMOTE CONTROL 7
5 THE MENU 10
MAIN MENU 10
OMMUNICATION MENU: 10
C
MENU 10
PTZ
MAGE MENU 11
I
Copyright © 2019 Laia www.laiatech.com All rights reserved
Page 4
1 Packing List
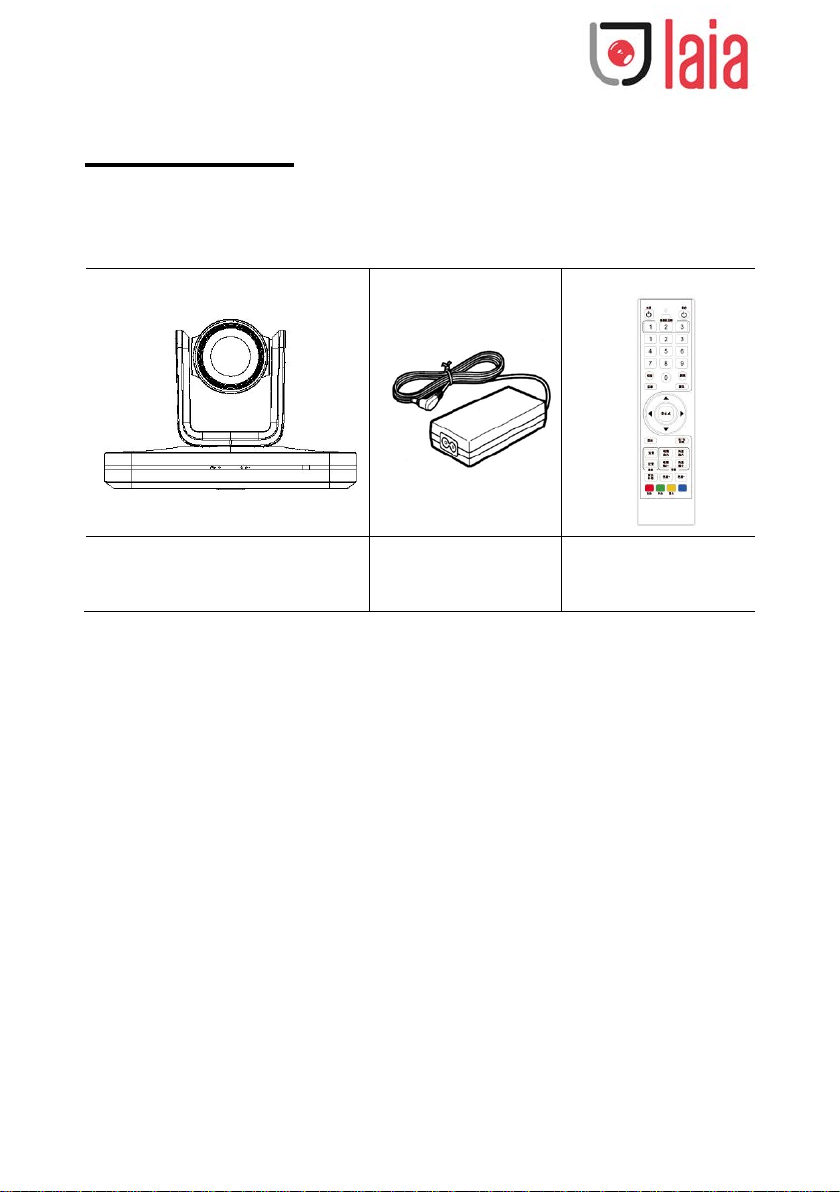
When unpacking, please check and confirm all attachments that should be
provided.
HD Video Conference Terminal x 1 Power Adapter x 1 Remote Control x 1
Copyright © 2019 Laia www.laiatech.com All rights reserved
Page 5
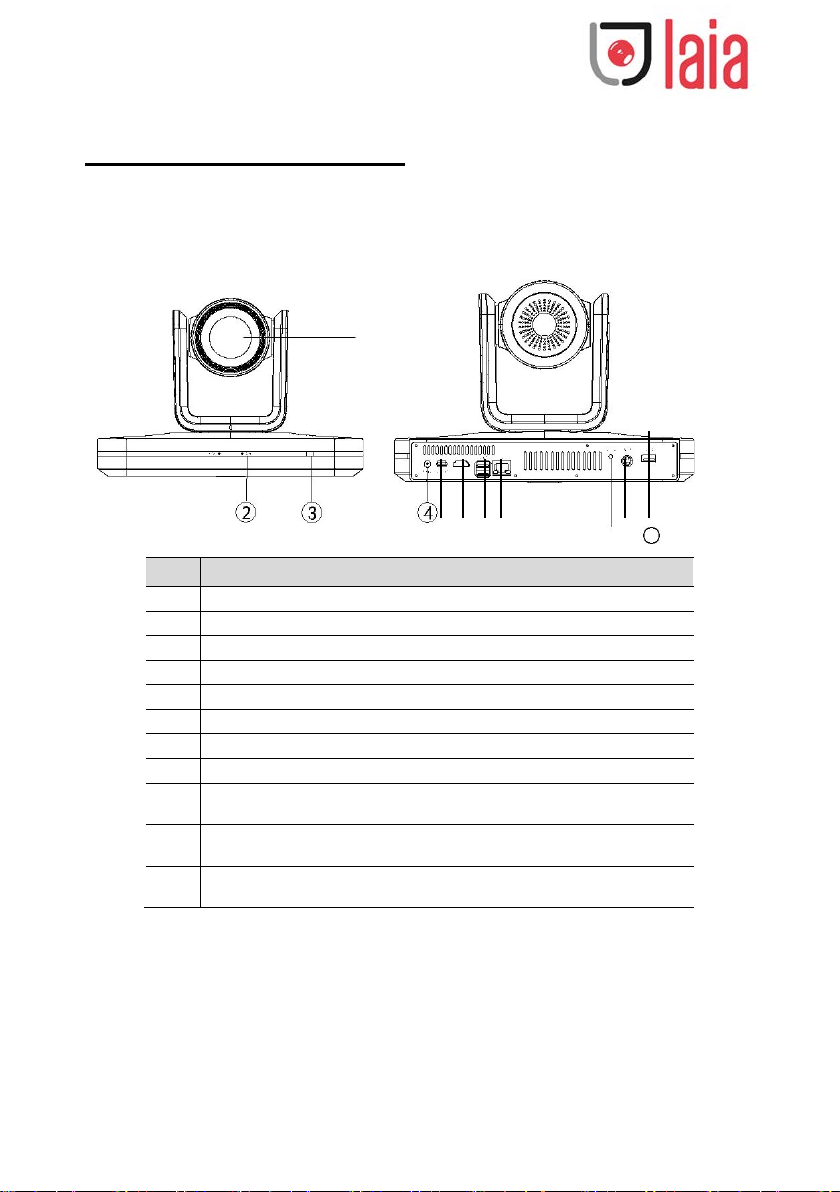
NO
Function
1
Lens
2
Power Lamp
3
Switch
4
Power port
5
Mini-DP Port
6
HDMI output port
7
USB 3.0
8
Network Port
⑤⑥⑦⑧
⑨⑩
11
2 Product Introduction
Product Appearance - interfaces
①
9 Line in/Out Mic
10 RS-232
11 USB 2.0
After the camera connect to the power supply, it will automatically turn on,
or it can be turned on manually by power switch in the power-on state.
The red and green lights are always on during power-on self-test.
The green light is on during normal operation.
Copyright © 2019 Laia www.laiatech.com All rights reserved
Page 6
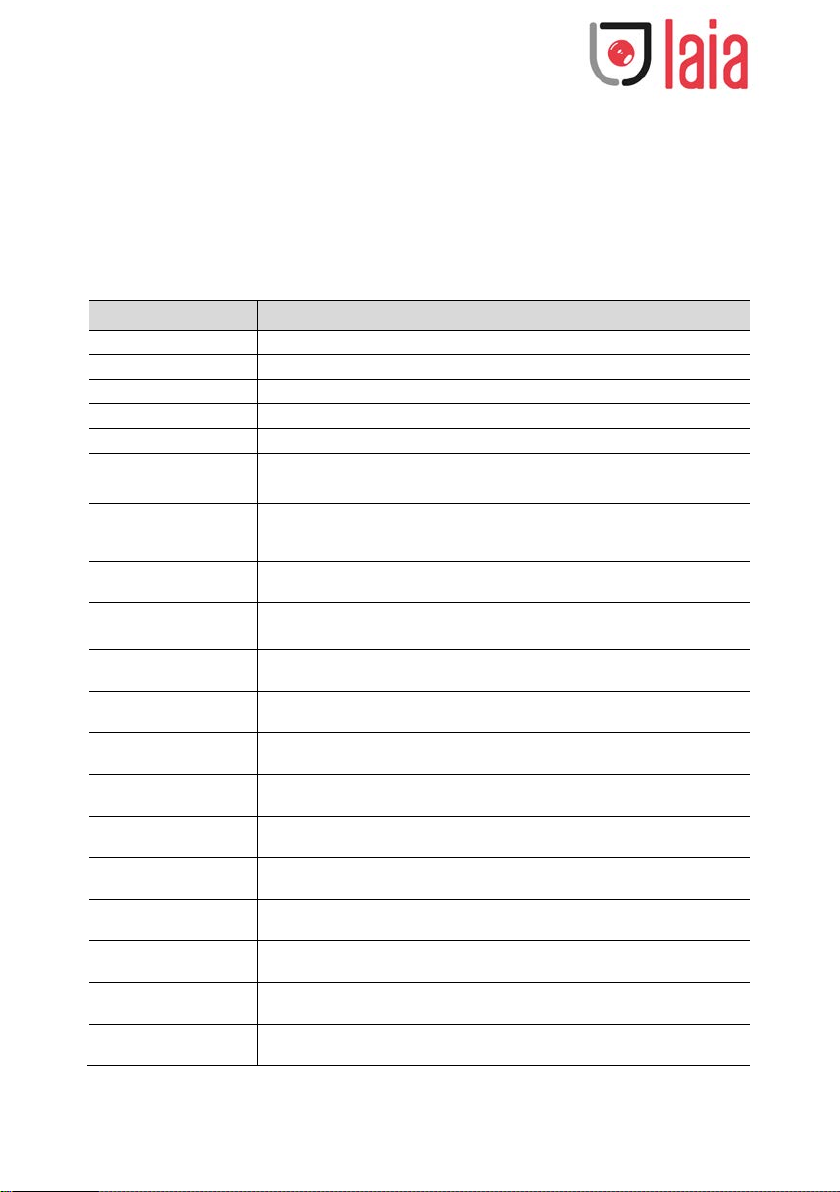
Feature
Description
Imagen Sensor
SONY 1/2.8 Progressive CMOS
Effective Pixels
3.10 Megapixel
Resolution
U3:YUY2:320×240,640×480,800×600,
HD
1280×720,1920×1080
Signal System
PAL/NTSC
12X optical zoom, f=3.9mm(wide ang le end)~46.8
mm(far end)
Minimun
Ilumination
The green light flashes when the remote control is controlled.
Remote control switch system can be controlled by the power button of the
remote control.
Features
Lens
Horizontal
View Angle
72.5°(W)~7.4°(T)
Focus System Auto/Manual
0.1Lux
Iris Auto/Manual
Shutter Speed 1/1~1/10,000s
Gain Auto/Manual
White Balance Auto/ Indoor/Outdoor/Manual
Image Effect Full color/Electronic flip
S/N Ratio ≥50db
Pan 355°(max. speed:80°/s)
Tilt -30° to +30°(max. s peed: 6 0°/s )
Preset position 9 preset positions by IR remote controller
Video input 2 x USB 3.0,1 x USB 2.0
Copyright © 2019 Laia www.laiatech.com All rights reserved
Page 7
Feature
Description
Network
interface
Video Output 1*HDMI 1* Mini-DP
Wire:1000M port,(10/100/1000M Adaptive)
Control method Remote control,USB internal control
Power DC-IN 19V 3.42A
Copyright © 2019 Laia www.laiatech.com All rights reserved
Page 8
Power
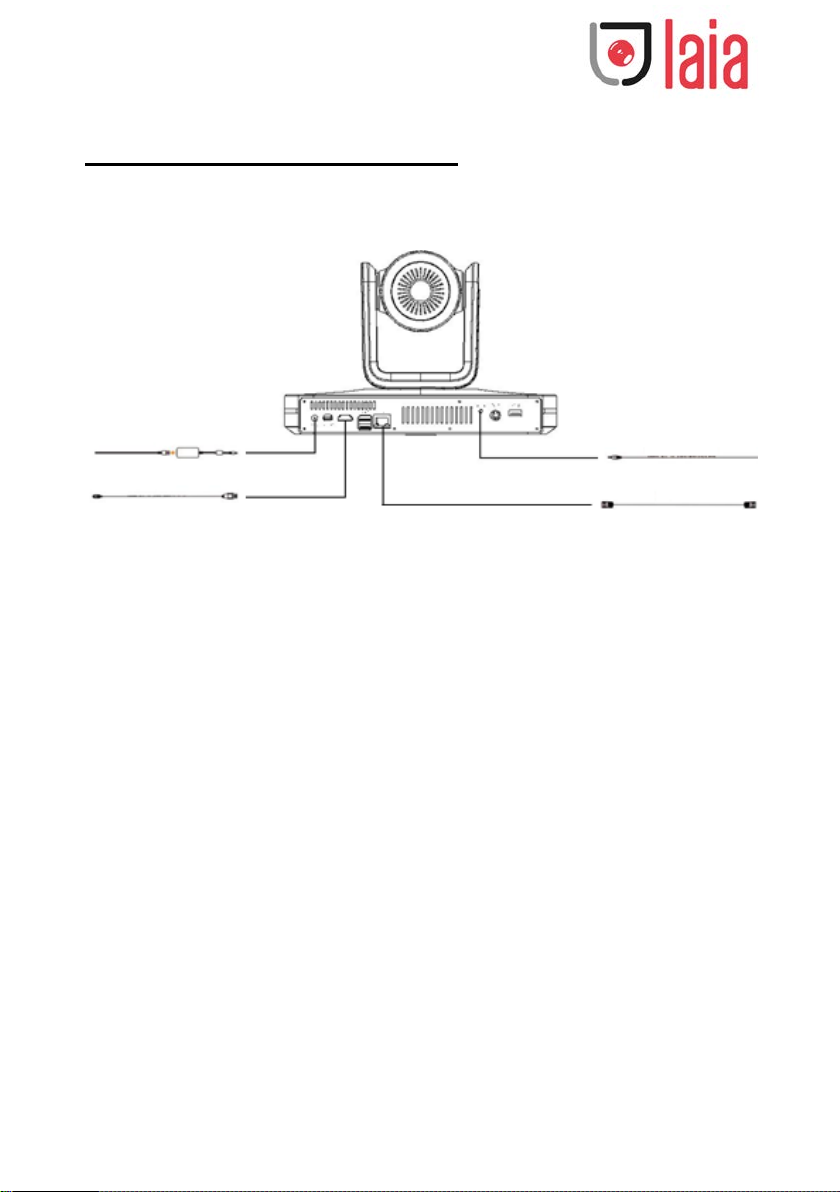
3 Connection instructions .
Please check if the connection is correct before starting the camera.
Audio cable
HDMI cable
Network cable
Attention please:
If the preset number 1 is set, after the camera powered, the camera's
pan/tilt/zoom will automatically call the preset point 1 . If the preset number
1 is not set, the camera will return to the HOME position, that is, the lens
will return horizontally and vertically to the front, and the zoom will be
minimized.
Copyright © 2019 Laia www.laiatech.com All rights reserved
Page 9
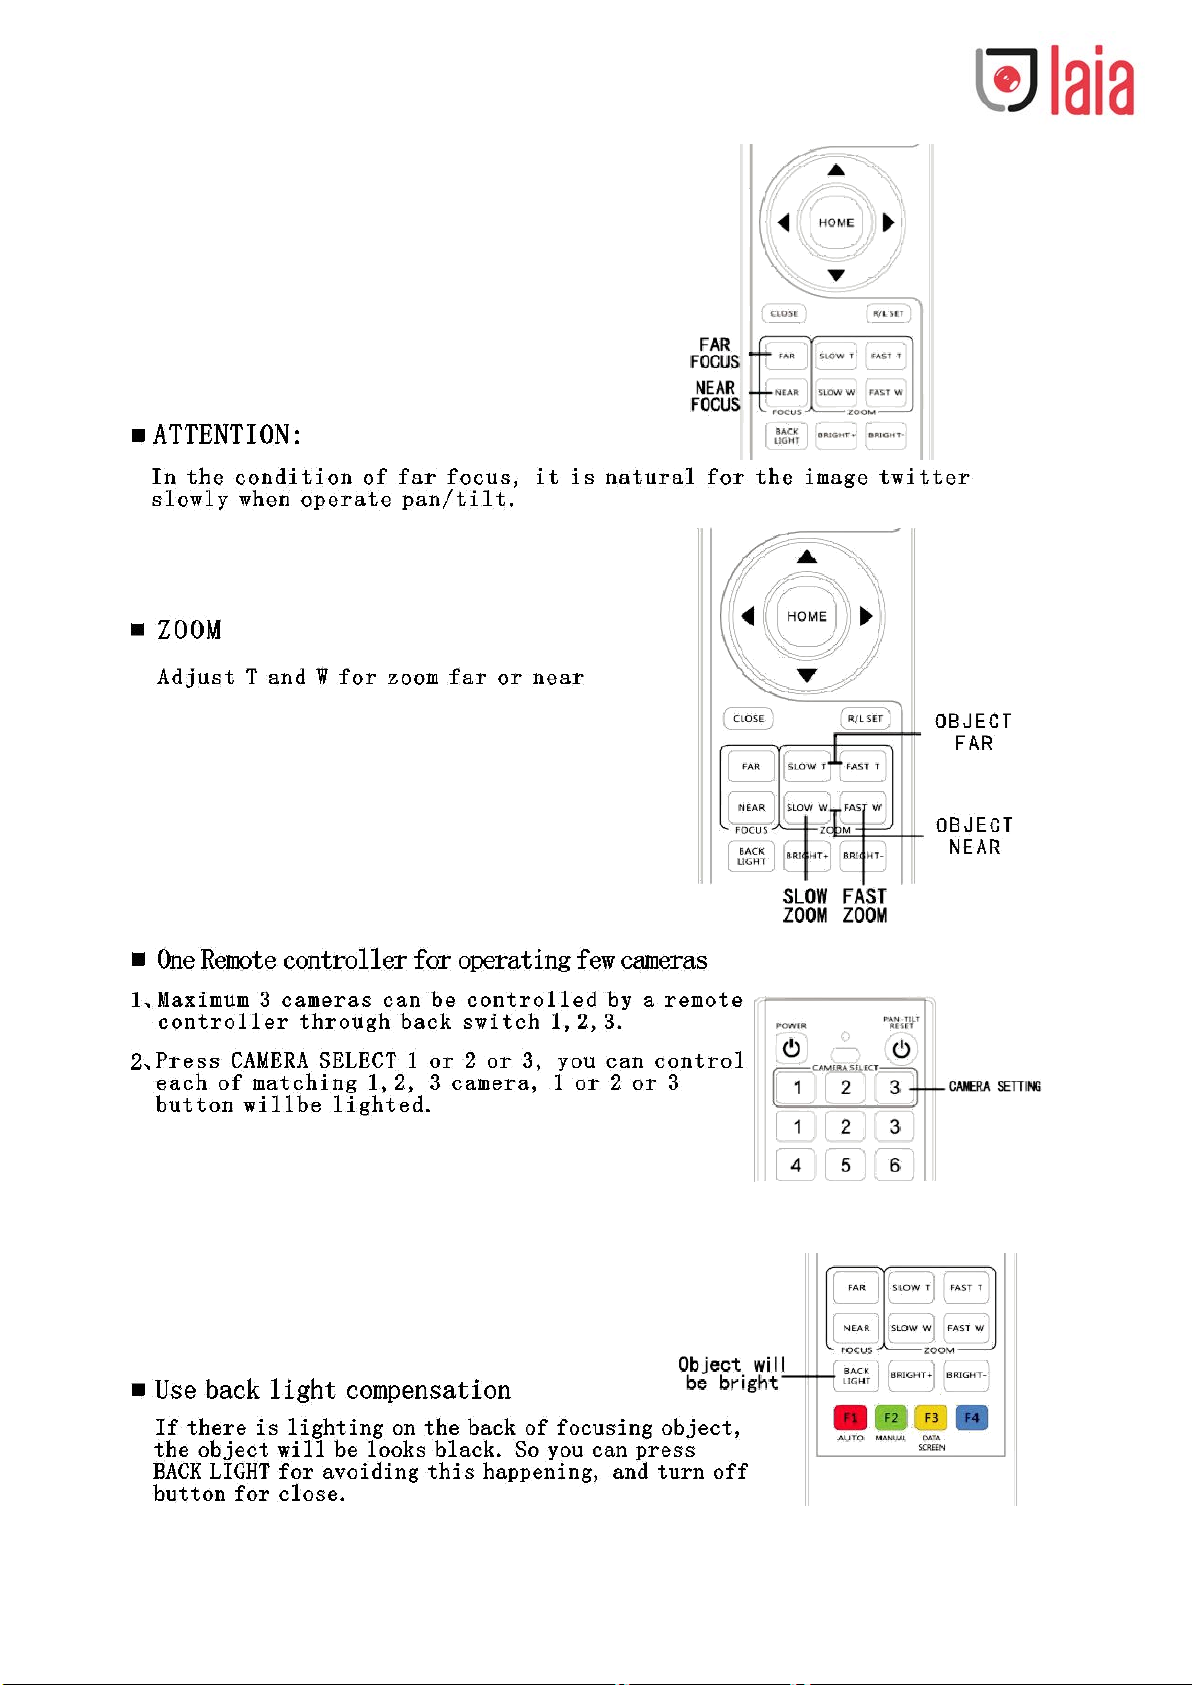
4 Use the Remote Control
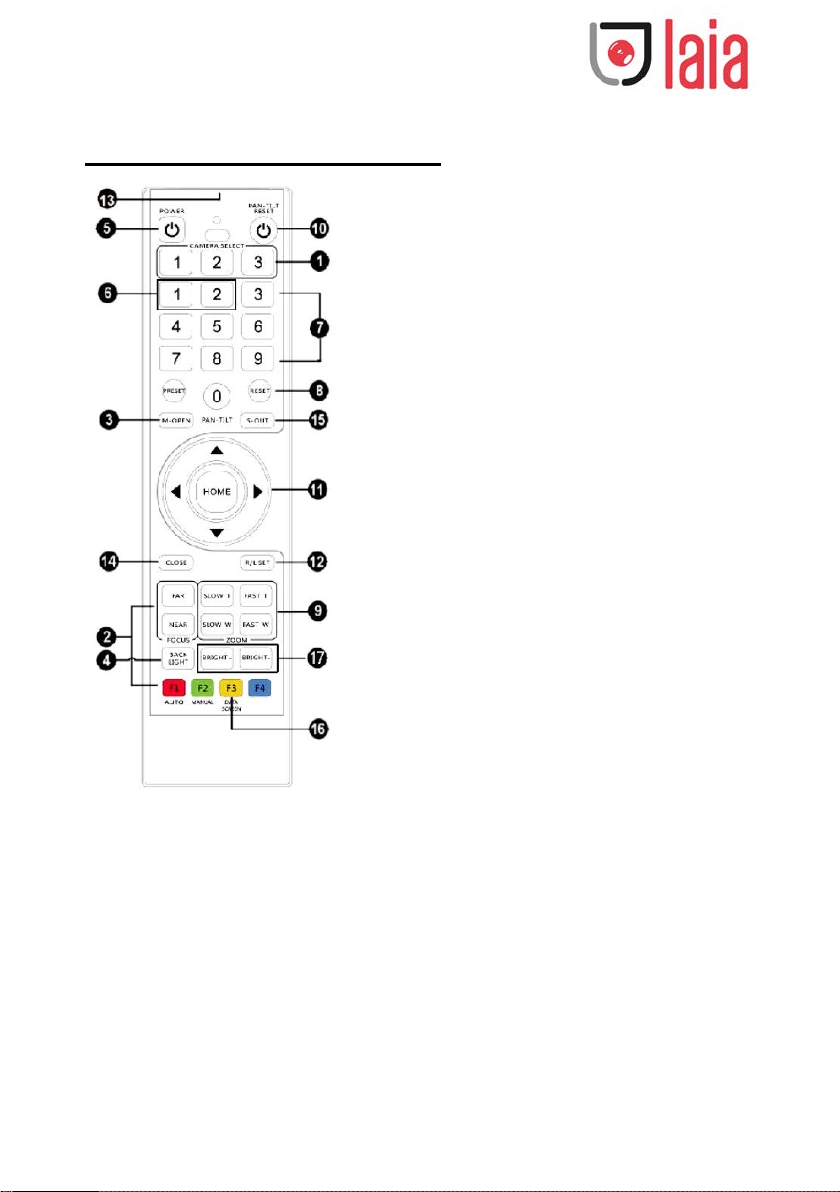
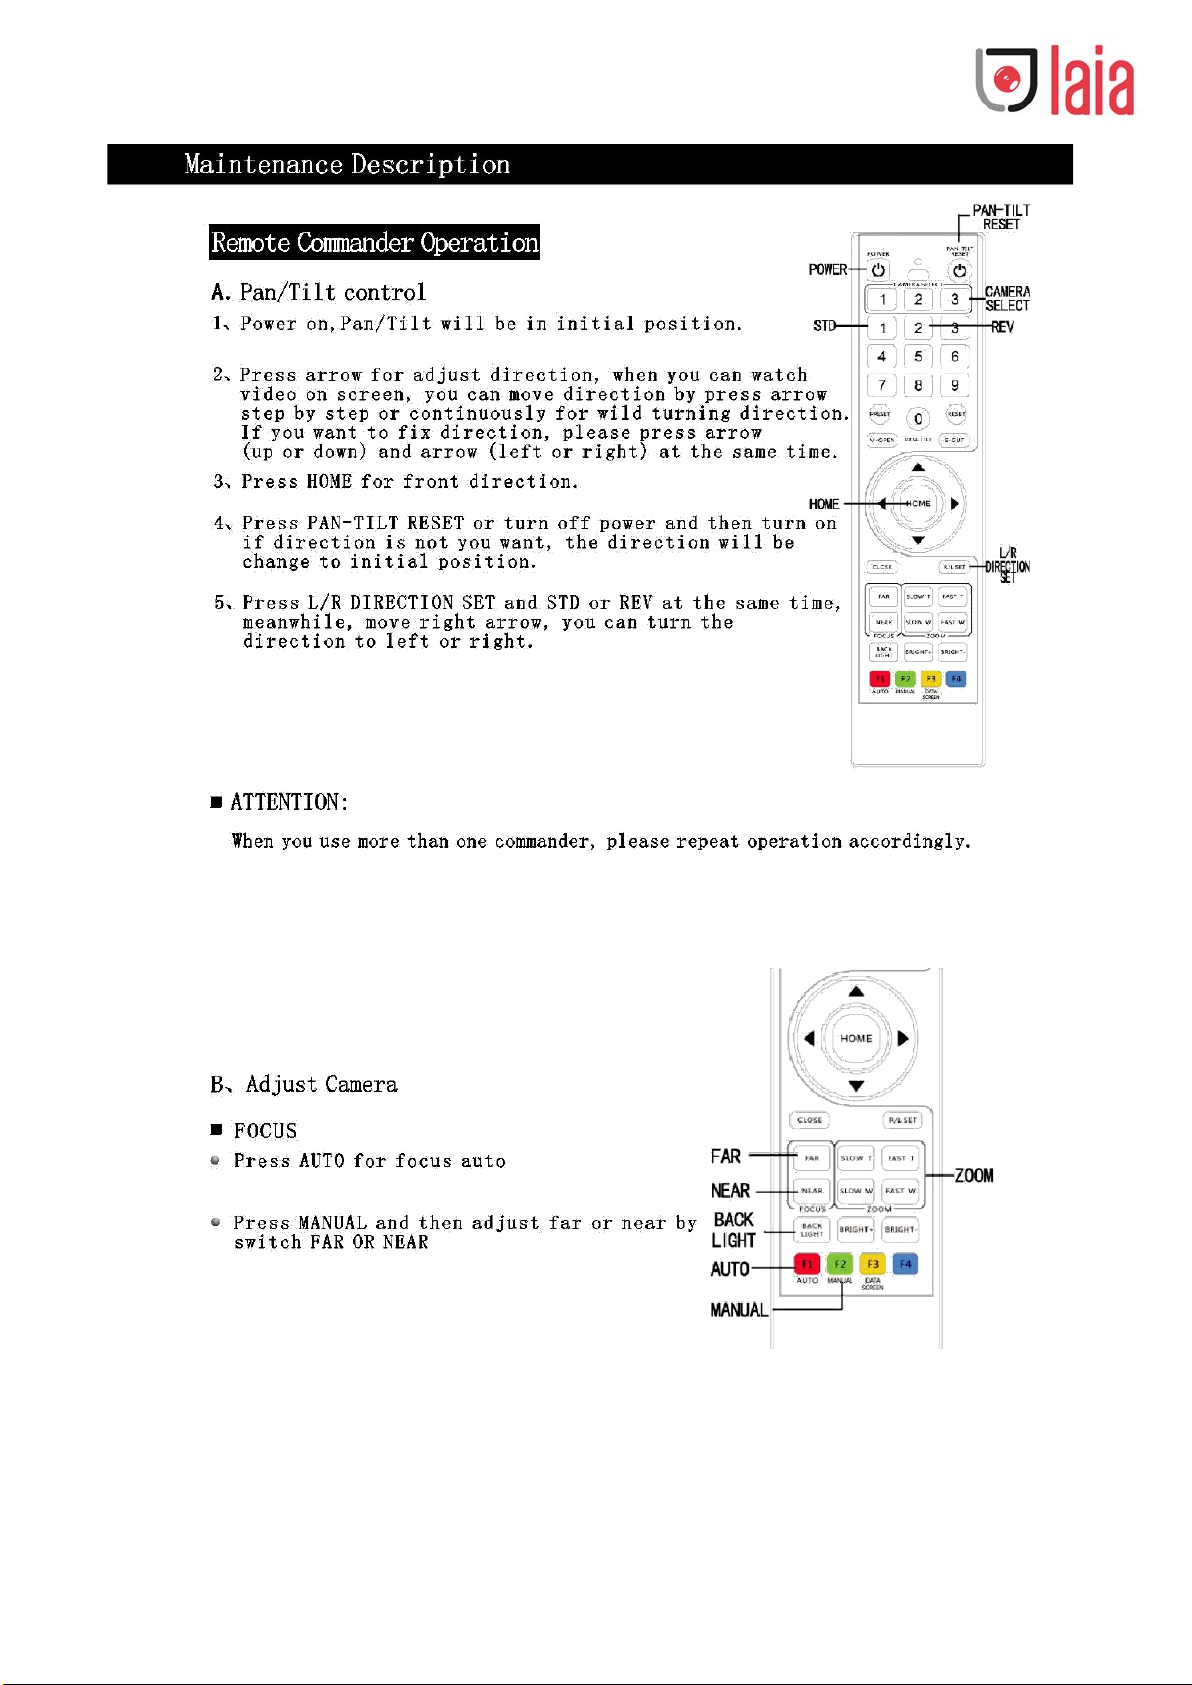
1. Camera Select
2. Focus (auto or normal)
3. M-Open: Open the menu
4. Back light
5. Power
6. Std Rev: (press L/R Direction Set, and
then press 1 or 2)
7. Presets (press PRESET then press 19 for set up preset position).
8. Reset: Press RESET and t hen press 19 for eliminate preset position.
9. Zoom
10. Pan-tilt Reset
11. Pan-tilt: HOME for return middle
position
12. L/R Direction SET
13. IR Transmit
14. Close the MENU
Copyright © 2019 Laia www.laiatech.com All rights reserved
Page 10
Copyright © 2019 Laia www.laiatech.com All rights reserved
Page 11
Copyright © 2019 Laia www.laiatech.com All rights reserved
Page 12
5 The Menu
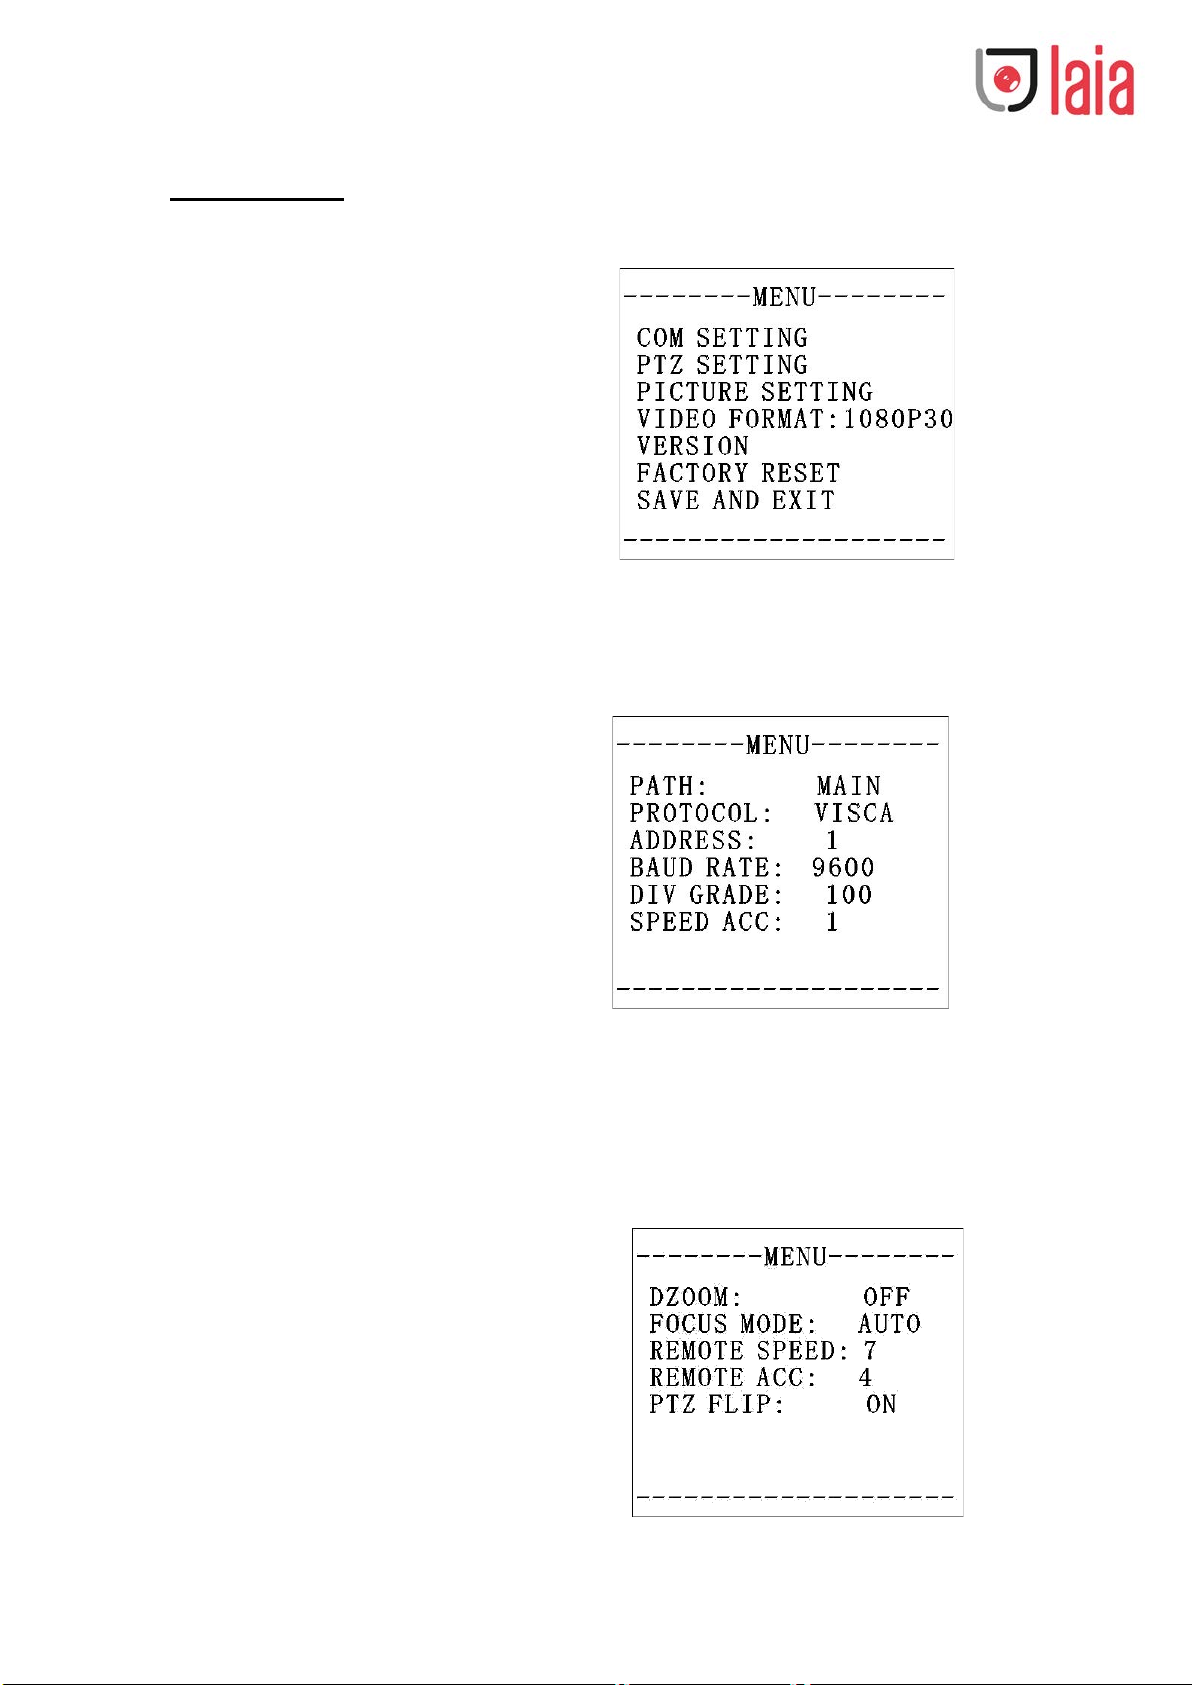
Main menu
COM SETTING: Comunication settings
PTZ SETTING: PTZ settings
PICTURE SETTING: Image settings
VIDEO FORMAT: Video format
VERSION: Version of firmware
FA CTORY RESET: Restore factory defaults
SAVE A N D EX I T: Save and exit.
Communication menu:
PATH: cannot be set
PROTOCOL: Visca/PELCO-P/D/VISCA2
ADDRESS: Set the camera communication
address ID
BAUD RATE: set the serial communication
baud rate2400/4800/9600/19200/
38400/115200
DIV GRADE: set the speed range of the PTZ
movement
SPEED ACC: set the movement acceleration of the PTZ
PTZ Menu
DZOOM: Digital zoom: ON / OFF
FOCUS MODE: AUTO / MANUAL
REMOTE SPEED: set the speed of the PTZ
Movement
REMOTE ACC: Set the movement acceleration
of the PTZ
PTZ FLIP: set image flip: ON / OFF
Copyright © 2019 Laia www.laiatech.com All rights reserved
Page 13
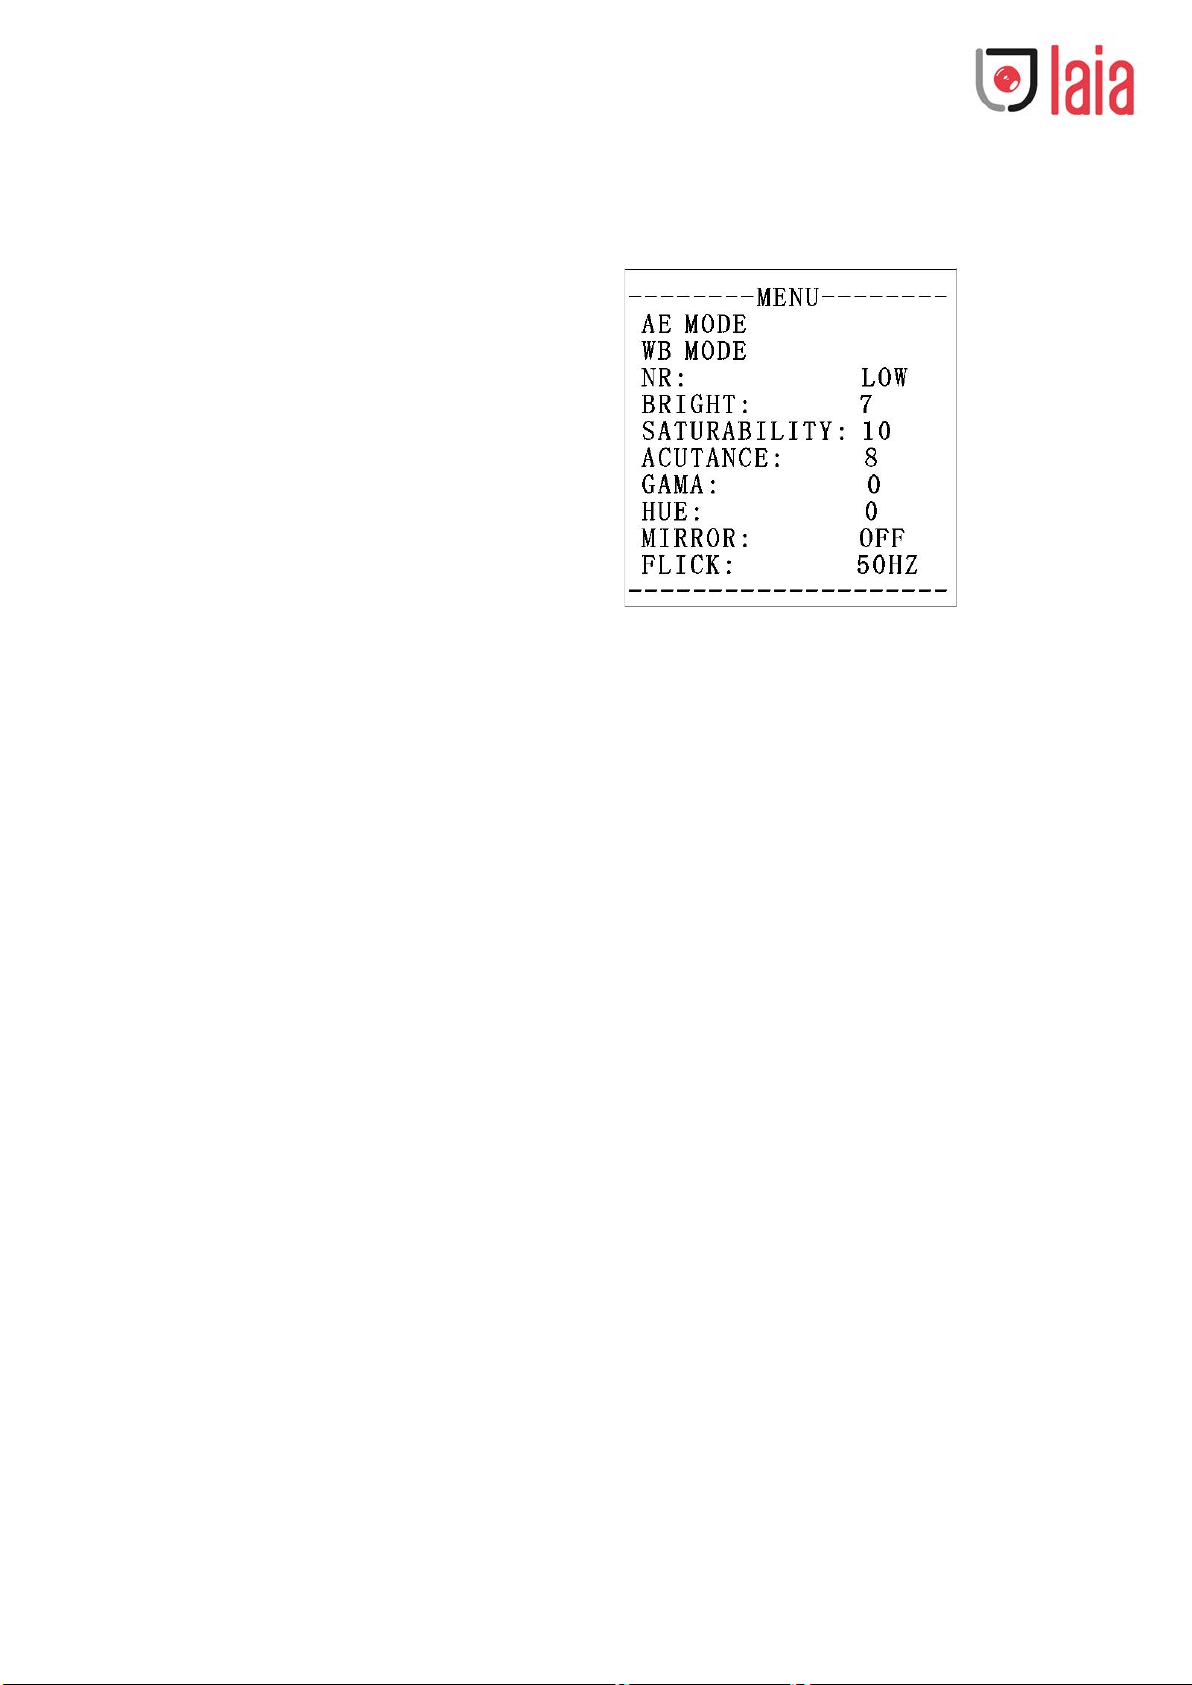
Image MENU
AE MODE: set exposure mode
WB MODE: White Balance: AUTO / INDOOR /
OUTDOOR / ONE PUSH / ATW / MANUAL
NR: set the noise: OFF / LOW / MIDDLE / HIGHT
BRIGHT: value of the screen: 1-15
SATURABILITY: set the color of the image: 1-14
ACUTANCE: set the acuity of image: 1-15
GAMA: set the gamma of image: 1-4
HUE: show the current hue
MIRROR: mirror: ON / OFF
FLICK: flick of image: OFF / 50 Hz / 60 Hz.
Copyright © 2019 Laia www.laiatech.com All rights reserved
 Loading...