

La Crosse W85947 Instruction Manual
Volume
ALL NOAA HAZARDS /AM / FM
Weather Aler t Clo ck R a dio
One Butt on Sele c t s Tornado Only Alerts
Model: W85947 | Instruction Manual
Weather radios are the fastest way to get emergency information.
Are frequ ent unwant ed alerts k eep in g you up at night? The La
Crosse™ Weather Alert Clock Radio has one simple button that limits
unwanted alerts interruptions without the need for programming.*
Monitor all 7 weather band channels, listen to AM/FM radio or press
one button to standby for ALL HAZARDS ALERTS or TORNADO
ONLY ALERTS. P r ofessional alert s ett i ngs all ow t ail or in g the weather
alert radio to your needs. Always on when a/c cord is plugged in so
you never mis s a warn in g.
QUICK SETUP:
A/C O peration:
Use a/c power cord for continual weath er al ert radio use. Plug the 6.0V
adapter into the wall outlet an d int o the AC/DC power port on the back
of the weath er al ert radio.
AUTO ON: As soon as you plug the A/C Ad apter
into the w all an d into the weather alert radio, the
radio turns ON.
1. The weather alert radio wi ll default to the
Weather Band and search for the clearest
channel. The c hannel indica tor will blink “-“ in the
chann el ar ea. The strength indicator will show
signal strength.
Note: Signal stren gt h indi c ator oper ates on
weather band only.
2. Use the ︿ or ﹀ navigation buttons to select a
different channel.
3. Press the OK button to confirm the channel.
4. CH # SELECTED will show on the scroll line for
5 seconds followed by NOAA WB and the
frequency.
5. After 10 seconds, the display will return to
time/date. T h e radio will play th e 24-hour
weather broadcast.
THAT’S IT! Nothing else is required for the weather radio to work!
There are many opt i ons to use the full f eatures of this W eat h er Alert
Clock Radio.
Note: An option to select FIPS Codes is in the pr ogr am m enu (prosettings).
OFF: The Weather Alert Radio is always on unless power is removed
(a/c adapt er an d bat teri es).
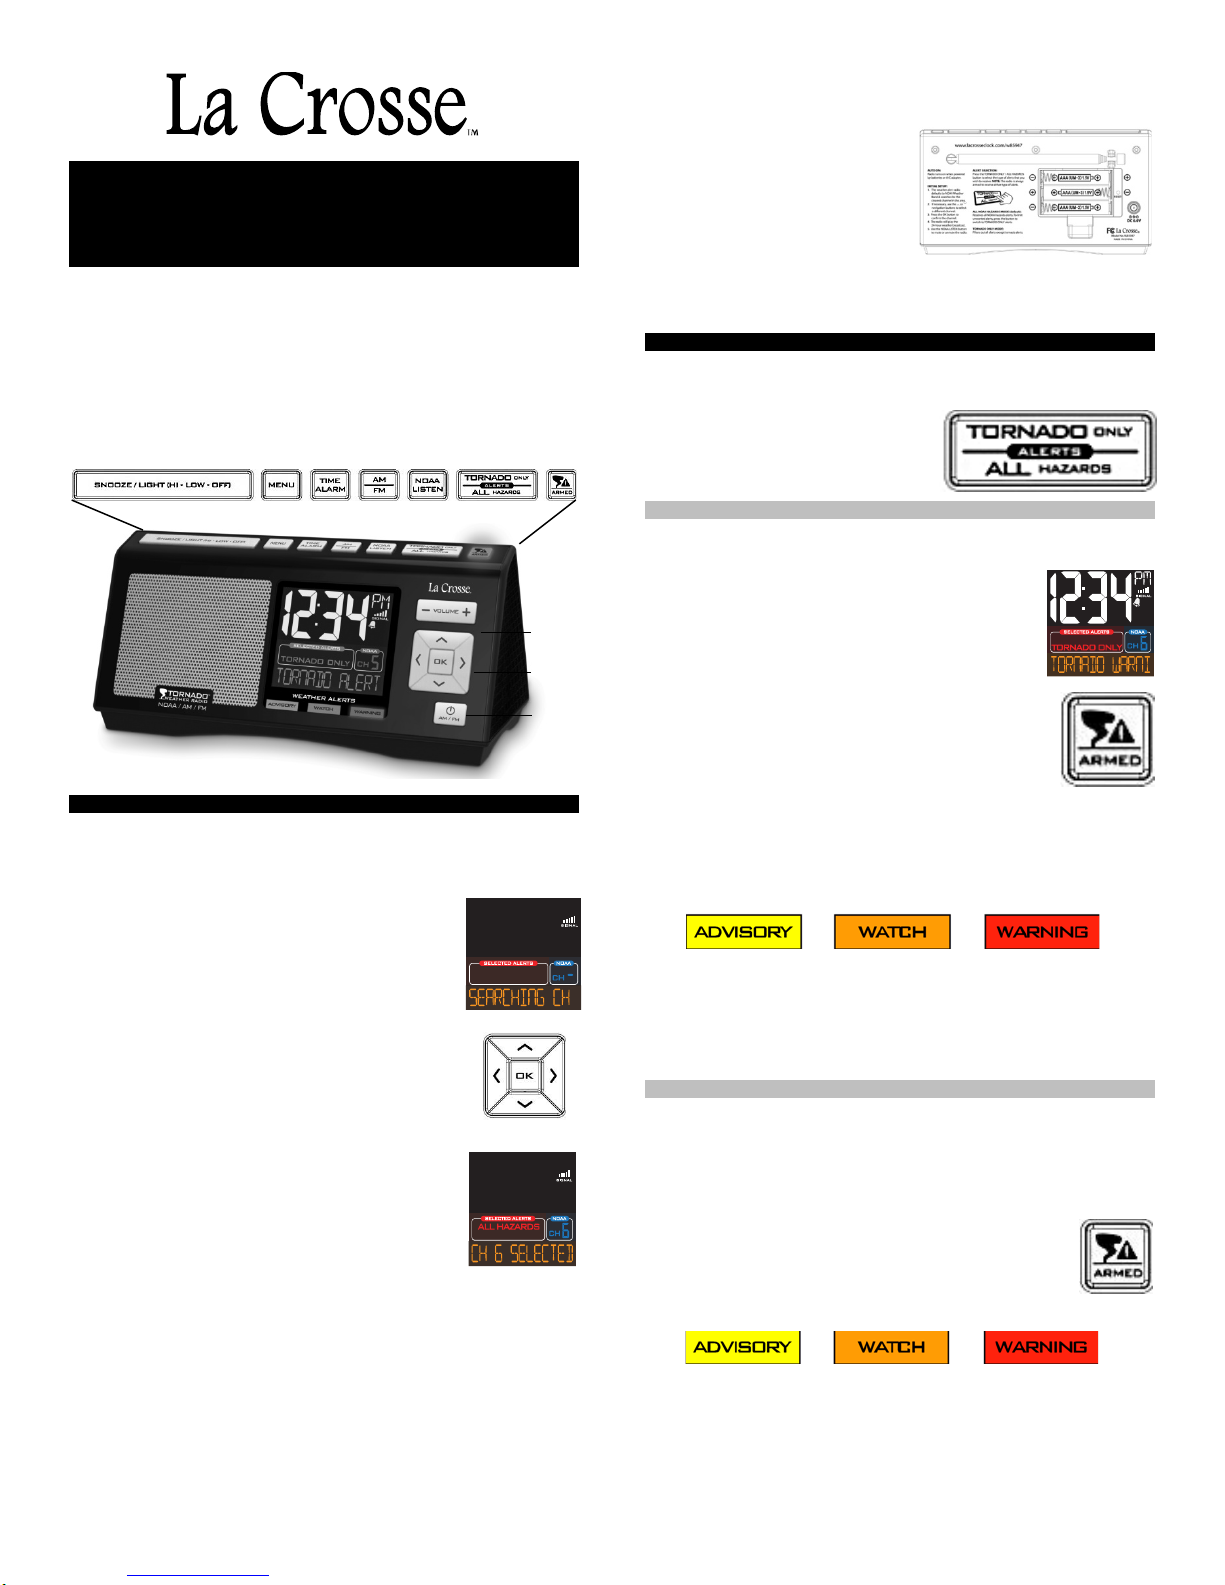
Backup Battery Operation:
Use backup batteries du r in g p ow er outag e. Bat t ery operati on is not for
button
Navigation
buttons
AM/FM
Power
button
regular use.
• Remove battery cover from
the back of the weather alert
radio.
• Install 3-AAA LR3 alkaline
batteries (not included) .
• Replace battery cover.
Important:
Do not mix old and ne w batt eri es.
Do not mix alkaline, standard, or rechargeable batteries.
ALERTS:
Easy 1 button press to select:
• Tornado Only Alerts
• All Hazards Alerts
Note: Th e weather al er t rad io will
always b e ar m ed reg ardless of
type of alert s el ect ed .
Tornado Only Alerts:
• The weather alert radio will default to All Hazards Alerts
• Press and release the TORNADO ONLY/ALL
HAZARDS button onc e to hear only th e
Tornado Alerts*.
• The Selected Alerts area will read TORNADO
ONLY.
• The Red LE D li ght (armed) will stay on while in
Tornado Mode.
Note: When TORNADO ONLY is displayed and
the Red LED Armed light is on stead y, you h av e
select ed t o onl y r ec ei ve t or n ad o al er ts .
During a Tornado Alert:
• The a lert message will s croll across t he b ottom of
the display (13 characters).
• The Red LE D Armed light will flash during Tornado Watch or
W arning Al ert . (0.8 seconds in every 2 s ec on ds ) .
• The color-coded Alert LED Lig ht (advisory, watc h , or war ni ng ) will
stay lit unti l t h e al er t exp ires.
• The volume will increase to 16 (the maximum sound)
automatically during a Tornado Warning Alert. The unit wil l stop
broadcasting when the final tone of the alert message is received.
Note: Tornado Watches will unmute the radio (if muted) but will
not autom atically inc reas e vol um e.
All Hazar d s Al er ts:
• The weather alert radio will default to All Hazards Alerts.
• The Selected Alerts area will read ALL HAZARDS.
During an All Hazard Alert (wi ll inc lud e Torn ado ) :
• The alert m essage will sc roll across th e bottom of th e dis pl ay (13
characters).
• The Red LE D Armed light will flash during Tornado
Watch and All Warning Alerts. (0.8 seconds in every
2 seconds).
• The color-coded Alert LED Light (advisory, watc h , or
warning) will stay lit until the alert expires.
• The volume will increase to 16 (the maximum sound)
automatically during a Warning Alert. The unit will stop
broadcasting when the final tone of the alert message is received.
1
Note: Tornado Watches will unmute the radio (if muted) but will
not autom atically inc reas e vol um e.
NOA A/LIS TE N B utton:
When in WB (weather ban d) , press the NOAA/LISTEN
button to mu te alerts*.
• When al ert s ar e muted, the Alert will continue to
scroll across the display.
• The color-coded Alert LED Light (advisory, watc h , or warning) will
stay lit unti l t h e al er t exp ires.
• The Red LE D Armed light will flash during Tornado warnings.
(0.8 seconds i n ev ery 2 seconds ) .
• Press the NO AA/LISTEN butt on again to hear th e alerts.
Note: All warnings will automatically unmute the radio and the
volume wi ll inc reas e to 16 (maximum).
Note: Advisories and Watches (except for Tornado Watch and
Weekly Test) will n ot u n mut e bu t th e message will sc roll and th e
appropriate Alert Type Light will remain on.
Weather Band Signal Strength Indicator
• Signal strength indicator operates on Weath er Band
only.
• The bars will not change once the reception of the
selected channel is okay unless it changes to
another Weather Band channel.
PROGRAM MENU:
The program menu allows you to set:
• DST (Daylight Saving Time) ON/OFF
• Time
• Calendar
• Scroll Speed
• Pro-settings (FIPS Code, Channel, Edit or Select Alerts)
OK Button: The OK button will confirm each setting.
〉Navigation button: From each mode the 〉navigation b utt on w il l
move to th e next mod e in t h e program m en u.
︿ or ﹀ Navigation Buttons: Use the ︿ or ﹀ navigation buttons to
adjust a setting.
DAYLIGHT SAVING TIME:
Press the ME NU b utton on the top of the weather radio to enter the
program m enu. DST ON will show on the display.
1. DST ON/OFF: Press the OK button to select
DST set.
2. Use the ︿ or ﹀ navigation buttons to select
DST ON or OFF. Press the OK button to
confirm.
3. Press the 〉navigation button to move to time
setting.
TIME SET:
With TIME SETTING displayed, press the OK button to select the
hour.
1. HOUR: The hour will flash. Us e t he ︿ or ﹀
navigation buttons to adjust the hour. Press the
OK button to confir m an d m ove t o th e minutes.
2. MINUTES: The m inutes will fla s h. Use the
︿ or ﹀ navigation buttons to adjust the
minutes. Press the OK button to confirm.
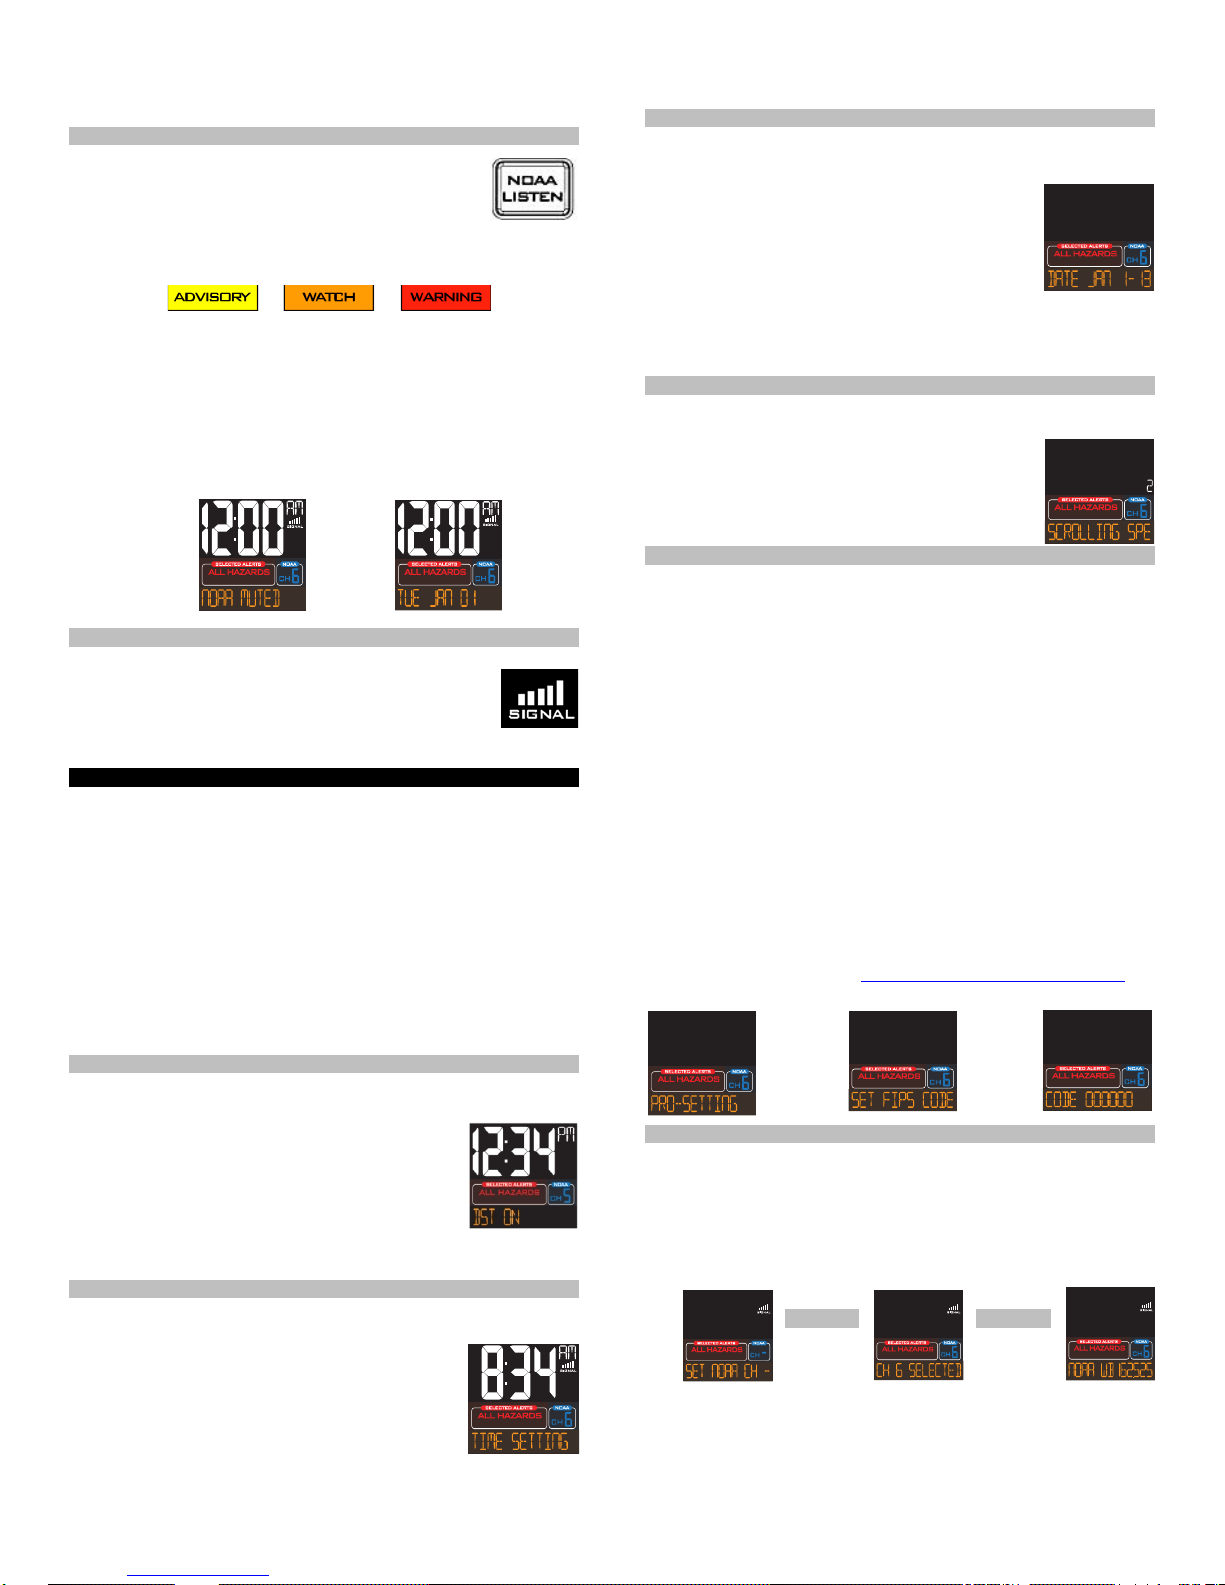
CALENDAR SET:
From the time set mode, press the navigat ion butt on 〉to e nter
calendar set mode to set the month.
1. MONTH: Press the OK button. The month will
flash. Use the ︿ or ﹀ navigation buttons to
adjust the three-letter month. Press the OK
button to confirm and move to the date.
2. DATE: The date will flash. Use the ︿ or ﹀
navigation buttons to adjust the date. Press the
OK button to confir m an d m ove t o th e year.
3. YEAR: The year will flash. Use the ︿ or ﹀ navigation buttons to
adjust the year. Press the OK button to confirm.
SCROLL SPEED:
From calendar set mode, press the 〉navigation button to enter scroll
speed. Press the OK button to enter the setting.
1. Use the ︿ or ﹀ navigation buttons to adjust the
scroll speed (1, 2 or 3).
2. Press the OK button t o confirm an d m ove t o the
optional pro-settings mode.
OPTIONAL PRO-SETTINGS:
These settings are not required for the alerts to function. These
settings allow you flexibility in the alerts* you wish to receive for a
given location.
• FIPS CODE
• CHANNEL
• SELECT ALERTS
PRO-SETTINGS: From scroll speed mode, press the 〉navigation
button to enter pro-settings.
Press the OK button to move to SET FIPS CODE setting. Press the
OK button again to select the FIPS Code (Federal Information
Processing Standard). The first “bit” will flash.
1. FIPS CODE: Use the ︿ or ﹀ navigation buttons to adjust the
first “bit” of the code. Use the
〉button to select the second bit of
the code.
2. Use the ︿ or ﹀ navigation buttons to adjust the “bit”. Repeat
these steps for the rest of the bits.
3. Press the OK button to confirm the setting.
Remove FIPS Code: To remove a FIPS Code, set all the ‘bits’ to “0”.
Note: Find USA FIPS Codes: http://nws.noaa.gov/nwr/indexnw.htm
SET NOAA CHANNEL:
From the FIPS Code settings press the 〉navigation butt on to m ove t o
manual channel set. Press t h e OK bu tton to ent er th e s etting.
1. Use the ︿ or ﹀ navigation buttons to select a weather band
channel.
2. Press the OK button to confirm. The radio will briefly show the
NOAA weather band selected.
SELECT ALERTS:
From channel
mode press
〉navigation button to move to Select Alerts.
the
Press the OK button t o view th e f irs t alert*.
2
 Loading...