

Page 1
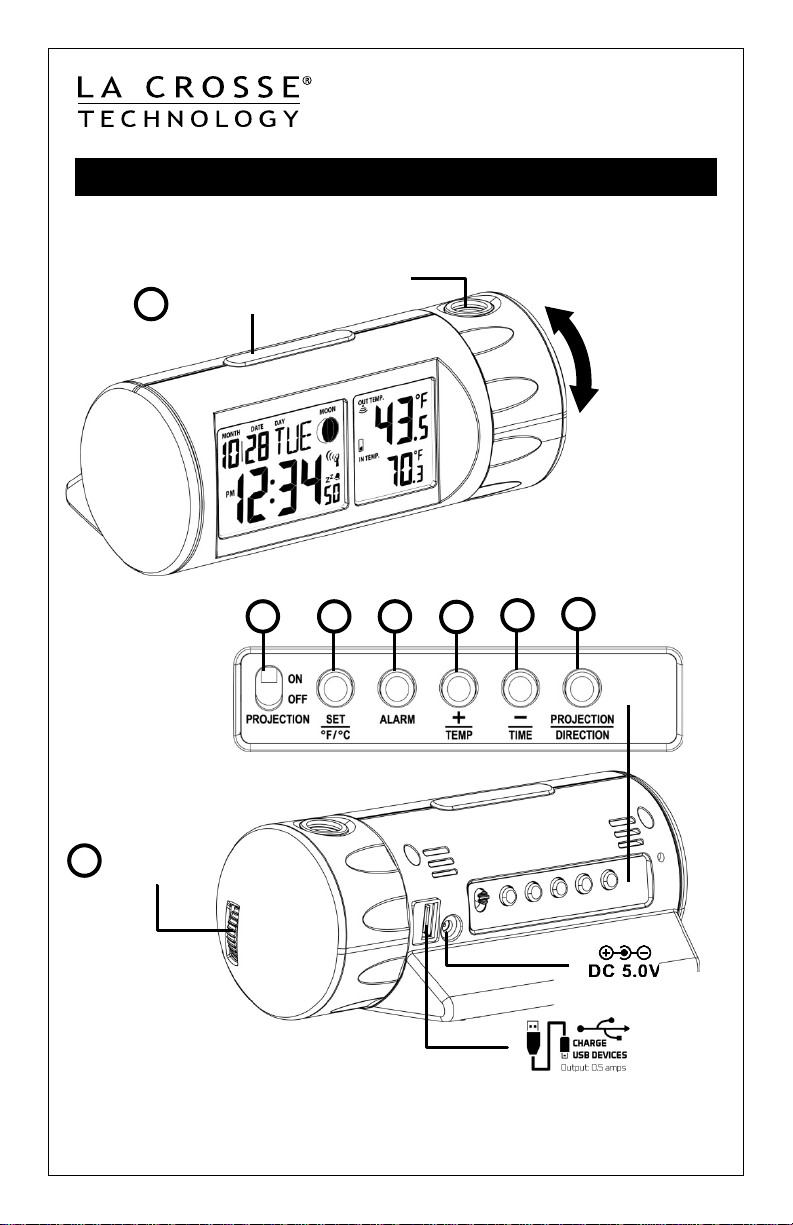
Projection Arm
Back)
Projection
Lens
Snooze/Backlight
1
Projection
Focus
8
AC Power Jack
USB
Buttons
BACK VIEW
FRONT VIEW
Model T83621 www.lacrossetechnology.com/support Page | 1
Quick Setup Guide
Atomic Projectio n A larm
Model: T83721
Rotation
(Front and
PORT
Page 2
5 6 3
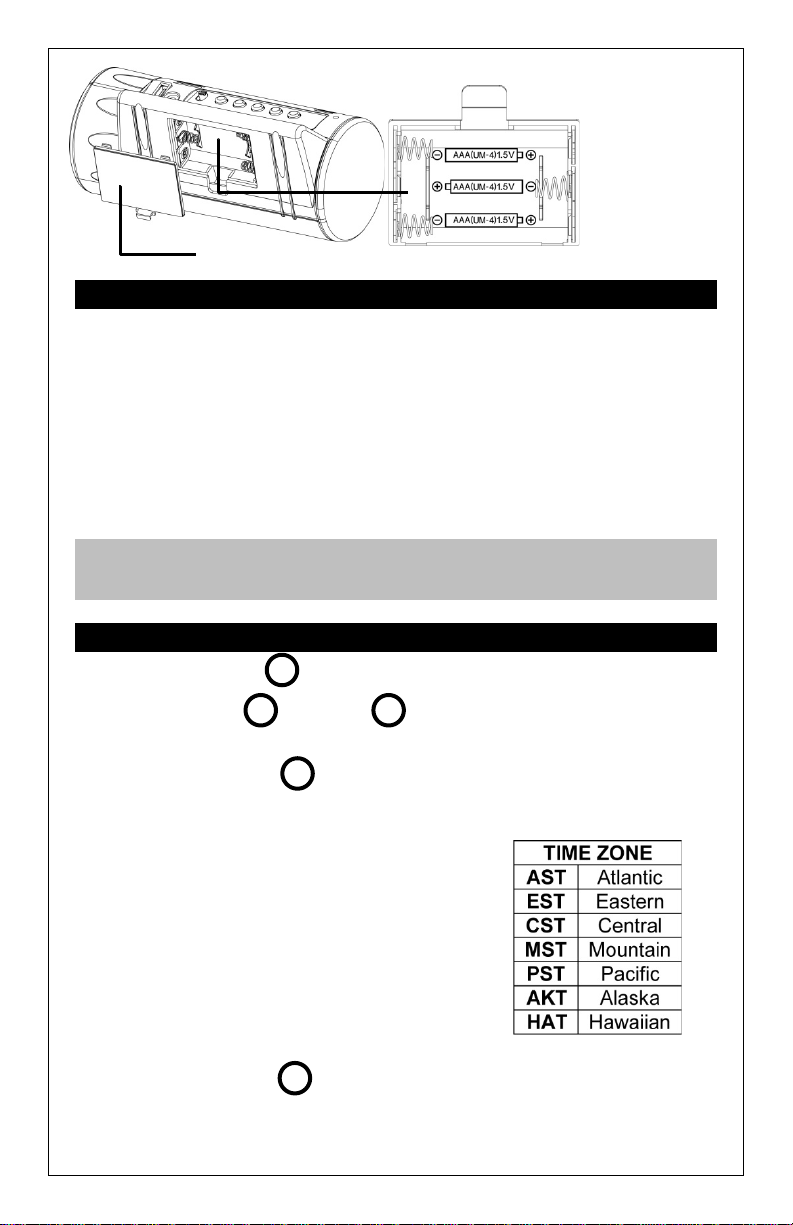
Battery Cover
Battery
BOTTOM VIEW
Compartment
3 “AAA”
Observe the correct
polarity before inserting
the batteries
GET STARTED
Step 1: Insert the included 5-volt AC power adapter into projection
alarm and then into wall outlet.
Step 2: Insert 3 new “AAA” batteries (not included) into the projection
alarm. Observe the correct polarity.
Step 3: Insert 2 new “AA” batteries (not included) into the TX141-B
transmitter. Observe the correct polarity.
NOTE: If the outdoor temperature is not displayed after 3 minut es, unplug the AC adapter and remove batteries from the projection alarm & transmitter for 15 minutes. Return to Step 1 above.
SET TIME AND DATE
1. Hold SET/°F/°C to enter time set mode.
2. Use +/TEMP or -/TIME buttons to adjust values.
3. Press SET/°F/°C to confirm adjustments and move to the
Time and Date setting order:
1. WWVB (ON/OFF)
2. Time Zone
3. DST Daylight Saving Time (ON/OFF)
4. 12/24 Hour Time Format
5. Hour
6. Minutes
7. Year
8. Month
9. Date
Press the SET/°F/°C to exit, or wait 20 seconds without pressing
buttons to return to the normal time display.
Model T83621 www.lacrossetechnology.com/support Page | 2
Press and hold for fast adjustment.
next item.
Page 3

FAHRENHEIT/CELSIUS
3 4 5
6
Alarm
Press the SET/°F/°C to select Fahrenheit or Celsius temperature
display.
SET TIME ALARM
1. Hold ALARM to enter alarm time set mode.
2. Use +/TEMP or -/TIME buttons to adjust values.
3. Press ALARM to confirm adjustments and move to the next
item.
Time and Date setting order:
1. HOURS
2. MINUTES
ACTIVATE / DEACTIVATE TIME ALARM
• Press ALARM once to view alarm time.
• Press ALARM again to activate the alarm.
Bell icon appears.
• Press ALARM again to deactivate the alarm.
The bell icon disappears.
Bell Icon
SNOOZE (Silences alarm temporaril y)
• Press the SNOOZE/LIGHT to silence alarm for 10 minutes.
• Zz will show.
• When in snooze mode, press ALARM to stop alarm for one day.
Note: The alarm is crescendo sound. The alarm will sound for 2 minutes and then shut off completely.
MOON PHASE
The segments that are highlighted will portray the part of the moon
that is lit. For instance, the moon will be blank during a new moon and
dark during a full moon. This is how this product is designed to best
view the on the display, what you will see in the sky. This cannot be
changed.
Model T83621 www.lacrossetechnology.com/support Page | 3
Page 4

MANUAL WWVB RADIO-CONTROLLED TIME SEARCH
•
•
2
8
WWVB
Icon
Projection
Focus
8
SIDE VIEW
• Press the -/TIME button to start or stop a manual signal
search. WWVB Icon will flash
For information about WWVB visit:
www.nist.gov/pml/div688/grp40/wwvb.cfm
BACKLIGHT
• Press the SNOOZE/LIGHT button to activate the backlight
for 5 seconds. The backlight will not remain on constantly.
PROJECTION (On/Off, rotate, focus)
• Projection (ON/OFF) : Slide to turn the projection off or on
when operating on AC power.
Projection Direction : Press to rotate projection 180º.
• Focus : Use the Focus wheel to focus the projected image.
Time/Outdoor Temperature Projection: The projection will alternate
between time and outdoor temperature every 5 seconds. This is not
adjustable.
NOTE:
On AC power the projection will be on constantly and alternate
between time and outdoor temperature (unless turned to OFF).
Using Battery power, the projection and backlight will come on for
10 seconds when SNOOZE/LIGHT is pressed.
IMPORTANT
When operating on a/c power, to avoid interference, the projection
and USB charge port will turn off while the projection alarm searches
for the WWVB signal. The projection and USB charge port will
function after the 2-10 minute search which occurs during the late
night or early morning hours.
Model T83621 www.lacrossetechnology.com/support Page | 4
Page 5

USB CHARGE PORT
5
Low Battery
Charge a smart phone, camera or other devices when the projection
alarm is plugged into a power outlet with the included 5V AC adapter.
NOTE: This is a power-output charging port. It does not supply power to the projection alarm.
• Connect your external device’s USB charging cable (not included)
to the USB charging port.
• Charging times will vary.
• USB Power Output: 0.5A maximum current. Charge 0.5A devic es
or devices that are self-regulating.
NOTE: Some USB cables are for data transfer only and cannot be used for charging. Make sure that the USB cable you use will charge your device. Most USB cables included with m obile de vices wil l work for charging.
POSITION OUTDOOR TRANSMITTER
• Mount the outdoor transmitter on a North-facing wall or in any
well shaded area. Under an eave or deck rail is preferred.
• The maximum transmitting range to the atomic projection alarm is
over 200-feet (60 meters) in open air, not including walls.
SEARCH FOR OUTDOOR TRANSMITTER
• Hold the +/TEMP button for 3 seconds to search for the
LOW BATTERY ICON
When the low battery icon is displayed it warns to replace batteries.
• If the icon is displayed in Outdoor Temp. section,
• If the icon is displayed in Indoor Temp. section,
Model T83621 www.lacrossetechnology.com/support Page | 5
outdoor transmitter.
replace bateries in the outdoor sensor.
replace bateries in the outdoor sensor.
Icon
Page 6

SPECIFICATIONS
Indoor:
Temperature Range:
+32°F to +122°F (0°C to 50°C)
Accuracy:
+/- 2 degrees Fahrenheit
Interval:
About every 30 seconds
Outdoor:
Temperature Range:
-40°F to 140°F (-40°C to 60°C)
Alkaline Batteries:
-20°F to 140°F (-28.8°C to 60°C)
Lithium Batteries:
-40°F to 140°F (-40°C to 60°C)
Temperatures below - 20°F (in the outdoor sensor.
Over 200 ft. (60 meters) RF
433MHz (open air)
Interval:
About every 30 seconds
Power:
Projection Alarm
5-volt AC power adapter
(included)
Optional 3-AAA, IEC, LR3
batteries (not included)
2-AA, IEC, LR6 batteries (not
included)
USB
USB Charge Port:
Output 0.5A
Battery Life:
Battery life is over 12 months
primary power
Battery life is over 24 months
Lithium batteries
Dimensions:
7.09" x 3.62" x 2.87" (180 x 92 x
73mm)
1.57" x 0.79" x 5.12" (40 x 20 x
130mm)
NOTE:
Distance:
Primary Power:
Optional/Battery Backup
TX141-B Transmitter:
Projection Alarm
Battery Backup:
TX141-B Transmitter:
28.8°C) require Lithium batteries
when using the AC adapter for
when using reputable battery
brands for both Alkaline and
Projection Alarm:
TX141-B Transmitter:
Model T83621 www.lacrossetechnology.com/support Page | 6
Page 7

CARE AND MAINTENANCE
Scan for
Full Manual
• Do not mix old and new batteries
• Do not mix Alkaline, Standard, Lithium or
Rechargeable Batteries
• Do not expose to extreme temperature, vibration or shock.
• Clean with a soft damp cloth. Do not use solvents or scouring
agents.
• The product is not a toy. Keep it out of reach of children.
• The product is not to be used for medical purpose or for public
information. It is intended for home use only.
• The specs of this product may change without prior notice.
• Improper use or unauthorized opening of housing voids warranty.
• If the product is not working properly, change the batteries and/or
check the A/C cord connection.
WARRANTY A ND SUPPORT
La Crosse Technology, Ltd. provides a 1-year limited time warranty
(from date of purchase) on this product re lat ing to manufacturing
defects in materials & workmanship.
View full warranty details online at:
www.lacrossetechnology.com/warranty_info.pdf
For warranty work, technical support or other information
contact:
La Crosse Technology, Ltd
2817 Losey Blvd. S.
La Crosse, WI 54601
Contact Support:
1-608-782-1610
Product Registration:
www.lacrossetechnology.com/support/register
Online Product Support: www.lacrossetechnology.com/t83721
Protected under U.S. Patents: 5,978,738, 6,076,044, 6,597,990
Model T83621 www.lacrossetechnology.com/support Page | 7
Page 8

FCC Statement
This Device complies with Part 15 of the FCC Rules. Operation is
subject to the following two conditions: (1) This device may not cause
harmful interference, and (2) the device must accept any interference
received, including interference that may cause undesired operation.
NOTE: THE MANUFACTURER IS NOT RESPONSIBLE FOR ANY
RADIO OR TV INTERFERENCE CAUSED BY UNAUTHORIZED
MODIFICATIONS TO THIS EQUIPMENT. SUCH MODIFICATIONS
COULD VOID THE USER AUTHORITY TO OPERATE THE
EQUIPMENT
All rights reserved. This handbook must not be reproduced in any
form, even in excerpts, or duplicated or processed using electronic,
mechanical or chemical procedures without written permission of the
publisher.
This handbook may contain mistakes and printing errors. The
information in this handbook is regularly checked and corrections
made in the next issue. We accept no liability for technical mistakes
or printing errors, or their consequences.
Model T83621 www.lacrossetechnology.com/support Page | 8
 Loading...