

Page 1
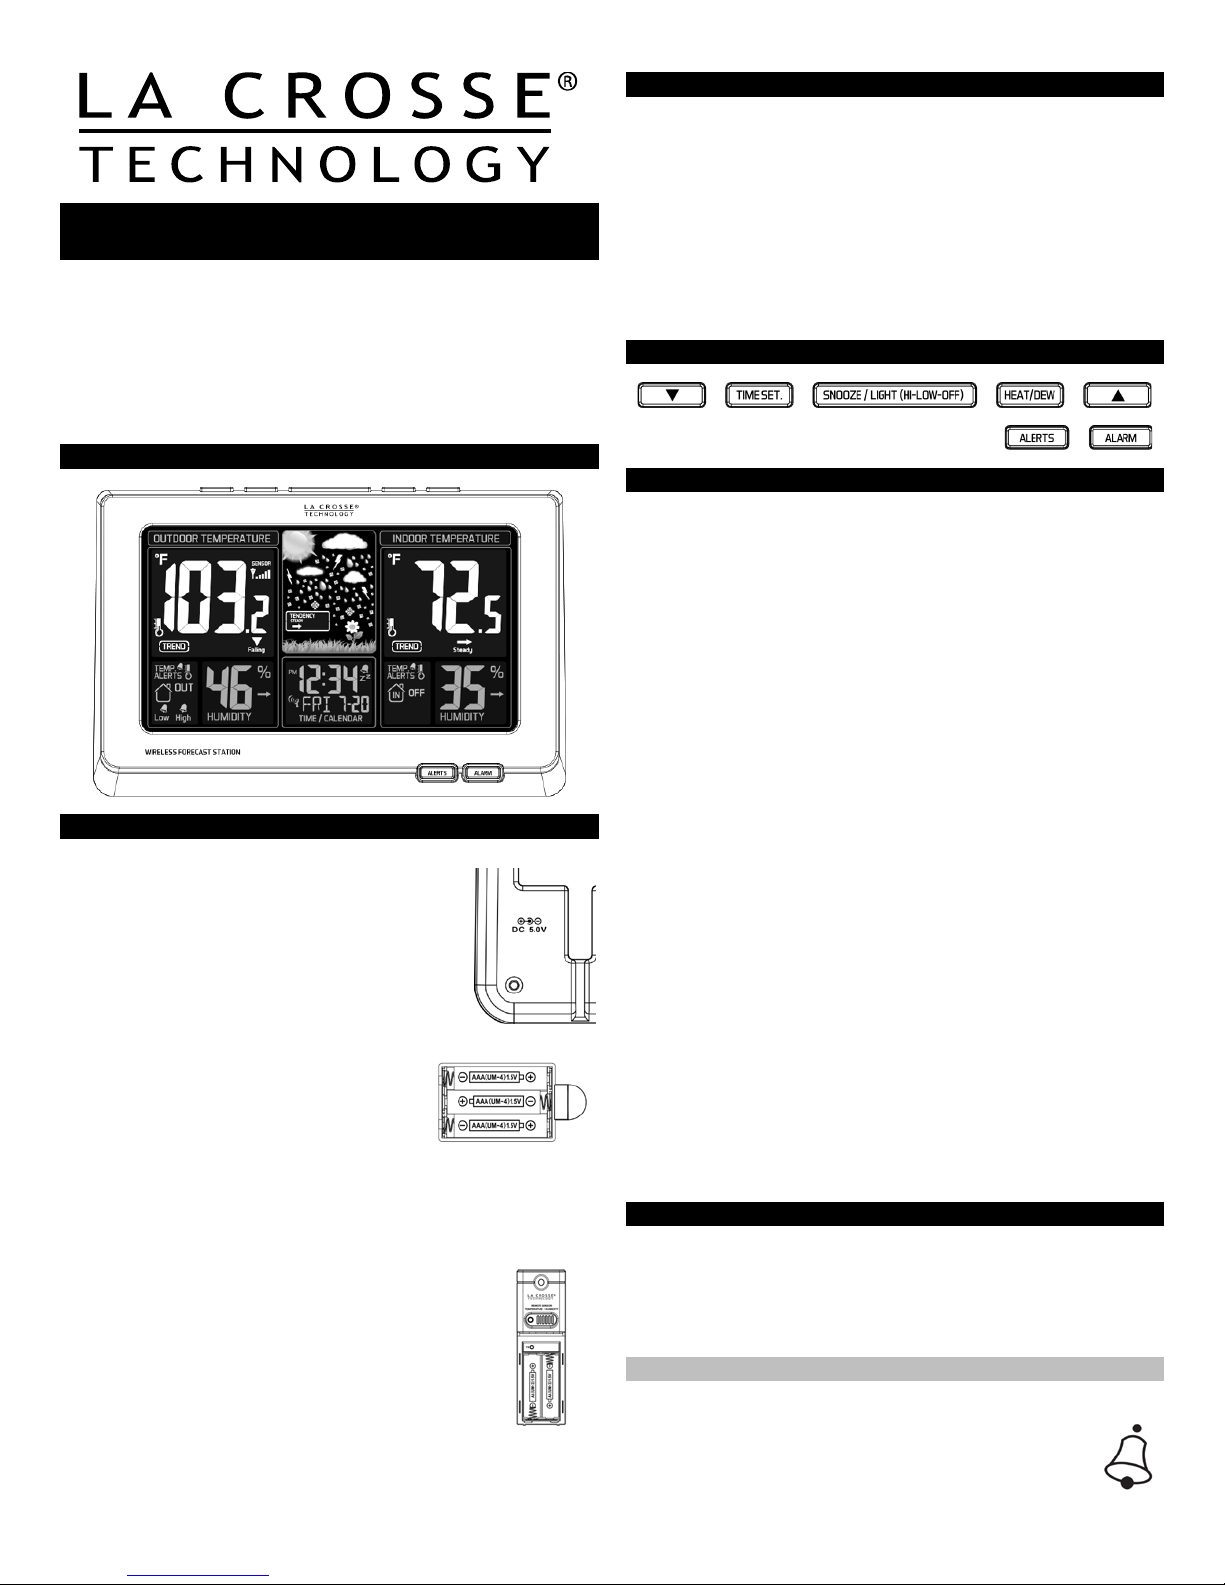
Wireless Color Weather Station
Model: S84193 | Quick Setup Guide
La Crosse Technology® introduces a Wireless Color Weather Station
that provides precise, real-time weather data straight from your
backyard. New—Monitor forecast and temperature trends and set
high/low temperature alerts. Animated color forecasts react to changing
barometric pressure. Monitor in/out temperature and humidity with daily
min/max records—al l on on e eas y-to-read displ a y wit h ad jus t able
brightness. Wireless transmission range of over 200 f eet ( 60 m et er s ) in
open air, from transmitter to weather station.
Wireless Color Weather Station
Setup Instructions Step-by-Step
STEP 1:
• Insert the 5-volt A/C power adapter into the
designated ar ea on the weather station.
• Insert the A/C p ow er ad apter into a wall outlet for
continuous backlight (ON/OFF), and dimmer
feature.
STEP 2: (option al b attery operation )
• Remove battery cover from the weather
station: Slide tab left and pull out to remove the cover.
• Insert 3 NEW AAA batteries (n ot inc l uded)
into the back of the weather station. Observe
the correct polarity (see marking inside the
battery compartment).
• The weather station will light up and show,
indoor tem perature, humi di ty and tim e.
• (Press and release the HI/LOW/OFF button to illuminate the backlight
for 10 s econds wh en usi ng only b att er y p ower .)
• Do Not Mix Old and New Batter ie s
• Do Not Mix Alkaline, Standard, Lithium or Rechargeable
Batteries
STEP 3:
• Ensure that the transmitter is within 10 feet of the
weather station.
• Remove battery cover from transmitter: Slide the battery
cover down and lift off the front.
• Insert 2 NEW AA batteries (not included) into the
TX141TH-B transmitter. Observe the correct polarity.
• Within 3 minutes, the weather station will show readings
in the Outdoor temp erature area on the LCD.
Note: Use Alkaline batteries (or Lithium for temperatures below - 20°F /-
28.8°C).
Troubleshooting
• If the weather station does not show the outdoor temperature after
three minutes, open the batt er y c over of th e outdoor transmitter to
reveal the TX button. Push down on the TX button for three seconds to
send a wir el ess si gn al t o th e weather station.
• Hold the HEAT/DEW button for three seconds so the weather station
search es ag ai n for the outdoor tr ans m itt er .
• If the outdoor temperature does not show up after a second attempt,
remove the A/C power adapter and all batteries from both units and
start the setup process again.
• For optimal 433 MHz signal reception, the outdoor transmitter should
be placed wit hi n 20 0 feet (60 meters) from the indoor weather station.
Buttons
Program Menu
The TIME SET button will move through the program menu. To change
a value use the ARROW buttons.
• WWVB ON/OFF: Hold the TIME SET button five seconds so WWVB
and the word ON will flash. Press and r el ease either ARROW button to
turn this to OFF if you do not wish WWVB time reception. Confirm with
the TIME SET button and move to tim e zon e.
• TIME ZONE: EST will flash. Press and release the ARROW buttons to
select a different Time Zone: AST=Atlantic, EST= Eastern, CST=
Central , MST= Mountain, PST= Pacific, AKT= Alaska, HAT=Hawaiian
time zon e. C onf irm with th e TIME SET button and m ove to DST.
• DAYLIGHT SAVING TIME: DST will fl ash an d the word ON. Press and
release the ARROW buttons to turn this to OFF if you do not observe
DST. Confirm with the TIME SET button and move t o 12/24 h our t i m e.
• 12/24 HOUR TIME: 12H will flash. Press and release the ARROW
buttons to select 24H. Confirm with the TIME SET button and mov e to
the hour.
• HOUR: The hour will flash. Press and release the ARROW buttons to
select the correct hour. Confirm with the TIME SET button an d m ov e to
the minutes.
• MINUTES: The minutes will flash. Press and release the ARROW
buttons to adjust the minutes. Confirm with the TIME SET button and
move to th e year.
• YEAR: The year will flash. Press and release the ARROW buttons to
select the correct year. Confirm with the TIME SET button an d m ov e t o
the month.
• M ONTH: The month will flash. Press and release the ARROW buttons
to select the correct month. Confirm with the TIME SET button and
move to the date.
• DATE: The date will flash. Press and release the ARROW buttons to
select the correct date. Confirm with the TIME SET button an d m ov e t o
F/C.
Note: The Day of the Week wi ll s et aut om atic all y wh en the ye ar , mon th
and date are set.
• FAHRENHEIT/CELSIUS: °F will flash. Press and release the ARROW
buttons to select Fahrenheit or Celsius. Confirm with the TIME SET
button and exit.
Alar m Set
• ALARM HOUR: Hold ALARM button for three seconds to ent er a larm
setting mode. The alarm hour will flash. Use the ARROW buttons to
set the hour. Press and release the ALARM button.
• ALARM MINUTE: The alarm minutes will flash. Use the ARROW
buttons to set the minutes. Press the ALARM button to exit.
Alarm Ac ti vat e/ D eacti vat e
• Press and release the ALARM button once to show Alarm Time.
• Press and releas e t h e ALA RM button repeat edl y t o act ivate
or deactivate the alarm.
• The alarm ic on app ear s wh en alarm is ac ti vated.
1
Page 2
Snooze
• When the alarm sounds, press the SNOOZE/LIGHT button to trigger
snooze alarm for 10 minutes. The snooze icon Zz wi ll flash when the
snooze feature is active.
• To stop al arm for one d ay, pr ess A LARM butt on, w hi l e in snooze
mode. Th e al ar m icon will remain solid.
Note: The alarm is crescendo sound. When the alarm sounds, it
continues for 2 minutes and then shuts off completely.
WWVB Radio-Controlled Time
The NIST radio station, WWVB, is located in Ft. Collins, Colorado and
transmits the exact time signal continuously throughout the United
States at 60 kHz. The signal can be received up to 2,000 miles away
through t h e int er n al an tenna in the Wireless Color Weather Station.
However, due to the nature of the Earth’s Ionosphere, reception is very
limited during daylight hours. The weather station will search for a signal
every night when reception is best.
WWVB reception icon with full signal strength will appear
screen when reception of atom ic tim e signal is successful.
• No tower icon displayed. The weather station was unable
to receive a signal at this time.
• Reposition the weather station for better signal reception or try again at
bedtime.
• The weather station will start searching at UTC: 07:00 and if no
recepti on on the first at t em pt they will t r y ag ain at 08:00, 0 9: 0 0 an d
10:00.
• If the signal is good it may catch a s ignal in ABOUT 2-3 minutes.
• If the signal is marginal it will try to catch a signal for up to 10 minutes.
• If there is no signal or too m uc h interf er ence the rec ei v er wi ll on l y be on
for 2 minutes .
• Press and release the TIME SET button to start or stop a manu al
signal search.
Note: In case the weather station is not able to d etect the WWVB-signal
(distur b ances, tr ans m itt ing dist ance, etc.) ; the time m ay b e man u all y s et.
Backlight
A/C adapter: The backlight is on continuously, when operating the
weather station with the 5-volt A/C adapter. Press and release the HILOW-OFF button to change the backlight brightness.
• HI: Brightes t intensity (default).
• LO: Press and release the HI-LOW-OFF button to dim th e backlight.
• OFF: Press and release the HI-LOW-OFF button again, to turn the
backlight off for sleep. Press again to return to full strength.
Note: When the backlight is off, press any button to activa te the
backlight fo r 10 seconds
Battery power only: Press and release the HI-LOW-OFF butt on and
the backlight will show for 10 seconds.
Note: When the adapter is NOT in use, the HI-LOW-OFF light feature is
not available.
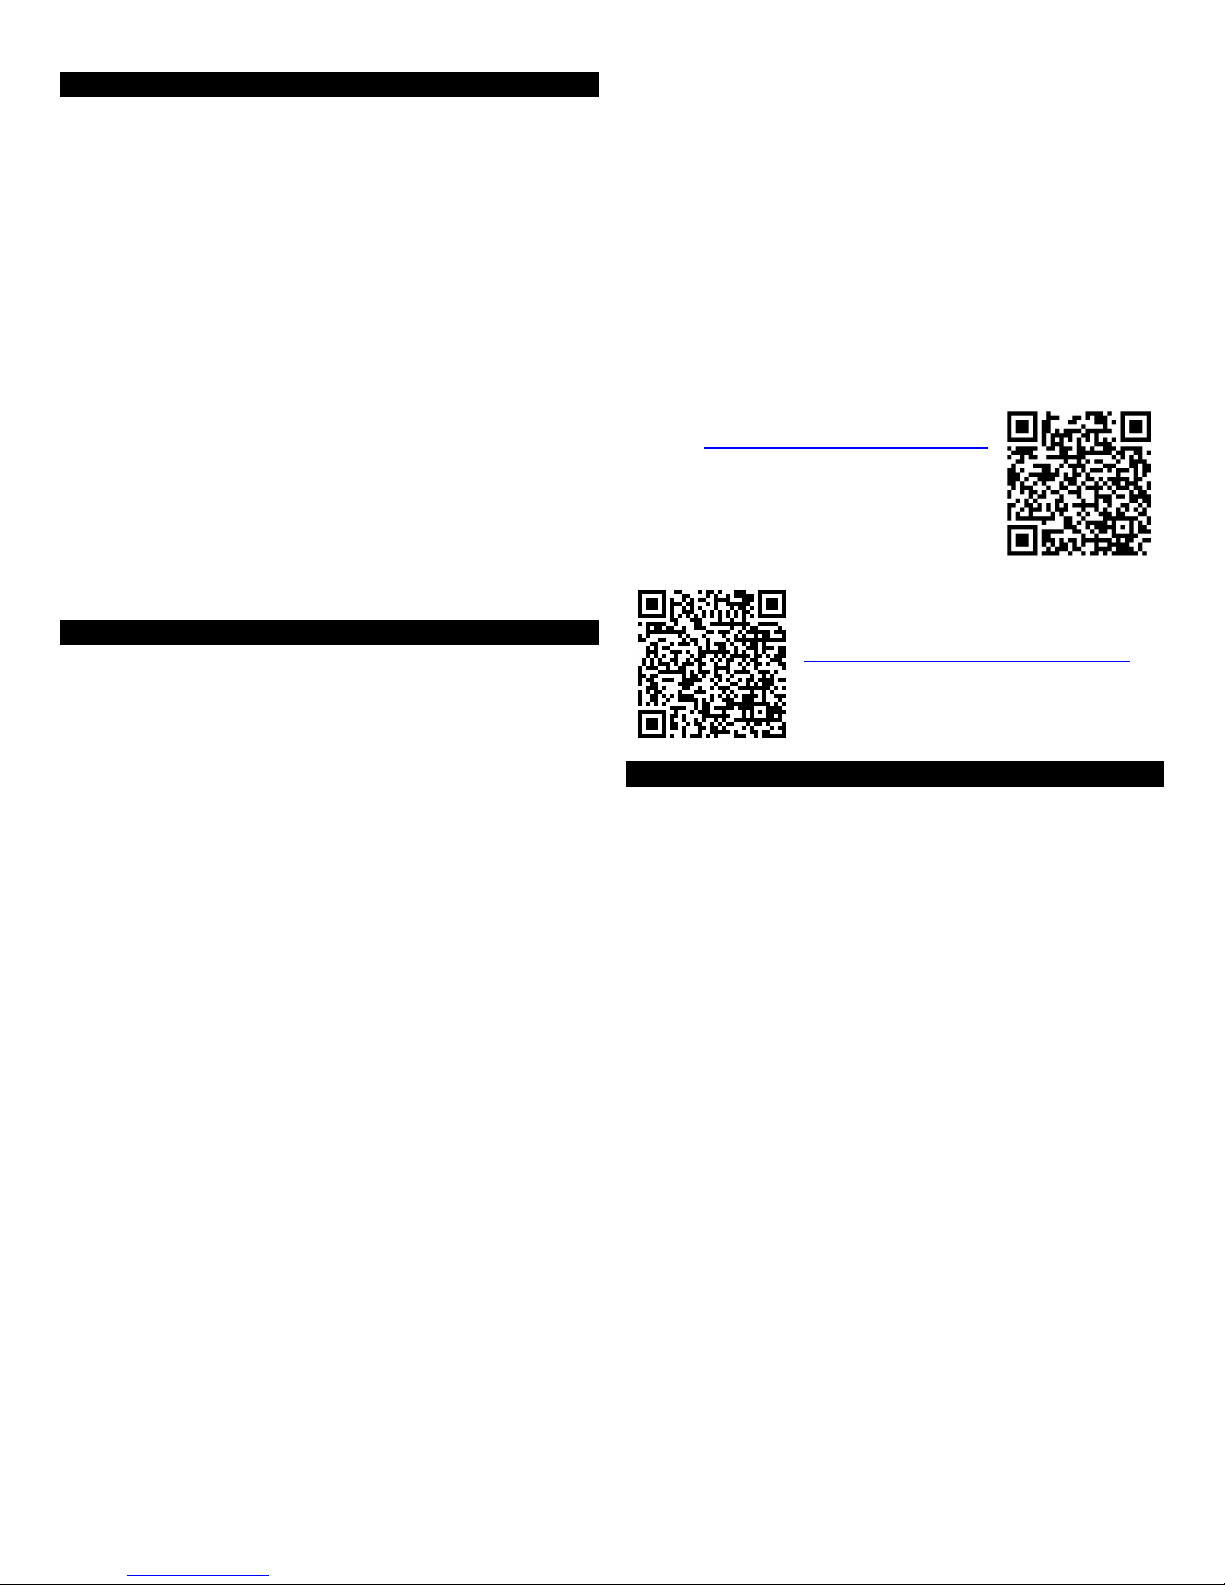
MAX/MIN Temperature/Humidity Data
The weather station shows daily minimum and maximum t em p eratures
each day starting at midnight (12:00 AM). The weather station
automat ically r es ets th e min/max t em p eratures at mi dn ight (12:00 AM).
• View MAX data: Press and release the UP ARROW button once to
view maxi m um tem perature and hum id it y val ues for indoor and
outdoor d ata.
• Reset MAX data: Hold the UP ARROW button for five seconds to
reset maximum temperature and humidity values for indoor and
outdoor d ata.
• View MIN data: Press and release the DOWN ARROW button once
to view minimum temperature and humidity values for indoor or
outdoor d ata.
• Reset MIN data: Hold the DOWN ARROW button for five seconds to
reset minimum temperature and humidity values for indoor and
outdoor d ata.
Heat Inde x
Heat Index combines the eff ects of heat and humid it y. This is the
apparen t tem p erature of how h ot it f eels to a human b ein g.
Note: Heat index will be the same number as the temperature until the
temper at ur e is ab ove 80°F (26.7°C).
View Heat Index: From a norm al dis play press the HEAT/DEW button
once and Heat Inde x wi ll s h ow ins t ead of t h e am bi ent temp erature.
Dew Point
Dew point is the saturation point of the air, or the temperature to which
the air has to be cooled in order to create condensation.
Note: Dew P oint gen er ally is lower t h an th e temper ature.
View Dew Point: Fr om a normal display press th e HEA T /D EW button
twice and Dew Point will show instead of the ambient temperature.
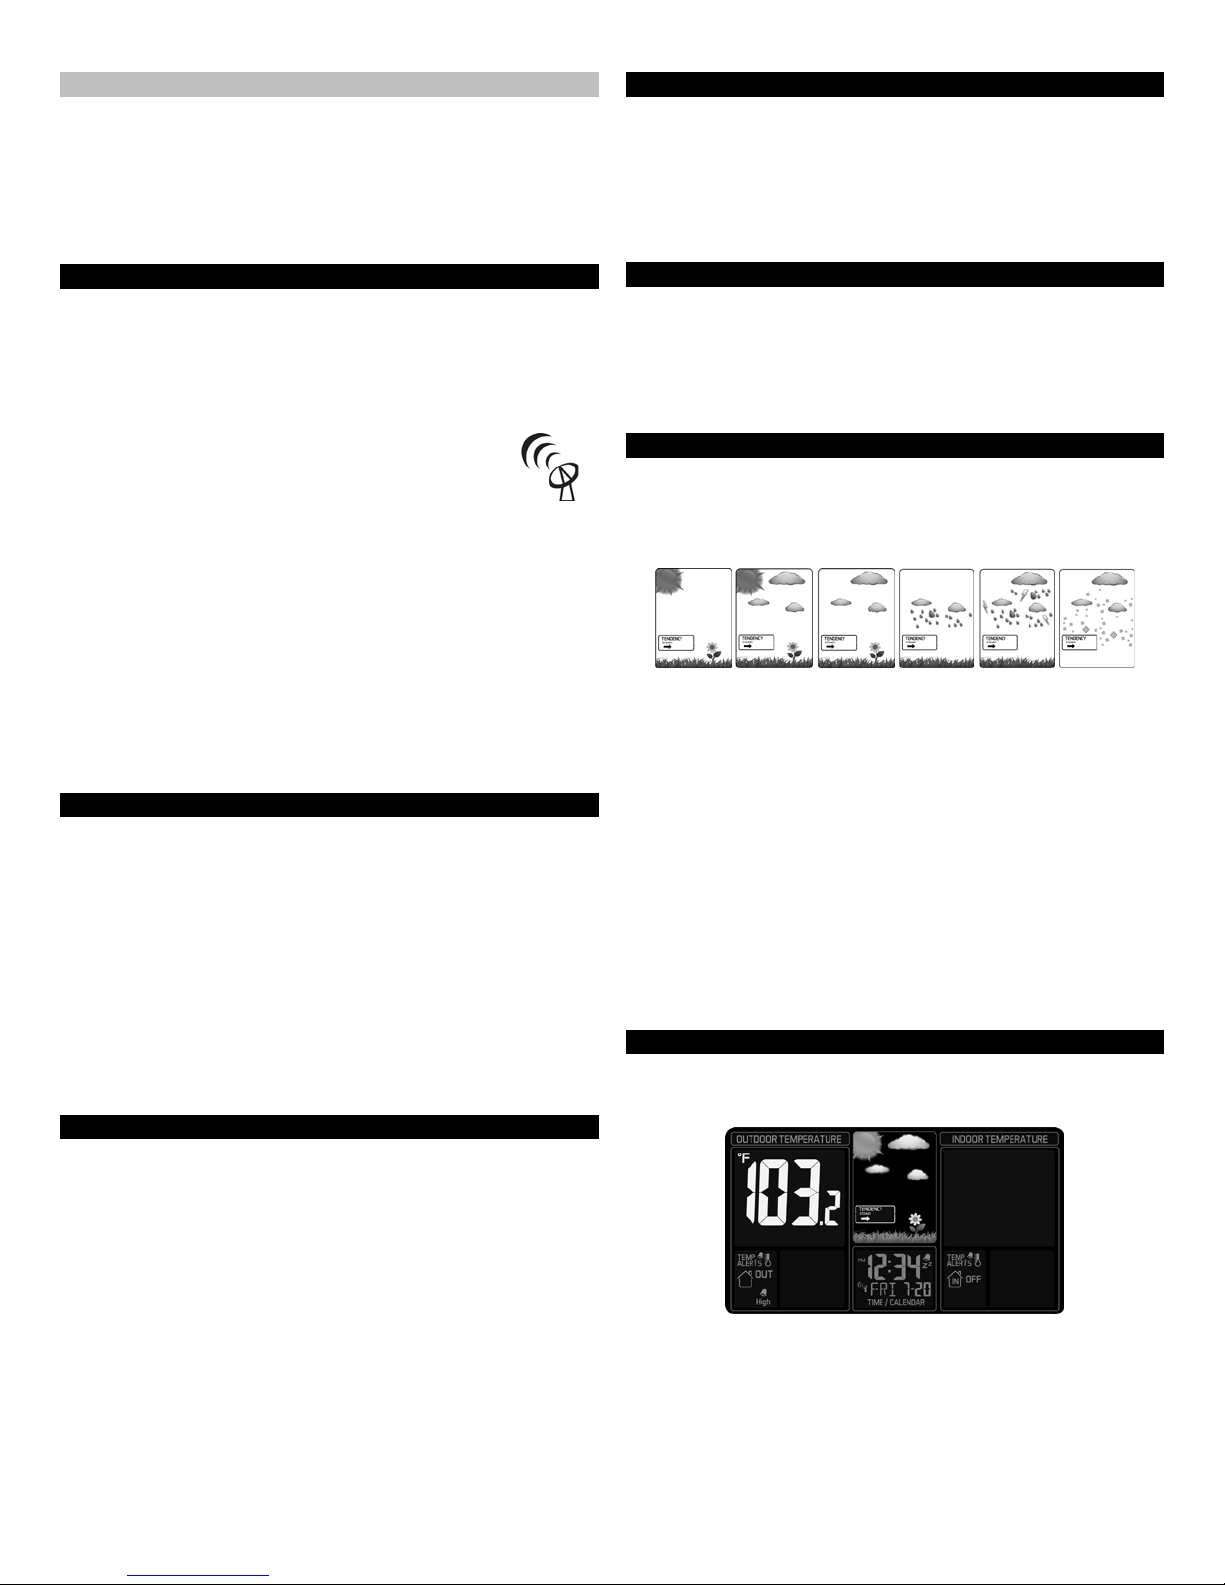
Weather Forecast Icons
The weather station predic ts w eather c ondi tion of the n ext 12-hours
based on th e ch an g e of atm os ph eric pressure with 70-75 % acc uracy.
Note: As weather conditions cannot be 100% correctly forecasted we
are not responsible for any loss caused by an incorrect forecast.
SUNNY PARTLY SUNNY CLOUDY RAINY STORMY SNOWY
Note: The “snowy” icon ap p ears when the temperature is below 32°F
(0°C) and the forecast is rainy or stormy.
THIS STATION LEARNS
The weather station calibrates barometric pressure based on its
location over a period of time to generate an accu rate, per s on a l
foreca st. Please allo w 3 to 4 weeks for bar o meter cali bration .
The forecast station samples the barometric pressure every twelve
minutes. These samples are averaged hourly and daily then stored in
nonvolatile memory. The three hour pressure icon change is based off of
the last four average hourly readings.
IMPORTANT: As the weather station builds memory, it will compare the
current average pressure to the past forty day average pressure for
increas ed acc uracy. Th e long er th e weather station operates in one
location the more accurate the forecast icons will be.
Set Temp er at u re A ler t V al ue s
Hold the ALERT button for five seconds, until the weather station beeps,
to select and set temperature alert values.
OUTD OOR HI GH al er t wi l l flash. Press the ARROW buttons to set the
alert value, and press the ALERT button to confirm. Then press the
ALERT button again switch to OUTDOOR LOW setting.
OUTDOOR LOW alert will flash. Press the ARROW buttons to set the
alert valu e, an d press the ALE R T button to confirm. Then press the
ALERT button ag ain s w itc h t o IND O OR HIGH setting.
INDOOR HIGH alert will flash. Press the ARROW buttons to set the
alert value, and press the ALERT button to confirm. Then press the
ALERT button ag ain s w itc h to INDOOR LOW setting.
2
Page 3

INDOOR LOW alert will flash. Press the ARROW buttons to choose
the value, and press the ALERT button to confirm and exit.
Note: After selecting temperature alert values use the next step to turn
individual alerts O N or OFF.
Arm/Disarm Temperature Alerts
In normal time mode, pr ess an d release the ALERT button to
toggle b etw e en:
Press the UP ARROW button to turn the selected alert ON. The
alert icon
Press the DOWN ARROW button to turn the selected alert OFF.
appears when each alarm is activated.
Temperature Alert Sounds
When temp er at ur e alert sou nds , t h e c orr es p on ding alert ic on will
flash.
The alert beep s once ever y mi nu t e, unti l the temp erature is out of
alert range.
Press an y button to stop al er t. The alert s ymb ol will still show.
Turn alert OFF: In normal mode, hold and release the ALERT button
to select the alert to turn off. With HI or LO alert selected, press the
DOWN ARROW button to turn that alert OFF.
Temperature/Humidity Trend Indicators
The indoor and outdoor temperature tr en d ind icators wi ll up d ate every
30 minutes or less. These trends represent temperature changes over
the past three hours.
Temper at ur e r os e m or e th an 2° F / 1°C i n the p ast t hr ee hours.
Humidity rose more than 3% RH in the past three hours
Temper at ur e h as n ot changed more than 2°F /1°C in the
past thr ee h our s . Humidity has not changed more than 3%
RH in the past three hours .
Temperature fell more than 2°F /1°C in the past three hours.
Humidity fell more than 3% RH in the past three hour s
Humidity trend indicator
Forecast Trend Indicators
The forecast tendency indicators in the lower left corner of the forecast
display indicate the rising or falling pressure trend.
• The up trending arrow indicates the pressure is rising and the
weather is improving.
• The down trending arrow indicates the
pressure is falling and the weat h er m ay
worsen.
• The righ t arrow indicates the pressure is steady.
Position the Weather Station
The weather station is free standing with the fold out base stand or can
be wall moun ted.
Wall mounted:
• Fix three screws (not included) into the
desired wall, leavi ng th e head extended
about 0.2 inches (5mm).
• Hang the weather station onto the screws.
Ensure that it locks into place before
releasing the weather station.
Free standing: Simply pull out the stand from t he back of
the weather station and place on a flat surface.
Position:
• Choose a location 6 feet or more from electronics such
as cordless phones, gaming systems, televisions,
microwaves, routers, bab y m oni tors, etc. , whic h c an prevent sig nal
reception.
• Place wit hi n range of the outdoor transmitters. The maximum
transmitting range in open air is 200-feet (60 meters).
• Be aware of el ec tri cal wires an d plu m bin g w ithin a wall. T h is wi ll
interfere with signal reception.
• Obstacles such as walls, windows, stucco, concrete, and large
metal objects can reduce the range.
• For best WWVB rece ption, place with the front or back facing
Color ad o, near and ext erior wall .
Position the Outdoor Transmitter
Once the weather station s h ows the outdoor temp erature/hum id it y,
place it and the transmitter in the desired locations and wait
approximately 1-hour b efore perm anentl y m ount ing the transmitt er to
ensure that there is proper reception. The transmitter should be
mounted vertically, in a sh ad ed , protect ed area, at leas t 6 f eet f r om the
ground to av oid damage and ens ur e acc urate readings. Th e tr ansmitter
is water resistant, not waterproof and should not be placed anywhere it
will become submerged in water or subject to standing water or snow.
Wireless transmitting range in open air is over 200-feet (60 meters)
from outdoor transmitter to weather station.
Option 1:
• Install one mounting screw (not included) into a wall leaving
approxi m ately ½ of an inch (1 2. 7mm) ext en d ed.
• Place the transmitter onto the screw, using the hanging
hole on the backside.
• Gently pull the transmitter down to lock the screw into
place.
Option 2:
• Insert the mounting screw (not included) through the
front of th e tr ans m itter and int o t h e wall.
• Tighten the screw to snug (do not over tighten).
To achieve a true temperature/humidity reading, mount where direct
sunlight cannot reach the outdoor transmitter. Mount the outdoor
transmi tter on a North-faci ng wall or in an y w el l sh ad ed area. Un d er an
eave or dec k rai l wor k wel l. Th e m axi m um tr ansmitting rang e in open air
is over 200-feet (60 meters). Obstacles such as walls, windows, stucco,
concrete, and large metal objects can reduce the range. Place the
transmitter at least 6 feet in the air to improve signal transmission.
Care and Maintenance
• Do Not Mix Old and New Batter ie s
• Do Not Mix Alkaline, Standard, Lithium or Rechargeable
Batteries
• Do not expose the weather station t o ext r eme temp eratures, vibrati on
or shock.
• Clean weather station wi th a soft damp cloth. Do not use solvents or
scourin g ag en t s .
• The product is not a toy. Keep it out of reach of children.
• The product is not to be used for medical purpose or for public
information. It is f or home use only.
• The specifications of this product may change without prior notice.
• Improp er us e or unauthori z ed openi ng of h ous i ng w il l void the
warranty.
• If the unit does not work prope rly, change the batteries and/or check
the A/C cord conne c tion.
Low Batter y
• When this low battery icon appears in the indoor (IN) reading
section, replace the batteries in the weather station.
• When this low battery icon appears in th e outdoor (OU T ) read ings
secti on, replac e the b atteries in the outdoor transm itt er .
3
Page 4
Specifications
Printed in China
Indoor Temperature Range: +32°F to +122°F (0°C to + 50 °C)
Humidity Range: 19%-97% (RH)
Outdoor Temp er atu r e R ang e: -40°F to 140°F (-40°C to 60°C)
Humidity Range: 19%-97% (RH)
Distance: Over 200 ft. (60 meters)
RF 433MHz ( open air)
Power Requirements
Weather Station: 5-volt A/C power adapter (inc l uded)
Optional 3 -AA, IEC, LR6 batteries
(not included)
TX141TH-B Transmitter: 2-AA, IEC, LR6 batteries (not included).
Bat tery Li fe TX141TH-B: Bat tery life i s over 1 y ear when using
reputable battery brands for b oth A lkaline
and Lithium batteries
Use Alkaline batteries for tem ps:
-20ºF to 140ºF ( -29ºC to 60ºC)
Use Lithium batteri es f or temps:
-40ºF to -20ºF (-40ºC t o -29ºC)
Weather Station
Bat tery Li fe: Bat tery life is over 3 y ears with A/C adapter
in use
Dimensions:
Weather Station: 8.34” L x 1.03” W x 5.48” H
(211.836 x 26.162 x 139.192mm)
TX141TH-B: 2.4” L x 1.3” W x 3.78” H
(64 x 36 x 101mm )
Warranty Inf ormation
La Crosse Technology, Ltd provides a 1-year l i mi t ed w arranty on this
product ag ainst manufact uring def ects in materials an d w ork m anship .
This limited warranty beg ins on th e ori gi nal date of purchase, is vali d
only on products purchased and used in North America and only to the
original purchaser of this product. To receive warranty service, the
purchaser must contact La Crosse Technology, Ltd for problem
determination and service procedures. Warranty service can only be
performed by a La Crosse Technology, Ltd authorized service center.
The original dat ed bil l of sale must be presen ted upon req u est as proof
of purchase to La Crosse Technolog y, Lt d or La Cr os se Technology,
Ltd’s authorized service center.
La Crosse Techn ol og y, Lt d wil l rep air or repl ac e this product , at our
option an d at no charg e as sti pu lated her ein, with new or rec on dition ed
parts or pr oduc ts if found to b e defectiv e during th e limi t ed w ar r anty
period specified above. All replaced parts and products become the
property of La Crosse Technology, Ltd and must be returned to La
Crosse Technology, Ltd. Replacement parts and products assume the
remaini ng or ig in al w ar r anty, or nin ety (90) days , w hichever is longer. La
Crosse Technol og y, Ltd w il l pay all exp enses for lab or and mat er i als for
all repairs covered by this warranty. If necessary repairs are not
covered by this w arrant y, or if a product is ex am i n ed wh ic h is not in
need or rep ai r, you will be charged for the repairs or examination. The
owner must pay any shipping charges incurred in getting the La Crosse
Technology, Ltd product to a La Crosse Technology, Ltd authorized
service center. La Crosse Technology, Ltd will pay ground return
shipping charges to the owner of the product to a USA address only.
The La Crosse Technology, Ltd warranty covers all defects in material
and workmanship with the following specified exceptions: (1) damage
caused by acc i dent, unreas on abl e use or negl ect (including the lack of
reason abl e and necessary mai n t en ance); (2) dam ag e oc c ur ri ng durin g
shipment (claims must be presented to the carrier); (3) damage to, or
deterioration of , an y access ory or decorat i ve sur face; (4 ) dam ag e
resulting from failure to follow instructions contained in the owner’s
manual; (5) damage resulting from the performance of repairs or
alterat i ons b y som e on e other than an aut h orized La Crosse T ec hn ol o gy,
Ltd author i z ed s ervice center; (6) u nits used for oth er th an h om e use (7)
applications an d uses that th is product was not intend ed or ( 8) t h e
products inability to receive a signal due to any source of interference..
This warr anty cover s onl y ac tu al defects wit h in th e product itself , and
does not cover the cost of installation or removal from a fixed
installation, normal set-up or adjus t m ent s , cl ai ms based on
misrepresentation by the seller or performance variations resulting from
installation-related circumstances.
LA CROSSE TECHNOLOGY, LTD WILL NOT ASSUME LIABILITY FOR
INCIDENTAL, CONSEQUENTIAL, PUNITIVE, OR OTHER SIMILAR
DAMAGES ASSOCIATED WITH THE OPERATION OR
MALFUNCTION OF THIS PRODUCT. THIS PRODUCT IS NOT TO BE
USED FOR MEDICAL PURPOSES OR FOR PUBLIC INFORMATION.
THIS PRODUCT IS NOT A TOY. KEEP OUT OF CHILDREN’S
REACH.
This war r anty gives y ou specif ic leg al r ig hts . Y ou m ay also have ot h er
rights specific to the State. Some States do not allow the exclusion of
consequenti al or inciden t al dam ag es t h erefore the above e xclusion of
limitati on m ay not appl y to you .
For warranty work, technica l sup por t, or inf orm at io n co ntact :
La C ros se Techn o l o g y , L td
2817 L osey B lvd. S.
La Crosse , WI 54601
The c om plete inst ructi on manual is availabl e
at: www.lacrossetechnology.com/s84193
Contact Support:
1-608-782-1610
Produc t Registr ation:
www.lacrossetechnology.com/support/register
Protected under U.S. Patents:
5,978,738
6,076,044
6,597,990
FCC St atement
This Device complies with Part 15 of the FCC Rules. Operation is
subject to the following two conditions: (1) This device may not cause
harmful in terfer ence, and (2 ) the device mus t ac cept an y int er ference
received, including interference that may cause undes ir ed operati on.
NOTE: THE MANUFACTURER IS NOT RESPONSIBLE FOR ANY
RADIO OR TV INTERFERENCE CAUSED BY UNAUTHORIZED
MODIFICATIONS TO THIS EQUIPMENT. SUCH MODIFICATIONS
COULD VOID THE USER AUTHORITY TO OPERATE THE
EQUIPMENT
All rights reserved. This handbook must not be reproduced in any form,
even in excerpts, or du pl icated or pr oc essed usin g electr onic ,
mechani cal or chem ical procedures without w ritten per mis s ion of the
publisher.
This hand b ook m ay c ontain mistakes and pr i nting errors. The
information in this handbook is regularly checked and corrections made
in the next issue. We accept no liability for technical mistakes or printing
errors, or th eir c ons equences.
4
 Loading...