

Page 1
WIFI PROJECTION
ALARM CLOCK
WITH FORECAST
INSTRUCTION MANUAL
Welcome!
Congratulations on your new Projection Alarm Clock and welcome to the
La Crosse Technology family! This product was designed with you in mind by our
hometown team of weather enthusiasts based in La Crosse, Wisconsin.
Model: CA81199
DC: 060619
Page | 1Wi-Fi Projection Alarm Clock
Page 2

TABLE OF CONTENTS
Setup
3
Button Functions
4
Alarm Clock Icons
4
Extra Sensor Area Icons
5
Purchase and Add Sensors
6
Connect to La Crosse View™ App
7
Benefits of Connecting to La Crosse View™
8
Enhanced Weather Forecasts w/La Crosse
9
View™
Advanced Forecast & Chance Precipitation
9
AccuWeather HI/LO Temperatures
9
Custom Data Streams
10
Status Messages when Connected
11
Features of Your Alarm Clock
12
Adjustable Backlight
12
Auto Dim Backlight
12
Settings Menu
13
Projection
14
Alarm with Custom Snooze Time
15
Nap Timer
17
Moon Phase
17
Indoor Comfort Statement
18
USB Charging Port
18
Low Battery Indicators
19
Factory Restart Alarm Clock
19
We’re Here to Help!
19
Care and Maintenance
19
Specifications
20
Warranty and Support
20
FCC Statement
21
Canada Statement
21
Page | 2Wi-Fi Projection Alarm Clock
Page 3
SETUP
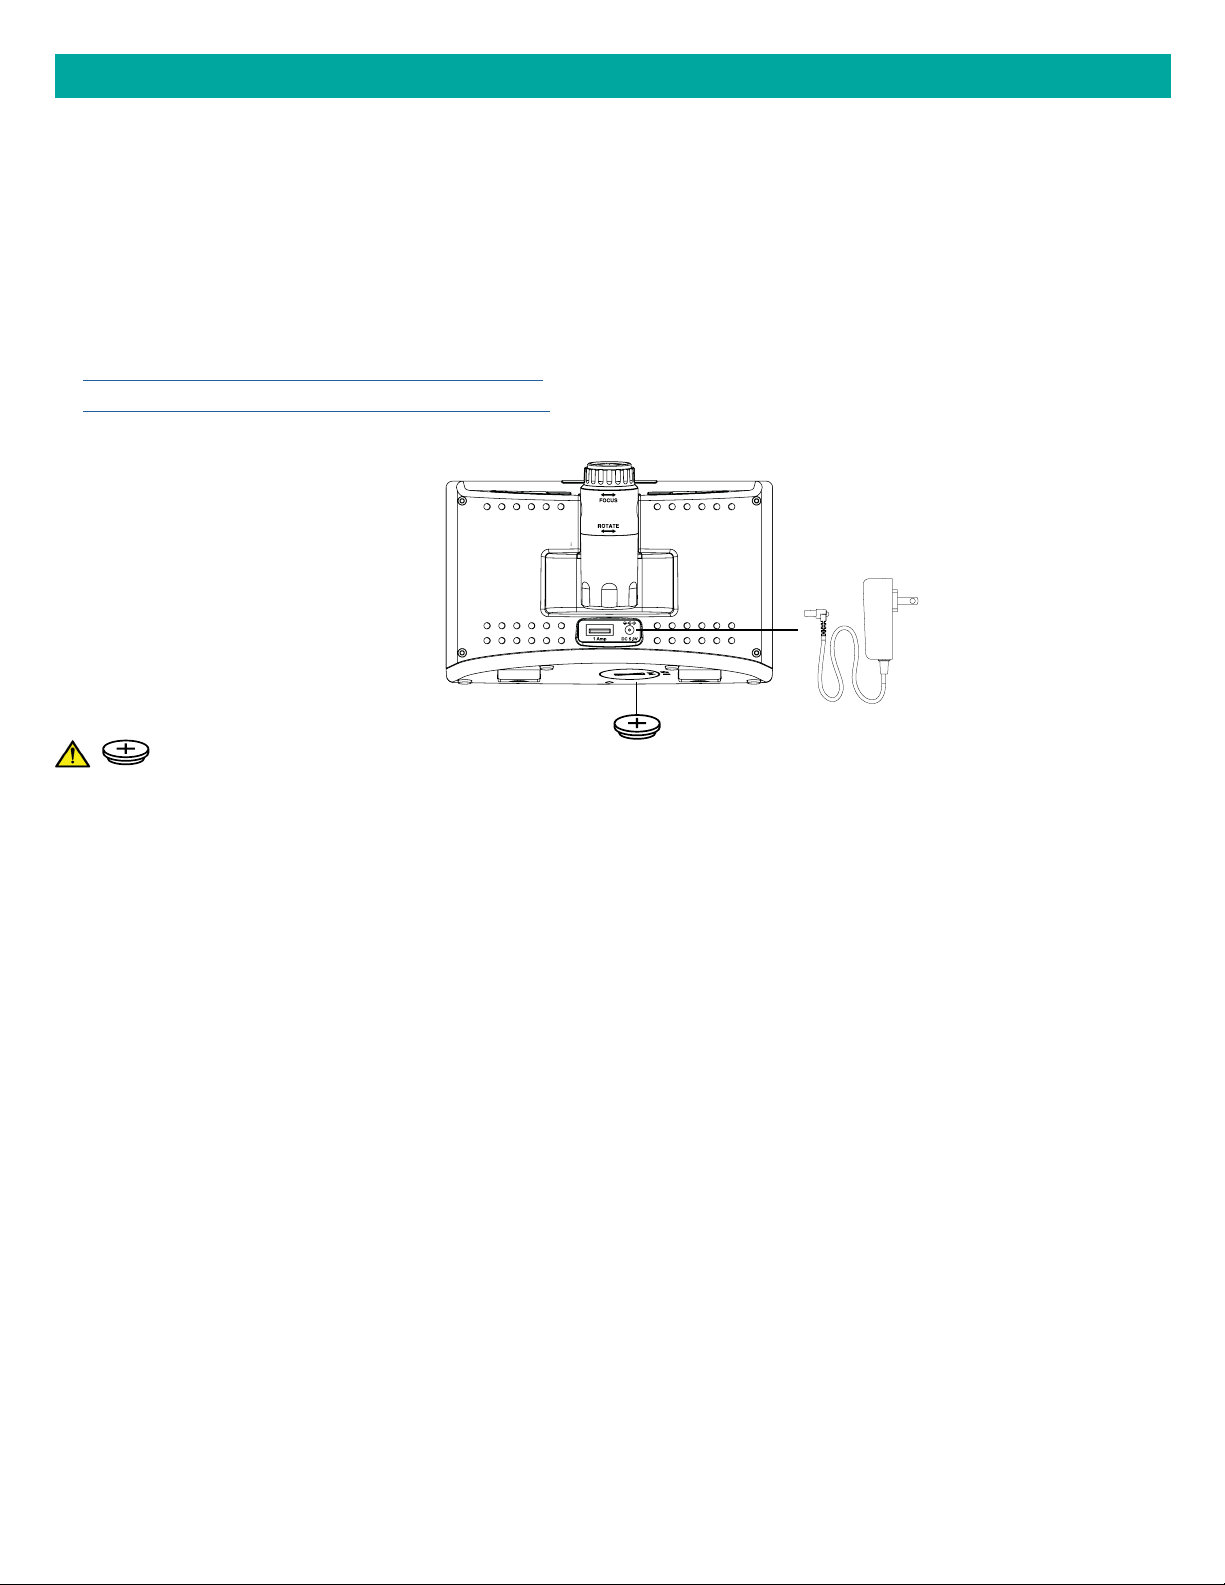
1. Insert the power cord into your CA81199 Alarm Clock. Remove the insulation tab from the CR2032
battery compartment found on the bottom of your alarm clock.
2. Remove the battery insulation tab installed on the bottom of the clock.
3. Download the La Crosse View™ App (App Store or Google Play)
4 Follow along with our instructional videos to connect your alarm clock to the app:
http://bit.ly/LaCrosseView_Support_Vid_01_1
http://bit.ly/LaCrosseView_Support_Vid_01_2
Projection Alarm Clock
CA81199
WARNING:
1. This product contains a Button Cell Battery.
2. If swallowed, it could cause severe injury or death in just 2 hours.
3. Seek medical attention immediately.
AVERTISSEMENT:
1. Cet article contient une pile bouton.
2. De graves blessures ou la mort pourraient suivre dans les deux heures
Suivant l’ingestion.
3. Demander l’aide de professionnels de la santé sur le champ.
WARNING - KEEP BATTERIES OUT OF REACH OF CHILDREN
1. Swallowing may lead to serious injury in as little as 2 hours or death, due to chemical burns and potential
perforation of the oesophagus.
2. If you suspect your child has swallowed or inserted a button battery, immediately seek urgent medical
assistance.
3. Examine devices and make sure the battery compartment is correctly secured, e.g. that the screw or
other mechanical fastener is tightened. 4. Do not use if compartment is not secure.
5. Dispose of used button batteries immediately and safely. Flat batteries can still be dangerous.
6. Tell others about the risk associated with button batteries and how to keep their children safe.
Page | 3Wi-Fi Projection Alarm Clock
Page 4
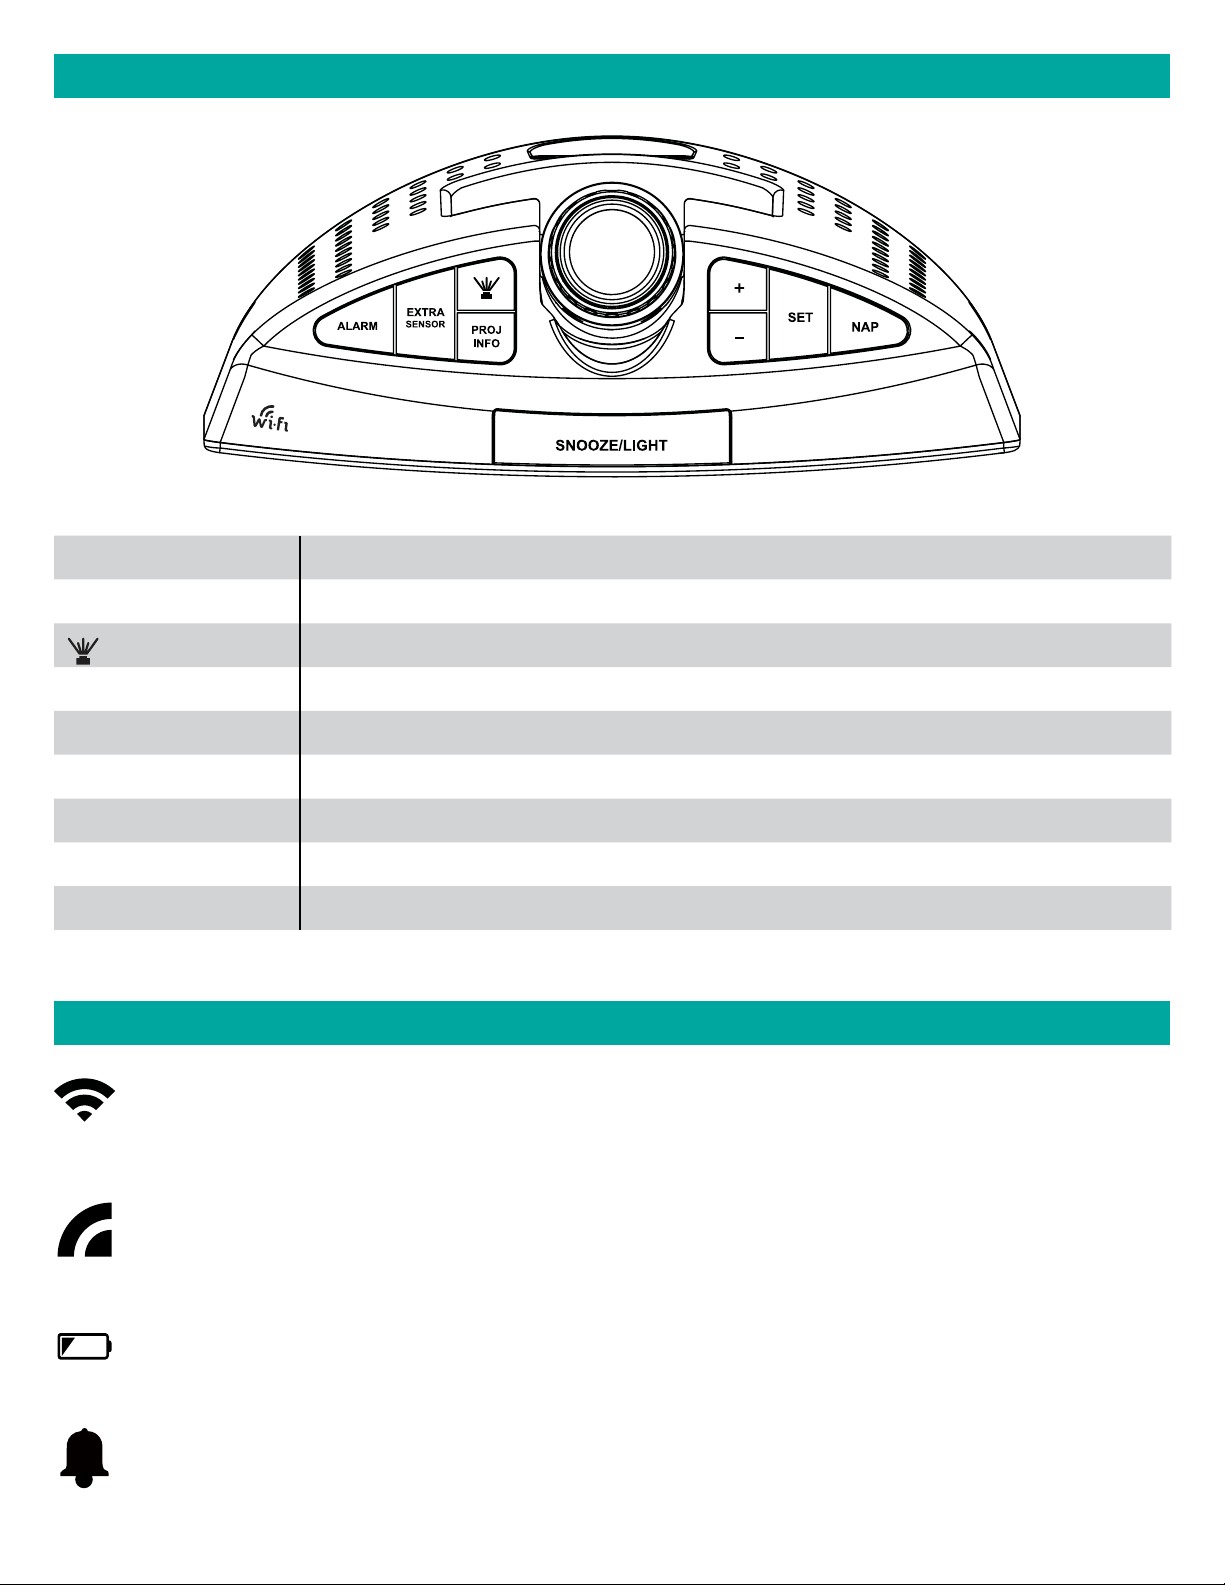
BUTTON FUNCTIONS
ALARM Press to activate/deactivate alarm. Hold to set alarm.
EXTRA SENSOR Press to see options. Hold to add sensors.
Press to adjust projection brightness.
PROJ INFO Press to see options. Hold to alternate.
+ or Press either to adjust value. Hold both to search for Wi-Fi signal.
SET Press to view Wi-Fi Status. Hold for basic settings.
NAP Press to start Nap countdown. Hold to set Nap time.
SNOOZE/LIGHT Press to adjust backlight. Hold to set Auto Dim time.
ALARM + NAP Hold both to Factory Reset Clock.
ALARM CLOCK ICONS
Wi-Fi Indicator: Will flash when your alarm clock is ready to connect to the Internet, and be solid on
screen when connected.
Internet Indicators: Will display in areas to indicate data coming from the Internet.
Low Battery Indicator: Will let you know when to replace your alarm’s backup coin cell battery.
Alarm Indicator: Indicates an active time alarm.
Page | 4Wi-Fi Projection Alarm Clock
Page 5
AUTO DIM: Indicates the Auto Dim backlight feature is set.
12 HR
12HR: When connected to La Crosse View App, the Forecast replaces moon phase. This is a 12
hour forecast.
Forecast Icons: When connected to La Crosse View App, the Forecast replaces moon phase.
Precent of Precipitation: When connected to La Crosse View App, the Percent of Precipitation will
show in the forecast area.
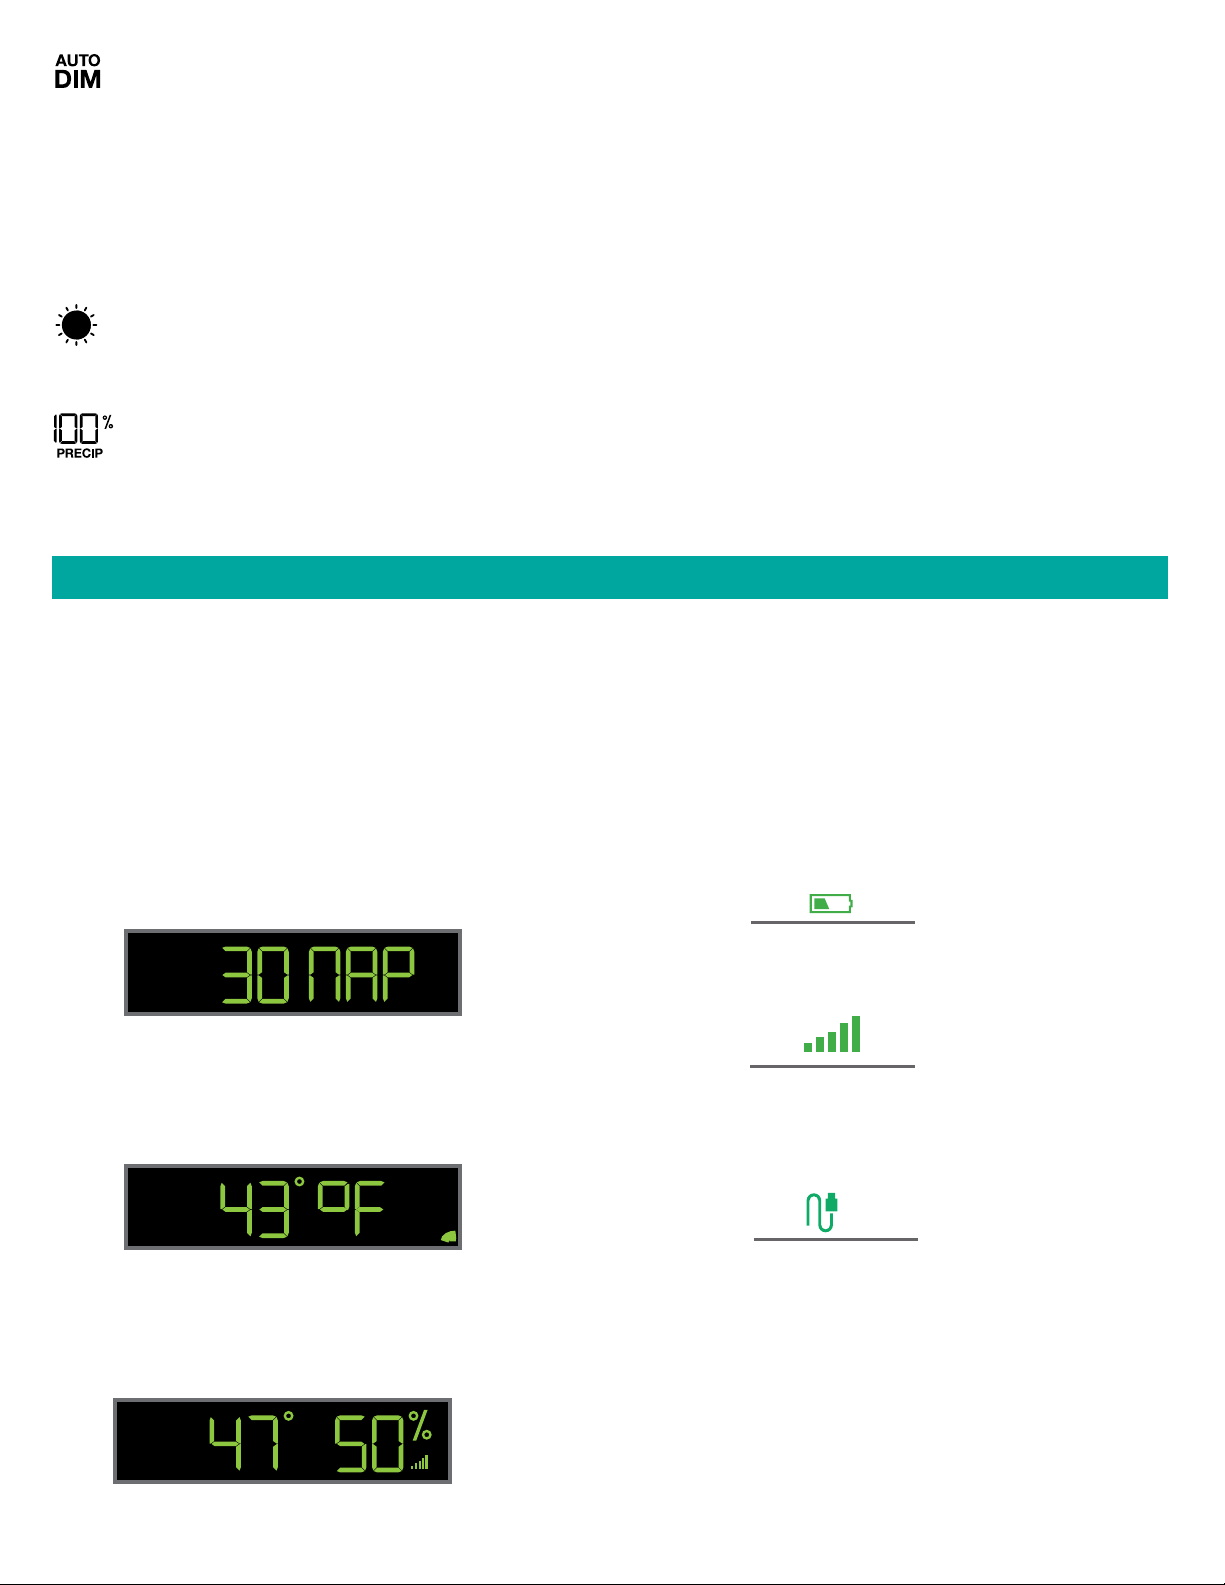
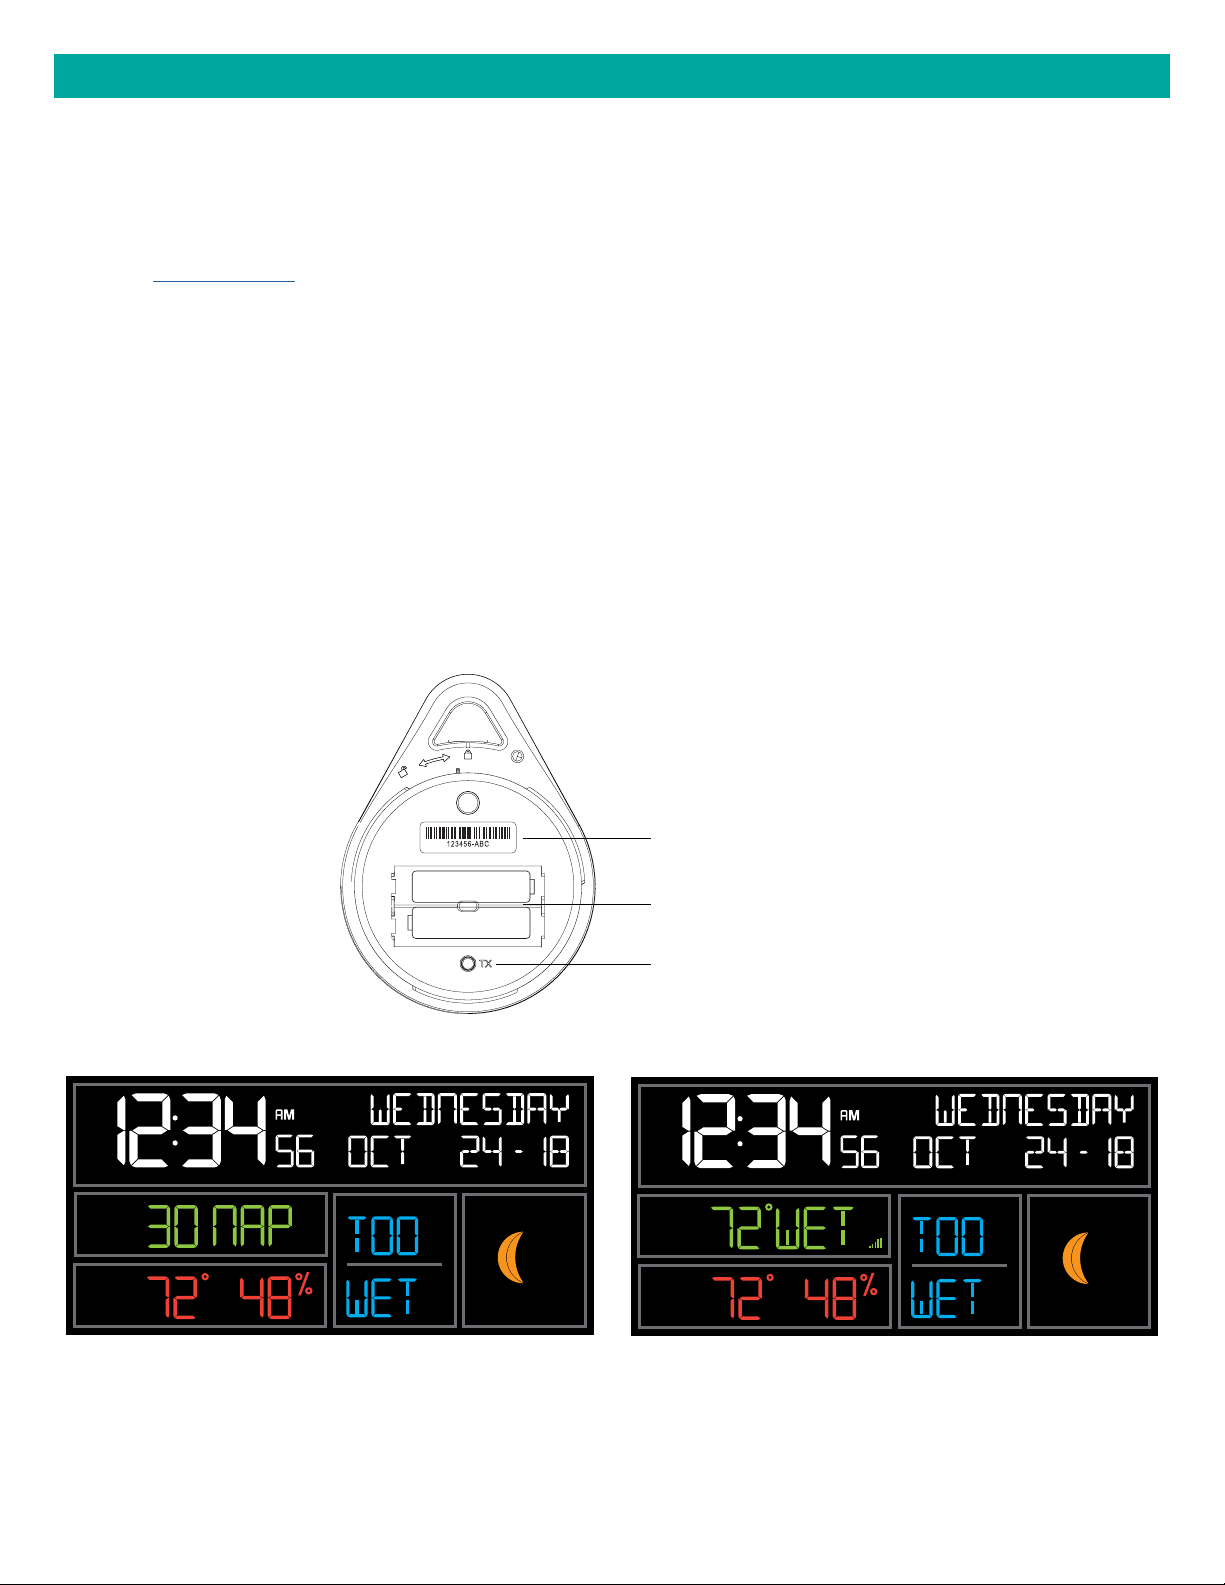
EXTRA SENSOR AREA ICONS
• The Extra Sensor area of your alarm clock will default to 30 NAP when you first power up.
• If you connect to the La Crosse View App you will see Internet Temperature.
• When you choose to add sensors, the Sensor Reception Indicator will show in the upper left corner
whether 30 NAP or Sensor reading is displayed.
• Press and release the EXTRA SENSOR button to view all additional sensors.
Default Reading-Press EXTRA SENSOR
button to toggle to Alarm Time
Low Battery
Indicator
Default Reading Connected-
Press EXTRA SENSOR button to toggle to
Alarm Time or Nap Duration
OU T
Sensor
Reception
Probe
Reading
Added Temperature/Humidity Sensor (not
included) Press EXTRA SENSOR button to
toggle to through readings in this area.
EXTRA
SENSO R
Page | 5Wi-Fi Projection Alarm Clock
Page 6
PURCHASE AND ADD SENSORS
Optional Extra Sensors: Up to 4 additional Thermo-Hygro, Wind Speed, Rain, Water Leak or any
combination of these sensors can read to the EXTRA SENSOR area of your display. Simply press and
release the EXTRA SENSOR button to view these sensors.
Purchase Extra Sensors: For additional sensors to read to your alarm clock or to the app visit the PARTS
TAB at: bit.ly/CA81199
Note: Not all sensors will read to the alarm clock. Be sure to check the chart to see if a sensor can read to
the app only, or both alarm clock (extra sesnor area) and app.
Add Extra Sensors to your alarm clock:
1. Hold the EXTRA SENSOR button 3 seconds, to add a sensor to the alarm clock.
2. Install batteries in the sensor, and if the sensor has a TX button, press the TX button to force a signal.
3. Allow up to 3 minutes to view sensor and ID on alarm clock.
Note: Once sensor is found the search will stop. Sensor, ID, and type will show for 3 seconds then return
to normal display.
4. Scan sensor bar code ID so it will read in the La Crosse View app.
5. Added sensors will be available for display in Extra Sensor area of alarm clock.
Sensor Barcode ID
+
AA
AA
+
-
Insert Batteries
TX Button
Basic alarm clock readings Basic alarm clock readings with Water Leak sensor.
COMFO RT
EXTRA
SENSO R
IN
MOON PH AS E
IN
COMFO RT
MOON PH AS E
Delete Extra Sensors from your alarm clock:
1. Press and release the EXTRA SENSOR button until you see the sensor and ID you wish to delete.
2. Hold the MINUS (-) button for 3 seconds to delete this sensor. The sensor readings and ID will show
dashes.
3. Sensor will no longer show in the Extra Sensor area.
Page | 6Wi-Fi Projection Alarm Clock
Page 7
CONNECT TO LA CROSSE VIEW™ APP
MOBILE DEVICE REQUIREMENTS
iOS Requirements:
Mobile device with iOS with cellular or Wi-Fi service
Android Requirements:
Mobile device with Android OS with cellular or Wi-Fi service
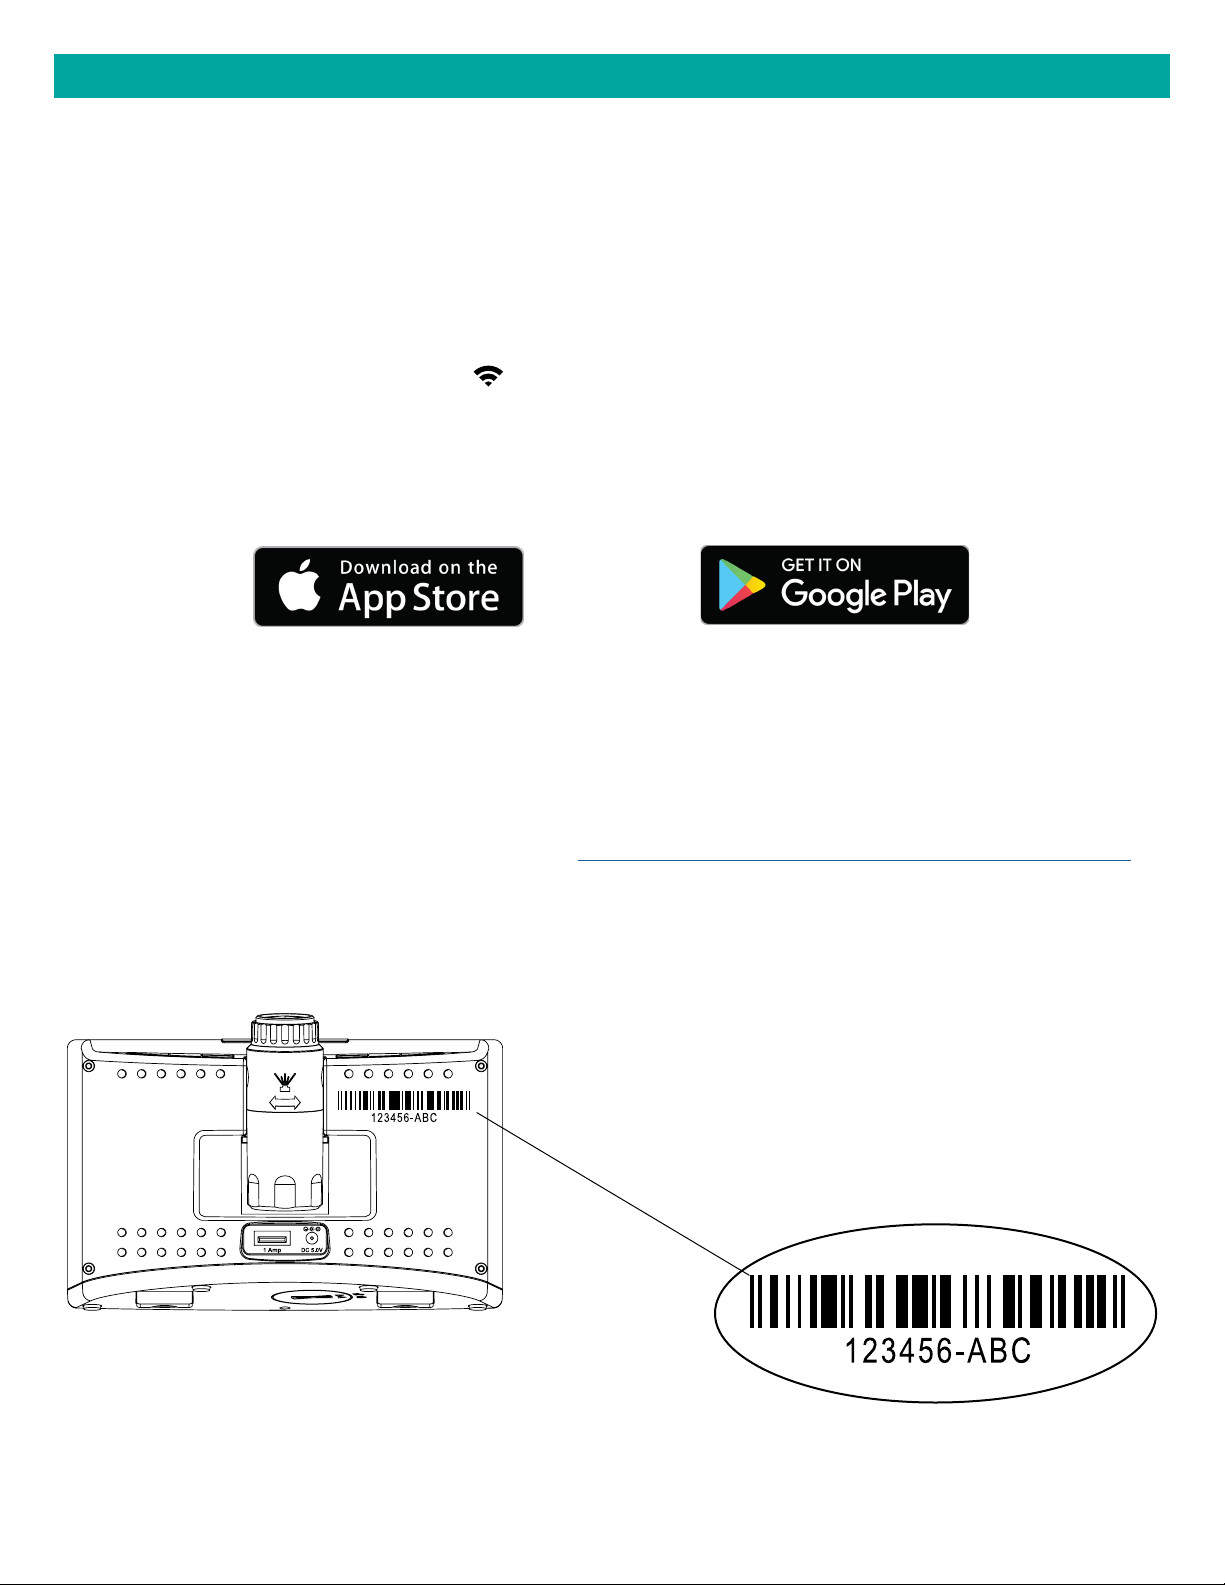
GET YOUR ALARM CLOCK READY
Ensure your alarm clock’s Wi-Fi Indicator is flashing. If it is not, press and hold the Plus (+) and Minus (–)
buttons down together until it begins flashing. This tells you that your alarm clock is ready to connect.
DOWNLOAD
Visit the App Store or Google Play Store to download the free LaCrosse View™ app onto your mobile
device.
LAUNCH & FOLLOW
Open the LaCrosse View™ app and follow the on-screen instructions.
HAVING TROUBLES CONNECTING?
Make sure your mobile device is connected to your router’s 2.4GHz Wi-Fi network, and that you’ve
correctly entered your Wi-Fi password.
For more troubleshooting tips and support visit: www.lacrossetechnology.com/lacrosseviewsupport
• Your alarm clock’s device ID can be found
on the back of the clock.
• Within 15 minutes after your alarm clock
connects to the La Crosse View app, you
should see the moon phase change to
forecast, the indoor comfort change to HI/
LO Temperature, Internet time/date set.
Alarm Clock Device ID
Page | 7Wi-Fi Projection Alarm Clock
Page 8

BENEFITS OF CONNECTING TO LA CROSSE VIEW™
Connecting You to Your Home Anytime, Anywhere.
FEATURES CONNECTEDSTANDALONE
Indoor Temperature
Indoor Humidity
Time Alarm
Moon Phase
Indoor Comfort Statement
Ability to Add Sensors
Internet Time and Calendar
Advance Forecast Icons
Internet Outdoor Temperature
Daily Forecast HIs & LOs
% Chance of Precipitation
Data Stream Technology
Remote Monitoring
Set Alerts
View Graphs
Page | 8Wi-Fi Projection Alarm Clock
Page 9

ENHANCED LACROSSE VIEW CONNECTED FEATURES.
• Forecast Icons & Chance of Precipitation (12 Hour Forecast)
• AccuWeather HI/LO Temperatures
• Custom Data Streams
FORECAST & CHANCE OF PRECIPITATION
SUNNY PARTLY SUNNY CLOUDS LIGHT RAIN
FORE CA ST
12 HR
PRECI P
FORE CA ST
12 HR
PRECI P
FORE CA ST
12 HR
PRECI P
FORE CA ST
12 HR
PRECI P
RAIN T-STORM LIGHT SNOW SNOW
FORE CA ST
12 HR
PRECI P
FORE CA ST
12 HR
PRECI P
FORE CA ST
12 HR
PRECI P
FORE CA ST
12 HR
PRECI P
WINTRY MIX WIND ICE FOG
FORE CA ST
12 HR
PRECI P
FORE CA ST
12 HR
PRECI P
FORE CA ST
12 HR
PRECI P
IC E
FORE CA ST
12 HR
FO G
PRECI P
ACCUWEATHER HI/LO TEMPERATURE
Connected: HI/LO
Temperature from Internet.
Not Connected: Indoor
Comfort from Alarm Clock
COMFO RT
Page | 9Wi-Fi Projection Alarm Clock
Page 10

IMPORTANT:
There may be small discrepancies between data displayed on your alarm clock and data shown through
other AccuWeather services, such as their website and/or mobile app. This is common, as there are
dierences in the timing in which forecast data is fetched by these items. Our connected alarm clocks will
receive forecast updates at least 4 times daily.
CUSTOM DATA STREAMS
Use the Data Stream Menu in the La Crosse View™ app to select up to 3 items to stream on your alarm
clock.
1. Open the La Crosse View™ app and swipe until you find your alarm clock’s device page.
2. Scroll down to the Data Stream section and press the blue stream icon in the upper right.
3. Follow the app’s instructions to customize your “Data Stream” to display on your alarm clock
Note: Allow up to 10 minutes for new Data Stream selections to appear on your alarm clock.
Custom Data Stream will alternate with Date
EXTRA
SENSOR
IN
TODAY
HI
LO
FORE CA ST
12 HR
PRECIP
Data Stream Items:
Customizable Data Streams to enhance your in-home alarm clock:
Wind Speed Wind Direction Wind Gust UV Index Visibility Dew Point Percentage of Clouds
Sunrise Time Sunset Time Hours of Sunlight Moon Rise Time Moon Set Time Temperature/Humidity
and more!
Personal Messages
Enter up to 20 characters for special events or reminders, such as:
SOCCER TONIGHT ICE CREAM IN FREEZER GREAT JOB MATH TEST or anything you can think of!
Note: Allow up to 10 minutes for new Data Stream selections to appear on your alarm clock.
Page | 10Wi-Fi Projection Alarm Clock
Page 11

STATUS MESSAGES WHEN CONNECTED
Quick Tip:
• The Wi-Fi Icon indicates Wi-Fi connection- not necessarily app connection.
• The Internet Icons by your Forecast, Internet Temp (extra sensor area) and HI/LO Temperatures will
indicate connection to the La Crosse View App and Weather Server.
Status Messages on you alarm clock will let you know if there are issues.
Press and release the SET button to view the status of your alarm clock.
ALL OK CONNECTED
• Alarm clock is connected all the way through to the
La Crosse View app.
OU T
IN
OU T
IN
TODAY
TODAY
COMFO RT
HI
LO
HI
LO
FORE CA ST
12 HR
FORE CA ST
12 HR
MOON PH AS E
PRECIP
CHECK APP
• The Wi-Fi router connection is working.
• Check your connection to the La Crosse View app.
• Check Notifications in the La Crosse View app
• Is there an update to install?
PRECIP
LOST WIFI
• Check your power cord connection (power cord
required to connect)
• When trying to reestablish your alarm clock’s WiFi connection, be sure your mobile device is on
the same 2.4GHz network you want your alarm
clock to use.
• Check your network connection.
• Hold the + and – buttons together for 3 seconds
to search for Wi-Fi.
NO WEATHER SERVICE
• Wi-Fi, and App are fine.
• Weather/Time service not connecting. This will be
COMFO RT
resolved at the Weather Server. Please be patient.
• Weather Forecast, Precipitation and Weather
HI/LO temperature will not be displayed.
IN
MOON PH AS E
Page | 11Wi-Fi Projection Alarm Clock
Page 12

FEATURES OF YOUR ALARM CLOCK
Your alarm clock provides most functionality when connected to the La Crosse View app. However it is
fully functional as a standalone projection alarm clock.
Here we have included the details for various functions of your alarm clock:
• Adjustable Backlight
• Auto Dim Backlight
• Settings Menu
• Projection
• Time Alarm with Snooze
• Nap Feature
• Moon Phase
• Indoor Comfort
• USB Charging Port
• Low Battery Indicator
• Factory Restart Alarm clock
ADJUSTABLE BACKLIGHT
Your alarm clock has 5 levels of brightness for the backlight:
• Press and release the LIGHT button to adjust the backlight at 5 levels of intensity.
Levels: OFF = 0% | level 1 = 1.5% | level 2 = 20% | level 3 = 50% | level 4 = 100%.
AUTO DIMMING BACKLIGHT
You can set your backlight to automatically dim to level 1 at a set hour for sleeping, then automatically
return to full brightness when you wake.
Set Auto Dim (Hour only):
1. Hold the SNOOZE/LIGHT button 2 seconds to enter dimmer set mode. AUTO DIM OFF will show.
2. Press the + or – buttons to turn dimmer (ON). AUTO DIM ON will show.
3. Press the SNOOZE/LIGHT button to select start time (Hour) for dimmer. AUTO DIM START TIME and the
hour will flash.
4. Press the + or – buttons to change the hour for the dimmer to be low light level.
5. Press the SNOOZE/LIGHT button to select start time for dimmer to be on High light level. AUTO DIM
STOP TIME and the hour will flash.
6. Press the + or – buttons to change the hour for the dimmer to be high light level.
7. Press the SNOOZE/LIGHT button to confirm exit.
Page | 12Wi-Fi Projection Alarm Clock
Page 13

Note: If you press the LIGHT button to manually adjust the backlight, the Auto Dim feature will resume at
the next scheduled time to dim.
SETTINGS MENU
1. Hold the SET button for 3 seconds to enter settings menu.
2. Press and release the + or - buttons to adjust the flashing values. Hold to adjust quickly.
3. Press and release the SET button to confirm and move to the next item.
Note: Press and release the SNOOZE/LIGHT button any time to exit settings.
Settings menu order:
• BEEP ON | OFF
• 12/24 hour format
• Hour
• Minutes
• Year
• Month
• Date
• Temperature Fahrenheit | Celsius
Note: Weekday sets automatically
as Year, Month and Date are set.
Page | 13Wi-Fi Projection Alarm Clock
Page 14

PROJECTION
Your alarm clock has projection with intensity levels, rotation, focus and the ability to select what is to be
projected.
INTENSITY: Press and release the button to adjust the Projection Intensity (HI-MED-LO-OFF). Projection
level will show briefly on the alarm clock.
Projection Level HI Projection OFF
OUT
IN
TODAY
FORE CAST
12 H R
HI
LO
PRECIP
OUT
IN
TODAY
FORE CAST
12 HR
HI
LO
PRECIP
ROTATION: The projection tube on the back of your station allows you to rotate the projected image 270
degrees. Simply turn the bottom of the tube to adjust.
FOCUS: Turn the top wheel on the projection tube to focus the projected image.
Turn wheel to focus
projected image.
Turn cylinder to rotate
projected image.
The Projection arm
tips back and forth
slightly to position
image on ceiling.
SELECTION: Time is the default projection image. Press and release the PROJ INFO button to select a
dierent item to project. Alarm clock will stay on last item selected.
Options:
• Current Time
• Indoor Temperature/Humidity
• Internet Outdoor Temperature (when connected)
• Extra Sensor Information (if Extra Sensor is connected to alarm clock)
Project Internt Temperature Project Water Leak sensor (extra)
OUT
EXTRA
SENSO R
Page | 14Wi-Fi Projection Alarm Clock
Page 15

ALTERNATE SELECTION: You may choose to alternate the Time Projection with another item. Time and
selected item will alternate every 5 seconds.
1. Hold PROJ INFO button 2 seconds to choose alternate projection mode. ALT WITH TIME OFF will show.
2. Press and release the + or – buttons to select ALT WITH TIME ON.
3. Press and release the PROJ INFO button to toggle through selections.
4. Press the SNOOZE LIGHT button to exit.
OUT
EXTRA
SENSO R
ALARM WITH CUSTOM SNOOZE TIME
Set Alarm Time:
1. Hold the ALARM button for 3 seconds to enter alarm time set mode. The alarm hour will flash. Press the +
or - buttons to set alarm hour
2. Press the ALARM button to confirm and move to the minutes. The alarm minutes will flash. Press the + or
- buttons to set the minutes.
3. Press the ALARM button to confirm and move to snooze duration. The snooze time will flash and start at
the preset of 10 minutes. The date area will read “SNOOZE”
4. Press + or - buttons to set Snooze Duration. Increase or decrease in 5 min intervals up to 120 min.
5. Press and release the ALARM button to confirm and exit.
Note: Alarm is crescendo sound. When the alarm sounds, it continues for 2 minutes and then shuts o
completely.
Alarm Hour Snooze DurationAlarm Minutes
Page | 15Wi-Fi Projection Alarm Clock
Page 16

Alarm is active when set.
Can show in Extra Sensor area
Alarm is active-bell icon shows be time.
Internet Temperature shown in Extra Sensor area
TODAY
IN
FORE CAST
12 H R
HI
LO
PRECIP
OUT
IN
TODAY
FORE CAST
12 HR
HI
LO
PRECIP
Deactivate Alarm:
1. From normal time display, press and release the ALARM button to activate or deactivate alarm.
2. Alarm time will show for 3 seconds (with or without bell icon) in Extra Sensor area. Everything else
disappears on screen.
3. Alarm icon will show when active and disappear when deactivated.
• Alarm icon will flash when alarm sounds.
• When alarm sounds, press any button except for SNOOZE/LIGHT to stop ringing for one day
Alarm time shows briefly. Alarm is inacvtive. No bell icon near time.
OUT
IN
TODAY
FORE CAST
12 HR
HI
LO
PRECIP
Snooze Time:
• When alarm sounds, press SNOOZE/LIGHT button to stop the alarm and activate SNOOZE function.
SNOOZE - duration will show in date area. Alarm icon will flash.
• During snooze count down, press any button except for SNOOZE/LIGHT to exit snooze count down
• During snooze count down, press SNOOZE/LIGHT only to change backlight
• When snooze alarm sounds, SNOOZE – duration “0m 00” will flash. Station beeps for 2 minutes then
returns to normal display or press any button to stop ringing and return to normal display. Press any
button except for SNOOZE/LIGHT to stop alarm and exit snooze function.
• Repeat: When snooze alarm sounds, SNOOZE – duration “0m 00”” will flash, for up to 2 minutes with
alarm sounding. Press SNOOZE/LIGHT button to stop the sound and activate the snooze function again.
Snooze countdown
OUT
IN
TODAY
FORE CAST
12 H R
HI
LO
PRECIP
Page | 16Wi-Fi Projection Alarm Clock
Page 17

NAP TIMER
Sometimes it is easier to use the Nap Timer to avoid reprogramming your time alarm. Set it one time then
just press the NAP button to start the timer.
Set Nap Timer:
1. Press and hold the NAP button for 3 seconds to enter nap set mode.
2. The time will flash and start at the preset of 30 minutes. The date area will read “NAP TIME”
3. Press + or - buttons to set nap duration. Increase or decrease in 5 min intervals up to 120 min.
4. Press the NAP button to confirm and start nap.
• While a nap is in progress the date area will display “NAP TIME” and time will count down to zero when
the alarm will sound.
• The nap duration will be saved in the station. Next time the NAP button is pressed it will display the
amount of time used last and the nap will start.
• When alarm sounds, NAP TIME “0m 00” will flash. Alarm beeps for 2 minutes then returns to normal
display or press any button to stop ringing and return to normal display.
Nap Duration
OUT
IN
Nap countdown
TODAY
FORE CAST
12 HR
HI
LO
PRECIP
MOON PHASE
The Moon Phase will only show when your alarm clock is not connected to the La Crosse View app.
When your alarm clock is connected, the Moon Phase will be replaced by 12 hour Forecast Icons.
New Moon
Small Waxing
Crescent
Large Waxing
Crescent
First Quarter
Small Waxing
Gibbous
Large Waxing
Gibbous
Full Moon
Large Waning
Gibbous
Small Waning
Gibbous
Last Quarter
Large Waning
Crescent
Small Waning
Crescent
Page | 17Wi-Fi Projection Alarm Clock
Page 18

INDOOR COMFORT STATEMENT
• Indoor Comfort Statement is based on the Indoor Humidity reading.
• The Indoor Comfort Statement will only show when if your alarm clock is not connected to the
La Crosse View app.
• When your alarm clock is connected, the Indoor Comfort Statement will be replaced by Forecast HI/LO
Temperatures.
Not Connected: Indoor
Comfort from Alarm Clock
COMFO RT
Indoor Comfort:
• TOO WET 84% to 99% RH
• IN WET 71% to 83% RH
• IN OK 40% to 70% RH
• IN DRY 26% to 39% RH
• TOO DRY 1% to 25% RH
USB CHARGING PORT
There is a 1 Amp USB charge port on the back of the station. Power Cord must be in use to charge a device.
• Connect your external device’s USB charging cable (not included) to the USB charging port.
• Charging times will vary.
• USB Power Output: 1A maximum current. Charge 1A devices or devices that are self-regulating.
USB Cord not included
Page | 18Wi-Fi Projection Alarm Clock
Page 19

LOW BATTERY INDICATOR
• Low Battery by Indoor Temperature, replace battery in your Alarm clock.
FACTORY RESET ALARM CLOCK
A factory restart of your alarm clock will remove all Wi-Fi settings and will return your alarm clock to its
default settings and “out of the box” condition. This may resolve connection issues with your sensors or
Wi-Fi.
1. Hold the ALARM and NAP buttons together for 5 seconds.
2. Your alarm clock will reset and search for Wi-Fi.
3. If sensors are attached, the alarm clock will search for all sensors. Allow up to 3 minutes to acquire
sensors.
4. You will need to reconnect to your La Crosse View app by following the steps on page 7.
CARE & MAINTENANCE
• Do not mix old and new batteries in extra sensors.
• Do not mix Alkaline, Standard, Lithium, or Rechargeable Batteries.
• Always purchase the correct size and grade of battery most suitable for intended use.
• Replace all batteries of a set at the same time.
• Clean the battery contacts and also those of the device prior to battery installation.
• Ensure the batteries are installed with correct polarity (+ and -).
• Remove batteries from equipment when it is not used for an extended period of time.
• Promptly remove expired batteries.
Page | 19Wi-Fi Projection Alarm Clock
Page 20

SPECIFICATIONS
Indoor
Temperature Range:
Humidity Range
32°F to 99°F (0°C to 37°C)
10% RH to 99%RH
Power
CA81199 Alarm Clock:
Battery Backup:
5.0 Volt power cord included (Required)
AC6: HX12H-0501500-AU-001 (Input 100-240V)
CR2032 battery included, backup for time and date
Battery Life
CA81199 Alarm Clock: over 24 months with power cord use
Dimensions
CA81199 Alarm clock:
6.04” W x 2.42” D x 4.10” H (15.34 cm x 6.15 cm x 10.41 cm)
WARRANTY & SUPPORT
LIMITED WARRANTY:
Springfield warrants this instrument to be free from defects in workmanship and material for a period of 1
year from date of purchase, and will repair or replace it at
our option, without charge.
For warranty issues please contact Springfield Instruments, Inc.:
Phone: 1-844-687-4040
Email: info@springfieldinstruments.com
Springfield Instruments, Inc.
104 Barr Street
Saint-Laurent, QC H4T 1Y4
WARNING: This product can expose you to chemicals including styrene, which is known in the State of
California to cause cancer. For more information go to: www.P65Warnings.ca.gov/
Page | 20Wi-Fi Projection Alarm Clock
Page 21

FCC STATEMENT
This equipment has been tested and found to comply with the limits for a Class B digital device, pursuant to part 15 of the FCC
Rules. These limits are designed to provide reasonable protection against harmful interference in a residential installation. This
equipment generates, uses and can radiate radio frequency energy and, if not installed and used in accordance with the
instructions, may cause harmful interference to radio communications. However, there is no guarantee that interference will not
occur in a particular installation.
If this equipment does cause harmful interference to radio or television reception, which can be determined by turning the
equipment o and on, the user is encouraged to try to correct the interference by one or more of the following measures:
• Reorient or relocate the receiving antenna.
• Increase the separation between the equipment and receiver.
• Connect the equipment into an outlet on a circuit dierent from that to which the receiver is connected.
• Consult the dealer or an experienced radio/TV technician for help.
This device must not be co-located or operating in conjunction with any other antenna or transmitter.
Operation is subject to the following two conditions:
(1 ) This device may not cause harmful interference, and
(2) This device must accept any interference received, including interference that may cause undesired operation.
Caution!
The manufacturer is not responsible for any radio or TV interference caused by unauthorized changes or modifications to this
equipment. Such changes or modifications could void the user authority to operate the equipment.
This equipment must be installed and operated in accordance with provided instructions and the antenna(s) used for this
transmitter must be installed to provide a separation distance of at least 20 cm from all persons and must not be co-located or
operating in conjunction with any other antenna or transmitter
All rights reserved. This manual may not be reproduced in any form, even in part, or duplicated or processed using electronic,
mechanical or chemical process without the written permission of the publisher. This booklet may contain errors or misprints.
The information it contains is regularly checked and corrections are included in subsequent editions. We disclaim any
responsibility for any technical error or printing error, or their consequences.
All trademarks and patents are recognized.
CANADA STATEMENT
This device complies with Industry Canada’s licence-exempt RSSs. Operation is subject to the following two conditions:
(1 ) This device may not cause interference; and
(2) This device must accept any interference, including interference that may cause undesired operation of the device.
Le présent appareil est conforme aux CNR d’Industrie Canada applicables aux appareils radio exempts de licence.
L’exploitation est autorisée aux deux conditions suivantes :
(1) l’appareil ne doit pas produire de brouillage;
(2) l’utilisateur de l’appareil doit accepter tout brouillage radioélectrique subi, même si le brouillage est susceptible d’en
compromettre le fonctionnement.
Apple and the Apple logo are trademarks of Apple Inc., registered in the U.S. and other countries.
App Store is a service mark of Apple Inc.
Google Play and the Google Play logo are trademarks of Google Inc.
Made in China - Printed in China
Page | 21Wi-Fi Projection Alarm Clock
 Loading...