

Page 1
LaCie Rugged Secure User Manual
Click here to access an up-to-date online version
of this document. You will also fin d the most recent conten t as well as expandable illu strations, easier
navigation, an d search capability.
Model:
Page 2

. . . . . . . . . . . . . . . . . . . . . . . . . . . . . . . . . . . . . . . . . . . . . . . . . . . . . . . . . . . . . . . . . . . . . . . . . . . . . . . . . . . . . . . . . . . . . . . . . . . . . . . . . . . . . . . . . . . . . . . . . . . . . . . . . . . . . . . . . . . . . . . . . . . . . . . . . . . . . . . . . . . . . . . . . . . . . . . . . . . . . . . . . . . . . . . . . . . . . . . . . . . . . . . . . . . . . . . . . . . . . . . . . . . . . . . . . . . . . . . . . . . . . . . . . . . . . . . . . . . . . . . . . . . . . . . . . . . . . . . .
. . . . . . . . . . . . . . . . . . . . . . . . . . . . . . . . . . . . . . . . . . . . . . . . . . . . . . . . . . . . . . . . . . . . . . . . . . . . . . . . . . . . . . . . . . . . . . . . . . . . . . . . . . . . . . . . . . . . . . . . . . . . . . . . . . . . . . . . . . . . . . . . . . . . . . . . . . . . . . . . . . . . . . . . . . . . . . . . . . . . . . . . . . . . . . . . . . . . . . . . . . . . . . . . . . . . . . . . . . . . . . . . . . . . . . . . . . . . . . . . . . . . . . . . . . . . . . . . . . . . . . . . . . . . . . . . . . . . . . . .
. . . . . . . . . . . . . . . . . . . . . . . . . . . . . . . . . . . . . . . . . . . . . . . . . . . . . . . . . . . . . . . . . . . . . . . . . . . . . . . . . . . . . . . . . . . . . . . . . . . . . . . . . . . . . . . . . . . . . . . . . . . . . . . . . . . . . . . . . . . . . . . . . . . . . . . . . . . . . . . . . . . . . . . . . . . . . . . . . . . . . . . . . . . . . . . . . . . . . . . . . . . . . . . . . . . . . . . . . . . . . . . . . . . . . . . . . . . . . . . . . . . . . . . . . . . . . . . . . . . . . . . . . . . . . . . . . . . . . . . .
. . . . . . . . . . . . . . . . . . . . . . . . . . . . . . . . . . . . . . . . . . . . . . . . . . . . . . . . . . . . . . . . . . . . . . . . . . . . . . . . . . . . . . . . . . . . . . . . . . . . . . . . . . . . . . . . . . . . . . . . . . . . . . . . . . . . . . . . . . . . . . . . . . . . . . . . . . . . . . . . . . . . . . . . . . . . . . . . . . . . . . . . . . . . . . . . . . . . . . . . . . . . . . . . . . . . . . . . . . . . . . . . . . . . . . . . . . . . . . . . . . . . . . . . . . . . . . . . . . . . . . . . . . . . . . . . . . . . . . . .
. . . . . . . . . . . . . . . . . . . . . . . . . . . . . . . . . . . . . . . . . . . . . . . . . . . . . . . . . . . . . . . . . . . . . . . . . . . . . . . . . . . . . . . . . . . . . . . . . . . . . . . . . . . . . . . . . . . . . . . . . . . . . . . . . . . . . . . . . . . . . . . . . . . . . . . . . . . . . . . . . . . . . . . . . . . . . . . . . . . . . . . . . . . . . . . . . . . . . . . . . . . . . . . . . . . . . . . . . . . . . . . . . . . . . . . . . . . . . . . . . . . . . . . . . . . . . . . . . . . . . . . . . . . . . . . . . . . . . . . .
. . . . . . . . . . . . . . . . . . . . . . . . . . . . . . . . . . . . . . . . . . . . . . . . . . . . . . . . . . . . . . . . . . . . . . . . . . . . . . . . . . . . . . . . . . . . . . . . . . . . . . . . . . . . . . . . . . . . . . . . . . . . . . . . . . . . . . . . . . . . . . . . . . . . . . . . . . . . . . . . . . . . . . . . . . . . . . . . . . . . . . . . . . . . . . . . . . . . . . . . . . . . . . . . . . . . . . . . . . . . . . . . . . . . . . . . . . . . . . . . . . . . . . . . . . . . . . . . . . . . . . . . . . . . . . . . . . . . . . . .
. . . . . . . . . . . . . . . . . . . . . . . . . . . . . . . . . . . . . . . . . . . . . . . . . . . . . . . . . . . . . . . . . . . . . . . . . . . . . . . . . . . . . . . . . . . . . . . . . . . . . . . . . . . . . . . . . . . . . . . . . . . . . . . . . . . . . . . . . . . . . . . . . . . . . . . . . . . . . . . . . . . . . . . . . . . . . . . . . . . . . . . . . . . . . . . . . . . . . . . . . . . . . . . . . . . . . . . . . . . . . . . . . . . . . . . . . . . . . . . . . . . . . . . . . . . . . . . . . . . . . . . . . . . . . . . . . . . . . . . .
. . . . . . . . . . . . . . . . . . . . . . . . . . . . . . . . . . . . . . . . . . . . . . . . . . . . . . . . . . . . . . . . . . . . . . . . . . . . . . . . . . . . . . . . . . . . . . . . . . . . . . . . . . . . . . . . . . . . . . . . . . . . . . . . . . . . . . . . . . . . . . . . . . . . . . . . . . . . . . . . . . . . . . . . . . . . . . . . . . . . . . . . . . . . . . . . . . . . . . . . . . . . . . . . . . . . . . . . . . . . . . . . . . . . . . . . . . . . . . . . . . . . . . . . . . . . . . . . . . . . . . . . . . . . . . . . . . . . . . . .
. . . . . . . . . . . . . . . . . . . . . . . . . . . . . . . . . . . . . . . . . . . . . . . . . . . . . . . . . . . . . . . . . . . . . . . . . . . . . . . . . . . . . . . . . . . . . . . . . . . . . . . . . . . . . . . . . . . . . . . . . . . . . . . . . . . . . . . . . . . . . . . . . . . . . . . . . . . . . . . . . . . . . . . . . . . . . . . . . . . . . . . . . . . . . . . . . . . . . . . . . . . . . . . . . . . . . . . . . . . . . . . . . . . . . . . . . . . . . . . . . . . . . . . . . . . . . . . . . . . . . . . . . . . . . . . . . . . . . . . .
. . . . . . . . . . . . . . . . . . . . . . . . . . . . . . . . . . . . . . . . . . . . . . . . . . . . . . . . . . . . . . . . . . . . . . . . . . . . . . . . . . . . . . . . . . . . . . . . . . . . . . . . . . . . . . . . . . . . . . . . . . . . . . . . . . . . . . . . . . . . . . . . . . . . . . . . . . . . . . . . . . . . . . . . . . . . . . . . . . . . . . . . . . . . . . . . . . . . . . . . . . . . . . . . . . . . . . . . . . . . . . . . . . . . . . . . . . . . . . . . . . . . . . . . . . . . . . . . . . . . . . . . . . . . . . . . . . . . . . . .
. . . . . . . . . . . . . . . . . . . . . . . . . . . . . . . . . . . . . . . . . . . . . . . . . . . . . . . . . . . . . . . . . . . . . . . . . . . . . . . . . . . . . . . . . . . . . . . . . . . . . . . . . . . . . . . . . . . . . . . . . . . . . . . . . . . . . . . . . . . . . . . . . . . . . . . . . . . . . . . . . . . . . . . . . . . . . . . . . . . . . . . . . . . . . . . . . . . . . . . . . . . . . . . . . . . . . . . . . . . . . . . . . . . . . . . . . . . . . . . . . . . . . . . . . . . . . . . . . . . . . . . . . . . . . . . . . . . . . . . .
. . . . . . . . . . . . . . . . . . . . . . . . . . . . . . . . . . . . . . . . . . . . . . . . . . . . . . . . . . . . . . . . . . . . . . . . . . . . . . . . . . . . . . . . . . . . . . . . . . . . . . . . . . . . . . . . . . . . . . . . . . . . . . . . . . . . . . . . . . . . . . . . . . . . . . . . . . . . . . . . . . . . . . . . . . . . . . . . . . . . . . . . . . . . . . . . . . . . . . . . . . . . . . . . . . . . . . . . . . . . . . . . . . . . . . . . . . . . . . . . . . . . . . . . . . . . . . . . . . . . . . . . . . . . . . . . . . . . . . . .
. . . . . . . . . . . . . . . . . . . . . . . . . . . . . . . . . . . . . . . . . . . . . . . . . . . . . . . . . . . . . . . . . . . . . . . . . . . . . . . . . . . . . . . . . . . . . . . . . . . . . . . . . . . . . . . . . . . . . . . . . . . . . . . . . . . . . . . . . . . . . . . . . . . . . . . . . . . . . . . . . . . . . . . . . . . . . . . . . . . . . . . . . . . . . . . . . . . . . . . . . . . . . . . . . . . . . . . . . . . . . . . . . . . . . . . . . . . . . . . . . . . . . . . . . . . . . . . . . . . . . . . . . . . . . . . . . . . . . . . .
. . . . . . . . . . . . . . . . . . . . . . . . . . . . . . . . . . . . . . . . . . . . . . . . . . . . . . . . . . . . . . . . . . . . . . . . . . . . . . . . . . . . . . . . . . . . . . . . . . . . . . . . . . . . . . . . . . . . . . . . . . . . . . . . . . . . . . . . . . . . . . . . . . . . . . . . . . . . . . . . . . . . . . . . . . . . . . . . . . . . . . . . . . . . . . . . . . . . . . . . . . . . . . . . . . . . . . . . . . . . . . . . . . . . . . . . . . . . . . . . . . . . . . . . . . . . . . . . . . . . . . . . . . . . . . . . . . . . . . . .
. . . . . . . . . . . . . . . . . . . . . . . . . . . . . . . . . . . . . . . . . . . . . . . . . . . . . . . . . . . . . . . . . . . . . . . . . . . . . . . . . . . . . . . . . . . . . . . . . . . . . . . . . . . . . . . . . . . . . . . . . . . . . . . . . . . . . . . . . . . . . . . . . . . . . . . . . . . . . . . . . . . . . . . . . . . . . . . . . . . . . . . . . . . . . . . . . . . . . . . . . . . . . . . . . . . . . . . . . . . . . . . . . . . . . . . . . . . . . . . . . . . . . . . . . . . . . . . . . . . . . . . . . . . . . . . . . . . . . . . .
. . . . . . . . . . . . . . . . . . . . . . . . . . . . . . . . . . . . . . . . . . . . . . . . . . . . . . . . . . . . . . . . . . . . . . . . . . . . . . . . . . . . . . . . . . . . . . . . . . . . . . . . . . . . . . . . . . . . . . . . . . . . . . . . . . . . . . . . . . . . . . . . . . . . . . . . . . . . . . . . . . . . . . . . . . . . . . . . . . . . . . . . . . . . . . . . . . . . . . . . . . . . . . . . . . . . . . . . . . . . . . . . . . . . . . . . . . . . . . . . . . . . . . . . . . . . . . . . . . . . . . . . . . . . . . . . . . . . . . . .
. . . . . . . . . . . . . . . . . . . . . . . . . . . . . . . . . . . . . . . . . . . . . . . . . . . . . . . . . . . . . . . . . . . . . . . . . . . . . . . . . . . . . . . . . . . . . . . . . . . . . . . . . . . . . . . . . . . . . . . . . . . . . . . . . . . . . . . . . . . . . . . . . . . . . . . . . . . . . . . . . . . . . . . . . . . . . . . . . . . . . . . . . . . . . . . . . . . . . . . . . . . . . . . . . . . . . . . . . . . . . . . . . . . . . . . . . . . . . . . . . . . . . . . . . . . . . . . . . . . . . . . . . . . . . . . . . . . . . . . .
. . . . . . . . . . . . . . . . . . . . . . . . . . . . . . . . . . . . . . . . . . . . . . . . . . . . . . . . . . . . . . . . . . . . . . . . . . . . . . . . . . . . . . . . . . . . . . . . . . . . . . . . . . . . . . . . . . . . . . . . . . . . . . . . . . . . . . . . . . . . . . . . . . . . . . . . . . . . . . . . . . . . . . . . . . . . . . . . . . . . . . . . . . . . . . . . . . . . . . . . . . . . . . . . . . . . . . . . . . . . . . . . . . . . . . . . . . . . . . . . . . . . . . . . . . . . . . . . . . . . . . . . . . . . . . . . . . . . . . . .
. . . . . . . . . . . . . . . . . . . . . . . . . . . . . . . . . . . . . . . . . . . . . . . . . . . . . . . . . . . . . . . . . . . . . . . . . . . . . . . . . . . . . . . . . . . . . . . . . . . . . . . . . . . . . . . . . . . . . . . . . . . . . . . . . . . . . . . . . . . . . . . . . . . . . . . . . . . . . . . . . . . . . . . . . . . . . . . . . . . . . . . . . . . . . . . . . . . . . . . . . . . . . . . . . . . . . . . . . . . . . . . . . . . . . . . . . . . . . . . . . . . . . . . . . . . . . . . . . . . . . . . . . . . . . . . . . . . . . . . .
. . . . . . . . . . . . . . . . . . . . . . . . . . . . . . . . . . . . . . . . . . . . . . . . . . . . . . . . . . . . . . . . . . . . . . . . . . . . . . . . . . . . . . . . . . . . . . . . . . . . . . . . . . . . . . . . . . . . . . . . . . . . . . . . . . . . . . . . . . . . . . . . . . . . . . . . . . . . . . . . . . . . . . . . . . . . . . . . . . . . . . . . . . . . . . . . . . . . . . . . . . . . . . . . . . . . . . . . . . . . . . . . . . . . . . . . . . . . . . . . . . . . . . . . . . . . . . . . . . . . . . . . . . . . . . . . . . . . . . . .
. . . . . . . . . . . . . . . . . . . . . . . . . . . . . . . . . . . . . . . . . . . . . . . . . . . . . . . . . . . . . . . . . . . . . . . . . . . . . . . . . . . . . . . . . . . . . . . . . . . . . . . . . . . . . . . . . . . . . . . . . . . . . . . . . . . . . . . . . . . . . . . . . . . . . . . . . . . . . . . . . . . . . . . . . . . . . . . . . . . . . . . . . . . . . . . . . . . . . . . . . . . . . . . . . . . . . . . . . . . . . . . . . . . . . . . . . . . . . . . . . . . . . . . . . . . . . . . . . . . . . . . . . . . . . . . . . . . . . . . .
. . . . . . . . . . . . . . . . . . . . . . . . . . . . . . . . . . . . . . . . . . . . . . . . . . . . . . . . . . . . . . . . . . . . . . . . . . . . . . . . . . . . . . . . . . . . . . . . . . . . . . . . . . . . . . . . . . . . . . . . . . . . . . . . . . . . . . . . . . . . . . . . . . . . . . . . . . . . . . . . . . . . . . . . . . . . . . . . . . . . . . . . . . . . . . . . . . . . . . . . . . . . . . . . . . . . . . . . . . . . . . . . . . . . . . . . . . . . . . . . . . . . . . . . . . . . . . . . . . . . . . . . . . . . . . . . . . . . . . . .
. . . . . . . . . . . . . . . . . . . . . . . . . . . . . . . . . . . . . . . . . . . . . . . . . . . . . . . . . . . . . . . . . . . . . . . . . . . . . . . . . . . . . . . . . . . . . . . . . . . . . . . . . . . . . . . . . . . . . . . . . . . . . . . . . . . . . . . . . . . . . . . . . . . . . . . . . . . . . . . . . . . . . . . . . . . . . . . . . . . . . . . . . . . . . . . . . . . . . . . . . . . . . . . . . . . . . . . . . . . . . . . . . . . . . . . . . . . . . . . . . . . . . . . . . . . . . . . . . . . . . . . . . . . . . . . . . . . . . . . .
Content sContent s
1 Introduction
Box content
Minim um system requirements
2 Cables and Connectors
USB-C protocols
Cables
3 Getting Connected
STEP 1 - Connect the USB cable
STEP 2 - Set up LaCie Rugged SECURE
4 Manage Security
Enabling security with Toolkit
Unlocking the drive
Locking the drive
Changing your password
Disabling security
Re-enabling secur ity
Crypto-erasing the drive
Resetting the drive to factory settings
5 Optional Formatting and Partitioning
About file system formats
Toolkit Optimize
Manual form atting
6 Safely Remove Rugged SECURE From Your Computer
. . . . . . . . . . . . . . . . . . . . . . . . . . . . . . . . . . . . . . . . . . . . . . . . . . . . . . . . . . . . . . . . . . . . . . . . . . . . . . . . . . . . . . . . . . . . . . . . . . . . . . . . . . . . . . . . . . . . . . . . . . . . . . . . . . . . . . . . . . . . . . . . . . . . . . . . . . . . . . . . . . . . . . . . . . . . . . . . . . . . . . . . . . . . . . . . . . . . . . . . . . . . . . . . . . . . . . . . . . . . . . . . . . . . . . . . . . . . . . . . . . . . . . . . . . . . . . . . . . . . . . . . . . . . . . . . . . . . . . . .Po r ts
. . . . . . . . . . . . . . . . . . . . . . . . . . . . . . . . . . . . . . . . . . . . . . . . . . . . . . . . . . . . . . . . . . . . . . . . . . . . . . . . . . . . . . . . . . . . . . . . . . . . . . . . . . . . . . . . . . . . . . . . . . . . . . . . . . . . . . . . . . . . . . . . . . . . . . . . . . . . . . . . . . . . . . . . . . . . . . . . . . . . . . . . . . . . . . . . . . . . . . . . . . . . . . . . . . . . . . . . . . . . . . . . . . . . . . . . . . . . . . . . . . . . . . . . . . . . . . . . . . . . . . . . . . . . . . . . . . . . . . . .Oper ating system
. . . . . . . . . . . . . . . . . . . . . . . . . . . . . . . . . . . . . . . . . . . . . . . . . . . . . . . . . . . . . . . . . . . . . . . . . . . . . . . . . . . . . . . . . . . . . . . . . . . . . . . . . . . . . . . . . . . . . . . . . . . . . . . . . . . . . . . . . . . . . . . . . . . . . . . . . . . . . . . . . . . . . . . . . . . . . . . . . . . . . . . . . . . . . . . . . . . . . . . . . . . . . . . . . . . . . . . . . . . . . . . . . . . . . . . . . . . . . . . . . . . . . . . . . . . . . . . . . . . . . . . . . . . . . . . . . . . . . . . .Minimum free dis k s pace
. . . . . . . . . . . . . . . . . . . . . . . . . . . . . . . . . . . . . . . . . . . . . . . . . . . . . . . . . . . . . . . . . . . . . . . . . . . . . . . . . . . . . . . . . . . . . . . . . . . . . . . . . . . . . . . . . . . . . . . . . . . . . . . . . . . . . . . . . . . . . . . . . . . . . . . . . . . . . . . . . . . . . . . . . . . . . . . . . . . . . . . . . . . . . . . . . . . . . . . . . . . . . . . . . . . . . . . . . . . . . . . . . . . . . . . . . . . . . . . . . . . . . . . . . . . . . . . . . . . . . . . . . . . . . . . . . . . . . . . .Ingres s Pro tection rating
. . . . . . . . . . . . . . . . . . . . . . . . . . . . . . . . . . . . . . . . . . . . . . . . . . . . . . . . . . . . . . . . . . . . . . . . . . . . . . . . . . . . . . . . . . . . . . . . . . . . . . . . . . . . . . . . . . . . . . . . . . . . . . . . . . . . . . . . . . . . . . . . . . . . . . . . . . . . . . . . . . . . . . . . . . . . . . . . . . . . . . . . . . . . . . . . . . . . . . . . . . . . . . . . . . . . . . . . . . . . . . . . . . . . . . . . . . . . . . . . . . . . . . . . . . . . . . . . . . . . . . . . . . . . . . . . . . . . . . . .USB 3.1 (USB-C) cable
. . . . . . . . . . . . . . . . . . . . . . . . . . . . . . . . . . . . . . . . . . . . . . . . . . . . . . . . . . . . . . . . . . . . . . . . . . . . . . . . . . . . . . . . . . . . . . . . . . . . . . . . . . . . . . . . . . . . . . . . . . . . . . . . . . . . . . . . . . . . . . . . . . . . . . . . . . . . . . . . . . . . . . . . . . . . . . . . . . . . . . . . . . . . . . . . . . . . . . . . . . . . . . . . . . . . . . . . . . . . . . . . . . . . . . . . . . . . . . . . . . . . . . . . . . . . . . . . . . . . . . . . . . . . . . . . . . . . . . . .USB 3.1 (USB-C)—to—USB Type A cable
. . . . . . . . . . . . . . . . . . . . . . . . . . . . . . . . . . . . . . . . . . . . . . . . . . . . . . . . . . . . . . . . . . . . . . . . . . . . . . . . . . . . . . . . . . . . . . . . . . . . . . . . . . . . . . . . . . . . . . . . . . . . . . . . . . . . . . . . . . . . . . . . . . . . . . . . . . . . . . . . . . . . . . . . . . . . . . . . . . . . . . . . . . . . . . . . . . . . . . . . . . . . . . . . . . . . . . . . . . . . . . . . . . . . . . . . . . . . . . . . . . . . . . . . . . . . . . . . . . . . . . . . . . . . . . . . . . . . . . . .Entering yo ur password with Too lkit
. . . . . . . . . . . . . . . . . . . . . . . . . . . . . . . . . . . . . . . . . . . . . . . . . . . . . . . . . . . . . . . . . . . . . . . . . . . . . . . . . . . . . . . . . . . . . . . . . . . . . . . . . . . . . . . . . . . . . . . . . . . . . . . . . . . . . . . . . . . . . . . . . . . . . . . . . . . . . . . . . . . . . . . . . . . . . . . . . . . . . . . . . . . . . . . . . . . . . . . . . . . . . . . . . . . . . . . . . . . . . . . . . . . . . . . . . . . . . . . . . . . . . . . . . . . . . . . . . . . . . . . . . . . . . . . . . . . . . . . .Entering yo ur password with the Unlock Drive app
. . . . . . . . . . . . . . . . . . . . . . . . . . . . . . . . . . . . . . . . . . . . . . . . . . . . . . . . . . . . . . . . . . . . . . . . . . . . . . . . . . . . . . . . . . . . . . . . . . . . . . . . . . . . . . . . . . . . . . . . . . . . . . . . . . . . . . . . . . . . . . . . . . . . . . . . . . . . . . . . . . . . . . . . . . . . . . . . . . . . . . . . . . . . . . . . . . . . . . . . . . . . . . . . . . . . . . . . . . . . . . . . . . . . . . . . . . . . . . . . . . . . . . . . . . . . . . . . . . . . . . . . . . . . . . . . . . . . . . . .How to cho o s e the file s ystem format
. . . . . . . . . . . . . . . . . . . . . . . . . . . . . . . . . . . . . . . . . . . . . . . . . . . . . . . . . . . . . . . . . . . . . . . . . . . . . . . . . . . . . . . . . . . . . . . . . . . . . . . . . . . . . . . . . . . . . . . . . . . . . . . . . . . . . . . . . . . . . . . . . . . . . . . . . . . . . . . . . . . . . . . . . . . . . . . . . . . . . . . . . . . . . . . . . . . . . . . . . . . . . . . . . . . . . . . . . . . . . . . . . . . . . . . . . . . . . . . . . . . . . . . . . . . . . . . . . . . . . . . . . . . . . . . . . . . . . . . .Mac
. . . . . . . . . . . . . . . . . . . . . . . . . . . . . . . . . . . . . . . . . . . . . . . . . . . . . . . . . . . . . . . . . . . . . . . . . . . . . . . . . . . . . . . . . . . . . . . . . . . . . . . . . . . . . . . . . . . . . . . . . . . . . . . . . . . . . . . . . . . . . . . . . . . . . . . . . . . . . . . . . . . . . . . . . . . . . . . . . . . . . . . . . . . . . . . . . . . . . . . . . . . . . . . . . . . . . . . . . . . . . . . . . . . . . . . . . . . . . . . . . . . . . . . . . . . . . . . . . . . . . . . . . . . . . . . . . . . . . . . .Windows
4
4
4
4
4
5
5
6
6
6
6
6
7
7
8
10
10
12
12
13
15
15
16
17
17
18
20
20
20
21
21
22
23
24
Page 3

. . . . . . . . . . . . . . . . . . . . . . . . . . . . . . . . . . . . . . . . . . . . . . . . . . . . . . . . . . . . . . . . . . . . . . . . . . . . . . . . . . . . . . . . . . . . . . . . . . . . . . . . . . . . . . . . . . . . . . . . . . . . . . . . . . . . . . . . . . . . . . . . . . . . . . . . . . . . . . . . . . . . . . . . . . . . . . . . . . . . . . . . . . . . . . . . . . . . . . . . . . . . . . . . . . . . . . . . . . . . . . . . . . . . . . . . . . . . . . . . . . . . . . . . . . . . . . . . . . . . . . . . . . . . . . . . . . . . . . . .
. . . . . . . . . . . . . . . . . . . . . . . . . . . . . . . . . . . . . . . . . . . . . . . . . . . . . . . . . . . . . . . . . . . . . . . . . . . . . . . . . . . . . . . . . . . . . . . . . . . . . . . . . . . . . . . . . . . . . . . . . . . . . . . . . . . . . . . . . . . . . . . . . . . . . . . . . . . . . . . . . . . . . . . . . . . . . . . . . . . . . . . . . . . . . . . . . . . . . . . . . . . . . . . . . . . . . . . . . . . . . . . . . . . . . . . . . . . . . . . . . . . . . . . . . . . . . . . . . . . . . . . . . . . . . . . . . . . . . . . .
. . . . . . . . . . . . . . . . . . . . . . . . . . . . . . . . . . . . . . . . . . . . . . . . . . . . . . . . . . . . . . . . . . . . . . . . . . . . . . . . . . . . . . . . . . . . . . . . . . . . . . . . . . . . . . . . . . . . . . . . . . . . . . . . . . . . . . . . . . . . . . . . . . . . . . . . . . . . . . . . . . . . . . . . . . . . . . . . . . . . . . . . . . . . . . . . . . . . . . . . . . . . . . . . . . . . . . . . . . . . . . . . . . . . . . . . . . . . . . . . . . . . . . . . . . . . . . . . . . . . . . . . . . . . . . . . . . . . . . . .
. . . . . . . . . . . . . . . . . . . . . . . . . . . . . . . . . . . . . . . . . . . . . . . . . . . . . . . . . . . . . . . . . . . . . . . . . . . . . . . . . . . . . . . . . . . . . . . . . . . . . . . . . . . . . . . . . . . . . . . . . . . . . . . . . . . . . . . . . . . . . . . . . . . . . . . . . . . . . . . . . . . . . . . . . . . . . . . . . . . . . . . . . . . . . . . . . . . . . . . . . . . . . . . . . . . . . . . . . . . . . . . . . . . . . . . . . . . . . . . . . . . . . . . . . . . . . . . . . . . . . . . . . . . . . . . . . . . . . . . .
. . . . . . . . . . . . . . . . . . . . . . . . . . . . . . . . . . . . . . . . . . . . . . . . . . . . . . . . . . . . . . . . . . . . . . . . . . . . . . . . . . . . . . . . . . . . . . . . . . . . . . . . . . . . . . . . . . . . . . . . . . . . . . . . . . . . . . . . . . . . . . . . . . . . . . . . . . . . . . . . . . . . . . . . . . . . . . . . . . . . . . . . . . . . . . . . . . . . . . . . . . . . . . . . . . . . . . . . . . . . . . . . . . . . . . . . . . . . . . . . . . . . . . . . . . . . . . . . . . . . . . . . . . . . . . . . . . . . . . . .
. . . . . . . . . . . . . . . . . . . . . . . . . . . . . . . . . . . . . . . . . . . . . . . . . . . . . . . . . . . . . . . . . . . . . . . . . . . . . . . . . . . . . . . . . . . . . . . . . . . . . . . . . . . . . . . . . . . . . . . . . . . . . . . . . . . . . . . . . . . . . . . . . . . . . . . . . . . . . . . . . . . . . . . . . . . . . . . . . . . . . . . . . . . . . . . . . . . . . . . . . . . . . . . . . . . . . . . . . . . . . . . . . . . . . . . . . . . . . . . . . . . . . . . . . . . . . . . . . . . . . . . . . . . . . . . . . . . . . . . .
Mac
Windows
7 Frequently asked questions
All users
Mac
Windows
. . . . . . . . . . . . . . . . . . . . . . . . . . . . . . . . . . . . . . . . . . . . . . . . . . . . . . . . . . . . . . . . . . . . . . . . . . . . . . . . . . . . . . . . . . . . . . . . . . . . . . . . . . . . . . . . . . . . . . . . . . . . . . . . . . . . . . . . . . . . . . . . . . . . . . . . . . . . . . . . . . . . . . . . . . . . . . . . . . . . . . . . . . . . . . . . . . . . . . . . . . . . . . . . . . . . . . . . . . . . . . . . . . . . . . . . . . . . . . . . . . . . . . . . . . . . . . . . . . . . . . . . . . . . . . . . . . . . . . . .Eject via Finder windo w
. . . . . . . . . . . . . . . . . . . . . . . . . . . . . . . . . . . . . . . . . . . . . . . . . . . . . . . . . . . . . . . . . . . . . . . . . . . . . . . . . . . . . . . . . . . . . . . . . . . . . . . . . . . . . . . . . . . . . . . . . . . . . . . . . . . . . . . . . . . . . . . . . . . . . . . . . . . . . . . . . . . . . . . . . . . . . . . . . . . . . . . . . . . . . . . . . . . . . . . . . . . . . . . . . . . . . . . . . . . . . . . . . . . . . . . . . . . . . . . . . . . . . . . . . . . . . . . . . . . . . . . . . . . . . . . . . . . . . . . .Eject via Desktop
. . . . . . . . . . . . . . . . . . . . . . . . . . . . . . . . . . . . . . . . . . . . . . . . . . . . . . . . . . . . . . . . . . . . . . . . . . . . . . . . . . . . . . . . . . . . . . . . . . . . . . . . . . . . . . . . . . . . . . . . . . . . . . . . . . . . . . . . . . . . . . . . . . . . . . . . . . . . . . . . . . . . . . . . . . . . . . . . . . . . . . . . . . . . . . . . . . . . . . . . . . . . . . . . . . . . . . . . . . . . . . . . . . . . . . . . . . . . . . . . . . . . . . . . . . . . . . . . . . . . . . . . . . . . . . . . . . . . . . . .Pro blem: I’m enabling security, and I get an “Inco rrect co de” error when I enter my secur e co de (SID)
. . . . . . . . . . . . . . . . . . . . . . . . . . . . . . . . . . . . . . . . . . . . . . . . . . . . . . . . . . . . . . . . . . . . . . . . . . . . . . . . . . . . . . . . . . . . . . . . . . . . . . . . . . . . . . . . . . . . . . . . . . . . . . . . . . . . . . . . . . . . . . . . . . . . . . . . . . . . . . . . . . . . . . . . . . . . . . . . . . . . . . . . . . . . . . . . . . . . . . . . . . . . . . . . . . . . . . . . . . . . . . . . . . . . . . . . . . . . . . . . . . . . . . . . . . . . . . . . . . . . . . . . . . . . . . . . . . . . . . . .Pro blem: My file trans fers are to o slow
. . . . . . . . . . . . . . . . . . . . . . . . . . . . . . . . . . . . . . . . . . . . . . . . . . . . . . . . . . . . . . . . . . . . . . . . . . . . . . . . . . . . . . . . . . . . . . . . . . . . . . . . . . . . . . . . . . . . . . . . . . . . . . . . . . . . . . . . . . . . . . . . . . . . . . . . . . . . . . . . . . . . . . . . . . . . . . . . . . . . . . . . . . . . . . . . . . . . . . . . . . . . . . . . . . . . . . . . . . . . . . . . . . . . . . . . . . . . . . . . . . . . . . . . . . . . . . . . . . . . . . . . . . . . . . . . . . . . . . . .Pro blem: I have an older co mputer with US B 2.0 po rts
. . . . . . . . . . . . . . . . . . . . . . . . . . . . . . . . . . . . . . . . . . . . . . . . . . . . . . . . . . . . . . . . . . . . . . . . . . . . . . . . . . . . . . . . . . . . . . . . . . . . . . . . . . . . . . . . . . . . . . . . . . . . . . . . . . . . . . . . . . . . . . . . . . . . . . . . . . . . . . . . . . . . . . . . . . . . . . . . . . . . . . . . . . . . . . . . . . . . . . . . . . . . . . . . . . . . . . . . . . . . . . . . . . . . . . . . . . . . . . . . . . . . . . . . . . . . . . . . . . . . . . . . . . . . . . . . . . . . . . . .Pro blem: I must us e a USB hub for my USB devices
. . . . . . . . . . . . . . . . . . . . . . . . . . . . . . . . . . . . . . . . . . . . . . . . . . . . . . . . . . . . . . . . . . . . . . . . . . . . . . . . . . . . . . . . . . . . . . . . . . . . . . . . . . . . . . . . . . . . . . . . . . . . . . . . . . . . . . . . . . . . . . . . . . . . . . . . . . . . . . . . . . . . . . . . . . . . . . . . . . . . . . . . . . . . . . . . . . . . . . . . . . . . . . . . . . . . . . . . . . . . . . . . . . . . . . . . . . . . . . . . . . . . . . . . . . . . . . . . . . . . . . . . . . . . . . . . . . . . . . . .Pro blem: The provided USB cables are to o short
. . . . . . . . . . . . . . . . . . . . . . . . . . . . . . . . . . . . . . . . . . . . . . . . . . . . . . . . . . . . . . . . . . . . . . . . . . . . . . . . . . . . . . . . . . . . . . . . . . . . . . . . . . . . . . . . . . . . . . . . . . . . . . . . . . . . . . . . . . . . . . . . . . . . . . . . . . . . . . . . . . . . . . . . . . . . . . . . . . . . . . . . . . . . . . . . . . . . . . . . . . . . . . . . . . . . . . . . . . . . . . . . . . . . . . . . . . . . . . . . . . . . . . . . . . . . . . . . . . . . . . . . . . . . . . . . . . . . . . . .Pro blem: I'm receiving file trans fer error messages
. . . . . . . . . . . . . . . . . . . . . . . . . . . . . . . . . . . . . . . . . . . . . . . . . . . . . . . . . . . . . . . . . . . . . . . . . . . . . . . . . . . . . . . . . . . . . . . . . . . . . . . . . . . . . . . . . . . . . . . . . . . . . . . . . . . . . . . . . . . . . . . . . . . . . . . . . . . . . . . . . . . . . . . . . . . . . . . . . . . . . . . . . . . . . . . . . . . . . . . . . . . . . . . . . . . . . . . . . . . . . . . . . . . . . . . . . . . . . . . . . . . . . . . . . . . . . . . . . . . . . . . . . . . . . . . . . . . . . . . .Pro blem: The hard dr ive icon does not appear on my des ktop
. . . . . . . . . . . . . . . . . . . . . . . . . . . . . . . . . . . . . . . . . . . . . . . . . . . . . . . . . . . . . . . . . . . . . . . . . . . . . . . . . . . . . . . . . . . . . . . . . . . . . . . . . . . . . . . . . . . . . . . . . . . . . . . . . . . . . . . . . . . . . . . . . . . . . . . . . . . . . . . . . . . . . . . . . . . . . . . . . . . . . . . . . . . . . . . . . . . . . . . . . . . . . . . . . . . . . . . . . . . . . . . . . . . . . . . . . . . . . . . . . . . . . . . . . . . . . . . . . . . . . . . . . . . . . . . . . . . . . . . .Pro blem: The hard dr ive icon doesn't appear in C o mputer
24
24
24
24
26
26
26
26
27
27
27
27
28
28
28
28
Page 4

Introducon
A mobile storage solution for creative professionals on the go, LaCie Rugged SECURE’s se lf-encrypting magic
offers extra protection for your intellectual prope rty. Add to this the drop, rain, and shock protection that
Rugged drives are famous for, and you get a drive that vigilantly protects your data.
Review this user manual for instructions on how to set up your Rugged SECURE and begin securely storing
your data with AES-256 hardware e ncryption.
For common questions and answers about your hard drive, see Frequently Asked Questions or visit LaCie
customer support.
Box content
LaCie Rugged Secure
USB 3.1 Gen 2 (USB-C) cable
USB 3.1 Gen 1 (USB-C)–to–USB Type A cable (compatible with Type A USB 2.0 and USB 3.0 ports)
Insert with se cure code (SID) and reset code (PSID)
Minimum system requirements
Ports
You can connect your LaCie device to a computer with a USB-C or Type A (USB 3.0 or USB 2.0) port.
Operang system
Windows 7 or higher
macOS 10.10 or higher
Important—Save your packaging. If you experience problems with your hard drive and want to
exchange it, the hard drive must be returned in its original packaging.
It’s recommended that you save the inse rt listing the secure code and reset code for your
de vice. The secure code is required to initially enable security for your device. The reset code
is required if you need to reset the device to factory settings. Note: If you no longer have the
inse rt, you can find the codes on stickers located under the protective bumper encasing the
hard drive.
®
®
4LaCie Rugged Secure
6/11/18
Page 5

Minimum free disk space
600MB recommended
Ingress Protecon rang
The Ingress Protection (IP) rating is a standard for defining the types of protection supported by equipment
and de vices. The two-digit code for IP lets users know the conditions that the de vice can withstand. The two
digits are independent, with each numbe r representing a different leve l of protection.
LaCie Rugged SECURE is rated IP 52.
5: Protection against dust from entering the device’s internal mechanism.
2: Protected against falling drops of water, if the case is disposed up to 15 from vertical.
LaCie Rugged SECURE is also protected when it is dropped from heights up to 1.2 meters / 4 fee t (in nonoperating mode).
5LaCie Rugged Secure
6/11/18
Page 6
Cables and Connectors
USB-C protocols
USB is a se rial input/output technology for connecting periphe ral devices to a computer. USB-C is the latest
imp lementation of this standard and it provide s higher bandwidth and new power m anageme nt features.
USB-C suppo rts many protocols:
Thunde rbo lt 3 transfer rates up to 40Gb/s
USB 3. 1 Ge n 2 transfer rates up to 10Gb/s
USB 3. 1 Ge n 1 transfer rates up to 5Gb/s
SuperSpee d USB 3.0 transfer rates up to 5Gb/s
Hi-Spee d USB 2.0 transfer rates up to 480Mb/s
The USB-C port on the LaCie Rugged SECURE is USB 3.1 Ge n 1. You can connect your Rugged SECURE to any
USB-C or USB Type A port but transfer rates vary. See be low for more details.
Cables
Your LaCie hard drive is shipped with two cables for universal compatibility with modern computers:
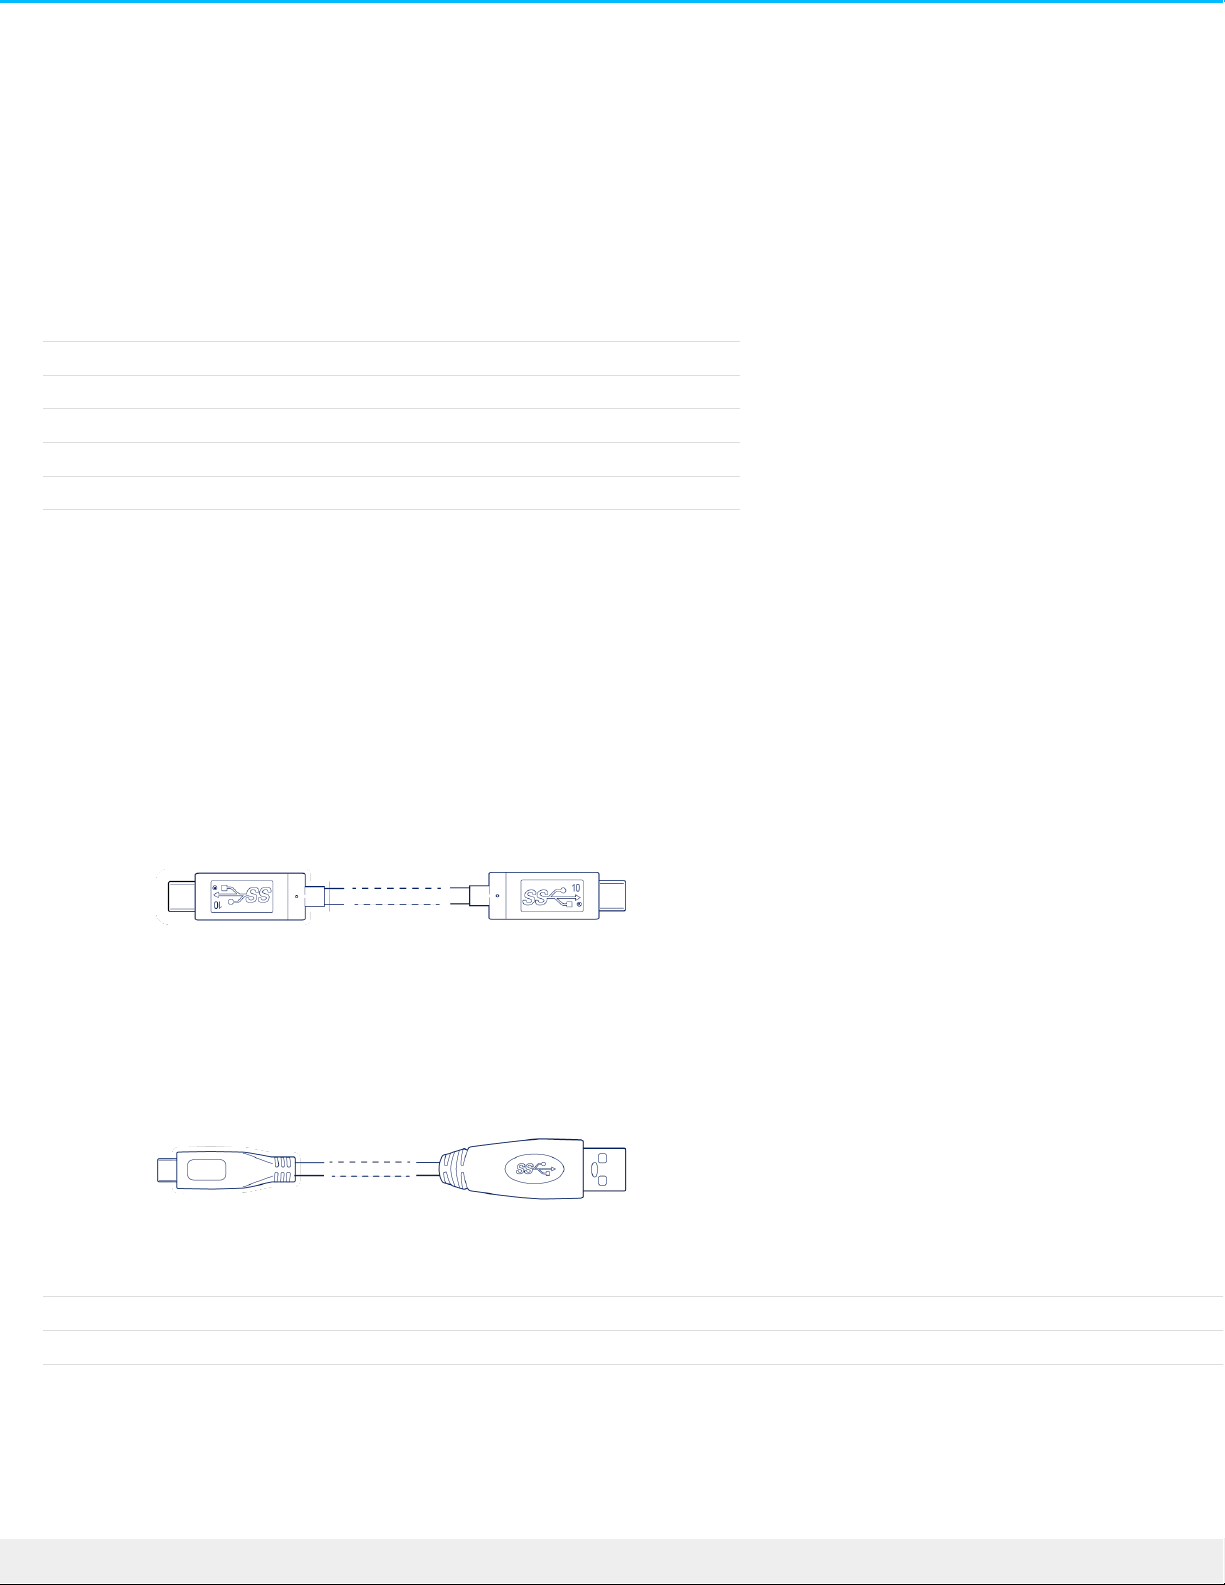
USB 3.1 (USB-C) cable
For optim al transfe r rates up to 5Gb/s , use the USB 3.1 (USB-C) cable to connect LaCie Rugged SECURE.
Connecting the device is easy since the cable is ide ntical on both e nds.
USB 3.1 (USB-C)—to—USB Type A cable
Use the USB 3.1 (USB-C)—to—USB Type A cable to connect LaCie Rugged SECURE to a computer’s Type A
port (USB 3.0 or USB 2. 0).
Transfe r rates with USB Type A connections have the pote ntial to reach the following spee ds:
SuperSpee d USB 3.0
Hi-Spee d USB 2.0
6LaCie Rugged Secure
6/11/18
Page 7
Geng Connected
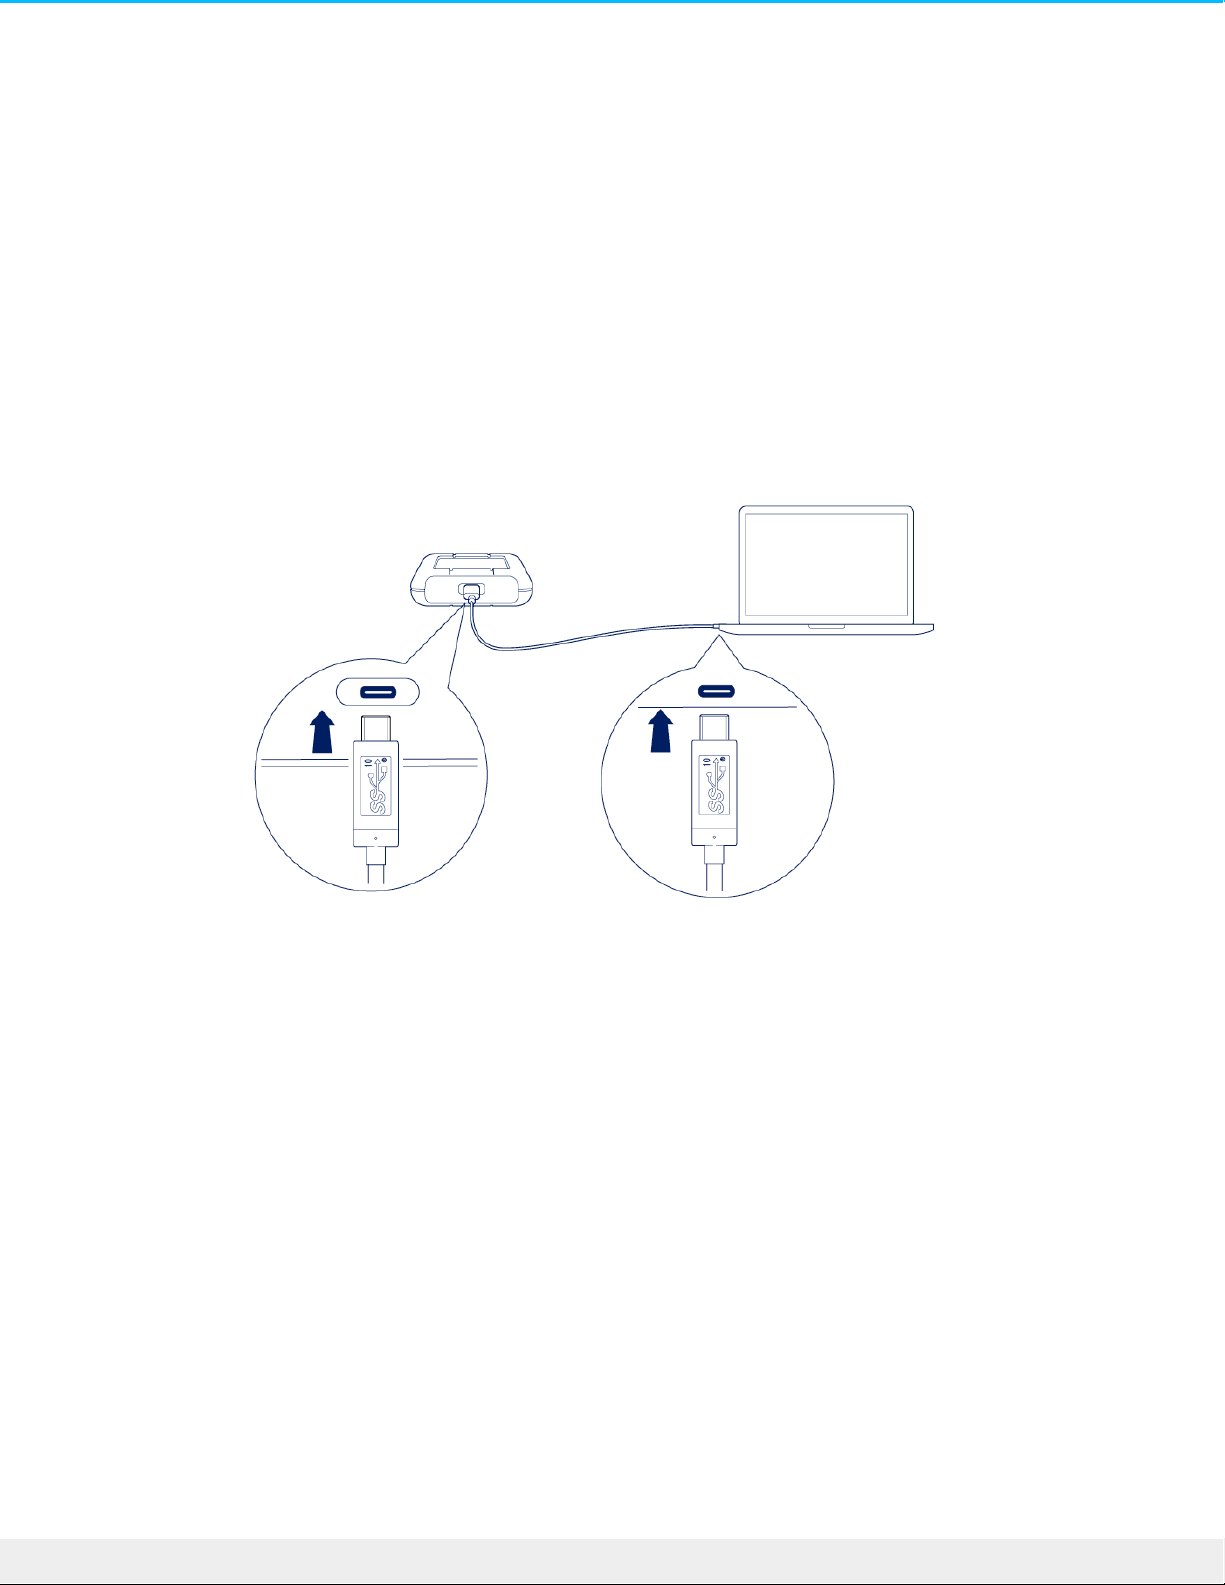
STEP 1 - Connect the USB cable
Before connecting LaCie Rugged SECURE, confirm the type of USB port on your computer, then choose the
appropriate cable to connect your device:
Use the USB 3.1 (USB-C) cable if your computer has a USB-C port.
Use the USB-C–to–USB Type A (USB 3.0/USB 2.0) cable if your computer does not have a USB-C port.
7LaCie Rugged Secure
6/11/18
Page 8
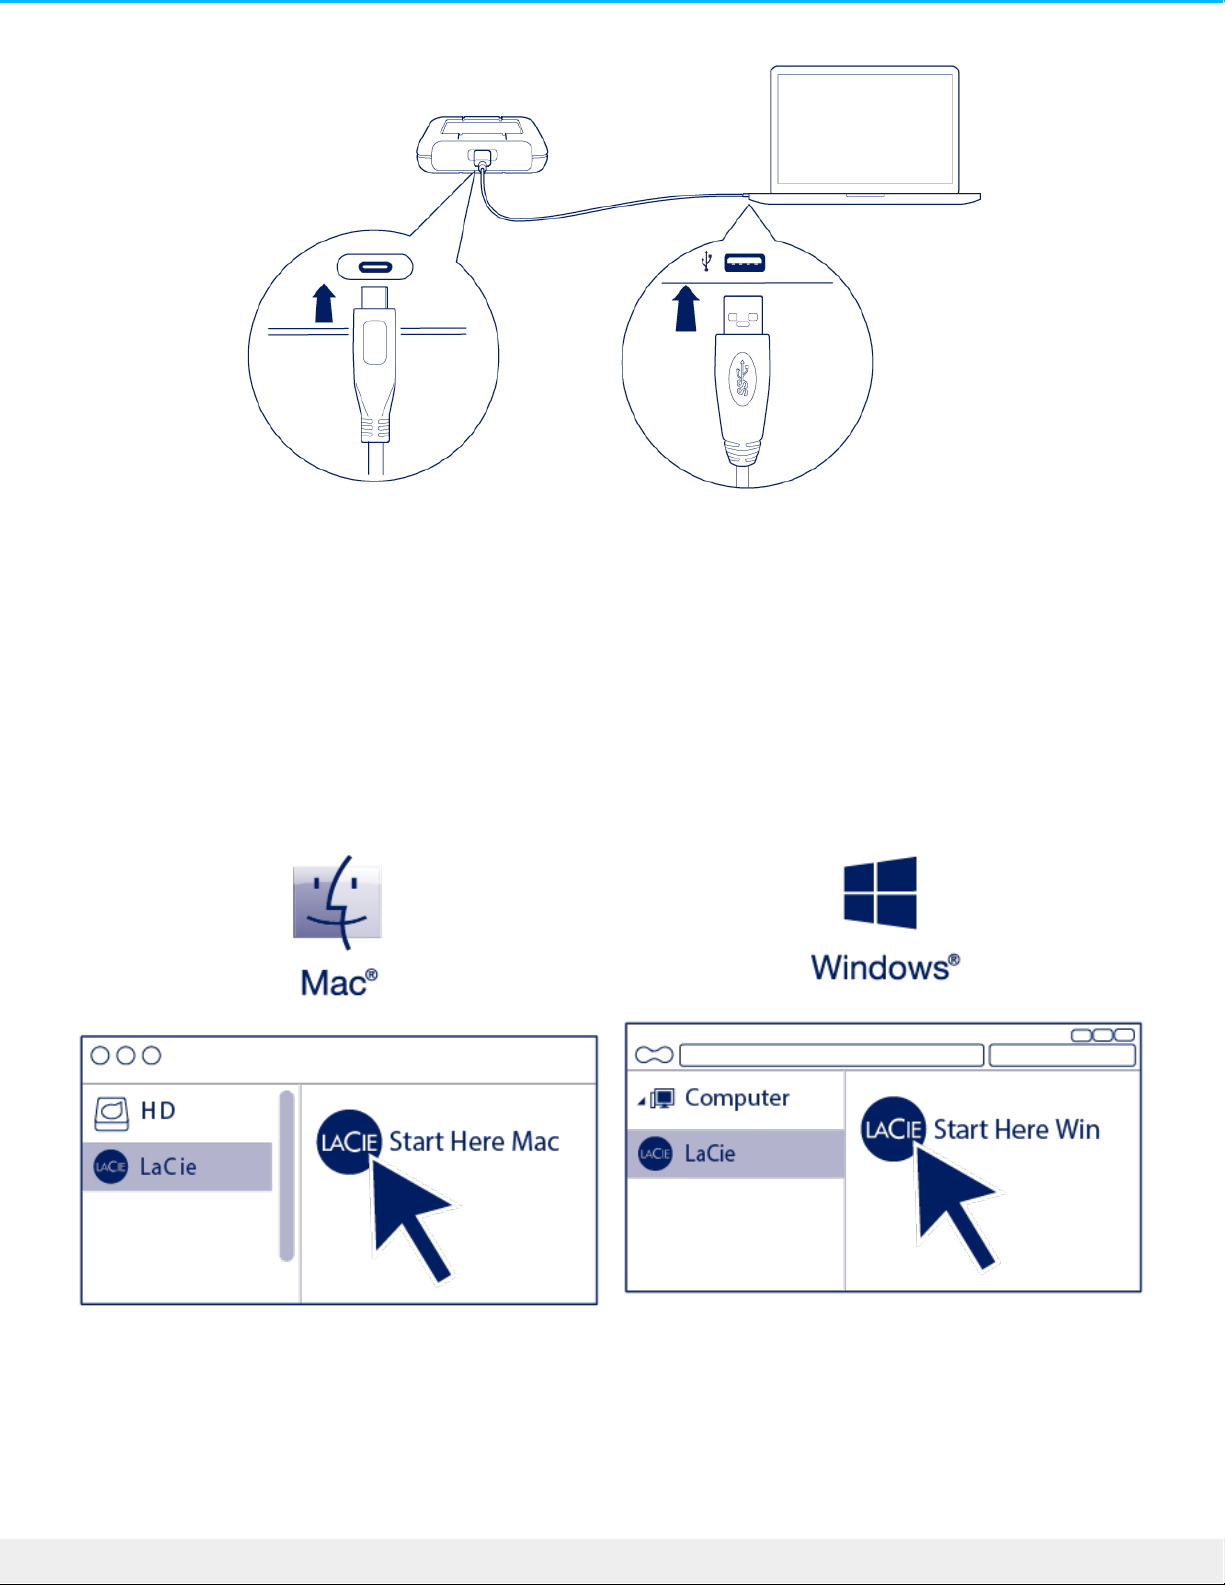
STEP 2 - Set up LaCie Rugged SECURE
An internet connection is required to install the Toolkit app.
1. Using a file manager such as File Explorer or Finder, ope n LaCie Rugged SECURE and launch Start Here
Win or Start Here Mac.
2. Follow the onscreen instructions to register your device and install the Toolkit app, which you’ll need to
enable security for LaCie Rugged SECURE.
8LaCie Rugged Secure
6/11/18
Page 9

Toolkit lets you enter your password whenever you want to lock or unlock the drive, and provide s other
useful tools such as:
Changing your password
Managing backup plans.
Creating mirror folde rs.
Enabling/disabling security.
Resetting your device to factory se ttings
Optimize disk format for pe rformance when used with a spe cific operating system.
For details on Toolkit features, see the LaCie Toolkit user manual.
Toolkit is required in order to enable se curity for LaCie Rugged SECURE. Be sure to install Toolkit
in order to password-protect your device using Seagate Se cure 256-bit encryption.
9LaCie Rugged Secure
6/11/18
Page 10

Manage Security
Managing the security of your LaCie Rugged SECURE is e asy using Toolkit. Enable security, create a
password, and rest easy knowing your data is protected with Seagate Secure 256-bit encryption technology.
Enabling security with Toolkit
Toolkit is required to e nable security for LaCie Rugged SECURE.
1. Connect LaCie Rugged SECURE to your computer.
2. Ope n Toolkit.
3. On the Main Menu, click on the LaCie Rugged SECURE device.
4. Click ENABLE SECURITY.
macOS 10.13 or later—A driver needs to be installed. At the prompt, use the Finder to e ject the
drive, and then disconnect the cable from the computer. Toolkit will prompt you to enable a
system extension:
Click NEXT. Navigate to your Security & Privacy System Preferences and enable the system extension
signed by “Seagate Technologies LLC”.
10LaCie Rugged Secure
6/11/18
Page 11

5. A notice appears informing you that you will create a password that you must remember or keep safe, as
it can’t be recove red. Click the checkbox to acknowledge the notification, and then click NEXT.
6. Enter the 8-character secure code (SID) listed on the insert that was included in your LaCie Rugged
SECURE packaging. (Note that the secure code is case-sensitive, meaning that it distinguishes between
upper-case and lowe r-case letters.)
7. Click NEXT.
8. Create a password that you will use to unlock the drive on any computer. In the upper field, e nter a
password that’s easy to remember but difficult to guess. Enter the same password in the lower field to
confirm.
If you no longer have the insert, you can find the secure code (SID) on a sticker located under
the protective bumper encasing the hard drive.
Incorrect code error? If you enabled security for the device at some point in the past, the
password you created may still be active. If you repeatedly receive an Incorrect code e rror while
entering the secure code (SID), try entering the last password you created for the drive.
11LaCie Rugged Secure
6/11/18
Page 12

9. Click NEXT.
10. You’ve now secured the drive with a password. Click DONE.
Unlocking the drive
To access data on the drive, you must enter the password you created with the Toolkit app. You can enter
your password using Toolkit or the Unlock Drive app located on the drive.
Entering your password with Toolkit
Each time you connect your drive to a computer installed with Toolkit, you’ll be prompted to enter your
password.
Note that the password you create is case-sensitive, me aning that it distinguishes between
upper-case and lowe r-case letters.
Keep your password in a safe place. Similar to mobile phones, your password cannot be
recovered, not eve n by LaCie.
12LaCie Rugged Secure
6/11/18
Page 13

1. Enter the password you created when you enabled se curity.
2. Click CONTINUE.
If the prompt doesn’t appear automatically when you connect the drive:
1. Ope n Toolkit.
2. On the Main Menu, click on the LaCie Rugged SECURE device.
3. Click UNLOCK DRIVE.
4. Enter your password.
5. Click CONTINUE.
Entering your password with the Unlock Drive app
If you connect LaCie Rugged SECURE to a computer that does not have Toolkit installed, you can enter your
password using the Unlock Drive app located on the drive.
1. Using a file manager such as File Explorer or Finder, ope n the DriveLocked volume.
Remember, the password you created is case -sensitive, meaning that it distinguishes between
upper-case and lowe r-case letters.
13LaCie Rugged Secure
6/11/18
Page 14

2. Click on Unlock Drive for Windows or Unlock Drive for Mac.
macOS 10.13 or later—A driver needs to be installed. At the prompt, use the Finde r to eject the
drive, and then disconnect the cable from the computer. Toolkit will prompt you to enable a
system extension:
Click NEXT. Navigate to your Security & Privacy System Preferences and enable the system extension
signed by “Seagate Technologies LLC”.
3. Enter the password you created for the drive.
14LaCie Rugged Secure
6/11/18
Page 15

4. Click OK.
Locking the drive
The drive is locked automatically wheneve r LaCie Rugged SECURE is ejected or disconnected from your
computer. You must enter your password again when you reconnect the drive.
You can also manually lock the drive while it’s connected to a computer.
1. Ope n Toolkit.
2. On the Main Menu, click on the LaCie Rugged SECURE device.
3. Click LOCK DRIVE.
4. Enter your password and click CONTINUE.
Changing your password
1. Ope n Toolkit.
2. On the Main Menu, click on the LaCie Rugged SECURE device.
3. Click on the More menu icon and then click CHANGE PASSWORD.
Remember, the password you created is case -sensitive, meaning that it distinguishes between
upper-case and lowe r-case letters.
Remember, the password you created is case -sensitive, meaning that it distinguishes between
upper-case and lowe r-case letters.
15LaCie Rugged Secure
6/11/18
Page 16

4. A notice appears informing you that you will create a password that cannot be recovered. Click NEXT.
5. In the uppe r fie ld, enter your current password.
6. Enter your new password in the middle field, and then e nter the same new password in the lower field
to confirm. Click NEXT.
7. You’ve now secured the drive with a new password. Click DONE.
Disabling security
You can disable security so that a password is no longer neede d to unlock LaCie Rugged SECURE. It will
function as an unsecured drive with no password protection. You can always re-e nable security again at a
later date using the password you created.
1. Ope n Toolkit.
2. On the Main Menu, click on the LaCie Rugged SECURE device.
3. Click on the More menu icon and then click DISABLE SECURITY.
4. A notification appears informing you that you will disable security. Enter your password to confirm, and
then click CONTINUE.
16LaCie Rugged Secure
6/11/18
Page 17

Re-enabling security
If you disabled security at some point, you can re-enable it using the password you created.
1. Ope n Toolkit.
2. On the Main Menu, click ENABLE SECURITY.
3. Enter the password you created when you first enabled security.
4. Click CONTINUE.
Crypto-erasing the drive
A crypto-erase securely deletes all data on the drive—it can never be recovered—while keeping your
security settings in place. Your password remains the same.
1. Ope n Toolkit.
2. On the Main Menu, click on the LaCie Rugged SECURE device.
3. Click on the More menu icon and then click CRYPTO ERASE.
4. A notification appears informing you that you will erase all the data on the drive but maintain your
security settings. Click ERASE.
Reme mber, the password you created is case-se nsitive , meaning that it distinguishes
be twee n upper-case and lower-case letters.
17LaCie Rugged Secure
6/11/18
Page 18

5. A dialog box appears. Enter your password to confirm, and then click CONTINUE.
Your system prompts you to allow Toolkit to make this change. Enter the system password for your
computer to confirm the crypto-e rase.
If you are logged in to your computer as an admin user, confirm that you want to allow Toolkit to
make this change. If you are logged in as a standard user, enter the system password for your
computer to confirm the crypto—erase.
Reseng the drive to factory sengs
A factory reset de letes all data on the drive and removes all security settings, including your password. The
drive reverts to its original factory settings.
1. Ope n Toolkit.
2. On the Main Menu, click on the LaCie Rugged SECURE device.
3. Click on the More menu icon and then click FACTORY RESET.
4. A notification appears informing you that you will erase all the data on the drive and remove your
security settings. Click RESET.
5. You’re prompted to enter your PSID. This is the 32-character rese t code listed on the insert that was
included in your LaCie Rugged SECURE packaging. Enter the 32-character PSID. (Toolkit will automatically
change lower-case letters to upper-case.)
18LaCie Rugged Secure
6/11/18
Page 19

6. Click CONTINUE.
Your system prompts you to allow Toolkit to make this change. Enter the system password for your
computer to confirm the crypto-e rase.
If you are logged in to your computer as an admin user, confirm that you want to allow Toolkit to
make this change. If you are logged in as a standard user, enter the system password for your
computer to confirm the crypto—erase.
If you no longer have the insert, you can find the PSID on a sticker
located under the protective bumper encasing the hard drive.
19LaCie Rugged Secure
6/11/18
Page 20

Oponal Formang and Paroning
LaCie Rugged SECURE is delivered formatted in e xFAT for compatibility with both Windows and Mac
computers. If you use the drive with only one type of computer, you can optimize file copy pe rformance by
formatting the drive in the native file system for your operating system—NTFS for Windows or HFS+ for
Macs. There are two ways you can optimize performance:
Toolkit Optimize—Format your drive for optimal performance with just a few simple clicks.
Manual formatting—Use Disk Management (Windows) or Disk Utility (Mac) to format your drive in non-native
formats.
About file system formats
NTFS—The native files system for Windows. macOS can read NTFS volumes but cannot native ly write to
them.
Mac OS Extended (HFS+)—The native hard drive file system for macOS. Windows cannot natively read or
write to HFS+ (journaled) volumes.
exFAT—Compatible with Mac and Windows. exFAT is not a journaled file system which means it can be
more susce ptible to data corruption when errors occur or the drive is not disconnected properly from the
computer.
FAT32—Compatible with Mac and Windows. However, FAT32 is a legacy file system designed for low
capacity hard drives and it is not recommende d for modern hard drives or operating systems. A FAT32
partition can reach up to 32GB when formatted on a Windows PC.
How to choose the file system format
Use NTFS if:
…you connect the storage device to Windows computers, and you don’t need to allow a Mac to write to the
disk.
Use HFS+ if:
…you connect the storage device to Mac computers, and you don’t nee d to allow a Windows computer to
read or write to the disk.
Use exFAT if:
…you need to allow both Mac and Windows computers to read and write to the disk.
20LaCie Rugged Secure
6/11/18
Page 21

You can use FAT32 if:
…you connect the storage device to older Windows and Mac computers. FAT32 is not recomme nded for
mode rn operating systems and computers.
Toolkit Opmize
Use Toolkit Optimize to format your drive for optimal performance with your ope rating system’s native file
format— NTFS for Windows or HFS+ for macOS. File transfer rates can be significantly be tter with the native
format.
1. Connect LaCie Rugged SECURE to your computer.
2. Ope n Toolkit.
3. On the Main Menu, click on the LaCie Rugged SECURE device.
4. Click on the More menu icon for the volume you want to optimize. There are two options:
OPTIMIZE—Let Toolkit choose the optimal format for your computer system and configure the volume
for you with just a few clicks.
FORMAT—Opens the disk manageme nt utility for your ope rating system, which you can use to manually
format your drive. Use this option if you want to format the drive in non-native formats.
5. Click OPTIMIZE.
6. A notice appears asking you to confirm the format operation. Click FORMAT.
Manual formang
The steps below help you format and partition a storage de vice.
Formatting erases everything on the storage device. LaCie highly recomme nds that you back up
all data on your storage device before performing the steps below. LaCie is not responsible for
any data lost due to formatting, partitioning or using a LaCie storage device.
21LaCie Rugged Secure
6/11/18
Page 22

Mac
macOS version 10.11 or later
1. Ope n the Finder and go to Applications | Utilities | Disk Utility.
2. In the sidebar to the left, select your LaCie Rugged SECURE drive.
3. Select Erase.
4. A dialog box ope ns. Enter a name for the drive. This will be the name displayed when the drive mounts
5. For Format, select OS X Extended (Journaled).
6. For Scheme, select GUID Partition Map.
7. Click Erase.
8. Disk Utility will format the drive. When it’s finished, click Done.
macOS version 10.9 to 10.10
1. Ope n the Finder and go to Applications | Utilities | Disk Utility.
2. In the sidebar to the left, select the LaCie Rugged SECURE drive that shows the capacity.
3. In the Disk Utility window, se lect the Partition tab.
4. Under Partition Layout, select 1 partition.
5. Enter a name for the drive . This will be the name displayed when the drive mounts.
6. For Format, select OS X Extended (Journaled).
7. Click on Options. Select GUID Partition Map, and then click OK.
8. Click Apply.
9. A dialog appears advising you that this is a data destructive process and any data currently on the drive
Formatting erases everything on the storage device. LaCie highly recomme nds that you back up
all data on your storage device before performing the steps below. LaCie is not responsible for
any data lost due to formatting, partitioning or using a LaCie storage device.
macOS 10.13 and later: Make sure to select the disk and not just the volume. If
you don’t se e two entries listed in the sidebar, change the vie w in disk utility to
show both the drive and the volume. The view button is in the upper left side
of the Disk Utility window. Change the vie w to Show All Devices. This feature
was introduced in macOS 10.13 and is not available in 10.11 or 10.12.
If se curity for the drive was disabled when you formatted, you will enable se curity once the
format process is complete. During the se curity setup se quence, you will be asked to enter your
secure code (SID). This will be the password you created previously, and not the secure code
found on the insert included with your package.
22LaCie Rugged Secure
6/11/18
Page 23

will be deleted.
10. Select Partition to complete the formatting proce ss.
Windows
1. Make sure the storage device is connected to and mounted on the computer.
2. Go to Search and then type diskmgmt.msc. In the se arch results, double click Disk Management.
3. From the list of storage device s in the middle of the Disk Management window, locate your LaCie
de vice.
4. The partition must be available to format. If it is currently formatted, right click on the partion and then
choose Delete.
5. To create a new partition, right click on the volume and select New Simple Volume. Follow the on-screen
instructions when the New Simple Volume Wizard appears.
If se curity for the drive was disabled when you formatted, you will enable se curity once the
format process is complete. During the se curity setup se quence, you will be asked to enter your
secure code (SID). This will be the password you created previously, and not the secure code
found on the insert included with your package.
23LaCie Rugged Secure
6/11/18
Page 24

Safely Remove Rugged SECURE From Your
Computer
Always eje ct a storage drive from your computer before physically disconnecting it. Your computer must
pe rform filing and housekeeping operations on the drive before it is removed. Therefore, if you unplug the
drive without using the operating system’s software, your files can become corrupt or damaged.
Mac
There are several ways you can eject your hard drive from a Mac. See below for two options.
Eject via Finder window
1. Ope n a Finde r window.
2. On the sidebar, go to Devices and locate the drive you want to eje ct. Click the eje ct symbol to the right
of the drive name.
3. Once the hard drive disappe ars from the sidebar or, the Finder window closes, you can disconnect the
hard drive’s cable from your Mac.
Eject via Desktop
1. Select the desktop icon for your hard drive and drag it to the Trash.
2. When the hard drive's icon is no longer visible on your desktop, you can physically disconnect the hard
drive from your Mac.
Windows
Use the Safely Remove tool to e ject a hard drive .
1. Click the Safely Remove icon in your Windows System Tray to view the devices you can
eject.
Windows 7:
24LaCie Rugged Secure
6/11/18
Page 25

Windows 8 / Windows 10:
2. If you don't see the Safely Remove Hardware icon, click the Show hidden icons arrow in the
system tray to display all icons in the notification area.
3. In the list of devices, choose the device you want to eject. Windows displays a notification
when it is safe to remove the device.
4. Disconnect the hard drive from the computer.
25LaCie Rugged Secure
6/11/18
Page 26

Frequently asked quesons
For help setting up and using your LaCie hard drive, review the frequently asked questions below. For
additional support resources, go to LaCie customer support.
All users
Problem: I’m enabling security, and I get an “Incorrect code” error
when I enter my secure code (SID)
Q: Did you correctly enter uppercase letters?
A: The secure code (SID) provided by the factor is case -sensitive. Letters that appear in uppercase on the
inse rt in your package must be entered in Toolkit in uppe rcase:
Q: Are you enabling security after formatting the drive?
A: If you disabled se curity and then later formatted the drive, you’ll have to go through the se curity setup
sequence again. You’ll be prompted to enter the secure code (SID)—howe ver, you should enter the
password you created when you initially enabled security, and not the secure code found on the insert
included with your package.
Problem: My file transfers are too slow
Q: Are both ends of the USB cable firmly attached?
A: Review troubleshooting tips for cable connections below:
Check both ends of the USB cable and make sure that they are fully seated in their respective ports.
Try disconnecting the cable, waiting 10 seconds, and then reconnecting it.
Try a different USB cable.
Q: Is the hard drive connected to a Hi-Speed USB 2.0 port on your computer or hub?
A:If your hard drive is connected to a Hi-Spe e d 2.0 port or hub, the inferior performance is normal. LaCie
Rugged SECURE performance will improve when it is connected to a USB 3.1 port or a SuperSpeed USB 3.0
port. Otherwise, the device operates at slower USB transfer rates.
26LaCie Rugged Secure
6/11/18
Page 27

Q: Are there other USB de vices connected to the same port or hub?
A: Disconnect other USB de vices and se e if the hard drive's pe rformance improve s.
Problem: I have an older computer with USB 2.0 ports
Q: Will my hard drive's USB 3.1 Gen 1 port work with my computer's USB 2.0 port?
A: Yes, the cable end that plugs into the computer (USB Type A) is compatible with both USB 3.0 and USB
2.0. Make ce rtain to use the included cable with the correct USB Type A connector. However, the transfer
rates are much slower with USB 2.0.
Problem: I must use a USB hub for my USB devices
Q: Can I use my hard drive with a USB hub?
A: Yes, the hard drive can be connected to a USB hub. If you use a hub and encounter detection problems,
slower than normal transfer rates, random disconnection from your computer or other unusual issues, try
connecting the hard drive directly to the computer's USB port.
Some USB hubs are less than efficient with power management, which can be problematic for connected
de vices. In such a case , consider trying a powered USB hub that includes a powe r cable.
Please note that USB 2.0 hubs limit your hard drive's transfer rates to USB 2.0 speeds.
Problem: The provided USB cables are too short
Q: Can I use my hard drive with a longer cable?
A: Yes, provided it is certified according to USB standards. However, LaCie recomme nds using the cable
shippe d with your hard drive for the best results. If you use a longer cable and experience problems with
de tection, transfe r rates or disconnection, use the original cable included with your hard drive.
Problem: I'm receiving file transfer error messages
Q: Did you get an "Error -50" me ssage while copying to a FAT32 volume?
A: When copying files or folde rs from a computer to a FAT32 volume, certain characters in the names cannot
be copied. These characters include, but are not limited to: ? < > / \ :
Check your files and folde rs to ensure that these characters are not in the name s.
27LaCie Rugged Secure
6/11/18
Page 28

If this is a recurring problem or you cannot find files with incompatible characters, consider reformatting the
drive to NTFS (Windows users) or HFS+ (Mac users). See Optional Formatting and Partitioning.
Q: Did you get an error message telling you that the drive has be e n disconnected when coming out of slee p
mode ?
A: Ignore this message since the drive remounts on the desktop despite the pop-up. LaCie drives conserve
power by spinning down when you set your computer to slee p mode. When the computer awakes from
sleep mode, the drive may not have e nough time to spin up, causing the pop-up to appear.
Mac
Problem: The hard drive icon does not appear on my desktop
Q: Is your Finder configured to hide hard drives on the desktop?
A: Go to Finde r and then check Preferences | General tab | Show these items on the desktop. Confirm that
Hard Disks is selected.
Q: Is your hard drive mounting in the operating system?
A: Ope n Disk Utility at Go | Utilities | Disk Utility. If the hard drive is listed in the left-hand column, check
your Finder preferences to se e why it is not displayed on the desktop (review the question above).
Q: Does your computer's configuration meet the minimum system requirements for use with this hard
drive?
A: Refer to the product packaging for the list of supported ope rating systems.
Q: Did you follow the correct installation steps for your operating system?
A: Review the installation steps in Getting Connected.
Windows
Problem: The hard drive icon doesn't appear in Computer
Q: Is the hard drive listed in Device Manager?
A: All drives appear in at least one place in Device Manager.
28LaCie Rugged Secure
6/11/18
Page 29

Type Device Manager in Search to launch it. Look in the Disk Drives section and, if necessary, click the Plus
(+) icon to view the full list of devices. If you’re uncertain that your drive is listed, safely unplug it and then
reconnect it. The entry that changes is your LaCie hard drive.
Q: Is your hard drive listed next to an unusual icon?
A: Windows Device Manager usually provides information about failures with peripherals. While the Device
Manager can assist with troubleshooting most problems, it may not display the exact cause or provide a
precise solution.
An unusual icon next to the hard drive can reve al a problem. For example, instead of the normal icon based
on the type of device, it has an exclamation point, question mark or an X. Right click this icon and then
choose Properties. The Ge neral tab provides a potential reason why the device is not working as expected.
29LaCie Rugged Secure
6/11/18
 Loading...