

Page 1
1
LaCie blue eye
User Guide
Page 2

Table of contents
Useful links
Useful links ...................................................................................................................3
Contents of the LaCie blue eye package .............................................................................4
System requirements ........................................................................................................4
Foreword .......................................................................................................................4
About the blue eye .........................................................................................................5
Calibration ................................................................................................................5
Room lighting compensation........................................................................................5
Matching to another monitor........................................................................................5
Color-management profile ...........................................................................................5
Calibration .....................................................................................................................6
About color and calibration.........................................................................................6
The difference between software and hardware calibration.............................................6
About gamma............................................................................................................7
The issue of black and white luminance ........................................................................7
The effect of ambient light ...........................................................................................7
About the calibrator....................................................................................................8
How blue eye works...................................................................................................8
Hardware calibration .............................................................................................8
Hardware calibration .............................................................................................8
In both cases.........................................................................................................8
Colorsync profiles..................................................................................................8
Monitor Matching............................................................................................................9
Installing the blue eye....................................................................................................10
blue eye Screens ...........................................................................................................12
The “INIT” ...............................................................................................................12
The Startup screen....................................................................................................12
The Main screen.......................................................................................................12
The Measure screen..................................................................................................14
Overview............................................................................................................14
Adjust Brightness .................................................................................................14
Measuring the display ..........................................................................................14
Matching to a reference.......................................................................................15
2
Page 3

Room lighthing.........................................................................................................16
Overview............................................................................................................16
Calibration measurement......................................................................................16
Manual ambient compensation .............................................................................16
The Setup Screen......................................................................................................16
Overview............................................................................................................16
Presets................................................................................................................17
Match to reference...............................................................................................17
Preferences settings ..............................................................................................17
The Expert Screen.....................................................................................................18
Overview............................................................................................................18
Lighting compensation ..........................................................................................18
Color temperature and gamma .............................................................................18
Make reference...................................................................................................19
Make preset........................................................................................................19
The electron screen...................................................................................................19
Overview............................................................................................................19
Color .................................................................................................................19
Geometry ...........................................................................................................20
Image ................................................................................................................21
FCC Information ............................................................................................................22
Information to user....................................................................................................22
General information statement ...................................................................................22
Useful links
• LaCie Home Page: http://www.lacie.com
• LaCie Color products: http://www.lacie.com/scripts/color/color.cfm
• Calibration: http://www.lacie.com/scripts/color/calibration.cfm
• Latest datasheets: http://www.lacie.com/scripts/press/pdfBank.cfm
• Technical support: http://www.lacie.com/scripts/support/colortech.cfm
• News: http://www.lacie.com/news
3
www
www
www
www
www
www
Page 4

Contents of the LaCie blue eye package
• 1 LaCie blue eye sensor
• 1 Signal Cable with a USB extension to use with a LaCie electron19blue II, electron22blue or electron22blue II
• 1 ”Color CD”
System Requirements
• Apple Macintosh G3 or G4
• One USB port on the back of the CPU for the hardware calibration of an electron19blue II, electron22blue or electron22blue II
• One additional USB port on the keybord or on an external USB hub in all cases for the sensor connection
• Apple Macintosh OS 9.x
Foreword
Congratulations on your purchase of a LaCie blue eye calibrator. This manual will help you:
• install your new device properly,
• put it into operation,
• learn rapidly how to operate it.
This manual also contains explanations about the latest interfaces.
Icons
Indented paragraphs have an icon indicating the type of information being given.
Note
Technical information, news.
This icon indicates a potential hazard. You should read the warning.
4
Page 5

5
A quickstart to blue eye
blue eye provides four very important functions for your color display system. These functions are Calibration, Room lighting
compensation, Matching to another monitor, and Profile generation.
Calibration
• blue eye sets the monitor white to an accuracy beyond visual discernment.
• blue eye adjusts the monitor gray tones to eliminate color casts.
• blue eye gives you control of the white-point and gamma settings.
Room lighting compensation
• blue eye measures the ambient room lighting and adjusts your monitor to provide maximum visibility of shadow detail.
• blue eye provides manual control over ambient correction for special situations.
Matching to another monitor
• blue eye matches the white of your monitor to a Reference monitor.
• blue eye matches the gray tones of your monitor to that of the Reference monitor.
• blue eye matches the luminance of your monitors at a black point and at full white to that of the Refe-ence monitor.
Color-management profile
blue eye builds a ColorSync (ICC) profile of your monitor which is usable by color management systems and PhotoShop for color
matching.
Page 6

6
Calibration
About color and calibration
Color, in imaging, begins with white. The white of the paper gives its color to all the inks, dyes, and colorants applied to it.
Thus, the white of the paper has a strong impact on the final color of the print.
Today, color editing is done on computer displays. But in order for the printed result to look like the image on the screen, the
white of the screen must match the white of the paper. Making this correction requires calibration of the monitor.
Calibration is the adjustment of your monitor to a standard setting. Calibration is important because monitors are not set to any
standard by the manufacturer. Since monitors may be shipped with different color settings, an image on one monitor can look
very different from the same image on another monitor. Calibration sets your monitor display to a standard color setting which
you may select.
Usually, monitors are calibrated to display a specified “white point” or color temperature. This setting is usually performed at
full-scale white, i.e. at a color value of (256, 256, 256). However, it is just as important that the white color temperature be
maintained through lower luminance levels from 0-255. These are the gray tones and include black. If the RGB mixture at white
is not maintained through the grays, color casts will appear in the image and the print will not look like the screen. blue eye
measures the display at white, at black, and at sixteen steps in the gray. The color temperature of white is set and enforced at
these points and all points between.
The difference between software and hardware calibration
Three popular methods of calibrating a monitor are using generic ColorSync™ profiles, customizing these profiles with software,
or creating profiles with a colorimeter. However, these 3 methods treat the imbalances that can occur in every monitor as
a given and do not try to change them. They only try to work around this problem by tweaking the signal from the CPU.
Unfortunately, while this method improves the color accuracy, it also reduces the gamut of the monitor. These three techniques,
even when using a piece of hardware (a colorimeter) are called software calibration as they do not correct the way the
monitor work bu only create a piece of software, an ICC profile, to compensate for the monitors defaults.
The blue eye has a completely different approach: it carries out hardware calibration through a unique video cable that uses
the DDC 2bi VESA standard that authorizes a two-way flux betwwen the Macintosh and the electron22blue monitor. Unlike a
standard video connection, which is a one-way flux from the Macintosh to the monitor, this specific connection enables the
monitor and the CPU to exchange information, allowing to calibrate the three Red, Green and Blue gun of the monitor individually
inside the monitor.
Page 7

About Gamma
But there is another factor important to image appearance, the image “gamma.” Gamma is the measure of contrast of an image.
The higher the gamma, the more “vibrant” and “lively” the image will appear. Images with low gamma appear flatter. You can
examine the effect of changing gamma by adjusting the Picture (or Contrast) control on your TV set.
The significance of gamma in computer imaging has to do with matching the monitor display to the original. If an image with
a gamma of 2.2 is displayed on the monitor at a gamma of 1.8, the image will appear flat. You will edit the image to restore
its lost contrast only to find, when you print it out, that you have miscorrected. The problem was with the monitor setting, not
the image data.
Thus, the second important part of computer image editing is matching gamma. Television has a specified gamma of 2.2, so
editing or preparing an image for TV replay should use this setting. Computer games and computer-generated art/drawings
probably were created under a gamma of 2.5 to 2.8. The gamma of scanned input depends on the source and setup of the
scanning plug-in.
The issue of black and white luminance
There are two other settings which affect monitor appearance, black luminance and white luminance. Basically, these are the
brightness of the monitor with the electron-guns turned all the way off (black point luminance) and the brightness of the monitor
with the electron guns turned all the way on (white point lumi-nance). These two settings define the endpoints of the color curve
for the monitor and greatly affect appearance. It is possible to calibrate two monitors to the same color temperature and
balance the grays, but if the black and white luminances don’t match, the monitors will appear different.
Black luminance also affects visibility of shadow detail. If the monitor is adjusted too low, shadow detail will disappear; if it is
too high, midtones will be too bright.
The brightness control knob on the monitor has the most effect on black luminance while the contrast control has the greatest
effect on white luminance. Both these settings, brightness and contrast, however, interact. Thus setting contrast greatly affects
white luminance but it also affects black luminance to some degree. The same is true for brightness on white luminance. blue
eye measures both black and white luminance and aids you in adjusting brightness and contrast.
The effect of the ambient light
Room lighting, also called “ambient” lighting, greatly affects the visibility of shadow detail in an image. The eye will see much
more image detail in darkly lit surroundings than in a brightly lit environment.
blue eye provides compensation for the effect of ambient light so that the level of detail visibility is enhanced. blue eye
measures the amount of light striking the screen and adjusts the gamma setting accordingly to increase brightness in the
shadows.
7
Page 8

About the calibrator
The blue eye calibrator is a precision measuring instrument consisting of a “pod” and a cable. The cable connects to your
Macintosh. The pod contains three color sensors for measuring the Red, Green, and Blue light from the monitor. The pod also
contains a fourth sensor that synchronizes the measurements of the color sensors to the refresh of the screen. An 8-bit RISC microprocessor processes the raw data from the sensors and controls all communication with the host Macintosh via the USB.
How blue eye works
Hardware calibration
When calibrating a LaCie electron19blueII, electron22blue or electron22blueII, the blue eye operates hardware calibration via
the specific video cable equipped with a USB connector. The blue eye driver in the Macintosh displays color patches of known
values on the monitor. The calibrator measures the color produced by the monitor and the software uses these measurements
to calculate the error in the monitor’s color display. The blue eye driver then adjusts the Red, Green and Blue guns inside the
monitor . It then remeasures the same color patches to create a ColorSync profiles if configured to do so.
Software calibration
On any other monitor the blue eye operates as software calibration. The use of the specific video cable is not necessary.
The blue eye driver in the Macintosh displays color patches of known values on the monitor. The calibrator measures the color
produced by the monitor and the software uses these measurements to calculate the error in the monitor’s color display.
blue eye then calculates a correction factor for the displayed color and sends this data to the graphics card. The corrected data
in the graphics card then produces a calibrated color display.
In both cases
blue eye measures the monitor display at total black, full white, and sixteen steps of gray. Each of these levels is then balanced
to the color temperature of white and the values saved. A curve is mathematically constructed to fit the eighteen points for each
color (red, green, blue).
Colorsync profiles
blue eye creates ColorSync profiles whenever the screen is measured successfully and you return to the Main Screen.
The ColorSync profile is given the name “blue eye“ and stored in your system’s ColorSync profiles folder.
8
Page 9

9
Monitor matching
In today’s color imaging world, the person who creates an image often is not the only person to view or work the image. Work
groups, remote creators like agencies, and the Internet all present this situation. People working on the same imaging project
may have totally different monitors and viewing conditions. In these cases, calibration to the same white point and gamma is
not sufficient. Since different monitors have different characteristics, it is necessary to match the display characteristics of these
monitors to insure the same color appearance.
The best results will be obtained when matching two monitors of the same make. Even greater consistency will be obtained if
the match to reference process is based on a hardware calibration for both the reference and the target monitors.
blue eye makes matching the display appearance of two or more monitors possible. To do this, one monitor (the monitor to
be matched) is designated the Reference monitor. The monitor to be matched to the Reference monitor is called the Target
monitor.
A Reference monitor is represented within blue eye by a data file of that monitor’s characteristics -– the R, G, B values for eighteen
color measurement values, and the luminance values for white and black. This data file completely defines the appearance of
color on the Reference monitor.
blue eye matches the Target monitor to the Reference monitor by calibrating each measurement point of the Target monitor to
each measurement point of the Reference monitor.
Since brightness of the white and black points is critical to the color appearance of the display, blue eye asks you to adjust
brightness of the Target monitor black and white points to the values measured for the Reference monitor. blue eye measures
the white/black luminance of your monitor and compares it to that of the Reference. blue eye then displays an indicator to tell
you how much to adjust the monitor control to achieve the Reference value. Once these controls are properly set, the Target
monitor will match the Reference monitor within the tolerance of the display card capabilities.
Proper selection of a Reference monitor may make some matching situations easier to achieve. Selecting the brightest and “best”
monitor may make it impossible for less capable monitors to match. It is common that older, larger monitors cannot achieve the
brightness of newer, smaller screens. Thus, the selection of the Reference should favor that which is most easily matched, not
that which is the highest performer. blue eye will let you know during the matching process if the Target monitor can achieve
the luminance settings of the Reference. If it cannot, recreate the Reference file using the Target monitor and match the previous
reference monitor to it.
Page 10
10
Installing the blue eye
Step 1
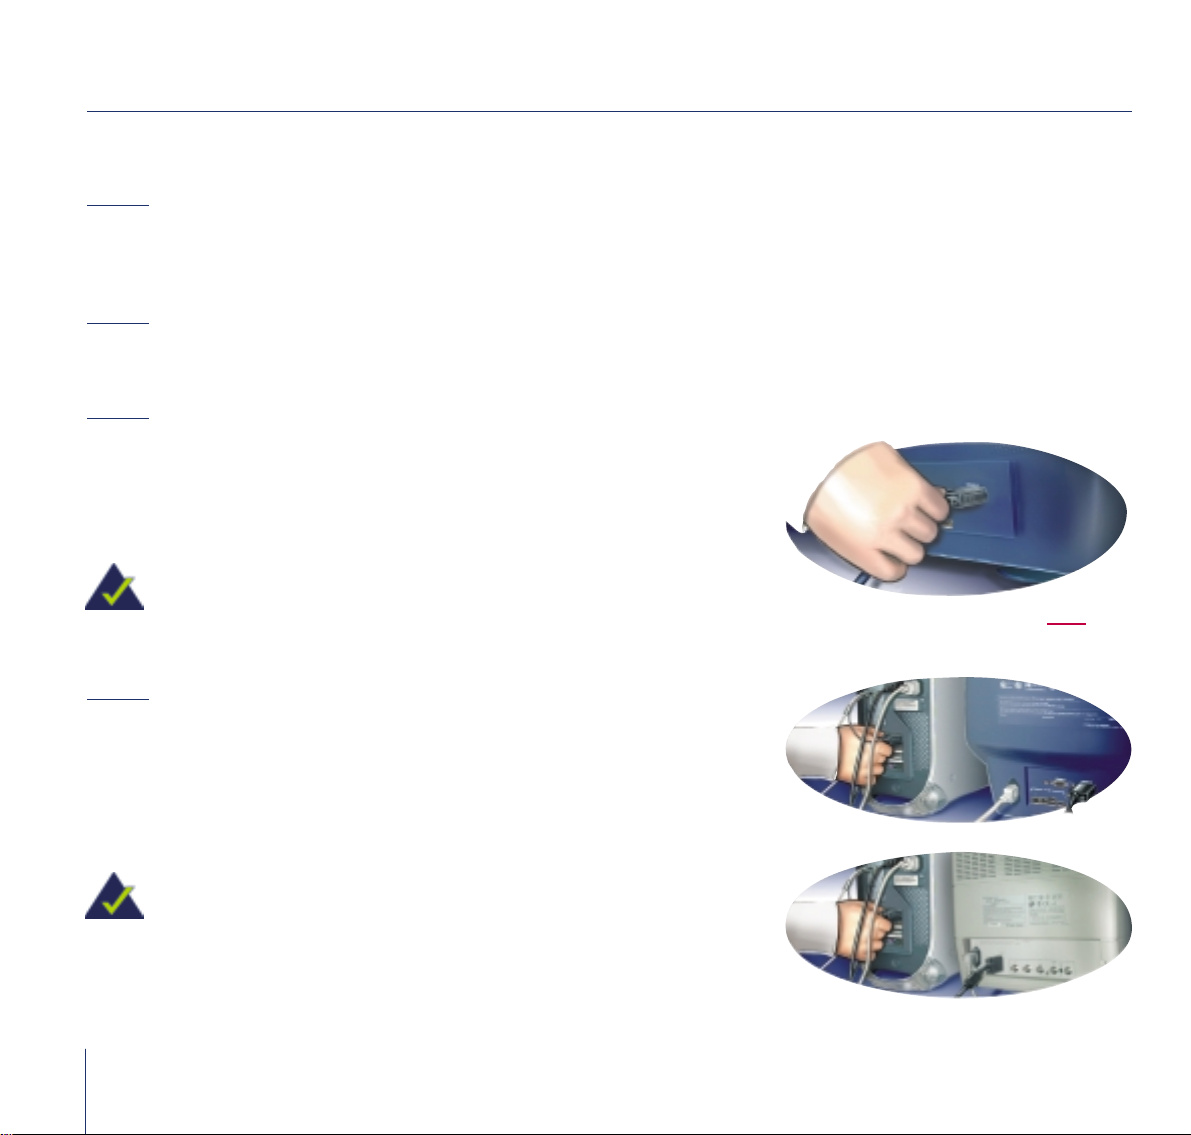
Insert the CD and click on the blue eye installer icon to install in your system the required USB extensions and to copy the application on your hard drive.
Step 2
Shutdown your computer (do not operate a restart) and switch off your monitor.
Step 3
If you do not already have a LaCie video cable equipped with a USB
connector, disconnect your current video cable from the back of the CPU
and from the back of the monitor.
Connect the end of the LaCie cable, which does not have a USB extension to
the back of your LaCie monitor.
Note: if you are using a LaCie electron22blueII use the signal-B connector on
the back of your monitor. The signal-A connector does not support hardware
calibration.
Step 4
Connect the other end of the video cable to the video port on the back of your
CPU. Connect the USB end of the video cable to one of the two USB ports on
the back of your CPU.
Note: if your are not using a LaCie electron19blueII, electron22blue or
electron22blueII, you do not need to use the specific video cable equipped with a
USB end. This cable is only required by the blue eye to operate a hardware
calibration, which the blue eye can not achieve on other monitors.
electron22blue II: signal-A, signal-B
Page 11
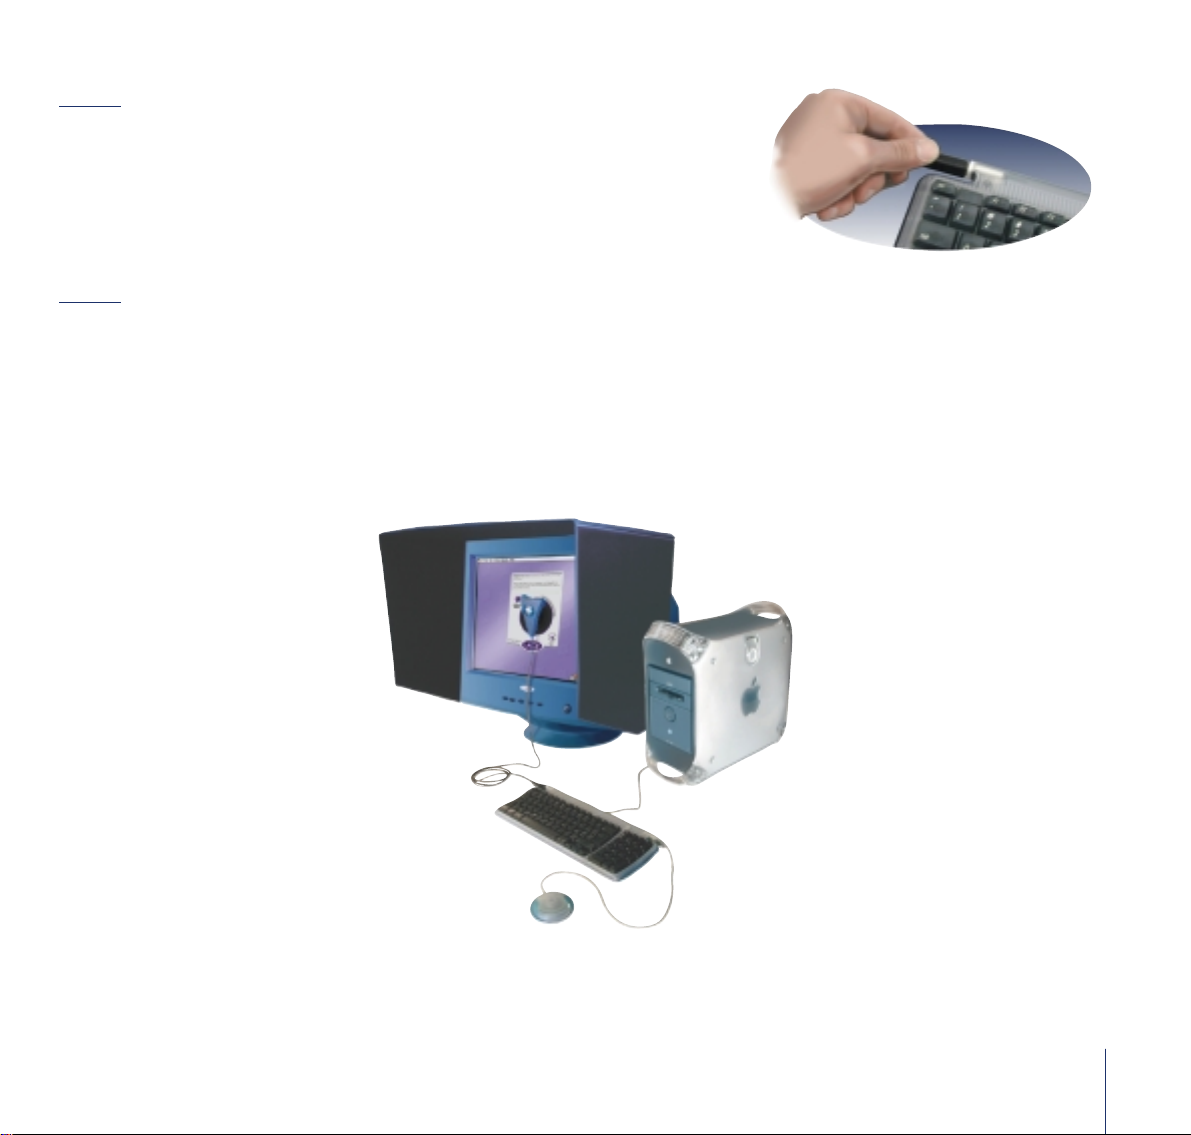
Step 5
Connect the blue eye sensor to an available USB port for example on your
keyboard or on an external USB hub.
Step 6
Launch the blue eye application either from the alias created on your desktop or the blue eye control strip.
11
Page 12

blue eye screens
The “Init”
blue eye includes a startup application, sometimes called an “Init” short for initialization. When the Mac powers-up, it looks in
the startup folder of the system folder and executes all programs that reside there. blue eye stores a small startup
program there that initializes the graphics card to the values last saved from calibration. Before the init runs, however, blue eye
checks to see if the monitor settings are correct. If the monitor is set to 256 colors, blue eye will display an error message and
will not restore the previous calibration data.
The Startup Screen
As soon as you double-click the blue eye icon to launch blue eye, the MacOS starts the process of loading the software and
starting blue eye. When blue eye gains control of the system, it performs several “requirements” tests before displaying the Main
Screen.
First, blue eye checks for connection of a calibrator. If one is not found, an error message is displayed. blue eye will run,
however, and allow you to use those functions that do not require a calibrator.
blue eye also checks the monitor settings. The monitor must be set to display either “thousands of colors” or “millions of colors.”
A set-ting of “256 colors” is inadequate. blue eye will display a message and terminate.
The Main Screen
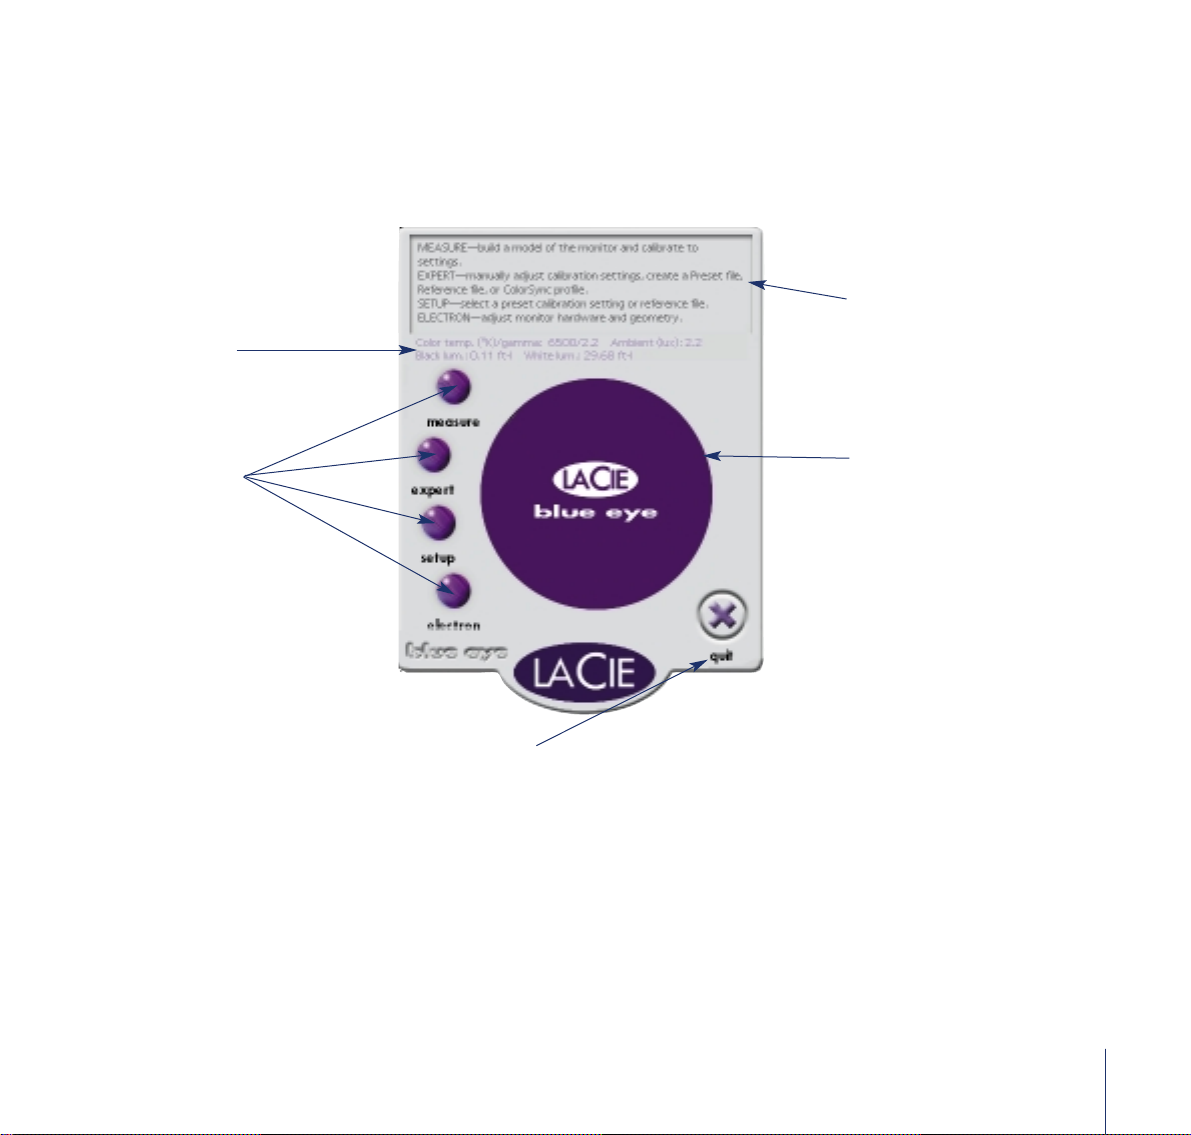
The first screen displayed, and the root screen of the system, is the Main Screen (Figure 1). All function screens originate with the Main
Screen from which you can choose to measure your monitor or ambient lighting, change the calibration setup or preferences, or
manually change a setting.
Note: the first time blue eye is launched, it has no data about your screen to use for calibration. Therefore, the first time blue eye is run and
the first time only, blue eye will display only one button – the Measure Button. A message in the Operator Guide Panel tells you that this
startup condition is in effect and that you must measure your screen before you can perform any other functions.
12
Page 13
13
Actions Buttons
These buttons take you to other
screens within blue eye
Quit/Back Button
On the MAIN screen, this button exits from ProColor and returns to
FINDER. ON other screens, this button is labeled “BACK” and returns
to the previous screen (this is difficult to read when it runs across
both side of the image).
Data Display Panel
This panel displays data from the last measurements about
color temperature, gamma, and ambient lighting.
Circle
The black circle is present on every measurement screen.
It is :
• where the calibrator is mounted during measurement.
• used to display targets for adjustment of brightness.
Figure 1 – The Main Screen
Information
Display current color and gamma
information of the monitor in use.
Page 14

14
The Measure Screen
Overview
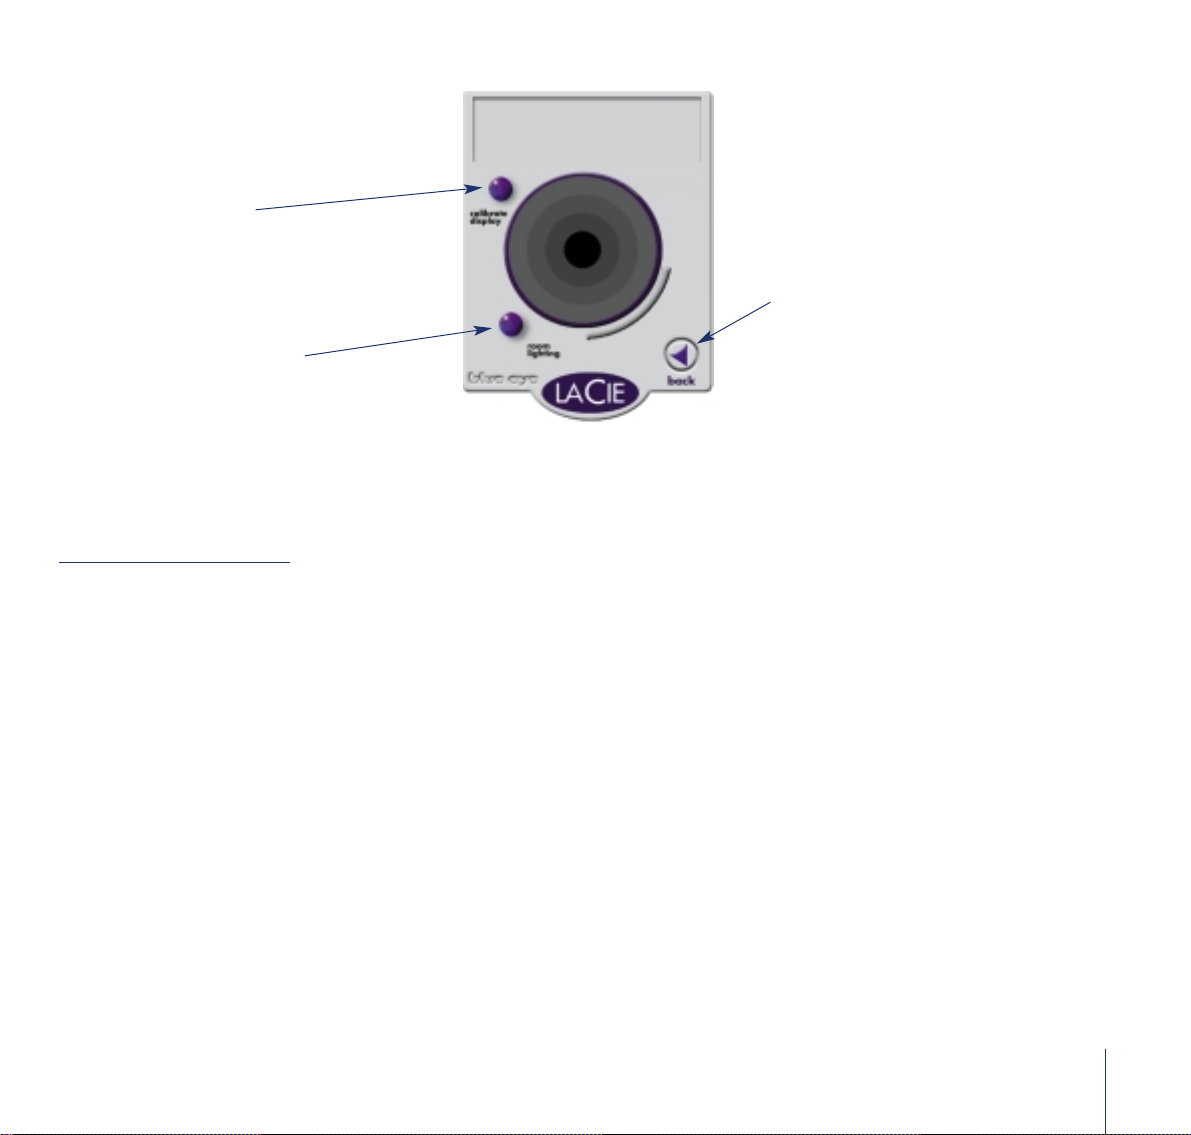
The main function of blue eye is to measure and calibrate your monitor. Pressing the Measure Button on the Main Screen takes
you to the Measure Screen shown in Figure 2. From this screen, you can continue to measure and calibrate your display or you
can adjust for room lighting.
Choosing Calibrate takes you down the path of measurement by the calibrator. A ColorSync profile (if that preference is selected)
is created when you return to the Main Screen.
Adjust brightness
When performing a hardware calibration, this operation will be automatically preocessed by the blue eye at the monitor level.
When operating a software calibration, before you press Calibrate Display, you should use the target presented in the black
circle to adjust brightness and contrast. When the Measure Screen is displayed, you will notice a definite change in contrast
on the display. Most of the time, the display will seem brighter. blue eye has set the gamma of the display to native which means
the monitor has no correction applied to it; this is its natural state.
With the lights out, the innermost ring should be just barely visible. If it is not (see Figure 3), turn up the brightness control on
the monitor until the ring is just barely visible. If the innermost ring is extremely visible (see Figure 4), turn down the brightness
control until it is just visible.
If the rings are always too visible or too dark, leave the brightness control at its lowest/highest setting. Call your monitor repairman. Your monitor needs internal adjustment. If the monitor is too dark, blue eye may not be able to achieve an accurate
calibration.
blue eye does not provide a target for adjustment of contrast. Modern monitors are engineered to display distinguishable highlight detail with the contrast control at its maximum setting so set contrast to its maximum and leave it there unless you need to
change it to match to another monitor.
Measuring the display
When you click on calibrate display, blue eye asks you to mount the calibrator to the screen. IT IS IMPORTANT THAT YOU
CLEAN THE SUCTION RING WITH AN ALCOHOL WIPE OR SOME SIMILAR TREATMENT IN ORDER FOR THE CALIBRATOR
TO ADHERE WELL TO THE SCREEN. Pressing continue starts the measuring.
Eighteen values of gray are measured including absolute black and full white. At the end of the measurement cycle, blue eye
checks to see if you are calibrating to a preset or matching-to-reference. If you are using a preset, you are done. blue eye
displays the calibration data for color temperature and gamma in the Display Panel area. Since new measured data for the
monitor now exists, any previous corrections for ambient light is invalid. blue eye ignores any existing ambient correction and
you should remeasure ambient, if you choose to apply this correction. Press back to return to the Main Screen. blue eye creates
a ColorSync profile named “blue eye” in the ColorSync profile folder in System/Preferences.
Page 15
15
Matching to a reference
If you were in a Match-to-reference condition, at the end of the measurement process, blue eye will display a message in the
Operator Guide panel noting that you had chosen to match a reference. In case of a software calibration, you should keep the
calibrator attached to the screen and now adjust brightness and contrast to match the settings of the reference.
blue eye will first display a black patch and measure its brightness. A needle indicator is displayed in the circular progress bar.
You should adjust the brightness control up or down to get the needle into the red, target area. Press Measure White to continue.
Now adjust the contrast control until the needle once again sits within the target zone. Since adjusting contrast affects the black
point setting, you may wish to remeasure and readjust brightness. Click Measure Black to do this. After you gain experience
with your monitor, you will know whether readjustment of the controls requires remeasurement or not.
To end the set black/white loop, press Accept Settings and blue eye will return to the Main Screen. You are done.If you had
been unable to adjust brightness and/or contrast to get the pointer into the target zone, your match may be close enough to
use. There are no absolute rules for this condition, but errors on the order of ten percent of the match luminance should leave
a usable match. Errors of more than ten percent are questionable. In any case, you should reverse the target and reference
monitors, using the old reference as the target and the old target as the new reference. This allows the monitor with the
greatest dynamic range (the old reference) to match the less capable monitor (the old target).
Figure 2 – The Measure Screen
Room Lighting
Use this to let the blue eye measure the
ambient room lighting and adjust your
monitor to provide maximum visibility of
shadow details.
calibrate
Click here to start the calibration
process.
Back button
Click here to go back to the main screen.
Page 16

16
Room Lighting
Overview
You may wish to check for room lighting conditions. Clicking the Room Lighting button takes you to the Room Lighting Screen.
The gamma of the monitor is reset to the value you have chosen.Turn the room lights back to normal and check the circular
targets now. If you can still see the innermost ring, you do not need any adjustment. If you cannot see the inner circle, use the
ambient compensation feature of blue eye.
Room Lighting adjusts the contrast curve of the monitor as a function of the illumination in the room. This adjustment increases
the brightness levels in the dark regions of an image by decreasing “gamma”. Using this adjustment will, therefore, alter the
appearance of an image without altering its data. The image, therefore, will produce the same output for shadow detail even
though the image looks more visible on the screen.
Use this function only to improve the image for screen editing and eliminate any ambient compensation to make image/color
judgments. Adjusting for room lighting will not alter or destroy a match-to-reference setting.
Calibrator measurement
To adjust for ambient light by measuring with the calibrator, hold the calibrator with the suction cup facing into the room and
the back of the calibrator against the screen. Point the calibrator toward the major source of light on the room. Try to position
the sensor aperture so that is captures the most prominent stream of light that strikes the monitor. This operation is not critical to
accuracy and may be redone several times to get an acceptable result (visible rings on the target).
Press Measure and blue eye measures the amount of light striking the calibrator. blue eye raises or lowers the contrast curve of
the monitor accordingly. It takes a few seconds for the measurement to complete. You may make as many measurements as you
wish, pointing the calibrator at different spots and sources. Click Return to return to the Main Screen.
Manual ambient compensation
Navigate to the Expert Screen. Move the Ambient slider to the position you desire. blue eye adjusts the monitor to the setting
of the slider upon release of the slider.
As an aid in adjusting lighting compensation, blue eye provides a gray ramp of dark values. Optimum adjustment occurs when
you can just see the step between the two leftmost bars. Press Back to return to the Main Screen.
The Setup Screen
Overview
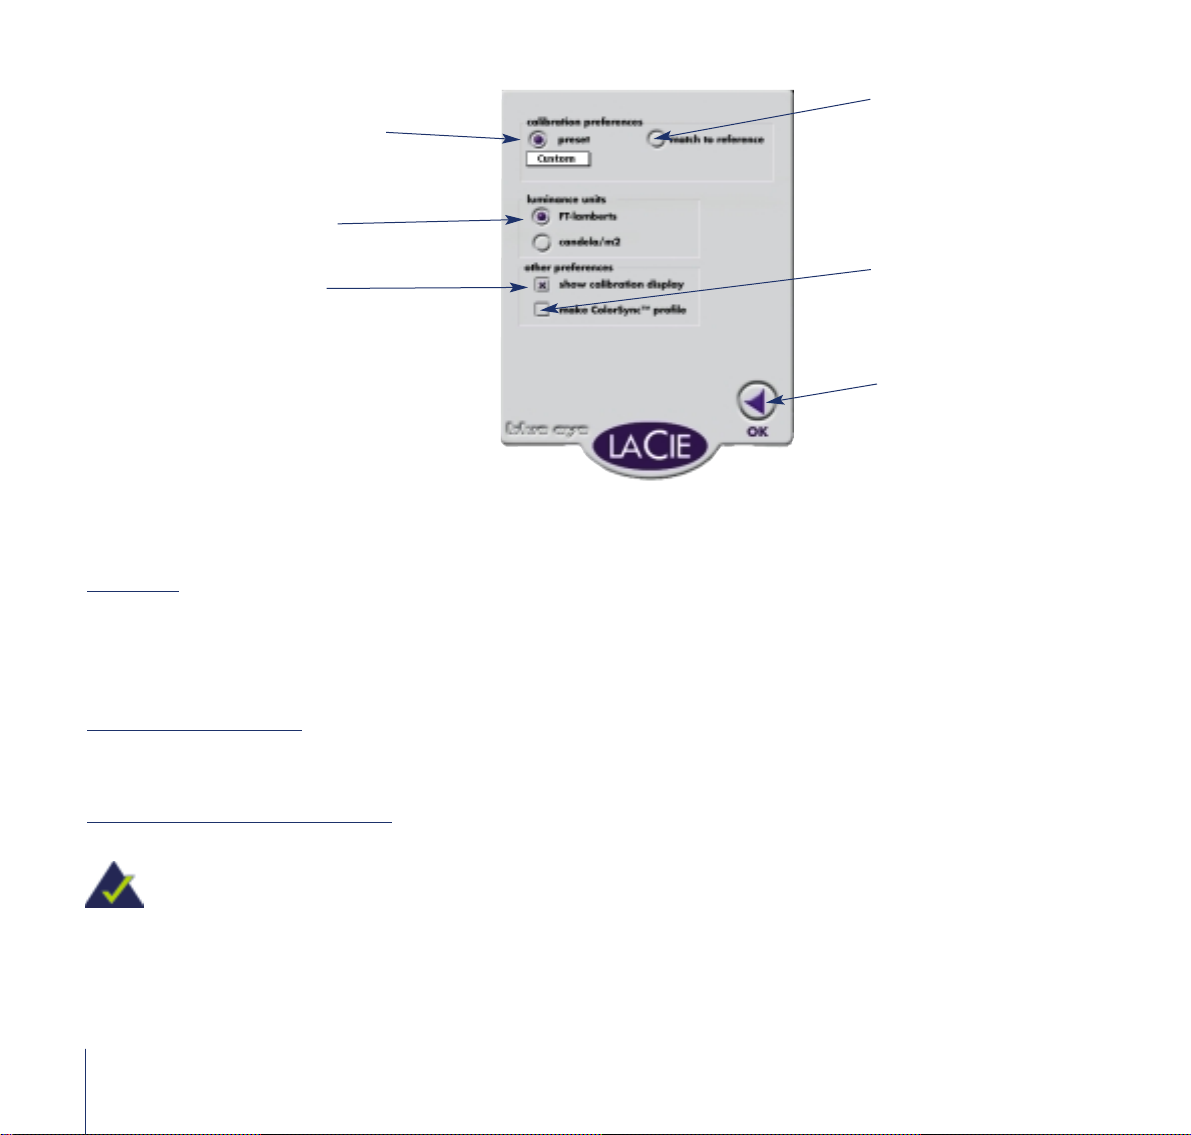
The Setup Screen allows you to select calibration modes and to set operational preferences. blue eye provides two different
calibration modes, calibrate to a Preset or calibrate to a Reference. A Preset is a file that specifies the color temperature and
gamma for the monitor. A Reference is a file of data about another monitor. blue eye will use this data to match your monitor to
the Reference monitor.
The Setup Screen also displays preferences for you to select regarding measurement units and ColorSync profiles.
Page 17

17
Presets
A pulldown is provided which displays the list of available Presets. Presets have names to make it easier to understand their use
and content. For example, the US publishing standard of D50 color temperature and 1.8 gamma is stored in a blue eye Preset
file named Publishing.
Since blue eye has saved the color measurement data about your monitor, it can recalibrate your monitor to any color temperature and gamma at any time by simple mathematical calculations. Thus, selecting a Preset from the pulldown list immediately
recalibrates your screen to the new parameters.
If you were in a Match-to-reference condition when you selected the Preset, blue eye will warn you that you are about to lose
the “match”. You may proceed or cancel calibration to the Preset, depending on your intent.
There are two special Preset files in blue eye; one is called Custom and the other is called Native. Custom contains the last
setting of the color temperature slider and the gamma slider in the Expert Screen. Native contains the settings of the monitor
with no calibration applied. Clicking Native sets the monitor to its uncorrected (“native”) state.
You can create your own calibration Presets by using the Expert Screen.
Match-to-reference
If you select a reference file, blue eye matches your monitor to the data in the file. this is done on a point-by-point basis with
each data point in the file. Thus, the color value of your monitor at full white is mapped to the color value of the reference at
full white, the color value of your monitor at 95% white is mapped to the color value of the reference monitor at 95% white,
and so forth. this mapping happens instantaneously.
When the color mapping is complete, blue eye asks you to match the luminance of your monitor to that of the reference. Attach
the calibrator to the screen and press Measure Black. A black patch is displayed and measured by blue eye. Displayed in the
Data Display panel are the luminance value of your screen and the luminance value of the reference. A needle pointer is also
displayed in the circular arc and a red target area is highlighted. Adjust the brightness control until the pointer is in the red
target area.
Press Measure White. A white patch is displayed and measured by blue eye. The luminance values of this measurement are
also displayed. Adjust the contrast control until the pointer is in the red target area.
You may readjust brightness and contrast repeatedly until you are satisfied with the settings (see Measure/Match-to-reference
for another explanation of the white/black adjustment process).
Match-to-reference disables the color temperature and gamma sliders in Expert to prevent accidental modification of the reference
settings. The Lighting Compensation slider remains active.
Preferences settings
blue eye also allows you to:
• select your preferred display units for data, either Foot-Lamberts or Candela/m2.
• enable/disable creation of a ColorSync profile. When blue eye starts-up, it checks the ColorSync control panel to see if
ColorSync is turned on. If it is, the ColorSync check-box in Setup is enabled. If Color-Sync is not on, the check-box is grayed-out.
• turn on/off the display of values in the Data Display panel on each screen.
Page 18
The Expert Screen
Overview
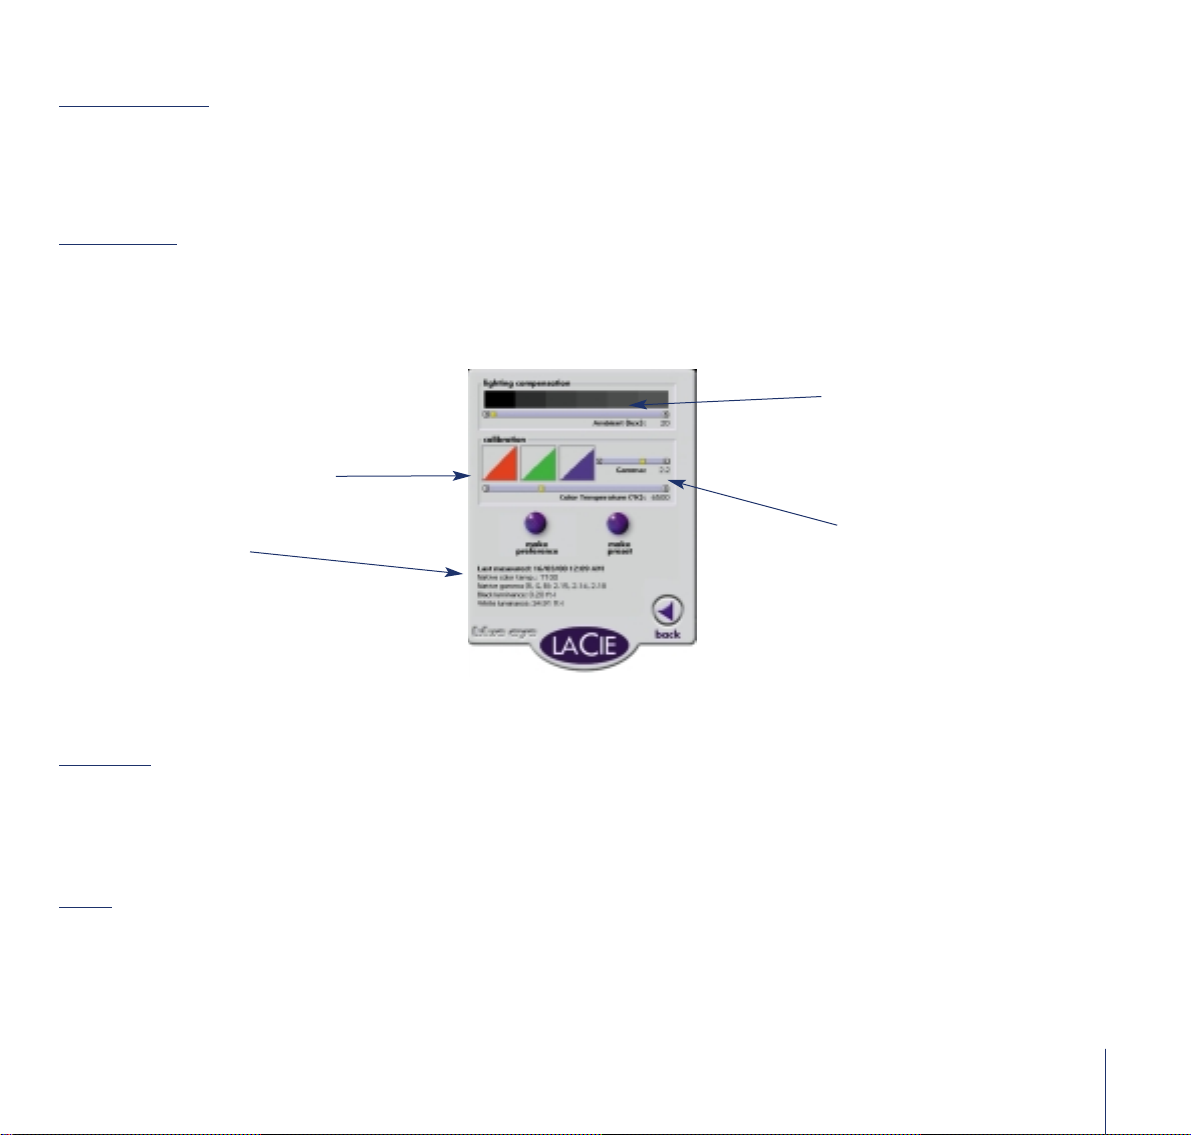
Expert provides manual control (via sliders) over three different functions – Lighting Compensation, Color Temperature and
Gamma. Clicking on any slider bar moves the pointer to the next detent. Clicking the arrow increments the pointer by a value
specific to that control. Expert also displays the values of the color temperature and gamma settings. Buttons are provided for
creation of new Preset and Reference files (this is difficult to read across the image).
Lighting compensation
The Lighting Compensation slider increases the amount of correction for bright rooms. A gray ramp is provided as a visual aid
for proper adjustment.
Color temperature and Gamma
Color Temperature and Gamma may also be adjusted.
Note: in Match-to-Reference mode, the sliders are disabled.
The curves loaded into the graphics card to create the color temperature or gamma are shown in the RGB triangles. The state
of the sliders is always saved in the Custom preset when you exit Expert.
18
Preset
Click here to select a preset settings
Match to reference
Click here to select a reference file
for monitor cloning
Luminance
Select the luminance unit.
Show calibration
Select to display color and gamma
information on all screens
ColorSync ™ profile
Select to automatically create a
ColorSync™ profile at the end of
the calibration.
Back button
Click here to go back to the main
screen.
Figure 3 – Room Lighting
Page 19
Make reference
You can create a reference file for others to match to your monitor. Click the Make reference button and blue eye asks you to
mount the calibrator to the screen. blue eye then measures your screen. A dialogue box appears for you to type the file name
for the reference. When you click Save, blue eye saves the color data as well as black and white luminances in the reference
file for use during matching.
Make preset
You can create a reference file for others to match to your monitor. Click the Make preset button and blue eye displays a
dialogue box for you to enter the name of the preset file. Upon clicking Save, blue eye saves the color temperature and gamma
values in the preset file.
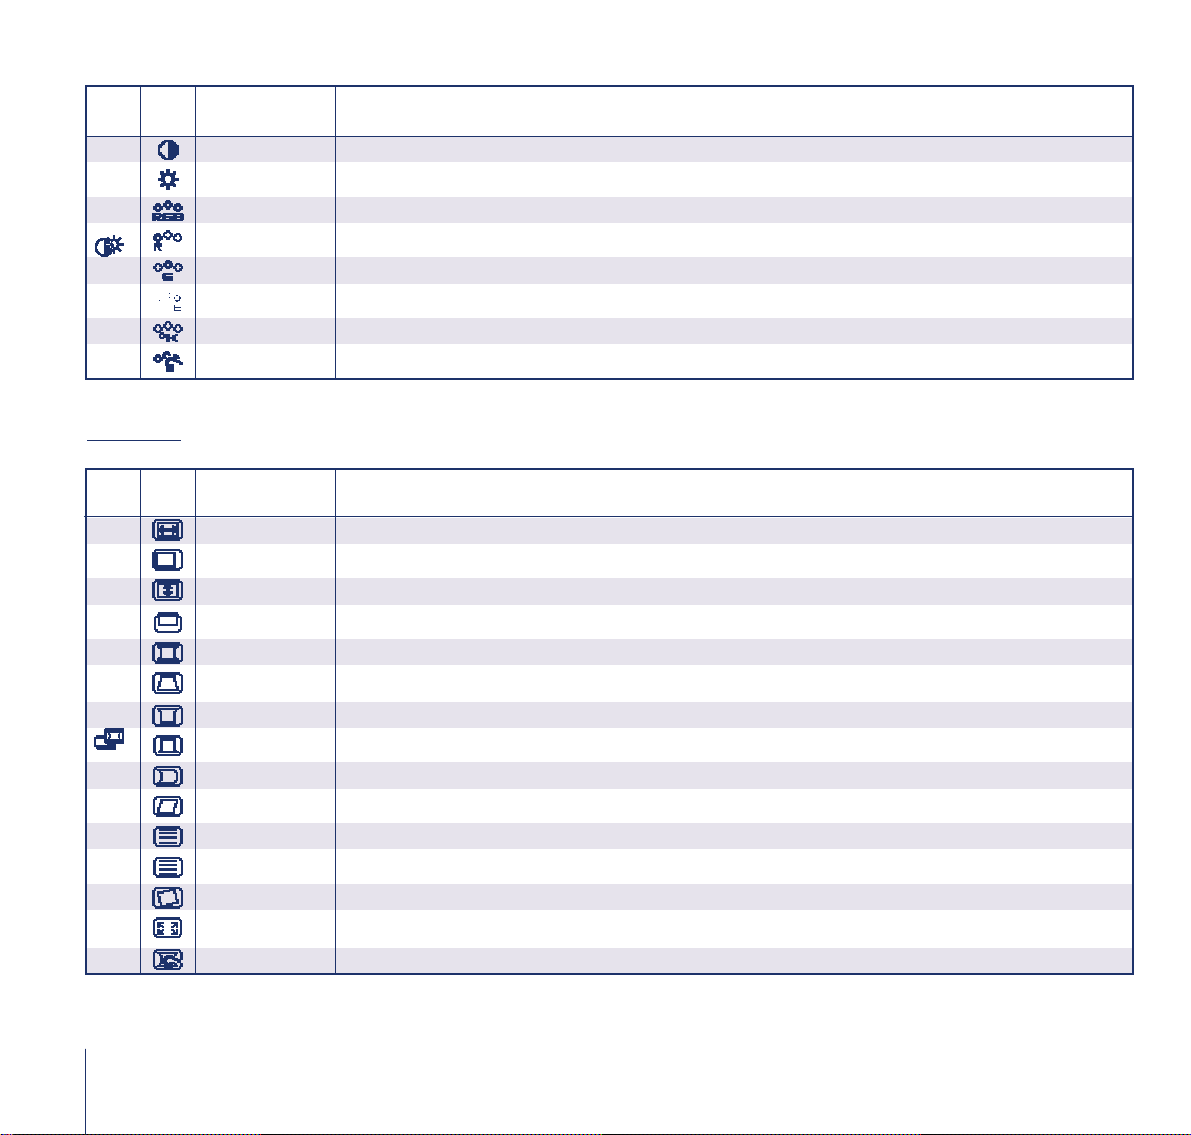
The Electron Screen
Overview
When connected to a LaCie electron19blueII, electron22blue or electron22blueII, the LaCie video cable equipped with 2 HD-15
connectors and 1 USB connector allows the digital control of these monitors settings.
Instead of using the OSD (On-Screen-Display) available through the buttons on the front panel of the monitor all color, geometry
and image settings can be adjusted digitally for a better ease-of-use and accuracy.
Color
These settings should not be adjusted if the monitor is calibrated. Any modification of these settings will invalidate the calibration.
19
Figure 4 – Expert Screen
Room Lighting gray-ramp
Use this to visually evaluate lighting setting. Darktest
steps sould be just visible.
Contents of DACs
Actual contents of graphic card DACs as loaded by blue eye
Calibration Data
Detail data about monitor from last measurement
Color Temperature and Gamma sliders
Page 20
Geometry
20
GROUP
GROUP
ITEM
ITEM
ICON
ICON
ICON
ICON
ITEM
ITEM
FUNCTIONS
FUNCTIONS
CONTRAST Adjusts the contrast level
BRIGHT Adjusts the black level of the screen
COLOR NO Select the desired color from Color 1, Color 2, and Color 3 presets
R-GAIN Adjusts the red-color balances for the selected color
G-GAIN Adjusts the green-color balances for the selected color
B-GAIN Adjusts the blue-color balances for the selected color
COLOR TEMPERATURE Adjusts the color temperature of the image on the screen
COLOR RESET estores each color gain and color temperature to the factory preset
GROUP
GROUP
ITEM
ITEM
ICON
ICON
ICON
ICON
ITEM
ITEM
FUNCTIONS
FUNCTIONS
HORIZ-SIZE Adjusts the horizontal size of the image on the screen
HORIZ-PHASE Adjusts the horizontal position of the image on the screen
VERT-SIZE Adjusts the vertical size of the image on the screen
VERT-POSITION Adjusts the vertical position of the image on the screen
PINCUSHION Straightens the left and right sides of the image on the screen
KEYSTONE Adjusts the parallelism of the left and right sides of the image on the screen
TOP-PIN Adjusts the pincushioning at the top corners of the screen
BOTTOM-PIN Adjusts the pincushioning at the bottom corners of the screen
PIN-BALANCE Adjusts the curvature of the left and right sides of the image on the screen
KEY-BALANCE Adjusts the vertical slant or tilt of the screen image
VERT-LIN-BALANCE Centers the linearity of the vertical axis of the screen
VERT-LIN Adjusts the linearity of the vertical axis of the screen
ROTATION Adjusts the rotation of the image on the screen.
ZOOM Zooms the screen to all sides
GEOMETRY RESET Restores to the factory preset level
Page 21
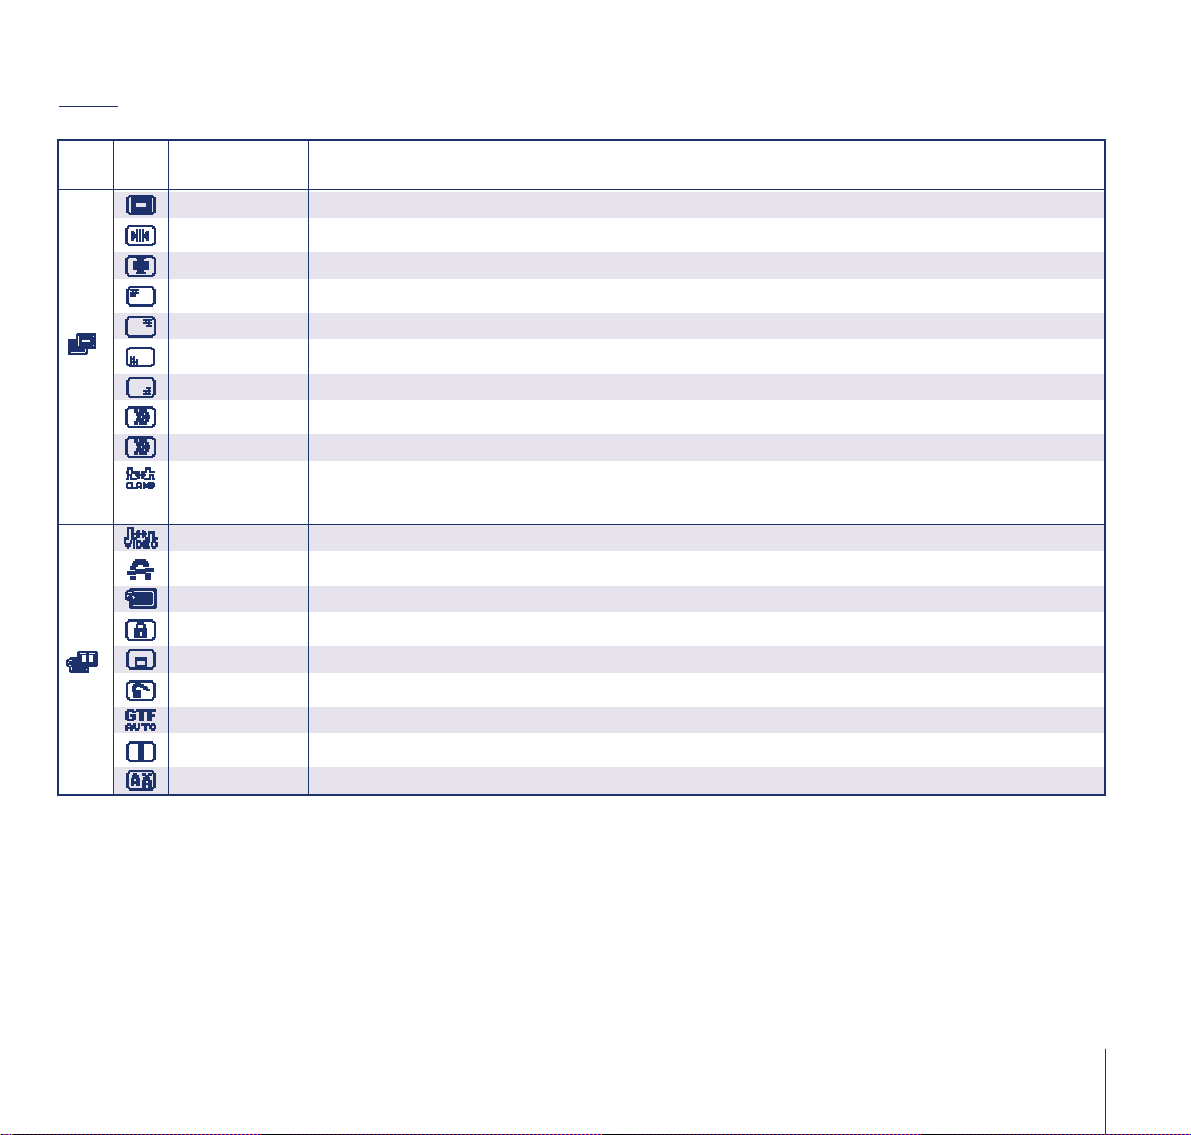
Image
21
GROUP
GROUP
ITEM
ITEM
ICON
ICON
ICON
ICON
ITEM
ITEM
FUNCTIONS
FUNCTIONS
FINE PICTURE MODE Selects the status which provides the most pleasing image
HORIZ-CONVERGENCE Adjusts the horizontal alignment of the red, green and blue beams
VERT-CONVERGENCE Adjusts the vertical alignment of the red, green and blue beams
CORNER PURITY(TL) Adjusts the purity of the top-left corners of the screen
CORNER PURITY(TR) Adjusts the purity of the top-right corners of the screen
CORNER PURITY(BL) Adjusts the purity of the bottom-left corners of the screen
CORNER PURITY(BR) Adjusts the purity of the bottom-right corners of the screen
MOIRE CANCEL When setting to ON, the moire level on the screen can decreased by the MOIRE CANCEL LEVEL
MOIRE CANCEL LEVEL Adjusts the moire level on the screen
CLAMP PULSE POSITION Uses this function to eliminate excessive green or white background that may occur
when both Sync-On-Green and external sync signals are applied to the monitor
VIDEO LEVEL Selects video level 1.0V or 0.7V. (0.7V Standard)
DEGAUSS Eliminates possible color shading or impurity
POWER-SAVE When setting to ON, the power consumption of the monitor will be reduced when not in use f your computer is set for power management
CONTROL LOCK Locks the OSD function except for ”BRIGHT” and ”CONTRAST”
OSD POSITION Moves the OSD screen position
ALL RESET Restores all items to the factory preset level
GTF AUTO ADJUST Adjusts the screen size and distortion automatically
DIAGNOSIS Indicates the current scanning frequency, factory or user preset timing number, and signal input connector
LANGUAGE Selects the language used on OSD screen
Page 22

FCC Information
Information to user
Any changes or modifications made to this device which are not expressly approved by LaCie are prohibited and may void the
user’s authority to operate this equipment.
General information statement
This device complies with Part 15 of the FCC Rules. Operation of this device is subject to the following two conditions:
1. This device may not cause harmful interference, and
2. This device must accept any interference received, including interference that may cause undesired operation.
This equipment has been tested and found to comply with the limits for a Class A digital device pursuant to part 15 of the FCC
Rules. These limits are designed to provide reasonable protection against harmful interference in a commercial installation. This
equipment causes, uses, and can radiate radio frequency energy and, if not installed and used in accordance with the instructions, may cause harmful interference to radio communications. There is no guarantee, however, that interference will not occur
in a particular installation. If this equipment does cause harmful interference to radio or television reception, which can be determined by turning the equipment off and then on, the user is encouraged to try to correct the interference by one or more of the
following measures:
1. Reorient or relocate the receiving antenna
2. Increase the separation between the equipment and the antenna
3. Connect the equipment into an outlet on a circuit different from that to which the receiver is connected
4. Consult the dealer or an experienced TV/radio technician for help
FCC compiance statement for United States users
This equipment has been tested and found to comply with the limits for a Class B digital device pursuant to Part 15 of the FCC
rules. These limits are designed to provide reasonable protection against harmful interference in a residential installation. This
equipment generates, uses, and can radiate radio frequency energy and if not installed and used in accordance with the instructions may cause harmful interference to radio communications. However, there is no guarantee that interference will not occur
in a particular installation. If this equipment does cause harmful interference to radio or television reception, which can be determined by turning the equipment off and on, the user is encouraged to try to correct the interference by one or more of the
following measures:
22
Page 23

• Reorient or relocate the receiving antenna
• Increase the separation between the equipment and receiver
• Connect the equipment into an outlet on a circuit different from that to which the receiver is connected
• Consult a dealer or an experienced radio/TV technician for help
Changes or modifications not expressly approved by the manufacturer could void the warranty of the user to operate this equip
ment.
This device complies with Part 15 of the FCC Rules. Operation is subject to the following two conditions;
1. this device may not cause harmful interference, and
2. this device must accept any interference received, including interference that may cause undesired operation.
For Canadian users
This Class B digital apparatus complies with Canadian ICES-003.
Cet appareil numerique de la classe B est conforme a la norme NMB-003 du Canada.
For Europen users
This product conforms to the requirements of EC Directives 73/23/EEC and 89/336/EEC.
Declaration of Conformity / Déclaration de Conformité / Erklarung zur einhaltung von Produktnormen:
Sequel Imaging, Inc.
25 Nashua Road, Londonderry, NH 03053-USA
Product Name/ Designation / Produktname:
Sequel Imaging
Model Number / Numéro de modèle / Modelnummer:
Digital Control
Conforms to the following Product Specifications / Satisfait aux spécificatons produit suivantes / Den folgenden Produktspezifikationen enspricht:
EMC: EN 60950 / EN 55022:1994 Class B / EN 61000-4-4:1995 / EN 55024:1998 / EN 61000-4-5:1995
EN 61000-4-2:1995 / EN 61000-4-6:1996 / EN 61000-4-3:1996 / EN 61000-4-11:199
23
 Loading...