

Page 1

Universal Serial Bus Interface External Floppy Disk Drive Unit
Standard Model
USB FDD
Installation Guide
For USB FDD Driver CD-ROM P/N 139283-01 Rev. B
Copyright © Lacie Group. All Rights Reserved.
Page 2

USB FDD Installation Guide Rev. B
Important
Important Safety
Important Important
Safety Instructions
SafetySafety
Instructions
InstructionsInstructions
Attention
Don’t
Reproduction in whole or in p art of this sof tware and instruct ion man ual, and the leas in g
of this software, without written permission of the licensor, are prohibited by the
Copyright Law.
This software is for use only with the designated equipment.
1) Please read all of the ReadMe file on the Driver CD-ROM be fore using.
2) The manufacturer and distributor accept absolutely no responsibility
nor liability for any loss, damage, or injury due to the improper use of
the USB FDD.
1) The USB FDD is a precision machine adjusted by the manuf act urer.
Do not drop, strike, shock or crush the USB FDD, as this may invite
trouble.
2) Remove any floppy disk from the USB FDD when not in use or when
carrying.
3) Do not carry or dangle the USB FDD by it’s cable.
4) Do not use the USB FDD near water, nor spill any liquid on it.
5) Do not open the USB FDD, as it may damage the unit or cause an
electric shock.
6) Do not use t he near the radio transmitter such as caller phone.
The specification of this software is subject to change without notice for improvement.
No liability whatsoever is assumed for any damages of any kind, including without
limitation damages for loss of business or profits, other pecuniary loss, or third party
claims, resulting from the use of the software included with this product.
No liability what soev er is assu med for any damages of a ny kind caused by misuse or by
other equipment, or for trouble or damage incurred by unauthorized repair or alteration.
Products with defects caused during manufacturing will gladly be replaced. No
liability whatsoever is assumed for defects due to other causes.
Apple, Mac and Macintosh are trademark of Apple Computer.
Microsoft Windows is a trademark of Microsoft Corporation.
Lacie Group is a trademark of Lacie Group S.A.
All other trademarks are the property of their respective owners and are hereby
acknowledged.
Page 2 Feb. 2002
Page 3

USB FDD Installation Guide Rev. B
Index
Index
IndexIndex
1. Introduction....................................................................................................................4
1.1. Features of the USB FDD......................................................................................4
1.2. Working Environment............................................................................................4
1.3. Part Names of Standard Model .............................................................................5
1.4. Package Contents ...................................................................................................5
1.5. Overview of Driver Installation.............................................................................6
2. Mac OS X (Version 10.1 or later)...................................................................................7
2.1. Installation..............................................................................................................7
2.2. Operating & Connecting the USB FDD................................................................ 7
2.3. Restrictions .............................................................................................................8
3. Mac OS 8.6, 9.0, 9.0.4, 9.1 and 9.2................................................................................ 9
3.1. Installation..............................................................................................................9
3.2. Manual Installation and un-installation ..............................................................9
3.3. Operating & Connecting the USB FDD................................................................ 9
3.4. Restrictions ...........................................................................................................10
3.5. PACE Anti-Piracy’s USB Floppy Enabler ........................................................... 11
4. Windows XP..................................................................................................................12
4.1. Installation............................................................................................................12
4.2. How to Unplug the USB Cable............................................................................12
5. Windows 2000...............................................................................................................13
5.1. Installation............................................................................................................13
5.2. How to Unplug the USB Cable............................................................................13
6. Windows Millennium Edition (Me).............................................................................14
6.1. Installation............................................................................................................14
6.2. How to Unplug the USB Cable............................................................................14
7. Windows 98 and Windows 98 Second Edition............................................................15
7.1. USB FDD Driver Installation..............................................................................15
7.2. Optional setting to use USB FDD as drive letter A:..........................................17
8. Restrictions Windows 98, Windows Me and Windows 2000.....................................19
9. Windows CE .................................................................................................................20
9.1. Installing with the Windows CE Service ............................................................20
9.2. To install using an Internet connection directly to your Handheld PC:........... 23
9.3. Restrictions ...........................................................................................................24
10. Specifications................................................................................................................25
10.1. Temperature Range...........................................................................................25
10.2. Humidity Range................................................................................................25
10.3. Operating Position ............................................................................................ 25
10.4. Supported Diskette Types (3.5 inch)................................................................25
11. Support .........................................................................................................................25
11.1. Contact Your Dealer.......................................................................................... 25
11.2. Contact Lacie..................................................................................................... 25
Page 3 Feb. 2002
Page 4

USB FDD Installation Guide Rev. B
1.
1. Introduction
Introduction
1.1.
IntroductionIntroduction
The USB FDD is a slim type floppy disk drive (FDD) with a Universal Serial Bus (USB)
interface. The USB FDD plugs into the USB port of your personal computer (PC). To
use the USB FDD, you need a personal computer with a USB port, an operating system
that supports USB, and the USB FDD driver software. This guide tells you how to
install the USB FDD driver software.
1.1.
1.1. Features of the U
Features of the USB FDD
1.1.1.1.
Features of the UFeatures of the U
1) Supports dynamic “plug-and-play”, plugging and unplugging the USB FDD without
restarting your computer.
2) Supports Macintosh, Windows 98, Windows Me, Windows 2000,Windows XP and
Windows CE computers.
3) Works without any additional AC adapter, so you can use it anywhere.
SB FDD
SB FDDSB FDD
1.2.
1.2. Working Environment
Working Environment
1.2.1.2.
Working EnvironmentWorking Environment
Macintosh Mac OS X Ver.10.1 or Higher
Mac OS 8.6
Mac OS 9.0
Mac OS 9.0.4
Mac OS 9.1, 9.2
Windows
Windows CE Windows CE 2.11 (H/PC Pro 3.0)
Note:
Note:
Note: Note:
1) The USB FDD driver for Macintosh does not support Mac OS 8.1 and Mac OS 8.5. If
your iMac has Mac OS 8.1 or Mac OS 8.5, please update Mac OS 8.6 or later.
More information about updating your iMac is available on the web at
http://www.apple.com/swupdates/
Windows XP
Windows 2000
Windows Millennium Edition ( Me)
Windows 98
Windows 98 Second Edition (SE)
Windows Powered Hand Held PC
2000
Works with standard
built-in driver of OS X.
iMac
Power Mac G3 / G4
Power Book G3 / G4
iBook
Works with standard
built-in driver of Windows.
Supported processor types:
ARM, MIPS and SH4.
2) According to Apple computer Inc., some Macintosh computers with Mac OS 9.0.2 or
9.0.3 may stop responding when certain Universal Serial Bus (USB) devices are
connected. Please update to Mac OS 9.0.4 or later.
More information about this problem is available on the web at
http://til.info.apple.com/techinfo.nsf/artnum/n25139
Page 4 Feb. 2002
.
Page 5
USB FDD Installation Guide Rev. B
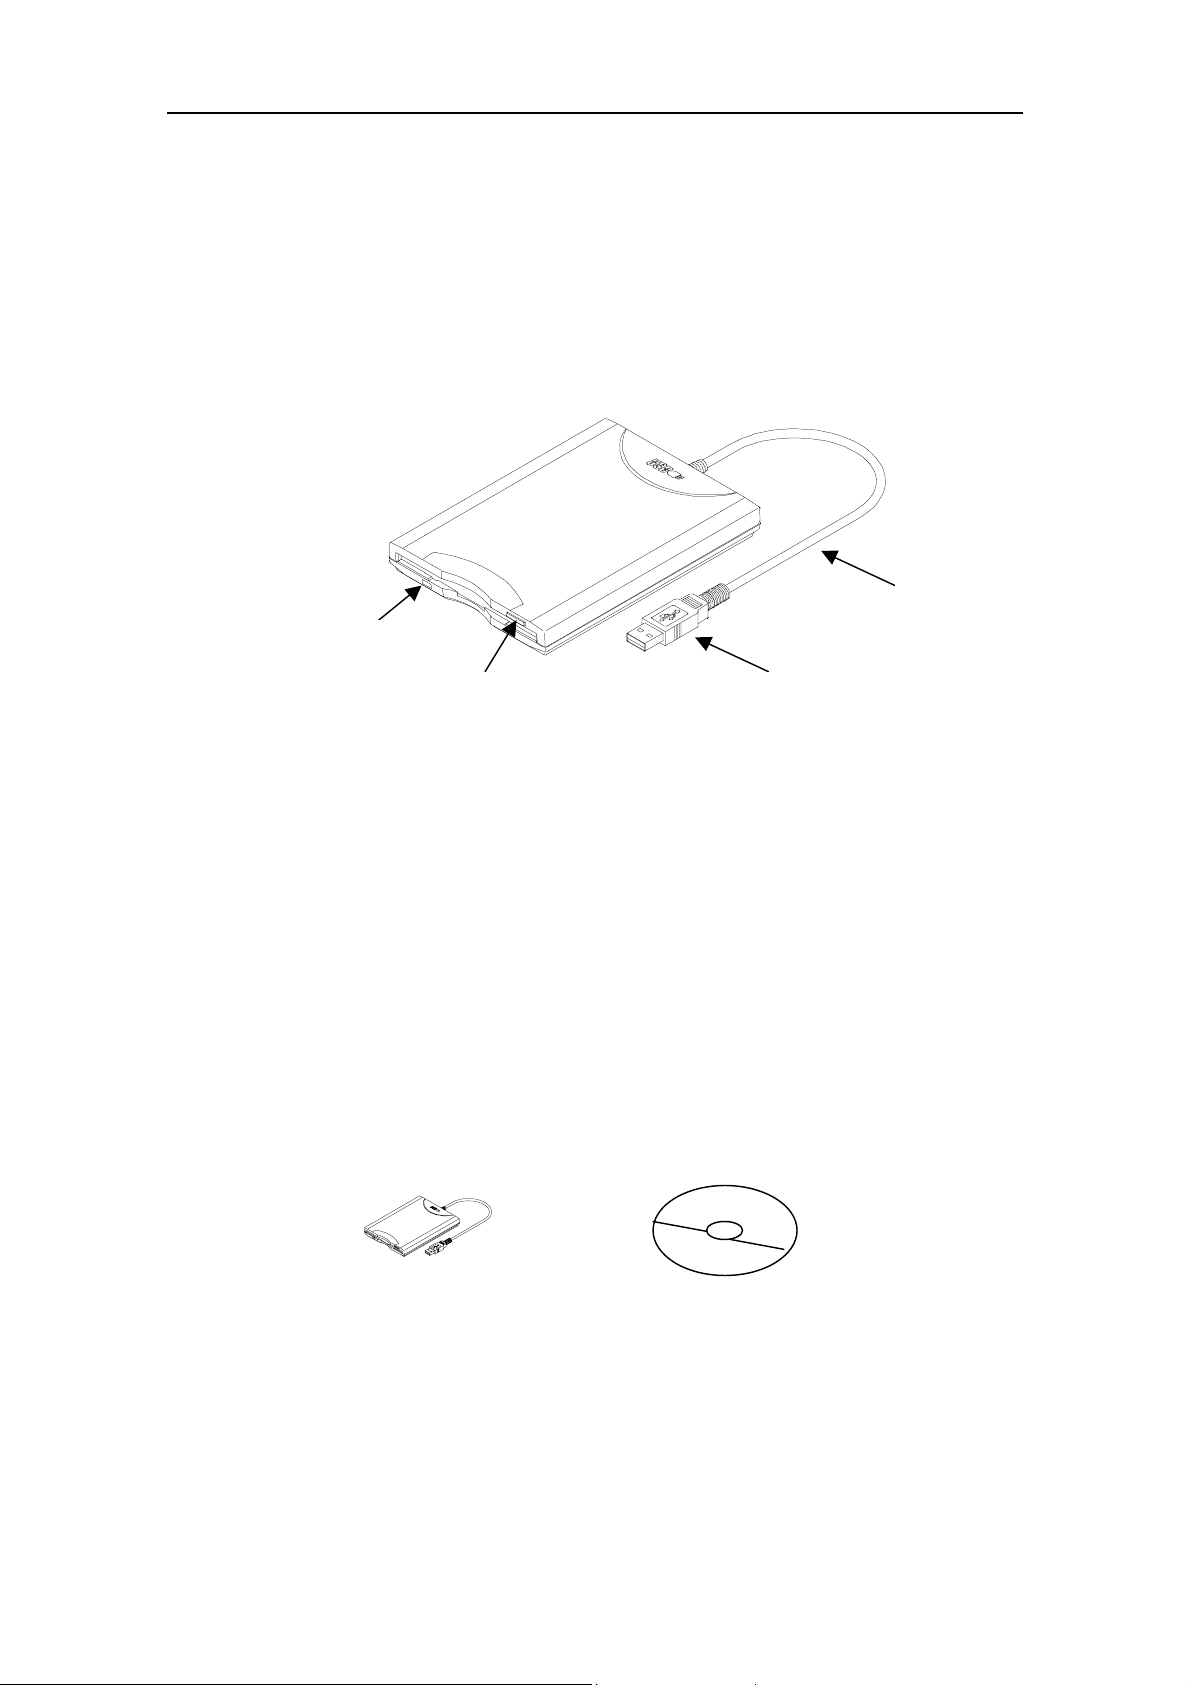
1.3.
1.3. Part Names of
Part Names of Standard
1.3.1.3.
Part Names of Part Names of
In Use LED
Standard Model
StandardStandard
Model
Model Model
USB Cable
1.4.
1.4. Pack
Package Contents
1.4.1.4.
age Contents
PackPack
age Contentsage Contents
Eject Button
USB FDD Unit
USB FDD Unit Driver CD
USB FDD UnitUSB FDD Unit
Driver CD----ROM
Driver CDDriver CD
USB Connector to PC or Ma c
ROM
ROMROM
Page 5 Feb. 2002
Page 6

USB FDD Installation Guide Rev. B
1.5.
1.5. Overview of Driver Installation
Overview of Driver Installation
1.5.1.5.
Overview of Driver InstallationOverview of Driver Installation
Operating
Operating
Operating Operating
System
System
SystemSystem
Mac OS X
Mac OS 9.0
Mac OS 9.0.4
Mac OS 9.1
Mac OS 9.2
Windows XP
Windows 2000
Windows Me
Windows 98
Windows 98 SE
Windows CE Software must be set up before USB connection.
No Drivers are necessary
No Drivers are necessary....
No Drivers are necessaryNo Drivers are necessary
Software must be set up before USB connectio
Software must be set up before USB connection.
Software must be set up before USB connectioSoftware must be set up before USB connectio
1) Run “USB FDD Installer” located in the driver
CD-ROM.
2) Upon completion of installing the driver, restart
your Macintosh.
3) Connect the USB FDD to your Macintosh and
insert a formatted diskette into the USB FDD. A
diskette icon will appear on the desktop.
Connecting a USB triggers software setup
Connecting a USB triggers software setup.
Connecting a USB triggers software setupConnecting a USB triggers software setup
1) USB FDD works with the Windows XP, 2000
and Me, standard built-in driver. Therefore, no
additional driver installation is necessary.
2) Just plug your USB FDD to your PC. Windows
will detect the USB FDD and install the
necessary drivers automatically.
3) A new 3½ Floppy disk icon will appear in the
“My Computer” folder.
Software must be set up before USB connection.
Software must be set up before USB connection.
Software must be set up before USB connection.Software must be set up before USB connection.
1) Run “USBFDD.exe” located in the driver
CD-ROM.
2) Upon completion of installing the driver, restart
your PC.
3) Connect the USB FDD to your PC. Windows will
detect the USB FDD and install the necessary
drivers automatically.
4) A new 3½ Floppy disk ic on will a ppe ar in the “M y
Computer” folder.
Software must be set up before USB connection.
Software must be set up before USB connection.Software must be set up before USB connection.
1) Connect your Handheld PC to your host
Windows PC with the Windows CE Service
software and cable.
2) Place the USB FDD driver CD in the CD-ROM
drive connected to the host Windows PC.
3) Run the Setup program located in the WINCE
folder of the driver CD-ROM.
4) Connect the USB FDD t o y our Han d held P C and
insert a formatted diskette into the USB FDD.
The diskette can be access as “Storage
folder in the “My Handheld PC”.
Description
Description Refer to:
DescriptionDescription
n.
n.n.
Storage Card
StorageStorage
Card”
Card Card
Refer to:
Refer to:Refer to:
Page 7
Page 9
Page 12
Page 13
Page 14
Page 15
Page 20
Page 6 Feb. 2002
Page 7
USB FDD Installation Guide Rev. B
A
2.
2. Mac OS X (Version 10.1 or later)
Mac OS X (Version 10.1 or later)
2.2.
Mac OS X (Version 10.1 or later)Mac OS X (Version 10.1 or later)
2.1.
2.1. Installation
Installation
2.1.2.1.
InstallationInstallation
The USB FDD works with the stan dard “USB Mass Storage Sup port” driver that is b uilt
in to Mac OS X. Therefore, no additional driver is necessary.
1) Start up Mac OS X.
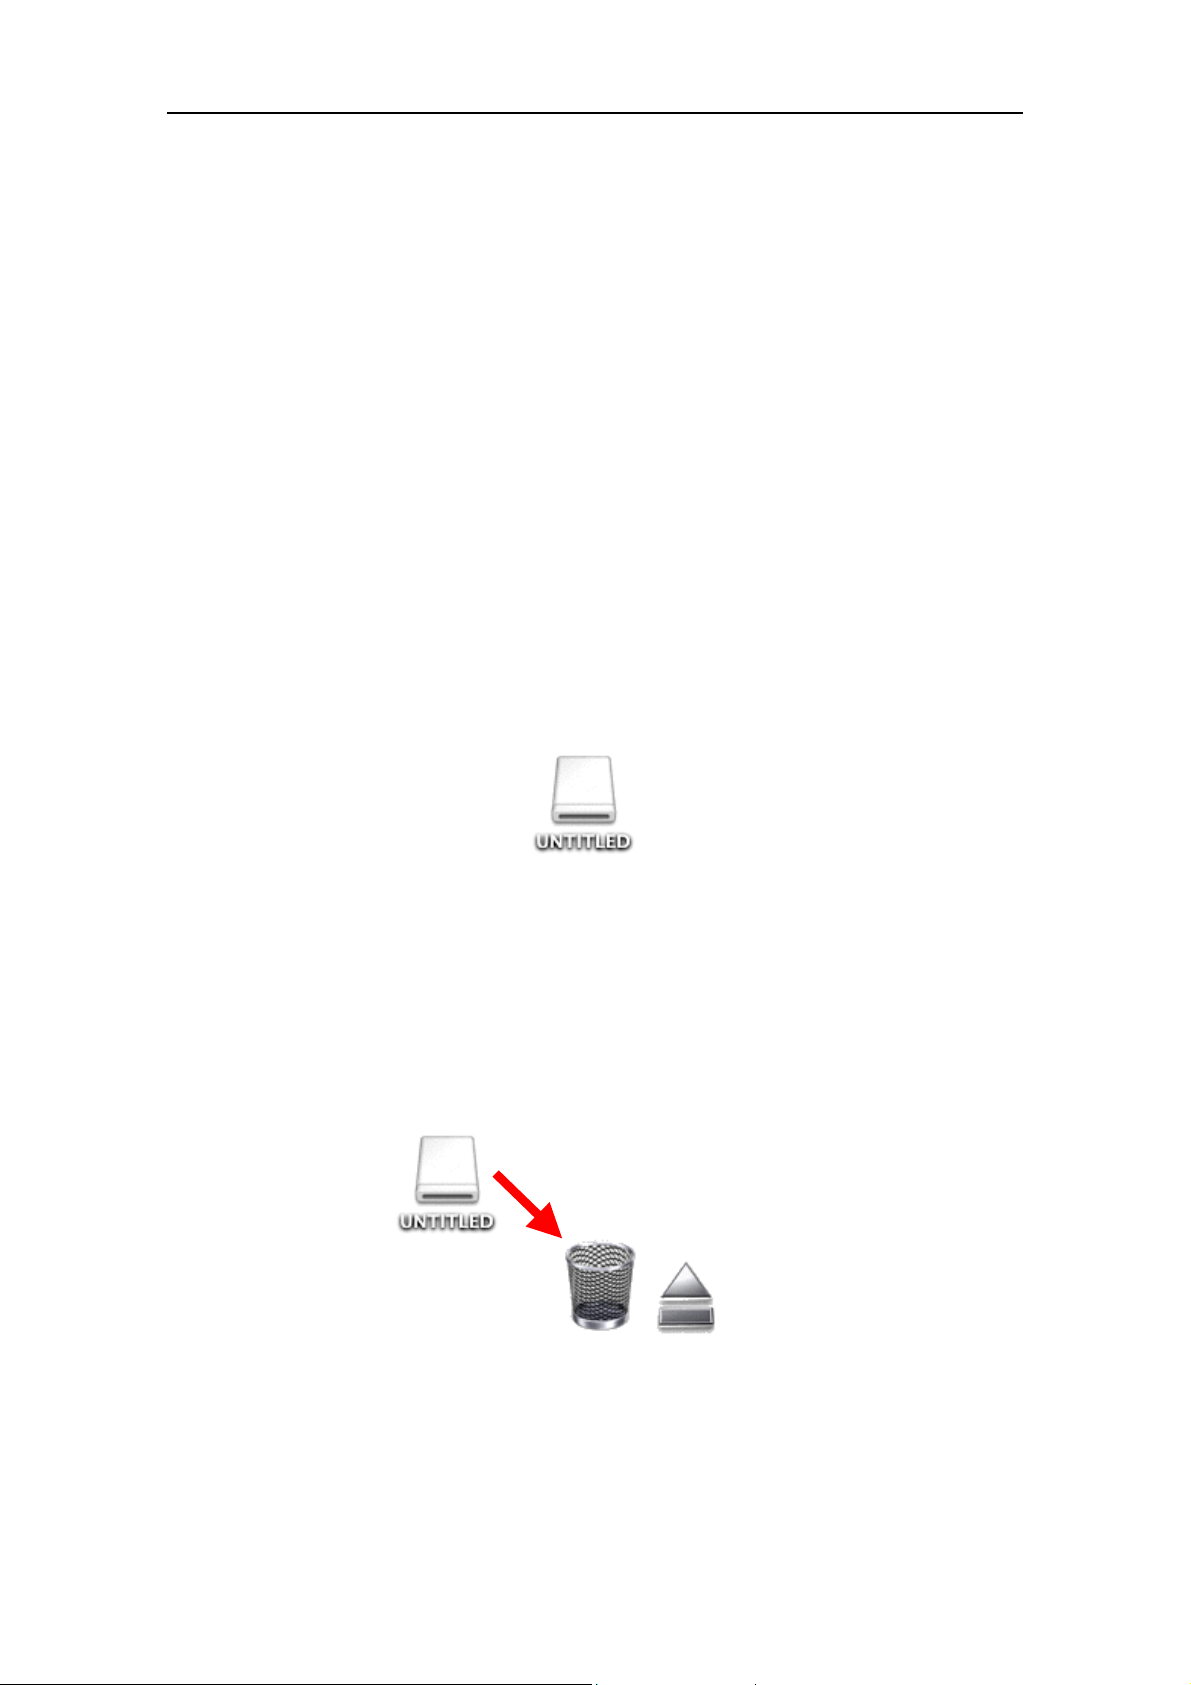
2) Plug your USB FDD into the USB port of your Macintosh. When you insert a
formatted floppy diskette into the USB FDD, a removable disk icon wil l appear on
the Macintosh desktop. The diskette can now be accessed.
2.2.
2.2. Operating &
Operating & Connecting
2.2.2.2.
Operating & Operating &
1) Insert a Floppy Diskette
Connecting the USB FDD
ConnectingConnecting
the USB FDD
the USB FDD the USB FDD
Insert a formatted floppy diskette into t he US B FD D; a removable disk icon will
appear on the desktop. The disket t e c an no w be ac c esse d.
2) Ejecting a Floppy Diskette (IMPORTANT)
Drag the removable disk icon on to th e trashcan. T he trashcan icon w ill change to an
eject icon. Then drop the removable disk icon. Or single c lick the flop py diskette icon
and select [Eject] from the Finder [Special] menu. After that, push the eject button
of USB FDD unit to eject the floppy diskette.
floppy disk will be displayed as a removable disk icon
Do not remove the floppy diskette excepted as outlined above. If you remove the floppy
diskette without following the Eject procedure above, Mac OS m ay become unstable, an d
the contents of diskette may be damaged.
Page 7 Feb. 2002
Page 8

USB FDD Installation Guide Rev. B
3) Connecting the USB FDD
The USB FDD is designed for Hot-Plug. Y ou may plug in the USB FDD at any time.
4) Disconnecting the USB FDD
Before you unplug the USB FDD, be sure that any floppy diskettes have been ejected
as outlined in step 2) above.
Do not unplug the USB FDD during sleep mode. This may cause errors when
resuming your Macintosh.
If sleep mode does not seem to work correctly, try unplugging the USB FDD before
entering sleep mode.
2.3.
2.3. Restrictions
Restrictions
2.3.2.3.
RestrictionsRestrictions
1) It takes about 30 seconds to mount DOS-formatted media. A Mac-formatted media
can be mounted in about 10 seconds.
2) Under Mac OS X, it is impossible to format (initialize) to Mac-standard 1.4 MB,
because the OS does not have the appropriate menu.
3) Mac-formatted media formatted on Mac OS 9.x and 8.x are readable and writable,
but desktop folders and o ther hidden files bec ome visible. (Th is problem may be fixed
in Mac OS 10.1.1 and later.)
4) We recommend you format your floppy diskettes using Mac OS 9.x or 8.x.
Page 8 Feb. 2002
Page 9

USB FDD Installation Guide Rev. B
3.
3. Mac OS 8.6, 9.0, 9.0.4,
Mac OS 8.6, 9.0, 9.0.4, 9.1 and 9.2
3.3.
Mac OS 8.6, 9.0, 9.0.4,Mac OS 8.6, 9.0, 9.0.4,
3.1.
3.1. Installation
Installation
3.1.3.1.
InstallationInstallation
You must first install the USB FDD driver software on your Macintosh before you use
the USB FDD. Do not connect the USB FDD until you have installed the driver files.
If your PC has Mac OS 9.0 or later, USB FDD works with “USB Mass Storage Support ”
Driver that is a Mac OS standard built-in driver made by Apple Computer.
In this case, it is not necessary to install the USB FD D driver from the driver CD-ROM.
1) Insert the USB FDD driver CD-ROM into your Macintosh.
2) A CD-ROM window will open automatically. If it doesn’t open, double click the
CD-ROM icon on the desktop.
3) Double click the USB-FDD installer icon that appears in the CD-RO M w indow.
4) When installation of the USB FDD driver has completed, restart your Macintosh.
5) After your Macintosh restarted, plug the USB FDD into the USB port of your
9.1 and 9.2
9.1 and 9.29.1 and 9.2
Macintosh.
6) Insert a formatted floppy diskette into the USB FDD. A floppy icon will appear on
the Macintosh desktop.
3.2.
3.2. Manual Installation and
Manual Installation and un
3.2.3.2.
Manual Installation and Manual Installation and
To perform a manual installation, please use the following instructions:
1) Copy the file named “YE USB-FDU” and “YE USB-FDU Shim” to the Extensions
folder in the System folder.
2) After copying the file, restart your Macintosh.
3) After your Macintosh has restarted, plug the USB FDD into the USB port of your
Macintosh.
To perform a manu al uninstallation, p lease use an Extensions manager and stop the
driver files “YE USB-FDU” and “YE US B- FDU Shim” in a System Folder.
3.3.
3.3. Operating &
Operating & Connecting
3.3.3.3.
Operating & Operating &
Connecting the USB FDD
ConnectingConnecting
un----installation
installation
unun
installationinstallation
the USB FDD
the USB FDD the USB FDD
1) Insert a Floppy Diskette.
Insert a formatted floppy diskette into the USB FDD. A floppy diskette icon will
appear on the desktop of your Macintosh. If the diskette has not bee n for matted yet,
an initialize dialog box will appear instead.
Page 9 Feb. 2002
Page 10

USB FDD Installation Guide Rev. B
2) Ejecting a Floppy Diskette
Ejecting a Flopp y Diskette (IMPORTANT)
Ejecting a Floppy DisketteEjecting a Floppy Diskette
Drag the floppy diskette icon to the trash-can. Or single click the floppy diskette icon
and select [Eject] from the Finder [Special] menu.
Note:
Note:
Note: Note:
operating system may become unstable, and the diskette contents may be damaged.
Do not remove the floppy diskette
Do not remove the floppy Do not remove the floppy
diskette is removed from the USB FDD by mistake, be sure to
diskette idiskette i
If the floppy diskette is removed from the USB FDD unexpectedly, the
Do not remove the floppy
diskette i
s removed from the USB FDD by mistake, be sure to insert
s removed from the USB FDD by mistake, be sure to s removed from the USB FDD by mistake, be sure to
(IMPORTANT)
(IMPORTANT)(IMPORTANT)
diskette except as outlined above! If the floppy
diskettediskette
except as outlined above! If the floppy
except as outlined above! If the floppy except as outlined above! If the floppy
insert the
insertinsert
the
the the
same diskette back into the USB FDD immediately!
same diskette back into the USB FDD immediately!
same diskette back into the USB FDD immediately!same diskette back into the USB FDD immediately!
3) Connecting the USB FDD
The USB FDD is designed for Hot-Plug. Y ou may plug in the USB FDD at any time.
4) Disconnecting the USB FDD
Before you unplug the USB FDD, be sure that any floppy diskettes have been ejected
as outlined in step 2) above.
Do not unplug the USB FDD during sleep mode. If sleep mode does not seem to work
correctly, try unplugging the USB FDD before entering sleep mode.
3.4.
3.4. Restrictions
Restrictions
3.4.3.4.
RestrictionsRestrictions
1) 2DD 800KB Mac format diskettes are not supported.
2) ProDos (Apple-II) format is not supported. Do not select this menu on the initialize
dialog box.
3) There is no function for Auto-Eject. The floppy diskette must be ejected manually.
4) You cannot start up the Macintosh f rom t he US B FD D.
5) This driver is designed only for u se wi th this USB FDD. I t cann ot be u sed for othe r
USB-FDD devices.
6) Some application programs use more than one installation floppy diskette.
Application installers sometimes require the use of the auto-eject feature to switch
diskettes. In such cases, the diskette change mechanisms will not work with the
USB FDD.
7) Floppy diskettes formatted manual ly to avoid ille gal dupli cation cann ot be insta lled.
Some CD-ROM software may have these types of floppy diskettes.
Page 10 Feb. 2002
Page 11

USB FDD Installation Guide Rev. B
8) Be sure to use a self-powered USB hub with AC adapter, if you use a US B hub.
9) Do not connect the USB FDD to the USB port on the keyboard.
10) Reset your Macintosh, if your Macintosh freez es or hang s up.
11) The USB FDD is a precision machine adjusted by the manufacturer. Do not drop,
strike, shock, or crush the USB FDD; otherwise the USB FDD may break.
12) When in sleep mode, do not remove the floppy diskette from the USB FDD or unplug
the USB FDD from yo ur Maci nto sh. If you d o, t he Maci ntos h wil l prom pt you to put
back the floppy diskette or plug in the USB FDD, when it wakes up from sleep mode.
Your Macintosh will continue to prompt it until you put back the floppy diskette or
plug the USB FDD back in.
Insert the same diskette in the USB FDD as the o
Insert the same diskette in the USB FDD as the one you had removed during sleep
Insert the same diskette in the USB FDD as the oInsert the same diskette in the USB FDD as the o
mode, when prom pted by the Mac intosh. Do not inse rt a diffe rent di skett e, as it w ill
mode, when prom pted by the Mac intosh. Do not inse rt a diffe rent di skett e, as it w ill
mode, when prom pted by the Mac intosh. Do not inse rt a diffe rent di skett e, as it w ill mode, when prom pted by the Mac intosh. Do not inse rt a diffe rent di skett e, as it w ill
become corrupted.
become corrupted.
become corrupted.become corrupted.
We strongly recom mend to eject any floppy diskett e, as described in section 2.3 above ,
ne you had removed during sleep
ne you had removed during sleep ne you had removed during sleep
and then unplug the USB FDD, before entering sleep mode. This is the best way to
protect the data on your diskettes.
3.5.
3.5. PACE Anti
P ACE Anti----Piracy
3.5.3.5.
P ACE AntiP ACE Anti
This USB FDD and driver supports PACE Anti-Piracy’s USB Floppy Enabler Ver 2.0 or
later. The USB Floppy Enabler is a special driver needed to install software that uses
diskette-based copy protection or key diskettes. Please refer to PACE Anti-Piracy web
site at http://www.paceap.com
Follow this procedure to install t h e PACE USB Floppy Enabler.
1) Install the USB FDD driver from the driver CD-ROM if you have not yet done so.
Install the USB FDD driver, even if you have been using the built-in Mac OS driver.
2) Insert the USB FDD driver CD-ROM into your Macintosh.
3) Open the PACE ANTI-PIRACY folder.
4) Double click the USB Floppy Enabler Installer icon to begin installation.
Note:
Note:
If you boot your Macintosh while a diske tte is inserted in the USB FDD, the USB
Note:Note:
Floppy Enabler will not recognize the USB FDD, and a warning messag e will appear on
Piracy’’’’s USB Floppy Enabler
PiracyPiracy
s USB Floppy Enabler
s USB Floppy Enablers USB Floppy Enabler
for more information.
the screen. If this happen, drag the diskette icon on your desktop to the trash, eject the
diskette from the USB FDD, and then reinsert the diskette.
Note:
Note:
When you don’t use a software protected by PA CE Interlok, for example, you may
Note:Note:
disable the USB Floppy Enabler using the Control Panel Extension Manager.
Note:
Note:
The standard “USB Mass Storage Support” driver that is built in to Mac OS 9.x
Note:Note:
does not support PACE Anti-Piracy’s USB Floppy Enabler.
Page 11 Feb. 2002
Page 12
USB FDD Installation Guide Rev. B
4.
4. Windows XP
Window s X P
4.4.
Window s X PWind ow s X P
4.1.
4.1. Installation
Installation
4.1.4.1.
InstallationInstallation
The USB FDD works with the Windows XP standard built-in driver made by Microsoft
Corporation. Therefore, no additional driver is necessary.
1) Start up Windows XP.
2) Plug your USB FDD to you r PC. Windows XP will detect the USB F DD and install
the necessary driver files automatically.
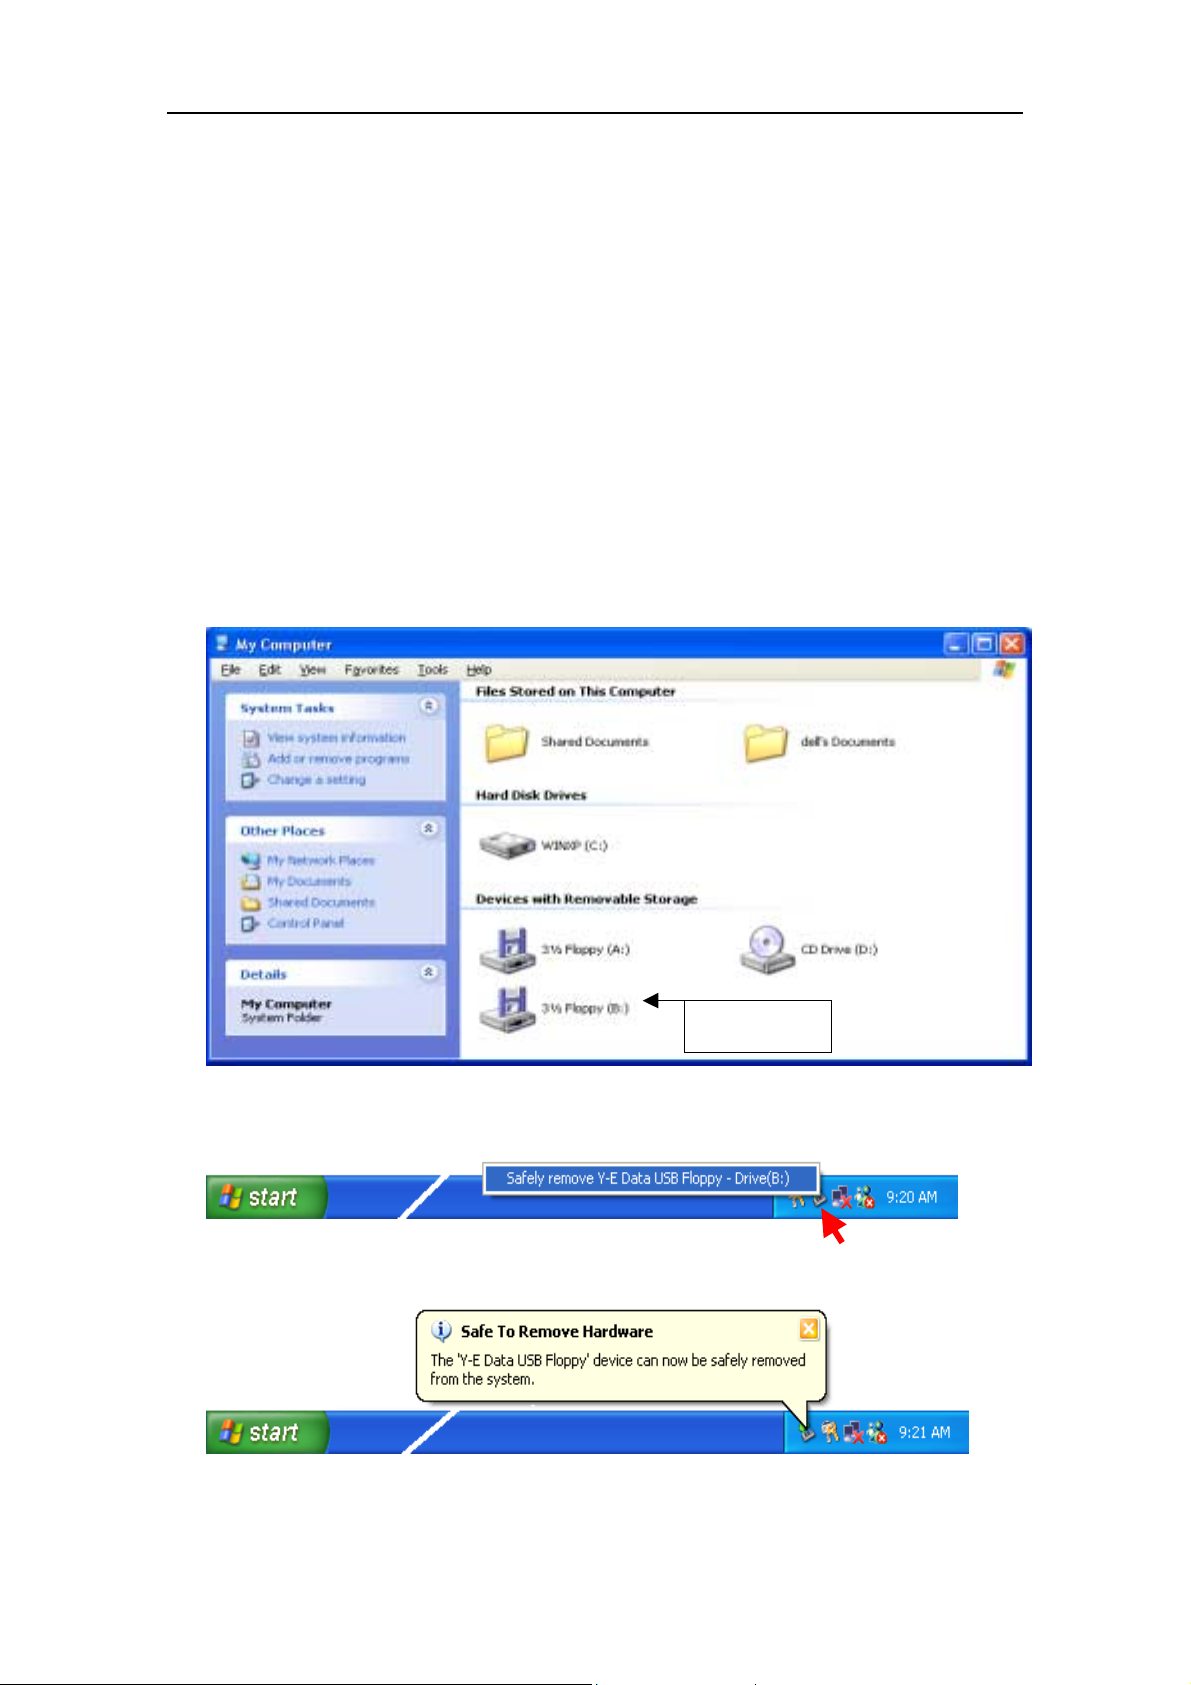
3) A new 3½ Floppy disk icon w ill appear in t he “ M y Comput er” f older. In the figure
below, the US B FD D ca n be acc esse d a s Flo ppy dr ive B: . F lo ppy d rive A: below is t he
built-in floppy drive of your PC. If your PC is a kind of “legacy free” PC, the USB
FDD will work as Drive A:.
USB FDD
4.2.
4.2. How to Unplug the USB Cable
How to Unplug the USB Cable
4.2.4.2.
How to Unplug the USB CableHow to Unplug the USB Cable
1) Click Eject Icon on the taskbar and click the “Safely remove USB Floppy” message.
2) Unplug the USB cable.
Page 12 Feb. 2002
Page 13
USB FDD Installation Guide Rev. B
5.
5. Windows 2000
Windows 2000
5.5.
Windows 2000Windows 2000
5.1.
5.1. Installation
Installation
5.1.5.1.
InstallationInstallation
The USB FDD works wit h the W indows 2000 st andard b uilt-in driver made by Microsoft
Corporation. Therefore, no additional driver is necessary.
1) Start up Windows 2000.
2) Plug your USB FDD to your PC. Windows 2000 will detect th e US B FDD and i nst all
the necessary driver files automatically.
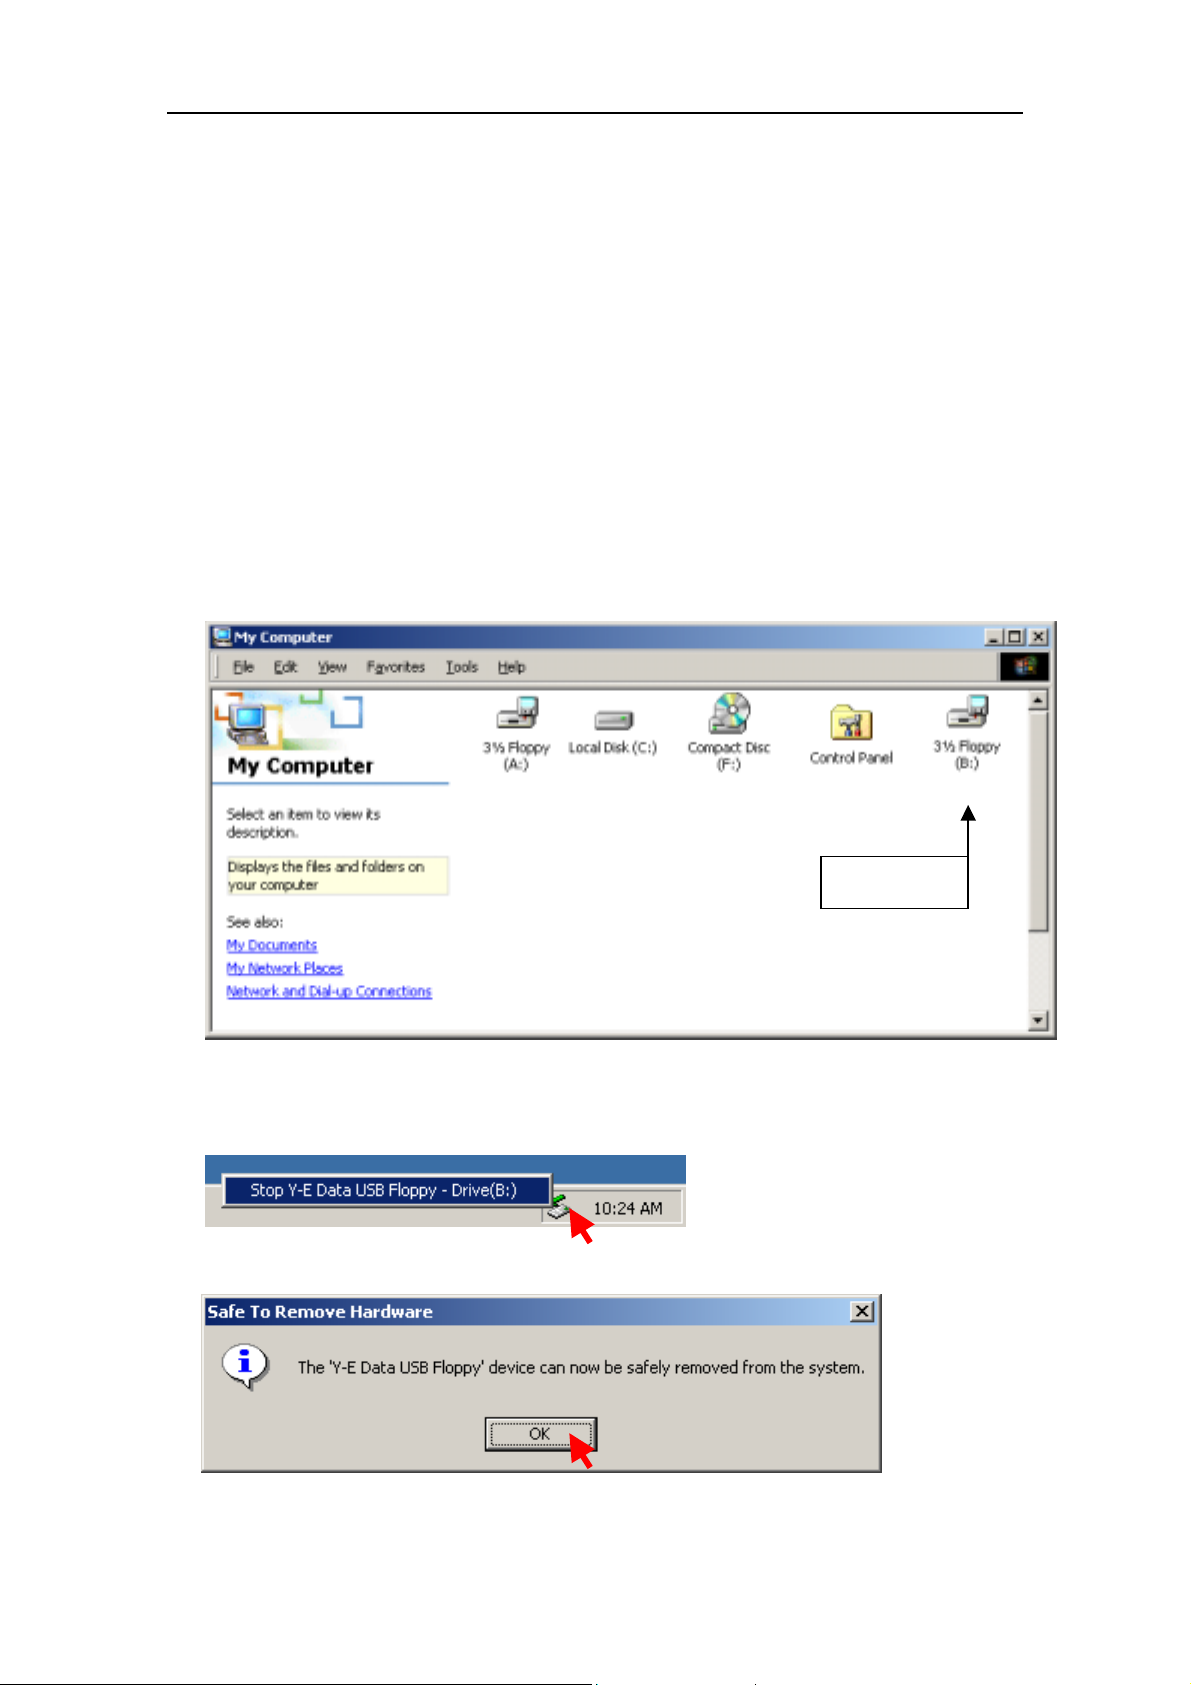
3) A new 3½ Floppy disk icon w ill appear in t he “ M y Comput er” f older. In the figure
below, the US B FD D ca n be acc esse d a s Flo ppy dr ive B: . F lo ppy d rive A: below is t he
built-in floppy drive of your PC. If your PC is a kind of “legacy free” PC, the USB
FDD will work as Drive A:.
USB FDD
5.2.
5.2. How to Unplug t
How to Unplug the USB Cable
5.2.5.2.
How to Unplug tHow to Unplug t
1) Click Eject Icon on the taskbar and click the “Stop USB Floppy” message.
2) Click OK and then unplug the USB cable.
he USB Cable
he USB Cablehe USB Cable
Page 13 Feb. 2002
Page 14
USB FDD Installation Guide Rev. B
6.
6. Windows
Windows Millennium
6.6.
Windows Windows
6.1.
6.1. Installation
Installation
6.1.6.1.
InstallationInstallation
The USB FDD works with the Windows Me standard built-in driver made by Microsoft
Corporation. Therefore, no additional driver is necessary.
1) Start up Windows Me.
2) Plug you r USB FDD to your PC. Windows Me will detect the USB FDD and install
the necessary driver files automatically.
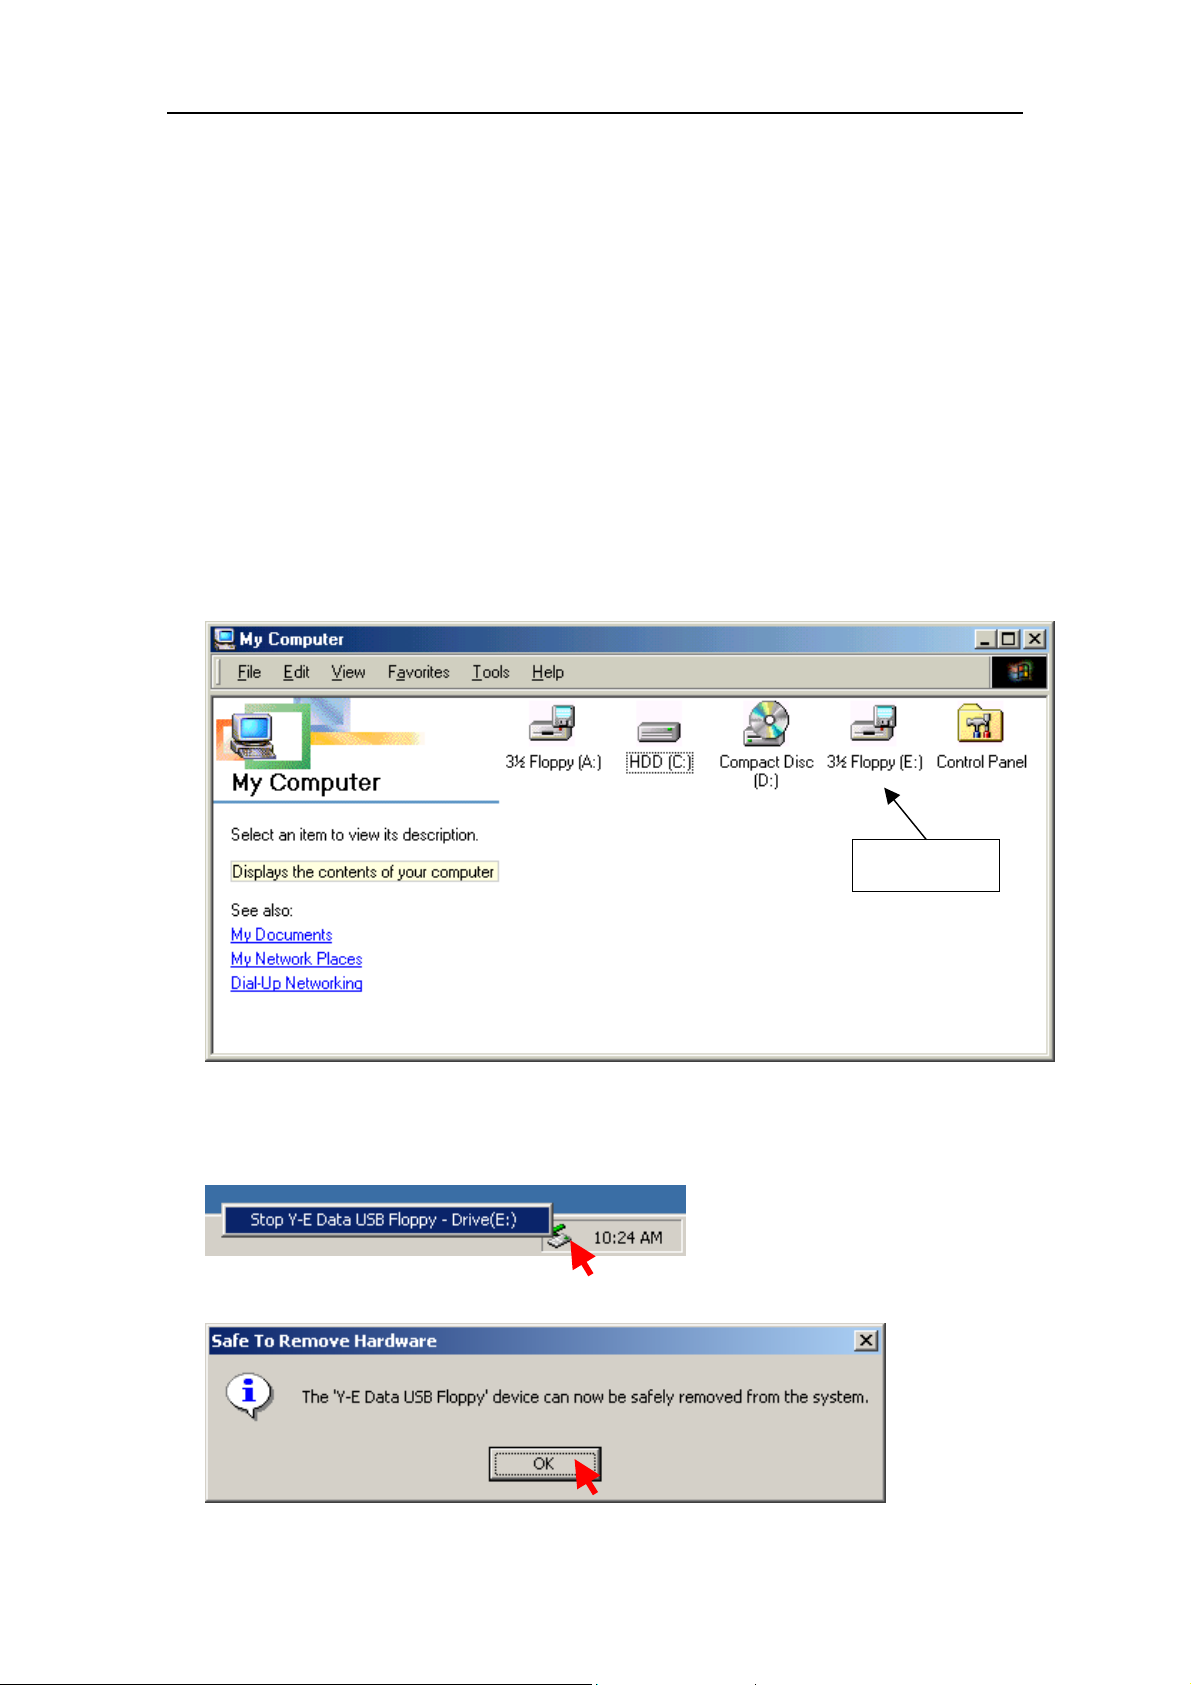
3) A new 3½ Floppy disk icon w ill appear in t he “ M y Comput er” f older. In the figure
below, the US B FD D ca n be acc esse d a s Flo ppy dr ive E: . F lo ppy d rive A: below is t he
built-in floppy drive of your PC. If your PC is a kind of “legacy free” PC, the USB
FDD will work as Drive A:.
Millennium Edition (Me)
MillenniumMillennium
Edition (Me)
Edition (Me) Edition (Me)
USB FDD
6.2.
6.2. How to Unplug the U
How to Unplug the USB Cable
6.2.6.2.
How to Unplug the UHow to Unplug the U
1) Click Eject Icon on the taskbar and click the “Stop USB Floppy” message.
2) Click OK button and then unplug the USB cable.
SB Cable
SB CableSB Cable
Page 14 Feb. 2002
Page 15
USB FDD Installation Guide Rev. B
7.
7. Windows 98 and Windows 98
Windows 98 and Windows 98 Second
7.7.
Windows 98 and Windows 98 Windows 98 and Windows 98
7.1.
7.1. USB FDD Driver Installation
USB FDD Driver Installation
7.1.7.1.
USB FDD Driver InstallationUSB FDD Driver Installation
Note:
Note:
Some
Some new
Note:Note:
Some Some
installed. In this case,
installed. In this case, do
installed. In this case, installed. In this case,
1) Boot up Windows 98.
2) Insert the USB FDD driver CD-ROM into the CD-ROM drive.
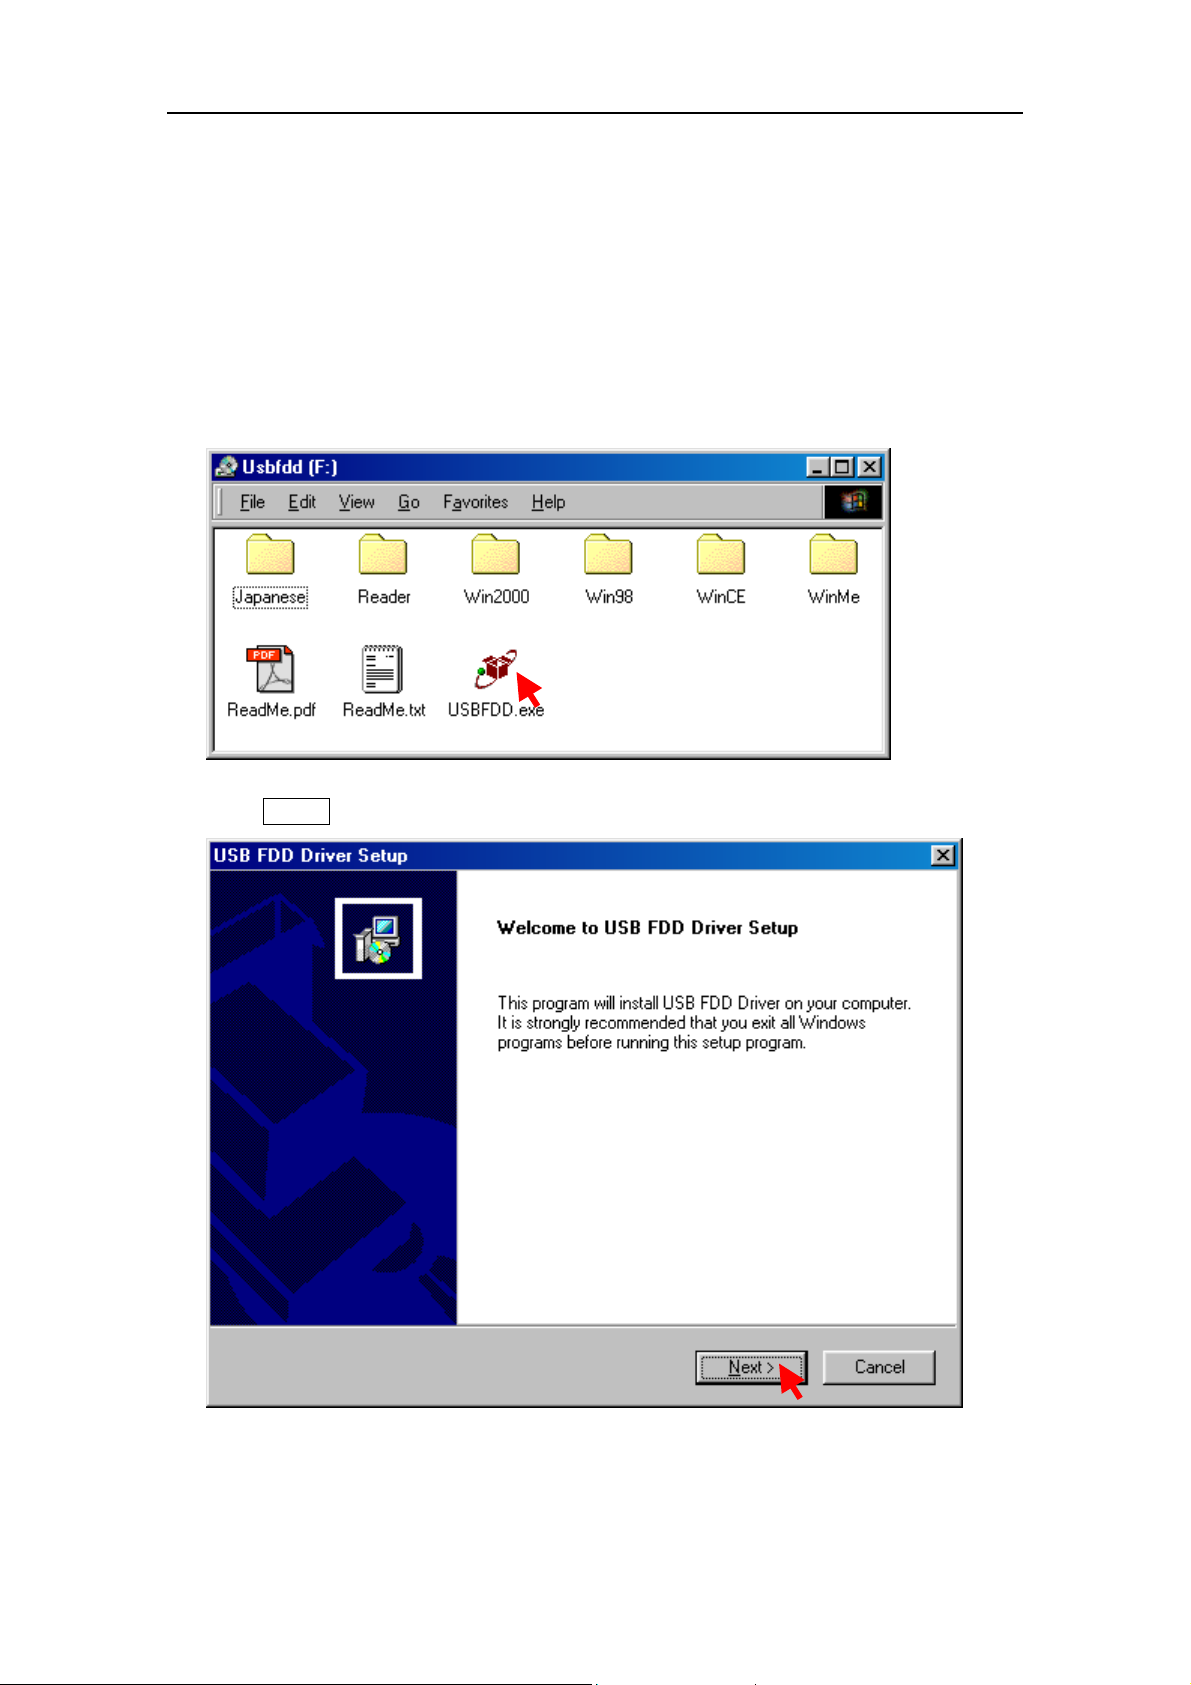
3) Run “USBFDD.exe” to install the driver software.
new computers have a special versi
computers have a special version of the USB FDD driver
newnew
computers have a special versi computers have a special versi
do not install the USB FDD driver from the driver CD
not install the USB FDD driver from the driv er CD----ROM.
dodo
not install the USB FDD driver from the driv er CD not install the USB FDD driver from the driver CD
Second Edition
SecondSecond
Edition
EditionEdition
on of the USB FDD driver already
on of the USB FDD driver on of the USB FDD driver
already
alreadyalready
ROM.
ROM.ROM.
4) Click Next > button to start an installation of the driver files.
Page 15 Feb. 2002
Page 16
USB FDD Installation Guide Rev. B
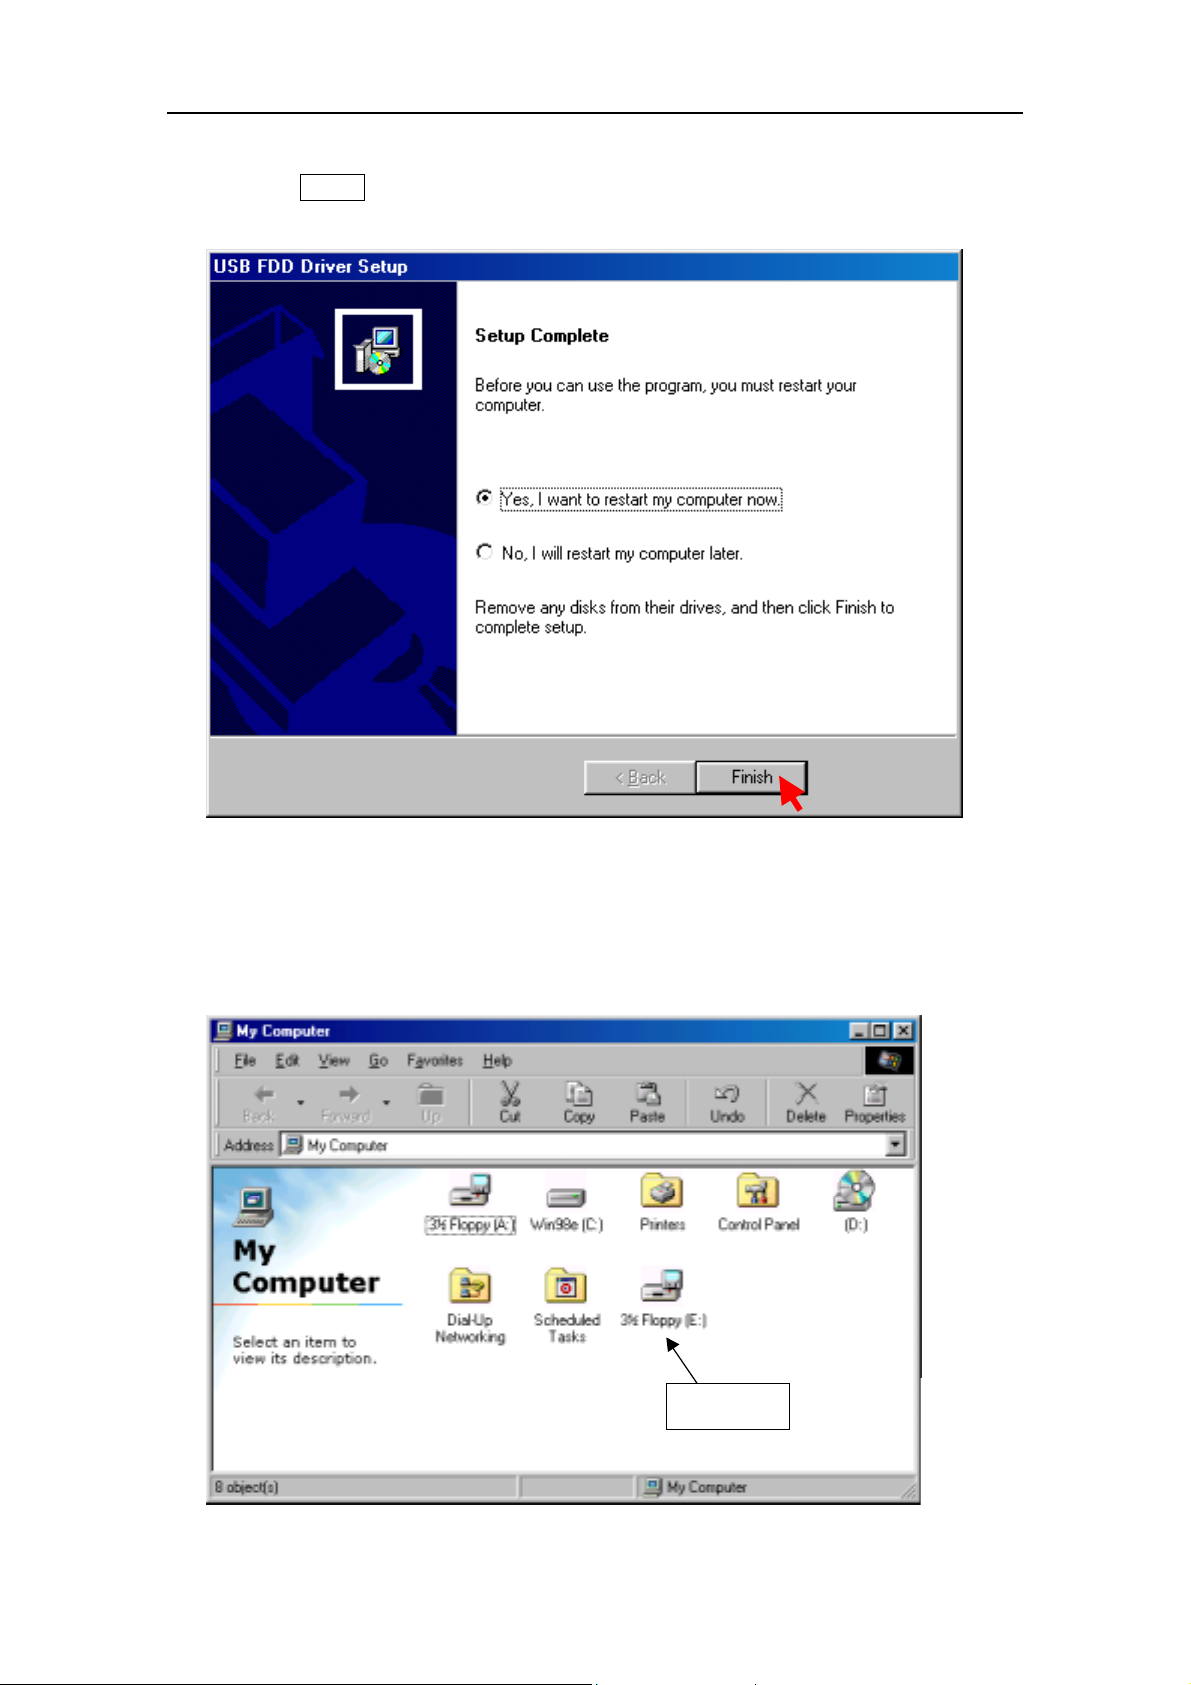
5) Click the Finish button to complete the installation. Window s w ill rest art y our
computer with in a few seconds.
6) After re-start the Wi ndo ws, pl ug your US B FDD to your P C.
W indows w ill det ect the
USB FDD automatically. A new 3½ Floppy disk icon w ill appear in t he “ M y
Computer” folder. In the figure below, the USB FDD can be accessed as Flop py driv e
E:. Floppy drive A: below is the built-in floppy drive of your PC.
USB FDD
Page 16 Feb. 2002
Page 17
USB FDD Installation Guide Rev. B
7.2.
7.2. Op
Optional setting to use USB FDD as drive letter A:
7.2.7.2.
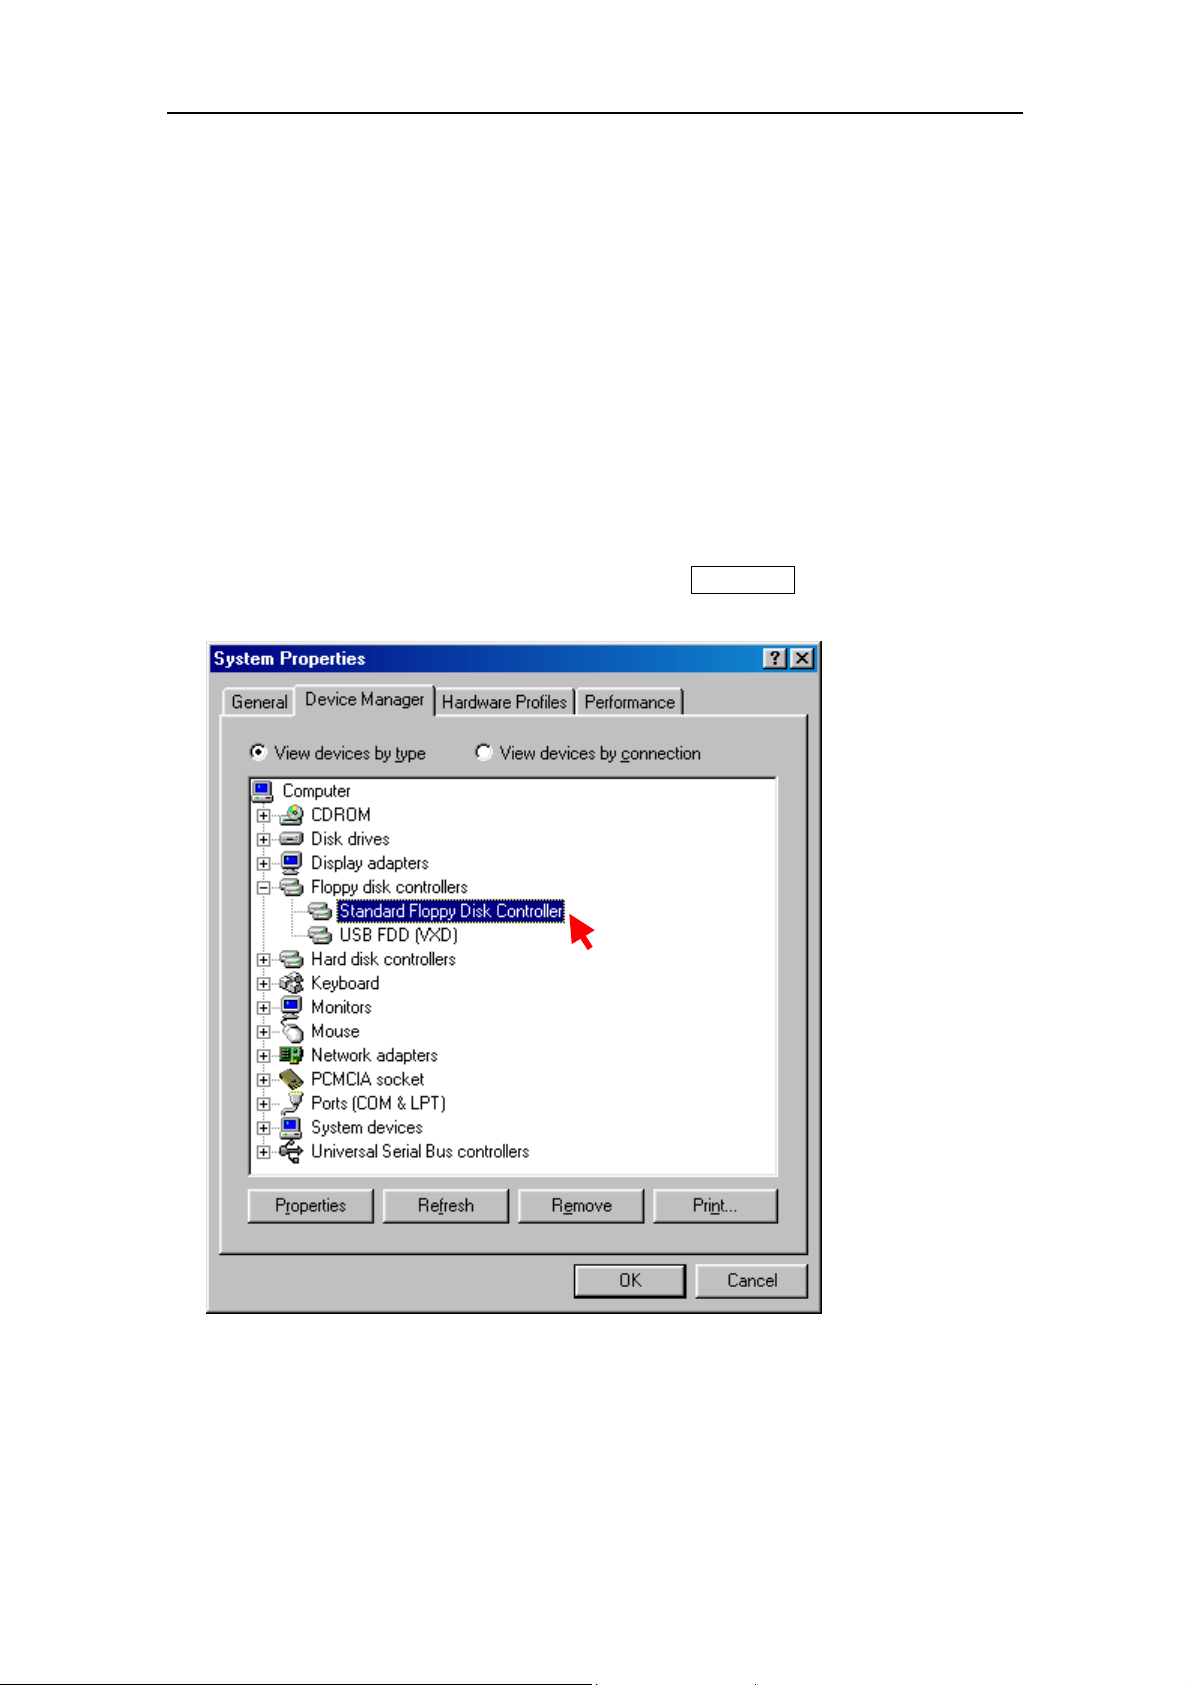
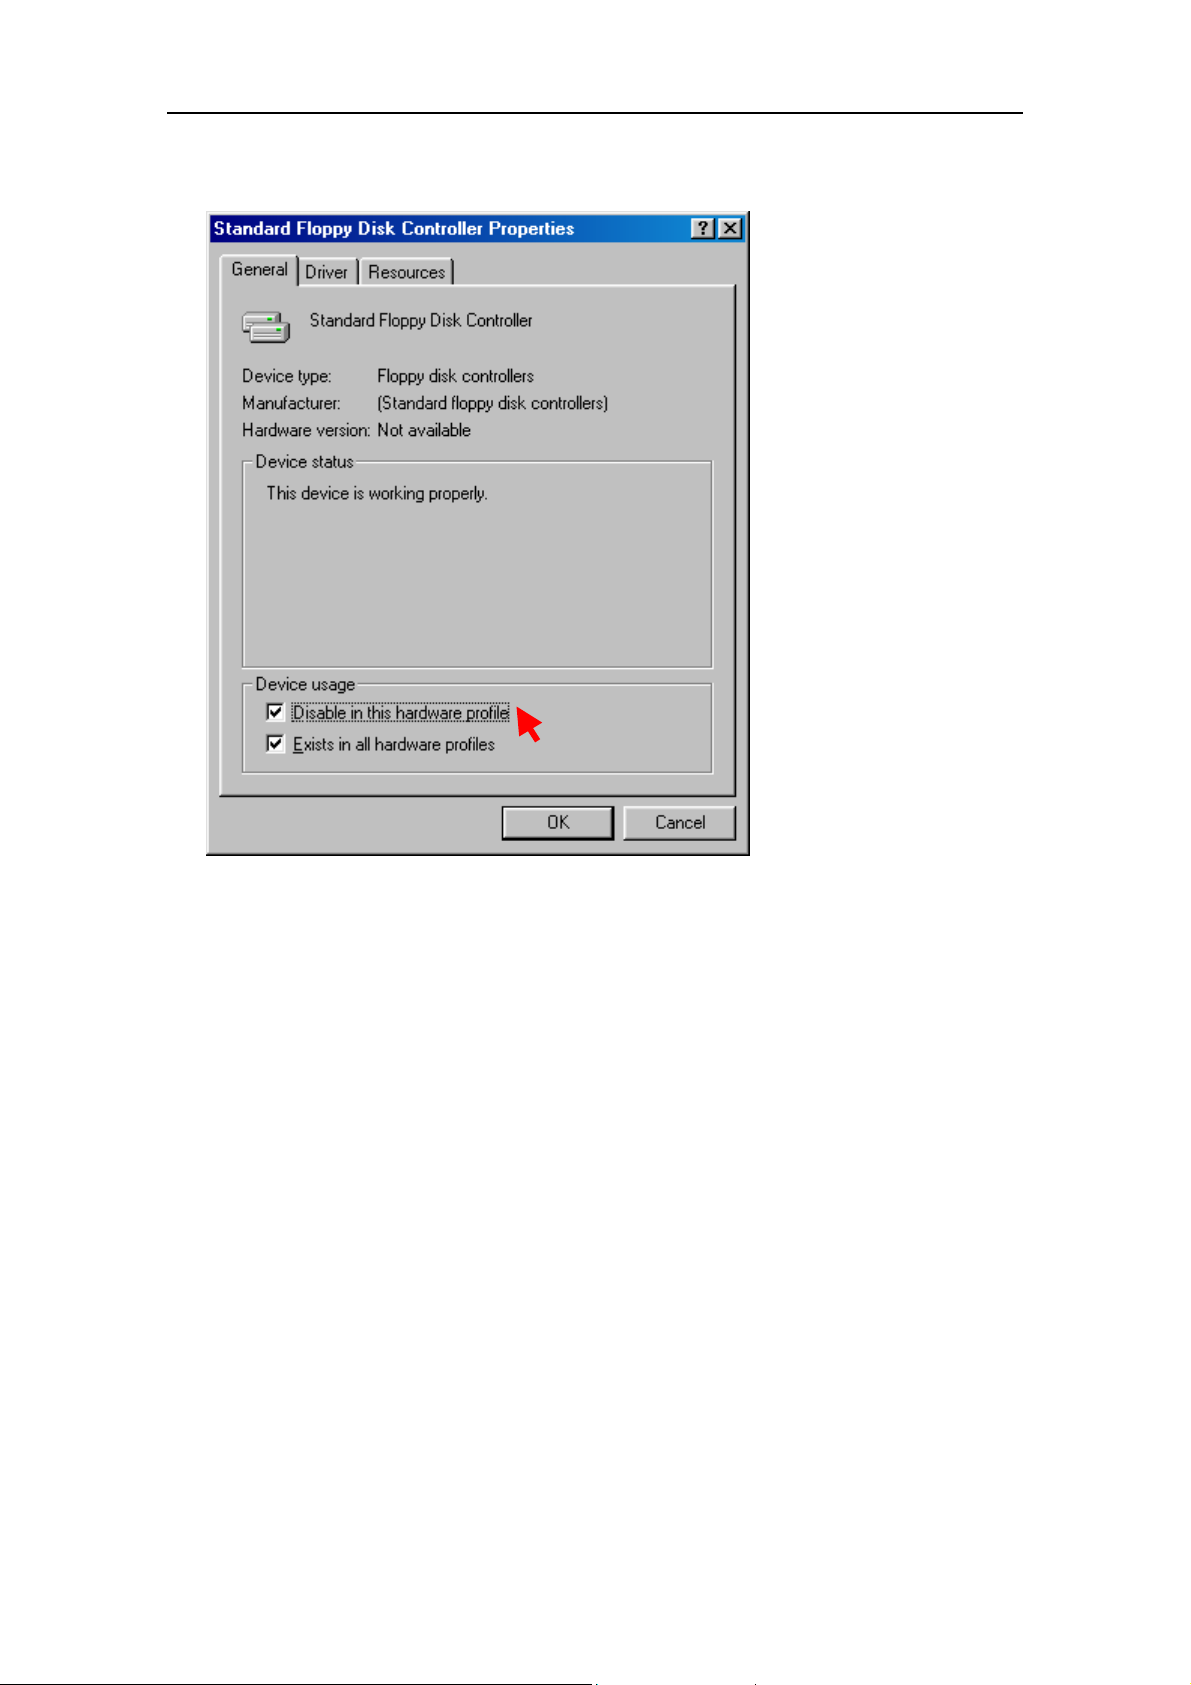
If you want use USB FDD as Drive letter A:, disable the Standard Floppy Disk
Controller. This is an option al setting for powe r user an d we could not g uarantee all of
the PC. If your PC does not work correctly, please set back the original setting.
Note: If you disable the
Note: If you disable the Stand a rd
Note: If you disable the Note: If you disable the
FDD. If you need to take a legacy FDD, do not disable the
FDD. If you need to take a legacy FDD, do not disable the Standard
FDD. If you need to take a legacy FDD, do not disable the FDD. If you need to take a legacy FDD, do not disable the
tional setting to use USB FDD as drive letter A:
OpOp
tional setting to use USB FDD as drive letter A:tional setting to use USB FDD as drive letter A:
Standard Floppy Disk
StandardStandard
Floppy Disk Controller
Floppy Disk Floppy Disk
Controller, you could not
ControllerController
, you could not access
, you could not , you could not
Standard Floppy Disk
StandardStandard
access legacy
accessaccess
Floppy Disk
Floppy Disk Floppy Disk
legacy
legacylegacy
Controller
Controller....
ControllerController
1) Double click the “System” icon on the control panel.
2) Select Standard Floppy Disk Controller and click Properties button in the Device
Manager Tab.
Page 17 Feb. 2002
Page 18
USB FDD Installation Guide Rev. B
3) Check “Disable in this hardware profile” and click OK button.
4) After re-start your computer, USB FDD w ill work as drive letter A:.
Page 18 Feb. 2002
Page 19

USB FDD Installation Guide Rev. B
8.
8. RRRRestrictions
8.8.
1) USB Hub
2) Booting
3) Virus Scan Soft
estrictions Windows 98, Windows Me, Windows 2000 and
estrictionsestrictions
Window s X P
Window s X P
Window s X PWind ow s X P
If you plug the USB FDD into a USB hub, be sure to use a self-powered hub that
includes an AC adapter. Do not use bus-powered hubs, such as the USB port on a
keyboard. Bus-powered hubs do not supply enough power to operate the USB FDD.
You cannot boot your computer from the USB FDD, unless your computer includes a
special BIOS that supports this feature. Some recent notebook computers support
booting from the USB FDD. For more details, please contact your distributor.
Some virus detect softwares assume a built-in floppy disk drive. When using such a
Windows 98, Windows Me, Windows 2000 and
Windows 98, Windows Me, Windows 2000 and Windows 98, Windows Me, Windows 2000 and
software, the operating system may become slow or unstable.
4) Standby
The USB FDD supports the standby mode of Windows 98 according to the PC99
Standard. However, if standby mode does not see m to work correctly, try unplugging
the USB FDD before entering standby.
5) Alternate Driver for Windows Me
We recomme nd to take a stan dard built-i n driver made by Mi crosoft corporatio n, but
if you want use the US B FDD as drive lett er A: with non leg acy free PC, you can t ake
a vender driver.
The way to install the vender driver is same as Windows 98 section (page 12). The
USBFDD.exe automatically detects Windows Version and will install the Driver for
Windows Me.
6) Initialization (Format) of a floppy disk on Windows XP
Windows XP allows you to format (initialize) a flop py diskette only as 1.44MB media.
Page 19 Feb. 2002
Page 20
USB FDD Installation Guide Rev. B
9.
9. Windows
Windows CE
9.9.
Windows Windows
9.1.
9.1. Installing with the Windows CE Service
Installing with the Windows CE Service
9.1.9.1.
Installing with the Windows CE ServiceInstalling with the Windows CE Service
When using the USB FDD with a Handheld PC, t he driver software nee ds to be installed
before connecting the USB FDD. Do not connect the USB FDD to your Handheld PC
until you have installed the USB FDD driver sof t w a re.
Lots of Handheld PCs have a pre-installed USB FDD driver. In this case, it is not
necessary to install a driver software.
T o check whether a drive r for USB FDD is installed or not, please refer to your Han dheld
PC manual
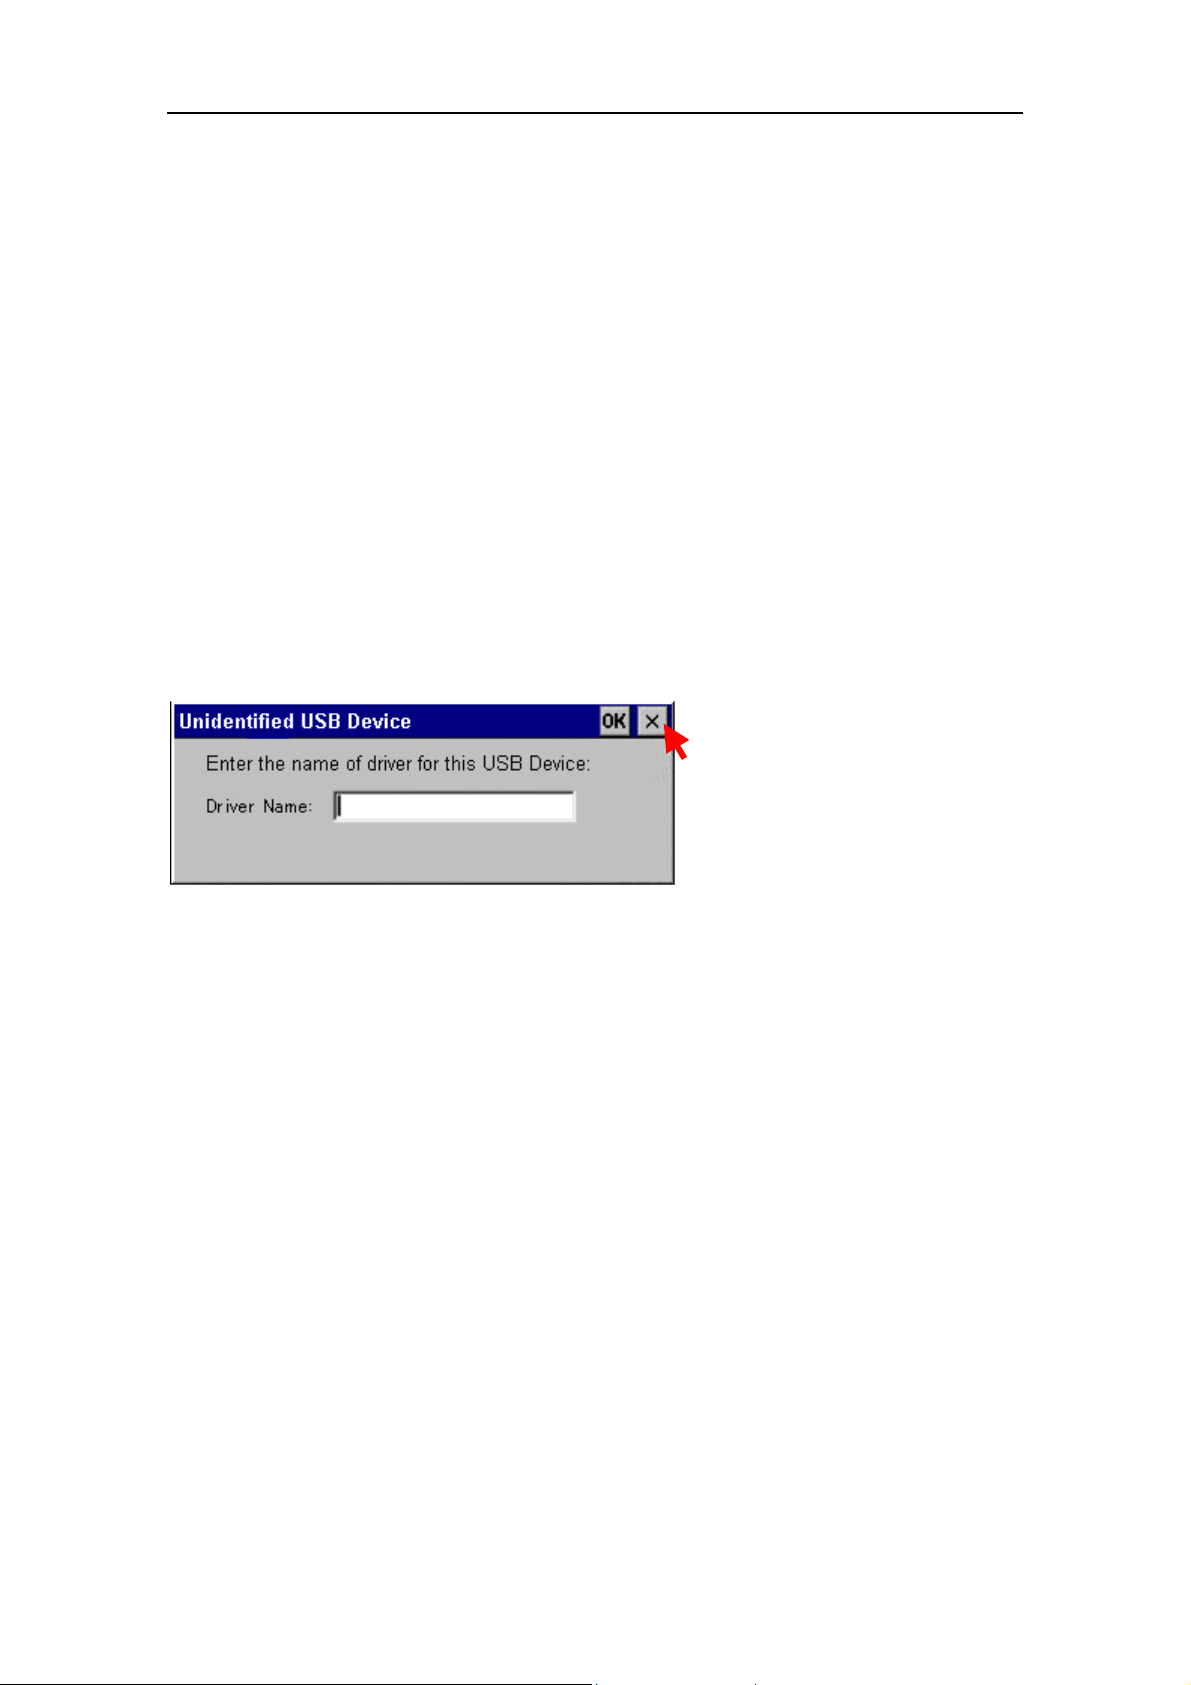
If the driver is not pre-installed, a following message is displayed on the screen when
connecting a USB FDD to Handhel d PC. So, please cl ick X button an d install t he driver.
CE
CE CE
For the installation of a driver, we have 2 methods as follows.
The way to connect a Handheld PC to a host Windows PC with the Windows CE
Service software and a cable.
The way to download a driver software via an Internet connection by dial-up from
Handheld PC.
The procedure below describes how to install the USB FDD drivers on your Handheld
PC from a Host Windows PC. To do this, you will need to connect your Handheld PC to
the Host Wind ows PC w ith the Windows CE serv ice software and a cabl e. Please r efer to
your Handheld PC manual about how to connect your handheld to the host .
1) Establish a partnership to transfer files from the Host Windows PC to your
Handheld PC.
2) Insert the USB FDD driver CD-ROM in the CD-RO M drive of the H ost W i ndows PC.
Page 20 Feb. 2002
Page 21
USB FDD Installation Guide Rev. B
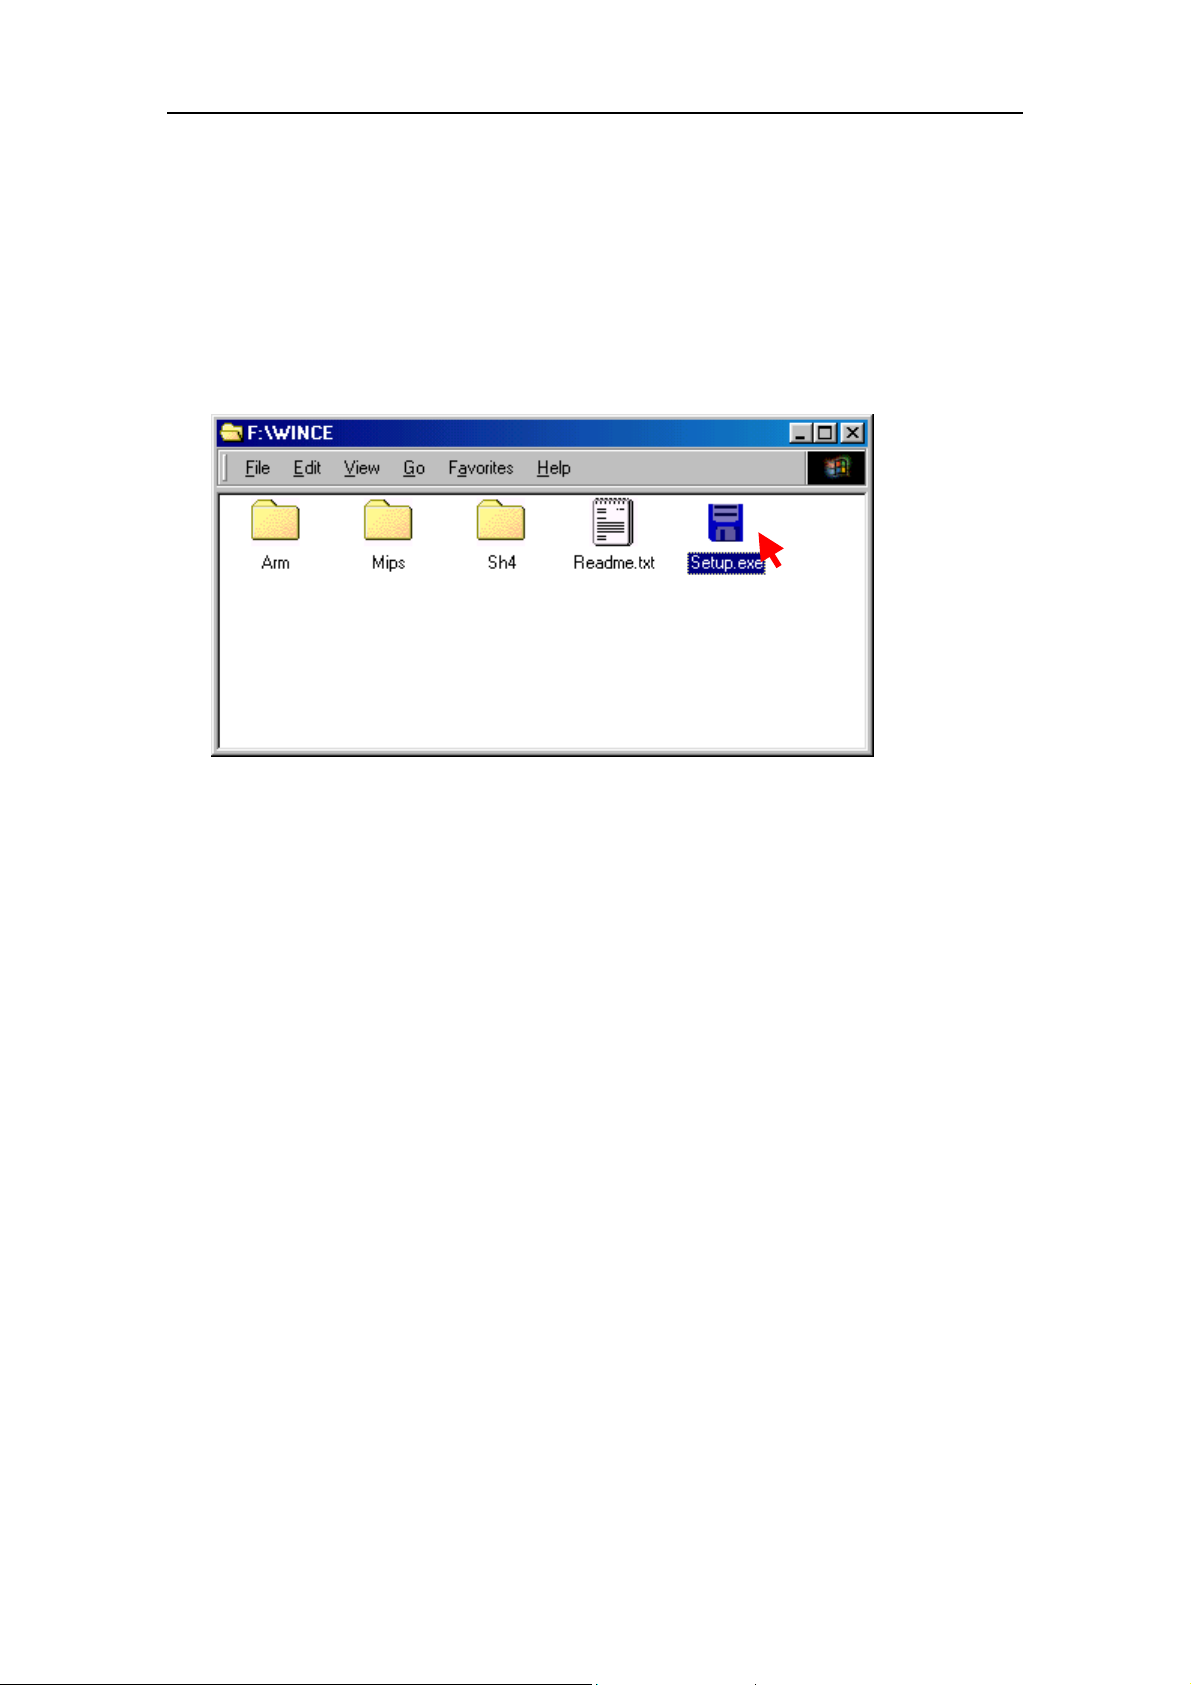
3) On the Host Windows PC, double click the CD-ROM icon in the “My Computer”
folder.
4) Double click the WINCE folder in the CD-ROM , and then doub le click the Setup ic on
to start the Setup program.
Page 21 Feb. 2002
Page 22
USB FDD Installation Guide Rev. B
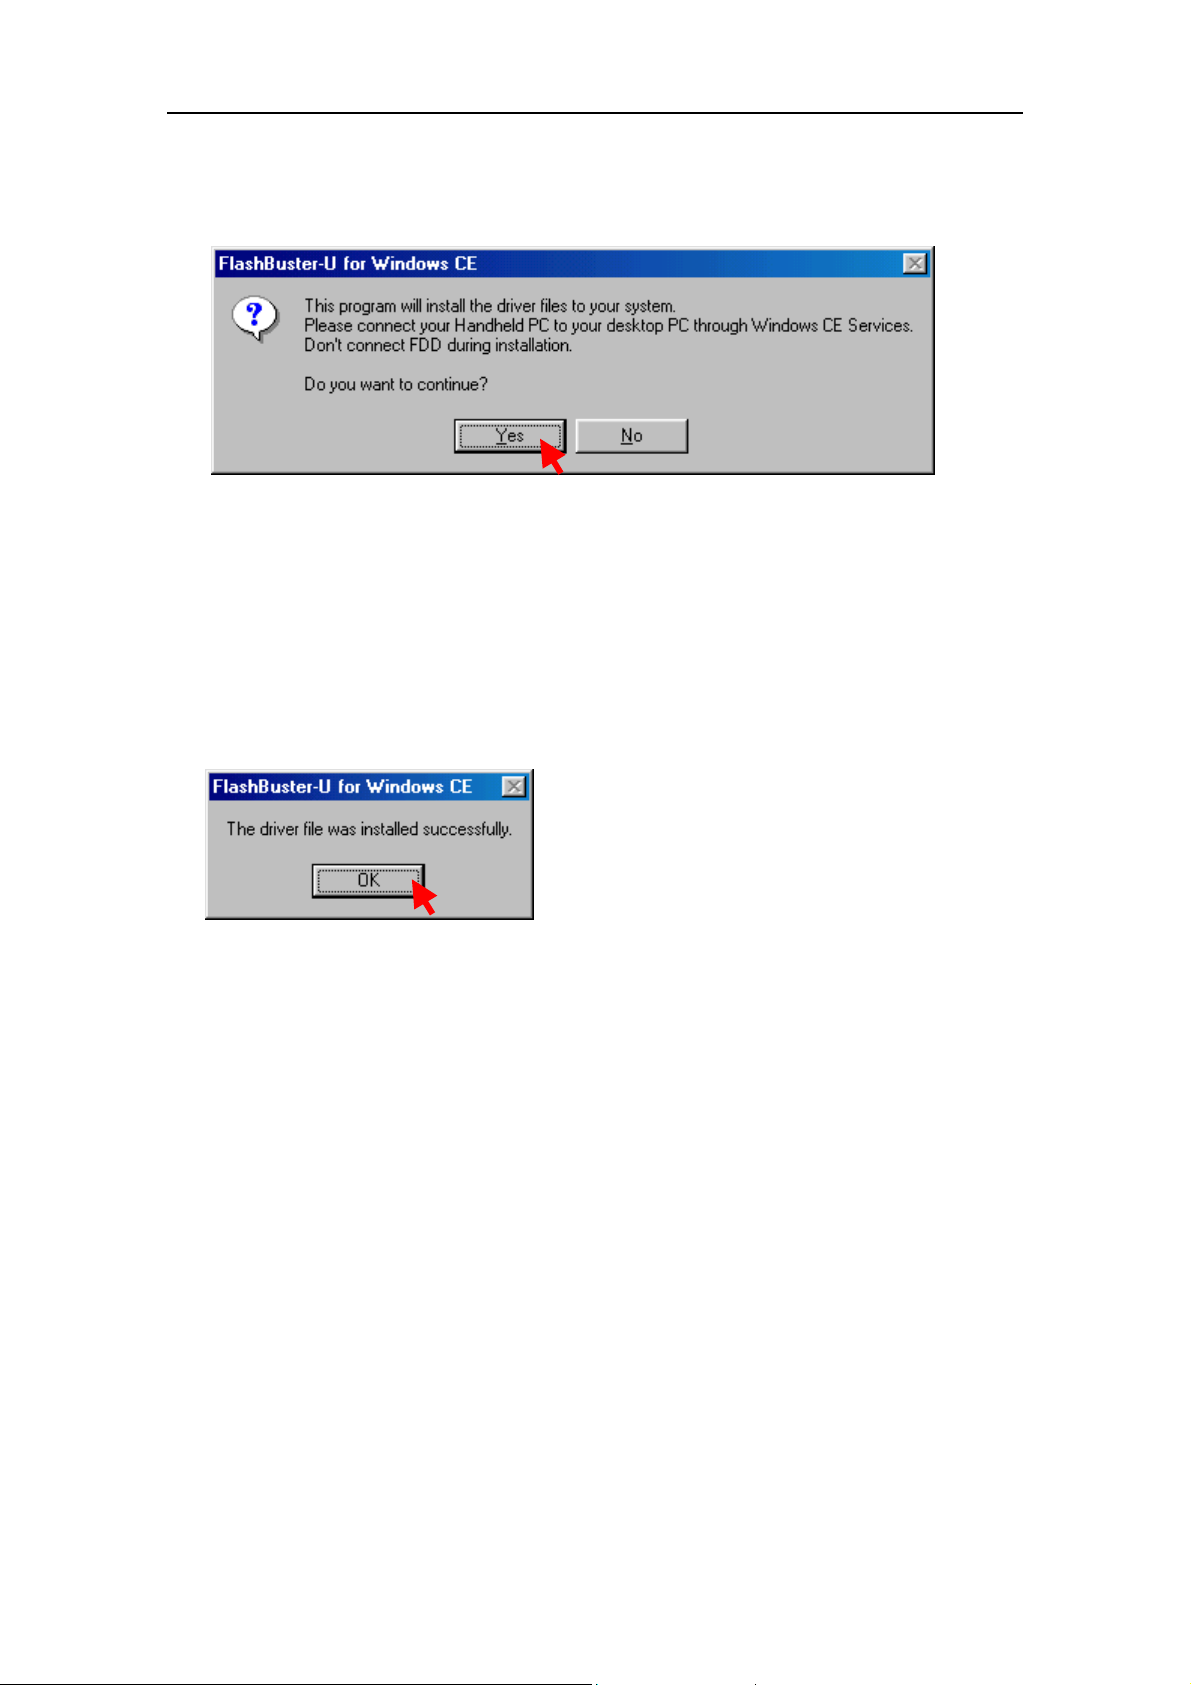
5) When the “FlashBuster-U for Windows CE” dialog box appears, click the YES button.
6) The Setup program installs the USB FDD driver software on your Handheld PC.
Please wait for a while, as it takes a few minutes to install it.
When the installation is completed normally, the following dialog box will appear.
Click the OK button to terminate this program.
7) Plug the USB FDD into the USB port of your Handheld PC.
8) If you insert a formatted diskette in the USB FDD, the diskette can be accessed as
“Storage Card” in the ”My Handheld PC” folder.
Note:
Note:
the
the “Storage
Note:Note:
inserted in the USB FDD.
inserted in the USB FDD.
inserted in the USB FDD.inserted in the USB FDD.
“Storage Card
the the
“Storage“Storage
Card”””” folder will not appear unless a formatted diskette is
Card Card
folder will not appear unless a formatted diskette is
folder will not appear unless a formatted diskette is folder will not appear unless a formatted diskette is
Page 22 Feb. 2002
Page 23
USB FDD Installation Guide Rev. B
9.2.
9.2. To install usin
To install using an Internet connection directly to your Handheld PC:
9.2.9.2.
To install usinTo install usin
Even if you have no Windows PC, you can download the driver file from Internet
connection, or copy the file from driver CD-ROM to your Han dheld PC with usi ng such
as a memory card.
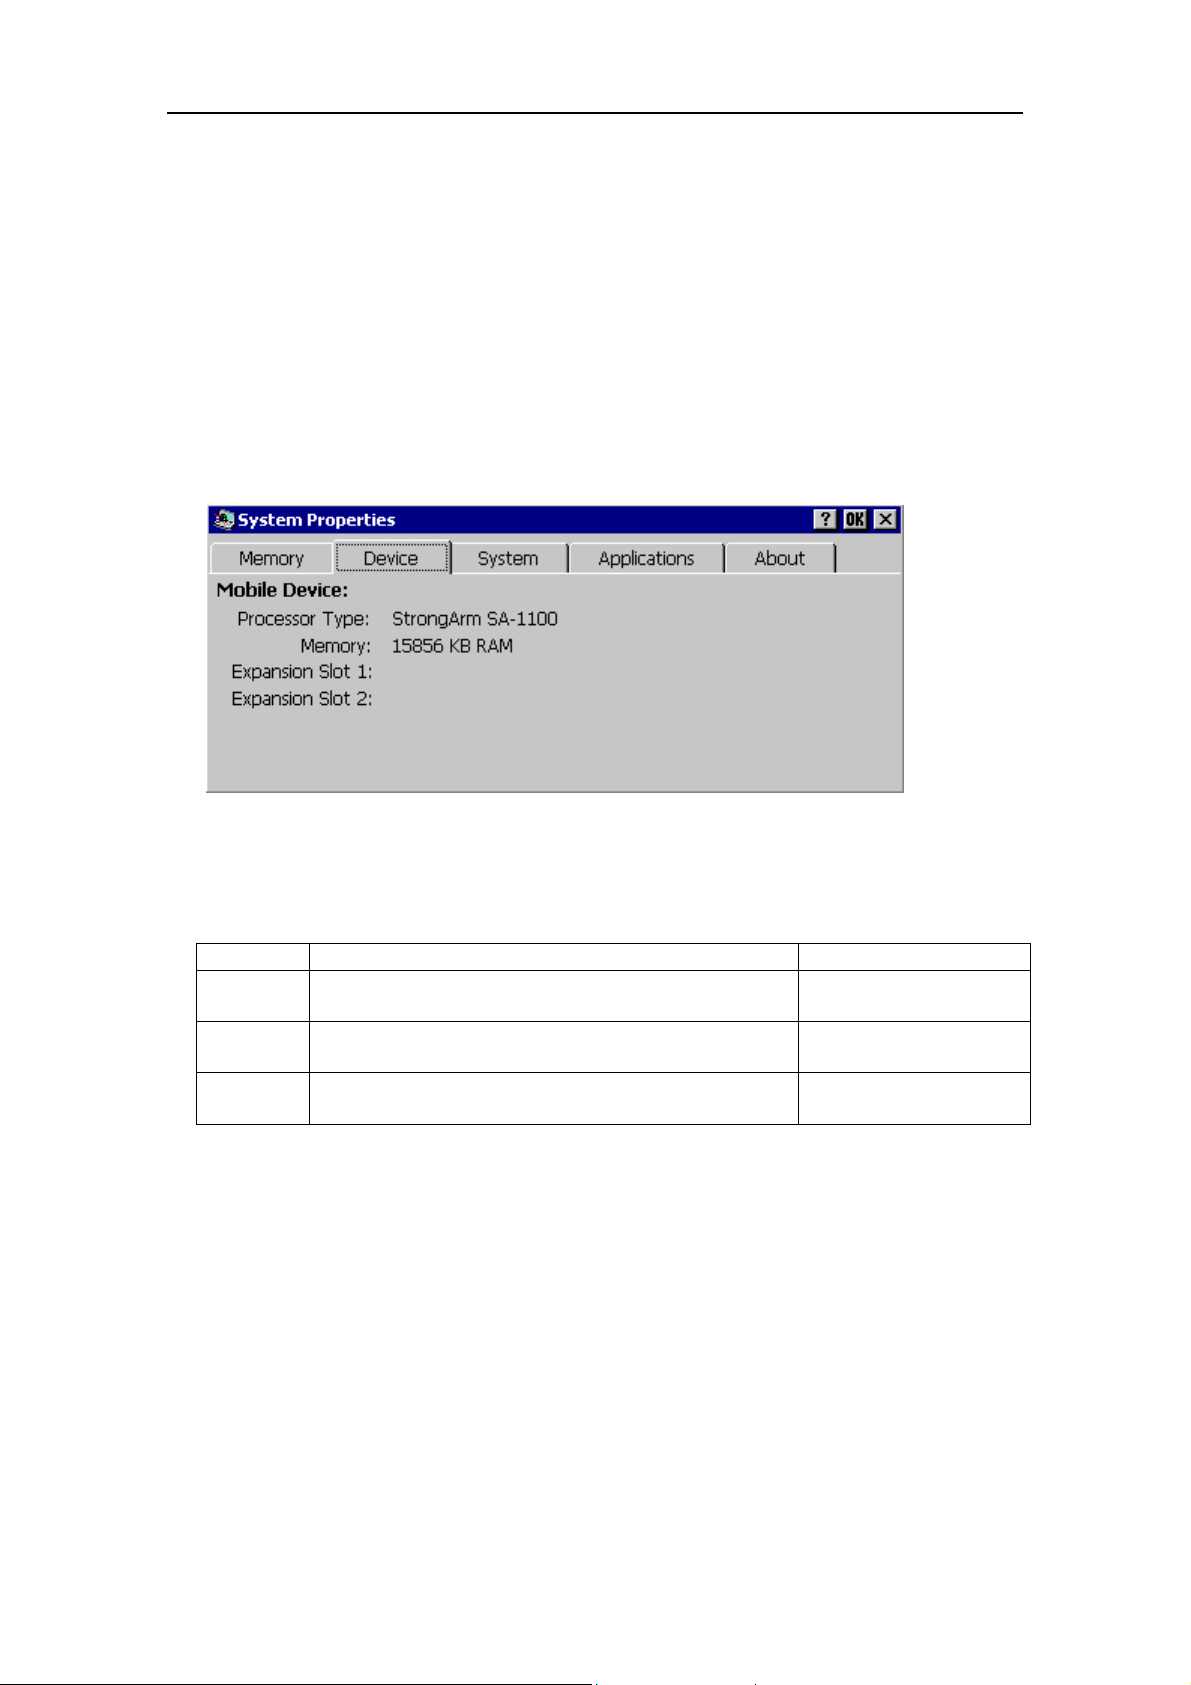
1) Check what kind of processor is bu ilt into y our Hand held P C: ARM, MI PS or SH 4. To
g an Internet connection directly to your Handheld PC:
g an Internet connection directly to your Handheld PC:g an Internet connection directly to your Handheld PC:
check the processor type, open the Control Panel
click the Device
Processor Type is ARM).
2) Download the appropriate software for your handheld PC based on the Processor
Type. Or copy a file from CD-ROM taking a Memory Card to your handheld PC.
Processor Location of Internet Driver CD-ROM
ARM http://www.yedata.com/support/fbu_arm.cab ARM Folder
MIPS http://www.yedata.com/support/fbu_mips.cab MIPS Folder
SH4 http://www.yedata.com/support/fbu_sh4.cab SH4 Folder
Device tab. And note the Processor Type
DeviceDevice
Control Panel, double click the System
Control PanelControl Panel
Processor Type, as shown below (in this case, the
Processor TypeProcessor Type
System icon, then
SystemSystem
fbu_arm.cab
fbu_mips.cab
fbu_sh4.cab
Page 23 Feb. 2002
Page 24
USB FDD Installation Guide Rev. B
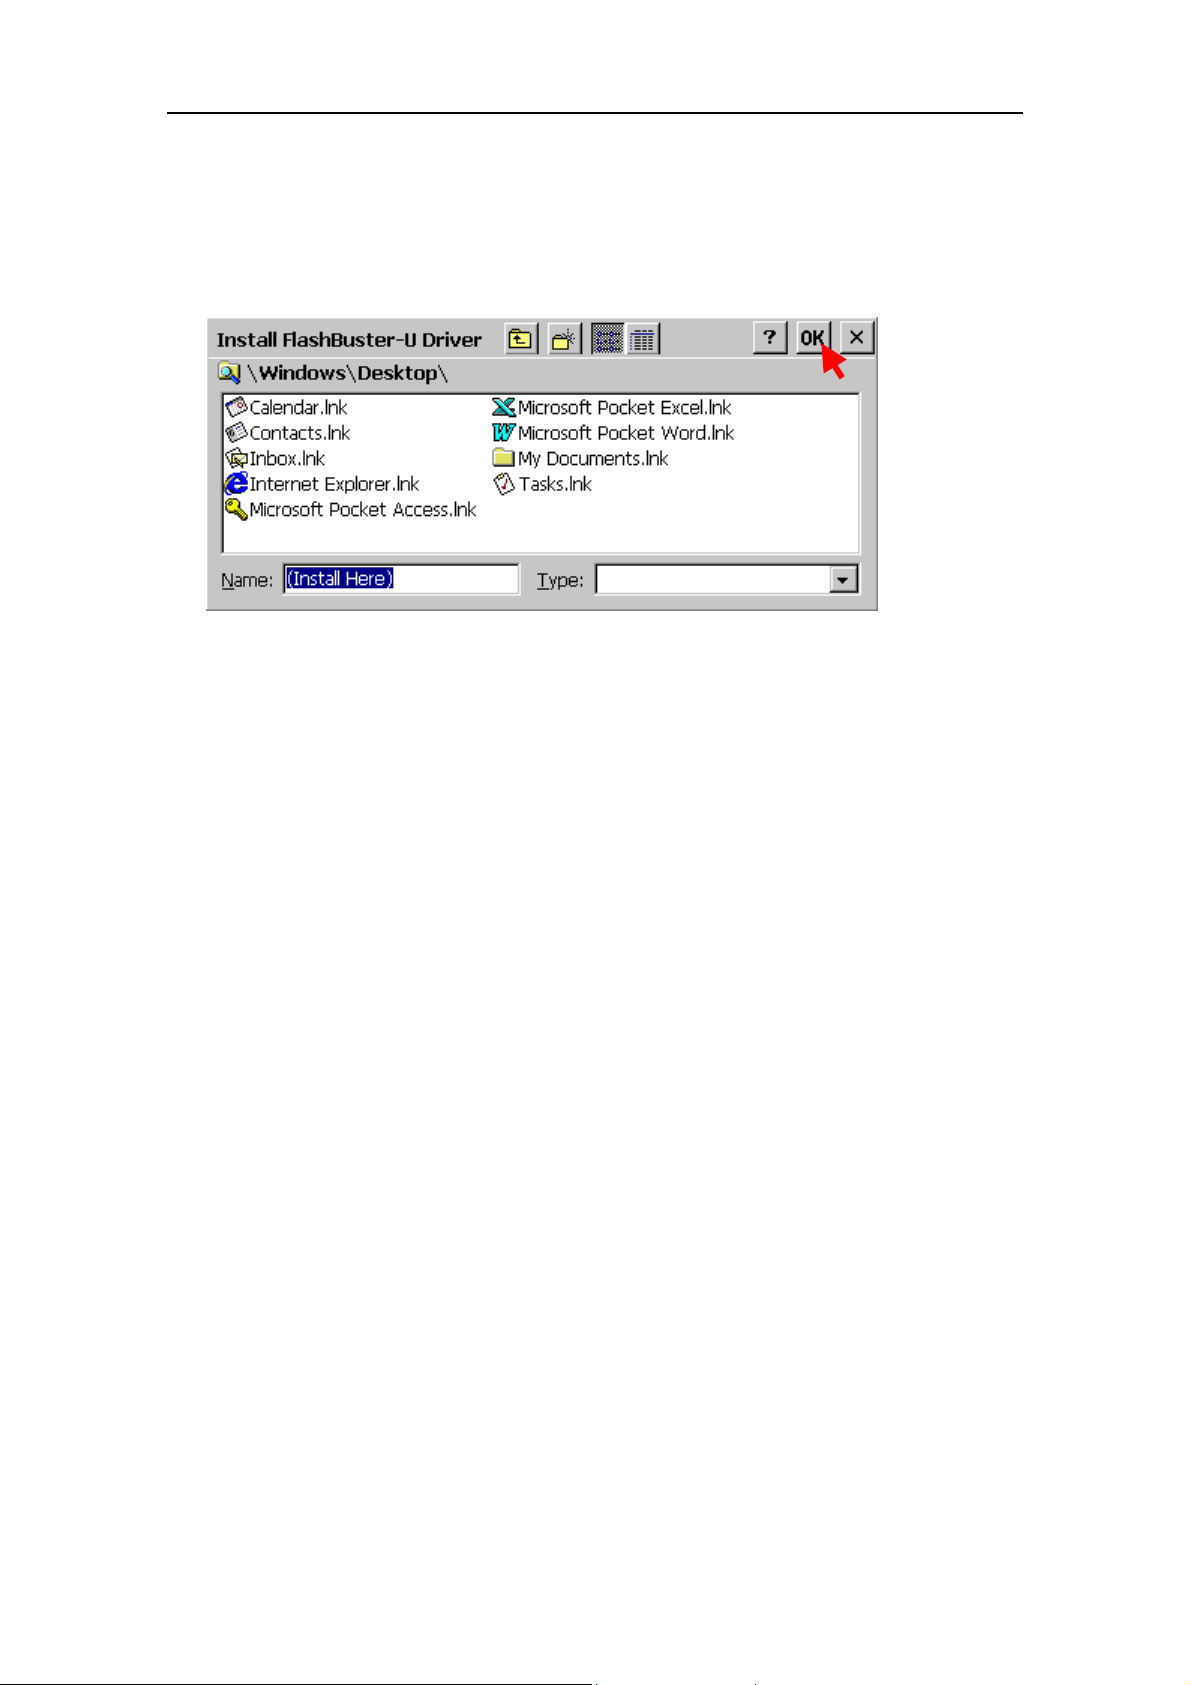
3) Double click the downloaded file; the driver for USB FD D will install automat ically.
The installer will ask w here to instal l the USBFD D.txt file; please click OK to install.
After the install has finished, you can find USBFDD.txt on the Desktop; please read
this file.
4) Connect the USB FDD to your handheld PC and insert a formatted diskette into the
USB FDD. The diskette can be accessed as the "Storage Card" folder by double
clicking on the "My Hand held P C" icon. The c omputer w ill addr ess the floppy disk as
if it were a memory card, because that is the usual means of storage for a handheld
PC.
9.3.
9.3. Restrictions
Restrictions
9.3.9.3.
Restrictions Restrictions
1) “Storage Card” folder
The “Storage Card” folder will not appear if you merely plug in the USB FDD. The
“Storage Card” folder will only appear after y ou hav e insert ed a f orm at t ed disk et t e.
2) Formatting a Diskette
There is a format utility program, USBFDFMT, in the Windows folder of your
Handheld PC. If you insert an unformatted diskette in the USB FDD, USBFDFMT
will run automatically.
3) Access Speed
Accessing the flop py is not so f ast. Writing large files will take seve ral m inutes w hen
running Windows CE 2.11.
4) USB Hub
Windows CE 2.11 does not support a USB hub between the Handheld PC and the
USB FDD. Plug the USB FDD directly in the USB port of your Handheld PC.
5) Suspend
The USB FDD supports suspend mode. However, if suspend mode does not seem to
work correctly, try unplugging the USB FDD before entering suspend.
Page 24 Feb. 2002
Page 25

USB FDD Installation Guide Rev. B
10.
10. Specifications
Specifications
10.10.
Specifications Specifications
10.1.
10.1. Temperature Range
Temperature Range
10.1.10.1.
Temperature RangeTemperature Range
Operating : 5~40°C (41~104°F)
Non-operating : -40~60°C (-40~140°F)
10.2.
10.2. Humidity Range
Humidity Range
10.2.10.2.
Humidity RangeHumidity Range
20~80% RH, no condensation
10.3.
10.3. Operating Position
Operating Position
10.3.10.3.
Operating PositionOperating Position
Horizontal (eject button above diskette slot)
10.4.
10.4. Supported Diskette Types (3.5 inch)
Supported Diskette Types (3.5 inch)
10.4.10.4.
Supported Diskette Types (3.5 inch)Supported Diskette Types (3.5 inch)
Diskette
Diskette Format
DisketteDiskette
2HD
2DD
Note:
Note:
Note:Note:
1. DOS Format 1.25M / 1.21M / 640K are Japanese domestic MS-D O S versions.
2. Mac Format 2DD diskettes are not supported.
3. Windows XP allows you to format (initialize) a floppy diskette only as 1.44MB
4. Diskettes formatted by Mac OS X cannot be recognized by other versions of Mac
11.
11. Support
Support
11.11.
SupportSupport
Format Support
FormatFormat
1.44 MB PC format Read / W rite / Format
1.4 MB Mac format Read / Write / Format Macintosh Only
1.7MB
Microsoft DMF
1.25 MB DOS Format Read / Write Windows Only
1.21 MB DOS Format Read / Write Windows Only
720 KB PC Format Read / W r ite / Format
800 KB Mac Format Not supported
640 KB DOS Format Read / W r ite Window s O nly
media
OS. We recommend that you format diskettes using Mac OS 9.x or 8.x.
Support Note
SupportSupport
Read Only Windows Only
Note
NoteNote
11.1.
11.1. Contact Your Dealer
Contact Your Dealer
11.1.11.1.
Contact Your DealerContact Your Dealer
For any support issue, please contact first your official Lacie dealer.
11.2.
11.2. Contact Lacie
Contact Lacie
11.2.11.2.
Contact LacieContact Lacie
Lacie Web-Support address: http://www.lacie.com/support
Page 25 Feb. 2002
 Loading...