

Page 1

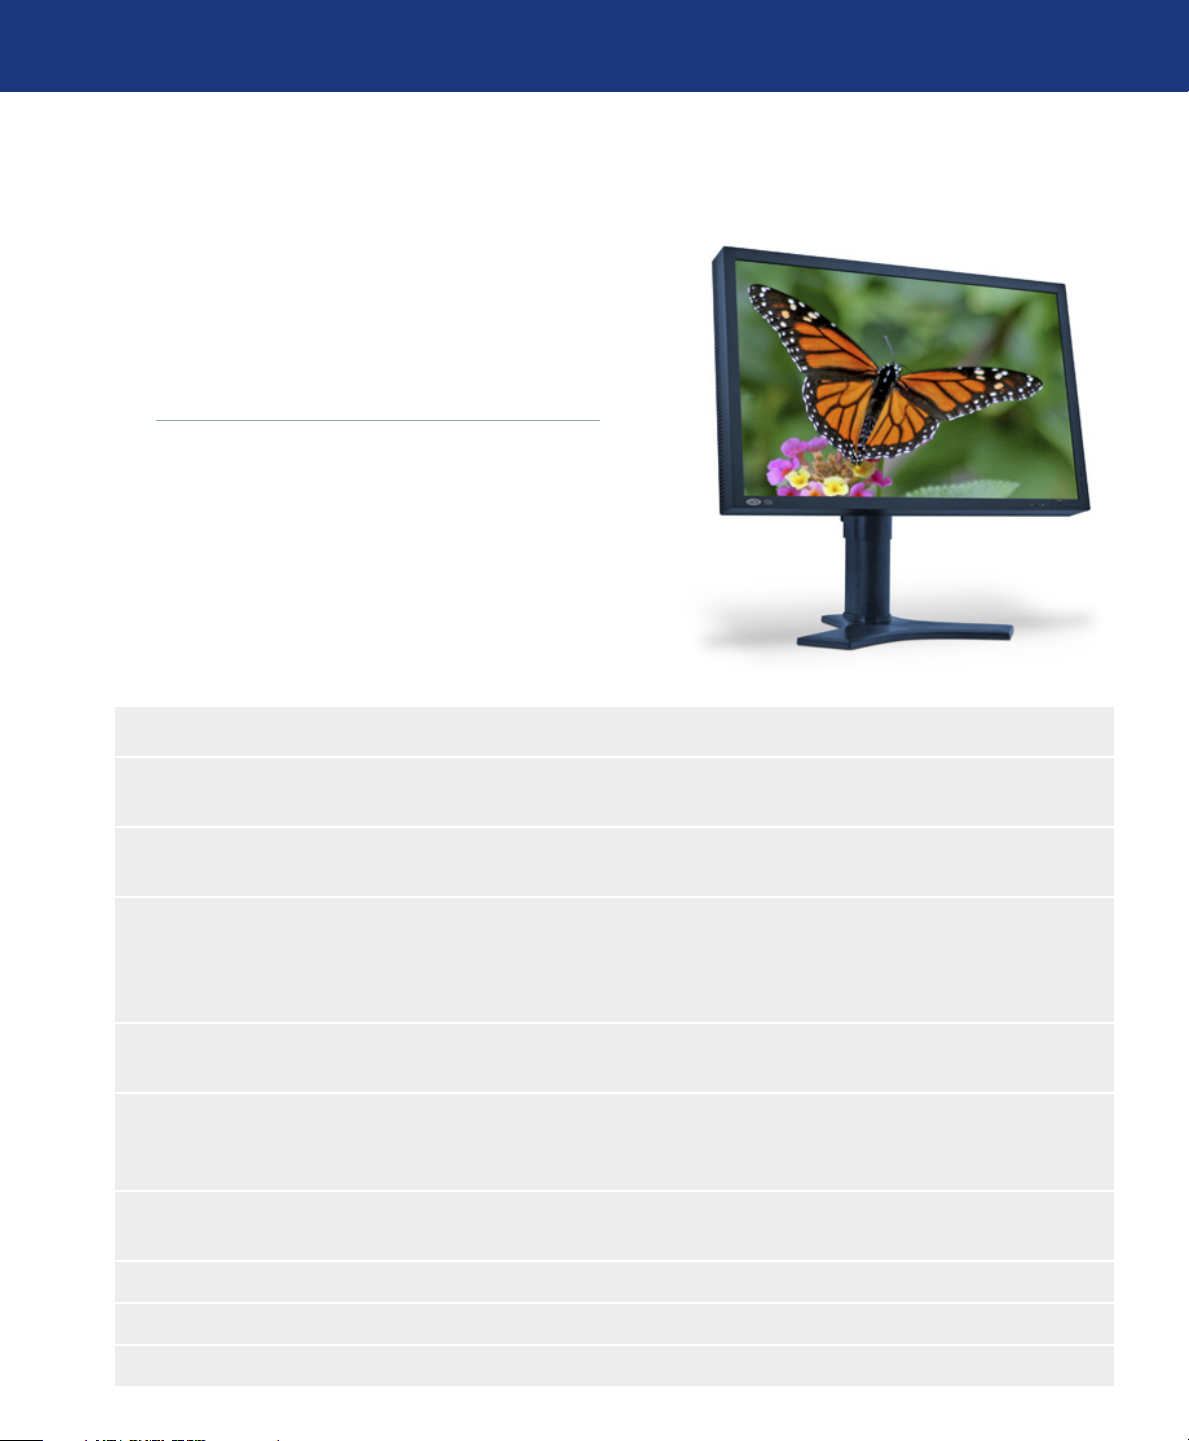
LaCie 500 Series LCD Monitor
User Manual
Table of Contents
Safety Precautions and Maintenance 3
Health and Ergonomic Precautions 4
Environmental Regulations 5
Manufacturer’s Recycling and Energy Information 6
Table of Contents
page 1
Monitor Specifications
1. Introduction to Your LaCie 500 Series LCD Monitor 8
1.1. 500 Series LCD Monitor Features 8
1.2. Box Content 9
2. Installing Your LaCie 500 Series LCD Monitor 1
3. Using Your LaCie 500 Series LCD Monitor 13
3.1. Physical Adjustments 13
3.1.1. Raise and lower monitor screen 13
3.1.2. Screen tilt 13
3.1.3. Screen rotation 14
3.1.4. Swivel 1
3.1.5. Remove monitor stand for mounting 15
3.1.6. Flexible arm installation 16
4. OSD (On-Screen Display) Control Button Functions 1
4.1. Brightness/Contrast Controls 18
4.2. Auto Adjust (Analog input only) 18
4.3. Image Controls 18
4.4. Color Control Systems 20
4.5. Tools 1 21
4.6. Menu Tools 24
4.7. Information 25
4.8. OSD Warnings 26
4.9. Advanced Menu Functions 26
4.10. Using the Auto Brightness Function 39
7
0
4
7
5. Troubleshooting 4
6. Contacting Customer Support 4
6.1. LaCie Technical Support Contacts 4
7. Warranty Information 4
1
3
4
5
Page 2
LaCie 500 Series LCD Monitor
User Manual
Forward
page 2
Copyrights
Copyright © 2007 LaCie. All rights
reserved. No part of this publication
may be reproduced, stored in a retrieval
system, or transmitted in any form or by
any means, electronic, mechanical, photocopying, recording or otherwise, without the prior written consent of LaCie.
Changes
e material in this document is for
information only and subject to change
without notice. While reasonable efforts have been made in the preparation
of this document to assure its accuracy,
LaCie assumes no liability resulting
from errors or omissions in this document, or from the use of the information contained herein. LaCie reserves
the right to make changes or revisions
in the product design or the product
manual without reservation and without
obligation to notify any person of such
revisions and changes.
FCC Declaration of Conformity:
LaCie 500 Series
LCD Monitor
Tested To Comply
With FCC standards
For Home of Office Use
NOTE: is equipment has been
tested and found to comply with the
limits for a Class B digital device, pursuant to Part 15 of the FCC Rules.
ese limits are designed to provide
reasonable protection against harmful interference in a residential installation. is equipment generates, uses
and can radiate radio frequency energy
and, if not installed and used in accordance with the instructions, may cause
harmful interference to radio communications. However, there is no guarantee that interference will not occur in a
particular installation. If this equipment
does cause harmful interference to radio
or television reception, which can be determined by turning the equipment off
and on, the user is encouraged to try and
correct the interference by one or more
of the following measures:
Reorient or relocate the receiving an-
❖
tenna.
Increase the separation between the
❖
equipment and receiver.
Connect the equipment into an out-
❖
let on a circuit different from that to
which the receiver is connected.
Consult the dealer or an experienced
❖
radio/TV technician for help.
Use only shielded cables to connect
❖
I/O devices to this equipment.
Use the attached specified cables
with the LaCie 500 Series color monitor so as not to interfere with radio and
television reception.
1. e power supply cord you use must
have been approved by and comply
with the safety standards of U.S.A.
and meet the following condition.
Power supply
chord
Length
Non shield type,
3-conductor
2.0 m
Plug shape
(USA)
2. Please use the supplied shielded video
signal cable, 15-pin mini D-SUB to
DVI-A cable or DVI-D to DVI-D
cable. Use of other cables and adapters may cause interference with radio
and television reception.
U.S. Responsible Party: LaCie, LTD
Address: 22985 NW Evergreen Pkwy
Hillsboro, OR 97124
Tel. No.: (503) 844-4503
Manufacturer’s Declaration for
CE Certification
We, LaCie, solemnly declare that this
product conforms to the following European standards:
EN60950-1, EN61000-3-2
❖
EN61000-3-3, EN55024
❖
With reference to the following conditions:
73/23/EEC Low Voltage Directive
❖
89/336/EEC EMC Directive
❖
LaCie S.A.
33 Bld du Général Martial Valin
75015 Paris
France
CAUTION: Modifications not au-
thorized by the manufacturer may void
the user’s authority to operate this device. Modifications not authorized by
the manufacturer may void the user’s
authority to operate this device.
CAUTION: A shielded-type
power cord is required in order to meet
FCC emission limits and also to prevent interference to the nearby radio
and television reception. It is essential
that only the supplied power cord be
used.
Page 3

LaCie 500 Series LCD Monitor
User Manual
Safety Precautions and Maintenance
DO NOT OPEN THE MONI-
❖
TOR. ere are no user serviceable
parts inside and opening or removing
covers may expose you to dangerous
shock hazards or other risks. Refer all
servicing to qualified service personnel.
Do not spill any liquids into the cabi-
❖
net or use your monitor near water.
Do not insert objects of any kind into
❖
the cabinet slots, as they may touch
dangerous voltage points, which can
be harmful or fatal or may cause electric shock, fire or equipment failure.
Do not place any heavy objects on
❖
the power cord. Damage to the cord
may cause shock or fire.
Do not place this product on a slop-
❖
ing or unstable surface, as the monitor may fall, causing serious damage.
Do not place any objects onto the
❖
monitor and do not use the monitor
outdoors.
e inside of the fluorescent tube
❖
located within the LCD monitor
contains mercury. Please follow the
bylaws or rules of
your municipality to dispose of the
tube properly.
Do not bend power cord.
❖
Do not use monitor in high tempera-
❖
tured, humid, dusty, or oily areas.
Do not cover vent on monitor.
❖
Immediately unplug your monitor
from the outlet and refer servicing to
qualified personnel under the following
conditions:
When the power supply cord or plug
❖
is damaged.
If liquid has been spilled, or objects
❖
have fallen into the monitor.
If the monitor has been exposed to
❖
rain or water.
If the monitor has been dropped or
❖
the cabinet damaged.
If the monitor does not operate nor-
❖
mally by following operating instructions.
If glass is broken, handle with care.
❖
If monitor or glass is broken, do not
❖
come in contact with the liquid crystal and handle with care.
Allow adequate ventilation around
❖
the monitor so that heat can properly
dissipate. Do not block ventilated
openings or place the monitor near
a radiator or other heat sources. Do
not put anything on top of monitor.
e power cable connector is the pri-
❖
mary means of detaching the system
from the power supply. e monitor
should be installed close to a power
outlet which is easily accessible.
Handle with care when transporting.
❖
Save packaging for transporting.
Image Persistence: Please be aware
❖
that LCD Technology may experience a phenomenon known as Image
Persistence.
Safety Precautions and Maintenance
page 3
Image Persistence occurs when a re-
❖
sidual or “ghost” image of a previous
image remains visible on the screen.
Unlike CRT monitors, LCD monitors’ image persistence is not permanent, but constant images being
displayed for a long period of time
should be avoided. To alleviate image persistence, turn off the monitor
for as long as the previous image was
displayed. For example, if an image
was on the monitor for one hour, the
monitor should be turned off for one
hour to erase the image.
When operating the LaCie 500 Se-
❖
ries LCD Monitor with a 220-240V
AC power source in Europe, use the
power cord provided with the monitor.
In the UK, a BS approved power cord
❖
with a moulded plug has a Black (five
Amps) fuse installed for use with this
equipment.
If a power cord is not supplied with
❖
this equipment please contact your
supplier.
When operating the LaCie 500 Se-
❖
ries LCD Monitor with a 220-240V
AC power source in Australia, use the
power cord provided with the monitor. If a power cord is not supplied
with this equipment please contact
your supplier.
For all other cases, use a power cord
❖
that matches the AC voltage of the
power outlet and has been approved
by and complies with the safety standard of your particular country.
Page 4
LaCie 500 Series LCD Monitor
User Manual
Health and Ergonomic Precautions
Health and Ergonomic Precautions
page 4
Correct placement and adjustment
of the monitor can reduce eye, shoulder
and neck fatigue. Check the following
when you position the monitor:
For optimum performance, allow 20
❖
minutes for warm-up.
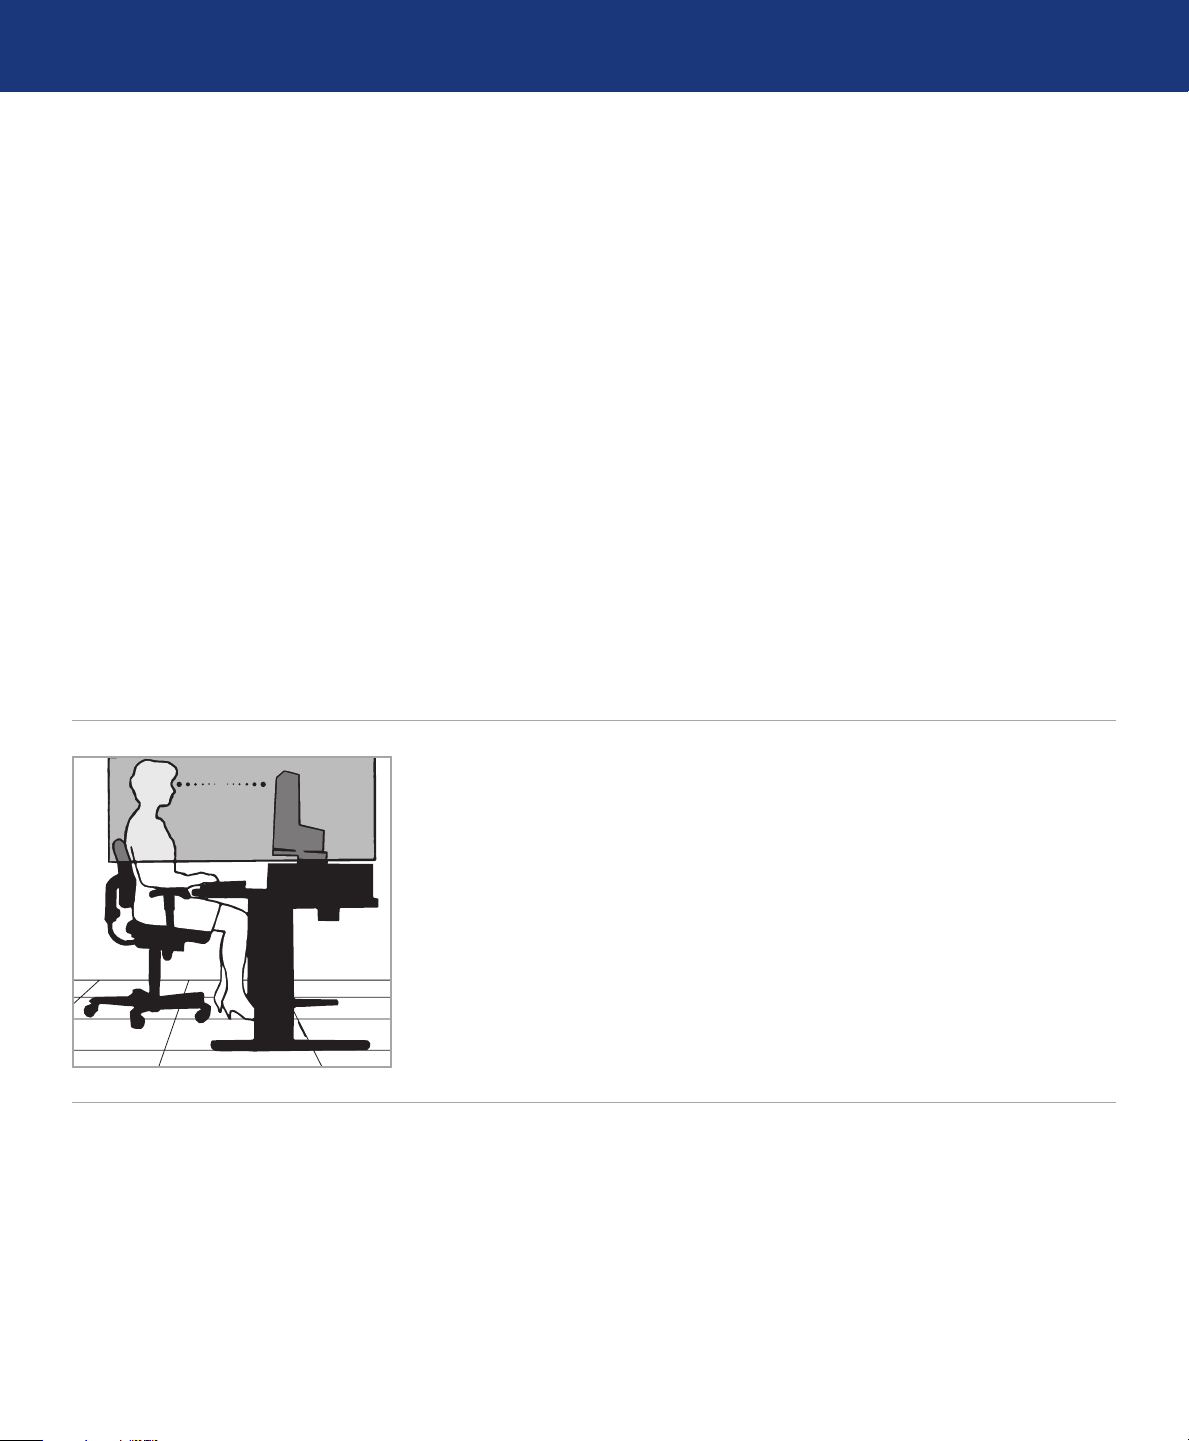
Adjust the monitor height so that the
❖
top of the screen is at or slightly below eye level. Your eyes should look
slightly downward when viewing the
middle of the screen.
Position your monitor no closer than
❖
40 cm and no further away than 70
cm from your eyes. e optimal distance is 50 cm.
Rest your eyes periodically by focus-
❖
ing on an object at least 20 feet away.
Blink often.
Position the monitor at a 90° angle
❖
to windows and other light sources to
minimize glare and reflections. Adjust the monitor tilt so that ceiling
lights do not reflect on your screen.
If reflected light makes it hard for
❖
you to see your screen, use an antiglare filter.
Clean the lcd monitor surface with a
❖
lint-free, non-abrasive cloth. Avoid
using any cleaning solution or glass
cleaner!
To maximize ergonomics benefits,
we recommend the following:
Adjust the brightness until the back-
❖
ground raster disappears.
Adjust the monitor’s brightness and
❖
contrast controls to enhance readability.
Use a document holder placed close
❖
to the screen.
Position whatever you are looking at
❖
most of the time (the screen or reference material) directly in front of you
to minimize turning your head while
you are typing.
Avoid displaying fixed patterns on
❖
the monitor for long periods of time
to avoid image persistence (after-image effects).
Use the preset color setting.
❖
Use non-interlaced signals with a
❖
vertical refresh rate between 60-75
hz.
Do not position the contrast control
❖
to its maximum setting.
Use the preset size and position con-
❖
trols with standard signals.
Do not use primary color blue on a
❖
dark background, as it is difficult to
see and may produce eye fatigue to
insufficient contrast.
Page 5

LaCie 500 Series LCD Monitor
User Manual
Environmental Regulations
Congratulations! e display you have just purchased carries the TCO’03 Displays label. is means that your
display is designed, manufactured and tested according to some of the strictest quality and environmental requirements in the world. is makes for a high performance product, designed with the user in focus that also minimizes
the impact on our natural environment.
Some of the features of the TCO’03 Display requirements:
Environmental Regulations
page 5
Ergonomics
■
Good visual ergonomics and image quality in order to
improve the working environment for the user and to reduce sight and strain problems. Important parameters are
luminance, contrast, resolution, reflectance, colour rendition and image stability.
Energy
■
Energy-saving mode after a certain time – beneficial
❖
both for the user and the environment
Electrical safety
❖
Emissions
■
Electromagnetic fields
❖
Noise emissions
❖
Ecology
■
e product must be prepared for recycling and the
❖
manufacturer must have a certified environmental management system such as EMAS or ISO 14 001
veloped by TCO Development in cooperation with scientists, experts, users as well as manufacturers all over the
world. Since the end of the 1980s TCO has been involved
in influencing the development of IT equipment in a more
user-friendly direction. Our labelling system started with
displays in 1992 and is now requested by users and ITmanufacturers all over the world.
For more information, please visit
www.tcodevelopment.com
Restrictions on:
❖
chlorinated and brominated flame retardants and
•
polymers
heavy metals such as cadmium, mercury and lead.
•
e requirements included in this label have been de-
Page 6
LaCie 500 Series LCD Monitor
User Manual
Environmental Regulations
page 6
Within the European Union
EU-wide legislation, as implemented in each Member State,
requires that waste electrical and
electronic products carrying the mark (left)
must be disposed of separately from normal
household waste. is includes monitors and
electrical accessories, such as signal cables or
power cords. When you need to dispose of
your LaCie display products, please follow
the guidance of your local authority,
or ask the shop where you purchased the
product, or if applicable, follow any agreements made between yourself and LaCie.
e mark on electrical and electronic products only applies to the current European
Union Member States.
Manufacturer’s Recycling and Energy Information
LaCie is strongly committed to environmental protection and sees recycling
as one of the company’s top priorities in
trying to minimize the burden placed
on the environment. We are engaged
in developing environmentally friendly
products, and always strive to help define and comply with the latest independent standards from agencies.
Recycling programs information:
Sweden - http://www.el-retur.se
Germany - http://www.recyclingpartner.de/
Holland - http://www.mirec.nl/
Japan - http://www.diarcs.com/
Energy saving:
is monitor features an advanced
energy saving capability. When a VESA
Display Power Management Signaling
Mode Power consumption LED color
Normal operation 65W Blue
Energy saving mode Less than 1W Amber
Off Less than 1W N/A
Outside the European Union
If you wish to dispose of used electrical and
electronic products outside the European
Union, please contact your local authority
so as to comply with the correct disposal
method.
(DPMS) Standard signal is sent to the
monitor, the Energy Saving mode is activated. e monitor enters a single Energy Saving mode.
Page 7
LaCie 500 Series LCD Monitor
User Manual
Monitor Specifications
Monitor Specifications
page 7
526 LCD Monitor
Technology:
Diagonal display:
Active Display:
Resolution:
Pixel pitch:
Gamut:
Color depth:
Gamma correction:
Luminance:
Contrast ratio:
Response time:
Viewing angles:
Connections:
Power consumption:
In power save mode
Weight:
Weight with stand:
Ergonomy:
Operating Temp.:
Humidity:
Altitude:
Certifications:
H-IPS A-TW POL
25.5” (64.9 cm)
550 (H) x 344 (V) mm
Some systems may not support all modes listed.
720 x 400*1 at 70 Hz to 85 Hz; 640 x 480*1 at 60 Hz to 85 Hz; 800 x 600*1 at 56 Hz to 85 Hz; 832 x
624*1 at 75 Hz; 1024 x 768*1 at 60 Hz to 85 Hz; 1152 x 864*1; 1152 x 870*1 at 75 Hz; 1280 x 960*1
at 60 Hz; 1280 x 1024*1 at 60 Hz to 85 Hz; 1600 x 1200*1 at 60 Hz to 75 Hz ;1200 x 1920*1 at 60 Hz
1920 x 1200 at 60 Hz – LaCie recommends this resolution for optimal display performance.
e LaCie 526 supports HDTV resolutions (1920x1080p@50Hz, 1920x1080p@60Hz,
1280x720p@60Hz, 1280x720p@50Hz) as well as 720x480p@60Hz and 720x576p@50Hz
0.287 mm, 89 PPI
91% NTSC
16,777,216
12 bit with 16 bit precision
400 cd/m2 (typ.)
800:1 (typical)
Rise time + Fall time : 16ms(typical) 8ms G t G
Left/Right ±89°, Up/Down ±89°
Mini D-sub 15 pin, DVI-I (analog or digital), DVI-D (digital)
111W (typical)
< 1 W
9.7 kg
13.7 kg
Up/down: 30° to -5°; left/right: 170° to 170°; clockwise: 90°; height adjustment: 150 mm
5°C to 35°C/41°F to 95°F
30% to 80%
0 to 10,000 feet / 0 to 3,048 m
CE, FCC-B, TÜV-Ergonomie, TÜV-GS, TCO’03, EnergyStar, GOST-R, c-UL, UL,
VESA DDC 2B, DDC-CI
*1 Interpolated Resolutions: When resolutions are shown that are lower than the pixel count of the
LCD module, text may appear different. is is normal and necessary for all current flat panel technologies when displaying non-native resolutions full screen. In flat panel technologies, each dot on the
screen is actually one pixel, so to expand resolutions to full screen, an interpolation of the resolution
must be done.
Page 8
LaCie 500 Series LCD Monitor
User Manual
1. Introduction to Your LaCie 500 Series LCD Monitor
ank you for purchasing the LaCie 500 Series
LCD Monitor. Designed for serious graphics professionals, these LCD monitors feature 12-bit gamma correction to meet the challenge of today’s color needs.
Introduction
page 8
1.1. 500 Series LCD Monitor Features
Large 25.5’’ diagonal size and wide 16:10 format enhances productivity by reducing the need for scrolling through documents and
❖
switching windows and allows full 1:1 scale display of two full pages with additional space for application palettes and toolbars.
High 1920x1200 resolution and HDCP Content Protection technology is ideal for high resolution graphics and video applica-
❖
tions.
Wide-Gamut H-IPS A-TW POL panel technology offers an industry-leading 91% NTSC Gamut that allows the LaCie 500
❖
series monitors to display an ever larger range of vibrant colors, previously unattainable by LCD monitors. When used in a colormanaged environment, this offers the benefit of an even closer match between captured, displayed and printed colors. is technology
offers an excellent balance between contrast (800:1), brightness (400 cd/m2 typ.) and expansive viewing angles of 178°.
Improved uniformity: Each panel is individually tested at the factory and corrected to ensure that brightness and chromaticity are
❖
uniform across the screen.
ColorKeeper Backlight Stabilizer: e LaCie 526 monitor has an embedded sensor that analyzes the brightness and chromaticity of
❖
its backlight in real time. A feedback mechanism then uses this information to continuously adjust the backlight and panel to ensure
stable monitor brightness and color.
12-bit Gamma Correction: e embedded Integrated Circuit enables a genuine hardware calibration of the monitor. Its 12-bit
❖
Gamma Correction tables (16 bits precision) allow an optimal display of color gradients.
Ergonomic stand enables height swivel tilt and pivot adjustments.❖
VESA-100 interface: e Monitor can be attached to any VESA 100 compatible attachment.❖
Portability handle and quick-release stand make your LaCie 500 Series Monitor easy to carry.❖
Page 9
LaCie 500 Series LCD Monitor
LaCie User Manual
ICC Profiles Included
20
0
6
LaCie 300 Series LCD Monitor
Version 2.0
Manuel Utilisateur • Guída Utente • Handbuch • ユーザー マニュアル
Manual De Instrucciones • Gebruikershandleiding
Profiles ICC inclus • Profili ICC inclusi
ICC Profile inbegriffen • Perfiles ICC incluidos
Quick Install Guide
LaCie 300 Series LCD Monito
r
User Manual
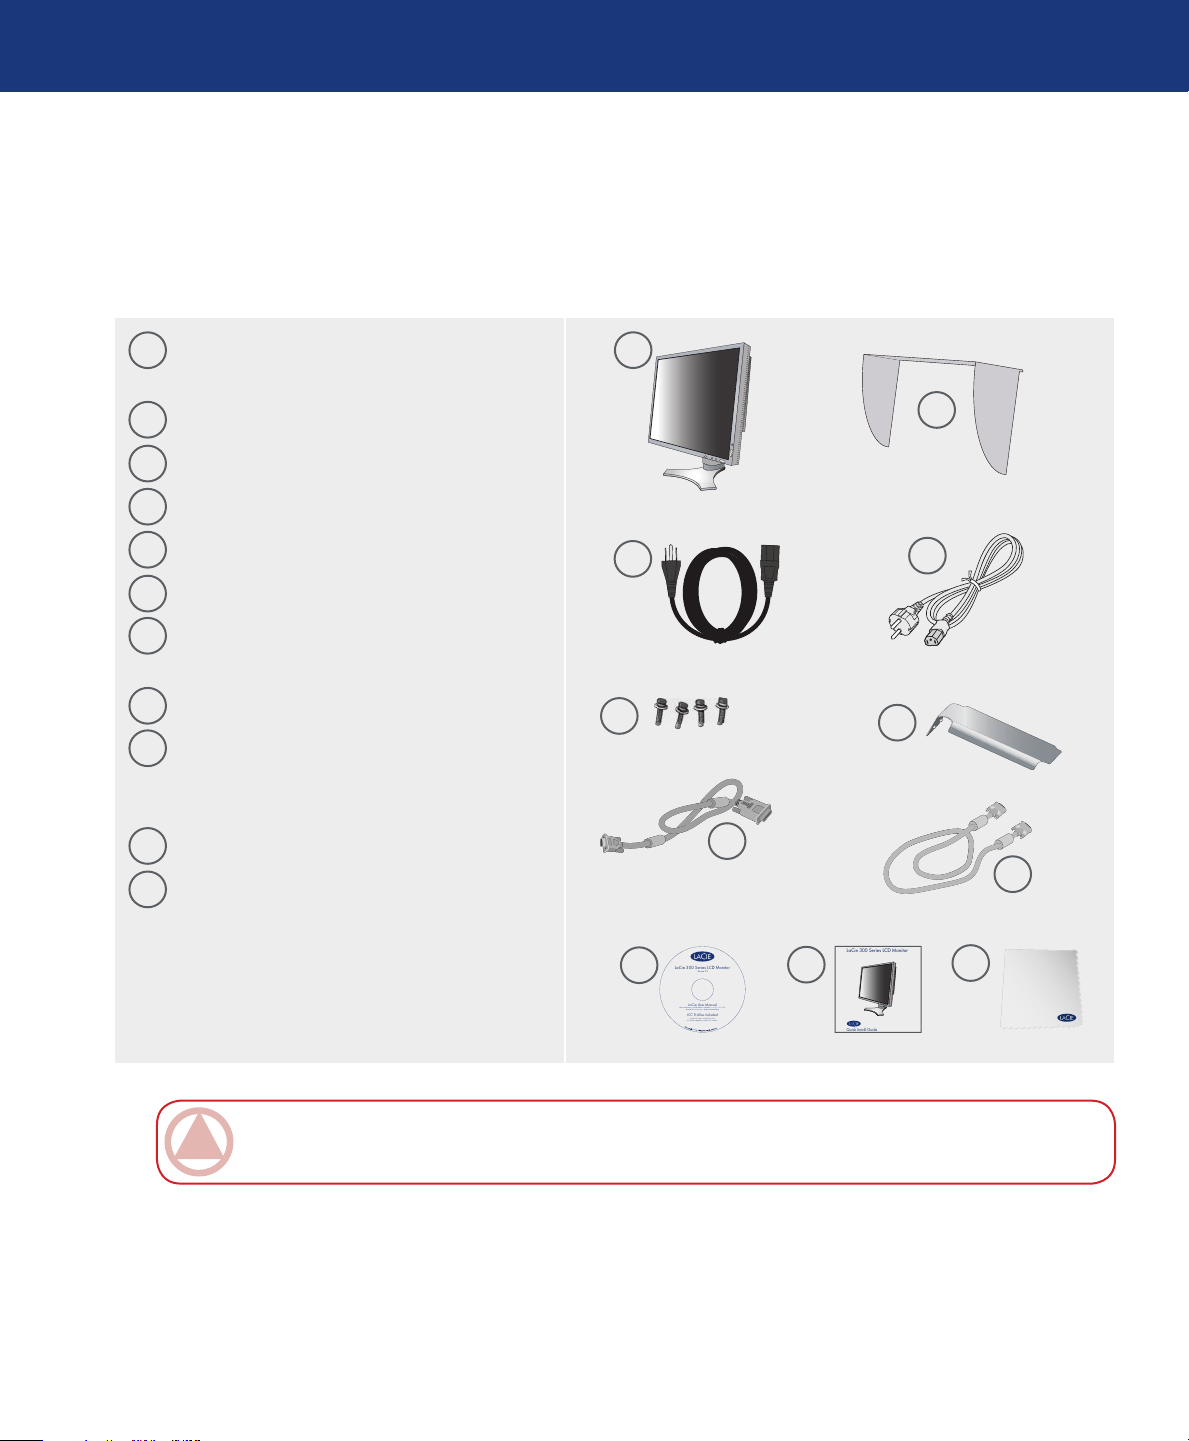
1.2. Box Content
Your LaCie 500 Series LCD Monitor box should
contain the following:
Introduction
page 9
1
LaCie 500 Series LCD Monitor with tilt/
swivel/pivot/height adjustable stand
2
easyHood
US power cord
3
CE power cord
4
Screws (to mount the monitor to a flexible arm)
5
Cable cover
6
Video signal cable (15-pin mini D-SUB male
7
to DVI-A)
Video signal cable (DVI-D to DVI-D cable)
8
LaCie Utilities CD-ROM (includes User
9
Manual, monitor ICC profiles and blue eye
pro calibration software)
Quick Install Guide
10
Cleaning cloth
11
1
2
3
5
4
6
7
8
9
10
11
ImpOrTANT INfO: Please save your packaging. In the event that the monitor should need to be repaired or
serviced, it must be returned in its original packaging.
Page 10
LaCie 500 Series LCD Monitor
User Manual
2. Installing Your LaCie 500 Series LCD Monitor
Mac Cable Adaptor
(not included)
Figure A Figure B Figure C
Installing Your LaCie Monitor
page 10
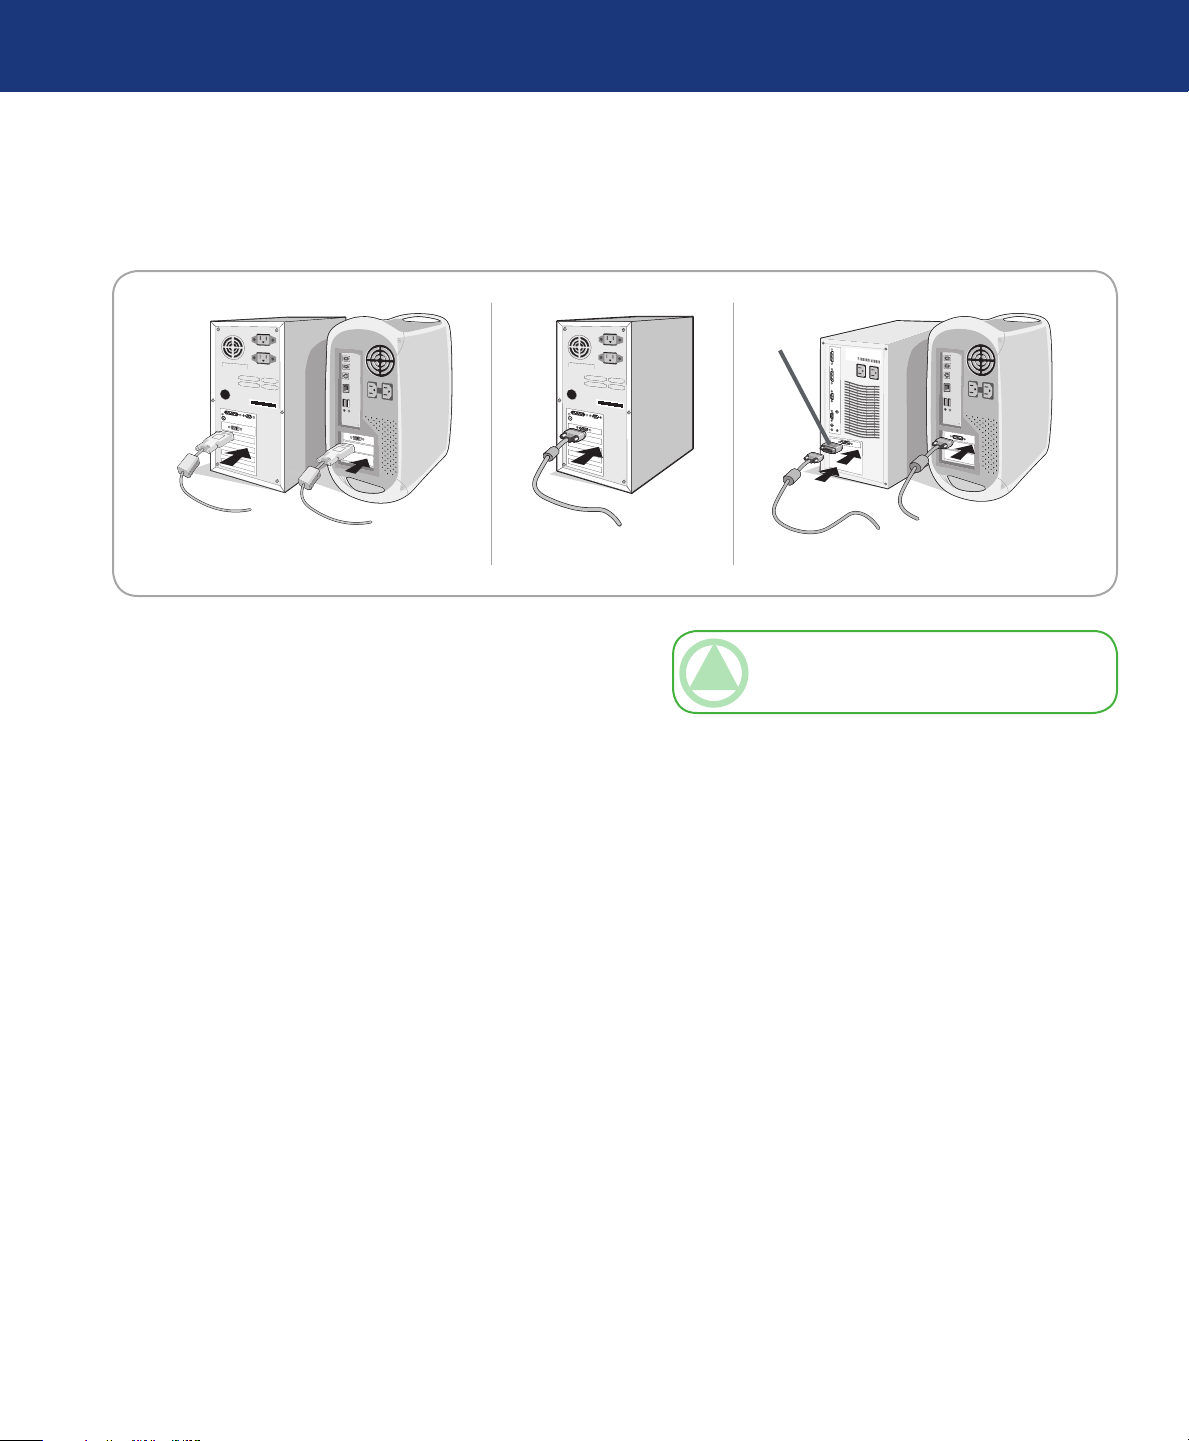
To attach the LCD monitor to your system, follow
these instructions:
1. Turn off the power to your computer.
2. For the PC or MAC with DVI digital output:
Connect the DVI signal cable to the connector of the
display card in your system (Figure A). Tighten all
screws.
For the PC with Analog output:
Connect the 15-pin mini D-SUB to DVI-A signal
cable to the connector of the display card in your system (Figure B).
For the MAC:
Connect the Macintosh cable adapter to the computer, then attach the 15-pin mini D-SUB signal cable to
the Macintosh cable adapter (Figure C).
TeChNICAl NOTe: Some Macintosh systems
do not require a Macintosh cable adapter.
Page 11
LaCie 500 Series LCD Monitor
User Manual
Installing Your LaCie Monitor
page 11
Highest
Stand
Position
DVI-I
DVI-D
D-SUB
Figure D
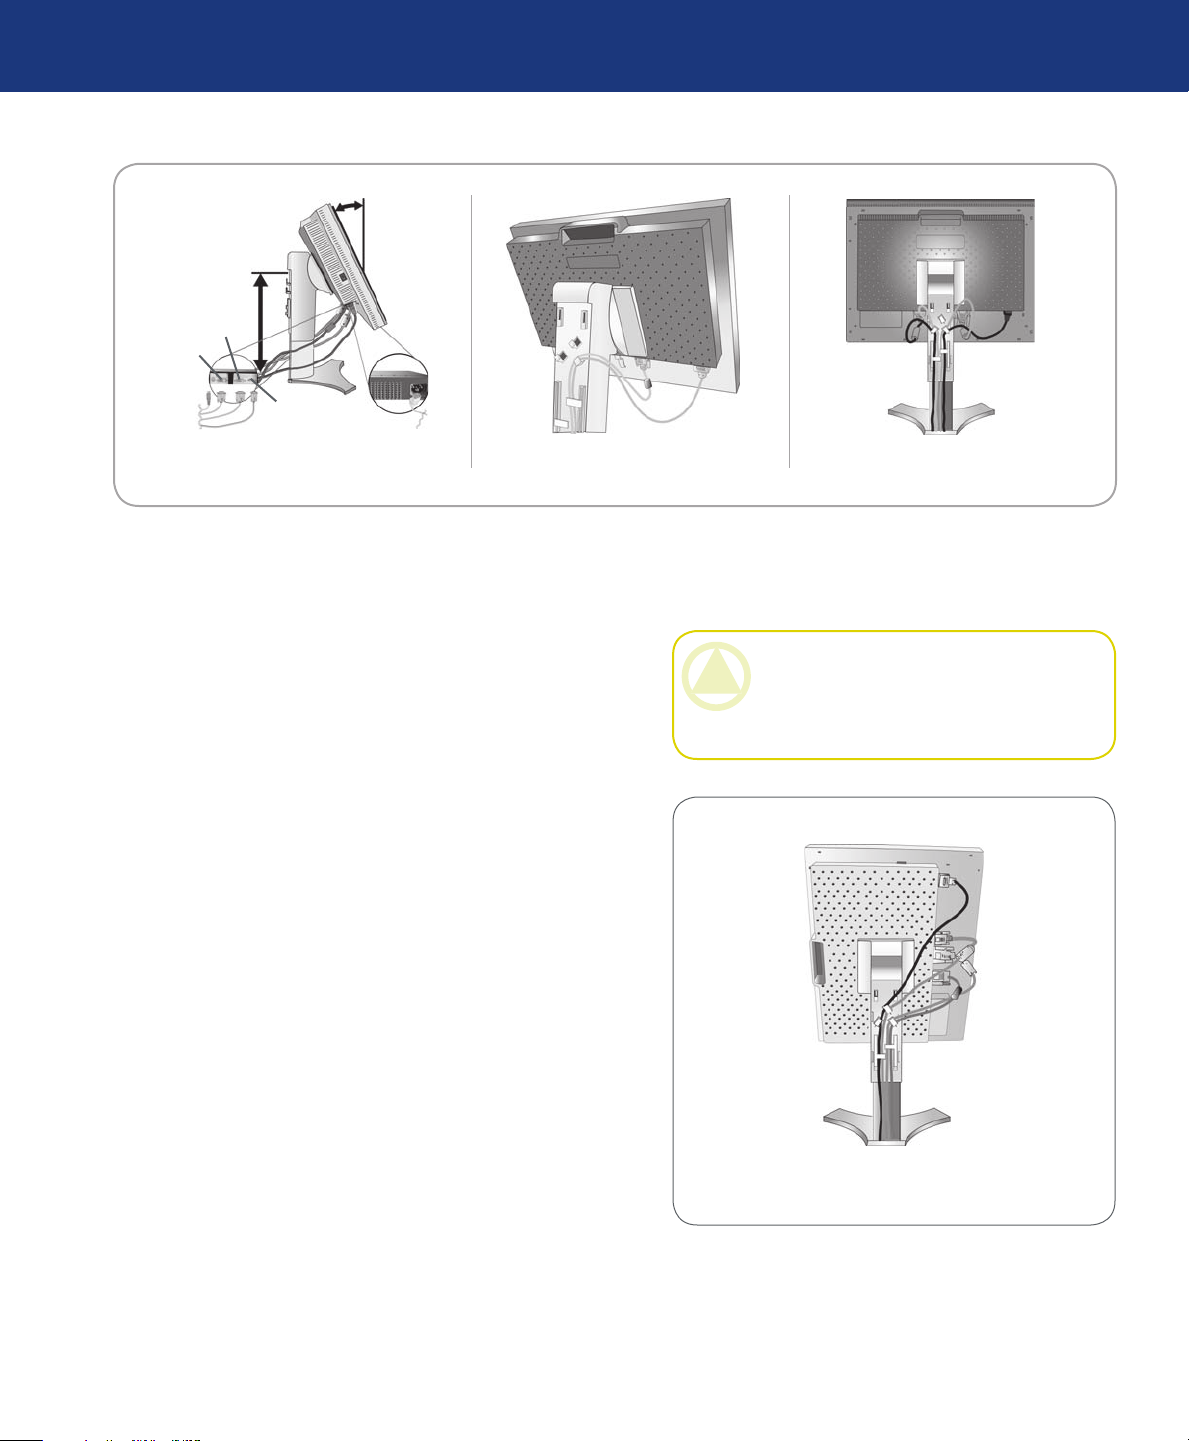
3. Place hands on each side of the monitor to tilt the
LCD panel to a 30-degree angle and lift up to the
highest position (Figure D).
4. Connect all cables to the appropriate connectors (Fig-
ure D).
5. To keep the cables neatly organized, place them into
the cable management system that is built into the
stand.
30° Tilt
Figure E Figure F
CAUTION: Incorrect cable connections may
result in irregular operation, damage display quality/components of LCD module and/or shorten
the module’s life.
Place the D-Sub cable (not included) and the
❖
power cable into the specific hooks as indicated
(Figure E).
Place the DVI cable and the 15-pin mini D-Sub
❖
to DVI-A cable into the hooks as indicated (Figure F).
When using the monitor in Portrait mode, place
❖
the DVI cable and the 15-pin mini D-Sub to
DVI-A cable into the hooks as indicated (Figure
G).
6. Make sure all cables are resting flat against the stand
(Figure F). Please check Tilt, Rise and Lower monitor screen and screen rotation when you manage
cables.
Figure G
Page 12
LaCie 500 Series LCD Monitor
User Manual
Figure H Figure I
Installing Your LaCie Monitor
page 12
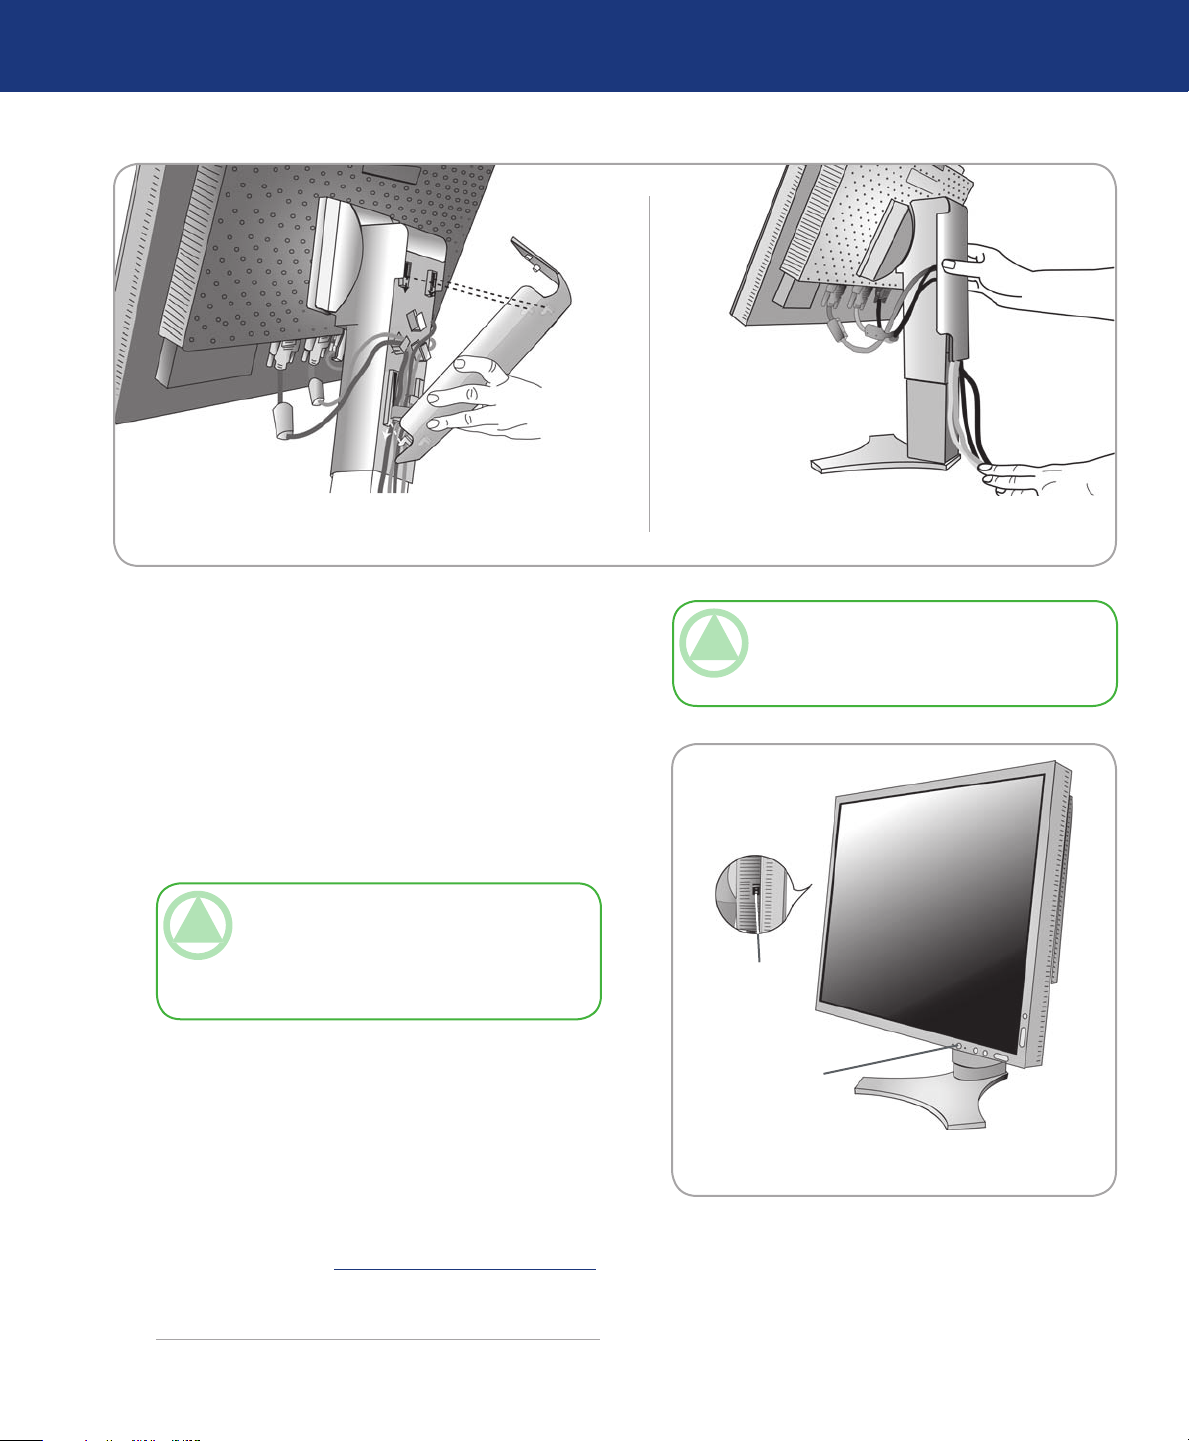
7. Hold all cables firmly and place the cable cover onto
the stand (Figure H). To remove the cable cover, lift
the cover off as shown in Figure H.
8. Connect one end of the power cord to the AC inlet
on the back of the monitor and the other end to the
power outlet.
9. e Vacation Switch on the left side of the moni-
tor must be turned on. Turn on the monitor with the
front power button (Figure J) and the computer.
TeChNICAl NOTe: e Vacation Switch is a
true on/off switch. If this switch is on the OFF po-
sition, the monitor cannot be turned on using the
front button. DO NOT switch on/off repeatedly.
10. No-touch auto adjust automatically adjusts the
monitor to optimal settings upon initial setup for
most timings. For further adjustments, use the following OSD (on-screen display) controls:
Auto Contrast (Analog input only)
❖
TeChNICAl NOTe: Please refer to Caution
section of this manual for proper selection of AC
power cord.
Vacation
Switch
Power
Button
Figure J
Auto Adjust (Analog input only)
❖
Refer to the page 17, OSD Control Button Functions,
for a full description of these OSD controls.
Page 13
LaCie 500 Series LCD Monitor
User Manual
3. Using Your LaCie 500 Series LCD Monitor
3.1. Physical Adjustments
3.1.1. Raise and lower monitor screen■
Using Your LaCie Monitor
page 13
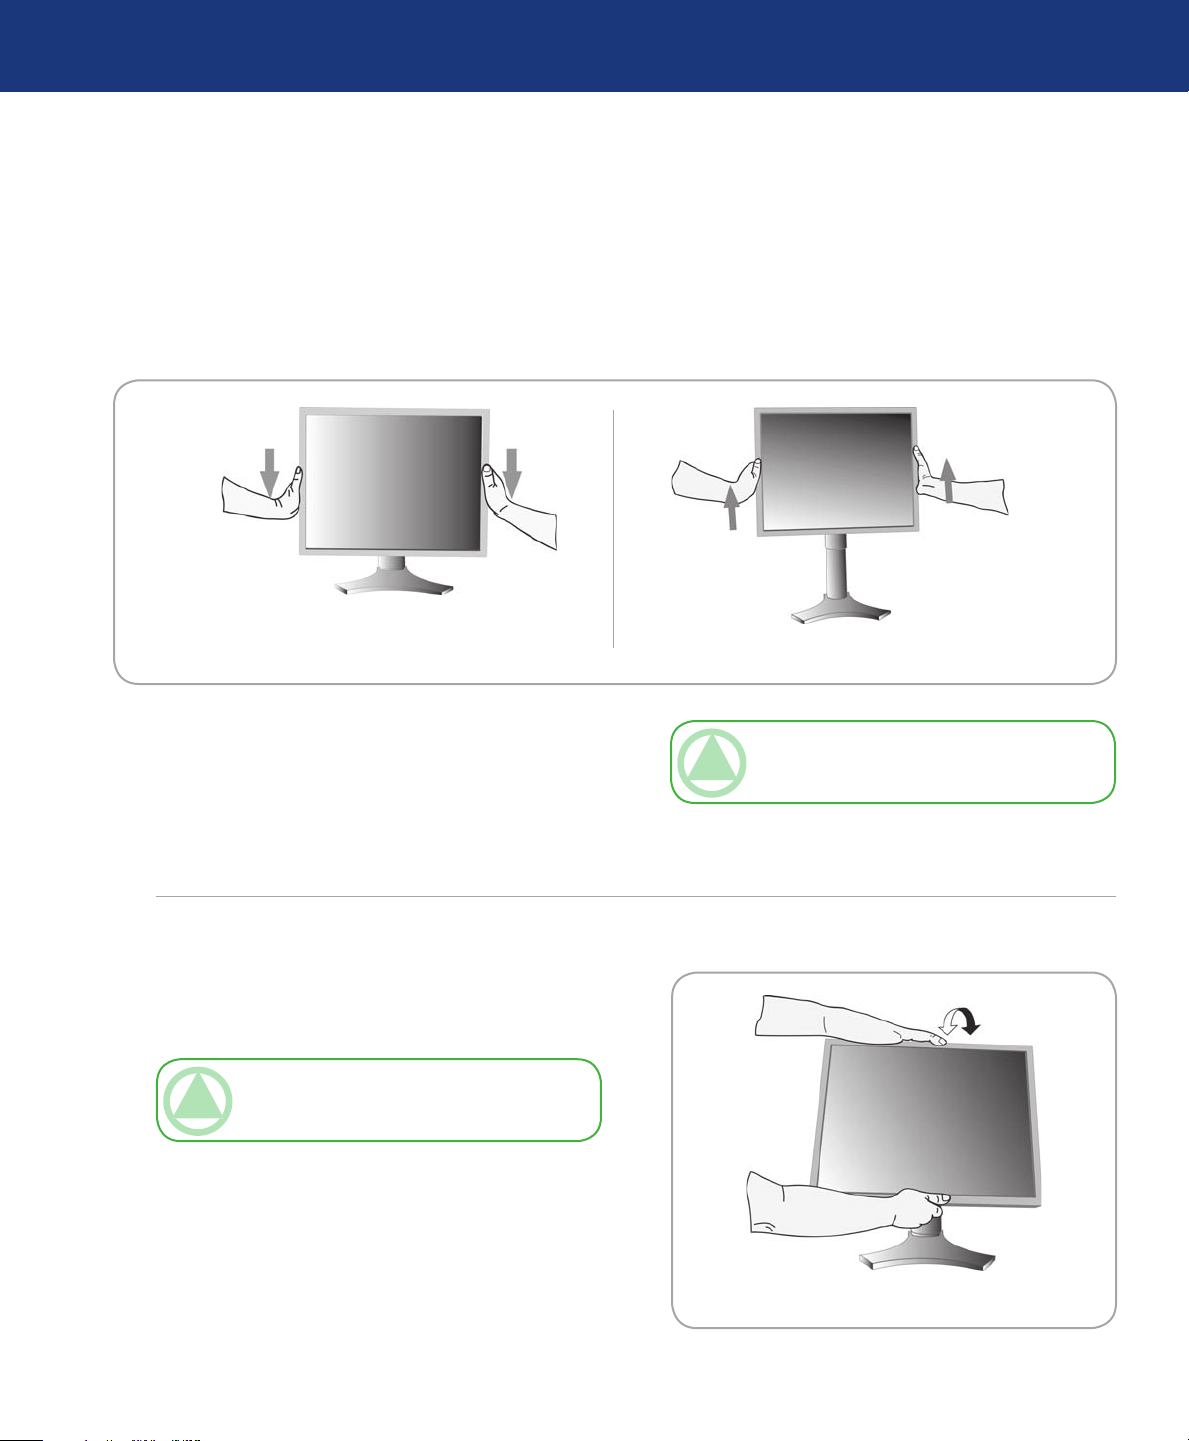
e monitor may be raised or lowered in either Portrait or Landscape mode.
To raise or lower screen, place hands on each side
of the monitor and lift or lower to the desired height
(Figure A and B).
3.1.2. Screen tilt■
Grasp top and bottom sides of the monitor screen with
your hands and adjust the tilt as desired (Figure C).
TeChNICAl NOTe: Handle with care when
tilting the monitor screen.
Figure BFigure A
TeChNICAl NOTe: Handle with care when
raising or lowering the monitor screen.
Figure C
Page 14
LaCie 500 Series LCD Monitor
User Manual
3.1.3. Screen rotation■
Using Your LaCie Monitor
page 14
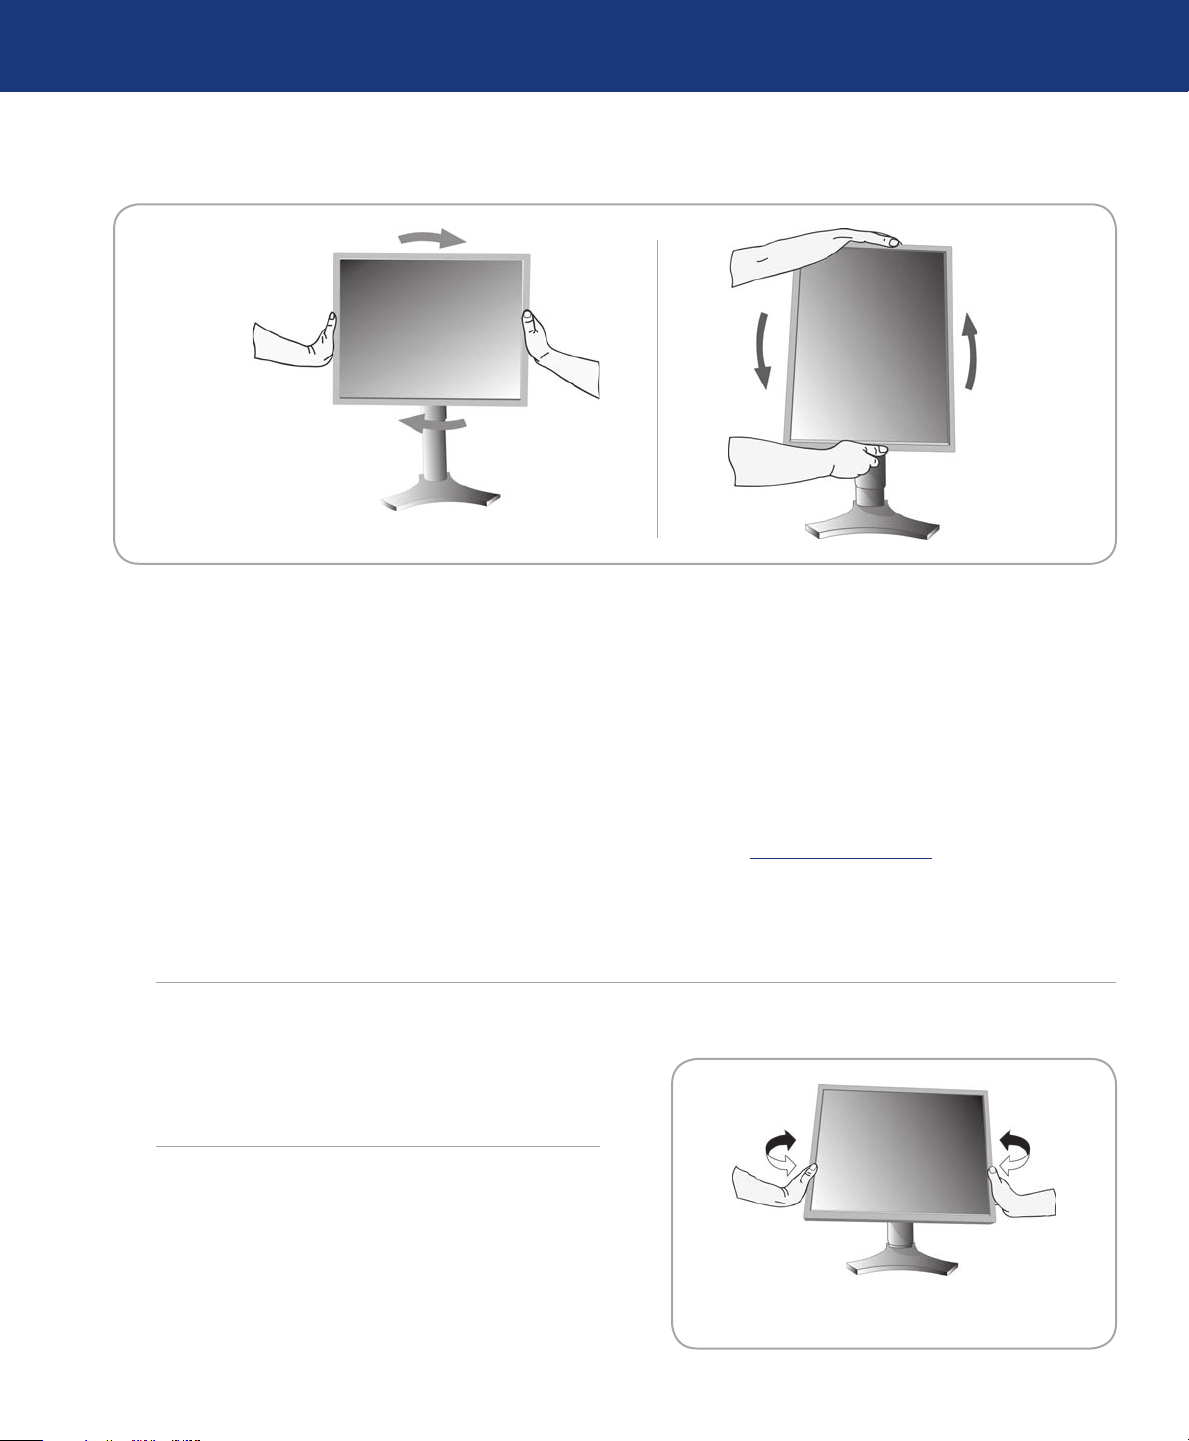
Figure D
Before rotating, the screen must be raised to the
highest level to avoid knocking the screen on the desk
or pinching with your fingers.
To raise the screen, place your hands on each side
of the monitor and lift up to the highest position (page
13, figure B).
To rotate the screen, place hands on each side of the
monitor screen and turn clockwise from Landscape to
Portrait or counterclockwise from Portrait to Landscape
(Figures D and E).
To rotate the OSD menu between landscape and
portrait, refer to “Controls” section.
3.1.4. Swivel■
Figure E
Mac Users
Portrait mode requires a high end graphic board
such as the ATI Radeon x800 or internal ATI graphic
chip.
PC Users
To get the full benefit from portrait mode, LaCie
recommends using PivotPro software from Portrait
Displays: www.portrait.com.
Grasp both sides of the monitor screen with your hands
and adjust the swivel as desired (Figure F).
Figure F
Page 15
LaCie 500 Series LCD Monitor
User Manual
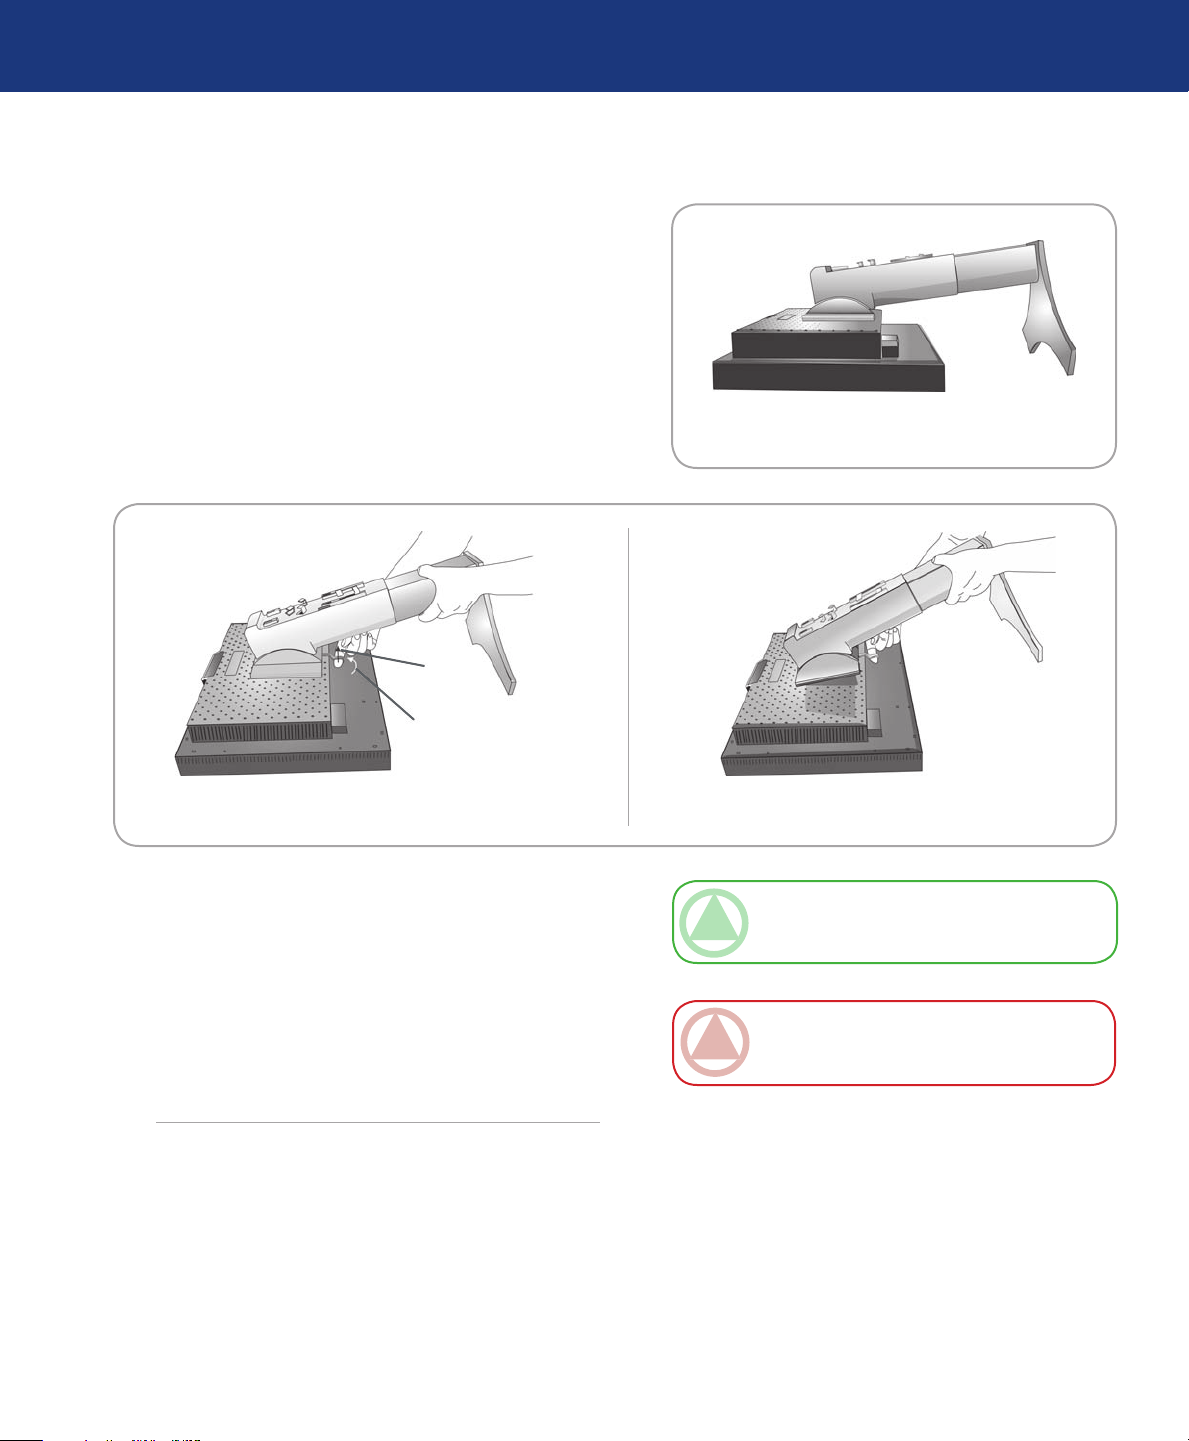
3.1.5. Remove monitor stand for mounting■
To prepare the monitor for alternate mounting purposes:
1. Disconnect all cables.
2. Place hands on each side of the monitor and lift up to
the highest position.
3. Place monitor face down on a non-abrasive surface
(Figure G).
Using Your LaCie Monitor
page 15
Figure G
Up
Slide
4. Place one hand around the base and one hand on the
Quick Release Lever. Move the Quick Release Lever
in the direction indicated by the arrows (Figure H).
5. Lift up the bottom of the stand to unhook it from the
monitor (Figure I). e monitor can now be mounted
using and alternating method. Reverse process to reattach stand.
Figure IFigure H
TeChNICAl NOTe: Use only VESA-compat-
ible alternative mounting method (100 mm pitch).
ImpOrTANT INfO: Handle with care when
removing monitor stand.
Page 16
LaCie 500 Series LCD Monitor
User Manual
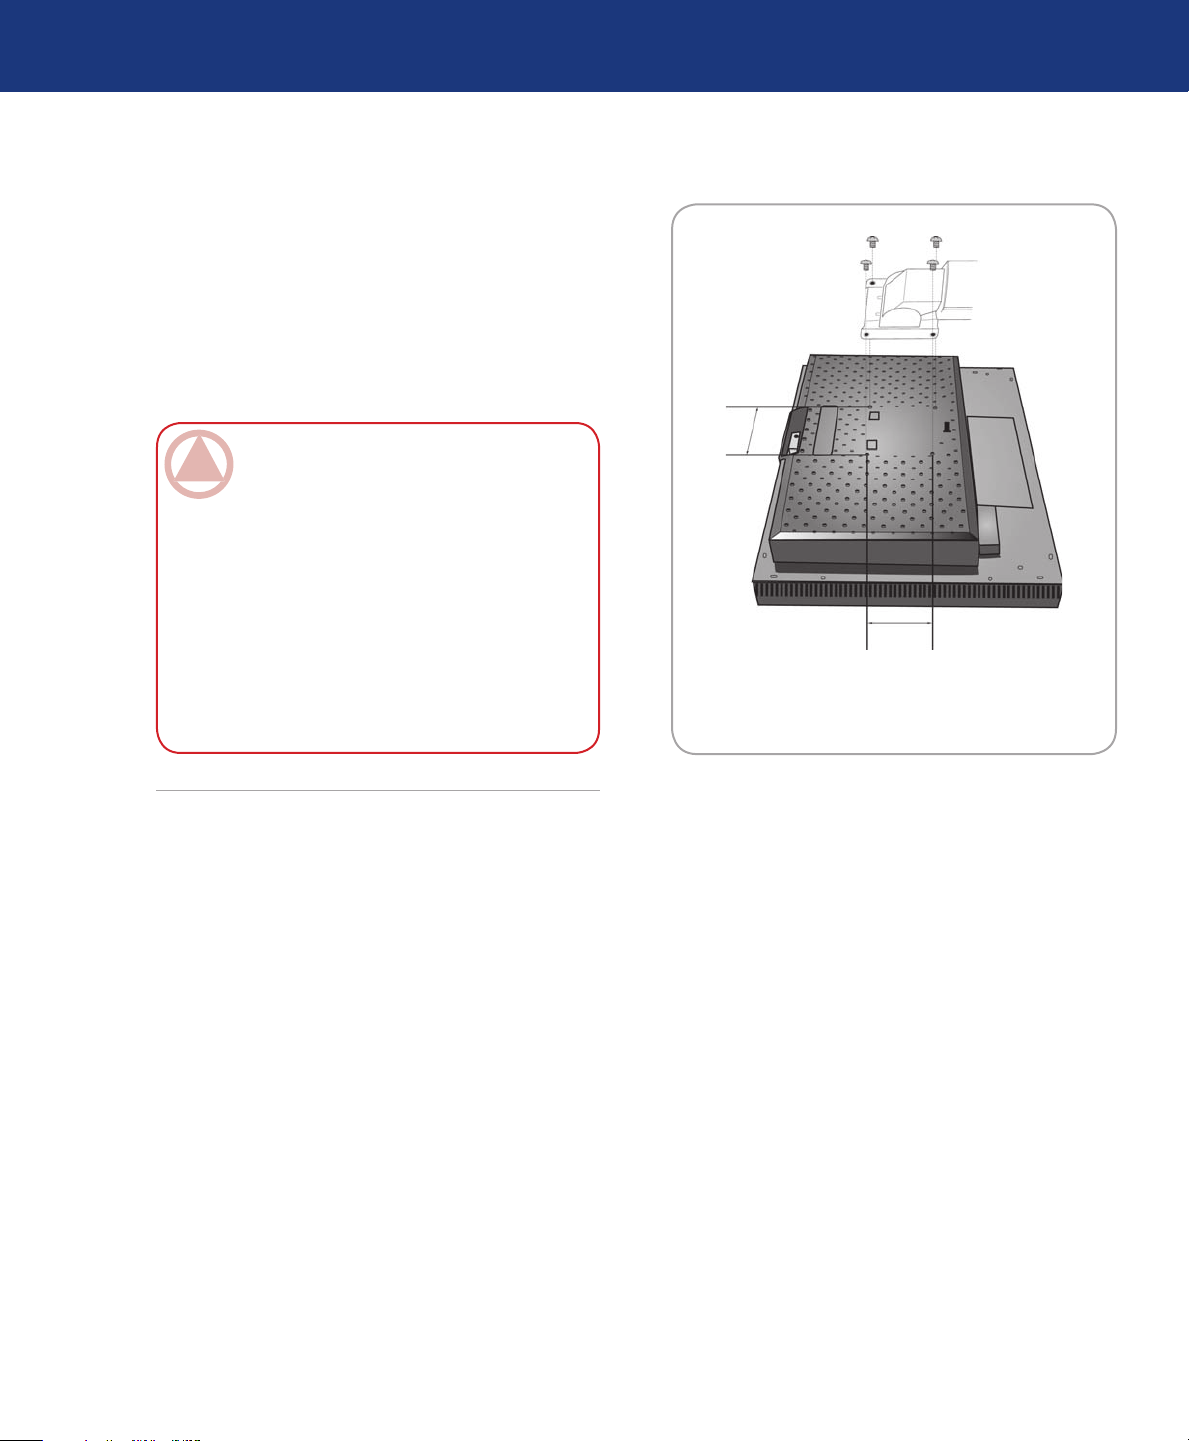
3.1.6. Flexible arm installation■
is LCD monitor is designed for use with a flex-
ible arm.
1. Follow the instructions on how Remove Monitor
Stand for Mounting to remove the stand.
2. Using the 4 screws from the stand removal and attach
the arm to the monitor (Figure J).
ImpOrTANT INfO: Use ONLY the screws
that are included when mounting to avoid damage
to the monitor and stand.
To fulfil the safety requirements the monitor must
be mounted to an arm which guaranties the necessary stability under consideration of the weight
of the monitor.
Using Your LaCie Monitor
page 16
e LCD monitor can be used with an arm (e.g.
the LaCie Twin Arm or the LaCie Articulated
Arm).
Figure J
Page 17
LaCie 500 Series LCD Monitor
OSD Control Button Functions
User Manual
4. OSD (On-Screen Display) Control Button Functions
page 17
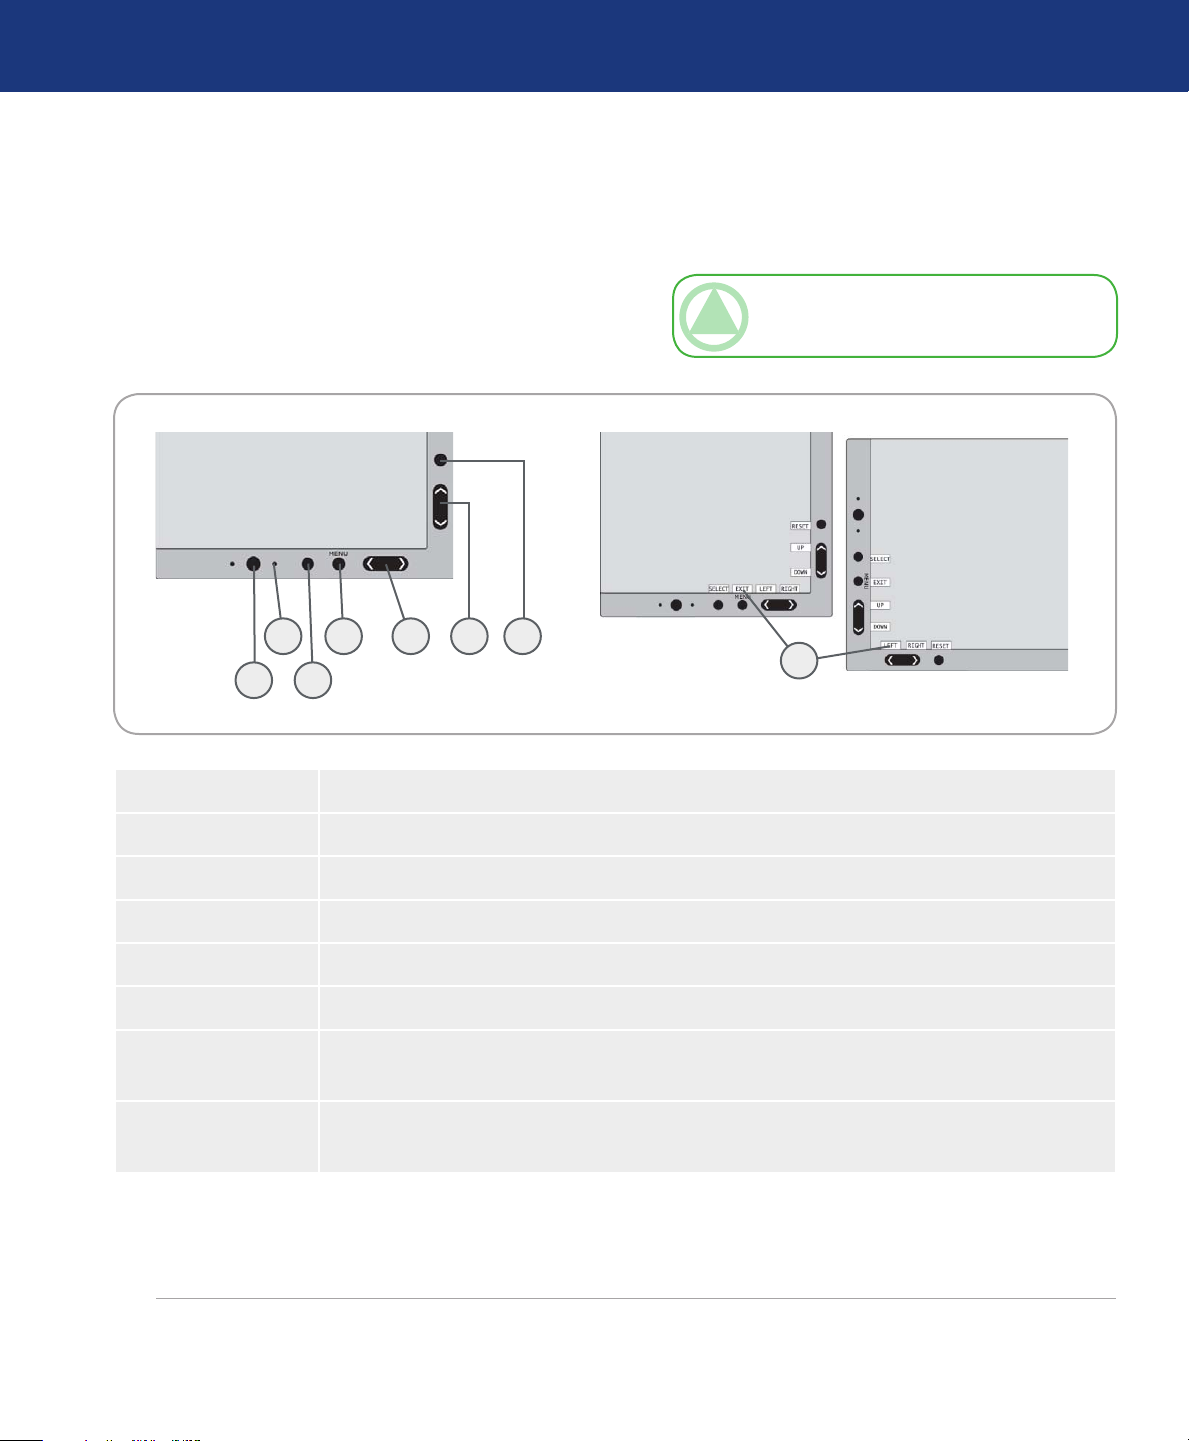
To access OSD menu, press any of the control but-
tons (MENU/EXIT, LEFT, RIGHT, UP, DOWN).
To change signal input, press the SELECT button.
2
1
1 POWER Turns the monitor on and off.
2 LED Indicates that the power is on.
4 5 6 7
3
TeChNICAl NOTe: e OSD must be closed
in order to change signal input.
8
3 INPUT/SELECT Enters OSD sub menus. Changes the input source when not in the OSD Control menu.
4 MENU/EXIT Opens/Exits the OSD sub menu. Opens/Exits OSD Control menu.
5 LEFT/RIGHT Navigates to the left or right through the OSD Control menu.
6 UP/DOWN Navigates up or down through the OSD Control menu.
7 RESET/ROTATE
OSD
8 KEY GUIDE e Key Guide appears on screen when the OSD control menu is accessed. e Key Guide will
* e “LEFT/RIGHT” and “UP/DOWN” buttons function-
ality is interchangeable depending on the orientation (landscape/portrait) of the OSD.
Resets the OSD back to factory settings. When pressed when the OSD is not showing, rotates
the OSD Control menu between portrait and landscape mode.*
rotate when the OSD control menu is rotated.
Page 18
LaCie 500 Series LCD Monitor
User Manual
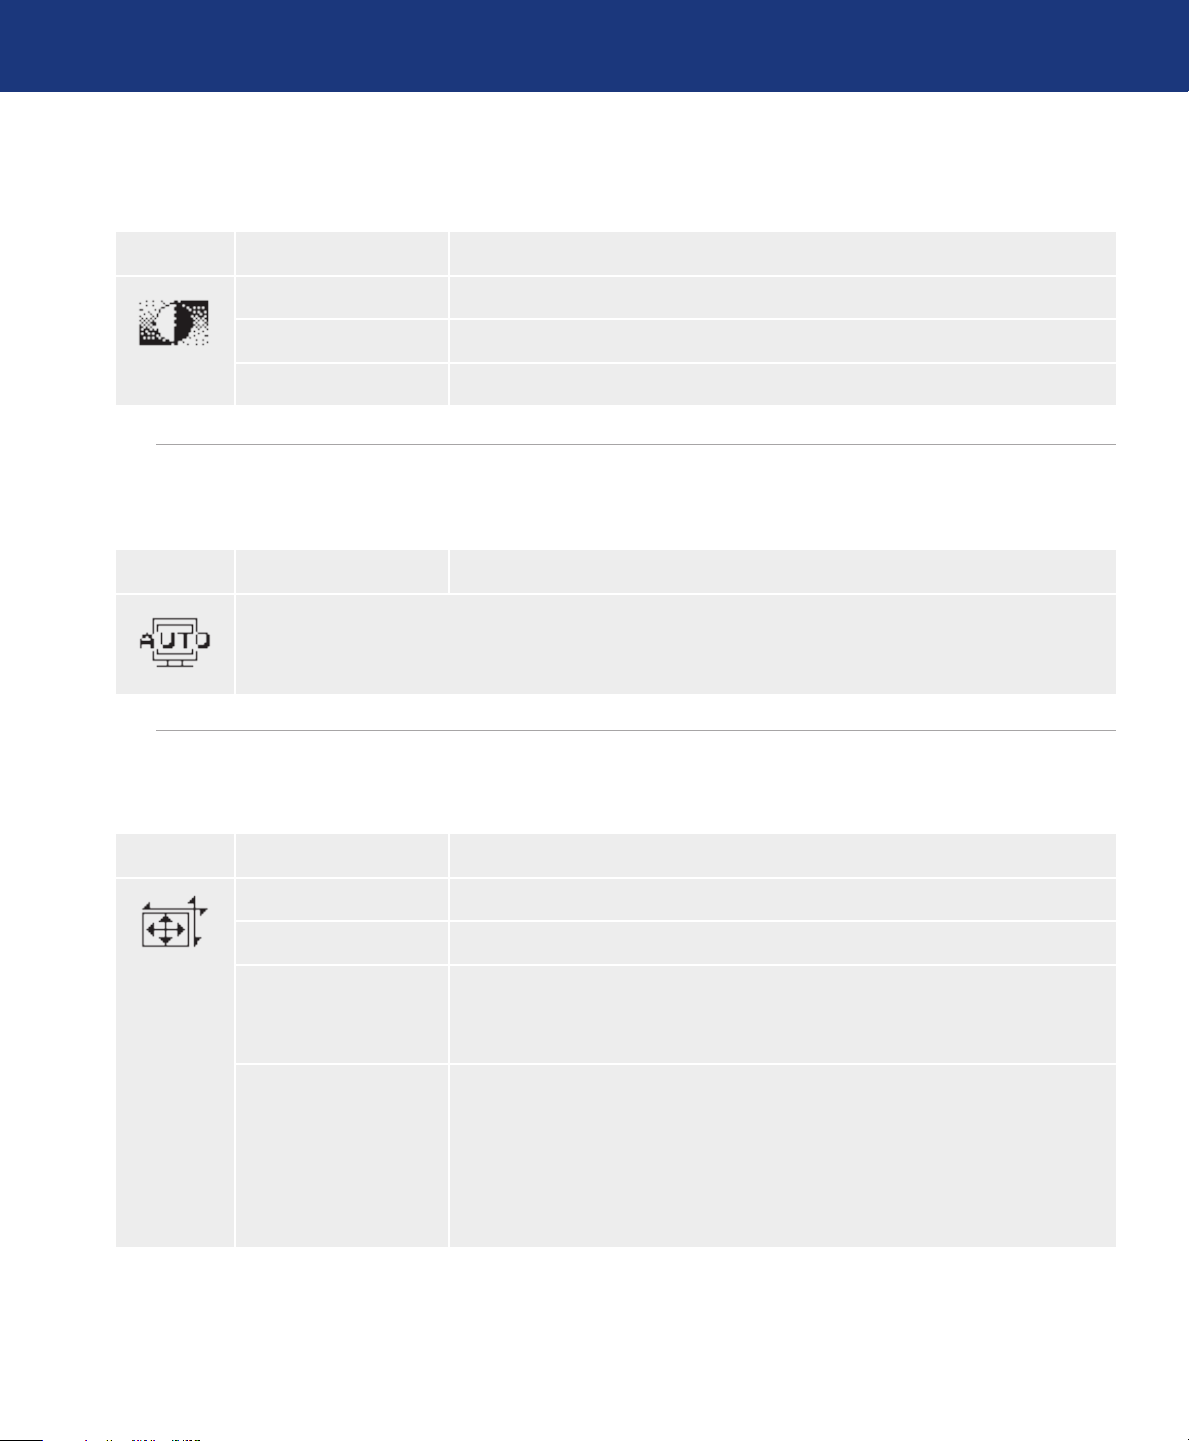
4.1. Brightness/Contrast Controls
Symbol Menu title Explanation
BRIGHTNESS Adjusts the overall image and background screen brightness.
CONTRAST Adjusts the image brightness in relation to the background.
OSD Control Button Functions
page 18
BLACK LEVEL
Adjust the black level.
4.2. Auto Adjust (Analog input only)
Symbol Menu title Explanation
Automatically adjusts the Image Position and H. Size settings and Fine settings.
4.3. Image Controls
Symbol Menu title Explanation
LEFT / RIGHT Controls Horizontal Image Position within the display area of the LCD.
DOWN / UP Controls Vertical Image Position within the display area of the LCD.
AUTO FINE
(Analog input only)
EXPANSION Sets the zoom method.
is function automatically and periodically adjusts the FINE setting for
change in signal condition. is function adjusts approximately every 33 minutes or when a change in signal timing is detected.
FULL: e image is expanded to 1920 x 1200 regardless of the resolution.
ASPECT: e image is expanded without changing the aspect ratio.
OFF: e image is not expanded.
CUSTOM: Refer to the ADVANCED OSD Controls menu section of the
user manual for detailed instructions.
(continued on next page)■
Page 19
LaCie 500 Series LCD Monitor
User Manual
Symbol Menu title Explanation
OSD Control Button Functions
page 19
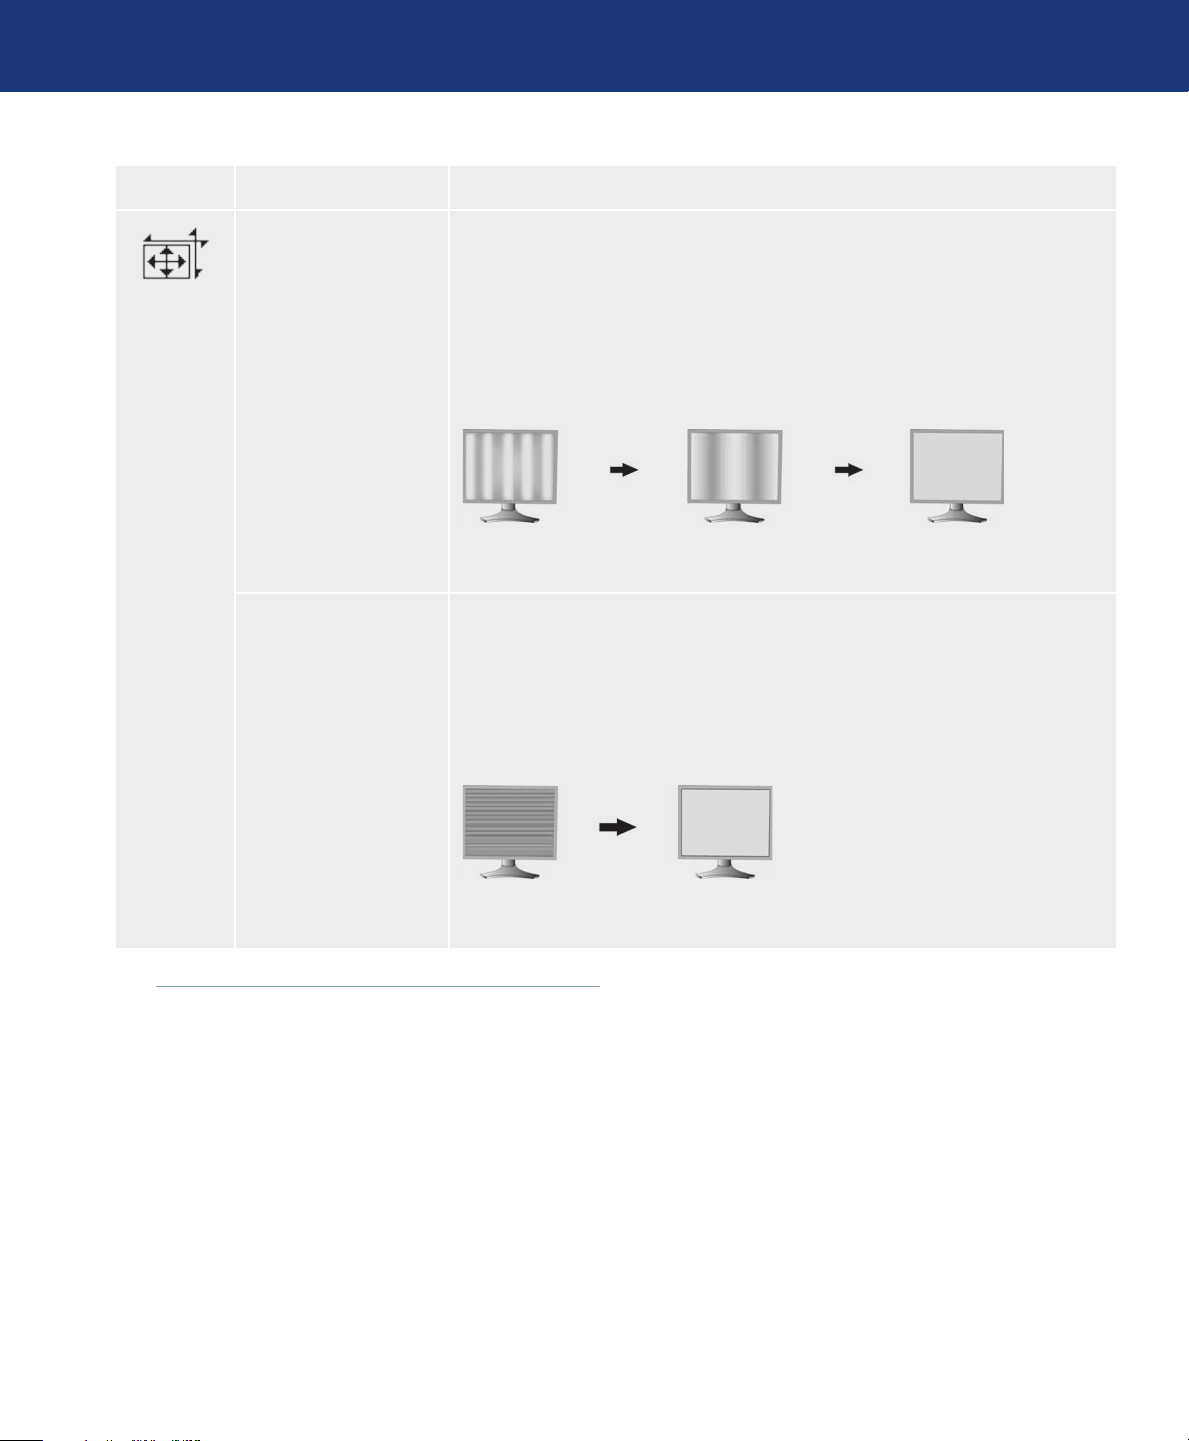
H.SIZE (V.SIZE)
(Analog input only)
FINE
(Analog input only)
Adjusts the horizontal size by increasing or decreasing this setting. If the
“AUTO Adjust function” do not give you a satisfactory picture setting, a further
tuning can be performed using the “H.Size (or V.Size)” function (dot clock).
For this a Moiré test pattern could be used. is function may alter the width of
the picture. Use LEFT/RIGHT Menu to center the image on the screen. If the
H.Size (or V.Size) is wrongly calibrated, the result would look like on the left
drawing. e image should be homogeneous.
When H.SIZE
value is incorrect
Improves focus, clarity and image stability by increasing or decreasing this
setting. If the “Auto Adjust function” and the “H.Size” function do not give
you a satisfactory picture setting, a fine tuning can be performed using the
FINE function. For this a Moiré test pattern could be used. If the Fine value
is wrongly calibrated, the result would look like on the left drawing. e image
should be homogeneous.
When H.SIZE
value is improved
When H.SIZE
value is correct
When FINE
value is incorrect
When FINE
value is correct
Page 20
LaCie 500 Series LCD Monitor
User Manual
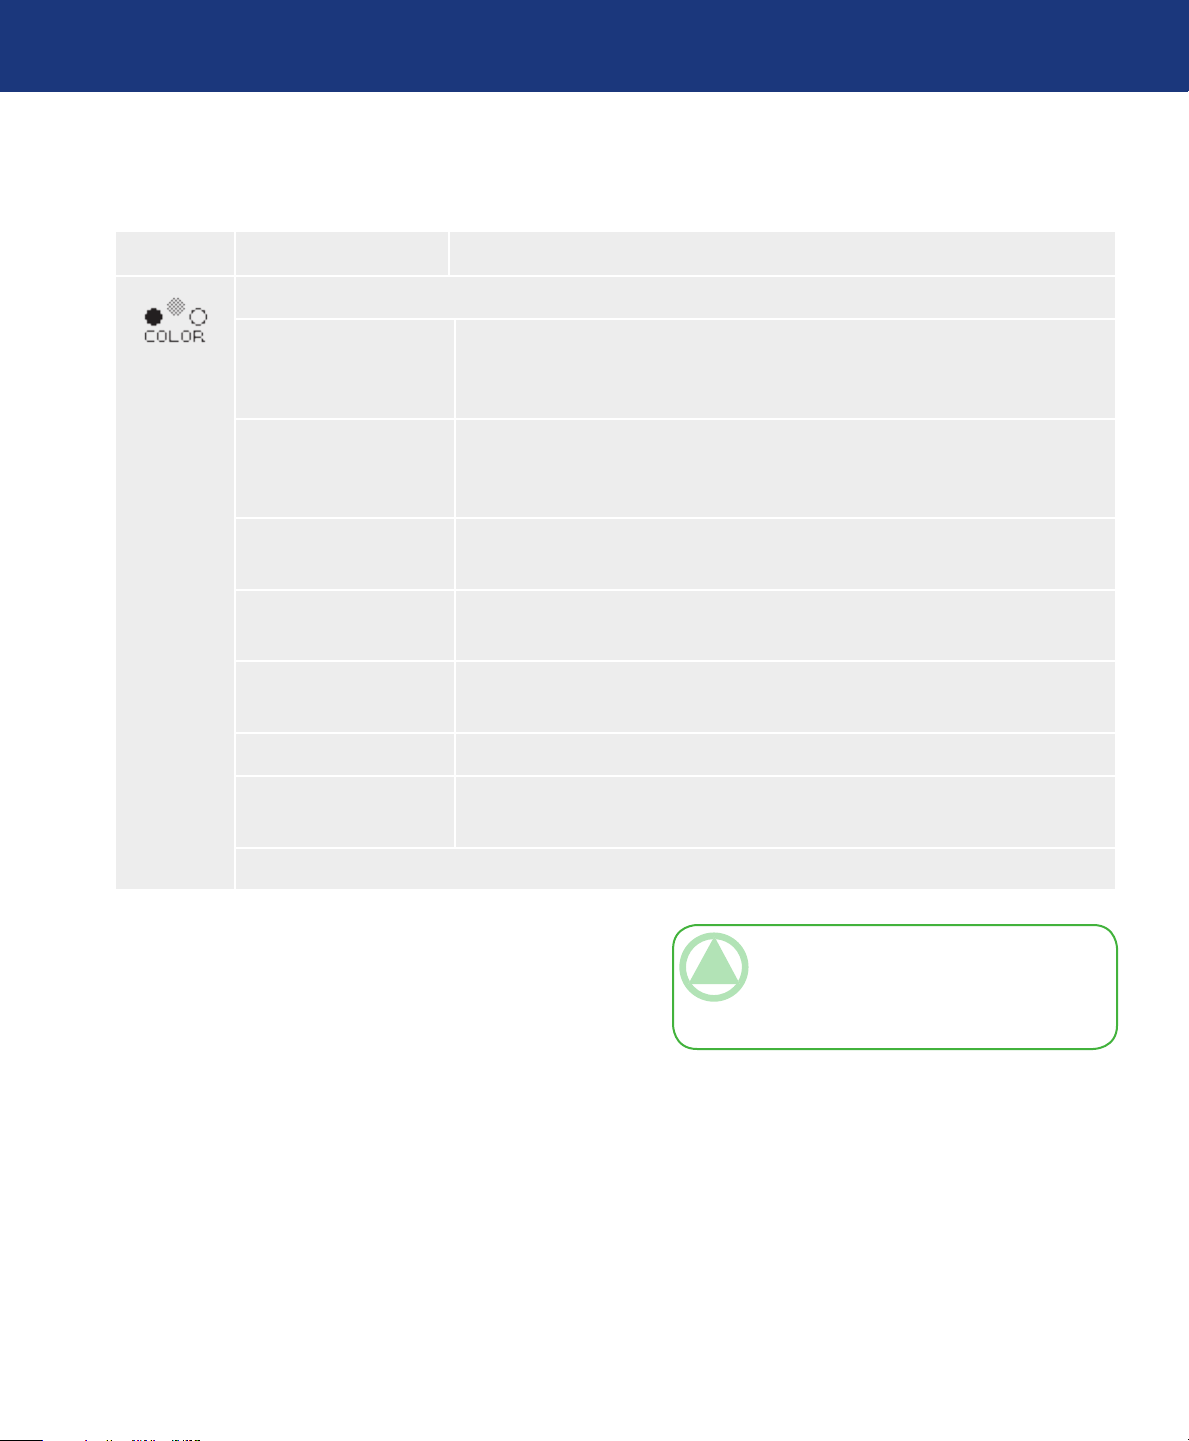
4.4. Color Control Systems
Symbol Menu title Explanation
For preset settings 1, 2, 3 and 5, the following levels can be adjusted:
TEMPERATURE Adjust the white temperature by increasing or decreasing this setting. A lower
OSD Control Button Functions
page 20
color temperature will make the screen reddish and a higher color temperature
will make the screen bluish.
WHITE (White Balance):
HUE Adjusts the hue of each color*1. e change in color will appear on screen and
SATURATION Adjusts the color depth of each color*1. Press the “RIGHT” button and the
OFFSET Adjusts the color brightness of each color*1. Press “RIGHT” button and the
NATIVE, sRGB Original color presented by the LCD panel that is not adjustable.
PROGRAMMABLE e color tone that was set up with the downloaded application software is
If TEMPERATURE needs further adjustment, the individual R/ G/ B/ levels
of the white point can be adjusted. To adjust the R/G/B levels, CUSTOM
must be showing as the TEMPERATURE selection.
the menu color bars will show the amount of adjustment.
color vividness increases.
color Brightness increases.
reflected.
1* RED, YELLOW, GREEN, CYAN, BLUE and MAGENTA
TeChNICAl NOTe: To reset a poor image set-
ting, turn on the monitor by using front power button while holding RESET and SELECT buttons
at the same time.
Page 21
LaCie 500 Series LCD Monitor
User Manual
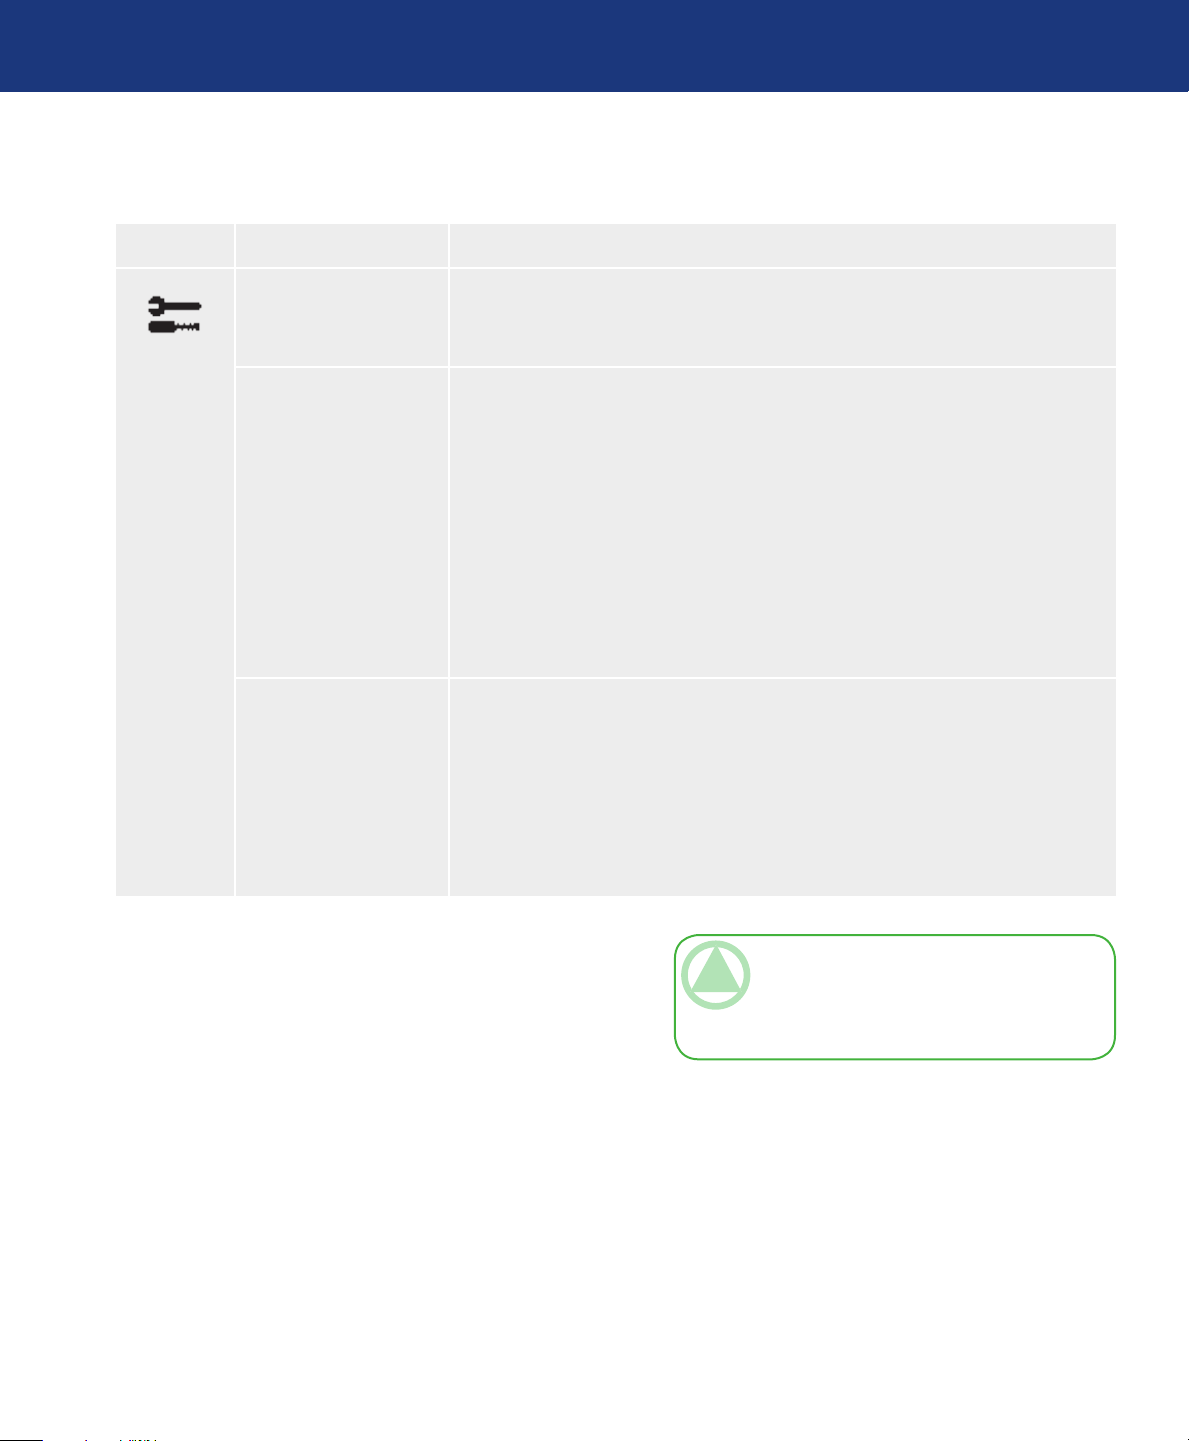
4.5. Tools 1
Symbol Menu title Explanation
SHARPNESS is function is digitally capable to keep crisp image at any timings. It is
DVI SELECTION is function selects the DVI input mode (DVI-I). When the DVI selection
OSD Control Button Functions
page 21
continuously adjustable to get distinct image or soft one as you prefer, and set
independently by different timings.
has been changed, the computer has to be restarted.
AUTO
By using the D-SUB to DVI-A cable, the DVI SELECTION is DIGITAL.
By using the DVI-D to DVI-D cable, the DVI SELECTION is ANALOG.
DIGITAL
DVI digital input is available.
ANALOG
DVI analog input is available.
HDCP CONTENT Selects the type of input to be used with HDCP CONTENT.
OFF
When a PC or other computer equipment is connected, select “OFF”.
ON
When a DVD player or other type of high definition device is connected, select
“ON”.
Technical noTe: Interlaced signals (480i,
576i, 1080i) are not supported. Please consult the
User’s Manual included with the device for assistance and detailed information.
(continued on next page)■
Page 22
LaCie 500 Series LCD Monitor
User Manual
OSD Control Button Functions
page 22
TeChNICAl NOTe: For the MAC with digital
output: Before turning on the MAC, the DVI Input
mode must be set to DIGITAL in “DVI SELECTION” of OSD by pressing SELECT button then
“CONTROL” button when the DVI signal cable is
connected to the DVI-I connector (DVI-I) of the
monitor. Otherwise the MAC may not turn on.
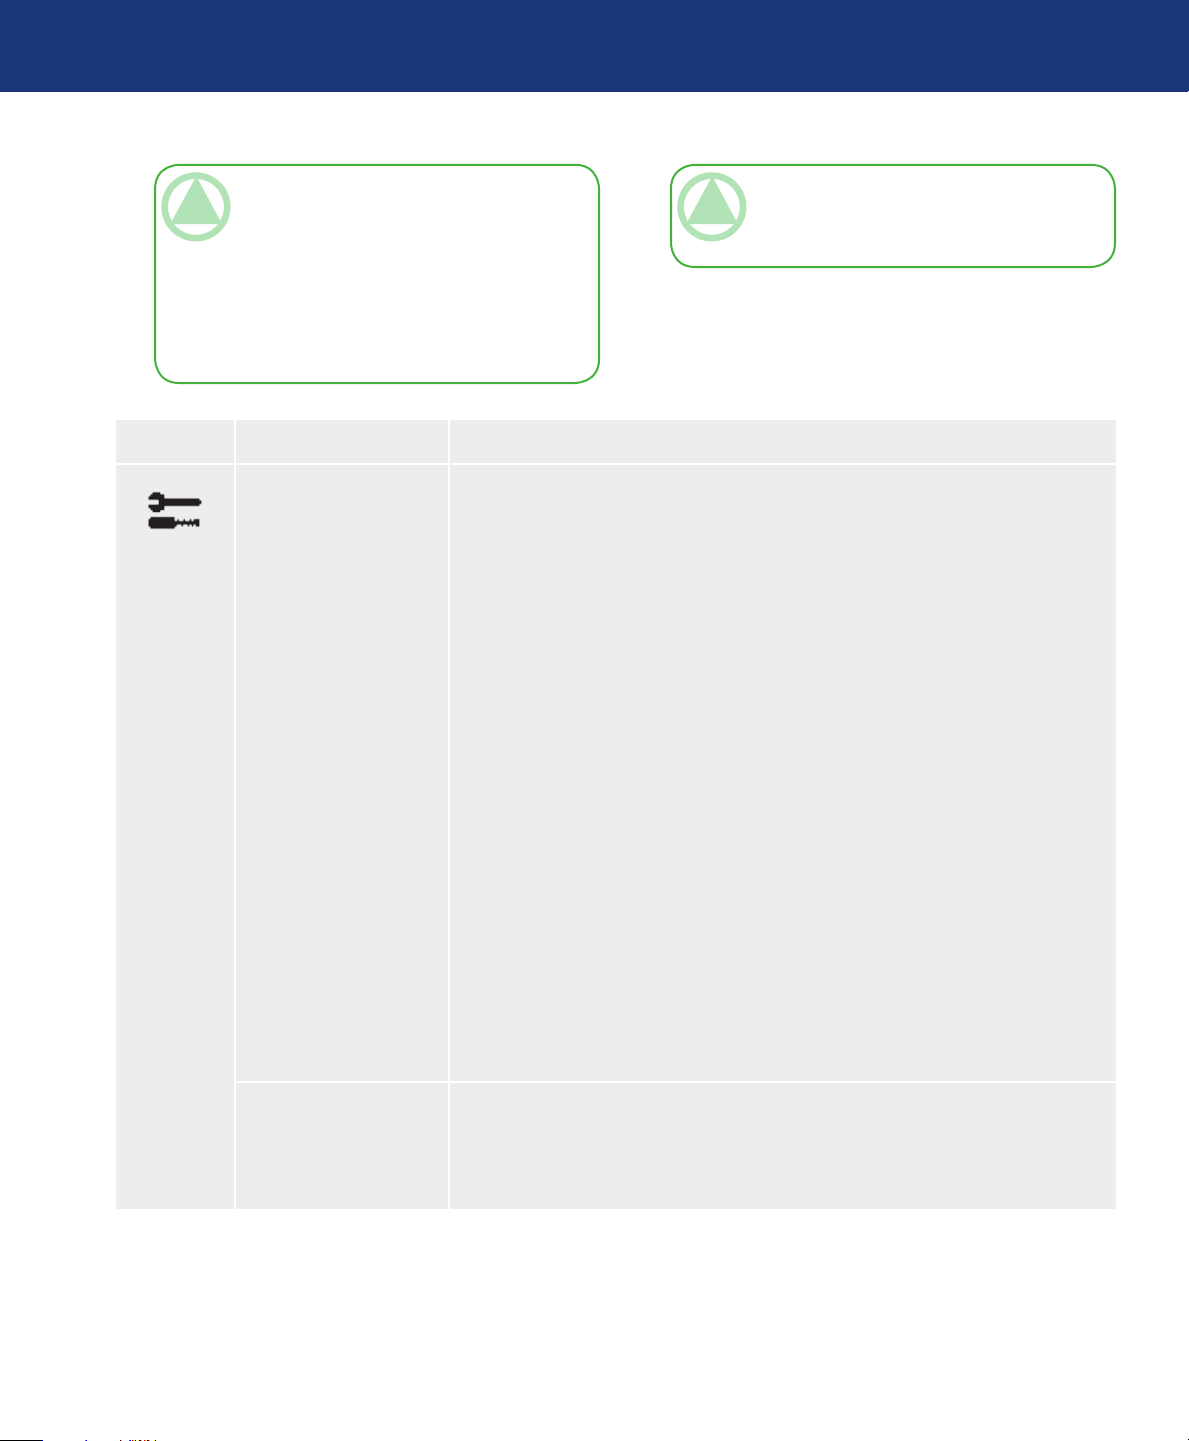
Symbol Menu title Explanation
VIDEO DETECT Selects the method of video detection when more than one computer is con-
nected.
FIRST
e video input has to be switched to FIRST mode. When current video input
signal is not present, then the monitor searches for a video signal from the
other video input port. If the video signal is present in the other port,
then the monitor switches the video source input port to the new found video
source automatically. e monitor will not look for other video signals while the
current video source is present.
TeChNICAl NOTe: Depending on the PC
and Video card used, or when another Video signal
cable is attached, this function may not operate.
LAST
e video input has to be switched to the LAST mode. When the monitor is
displaying a signal from the current source and a new secondary source is supplied to the monitor, then the monitor will automatically switch to
the new video source. When current video input signal is not present, then the
monitor searches for a video signal from the other video input port. If the video
signal is present in the other port, then the monitor switches the video source
input port to the new found video source automatically.
NONE
e Monitor will not search the other video input port unless the monitor is
turned on.
OFF TIMER Monitor will automatically power down when the user has selected a prede-
termined amount of time. Before powering off, a message will appear on the
screen asking if the user wants to delay the turnoff time by 60 minutes. Press
any OSD button to delay the turnoff time.
(continued on next page)■
Page 23
LaCie 500 Series LCD Monitor
User Manual
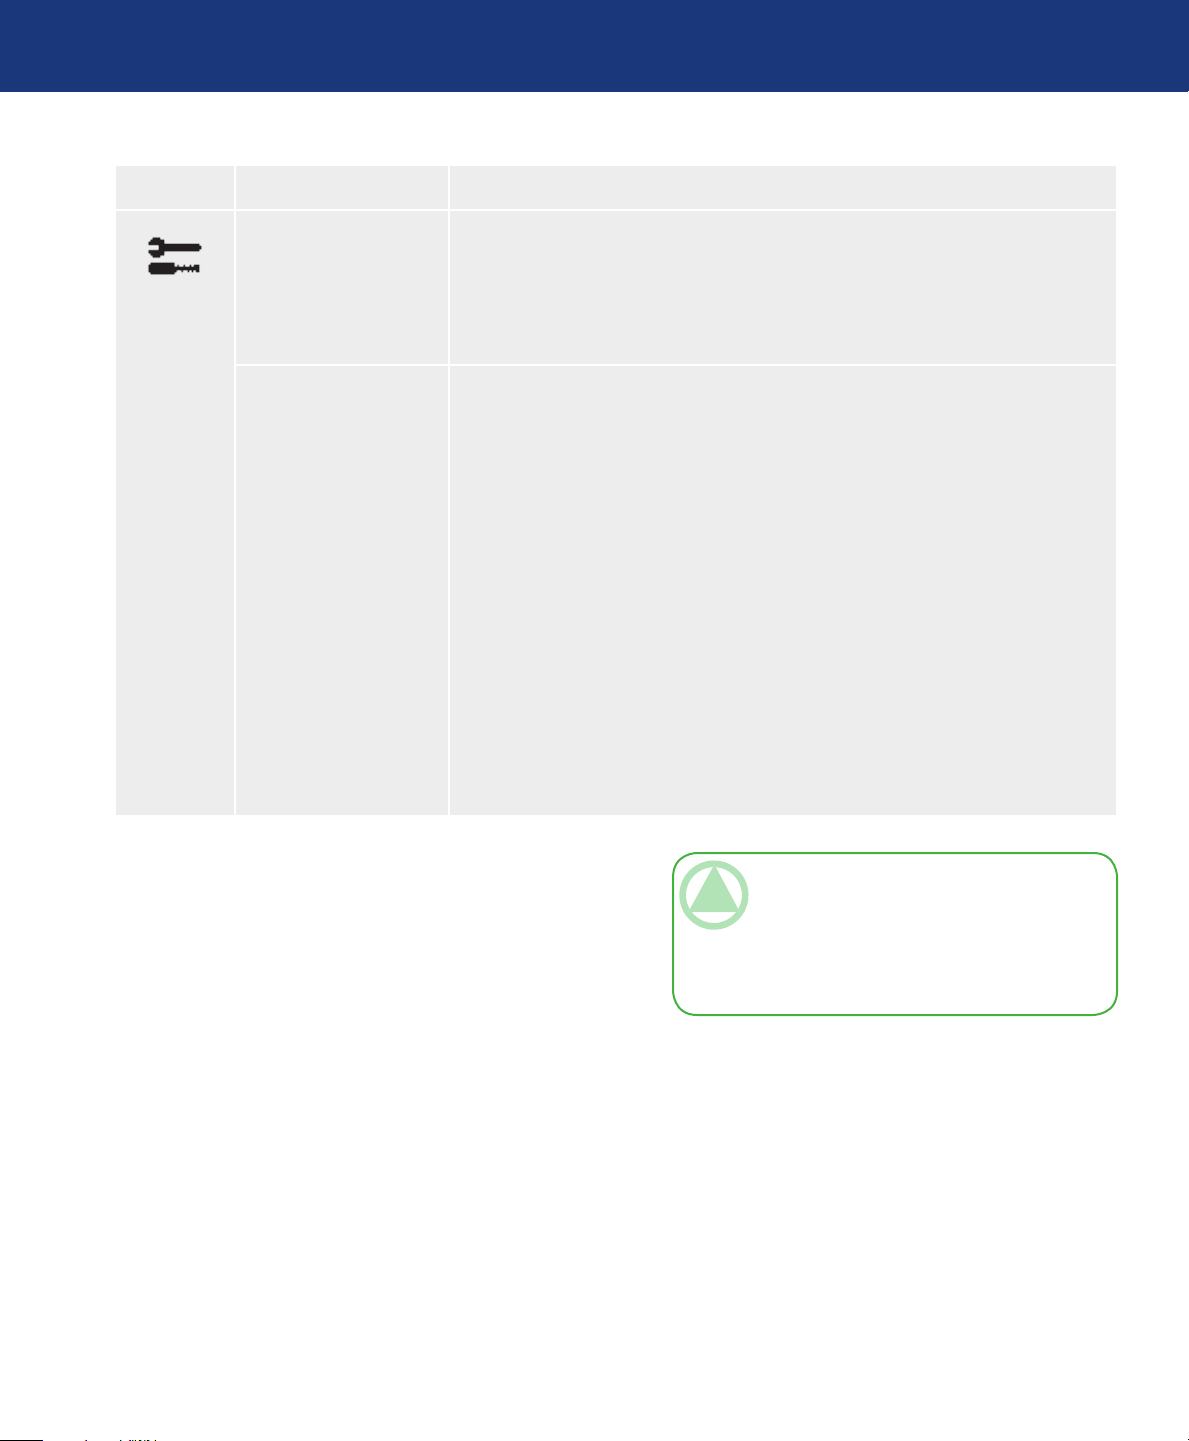
Symbol Menu title Explanation
UNIFORMITY is function electronically compensates for the slight variations in the white
POWER MANAGER e Power Manager allows the monitor to enter into a power saving mode after
OSD Control Button Functions
page 23
uniformity level, as well as for deviations in color that may occur throughout
the display area of the screen. ese variations are characteristic of LCD panel
technology. is function improves the color and evens out the luminance
uniformity of the display.
a period of inactivity. e Power Manager has three settings:
OFF
Monitor does not go into power save mode when the input signal is lost.
STANDARD
Monitor enters power save mode automatically when the input signal is lost.
OPTION
Monitor enters power save mode automatically when the amount of surrounding light goes below the level that is determined by the user. e level can be
adjusted in Tag 7 of the Advanced OSD Control menu. When in power save
mode, the LED on the front of the monitor blinks amber. While in power save
mode, push any of the front buttons, except for POWER and SELECT to
return to normal. When the amount of surrounding light returns to normal
levels, the monitor will automatically return to normal mode.
TeChNICAl NOTe: Using the UNIFOR-
MITY feature reduces the overall peak luminance
of the display. If greater luminance is desired over
the uniform performance of the display, then UNIFORMITY should be turned off.
Page 24
LaCie 500 Series LCD Monitor
User Manual
4.6. Menu Tools
Symbol Menu title Explanation
LANGUAGE OSD control menus are available in eight languages.
OSD LEFT/RIGHT You can choose where you would like the OSD control image to appear on your
OSD DOWN/UP You can choose where you would like the OSD control image to appear on your
OSD TURN OFF e OSD control menu will stay on as long as it is use. In the OSD Turn Off
OSD Control Button Functions
page 24
screen. Selecting OSD Location allows you to manually adjust the position of
the OSD control menu left or right.
screen. Selecting OSD Location allows you to manually adjust the position of
the OSD control menu Up or Down.
submenu, you can select how long the monitor waits after the last touch of a
button to shut off the OSD control menu. e preset choices are 10-120 seconds by 5 seconds step.
OSD LOCK OUT is control completely locks out access to all OSD control functions. When
attempting to activate OSD controls while in the Lock Out mode, a screen
will appear indicating the OSD controls are locked out. ere are four types of
OSD LOCK OUT:
OSD LOCK OUT with BRIGHTNESS and CONTRAST control:
To activate the OSD Lock Out function, press SELECT, then UP button and
hold down simultaneously. To deactivate the OSD Lock Out, press SELECT,
then UP button and hold down simultaneously while in the OSD menu.
BRIGHTNESS and CONTRAST can be adjusted while in the lock out mode.
OSD LOCK OUT with no control:
To activate the OSD Lock Out function, press SELECT, then RIGHT button
and hold down simultaneously. To deactivate the OSD Lock Out, press SELECT, then RIGHT button and hold down simultaneously while in the OSD
menu. No controls can be adjusted while in the lock out mode.
OSD LOCK OUT with BRIGHTNESS (only) control:
To activate the OSD Lock Out function, press SELECT, then DOWN and
LEFT buttons and hold down simultaneously. To deactivate the OSD Lock
Out, press SELECT, then DOWN and LEFT buttons and hold down simultaneously while in the OSD menu. BRIGHTNESS can be adjusted while in the
lock out mode.
CUSTOM:
Refer to the Advanced OSD Menu.
(continued on next page)■
Page 25
LaCie 500 Series LCD Monitor
User Manual
Symbol Menu title Explanation
OSD Control Button Functions
page 25
RESOLUTION
NOTIFIER
HOT KEY You can adjust the brightness and contrast directly. When this function is set
FACTORY PRESET Selecting Factory Preset allows you to reset all OSD control settings
4.7. Information
Symbol Explanation
is optimal resolution is 1920 x 1200. If ON is selected, a message will appear
on the screen after 30 seconds, notifying you that the resolution is not at 1920 x
1200.
to ON, you can adjust the brightness with LEFT or RIGHT , contrast with
DOWN or UP buttons, while the OSD menu is off. e standard OSD can
be accessed with the EXIT button.
(BRIGHTNESS, CONTRAST, BLACK LEVEL, IMAGE CONTROL,
COLOR CONTROL SYSTEM, SHARPNESS, POWER MANAGER,
OSD LEFT/RIGHT, OSD UP/DOWN, OSD TURN OFF,) back to the factory settings. Individual settings can be reset by highlighting the control to be
reset and pressing the RESET button.
Provides information about the current resolution display and technical data including the preset timing
being used and the horizontal and vertical frequencies. Indicates the model and serial numbers of your
monitor.
Page 26
LaCie 500 Series LCD Monitor
OSD Control Button Functions
User Manual
4.8. OSD Warnings
Explanation
OSD Warning menus disappear with EXIT button.
NO SIGNAL
is function gives a warning when there is no Horizontal or Vertical Sync. After power is turned on or when there is a
change of input signal, the No Signal window will appear.
RESOLUTION NOTIFIER
is function gives a warning of use with optimized resolution. After power is turned on or when there is a change of
input signal or the video signal doesn’t have proper resolution, the Resolution Notifier window will open.
OUT OF RANGE
is function gives a recommendation of the optimized resolution and refresh rate. After the power is turned on or there
is a change of input signal or the video signal doesn’t have proper timing, the Out Of Range menu will appear.
page 26
PORTRAIT WARNING
When the monitor is used in the portrait position, the brightness value will be reduced to 300 cd/m2. If the Portrait
Warning is ON, a message will appear on the screen for 10 seconds.
LUMINANCE WARNING
When the backlight cannot display the desired luminance, a message will appear on the display. To avoid this, reduce the
BRIGHTNESS level or set the AUTO LUMINANCE function to OFF (page 27, TAG1).
Technical noTe: It is possible to change
the DVI SELECTION, to change the IPM or to
change the HDCP CONTENT settings while the
“NO SIGNAL” or “OUT OF RANGE” messages
are displayed.
4.9. Advanced Menu Functions
To make an adjustment, ensure that the tag is high-
To access the advanced menu:
Turn off your monitor.
1.
Turn on your monitor by pushing the POWER
2.
and SELECT button simultaneously for at least
one second. en press any of the control buttons
(MENU/EXIT, LEFT, RIGHT, UP, DOWN).
You will see the Advanced menu. is menu is larger
3.
than the normal OSD.
4.
lighted, then press SELECT. To move to another
tag, press EXIT , then press LEFT or RIGHT to
highlight another tag.
To exit the advanced menu turn off and restart your
monitor in the normal way.
Page 27

LaCie 500 Series LCD Monitor
User Manual
Tag Menu title Explanation
Tag1 Brightness Adjusts the overall image and screen background brightness.
Press “Left” or “Right” to adjust.
When AUTO LUMINANCE is OFF or 2, the brightness level is adjusted/measured using percentage (%).
When AUTO LUMINANCE is 1 or 3, brightness level is adjusted/measured using cd/m2. is is the “Estimated Brightness” level.
Contrast Adjusts the image brightness and contrast in relation to the background. Press
LEFT or RIGHT to adjust.
OSD Control Button Functions
page 27
Auto Contrast
(Analog input only)
Auto Black Level
(Analog input only)
Auto Brightness Auto Brightness has three settings.
Black Level Allows you to manually adjust the black level. Press LEFT or RIGHT to adjust.
Auto Luminance Stabilizes the luminosity and colour of the image. While the BRIGHTNESS level
Adjusts the image displayed for non-standard video inputs. Press SELECT to
adjust. Any adjustment requires the image to have white portions.
Automatically adjusts the black level. Any adjustment requires the image to have
black portions. Press SELECT to activate Auto Adjust.
OFF: No function.
1: Adjusts the brightness automatically, by detecting the brightness level of your
environment and adjusting the monitor with your BRIGHTNESS setting.
2: Adjusts the brightness automatically for the best BRIGHTNESS setting based
on the white display area.
is adjusting, the numerical value blinks
OFF: No function
1: Stabilize Luminance
2: Stabilize Colour
3: Stabilize Luminance and colour
noTe: e AUTO LUMINANCE function is only available when “AUTO
BRIGHTNESS” is OFF.
When “AUTO LUMINANCE” is 1 or 3, maximum value of the Brightness level
is limited.
When AUTO LUMINANCE is OFF or 2, the brightness level is adjusted/measured using percentage (%).
Low Bright Mode Reduce the brightness by about half.
If user wants a lower brightness than the level that is set in the BRIGHTNESS
setting, select “ON”.
noTe: When PROGRAMABLE is set for the Gamma Selection (tag5), LOW
BRIGHT MODE is disabled.
(continued on next page)■
Page 28
LaCie 500 Series LCD Monitor
User Manual
Tag Menu title Explanation
OSD Control Button Functions
page 28
Tag2 R-H.position
(Analog input only)
G-H.position
(Analog input only)
B-H.position
(Analog input only)
R-FINE
(Analog input only)
G-FINE
(Analog input only)
B-FINE
(Analog input only)
R-SHARPNESS
(Analog input only)
G-SHARPNESS
(Analog input only)
B-SHARPNESS
(Analog input only)
Adjusts the position of the red component of the image. Press LEFT or RIGHT
to adjust.
Adjusts the position of the green component of the image. Press LEFT or
RIGHT to adjust.
Adjusts the position of the blue component of the image. Press LEFT or RIGHT
to adjust.
Adjusts the FINE setting of the RED component of the image. Press LEFT or
RIGHT to adjust.
Adjusts the FINE setting of the GREEN component of the image. Press LEFT
or RIGHT to adjust.
Adjusts the FINE setting of the BLUE component of the image. Press LEFT or
RIGHT to adjust.
Adjusts the sharpness of the red component of the image. Press LEFT or RIGHT
to adjust.
Adjusts the sharpness of the green component of the image. Press LEFT or
RIGHT to adjust.
Adjusts the sharpness of the blue component of the image. Press LEFT or
RIGHT to adjust.
DVI Long Cable
(Digital input only)
Compensates for image degradation caused by using a long DVI cable. ere are
4 possible settings, with “0” being the lowest level of compensation and “3” being
the highest level. e default setting is “1”.
Page 29
LaCie 500 Series LCD Monitor
User Manual
Tag Menu title Explanation
OSD Control Button Functions
page 29
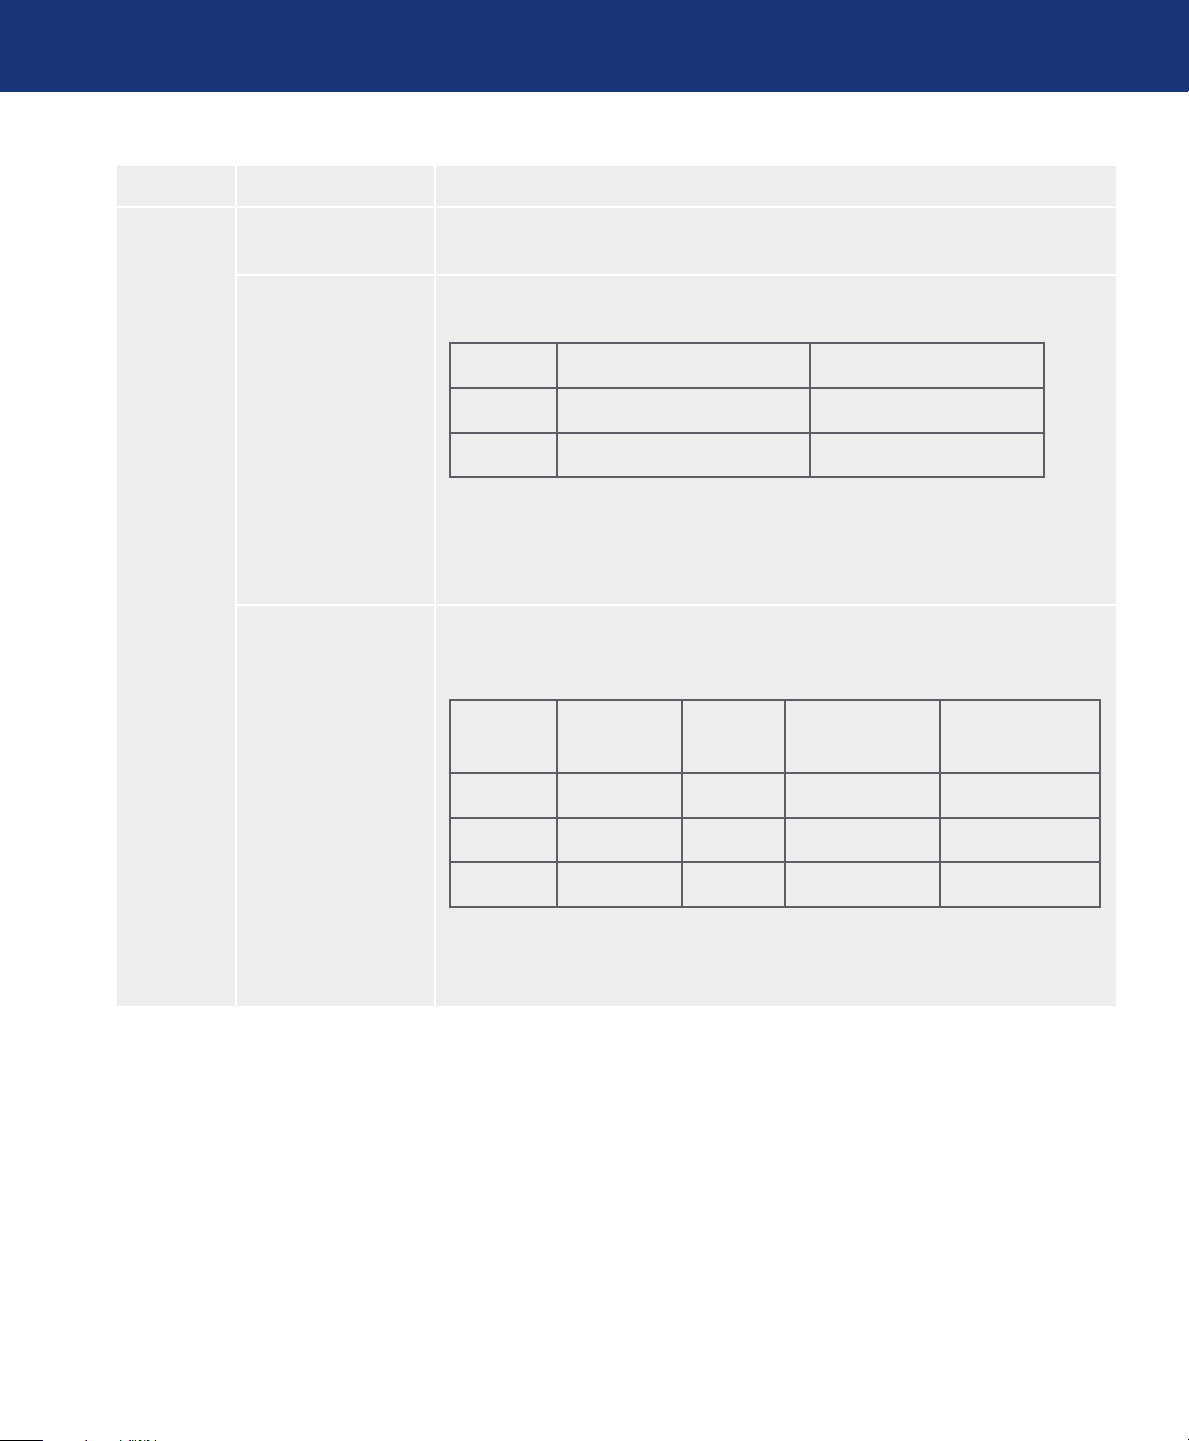
Tag3 Auto Adjust
(Analog input only)
Signal Adjust
(Analog input only)
Auto Adjust Level
(Analog input only)
Automatically adjusts the Image Position and H.Size settings and Fine settings.
Press SELECT to activate Auto Adjustment.
Determines when the auto adjustment is activated automatically. e choices are
SIMPLE and FULL. Press LEFT or RIGHT to select.
H-size, Fine, H/V Position Contrast
SIMPLE
FULL
O = Automatic adjustment
X = No automatic adjustment
NOTE: Automatic Adjustment does not work at resolutions less than 800x600 resolution.
Determines the automatic adjustment level for Auto Adjust. e choices are
SIMPLE, FULL and DETAIL. Press LEFT or RIGHT to select. Refer to the
below table.
SIMPLE
O X
O O
Size, Fine,
Position
O X X 1 second
Contrast Black level Time
FULL
DETAIL
O = Automatic adjustment
X = No automatic adjustment
O O X 1.5 seconds
O O O 5 seconds
Page 30

LaCie 500 Series LCD Monitor
User Manual
Tag Menu title Explanation
OSD Control Button Functions
page 30
Tag3 A-NTAA SW (ana-
log only)
Tag4 H. Position Controls Horizontal Image Position within the display area of the LCD. Press
V. Position Controls Vertical Image Position within the display area of the LCD. Press
e Advanced No Touch Auto Adjust function is able to recognize new signals
even when neither the resolution nor the refresh rate has changed. If several PCs
are connected to the monitor, and each transmit very similar (or even the same)
signals in terms of resolution and refresh rates, the monitor recognizes that there
is a new signal and automatically optimizes the picture without the need for any
action on the part of the user.
OFF: A-NTAA is disabled.
ON: If a change in signal is detected A-NTAA will adjust the monitor to the
optimal settings for the new signal. If no change in the signal is detected then
A-NTAA does not activate. e screen will be blank while the monitor optimizes
the signal.
LEFT or RIGHT to adjust.
LEFT or RIGHT to adjust.
Page 31

LaCie 500 Series LCD Monitor
User Manual
Tag Menu title Explanation
OSD Control Button Functions
page 31
Tag4 H. Size
(Analog input only)
Fine
(Analog input only)
Auto Fine
(Analog input only)
H. Resolution Adjusts the horizontal size by increasing or decreasing the setting. Press RIGHT
V. Resolution Adjusts the vertical size by increasing or decreasing the setting. Press RIGHT
Adjusts the horizontal size of the screen. If the “AUTO Adjust function” do not
give you a satisfactory picture setting, a further tuning can be performed using
the “H.Size (V.Size)” function (dot clock). For this a Moiré test pattern could be
used. is function may alter the width of the picture. Use left/Right Menu to
center the image on the screen. If the H.Size (V.Size) is wrongly calibrated, the
result would look like on the left drawing. e image should be homogeneous.
Improve focus, clarity and image stability by increasing or decreasing this setting.
If the “Auto Adjust function” and the “H.Size” function do not give you a satisfactory picture setting, a fine tuning can be performed using the FINE function. For this a Moiré test pattern could be used. If the Fine value is wrongly
calibrated, the result would look like on the left drawing. e image should be
homogeneous.
is function automatically and periodically adjusts the FINE setting for change
in signal condition. is function adjusts approximately every 33 minutes or
when a change in signal timing is detected.
button to expand the width of the image on the screen. Press LEFT button to
narrow the width of the image on the screen.
button to expand the height of the image on the screen. Press LEFT button to
narrow the height of the image on the screen.
Expansion Sets the zoom method.
FULL: e image is expanded to 1920 x 1200 regardless of the resolution.
ASPECT: e image is expanded without changing the aspect ratio.
OFF: e image is not expanded.
CUSTOM: When CUSTOM is selected as the Expansion mode, it becomes
possible to adjust the H. ZOOM., V. ZOOM, and ZOOM POS.
H.ZOOM
(Available in Expansion mode only)
V.ZOOM
(Available in Expansion mode only)
e image is expanded from 1 to 3 times in the horizontal (H. EXPANSION)
direction by 0.01 increments.
e image is expanded from 1 to 3 times in the vertical (V. EXPANSION)
direction by 0.01 increments.
Page 32

LaCie 500 Series LCD Monitor
User Manual
Tag Menu title Explanation
OSD Control Button Functions
page 32
Tag4 ZOOM POS.
(Available in Expansion mode only)
Tag5 Gamma Selection Allows you to manually select the brightness level of grayscale. ere are five selec-
Sets the point from which the screen will be expanded when either H.ZOOM or
V.ZOOM is Custom selected as the expansion method. Options are CENTER
and LEFT TOP.
CENTER: H.ZOOM expands the image from the centre outward to the sides
of the screen.
V.ZOOM expands the image from the centre towards the top and bottom of the
screen.
LEFT TOP: Indicates the set point for image expansion (TOP in V. Zoom,
LEFT in H.ZOOM). If the resolution does not fill out the screen, when expanding, the image will not expand past the TOP or the LEFT of the screen. e
image can be expanded past the right and bottom edges of the screen.
tions: NO CORRECTION, 2.2, OPTION, PROGRAMMABLE and CUSTOM.
NO CORRECTION: No Correction possible.
2.2: e value is fixed at 2.2.
OPTION: ere are two ways of OPTION selection.
1: is setting is recommended for Video source. Gray area looks much brighter
than NO CORRECTION setting.
2: e value near DICOM gamma is set up in a factory and the luminosity dif-
ference between gradations is changing into the legible state.
PROGRAMMABLE: e brightness of grayscale can be changed to your preference using blue eye pro software.
CUSTOM: Below items can be adjusted when CUSTOM is selected as the
GAMMA SELECTION setting.
Custom Value: e gamma value is selected from the rate of 0.5 to 4.0 by 0.1 steps.
When the COLOR CONTROL is sRGB, the value is fixed at 2.2 and NOT
ADJUSTABLE.
Offset: e OFFSET digitally adjusts the black level after the signal is converted
from analog to digital.
(continued on next page)■
Page 33

LaCie 500 Series LCD Monitor
User Manual
Tag Menu title Explanation
Tag6 Color Control Colour Control Systems: Seven preset color settings.
For preset settings 1, 2, 3 and 5, the following levels can be adjusted:
TEMPERATURE: Adjust the white temperature by increasing or decreasing this setting. A lower colour temperature will make the screen reddish and a
higher colour temperature will make the screen bluish.
WHITE (White Balance): If TEMPERATURE needs further adjustment; the
individual R/ G/ B/ levels of the white point can be adjusted. To adjust the R/G/
B levels, CUSTOM must be showing as the TEMPERATURE selection.
HUE: Adjusts the hue of each colour*1. e change in colour will appear on
screen and the menu colour bars will show the amount of adjustment.
SATURATION: Adjusts the colour depth of each colour*1. Press the “RIGHT”
button and the colour vividness increases.
OFFSET: Adjusts the colour brightness of each colour*1. Press “RIGHT” button
and the colour Brightness increases.
*1: RED, YELLOW, GREEN, CYAN, BLUE and MAGENTA.
NATIVE, sRGB: Original colour presented by the LCD panel that is unadjustable.
PROGRAMMABLE: e colour tone that was set up with the downloaded application software is reflected.
OSD Control Button Functions
page 33
Tag7 Sharpness is is a digital capability for keeping a crisp image at all signal timings. It
continuously adjusts to maintain a distinct or soft image as you prefer, and is set
independently according to different timings. Press LEFT or RIGHT to adjust.
DVI Selection is function selects the DVI input mode. When the DVI selection has been
changed, you must restart your computer. Press LEFT or RIGHT to select.
AUTO: By using the DVI-D to DVI-D cable, the DVI SECTION is DIGITAL.
By using the D-SUB to DVI-A cable, the DVI SECTION is ANALOG.
DIGITAL: DVI digital input is available.
ANALOG: DVI analog input is available.
HDCP Content
(Digital Input Only)
Selects the type of input to be used with HDCP CONTENT.
OFF: When a PC or other computer equipment is connected, select “OFF”.
ON: When a DVD player or other type of high definition device is connected,
select “ON”.
noTe: Interlaced signals (480i, 576i, 1080i) are not supported.
(continued on next page)■
Page 34

LaCie 500 Series LCD Monitor
OSD Control Button Functions
User Manual
Tag Menu title Explanation
Tag7 Video Detect Selects the method of video detection when more than one computer is con-
nected.
Press LEFT or RIGHT to select.
FIRST: e video input has to be switched to FIRST mode. When current video
input signal is not present, then the monitor searches for a video signal from
the other video input port. If the video signal is present in the other port, then
the monitor switches the video source input port to the new found video source
automatically. e monitor will not look for other video signals while the current
video source is present.
LAST: e video input has to be switched to the LAST mode. When the monitor is displaying a signal from the current source and a new secondary source is
supplied to the monitor, then the monitor will automatically switch to the new
video source. When current video input signal is not present, then the monitor
searches for a video signal from the other video input port. If the video signal is
present in the other port, then the monitor switches the video source input port
to the new found video source automatically.
NONE: e Monitor will not search the other video input port unless the monitor is turned on.
page 34
Off Timer Monitor will automatically turn off after the preset time period from power on
with the ON/OFF function. When you select ON, press SELECT and LEFT
or RIGHT to adjust. Before powering off, a message will appear on the screen
asking the user if they want to delay the turn off time by 60 minutes. Press any
OSD button to delay the turn off time.
Power Manager e Power Manager allows the monitor to enter into a power saving mode after
Manager) a period of inactivity. e Power Manager has three settings.
OFF: Monitor does not go into power save mode when the input signal is lost.
STANDARD: Monitor enters power save mode automatically when the input
signal is lost.
OPTION: Monitor enters power save mode automatically when the amount of
surrounding light goes below the level that is determined by the user.
Power Manager Adjust Adjusts the luminance value for Power Manager.
Over Speed Turns the OVER SPEED function on or off. Over Speed may reduce blurring
that occurs in some moving images. When Over Speed is on, response time is
lower.
Side Border Color Adjusts the side black bars color between black and white. For wide aspect monitors.
LED Brightness Controls the brightness of the LED on the monitor.
(continued on next page)■
Page 35
LaCie 500 Series LCD Monitor
OSD Control Button Functions
User Manual
Tag Menu title Explanation
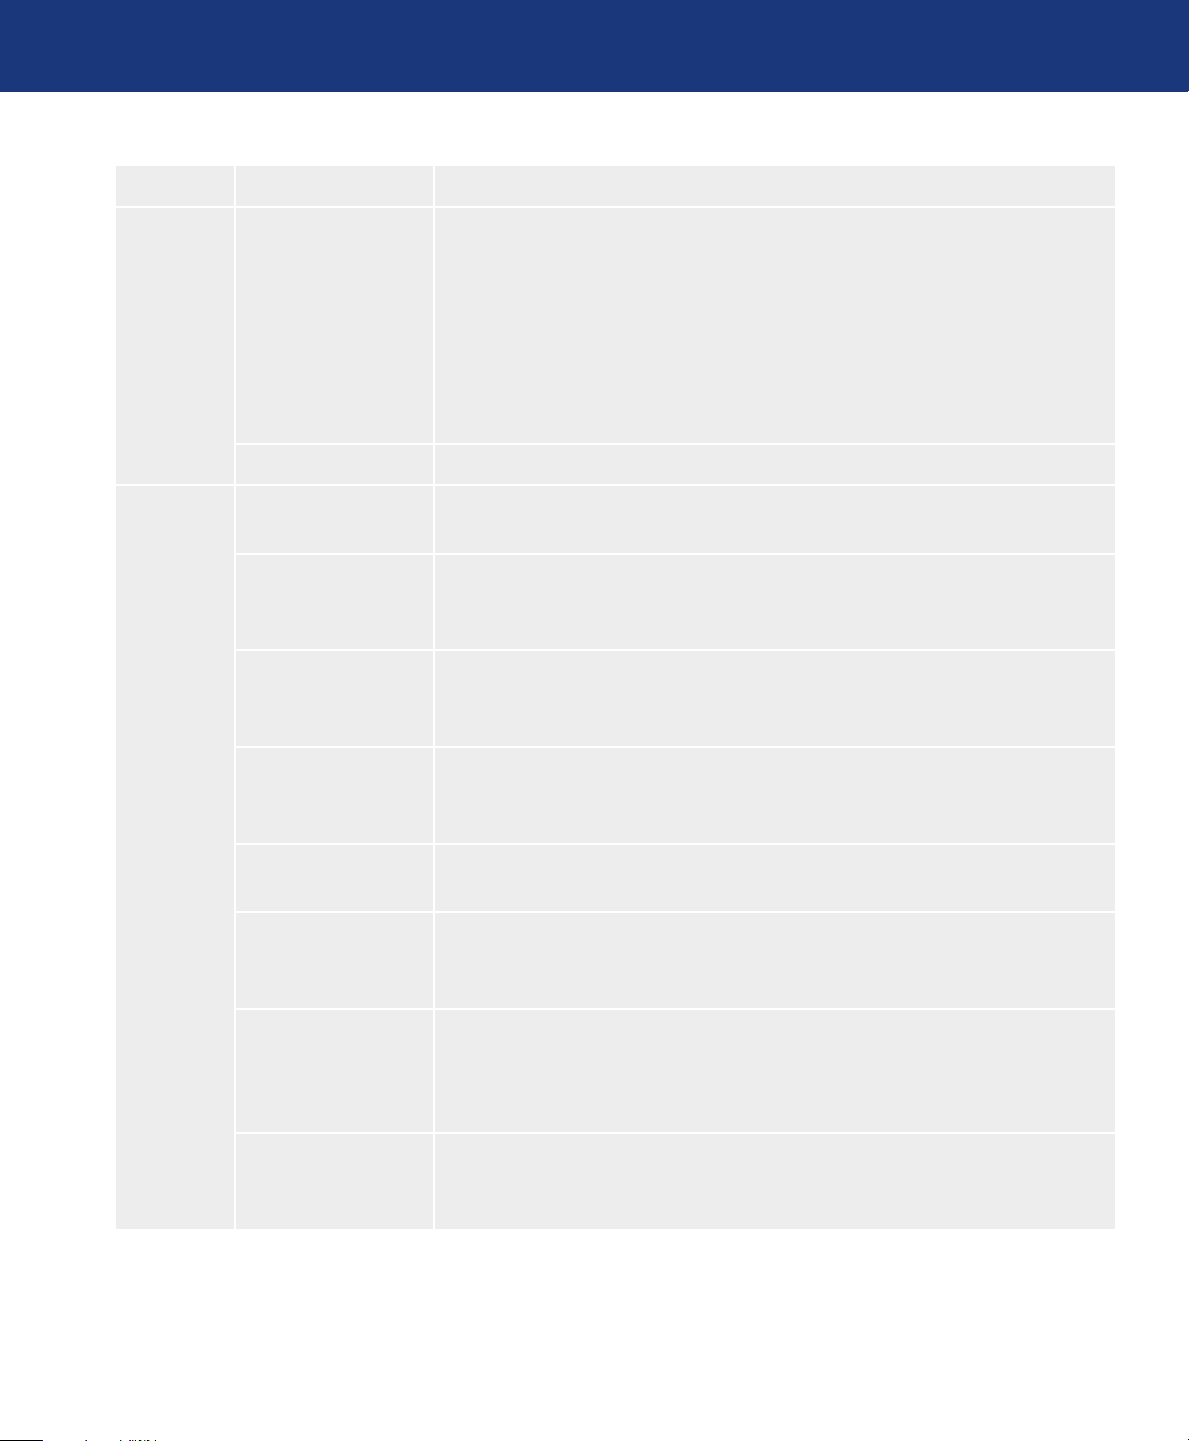
Tag7 Uniformity is function electronically compensates for the slight variations in the white
uniformity level as well as for deviations in color that may occur throughout the
display area of the screen. ese variations are characteristic of LCD panel technology. is function improves the color and evens out the luminance uniformity
of the display.
NOTE: Using the UNIFORMITY feature does reduce the overall peak luminance of the
display. If greater luminance is desired over the uniform performance of the display, then
UNIFORMITY should be turned off.
Uniformity Level Select the level for UNIFORMITY adjustments.
Tag8 Language OSD control menus are available in eight languages. Press LEFT or RIGHT to
select.
OSD H. Position You can choose where you would like the OSD control image to appear on your
screen. Selecting OSD Location allows you to manually adjust the position of the
OSD control menu left or right.
page 35
OSD V. Position You can choose where you would like the OSD control image to appear on your
screen. Selecting OSD Location allows you to manually adjust the position of
the OSD control menu up or down.
OSD Turn off e OSD control menu will stay on as long as it is use. In the OSD Turn Off submenu,
you can select how long the monitor waits after the last touch of a button to shut off the
OSD control menu. e preset choices are 10-120 seconds by 5 seconds step.
Signal Information Signal information can be displayed in the corner of the screen. Signal information is
either ON or OFF”.
Resolution Notifier e optimal resolution is 1920 x 1200. If ON is selected, a message will appear on the
screen after 30 seconds, notifying you that the resolution is not set to 1920 x 1200. Press
LEFT or RIGHT to select.
Hot Key When this function is activated; the brightness and contrast of the monitor can be
adjusted without entering the OSD menu by using the front buttons. e LEFT or
RIGHT buttons adjust the brightness level. e DOWN or UP buttons adjust the
contrast level.
Factory Preset Selecting Factory Preset allows you to reset all OSD control settings back to the factory
settings. Highlighting the control to be reset and pressing the RESET button can reset
individual settings.
(continued on next page)■
Page 36

LaCie 500 Series LCD Monitor
OSD Control Button Functions
User Manual
Tag Menu title Explanation
Tag8 OSD Lock Out is control completely locks out access to all OSD control functions. When at-
tempting to activate OSD controls while in the Lock Out mode, a screen will appear
indicating the OSD controls are locked out. ere are three types of OSD LOCK
OUT:
OSD LOCK OUT with BRIGHTNESS and CONTRAST control: To activate
the OSD Lock Out function, press SELECT, then UP button and hold down
simultaneously. To deactivate the OSD Lock Out, press SELECT, then UP button and hold down simultaneously while in the OSD menu. BRIGHTNESS and
CONTRAST can be adjusted while in the lock out mode.
OSD LOCK OUT with no control: To activate the OSD Lock Out function,
press SELECT, then RIGHT button and hold down simultaneously. To deactivate the OSD Lock Out, press SELECT, then RIGHT button and hold down
simultaneously while in the OSD menu. No controls can be adjusted while in the
lock out mode.
OSD LOCK OUT with BRIGHTNESS (only) control: To activate the OSD
Lock Out function, press SELECT, then DOWN and LEFT buttons and hold
down simultaneously. To deactivate the OSD Lock Out, press SELECT, then
DOWN and LEFT buttons and hold down simultaneously while in the OSD
menu. BRIGHTNESS can be adjusted while in the lock out mode.
CUSTOM: Press RESET and EXIT to enter the CUSTOM Menu. Select ENABLE or DISABLE for POWER KEY, INPUT SEL, HOT KEY, BRIGHTNESS/CONTRAST, WARNING, RESOLUTION NOTIFIER/OSD LOCK
OUT. To Deactivate the OSD Lock Out function, press RESET and EXIT to
bring up the LOCK OUT warning. Press SELECT, SELECT, <, >, <, >, EXIT.
page 36
Tag9 OSD Rotation AUTO: e OSD rotates automatically when the monitor is rotated. OSD RO-
TATION is set to AUTO by default.
MANUAL: To rotate the OSD, press the ROTATE OSD button when the
OSD is not showing.
Image Rotation AUTO: e display image automatically rotates according to the orientation of
the OSD. If AUTO is selected in the OSD ROTATION menu, the display image rotates according to the orientation of the monitor.
OFF: e display image is not rotated. IMAGE ROTATION is set to OFF by default.
ON: e display image always rotated.
Portrait Warning When the monitor is used in the portrait position, the brightness value will be
reduced to 300 cd/m2 maximum. If the Portrait Warning is ON, a message will
appear on the screen for 10 seconds.
DDC/CI DDC/CI ENABLE/DISABLE: Turns on or off the two way communication
and control of the monitor.
(continued on next page)■
Page 37

LaCie 500 Series LCD Monitor
User Manual
Tag Menu title Explanation
Tag9 Screen Saver Use the SCREEN SAVER to reduce the risk of image persistence.
MOTION (Default OFF): Screen image moves periodically in 4 directions in
order to reduce the risk of image retention. Timing for MOTION can be set so
the screen image moves in intervals from every 10 to 900 seconds. Timing is set
in 10-second increments.
OPTION (Default REDUCED): ere are two optional selections.
REDUCED: Screen image is reduced to 95% size and is moved periodically in
4 directions. Screen may appear slightly less sharp than normal. e full image
appears on the display.
FULL: Screen image is set to FULL and is moved periodically in 4 directions.
Screen image goes outside of the display area in the direction that it shifts so
that a portion of the image may appear to be cut off. GAMMA (Default OFF):
When OFF, the GAMMA selection that the display uses is the same as the
GAMMA selection in Tag5.
When ON is selected, the GAMMA curve (except PROGRAMMABLE)
becomes narrow, reducing the contrast and cutting down the risk of image retention.
noTe: SCREEN SAVER does not function when the TILING function is
enabled.
page 37
Input Setting Video Band Width (Analog input only): It is used when the unnecessary noise
from computer appears on a screen. It is strong ineffective, so that a number
becomes small. Press LEFT or RIGHT to select.
Sync reshold (Analog input only): Adjusts the slice level of a synchronization
signal. Press SELECT to move the adjustment menu. Adjusts the sensitivity of
the separate or composite input signals. Try this option if the FINE adjustment
does not successfully eliminate the noise.
SOG reshold (Analog input only): Adjusts the sensitivity of the Sync On
Green input signals. Adjusts the slice level when separating synchronization from
sync On Green signal input. Press LEFT or RIGHT to select.
CLAMP POSITION: Operating your monitor at a non-standard timing may
cause images to appear darker than normal or have color distortion. Use of the
CLAMP POSITION control will adjust images to their normal state.
Page 38
LaCie 500 Series LCD Monitor
Monitor 1
Monitor 2
Monitor 3
Monitor 4
Monitor 1
Monitor 2
Monitor 3
Monitor 4
User Manual
Tag Menu title Explanation
TagA Tiling Tiling demonstrates multiple screens. is feature provides a single large screen
using up to 25 monitors. It will be able to divide up to 5 each H and V.
is requires you to feed the PC output into each of the monitors through a
distributor.
ENABLE: Select “ON”, the monitor will expand the selected position.
H MONITORS: Select number of horizontal divide.
V MONITORS: Select number of vertical divide.
MONITOR NO: Select a position to expand the screen.
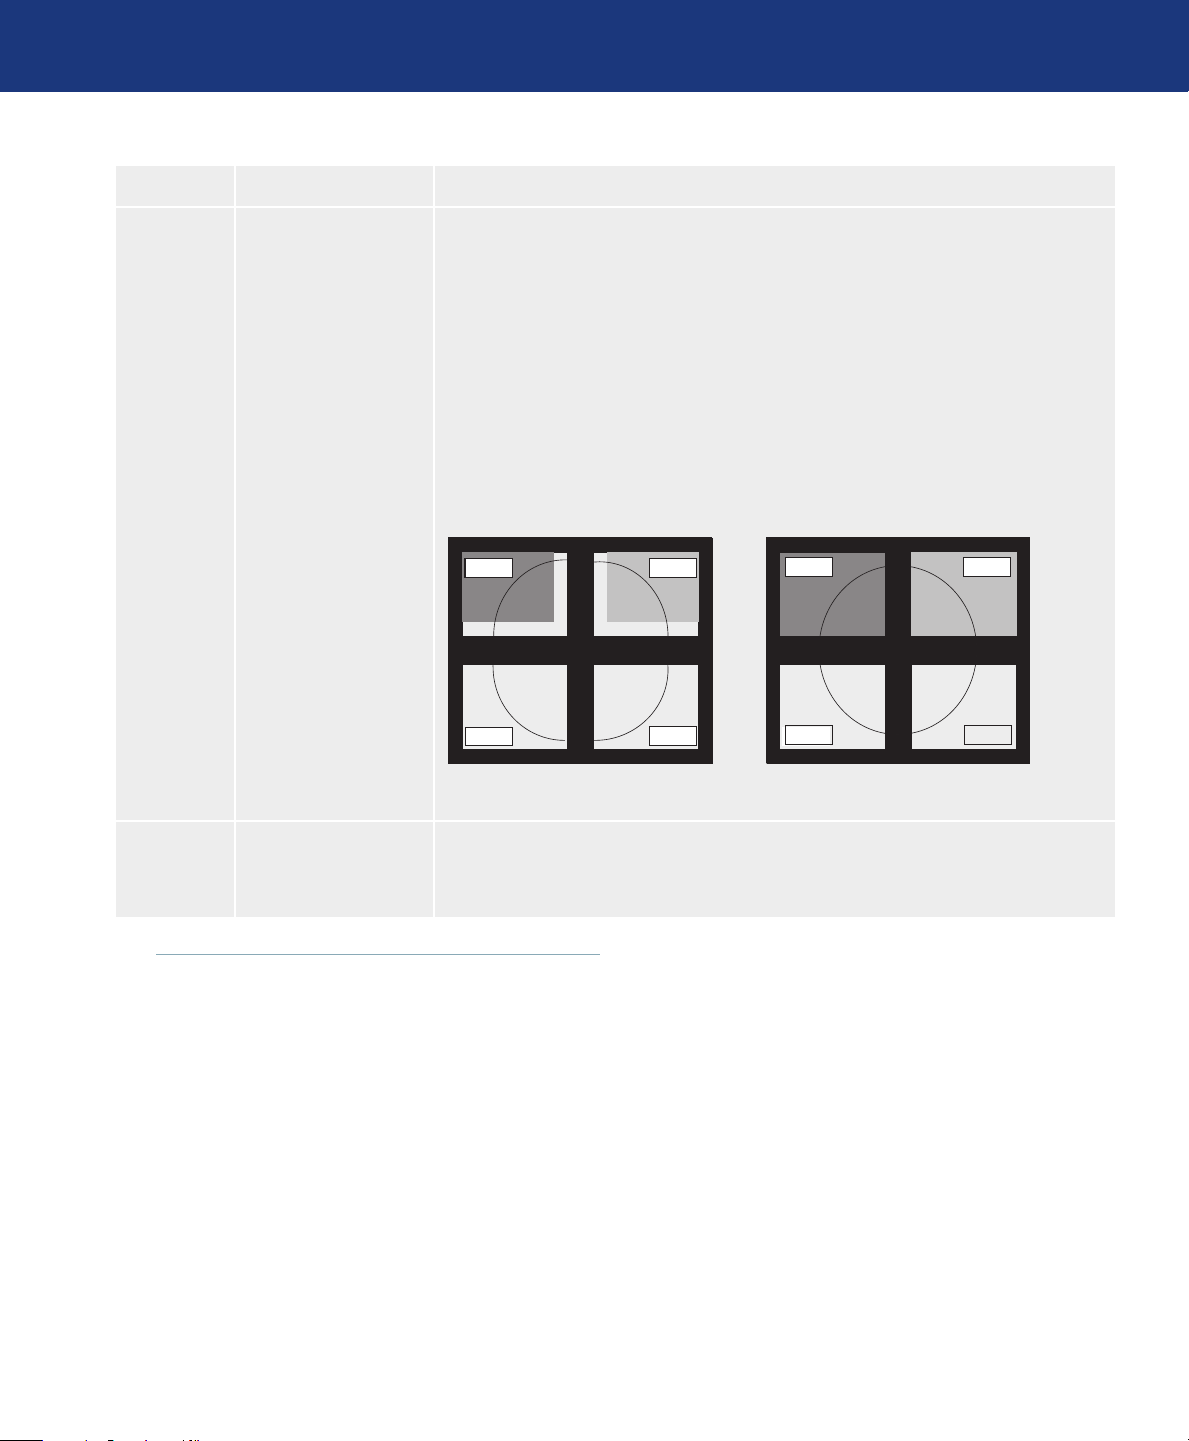
Frame Cut: Works in tandem with Tiling to compensate for the width of the tile
bezels in order to accurately display the image.
Frame cut with 4 monitors (black area shows monitor frames):
page 38
Frame cut OFF Frame cut ON
TagB Information Provides information about the current display resolution Technical data, in-
cluding the preset timing currently being used and the horizontal and vertical
frequencies is also displayed.
Page 39
LaCie 500 Series LCD Monitor
User Manual
4.10. Using the Auto Brightness Function
e brightness of the LCD screen can be set to increase or decrease depending on the amount of ambient
light in the room. If the room is bright, the monitor becomes correspondingly bright. If the room is dim, then
the monitor will dim accordingly. e purpose of this
function is to make the viewing experience more comfortable to the eye in a variety of lighting conditions.
e Auto Brightness function is set to OFF by default. When Autoluminance is ON, this function is disabled.
Setup: Select the brightness range■
OSD Control Button Functions
page 39
ImpOrTANT INfO: To access the Auto
brightness function, you must first access the Advanced OSD mode. See page 26 for details.
Use the following procedure to select the Brightness
Range that the monitor will use when the Auto Brightness function is activated.
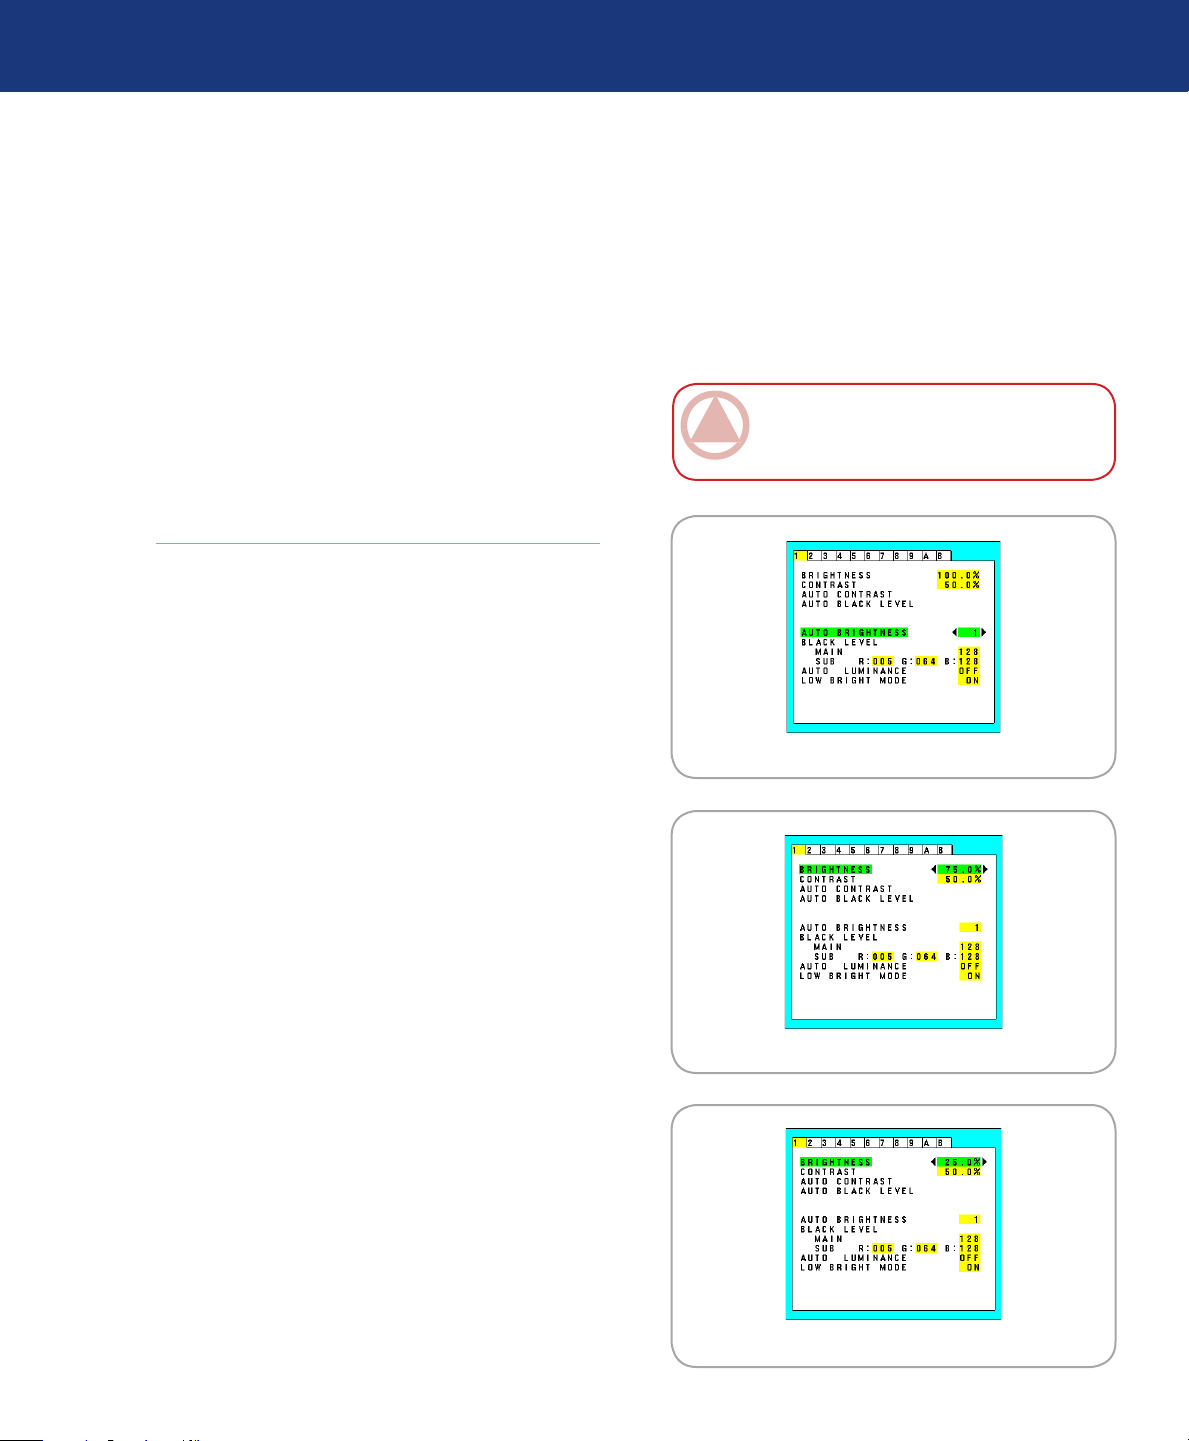
1. Set the BRIGHT level. is is the brightness level
that the monitor will go up to when the ambient
light level is highest. Make sure the room is at its
brightest when setting this level.
Select “1” in the AUTO BRIGHTNESS menu
(Figure A). en use the front buttons to move the
cursor up to the BRIGHTNESS setting. Choose the
desired brightness level (Figure B).
2. Set the DARK level. is is the level of brightness
that the monitor will go down to when the ambient
light level is low. Make sure the room is at its darkest
when setting this level.
en use the front buttons to move the cursor up
to the BRIGHTNESS setting. Choose the desired
brightness level (Figure C).
Figure A
Figure B
Figure C
Page 40
LaCie 500 Series LCD Monitor
User Manual
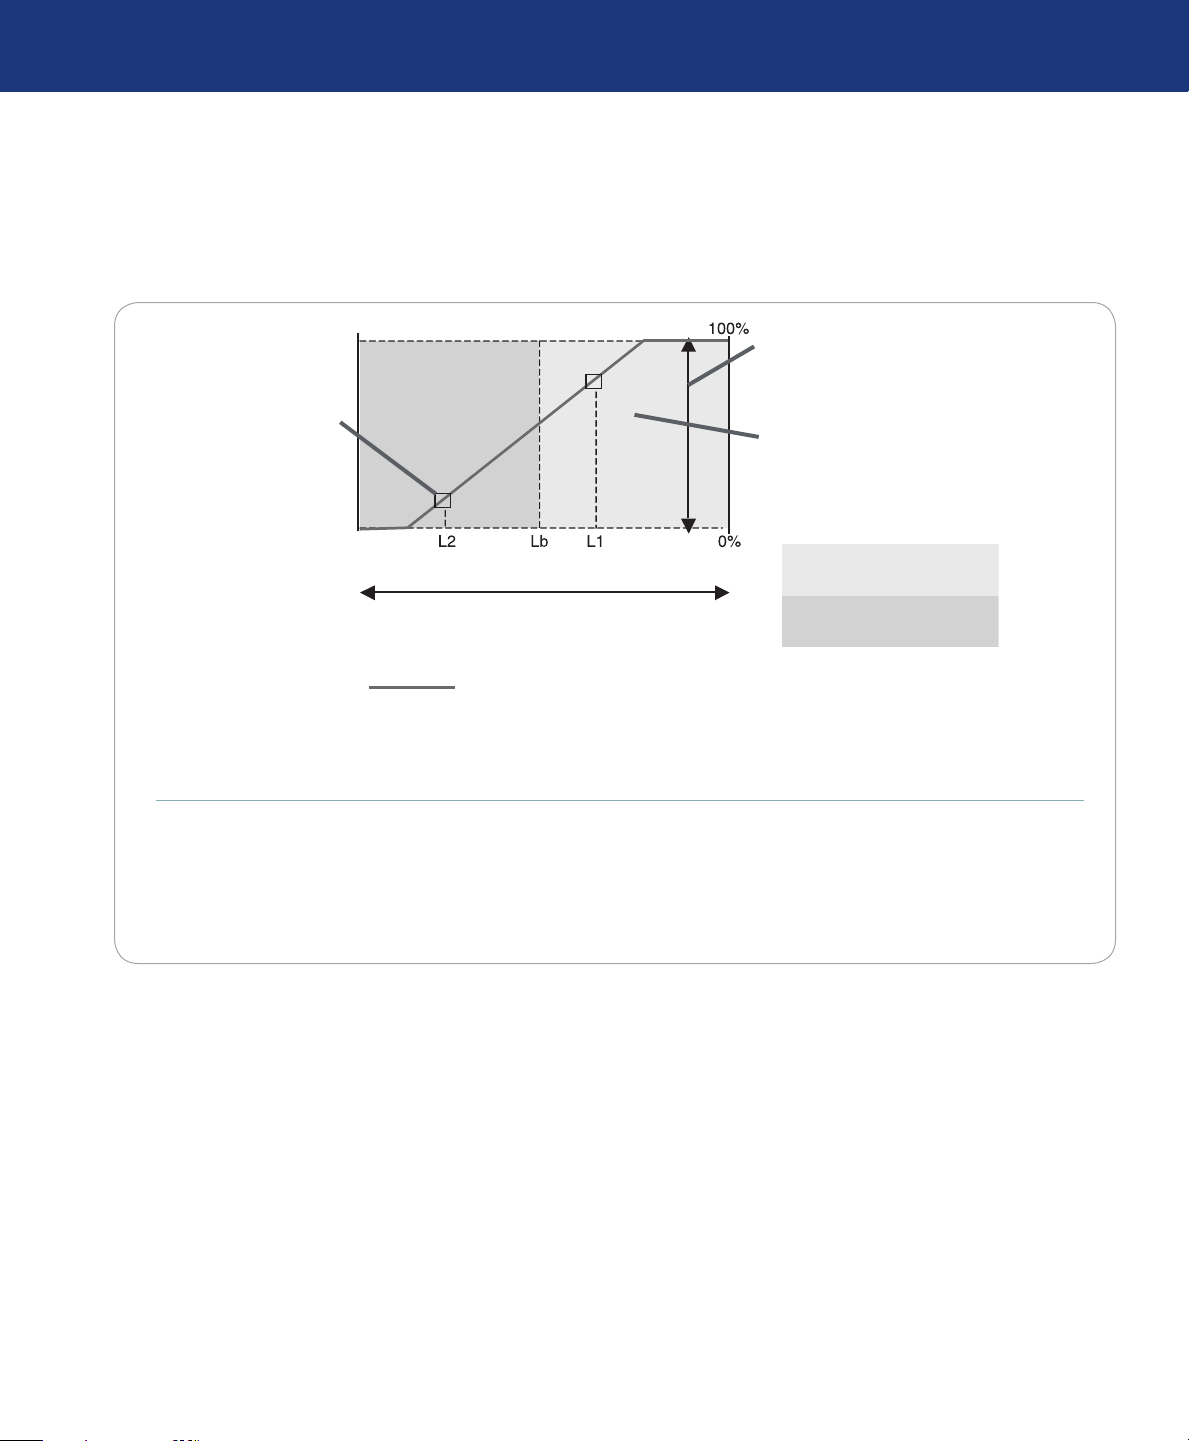
When the AUTO BRIGHTNESS function is enabled the Brightness level of the screen changes automatically according to the lighting conditions of the room (Figure D).
OSD Control Button Functions
page 40
BRIGHTNESS level set
for the monitor to use
when ambient lighting
level is low.
dark
room bright condition bright
Screen Brightness value by Auto Brightness function
BRIGHTNESS range
BRIGHTNESS level set for the
monitor to use when ambient
lighting level is high.
Bright condition area
Dark condition area
Figure D
Lb = Border between bright and dim lighting conditions; set at factory
L1 = BRIGHTNESS level set for the monitor to use when ambient lighting level is high (L1>Lb)
L2 = BRIGHTNESS level set for the monitor to use when ambient lighting level is low (L2<Lb)
L1 and L2 = Brightness levels set by the user to compensate for changes in ambient lighting
Page 41

LaCie 500 Series LCD Monitor
User Manual
5. Troubleshooting
Troubleshooting
page 41
In the event that your LaCie 500 Series LCD
Monitor is not working correctly, please refer to
the following checklist to find out where the problem is coming from. If you have gone through all
of the points on the checklist and your monitor is
still not working correctly, please have a look at the
FAQs that are regularly published on our website –
www.lacie.com.
One of these FAQs may provide an answer to your
specific question. If you need further assistance, please
contact your LaCie reseller or LaCie Technical Support (see page 43, Contacting Customer Support for
details).
Problem Solution
No picture. e signal cable should be completely connected to the display card/computer.
❖
e display card should be completely seated in its slot.
❖
Check the Vacation Switch should be in the ON position.
❖
Front Power Switch and computer power switch should be in the ON position.
❖
Check to make sure that a supported mode has been selected on the display card or system being used.
❖
(Please consult display card or system manual to change graphics mode.)
Check the monitor and your display card with respect to compatibility and recommended settings.
❖
Ensure the DVI input mode is set to DIGITAL when the MAC digital output is connected to the DVI-I
❖
connector.
Manual Updates
■
LaCie is constantly striving to give you the most
up-to-date, comprehensive User’s Manuals available on
the market. It is our goal to provide you with a friendly,
easy-to-use format that will help you quickly install and
utilize the many functions of your new device.
If your manual does not reflect the configurations of
the product that you purchased, please check our website for the most current version available.
Power Button does
not respond.
Check the signal cable connector for bent or pushed-in pins.
❖
Check the signal input, “DVI-D, DVI-I or DSub”.
❖
When using a DVD player or any other type of high-definition device, please do not use interlaced signals.
❖
If the monitor detects an interlaced signal, an OSD warning will appear. If this OSD warning appears,
please do the following: press the RESET and EXIT buttons simultaneously, to temporarily show the
image coming from the high-definition device. While the image is visible, change the signal of the device
from interlaced to progressive (non-interlaced). Consult the User’s Manual included with the device for
detailed information on changing the signal from interlaced to progressive.
Unplug the power cord of the monitor from the AC outlet to turn off and reset the monitor.
❖
Check the Vacation Switch on the left side of the monitor.
❖
Page 42

LaCie 500 Series LCD Monitor
User Manual
Problem Solution
Troubleshooting
page 42
LED on monitor is
not lit.
Image persistence. Please be aware that LCD Technology may experience a phenomenon known as Image Persistence. Im-
Message OUT OF
RANGE is displayed
(screen is either blank
or shows rough images
only).
Image is unstable or
unfocused.
Power Switch should be in the ON position and power cord should be connected.
age persistence occurs when a residual or “ghost” image of a previous image remains visible on the screen.
Unlike CRT monitors, LCD monitors’ image persistence is not permanent, but constant images being
displayed for a long period of time should be avoided. To alleviate image persistence, turn off the monitor
for as long as the previous image was displayed. For example, if an image was on the monitor for one hour
and a residual image remains, the monitor should be turned off for one hour to erase the image.
NOTE: As with all personal display devices, LaCie recommends displaying moving images and using a
moving screen saver at regular intervals whenever the screen is idle or turning off the monitor when not in
use.
Image is displayed only roughly (pixels are missing) and OSD warning OUT OF RANGE is displayed:
❖
Either signal clock or resolution is too high. Choose one of the supported modes.
OSD warning OUT OF RANGE is displayed on a blank screen: Signal frequency is out of range. Choose
❖
one of the supported modes.
❖
Signal cable should be completely attached to the computer.
❖
Use the OSD Image Adjust controls to focus and adjust display by increasing or decreasing
❖
the fine total. When the display mode is changed, the OSD Image Adjust settings may need to be readjusted.
❖
Check the monitor and your display card with respect to compatibility and recommended signal timings.
❖
If your text is garbled, change the video mode to non-interlace and use 60Hz refresh rate.
Please be aware that LCD Technology may experience a phenomenon known as Image Persistence. Im-
❖
age persistence occurs when a residual or “ghost” image of a previous image remains visible on the screen.
Unlike CRT monitors, LCD monitors’ image persistence is not permanent, but constant images being
displayed for a long period of time should be avoided. To alleviate image persistence, turn off the monitor
for as long as the previous image was displayed. For example, if an image was on the monitor for one hour
and a residual image remains, the monitor should be turned off for one hour to erase the image.
NOTE: As with all personal display devices, LaCie recommends displaying moving images and using a
moving screen saver at regular intervals whenever the screen is idle or turning off the monitor when not in
use.
Display image is not
sized properly.
No Video. If no video is present on the screen, turn the Power button off and on again.
Use the OSD Image Adjust controls to increase or decrease the Coarse total.
❖
Check to make sure that a supported mode has been selected on the display card or system being used.
❖
(Please consult display card or system manual to change graphics mode.)
❖
Make certain the computer is not in a power-saving mode (touch the keyboard or mouse).
❖
Page 43

LaCie 500 Series LCD Monitor
User Manual
6. Contacting Customer Support
Before You Contact Technical Support■
Contacting Customer Support
page 43
Read the User Manual and review the Troubleshoot-
ing section.
If your question is related to monitor calibration,
please refer to the Troubleshooting section of the LaCie
blue eye pro User Manual. Launch the LaCie blue eye
pro application and in the “About” section verify that
your monitor is plugged in via the DVI connection.
en perform a monitor Calibration Report and send it
via email to Tech Support along with your question.
If you have asked yourself all of the pertinent questions in the troubleshooting checklist, and you still can’t
get your LaCie monitor to work properly, contact us via
the contacts on page 44. Before contacting us, make sure
that you are in front of your computer and that you have
the following information on hand:
Information to Include in Email Correspondence■
Information Where to Find Information
1. LaCie 500 Series serial number Located on a sticker at the back of monitor or via the OSD “Information” menu (see page 25).
2. Macintosh/PC model Mac users:
Click on the Apple icon in the menu bar and select About this Mac.
3. Operating system version
4. Processor speed
Windows users:
Right click My Computer and select Properties > General.
5. Computer memory
6. e brands and models of other internal and external
peripherals installed on my computer
Mac users:
Click on the Apple icon in the finder bar and select About this Mac.
Select More Info... e Apple System Profiler will launch and will
list your internal and external peripherals.
Windows users:
Right click My Computer and select Properties > Hardware.
Page 44
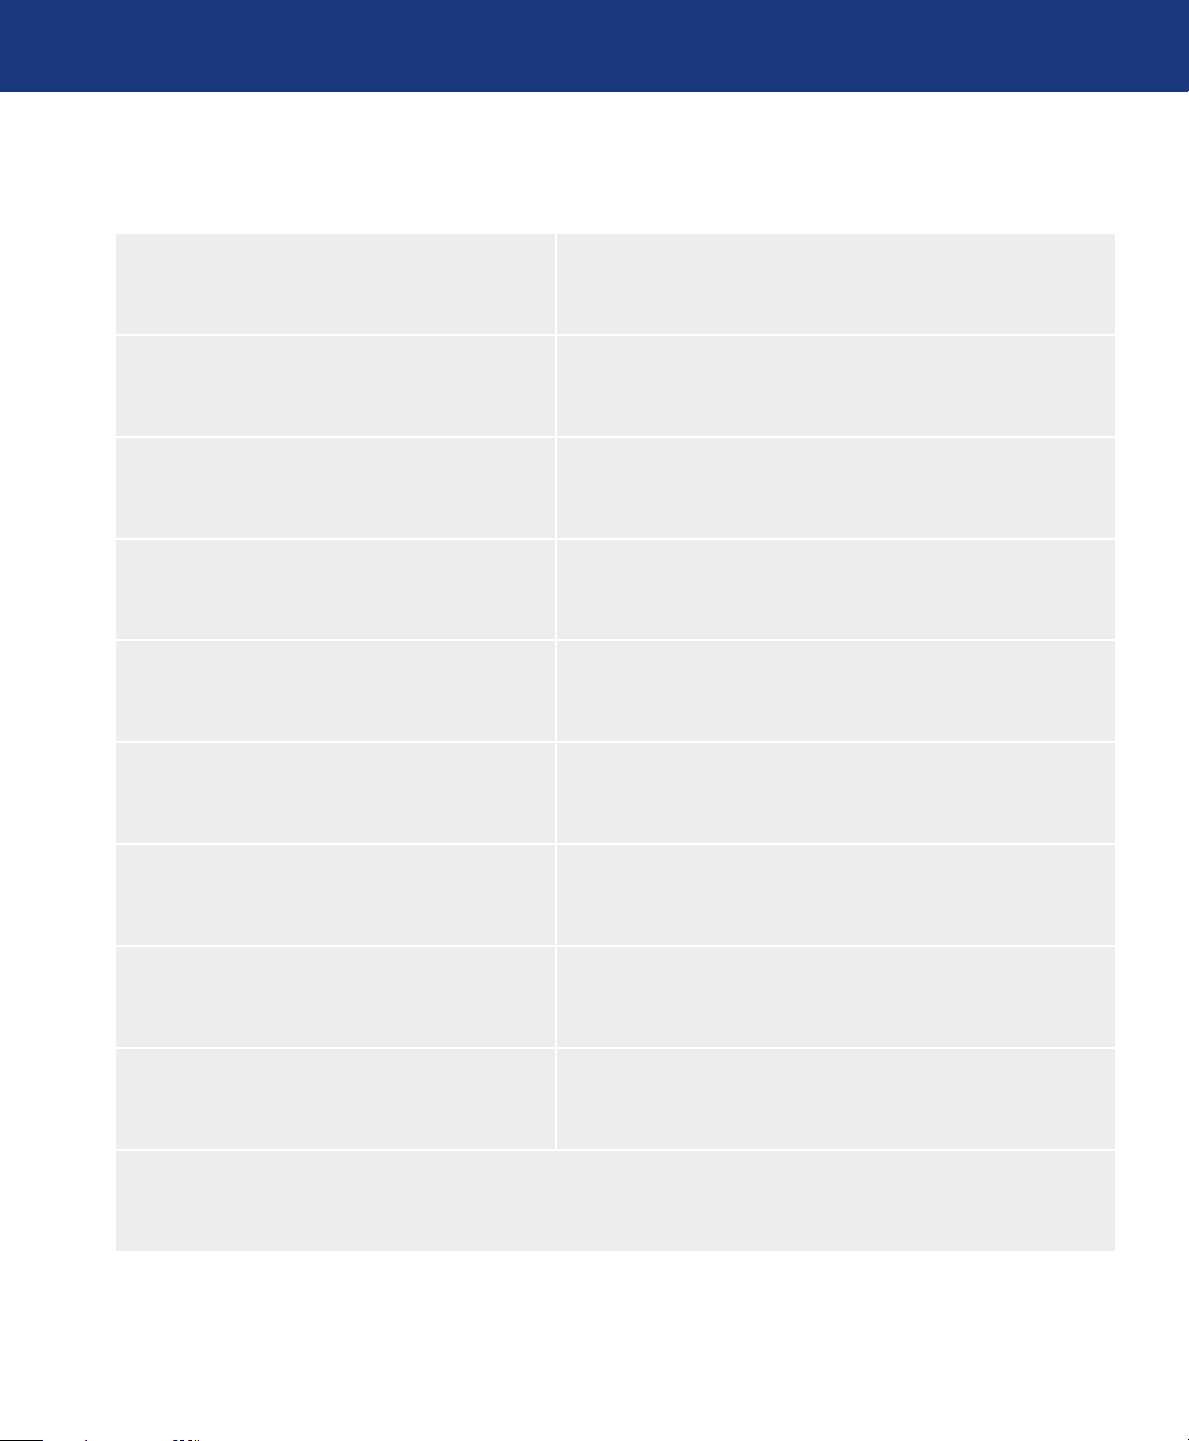
LaCie 500 Series LCD Monitor
User Manual
6.1. LaCie Technical Support Contacts
Contacting Customer Support
page 44
LaCie Asia, Singapore, and Hong Kong
Contact us at:
http://www.lacie.com/asia/contact/
LaCie Belgium
Contact us at:
http://www.lacie.com/be/contact/ (Français)
LaCie Denmark
Contact us at:
http://www.lacie.com/dk/contact
LaCie France
Contact us at:
http://www.lacie.com/fr/contact/
LaCie Italy
Contact us at:
http://www.lacie.com/it/contact/
LaCie Netherlands
Contact us at:
http://www.lacie.com/nl/contact/
LaCie Australia
Contact us at:
http://www.lacie.com/au/contact/
LaCie Canada
Contact us at:
http://www.lacie.com/caen/contact/ (English)
LaCie Finland
Contact us at:
http://www.lacie.com/fi/contact/
LaCie Germany
Contact us at:
http://www.lacie.com/de/contact/
LaCie Japan
Contact us at:
http://www.lacie.com/jp/contact/
LaCie Norway
Contact us at:
http://www.lacie.com/no/contact/
LaCie Spain
Contact us at:
http://www.lacie.com/es/contact/
LaCie Switzerland
Contact us at:
http://www.lacie.com/chfr/contact/ (Français)
LaCie Ireland
Contact us at:
http://www.lacie.com/ie/contact/
LaCie International
Contact us at:
http://www.lacie.com/intl/contact/
LaCie Sweden
Contact us at:
http://www.lacie.com/se/contact
LaCie United Kingdom
Contact us at:
http://www.lacie.com/uk/support/request/
LaCie USA
Contact us at:
http://www.lacie.com/contact/
Page 45
LaCie 500 Series LCD Monitor
User Manual
7. Warranty Information
Warranty Information
page 45
LaCie warrants your monitor against any defect in
material and workmanship, under normal use, for the
period designated on your warranty certificate. In the
event this product is found to be defective within the
warranty period, LaCie will, at its option, repair or replace the defective drive. is warranty is void if:
e monitor was operated/stored in abnormal use or
❖
maintenance conditions;
e monitor is repaired, modified or altered, unless
❖
such repair, modification or alteration is expressly authorized in writing by LaCie;
e monitor was subjected to abuse, neglect, light-
❖
ning strike, electrical fault, improper packaging or
accident;
e monitor was installed improperly;
❖
e serial number of the monitor is defaced or missing;
❖
e broken part is a replacement part such as a pick-
❖
up tray, etc.
e tamper seal on the monitor casing is broken.
❖
LaCie will not, under any circumstances, be liable
for direct, special or consequential damages such as, but
not limited to, damage or loss of property or equipment,
loss of profits or revenues, cost of replacement goods,
or expense or inconvenience caused by service interruptions.
Under no circumstances will any person be entitled
to any sum greater than the purchase price paid for the
drive.
To obtain warranty service, call LaCie Technical Support. You will be asked to provide your LaCie
product’s serial number, and you may be asked to furnish
proof of purchase to confirm that the monitor is still
under warranty.
All monitors returned to LaCie must be securely
packaged in their original box and shipped with postage
prepaid.
ImpOrTANT INfO: Register online for free
technical support: www.lacie.com/register
 Loading...