

Page 1
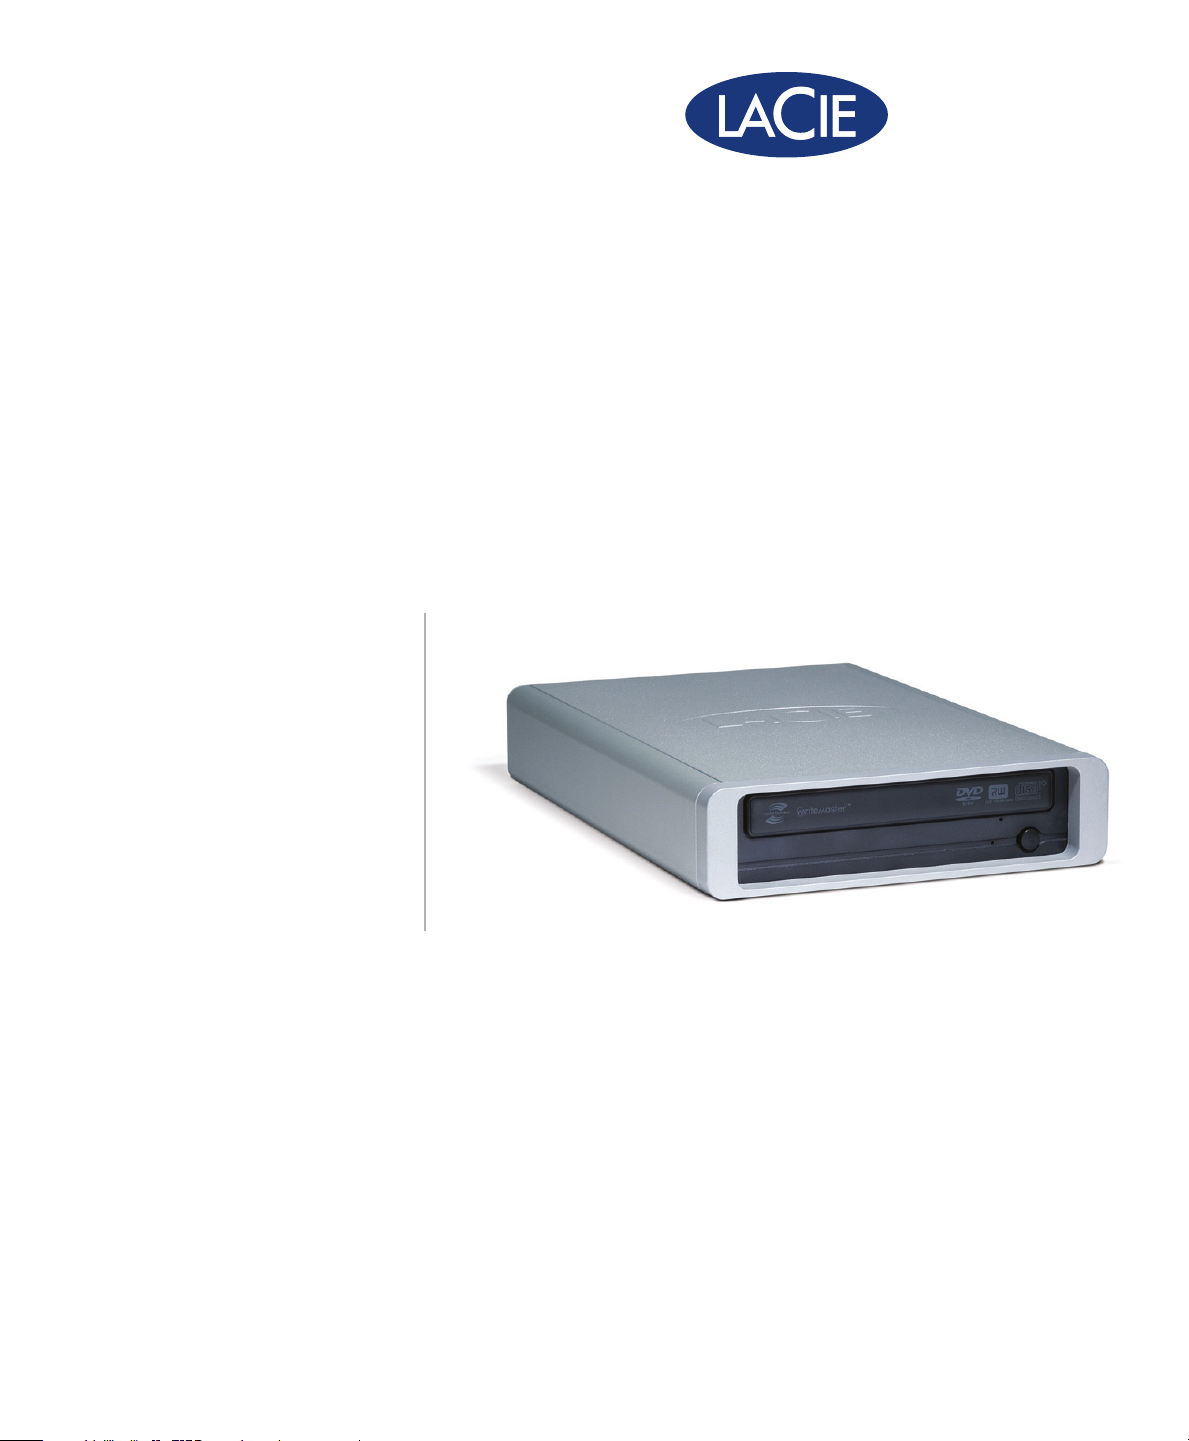
d2 DVD±RW drive
user manual
manuel utilisateur
manual de instrucciones
gebruikershandleiding
guída utente
• •
FireWire 400USB 2.0 FireWire 400 & USB 2.0
handbuch
Page 2

LaCie d2 DVD±RW Drive
User Manual
Table of Contents
Health, Safety & General Use Precautions 4
Health & Safety Precautions 4
General Use Precautions 4
Table of Contents
page 1
1. Introduction
1.1. Minimum System Requirements 7
1.2. Box Content 8
1.3. Views of the Drive 9
1.4. Cables and Connections 13
1.5. Supported DVD and CD Formats 14
2. Connecting Your LaCie d2 DVD±RW Drive 1
2.1. Installing DVD/CD Burning Software 17
2.2. Connecting the Power Supply 18
2.3. Connecting the USB 2.0 Cable 19
2.4. Connecting the FireWire 400 Cable 20
3. Using Your LaCie d2 DVD±RW Drive 21
3.1. Inserting Discs 21
3.2. Accessing Discs 21
3.3. Ejecting Discs 22
3.4. Emergency Disc Ejection 22
4. Helpful Technical Information 23
4.1. File System Formats 23
4.2. DVD±RW Writing Methods 24
4.3. About DVD/CD Available Capacity 25
4.5. FireWire Questions & Answers 26
4.6. USB Questions & Answers 27
4.7. Choosing between FireWire and USB (USB 2.0 & FireWire only) 28
4.8. Data Transfers 28
6
6
5. Troubleshooting 29
5.1. Mac Troubleshooting 30
5.2. Windows Troubleshooting 33
6. Contacting Customer Support 36
6.1. LaCie Technical Support Contacts 37
7. Warranty Information 38
Page 3
LaCie d2 DVD±RW Drive
User Manual
Copyrights
Copyright © 2007 LaCie. All rights reserved. No part of this publication may
be reproduced, stored in a retrieval system, or transmitted in any form or by
any means, electronic, mechanical, photocopying, recording or otherwise, without the prior written consent of LaCie.
Trademarks
FireWire, Apple, Mac, and Macintosh
are registered trademarks of Apple Inc.
Microsoft, Windows, Windows 98 SE,
Windows Millennium Edition, Windows 2000, Windows XP and Windows Vista are registered trademarks of
Microsoft Corporation. All trademarks
mentioned in this manual are the property of their respective owners.
Changes
e material in this document is for information only and is subject to change
without notice. While reasonable efforts have been made in the preparation
of this document to assure its accuracy,
LaCie assumes no liability resulting
from errors or omissions in this document, or from the use of the information contained herein. LaCie reserves
the right to make changes or revisions
in the product design or the product
manual without reservation and without
obligation to notify any person of such
revisions and changes.
Canada Compliance Statement
is Class A digital apparatus meets
all requirements of the Canadian Interference-Causing Equipment Regulations.
LaCie d2 DVD±RW
Tested To Comply
With FCC standards
FOR HOME OR
OFFICE USE
Federal Communications Commission Radio Frequency Interference Statement (FCC)
WARNING: Changes or modifications
to this unit not expressly approved by
the party responsible for compliance
could void the user’s authority to operate the equipment.
is equipment has been tested and
found to comply with the limits for a
Class B digital device, pursuant to Part
15 of the FCC Rules. ese limits are
designed to provide reasonable protection against harmful interference when
the equipment is operated in a commercial environment. is equipment
generates, uses, and can radiate radio
frequency energy, and if not installed
and used in accordance with the instructions, may cause harmful interference to
radio communications. However, there
is no guarantee that interference will
not occur in a particular installation. If
this equipment does cause harmful interference to radio or television reception, which can be determined by turning the equipment off and on, the user
is encouraged to correct the interference
by one of the following measures:
Reorient or relocate the receiving an-
❖
tennas.
Increase the separation between the
❖
equipment and the receiver.
Connect the equipment into an out-
❖
let on a circuit different from that to
which the receiver is connected.
Forward
page 2
❖
Consult the reseller or an experienced
radio/TV technician for help.
Shielded cables and I/O cards must
be used for this equipment to comply
with the relevant FCC regulations.
is device complies with Part 15 of
the FCC rules. Operation is subject to the
following two conditions: (1) this device
may not cause harmful interference, and
(2) this device must accept any interference received, including interference that
may cause undesired operation.
Manufacturer’s Declaration for CE Certification
We hereby certify that this device is in
compliance with both the EMC Directive (89/336/EEC) and the Low Voltage Directive (73/23/EEC) issued by
the Commission of the European Community.
Compliance with these directives implies conformity to the following European Norms:
Class B EN60950, EN55022, EN500821, EN61000-3-2
With reference to the following conditions:
73/23/EEC Low Voltage Directive
89/336/EEC EMC Directive
Class I Laser product
is equipment is certified to comply
with DHHS Rule 21 CFR Chapter I,
subchapter J in effect as of the date of
manufacture.
is equipment is classified as a
Class I Laser product and no hazardous laser radiation is emitted outside the
drive.
Page 4

LaCie d2 DVD±RW Drive
User Manual
Forward
page 3
is symbol on the product or on its packaging
indicates that this product
must not be disposed of
with your other household waste. Instead, it is your responsibility to dispose
of your waste equipment by handing it
over to a designed collection point for
the recycling of waste electrical and
electronic equipment. e separate
collection and recycling of your waste
equipment at the time of disposal will
help to conserve natural resources and
ensure that it is recycled in a manner
that protects human health and the environment. For more information about
where you can drop off your waste
equipment for recycling, please contact your local city office, your household waste disposal service, or the shop
where you purchased the product.
CAUTION: Modifications not
authorized by the manufacturer
may void the user’s authority to
operate this device.
Page 5

LaCie d2 DVD±RW Drive
User Manual
Health, Safety & General Use Precautions
Forward
page 4
e drive you have just purchased
includes a laser diode device, which classifies it as a “Laser Class I” product. is
laser is not dangerous for the user under
normal operating conditions. However,
we strongly advise you not to place any
Health & Safety Precautions
Read this User Manual carefully, and
❖
follow the correct procedure when
setting up the device.
Do not look inside or place your hand
❖
over the open media tray. Never look
directly or indirectly (with a mirror)
at the laser diode, even when the device is not in operation. If you expose
your eyes to the laser inside you drive,
you risk damage or loss of your vision
or other injury.
reflective objects in the disc loading system, due to the risk of exposure to laser
emissions that may be reflected by such
objects. Always follow the basic precautions listed below to use your LaCie
drive safely and correctly. Respecting
Do not open your drive or attempt to
❖
disassemble or modify it. Never insert any metallic object into the drive
to avoid any risk of electrical shock,
fire, short-circuiting or dangerous
emissions. Your drive contains no
user-serviceable parts. If it appears to
be malfunctioning, have it inspected
by qualified LaCie service staff.
Never expose your device to rain or
❖
use it near water or in damp or wet
these guidelines will help to avoid the
possibility of personal injury to yourself
or others, as well as to prevent damage to
your device and other computer equipment. ese include, but are not limited
to, the following precautions.
conditions. Never place containers
on it containing liquids that may spill
into its openings. Doing so increases
the risk of electrical shock, short-circuiting, fire or personal injury.
Make sure that the computer and
❖
drive are electrically grounded. If the
devices are not grounded, there is an
increased risk of electrical shock.
General Use Precautions
Do not expose the drive to tempera-
❖
tures outside the range of 5° C to 40°
C (41° F to 104° F) during operation. Doing so may damage the drive
or disfigure its casing. Avoid placing
your drive near a source of heat or
exposing it to sunlight (even through
a window). Inversely, placing your
drive in an environment that is too
cold or humid may damage the unit.
Do not block the ventilation outlets
❖
on the rear of the drive. ese help
to keep your drive cool during opera-
tion. Blocking the ventilation outlets
may cause damage to your drive and
cause an increased risk of short-circuiting or fire.
Always unplug the drive if there is a
❖
risk of lightning or if it will not be
used for an extended period of time.
Otherwise, there is an increased risk
of electrical shock, short-circuiting
or fire.
Do not place heavy objects on top of
❖
the drive or use excessive force on its
buttons, connectors and tray.
Always place your drive in a hori-
❖
zontal position before using it. is
LaCie drive has not been designed to
be used in an upright position. ismay result in damage to the device or
data loss.
Always remove the disc from the disc
❖
tray before transporting your drive.
Otherwise, written data may be destroyed or the drive’s internal components may be damaged.
Never use excessive force on the disc
❖
loading system; discs should be in-
Page 6
LaCie d2 DVD±RW Drive
User Manual
Forward
page 5
serted effortlessly into your drive.
If you detect a problem, consult the
Troubleshooting section and contact
your after-sales department.
Protect your drive from excessive ex-
❖
posure to dust during use or storage.
ImpOrTANT INfO: Any loss, corruption or destruction of data while using a LaCie drive is the sole responsibility of the
user, and under no circumstances will LaCie be held liable for the recovery or restoration of this data. To help prevent the loss
of your data, LaCie highly recommends that you keep TWO copies of your data; one copy on your external hard drive, for
instance, and a second copy either on your internal hard drive, another external hard drive or some other form of removable
storage media. LaCie offers a complete line of CD and DVD drives. If you would like more information on backup, please
refer to our website.
ImpOrTANT INfO: 1GB = 1,000,000,000 bytes. 1TB = 1,000,000,000,000 bytes. Once formatted, the actual available
storage capacity varies depending on operating environment (typically 5-10% less).
Dust can build up inside the device,
increasing the risk of damage or malfunction.
Never use benzene, paint thinners,
❖
detergent or other chemical products to clean the outside of the drive.
Such products will disfigure and
discolor the front panel and casing.
Instead, use a soft, dry cloth to wipe
the device.
mANUAl NOTe: Several sections of this user
manual contain information about three different
LaCie d2 DVD±RW Drives. Differences between
drives are noted where applicable. Make sure to
refer to the sections about your specific drive.
Page 7
LaCie d2 DVD±RW Drive
User Manual
1. Introduction
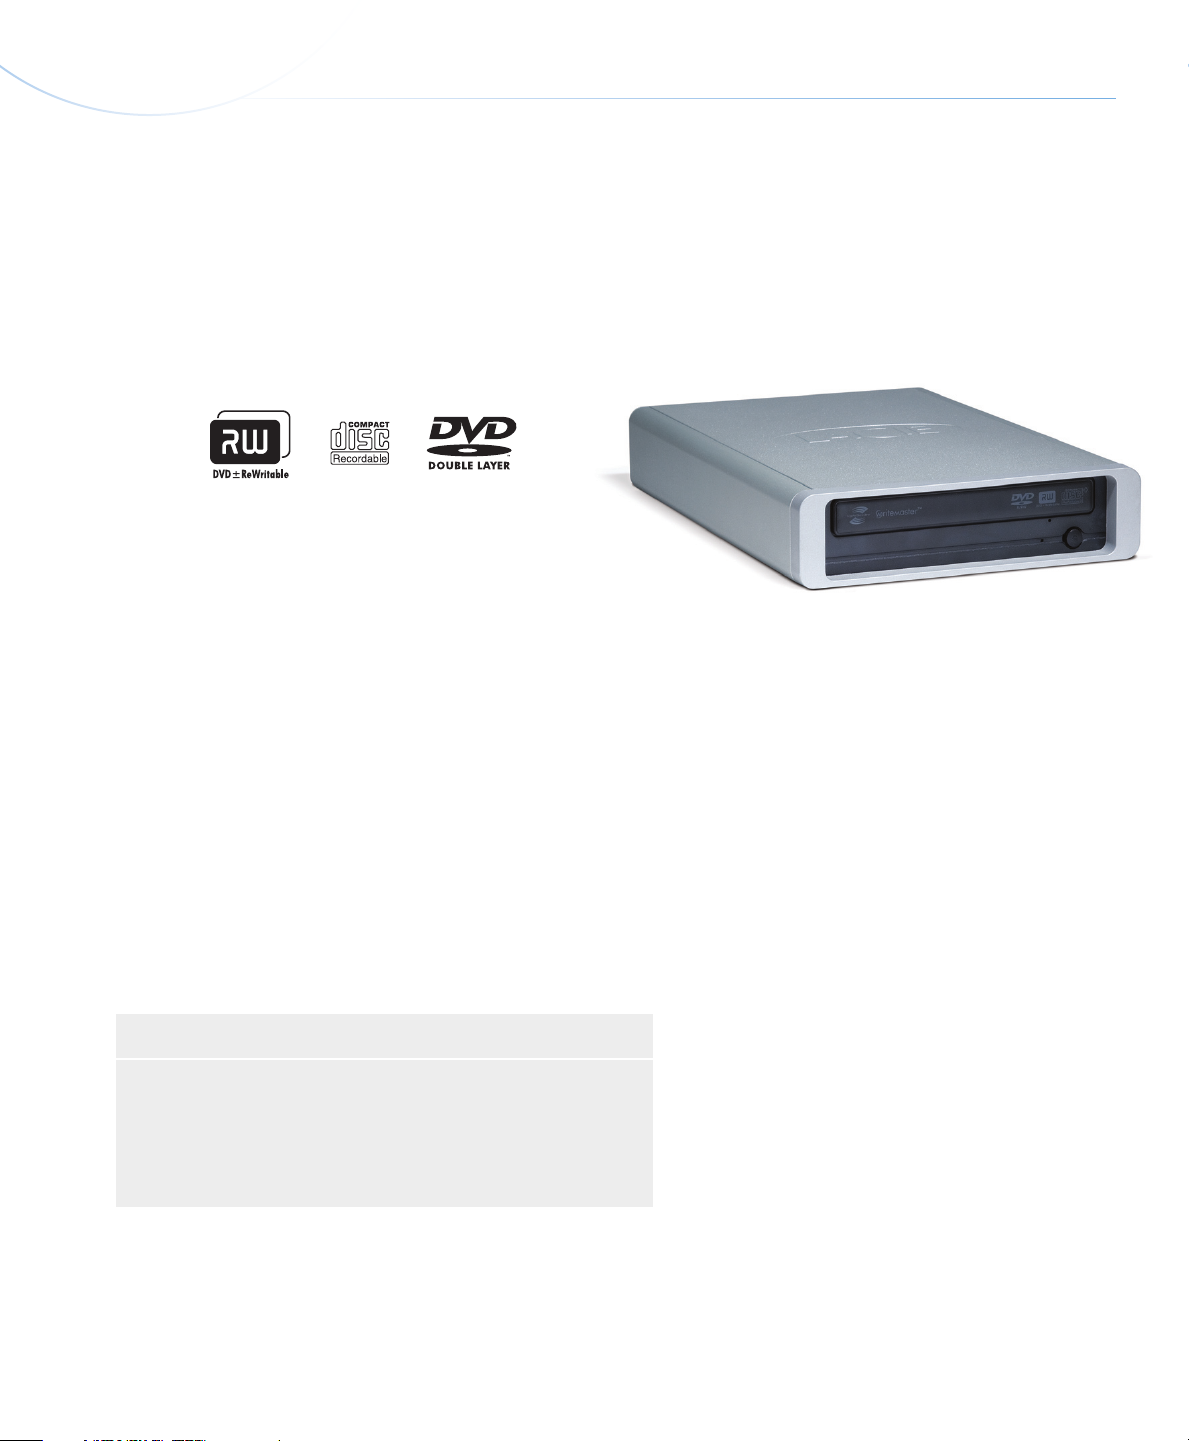
Congratulations on the purchase of your new
LaCie d2 DVD±RW Drive – your complete DVD and
CD creation solution! is drive gives you maximum
compatibility with the various DVD and CD formats,
reading and writing to all of the popular standards
(DVD±RDL, DVD±RW, CD-R, CD-RW).
Double Layer DVD Recording
With the same technology that underpins Hollywood-style DVD-Videos, Double Layer (DL) discs are
compatible with most consumer set-top DVD players
and computer DVD-ROM drives.
Introduction
page 6
On one DVD+R9 DL disc, you’ll be able to store up
to four hours of MPEG-2 video, sixteen hours of VHSquality video or increase the video bit rate for higher
quality movies. And with 8.5GB of storage space on a
single DL disc, they’re ideal for archiving and backup
applications, and could even be used as replacement for
tape in some instances.
Now you have the tools to make high-impact, professional quality DVD videos, conveniently make system backups and preserve all of your memories for the
future.
LaCie d2 DVD±RW Drive Capabilities■
Create an record your own music, movie & photo CD/DVDs
❖
LightScribe: design & etch custom, professional labels
❖
Optimum performance with fast 20x write speed
❖
Record to DL DVD±R, DVD±R/RW & CD-R/RW
❖
Page 8

LaCie d2 DVD±RW Drive
User Manual
1.1. Minimum System Requirements
Windows Users
USB 2.0 & FireWire■ FireWire ■ USB■
FireWire 400 or USB equipped
❖
computer
Windows 2000, Windows XP or
❖
Windows Vista
Pentium IV processor or higher
❖
256MB RAM
❖
Direct-disc labeling requires LightScribe CD/DVDs (not inlcuded)❖
FireWire 400 equipped computer
❖
Windows 2000, Windows XP or
❖
Windows Vista
Pentium IV processor or higher
❖
256MB RAM
❖
Introduction
page 7
USB equipped computer
❖
Windows 2000, Windows XP or
❖
Windows Vista
Pentium IV processor or higher
❖
256MB RAMM
❖
Mac Users
USB 2.0 & FireWire■ FireWire ■ USB■
FireWire 400 or USB equipped
❖
computer
Mac OS X 10.3.9
❖
Power PC G4 or higher, Mac Intel
❖
processor
256MB RAM
❖
Direct-disc labeling requires LightScribe CD/DVDs (not inlcuded)❖
Linux Users
FireWire 400 equipped computer
❖
Mac OS X 10.3.9
❖
Power PC G4 or higher, Mac Intel
❖
processor
256MB RAM
❖
USB 2.0 & FireWire■ FireWire ■ USB■
FireWire 400 or USB equipped
❖
computer
Linux-based system
❖
256MB RAM
❖
FireWire 400 equipped computer
❖
Linux-based system
❖
256MB RAM
❖
USB equipped computer
❖
Mac OS X 10.3.9
❖
Power PC G4 or higher, Mac Intel
❖
processor
256MB RAM
❖
USB equipped computer
❖
Linux-based system
❖
256MB RAM
❖
Direct-disc labeling requires LightScribe CD/DVDs (not inlcuded)❖
Page 9
LaCie d2 DVD±RW Drive
R D
L
ReWritable
Ultra Speed
©
C
o
p
y
r
i
g
h
t
2
0
0
7
,
L
a
C
i
e
.
•
w
w
w
.
l
a
c
i
e
.
c
o
m
•
7
1
1
562
EasyMedia Creator Sui te 9
withLightScribe Label er for
Windows 2000,XP & Vist a
Windows
DVD
UTILITIES v.6.9
BURN*FLIP* BURN
User Manual
Manuel Utilisateur
Manuale Di Utente
Benutzerhandbuch
Manual De Usuario
Gebruikershandleiding
Quick Install Guide
LaCie d2 DVD ± RW
USB 2.0
User Manual
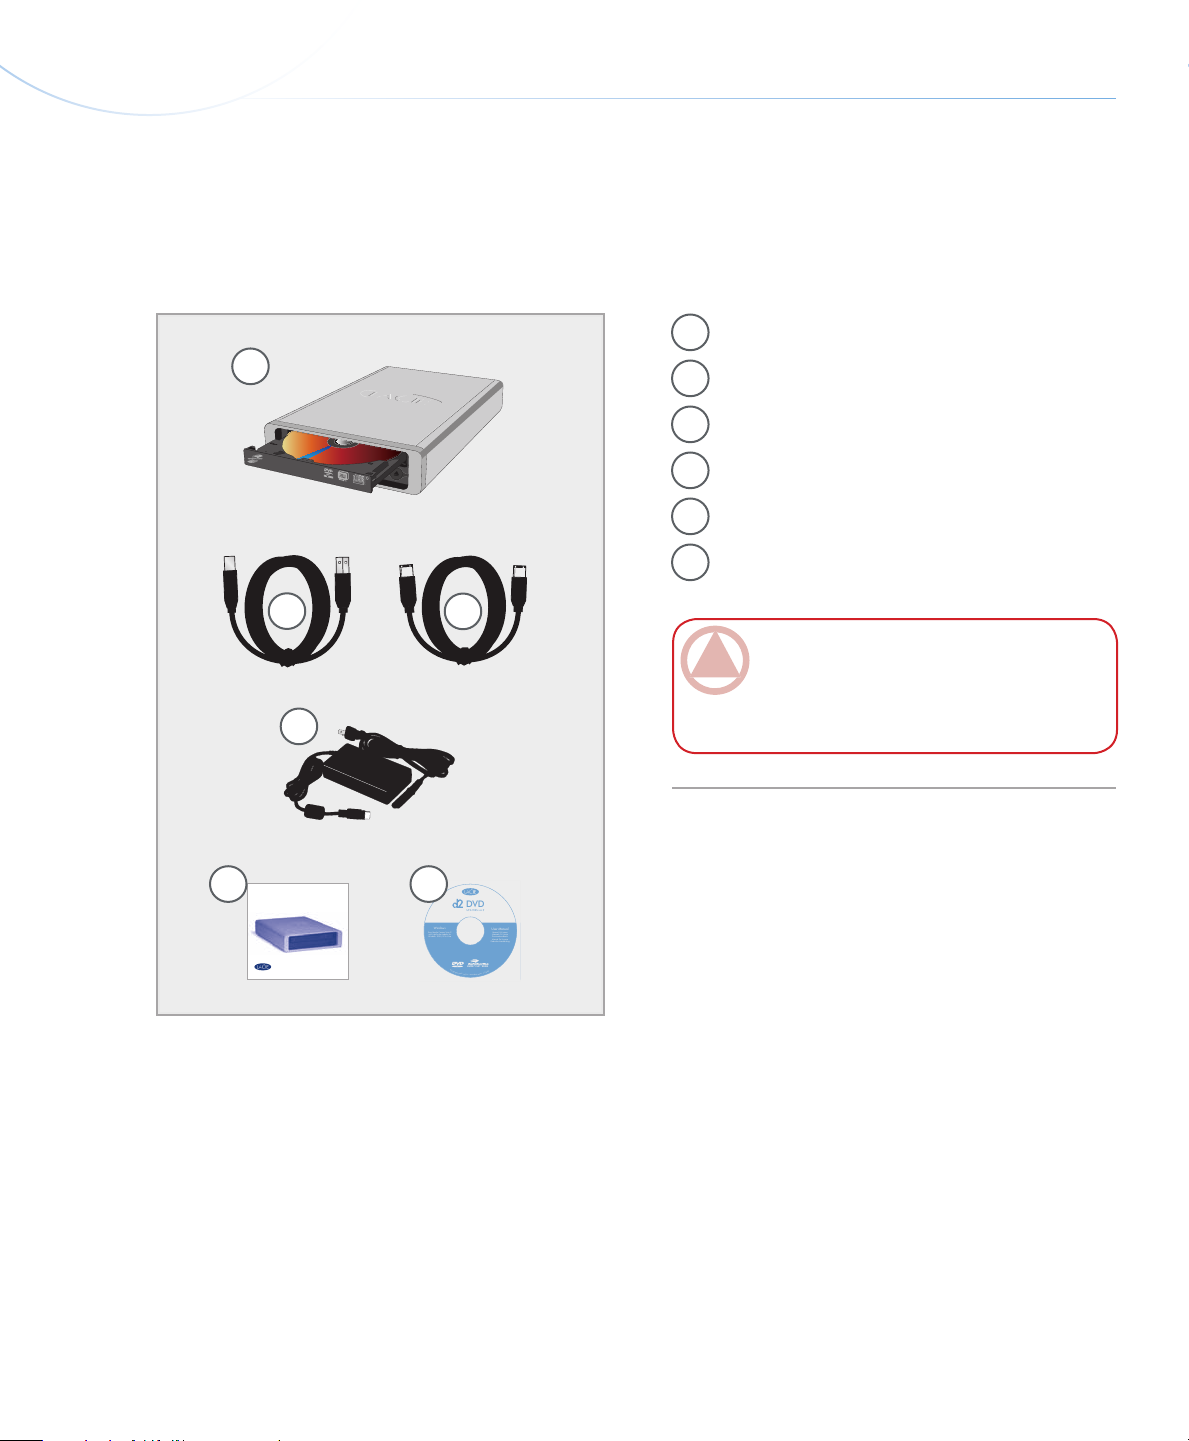
1.2. Box Content
Your LaCie d2 DVD±RW Drive box should contain
the following:
1
LaCie d2 DVD±RW Drive
1
USB 2.0 cable*
2
FireWire 400 cable**
3
Power supply
4
Quick Install Guide
5
LaCie d2 DVD Utilities CD-ROM
6
Introduction
page 8
2
4
5 6
3
ImpOrTANT INfO: Please save your packag-
ing. In the event that the drive should need to
be repaired or serviced, it must be returned in its
original packaging.
*USB 2.0 cable not included with LaCie d2
DVD ±RW FireWire-only model.
**FireWire 400 cable not included with LaCie d2
DVD±RW USB-only model.
Page 10
LaCie d2 DVD±RW Drive
User Manual
1.3. Views of the Drive
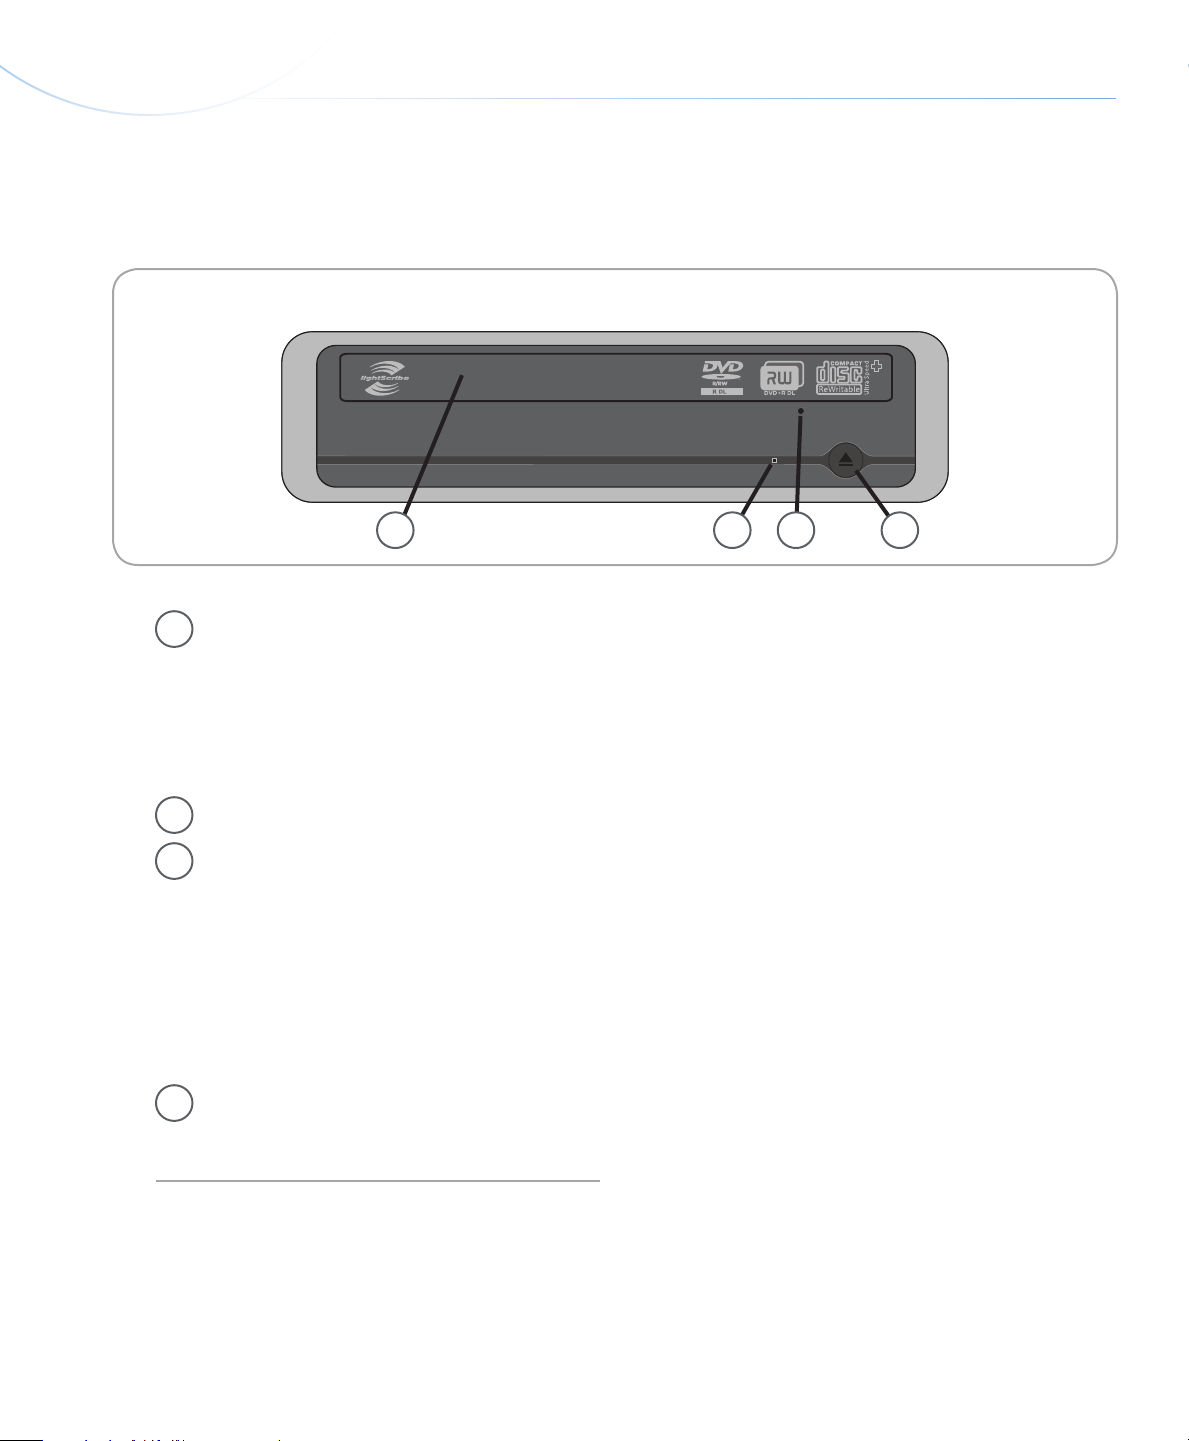
Front View (all models)■
Introduction
page 9
1
Disc Tray - Open the tray by pressing the load/
1
eject button, then place a DVD or CD into the
tray with the label facing up. Close the tray by
pushing the load/eject button or pushing the
front part of the tray. is drive hasn not been
designed to accept media with cartidges.
Drive Activity LED
2
Emergency Eject Hole – Insert a straightened
3
paper clip (or similar object) and push to eject the
tray if the load/eject button does not work. In
normal operation, the eject button should always
be used to unload the tray. If you must use the
emergency eject hole, make sure the drive’s power
is turned off and wait until disc rotation has
stopped.
Load/Eject Button – Push this button to open
4
the media tray.
32 4
Page 11
LaCie d2 DVD±RW Drive
LaCie Ltd. XXXXXX
Serial Number XXXXXXXXX
ON
OFF
User Manual
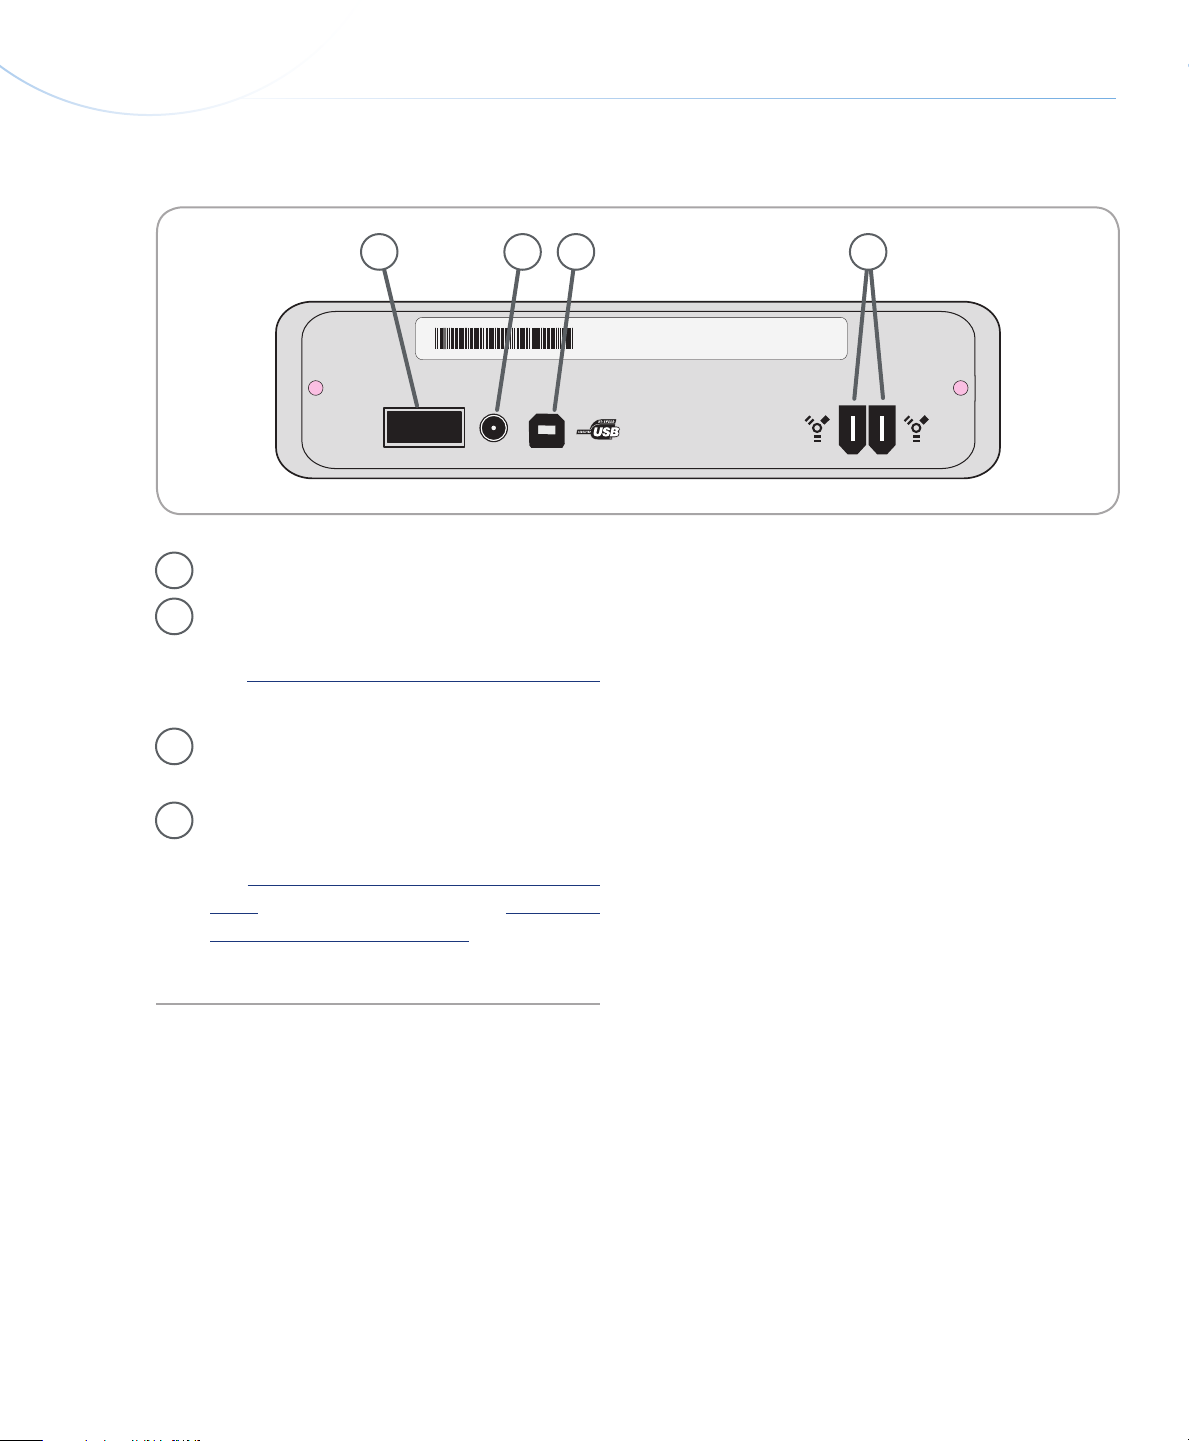
Rear View (USB 2.0 & FireWire 400)■
On/Off Switch
1
Power Supply Connection - is is where you
2
plug in the AC adapter supplied with the drive.
See section 2.2, Connecting the Power Supply
for more information.
Introduction
page 10
2 3 41
Hi-Speed USB 2.0 Port - is is where you plug
3
in the USB 2.0 cable furnished with the drive.
FireWire 400 Ports - is is where you plug in
4
the FireWire 400 cables supplied with the drive.
See section 2.4, Connecting the FireWire 400
Cable for more information. See section 2.3,
Connecting the USB 2.0 Cable for more infor-
mation.
Page 12
LaCie d2 DVD±RW Drive
LaCie Ltd. XXXXXX
Serial Number XXXXXXXXX
ON
OFF
User Manual
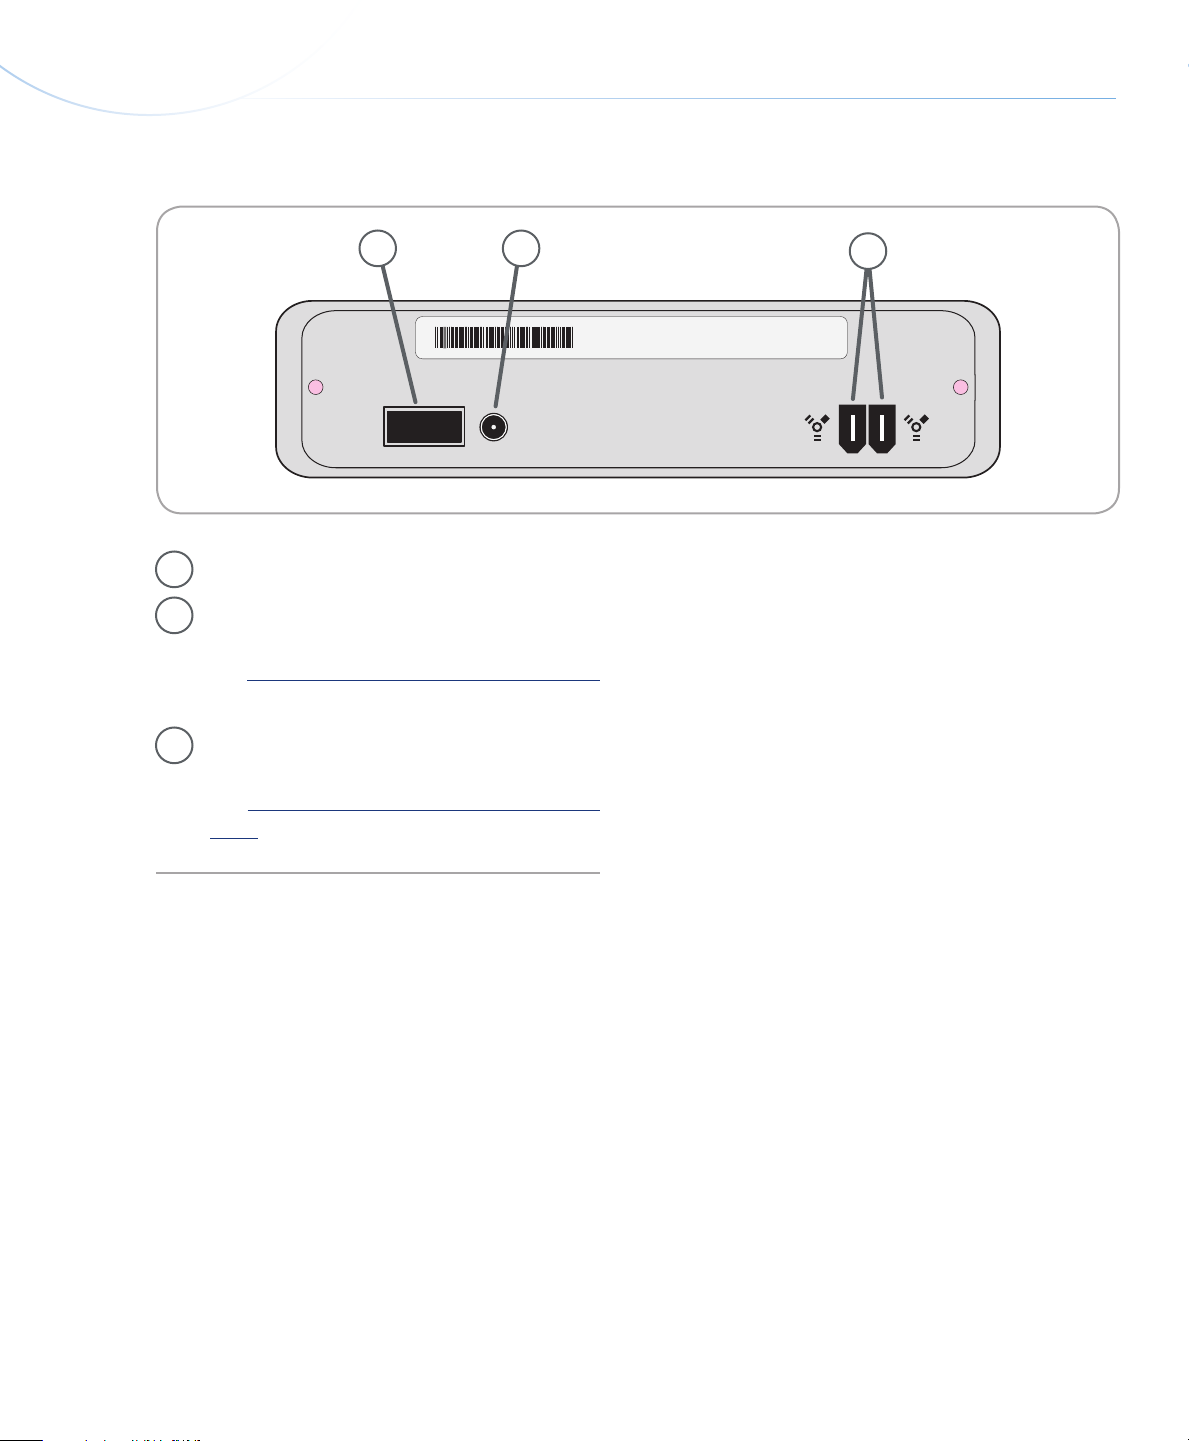
Rear View (FireWire 400)■
Introduction
page 11
On/Off Switch
1
Power Supply Connection - is is where you
2
plug in the AC adapter supplied with the drive.
See section 2.2, Connecting the Power Supply
for more information.
FireWire 400 Ports - is is where you plug in
3
the FireWire 400 cables supplied with the drive.
See section 2.4, Connecting the FireWire 400
Cable for more information.
21
3
Page 13
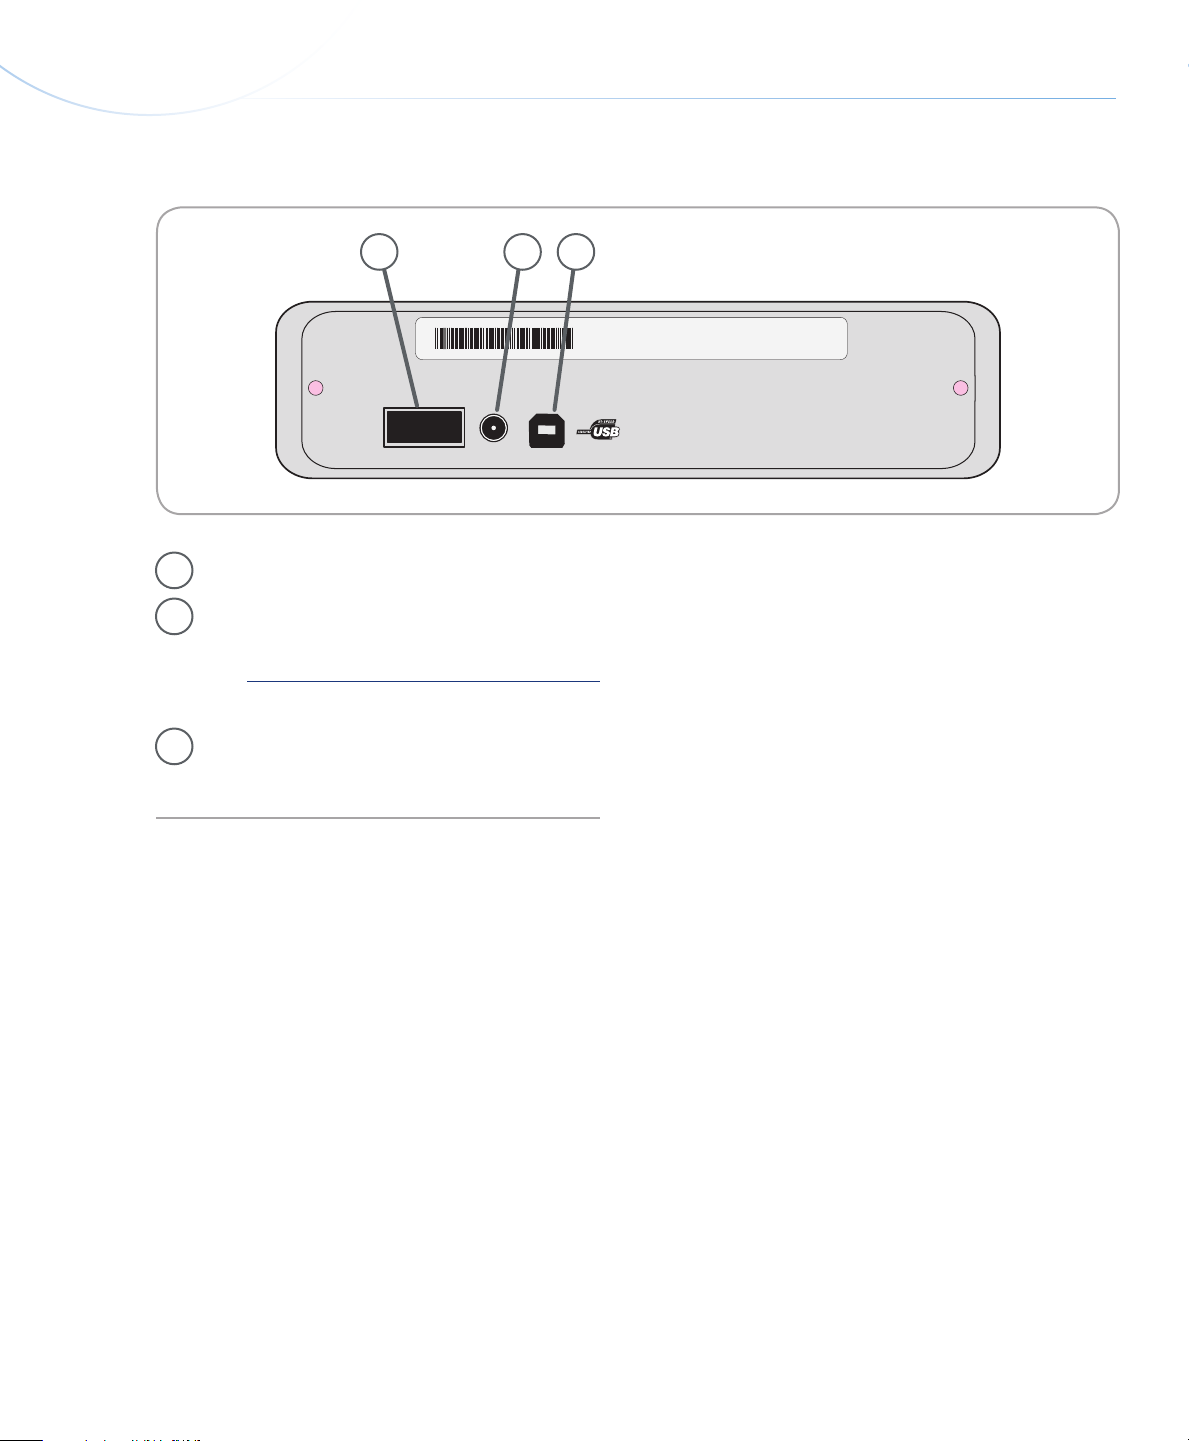
LaCie d2 DVD±RW Drive
LaCie Ltd. XXXXXX
Serial Number XXXXXXXXX
ON
OFF
User Manual
Rear View (USB 2.0)■
On/Off Switch
1
Power Supply Connection - is is where you
2
plug in the AC adapter supplied with the drive.
See section 2.2, Connecting the Power Supply
for more information.
Introduction
page 12
2 31
Hi-Speed USB 2.0 Port - is is where you plug
3
in the USB 2.0 cable furnished with the drive.
Page 14
LaCie d2 DVD±RW Drive
User Manual
1.4. Cables and Connections
Introduction
page 13
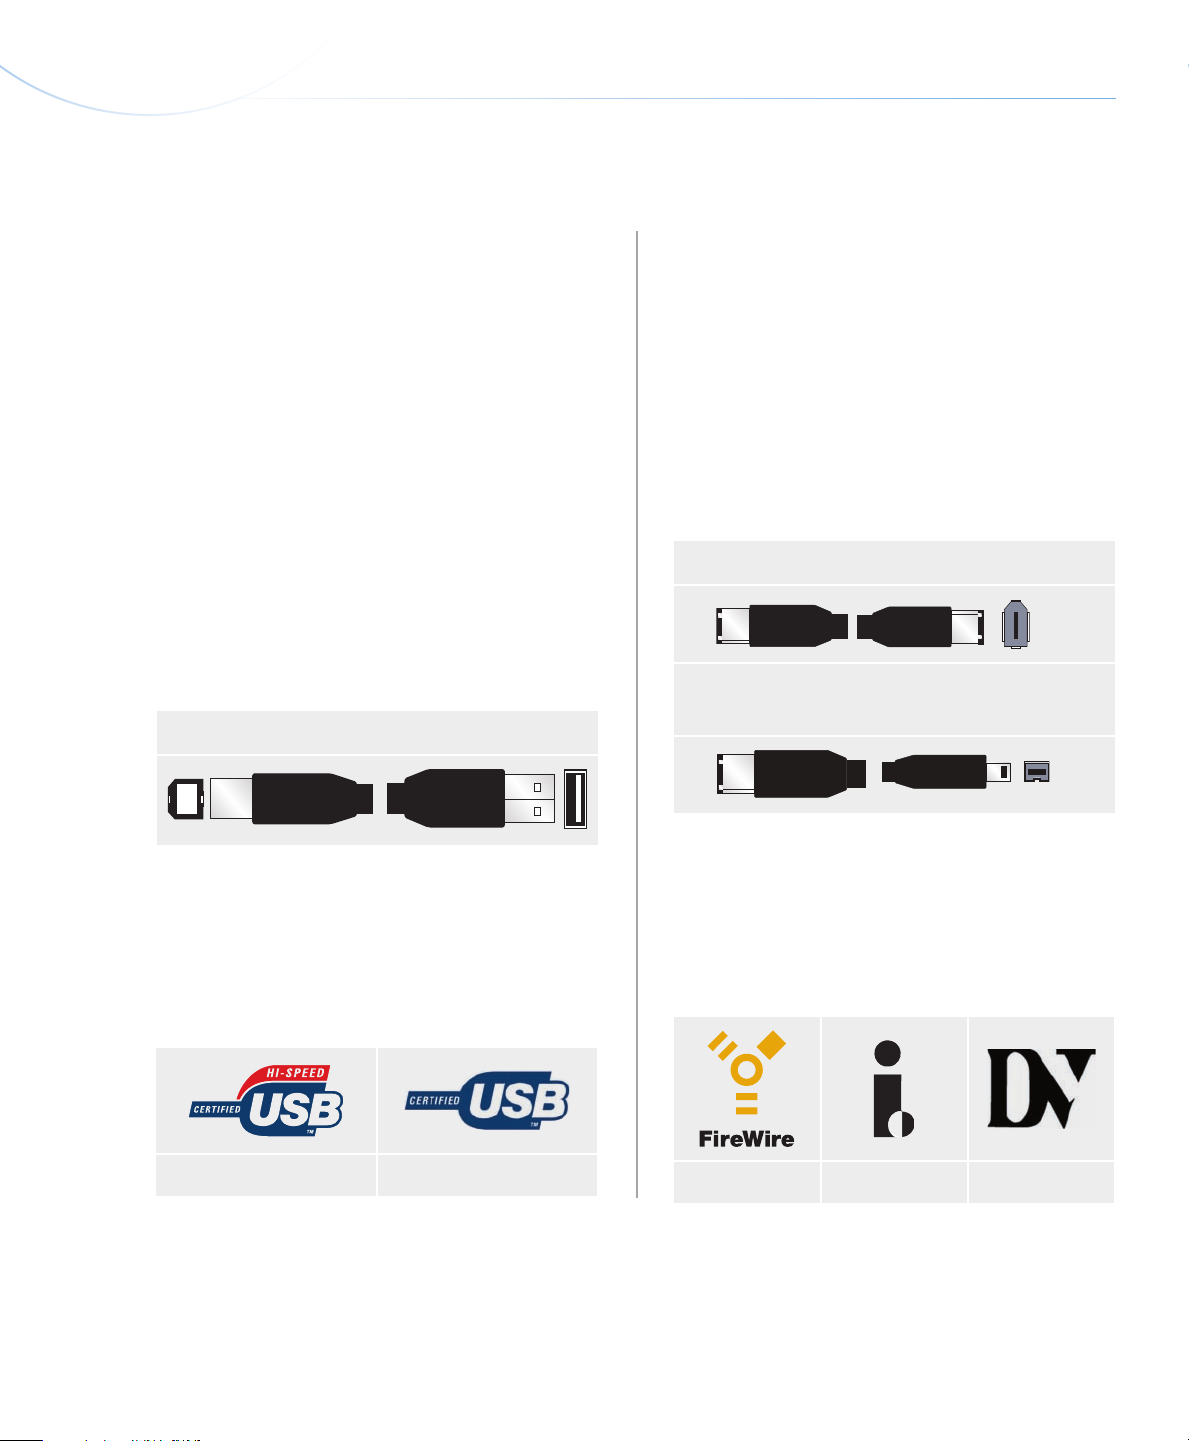
Hi-Speed USB 2.0■
USB is a serial input/output technology for connecting peripheral devices to a computer or to each other.
Hi-Speed USB 2.0 is the latest implementation of this
standard, and it provides the necessary bandwidth and
data transfer rates to support high speed devices such as
hard drives, CD/DVD drives and digital cameras.
USB 2.0 Cables
Your LaCie drive is shipped with a Hi-Speed USB
2.0 cable to ensure maximum data transfer performance
when connected to a Hi-Speed USB 2.0 port. e cable
will also work when connected to a USB 1.1 port, but
drive performance will be limited to USB 1.1 transfer
rates.
USB 2.0 Cable and Cable End
FireWire 400■
FireWire 400, also known as IEEE 1394a, is a highspeed serial input/output technology for connecting peripheral devices to a computer or to each other.
FireWire Cables
ere are two types of FireWire 400 cables on the
market: 6-to-6-pin and 6-to-4-pin (not included) cables.
FireWire 400 Cable and Cable End
iLink/DV Cable and Cable End (Sold separately)
USB Icons
ese icons will help you easily identify the USB
interfaces. ey appear on USB cables and next to the
USB port connectors on certain computers.
USB 2.0 icon USB 1.1 icon
FireWire Icons
eses icons will help you easily identify the FireWire
interface. ey appear on FireWire cables, and next to
the FireWire port connectors on certain computers.
FireWire icon iLink icon DV icon
Page 15

LaCie d2 DVD±RW Drive
User Manual
1.5. Supported DVD and CD Formats
Format Type of Disc Write Speed Capacity
DVD DVD±R DL 8x 8.5GB
DVD±R 20x 4.7GB
DVD+RW 8x 4.7GB
DVD-RW 6x 4.7GB
Introduction
page 14
DVD-ROM (Single and dual layer)
CD CD-R 48x 700MB
CD-RW 24x 650MB
CD-ROM -- --
--
4.7/8.5
GB
DVD and CD Media Format Definitions■
ese discs have the same write-once concept as CD-
DVD+RW Discs
Best suited for: backing up and archiving digital con-
❖
tent.
ese discs are functionally similar to CD-RW and
❖
DVD-RW discs, but utilizes the same recording
techniques as DVD+R.
Incorporates the Direct Overwrite (DOW) system,
❖
allowing data to be written directly over existing data
in a single pass.
❖
R media, but with 4.7GB of capacity versus 700MB
for CD-R discs.
DVD+R supports “lossless linking” and the combina-
❖
tion of Constant Angular Velocity (CAV) and Constant Linear Velocity (CLV) recording techniques.
DVD-R Discs
Best suited for: recording DVD videos, storing mul-
❖
tiple photo albums and data DVDs under 4.7GB.
DVD-RW Discs
Best suited for: backing up and archiving digital con-
❖
tent.
ese discs serve the same general purpose as CD-
❖
RW media, but with 4.7GB of space versus 650MB.
Discs can be written and erased up to 1,000 times.
❖
DVD+R Discs
Best suited for: recording DVD videos, storing mul-
❖
tiple photo albums and data DVDs under 4.7GB.
ese discs are also functionally similar to CD-R
❖
media, and have the same capacity as DVD+R discs.
ere are two types of DVD-R discs: DVD-R Gen-
❖
eral, which are intended for home applications, and
DVD-R Authoring, which are intended for professional DVD-Video development applications.
DVD+R9 DL and R-9 DL (Double Layer) Discs
Ideal for: recording high-quality DVD videos, back-
❖
ing up and archiving large data DVDs.
ese discs follow the DVD+ recording techniques,
❖
Page 16

LaCie d2 DVD±RW Drive
User Manual
but with 8.5GB of capacity versus 4.7GB for DVD±R
discs.
With the increased capacity, it is now possible to
❖
increase the video bit rate for higher quality DVD
videos.
CD-R Discs
Best suited for: recording audio CDs, storing photos
❖
and for data CDs.
Files can not be deleted from CD-R discs, and you
❖
cannot write over existing files on a CD-R disc.
CD-RW Discs
Best suited for: passing medium sized files around an
❖
office or among students.
Discs can be reformated up to 1,000 times, and files
❖
can be written over.
Introduction
page 15
For Best Recording Results
Close all other open programs and disconnect
❖
from the internet
Copy data to your hard drive first
❖
Check media speed rating
❖
Use media that is free of scratches and finger-
❖
prints
Most CD-ROM drives and audio CD players can-
❖
not read CD-RW discs.
Page 17
LaCie d2 DVD±RW Drive
User Manual
2. Connecting Your LaCie d2 DVD±RW Drive
ere are three parts to connecting and turning on
your LaCie d2 DVD±RW Drive.
e LaCie d2 DVD±RW Drive can be connected to
both Macs and PCs; however bundled software varies
depending on the model.
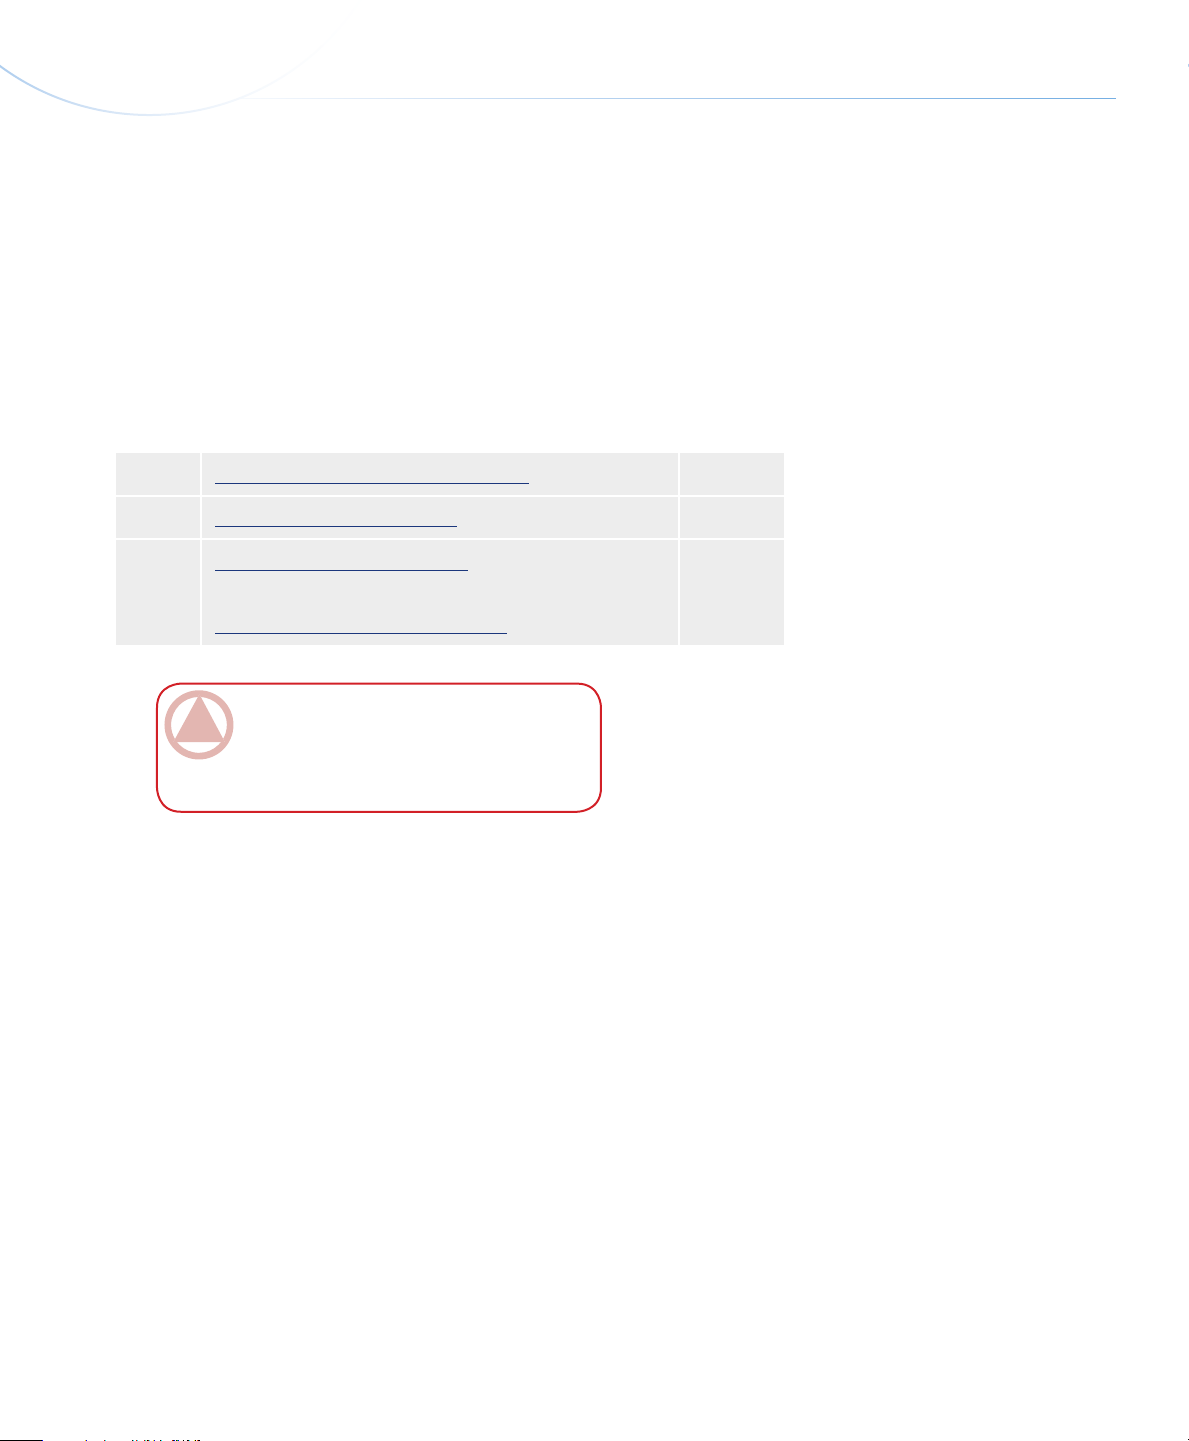
Step 1 Installing DVD/CD Burning Software Page 17
Step 2 Connecting the Power Supply Page 18
Getting Connected
page 16
Step 3 Connecting the USB 2.0 Cable
OR
Connecting the FireWire 400 Cable
ImpOrTANT INfO: For drives with both USB
and FireWire interfaces, the USB and FireWire interfaces cannot be connected at the same time. Unmount the drive before switching interfaces.
Page 19
Page 20
Page 18
LaCie d2 DVD±RW Drive
User Manual
2.1. Installing DVD/CD Burning Software
Getting Connected
page 17
Installing the Recording Software■
Insert your LaCie DVD Utilities DVD-ROM into
your computer’s internal DVD drive and follow the instructions below for your LaCie d2 DVD±RW Drive
model. For more information about the various programs, please refer to the software’s Help menu.
USB 2.0 & FireWire
■
Mac
Double-click the LaCie DVD Utilities DVD-ROM
icon and open the “Toast Basic” folder. Drag and drop
the Roxio Toast Basic application icon into the Applications folder on your hard drive.
PC
Double-click the LaCie DVD Utilities DVD-ROM
icon and then open the “Easy Media Creator” folder.
Double click the installer and follow the on-screen instructions.
FireWire-only
■
ImpOrTANT INfO: Available software vary
from one model to another. For a complete list
of software, please check the packaging of your
product or the label of the included CD- or DVD-
ROM.
Available software includes (depending on chosen
model):
Recording Software
Toast Titanium (Mac)
❖
Toast Basic (Mac)
❖
Easy Media Creator (Windows)
❖
LaCie reserves the right to include a higher version of these software or different software. Please
check your product packaging for an exact list.
Please see www.roxio.com for information on Toast
Titanium, Toast Basic and Easy Media Creator.
Please check the LaCie website for software updates: www.lacie.com/support/drivers/dvd
Double-click the LaCie DVD Utilities CD-ROM
icon and open the “Toast Titanium” folder. Drag and
drop the Roxio Toast Titanium application icon into the
Applications folder on your hard drive.
USB 2.0-only
■
Double-click the LaCie DVD Utilities DVD-ROM
icon and then open the “Easy Media Creator” folder.
Double click the installer and follow the on-screen instructions.
TeChNICAl NOTe: You will be prompted for
the CD key the first time you use Toast Titanium.
e serial number for Toast Titanium is located
on the front of the LaCie d2 DVD±RW Utilities
CD-ROM sleeve.
Page 19
LaCie d2 DVD±RW Drive
La
C
ie
L
t
d
.
X
X
X
X
X
X
Seri
a
l
N
u
mb
e
r
XXX
XXX
X
X
X
ON
OFF
User Manual
2.2. Connecting the Power Supply
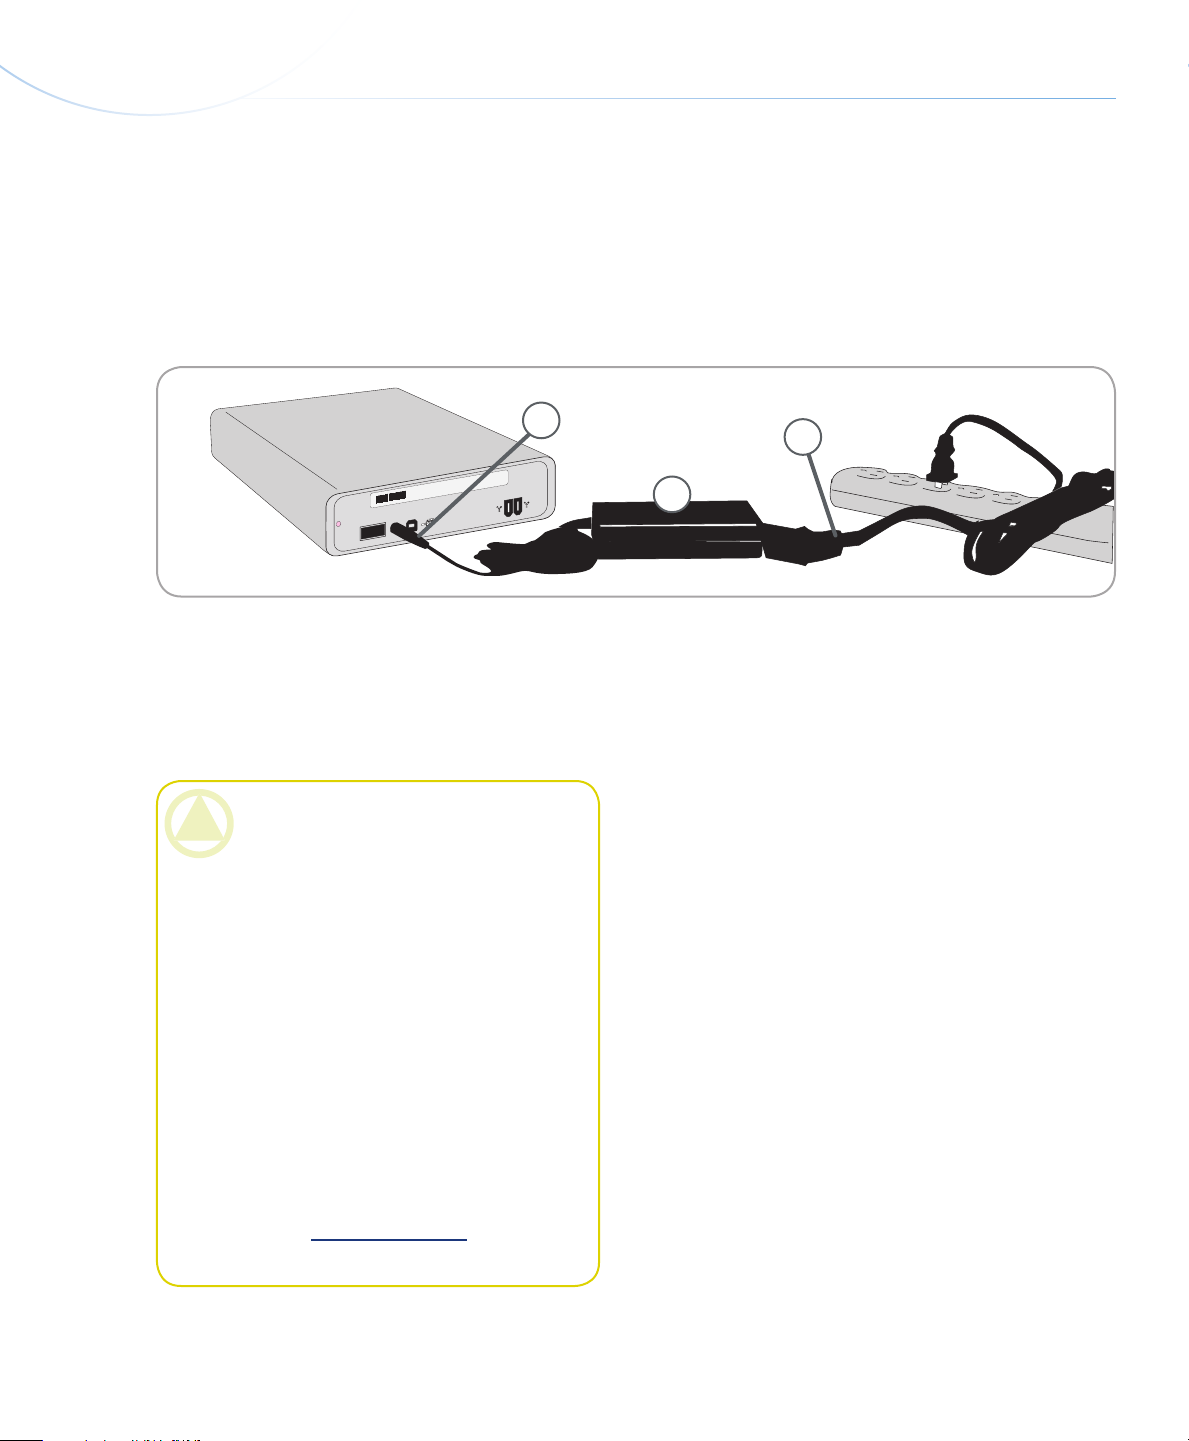
e power supply kit is composed of two cables: one
cable (A) connects to the LaCie drive; and the other
cable (B) connects to a power outlet, such as a wall outlet or a surge protector.
Getting Connected
page 18
Connect Cable A to your LaCie Drive.
1.
Connect Cable B to the power supply brick (C).
2.
Connect Cable B to a surge protector or wall outlet.
3.
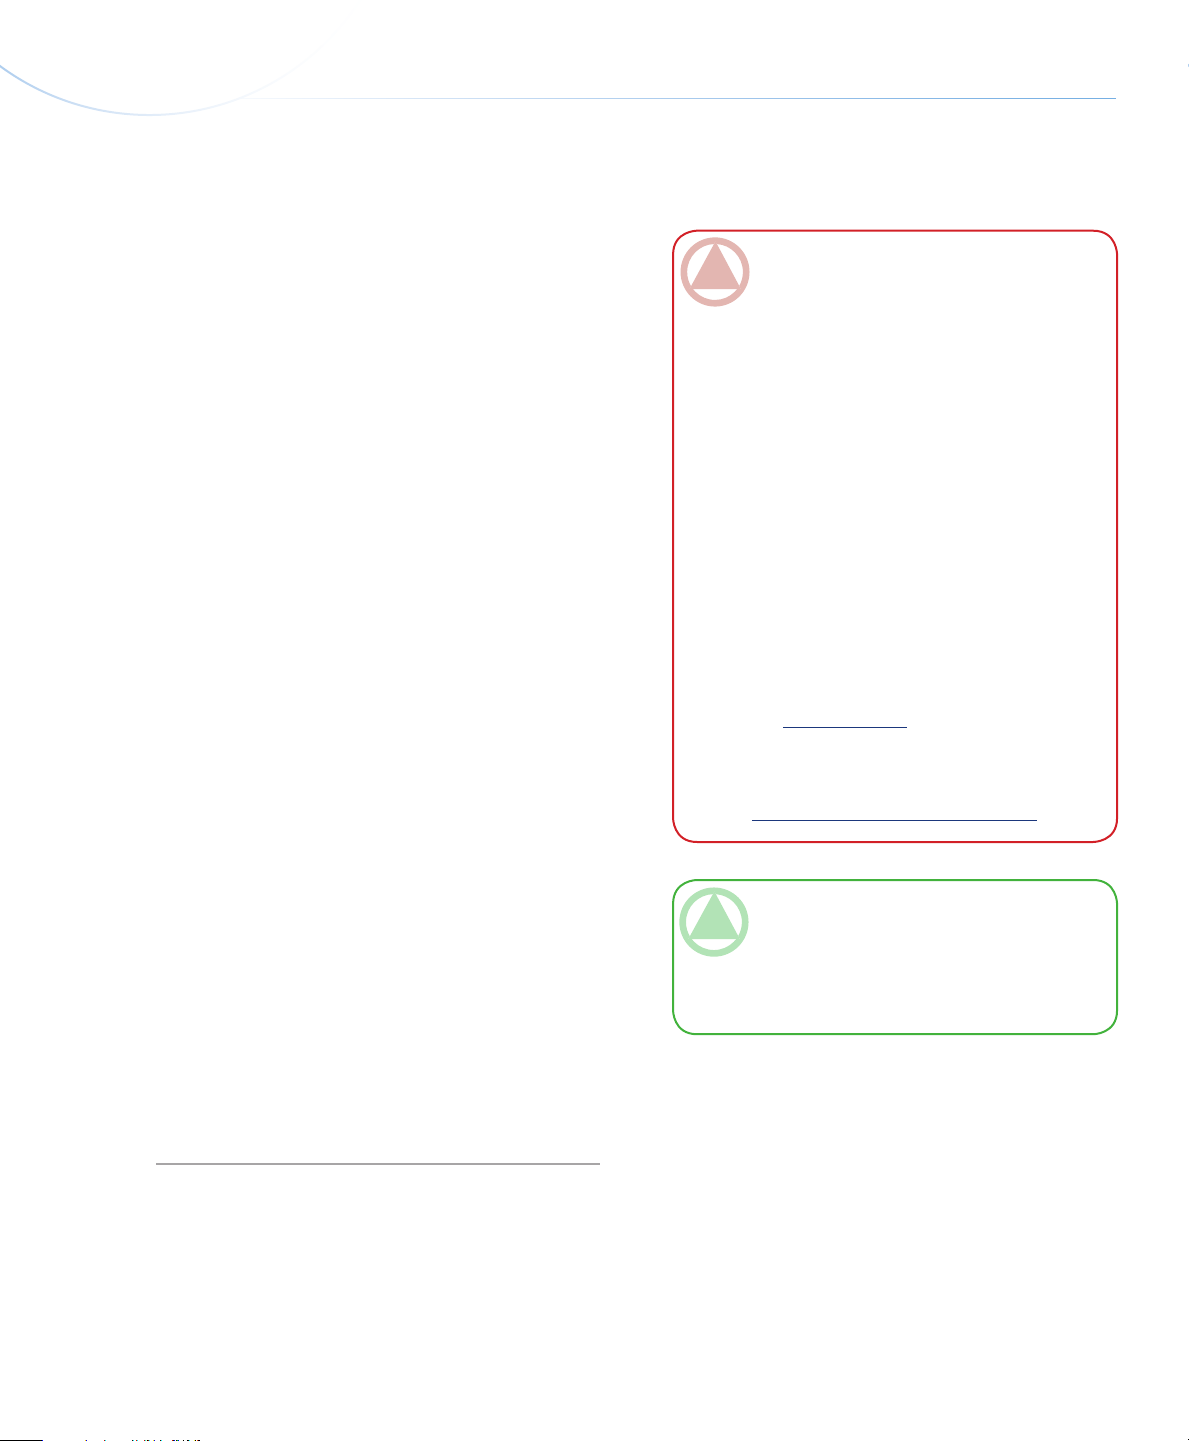
CAUTION:
Only use the AC adapter supplied with your spe-
❖
cific LaCie drive. Do not use a power supply from
another LaCie drive or another manufacturer. Using any other power cable or power supply may
cause damage to the device and void your warranty.
A
B
C
Always remove the AC adapter before trans-
❖
porting your LaCie drive. Failure to remove the
adapter may result in damage to your drive and
will void your warranty.
If your power supply gets damaged, a re-
❖
placement can be purchased from your local LaCie retailer or on the LaCie Web site:
www.lacie.com
Page 20
LaCie d2 DVD±RW Drive
LaCie Ltd. XXXXXX
Serial Number XXXXXXXXX
ON
OFF
User Manual
2.3. Connecting the USB 2.0 Cable
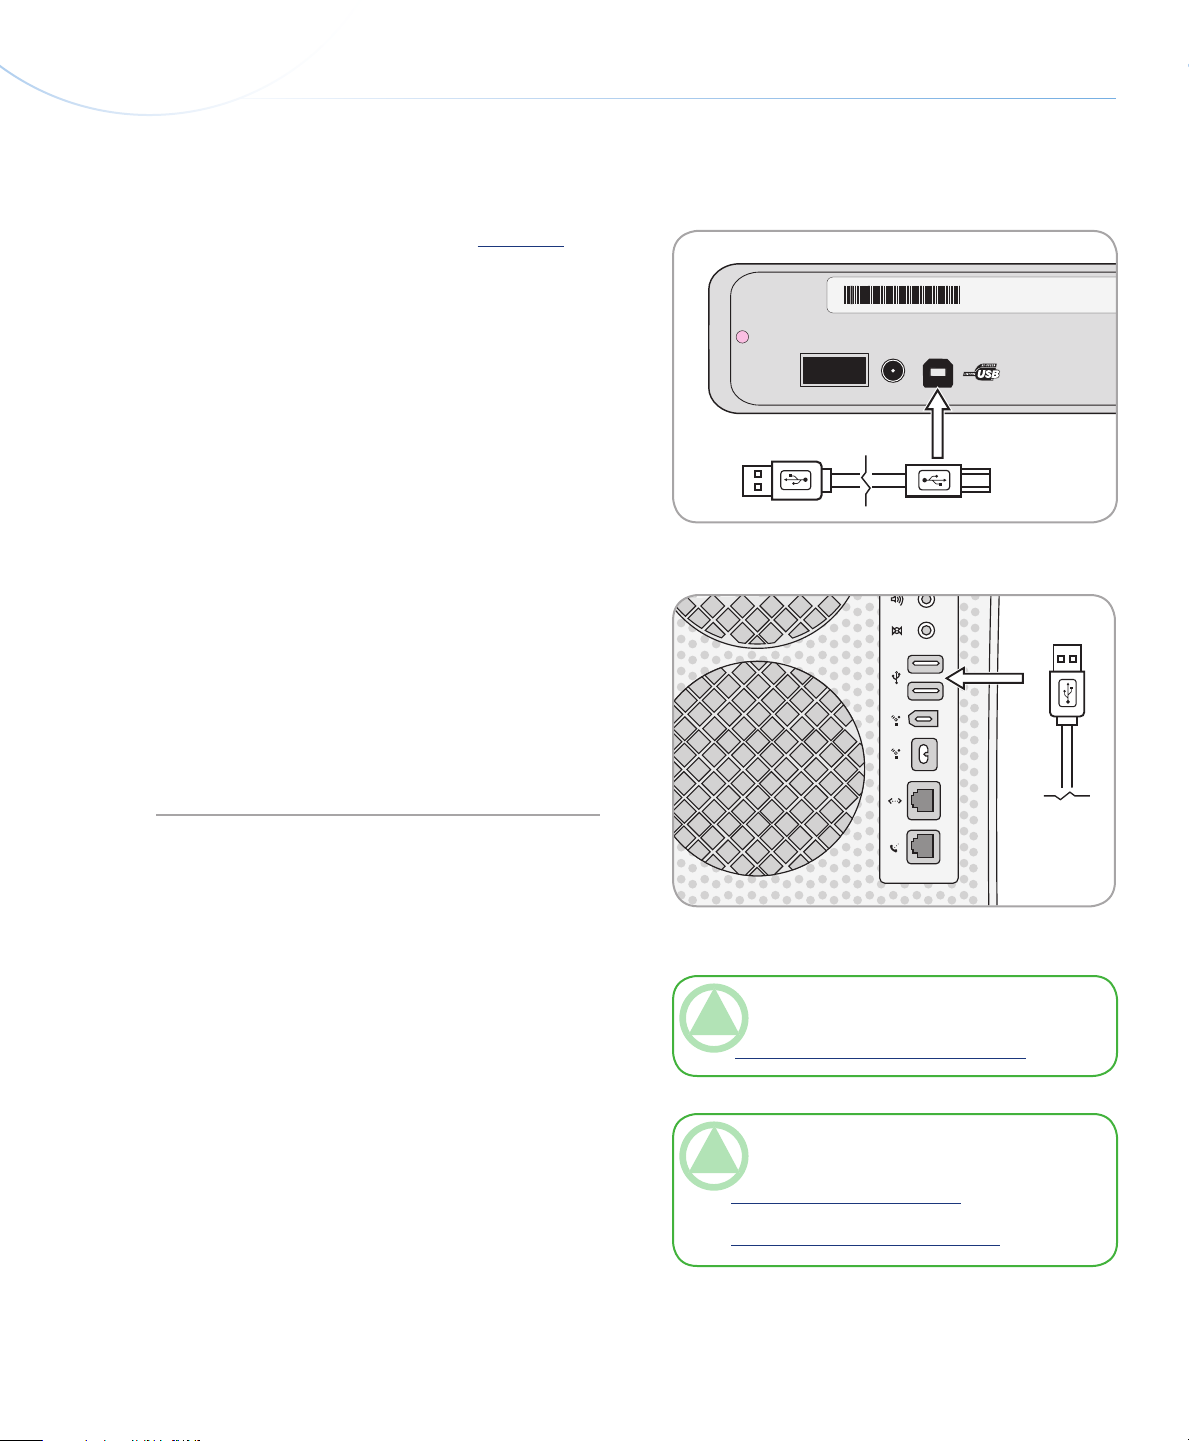
Connect the power supply cable (see section 2.2).
1.
Connect the Hi-Speed USB 2.0 cable to the USB
2.
2.0 port on the back of the drive (Fig. 2.3.A).
Attach the other end of the interface cable to an
3.
available USB port on your computer (Fig. 2.3B).
Your drive should now be ready for use. To verify
4.
that your drive is correctly installed and communicating with your computer, follow these steps:
Mac Users
Getting Connected
page 19
In the Apple menu, click on About is Mac, then
More Info. is will open the Apple System Profiler.
Your drive should be listed under the Hardware category.
Windows Users
Right click your My Computer folder and select
Properties. Click on General. Your drive should be
listed.
Fig. 2.3.A
Fig. 2.3.B
TeChNICAl NOTe: Your drive must be con-
nected to a USB 2.0 (as opposed to USB 1.1) port.
See section 1.4, Cables and Connections.
TeChNICAl NOTe: For more information on
USB connections, see the following sections:
1.4, Cables and Connections
❖
4.6, USB Questions and Answers
❖
Page 21
LaCie d2 DVD±RW Drive
User Manual
2.4. Connecting the FireWire 400 Cable
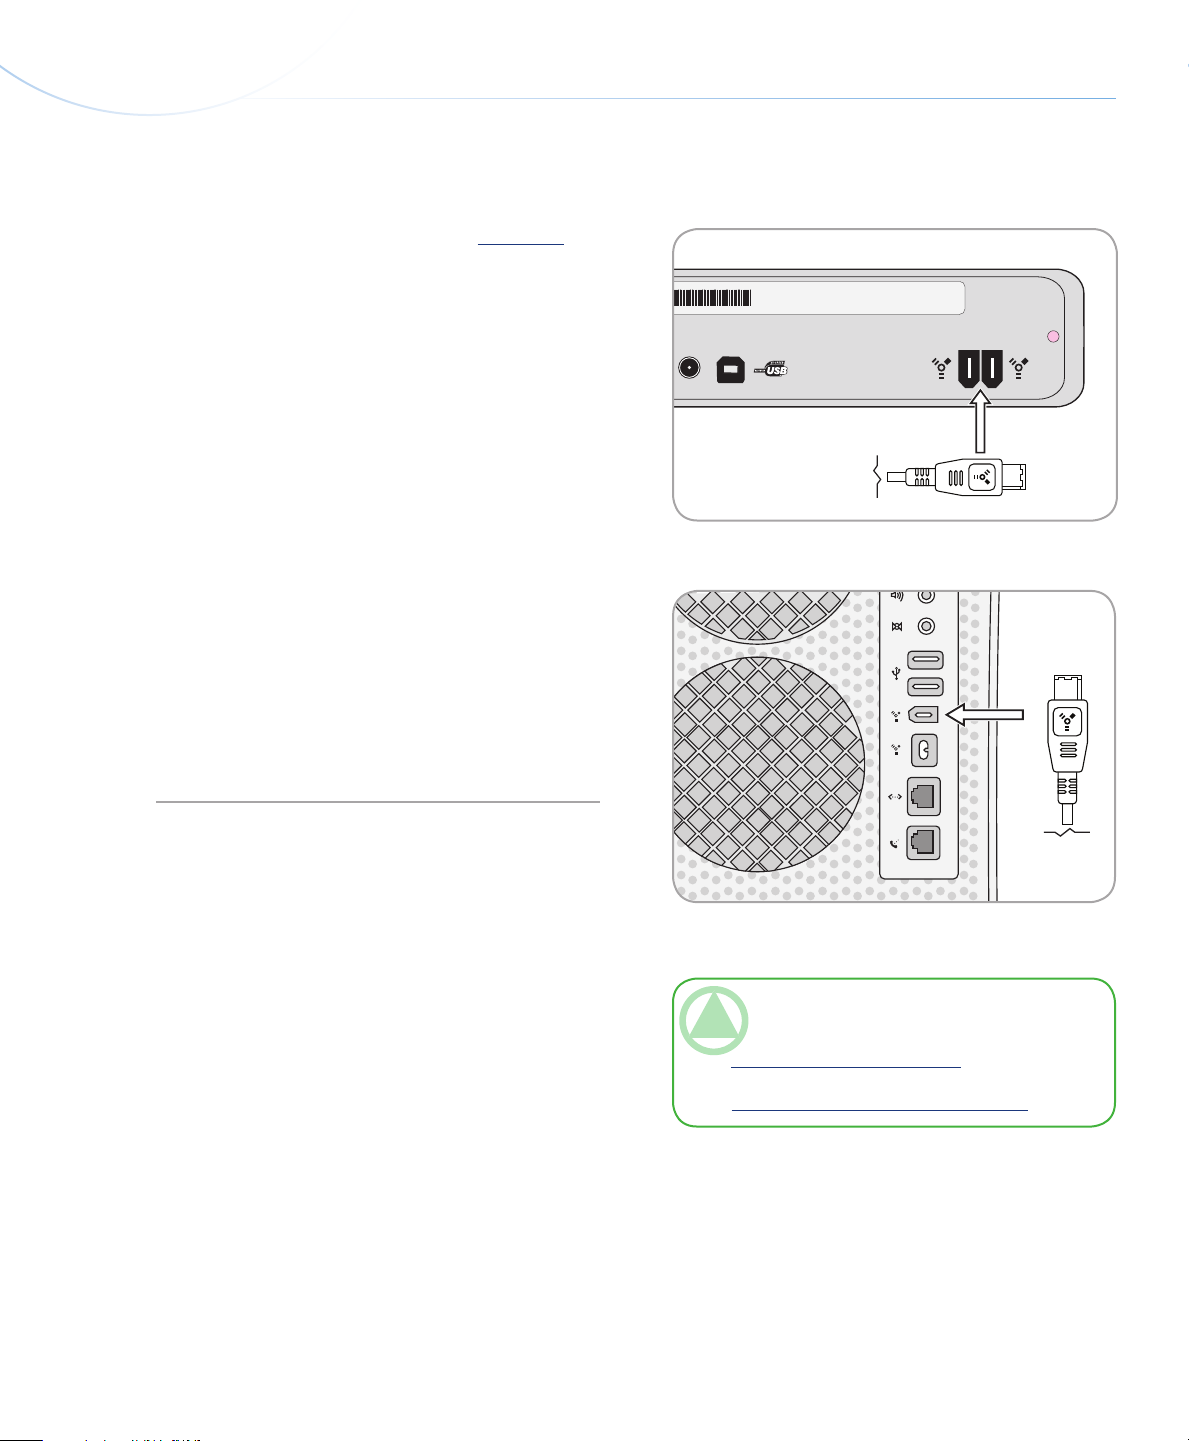
Connect the power supply cable (see section 2.2).
1.
Connect the FireWire 400 cable to a FireWire 400
2.
port on the back of the drive (Fig. 2.4.A).
Attach the other end of the interface cable to an
3.
available FireWire 400 port on your computer (Fig.
2.4.B).
Your drive should now be ready for use. To verify that
4.
your drive is correctly installed and communicating
with your computer, follow these steps:
Getting Connected
page 20
Mac Users
In the Apple menu, click on About is Mac, then
More Info. is will open the Apple System Profiler.
Your drive should be listed in the Hardware category.
Windows Users
Right click your My Computer folder and select
Properties. Click on General. Your drive should be
listed.
Fig. 2.4.A
Fig. 2.4.B
TeChNICAl NOTe: For more information on
FireWire connections, see the following sections:
1.4, Cables and Connections
❖
4.5, FireWire Questions and Answers
❖
Page 22
LaCie d2 DVD±RW Drive
User Manual
3. Using Your LaCie d2 DVD±RW Drive
3.1. Inserting Discs
To insert a disc:
Push the open/close button on your LaCie d2
1.
DVD±RW Drive.
When the disc tray opens, put the DVD or CD me-
2.
dia into the tray with the label side facing up. Make
sure the DVD or CD is correctly placed in the center
of the disc tray.
Push the open/close button to close it.
3.
Do not attempt to force the door open; you will
damage the drive. e power must be on in order to
open the drive. e drive must be on a flat surface to
work correctly.
To close the disc tray:
Push the open/close button. Pushing the media tray
closed is not recommended.
Fig. 3.1
CAUTION:
Do not force the disc tray open or closed. You
❖
will damage the drive.
Always remove discs before transporting the
❖
drive.
Using Your d2 DVD±RW Drive
page 21
3.2. Accessing Discs
Mac Users
e DVD or CD volume will appear as an icon on
the desktop. Click on the icon to access the contents of
the DVD or CD.
Windows Users
e DVD or CD volume will appear in your My
Computer folder. Click on the icon to access the contents of the disc.
Never move the drive while it is in operation.
❖
is drive is not compatible with cartridges.
❖
Page 23
LaCie d2 DVD±RW Drive
User Manual
3.3. Ejecting Discs
Mac Users
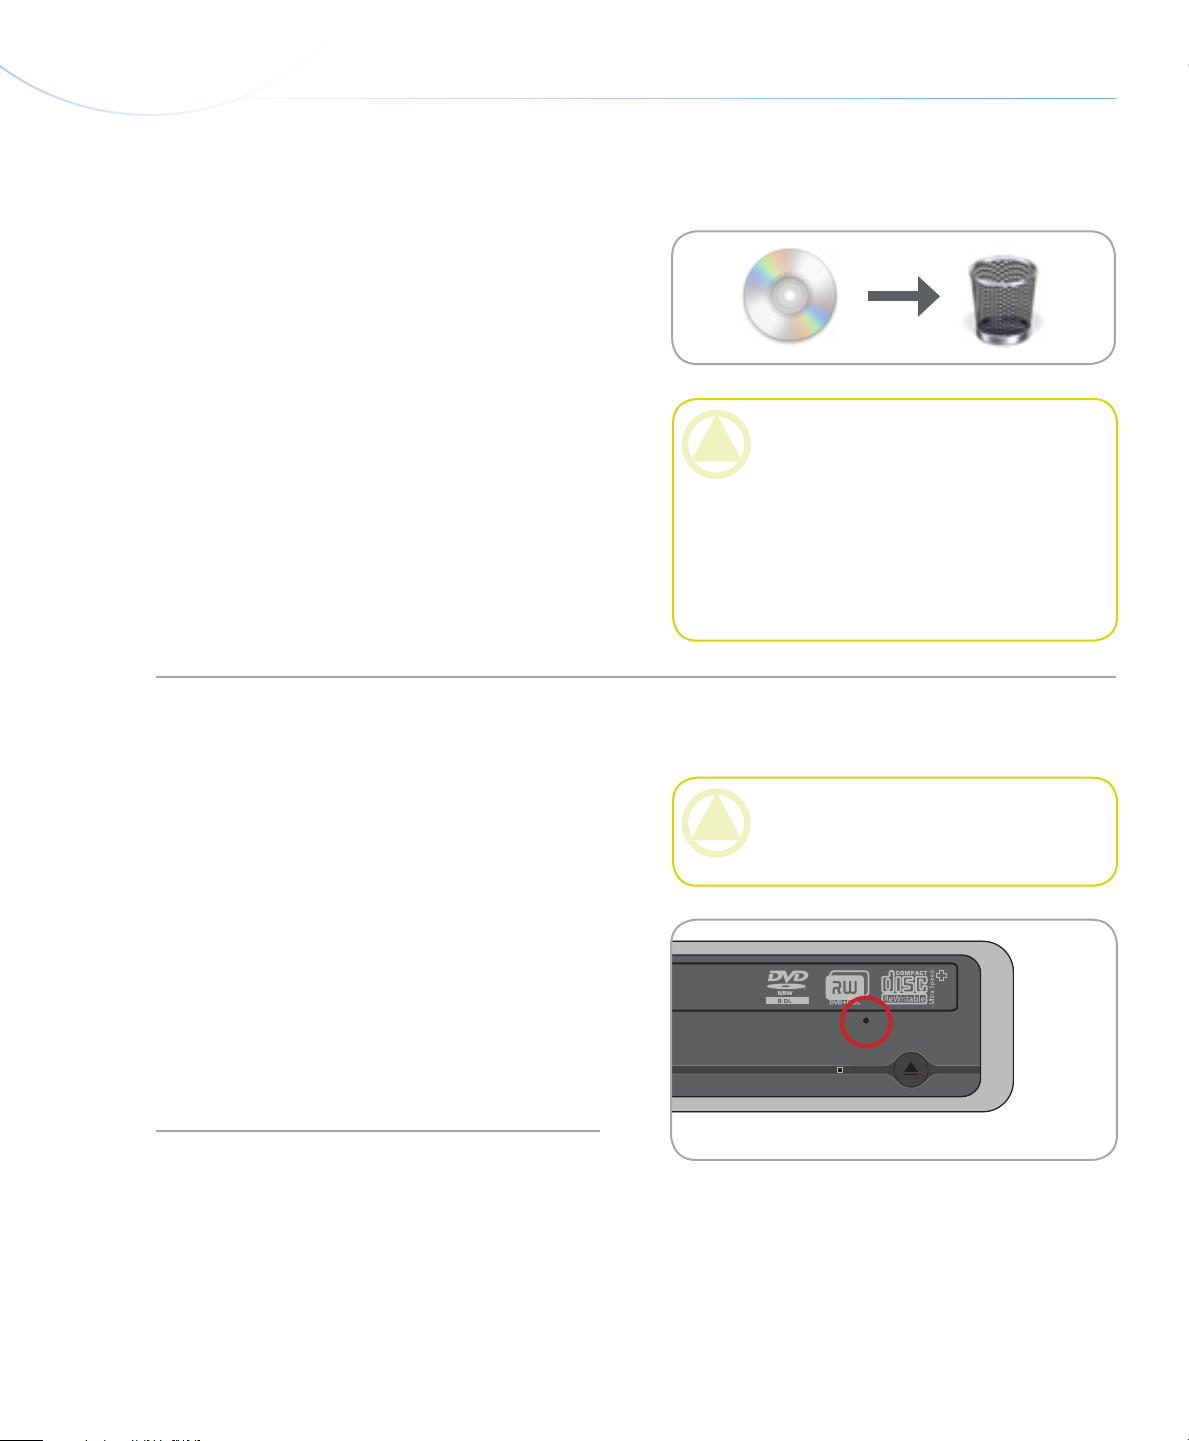
1.
Drag the DVD/CD icon on the desktop to the Trash.
e disc tray will open.
2.
Remove the disc.
3.
Push the open/close button on the drive to close the
disc tray.
Windows Users
1.
Press the open/close button on the front of the
drive.
Remove the disc.
2.
Push the open/close button on the drive to close the
3.
disc tray.
Using Your d2 DVD±RW Drive
page 22
CAUTION: Do not attempt to open the drive’s
disc tray or remove the disc while the unit is in use
and being accessed by the computer. You may injure yourself and/or damage the drive and/or your
computer system. Do not transport the drive with
the disc tray open or with a DVD or CD disc inside. Doing so may damage the drive and/or data
stored on the disc, and will void your warranty.
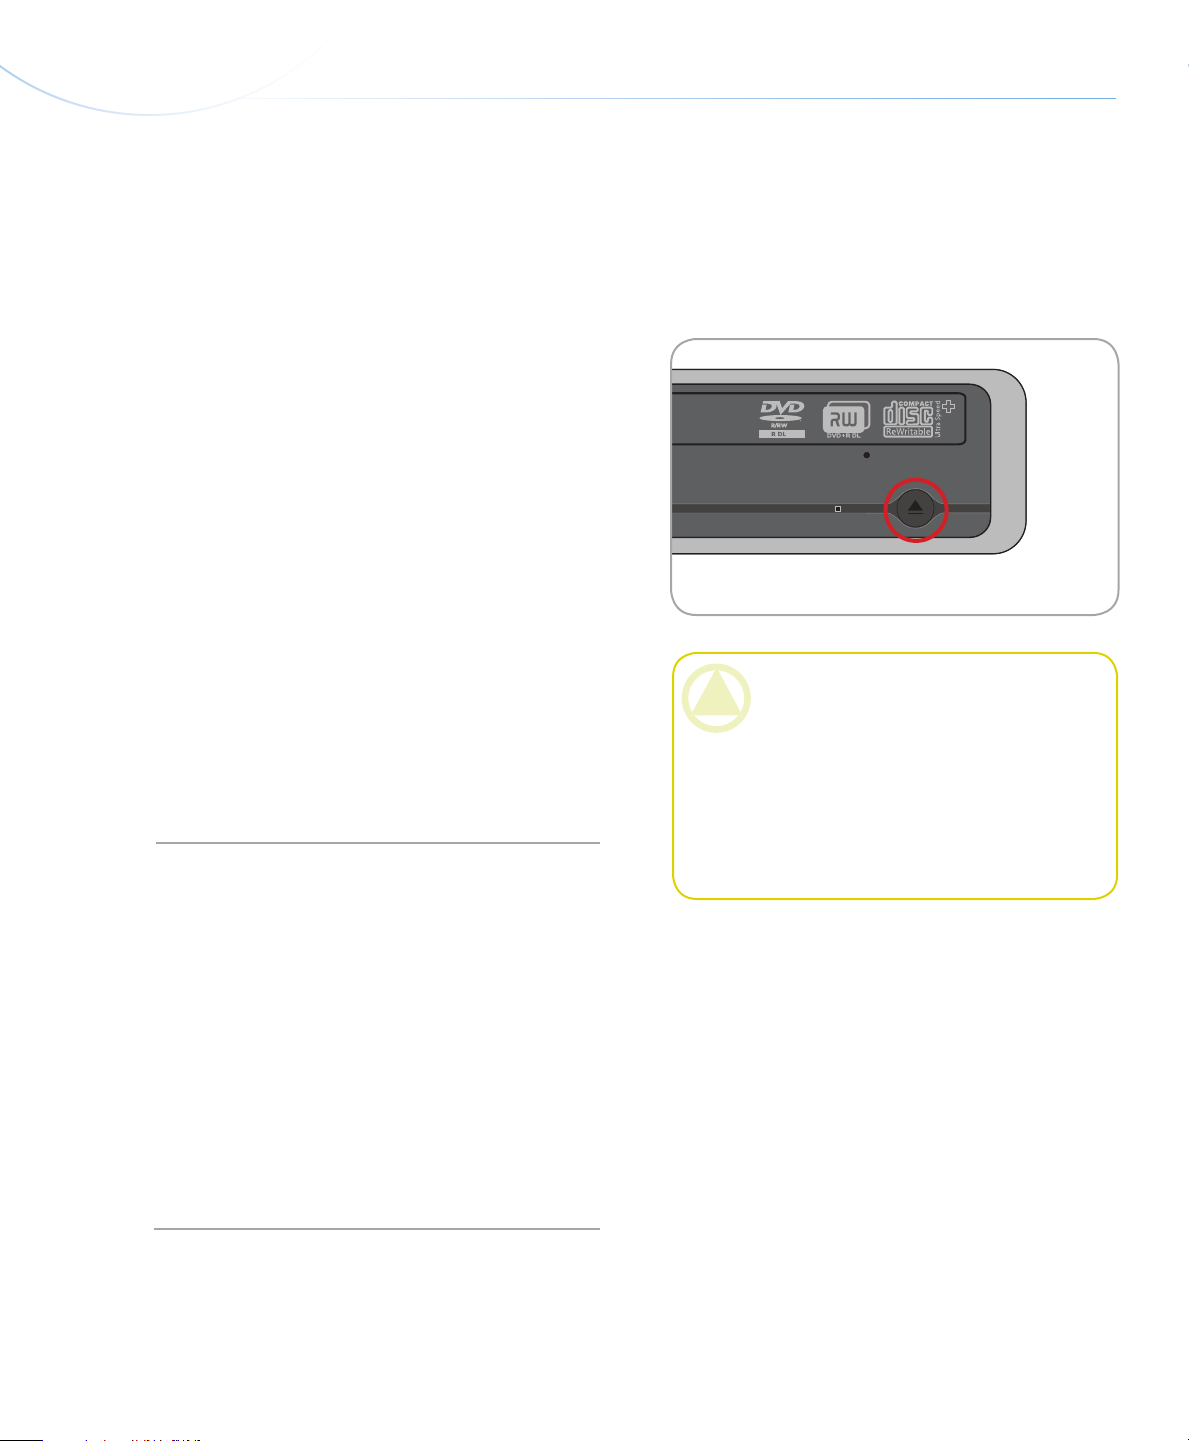
3.4. Emergency Disc Ejection
In the event that a DVD or CD cannot be ejected
with the open/close button and the software is not controlling the drive, use the emergency eject operation to
open the disc tray.
Switch off the drive and unplug the interface cable.
1.
Insert a small metal poker, such as an unbent paper
2.
clip, into the emergency eject hole (see Fig. 3.4) until
the poker presses against the manual eject mechanism. You will feel the mechanism eject the disc tray.
Only use this method if the open/close button is
not working.
CAUTION: Make sure the drive is off and the
power unplugged before attempting the emergency
ejection procedure.
Fig. 3.4
Page 24

LaCie d2 DVD±RW Drive
User Manual
4. Helpful Technical Information
4.1. File System Formats
Helpful Technical Information
page 23
When writing DVD±R/RW and CD-R/RW discs,
you will have the option to assign the disc a particular
file format (the way in which a computer names and organizes files for storage and to manage data exchange).
ere are essentially three file system formats to be concerned with when using a LaCie DVD/CD Drive:
Universal Disk Format (UDF)
❖
ISO 9660
❖
Mac OS Extended (also known as HFS+)
❖
UDF - is specification, developed by Optical
Storage Technologies Association, is the predominant
file system that allows compatibility across various Bluray, DVD and CD applications, hardware platforms and
computer operating systems.
ISO 9660 - is is the standard file system which
allows media to be read on a Mac, PC or other major computer platform. Published by the International
Organization of Standardization, this standard defines
a file system for DVD-ROM and CDs. It supports
Microsoft Windows, Mac OS and operating systems
that follow the Unix specification, but doesn’t support
custom features of Mac file systems such as long file
names or icon options. Microsoft created an extension
to the format, called Joliet, which allows for Unicode
file character names and file names up to 64 characters
in length (twice as many as the ISO 9660 Level 2 and
3 specifications).
Mac OS Extended - Also known as HFS+, this is
the file system used by Macintosh. If you will be using
your disc only on Macs, this is the preferred file format.
Hybrid discs (Mac & PC) - Mac users can also
choose to create hybrid discs which contain two partitions: one to be viewed by Mac users, one by Windows users. Toast 7 Titanium does allow this file system
choice.
Page 25
LaCie d2 DVD±RW Drive
User Manual
4.2. DVD±RW Writing Methods
Helpful Technical Information
page 24
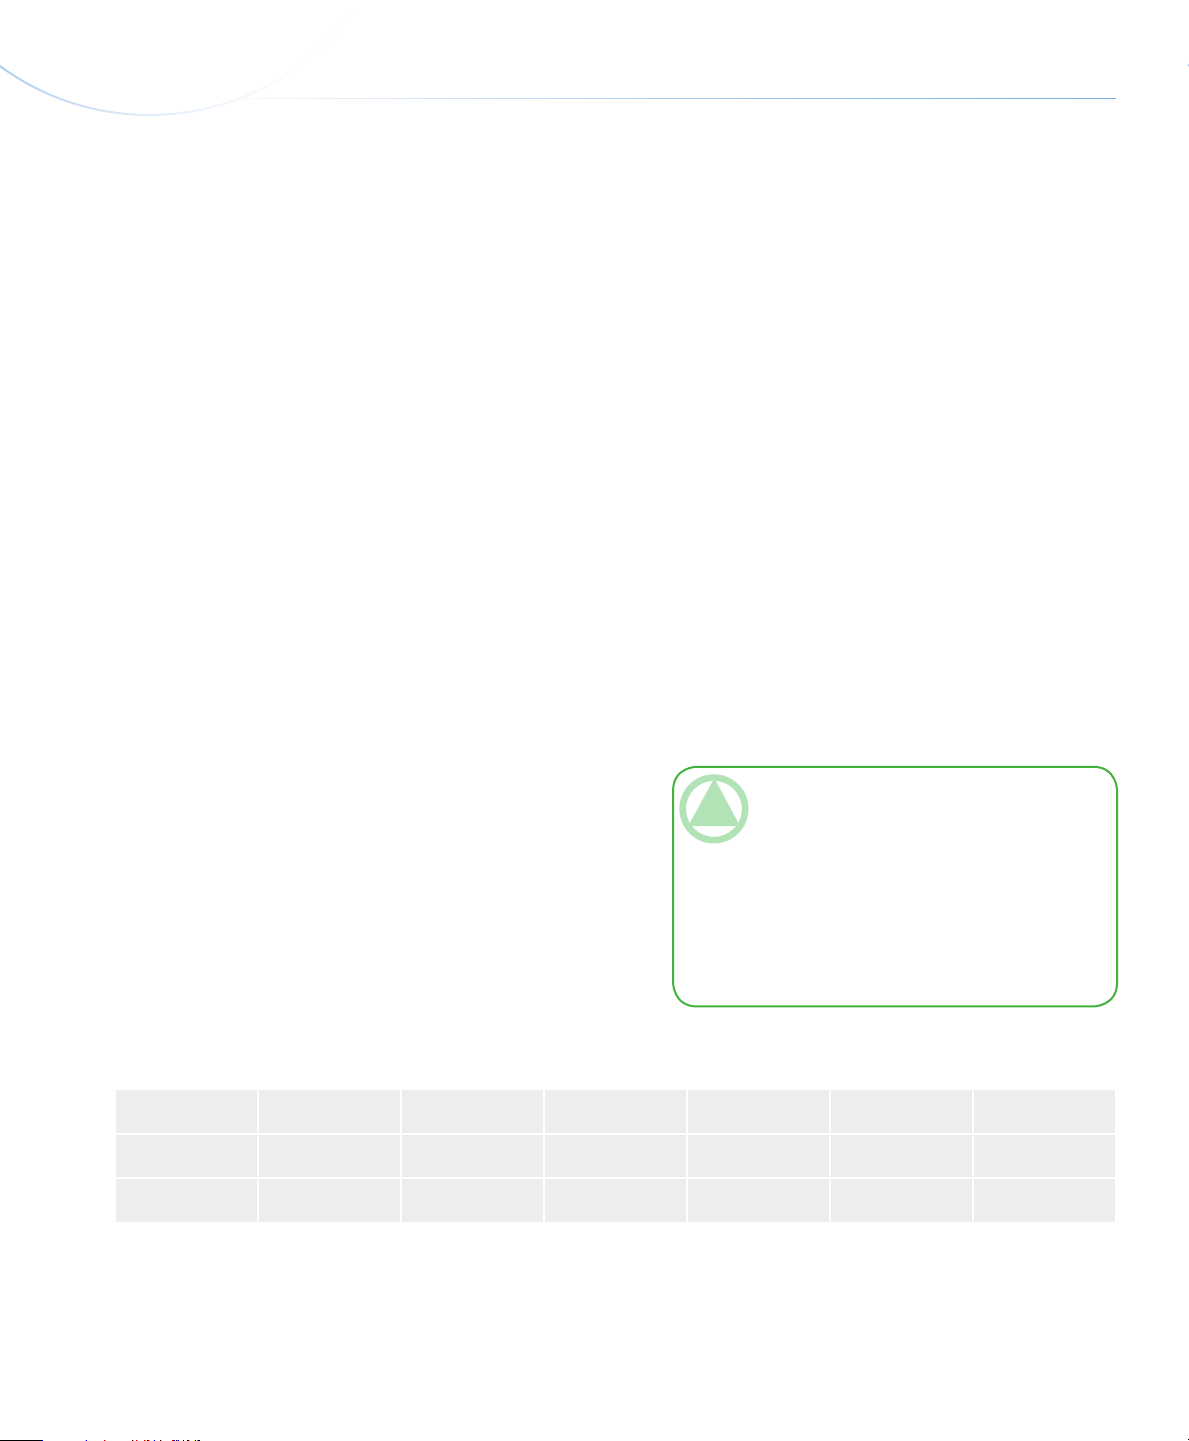
Disc at Once (DAO) – A DVD writing process in
which the entire DVD is recorded in one session, and
data cannot be added after the recording is finished. Differs from the CD-R DAO method because the lead-in,
data area and lead-out areas are all written sequentially.
Session at Once (SAO) – A writing process which
is similar to DAO, where all of the information is written in one session, but SAO allows for the ability to begin another session and record at a later time. is mode
allows for greater control of the recording process than
Packet Writing (PW) or TAO, and more disc space can
be utilized because there is no need for gaps between
tracks.
Incremental Recording (IR) – A writing process
that is similar to the Session at Once (SAO) CDR writing method; files may be added directly to the
DVD-R disc one recording at a time, instead of recording the files to a hard drive before writing the disc. e
minimum recorded size, though, must be at least 32KB
(even if the file to be recorded is smaller than that), and
capacities and write speeds are decreased due to the
overhead of combined lead-in/out areas and data. Also,
the disc must be finalized before it may be played back
by a drive other than the drive recording the disc.
Multi-Border Recording (MBR) – A writing pro-
cess that is very similar to IR, MBR allows you to make
an IR disc and then play the disc back on a device that
recognizes this type of recording method. MBR creates
a very short boundary zone around a recording session
so a compatible player or DVD-ROM drive does not
attempt to play beyond the border of the recorded area,
instead allowing the unfinalized disc to be read by a
player that supports this recording method.
Restricted Overwriting (RO) – With this method,
if a disc has already been written to, new data segments
can be randomly inserted anywhere within the recorded
boundary. New data, however, can only be added to an
area of the disc that has already been recorded over and
from the point where the last session was stopped.
Packet Writing (PW) – A drag-and-drop writ-
ing process writing process that is very useful for data
backup. Buffer underrun* is impossible in this mode,
because the data is written in “packets” of a few KBs.
Packet Writing is a CPU-intensive process because it
constantly checks the available space on the disc.
TeChNICAl NOTe: *Buffer Underrun – e
recording of a disc is a system-intensive application,
and the rewritable drive needs a constant stream of
data. A buffer underrun occurs when the stream of
data to the rewritable drive is not fast enough to
keep the rewritable drive’s buffer full, causing the
an error in the recording process. If this problem
occurs often, turn down the recording speed.
CD
DVD
DAO SAO IR MBR RO PW
X X X
X X X X
Page 26

LaCie d2 DVD±RW Drive
User Manual
4.3. About DVD/CD Available Capacity
ere are important factors to consider when recording video, audio or data to CD or DVD discs. e DVD
media specification provides for two physical sizes: 4.7”
(12cm) and 3.1” (8cm) (both are .47” (1.2cm) thick).
DVD discs are single-sided and can have one (SL) or
two (DL) layers of data.
e amount of data or video that a disc can hold are
dependent upon factors such as the amount of audio and
the degree of compression of the data, video or audio.
When media companies reference the amount
of data that a disc can hold, they represent the total
amount in terms of gigabytes (GB), or a billion bytes
(1000 x 1000 x 1000 bytes). is number, though, is not
the way in which a computer addresses the data; to a
computer the value is binary and larger than a billion
bytes – 1,073,741,824 (1024 x 1024 x 1024 bytes).
Helpful Technical Information
page 25
Page 27

LaCie d2 DVD±RW Drive
User Manual
4.5. FireWire Questions & Answers
Helpful Technical Information
page 26
What is FireWire /IEEE 1394?
■
A serial bus used to connect external computer and
consumer electronic devices to computers and consumer
electronic consoles.
What does IEEE 1394 mean?
■
“1394” is an abbreviation of IEEE 1394, the name
given to this highperformance serial bus. IEEE (the
Institute of Electrical and Electronic Engineers) is the
name of the engineering corps that developed this standard. e 1394 refers to the 1,394th standard that the
IEEE has produced.
What is the relationship between IEEE
■
1394, FireWire, iLink and DV?
ese four names all refer to the same interface:
IEEE 1394 - the name of the standard, used in the
❖
computer industry.
FireWire - the brand name used by Apple.
❖
iLink - the brand name used by Sony.
❖
DV - logo used by video camcorder manufacturers.
❖
FireWire is also a point-to-point interface, meaning that a FireWire device can transmit data to another
FireWire device without having to go through a computer. is lets several computers share a given device,
and also allows up to 63 devices to be daisy-chained to
the same FireWire bus (with a max of 16 devices on
one branch). To daisy-chain, connect your one FireWire
drive directly to the computer, then connect another
FireWire drive to the first FireWire drive.
Does my computer have a FireWire port?
■
All Macs and most recent PCs come with FireWire
or i-Link interfaces. If your computer doesn’t include a
FireWire interface, an extension card can be purchased
from your LaCie reseller or from the LaCie website:
www.lacie.com
Will my LaCie drive work faster if con-
■
nected to a FireWire 800 port ?
No. Your LaCie drive can be connected to a FireWire
800 port (cable not supplied) but the speeds will remain
identical.
What can the FireWire interface be used
■
for?
With its high data transfer rates, FireWire is a great
interface for consumer electronics, like BD, DVD and
CD recorders, external hard drives and video devices,
such as digital camcorders, because it has an extremely
large bandwidth and supports two types of data transfer
(anyschronus and isochronous) which help to guarantee
the transfer of time-critical data.
Page 28

LaCie d2 DVD±RW Drive
User Manual
4.6. USB Questions & Answers
What Are the Benefits of the USB Inter-
■
faces?
Cross-platform: All recent Macintoshes and PC in-
❖
clude USB ports.
“Hot Swappable”: No need to shut down or restart
❖
your computer when adding or removing a USB device. Plug it in and its ready.
Automatic configuration: Once your device is con-
❖
nected, your computer recognizes the device and
configures the software (Windows 2000, Windows
XP and Windows Vista).
Daisy-Chaining: with USB ports on your computer,
❖
you can connect up to 127 peripherals using hubs.
Helpful Technical Information
page 27
Easy Installation: One standardized port and plug
❖
combination makes it simple to connect.
Will Hi-Speed USB 2.0 Devices Work on
■
USB 1.1 Hubs and Vice Versa?
You can use your Hi-Speed USB 2.0 devices with
USB 1.1 hubs, but the peripherals will be limited to
USB 1.1 performance levels.
For more information about the USB interface,
please visit the LaCie website:
www.lacie.com/technologies
Page 29

LaCie d2 DVD±RW Drive
User Manual
4.7. Choosing between FireWire and USB (USB 2.0 & FireWire only)
If your computer supports both interfaces, we advise
you to use the FireWire interface. FireWire technology
allows for daisy chaining of drives (i.e. you can connect
the peripherals to each another) which avoids the use
of a hub. Furthermore, sustained data transfer rates are
usually higher with FireWire.
4.8. Data Transfers
Helpful Technical Information
page 28
Data transfers are the flow of data that accomplishes
a task, usually related to moving data from storage to
computer RAM or between storage devices. During
data transfers, it’s best to wait before launching other
applications on the same FireWire or USB port. Anomalies may arise with computers that have FireWire or
USB controllers that do not conform to OHCI (Open
Host Controller Interface) standards. In any other configurations, we cannot ensure 100% correct operation.
Due to this, you may encounter hanging problems. If
this happens, proceed as follows:
Make sure that the FireWire or USB cable is con-
1.
nected tightly and securely on both ends of the cable,
from the drive to the computer. If you are using a
FireWire or USB cable other than the one supplied
with your LaCie drive, check that it is FireWire
(IEEE 1394) certified.
Check that the power supply and ground connection
2.
are seated properly.
Disconnect your computer’s FireWire or USB cable.
3.
Wait 30 seconds. Reconnect.
TeChNICAl NOTe: *Controller - is is
a component or an electronic card (referred to
in this case as a “controller card”) that enables a
computer to communicate with or manage certain
peripherals. An external controller is an expansion
card which fills one of the free slots (i.e. PCI or
PCMCIA) inside your PC and which enables a
peripheral (i.e. DVD/RW drive, Hard Drive, scanner or printer) to be connected to the computer.
If your computer is not equipped with a FireWire
controller card, you can purchase an external controller through LaCie. Contact your LaCie reseller
or LaCie Technical Support (page 32, Contacting
Customer Support) for more information.
Page 30

LaCie d2 DVD±RW Drive
User Manual
5. Troubleshooting
In the event that your LaCie d2 DVD±RW Drive
is not working correctly, please refer to the following
checklist to determine the source of the problem. If you
have gone through all of the points on the checklist and
your drive is still not working correctly, please check
the FAQs that are regularly published on our Web site,
www.lacie.com. One of these FAQs may provide an
answer to your specific question. You can also visit the
downloads page, where the most recent software updates will be available.
If you need further assistance, please contact your
LaCie reseller or LaCie Technical Support (see section
6. Contacting Customer Support for details).
Troubleshooting
page 29
Manual Updates
LaCie is constantly striving to give you the most
up-to-date, comprehensive User’s Manuals available on
the market. It is our goal to provide you with a friendly,
easy-to-use format that will help you quickly install and
utilize the many functions of your new device.
If your manual does not reflect the configurations of
the product that you purchased, please check our Web
site for the most current version available.
e Troubleshooting tips on the following pages are
divided up by operating system.
Page 31

LaCie d2 DVD±RW Drive
User Manual
5.1. Mac Troubleshooting
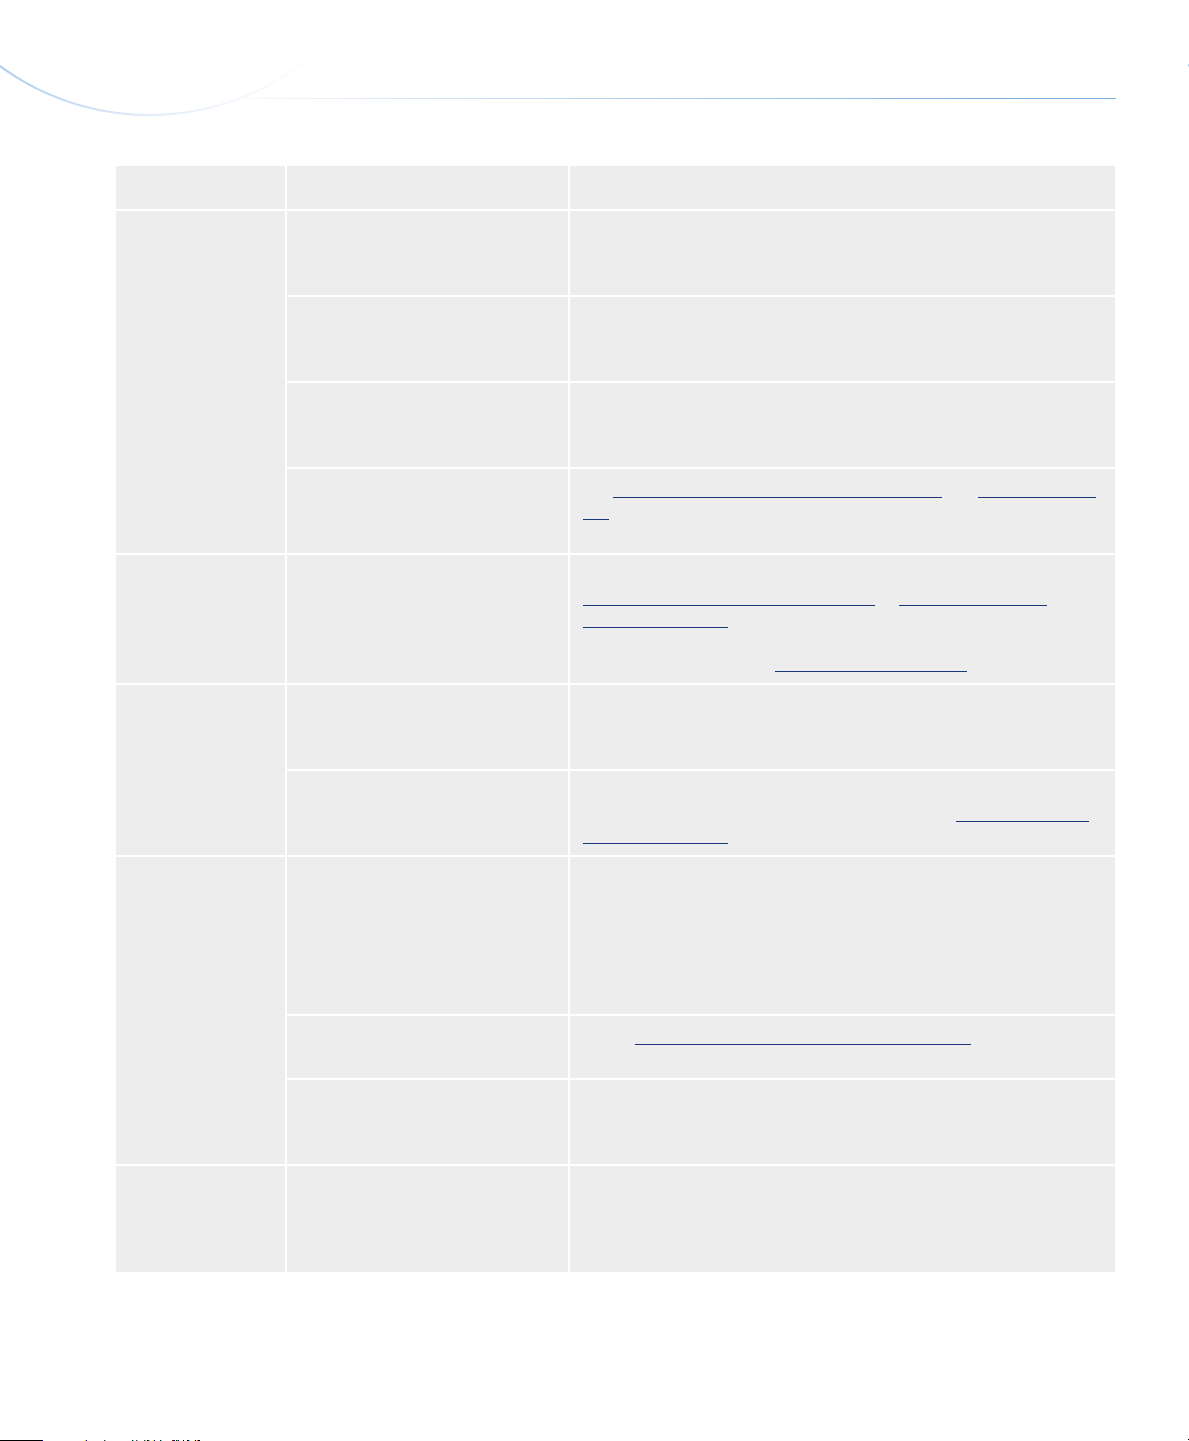
Problem Question Solution
Troubleshooting
page 30
e drive is not
recognized by the
computer
Does your computer’s configuration meet the minimum system
requirements for use with this
drive?
Is the drive’s power supply connected and the drive turned on?
Did you follow the correct installation steps for the specific interface?
Does the drive’s icon appear on the
desktop?
Are both ends of the FireWire or
USB cable securely attached?
See section 1.1, Minimum System Requirements.
Make sure that the power supply is properly connected (see section 2.2,
Connecting the Power Supply), and that the outlet the power supply is
connected to is also turned on.
Review the installation steps in sections 2.3, Connecting the USB 2.0
Cable and 2.4, Connecting the FireWire 400 Cable.
When there is a CD or DVD disc in the drive, there should be an icon
for the LaCie drive on the desktop. Select About is Mac from the
Apple menu and click the More Info... button. Check the Hardware
category for the LaCie drive. If your device is not listed, follow the rest
of the Troubleshooting tips to isolate the problem.
Disconnect the FireWire or USB cable, wait 10 seconds and then
•
reconnect.
Ensure that the FireWire/USB connectors are properly aligned.
•
FireWire/USB cables can only be inserted one way. Make sure that
they are correctly oriented.
Check that the FireWire/USB connectors are straight and fully
•
seated int he FireWire/USB ports.
Is the drive connected to the
computer through another drive?
(FireWire only)
Is there a conflict with other device
drivers or extensions?
Only use certified FireWire/USB cables, such as the cables pro-
•
vided with your LaCie drive.
If you have followed all of these steps and the drive is still not recognized, shut down your computer, wait 3 to 5 minutes, restart your
computer and try again.
Try connecting the drive directly to a FireWire port on the computer.
For best performance and reliability, connect the LaCie d2 DVD±RW
Drive directly to the computer.
Contact LaCie Customer Support for assistance. See section 6.1, LaCie
Customer Support Contacts.
Page 32
LaCie d2 DVD±RW Drive
User Manual
Problem Question Solution
Troubleshooting
page 31
e drive is not
running noticeably faster when
connected via HiSpeed USB 2.0.
e drive is working slowly.
e drive’s media
tray will not open.
Are there other USB or FireWire
devices connected to the same port
or hub?
Is the drive connected to a USB
hub?
Is the drive connected to a HiSpeed USB 2.0 port on your
computer?
Does your computer or operating
system support Hi-Speed USB
2.0?
Is the drive connected directly to
the host computer?
Have you tried dragging the disc’s
icon to the Trash?
Has a running software program
locked the eject function?
Disconnect any other USB or FireWire devices and see if the drive’s
performance improves.
A Hi-Speed USB 2.0 device can only operate at Hi-Speed USB 2.0
speeds if it is connected to a Hi-Speed USB 2.0 port or hub. Make sure
your USB hub supports Hi-Speed USB 2.0.
Make sure that the Hi-Speed USB 2.0 drivers for both your host bus
adapter and device have been installed correctly. If in doubt, un-install
the drivers and re-install them.
See sections 1.1, Minimum System Requirements and 4.8, Data Trans-
fers for more information.
Make sure that your drive is connected directly to the computer (see
sections 2.3, Connecting the USB Cable or 2.4, Connecting the
FireWire 400 Cable for more information). For best performance, avoid
daisy-chain configurations and connect devices directly to the computer.
For more information, see section 4.8, Data Transfers.
Drag the disc icon onto the Trash icon. e disc should then eject
automatically. If this does not work, try using the eject funtcion of the
software program that you are using.
To check, disconnect the interface cable, then reconnect and push the
open/close button. If the disc still will not eject, see section 3.4, Emer-
gency Disc Ejection for more information on how to eject your media.
e drive’s media
tray automatically
ejects a disc when
you try to record
on it, or the drive is
not writing to CD/
DVD correctly.
Is the disc full? To verifty the contents of the disc:
Use your recording software OR
•
Select the disc on the desktop and select Get Info from the File
•
menu. If the disc appears empty but the problem persists, try using
another piece of media.
Does the drive support the format
of the disc you have inserted?
Is the disc damaged? Carefully inspect the disc. Look to see if there are highly visible
Has the recording software been
installed correctly?
Check section 1.6, Supported DVD and CD Formats for information
about the different formats supported by your drive.
scratches to the recording surface (the bright, shiny, reflective side) of
the disc. If in doubt, try another disc.
Double-check the installation of your recording software and re-install
the software, if necessary. Review the recording software’s troubleshooting and help sections for more information about the recording
software.
Page 33

LaCie d2 DVD±RW Drive
User Manual
Problem Question Solution
Troubleshooting
page 32
Has buffer underrun occurred (has
something interupted the stream
of data to the recorder)?
For the best recordings, follow these tips to avoid buffer underrun
interuptions:
Quit all other running software programs before starting to record.
•
De-activate File Sharing if it is active.
•
If you are making a direct recording, such as a copy, from a CD or a
•
DVD, make sure that the speed of the drive playing the CD or DVD
is fast enough to provide a sufficient data stream to the LaCie drive.
When making copies, it is recommended that you transfer the material to be copied to your hard drive, and then make the recording
from the data on the hard drive.
Reduce the write speed of the LaCie drive using the appropriate
•
menu in the recording software.
Page 34

LaCie d2 DVD±RW Drive
User Manual
5.2. Windows Troubleshooting
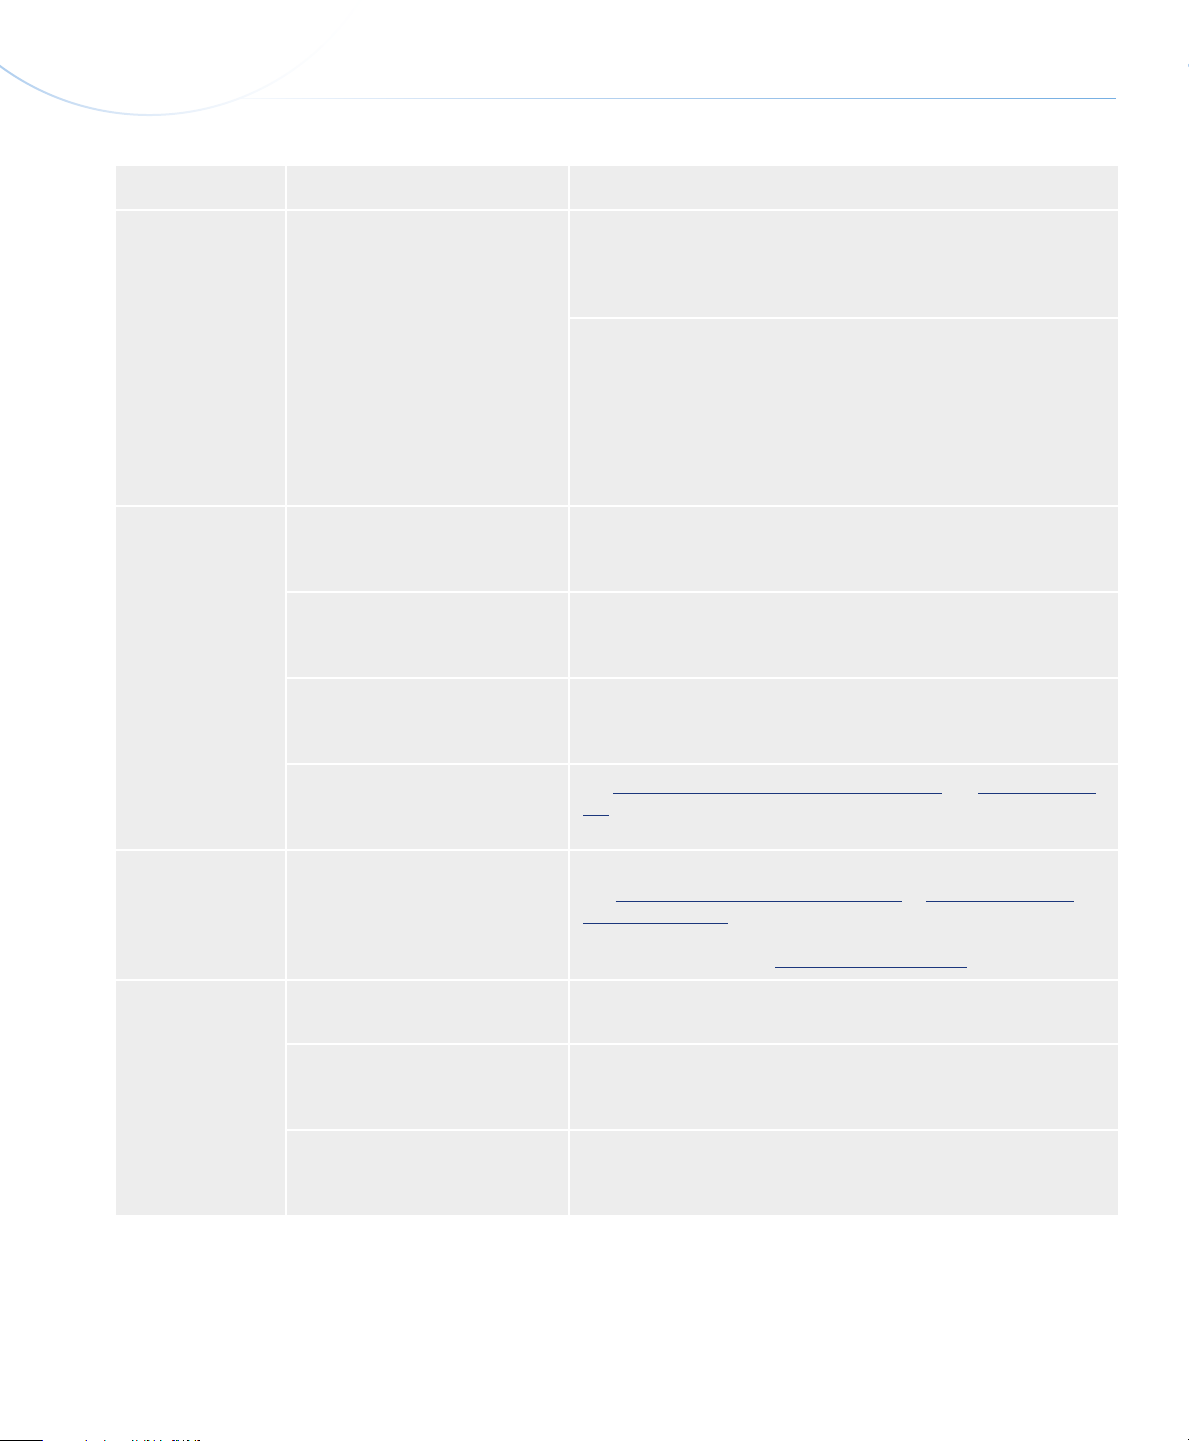
Problem Question Solution
Troubleshooting
page 33
e drive is not
recognized by the
computer.
Does your computer’s configuration meet the minimum system
requirements for use with this
drive?
Is the drive’s power supply connected and the drive turned on?
Did you follow the correct installation steps for the specific interface?
Is there an icon for the drive in My
Computer?
Are both ends of the FireWire or
USB cable securely attached?
See section 1.1, Minimum System Requirements.
Make sure that the power supply is properly connected (see section 2.2,
Connecting the Power Supply), and that the outlet the power supply is
connected to is also turned on.
Review the installation steps in sections 2.3, Connecting the USB 2.0
Cable and 2.4, Connecting the FireWire 400 Cable.
Go into My Computer and look for an icon and drive letter assigned
to the LaCie drive. If the drive does not appear, follow the rest of the
Troubleshooting tips to isolate the problem.
Disconnect the FireWire or USB cable, wait 10 seconds and then
•
reconnect.
Ensure that the FireWire/USB connectors are properly aligned.
•
FireWire/USB cables can only be inserted one way. Make sure that
they are correctly oriented.
Check that the FireWire/USB connectors are straight and fully
•
seated int he FireWire/USB ports.
Only use certified FireWire/USB cables, such as the cables pro-
•
vided with your LaCie drive.
Is the drive connected to the
computer through another drive?
(FireWire only)
Is there a conflict with other device
drivers or extensions?
If you have followed all of these steps and the drive is still not recognized, shut down your computer, wait 3 to 5 minutes, restart your
computer and try again.
Try connecting the drive directly to a FireWire port on the computer.
For best performance and reliability, connect the LaCie d2 DVD±RW
Drive directly to the computer.
Contact LaCie Customer Support for assistance. See section 6.1, LaCie
Customer Support Contacts.
Page 35
LaCie d2 DVD±RW Drive
User Manual
Problem Question Solution
Troubleshooting
page 34
e drive is not
recognized by the
computer.
e drive is not
running noticeably faster when
connected via HiSpeed USB 2.0.
Have the FireWire/USB drivers been installed correctly and
enabled?
Are there other USB or FireWire
devices connected to the same port
or hub?
Is the drive connected to a USB
hub?
Is the drive connected to a HiSpeed USB 2.0 port on your
computer?
Does your computer or operating
system support Hi-Speed USB
2.0?
Windows 2000 Users: Go to Start > Settings > Control Panel > System
> Hardware tab > Device Manager button > USB Controller or IEEE
1394 Controller. Click on the + sign next to the controller icon, and you
should see your device listed.
Windows XP and Windows Vista Users: Go to Start > Control Panel
> Performance and Maintenance > System > Hardware tab > Device
Manager button > USB Controller or IEEE 1394 Controller. Click on
the + sign next to the controller icon, and you should see your device
listed.
If you still can’t see your device, recheck the cables and try the other
troubleshooting tips listed here.
Disconnect any other USB or FireWire devices and see if the drive’s
performance improves.
A Hi-Speed USB 2.0 device can only operate at Hi-Speed USB 2.0
speeds if it is connected to a Hi-Speed USB 2.0 port or hub. Make sure
your USB hub supports Hi-Speed USB 2.0.
Make sure that the Hi-Speed USB 2.0 drivers for both your host bus
adapter and device have been installed correctly. If in doubt, un-install
the drivers and re-install them.
See sections 1.1, Minimum System Requirements and 4.8, Data Trans-
fers for more information.
e drive is working slowly.
DVD-Video
playback does not
work.
Is the drive connected directly to
the host computer?
Have you installed the appropriate
MPEG-2 software decoder?
Has the LaCie drive been set as
the default DVD drive in your
DVD playback software?
Are you running other software
programs simultaneously?
Make sure that your drive is connected directly to the computer
(see sections 2.3, Connecting he USB Cable or 2.4, Connecting the
FireWire 400 Cable for more information). For best performance, avoid
daisy-chain configurations and connect devices directly to the computer.
For more information, see section 4.8, Data Transfers.
Ensure that the MPEG-2 software has been installed correctly. See the
help section of the software program for more information.
Consult the Help section of your DVD playback software for information on how to configure your LaCie drive as your default DVD player.
Check to see if other programs are running. If so, close them. Depending on your computer’s configuration, playback may be possible only if
the DVD player software is the only program running.
Page 36

LaCie d2 DVD±RW Drive
User Manual
Troubleshooting
page 35
e drive’s media
tray automatically
ejects a disc when
you try to record
on it, or the drive is
not writing to CD/
DVD correctly.
Is the disc full? To verifty the contents of the disc:
Use your recording software OR
•
Select the disc on the desktop and select Get Info from the File
•
menu. If the disc appears empty but the problem persists, try using
another piece of media.
Does the drive support the format
of the disc you have inserted?
Is the disc damaged? Carefully inspect the disc. Look to see if there are highly visible scratch-
Has the recording software been
installed correctly?
Has buffer underrun occurred (has
something interupted the stream
of data to the recorder)?
Check section 1.6, Supported DVD and CD Formats for information
about the different formats supported by your drive.
es to the recording surface (the bright, shiny, reflective side) of the disc.
If in doubt, try another disc.
Double-check the installation of your recording software and re-install
the software, if necessary. Review the recording software’s troubleshooting and help sections for more information about the recording
software.
For the best recordings, follow these tips to avoid buffer underrun
interuptions:
Quit all other running software programs before starting to record.
•
Disconnect from networks.
•
If you are making a direct recording, such as a copy, from a CD or
•
a DVD, make sure that the speed of the drive playing the CD or
DVD is fast enough to provide a sufficient data stream to the LaCie
drive. When making copies, it is recommended that you transfer the
material to be copied to your hard drive, and then make the recording
from the data on the hard drive.
Reduce the write speed of the LaCie drive using the appropriate
•
menu in the recording software.
Page 37

LaCie d2 DVD±RW Drive
User Manual
6. Contacting Customer Support
■
Before You Contact Technical Support
Read the manuals and review the Troubleshooting
section.
Try to isolate the problem. If possible, make the drive
the only external device on the CPU, and make sure that
all of the cables are correctly and firmly attached.
If you have asked yourself all of the pertinent questions in the troubleshooting checklist, and you still can’t
get your LaCie drive to work properly, contact us via the
provided Web link. Before contacting us, make sure that
you are in front of your computer and that you have the
following information on hand:
Contacting Customer Support
page 36
www.lacie.com/support
Information Where to Find Information
1. LaCie d2 DVD±RW Drive serial number Located on a sticker at the back of drive or on the original packaging
2. Macintosh/PC model
3. Operating system version
4. Processor speed
5. Computer memory
6. e brands and models of other internal and external
peripherals installed on my computer
7. Type of media used when problem occurred Mac Users
Mac Users
Click on the Apple icon in the menu bar and select About this
Mac.
PC Users
Right click your My Computer icon and select Properties.
Mac Users
Click on the Apple icon in the finder bar and select About this
Mac. Select More Info... e Apple System Profiler will launch
and will list your internal and external peripherals.
PC Users
Right click your My Computer icon, select Properties, and click
Device Manager.
From your software, click on Recorder then CD info .
PC Users
From your software, click on Tools then CD info.
Page 38
LaCie d2 DVD±RW Drive
User Manual
6.1. LaCie Technical Support Contacts
Contacting Customer Support
page 37
LaCie Asia, Singapore, and Hong Kong
Contact us at:
http://www.lacie.com/asia/contact/
LaCie Belgium
Contact us at:
http://www.lacie.com/be/contact/ (Français)
LaCie Denmark
Contact us at:
http://www.lacie.com/dk/contact
LaCie France
Contact us at:
http://www.lacie.com/fr/contact/
LaCie Italy
Contact us at:
http://www.lacie.com/it/contact/
LaCie Netherlands
Contact us at:
http://www.lacie.com/nl/contact/
LaCie Australia
Contact us at:
http://www.lacie.com/au/contact/
LaCie Canada
Contact us at:
http://www.lacie.com/caen/contact/ (English)
LaCie Finland
Contact us at:
http://www.lacie.com/fi/contact/
LaCie Germany
Contact us at:
http://www.lacie.com/de/contact/
LaCie Japan
Contact us at:
http://www.lacie.com/jp/contact/
LaCie Norway
Contact us at:
http://www.lacie.com/no/contact/
LaCie Spain
Contact us at:
http://www.lacie.com/es/contact/
LaCie Switzerland
Contact us at:
http://www.lacie.com/chfr/contact/ (Français)
LaCie Ireland
Contact us at:
http://www.lacie.com/ie/contact/
LaCie International
Contact us at:
http://www.lacie.com/intl/contact/
LaCie Sweden
Contact us at:
http://www.lacie.com/se/contact
LaCie United Kingdom
Contact us at:
http://www.lacie.com/uk/contact/
LaCie USA
Contact us at:
http://www.lacie.com/contact/
Page 39
LaCie d2 DVD±RW Drive
User Manual
7. Warranty Information
Warranty Information
page 38
LaCie warrants your drive against any defect in material and workmanship, under normal use, for the period designated on your warranty certificate. In the event
this product is found to be defective within the warranty
period, LaCie will, at its option, repair or replace the
defective drive.
This warranty is void if:
■
e drive was operated/stored in abnormal use or
❖
maintenance conditions;
e drive is repaired, modified or altered, unless such
❖
repair, modification or alteration is expressly authorized in writing by LaCie;
e drive was subjected to abuse, neglect, lightning
❖
strike, electrical fault, improper packaging or accident;
e drive was installed improperly;
❖
e serial number of the drive is defaced or missing;
❖
e broken part is a replacement part such as a pick-
❖
up tray, etc.
e tamper seal on the drive casing is broken.
❖
written to. Under no circumstances do LaCie or its suppliers guarantee the reliability of the DVD or CD media
used in this drive.
LaCie will not, under any circumstances, be liable
for direct, special or consequential damages such as, but
not limited to, damage or loss of property or equipment,
loss of profits or revenues, cost of replacement goods,
or expense or inconvenience caused by service interruptions.
Any loss, corruption or destruction of data while using a LaCie drive is the sole responsibility of the user,
and under no circumstances will LaCie be held liable
for the recovery or restoration of this data. Under no
circumstances will any person be entitled to any sum
greater than the purchase price paid for the drive.
To obtain warranty service, call LaCie Technical
Support. You may be asked to furnish proof of purchase
to confirm that the drive is still under warranty.
All drives returned to LaCie must be securely packaged in their original box and shipped with postage prepaid.
LaCie and its suppliers accept no liability for any
loss of data during the use of this device, or for any of
the problems caused as a result. As a precaution, it is
recommended that the CD-R/RW, DVD-R/RW and
DVD+R/RW media be tested after they have been
ImpOrTANT INfO: Register online for free
technical support: www.lacie.com/register
 Loading...