

Page 1
Rev. 2.01
Operation manual
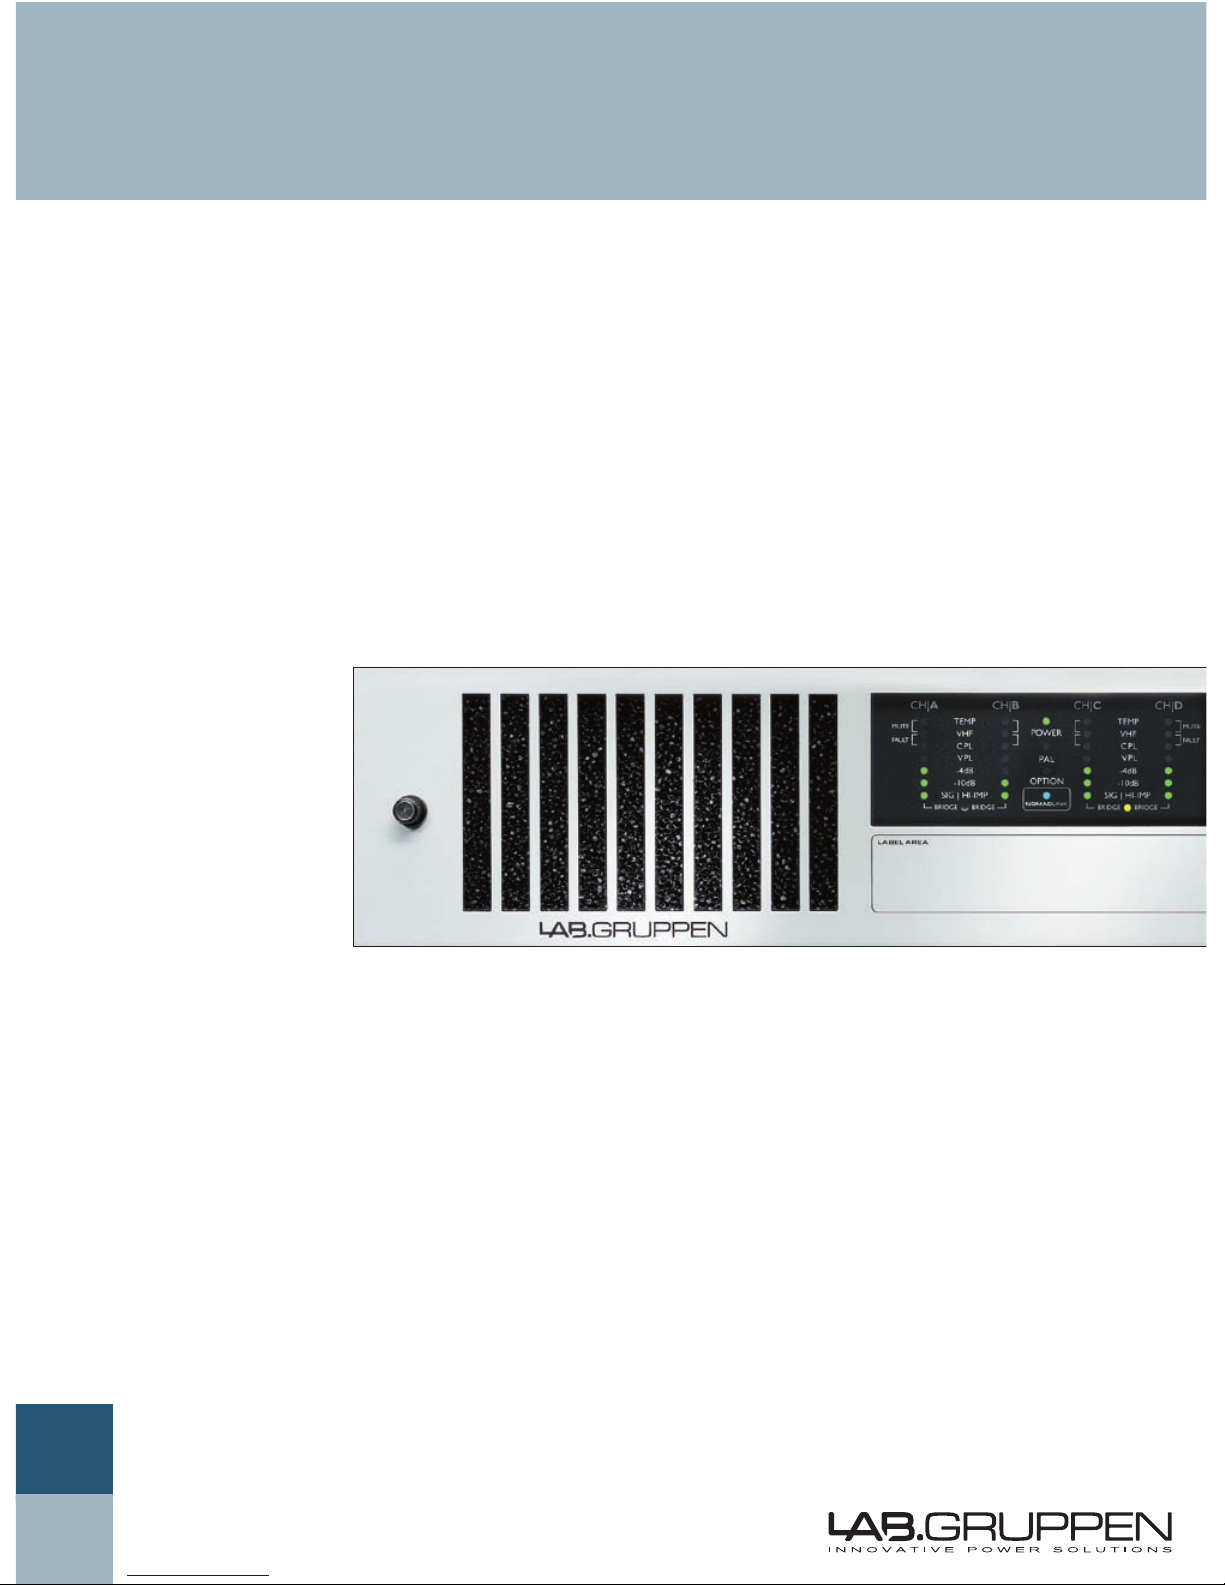
C Series:
Installation-Dedicated Amplifiers
• C 68:4
• C 48:4
• C 28:4
• C 16:4
Part no. UM-CS
Page 2

2 C Series Operation Manual
1 CONTENTS .................................................................................................................................................2
2 APPROVALS ................................................................................................................................................4
3 WARNINGS .................................................................................................................................................4
3.1 Explanation of graphical symbols ........................................................................................................4
3.1.1 WARNING ................................................................................................................................4
3.1.2 CAUTION..................................................................................................................................4
3.2 Important Safety Instructions ..............................................................................................................4
3.3 User responsibility ...............................................................................................................................5
3.3.1 Mains connection grounding ....................................................................................................5
3.3.2 Speaker output hazard ..............................................................................................................5
3.3.3 Radio interference ....................................................................................................................5
3.3.4 Speaker damage .......................................................................................................................5
3.3.5 Maintenance .............................................................................................................................5
4 WELCOME ...................................................................................................................................................6
4.1 Introduction ..........................................................................................................................................6
4.2 Main Features ......................................................................................................................................6
4.2.1 Class TD amplifier and regulated switch-mode power supply .................................................6
4.2.2 Amplifier gain ...........................................................................................................................6
4.2.3 Voltage Peak Limiter .................................................................................................................7
4.2.4 Protection and performance optimization ................................................................................
7
4.2.5
NomadLink / Ethernet control and monitoring network ...........................................................7
5 INSTALLATION ...........................................................................................................................................8
5.1 Unpacking ............................................................................................................................................
8
5.2 Mounting .............................................................................................................................................8
5.3
Cooling .................................................................................................................................................8
5.4 Operating voltage ................................................................................................................................8
5.5 Grounding ............................................................................................................................................9
6 QUICK GUIDE OVERVIEW .......................................................................................................................
10
6.1 Front Panel overview .........................................................................................................................10
6.1.1 Power on/off and remote switch ............................................................................................10
6.1.2 Front Panel LED’s ...................................................................................................................10
6.2 Rear Panel overview ..........................................................................................................................11
6.2.1 The DIP switch features ......................................................................................................... 11
6.3 NomadLink / Ethernet network setup ................................................................................................12
7 OPERATION AND PERFORMANCE ........................................................................................................
14
7.1 Introduction ........................................................................................................................................14
7.2 Operation precautions .......................................................................................................................14
7.3 Signal flow and headroom .................................................................................................................14
7.3.1 Signal flow blocks ...................................................................................................................14
7.3.2 Headroom, sensitivity and VPL / Gain settings ......................................................................15
7.4 Audio Input and Output connections, setup and features .................................................................16
7.4.1 Balanced / Unbalanced Input connection ...............................................................................16
1 CONTENTs
Page 3

C Series Operation Manual 3
7.4.2 Output operation and connection ...........................................................................................16
7.4.3 Output bridge mode ...............................................................................................................
16
7.4.4 Amplifier Gain .........................................................................................................................17
7.4.4.1 Channel gain / Level (front panel pots) ..........................................................................17
7.4.4.2 Amplifier sensitivity .......................................................................................................17
7.4.5 Output Voltage Peak Limiter (VPL) .........................................................................................17
7.4.6 Constant Voltage 70 V and 100 V systems setup and operation ............................................18
7.4.7 Current Peak Limiter, (CPL) ....................................................................................................18
7.5 Protection, faults and warnings .........................................................................................................
18
7.5.1 Introduction ............................................................................................................................18
7.5.2 Safe Operating Area Detector (SOAD) ...................................................................................18
7.5.3 Very High Frequency protection .............................................................................................18
7.5.4 DC protection .........................................................................................................................
19
7.5.5 Hi impedance warning (open load) .........................................................................................19
7.5.6 Lo impedance protection (short circuit) ..................................................................................19
7.5.7 Temperature protection ..........................................................................................................20
7.5.8 Power Average Limiter (PAL) .................................................................................................20
7.5.9 Soft Start ................................................................................................................................20
7.6 Front panel monitoring and adjustments ...........................................................................................21
7.6.1 Level indicators .......................................................................................................................21
7.6.2 Level adjust ............................................................................................................................21
7.6.3 Mute indication .......................................................................................................................21
7.6.4 Performance, Warning and Fault indicators........................................................................... 22
7.7 NomadLink network and PC editor ....................................................................................................23
7.7.1 NomadLink network in the amplifiers ....................................................................................23
7.7.2 Connection and setup.............................................................................................................23
7.7.3 NomadLink network cable lengths .........................................................................................24
7.7.4 Ethernet network cable lengths .............................................................................................25
7.7.5 DeviceControl editor ...............................................................................................................25
8 APPENDIX .................................................................................................................................................26
8.1 Maintenance ......................................................................................................................................
26
8.2 FAQ ....................................................................................................................................................26
8.3 Bench test the amplifier ....................................................................................................................26
8.4 Additional documentation ..................................................................................................................27
8.5 BTU specifications .............................................................................................................................28
9 TECHNICAL SPECIFICATIONS ................................................................................................................
30
10
WARRANTY ..............................................................................................................................................32
CONTENTs 1
Page 4

4 C Series Operation Manual
This equipment conforms to the requirements of the EMC directive 89/336/EEC, amended by 92/31/EEC and 93/68/ EEC and the
requirements of the Low Voltage Directive 7 3/23/EEC, amended by 93/68 /EEC.
Standards applied: EMC Emission EN 55103-1, E3
EMC Immunity EN55103-2, E3, with S/ N below 1% at normal operation level.
Electrical Safety EN60065, Class I
This equipment is tested and approved according to the U.S . safety standard ANSI/ UL 60 065 and Canadian safety standard CSA
C22. 2 NO. 60065. E TL made the tests and they are a Nationally Recognized Testing L aborator y (NRTL).
3.1 Explanation of graphical symbols
The lightning symbol within a triangle is intended to alert the user to the presence of un -insulated “dangerous voltage” within the amplifier’s
enclosure that may be of suf ficient magnitude to constitute a risk of electric shock to humans.
The exclamation point within a triangle is intended to aler t the user to presence of impor tant operating and service instructions in the literature
accompanying the product.
3.1.1 WARNING 3.1.2 CAUTION
3.2 Important Safety Instructions
Before using your amplifier, be sure to carefully read the applicable items of these operating instructions and the safety suggestions
Keep this manual for future reference.
Heed all warnings.
Follow all instructions.
Do not use this unit near water.
Do not spill water or other liquids into or on the unit. Do not operate the amplifier while wet or standing in liquid.
Clean only with dr y cloth.
Do not block the air intake or exhaust ports. Install the unit in accordance with the instructions.
Do not operate the amplifier near heat producing devices such as radiators, heat registers, stoves or other apparatus that produce heat. Always
operate the unit with the chassis ground wire connected to the electrical safety earth. Do not defeat the safety purpose of a grounding-type plug. A
grounding type plug has two pins and a third grounding prong. The third prong is provided for your safety. If the provided plug does not fit into your
outlet, consult an electrician for replacement of the obsolete outlet.
Connect only to AC power outlets rated 100-120 V or 200-240 V, 50-60 Hz.
Do not use this amplifier if the power cord is broken or frayed. P rotect the power cord from being walked upon or pinched particularly at the plugs
and the point where it exits from the apparatus.
Only use accessories specified by the manufacturer.
The unit is intended to use in a 19” rack. Follow the mounting instructions. When a rack on wheels is used, use caution when moving the loaded
rack to avoid injury from tipping over.
Unplug this apparatus during lightning storms or when unused for long periods of time.
Do not connect an amplifier output in parallel or series with any other ampli fier’s output. Do not connect the amplifier output to any other voltage
source, such as batter y, mains source, or power supply, regardless of whether the amplifier is turned on or of f.
Do not run the output of any amplifier back into another channel’s input.
Refer all servicing to qualified service personnel. Servicing is required when the apparatus has been damaged in any way such as:
Power-supply cord or plug is damaged.
Liquid has been spilled into the unit
An object has fallen into the unit
The unit has been exposed to rain or moisture
The unit does not operate normally
The unit was dropped or the enclosure is damaged
17. Do not remove top or bottom covers. Removal of the covers will expose hazardous voltages. There are no user serviceable parts inside and
removal may void the warrant y.
18. An experienced user shall always supervise this professional audio equipment, especially if inexperienced adults or minors are using th
equipment.
19. The mains plug is used as the disconnec t device and shall remain readily operable. If mounted in a 19" rack causing the mains plug not being
readily operable, the mains plug for the entire rack must be readily operable.
20. The US N ational Differencescl.16.3 requires that NomadLinknet work cables must be flame rated VW-1.
1.
2.
3.
4.
5.
6.
7.
8.
9.
10.
11.
12.
13.
14.
15.
16.
•
•
•
•
•
•
2 APPROVALs
To reduce risk of fire or electric shock, do not expose this
apparatus to rain or moisture.
To reduce the risk of fire or electric shock, do not remove
screws. No user-serviceable parts inside. Refer servicing to
qualified service personnel
3 WARNINGs
Page 5
C Series Operation Manual 5
WARNINGs 3
3.3 User responsibility
3.3.1 Mains connection grounding
Your amplifier must be connected to a
grounded socket outlet.
3.3.2 Speaker output hazard
Power amplifiers are capable of producing
hazardous output voltages. To avoid electrical
shock, do not touch any exposed speaker wiring
while the amplifier is operating. The external wiring
connected to the speaker terminals shall be installed
by a qualified instructed person or ready-made leads
or cords of appropriate capacity shall be used.
3.3.3 Radio interference
As the amplifier outputs produce high voltage,do
not connect or disconnect speaker cables when
the mains power is on. Also, attach the safety cover
on the speaker terminals for safe operation and to
comply with electrical product approvals.
A sample of this product has been tested and complies
with the limits for the European Electro Magnetic
Compatibility (EMC) directive. This equipment has
also been tested and found to comply with the limits
for a Class B digital device, pursuant to Part 15 of
the FCC Rules. These limits are designed to provide
reasonable protection against harmful interference
from electrical equipment. This product uses radio
frequency energy and if not used or installed in
accordance with these operating instructions, may
cause interference to other equipment, such as radio
receivers. However, there is no guarantee that interference will not occur in a particular installation.
If this equipment does cause harmful interference
to radio or television reception, which can be determined by turning the equipment on and off, the user
is encouraged to try to correct the interference by
one or more of the following measures:
Reorient or relocate the antenna.
Increase the separation between the equipment
and receiver.
Connect the equipmnt into an outlet on a
circuit different from that to which the receiver is
connected.
•
•
•
Check if the affected unit complies with the EMC
limits for immunity, (CE-labeled). If not, address
the problem with the manufacturer or supplier.
All electrical products sold in the EC must be
approved for immunity against electromagnetic fields, high voltage flashes, and radio interference.
Consult the dealer or an experienced radio/T V
technician for help.
3.3.4 Speaker damage
Your amplifier is very powerful and can be
potentially dangerous to both loudspeakers and
humans alike. Many loudspeakers can be easily
damaged or destroyed by overpowering, especially
with the high power available from a bridged
amplifier.
Always check the speaker’s continuous and peak
power capabilities.
Even if though the amplifier’s front panel attenuators
can be used to reduce the gain, it is still possible to
reach full output power if the input signal level is
high enough.
3.3.5 Maintenance
For long-term and safe operation it is recommended
that the amplifier dust filters on the front panel, as
well as the inside of the amplifier is cleaned regularly.
If the dust filters and inside are not maintained there
will be safety risks. For example the amplifier can
ignite the dust and a fire will occur due to high internal
temperatures. There is also a risk that the amplifier
will malfunction since the amplifier is dependent
of constant airflow from front to rear. If the dust
filters are not clean and the amplifier malfunctions,
any resultant problems will not be covered by the
warranty.
•
•
Page 6

6 C Series Operation Manual
4 WELCOME
4.1 Introduction
Thank you for choosing Lab.gruppen C Series power
amplifiers for your sound reinforcement system
installation. We are confident that you will be
very pleased with the performance, configuration
flexibility, reliability, and long-term durability offered
by the C Series products.
This manual provides a comprehensive guide to the
features and functionality of C Series amplifiers.
Please read through it in its entirely to become fully
acquainted with the many configuration options and
multiple layers of protection circuitry.
To facilitate timely installation and use of this C Series
product, we have included a Quick Guide Overview
(section 6). This brief summary, in conjunction with
Installation (section 5), contains the basic information
needed to safely install the amplifier and place it in
service. However, we highly recommend reading
through this manual in its entirety, beginning with
Main Features and Technologies and continuing
through Operation and Performance. As you become
thoroughly familiar with all aspects of operation, you
may learn of features or options that will affect your
choices on amplifier modes or loudspeaker system
configuration.
Thank you again for placing your confidence in
Lab.gruppen power amplifiers.
Lab.gruppen C Series power amplifiers are designed
and built specifically for the unique demands of
permanent installation applications. C Series
amplifiers offer the optimum combination of highquality audio reproduction, flexible features, ease of
installation, and 100% reliability in normal use.
By packing four channels of reconfigurable power
amplification into a 2U chassis, the C Series achieves
unprecedented “power density.” The benefits of
compact dimensions include reduced rack space
requirements and minimal heat build-up. The flexible
output stages enable each amplifier channel to be set
for either low impedance or constant voltage (70 V /
100 V) mode. NomadLink, an easy-to-use network for
monitoring and control, is implemented as a standard
feature on all C Series amplifiers.
Although C Series features and facilities are tailored
to installation applications, at the heart of each
amplifier is the same advanced technology that has made
Lab.gruppen the benchmark of quality for touring
concert systems: exceptional sonic performance,
rugged construction, proven reliability, and protection
features that anticipate every unwelcome possibility.
Read on to learn.
4.2 Main Features
Superficially, your new C Series amplifier may
appear similar to other products made for the same
purpose. On closer inspection, however, you will find
a number of sophisticated technologies – many of
them proprietary to Lab.gruppen – that are provided
to ensure the best possible performance and many
years of reliable operation. Familiarizing yourself with
these technologies will prove invaluable in setting up
and optimizing your loudspeaker system.
4.2.1 Class TD amplifier and regulated switch-
mode power supply
Lab.gruppen’s patented Class TD technology
combines the exceptional efficiency of a Class D
amplifier with the high sonic quality associated with
Class B designs. Class TD also incorporates the same
basic concepts behind Class H designs, but here they
are refined and pushed to a higher level to achieve
much greater efficiency.
The Class TD output sections work in concert with
Lab.gruppen’s unique, regulated switch-mode power
supply to create a superior overall power amplifier
topology. The regulated PSU ensures stable, full
output power over an extremely wide range of mains
voltage levels. Sagging or fluctuating mains voltage
will not affect the power output delivered to the
loudspeakers.
4.2.2 Amplifier gain
For greater flexibility in system integration, C Series
amplifiers allow gain adjustment from +23 dB to +44
dB in 3 dB steps. This feature accommodates any
combination of input device and loudspeaker type.
For example, if the input signal is weak, the gain can
be boosted to maintain maximum power output while
Page 7

C Series Operation Manual 7
avoiding a poor signal-to-noise ratio. This gain adjust
ment feature makes it easier to achieve an optimal
balance between headroom and noise floor.
4.2.3 Voltage Peak Limiting
The Voltage Peak Limiting (VPL) feature allows user
adjustments that determine maximum voltage output,
thus matching the amplifier to the connected speaker
load. Whether the connected load is low impedance
(8, 4 or 2 ohms) or high impedance (70 V / 100 V),
the VPL feature can be set to ensure that neither
temperature nor current limitations are exceeded
before reaching the desired voltage threshold.
4.2.4 Protection and performance
optimization
Appropriate and reliable power amplification is vital
to any audio system. Inadequate or faulty power
amplification could cause damage to the loudspeakers,
or in some cases to the power amplifiers themselves.
To prevent any damage or costly service interruptions, C Series amplifiers offer advanced features
to protect both internal circuits and any connected
loads. These features even protect the mains fuse
that, in extreme cases, could be overloaded.
Following are short descriptions of standard built-in
C Series protection features:
CPL, Current Peak Limiter ensures that the
amplifier’s output does not exceed the safe
current handling parameters of amplifier
components.
Temperature protection ensures that the
amplifier will not be damaged by exceeding
thermal limits.
PAL, Power Average Limiter limits the maximum
average power consumption according to the
power supply and mains-breaker capabilities.
VHF, Very High Frequency protection circuits
mute the output of the amplifier when nondynamic continuous signals above 10 kHz are
detected.
DC protection ensures destructive DC signals
will not appear at the amplifier outputs. If such
conditions occur an internal fuse opens and fault
indication is displayed.
Low impedance (short circuit) protection
provides a fault warning indication and shuts
down the output stage when, for example, an
input signal is present and a malfunctioning cable
or driver is short circuiting the output.
•
•
•
•
•
•
High impedance warning reports an alert when
at the same time output signal is high, simultaneously, and no current draw is measured. This
situation might occur when no speakers are
connected, or when a driver is blown.
Low inrush current ensures that the mains
breaker will not trip when several power
amplifiers are turned on simultaneously.
4.2.5 NomadLink / Ethernet control and
monitoring network
The NomadLink network allows easy setup and
control of C Series power amplifiers and other
devices. The patented network topology allows
automatic detection and addressing of multiple
amplifiers, and is controlled from a PC via a bridge
(NLB 60E) using standard TCP/IP communication.
Phantom powering through the network cables
allows the software to detect devices that are not
currently turned on or connected to the mains. This
ensures very high reliability and redundancy levels
while allowing connected amplifiers to remain on
standby with no power consumption.
Cable connections can be daisy-chained for
easier system setup. This also reduces total
component costs, simplifies installation, and makes
daily operation more convenient. There is no need to
create a star topology using many switches as with,
for example, an Ethernet system. Individual amplifier
addresses do not need to be manually entered. You
will automatically know where an individual amplifier
resides in the network.
A daisy chain network-loop, in combination with
the automatic addressing of devices, enables
Lab.gruppen’s proprietary DeviceControl editor
software to automatically create a precise picture of all
connected devices and their relative position in the
chain. This is the key to creating a quick overview
of the system layout, allowing simple operation of a
large group of amplifiers. Installation time is kept to
a minimum, and fast access is provided to monitor
performance and solve problems during operation.
Via NomadLink, you can monitor all metering data
as well as all faults and warning indications simultaneously. NomadLink also allows you to remotely
control power on and power off, as well as engage
Mute and Solo functions on individual channels.
•
•
WELCOME 4
Page 8
8 C Series Operation Manual
5.1 Unpacking
Carefully open the shipping carton and check for any
noticeable damage. Every Lab.gruppen amplifier is
tested and inspected before leaving the factory and
should arrive in perfect condition. If any damage
is discovered, please notify the shipping company
immediately. Only the consignee may institute a
claim with the carrier for damage incurred during
shipping. Save the carton and packing materials for
the carrier’s inspection. Should you ever need to
ship the amplifier, always use the original packaging
materials.
5.2 Mounting
The amplifier is two rack units high (2U) and will fit
into a standard EIA 19” rack.
The depth is 343 mm (13.5”).
The weight is approximately 12 kg (26.4 lbs.) depending on model type.
Free airflow from front to rear of the amplifier must
be possible. Therefore, no doors or rack-lids should
be mounted in front of or behind the amplifiers.
Amplifiers may be stacked directly on top of each
other. There is no need for spacing in between units,
though this might enable more convenient installation
of cabling on the rear-panel.
It is recommended that rear supports be mounted
for maximum long-term stability.
5.3 Cooling
The amplifier uses a forced-air cooling system
with air flow from front to rear, maintaining a low
operating temperature within defined limits. Front-torear airflow is preferred as cooler air is present at the
front in nearly all installed applications. (This allows
higher continuous power levels without encountering
thermal problems.) Never attempt to reverse the
airflow. The amplifier modules require a pressure
chamber between the fans and heatsink, and this
effect functions only in one direction.
Make sure that there is an adequate air supply in front
of the amplifier, and that the rear of the amplifier has
sufficient space to allow the exhaust to escape. If
the amplifier is rack-mounted, do not use covers or
doors on the front or rear of the rack.
Should a heat sink overheat, the temperature
sensing circuits will mute the overheating channel.
If the power supply overheats, another sensing
circuit will mute all output channels until the power
supply cools to safe operating temperature. An early
warning before shut down will be indicated on the
front panel LEDs, and a warning will be sent through
the NomadLink network.
Always make sure that the dust-filters behind the
detachable front panel are clean to ensure maximum
possible airflow.
If the amplifier malfunctions due to dirty
dust filters, any required repairs are not
covered by the warranty.
To calculate the maximum heat emission value, when
installing the amplifiers in rooms with an air-conditioning system, please refer to the BTU specifications
provided in the Appendix section.
5.4 Operating voltage
The label placed to the right of the mains
cable on the rear of the amplifier indicates the
AC mains voltage for which the amplifier is wired
and approved: 115 V or 230 V. Connect the power
cable only to the AC source type referred to on the
label. The warranty will not cover damage caused by
connecting to an incorrect type of AC mains.
Lab.gruppen switch mode amplifiers use primary
switching. Because the mains power is rectified
directly in front of the transformer, the amplifier is
insensitive to mains frequency. It may be connected
to 50 or 60Hz sources, and actually will operate on
line frequencies from DC to 400 Hz.
If the power plug mounted at the factory is not
appropriate for your country, it can be removed and
the proper connector wired in its place as follows.
BLACK or BROWN LIVE
WHITE or BLUE NEUTRAL
GREEN or GREEN/ YELLOW EARTH(GROUND)
Warning: If you are not 100% confident of your
competence to replace the mains plug, engage
qualified personnel to do the job.
Once a suitable AC supply is connected, the
5 INsTALLATION
Page 9

C Series Operation Manual 9
amplifier can be turned on using the front panel
power switch. The amplifier then goes through a
soft-start sequence as it self-checks its circuits. The
fans will blow at high speed before dropping to idle,
and the “power” LED will illuminate.
Inrush power is controlled and limited during “soft
start”, enabling multiple amplifiers to be powered up
simultaneously.
5.5 Grounding
There is no ground lift switch or terminal on the
C Series amplifiers. The signal ground is always
floating, via a resistor, to chassis and therefore the
grounding system is automatic.
In the interests of safety, never disconnect the earth
(ground) pin on the AC power cord.
Use balanced input connections to avoid hum and
interference.
INsTALL ATION 5
Page 10
10 C Series Operation Manual
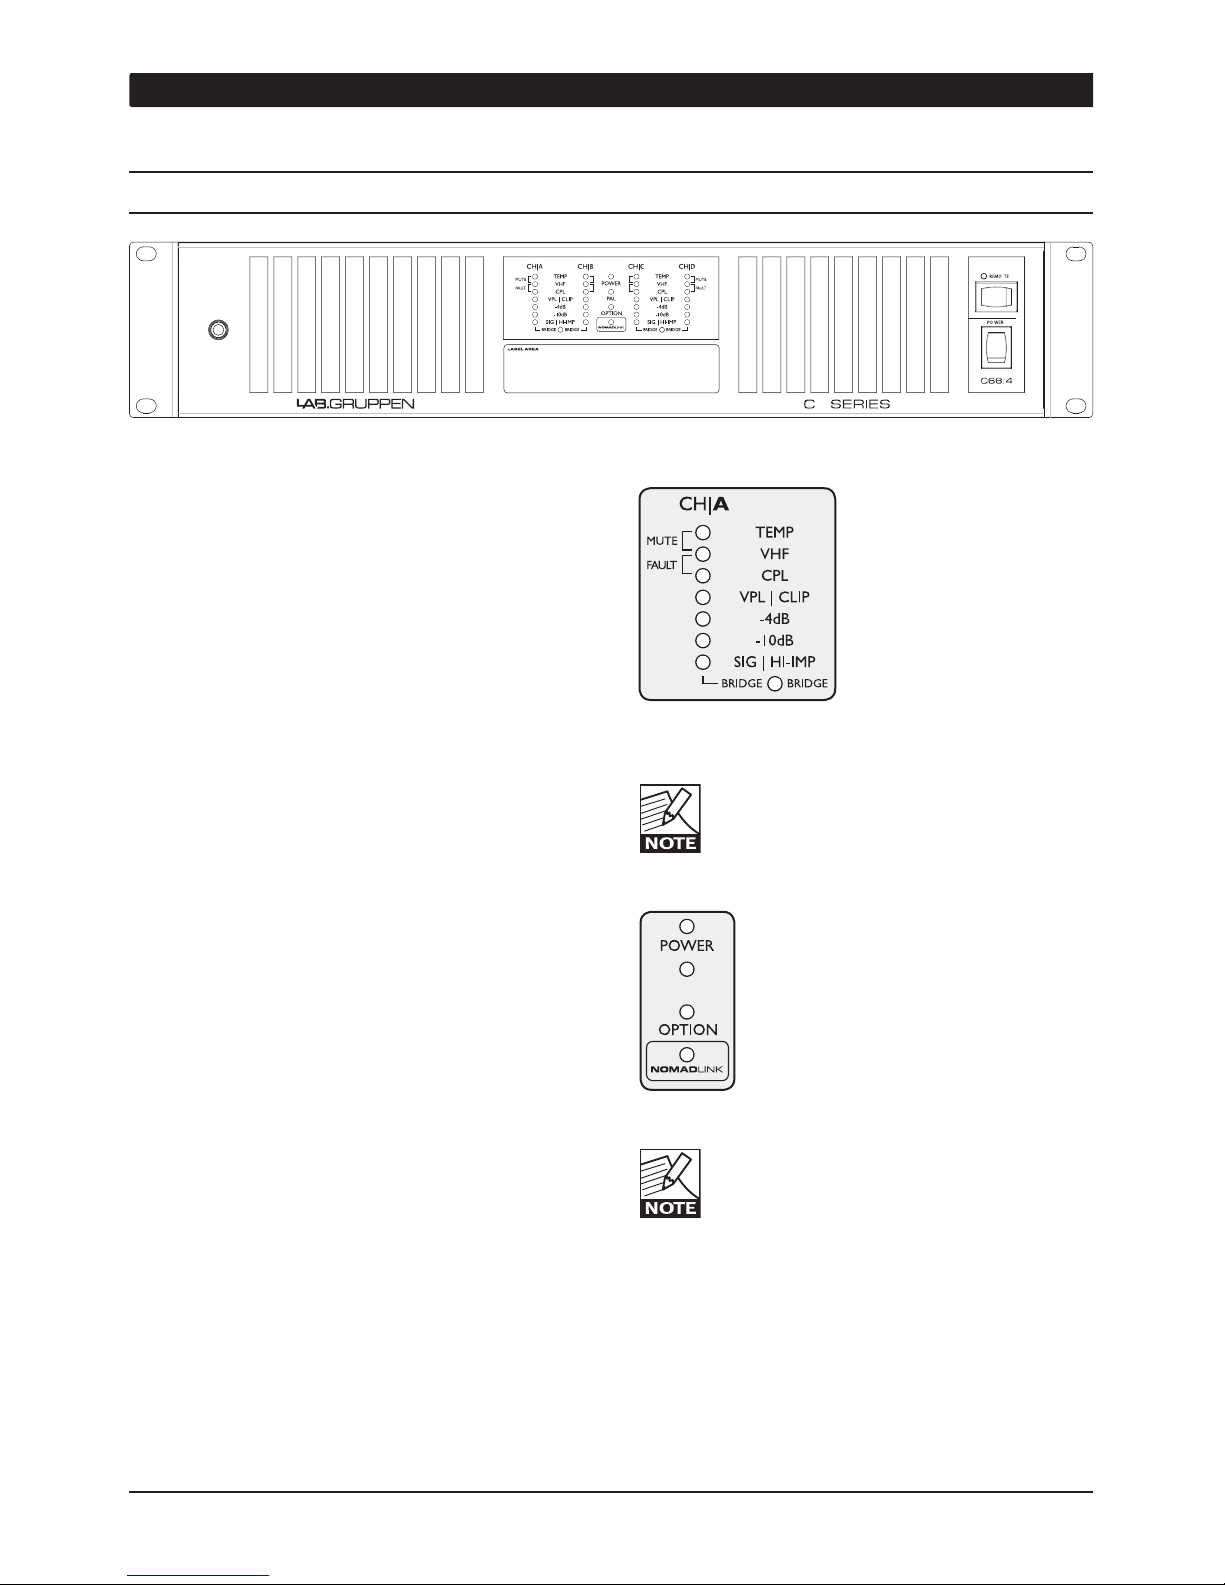
6 QUICK GUIDE OVERVIEW
The amplifier’s front panel presents the performance
and fault condition indicators, power and remote
switches ,and a removable dust-filter cover. Four
level potentiometers located behind the cover
provide individual attenuation for the four amplifier
channels. Range is 0 dB to - infinity. The 12 o’clock
position indicates -10 dB attenuation.
To remove the dust-filter cover, loosen the
thumbscrew at the far left. This allows removal of
the dust filters for cleaning, and provides access to
channel attenuation. The front cover may be made
“tamper resistant” by replacing the thumbscrew
with Philips head or safety Torx screw. Thread size
is M3.
6.1.1 Power on/off and remote switch
The Power on/off switch is located on the right side.
A second switch, labeled “REMOTE,” is above the
Power switch. When the Remote switch is on, the
yellow LED above it will illuminate indicating that
external power on/off commands from the NomadLink
network connection will switch the amplifier on or
off. When Remote is activated the amplifier will not
switch on until a “Power On” command is received
from the network. When the remote switch is off,
it is not possible to switch amplifier power on or off
using NomadLink network control.
6.1.2 Front panel LED’s
The front panel LED area includes the following
indicators per channel:
Temperatur e warning ( Yellow flashing )
Temperatur e mute (Yellow co nstant)
Very Hig h Frequency protection a ctive
(outpu t muted) (Yell ow)
Mute channel via Nom adLink net work
(2x Yellow )
Current P eak Limiter ( CPL) act ive (Orang e
flashin g),
CPL con stant (outp ut muted): Lo
impedance / Shor t circuit dete ction
Fault ( Yellow plus Ora nge)
Voltage Peak Limiter ( VPL) active, VPL/Clip
(Red)
-4 dB s ignal level ( Green)
-10 dB signal l evel (Green)
-4 0 dB signal le vel (Green),
Hi- Imp open lo ad detected ( Red)
Bridge mode o peration on (Yellow). Ch. A+B
or C+D bridged.
When no VPL, CPL or PAL indicators are
illuminated, the amplifier channel is able to
deliver maximum rated output power.
Common LED’s on the front panel:
Power on (Green)
Power Average Limiter active (PAL) (Red)
Option active (Yellow)
NomadLink network active (Blue).
When the network is connected, the blue
NomadLink LED will illuminate even when
mains power is not connected. NomadLink
receives phantom power from the network
supplied by the NLB 60E.
PAL
6.1 Front Panel overview
Page 11

C Series Operation Manual 11
QUICK GUIDE OVERVIEW 6
44dB
41dB
38dB
35dB
32dB
29dB
26dB
23dB
141V*
118V
100V**
85V
71V
59V
50V
42V
*100V
rms
**70V
rms
Ser. N:o
Removed!
SPEAKER OUTPUTS
BALANCED INPUTS
CHD
CHBCHC
CHA
WIRING
NORMAL: CLASS 2
BRIDGED: CLASS 3
PUSH PUSH
Must be grounded
Made in Sweden
200-240VAC 50-60Hz :2300W
.
6.2.1 The DIP switch features
The following features may be adjusted using the
DIP switches on the rear-panel of the amplifier.
Gain - Set for all four channels from +23 dB to +44
dB in 3 dB steps.
Option active - Available for future upgrades.
Fan Masked - When on, engages the intelligent
fan feature lowers fan speed when no signal is
present.
Bridged A+B and C+D- Switches the channel pairs
into bridged mode operation (automatic - 6 dB gain
compensation).
VPL - Voltage Peak Limiter adjustment is
provided for 8 individual levels. Select the setting
most appropriate for connected speakers. See
Appendix for details.
Mode - Select VPL mode between Hard and Soft. For
channels driving sub-woofers and Lo-end frequencies, it is recommended to use the Hard setting for
optimal operation. For mid and hi-end drivers, always
select Soft.
Mains input 115V or
230V operation
(Not selectable)
NomadLink
network In and Out
on EtherCon housed
RJ45 connections
DIP switches
for adjusting key
features
(See below)
3-pole Phoenix
input connectors
2-pole screw
terminal output
connections
6.2 Rear Panel overview
Page 12

12 C Series Operation Manual
6 QUICK GUIDE OVERVIEW
6.3 NomadLink / Ethernet network setup
The amplifier includes, as a standard feature, internal
facilities for the NomadLink monitoring and control
network. All features of the NomadLink network are
accessible via a PC running Lab.gruppen’s proprietary
DeviceControl software. A single rackspace network
bridge, the NLB 60E, accepts the TCP/IP data stream
from the computer and converts it to the NomadLink
protocols. Even when no computer is connected,
the NLB 60E can initiate stand-alone power on/off
and muting functions, as well as report any fault or
warning conditions.
The PC is connected to the NLB 60E using a
standard Ethernet interface and a crossed Cat5 cable
(peer-to-peer setup). If a HUB or switch is in the
network, standard “straight” Cat5 cables must be
used. The front and rear Ethernet connections on
the NLB 60E can be used individually, but only one
PC at a time running DeviceControl can access the
subnet.
The default fixed TCP/IP address of the NLB 60E is
192.168.1.166. The subnet mask is 255.255.255.0.
For further details, please refer to instructions supplied with the NLB 60E unit.
The NomadLink connections use standard “straight”
Cat5/RJ45 equipped cables. For a safer mechanical
connection it is possible to use Neutrik EtherCon
“XLR-type” housings on the cables.
US National Differences cl.16.3 requires
that NomadLink network cables must be
rated VW-1.
The OUT port from the NLB 60E must be connected
to the IN port of the first amplifier. The OUT port
from the first amplifier in turn connects to the next
amplifier’s IN port to form a daisy chain The OUT
port on the last amplifier is connected to the IN port
on the NLB 60E to close the loop.
There are electrical limitations to cable
lengths on a NomadLink network, both in
terms of total cable length in the loop and
between any two devices. Read the
Operation and Performance chapter in this manual,
or the instructions supplied with the NLB 60E, to
ensure the network is configured within these
constraints.
Although the network will function as an
open loop under most circumstances, it is
strongly recommended that the loop be
closed by connecting to the NLB 60E’s IN
por t. Doing so will improve redundancy and
communication speed.
External contact closures and 24 V low/high triggers
can be connected to GPI connectors on the NLB 60E
for control of fire-alarm systems or external power
sequencers. For more details read the instructions
supplied with the NLB 60E.
IN OUT
NOMADLINK
IN OUT
NOMADLINK
NOMADLINK
IN OUT
ETHERNET
GENERAL
PURPOSE
INPUT, GPI
ETHERNET
Crossed RJ45 Ethernet cable between bridge and PC.
If bridge is connected to switch of HUB, use " straight " cable.
PC can also be connected on front-panel.
" Straight " RJ45 cables between bridge and amplifiers.
Page 13

C Series Operation Manual 13
Page 14
14 C Series Operation Manual
7.1 Introduction
The following sections provide comprehensive information on amplifier connection, setup, operation, and
performance. The detailed information included here
is essential to realizing the full functionality of the C
Series amplifiers.
7.2 Operation precautions
Make sure that the Power switch and the Remote
switch on the amplifier front panel are set to
“off” before making any input, output or network
connections, and also before manipulating the
DIP switches on the rear-panel.
Make sure that the AC mains voltage is correct
and matches the voltage printed on the rear panel
of the amplifier (115 V or 230 V).
Make sure that no signal is present at the input
to the amplifier when powering up. This will
produce an unintentionally loud initial volume
from the speakers.
7.3 Signal flow and headroom
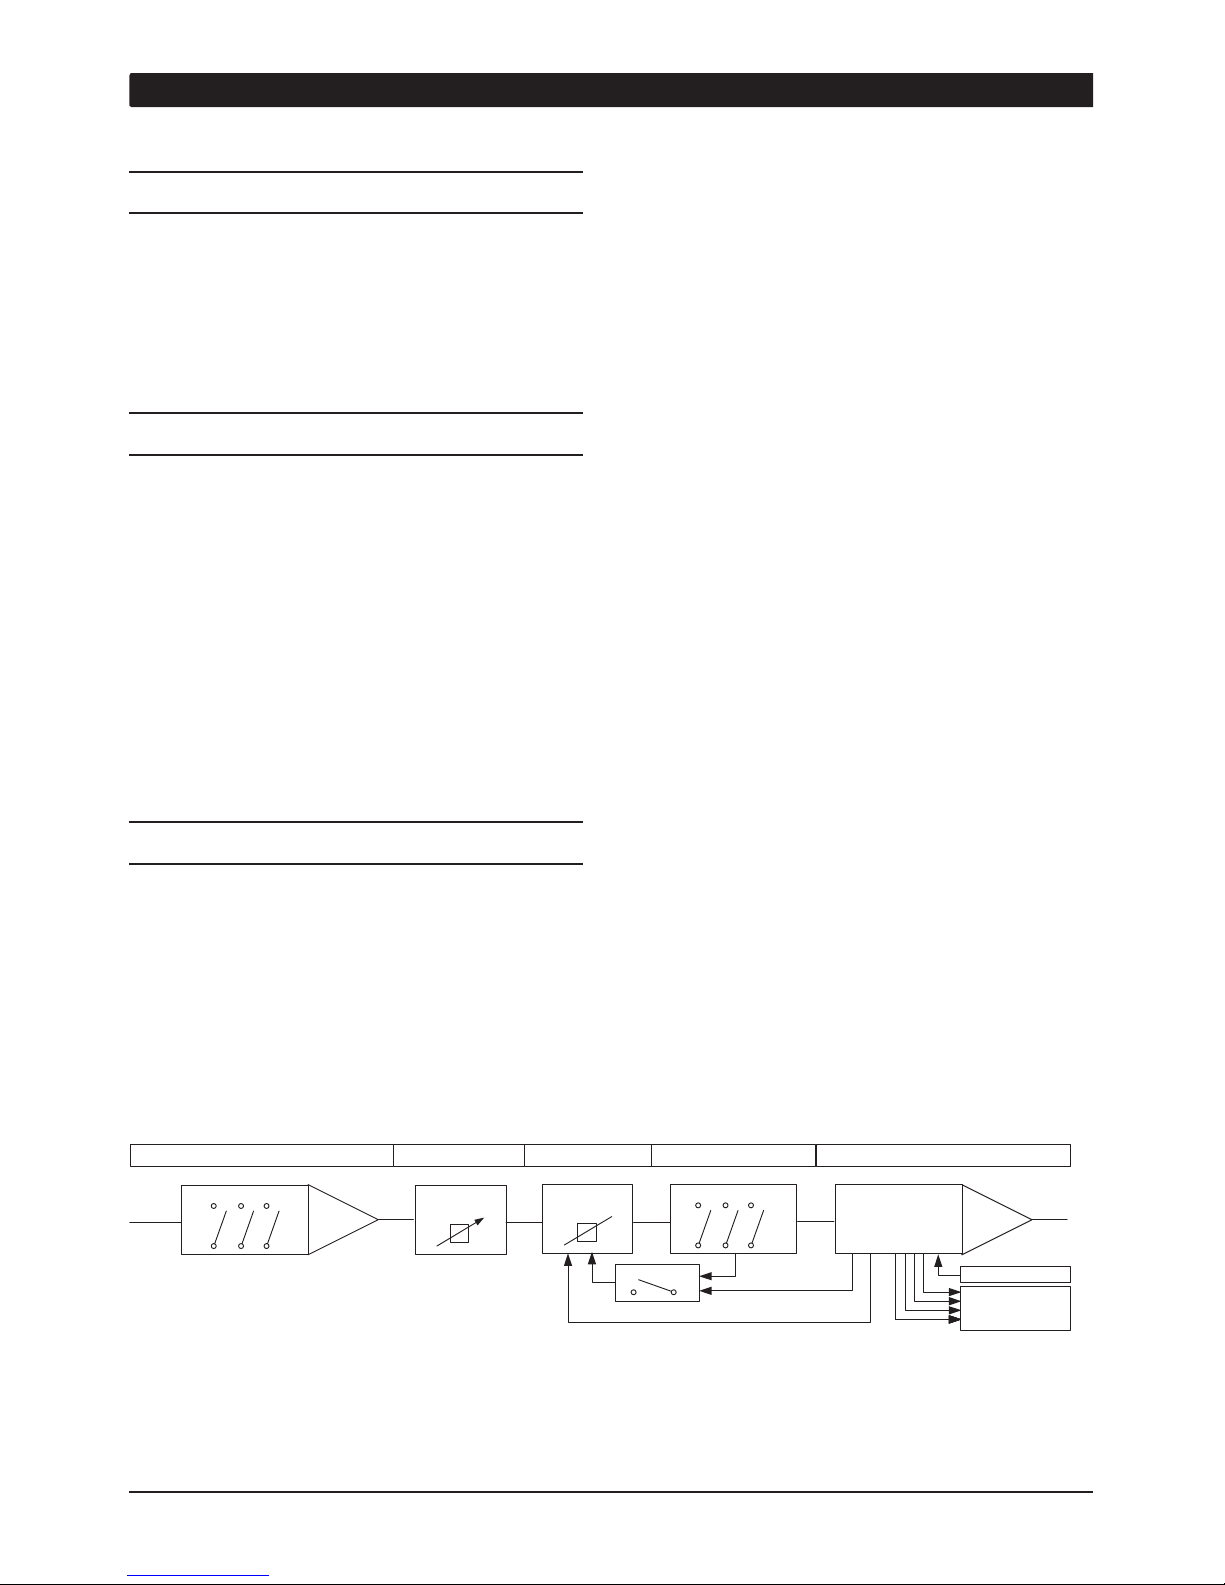
7.3.1 Signal flow blocks
All C Series amplifiers have the same signal flow
and feature set. The only difference is the amplifier’s
maximum output current per channel.
The input stage of all C Series amplifiers has a high
sensitivity to provide ample system headroom. This
in effect means that the input stage is almost impossible to clip.
Hard/Sof
t switch
Gain select switches
Front panel
potentiometer
Dynamic
Ga
in red
uction
VP
L sele
ct switches
Class TD
Vo
ltageClip sensing
Current
cli
p s
ensin
g
MonitoringLeve
l
Temperature
Fault/Warning
Co
ntro
l Mu
te
Input Amplifier
Level control
Cl
ip Limiter Vo
ltage Pe
ak Limiter Output Power Amplifier
•
•
•
Overall amplifier input gain is adjusted using the
input stage DIP switches. Please note that the gain
setting is global, affecting all four channels. Following
the input stage, the dedicated level control on each
channel allows signal attenuation from 0 dB to minus
infinity.
The Current Peak Limiter (CPL) section dynamically
limits the input signal based on three parameters:
sensed current level, feedback from the output stage,
and sensed voltage clip from the VPL (and output
amplifier voltage clip if “Soft Clip” activated). This
ensures that power output is maintained within the
design limits of the amplifier.
The adjustable Voltage Peak Limiter (VPL) sets the
maximum output voltage and therefore also the
maximum output power. Eight (8) different voltage
stages are available using the DIP switches on the
rear-panel. See table in Appendix section with VPL
ratings at typical loads.
The sophisticated output section monitors faults
and generates appropriate warnings, which are
displayed on the amplifier front panel and transmitted
through the NomadLink network. These alerts allow
the operator to adjust system settings and thereby
avoid problems. In the rare event that conditions are
extraordinarily severe, the amplifier will shut down
until the fault or problem setting has been rectified
or adjusted. These sensing circuits are also employed
to feed back voltage and current level information,
via a side chain, to the limiters. Sensing circuits
also transmit local amplifier module temperature
and power supply temperature to the appropriate
protection mechanisms. Read the Protection, Faults
and Warnings section for further details.
7 OPERATION AND PERFORMANCE
Page 15

C Series Operation Manual 15
The headroom available through the input stage to
the clip limiter is shown by the dotted lines as +10
dB at 141 Vpeak and +20.4 dB at 42 Vpeak. These
lines illustrate the additional signal level that can be
accepted at the input before any significant distortion
will appear at the input stage.
If you use the level potentiometer in the
signal chain to reduce the level by an amount
greater than the headroom relative to input
sensitivity, AND you drive the amplifier to
clip level, you are in danger of clipping the input stage
before the current or voltage peak limiters are
activated.
When bridging two channels, you must ad
+6 dB to the input sensitivity to achieve
maximum output voltage due to the
automatic -6 dB gain compensation
inserted by the amplifier.
7.3.2 Headroom, sensitivity and VPL / Gain
settings
The input amplifier and limiter system is designed to
accommodate extremes of performance. Typically,
exceeding maximum input by much as +10 dB will
only result in a 1% increase in distortion. The
following schematics illustrate how the adjusable
VPL and Gain circuitry affect input sensitivity and
output power:
The tables to the left of the drawing below, show
input sensitivity for C 68:4 with an 8 ohm load and
141 Vpeak (max.) and 42 Vpeak (min.) respectively
for the eightdifferent gain stages between +23 dB
and +44 dB. The resulting output power is displayed
in dBu, Vrms and Watt in the tables to the far right.
Complete input sensitivity tables for all VPL and
Gain settings for all C Series models, can be found
at www.labgruppen.com.
The headroom available through the input stage to
the clip limiter is shown by the dotted lines as +10
dB at 141 Vpeak and +20.4 dB at 42 Vpeak. These
lines illustrate the additional signal level that can be
accepted at the input before any significant distortion
will appear at the input stage.
Gainset to:
(DIP-switches)
+ 44
dB
+ 41
dB
+ 38
dB
+ 35
dB
+ 32
dB
+ 29
dB
+ 26
dB
+ 23
dB
Voltage Peak
Limiter set to:
(DIP-switches)
141 V
peak
11
8 V
peak
100 V
peak
85 V
peak
71 V
peak
59 V
peak
50 V
peak
42
V
peak
Input
sensitiv
ity
dBu / V
rms
-2,0 /
0,6
1,0 / 0,9
4,0 / 1,2
7,0 / 1,7
10,0 / 2,5
13,0 / 3,5
16,0 / 4,9
19,0 / 6,9
Gain
set to:
(DIP-
switches)
+ 44dB
+ 41 d
B
+ 38dB
+ 35dB
+ 32
d
B
+ 29 d
B
+ 26dB
+ 23dB
Input
sensi
tivity
dBu / V
rms
-12,3 / 0,2
-9,3 /
0,3
-6,
3 /
0,4
-3,3 /
0,5
-0,3 /
0,7
2,7 / 1,1
5,7 / 1,5
8,7 / 2,1
V
PL s
e
t to 42
V
pe
ak
VPL set to 141 V
peak
*)Headro
m limited to +8d
B at Gain set
to +23 dB at Ma
x. VPL
Complete tables for all VPL
settings can be
found at:
www.labgruppen.com
Hard/Soft switch
Gain
se
lectswit
ches
Front panel
pote
ntiomete
r
Dy
namic
Ga
in red
uction
VPL se
lect
switches
Class T
D
VoltageCli
p sens
ing
Curren
t c
lipsensing
Monito
ring
Level
Temperature
Fault/Warning
Control Mu
te
Input Amplifier
Level control
Clip Limiter Voltage Peak Limiter Output Power Amplifier
Output
power
dBu / V
rms
42,2 / 100
40,7 / 84
3
9,2 / 71
3
7,8 / 60
36,2 / 50
34,7 / 42
3
3,1 / 35
31,
8 / 30
Output
power
Watt
1200 W
880 W
6
30 W
440 W
310 W
220 W
1
60 W
110 W
+10 dB headr
oom to clip,
relati
ve
to input sensitivity
*)
+20,4 dB headroom to cl
ip,
relative to input sensitivity *)
OPERATION AND PERFORMANCE 7
Page 16

16 C Series Operation Manual
7.4 Audio Input and Output connections, setup and features
7.4.1 Balanced / Unbalanced Input connection
Two electronically balanced Phoenix-type inputs are
available. Follow the +,– and Ground labels when
connecting the input signal.
If an unbalanced connection is desired this can be
achieved by summing the minus (“COLD”) and
Ground terminals and using the + terminal as the
“HOT” signal. For the best possible performance,
the summing of ground and minus wires should be
done at the source unit end of the cable (e.g. a CD
player).
Four connectors are supplied for attaching cables to
the inputs. The type of connector used is: Phoenix
Contacts, Part number MSTB 2,5/3-STZ-5,08
When linking the same source signal to
several input channels, be aware that there
is a limit to the number of channels an
output source can “drive”. A typical output
source (e.g. a DSP crossover unit) can drive up to 4
amplifier channels before line-drivers would be
required to buffer the signal.
7.4.2 Output operation and connection
Screw-terminal connectors with + and – poles are
provided at each channel output for connection of
the speakers.
Make sure that the speaker cables are connected
correctly and tightly, and that accurate polarity is
maintained to all speakers in the system.
As the amplifier outputs produce high voltage,
do not connect or disconnect speaker cables
when the mains power is on. Also, attach the safety
cover on the speaker terminals for safe operation
and to comply with electrical product approvals.
7.4.3 Output bridge mode
It is possible to bridge channels in pairs of two (A+B
and C+D for example). When bridged, the input
source must be connected to input A (A+B) or C
(C+D) respectively. Output speaker cables must be
connected to the plus pole on channel A or C and
the minus pole on B or D.
The main benefit of bridging the output is a doubling
of output voltage. Bridging can be used to turn the
amplifier into a 3 channel amplifier with, for example,
2x1200 W and 1x2400 W at 4 ohms utilizing the C
48:4, or simply to achieve an impressive 200 Vrms
supply per channel.
Most power amplifier designs, when bridged,
automatically introduce a +6 dB input gain boost
which can lead the user to conclude that said
amplifier delivers “more than double the power”
when in bridge mode. This is clearly not the case, as
the gain boost artificially enhances perceived power
at the costof headroom. The C Series amplifiers
work on globally set constant gain, and automatically
compensate the input gain by -6 dB. For example, if
the amplifier is configured in a three channel mode,
then the selected gain is maintained from input to
output on all channels.
7 OPERATION AND PERFORMANCE
Page 17

C Series Operation Manual 17
7.4.4 Amplifier Gain
All C Series amplifiers feature adjustable input gain.
This versatility enables the amplifier to accommodate
a multitude of system configurations with various
input sources and speaker layouts.
Amplifier gain is set globally for all four channels. The
range is +23 dB to +44 dB in 3 dB steps. Individual
channel fine level adjustment is available using the
potentiometers on the front panel.
The unique adjustable input gain feature of the C
Series makes it easier to attain the optimum balance
between headroom and signal-to-noise ratio in the
signal path. A weak signal at the input might require
the gain to be raised in order to achieve maximum
output power with the lowest signal-to-noise ratio. A
“hot” input signal, however, would require a lowering
of the gain to avoid sending the amplifier into Voltage
or Current clipping.
See Appendix to review the table containing Gain
versus VPL setting implications for input sensitivity
and output power.
Bridge mode operation automatically
compensates by -6 dB, keeping all channels
at the same gain.
7.4.4.1 Channel gain/Level (front panel pots)
Individual channel gain (level) may be adjusted using
the potentiometers located on the front panel behind
the dust-filter cover. Range is from 0 dB to -Infinity
in 21 steps. The attenuation is logarithmic, with the
12 o’clock position indicating -10 dB.
Use your fingers or a screwdriver to adjust the
potentiometers.
If the level control is used to attenuate to
a lower level than the headroom relative to
input sensitivity AND the amplifier input is
driven into clip, there is a danger of clipping
the input stage before the current or voltage peak
limiters are activated.
7.4.4.2 Amplifier sensitivity
Sensitivity is defined as how many Volts (rms) or
dBu (referred to 0.775 Vrms) are required to achieve
full (maximum) output power. As the output power
varies with the load impedance, 4 ohms is usually
the common reference.
Since C Series amplifiers are capable of providing
multiple maximum output power levels through use
of the VPL feature, many sensitivity calculations
may be required for a single amplifier. We recommend use of the DeviceControl editor to simplify this
process. DeviceControl’s device view page, used in
combination with the DIP switch settings display,
will automatically produce a sensitivity calculation
from the given data (VPL, Gain and load).
7.4.5 Output Voltage Peak Limiter (VPL)
Voltage Peak Limiter (VPL) is a unique feature in C
Series amplifiers. It is used to select the maximum
power available on each output channel. Eight levels
can be set using the DIP switches on the amplifier’s
rear panel.
V
peak
V
rms
141 100
118 84
100 70
85 60
71 50
59 42
50 35
42 30
The values for VPL are displayed as maximum Voltage
Peak. To translate Voltage Peak into V
rms
, you must
divide the Voltage Peak values by 1.41 (see table).
The VPL allows you to set the correct maximum
output peak power for optimum performance with the
connected speakers. The correct setting depends on
the system type (lo-or hi-impedance) and the specific
load connected to the channel. Since each channel
can be configured to deliver either very high voltage
peak power OR high current draw at low impedances,
it is important to set the VPL correctly.
To configure an individual output channel for a
constant voltage system, you simply adjust the DIP
switches to the desired voltage. However, when
using an output for a low impedance system (2,
4, 8 or 16 ohms), then sometimes you need to
adjust the VPL to a lower setting to avoid either
delivering excessively high continuous power to the
OPERATION AND PERFORMANCE 7
Page 18

18 C Series Operation Manual
speaker or overheating of the output channel through
high current draw. For example, with a very “hot”
conti-nuous output signal, the temperature could rise
to a critical level and activate Temp warning or even
Temp Mute. Lowering the VPL setting normally will
solve this situation.
If the Current Peak Limiter is active or indicates low
impedance, lowering the VPL setting can rectify this
situation as well.
7.4.6 Constant Voltage 70 V and 100 V systems
setup and operation
When using C Series amplifiers to drive constant
voltage (hi-impedance) speaker systems at 70 V
rms
or 100 V
rms
, you can in most cases simply connect
the speakers to the amplifier output terminals, select
the correct VPL setting, and place the amplifier in
service.
7.4.7 Output Current Peak Limiter (CPL)
The Current Peak Limiter (CPL) ensures that the
amplifier will not be damaged by trying to deliver more
current to the outputs than that physically possible for
the transistors. The CPL keeps the amplifier within
the Safe Operating Area. The CPL is non-adjustable
and has different limit values depending on model
type. The maximum output current values for the
four C Series models are:
C 68:4, 24,5 A
rms
per channel
C 48:4, 17,5 A
rms
per channel
C 28:4, 12 A
rms
per channel
C 16:4, 8,5 A
rms
per channel
CPL activity is indicated by illumination of an orange
LED for each channel on the front panel. Warnings
also are shown in the DeviceControl software’s
GUI.
A steadily illuminated orange CPL LED indicates a
short circuit situation (or very low impedance). The
output will mute for 6 seconds before measuring
the output impedance again. This will continue until
the short circuit is fixed, at which time the output
will automatically un-mute. An input signal must be
present to allow detection of short circuit or low
impedance conditions.
If the CPL LED is steadily illuminated orange
•
•
•
•
while the output is muted and the -4 dB signal LED
is NOT on, then the amplifier output is detecting a
short circuit or low impedance condition. The problem
can be solved by checking input and output cables
and examining the state of the loudspeaker load. If
there is no short circuit present, then the condition
may be rectified by lowering the VPL or input levels.
If the CPL and -4 dB indicators are lit simultaneously,
then the amplifier is delivering too high a current and
is being forced into a current limiting state (output
muted).
7.5 Protection, faults and
warnings
7.5.1 Introduction
The C Series amplifiers incorporate a sophisticated
and comprehensive set of protection features. Faults
and warnings are indicated on the front panel and
reported via the NomadLink network for indication
on the DeviceControl GUI.
7.5.2 Safe Operating Area Detector (SOAD)
The Safe Operating Area Detector (SOAD) compares
output voltage against output current to ensure that
the output transistors are working inside their safe
operating area.
The SOA detector provides fault monitoring and
input to the Current Peak Limiter (CPL). The SOA
detector has no dedicated indicator, and its operation
is revealed only in conjunction with features such
as the CPL.
7.5.3 Very High Frequency protection
All C Series amplifiers include protection circuits that
detect continuous Very High Frequency content in the
input signal. The detection begins at approximately 10
kHz and moves upwards to include ultrasonic signals
If VHF signals are detected, the output will mute for
6 seconds before re-measuring. Once no continuing
VHF signal is detected, the output un-mutes and
returns to normal operation.
This feature recognizes that continuous full-scale VHF
7 OPERATION AND PERFORMANCE
Page 19

C Series Operation Manual 19
signals do not appear in “natural” sources such as
music. Any such signals can therefore be considered
as a fault when present. VHF protection is essential
in avoiding damage to high frequency drivers.
The VHF protection operational area is dependent
on output power level and frequency. The illustration
below shows a decreasing threshold on the output
power level, starting at approximately 10 kHz and
rising with a -6 dB slope. This defines the VHF protection area. When continuous output power above
the threshold line is detected the VHF protection
becomes active.
20 Hz 10 kHz 20 kHz
30 kHz
- 6 dB slope
VHF protection
operation area
Max. Peak
output power
Max. Continous
output power
power
Attack time
VHF protection
Slow
Fast
20 Hz 10 kHz 20 kHz
30 kHz
The Attack time for the VHF protection is increasingly shorter at higher frequencies. For example, an
ultrasonic continuous signal will cause the outputs to
mute rapidly, where it will take several milliseconds
for a 10 kHz continuous signal to trigger the output
mute. This is shown in the illustration above.
The VHF protection is NOT a limiter and does not
alter the amplifier’s frequency response. It is implemented solely to detect continuous VHF content. The
amplifier will always pass VHF peaks at full power,
with no effect on musical “transients”.
The VHF protection is indicated by a yellow LED
on the amplifier front panel, with output muting for
6 seconds when in action. It is reported as a fault
via the NomadLink network on the DeviceControl
GUI.
If you bench test the amplifier using a
continuous, full scale sine-wave input above
10 kHz, the VHF protection will activate and
prevent measurement of full peak output power.
(Output will be muted long before maximum output
power is attained.) To measure the true peak output
power, use a burst signal.
7.5.4 DC protection
DC protection is implemented on each output
to prevent damage to connected loudspeakers.
DC present at the output will trigger muting and
illuminate the fault LED indicator. Any DC present
at the output indicates a hardware malfunction that
requires servicing of the amplifier.
7.5.5 Hi impedance warning (open load)
A high impedance (open load) condition is indicated
when an input signal above approximately -29dB
is detected and no functioning loudspeakers are
connected to the amplifier. The fault in indicated by
a red Sig/Hi-imp LED. The indicator is green when
a valid load is present under the same input signal
conditions
Since the Hi-impedance detection
initially triggers only when the input signal
rises above -29dB, it might cause the
indicator to first turn green, and then red,
even in situations where no speaker is connected.
7.5.6 Lo-impedance protection (short circuit)
A lo-impedance or short circuit fault is detected
when current draw is high (Current Peak Limiter
active) and when, simultaneously, output signal
is low (-4 dB LED does not illuminate). When this
occurs, the amplifier protects the output stage
from damage by muting the output signal and
bypassing the circuits. Indication of this fault is a
constant orange illumination of the Current Peak
Limiter (CPL) LED on the front panel. The protection
will sequence at 6 second intervals to re-measure
conditions. If the low-impedance fault is no longer
detected, the amplifier will un-mute.
If the CPL turns constant orange, the output
is muted, and the -4dB signal LED is ON,
then the amplifier has gone into maximum
current protection. This situation is caused
by an excessive input signal and is not due to a short
circuit. Turn down the input signal to avoid or
remedy this situation.
OPERATION AND PERFORMANCE 7
Page 20

20 C Series Operation Manual
7.5.7 Temperature protection
Thermal measurement points are provided on each
output channel as well as on the power supply. These
indicators will, if the pre-specified temperature level
is exceeded, give a high temperature warning. This
warning condition is indicated by a flashing Temp LED
on the front panel, and it is reported on the Device
Control GUI via the NomadLink network.
As the amplifier approaches a thermal protection
threshold, the warning LED sequence will start with
short “on-time” bursts. If the amplifier continues
to overheat and approaches the temperature limit,
the flashing sequence will be defined by longer and
longer on-time bursts until the protection mode is
activated.
If the temperature becomes too high to continue
safe operation, the overheated output channel(s)
will be muted until the temperature returns to an
acceptable level.
Fully active temperature protection (with muting) is
indicated by a constantly illuminated Temp LED. It
will also be indicated as a fault via the NomadLink
network on the DeviceControl GUI.
Temperature measurements will continue at 6
second intervals. The output will un-mute when the
channel or power supply returns to a safe operating
temperature.
7.5.8 Power Average Limiter (PAL)
The Power Average Limiter (PAL) controls the
current-drawing relationship between the power
supply and the mains inlet. PAL limits the maximum
average power consumption according to the power
supply capabilities, ensuring that the PSU will not
overload. In addition, in the larger models that
potentially could pull more current from the mains
than the mains-fuses are specified to handle (more
than 16 A), PAL limits the amplifier’s maximum
current draw to prevent blowing the mains fuse.
7.5.9 Soft Start
High powered amplifiers with inadequate inrush
limiting can pull considerable current from the
mains at turn-on. This can result in fast acting mains
breakers tripping. Such is not the case with C Series
amplifiers. The C Series amplifiers have very low
inrush power as the capacitors are charged slowly
and in a controlled manner ensuring that breakers
will not trip.
Several amplifiers will, under normal conditions, be
able to be powered up simultaneously. If you do
experience problems powering up multiple amplifiers
simultaneously, use the NomadLink network and the
NLB60E to establish a power sequence with a pre
set delay between each amplifier start-up.
7 OPERATION AND PERFORMANCE
Page 21

C Series Operation Manual 21
7.6 Front panel monitoring and
adjustments
7.6.1 Level indicators
Four signal/level/clip LEDs per channel are contained
on the C Series front panels :
Orange CPL (Current Peak Limiter) flashing
indicates signal exceeds max. output current.
Red VPL/CLIP indicates that the signal has
exceeded maximum output voltage. This
activity is governed by the rear panel VPL
settings.
Green - 4 dB indicates output signal has reached
this level.
Green - 10 dB indicates output signal has
reached this level.
Signal / Hi-Imp (Green/red) indicates an output
signalabove -44 dB. If it turns RED, this indicates
that a high impedance (“open” connection) has
been detected at the output. This can be a fault
such as a disconnected cable or the driver is
not functioning properly. However, it could
indicate acceptable high impedance, such as a
sub-bass enclosure with high impedance at a
certain frequency. When the -10 dB signal LED
is on AND the Hi-Imp. LED turns red, then the
amplifier has detected an open load no speaker
is connected).
For more detailed signal level indications use the
DeviceControl editor application.
1.
2.
3.
4.
5.
8.6.2 Level adjust
Step Attenuation
1 (Min) - Inf. dB
2 -Inf. dB
3 -50 dB
4 - 40 dB
5 -35 dB
6 -21.5 dB
7 -21.5 dB
8 -14.7 dB
9 -12.9 dB
10 -11.4 dB
11 -10.0 dB
12 -8.7 dB
13 -7.4 dB
14 -6.0 dB
15 -4.5 dB
16 -2.7 dB
17 -0.6 dB
18 -0.3 dB
19 - 0.1 dB
20 0 dB
21 (Max) 0 dB
Level adjust potentiometers (one per channel) are
located behind the removable dust filter cover on the
amplifier’s front panel. With the dust cover in place
it is not possible to adjust the level settings.
The potentiometer’s operational range is 0 dB to
-Infinity in 21 steps. Attenuation is logarithmic, with
12 o’clock position being -10 dB. See table to the
right with increments.
It is not possible to adjust the individual channel
attenuation from the NomadLink network or
elsewhere on the amplifier.
Use fingers or a screwdriver to adjust the potentiometers.
7.6.3 Mute indication
Individual channel Mute is indicated by illumination
of the two yellow LEDs at the top of the channel’s
LED bargraph. Mute/Un-mute can only be performed
from the network using either the NLB 60E and/or
the DeviceControl PC editor.
OPERATION AND PERFORMANCE 7
Page 22

22 C Series Operation Manual
7.6.4 Performance, Warning and Fault
indicators
Power on/off (green) indicates that mains power
is switched on.
NomadLink (blue) indicates that the network
is connected. The NomadLink LED will light up
even before the mains power is connected and
switched on as it takes phantom power from the
network cable.
Bridge mode (yellow) indicates if two chan-
nels are bridged using the DIP switch on the
rear-panel.
CPL, Current Peak Limiter (orange), when flashing
indicates the maximum possible current draw
has been reached.
CPL, Current Peak Limiter (orange), when constant
indicates excessive current draw caused by a
short circuit on the output or very low operational
impedance. When detected, the output will mute
for 6 seconds before re-measuring the output
impedance. This will continue until the short
circuit is removed. CPL remains constant orange
in a fault condition only when an input signal is
present.
Temperature (yellow) warning is indicated by a
flashing LED. If the amplifier goes into thermal
protect (output muted) the LED illuminates
constant yellow.
VHF, Very High Frequency protection (yellow),
indicates that potentially harmful continuous high
frequencies have been detected on the input
signal. The output is muted.
PAL, Power Average Limiter (red), indicates
that the amplifier is limiting because the power
supply and/or the mains-inlet fuse has reached
maximum capability.
Hardware fault is indicated when both the CPL
and VHF indicators light up simultaneously. The
amplifier requires servicing before placing back
in operation.
•
•
•
•
•
•
•
•
•
7 OPERATION AND PERFORMANCE
Page 23

C Series Operation Manual 23
7.7 NomadLink network and PC
editor
7.7.1 NomadLink network in the amplifiers
All C Series amplifiers are equipped with the proprietary NomadLink network interface. This includes
two EtherCon housed RJ45 connections: one IN
and one OUT.
Use standard straight Cat5 Ethernet cables with
RJ45 connectors to connect the amplifier to the
NLB 60E network bridge or to daisy-chain multiple
amplifiers.
It is very important that two IN or two OUT
ports are NEVER connected to each other.
This will cause the NomadLink communi-
cation and DeviceControl editor to exhibit
erratic behavior and display inaccurate data.
However, this situation will not damage the
amplifier circuitry.
Up to 60 amplifiers can be connected to one NLB
60E in a daisy-chain or closed loop.
When the NLB 60E bridge is powered up, the
NomadLink network receives phantom power.
This causes the blue NomadLink LED on the
amplifier front panel and the NomadLink LED on the
rear-panel to light up. NomadLink is active even when
the amplifier has mains power disconnected or is not
yet powered up.
The amplifier does not have a stand-by power
supply for the network. The network is solely
powered from the NLB 60E. Should an amplifier fail
or be inadvertently disconnected from the mains,
OPERATION AND PERFORMANCE 7
network integrity is fully maintained and all amplifiers
remain visible on the system.
7.7.2 Connection and setup
The NomadLink network requires use of a
NLB 60E. The NomadLink network is established
by connecting the NLB 60E OUT port to the first
amplifier’s IN port. Then a daisy-chain is established
by connecting the first amplifier’s OUT port to the
next amplifier’s IN port, and so on. If a closed loop
network is desired for improved redundancy (highly
recommended), the last amplifier’s OUT port must
be connected to the NLB 60E’s IN port.
For all connections, straight Cat5 RJ45-equipped
Ethernet cables should be used.
Optimal NomadLink performance can only
be assured when using Cat5 cables.
However, as NomadLink is only using two
wires + ground for communication and
phantom power it is possible to create converters
from RJ45 to, for example, XLR connectors using
2-wire shielded cable. The NomadLink network can
then be operated using a standard tie-line in a
multicore signal distribution system. See the drawing
opposite for an example of how to create a
converter.
If any cable format or connection other than
Cat5 (or better) and RJ45 is utilized, network
performance may be compromised. In this
event Lab.gruppen cannot guarantee that
the NomadLink network will be fully operational.
Page 24

24 C Series Operation Manual
7 OPERATION AND PERFORMANCE
7.7.3 NomadLink network cable lengths
In situations where the amplifiers and the NLB 60E
will be positioned in different locations at some
distance from each other, or where groups of
amplifiers within a single subnet with up to 60 units
will be installed with a distance in between, these
general rules may be considered:
Below are typical examples of NomadLink network
setups:
<300m/980ft
Amp. #1
IN
OUT
Amp. #60
IN
OUT
Example #1a: Daisy chain, total cable length max. 400m/1300ft
E.g., all amplifiers in one location or close to each other; NLB 60E in a
different location.
Amp. #2
IN
OUT
Amp. #3
IN
OUT
<300m/980ft
Amp. #4
IN
OUT
Amp. #60
IN
OUT
Example #2a, Daisy chain, total cable length max. 400m/1300ft
E.g., one group of amplifiers joined by the NLB 60E; more amplifiers in
remote locations.
Amp. #5
IN
OUT
Amp. #6
IN
OUT
Amp. #1
IN
OUT
Amp. #2
IN
OUT
Amp. #3
IN
OUT
Amp. #60
IN
OUT
Amp. #1
IN
OUT
Example #2b, Dual daisy chain, total cable length max. 700m/2300ft
E.g., groups of amplifiers in separate locations without interconnection;
NLB 60E in a different location. Desirable where certain groups of
amplifiers can physically not be connected.
Amp. #3
IN
OUT
Amp. #2
IN
OUT
Amp. #1
IN
OUT
Amp. #2
IN
OUT
Amp. #3
IN
OUT
<100m/328ft total
cable length for links in
between amplifiers.
Example #1b: Closed loop, total cable length max. 700m/2300ft
E.g., all amplifiers in one location or close to each other; NLB 60E in a
different location. Closing the loop via "return" cable provides extra
redundancy and safer operation.
NLB 60E
IN
OUT
<300m/980ft
Amp. #1
IN
OUT
Amp. #60
IN
OUT
Amp. #2
IN
OUT
Amp. #3
IN
OUT
<100m/328ft total
cable length for links in
between amplifiers.
NLB 60E
IN
OUT
<300m/980ft
NLB 60E
IN
OUT
<100m/328ft total
cable length for links in
between amplifiers.
Ethernet / Cat5
Ethernet / Cat5
Ethernet / Cat5
Ethernet / Cat5
NLB 60E
IN
OUT
<300m/980ft
<300m/980ft
<100m/328ft total
cable length for links in
between amplifiers.
<300m/980ft
Amp. #1
IN
OUT
Amp. #60
IN
OUT
Example #1a: Daisy chain, total cable length max. 400m/1300ft
E.g., all amplifiers in one location or close to each other; NLB 60E in a
different location.
Amp. #2
IN
OUT
Amp. #3
IN
OUT
<300m/980ft
Amp. #4
IN
OUT
Amp. #60
IN
OUT
Example #2a, Daisy chain, total cable length max. 400m/1300ft
E.g., one group of amplifiers joined by the NLB 60E; more amplifiers in
remote locations.
Amp. #5
IN
OUT
Amp. #6
IN
OUT
Amp. #1
IN
OUT
Amp. #2
IN
OUT
Amp. #3
IN
OUT
Amp. #60
IN
OUT
Amp. #1
IN
OUT
Example #2b, Dual daisy chain, total cable length max. 700m/2300ft
E.g., groups of amplifiers in separate locations without interconnection;
NLB 60E in a different location. Desirable where certain groups of
amplifiers can physically not be connected.
Amp. #3
IN
OUT
Amp. #2
IN
OUT
Amp. #1
IN
OUT
Amp. #2
IN
OUT
Amp. #3
IN
OUT
<100m/328ft total
cable length for links in
between amplifiers.
Example #1b: Closed loop, total cable length max. 700m/2300ft
E.g., all amplifiers in one location or close to each other; NLB 60E in a
different location. Closing the loop via "return" cable provides extra
redundancy and safer operation.
NLB 60E
IN
OUT
<300m/980ft
Amp. #1
IN
OUT
Amp. #60
IN
OUT
Amp. #2
IN
OUT
Amp. #3
IN
OUT
<100m/328ft total
cable length for links in
between amplifiers.
NLB 60E
IN
OUT
<300m/980ft
NLB 60E
IN
OUT
<100m/328ft total
cable length for links in
between amplifiers.
Ethernet / Cat5
Ethernet / Cat5
Ethernet / Cat5
Ethernet / Cat5
NLB 60E
IN
OUT
<300m/980ft
<300m/980ft
<100m/328ft total
cable length for links in
between amplifiers.
Rule 1:
The maximum cable length in between any two
devices may not exceed 300 meters / 980 feet.
Rule 2:
In a non-closed-loop daisy-chained subnet the
total maximum cable length is 400 meters /
1300 feet.
Rule 3:
In a closed-loop subnet the total maximum
cable length is 700 meters / 2300 feet.
•
•
•
Page 25

C Series Operation Manual 25
7.7.4 Ethernet network cable lengths
The connection between the NLB 60E and your PC
is a standard Ethernet network running the TCP/IP
protocol. Cable distances between NLB 60E and your
PC follow standard rules for Ethernet systems.
Contact your IT expert for more details.
7.7.5 DeviceControl editor
The DeviceControl editor is Lab.gruppen’s proprietary
software application for monitoring and controlling
networked C Series power amplifiers. DeviceControl
runs on a Windows PC, which connects via Ethernet
to the NLB 60E network bridge. DeviceControl
provides comprehensive monitoring of amplifier
status as well as control of amplifier power on/off
and individual channel mute and solo functions.
Please review the DeviceControl user manual for
more detailed information.
OPERATION AND PERFORMANCE 7
Page 26

26 C Series Operation Manual
8 APPENDIX
8.1 Maintenance
During normal operation your C Series amplifier will
provide trouble-free service. The only user maintenance required is to periodically vacuum clean the
foam dust filters behind the front grille.
In some extreme cases it may be necessary for
authorized service personnel to clean the inside of
the amplifier. These conditions usually occur after
prolonged use in extreme environments such as
those using “cracked oil” smoke machines. If you
are using your amplifier in a heavy duty application,
it is recommended to have your amplifier serviced
every 3 years purely as a preventative action.
8.2 FAQ
Following are common questions asked about
Lab.gruppen C Series power amplifiers together with
helpful answers.
Q: What is the input sensitivity of the amplifiers?
A: Input sensitivity is calculated from the amplifier
gain, maximum output voltage and load. As gain and
output voltage is adjustable in C Series amplifiers,
you need to look this information up in a table found in
the Appendix section of this manual. Input sensitivity
also is automatically calculated in the DeviceControl
editor software application.
Q: What are the maximum cable lengths allowed
when using the NomadLink network?
A: NomadLink uses a daisy-chain topology to
connect amplifiers and an NLB 60E bridge in a
network. Standard RJ45-equipped Cat5 cables are
used throughout. The daisy chain may be made into
a closed-loop by connecting a return cable to the
NLB 60E from the last amplifier.
General rules of cable lengths:
The maximum cable length in between any
two devices may not exceed 300 meters / 980
feet.
In a non-closed-loop daisy-chained subnet the
maximum cable length is 400 meters / 1300
feet.
In a closed-loop subnet the maximum cable
length is 700 meters / 2300 feet.
•
•
•
Exceeding these limits may result in lost contact
with the devices, or loss of phantom powering due
to cable resistance.
Q: How long can cable-runs be on the Ethernet
network connecting the NLB 60E to the PC?
A: On the Ethernet side, normal Ethernet cable limits
apply. This is typically a maximum of 80 meters
/ 300 feet between each device. Follow standard
installation procedures for Ethernet. Distances
beyond100 meters may require use of a repeater, a
format converter, or optical cables.
Q: Why is the NomadLink network a closed-loop
topology?
A: Technically speaking, the closed loop is
optional. The purpose of closing the loop is primarily to
provide a secondary path to the amplifiers. If cables
are broken or disconnected in either direction, all
amplifiers still may be addressed by the network.
Q: How can I be sure that no protection circuits or
safety functions interfere with the output signal?
A: If no Clip or Warning LEDs on the front panel light
up, you can be fully confident that the rated maximum
output power in the full frequency range is available
for your speakers. No limiting or gain-reduction takes
place without a warning or fault indication.
8.3 Bench test the amplifier
All Lab.gruppen amplifiers are highly advanced
devices which incorporate various features (e.g. VHF
protection and Power Average Limiter) that make it
impossible to verify maximum performance when
performing a standard bench-test with continuous,
full-scale sine-wave signals.
We therefore highly recommend that you take
the time to read our document: “Amplifier
testing procedure”, found at www.labgruppen.com
under Technical Notes, before you bench-test a
Lab.gruppen amplifier.
Page 27

C Series Operation Manual 27
8.4 Additional documentation
In case you didn’t find what you were looking for in
this Operation Manual, check out the website at
ww w.labgruppen.com, where you can find a
multitude of additional documentation for C Series:
Drawings, technical data sheets, tables with input
sensitivity, background technology briefs and much
more.
APPENDIX 8
Page 28

28 C Series Operation Manual
8.5 BTU specifications
The following tables contain information on measured current consumption as well as calculated heat dissipation
at three states: 1) Stand-by/idling; 2) Normal operation (1/8 of rated power); and 3) at extreme heavy duty
operation (Max. power).
115VAC 230VAC In Out Dissipated BTU/hr kCal/hr
0 0 0 0 0
133 0 133 454 114
8 Ω / Ch. 1200
x4
16 Ω / Bridged 2400
x2
4 Ω / Ch. 1700
x4
8 Ω / Bridged 3400
x2
2 Ω / Ch. 1200
x4
4 Ω / Bridged 2400
x2
100V / Ch. 1600
x4
200V / Bridged 3200
x2
8 Ω / Ch. 1200
x4
16 Ω / Bridged 2400
x2
4 Ω / Ch. 1700
x4
8 Ω / Bridged 3400
x2
4 Ω / Ch. 1200
x4
8 Ω / Bridged 2400
x2
100V / Ch. 1600
x4
200V / Bridged 3200
x2
Mains connector, 230 V CE version
Mains connector, 115 V ETL version
800
663
3402
19,4
997
1700
2697
2262
Amp (I) *2)
21,0
10,5
1463
32,6
2829
16,3
829
1600
2429
857
38,8
W
450
22,4
11,2
1578
850
728
713
*2) Current draw figures measured at 230 V. 115 V figures are 230 V figures multiplied by two.
*1) The amplifier's PSU operates as a non-resistive load, so the calculation "Volts x Amps = Watts" would not be correct. Instead, measured and
specified here is what is known as the "Active Power" in the amplifier providing useful, real-world values of power consumption and heat
dissipation.
*3) Figures measured at maximum power before amplifier protection and limiter features kicks in. Typically this is between 1/4 and 1/3 of rated
power. Note that the max. power condition is very extreme and will never occour during normal operation. Also note that the mains breaker will
not be tripped even it's in excess of max. ratings.
20 A / 5-20P
C 68:4
Level
Load
Rated
power
Line Current
Watt *1)
Thermal Dissipation
Standby w. remote Power Off via NomadLink
Power On, Idling
1/8 of
rated
power
(Pink noise,
12 dB crest
factor)
16,0
8,0
1123
600
523
1784
2484
626
21,2
10,6
1378
600
778
2655
669
570
Max.
power
*3)
(Pink noise,
6dB crest
factor)
35,2
17,6
2296
1200
1096
3740
942
1005
3429
864
16 A, CEE7
35,4
17,7
2605
1600
115VAC 230VAC In Out Dissipated BTU/hr kCal/hr
0 0 0 0 0
123 0 123 420 106
8 Ω / Ch. 1000
x4
16 Ω / Bridged 2000
x2
4 Ω / Ch. 1200
x4
8 Ω / Bridged 2400
x2
2 Ω / Ch. 600
x4
4 Ω / Bridged 1200
x2
100V / Ch. 900
x4
200V / Bridged 1800
x2
8 Ω / Ch. 1000
x4
16 Ω / Bridged 2000
x2
4 Ω / Ch. 1200
x4
8 Ω / Bridged 2400
x2
4 Ω / Ch. 600
x4
8 Ω / Bridged 1200
x2
100V / Ch. 900
x4
200V / Bridged 1800
x2
Mains connector, 230 V CE version
Mains connector, 115 V ETL version
*1) The amplifier's PSU operates as a non-resistive load, so the calculation "Volts x Amps = Watts" would not be correct. Instead, measured and
specified here is what is known as the "Active Power" in the amplifier providing useful, real-world values of power consumption and heat
dissipation.
*3) Figures measured at maximum power before amplifier protection and limiter features kicks in. Typically this is between 1/4 and 1/3 of rated
power. Note that the max. power condition is very extreme and will never occour during normal operation. Also note that the mains breaker will
not be tripped even it's in excess of max. ratings.
*2) Current draw figures measured at 230V. 115V figures are 230V figures multiplied by two.
Standby w. remote Power Off via NomadLink
Amp (I) *2)
W
17,4
8,7
1171
600
571
C 48:4
Level
Load
Rated
power
Line Current
Watt *1)
Thermal Dissipation
Power On, Idling
1/8 of
rated
power
(Pink noise,
12 dB crest
factor)
13,8
6,9
945
500
445
1518
383
491
390
1331
335
1948
469
1600
403
12,4
6,2
769
13,2
6,6
840
450
300
Max.
power
*3)
(Pink noise,
6dB crest
factor)
28,2
14,1
2116
30,6
15,3
2168
1333
783
2670
673
1200
968
16 A, CEE7
3303
832
21,6
10,8
1368
600
768
2620
660
20 A / 5-20P
627
2139
539
26,4
13,2
1827
1200
8 APPENDIX
Page 29

C Series Operation Manual 29
115VAC 230VAC In Out Dissipated BTU/hr kCal/hr
0 0 0 0 0
123 0 123 420 106
8 Ω / Ch. 700
x4
16 Ω / Bridged 1400
x2
4 Ω / Ch. 700
x4
8 Ω / Bridged 1400
x2
2 Ω / Ch. 300
x4
4 Ω / Bridged 600
x2
100V / Ch. 700
x4
200V / Bridged 1400
x2
8 Ω / Ch. 700
x4
16 Ω / Bridged 1400
x2
4 Ω / Ch. 700
x4
8 Ω / Bridged 1400
x2
4 Ω / Ch. 300
x4
8 Ω / Bridged 600
x2
100V / Ch. 700
x4
200V / Bridged 1400
x2
Mains connector, 230 V CE version
Mains connector, 115 V ETL version
*1) The amplifier's PSU operates as a non-resistive load, so the calculation "Volts x Amps = Watts" would not be correct. Instead, measured and
specified here is what is known as the "Active Power" in the amplifier providing useful, real-world values of power consumption and heat
dissipation.
*3) Figures measured at maximum power before amplifier protection and limiter features kicks in. Typically this is between 1/4 and 1/3 of rated
power. Note that the max. power condition is very extreme and will never occour during normal operation. Also note that the mains breaker will
not be tripped even it's in excess of max. ratings.
*2) Current draw figures measured at 230V. 115V figures are 230V figures multiplied by two.
C 28:4
Rated
power
Line Current
350
377
1286
Level
Load
Watt *1)
Thermal Dissipation
13,0
6,5
775
11,6
5,8
727
1450
150
379
1293
350
313
350
425
525
14,0
7,0
20,8
10,4
1359
700
656
843
1853
659
2249
2237
300
543
Power On, Idling
324
Standby w. remote Power Off via NomadLink
Amp (I) *2)
W
365
326
1/8 of
rated
power
(Pink noise,
12 dB crest
factor)
1068
9,4
4,7
10,4
5,2
529
663
269
564
567
Max.
power
*3)
(Pink noise,
6dB crest
factor)
24,0
12,0
1790
1589
933
16 A, CEE7
20 A / 5-20P
467
451
21,4
10,7
1458
933
115VAC 230VAC In Out Dissipated BTU/hr kCal/hr
0 0 0 0 0
129 0 129 440 111
8 Ω / Ch. 400
x4
16 Ω / Bridged 800
x2
4 Ω / Ch. 300
x4
8 Ω / Bridged 600
x2
2 Ω / Ch. n.r.
4 Ω / Bridged n.r.
100V / Ch. 400
x4
200V / Bridged 800
x2
8 Ω / Ch. 400
x4
16 Ω / Bridged 800
x2
4 Ω / Ch. 300
x4
8 Ω / Bridged 600
x2
2 Ω / Ch. n.r.
4 Ω / Bridged n.r.
100V / Ch. 400
x4
200V / Bridged 800
x2
Mains connector, 230 V CE version
Mains connector, 115 V ETL version
*1) The amplifier's PSU operates as a non-resistive load, so the calculation "Volts x Amps = Watts" would not be correct. Instead, measured and
specified here is what is known as the "Active Power" in the amplifier providing useful, real-world values of power consumption and heat
dissipation.
*2) Current draw figures measured at 230V. 115V figures are 230V figures multiplied by two.
*3) Figures measured at maximum power before amplifier protection and limiter features kicks in. Typically this is between 1/4 and 1/3 of rated
power. Note that the max. power condition is very extreme and will never occour during normal operation. Also note that the mains breaker will
not be tripped even it's in excess of max. ratings.
C 16:4
Rated
power
Line Current
200
326
1112
Level
Load
Watt *1)
Thermal Dissipation
8,2
4,1
485
8,6
4,3
526
1143
200
263
150
335
411
15,2
7,6
953
400
513
553
1887
1749
Power On, Idling
280
Standby w. remote Power Off via NomadLink
Amp (I) *2)
W
288
1/8 of
rated
power
(Pink noise,
12 dB crest
factor)
897
7,6
3,8
463
226
441
475
Max.
power
*3)
(Pink noise,
6dB crest
factor)
16,2
8,1
1401
1046
533
16 A, CEE7
15 A / 5-15P
353
14,4
7,2
944
533
APPENDIX 8
Page 30

30 C Series Operation Manual
9 TEChNICAL sPECIFICATIONs
Following are the C Series technical specifications. These figures are accurate at the time of printing but
please note that all figures are subject to change without notice. For the most accurate and current information
available, please visit www.labgruppen.com.
Individual values for C Series amplifiers
C 68:4 C 48:4 C 28:4 C 16:4
Numb er of cha nnels p er amp lifier 4 4 4 4
Total Powe r Limit
680 0 W 480 0 W 28 00 W 1600 W
Max. o utput voltage p er chan nel
100 V
rms
100 V
rms
100 V
rms
100 V
rms
Max. o utput c urren t per channel
24,5 A
rms
17,5 A
rms
12 A
rms
8.5 A
rms
Max. c ontin uous output pow er all 4 ch annel s driven a t VPL: 141V and Gai n: 35dB
16 ohms (per ch.) 650 W 625 W 600 W 4 00 W
8 ohms (pe r ch.) 1200 W 100 0 W 700 W 400 W
4 ohms (pe r ch.) 1700 W 1200 W 600 W 300 W
2 ohms (pe r ch.) 1200 W 60 0 W 3 00 W n .r. 4)
Hi-Z : 70V/100 V (per ch.) 1600 W 90 0 W 70 0 W 4 00 W
16 ohms (br idged, per 2 ch.’s)
1)
240 0 W 200 0 W 1400 W 800 W
8 ohms (br idged, pe r 2 ch.’s)
1)
340 0 W 240 0 W 120 0 W 600 W
4 ohms (br idged, pe r 2 ch.’s)
1)
240 0 W 1200 W 6 00 W n.r. 4)
Hi-Z : 140V/2 00V (br idged, pe r 2 ch.’s)
1)
320 0 W 1800 W 14 00 W 80 0 W
Mains co nnector, 23 0V CE versio n 16A / C EE7 16A / CEE7 16 A / CEE7 16A / CEE7
Mains co nnector, 115V ETL version 20 A / 5-20P 20 A / 5-20P 20 A / 5-20P 15 A / 5-15P
Maximum mains curre nt consumption, 230 V version 11.2 A 8,7 A 6, 5 A 4. 3 A
Maximum mains curre nt consumption, 115V version 2 2.4 A 17,4 A 13 A 8.6 A
Note 1): Automatic -6 dB gain compensation when bridging two Channels. A+B and/or C+D can be bridged
individually.
Note 2): PALTM reduces the maximum output power keeping the power supply in safe operating area and/or
preventing excessive current draw tripping the mains breaker. Refer to user’s manual.
Note 3): The Voltage Peak output values translate to rms Voltage for a sine wave as: peak/1.41 = Vrms.
E.g. 141V peak is 100V
rms
and 100V peak is 70V
rms
. This means that the outputs can be set for
high impedance loads without the use of an external transformer.
Note 4): Single channel operation at 2 ohms and bridged mode at 4 ohms are not recommended.
Note 5): Separate 230 V or 115 V versions available. Not selectable on the amplifier.
Page 31

C Series Operation Manual 31
TEChNICAL sPECIFICATIONs 9
Common values for all C Series amplifiers
Perf ormance with Gain: 35d B and VPL: 141V
THD 20 H z - 20kHz for 1W 0.1%
THD at 1kHz a nd 1dB below clipping 0.05%
Signal To No ise Ratio 112 dBA
Channel separatio n (Crossta lk) at 1kHz 70 dB
Frequen cy response (1 W into 8 Ohm) +0/ -3dB 6.8 Hz - 3 4 kHz
Voltag e Peak Lim iter (V PL), max. p eak out put
VPL , selectab le per ch. ( V)
3)
141, 118, 100, 8 5, 71, 59, 5 0, 42 V
VPL , when bridg ed (V )
3), 1)
282, 2 36, 20 0, 170, 142, 118, 100, 8 4 V
Voltage Peak Limiter m ode (per ch .) Hard / Sof t
Gain a nd level
Ampli fier gain sel ectable ( all channels)
1)
Rear pan el switches: 2 3, 26, 29 , 32, 35, 3 8, 41, 44 dB
Default g ain 35dB
Level adj ustment (pe r ch.) Front p anel pot, 21 p osition dete nt -inf to 0 dB, .
hidden b ehind secur ity panel /dust filte r grille
Gene ral
Input co nnectors ( per ch.) 3- pin Phoeni x, electro nically b alanced
Output c onnector s (per ch.) Barrie r strip 2- pole screw ter minals
Output b ridge mod e A+B and/ or C+D, input s A and C are signal s ource
Nomad Link netwo rk On board, 2 x RJ45 E therCon c onnector s, IN and OUT
Intellig ent fans (on /off) Depending on presen ce of output s ignal
Power on /off and Remote enable on /off Indivi dual switch es on front pan el
Cooli ng Two fans, front to b ack airfl ow, temperatu re controlle d speed
Front panel in dicators:
Common NomadLink® Network; Power Average Limiter (PAL™) 2); Power on
Per channel Signal present / High impedance; -10 dB and -4 dB output signal;
Voltage Peak Limiter (VPL); Current Peak Limiter (CPL): Very High
Frequency (VHF); High temperature; Fault; Mute
Power
Operating voltag e, 230 V / 115 V nominal
5)
130 -265 V / 65 -135 V
Minimum p ower-up vo ltage, 23 0 V / 115 V 171 V / 85 V
Power Average Limiter
2)
Yes
Soft st art / Inrus h power Yes / max. 5A
Dime nsion s (W/H/D)
W: 48 3 mm (19”), H: 88 mm ( 2 U), D: 34 3 mm (13.5”)
Weigh t
12 kg (26.4 l bs.)
Fini sh
Black painted steel ch assis with g ray painted steel front
Appr ovals
CE 230V, ETL 115V/23 0V, FCC
Page 32

32 C Series Operation Manual
General
This product is manufactured by Lab.gruppen, and it
is warranted to be free from any defects caused by
components or factory workmanship, under normal
use and service, for a period of six (6) years from
date of purchase from an authorized Lab.gruppen
dealer.
If the product fails to perform as specified during the
warranty period, Lab.gruppen will undertake to repair,
or at its option, replace this product at no charge to
its owner, provided the unit is returned undamaged,
shipping prepaid, to an authorized service facility or
to the factory.
This warranty shall be null and void if the product is
subjected to: repair work or alteration by a person
other than those authorized by us; mechanical
damage including shipping accidents; war, civil insurrection, misuse, abuse, operation with incorrect AC
voltage, incorrect connections or accessories; operation with faulty associated equipment; or exposure
to inclement weather conditions. Damage due to
normal wear and tear is not covered by the warranty.
Units on which the serial number has been removed
or defaced will not be eligible for warranty service.
Lab.gruppen shall not be responsible for any
incidental or consequential damages. Lab.gruppen’s
responsibility is limited to the product itself.
Lab.gruppen takes no responsibility for any loss
due to cancellation of any events, or rent of replacement equipment or costs due to a third party’s or
customer’s loss of profit, or any other indirect cost
or losses however incurred.
Lab.gruppen reserves the right to make changes or
improvements in design or manufacturing without
assuming any obligation to change or improve
products previously manufactured.
This warranty is exclusive, and no other warranty is
expressed or implied. This warranty does not affect
the customer’s statutory rights.
International warranties
Please contact your supplier or distributor for this
information, as rights and disclaimers may vary from
country to country.
Technical assistance and service
International
If your Lab.gruppen product requires repair, contact
your Lab.gruppen dealer or distributor, or contact
Lab.gruppen by fax or email to obtain the location
of the nearest authorized service centre.
Factory service
In the event Lab.gruppen product requires factory
service, you may contact Lab.gruppen’s service
department for return instructions and a Return
Authorization number.
Please note for product return:
Use the original packing.
Include a copy of the sales receipt, your name,
return address, phone and fax number, email
address and description of the defect.
Mark the Return Authorization number on the
outside of the packing.
Ship the product prepaid to:
Lab.gruppen AB
Faktorvägen 1
SE-434 37 Kungsbacka
SWEDEN
Phone: +46 300 56 28 00
Fax: +46 300 56 28 99
info@labgruppen.com
www.labgruppen.com
1.
2.
3.
4.
10 WARRANTY
Page 33

L a b . g r u p p e n a b • S w e d e n • & + 4 6 3 0 0 5 6 2 8 0 0
T C e L e C T r o n i C i n C
u S a • & ( 8 1 8 ) 6 6 5 4 9 0 0
[
m a i l
]
i n f o @ L a b g r u p pe n . C o m
w w w . l a b g r u p p e n . c o m
 Loading...