

Page 1

User’s Manual
PuriCare
Stations
Models
3840000
™
Bedding Disposal
3840020
To receive important product updates,
complete your product registration card
online at register.labconco.com
Labconco Corporation
8811 Prospect Avenue
Kansas City, MO 64132-2696
800-821-5525, 816-333-8811
FAX 816-363-0130
E-MAIL labconco@labconco.com
HOME PAGE www.labconco.com
Please read the User’s Manual before operating the equipment.
Page 2

Copyright © 2003, 2007 Labconco Corporation. All rights reserved.
The information contained in this manual and the accompanying products are copyrighted and all rights
reserved by Labconco Corporation. Labconco Corporation reserves the right to make periodic design
changes without obligation to notify any person or entity of such change.
Warranty
Labconco provides a warranty on all parts and factory workmanship. The warranty includes areas
of defective material and workmanship, provided such defect results from normal and proper use of
the equipment.
The warranty for all Labconco products will expire one year from date of installation or two years
from date of shipment from Labconco, whichever is sooner, except the following;
• Purifier® Delta® Series Biological Safety Cabinets and PuriCare® Lab Animal Research
Stations carry a three-year warranty from date of installation or four years from date of
shipment from Labconco, whichever is sooner.
• SteamScrubber® & FlaskScrubber® Glassware Washers carry a two-year warranty from
date of installation or three years from date of shipment from Labconco, whichever is
sooner.
• Blood Drawing Chairs carry a ten year warranty.
• Carts carry a lifetime warranty.
• Glassware is not warranted from breakage when dropped or mishandled.
This limited warranty covers parts and labor, but not transportation and insurance charges. In the
event of a warranty claim, contact Labconco Corporation or the dealer who sold you the product. If
the cause is determined to be a manufacturing fault, the dealer or Labconco Corporation will repair
or replace all defective parts to restore the unit to operation. Under no circumstances shall
Labconco Corporation be liable for indirect, consequential, or special damages of any kind. This
statement may be altered by a specific published amendment. No individual has authorization to
alter the provisions of this warranty policy or its amendments. Lamps and filters are not covered by
this warranty. Damage due to corrosion or accidental breakage is not covered.
Returned or Damaged Goods
Do not return goods without the prior authorization from Labconco. Unauthorized returns will not be
accepted. If your shipment was damaged in transit, you must file a claim directly with the freight carrier.
Labconco Corporation and its dealers are not responsible for shipping damages.
The United States Interstate Commerce Commission rules require that claims be filed with the delivery
carrier within fifteen (15) days of delivery.
Limitation of Liability
The disposal and/or emission of substances used in connection with this equipment may be governed by
various federal, state, or local regulations. All users of this equipment are required to become familiar with
any regulations that apply in the user’s area concerning the dumping of waste materials in or upon water,
land, or air and to comply with such regulations. Labconco Corporation is held harmless with respect to
user’s compliance with such regulations.
Contacting Labconco Corporation
If you have questions that are not addressed in this manual, or if you need technical assistance, contact
Labconco’s Customer Service Department or Labconco’s Product Service Department at 1-800-821-5525
or 1-816-333-8811, between the hours of 7:00 a.m. and 6:00 p.m., Central Standard Time.
Part #3785900, Rev. G
ECO E225
Page 3

T
AABBLLEE
T
CHAPTER 1: INTRODUCTION 1
About This Manual 2
Typographical Conventions 3
Your Next Step 4
CHAPTER 2: PREREQUISITES 5
Location Requirements 6
Electrical Requirements 6
Space Requirements 7
Overhead Clearance 7
Your Next Step 7
CHAPTER 3: GETTING STARTED 9
Unpacking Your Bedding Disposal Station 10
PuriCare Components 11
Removing the Shipping Skid 11
Measuring the Inflow Velocity 13
Initial Certification 13
Your Next Step 13
CHAPTER 4: THEORY OF OPERATION AND
Prefilter 16
HEPA Filter 16
The Activated Carbon/Alumina Postfilter 17
Directional Airflow 18
Impellers 19
Speed Control 19
Airfoil, Baffle & Ductwork 19
Safety Precautions 20
Your Next Step 22
O
O
SAFETY PRECAUTIONS 15
FF
C
C
OONNTTEENNTTSS
Page 4

CHAPTER 5: USING YOUR PURICARE 23
Starting the Station 23
Reading the Filter System Indicator 23
Working in Your PuriCare 24
Your Next Step 25
CHAPTER 6: MAINTAINING YOUR PURICARE 27
Routine Maintenance Schedule 28
Service Operations 28
Speed Control Adjustment 31
Filter Indicator System Adjustment 32
HEPA Filter Replacement 33
HEPA Filter Leak Test Procedure 35
Inflow Velocity Test Procedure 37
Airflow Smoke Patterns 38
Motorized Impeller Replacement 38
Storage 39
CHAPTER 7: TROUBLESHOOTING 41
APPENDIX A: BEDDING DISPOSAL STATION
COMPONENTS 43
APPENDIX B: BEDDING DISPOSAL STATION
DIMENSIONS 45
APPENDIX C: BEDDING DISPOSAL STATION
SPECIFICATIONS 47
Electrical Data 47
Impeller Specifications 47
APPENDIX D: QUICK CHART FOR THE PURICARE
BEDDING DISPOSAL STATION 51
APPENDIX E: REFERENCES 53
DECLARATION OF CONFORMITY 55
Page 5

C
HHAAPPTTEERR
C
I
NNTTRROODDUUCCTTIIOONN
I
Congratulations on your purchase of a Labconco
PuriCare Bedding Disposal Station. Your PuriCare
product is designed to protect you and your laboratory
environment from aerosols. It is the result of
Labconco’s years of experience manufacturing
laboratory equipment, and many of its features were
suggested to us by users like you.
The PuriCare offers many unique features to enhance
safety, performance and ergonomics. To take full
advantage of them, please acquaint yourself with this
manual and keep it handy for future reference. If you
are unfamiliar with how bedding disposal stations
operate, please review Chapter 4: Theory of Operation
and Safety Precautions before you begin working in the
station. Even if you are an experienced user, please
review Chapter 5: Using Your Bedding Disposal
Station; it describes your PuriCare’s features so that
you can use the station efficiently.
1
1
Product Service 1-800-522-7658
1
Page 6

Chapter 1: Introduction
About This Manual
This manual is designed to help you learn how to
install, use, and maintain your bedding disposal station.
Chapter 1: Introduction provides a brief overview of
the bedding disposal station, explains the organization
of the manual, and defines the typographical
conventions used in the manual.
Chapter 2: Prerequisites explains what you need to do
to prepare your site before you install your disposal
station. Electrical and service requirements are
discussed.
Chapter 3: Getting Started contains the information
you need to properly unpack, inspect, install, and
certify your disposal station.
Chapter 4: Theory Of Operation And Safety
Precautions explains how the PuriCare operates and the
appropriate precautions you should take when using the
station.
Chapter 5: Using Your PuriCare discusses the basic
operation of your station. Information on how to
prepare, use and shut down your PuriCare are included.
Chapter 6: Maintaining Your PuriCare explains how to
perform routine maintenance on your disposal station.
Information on how to safely disinfect the interior of
your station and replace the lamps are included.
Chapter 7: Troubleshooting contains a table of
problems you may encounter while using your disposal
station including the probable causes of the problems
and suggested corrective actions.
Appendix A: Bedding Disposal Station Components
contains labeled diagrams of all of its components.
2
Product Service 1-800-522-7658
Page 7

Appendix B: Bedding Disposal Station Dimensions
contains comprehensive diagrams showing all of the
dimensions for the PuriCare model.
Appendix C: Bedding Disposal Station Specifications
contains the electrical requirements for the Bedding
Disposal Station. Wiring diagrams for both the 115V
and 230V models are also included.
Appendix D: Quick Chart for the PuriCare Bedding
Disposal Station provides useful operating
specifications.
Appendix E: References lists the various resources
available that deal with biosafety.
Chapter 1: Introduction
Typographical Conventions
Recognizing the following typographical conventions
will help you understand and use this manual:
• Book, chapter, and section titles are shown in italic
type (e.g., Chapter 3: Getting Started).
• Steps required to perform a task are presented in a
numbered format.
• Comments located in the margins provide
suggestions, reminders, and references.
• Critical biosafety information is presented in
boldface type in paragraphs that are preceded by the
biosafety icon. Failure to comply with the
information following a biosafety icon may result in
illness or death.
• Critical information is presented in boldface type in
paragraphs that are preceded by the exclamation
icon. Failure to comply with the information
following an exclamation icon may result in injury
to the user or permanent damage to your bedding
disposal station.
!
Product Service 1-800-522-7658
3
Page 8

Chapter 1: Introduction
)
• Critical information is presented in boldface type in
paragraphs that are preceded by the wrench icon.
These operations should only be performed by a
trained certifier or contractor. Failure to comply
with the information following a wrench icon may
result in injury to the user or permanent damage to
your bedding disposal station.
• Important information is presented in capitalized
type in paragraphs that are preceded by the pointer
icon. It is imperative that the information contained
in these paragraphs be thoroughly read and
understood by the user.
Your Next Step
If your PuriCare needs to be installed, proceed to
Chapter 2: Prerequisites to ensure your installation site
meets all of the requirements. Then, go to Chapter 3:
Getting Started for instructions on how to install your
bedding disposal station and make all of the necessary
connections.
If you would like to review how the bedding disposal
station operates, go to Chapter 4: Theory Of Operation
And Safety Precautions.
For information on the operational characteristics of
your bedding disposal station, go to Chapter 5: Using
Your PuriCare.
If your bedding disposal station is installed and you
need to perform routine maintenance on the station,
proceed to Chapter 6: Maintaining Your PuriCare.
Refer to Chapter 7: Troubleshooting if you are
experiencing problems with your PuriCare.
4
Product Service 1-800-522-7658
Page 9

C
HHAAPPTTEERR
C
P
RREERREEQQUUIISSIITTEESS
P
Before you install your Bedding Disposal Station, you
need to prepare your site for installation. Carefully
examine the location where you intend to install your
station. You must be certain that the area is level and
of solid construction. In addition, a dedicated source of
electrical power must be located near the installation
site.
Carefully read this chapter to learn:
• the location requirements for your installation
site.
• the electrical power requirements for your
installation site.
• the space requirements for your installation site.
Refer to Appendix C: Bedding Disposal Station
Specifications for complete station electrical and
environmental conditions, specifications and
requirements.
2
2
Product Service 1-800-522-7658
5
Page 10
Chapter 2: Prerequisites
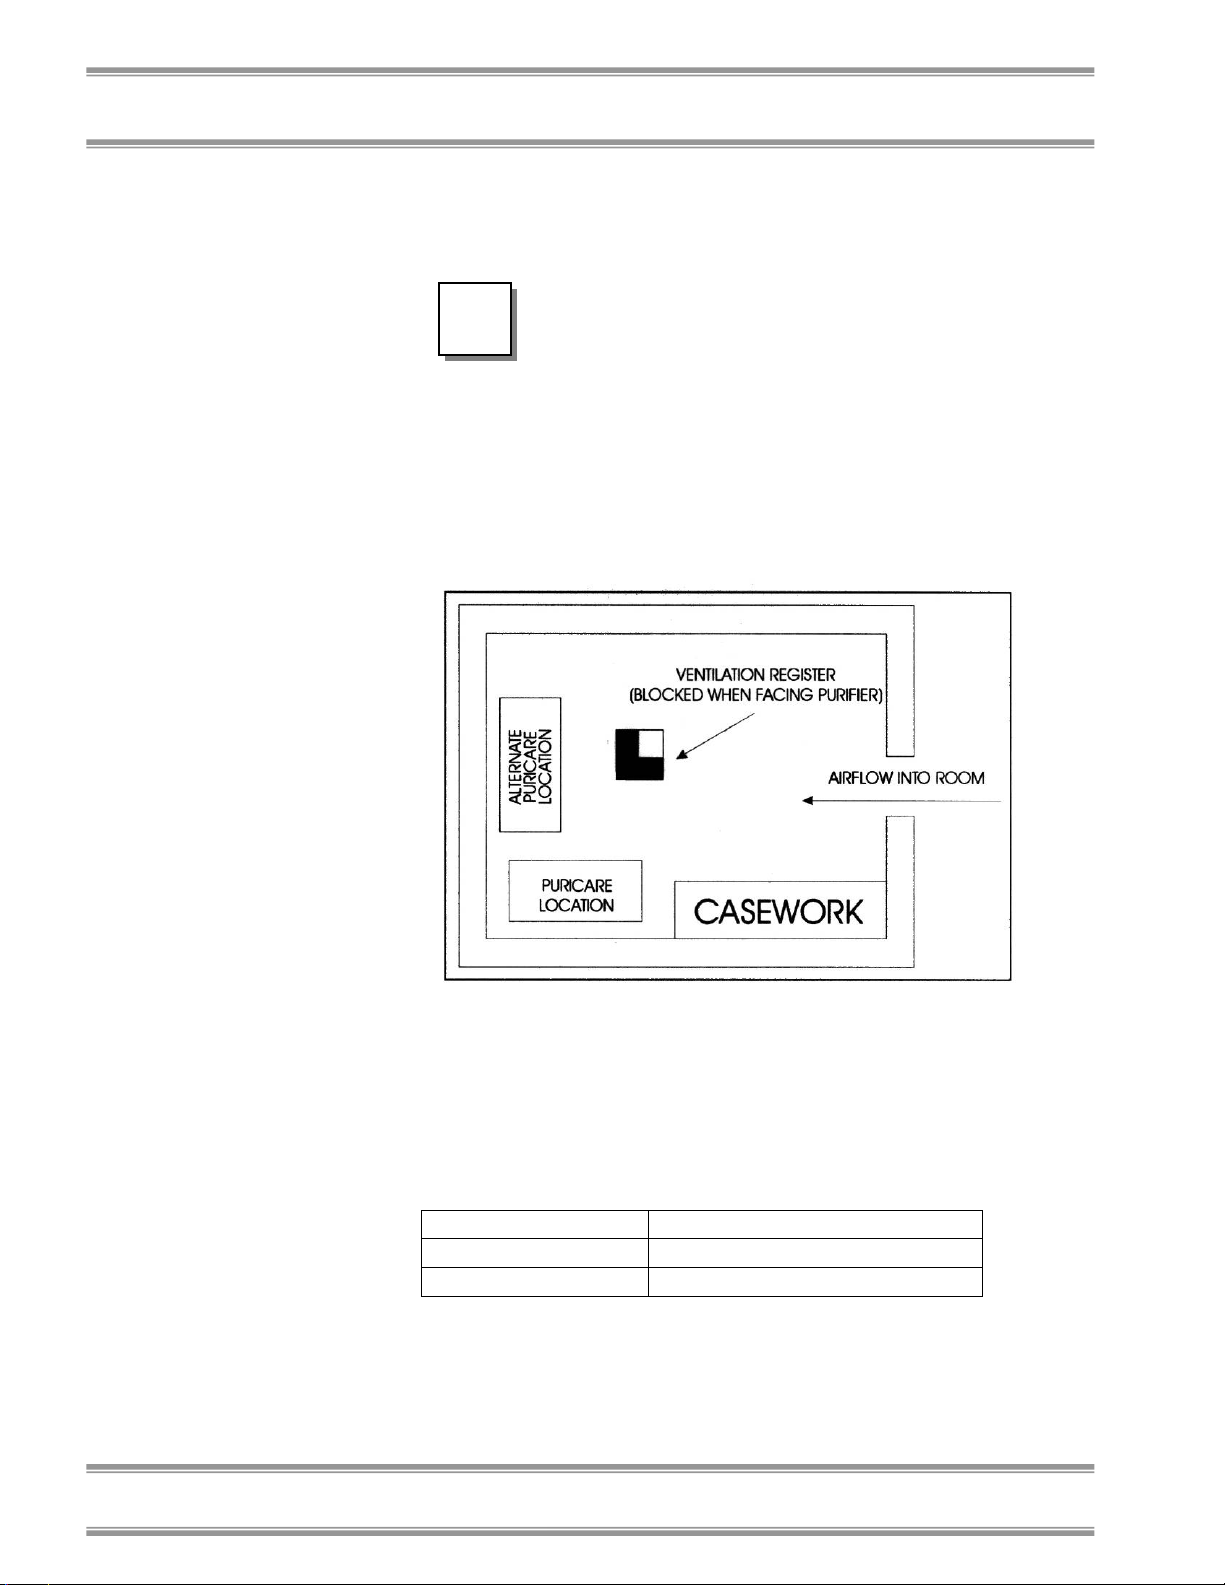
Location Requirements
The PuriCare should be located away
!
from traffic patterns, doors, fans,
ventilation registers, fume hoods and
any other air-handling device that
could disrupt its airflow patterns. All
windows in the room should be closed.
Figure 2-1 shows the optimum
location for the PuriCare.
Figure 2-1
6
Electrical Requirements
The different PuriCare models have the following
electrical requirements:
Model # Requirements
38400- 00-09 115 VAC, 60 Hz, 5 Amps
38400- 20-29 230 VAC, 50 Hz, 3 Amps
Product Service 1-800-522-7658
Table 2-1
Page 11

All PuriCare Stations with model numbers ending in –
00 to –09 are designed for operation at 115 volts, 60Hz,
alternating current. PuriCare Stations with model
numbers ending in –20 to –29 are designed for
operation at 230 +/- 20 volts, 50 Hz alternating current.
A dedicated outlet with a circuit breaker rated at 10
amps should be located as close as possible to the right
rear side of the station.
Always follow the plug
manufacturer’s instructions for the
!
proper assembly and testing of the
plug and power cord.
Space Requirements
The dimensions for the different models are shown in
Appendix B: Bedding Disposal Station Dimensions.
Chapter 2: Prerequisites
Overhead Clearance
In order for the bedding disposal station to operate
properly, there must be at least six inches (150 mm)
clearance from any overhead obstructions when the
station is in its final operating position.
Your Next Step
After you have determined that the location you have
selected accommodates the installation and operational
requirements of your station, you are ready to begin
installation. Proceed to Chapter 3: Getting Started.
Product Service 1-800-522-7658
7
Page 12

Chapter 2: Prerequisites
8
Product Service 1-800-522-7658
Page 13

C
HHAAPPTTEERR
C
G
EETTTTIINNGG
G
Now that the site for your bedding disposal station is
properly prepared, you are ready to unpack, inspect,
install, and certify it. Read this chapter to learn how to:
• unpack and move your PuriCare.
• set up the station.
• connect the electrical supply source.
• arrange certification.
Depending upon which model you are installing, you
may need common plumbing and electrical installation
tools in addition to a 3/4" wrench, a flat-blade
screwdriver, and a Phillips screwdriver.
The Bedding Disposal Station weighs
!
approximately 400 lbs. (182 kg). The
carton allows for lifting with a
mechanical lift truck or floor jack. If
you must lift the PuriCare manually,
use at least four (4) persons and follow
safe-lifting guidelines.
S
S
3
3
TTAARRTTEEDD
Product Service 1-800-522-7658
9
Page 14

Chapter 3: Getting Started
The United States
Interstate Commerce
Commission rules
require that claims be
filed with the delivery
carrier within fifteen (15)
days of delivery.
Unpacking Your Bedding
Disposal Station
Carefully unpack your PuriCare and inspect it for
damage that may have occurred in transit. If your unit
is damaged, notify the delivery carrier immediately and
retain the entire shipment intact for inspection by the
carrier.
DO NOT RETURN GOODS
WITHOUT THE PRIOR
)
Do not discard the carton or packing material for your
PuriCare until you have checked all of the components
and installed and tested the unit.
!
)
AUTHORIZATION OF LABCONCO.
UNAUTHORIZED RETURNS WILL
NOT BE ACCEPTED.
IF YOUR STATION WAS DAMAGED
IN TRANSIT, YOU MUST FILE A
CLAIM DIRECTLY WITH THE
FREIGHT CARRIER. LABCONCO
CORPORATION AND ITS DEALERS
ARE NOT RESPONSIBLE FOR
SHIPPING DAMAGES.
Do not remove the PuriCare from its
shipping skid until it is ready to be
placed into its final location. Move the
unit by placing a flat, low dolly under
the shipping skid, or by using a floor
jack.
DO NOT MOVE THE STATION BY
TILTING IT ONTO A HAND TRUCK.
10
Product Service 1-800-522-7658
Page 15

PuriCare Components
Labconco manufactures bedding stations for operation
on 115V or 230V.
Locate the station model you received in the following
group of tables. Verify that the components listed are
present and undamaged.
Catalog # PuriCare Description
3840000 Bedding Disposal Station, 115 VAC
3840020 Bedding Disposal Station, 230 VAC
Plus the Following:
Part # Component Description
3785900 User’s Manual
Power Cord
(4) Caster Wheels
(4) Flat Washers
(4) Lock Washers
(4) Hex Nuts
If you did not receive one or more of the components
listed for your PuriCare, or if any of the components are
damaged, contact Labconco Corporation immediately
for further instructions.
Chapter 3: Getting Started
Preparing the Station for
Operation
ASSEMBLY INSTRUCTIONS FOR
)
Product Service 1-800-522-7658
THE STATION (LABCONCO P/N
1058500) ARE ATTACHED TO THE
FRONT PANEL OF THE PURICARE.
IF THESE INSTRUCTIONS ARE
MISSING OR UNCLEAR, CONTACT
LABCONCO AT 800-821-5525.
11
Page 16
Chapter 3: Getting Started
Before Turning on the Unit:
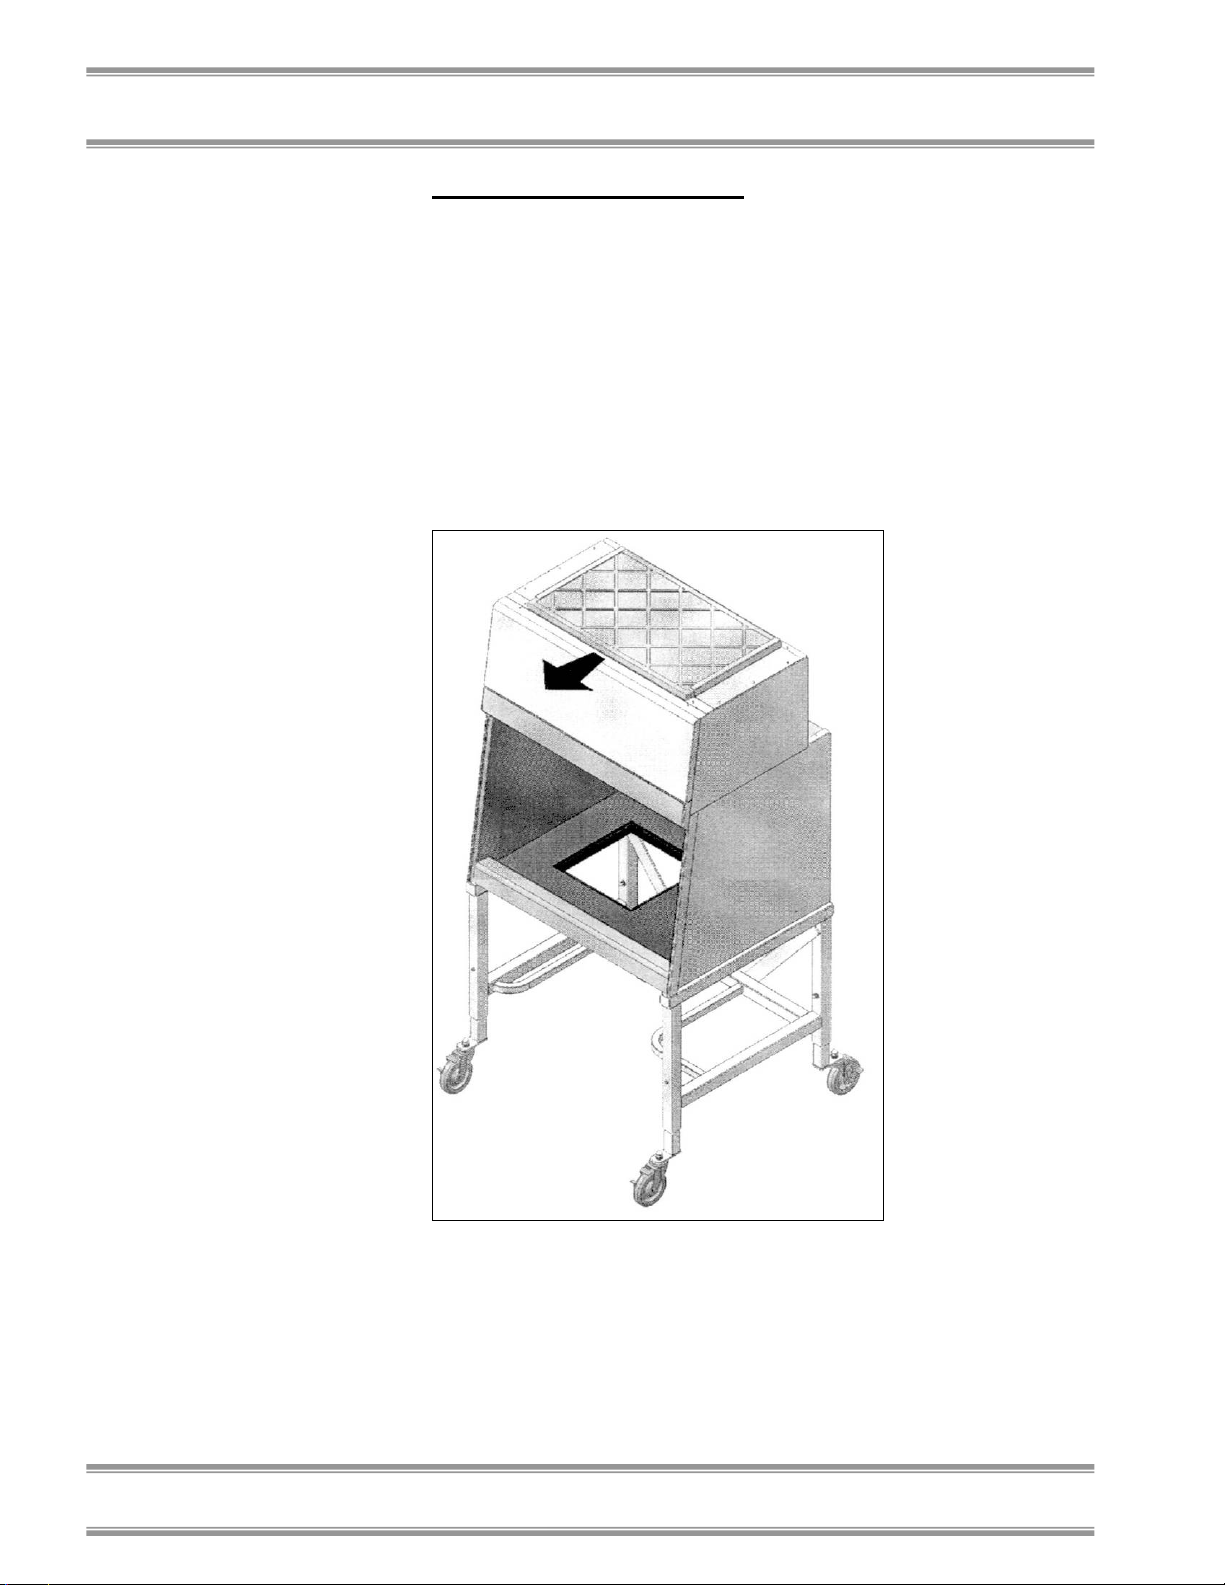
1. Remove the postfilter from its holder on top of the
station by pulling it forward, as shown in Figure
3-3.
2. Remove the clear plastic wrapping off of the filter.
3. Reinstall the postfilter, orienting it as shown by the
flow arrows on the filter frame. Push the filter back
into position until it stops.
Figure 3-3
12
Product Service 1-800-522-7658
Page 17

Measuring the Inflow
Velocity
Inflow values and measurement
procedures for the PuriCare are
described fully in Chapter 6:
Maintaining Your PuriCare.
Initial Certification
Prior to use, all PuriCare stations should be certified by
a qualified certifier. Under normal operating
conditions, the PuriCare stations should be recertified at
least annually and when serviced. The certifier should
perform the following tests:
• HEPA Filter Leak Test
• Inflow Velocity Test
• Airflow Smoke Patterns
If you have any questions regarding certification
agencies or need assistance in locating one, contact
Labconco’s Product Service Department at 1-800-5227658 or 816-333-8811.
Chapter 3: Getting Started
Your Next Step
After your PuriCare has been installed and certified,
you are ready to proceed to Chapter 4: Theory Of
Operation And Safety Precautions.
Product Service 1-800-522-7658
13
Page 18

Chapter 3: Getting Started
14
Product Service 1-800-522-7658
Page 19

C
HHAAPPTTEERR
C
T
HHEEOORRY
T
O
PPEERRAATTIIOONN
O
S
AAFFEETTYY
S
P
RREECCAAUUTTIIOONNSS
P
The Bedding Disposal Station operates using the
following principles:
• Filtration and retention of particulates by High
Efficiency Particulate Air (HEPA) filter
• Directional airflow
The major components in the Bedding Disposal Station
are:
• The prefilter
• The HEPA filter
• The activated carbon/alumina postfilter
• The impellers to force air through the unit
• A speed control for the motor
• Station air intakes (baffles) and ductwork
Y
O
O
4
4
F
F
A
A
NNDD
Product Service 1-800-522-7658
15
Page 20

Chapter 4: Theory Of Operation And Safety Precautions
Prefilter
The prefilter is located just below the HEPA filter. Its
purpose is to lengthen the operating life of the HEPA
filter by removing large particles before they can block
it.
REGULARLY SCHEDULED
INSPECTION AND REPLACEMENT
)
OF THE PREFILTER IS KEY TO
MAINTAINING PROPER
OPERATION OF THE ENCLOSURE.
HEPA Filter
HEPA filters are disposable, dry-type particulate filters.
The filter material or media is typically made of
borosilicate microfibers that are made into a thin sheet,
in a process similar to the production of paper. This
sheet is folded, or pleated to increase its surface area.
The pleats are held in place by aluminum diffusers or
by beads of glue that add rigidity to the media pack.
The media pack is then set into a suitable frame, and the
perimeter sealed to the filter frame, as shown in Figure
4-1.
The HEPA filter media is very fragile.
!
Do not touch or contact the media
surface. If you think the surface of a
HEPA filter is damaged, DO NOT
USE THE STATION. Have the
HEPA filter integrity tested by a
qualified certifier before using the
station.
HEPA Filters are only effective
against particulate material. Gases
will pass through the filter.
16
Product Service 1-800-522-7658
Page 21

Chapter 4: Theory Of Operation And Safety Precautions
Figure 4-1
The Activated
Carbon/Alumina Postfilter
The postfilter in your Bedding Disposal Station is
unique. Inside of its polyester media are granular
activated carbon for the adsorption of odors, plus
activated alumina impregnated with potassium
permanganate, for additional removal of odors and light
gases.
Product Service 1-800-522-7658
17
Page 22

Chapter 4: Theory Of Operation And Safety Precautions
Directional Airflow
Directional airflow also plays a key role in the Bedding
Disposal Station’s performance. Air is drawn into the
front of the station and odors. This “curtain” of air
makes it difficult for aerosols and odors to escape out of
the work area and into the outside environment. This
airflow is often calculated and referred to as the
Average Inflow Velocity. This is shown graphically in
Figure 4-2.
Figure 4-2
18
Product Service 1-800-522-7658
Page 23

Chapter 4: Theory Of Operation And Safety Precautions
Impellers
The impellers pull air into the front of the station,
through the pre- and HEPA filters, and then discharge it
through the postfilter.
Speed Control
The speed control should only be
!
The speed control is an electronic circuit that allows the
certifier to set the impellers’ speed by adjusting its
voltage. The PuriCare speed control is rated for 10
Amps current, far in excess of the impellers’ normal
current draw, to allow for greater reliability.
adjusted by a qualified certifier.
Airfoil, Baffle and Ductwork
The station’s containment and performance are affected
by the location, size, and pattern of the airfoils at the
front, and the baffle at the rear of the work area.
Never block or obstruct the airfoils or
!
The internal ductwork of the PuriCare conveys the air
from the work area to the pre- and HEPA filters, then to
the blower, and then to the postfilter.
baffle of the PuriCare.
Product Service 1-800-522-7658
19
Page 24

Chapter 4: Theory Of Operation And Safety Precautions
Safety Precautions
The PuriCare Bedding Disposal
Station is NOT a biosafety cabinet.
Do not use this device for the
containment of biohazardous, toxic,
flammable, or explosive materials. If
you have questions regarding the
operation of this device, contact
Labconco at 800-821-5525 or
www.labconco.com.
!
The PuriCare Bedding Disposal
Station should be certified by a
qualified certification technician
before its initial use. The station
should be recertified whenever it is
relocated, serviced or at least annually
thereafter.
Some components of the PuriCare
Bedding Disposal Station should only
be serviced by a qualified certification
technician. Some internal components
of the PuriCare may become
contaminated during operation of the
unit. Only experienced personnel
competent in the decontamination
procedure should decontaminate the
station before servicing contaminated
components. If you have any
questions regarding certification
agencies, or need assistance in locating
one, contact Labconco’s Product
Service Department at 800-522-7658
or 816-333-8811.
Ensure that the unit is connected to
electrical service in accordance with
local and national electrical codes.
Failure to do so may create a fire or
electrical hazard. Do not remove or
service any electrical components
20
Product Service 1-800-522-7658
Page 25

!
)
Chapter 4: Theory Of Operation And Safety Precautions
without first disconnecting the
PuriCare from electrical service.
Avoid the use of flammable gases or
solvents in the PuriCare. Care must
be taken to ensure against the
concentration of flammable or
explosive gases or vapors. An open
flame should NOT be used in the
PuriCare. Open flames may disrupt
the airflow patterns in the station or
damage the filters’ adhesive. Gases
under high pressure should not be
used in the PuriCare station, as they
may disrupt the airflow patterns of
the station.
The surface of the HEPA filters are
fragile and should not be touched.
Care must be taken to avoid
puncturing the HEPA filter during
installation or normal operation. If
you suspect that a HEPA filter has
been damaged, DO NOT use the
station; contact a local certification
agency or Labconco at 800-522-7658
or 816-333-8811 for recertification
information.
THE HEPA FILTER IN THE
PURICARE STATION WILL
GRADUALLY ACCUMULATE
AIRBORNE PARTICULATE
MATTER FROM THE ROOM AND
FROM WORK PERFORMED IN THE
STATION. THE RATE OF
ACCUMULATION WILL DEPEND
UPON THE CLEANLINESS OF THE
ROOM AIR, THE AMOUNT OF TIME
THE STATION IS OPERATING AND
THE NATURE OF WORK BEING
DONE IN THE STATION.
Product Service 1-800-522-7658
21
Page 26

Chapter 4: Theory Of Operation And Safety Precautions
Proper operation of the station
depends largely upon its location and
!
)
the operator’s work habits. Consult
the Installation and Normal Operation
sections of this manual for further
details.
WHEN SURFACE DISINFECTING
THE PURICARE STATION:
• AVOID SPLASHING THE
DISINFECTING SOLUTION ON
SKIN OR CLOTHING.
• ENSURE ADEQUATE
VENTILATION.
• CAREFULLY FOLLOW THE
MANUFACTURER’S SAFETY
INSTRUCTIONS WHEN
HANDLING DISINFECTANTS
AND ALWAYS DISPOSE OF
DISINFECTING SOLUTIONS IN
ACCORDANCE WITH LOCAL
AND NATIONAL LAWS.
DO NOT ALLOW DISINFECTANTS
WITH FREE CHLORINE TO
CONTACT THE STAINLESS STEEL
COMPONENTS OF THE PURICARE
FOR A LONG PERIOD OF TIME.
FREE CHLORINE WILL CORRODE
STAINLESS STEEL AFTER
EXTENDED CONTACT.
22
Your Next Step
After you understand the theory of operation and safety
precautions, you are ready to proceed to Chapter 5:
Using Your PuriCare.
Product Service 1-800-522-7658
Page 27

C
HHAAPPTTEERR
C
U
SSIINNG
U
P
UURRI
P
Starting the Station
To start the PuriCare, turn the blower switch to the
“ON” position, as shown in Figure 5-1.
Reading the Filter System
Indicator
The two light system located on the control panel as
shown in Figure 5-1 indicates the total system pressure.
During operation, a green “NORMAL” indicator light
stays on. When the pre- or HEPA filters become
excessively loaded, the “NORMAL” light turns off and
the “SERVICE” light turns on, indicating the unit
should be serviced. If the “SERVICE” light stays on
after replacing the prefilter, a qualified certifier can
then determine if the HEPA filter needs to be replaced.
I
G
C
C
Y
Y
AARREE
5
5
OOUURR
Product Service 1-800-522-7658
23
Page 28

Chapter 5: Using Your PuriCare
Working In Your PuriCare
Planning
Start-up
Wipe-Down
Figure 5-1
• Thoroughly understand procedures and
equipment required before beginning work.
• Arrange for minimal disruptions, such as room
traffic or entry into the room while the station is
in use.
• Turn on fluorescent light and station blower.
• Check the airfoil and baffle for obstructions, and
note the indicator lights.
• Allow the station to operate unobstructed for 5
minutes.
• Wash hands and arms thoroughly with
germicidal soap.
• Wear a long sleeved lab coat with knit cuffs and
over-the-cuff rubber gloves. Use protective
eyewear. Wear a protective mask.
• Wipe down the interior surfaces of the station
with 70% ethanol, or a suitable cleaner, and
allow to dry.
24
Product Service 1-800-522-7658
Page 29

Bedding Disposal Operations
• Do not obstruct the front airfoils or rear baffle.
• Large objects should not be placed close
together.
• Keep all materials at least 4 inches inside of the
airfoil, and perform all operations as far to the
rear of the work area as possible.
• Avoid the use of an open flame.
• Avoid using techniques or procedures that
disrupt the airflow patterns of the station.
Final Purging
• Upon completion of work, the station should be
allowed to operate for two to three minutes
undisturbed, to purge airborne contaminants
from the work area.
Wipe-Down
• Wipe down the interior surfaces of the station
with 70% ethanol, or a suitable cleaner, and
allow to dry.
• Inspect and clean the prefilter located under the
HEPA filter.
• Dispose of rubber gloves appropriately, and
have lab coat laundered properly.
• Wash hands and arms thoroughly with
germicidal soap.
Shutdown
• Turn off the fluorescent light and station blower.
Chapter 5: Using Your PuriCare
Your Next Step
After you understand how to operate and work in the
Bedding Disposal Station, you are ready to proceed to
Chapter 6: Maintaining Your PuriCare.
Product Service 1-800-522-7658
25
Page 30

Chapter 5: Using Your PuriCare
26
Product Service 1-800-522-7658
Page 31

C
HHAAPPTTEERR
C
M
P
Now that you have an understanding of how to work in
the Bedding Disposal Station, we will review the
suggested maintenance schedule and the common
service operations necessary to maintain your PuriCare
for peak performance.
AAIINNTTAAIINNIINNG
M
C
P
UURRI
I
C
AARREE
Many of the service operations should
!
be performed only by trained and
experienced certification technicians
after the station has been properly
decontaminated. DO NOT attempt to
perform these operations if you are
not properly trained. The service
operations that require qualified
certifiers are preceded by the wrench
icon.
6
6
G
Y
Y
OOUURR
Product Service 1-800-522-7658
27
Page 32

Chapter 6: Maintaining Your PuriCare
Routine Maintenance
Schedule
After Each Work Session
• Inspect the prefilter and replace if needed.
Weekly
• Using 70% ethanol, or a suitable disinfectant,
surface disinfect the inside of the station, and
the work surface.
• Operate the station blower, noting the indicator
lights.
Monthly (or more often as required)
• Using a damp cloth, clean the exterior surfaces
of the station, particularly the front and top of
the unit, to remove any accumulated dust.
• Replace the prefilter if needed.
• All weekly activities.
Annually
• Have the station recertified by a qualified
certification technician.
• All monthly activities.
Biannually
• Replace the fluorescent lamp.
28
Service Operations
Prefilter Removal:
The prefilter may be contaminated
!
with allergenic material. Take
appropriate precautions when
removing and handling the prefilters
to prevent exposure.
Product Service 1-800-522-7658
Page 33

Chapter 6: Maintaining Your PuriCare
Prefilter replacement:
1. Turn the station off.
2. Loosen the four thumbscrews that secure the
prefilter access panel to the top of the work area, as
shown in Figure 6-1. Let the access panel swing
down.
3. Pull the prefilter straight out and down.
4. Install a new prefilter, orienting the prefilter airflow
directional arrows up towards the HEPA filter.
Figure 6-1
Postfilter replacement:
1. Remove the postfilter from its holder on top of the
station by pulling it forward, as shown in Figure
6-2.
2. Discard the old postfilter.
3. Remove the clear plastic wrapping off of the new
postfilter.
Product Service 1-800-522-7658
29
Page 34

Chapter 6: Maintaining Your PuriCare
4. Install the postfilter, orienting it as shown by the
flow arrows on the filter frame. Push the filter back
into position until it stops.
Figure 6-2
30
Dress Panel Removal:
1. Locate the front dress panel, just above the control
panel. Remove the two screws located on the top of
the panel. Remove the panel by pulling it slightly
upward and out, as shown in Figure 6-3.
Product Service 1-800-522-7658
Page 35

Chapter 6: Maintaining Your PuriCare
Fluorescent Lamp Removal:
1. Remove the front dress panel as described above.
2. Locate the control panel on the front of the cabinet,
which has the filter indicator lights and switches.
Remove the screws located on each lower end of
the panel. Swing the panel upward for access to the
fluorescent lamp, as shown in Figure 6-3.
3. Remove the fluorescent lamp by rotating the lamp
and pulling it straight out of its sockets.
4. Install the new lamp by reversing the removal
procedure.
Figure 6-3
Speed Control Adjustment
The speed control should only be adjusted by a
qualified certifier.
1. Remove the front dress panel as described
above.
2. Adjust the speed control as required by turning
the screw counterclockwise to increase blower
speed, or clockwise, to decrease the blower
speed, as shown in Figure 6-4.
Product Service 1-800-522-7658
31
Page 36

Chapter 6: Maintaining Your PuriCare
3. Replace the front dress panel and reestablish the
inflow air velocity.
Figure 6-4
Filter Indicator System
Adjustment
The Filter Indicator System was
!
To adjust system, do the following:
1. Ensure that the prefilter is new and the station is
operating within its airflow tolerance.
2. Remove the two screws that secure the front
dress panel, as shown in Figure 6-3, and remove
the panel.
3. Locate the adjustment screw access plug, on the
left side of the enclosure frame, above the
HEPA filter. Remove the plug. Replace the
dress panel.
4. Using cardboard, or a similar material, block off
approximately ½ of the postfilter. This will
simulate an increased load on the system.
adjusted at the factory and should not
require recalibration until the HEPA
filter is replaced.
32
Product Service 1-800-522-7658
Page 37

5. If the ‘NORMAL’ light is on, remove the dress
panel, and using the appropriate hex wrench,
turn the adjustment switch slowly clockwise as
shown in Figure 6-5. Reinstall the dress panel.
Repeat this procedure until the ‘SERVICE’ light
turns on when the dress panel is replaced.
6. If the ‘SERVICE’ light is on, remove the dress
panel, and using the appropriate hex wrench,
turn the adjustment switch slowly
counterclockwise as shown in Figure 6-5.
Reinstall the dress panel. Repeat this procedure
until the ‘NORMAL’ light turns on when the
dress panel is replaced.
7. To confirm correct operation, turn the unit off,
uncover the postfilter and restart the station.
The ‘NORMAL’ light will be on. When the
postfilter is slowly covered over, the
‘SERVICE’ light will illuminate.
Figure 6-5
Chapter 6: Maintaining Your PuriCare
HEPA Filter Replacement
The HEPA filter should be serviced
!
1. Unplug the cabinet.
2. Remove the front dress panel as described in
Customer Service Operations section of this
manual.
Product Service 1-800-522-7658
only by a qualified certifier. After the
HEPA filter is replaced, the unit
MUST be certified.
33
Page 38

Chapter 6: Maintaining Your PuriCare
3. Remove the two access hole plugs on the top of
the unit.
4. Using the 9/16” deep socket, loosen the filter
clamp nuts located in the access holes. Refer to
Figure 6-6 for further details.
5. With the clamp bolts loosened, the supply filterclamping frame should be clear of filter.
Carefully pull the filter straight out of the unit
and discard properly.
6. With the filter removed, inspect the clamping
frame and the frame of the cabinet for damage.
7. Cover the surface of the new HEPA filter gasket
with a light coating of silicone grease, if desired.
8. Install the new HEPA filter by pushing it
straight into the cabinet, ensuring that it is
correctly oriented and the filter fits properly in
the cabinet.
!
9. Tighten the clamp nuts uniformly until the filter
gasket is properly compressed against the
cabinet frame. Inspect the seal thoroughly
before proceeding.
10. Reinstall the front dress panel and the access
hole plugs on the top of the unit.
11. Plug the cabinet in and have it recertified before
use.
The filter clamp nuts should only be
tightened enough to ensure a proper
seal at maximum tightness, the height
of the filter spring should equal 1"
(25mm). NEVER tighten the clamp
nut beyond this setting. See Figure
6-6.
34
Product Service 1-800-522-7658
Page 39

Chapter 6: Maintaining Your PuriCare
Figure 6-6
HEPA Filter Leak Test
Procedure
To ensure dirty room air does not affect the HEPA
Filter Leak Test and that the control panel and sash
gaskets are sealing, take the following steps:
1. Turn on the enclosure and set the average inflow
velocity as indicated in inflow velocity test
procedure. Remove the postfilter
2. Tape closed all openings full length across top,
front and sides of the front dress panel as shown
in Figure 6-7.
3. Turn the photometer on and calibrate it per the
manufacturer’s instructions. The upstream
concentration of DOP will be approximately
24 ug/l. Use these values to establish the
upstream value of 100%.
Product Service 1-800-522-7658
35
Page 40

Chapter 6: Maintaining Your PuriCare
4. Place photometer pickup over the exhaust
discharge and sample the concentration. The
concentration must not exceed 0.005%.
5. If the unit fails, check the gasket between the
control panel and the upper cabinet flange.
Also, check gasket attached to underside of the
upper cabinet for contact with the upper edge of
the sash when it is in the closed position.
6. Use a Laskin nozzle-type generator. DO NOT
use more than one nozzle. Operate the
generator at 10 PSIG. The calculations listed
above are based on the use of Di-octyl-Pthalate
as an aerosol challenge. You may need to
correct the valves listed if you use an alternate
fluid.
7. Place the generator discharge near the work
access opening of the enclosure.
8. Start the generator. Ensure that only one nozzle
is operating at 10 PSIG.
9. To establish the downstream concentration of
aerosol, place the photometer pick up over the
exhaust discharge, and sample the concentration
at several locations.
10. The average concentration at each of the points
must not exceed 0.005% of the upstream
concentration.
Figure 6-7
36
Product Service 1-800-522-7658
Page 41

Chapter 6: Maintaining Your PuriCare
Inflow Velocity Test Procedure
Inflow velocity can be determined by use of a thermal
anemometer at the face of the work access opening by
taking the following steps:
1. If the meter has an adjustable time constant, set
it at 10 to 15 seconds.
2. Take three rows of readings at 8, 12 and 16
inches from the top of the opening at positions
that are 6 and then 12 inches in from both
sidewalls. This will yield a grid of 12 sampling
points. See Figure 6-8 for probe placement.
3. Add the 12 readings together and divide by
twelve to obtain the average inflow velocity.
4. The factory inflow velocity setting should equal
or exceed 65 FPM. The blower speed can be
adjusted by turning the speed control located
behind the front dress panel.
Figure 6-8
Product Service 1-800-522-7658
37
Page 42

Chapter 6: Maintaining Your PuriCare
Airflow Smoke Patterns
Non-thermal smoke should be released from one side of
the enclosure to the other, along a line in the middle of
the work area, two inches above the work surface. The
smoke should flow directly into the rear baffle. Smoke
released near the front end of the enclosure, or at the
top of the enclosure may exhibit vortexing and a reflux
along the sidewalls or top of the enclosure. This
turbulence is normal and does not negatively impact
containment of aerosols above the disposal hole.
Motorized Impeller
Replacement
The motorized impeller should be replaced by a
qualified certifier. The motorized impeller is a nonserviceable component and must be replaced as a unit.
When the motorized impeller is replaced, its capacitor
should be replaced with a new one. Following
replacement of the motorized impeller, the cabinet
MUST be recertified by a qualified certifier.
1. Unplug the enclosure. Remove the post filter.
Remove the top panel by removing all of the
fasteners on the top as described in the
Customer Service Operations section of this
manual.
2. Disconnect the motor ground wire from the
frame. Disconnect the wires connecting the
motorized impeller to the wiring harness.
3. Using a small wrench, remove the four lock nuts
that secure the motor brace to the blower shelf.
Remove the brace and motorized impeller as an
assembly. Placing the assembly on a flat
surface, remove the four screws that secure the
motorized impeller to the brace. Disconnect the
two wires from the motor to its capacitor,
located on the side of the brace. Remove the
motorized impeller from the brace.
38
Product Service 1-800-522-7658
Page 43

Chapter 6: Maintaining Your PuriCare
4. Replace the capacitor with a new one of equal
voltage and capacity.
5. Reassemble the unit by reversing the
disassembly steps. Recertify the enclosure.
Storage
If the Bedding Disposal Station is to be left unused for
more than one month, the unit should be prepared for
storage.
1. Surface disinfect or contaminate the cabinet as
required.
2. Unplug the unit.
3. Cover and seal the work area access opening
and the exhaust outlet with plastic sheeting.
4. Ensure that the cabinet will not be moved or
disturbed while in storage.
The cabinet should not be stored in excessive humidity
or temperature extremes. If the cabinet is moved during
storage it must be recertified before use.
Product Service 1-800-522-7658
39
Page 44

Chapter 6: Maintaining Your PuriCare
40
Product Service 1-800-522-7658
Page 45

C
HHAAPPTTEERR
C
T
RROOUUBBLLEESSHHOOOOTTIINNGG
T
Refer to the following table if your Bedding Disposal
Station fails to operate properly. If the suggested
corrective actions do not solve your problem, contact
Labconco for additional assistance.
PROBLEM CAUSE CORRECTIVE ACTION
Station impellers
and lights won’t
turn on
Circuit breakers
Motorized impellers
won’t turn on but
lights work
Impeller switch is
Motorized impeller is
Capacitor is defective Replace capacitor
Cabinet impeller
turns on but lights
don’t work
Lamp wiring is
7
7
Unit not plugged into
outlet
tripped
Impeller wiring is
disconnected
defective
defective
Lamp not installed
correctly
disconnected
Plug the PuriCare into appropriate
electrical service.
Reset circuit breakers.
Inspect impeller wiring
Replace impeller switch
Replace motorized impeller
Inspect lamp installation.
Inspect lamp wiring
Product Service 1-800-522-7658
41
Page 46

Chapter 7: Troubleshooting
PROBLEM CAUSE CORRECTIVE ACTION
Cabinet impeller
turns on but lights
don’t work (cont.)
Lamp switch is
Defective lamp
Service light is on
Prefilter loading Replace prefilter
HEPA filter loading The light will turn on when the filter is
Lamp is defective Inspect lamp wiring.
Replace lamp switch
defective
Replace lamp ballast
ballast
Blockage of the
exhaust grille
Check the exhaust grille on top of the
unit to ensure they are not blocked or
restricted
loaded
42
Product Service 1-800-522-7658
Page 47

A
PPPPEENNDDIIXX
A
B
EEDDDDIINNGG
B
S
TTAATTIIOONN
S
C
OOMMPPOONNEENNTTSS
C
Illustration A-1 indicates the location of the following
service parts:
Bedding Disposal Station Replacement Parts
Item Quantity Part No. Description
1 1 1327204 Circuit Breaker, 5 Amp
2 2 1327200 Circuit Breaker, 3 Amp
3 2 3717400 Impeller, 115 VAC
3A 2 3717500 Impeller, 230 VAC
4 1 3704400 Speed Control Assembly, 115 VAC
4A 1 3704401 Speed Control Assembly, 230 VAC
5 1 3707901 HEPA Filter
6 1 3801000 Waste Container
7 1 3801500 Dolly
8 1 1230900 Lamp, 17 watt Fluorescent (F17T8) (not shown)
9 2 1302300 Switch – 2 Position (not shown)
10 1 1306500 Capacitor, 115 VAC (not shown)
10A 1 1304600 Capacitor, 230 VAC (not shown)
11 1 3803200 Prefilter (not shown)
12 1 3796201 Postfilter (not shown)
D
D
A
A
IISSPPOOSSAALL
Product Service 1-800-522-7658
43
Page 48

Appendix A: PuriCare Components
A-1
44
Product Service 1-800-522-7658
Page 49

A
PPPPEENNDDIIXX
A
B
EEDDDDIINNGG
B
S
TTAATTIIOON
S
N
B
B
D
D
D
D
IISSPPOOSSAALL
IIMMEENNSSIIOONNSS
B-1
Product Service 1-800-522-7658
45
Page 50

Appendix B: Bedding Disposal Station Dimensions
46
Product Service 1-800-522-7658
Page 51

A
PPPPEENNDDIIXX
A
B
EEDDDDIINNGG
B
S
TTAATTIIOONN
S
S
PPEECCIIFFIICCAATTIIOONNSS
S
Electrical Data
Station Model Electrical Requirements
3840000 to –09 115 VAC – 60 Hz, 1 Phase – 5 Amps
Station Model Electrical Requirements
3840020 to –29 230 VAC – 50/60 Hz, 1 Phase – 3 Amps
Impeller Specifications (2 each)
Station Model Electrical Requirements
3840000 to –09
Station Model Electrical Requirements
3840020 to –29 230 VAC – 50/60 Hz, 100 Watts, 2550 RPM,
D
D
C
C
IISSPPOOSSAALL
115 VAC – 60 Hz, 100 Watts, 2550 RPM,
Automatic Thermal Protection
Automatic Thermal Protection
Product Service 1-800-522-7658
47
Page 52

Appendix C: Bedding Disposal Station Specifications
Environmental Conditions
• Indoor use only.
• Maximum altitude: 6562 feet (2000 meters).
• Ambient temperature range: 41° to 104°F (5° to
40°C).
• Maximum relative humidity: 80% for
temperatures up to 88°F (31°C), decreasing
linearly to 50% relative humidity at 104°F
(40°C).
• Main supply voltage fluctuations not to exceed
±10% of the nominal voltage.
• Transient overvoltages according to Installation
Categories II (Overvoltage Categories per IEC
1010). Temporary voltage spikes on the AC
input line that may be as high as 1500V for
115V models and 2500V for 230V models are
allowed.
• Used in an environment of Pollution degrees 2
(i.e., where normally only non-conductive
atmospheres are present). Occasionally,
however, a temporary conductivity caused by
condensation must be expected, in accordance
with IEC 664.
48
Product Service 1-800-522-7658
Page 53

Appendix C: Bedding Disposal Station Specifications
C-1
Product Service 1-800-522-7658
49
Page 54

Appendix C: Bedding Disposal Station Specifications
50
Product Service 1-800-522-7658
Page 55

A
PPPPEENNDDIIXX
A
Q
UUIICCKK
Q
T
HHEE
T
B
EEDDDDIINNGG
B
S
TTAATTOONNSS
S
Total Air Volume Displacement (CFM) 262-314
Number of Laskin Nozzles Needed 1
P
C
C
UURRI
P
Opening Height (inches) 23
Inflow (FPM) 65 or greater
Work Area (ft2) 5.23
HEPA Filter Dims. (in.) 30x18x3
Fluorescent Light(s) F17T8
D
HHAARRTT
C
I
C
D
D
D
AARREE
IISSPPOOSSAALL
Model 38400
F
F
OORR
Product Service 1-800-522-7658
51
Page 56

Appendix D: Quick Chart for the PuriCare Bedding Disposal Station
52
Product Service 1-800-522-7658
Page 57

A
PPPPEENNDDIIXX
A
R
EEFFEERREENNCCEESS
R
Many excellent reference texts and booklets are
currently available. The following is a brief listing:
Primary Containment for Biohazards: Selection,
Installation and Use of Biological Safety Stations.
September 1995. U.S. Department of Health and
Human Services, Public Health Service, Centers for
Disease Control and Prevention and National Institutes
of Health.
Biosafety in Microbiological and Biomedical
Laboratories. 4th Edition, May 1999. U.S. Department
of Health, Education, and Welfare, National Institutes
of Health, Division of Safety, Bethesda, MD 20892.
Biosafety in the Laboratory. 1989. National Research
Council, National Academy Press, Washington, D.C.
Laboratory Safety: Principles and Practices. 2nd
Edition 1995. American Society for Microbiology,
Washington, D.C.
The Foundations of Laboratory Safety. 1990. Stephen
R. Rayburn. Springer-Verlag, New York.
Websites of Interest:
www.absa.org
www.cdc.gov
www.labconco.com
E
E
Product Service 1-800-522-7658
53
Page 58

Appendix E: References
54
Product Service 1-800-522-7658
Page 59

DECLARATION OF CONFORMITY
Application Council Directive(s): 73/23/EEC, 89/336/EEC
Standard(s) to which conformity is declared: EN61010, EN55022, EN50082-1
Manufacturer’s Name: Labconco Corporation
Manufacturer’s Address: 8811 Prospect Avenue
Kansas City, MO 64132 USA
Importer’s Name: See Shipping/Customs Documents*
Importer’s Address: See Shipping/Customs Documents for your equipment
Type of Equipment: Laboratory Equipment
Model No: PuriCare Bedding Disposal Station
3840020 3-foot wide
Serial No.: Various – See Individual Declaration
Year of Manufacture: 2003 and subsequent
I, the undersigned, hereby declare that the equipment specified above conforms to the
above Directive(s) and Standard(s).
See individual Declaration of Conformity which
will be signed by the importer for your country.
Place: _______________________________________
(Signature)
Date: _______________________________________
(Full Name)
_______________________________________
(Position)
*An individual version of this declaration is included with your shipping/customs
documentation.
Labconco P/N 36960-36, REV. -
Product Service 1-800-522-7658
55
 Loading...